Prompting - Teacher PD (course) NEW speaker...
24
Severe Developmental Disabilities Course Enhancement Module Prompting: Impact on Inferences about Student Learning Speaker Notes Overview for Instructors The CEEDAR Center is pleased to provide the presentation: Prompting: Impact on Inferences about Student Learning. The materials are designed to be included in a preservice teacher preparation course or inservice professional development program. This resource will increase preservice and inservice educators’ understanding of and planning for the use of prompting to facilitate learning and improve educational outcomes for students with moderate to severe developmental disabilities. Suggestions for Use of the Materials These materials are available for instructors to use as appropriate. The presentation Power Point is available and includes speaker notes. Instructors can modify it to meet their needs. Please note that the slides cannot be edited but you may insert or delete slides as needed. It includes activities, links to videos and audio and can be used as provided. Activities can also be excerpted and used as outofclass or extension activities. Speaker Notes The speaker notes are what the instructor can say, verbatim, to explain each slide and the activities. The notes are provided as a guide, and instructors should feel free to modify these as needed.
Transcript of Prompting - Teacher PD (course) NEW speaker...

Severe Developmental Disabilities Course Enhancement Module
Prompting: Impact on Inferences about Student Learning Speaker Notes
Overview for Instructors
The CEEDAR Center is pleased to provide the presentation: Prompting: Impact on Inferences about Student Learning. The materials are designed to be included in a pre-‐service teacher preparation course or in-‐service professional development program. This resource will increase pre-‐service and in-‐service educators’ understanding of and planning for the use of prompting to facilitate learning and improve educational outcomes for students with moderate to severe developmental disabilities.
Suggestions for Use of the Materials
These materials are available for instructors to use as appropriate. The presentation Power Point is available and includes speaker notes. Instructors can modify it to meet their needs. Please note that the slides cannot be edited but you may insert or delete slides as needed. It includes activities, links to videos and audio and can be used as provided. Activities can also be excerpted and used as out-‐of-‐class or extension activities.
Speaker Notes
The speaker notes are what the instructor can say, verbatim, to explain each slide and the activities. The notes are provided as a guide, and instructors should feel free to modify these as needed.

Materials
1. Computer 2. Projector 3. Screen 4. Speakers 5. Index cards 6. Paper cups
Articles (to be read by the instructor or participants prior to the session)
Collins, B. (2012). Systematic instruction for students with moderate and severe disabilities. Baltimore, Md: Paul H. Brookes. Cooper, J. O., Heron, T. E., & Heward, W. L. (2007). Applied behavior analysis (2nd ed.). Upper Saddle River, NJ: Pearson. Doyle, P. M., Wolery, M., Ault, M. J., & Gast, D. L. (1988). System of least prompts: A literature review of procedural parameters. The Journal of the Association for Persons with Severe Handicaps, 13, 28-‐40. Godsey, J. R., Schuster, J. W., Lingo, A. S., Collins, B. C., & Kleinert, H. L. (2008). Peer-‐implemented time delay procedures on the acquisition of chained tasks by students with moderate and severe disabilities. Education and Training in Developmental Disabilities, 43, 111-‐122. Riesen, T., McDonnell, J., Johnson, J. W., Polychronis, S., & Jameson, M. (2003). A comparison of constant time delay and simultaneous prompting within embedded instruction in general education classes with students with moderate to severe disabilities. Journal of Behavioral Education, 12, 241-‐259. Activities
Attention Getter: Play a game in which you give step-‐by-‐step directions to draw something without the other person knowing what it is; share drawings and talk about what type of directions work best
Present the PowerPoint (see background reading for content to develop ppt). Be sure to pause for some discussion.

Role play each method of prompting with a partner. Use the index cards to make sight word flash cards to practice time delay. You might have participants practice using either constant or progressive time delay. Use the cups to practice using a system of least intrusive prompting to teach someone to drink from a cup.
Share visual supports that you procured for this session. Have students consider what other supports students might use (or that they have used).
Plan for generalization. How would you plan for students to generalize reading sight words or drinking from a cup. Have them consider different settings, activities, materials, and people.
Terminology
1. Students refers to K-‐12 students. 2. Participants refers to the teacher candidates and/or in-‐service teachers in the classroom.
Participant Grouping
At the beginning of class, pair the participants. This will help facilitate the activities.

Slide 1-‐ Prompting: Impact on Inferences about Student Learning
Slide 2–Goals for Presentation
The purpose of the session goals are to clearly define prompts and specific prompting systems that promote student learning.

Slide 3– Student Achievement vs. “Something Else”
We have to be aware of “learned helplessness,” the tendency for our students not to try to learn or participate in independent responses because of a history of other people doing a task for a student. We have to ensure both the tasks we select and the methods we choose for the student to demonstrate learning are promoting the greatest degree of independent response. Real student achievement occurs when a student is making an intentional response to demonstrate understanding of content. If a student is only ever mimicking a model, always being physically guided to make a response, or if someone else is selecting the response for the student, this is NOT real student achievement. This is “something else,” and we should be careful to promote real achievement. Slide 4–Task Analysis
When designing instruction for teaching a skill, you first have to decide if the skill is discrete (can be performed by the student in one step) or chained (requires multiple steps to perform). For skills that require multiple steps, each step must be taught. First, a teacher will write a task analysis of all of the steps necessary to perform the skill. For instance, consider all of the steps it takes to prepare a salad for dinner. After identifying the steps, you must decide how you will train the steps. This clip demonstrates the steps in a task analysis.

Slide 5–Forward Chaining (FC) Here is the sequence of training if using forward chaining.
Slide 6–Examples of FC Here is a video example of forward chaining.

Slide 7–Backwards Chaining (BC)
Here are the steps for backward chaining. Notice how this differs from forward chaining.
Slide 8–Example of BC Here is a video example of backward chaining to teach the skill handwashing.
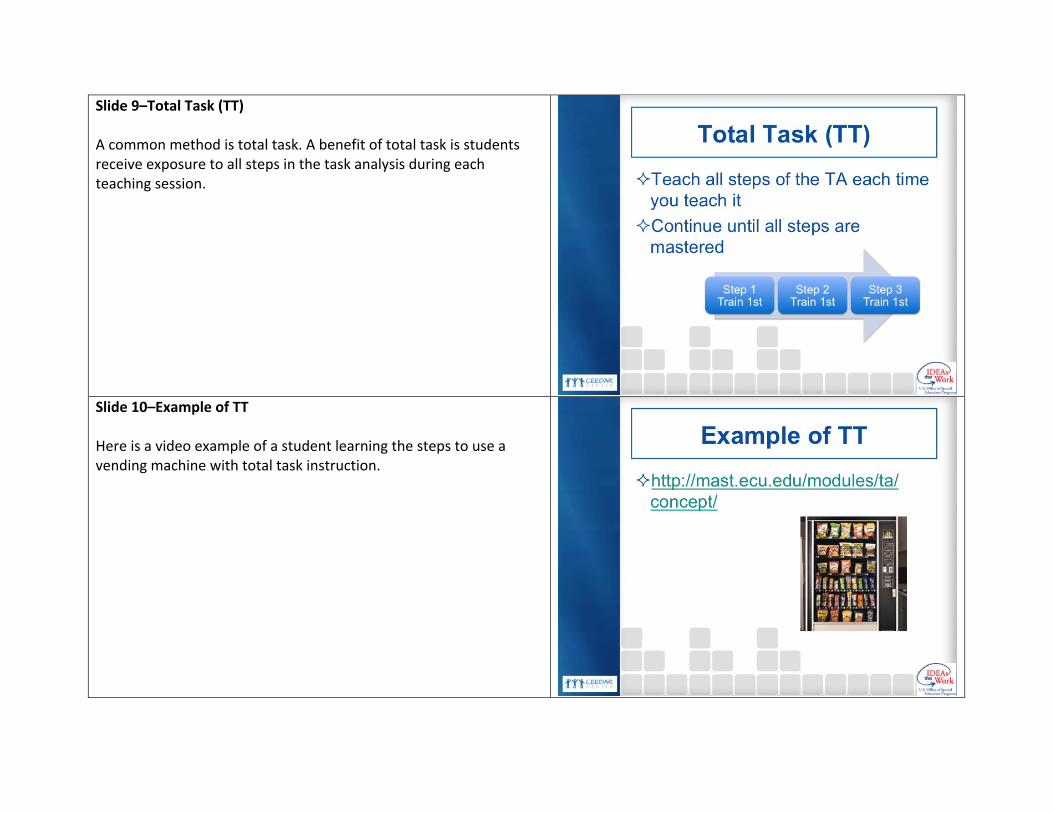
Slide 9–Total Task (TT)
A common method is total task. A benefit of total task is students receive exposure to all steps in the task analysis during each teaching session.
Slide 10–Example of TT
Here is a video example of a student learning the steps to use a vending machine with total task instruction.

Slide 11– Your Turn
Slide 12–Prompting is from Principles of Applied Behavior Analysis
Now it is time to learn how to teach a skill, whether it is a single discrete skill or the steps of a task analysis (a chained skill). The basic principle of a stimulus, response, consequence contingency is critical to understanding the relationship between the stimuli and reinforcers we select and the student response. Responses are any observable, measurable behavior. We measure discrete, or singular, responses as performed independently correct, prompted correct, incorrect, or not performed at all (no response). Initially, we may need to provide prompts in addition to the stimulus to help students make a correct response. The goal is to fade these prompts over time so that students are making independent correct responses. Reinforcing every correct response, both independent correct and prompted correct, is very important. Choosing reinforcers that are desirable to each particular student is critical to the effectiveness of

the reinforcer in promoting learning. The stimulus itself is not a prompt, but rather, the signal a teacher uses to let the student know it’s time to make a specific response. The stimulus might be a sight word flashcard, or the teacher giving a verbal directional cue, like “Pick up your tray.” Slide 13–Learning Has Occurred…
Learning has occurred when the student is presented with a stimulus (e.g., the teacher says: “Read this word” and shows a sight word card) and the student reads “cat” without any help or prompting. The “be quiet” means we must give students an opportunity to perform the response independently in order to assess if learning has actually occurred. It can be tricky for teachers to withhold help, but it’s important to know what the students truly can and cannot do independently.

Slide 14–Discriminative Stimulus is the Cue to Respond
The SD, or discriminative stimulus, is the cue for the student to respond. It’s what the student sees or hears that lets him know he is supposed to perform a certain skill. The SD does not provide any hints or help as to how to perform the skill or what the correct response actually is. It can be a question, asked verbally. It can be a flashcard the student needs to read. It can be an equation for the student to solve.
Slide 15–Add a Stimulus If a student cannot perform a skill in the presence of the stimulus alone, prompts may be needed. Maybe the target behavior is for the student to write his name. Initially, the teacher would deliver the directional cue, “Write your name, Sam.” In order to write his name, Sam needed the teacher to first model how to write “S -‐ a – m” using stamps and an ink pad. Eventually, by practicing several times following the teacher’s model, Sam learns to stamp his name without the model prompt. Now, when the teacher says, “Write your name, Sam,” Sam picks up the stamps and stamps his name independently. Learning has occurred, and the stimulus control has shifted from the prompt (the model) to the directional cue (“Write your name, Sam”). In the coat example on the slide, this prompt, or help, was added to the stimulus materials (the flash card).
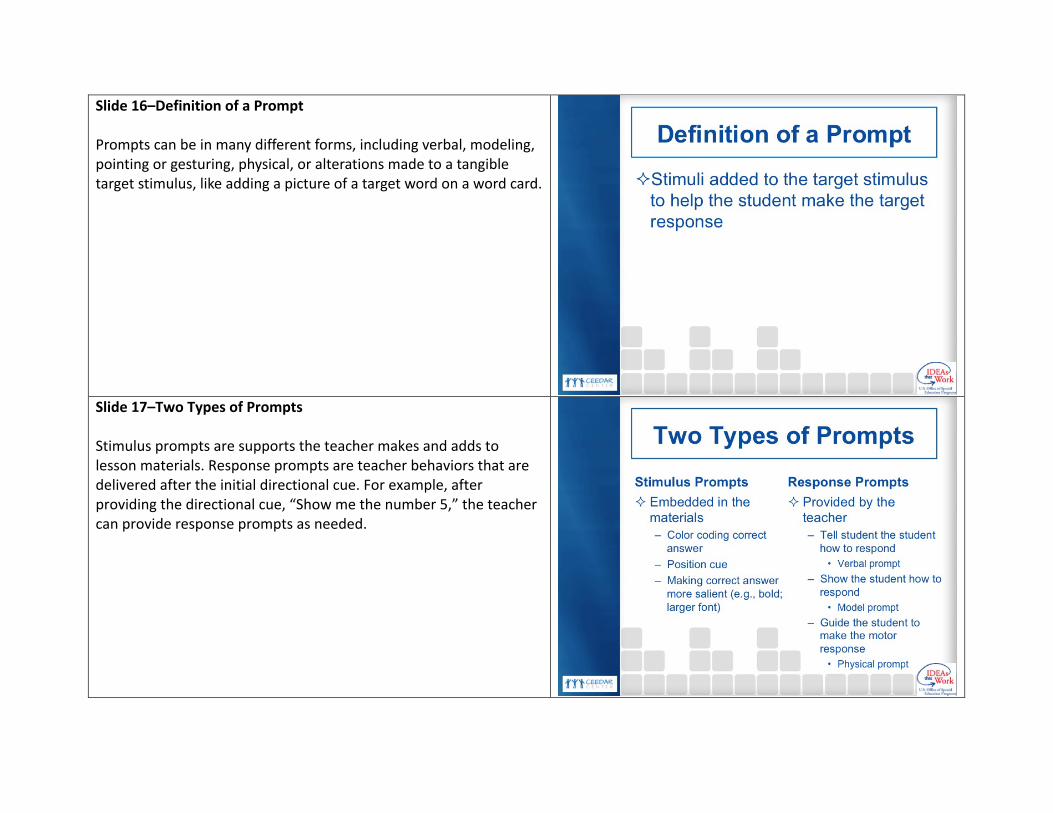
Slide 16–Definition of a Prompt
Prompts can be in many different forms, including verbal, modeling, pointing or gesturing, physical, or alterations made to a tangible target stimulus, like adding a picture of a target word on a word card.
Slide 17–Two Types of Prompts Stimulus prompts are supports the teacher makes and adds to lesson materials. Response prompts are teacher behaviors that are delivered after the initial directional cue. For example, after providing the directional cue, “Show me the number 5,” the teacher can provide response prompts as needed.

Slide 18–Two Examples Here are examples of stimulus prompts (on the left) and response prompts (on the right). What additional examples can you think of?
Slide 19–To Establish Stimulus Control (Show Learning), Prompts are Faded If we continually help students (provide prompts), students may never be motivated to perform the skill independently. To prevent students from becoming dependent on prompts, we have to fade prompts. Fading stimulus prompts can be time consuming, as it often requires creating duplicate sets of materials with varying degrees of supports. There are several response prompt procedures that include guidelines for fading prompts in the instruction itself.

Slide 20–Time Delay The first response prompt procedure we will discuss is called “Time Delay.” “Time Delay” refers to a specific set of instructional procedures. Sometimes this term is misused, confused with the concept of “time increment.” For instance, we may insert a 5-‐s increment of time between delivery of prompts. This time increment is not interchangeable with the procedures of “Time Delay.” The basic premise of the procedures for time delay is to initially pair a target stimulus with a prompt and eventually insert a small increment of time between the target stimulus and the prompt. This increment allows students a chance to answer independently if possible, but if students are not able to answer, the prompt will be provided quickly (following the predetermined delay increment).
Slide 21– Time Delay Prior to beginning time delay procedures, you must ensure you have identified a true controlling prompt. If the student is not able to successfully perform the skill after receiving the prompt, then a true controlling prompt has not been identified. Often a model prompt is selected as the controlling prompt, because most students are able to successfully perform most skills after given a clear model. Only one controlling prompt is selected and used when using time delay to teach a specific skill.

Slide 22–Steps for Time Delay Here are the specific steps for implementing time delay. Watch the video clip and identify each step of the procedures. Identify if this is constant or progressive time delay.
Slide 23–Prompt Hierarchies The last two response prompt procedures we will talk about can be described as prompt hierarchies. While time delay utilized only one prompt (the controlling prompt for a particular skill), these two prompting systems utilize a hierarchy of prompts. Hierarchies can be ordered from “least to most” intrusive or most to least” intrusive.

Slide 24–Least to Most Steps Prior to instruction, select three response prompts that a teacher can implement separately. Verbal – model – physical is how you would order these three types of prompts from least intrusive to most intrusive. Remember, a verbal prompt is NOT the same as a directional cue. This prompt is additional information that is told to the student that explains exactly how to perform a skill. The model prompt involves demonstrating the skill fully, and a physical prompt (the most intrusive type) involves physically guiding the student to perform the skill. The same delay interval will be used throughout instruction (e.g., 5-‐s between delivery of directional cue, then verbal cue, then model cue, and then physical cue, if needed). The student should receive praise for all independent or prompted correct responses. Prompted correct responses occur if the student performs the skill without an error, even if the student required the most intrusive prompt in the hierarchy. Remember to increase the intensity of the reinforcement based on the level of independence exhibited by the student. This differential reinforcement will help teach the student that it is most desirable to perform the skill independently.
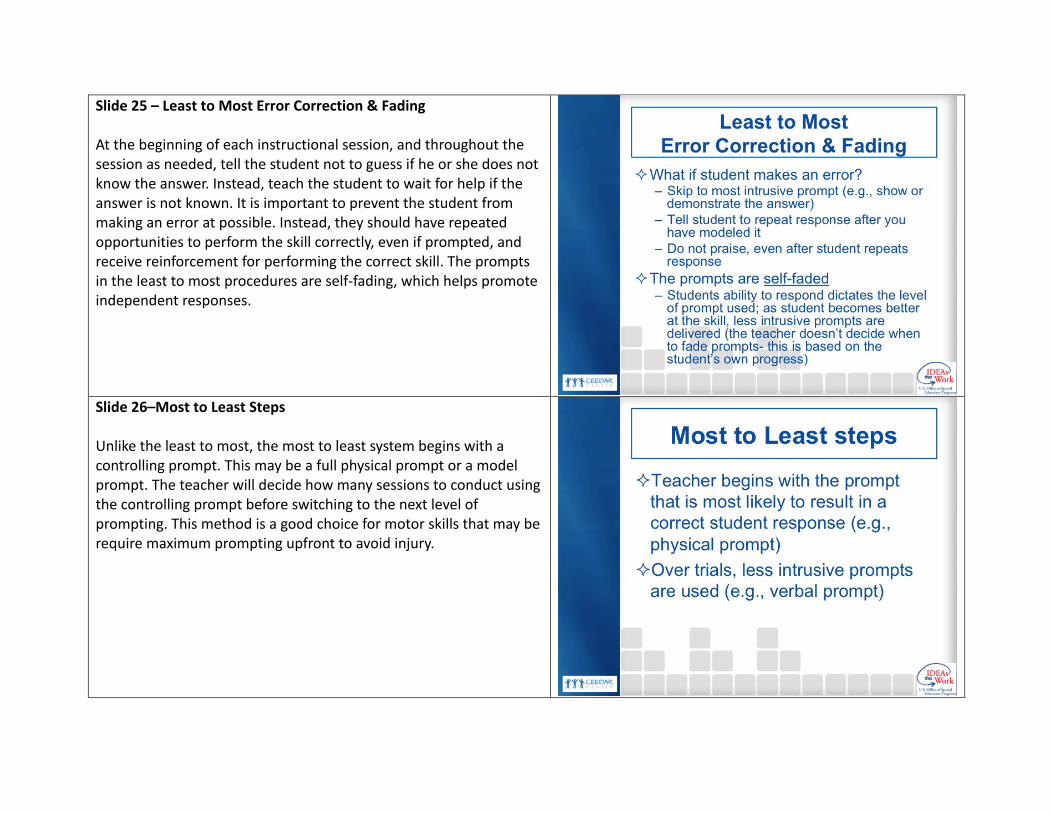
Slide 25 – Least to Most Error Correction & Fading At the beginning of each instructional session, and throughout the session as needed, tell the student not to guess if he or she does not know the answer. Instead, teach the student to wait for help if the answer is not known. It is important to prevent the student from making an error at possible. Instead, they should have repeated opportunities to perform the skill correctly, even if prompted, and receive reinforcement for performing the correct skill. The prompts in the least to most procedures are self-‐fading, which helps promote independent responses.
Slide 26–Most to Least Steps Unlike the least to most, the most to least system begins with a controlling prompt. This may be a full physical prompt or a model prompt. The teacher will decide how many sessions to conduct using the controlling prompt before switching to the next level of prompting. This method is a good choice for motor skills that may be require maximum prompting upfront to avoid injury.

Slide 27–Fading Most to Least Prompts For example, a teacher might teach three sessions while delivering the controlling prompt (a model prompt) immediately after the directional cue. If the student is able to perform the skill across all three sessions, the teacher can drop to the next level of prompting for three sessions. Now the teacher provides the directional cue followed by a gestural or pointing prompt. If the student is able to perform the skill consistently at this level of prompting, the teacher can drop back to another level of prompting (e.g., a verbal prompt), and after another three sessions, the teacher can allow the student to perform the skill independently.
Slide 28–Two Important Points This slide reiterates the importance of promoting independent responses by delivering no more support or prompts than needed. It is important to know the students well and be clear about their present level of performance prior to teaching a skill. If you anticipate an error, try and interrupt the error and provide the next level of prompting. If the student is reaching for an incorrect response, this interruption might be gently guiding the students hand to the correct response instead. Ideally, the student would only ever make the correct response, first after receiving prompting and over time, independently.

Slide 29–Learning Has Occurred… It is important to keep detailed record of the prompting levels at which students perform the skill because this information is valuable for demonstrating progress. For students who have not yet progressed to responding after a model prompt, this shift, from needing physical prompts to needing model prompts, is a substantial accomplishment. While independent student responses are still the “gold standard” and represent true learning, progress across prompting levels should not be discredited.
Slide 30–What about Scaffolding? We can have hierarchies within a prompting level. Applying this concept to academics is a relatively new application for students with moderate and severe disabilities. For example, to teach listening comprehension of text, a teacher might deliver a least to most prompting system using various levels of verbal prompts. In this example, the first prompt, if needed, is a reread of the entire paragraph in which the answer is contained. After a delay, if needed, the next level of prompting is a reread of three sentences that contain the answer. The final prompt, if needed, is a reread of the target sentence. These are all types of verbal prompts. A final model prompt, in which the teacher points to and says the target response, could be delivered as the most intrusive level of prompting if needed.

Slide 31–Five Ways to Eliminate Prompts 1. Change Response Mode
In picture to the right, the student is using eye gaze to respond. The teacher is using a stimulus prompt (flashlight) in this early stage of learning. She will fade this using time delay (by waiting longer for Sheila to make the response before adding the light).
Slide 32–Five Ways to Eliminate Prompts
2. Assistive Technology Carlos has autism and his vocal responding is traditionally echolaliac. Carlos is learning to use a communication app on an iPad to voice phonemes and read connected text. His teacher is using time delay to teach him to identify phonemes and blend and segment sounds that he could not voice on his own.

Slide 33–Five Ways to Eliminate Prompts 3. Use Prompt Fading
Teachers need to plan for prompt fading when initially designing instruction. Prompts fading may depend on student progress, but the understanding that prompts may need to be intentionally faded is something teachers should articulate in their lesson plans.
Slide 34–Five Ways to Eliminate Prompts
4. Use Differential Reinforcement Initially, you may need to fully praise all correct responses. Quickly fade to differential reinforcement, in which independent correct responses receive the greatest level of praise. Make it more desirable to perform a skill independently than with prompting.

Slide 35–Five Ways to Eliminate Prompts 5. Increase the Delay
Progressive time delay is based on this concept. Time increments gradually increase across trials or sessions.
Slide 36–Prompt Confusion Remember the basic contingency of stimulus, response, consequence. The stimulus is the task direction, or directional cue. Prompts are either added to the stimulus (stimulus prompts) or inserted in tandem with or after the delivery of the stimulus (response prompts). These prompts are intended to promote a high level of correct responses and help the student avoid making an error. It is critical to ensure the student is ready to receive instruction. A new way to think about the structure of the contingency is: get student’s attention, provide stimulus, wait for student response, provide reinforcement. The act of obtaining student attention (e.g., saying, “Look” or “Time to work” or “Are you ready” and saying the student’s name) is not a prompt. This is just a way to set the stage for learning to occur.
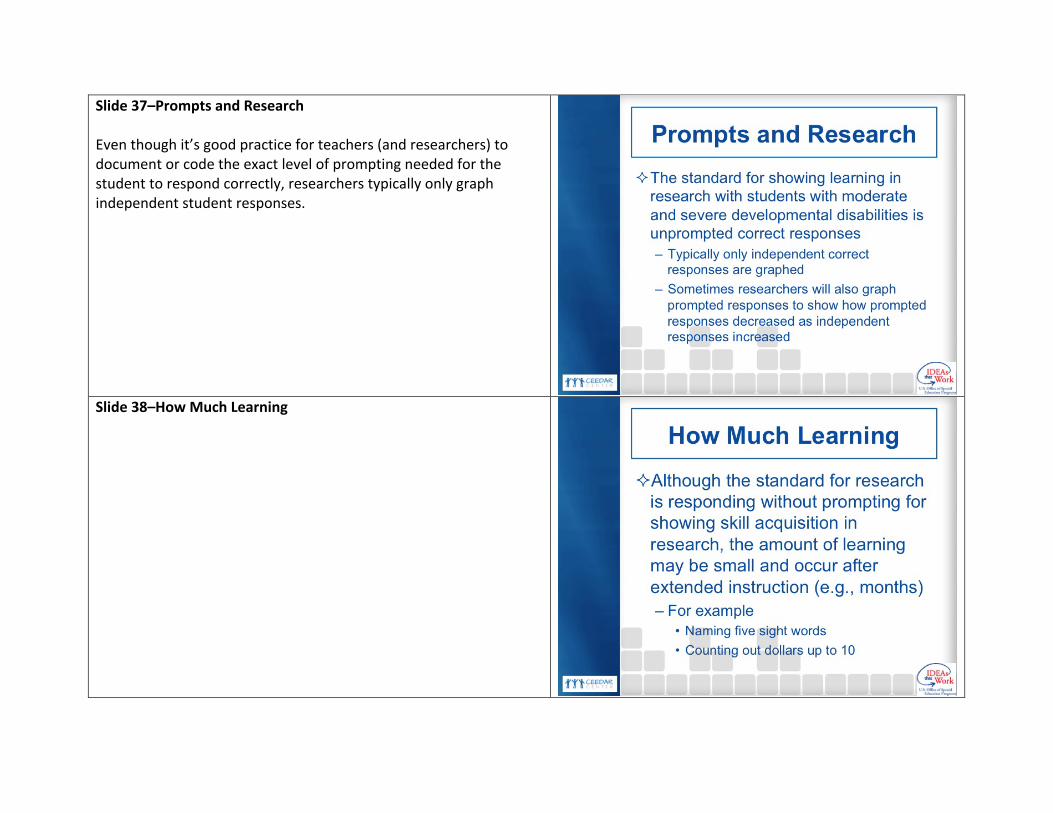
Slide 37–Prompts and Research Even though it’s good practice for teachers (and researchers) to document or code the exact level of prompting needed for the student to respond correctly, researchers typically only graph independent student responses.
Slide 38–How Much Learning

Slide 39–FINAL THOUGHT: Can we infer student learning? Teachers should plan for fading prompts when designing instruction. Giving a student the opportunity to answer independently gives a student an opportunity to demonstrate learning and promote self-‐determination skills.