Programming Guide Version 1 - Amazon Web...
72
AWS Import/Export Programming Guide Version 1.3
-
Upload
dinhkhuong -
Category
Documents
-
view
233 -
download
1
Transcript of Programming Guide Version 1 - Amazon Web...
AWS Import/ExportProgramming Guide
Version 1.3

AWS Import/Export Programming Guide
AWS Import/Export: Programming GuideCopyright © 2010 Amazon Web Services LLC or its affiliates.

AWS Import/Export Programming Guide
Table of ContentsWelcome ............................................................................................................................................................ 1What's New ....................................................................................................................................................... 4Introduction to AWS Import/Export ................................................................................................................... 6Getting Set Up ................................................................................................................................................ 11Creating an Import Job ................................................................................................................................... 16Creating an Export Job ................................................................................................................................... 24
When Exports Fail ............................................................................................................................... 31Shipping Your Storage Device ........................................................................................................................ 34
AWS Shipping Addresses ................................................................................................................... 37Filling Out Your Shipping Label and Sending Your Storage Device ................................................... 38
Managing Your Jobs ....................................................................................................................................... 40Appendix: Examples ....................................................................................................................................... 46Appendix: File Extension to Mime Types ....................................................................................................... 57Glossary .......................................................................................................................................................... 64Document Conventions ................................................................................................................................... 66Index ................................................................................................................................................................ 69

AWS Import/Export Programming GuideWho Should Read this Guide
Version 1.31
Welcome
Topics
• Who Should Read this Guide (p. 1)
• Business Requirements (p. 2)
• How to Give Us Feedback (p. 2)
• How This Guide Is Organized (p. 2)
• AWS Import/Export Resources (p. 3)
AWS Import/Export accelerates transferring large amounts of data between the AWS cloud andportable storage devices that you mail to us. AWS Import/Export transfers data directly onto andoff of your storage devices using Amazon’s high-speed internal network. For large data sets, AWSImport/Export is significantly faster than Internet transfer and more cost effective than upgrading yourconnectivity.
This is the AWS Import/Export Developer Guide. This section describes who should read this guide,how the guide is organized, and other resources related to this service.
Amazon Elastic Compute Cloud and Amazon Simple Storage Service are sometimes referred to in thisguide as Amazon EC2 and Amazon S3, respectively. All copyrights and legal protections still apply.
For a description of what's new in this release of the AWS Import/Export service, see What's New (p.4).
Who Should Read this GuideThis guide is for developers who want to use AWS Import/Export to transfer terabytes of data from adata storage device to Amazon Web Services (AWS). This guide assumes that you are already anAmazon S3 user.
Required Knowledge and SkillsDevelopers should be familiar with the following:
• Familiarity with Amazon S3.

AWS Import/Export Programming GuideBusiness Requirements
Version 1.32
For more information, go to Amazon Simple Storage Service Developer Guide. In particular, youshould understand the basic concepts of Amazon S3, including bucket, object, key, and AmazonS3's basic functionality, including importing, exporting, and deleting data.
• YAML Ain’t Markup Language.For more information, go to http://yaml.org.
Business RequirementsTo use AWS Import/Export, you must have an AWS account and be signed up to use both AWSImport/Export and Amazon S3. For more information, see Getting Set Up (p. 11).
How to Give Us FeedbackThe online version of this guide provides a link at the top of each page that enables you to enterfeedback about this guide. We strive to make our guides as complete, error free, and easy to read aspossible. You can help by giving us feedback. Thank you in advance!
How This Guide Is OrganizedThis guide is organized into several major sections described in the following table.
Information Relevant Sections
What's new in this release What's New (p. 4)
AWS Import/Export concepts Introduction to AWS Import/Export (p. 6)
Customer device power requirements,connector types and file formats.
Storage Device Requirements (p. 35)
How to import data into the AWS cloud Creating an Import Job (p. 16)
How to export data from the AWScloud onto your storage device
Creating an Export Job (p. 24)
Shipping your device to AWS Shipping Your Storage Device (p. 34)
Getting status, canceling, and lookingat log files for your jobs
Managing Your Jobs (p. 40)
Example manifest, signature, and logfiles
Examples (p. 46)
In addition, there is a glossary, an overview of our typographical conventions, and an index. Eachsection is written to stand on its own, so you should be able to look up the information you need andgo back to work. However, you can also read through the major sections sequentially to get in-depthknowledge about AWS Import/Export.

AWS Import/Export Programming GuideAWS Import/Export Resources
Version 1.33
AWS Import/Export ResourcesThe following table lists related resources that you'll find useful as you work with this service.
Resource Description
AWS Import/Export TechnicalReference
Presents frequently asked questions and answers aboutAWS Import/Export.
FAQ The FAQ covers the top questions developers have askedabout this product.
Release Notes The release notes give a high-level overview of thecurrent release. They specifically note any new features,corrections, and known issues.
Amazon Simple Storage ServiceDeveloper and Amazon SimpleStorage Service Getting Started Guide
Provides a detailed discussion of Amazon S3, includingthe basics of getting started, an overview of the service, aprogramming reference, and an API reference.
Amazon ElasticCompute CloudDeveloper Guide
Provides a detailed discussion of Amazon EC2, which is adistributed computing platform.
Amazon Elastic MapReducedocumentation
Amazon Elastic MapReduce uses Hadoop to process largeamounts of data.
AWS Developer Resource Center A central starting point to find documentation, codesamples, release notes, and other information to help youbuild innovative applications with AWS.
Amazon S3 Discussion Forum A community-based forum for developers to discusstechnical questions related to Amazon S3 and AWS Import/Export.
AWS Support Center The home page for AWS Technical Support, includingaccess to our Developer Forums, Technical FAQs, ServiceStatus page, and Premium Support.
Product information The primary web page for information about AWS Import/Export.
Contact Us A central contact point for inquiries concerning AWS billing,account, events, abuse etc..
Conditions of Use Detailed information about the copyright and trademarkusage at Amazon.com and other topics.

AWS Import/Export Programming Guide
Version 1.34
What's New
This What's New is associated with the 1.3 version of AWS Import/Export. This guide was last updatedon 2010-05-17.
Change Description Release Date
New support forinternal SATAand 4 TB devicecapacity limit
AWS Import/Export now supports internal SATA hard drivesfor data loads in the Amazon S3 Standard and EU (Ireland)Regions. Additionally, you can now send portable storagedevices with capacities up to 4 TB, reducing the number ofdevices required for large data loads. For more information,see Storage Device Requirements When Shipping to theUnited States (p. 35).
5 March 2010
Internationalsupport for AWSImport/Export
Now you can send and receive storage devices to andfrom most international locations for loading data to andfrom US Standard Region buckets. To do so, you attacha Declaration Form to your CREATE JOB e-mail. For moreinformation, see Shipping Your Storage Device (p. 34).
9 December 2009
Support for EU(Ireland) buckets
Now you can import and export data to and from EU(Ireland) buckets. For more information, see AWS ShippingAddresses (p. 37).
9 December 2009
Technicaldocumentsreorganized
The API reference has been split out of the Amazon Import/Export Developer Guide. Now, on the documentationlanding page, http://developer.amazonwebservices.com/connect/entry.jspa?externalID=2738&categoryID=48, youcan select the document you want to view. When viewingthe documents online, the links in one document will takeyou, when appropriate, to one of the other guides.
16 September2009
New FeatureAdded
Now we can export (download) data from the AWS cloudonto one or more storage devices that you mail to us.The export functionality works similarly to the importfunctionality. For more information about the exportfunctionality, see Creating an Export Job (p. 24).
13 August 2009

AWS Import/Export Programming Guide
Version 1.35
Change Description Release Date
New ParametersAdded
To implement the export functionality, we added newmanifest file parameters. These parameters enable you tospecify the target directory on the storage device(s) wherewe export data, enable you to export data from multiplebuckets, and constrain the amount of data exported. Formore information, see Export Manifest File Parameters.
13 August 2009

AWS Import/Export Programming GuideOverview of AWS Import/Export
Version 1.36
Introduction to AWS Import/Export
Topics
• Overview of AWS Import/Export (p. 6)
• AWS Import/Export Concepts (p. 7)
• Pricing (p. 9)
• Related Amazon Web Services (p. 10)
This introduction provides a high-level overview of AWS Import/Export. After reading this section, youshould have a good idea what AWS Import/Export offers and how it can fit in with your business.
Overview of AWS Import/ExportAWS Import/Export accelerates transferring large amounts of data between the AWS cloud andportable storage devices that you mail to us. AWS transfers data directly onto and off of your storagedevices using Amazon’s high-speed internal network. Your data load typically begins the next businessday after your storage device arrives at AWS. After the data export or import completes, we return yourstorage device. For large data sets, AWS Import/Export is significantly faster than Internet transfer andmore cost effective than upgrading your connectivity.
Advantages to AWS Import/ExportUsing AWS Import/Export provides the following major advantages:
• Import Large Amounts of Data into the AWS Cloud—Mail us one or more storage devices withany amount of data. We load your data to the AWS cloud and return your storage device
• Export Large Amounts of Data from the AWS Cloud—We can export data from the AWS cloudonto one or more of your storage devices
• Off Site Backup—Send full or incremental backups to Amazon S3 for reliable and redundant off sitestorage
• Direct Data Interchange—If you regularly receive content on portable storage devices from yourbusiness associates, you can have them send it directly to AWS for import into your Amazon S3buckets

AWS Import/Export Programming GuideAWS Import/Export Concepts
Version 1.37
• Disaster Recovery—In the event you need to quickly retrieve a large backup stored in Amazon S3,use AWS Import/Export to transfer the data to a portable storage device and deliver it to your site
AWS Import/Export ConceptsTopics
• Object (p. 7)
• Bucket (p. 7)
• Key (p. 7)
• Job (p. 7)
• Manifest and Signature Files (p. 8)
This section describes key concepts and terminology you need to understand to use AWS Import/Export effectively. They are presented in the order you will most like encounter them.
ObjectObjects are the fundamental entities stored in Amazon S3. Objects consist of data and metadata.Amazon S3 ignores the data portion of the object. The metadata is a set of name-value pairs thatdescribe the object. These include some default metadata, such as the date last modified and standardHTTP metadata, such as Content-Type. You can also specify custom metadata when you store anobject. The maximum size of an object is five gigabytes, but you can store an unlimited number ofobjects in an Amazon S3 bucket.
BucketA bucket is a container for objects stored in Amazon S3. Every object on Amazon S3 resides in abucket. For example, if you store an object named photos/puppy.jpg in the johnsmith bucket,then the object is addressable using the URL http://johnsmith.s3.amazonaws.com/photos/puppy.jpg.
Buckets serve several purposes: they organize the Amazon S3 namespace at the highest level, theyidentify the AWS account responsible for storage and data transfer charges, they play a role in accesscontrol, and they serve as the unit of aggregation for usage reporting.
For more information, see the Amazon Simple Storage Service Developer Guide.
KeyA key is the unique identifier for an object within a bucket. Every object in a bucket has exactly onekey. Since a bucket and key together uniquely identify each object, Amazon S3 can be thought of asa basic data map between "bucket + key" and the object itself. Every object in Amazon S3 can beuniquely addressed through the combination of the service endpoint, bucket name, and key, as inhttp://doc.s3.amazonaws.com/2006-03-01/AmazonS3.wsdl, where doc is the name of thebucket, and 2006-03-01/AmazonS3.wsdl is the key.
JobThere are two kinds of jobs:
• Import—We import data from one or more of your storage devices into the AWS cloudYou mail us your storage device(s) and we use our high bandwidth network at our AWS data centerto load your data.
AWS Import/Export Programming GuideManifest and Signature Files
Version 1.38
• Export—We export data from the AWS cloud onto one or more of your storage devicesYou mail us your storage device(s) and we use our high bandwidth network at our AWS data centerto export your data.
Each AWS Import/Export job consists of the following:
• Manifest file—Contains instructions for how to process and transfer your dataThis file enables you to specify options, such as Amazon S3 bucket and key prefix. You attachthis file to a CREATE JOB e-mail that you send to AWS Import/Export. For more information, seeManifest File (p. 8).
• SIGNATURE file—Identifies your storage deviceWhen creating a new AWS Import/Export job, you copy the SIGNATURE file to the root directory ofyour storage device and then ship it to AWS. You generate the signature using your Secret AccessKey as a key to sign an encrypted hash constructed from your manifest file and the job ID. TheSIGNATURE file links your storage device to the CREATE JOB request you submitted. For moreinformation, see SIGNATURE File (p. 9).
• Job ID—A five digit alphanumeric string generated by AWS Import/Export that uniquely identifiesyour jobAWS Import/Export returns this ID to you in an e-mail after a CREATE JOB request succeeds.
• Storage device—Any physical medium, such as a hard drive, that stores your data
• Declaration Form—If you are shipping a storage device from a non-US address to the US or arerequesting that AWS return your device to a non-US address, you must attach the AWS Import/Export Declaration Form to your CREATE JOB email. For more information, see Filling Out YourShipping Label and Sending Your Storage Device (p. 38).
Each AWS Import/Export job has a status and each job corresponds to exactly one storage device.
Job ExpirationEach AWS Import/Export job is valid for 30 days. If we do not receive your storage device within 30days of receiving the CREATE JOB e-mail, the job expires and we will not accept delivery of yourpackage. We only process jobs that arrive before the job expiration date.
Manifest and Signature FilesTopics
• Manifest File (p. 8)
• SIGNATURE File (p. 9)
The manifest and SIGNATURE files describe how to transfer data between your storage deviceand the AWS cloud. You attach the manifest file to a CREATE JOB e-mail, as described in thesections, Creating an Import Job (p. 16) and Creating an Export Job (p. 24). You must copythe corresponding SIGNATURE file to the root directory of your storage device. AWS Import/Exportcompares the contents of the manifest file that you attach to a CREATE JOB e-mail with the contentsof the SIGNATURE file. The content common to both files must match. If the common content does notmatch, AWS Import/Export will not perform the data transfer and we will return your storage device.
You must create a manifest file and a matching SIGNATURE file for each of your import or export jobs.
Manifest FileThe manifest file is a YAML-formatted file that specifies how we should process the data on yourstorage device. (For more information about YAML, go to http://yaml.org.) Each manifest file is

AWS Import/Export Programming GuidePricing
Version 1.39
associated with one or more AWS Import/Export jobs; each AWS Import/Export job has exactly onemanifest file.
The information in the manifest includes the address to return your storage device to, your AWSAccess Key ID, the bucket you want your data transfered to or from, and the version of the manifestfile you're writing. You attach a manifest file to a CREATE JOB e-mail. For more information, seeCreating an Import Job (p. 16) or Creating an Export Job (p. 24). For information about manifestparameters, see Import Manifest File Parameters or Export Manifest File Parameters.
SIGNATURE FileThe SIGNATURE file uniquely identifies the AWS Import/Export job and authenticates your request. Thefile contains:
• The version of the SIGNATURE file
• Method used to encrypt the signature value
• Job ID listed in the corresponding manifest file
• Signature value
Following is a sample SIGNATURE file.
version:1.0signingMethod:HmacSHA1jobId:112233signature:fzfS9XZ/2XKgeXamPleXRWZcX3t/8=
The signature value in the file is an HMAC-SHA-1 encryption of the job ID and the bytes in the manifestfile. Any alteration of the manifest file while it travels over the Internet will produce a different signaturevalue from the one you created with the original manifest file. You must include the SIGNATURE file onthe root directory of your storage device so that we can compare the signature value you generatedwith one we generate from the manifest file you e-mailed us. If the signature value we generate doesnot match the one in the SIGNATURE file on your storage device, we assume the manifest file wastampered with and we will not process your job.
PricingAs with all AWS services, you pay only for the resources that you use. We charge less where our costsare less, and prices are based on the location of your Amazon S3 bucket. Pricing includes fees foreach storage device used and for the number of hours it takes to load your data. For more information,go to the AWS Import Export Detail Page. You can approximate your costs using the AWS Import/Export calculator. For more information, go to the AWS Import/Export Calculator.
If you elect to have us erase your storage device after importing its data, all writable blocks on yourstorage device will be overwritten with zeroes. You will need to repartition and format your device afterthe erasure. Data-wiping-hours, which are equivalent in price to data-loading-hours, will be chargedduring this process.
Return ShippingReturn shipping charges are dependent on the location of your Amazon S3 bucket and your returnshipping destination. Any applicable return shipping expenses will be charged once your package isready for shipment to your return shipping address. You can estimate your return shipping costs usingthe AWS Import/Export Calculator. For more information, go to http://aws.amazon.com/calculator.
The following table provides guidelines for return shipping charges.

AWS Import/Export Programming GuideRelated Amazon Web Services
Version 1.310
Region Charges
US • If you have specified a return address within the US, AWS will pay reasonablereturn shipping charges, but you are responsible for any return shippingexpenses that AWS determines to be unreasonable or excessive.
• If you have specified a return address outside of the US, you will be chargedbased on your shipment destination and weight.
Europe • If you specify a return shipping address within Ireland, AWS will pay reasonablereturn shipping charges, but you are responsible for any return shippingexpenses that AWS determines to be unreasonable or excessive.
• If you specify a return address outside of Ireland, you will be charged based onyour shipment destination and weight. Devices shipped to AWS for import intoor export from EU Region buckets must originate and be returned to an addresswithin the European Union.
Related Amazon Web ServicesOnce we transfer your data into the AWS cloud you can use it with all AWS services. The followingservices are the ones you might use most frequently:
• Amazon Elastic Compute Cloud—This web service provides virtual compute resources in thecloud.For more information, go to Amazon Elastic Compute Cloud.
• Amazon Elastic MapReduce—This web service enables businesses, researchers, data analysts,and developers to easily and cost-effectively process vast amounts of dataIt utilizes a hosted Hadoop framework running on the web-scale infrastructure of Amazon ElasticCompute Cloud (Amazon EC2) and Amazon Simple Storage Service (Amazon S3). For moreinformation, go to Amazon Elastic MapReduce.
• Amazon Simple Storage Service—This web service provides data storage across the InternetAmazon S3 is tightly integrated with all AWS services. Typically, we transfer the data on yourstorage device onto Amazon S3. For more information, go to Amazon Simple Storage Service.

AWS Import/Export Programming GuideSigning Up for AWS Import/Export
Version 1.311
Getting Set Up
Topics
• Signing Up for AWS Import/Export (p. 11)
• Viewing Your AWS Security Credentials (p. 11)
• Amazon S3 Bucket Creation (p. 13)
• Bucket Permissions (p. 14)
• How to Download the CreateSignature Tool (p. 14)
• How to Export the Java Runtime Environment (p. 15)
The following sections walk you through each of the tasks you must complete before you can use AWSImport/Export to load data. They are presented in the order you should accomplish them so that youcan start loading data as quickly as possible.
Important
This guide assumes that you are an Amazon S3 user, already have an AWS account, andhave signed up for Amazon S3. If that is not the case, go to the Amazon Simple StorageService Getting Started Guide.
Signing Up for AWS Import/ExportBefore you can use this service, you must first register for it.
1. Go to the AWS Import/Export detail page.
2. Click Sign Up For AWS Import/Export.
3. Sign in using your AWS login name and password and click OK.
Viewing Your AWS Security CredentialsAWS uses special identifiers to help protect your data. In this section, we show you how to view youridentifiers so you can use them.
Tip
If you already know how to view your AWS security credentials, skip to the next section. Formore information, see Signing Up for Amazon S3.

AWS Import/Export Programming GuideViewing Your AWS Security Credentials
Version 1.312
AWS assigns you the following credentials when you create your AWS account:
• Access Key ID (a 20-character, alphanumeric sequence, for example: 022QF06E7MXBSH9DHM02)
You include your Access Key ID in all AWS service requests to identify yourself as the sender of therequest.
• Secret Access Key (a 40-character sequence, for example: kWcrlUX5JEDGM/LtmEENI/aVmYvHNif5zB+d9+ct)
Caution
Your Secret Access Key is a shared secret between you and AWS. Keep this ID secret;we use it to bill you for the AWS services you use. Never include the ID in your requests toAWS and never e-mail the ID to anyone even if an inquiry appears to originate from AWS orAmazon.com. No one who legitimately represents Amazon will ever ask you for your SecretAccess Key.
The Access Key ID is not a secret, and anyone could use your Access Key ID in requests to AWS. Toprovide proof that you truly are the sender of the request, you also include a digital signature calculatedusing your Secret Access Key. The sample code handles this for you.
Your Access Key ID and Secret Access Key display when you create your AWS account. They arenot e-mailed to you. If you need to see them again, you can view them at any time from your AWSaccount.
To view your AWS security credentials
1. Go to http://aws.amazon.com/security-credentials.
If you're not logged in, you are asked to. If you are logged in, the Security Credentials pagedisplays.
2. Click Access Key ID or Secret Access Key to display your IDs.

AWS Import/Export Programming GuideAmazon S3 Bucket Creation
Version 1.313
Amazon S3 Bucket CreationBefore you can use AWS Import/Export you must create an Amazon S3 bucket where AWS Import/Export can load your data or log files.
Important
AWS Import/Export supports buckets stored in the US Standard and EU (Ireland) Regions.Data loads to and from US buckets must be sent to an AWS location in the USA, whereas dataloads to and from EU (Ireland) Region buckets must be sent to a specified AWS location inIreland. Storage devices shipped into the US from abroad must include a Declaration Formin their CREATE JOB e-mail. For more information, see Shipping Your Storage Device (p.34).
Note
If you want to use AWS Import/Export with a Northern California Region bucket, please contactus at [email protected].
If you are already familiar with Amazon S3 bucket creation and permissions, you can skip to Gettingthe Create Signature Tool (p. 14).
The following tools make creating a bucket and retrieving data from it easy:
• S3curlFor more information, go to http://developer.amazonwebservices.com/connect/entry.jspa?externalID=128.
• S3 Firefox OrganizerFor more information. go to https://addons.mozilla.org/en-US/firefox/addon/3247.
• S3 toolFor more information, go to http://developer.amazonwebservices.com/connect/entry.jspa?externalID=739.
• Bucket ExplorerFor more information, go to http://www.bucketexplorer.com/.
• CloudBerryFor more information, go to http://cloudberrylab.com/?page=cloudberry-explorer-amazon-s3.
• CloudBuddyFor more information, go to http://www.mycloudbuddy.com/.
For more information on creating an Amazon S3 bucket, go to the Amazon Simple Storage ServiceGetting Started Guide. Consult each tool's documentation for more information.
Naming Conventions for Amazon S3 BucketsWe recommend that you create a bucket with a DNS friendly name that conforms to the following DNSrequirements:
• Bucket names should not contain underscores (_)
• Bucket names should be between 3 and 63 characters long
• Bucket names should not end with a dash
• Bucket names cannot have two periods adjacent to one another

AWS Import/Export Programming GuideBucket Permissions
Version 1.314
• Bucket names cannot contain dashes next to periods, for example, "my-.bucket.com" and "my.-bucket" are invalid
For more details, go to http://docs.amazonwebservices.com/AmazonS3/latest/index.html?BucketRestrictions.html.
Make a note of your bucket name so that you can use it for other procedures in this guide.
Bucket PermissionsAfter creating a bucket, make sure to set appropriate permissions on it. Typically, you give the ownerread and write access and authenticated users read access.
How you give permission depends on the tool.
To set permissions on a bucket using S3 Firefox Organizer
1. Open S3 Firefox Organizer and navigate to the bucket you created.
2. Right click on your bucket and select the permissions you want to give to each user type and clickOK.
How to Download the CreateSignature ToolThe CreateSignature tool is a command line utility that creates SIGNATURE files. You must create andcopy a SIGNATURE file to the root directory of your storage device to authenticate each of your AWSImport/Export CREATE JOB requests.
Important
You need Java Standard Edition 2, version 1.4.2 or newer to use the CreateSignature tool.

AWS Import/Export Programming GuideSource Code
Version 1.315
To export the CreateSignature tool
1. Go to http://s3.amazonaws.com/awsimportexport/AWSImportExport.zip.
2. Export and decompress the zip file, AWSImportExport.zip, onto your local system.
Source CodeWe include the source code for CreateSignature in the distribution so developers can create and sharetheir own tools that can produce valid AWS Import/Export SIGNATURE files. AWSImportExport.zipincludes the following source files for the tool:
• CreateSignature.java
• Base64.java
These files are in the lib directory of AWSImportClientSignatureTool-1.0.jar, which you canexport from http://s3.amazonaws.com/awsimportexport/AWSImportExport.zip
The CreateSignature.java source file is licensed under the Apache license, version 2.0. Your useof this file must comply with the terms of this license. For information about the license, go to http://aws.amazon.com/apache2.0/.
The Base64.java source file is part of the public domain. For more information, go to http://iharder.net/base64.
How to Export the Java Runtime EnvironmentYou need Java Standard Edition 2, version 1.4.2 or newer to use the CreateSignature tool to run theCreateSignature tool, which creates the signatures required for your requests. You can verify yourversion.
To verify your Java Runtime Environment version
• Type “java –version” at a command prompt.If your version is older than version 1.4.2, you must export and install a newer version.
To export and install the Java Runtime Environment
• Go to http://java.sun.com and follow the instructions for exporting and installing the Java RuntimeEnvironment.

AWS Import/Export Programming GuideOverview
Version 1.316
Creating an Import Job
OverviewThe following figure and table describe the process AWS Import/Export uses to load your data into theAWS cloud.
Job Process
1 You copy your data to your storage device. Make sure the file paths correspond to the keynames you want to use in Amazon S3. For example, if you want your Amazon S3 key to startwith images/, place your files in a directory called images.
2 You create an import manifest file that specifies such things as the bucket name, key prefix, andContent-Type. For more information, see Manifest File (p. 8)
3 You create a new import job by sending an e-mail to [email protected] with theimport manifest file attached and “CREATE JOB” in the Subject line. If you are importing intoa US bucket and are shipping your device from or requesting that AWS return your deviceto a non-US based address, you must attach an AWS Import/Export Declaration Form withyour CREATE JOB e-mail. We use this form to ensure that all shipments comply with US andinternational import and export regulations. AWS Import/Export validates the import manifestand returns a success e-mail with “RE: CREATE JOB” in the Subject line within one businessday. The success e-mail includes the job ID and a link that takes you to the correct address toship your storage device to.
4 You create a new SIGNATURE file for your storage device by signing your manifest file from step2 and the job ID from step 3. For more information, see SIGNATURE File.

AWS Import/Export Programming GuideHow to Import Data into the AWSCloud Using AWS Import/Export
Version 1.317
5 You copy the SIGNATURE file from step 4 to the root directory of your storage device. You mustname the SIGNATURE file SIGNATURE.If you change your manifest file in any way after sending the CREATE JOB e-mail and beforesending your storage device to AWS, you must send a new CREATE JOB e-mail and attach therevised manifest file.
6 You fill out the AWS Import/Export packing slip. We accept only one device per package andonly one job per device.
7 You ship your storage device and packing slip to AWS. Make sure to include your job ID onthe shipping label. Otherwise, we will refuse delivery of the package. Make sure your storagedevice conforms to AWS Import/Export requirements. For more information about the criteria,see Storage Device Requirements (p. 35).
8 AWS Import/Export validates the signature generated from the import manifest file attached tothe original CREATE JOB e-mail with the signature on the root drive of your storage device. Ifthe signatures don’t match, the manifests differ and AWS won’t load your data. If the manifestfiles from the original e-mail and in the SIGNATURE file match, we load your data into the AWScloud.Your data load typically begins the next business day after your storage device arrives at AWS.The timeline for loading your data depends on a number of factors, including the availability ofan import station, the amount of data to load, and the data transfer rate of your device.
9 We e-mail you the status of the load and the location on Amazon S3 of the AWS Import/Exportlog. The log contains details about your data files that we loaded, including the key names,number of bytes, and MD5 checksum values.
10 We repack your storage device and ship it to the return shipping address listed in your manifestfile. We do not ship to post office boxes.
How to Import Data into the AWS Cloud UsingAWS Import/Export
The following sections walk you through the steps of creating an import job using S3 Fox Organizer.
Note
You can use other third party tools to create manifest and signature files. For moreinformation, see Amazon S3 Bucket Creation (p. 13). You can also create manifest andsignature files using a text editor. For more information, see Creating an Import Manifest andSIGNATURE Files Without Third Party Tools (p. 21).
At this point, you should have already signed up to be an Amazon S3 user, have an AWS account,have signed up for Amazon S3, and have installed Firefox S3 Organizer. If you haven't, see GettingSet Up (p. 11).
To create a bucket using S3 Fox Organizer
• In Firefox, click Tools then S3 Organizer and create a bucket on Amazon S3 where you want us toload your data.Make a note of the bucket name. For more information on creating an Amazon S3 bucket, go to theAmazon Simple Storage Service Getting Started Guide.
The following procedures takes you through creating an import job using Firefox S3 Organizer. If youprefer to create the manifest and SIGNATURE files without using Firefox S3 Organizer, see Creatingan Import Manifest and SIGNATURE Files Without Third Party Tools (p. 21).

AWS Import/Export Programming GuideHow to Import Data into the AWSCloud Using AWS Import/Export
Version 1.318
To create an import job using S3 Fox Organizer
1. In Firefox, click Tools and S3 Organizer.
2. Click AWS Import/Export.
The Create Manifest File pane appears.
3. Enter values in the fields. For more information about the fields, see Import Manifest FileParameters.
Note
Optionally, click Preview Manifest File to preview the manifest file in the Manifest FileContents area.
4. Click Save Manifest, navigate to a place on your local computer (not storage device) where youwant to save the manifest file and click Save.

AWS Import/Export Programming GuideHow to Import Data into the AWSCloud Using AWS Import/Export
Version 1.319
Note the location of the manifest file.
5. Open your e-mail client and create a new e-mail.
A Enter [email protected] in the TO field and CREATE JOB in the Subject field.
B Attach the Manifest.txt file to the e-mail so the e-mail looks similar to the following.
If you are importing into a US bucket and are shipping your device from or requesting thatAWS return your device to a non-US based address, you must attach an AWS Import/ExportDeclaration Form with your CREATE JOB e-mail. We use this form to ensure that all shipmentscomply with US and international import and export regulations.
C Click Send.Within one business day you should receive an e-mail from [email protected] RE: CREATE JOB.
The link in the awsShippingAddress field takes you to the address that you need to ship yourstorage device to.
Note
Use e-mail to issue all commands. We process these requests manually eachbusiness day. If you do not get a response within one business day, please sendanother e-mail or contact your AWS representative.
6. On the Create Manifest File pane click Next.The Create Signature File page displays.

AWS Import/Export Programming GuideHow to Import Data into the AWSCloud Using AWS Import/Export
Version 1.320
A Enter the job ID returned in the e-mail and click Create Signature File.The Browse For Folder window appears.
B In this window, navigate to the root directory of your storage device and click OK.The tool automatically saves the file with the name SIGNATURE.
7. On the Create Signature File page, click Finish.
You have now created the manifest file, which you will e-mail as an attachment with your CREATEJOB request and you have saved the corresponding SIGNATURE file on the root directory of yourstorage device.
Your next task is to ship your storage device to us. For more information, see Shipping Your StorageDevice (p. 34)
We compare the signature value you generated with one we generate from the manifest file you e-mailed us. If the signature value we generate does not match the one in the SIGNATURE file on yourstorage device, we assume the manifest file was tampered with and we will not transfer data. For thisreason, if you change the manifest in any way between the time you send the CREATE JOB e-mail andthe time you generate the signature value and copy it to the root directory of your storage device, youmust send a CANCEL JOB e-mail for the original job (or just let it expire in 30 days) and send us a newCREATE JOB request that includes a new manifest file. For more information, see SIGNATURE File.
Note
To cancel a job, see Canceling Your Job (p. 43).

AWS Import/Export Programming GuideCreating an Import Manifest and
SIGNATURE Files Without Third Party Tools
Version 1.321
Creating an Import Manifest and SIGNATUREFiles Without Third Party ToolsThis section describes how to create import manifest and SIGNATURE files without using third partytools. If you have used one of the third party tools to create those files, you do not need to use thissection. Instead, skip to the next section, Shipping Your Storage Device (p. 34).
To create a manifest file without third party tools
• Use a text editor to create a YAML file with the required parameters.
For more information about parameters in the manifest file, see Import Manifest File Parameters.
The following is a sample import manifest file.
bucket: [Amazon S3 bucket where AWS Import/Export loads your data]accessKeyId: [Your Access Key ID]manifestVersion: 1.3eraseDevice: NodeviceId: [Device ID]returnAddress: name: Amazon.com ATTN:Joe Random street1: 5555555 5th Ave city: Seattle stateOrProvince: WA postalCode: 98104 phoneNumber: 206-555-1000 country: USA
Use the following table to understand the parameters. For more information about these and otherimport manifest parameters, see Import Manifest File Parameters.
Parameter Description
accessKeyId Your Access Key ID. For more information, see Viewing Your AWSIdentifiers (p. 11)
bucket Amazon S3 bucket where AWS Import/Export loads the data from your storagedevice. For more information about creating an Amazon S3 bucket, see AmazonS3 Bucket Creation (p. 13).
deviceId An identifying number, such as a serial number, on your storage device. If yourdevice does not have one, attach a label with a unique identifier
eraseDevice Specifies whether (Yes) or not (No) to erase your storage device after we loadyour data into the AWS cloud.
manifestVersion Version of the manifest file you are using.
returnAddress Container for address information. The sub parameters specify the addresswhere we return your storage device.
Important
Your return address must be a physical street address in the UnitedStates that UPS can deliver to.

AWS Import/Export Programming GuideCreating an Import Manifest and
SIGNATURE Files Without Third Party Tools
Version 1.322
Note
If you change your Secret Access Key before we complete your AWS Import/Export job, yourjob will fail and we will return your storage device. If we return your storage device, you needto create a new CREATE JOB request and SIGNATURE file. If you change your key and havenot yet shipped your storage device, you just need to generate a new SIGNATURE file, newmanifest file, and a new CREATE JOB request. We use the SIGNATURE file to authenticateyour job.
To see how specific manifest fields affect the loaded files, see Examples (p. 46) in the appendix.
Next you create a SIGNATURE file based on the manifest file you just created.
How to Create a SIGNATURE File
The SIGNATURE file uniquely identifies the AWS Import/Export job and authenticates your request. Youcopy the SIGNATURE file to the root directory of your storage device. The SIGNATURE file incorporatesinto it the manifest file, job ID, and a signature value, which is an HMAC SHA-1 encrypted value.
The SIGNATURE file does two things:
• The file labels your storage device with your job ID. In this way, we have instructions on the storagedevice that tell us how to process your data.
• We use the job ID in the SIGNATURE file to locate the CREATE JOB request that you e-mailedpreviously. We then validate the manifest included in the SIGNATURE file to the manifest file attachedto your CREATE JOB e-mail. If the two manifest files are not the same, we do not process your data.
To create the SIGNATURE file, you need your job ID, manifest file, and Secret Access Key. For moreinformation about the Secret Access Key, see Viewing Your AWS Identifiers (p. 11).
Important
Your Secret Access Key is a shared secret between you and AWS. You should neverinclude it in plain text in an e-mail because it represents your identity as a customer. AWSauthenticates requests by the Secret Access Key and bills people accordingly. If you suspectthat the secrecy of your Secret Access Key has been compromised, generate a new oneimmediately. For more information about generating a new key, go to http://aws.amazon.com,hold the mouse over Your Account, and click Access Identifiers.
Note
If you generate a new secret access key after sending a CREATE JOB e-mail, your job will failand we will return your storage device.
For more information, see SIGNATURE File Parameters.
To create a SIGNATURE file
1. From the command line, navigate to the directory where you decompressedAWSImportExport.zip.
2. Enter the name of your manifest file, the job ID, and the SIGNATURE filename as arguments to thejar file.
java -jar lib/AWSImportClientSignatureTool-1.0.jar manifest-file job-ID SIGNATURE-file-name

AWS Import/Export Programming GuideCreating an Import Manifest and
SIGNATURE Files Without Third Party Tools
Version 1.323
The following example (on Linux) uses the manifest file, Manifest.txt (located in the examplesdirectory), the JOBID 49382, and a SIGNATURE filename of SIGNATURE.
java -jar lib/AWSImportClientSignatureTool-1.0.jar examples/Manifest.txt 49382 SIGNATURE
The service responds by prompting you to enter your Secret Access Key.
3. Enter your Secret Access Key at the command prompt.
Please enter Secret Access Key> R2lzSsampleGaNG038402849204830d9w028e0283SJD9802
The tool creates a new SIGNATURE file.
4. Copy the SIGNATURE file to the root directory of your storage device.Make sure to name the file SIGNATURE.

AWS Import/Export Programming GuideOverview
Version 1.324
Creating an Export Job
Topics
• Overview (p. 24)
• How to Create an Export Job (p. 25)
• When Exports Fail (p. 31)
OverviewThe following figure and table describe the process AWS Import/Export uses to export your data.
Job Process
1 Create a manifest file that specifies such things as the bucket name to export from. Formore information, see Manifest File (p. 8). If you are going to mail us multiple storagedevices, you must create a manifest file for each. You can let AWS Import/Export create themanifest files for you by sending a CREATE EXPORT PLAN e-mail. For more information,see Exporting Data to Multiple Storage Devices (p. 28).
2 Create a new AWS Import/Export job by sending an e-mail [email protected] with the manifest file attached and “CREATE JOB” in theSubject line. If you are importing into a US bucket and are shipping your device from orrequesting that AWS return your device to a non-US based address, you must attach anAWS Import/Export Declaration Form with your CREATE JOB e-mail. We use this form toensure that all shipments comply with US and international import and export regulations.The AWS Import/Export validates the manifest and returns a success e-mail with “RE:CREATE JOB” in the Subject line within one business day. The success e-mail includesthe job ID and a link that takes you to the correct address to ship your storage device to.

AWS Import/Export Programming GuideHow to Create an Export Job
Version 1.325
3 Create a SIGNATURE file for your storage device. You need a SIGNATURE file for eachstorage device you mail to us. For more information, see SIGNATURE File.
4 Copy the SIGNATURE file from step 2 to the root directory of your storage device. If youare mailing multiple storage devices, you have multiple manifest files and correspondingSIGNATURE files. Each storage device gets its own SIGNATURE file. You must name theSIGNATURE file SIGNATURE.If you change your manifest file in any way after sending the CREATE JOB e-mail andbefore sending your storage device to AWS, you must send a new CREATE JOB e-mail andattach the revised manifest file.
5 Fill out the AWS Import/Export packing slip. We accept only one device per package andonly one job per device.
6 Ship your storage device and packing slip to AWS. Make sure to include your job ID on theshipping label. Otherwise, we will refuse delivery of the package. Make sure your storagedevice conforms to AWS Import/Export requirements. For more information about thecriteria, see Storage Device Requirements (p. 35).
7 AWS Import/Export validates the signature generated from the manifest file attached to theoriginal CREATE JOB e-mail with the signature on the root drive of your storage device. Ifthe signatures don’t match, AWS Import/Export won’t export your data.We export your data typically by the end of the next business day after we receive yourstorage device. The timeline for exporting your data depends on a number of factors,including the availability of an export station, the amount of data to export, and the datatransfer rate of your device.
8 We e-mail you the status of the export and the location on Amazon S3 of the AWS Import/Export log. The log contains details about your data files that we exported, including the keynames, number of bytes, and MD5 checksum values.
9 We repack your storage device and ship it to the return shipping address listed in yourmanifest file. We do not ship to post office boxes
How to Create an Export JobThe following procedure walks you through the steps of creating an export job using only the requiredexport manifest file parameters. The sections following the procedure explain how to use additionalexport manifest parameters to export data from more than one Amazon S3 bucket, limit the amount ofdata exported from one or more buckets, and load data onto two or more storage devices.
At this point, you should have already signed up to be an Amazon S3 user, have an AWS account,have signed up for Amazon S3, and have installed Firefox S3 Organizer. If you haven't, see GettingSet Up (p. 11).
To create a bucket using S3 Fox Organizer
• In Firefox, click Tools then S3 Organizer and create a bucket on Amazon S3 where you want us toload your log files.Make a note of the bucket name. For more information on creating an Amazon S3 bucket, go to theAmazon Simple Storage Service Getting Started Guide.
To create an export job
1. Use a text editor to create and save a YAML file that includes (at least) the required export manifestparameters.

AWS Import/Export Programming GuideHow to Create an Export Job
Version 1.326
The following export manifest file uses all of the required parameters.
manifestVersion: 1.3accessKeyId: [Your Access Key ID]deviceId: [Device ID]logBucket: [Amazon S3 bucket where AWS Import/Export stores your log data]fileSystem: [Your file system type, e.g. NTFS, FAT32, EXT2, EXT3]operations: - exportBucket: [Amazon S3 bucket where AWS Import/Export retrieves your data]returnAddress: name: Amazon.com ATTN:Joe Random street1: 5555555 5th Ave city: Seattle stateOrProvince: WA postalCode: 98104 phoneNumber: 206-555-1000 country: USA
Important
Your return address must be a physical street address that UPS, DHL, or An Post candeliver to.
This manifest file specifies that AWS Import/Export should export all of the objects in the bucketspecified by exportBucket onto your storage device. For information about all export manifestfile parameters, see Export Manifest File Parameters. To see how specific manifest fields affect theloaded files, see Examples (p. 46).
Note
If you change your Secret Access Key before we complete your AWS Import/Export job,your job will fail and we will return your storage device. If we return your storage device, youneed to create a new CREATE JOB request and SIGNATURE file. If you change your SecretAccess Key and have not yet shipped your storage device, generate a new SIGNATUREfile, new manifest file, and a new CREATE JOB request. We use the SIGNATURE file toauthenticate your job.
This procedure uses Manifest.txt for the name of the manifest file. You can use anyname for the file.
2. Open your e-mail client and create a new e-mail.
A Enter [email protected] in the TO field and CREATE JOB in the Subjectfield.

AWS Import/Export Programming GuideHow to Create an Export Job
Version 1.327
B Attach the Manifest.txt file to the e-mail so the e-mail looks similar to the following.
If you are importing into a US bucket and are shipping your device from or requestingthat AWS return your device to a non-US based address, you must attach an AWSImport/Export Declaration Form with your CREATE JOB e-mail. We use this form toensure that all shipments comply with US and international import and export regulations.
C Click Send to send the e-mail.Within one business day you should receive an e-mail [email protected] entitled RE: CREATE JOB. Take note of the job ID in thee-mail.
The link in the awsShippingAddress field takes you to the address that you need to shipyour storage device to.
Note
Use e-mail to issue all commands. We process these requests manually eachbusiness day. If you do not get a response within one business day, please sendanother e-mail or contact your AWS representative.
3. From the command line, navigate to the directory where you decompressedAWSImportExport.zip.
For more information, see How to Download the CreateSignature Tool (p. 14).
4. Enter the name of your manifest file, the job ID returned in the e-mail, and the SIGNATURE filenameas arguments to the JAR file.
java -jar lib/AWSImportClientSignatureTool-1.0.jar manifest-file job-ID SIGNATURE-file-name

AWS Import/Export Programming GuideExporting Data to Multiple Storage Devices
Version 1.328
The following example (on Linux) uses the manifest file, Manifest.txt (located in the examplesdirectory), the JOBID 49382, and a SIGNATURE filename of SIGNATURE. You must name the fileSIGNATURE.
java -jar lib/AWSImportClientSignatureTool-1.0.jar examples/Manifest.txt 49382 SIGNATURE
The service responds by prompting you to enter your Secret Access Key.
5. Enter your Secret Access Key at the command prompt.
Please enter Secret Access Key> R2lzSsampleGaNG038402849204830d9w028e0283SJD9802
The tool creates a new SIGNATURE file.
6. Copy the SIGNATURE file to the root directory of your storage device.
Make sure to name the file SIGNATURE.
Your next task is to ship your storage device to us. For more information, see Shipping Your StorageDevice (p. 34).
We compare the signature value you generated with one we generate from the manifest file you e-mailed us. If the signature value we generate does not match the one in the SIGNATURE file on yourstorage device, we assume the manifest file was tampered with and we will not transfer data. For thisreason, if you change the manifest in any way between the time you send the CREATE JOB e-mail andthe time you generate the signature value and copy it to the root directory of your storage device, youmust send a CANCEL JOB e-mail for the original job (or just let it expire in 30 days) and send us a newCREATE JOB request that includes a new manifest file. For more information, see SIGNATURE File.
Note
To cancel a job, see Canceling Your Job (p. 43).
Exporting Data to Multiple Storage DevicesTopics
• How to Create an Export Plan (p. 29)
• Retrieving the Export Plan (p. 30)
• Export Plan Contents (p. 31)
An export plan is a way we can help you export your data using multiple storage devices. Essentially,you input the capacity of your storage device(s) and AWS Import/Export generates the manifest file(s)you'll attach to your CREATE JOB e-mails for your export job. You could generate the manifest filesyourself but CREATE EXPORT PLAN does the work for you.
The CREATE EXPORT PLAN e-mail command specifies the Amazon S3 bucket and key location of theexport plan that AWS Import/Export generates.

AWS Import/Export Programming GuideExporting Data to Multiple Storage Devices
Version 1.329
If all of the data you want to export can fit on one storage device, you don’t need to generate an exportplan.
Note
Your export plan is available in Amazon S3 for only 30 days. If you want to keep a copy, exportit from Amazon S3.
To retrieve the export file, you must use a tool, such as S3 Firefox Organizer or Bucket Explorer. Formore information, see Amazon S3 Bucket Creation (p. 13).
How to Create an Export Plan
This section explains how to create an export plan using CREATE EXPORT PLAN.
To create an export plan
1. Use a text editor to create a manifest file.
For more information, see How to Create an Export Manifest File (p. 25).
This procedure uses Manifest.txt for the name of the manifest file. You can use any name forthe file.
2. Open your e-mail client and create a new e-mail
3. Enter [email protected] in the TO field and CREATE EXPORT PLAN in the Subjectfield.
4. Attach the Manifest.txt file to the e-mail.
5. In the body of the e-mail, enter rawCapacity (or formattedCapacity) with the storage capacityfor each storage device.
Separate the values with commas. For a list of the units you can use with rawCapacity (orformattedCapacity) to specify the capacity, see Export Manifest File Parameters.

AWS Import/Export Programming GuideExporting Data to Multiple Storage Devices
Version 1.330
6. If you are importing into a US bucket and are shipping your device from or requesting that AWSreturn your device to a non-US based address, you must attach an AWS Import/Export DeclarationForm with your CREATE JOB e-mail. We use this form to ensure that all shipments comply with USand international import and export regulations.
7. Click Send to send the e-mail.
Within one business day you should receive an e-mail from [email protected] entitledRE: CREATE EXPORT PLAN.
Note
You’ll need to use Amazon S3 Fox, BucketExplorer, or another tool to retrieve this file fromAmazon S3 using the account specified in your manifest file.
Retrieving the Export Plan
AWS Import/Export stores the export plan in an Amazon S3 bucket and gives you the bucket name andkey in an e-mail.
To retrieve the export plan
• Use a tool, such as Bucket Explorer, S3 Firefox Organizer, S3 Curl, or S3 Tool to retrieve the exportplan from Amazon S3.The CREATE EXPORT PLAN response contains the bucket name and key for the export plan. Formore information about the tools you can use to retrieve the export plan, see Amazon S3 BucketCreation (p. 13).

AWS Import/Export Programming GuideWhen Exports Fail
Version 1.331
Export Plan Contents
When you unzip the export plan, you'll see that the plan includes:
• The original manifest file you attached to the CREATE EXPORT PLAN e-mail. AWS Import/Exportpropagates many of the values in the original manifest file to the generated manifest files.
• Manifest files for each of your storage devices. It is possible that the data exceeds the total capacityof all of the storage devices you mail to us. In that case, AWS Import/Export creates additionalmanifest files with the assumption that you will mail the same storage devices back to us so that wecan export more data onto them.
• A list of the files that AWS Import/Export either could not export or could not save using the key asthe filename. There are numerous reasons why AWS Import/Export might not be able to map keysdirectly to filenames on the storage device. For example, some characters allowed in keys are illegalin filenames. The list explains why the export either failed or the filename was altered. For moreinformation, see When Exports Fail (p. 31).
The following export plan assumes that you mailed us three storage devices and their raw capacitieswere 1.5TB, 1TB, and 500GB. The plan also assumes that the total capacity of the devices was onlyhalf of what was needed to store the data. Given these conditions, AWS Import/Export would create anexport plan containing the following.
/(filesystemtype)- compatibility.csv/original-manifest.txt/manifest-1.5TB-1.txt/manifest-1TB-2.txt/manifest-500GB-3.txt/manifest-1.5TB-4.txt/manifest-1TB-5.txt/manifest-500GB-6.txt
This plan has the following elements:
• compatibility.csv file—Contains a list of all files that either AWS Import/Export cannot export orcannot use the key for the filename on the storage device.AWS Import/Export exports the renamed files to the directory you specify using the export manifestparameter, recoveryDirectory. For more information, see When Exports Fail (p. 31).
• original-manifest.txt—Contains the original manifest file that you attached to the CREATE EXPORTPLAN e-mail
• Next three entries—Are the manifest files for each of the three storage devices you mailed to us
• Last three entries—Are the manifest files for each of the three storage devices assuming that wemailed them back to you, you extracted the data from them, and you mailed them back to us toexport the remainder of the data.
Important
You need to update the deviceId in each generated manifest file to reflect the device’s serialnumber or other unique identifier.
When Exports FailThere are numerous reasons why AWS Import/Export might not be able to export a file or use anobject's key for its filename on your storage device. For example, valid keys can contain charactersthat are illegal in filenames. When naming errors occur, AWS Import/Export:

AWS Import/Export Programming GuideThe compatibility.csv File
Version 1.332
1. Renames the file
For information about how AWS Import/Export renames the file, see recoveryDirectory.
2. Exports the file into the directory specified by the manifest file parameter, recoveryDirectory
3. Adds a single-line entry to the compatibility.csv file
WhenAWS Import/Export cannot export an object, AWS Import/Export adds a single-line entry to thecompatibility.csv file. For more information, see The compatibility.csv File (p. 32).
The following list shows other factors that either prevent AWS Import/Export from exporting AmazonS3 objects, or that make AWS Import/Export export objects with different filenames into the directoryspecified by the manifest parameter, recoveryDirectory:
• Some filenames are reserved, for example, a single period (.) and a double period (..).
• FAT32 and NTFS are case aware for display purposes but are case unaware when writing files.For example, foo.bar and FOO.BAR are different objects in Amazon S3 but they are equivalentfilenames in many file systems. So, instead of overwriting the first file (foo.bar) with the second file(FOO.BAR) AWS Import/Export writes the second file to the recovery directory.
• FAT32 filenames are limited to 256 characters but Amazon S3 keys can contain up to 1024 bytes.
• FAT32 directories can have a maximum of between 10,000 and 11,000 files per directory. AmazonS3 does not have any such restrictions.
The compatibility.csv FileThe following example shows the contents of a compatibility.csv file. The first line contains theheadings for the fields in each line. Three entries follow the first line. The first entry shows that theexport failed because the object to export was too large. The last two entries show that the objectswere renamed and saved to the recoveryDirectory directory because the key mapped to an invalidfilename.
STATUS,DESCRIPTION,BYTES,KEYFailed,“Too Large”,5368709120,"mybucket/mykey/"Remapped,”Invalid Filename”,500234,”mybucket/invalidfilename////”Remapped,”Invalid characters”,128,”mybucket/invalid:::?*filenamecharacter”
Each line in the compatibility.csv file contains four fields, as shown by the headings listed in thefirst line: STATUS, DESCRIPTION, BYTES, KEY. The following table describes those fields.
Entry Description
STATUS Specifies whether AWS Import/Export remapped the key to a different filenameor that AWS Import/Export could not export the file.The status values are Remapped or Failed. Remapped indicates thatthe key contains characters that are illegal in filenames. As a result, AWSImport/Export renamed and exported the file into the directory specified byrecoveryDirectory (instead oftargetDirectory). Failed indicates thatthe Amazon S3 object is larger than the target file system’s maximum file sizeand AWS Import/Export cannot export it.
DESCRIPTION Describes why AWS Import/Export remapped the file or could not export it.
BYTES Specifies the number of bytes of the exported object, for example, 57344.

AWS Import/Export Programming GuideThe compatibility.csv File
Version 1.333
Entry Description
KEY Identifies the origin in Amazon S3 of the remapped (or failed) file. The keyincludes the bucket name and the key, for example, /mybucket/myprefix/images/image.jpg.
Note
All file and KEY values are enclosed in quotes.

AWS Import/Export Programming Guide
Version 1.334
Shipping Your Storage Device
Topics
• Storage Device Requirements (p. 35)
• SIGNATURE File (p. 36)
• How to Pack Your Storage Device (p. 36)
• AWS Shipping Addresses (p. 37)
• How to Fill Out the Packing Slip (p. 38)
• Filling Out Your Shipping Label and Sending Your Storage Device (p. 38)
• Send Us Your Feedback Now (p. 39)
The following sections explain how to ship your storage device to AWS. The tasks in the followingprocedure are explained in the sections below the procedure.
You can use a courier service to send packages to AWS. For imports into and exports from US andregion buckets, AWS returns all US-bound packages via standard UPS ground and all international-bound packages via DHL Express Worldwide. For imports into and exports from Europe regionbuckets, AWS returns all packages via An Post.
This section explains how to accomplish the workflow described in the following table.
Storage Device Packing Preparation
1 Make sure your storage device conforms to AWS requirements.
2 Create a SIGNATURE file.
3 Copy the SIGNATURE file to the root directory of your storage device.
4 Pack your storage device.
5 Create a packing slip.
For a checklist that covers most of the topics in this section, go to AWS Import/Export Pack and ShipChecklist.
AWS Import/Export Programming GuideStorage Device Requirements
Version 1.335
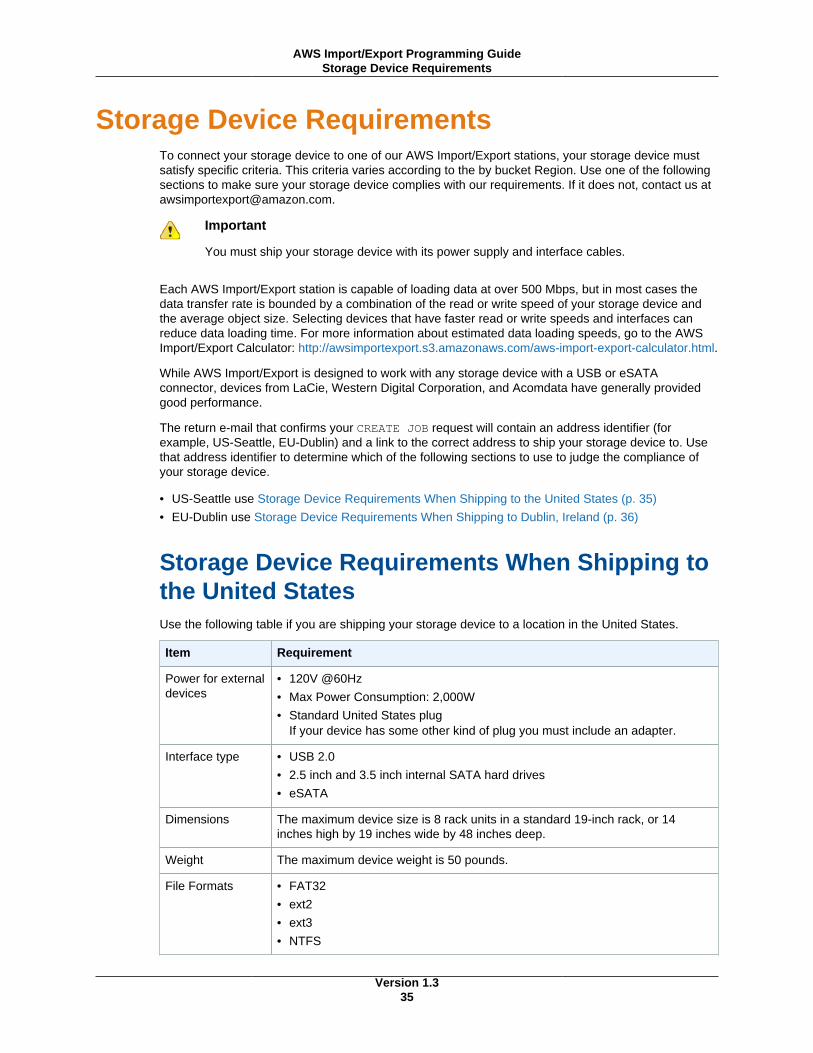
Storage Device RequirementsTo connect your storage device to one of our AWS Import/Export stations, your storage device mustsatisfy specific criteria. This criteria varies according to the by bucket Region. Use one of the followingsections to make sure your storage device complies with our requirements. If it does not, contact us [email protected].
Important
You must ship your storage device with its power supply and interface cables.
Each AWS Import/Export station is capable of loading data at over 500 Mbps, but in most cases thedata transfer rate is bounded by a combination of the read or write speed of your storage device andthe average object size. Selecting devices that have faster read or write speeds and interfaces canreduce data loading time. For more information about estimated data loading speeds, go to the AWSImport/Export Calculator: http://awsimportexport.s3.amazonaws.com/aws-import-export-calculator.html.
While AWS Import/Export is designed to work with any storage device with a USB or eSATAconnector, devices from LaCie, Western Digital Corporation, and Acomdata have generally providedgood performance.
The return e-mail that confirms your CREATE JOB request will contain an address identifier (forexample, US-Seattle, EU-Dublin) and a link to the correct address to ship your storage device to. Usethat address identifier to determine which of the following sections to use to judge the compliance ofyour storage device.
• US-Seattle use Storage Device Requirements When Shipping to the United States (p. 35)
• EU-Dublin use Storage Device Requirements When Shipping to Dublin, Ireland (p. 36)
Storage Device Requirements When Shipping tothe United StatesUse the following table if you are shipping your storage device to a location in the United States.
Item Requirement
Power for externaldevices
• 120V @60Hz
• Max Power Consumption: 2,000W
• Standard United States plugIf your device has some other kind of plug you must include an adapter.
Interface type • USB 2.0
• 2.5 inch and 3.5 inch internal SATA hard drives
• eSATA
Dimensions The maximum device size is 8 rack units in a standard 19-inch rack, or 14inches high by 19 inches wide by 48 inches deep.
Weight The maximum device weight is 50 pounds.
File Formats • FAT32
• ext2
• ext3
• NTFS

AWS Import/Export Programming GuideStorage Device Requirements
When Shipping to Dublin, Ireland
Version 1.336
Item Requirement
Maximum devicecapacity
4 TB
Storage Device Requirements When Shipping toDublin, IrelandUse the following table if you are shipping your storage device to a location in Dublin, Ireland.
Item Requirement
Power for externaldevices
• 230V @50Hz
• Max Power Consumption: 2,000W
• UK/Ireland Plugs: BS1363 ( Rated 13 amps are CEE17, with 3 rectangularpins)
• Continental Europe Plugs: Schuko (CEE7) (Rated 16 amps, with 2 roundpins), or Kettle Lead Plugs: IEC 320/C14If your device has some other kind of plug you must include an adapter.
Interface type • USB 2.0
• 6.4-cm (2.5 inch) and 8.9-cm (3.5 inch) internal SATA hard drives
• eSATA
Dimensions The maximum device size is 35 centimeters high by 48 centimeters wide by 91centimeters deep.
Weight The maximum device weight is 22.5 kilograms.
File Formats • FAT32
• ext2
• ext3
• NTFS
Maximum devicecapacity
4 TB
SIGNATURE FileYour storage device must have on its root directory a file named SIGNATURE. For more informationabout creating that file, see Creating Manifest and Signature Files (p. 8).
How to Pack Your Storage DeviceThis section describes how to pack your media and packing slip. For more information about thepacking slip, see How to Fill Out the Packing Slip (p. 38).
To pack your storage device
1. Make sure that you package your equipment appropriately. Your shipper can provide packingguidelines. For more information, go to:

AWS Import/Export Programming GuideAWS Shipping Addresses
Version 1.337
• UPS—http://www.ups.com/content/us/en/resources/prepare/guidelines/prepare_package1.html
• FEDEX—http://fedex.com/ca_english/shippingguide/preparepackage
Important
Although AWS has a number of internal controls and procedures to prevent loss, damageor disclosure of your data, AWS is not responsible for damages associated with lossor inadvertent disclosure of data; or the loss, damage, or destruction of the physicalhardware. You should always retain a back-up copy of your data.
2. Enclose your device and your device’s power supply, power cable, and data connector.
3. Enclose your filled-out packing slip
AWS Shipping AddressesYou will ship your storage device to an address in the United States or in Europe. When you senda CREATE JOB e-mail, AWS Import/Export replies with a confirmation e-mail that includes a jobID, your unique device ID from the manifest, an AWS shipping address identifier, and a link to thecorresponding shipping address. The AWS shipping address identifiers are US-Seattle and EU-Dublin.The following sample response shows the link to the shipping address in US-Seattle.
Important
If you ship your storage device to an address not specified in the CREATE JOB confirmation e-mail, AWS Import/Export will return your storage device without performing the job and you willbe charged for any applicable return shipping charges and device-handling fees. You shouldalways verify the address before shipping.
To access Amazon S3 buckets that are in the EU Region, the shipping device must originateand be shipped back to a location in the European Union.
Caution
Check the referenced web site address in the awsShippingAddress field. GenuineAmazon Web Services web sites are always hosted on the amazon.com domain (http://
AWS Import/Export Programming GuideHow to Fill Out the Packing Slip
Version 1.338
aws.amazon.com/. . .) You can check where it actually points to by hovering yourmouse over the link--the actual Web site where it points to will be shown in the status barat the bottom of your browser window or as a pop-up. Amazon will never ask you for yourAWS credentials or your Amazon password in an email or over the phone. If you receivesuch requests, please refrain from providing the information to the requester and notify usimmediately by sending an e-mail to [email protected].
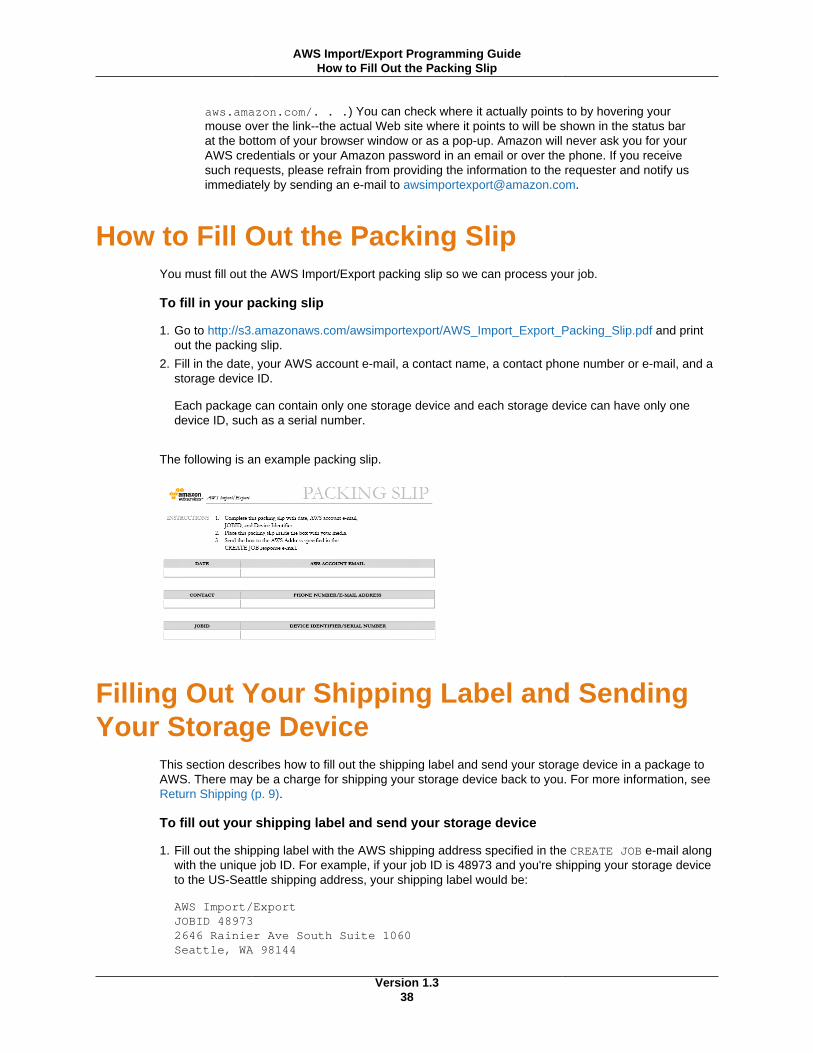
How to Fill Out the Packing SlipYou must fill out the AWS Import/Export packing slip so we can process your job.
To fill in your packing slip
1. Go to http://s3.amazonaws.com/awsimportexport/AWS_Import_Export_Packing_Slip.pdf and printout the packing slip.
2. Fill in the date, your AWS account e-mail, a contact name, a contact phone number or e-mail, and astorage device ID.
Each package can contain only one storage device and each storage device can have only onedevice ID, such as a serial number.
The following is an example packing slip.
Filling Out Your Shipping Label and SendingYour Storage Device
This section describes how to fill out the shipping label and send your storage device in a package toAWS. There may be a charge for shipping your storage device back to you. For more information, seeReturn Shipping (p. 9).
To fill out your shipping label and send your storage device
1. Fill out the shipping label with the AWS shipping address specified in the CREATE JOB e-mail alongwith the unique job ID. For example, if your job ID is 48973 and you're shipping your storage deviceto the US-Seattle shipping address, your shipping label would be:
AWS Import/ExportJOBID 489732646 Rainier Ave South Suite 1060Seattle, WA 98144

AWS Import/Export Programming GuideSend Us Your Feedback Now
Version 1.339
Important
The shipping label must include a valid job ID. If that information is missing, AWS will refusedelivery of your storage device and your carrier will process it as an undelivered package.For more information about the job ID, see Job (p. 7).
2. Fill in your return shipping address.Include a contact phone number in case we have a problem processing your storage device.
Note
You can ship your storage device to AWS from one address and have the device returnedto another address.
Important
If AWS Import/Export refuses the delivery of your package, the carrier uses the returnshipping address to return your storage device. After AWS processes your job, however, wereturn your storage device to the return address you specified in your manifest file, not thereturn address listed on your shipping label.
3. If you are shipping a storage device from a non-US address or are requesting that AWS returnyour device to a non-US address, you must also attach the AWS Import/Export Declaration Form toyour CREATE JOB email. To use this form, go to https://s3.amazonaws.com/awsimportexport/AWS%20Import_Export%20Declaration%20Form.pdf.
If your shipment does not comply with all of the requirements in the declaration form or you neglectto attach the AWS Import/Export Declaration Form, your CREATE JOB request will fail.
4. Ship your package using the carrier of your choice.
Important
If you are shipping from a non-US address, you must pay your shipping courier for the Duty/Taxes on your shipment. AWS will not accept any packages that have unpaid Duty/Taxes.You are responsible for shipping charges to AWS (including any applicable duty and taxes).Packages with unpaid duty and/or taxes will be denied upon arrival. If your Amazon S3bucket is located in the US or Northern California Region, you will also be responsible for anyapplicable duty and taxes on return shipments sent to addresses outside of the US. Theseduty and taxes will be charged directly by our return shipping carrier upon delivery of yourpackage.
Send Us Your Feedback NowYour input is important to us to help make our documentation helpful and easy to use. Please take aminute to give us your feedback on how well we were able to ship your storage device. Just click thisFeedback link. Thank you.

AWS Import/Export Programming GuideRequesting Job Status
Version 1.340
Managing Your Jobs
Topics
• Requesting Job Status (p. 40)
• Updating Your Job (p. 42)
• Canceling Your Job (p. 43)
• Viewing Log Files (p. 43)
This section discusses all of the tasks you can accomplish after creating a job and shipping yourstorage device.
Requesting Job StatusAfter shipping your storage device, you can check on the status of your job. To do that, you use theGET STATUS command.
There are two different status codes that the system tracks: your device status and your job status. Thetypical device status flow is:
1. NotReceived
2. AtAWS
3. Returned
The typical job status flow is:
1. Pending
2. InProgress
3. Completed
For more information about status, see GET STATUS.
To request status
1. Open your e-mail client and create a new e-mail.

AWS Import/Export Programming GuideRequesting Job Status
Version 1.341
Important
You must send the e-mail from the same AWS account you used to send the CREATE JOBe-mail.
2. Enter [email protected] into the TO field, GET STATUS in the Subject field, andJOBID: [job ID] in the body.
3. Click Send.
After approximately one business day you should receive an e-mail [email protected] with the subject RE: GET STATUS.
AWS Import/Export Programming GuideUpdating Your Job
Version 1.342
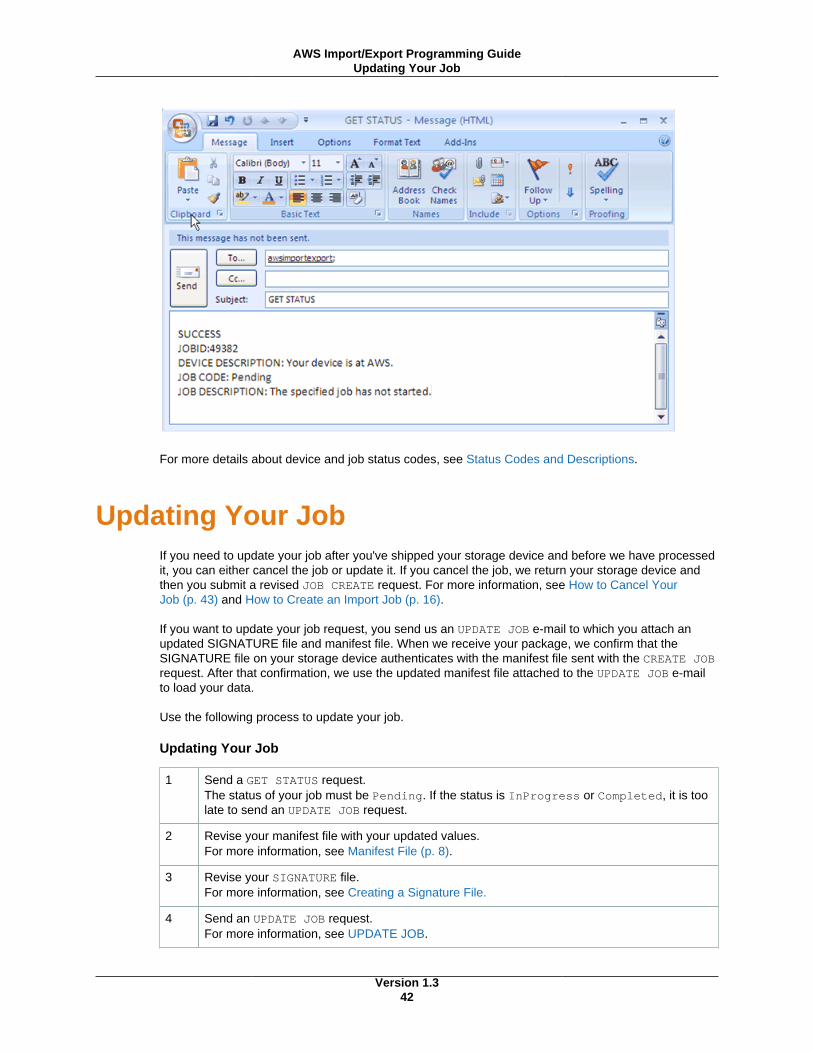
For more details about device and job status codes, see Status Codes and Descriptions.
Updating Your JobIf you need to update your job after you've shipped your storage device and before we have processedit, you can either cancel the job or update it. If you cancel the job, we return your storage device andthen you submit a revised JOB CREATE request. For more information, see How to Cancel YourJob (p. 43) and How to Create an Import Job (p. 16).
If you want to update your job request, you send us an UPDATE JOB e-mail to which you attach anupdated SIGNATURE file and manifest file. When we receive your package, we confirm that theSIGNATURE file on your storage device authenticates with the manifest file sent with the CREATE JOBrequest. After that confirmation, we use the updated manifest file attached to the UPDATE JOB e-mailto load your data.
Use the following process to update your job.
Updating Your Job
1 Send a GET STATUS request.The status of your job must be Pending. If the status is InProgress or Completed, it is toolate to send an UPDATE JOB request.
2 Revise your manifest file with your updated values.For more information, see Manifest File (p. 8).
3 Revise your SIGNATURE file.For more information, see Creating a Signature File.
4 Send an UPDATE JOB request.For more information, see UPDATE JOB.

AWS Import/Export Programming GuideCanceling Your Job
Version 1.343
Canceling Your JobYou can cancel a job anytime before we finish the data load. When you cancel a job, we return yourstorage device and send you an e-mail to confirm the cancellation.
If AWS has already received your storage device, you will be charged the per device handling fee. Ifthe data load has started you will be charged for all data-loading hours prior to processing the CANCELJOB command. There typically is a delay between your CANCEL JOB e-mail and when we cancel thejob. You are responsible for all device and transfer fees for the data loaded before we cancel the job.You will also incur any applicable return shipping charges if you cancel a job after you have shippedyour device to us. There are no refunds of transfer fees for data we have loaded.
Important
You cannot cancel a completed job.
To cancel a job
1. Send a GET STATUS request.
The status of your job must be Pending or InProgress. If the status is Completed, it is too late tosend a CANCEL JOB request.
2. Send a CANCEL JOB request.
Include in the body of the e-mail the job ID of the job you're canceling. For more information, seeCANCEL JOB.
Note
There is no option to restore your bucket to its previous state. If you want to delete the loadeddata, you need to write a program to traverse your import log and issue a Amazon S3 DELETEoperation on each object.
Viewing Log FilesFor each successful job, AWS Import/Export generates a log file. The log file is a UTF8 encodedCSV file that contains, among other things, information about each file loaded to or from your storagedevice.
With import jobs, AWS Import/Export saves the log files to the same Amazon S3 bucket as your data.With export jobs, AWS Import/Export saves the log files to bucket you specify with the export manifestfile parameter, logBucket. For more information, see Export Manifest File Parameters.
The log file name always ends with the phrase import-log- followed by your JOBID. For example, ifthe JOBID is 53TX4, the log file name would end in import-log-53TX4. By default, if you do not setlogPrefix in the manifest file, a job loaded to mybucket with the JOBID of 53TX4 loads the logs tohttp://mybucket.s3.amazonaws.com/import-log-53TX4. If you set logPrefix to logs/, thelog file location would be http://s3.amazonaws.com/mybucket/logs/import-log-53TX4.
Note
If you have a log file name with the same name as an existing Amazon S3 object, the newlog file overwrites the existing object. You can use the logPrefix field to prevent objectcollisions. For more information about logPrefix, see Export Manifest File.

AWS Import/Export Programming GuideSample Log File
Version 1.344
To view the log files
• Use S3curl or S3 Foxfire Organizer to export the log file contents.For more information, see Amazon S3 Bucket Creation (p. 13).
Sample Log FileThe following shows a sample import log file.
DateTime File Status Code Key MD5 BytesContent-Type
Tue 03 Feb200921:57:43GMT
"SIGNATURE"103 Ignore 90 application/octet-stream
Tue 03 Feb200921:57:43GMT
"Notice.txt" 200 OK "toady/images/Notice.txt"
f60fe317bc497b1204b327490959eb64
13 text/plain
Tue 03 Feb200921:57:43GMT
"README.txt"200 OK" toady/images/README.txt"
d5a46fa22596d2464effbabb19000e
13 text/plain
Tue 03 Feb200921:57:43GMT
"images/wookie1.jpg"
200 OK "toady/images/images-wookie1.jpg"
ccac0d031603ff1c2997703a64845
497 image/jpeg
Tue 03 Feb200921:57:43GMT
"images/chewie.GIF"
200 OK "toady/images/images-chewie.GIF"
5fc22dc594e0c5929c0b9585ba9e70
878 image/gif
Tue 03 Feb200921:57:43GMT
"images/resources/chewie.psd"
200 OK "toady/images/images-resources-chewie.psd"
130b64d171e9bbc2be117f189796c
524 application/octet-stream
Tue 03 Feb200921:57:43GMT
"images/chewie.TIF"
200 OK "toady/images/images-chewie.TIF"
823d17b05321b96f9174e3dcace7
458 image/tiff
For more examples of log files, see Examples (p. 46).
Log File FieldsThe following table describes the fields in the log file.
Field Description
DateTime The date and time when we processed a file, for example, Wed Nov 1211:07:34 PST 2008.
File The name of the file in the root directory of your storage device, for example,"/images/image.jpg".
Note
All File and Key values are surrounded by quotes.

AWS Import/Export Programming GuideStatus
Version 1.345
Field Description
Status Specifies either an AWS Import/Export status or one of the standard AmazonS3 REST web server HTTP status codes, for example, 200. For moreinformation, see AWS Import/Export Status Codes.
Code Specifies either an AWS Import/Export code, such as Ignored when theStatus is 103, or the standard Amazon S3 REST error codes, for example,OK.
Key Specifies where AWS Import/Export loads the file in Amazon S3. The keyincludes the bucket name and any prefix settings set in the manifest file, forexample, "/mybucket/myprefix/images/image.jpg".
Note
All File and Key values are enclosed in quotes.
MD5 The checksum of the object stored in Amazon S3 identified by Key, forexample, d2a22fcab097sample32c544.
Bytes The number of bytes stored in S3 for the object identified by Key, for example,57344.
Content-Type The content type of the key stored in Amazon S3, for example, image/jpeg.
StatusFor information about Amazon log file status codes, see Status Codes.

AWS Import/Export Programming GuideImport Example
Version 1.346
Appendix: Examples
Topics
• Import Example (p. 46)
• Export Examples (p. 52)
Import ExampleThis section walks you through creating three sample AWS Import/Export jobs and shows the manifestfile’s corresponding signature and log files. In these examples, the following files are at the rootdirectory of the storage device. The resulting log files illustrate how manifest fields effect the data load.
• /README
• /NOTICE.txt
• /images/wookie1.jpg
• /images/chewie.gif
• /images/chewie.tif
• /images/resources/chewie.psd
The following sections show different ways to create AWS Import/Export jobs.
Example – TSTD1The TSTD1 example demonstrates the default behavior using a manifest file with the minimumconfiguration options. The example files associated with job TSTD1 are:
• manifest-TSTD1.txt
• SIGNATURE-TSTD1
• secret-key.txt
• import-log-TSTD1.csv

AWS Import/Export Programming GuideExample – TSTD1
Version 1.347
These files are located in the examples directory. The following is the contents of manifest-TSTD1.txt file.
manifestVersion: 1.1bucket: toadyaccessKeyId: 13Q2729SAMPLE3FK02deviceId: 3QD0T87TeraseDevice: NoreturnAddress: name: Amazon.com ATTN Joe Random street1: 5555 5th Street city: Seattle stateOrProvince: WA postalCode: 98555 phoneNumber: 206-555-0000 country: USA
Important
Your return address must be a physical street address in the United States that UPS candeliver to.
Recreating the SIGNATURE-TSTD1 File
Use the following procedure to recreate the SIGNATURE-TSTD1 file.
To Recreate the SIGNATURE-TSTD1 file
1. On the command line, navigate to the directory where you decompressed the AWSImportExport.zip.
2. Enter the following, depending upon your operating system.
On Linux or MAC,
cat examples/secret-key.txt | java -jar lib/ASImportClientSignatureTool-1.0.jar examples/manifest-TSTD1.txt TSTD1 SIGNATURE
On Windows,
type examples\secret-key.txt | java -jar lib/AWSImportClientSignatureTool-1.0.jar examples\manifest-TSTD1.txt TSTD1 SIGNATURE
AWS Import/Export creates the signature file.
The following shows a sample SIGNATURE file.
version: 1.0signingMethod: HmacSHA1jobId: TSTD1signature: 5D2P6A0RJ06s6JnruTOSDiAkWUU=
TSTD1 Log File
After AWS Import/Export processes this job, the service saves the resulting log file to http://s3.amazonaws.com/toady/import-log-TSTD1. A copy of the log file was saved to the examplesdirectory as import-log-TSTD1.csv. The contents of the log file are shown in the following table.

AWS Import/Export Programming GuideExample – TSTD2
Version 1.348
DateTime File Status Code Key MD5 BytesContent-Type
Tue 03 Feb200921:57:43GMT
SIGNATURE 103 Ignored 90 text/plain
Tue 03 Feb200921:57:43GMT
Notice.txt 200 OK toady/images/Notice.txt
f60fe317bc497b1204b327094959eb64
13 text/plain
Tue 03 Feb200921:57:43GMT
README.txt 200 OK toady/images/README.txt
d5a46fa22596d2464eff10babb19000e
13 text/plain
Tue 03 Feb200921:57:43GMT
images/wookie1.jpg
200 OK toady/images/images-wookie1.jpb
ccac0d031603ff1c2994e07703a64845
447 image/jpeg
Tue 03 Feb200921:57:43GMT
images/chewie.GIF
200 OK toady/images/images-chewie.GIF
5fc22dc594e0c5929c090b9585ba9e70
848 image/gif
Tue 03 Feb200921:57:43GMT
images/resources/chewie.psd
200 OK toady/images/images-resources-chewie.psd
130b64d171e9bbc2a8dbe117f189796c
524 application/octet-stream
Tue 03 Feb200921:57:43GMT
images/chewie.TIF
200 OK toady/images/images-chewie.TIF
823d17b05321b968e01f9174e3dcace7
738 image/tiff
Example – TSTD2The TSTD2 example demonstrates the behavior associated with adding the following manifest fields:acl, prefix, and logPrefix, to the manifest file used in TSTD1. The example files associated withjob TSTD2 are:
• manifest-TSTD2.txt
• SIGNATURE-TSTD2
• secret-key.txt
• import-log-TSTD2.csv
These files are located in the examples directory. The following text shows the contents ofmanifest-TSTD2.txt.
manifestVersion: 1.1bucket: toadyaccessKeyId: 13Q2729SAMPLE3FK02deviceId: eQD0T87TeraseDevice: NoreturnAddress: name: Amazon.com ATTN Joe Random street1: 5555 5th Street city: Seattle stateOrProvince: WA
AWS Import/Export Programming GuideExample – TSTD2
Version 1.349
postalCode: 98555 phoneNumber: 206-555-0000 country: USAacl: public-readprefix: images/logPrefix: loadlogs-
Recreating the SIGNATURE-TSTD2 File
Use the following procedure to recreate the SIGNATURE-TSTD2 file.
To Recreate the SIGNATURE-TSTD2 file
1. On the command line, navigate to the directory where you decompressed AWSImportExport.zip.
2. Enter the following, depending upon your operating system.
On Linux or MAC
cat examples/secret-key.txt | java -jar lib/AWSImportClientSignatureTool-1.0.jar examples/manifest-TSTD2.txt TSTD2 SIGNATURE
On Microsoft Windows,
type examples\secret-key.txt | java -jar lib/AWSImportClientSignatureTool-1.0.jar examples\manifest-TSTD2.txt TSTD2 SIGNATURE
AWS Import/Export creates the SIGNATURE file.
The following shows a sample SIGNATURE file.
version: 1.0signingMethod: HmacSHA1jobId: TSTD2signature: nf5AnSdmfgW8fARxhuTi4WPjFzI=
TSTD2 Log File
After AWS Import/Export processes this job, the service saves the resulting log file to http://s3.amazonaws.com/toady/import-log-TSTD2. A copy of the log file was saved to the examplesdirectory as import-log-TSTD2.csv. The contents of the log file are shown in the following table.
DateTime File Status Code Key MD5 BytesContent-Type
Tue 03 Feb200921:57:43GMT
SIGNATURE 103 Ignored 90
Tue 03 Feb200921:57:43GMT
Notice.txt 200 OK toady/images/Notice.txt
f60fe317bc497b12004b327094959eb64
13 text/plain
Tue 03 Feb200921:57:43GMT
README.txt 200 OK toady/images/README.txt
d5a46fa22596d2464eff10babb19000e
13 text/plain

AWS Import/Export Programming GuideExample – TSTD3
Version 1.350
DateTime File Status Code Key MD5 BytesContent-Type
Tue 03 Feb200921:57:43GMT
images/wookie1.jpg
200 OK toady/images/images-wookie1.jpg
ccac0d031603ff1c94e07703a64845
444 image/jpeg
Tue 03 Feb200921:57:43GMT
images/chewie.GIF
200 OK toady/images/images-chewie.GIF
5f22dc594e0c592929c090b9585ba9e70
846 image/gif
Tue 03 Feb200921:57:43GMT
images/resources/chewie.psd
200 OK toady/images/images-resources-chewie.psd
130b64d171e9bbc28dbe117f189796c
590 application/octet-stream
Tue 03 Feb200921:57:43GMT
images/chewie.TIF
200 OK toady/images/images-chewie.TIF
823d17b05321b968e01f9174e3dcace7
734 image/tiff
Example – TSTD3The TSTD3 example load demonstrates the behavior of the following manifest fields: acl,contentTypes, prefix, and ignore. The example files associated with job TSTD3 are:
• manifest-TSTD3.txt
• SIGNATURE-TSTD3
• secret-key.txt
• import-log-TSTD3.csv
These files are located in the examples directory. The following text shows the contents ofmanifest-TSTD3.txt file.
manifestVersion: 1.1bucket: toadyaccessKeyId: 13Q2729SAMPLE3FK02deviceId: 3QD0T87TeraseDevice: NoreturnAddress: name: Amazon.com ATTN Joe Random street1: 5555 5th Street city: Seattle stateOrProvince: WA postalCode: 98555 phoneNumber: 206-555-0000 country: USAacl: public-readprefix: dropoffcontentTypes: jpg: application/octet-stream gif: application/octet-stream tif: application/octet-stream txt: text/htmlignore: - \.psd$
AWS Import/Export Programming GuideExample – TSTD3
Version 1.351
Recreating the SIGNATURE-TSTD3 File
Use the following procedure to recreate the SIGNATURE-TSTD3 file.
To Recreate the SIGNATURE-TSTD3 file
1. On the command line, navigate to the directory where you decompressed the AWSImportExport.zip.
2. Enter the following, depending upon your operating system.
On Linux or MAC,
cat examples/secret-key.txt | java -jar lib/AWSImportClientSignatureTool-1.0.jar examples/manifest-TSTD3.txt TSTD3 SIGNATURE
On Windows,
type examples\secret-key.txt | java -jar lib/AWSImportClientSignatureTool-1.0.jar examples\manifest-TSTD3.txt TSTD3 SIGNATURE
AWS Import/Export creates the signature file.
The following shows a sample SIGNATURE file.
version: 1.0signingMethod: HmacSHA1jobId: TSTD3signature: ZMS+GiePesKe0mz0MtCrPADdcGs=
TSTD3 Log File
After AWS Import/Export processes this job, the service saves the resulting log file to http://s3.amazonaws.com/toady/import-log-TSTD3. A copy of the log file was saved to the examplesdirectory as import-log-TSTD3.csv. The contents of the log file are shown in the following table.
DateTime File Status Code Key MD5 BytesContent-Type
Tue 03 Feb200921:57:43GMT
SIGNATURE 103 Ignored 90
Tue 03 Feb200921:57:43GMT
Notice.txt 200 OK toady/dropoffNotice.txt
386317bc497b12027094959eb64
13 text/html
Tue 03 Feb200921:57:43GMT
README.txt 200 OK toady/dropoffREADME.txt
4686fa22596d2464e0babb19000e
13 text/html
Tue 03 Feb200921:57:43GMT
images/wookie1.jpg
200 OK toady/dropoffimages/wookie1.jpg
586d031603ff1c2997703a64845
449 application/octet-stream
Tue 03 Feb200921:57:43GMT
images/chewie.GIF
200 OK toady/dropoffimages/chewie.GIF
89022dc594e0c5c090b585ba9e70
846 image/gif

AWS Import/Export Programming GuideExport Examples
Version 1.352
DateTime File Status Code Key MD5 BytesContent-Type
Tue 03 Feb200921:57:43GMT
images/resources/chewie.psd
108 Ignored 590
Tue 03 Feb200921:57:43GMT
images/chewie.TIF
200 OK toady/dropoffimages/chewie.TIF
8237897-21b968e0174e3dcace7
734 image/tiff
Note
The contentTypes field is case sensitive, so chewie.TIF and chewie.GIF were not pickedup by the gif or tif contentTypes filter.
The prefix field, dropoff, did not have a trailing forward slash, (/), so the key name did nothave a delimiter between dropoff and the loaded file path.
Export ExamplesTopics
• Export Files (p. 52)
• Example – TSTDA (p. 53)
• Example – TSTDB (p. 54)
This section walks through example AWS Import/Export jobs and shows the manifest file’scorresponding SIGNATURE and log files.
Export FilesThe following keys are referenced as part of each export job.
• /mybucket/README
• /mybucket /NOTICE.txt
• /mybucket /images/wookie1.jpg
• /mybucket /images/chewie.gif
• /mybucket /images/chewie.tif
• /mybucket /images/resources/chewie.psd
• /mybucket//backup/images/chewie.gif
• /lostbucket/bin/lost.rhtml
• /lostbucket/html/directory.html
• /lostbucket/images/hurley.jpg
• /lostbucket/images/john.jpg
• /lostbucket/images/kate.jpg
• /lostbucket/images/sawyer.jpg
• /lostbucket/index.html

AWS Import/Export Programming GuideExample – TSTDA
Version 1.353
Example – TSTDATopics
• Recreating the SIGNATURE-TSTDA File (p. 53)
• TSTDA Log File (p. 54)
The TSTDA example upload demonstrates the default behavior using a manifest file with the minimumconfiguration options. The example files associated with job TSTDA are:
• manifest-TSTDA.txt
• SIGNATURE-TSTDA
• secret-key.txt
• export-log-TSTDA.csv
These files are located in the examples directory. The following is the contents of manifest-TSTDA.txt file.
manifestVersion: 1.2accessKeyId: 13Q2729HYRYMYRB3FK02deviceId: 532404500021logBucket: mybucketfileSystem: FAT32operations: - exportBucket: mybucketreturnAddress: name: Amazon.com ATTN Joe Random street1: 1200 12th Ave S. city: Seattle stateOrProvince: WA postalCode: 98114 phoneNumber: 206-266-0000 country: USA
Recreating the SIGNATURE-TSTDA File
Use the following procedure to recreate the SIGNATURE-TSTDA file.
To Recreate the SIGNATURE-TSTDA file
1. On the command line, navigate to the directory where you decompressed theAWSExportPrivateBeta.zip.
2. Enter the following, depending upon your operating system.
On Linux or MAC,
cat examples/secret-key.txt | java -jar lib/AWSIngestionClientSignatureTool-1.0.jar examples/manifest-TSTDA.txt TSTDA SIGNATURE
On Windows,
type examples\secret-key.txt | java -jar lib/AWSIngestionClientSignatureTool-1.0.jar examples\manifest-TSTDA.txt TSTDA
AWS Import/Export creates the signature file.

AWS Import/Export Programming GuideExample – TSTDB
Version 1.354
The following shows a sample SIGNATURE file.
version: 1.0signingMethod: HmacSHA1jobId: TSTDAsignature: 5D2P6A0RJ06s6JnruTOSDiAkWUU=
TSTDA Log FileAfter AWS Import/Export processes this job, the service saves the resulting log file to http://s3.amazonaws.com/mybucket/export-log-TSTDA.csv.zip. A copy of the log file was savedto the examples directory as upload-log-TSTDA.csv. The contents of the log file are shown in thefollowing table.
DateTime File Status Code Key MD5 BytesContent-Type
Tue 03 Feb200921:57:43GMT
"mybucket/README.txt"
200 OK "mybucket/README.txt"
d5a46fa22596d2464eff10babb19000e
13 text/html
Tue 03 Feb200921:57:43GMT
"mybucket/NOTICE.txt"
200 OK "mybucket/NOTICE.txt"
f60fe317bc497b1204b327094959eb64
13 text/html
Tue 03 Feb200921:57:43GMT
"mybucket/images-wookie1.jpg"
200 OK "mybucket/images/wookie1.jpg"
ccac0d031603ff1c2994e07703a64845
447 image/jpeg
Tue 03 Feb200921:57:43GMT
"mybucket/images/chewie.gif"
200 OK "mybucket/images/chewie.gif"
5fc22dc594e0c5929c090b9585ba9e70
848 image/gif
Tue 03 Feb200921:57:43GMT
“mybucket/images/resources/chewie.psd”
200 OK “mybucket /images/resources/chewie.psd”
130b64d171e9bbc2a8dbe117f189796c
524 application/octet-stream
Tue 03 Feb200921:57:43GMT
“EXPORT-RECOVERY/0000/0000”
200 FilenameTooLong
“mybucket//backup/images/chewie.gif”
823d17b05321b968e01f9174e3dcace7
738 image/gif
Example – TSTDBTopics
• Recreating the SIGNATURE-TSTDB File (p. 55)
• TSTDB Log File (p. 56)
The TSTDB example upload demonstrates the default behavior using a manifest file with the followingconfiguration options: multiple buckets, targetDirectory, prefix, beginMarker, and endMarker.The example files associated with job TSTDB are:
• manifest-TSTDB.txt
• SIGNATURE-TSTDB
• secret-key.txt

AWS Import/Export Programming GuideExample – TSTDB
Version 1.355
• export-log-TSTDB.csv
These files are located in the examples directory. The following is the contents of manifest-TSTDB.txt file.
manifestVersion: 1.2accessKeyId: 13Q2729HYRYMYRB3FK02deviceId: 532404500021logBucket: myBucketlogPrefix: logs/fileSystem: NTFSoperations: - exportBucket: mybucket prefix: images targetDirectory: starwars/image-backup - exportBucket: lostbucket beginMarker: html/ endMarker: images/kate.jpgreturnAddress: name: Amazon.com ATTN Joe Random street1: 1200 12th Ave S. city: Seattle stateOrProvince: WA postalCode: 98114 phoneNumber: 206-266-0000 country: USA
Recreating the SIGNATURE-TSTDB File
Use the following procedure to recreate the SIGNATURE-TSTDB file.
To Recreate the SIGNATURE-TSTDB file
1. On the command line, navigate to the directory where you decompressed theAWSExportPrivateBeta.zip.
2. Enter the following, depending upon your operating system.
On Linux or MAC,
cat examples/secret-key.txt | java -jar lib/AWSIngestionClientSignatureTool-1.0.jar examples/manifest-TSTDB.txt TSTDB SIGNATURE
On Windows,
type examples\secret-key.txt | java -jar lib/AWSIngestionClientSignatureTool-1.0.jar examples\manifest-TSTDB.txt TSTDB
AWS Import/Export creates the signature file.
The following shows a sample SIGNATURE file.
version: 1.0signingMethod: HmacSHA1jobId: TSTDBsignature: 5D2P6A0RJ06s6JnruTOSDiAkWUU=
AWS Import/Export Programming GuideExample – TSTDB
Version 1.356
TSTDB Log FileAfter AWS Import/Export processes this job, the service saves the resulting log file to http://s3.amazonaws.com/mybucket/export-log-TSTDB.csv.zip. A copy of the log file is saved tothe examples directory as upload-log-TSTDB.csv. The contents of the log file are shown in thefollowing table.
DateTime File Status Code Key MD5 BytesContent-Type
Tue 03 Feb 200921:57:43 GMT
“starwars/image-backup/mybucket/images/wookie1.jpg”
200 OK “mybucket /images/wookie1.jpg”
d5a46fa22596d246f10babb19000e
13 image/jpeg
Tue 03 Feb 200921:57:43 GMT
“starwars/image-backup/mybucket/images/chewie.gif”
200 OK “mybucket/images/chewie.gif”
f60fe317bc497b12047094959eb64
13 image/gif
Tue 03 Feb 200921:57:43 GMT
“starwars/image-backup/mybucket /images/chewie.tif”
200 OK “mybucket/images/chewie.tif”
ccac0d031603ff1c4e07703a64845
447 image/tiff
Tue 03 Feb 200921:57:43 GMT
“starwars/image-backup/mybucket/images/resources/chewie.psd”
200 OK “mybucket /images/resources/chewie.psd”
5fc22dc594e0c5929cb9585ba9e70
848 application/octet-stream
Tue 03 Feb 200921:57:43 GMT
“lostbucket/html/directory.html”
200 OK “lostbucket/html/directory.html”
130b64d171e9bbc2ae117f189796c
524 text/html
Tue 03 Feb 200921:57:43 GMT
“lostbucket/images/hurley.jpg”
200 OK “lostbucket/images/hurley.jpg”
823d17b05321b968f9174e3dcace7
738 image/jpeg
Tue 03 Feb 200921:57:43 GMT
“lostbucket/images/john.jpg”
200 OK “lostbucket/images/john.jpg”
823d17b05321b968e9174e3dcace7
615 image/jpeg
Tue 03 Feb 200921:57:43 GMT
“lostbucket/images/kate.jpg”
200 OK “lostbucket/images/kate.jpg”
5fc22dc594e0c5929c90b9585ba9e70
345 image/jpeg
AWS Import/Export Programming Guide
Version 1.357
Appendix: File Extension to MimeTypes
The following table is derived from the Internet Assigned Numbers Authorities MIME Media Types website. For more information, go to http://www.iana.org/assignments/media-types. AWS Import/Exportdoes a case insensitive lookup against this table. File types not included in this table use the AmazonS3 default, Content-Type application/octet-stream.
Attribute Description
ai application/postscript
aif audio/x-aiff
aifc audio/x-aiff
aiff audio/x-aiff
asc text/plain
asf video/x-ms-asf
asx video/x-ms-asf
au audio/basic
avi video/x-msvideo
bcpio application/x-bcpio
bin application/octet-stream
bmp image/bmp
bz2 application/x-bzip2
cdf application/x-netcdf
chrt application/x-kchart
class application/octet-stream
cpio application/x-cpio
cpt application/mac-compactpro

AWS Import/Export Programming Guide
Version 1.358
Attribute Description
csh application/x-csh
css text/css
dcr application/x-director
dir application/x-director
djv image/vnd.djvu
djvu image/vnd.djvu
dll application/octet-stream
dms application/octet-stream
doc application/msword
dvi application/x-dvi
dxr application/x-director
eps application/postscript
etx text/x-setext
exe application/octet-stream
ez application/andrew-inset
flv video/x-flv
gif image/gif
gtar application/x-gtar
gz application/x-gzip
hdf application/x-hdf
hqx application/mac-binhex40
htm text/html
html text/html
ice x-conference/x-cooltalk
ief image/ief
iges model/iges
igs model/iges
img application/octet-stream
iso application/octet-stream
jad text/vnd.sun.j2me.app-descriptor
jar application/x-java-archive

AWS Import/Export Programming Guide
Version 1.359
Attribute Description
jnlp application/x-java-jnlp-file
jpe image/jpeg
jpeg image/jpeg
jpg image/jpeg
js application/x-javascript
kar audio/midi
kil application/x-killustrator
kpr application/x-kpresenter
kpt application/x-kpresenter
ksp application/x-kspread
kwd application/x-kword
kwt application/x-kword
latex application/x-latex
lha application/octet-stream
lzh application/octet-stream
m3u audio/x-mpegurl
man application/x-troff-man
me application/x-troff-me
mesh model/mesh
mid audio/midi
midi audio/midi
mif application/vnd.mif
mov video/quicktime
movie video/x-sgi-movie
mp2 audio/mpeg
mp3 audio/mpeg
mpe video/mpeg
mpeg video/mpeg
mpg video/mpeg
mpga audio/mpeg
ms application/x-troff-ms

AWS Import/Export Programming Guide
Version 1.360
Attribute Description
msh model/mesh
mxu video/vnd.mpegurl
nc application/x-netcdf
odb application/vnd.oasis.opendocument.database
odc application/vnd.oasis.opendocument.chart
odf application/vnd.oasis.opendocument.formula
odg application/vnd.oasis.opendocument.graphics
odi application/vnd.oasis.opendocument.image
odm application/vnd.oasis.opendocument.text-master
odp application/vnd.oasis.opendocument.presentation
ods application/vnd.oasis.opendocument.spreadsheet
odt application/vnd.oasis.opendocument.text
ogg application/ogg
otg application/vnd.oasis.opendocument.graphics-template
oth application/vnd.oasis.opendocument.text-web
otp application/vnd.oasis.opendocument.presentation-template
ots application/vnd.oasis.opendocument.spreadsheet-template
ott application/vnd.oasis.opendocument.text-template
pbm image/x-porinformaltable-bitmap
pdb chemical/x-pdb
pdf application/pdf
pgm image/x-porinformaltable-graymap
pgn application/x-chess-pgn
png image/png
pnm image/x-porinformaltable-anymap
ppm image/x-porinformaltable-pixmap
ppt application/vnd.ms-powerpoint
ps application/postscript
qt video/quicktime
ra audio/x-realaudio
ram audio/x-pn-realaudio
AWS Import/Export Programming Guide
Version 1.361
Attribute Description
ras image/x-cmu-raster
rgb image/x-rgb
rm audio/x-pn-realaudio
roff application/x-troff
rpm application/x-rpm
rtf application/rtf
rtf text/rtf
rtx text/richtext
sgm text/sgml
sgml text/sgml
sh application/x-sh
shar application/x-shar
silo model/mesh
sis application/vnd.symbian.install
sit application/x-stuffit
skd application/x-koan
skm application/x-koan
skp application/x-koan
skt application/x-koan
smi application/smil
smil application/smil
snd audio/basic
so application/octet-stream
spl application/x-futuresplash
src application/x-wais-source
stc application/vnd.sun.xml.calc.template
std application/vnd.sun.xml.draw.template
sti application/vnd.sun.xml.impress.template
stw application/vnd.sun.xml.writer.template
sv4cpio application/x-sv4cpio
sv4crc application/x-sv4crc

AWS Import/Export Programming Guide
Version 1.362
Attribute Description
swf application/x-shockwave-flash
sxc application/vnd.sun.xml.calc
sxd application/vnd.sun.xml.draw
sxg application/vnd.sun.xml.writer.global
sxi application/vnd.sun.xml.impress
sxm application/vnd.sun.xml.math
sxw application/vnd.sun.xml.writer
t application/x-troff
tar application/x-tar
tcl application/x-tcl
tex application/x-tex
texi application/x-texinfo
texinfo application/x-texinfo
tgz application/x-gzip
tif image/tiff
tiff image/tiff
torrent application/x-bittorrent
tr application/x-troff
tsv text/tab-separated-values
txt text/plain
ustar application/x-ustar
vcd application/x-cdlink
vrml model/vrml
wav audio/x-wav
wax audio/x-ms-wax
wbmp image/vnd.wap.wbmp
wbxml application/vnd.wap.wbxml
wm video/x-ms-wm
wma audio/x-ms-wma
wml text/vnd.wap.wml
wmlc application/vnd.wap.wmlc

AWS Import/Export Programming Guide
Version 1.363
Attribute Description
wmls text/vnd.wap.wmlscript
wmlsc application/vnd.wap.wmlscriptc
wmv video/x-ms-wmv
wmx video/x-ms-wmx
wrl model/vrml
wvx video/x-ms-wvx
xbm image/x-xbitmap
xht application/xhtml+xml
xhtml application/xhtml+xml
xls application/vnd.ms-excel
xml text/xml
xpm image/x-xpixmap
xsl text/xml
xwd image/x-xwindowdump
xyz chemical/x-xyz
zip application/zip
AWS Import/Export Programming Guide
Version 1.364
Glossary
Access Control List (ACL) Each bucket and object in Amazon S3 has an ACL that defines itsaccess control policy. The policy defines what each type of usercan do, including write and read permissions.
authentication The process of proving your identity to the system.
Access Key ID A string distributed by AWS that uniquely identifies an AWSdeveloper.
bucket A container for objects stored in AWS Import/Export. Everyobject is contained within a bucket. For example, if the objectnamed photos/puppy.jpg is stored in the johnsmith bucket,then it is addressable using the URL http://johnsmith/S3.amazonaws.com/photos/puppy.jpg
HMAC The Hash Message Authentication Code used to authenticate amessageThe HMAC is calculated using a standard, cryptographic hashalgorithm, such as SHA-1. This algorithm uses a key value toperform the encryption. In AWS Import/Export, that key is yourSecret Access Key. For that reason, your Secret Access Key mustremain a shared secret between you and AWS Import/Export.
import log The import log is a report that includes details about the processingof your data by AWS Import/Export.
import/export station An import/export station is a machine that uploads or downloadsyour data to or from Amazon S3.
job ID Job IDs are used with the logPrefix and prefix fields. A JobIdis a five character alphanumeric string that uniquely identifies onestorage device in your shipment. AWS issues jobId in response toa CREATE JOB e-mail command.
key A key is a sequence of unicode characters whose UTF-8 encodingis at most 1024 bytes long. If a key, for example, logPrefix + import-log-JOBID, is longer than 1024 bytes, AWS Import/Export returnsan InvalidManifestField error.
AWS Import/Export Programming Guide
Version 1.365
object The fundamental entities stored in Amazon S3. Objects consist ofobject data and metadata. The data portion is opaque to AmazonS3.
Secret Access Key A string distributed by AWS that uniquely identifies an AWSdeveloper.The Secret Access Key is a shared secret between a developerand AWS. The Secret Access Key is used as the key in the HMACalgorithm that encrypts the signature.
service endpoint The host and port with which you are trying to communicate withinthe destination URL.
Signature A URL-encoded string composed of request parameters and theirvalues encrypted using an HMAC algorithm.Signatures are used to authenticate and safeguard requests.
SIGNATURE File A file you copy to the root directory of your storage device. The filecontains a job ID, manifest file, and a signature (p. 65).
AWS Import/Export Programming GuideTypographical Conventions
Version 1.366
Document Conventions
This section lists the common typographical and symbol use conventions for AWS technicalpublications.
Typographical ConventionsThis section describes common typographical use conventions.
Convention Description/Example
Call-outs A call-out is a number in the body text to give you a visual reference. Thereference point is for further discussion elsewhere.
You can use this resource regularly.
Code in text Inline code samples (including XML) and commands are identified with aspecial font.
You can use the command java -version.
Code blocks Blocks of sample code are set apart from the body and markedaccordingly.
# ls -l /var/www/html/index.html-rw-rw-r-- 1 root root 1872 Jun 21 09:33 /var/www/html/index.html# dateWed Jun 21 09:33:42 EDT 2006
Emphasis Unusual or important words and phrases are marked with a special font.
You must sign up for an account before you can use the service.
Internal crossreferences
References to a section in the same document are marked.
See Document Conventions (p. 66).
Logical values,constants, and regularexpressions, abstracta
A special font is used for expressions that are important to identify, but arenot code.
If the value is null, the returned response will be false.

AWS Import/Export Programming GuideTypographical Conventions
Version 1.367
Convention Description/Example
Product and featurenames
Named AWS products and features are identified on first use.
Create an Amazon Machine Image (AMI).
Operations In-text references to operations.
Use the GetHITResponse operation.
Parameters In-text references to parameters.
The operation accepts the parameter AccountID.
Response elements In-text references to responses.
A container for one CollectionParent and one or moreCollectionItems.
Technical publicationreferences
References to other AWS publications. If the reference is hyperlinked, it isalso underscored.
For detailed conceptual information, see the Developer Guide.
User entered values A special font marks text that the user types.
At the password prompt, type MyPassword.
User interface controlsand labels
Denotes named items on the UI for easy identification.
On the File menu, click Properties.
Variables When you see this style, you must change the value of the content whenyou copy the text of a sample to a command line.
% ec2-register <your-s3-bucket>/image.manifest
See also the following symbol convention.

AWS Import/Export Programming GuideSymbol Conventions
Version 1.368
Symbol ConventionsThis section describes the common use of symbols.
Convention Symbol Description/Example
Mutuallyexclusiveparameters
(Parentheses | and| vertical | bars)
Within a code description, bar separators denote options fromwhich one must be chosen.
% data = hdfread (start | stride | edge)
Optionalparameters
XML variabletext
[square brackets] Within a code description, square brackets denote completelyoptional commands or parameters.
% sed [-n, -quiet]
Use square brackets in XML examples to differentiate themfrom tags.
<CustomerId>[ID]</CustomerId>
Variables <arrow brackets> Within a code sample, arrow brackets denote a variable thatmust be replaced with a valid value.
% ec2-register <your-s3-bucket>/image.manifest
AWS Import/Export Programming Guide
Version 1.369
IndexBbucket, 7
Cconcepts
keys, 7
Ddevice requirements, 35downloading data, 24
Eexample export, 53, 54example job cancellation
canceling a job, 43example load, 46, 48, 50example update job
updating a job, 42exporting data, 24Exporting data, 24
Ffeatures, 6
Iimport manifest file, 21
Jjob, 7job, creating
creating a job, 16, 16, 24, 24, 46
Kkeys, 7
Lloading data, 16, 16log file fields, 44log file sample, 44
Mmanifest file, 8manifest file format, 21manifest file, import, 21
Oobject, 7
SSIGNATURE file, 8
SIGNATURE file, creating, 22