Produce desktop published documents (Publisher 2013… Sample... · Produce desktop published...
33
Produce desktop published documents (Publisher 2013) 2 nd Edition This workbook supports BSBITU309A Produce desktop published documents in the BSB07 Business Services Training Package. © Millbank Investments Ltd, NZ, June 2015 Author: Software Publications writing team ISBN 978-1-922241-56-6 Disclaimer All rights reserved. No part of this publication may be reproduced or transmitted in any form or by any means, electronic or mechanical, including photocopying, scanning, recording, or any information storage and retrieval system, without permission in writing from Millbank Investments Ltd, NZ or Software Publications Pty Ltd. No patent liability is assumed with respect to the use of the information contained herein. While every precaution has been taken in the preparation of this book, the publisher and authors assume no responsibility for errors or omissions. Neither is any liability assumed for damages resulting from the use of the information contained herein. Software Publications Pty Ltd (ABN 75 078 026 150) Head Office — Sydney Unit 3 25 Gibbes Street Chatswood NSW 2067 www.softwarepublications.com.au
Transcript of Produce desktop published documents (Publisher 2013… Sample... · Produce desktop published...

Produce desktop published documents (Publisher 2013) 2nd Edition
This workbook supports BSBITU309A Produce desktop published documents in the BSB07 Business Services Training Package.
© Millbank Investments Ltd, NZ, June 2015
Author: Software Publications writing team
ISBN 978-1-922241-56-6
Disclaimer
All rights reserved. No part of this publication may be reproduced or transmitted in any form or by any means, electronic or mechanical, including photocopying, scanning, recording, or any information storage and retrieval system, without permission in writing from Millbank Investments Ltd, NZ or Software Publications Pty Ltd. No patent liability is assumed with respect to the use of the information contained herein. While every precaution has been taken in the preparation of this book, the publisher and authors assume no responsibility for errors or omissions. Neither is any liability assumed for damages resulting from the use of the information contained herein.
Software Publications Pty Ltd (ABN 75 078 026 150)
Head Office — Sydney Unit 3 25 Gibbes Street Chatswood NSW 2067
www.softwarepublications.com.au
© Millbank Investments Ltd, 2014 Study Guide BSBITU309A i
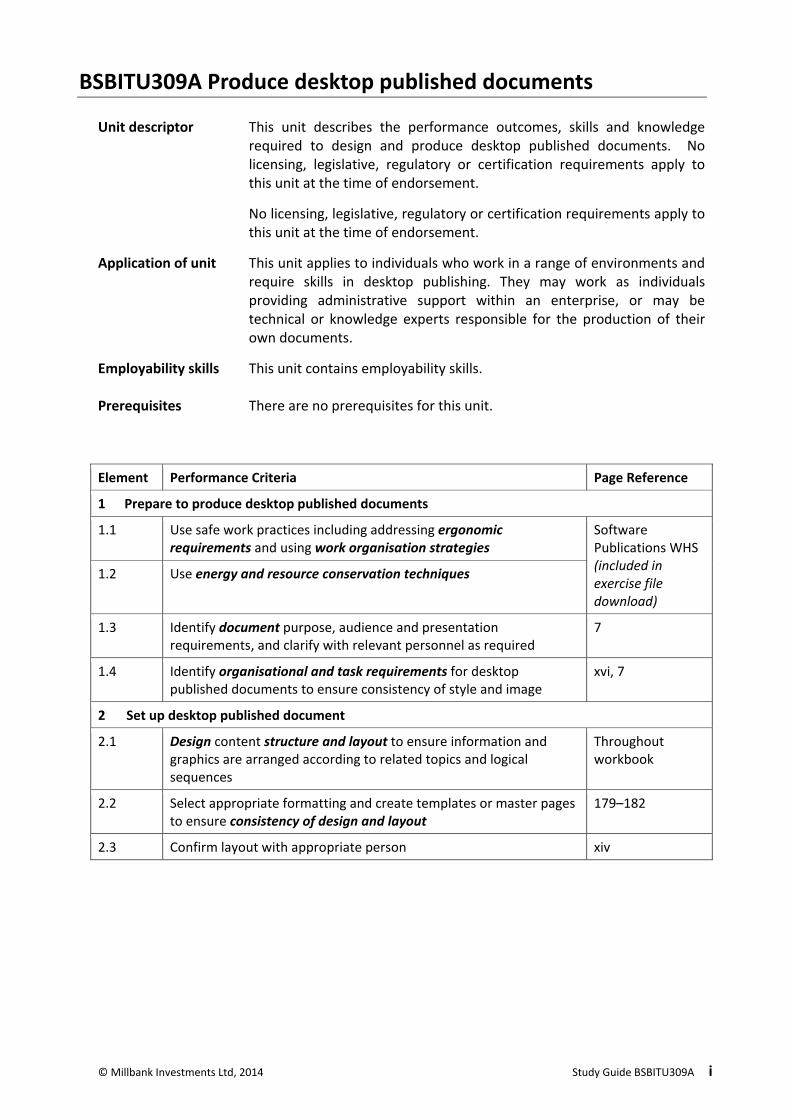
BSBITU309A Produce desktop published documents
Unit descriptor This unit describes the performance outcomes, skills and knowledge required to design and produce desktop published documents. No licensing, legislative, regulatory or certification requirements apply to this unit at the time of endorsement.
No licensing, legislative, regulatory or certification requirements apply to this unit at the time of endorsement.
Application of unit This unit applies to individuals who work in a range of environments and require skills in desktop publishing. They may work as individuals providing administrative support within an enterprise, or may be technical or knowledge experts responsible for the production of their own documents.
Employability skills This unit contains employability skills.
Prerequisites There are no prerequisites for this unit.
Element Performance Criteria Page Reference
1 Prepare to produce desktop published documents
1.1 Use safe work practices including addressing ergonomic requirements and using work organisation strategies
Software Publications WHS (included in exercise file download)
1.2 Use energy and resource conservation techniques
1.3 Identify document purpose, audience and presentation requirements, and clarify with relevant personnel as required
7
1.4 Identify organisational and task requirements for desktop published documents to ensure consistency of style and image
xvi, 7
2 Set up desktop published document
2.1 Design content structure and layout to ensure information and graphics are arranged according to related topics and logical sequences
Throughout workbook
2.2 Select appropriate formatting and create templates or master pages to ensure consistency of design and layout
179–182
2.3 Confirm layout with appropriate person xiv

ii Study Guide BSBITU309A © Millbank Investments Ltd, 2014
Element Performance Criteria Page Reference
3 Create desktop published document
3.1 Prepare, format and enter required text Throughout workbook
3.2 Import text from other applications and resolve any formatting issues
73, 102, 112, 122, 124, 130, 133, 154, 164
3.3 Scan or import graphics from other applications and resolve any formatting issues
72–73, 78–80, 179–181
3.4 Arrange text and graphics according to organisational and task requirements
Throughout workbook
4 Finalise desktop published document
4.1 Review text for possible errors and omissions, and resolve any issues 14, 134, 136, 163, 188 4.2 Check page order, structure and linkages
4.3 Produce completed document in required format 29, 51
4.4 Name and store text documents, in accordance with organisational requirements and exit the application without information loss/damage
v–ix, 21, 36
4.5 Prepare text documents within designated time lines and organisational requirements for speed and accuracy
vii, 85, 116, 167
4.6 Use manuals, user documentation and online help to overcome problems with document design and production
82–83

© Millbank Investments Ltd, 2014 Study Guide BSBITU309A iii
Required Skills and Knowledge This section describes the skills and knowledge required for this unit.
Required skills
• communication skills to clarify requirements of documents
• culturally appropriate communication skills to relate to people from diverse backgrounds and people with diverse abilities
• editing and proofreading skills to check own work for accuracy against original
• keyboarding skills to enter text and numerical data
• literacy skills to read and understand the organisation's procedures and to use models or exemplars to produce a range of documents
• problem-solving skills to edit documents and to resolve issues of consistency of design.
Required knowledge
• energy and resource conservation techniques
• organisational requirements for ergonomics, work periods and breaks
• organisational style guides
• purposes, uses and functions of desktop publishing software
• styles and their effect on formatting, readability and appearance of document.

iv Study Guide BSBITU309A © Millbank Investments Ltd, 2014
Range Statement The range statement relates to the unit of competency as a whole. It allows for different work environments and situations that may affect performance. Bold italicised wording, if used in the performance criteria, is detailed below. Essential operating conditions that may be present with training and assessment (depending on the work situation, needs of the candidate, accessibility of the item, and local industry and regional contexts) may also be included.
Variable Scope Pages Ergonomic requirements may include:
avoiding radiation from computer screens
Software Publications WHS (included in exercise file download)
chair height, seat and back adjustment document holder footrest keyboard and mouse position lighting noise minimisation posture screen position workstation height and layout
Work organisation strategies may include:
exercise breaks mix of repetitive and other activities
rest periods
Energy and resource conservation techniques may include:
double-sided paper use recycling used and shredded paper re-using paper for rough drafts (observing confidentiality requirements) utilising power-save options for equipment
Documents may include:
brochures Throughout workbook calendars n/a faxes n/a flyers Throughout workbook forms n/a mail merge documents, including labels 182–188, 200–208 memos n/a multi-page letters n/a promotional material Throughout workbook reports n/a schedules n/a tables 147–150

© Millbank Investments Ltd, 2014 Study Guide BSBITU309A v
Variable Scope Pages Organisational and task requirements may include:
company colour scheme
xv–17
company logo consistent corporate image content restrictions established guidelines and procedures for document production house styles observing copyright legislation xiii organisation name, time, date, document title, filename or other fields in headers and footers
159–163
templates 179–182 Design may include:
balance
7–14, throughout workbook
diversity relative positioning of graphics, headings and white space simplicity text flow typography
Structure and layout may include:
boxes Throughout workbook colour Throughout workbook columns 124, throughout workbook drawing 42, throughout workbook graphics Throughout workbook headings Throughout workbook letter and memo conventions page layout Throughout workbook photographs Throughout workbook typeface Throughout workbook white space Throughout workbook
Consistency of design and layout may include:
annotated references borders Throughout workbook
bulleted and numbered lists 119–122, throughout workbook
captions n/a consistency with other business documents xv–xvi footnotes and endnotes n/a indentations 119, throughout workbook page numbers 159–163 spacings Throughout workbook font styles and point size Throughout workbook

vi Study Guide BSBITU309A © Millbank Investments Ltd, 2014
Variable Scope Pages Naming and storing documents may include:
authorised access ix file and folder names which identify requirements such as the operator, author, section or date
v–vi
filing locations v–vi file names according to organisational procedure v–vi
file names which are easily identifiable in relation to the content v–vi
organisational policy for backing up files storage in folders and sub-folders viii
organisational policy for filing hard copies of documents vii
security and password protection ix storage on disk drives, USBs, CD-ROM, tape back-up to server ix
Designated time lines may include:
time line agreed with internal or external client
vii, 85, 116, 167 time line agreed with supervisor or person requiring document organisational time line e.g. deadline requirements

© Millbank Investments Ltd, 2014 Study Guide BSBITU309A vii
Evidence Guide The evidence guide provides advice on assessment and must be read in conjunction with the performance criteria, required skills and knowledge, range statement and the assessment guidelines for the Training Package.
Critical aspects for assessment and evidence required to demonstrate competency in this unit
Evidence of the following is essential: • knowledge of document design and layout principles • producing desktop published documents.
Context of and specific resources for assessment
Assessment must ensure: • access to office equipment and resources in a workplace or
simulated environment • access to samples of relevant workplace desktop published
documents.
Method of assessment A range of assessment methods should be used to assess practical skills and knowledge. The following examples are appropriate for this unit: • direct questioning combined with review of portfolios of
evidence and third party workplace reports of on-the-job performance by the candidate
• review of desktop published documents • demonstration of techniques • oral or written questioning to assess knowledge of desktop
publishing software functions
Guidance information for assessment
Holistic assessment with other units relevant to the industry sector, workplace and job role is recommended, for example: • general administration units • other IT use units.

viii Study Guide BSBITU309A © Millbank Investments Ltd, 2014
Employability Skills Employability Skills for BSB30112: Certificate III in Business
Employability Skill Industry/enterprise requirements for this qualification include
How this Employability Skill is covered
Communication • writing a range of simple documentation and communications
Writing a range of simple communications is described throughout the workbook
Teamwork • completing individual tasks to support team goals
• conveying workplace procedures and work instructions to team members
Page vii describes the use of timelines. Page xii describes the use of procedures manuals.
Problem solving • using manuals and other documentation to overcome problems with information technology or other office equipment
Page xii describes the use of manuals. Pages 82–83 describe the use of Publisher Help.
Initiative and enterprise
• completing individual tasks to support team goals
• conveying workplace procedures and work instructions to team members
Page vii describes the use of timelines. Page xii describes the use of procedures manuals.
Planning and Organising
• contributing to planning processes with team members to meet expected outcomes
Page vii describes teamwork and planning
Self-management • identifying development needs and seeking training to fill needs
• monitoring and recording the performance of own work area
n/a
Learning • developing a comprehensive knowledge and understanding of products and services
Understanding of publication production occurs throughout the workbook
Technology • using word processing packages, spreadsheets and/or databases to produce written correspondence and reports
Throughout workbook

xiv Office Procedures © Millbank Investments Ltd, 2014
Work Request Forms
In an efficient organisation a work request form will be given by an author to computer staff regarding tasks to be completed. This generally displays the information shown at the top of the form below.
Always ensure you clarify the requirements for the document with the author if there is anything that you do not understand. Requirements include who the document is for, why it is needed, the style or layout, where it is to be stored and any security requirements.
When you are happy that you understand the instructions, it is a good idea to sketch out a plan based on the requirements given to you. An example of publication requirements and a publication plan based on them are shown below. A blank publication plan has been provided with the exercise files for this workbook (Publication Plan).
WORK REQUEST FORM
Author’s Name: ..........................................................
Date: ................................................................
Date Required: ................................................................................
No. of Copies: ...................................................................................
Instructions: Please create an advert for Mark Jones’ law firm, to appear in the local directory. Include address, phone and fax numbers and list the legal services that the firm specialises in. Because the advert is to appear in a directory, the company name and phone number must stand out.
Publication Plan: Name File name
Design Concepts: Consider layout and design concepts and includes notes in the space provided below as to how you will ensure the publication follows the principles of good design.
..........................................................................................................................................................
..........................................................................................................................................................
..........................................................................................................................................................
Publication Purpose: ........................................................................................................................
Target Audience: .......................................................................................................................
Paper Size & Orientation: ................................................................................................................
Supplied Content: ............................................................................................................................
Sketch
Lisa Allinson Today
1
Hamish Williams JonesM_Ad_Aug2014
Formal font type, prominent company name and phone number, flow from name to
services, balanced with phone number and address details, white space for readability.
Ad for Mark Jones (lawyer) in local directory
People seeking legal services
Single column landscape advertisement
See work request form
Mark Jones Phone Fax
Address details here
List of specialised work
LAWYER

© Millbank Investments Ltd, 2014 Office Procedures xv
Consistency Techniques
Templates A template is a read-only file which forms the basis of a new publication. When a new publication is created based on the template, the formatting in the template is applied to the new publication. This formatting may include:
• font styles
• paragraph spacing
• paragraph numbering/bullet styles
• paper size
• margin sizes.
The template may also contain text which will be included in every publication based on the template. For example, an organisation’s contact details may be included at the top of every publication.
Styles are often set up in a template for ease of use and to ensure consistent formatting.
Styles A style is a set of formatting instructions combined into a meaningful name that can be applied easily to text. For example, formatting instructions for a heading that is Arial, 18 pt, left aligned and bold, could be assigned as Heading 1. This can then be applied from the Styles gallery on the Home Ribbon to all text requiring this formatting. Examples are provided below.
Heading 1 Heading 1 (Cambria 18 pt, bold, 6 pt spacing after)
Heading 2 Heading 2 (Cambria 15 pt, bold, 6 pt spacing after)
Normal Text Normal (Calibri 10 pt, Justified, 10 pt spacing after)
The organisation you work for may have house styles which have been created to ensure all publications created by the organisation have a uniform look. These may be included in templates or you may be required to set them yourself.
Logos A company logo can be inserted into a range of publications, such as a brochure or an advertisement. This adds to consistency and immediately identifies the company which produced the publication.
Colour Schemes Your company may have a colour scheme which is representative of the company. The use of colour can add interest and draw attention to a publication. The company colours can be used on letterheads, brochures, for heading styles, etc.

xvi Office Procedures © Millbank Investments Ltd, 2014
Other Consistency Tips Your organisation may have other requirements for written documents. For example do you use one or two spaces after full stops? Should you use short sentences or make use of commas (,) or semicolons (;)? When should you use capital letters? If your company has a procedures manual (defined on page xii) this may contain this sort of information as well as sample documents and the formats used.
The following documents show examples of organisational style requirements of formatting for Software Publications Pty Ltd. Notice the same company logo, colour scheme, etc. are used throughout.

58 SECTION 2 © Millbank Investments Ltd, 2014
Drawing and Formatting Shapes
The shapes tools enable you to draw boxes, circles, lines and various other shape types. Shapes can be inserted into a publication from the Insert Ribbon Illustrations Group or when the Drawing Tools Format Ribbon is displayed, from the Insert Shapes Group. The following exercises will show you how to draw, resize, move and format drawing objects.
Line
Exercise 28 Create a blank A4 portrait publication. On the Insert Ribbon click on the Shapes button 1
from the Lines section click on Line .
Move the mouse pointer to the left margin of the publication at approximately 2.5 cm on the 2vertical ruler.
Hold down the Shift key, then click and drag to the right margin of the publication, as shown 3below.
Release the left mouse button. A line will be drawn at the top of the page and the Drawing 4Tools Format Ribbon will display.
Leave the publication open for the next exercise. 5

© Millbank Investments Ltd, 2014 SECTION 2 59
Rectangle
Exercise 29
Using the publication created in Exercise 28, press F9 to zoom into the line. 1
From the Insert Shapes button on the Insert Ribbon, click on the More button and then 2click on the Rectangle .
Move the mouse pointer to the top left corner of the page margins. 3
Click and drag diagonally from the left margin of the publication to create a box as displayed 4below, then release the left mouse button.
Right click on the rectangle and select . On the Size tab, adjust the 5Height: to 2 cm and the Width: to 7 cm. Click OK.
Position the mouse pointer over the rectangle so that the Move mouse pointer displays then 6click and drag the box to the right so the right side of the box is positioned at the centre of the page. Ensure the line is vertically centred in the box as shown below. Release the left mouse button.
Save the publication with the name Kensington Letterhead. 7
Leave the publication open for the next exercise. 8

60 SECTION 2 © Millbank Investments Ltd, 2014
Applying a Shape Style A number of shape styles are provided in Publisher 2013 that allows you to quickly apply line colour, weight and fill colour to the selected shape.
Exercise 30
Using the publication Kensington Letterhead, check the rectangle is still selected. From the 1Drawing Tools Format Ribbon click on the More button from the Shape Styles Group.
From the styles displayed click on Solid Fill, Compound Outline - Dark. The selected style will 2be applied to the rectangle.
Leave the publication open for the next exercise. 3
Applying Line Weight
Exercise 31
Using the publication Kensington Letterhead, select the line and from the Drawing Tools 1
Format Ribbon click on the of Shape Outline button .
Position the mouse pointer over and from the resulting line 2weights select 3 pt. The line weight will be applied.
Click on and leave the publication open for the next exercise. 3
Rounded Rectangle
Exercise 32
Using the publication Kensington Letterhead, zoom to Page Width, i.e. from the View 1
Ribbon click on the Page Width button to view the top portion of the page.
From the Drawing Tools Format Ribbon click on the More button from the Insert Shapes 2Group and from the Basic Shapes section click on Rounded Rectangle .
Move the mouse pointer to near the top left corner of the box. 3
Click and drag diagonally on top of the existing box as shown below, then release the left 4mouse button.
The rectangle with rounded corners will be selected (handles appear around the object).
Leave the publication open for the next exercise. 5

© Millbank Investments Ltd, 2014 SECTION 2 61
Applying a Fill
Exercise 33
Using the publication Kensington Letterhead, check the rounded rectangle is selected. Click 1
on the of the Shape Fill button .
Select Accent 5 (White) from the colours provided. A white fill will be added to the rounded 2rectangle.
An adjustable handle in the shape of a yellow diamond appears in the top left corner of the rounded rectangle.
By dragging the handle to the left or right you can increase/decrease how round the corners are. Practise increasing and decreasing the roundness of the corners on this shape. Finish by dragging the handle as far right as possible creating fully rounded ends to the rectangle.
A white rotate handle also appears at the centre top of the shape. Dragging on this handle 3will rotate the shape. Holding down the Shift key while dragging will rotate the shape in steps of 15°. Practise rotating the shape then return it to its original position.
Save the publication and leave it open for the next exercise. 4
Layering Objects Objects can be placed on top of each other to create a layered effect. The following steps will show how to layer and rearrange objects.
Exercise 34
Using the publication Kensington Letterhead, check the rounded rectangle is selected 1(handles will display).
Click on the of the Send Backward button and select . 2
The rounded rectangle will be moved behind all the objects in the publication and will now be displayed behind the box and line.
With the rounded rectangle still selected click on the Bring Forward button . 3
The rounded rectangle will be brought forward one layer, moving in front of the line but still behind the black rectangle.
Adjustable handle
Alt Shift F6

62 SECTION 2 © Millbank Investments Ltd, 2014
With the rounded rectangle still selected click on the of the Bring Forward button 4
and select .
The rounded rectangle will be brought to the front of all the objects in the publication.
Send Backward and Bring Forward will move up or down one layer of objects at a time. Send to Back and Bring to Front will move to behind or in front of all objects.
Leave the publication open for the next exercise. 5
Grouping Objects Sometimes you may need to group objects to keep them together or to resize several objects at once.
Exercise 35
Using the publication Kensington Letterhead, position the mouse pointer at the top left 1corner of the page.
Click and drag to the bottom right corner of the group of objects, as displayed below (this is 2referred to as a selection box).
All objects in the invisible box will be selected.
From the Drawing Tools Format Ribbon click on the Group button from the 3Arrange Group. This will group all the selected objects together as one large object.
Note
Clicking on the Ungroup button will ungroup grouped objects.
Position the mouse pointer over the bottom middle handle and drag down to resize the 4bottom of the group to the 4 cm mark on the vertical ruler.
Alt F6
Ctrl Shift G
Ctrl Shift G

© Millbank Investments Ltd, 2014 SECTION 2 63
From the View Ribbon put a tick in the Boundaries check box . 5
From the Insert Ribbon click on the Draw Text Box button . Draw a text box inside 6the rounded corners rectangle as displayed below.
The cursor will flash inside the text box. Type: Kensington Engineering Pty Ltd
Press Ctrl A to select the text in the text box. 7
On the Text Box Tools Format Ribbon click on Align Center . 8
With the text still selected apply the font Imprint MT Shadow. 9
With the text still selected click on the Increase Font Size button to increase the size of 10the text.
Continue clicking on the Increase Font Size button so the text fills the text box. The 11
Decrease Font Size button reduces the size of text.
You may need to resize or move the text box slightly so it is balanced in the rounded corners rectangle.
With the text box still selected, hold down the Shift key and click on the line to select both 12the text box and the grouped shapes. (Alternatively, you could draw a selection box around all the objects.) From the Drawing Tools Format Ribbon click on the Group button
to group the text box with the grouped shapes. Click in the Scratch Area to deselect.
Save the publication and leave it open for the next exercise. 13

112 SECTION 3 © Millbank Investments Ltd, 2014
Find and Replace
The Find feature allows you to quickly find text when editing. This feature can also be used to find and replace common occurrences of text. The Replace feature allows you to replace one word with another word (or several words).
Both of these features are accessed using the Find and Replace Task Pane. This can be displayed
from the Home Ribbon by clicking on either the Find button or the Replace button
, or pressing Ctrl F (for Find) or Ctrl H (for Replace).
On the Find and Replace Task Pane, switch between the features by clicking on the Find or Replace options at the top of the pane.
Look at the options shown in the above task panes. You will see that you can match case or match whole words only. You can replace one occurrence of a word or replace all occurrences (referred to as global replacement).
Exercise 65
In a new A4 portrait publication set horizontal ruler guides at 10.5 cm and 21.5 cm. 1
Insert the headings and a suitable picture for the document shown on the next page. 2
Draw a text box between the left and right margins and ruler guides. Insert the file called 3TCM.
Change the text to Arial 14 pt. 4

© Millbank Investments Ltd, 2014 SECTION 3 113
Turn off automatic hyphenation. (From the Text Box Tools Format Ribbon click on the 5
Hyphenation button . Uncheck the Automatically hyphenate this story check box then click on OK.)
Note
To insert a manual hyphen press Ctrl Hyphen.
From the Home Ribbon click on the Find button to display the Find and Replace 6Task Pane.
Click in the text box and press Ctrl Home to move the cursor to the beginning of the text. 7
Type: Registered in the Search for: box and click on . The word registered will be 8selected.
Click after the word Registered. Press the Spacebar and type: Dietician 9
Press Ctrl Home. 10
Select the text in the Search for: box and type: AU and click on . Replace the first 11occurrence of AU with Australian (as in Australian Registered) and the second occurrence with Australia.
Select at the top of the Find and Replace Task Pane. 12
Press Ctrl Home. 13
Type: course in the Search for: box. 14
Type: seminar in the Replace with: box. 15
Click on . The first instance of course will be selected. 16
Click on to replace course with seminar. The second instance of the word course 17will be selected.
Click on . The third instance of course will be selected. This instance of the word 18
is not to be replaced so click on . The following dialog box will display:
Click on OK. 19
Click in the Search for: box and type: TCM then click in the Replace with: box and type: 20Traditional Chinese Medicine
Put a tick in the Match case checkbox and click on . 21
Replace all instances of TCM except for the occurrence The TCM approach to health… 22
Complete the publication as shown on the following page. 23
Save with an appropriate file name, print and close. 24

114 SECTION 3 © Millbank Investments Ltd, 2014

© Millbank Investments Ltd, 2014 SECTION 3 115
Revision
1 Explain the following terms:
Kerning .........................................................................................................................................
.....................................................................................................................................................
Tracking .......................................................................................................................................
.....................................................................................................................................................
2 How can you quickly select the following text?
A word .........................................................................................................................................
All text with a text box .................................................................................................................
.....................................................................................................................................................
3 Explain the difference between paragraph spacing and line spacing.
.....................................................................................................................................................
.....................................................................................................................................................
.....................................................................................................................................................
4 How can you insert symbols into a publication?
.....................................................................................................................................................
.....................................................................................................................................................
5 Which shortcut key is used to copy text using drag and drop?
.....................................................................................................................................................
6 Where can you turn off automatic hyphenation?
.....................................................................................................................................................
.....................................................................................................................................................
7 What are the shortcut keys for:
Cut ...............................................................................................................................................
Copy .............................................................................................................................................
Paste ............................................................................................................................................
8 Explain Find and Replace features.
.....................................................................................................................................................
.....................................................................................................................................................
.....................................................................................................................................................
.....................................................................................................................................................

© Millbank Investments Ltd, 2014 SECTION 5 187
Inserting Fields
Exercise 110
The main publication would be created at this point if it did not already exist. In this case, all that remains to be added to the main publication are field codes to indicate where the variable data is to be inserted during the merge process.
Using the publication Grape Leaf Main, check you are viewing the top of page 1 at 100%. 1Click directly after the word Dear and press the Spacebar once.
From the Mailings Ribbon, click on and then click on First Name from the drop-2down list of fields.
Display the top of page 2 at 100%. Click in the Mailing Address text box inside the green 3border of the label.
From the Mailings Ribbon, click on and then click on Title from the drop-down 4list of fields. Press the Spacebar to insert a space. Then insert the First Name field, Spacebar, Last Name field. Press Enter.
Continue adding the rest of the fields into the main document. Press Enter to insert a new 5line after both the Last Name and Address Line 1 fields. The text box should display as below.
On the Mailings Ribbon, click on . The data for the first record in your data 6document will display.

188 SECTION 5 © Millbank Investments Ltd, 2014
On the Mailing Ribbon, use the record navigators to view each name 7and address.
Switch to page 1 to view the recipient’s first name in the invitation letter. 8
Save the publication and leave it open for the next exercise. 9
Merging the Publication
Exercise 111
Using the publication Grape Leaf Main, check all fields display correctly within the 1publication before printing.
From the Mailings Ribbon, click on . Select to view the 2
individual invitations. Click on and to preview the invitations.
As this is a two-sided flyer that will be folded to enclose the invitation inside and display the 3
address on the outside click on and select a two sided print option.
Click on the Print button to print the merged publication. 4
Save the publication as Grape Leaf Invitations and close it. The data source file is saved and 5closed at the same time.
If your publication has more than one page it may be more cost effective to set up two publications – one for the merged fields page and the other for the rest of the publication.

© Millbank Investments Ltd, 2014 SECTION 5 189
Revision
1 What paper size should be set for Australia?
.....................................................................................................................................................
2 Name two common folded page setups.
.....................................................................................................................................................
3 What are crop marks?
.....................................................................................................................................................
.....................................................................................................................................................
.....................................................................................................................................................
4 What is the purpose in creating a template?
.....................................................................................................................................................
.....................................................................................................................................................
.....................................................................................................................................................
5 Where in the New templates gallery can you access templates that you have created?
.....................................................................................................................................................
6 Two files are used for a mail merge. What are they?
.....................................................................................................................................................
.....................................................................................................................................................
7 Why is it advantageous to use a separate file for the page of a document that contains mail merge fields?
.....................................................................................................................................................
.....................................................................................................................................................
.....................................................................................................................................................
194 © Millbank Investments Ltd, 2014
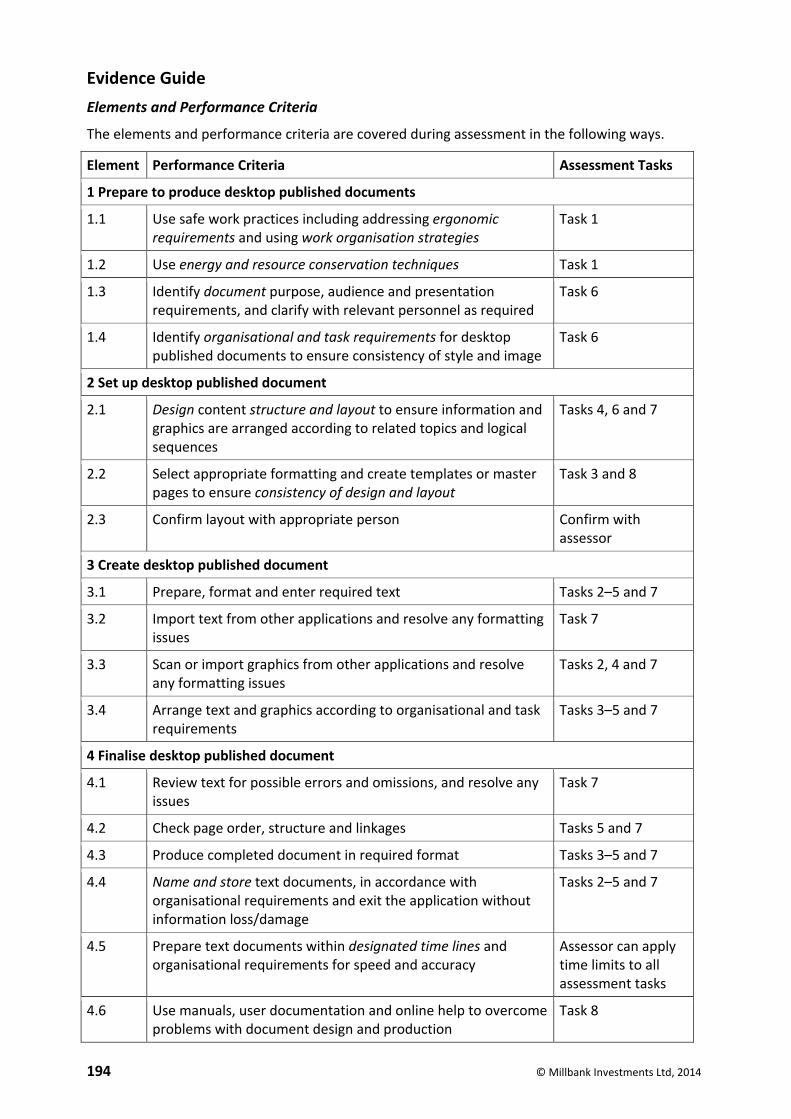
Evidence Guide Elements and Performance Criteria
The elements and performance criteria are covered during assessment in the following ways.
Element Performance Criteria Assessment Tasks
1 Prepare to produce desktop published documents
1.1 Use safe work practices including addressing ergonomic requirements and using work organisation strategies
Task 1
1.2 Use energy and resource conservation techniques Task 1
1.3 Identify document purpose, audience and presentation requirements, and clarify with relevant personnel as required
Task 6
1.4 Identify organisational and task requirements for desktop published documents to ensure consistency of style and image
Task 6
2 Set up desktop published document
2.1 Design content structure and layout to ensure information and graphics are arranged according to related topics and logical sequences
Tasks 4, 6 and 7
2.2 Select appropriate formatting and create templates or master pages to ensure consistency of design and layout
Task 3 and 8
2.3 Confirm layout with appropriate person Confirm with assessor
3 Create desktop published document
3.1 Prepare, format and enter required text Tasks 2–5 and 7
3.2 Import text from other applications and resolve any formatting issues
Task 7
3.3 Scan or import graphics from other applications and resolve any formatting issues
Tasks 2, 4 and 7
3.4 Arrange text and graphics according to organisational and task requirements
Tasks 3–5 and 7
4 Finalise desktop published document
4.1 Review text for possible errors and omissions, and resolve any issues
Task 7
4.2 Check page order, structure and linkages Tasks 5 and 7
4.3 Produce completed document in required format Tasks 3–5 and 7
4.4 Name and store text documents, in accordance with organisational requirements and exit the application without information loss/damage
Tasks 2–5 and 7
4.5 Prepare text documents within designated time lines and organisational requirements for speed and accuracy
Assessor can apply time limits to all assessment tasks
4.6 Use manuals, user documentation and online help to overcome problems with document design and production
Task 8

© Millbank Investments Ltd, 2014 195
Required Skills and Knowledge
The skills and knowledge are covered during assessment in the following ways.
Required Skills How will Evidence be Gathered?
• communication skills to clarify requirements of documents
Assessed through communication between candidate and assessor.
• culturally appropriate communication skills to relate to people from diverse backgrounds and people with diverse abilities
n/a
• editing and proofreading skills to check own work for accuracy against original
Tasks 3–5 and 7
• keyboarding skills to enter text and numerical data Tasks 2–5 and 7
• literacy skills to read and understand the organisation’s procedures and to use models or exemplars to produce a range of documents
Tasks 2–57
• problem-solving skills to edit documents and to resolve issues of consistency of design.
Task 7
Required knowledge How will Evidence be Gathered?
• energy and resource conservation techniques Task 1
• organisational requirements for ergonomics, work periods and breaks
Task 1
• organisational style guides Tasks 2–5 and 7
• purposes, uses and functions of desktop publishing software
Tasks 2–7
• styles and their effect on formatting, readability and appearance of document
Tasks 2–7

196 © Millbank Investments Ltd, 2014
Employability Skills BSB30110 – Certificate III in Business
Employability skills for BSB30110 Certificate III in Business are assessed in the following assessment tasks.
Employability Skill Industry/Enterprise Requirements for this Qualification Include: Task
Communication • communicating verbally with others in negotiation, training and questioning
• writing a range of simple documentation and communications
n/a
Teamwork • completing individual tasks to support team goals
• conveying workplace procedures and work instructions to team members
n/a
Problem-solving • resolving issues and conflicts with team members
• using manuals and other documentation to overcome problems with information technology or other office equipment
Task 8
Initiative and enterprise
• demonstrating individual responsibility for completing tasks
• suggesting improvements to support the development of improved work practices and team effectiveness
Whole assessment
Planning and organising
• contributing to planning processes with team members to meet expected outcomes
• gathering, organising and applying workplace information for the organisation's work processes and information systems
Tasks 2–8
Self-management • identifying development needs and seeking training to fill needs
• monitoring and recording the performance of own work area
n/a
Learning • developing a comprehensive knowledge and understanding of products and services
• identifying priorities and pursuing personal work goals in accordance with organisational objectives
Tasks 2–8
Technology • using information communication technology to communicate with team members or clients
• using word processing packages, spreadsheets and/or databases to produce written correspondence and reports
Technology is used throughout assessment

© Millbank Investments Ltd, 2014 217
BSB Business Services Training Package
Supplement
This workbook can be used by learners completing a qualification in the BSB Business Services Training Package.

218 © Millbank Investments Ltd, 2014
BSBITU309 Produce desktop published documents
Application This unit describes the skills and knowledge required to design and produce desktop published documents.
It applies to individuals who work in a range of environments, which may include providing administrative support within an enterprise, or who may be technical or knowledge experts responsible for production of their own documents.
No licensing, legislative or certification requirements apply to this unit at the time of publication.
Elements and Performance Criteria
Element Elements describe the essential outcomes.
Performance Criteria Performance criteria describe the performance needed to demonstrate achievement of the element.
Workbook page reference
Assessment tasks
1. Prepare to produce desktop published documents
1.1 Use safe work practices including addressing ergonomic requirements and using work organisation strategies
Software Publications WHS (included in exercise file download)
Task 1
1.2 Use energy and resource conservation techniques
Task 1
1.3 Identify document purpose, audience and presentation requirements, and clarify with relevant personnel as required
7 Task 6
1.4 Identify organisational and task requirements for desktop published documents to ensure consistency of style and image
xvi, 7 Task 6
2. Set up desktop published document
2.1 Design content structure and layout to ensure information and graphics are arranged according to related topics and in logical sequences
Throughout workbook
Tasks 4, 6 and 7
2.2 Select appropriate formatting and create templates or master pages to ensure consistency of design and layout
179–182 Task 3 and 8
2.3 Confirm layout with appropriate person
xiv Confirm with assessor
3. Create desktop published document
3.1 Prepare, format and enter required text
Throughout workbook
Tasks 2–5 and 7
3.2 Import text from other applications and resolve any formatting issues
73, 102, 112, 122, 124, 130, 133, 154, 164
Task 7
3.3 Scan or import graphics from other applications and resolve any formatting issues
72–73, 78–80, 179–181
Tasks 2, 4 and 7
3.4 Arrange text and graphics according to organisational and task requirements
Throughout workbook
Tasks 3–5 and 7

© Millbank Investments Ltd, 2014 219
Element Elements describe the essential outcomes.
Performance Criteria Performance criteria describe the performance needed to demonstrate achievement of the element.
Workbook page reference
Assessment tasks
4. Finalise desktop published document
4.1 Review text for possible errors and omissions, and resolve any issues
14, 134, 136, 163, 188
Task 7
4.2 Check page order, structure and linkages
Tasks 5 and 7
4.3 Produce completed document in required format
29, 51 Tasks 3–5 and 7
4.4 Name and store text documents, in accordance with organisational requirements and exit application without information loss/damage
v–ix, 21, 36 Tasks 2–5 and 7
4.5 Prepare text documents within designated timelines and organisational requirements for speed and accuracy
vii, 85, 116, 167 Assessor can apply time limits to all assessment tasks
4.6 Use manuals, user documentation and online help to overcome problems with document design and production
82–83 Task 8

220 © Millbank Investments Ltd, 2014
Foundation Skills This section describes language, literacy, numeracy and employment skills incorporated in the performance criteria that are required for competent performance.
Skill Performance Criteria
Description Workbook page reference
Reading 1.3, 1.4, 3.3, 3.4, 4.1, 4.2, 4.6
Recognises and interprets diagrammatical and textual information from a range of sources to determine and adhere to requirements
Throughout workbook
Applies strategies to self-correct and verify clarity and conformity of information
Throughout workbook
Writing 2.1, 2.2, 3.1-3.4, 4.1-4.3, 4.5
Enters and amends routine data using a format appropriate to requirements
Throughout workbook
Develops documents using required format, accurate spelling and grammar, and organises content to support purpose and audience of material, using clear and logical language
Throughout workbook
Oral Communication
1.3, 2.3 Confirms requirements with relevant personnel using specific terminology and listening and questioning techniques to confirm understanding
xiv
Navigate the world of work
1.3, 1.4, 2.1, 2.2, 3.4, 4.3-4.5
Recognises and follows explicit and implicit protocols and meets expectations associated with own role
Throughout workbook and Software Publications WHS document
Interact with others
1.3, 2.3 Collaborates with others to achieve joint outcomes
xiv
Get the work done
2.1, 2.2, 3.1-3.4, 4.1-4.6
Recognises and responds to routine problems in context of own work
Throughout workbook
Uses advanced features within applications to access, store, organise data and perform routine and complex work tasks
Throughout workbook

© Millbank Investments Ltd, 2014 221
Assessment Requirements v1.0 Performance Evidence
Evidence of the ability to: Assessment task
follow organisational and safe work practices including: ergonomic requirements energy and resource conservation techniques
Task 1
adhere to organisational requirements by: ensuring consistency of style and image logically sequencing data producing documents within designated timelines naming and storing documents
Task 2–Task 7
adhere to task requirements when producing documents including: applying consistent formatting using appropriate templates and master pages using correct layouts
Task 3–Task 7
resolve any issues including: formatting issues errors and omissions problems with design or production
Task 2–Task 7
use appropriate data storage options Task 2–Task 7
apply knowledge of functions and features of contemporary computer applications
Task 2–Task 8
communicate with relevant personal Assessed through communication between candidate and assessor
Knowledge Evidence
To complete the unit requirements safely and effectively, the individual must:
Assessment task
identify energy and resource conservation techniques Task 1
outline organisational requirements for ergonomics, work periods and breaks
Task 1
describe contents and purpose of organisational style guides Task 2–Task 7
explain purposes, uses and functions of desktop publishing software
Task 2–Task 7
outline various formatting styles and their effect on formatting, readability and appearance of documents
Task 2–Task 7