Procedure Description WEB-EDI - BHTC
22
Procedure Description WEB-EDI 1
Transcript of Procedure Description WEB-EDI - BHTC
Procedure Description WEB-EDI
1

Procedure Description WEB-EDI
2
Inhaltsverzeichnis
1 Introduction ......................................................................................................................... 3
1.1 Requirements ................................................................................................................ 3
2 Log In .................................................................................................................................. 3
3 Start Menu .......................................................................................................................... 4
4 Delivery instructions ............................................................................................................ 4
5 Delivery and transport data ................................................................................................. 6
5.1 Create a new shipment ................................................................................................. 6
5.2 Handling a shipment ..................................................................................................... 7
5.2.1 Choosing an order .................................................................................................. 7
5.2.2 Choosing a Pack Unit ............................................................................................. 9
5.2.3 Enter assing additional packaging ........................................................................ 10
5.2.4 Commit the delivery .............................................................................................. 11
5.2.5 Send Order ........................................................................................................... 12
6 Consignment ..................................................................................................................... 15
6.1 Inventory reports ......................................................................................................... 16
6.2 Goods movement ........................................................................................................ 17
7 credit note ......................................................................................................................... 19
8 General Information .......................................................................................................... 21
8.1 Handbook and help ..................................................................................................... 21
9 Contact person .................................................................................................................. 22
History
Issue Type of revision Chapter
November 2005
New edition
Juli 2010 Consignation added 6
Mai 2013 Delivery and transport data updated 5
16.07.2013 Modified the information for the quanity of additional packaging 5.2.3

Procedure Description WEB-EDI
3
1 Introduction In order to ensure perfect logistics it is necessary to conduct the complete process in an EDI system. This documentation describes how to transfer a delivery instruction with supply and transport data, how to print a DFÜ cover letter, bill of delivery, shipping order, VDA Label and how to send the delivery data via DFÜ.
1.1 Requirements
The address of the internet platform is www.hella.com/webedi/jsp/index.jsp. In order to take part in the Web-EDI system the Internet Explorer and the Adobe Acrobat Reader must be installed, each with the latest version. In addition the Barcode Fonts have to be installed. This is described in the course of this documentation.
2 Log In
Log in On the starting screen of the Web EDI system please enter your user name and password. You get these dates from your contact person.

Procedure Description WEB-EDI
4
3 Start Menu
4 Delivery instructions Delivery instructions are sent to the internet platform. An e-mail is automatically sent to the supplier within 12 hours. In order to see the delivery instructions please press the “delivery instructions” button. The following window is opened.
As a registered user you find various menu items on the starting screen.
Select Part Number
Delivery Instructions new and in total
Download opportunity in various formats
Select the data field
Press this button for print out

Procedure Description WEB-EDI
5
After the selection of the part number the window shown beside opens
Select the plant
After choice of receiving plant the delivery instructions are shown in detail.
Procedure Description WEB-EDI
6
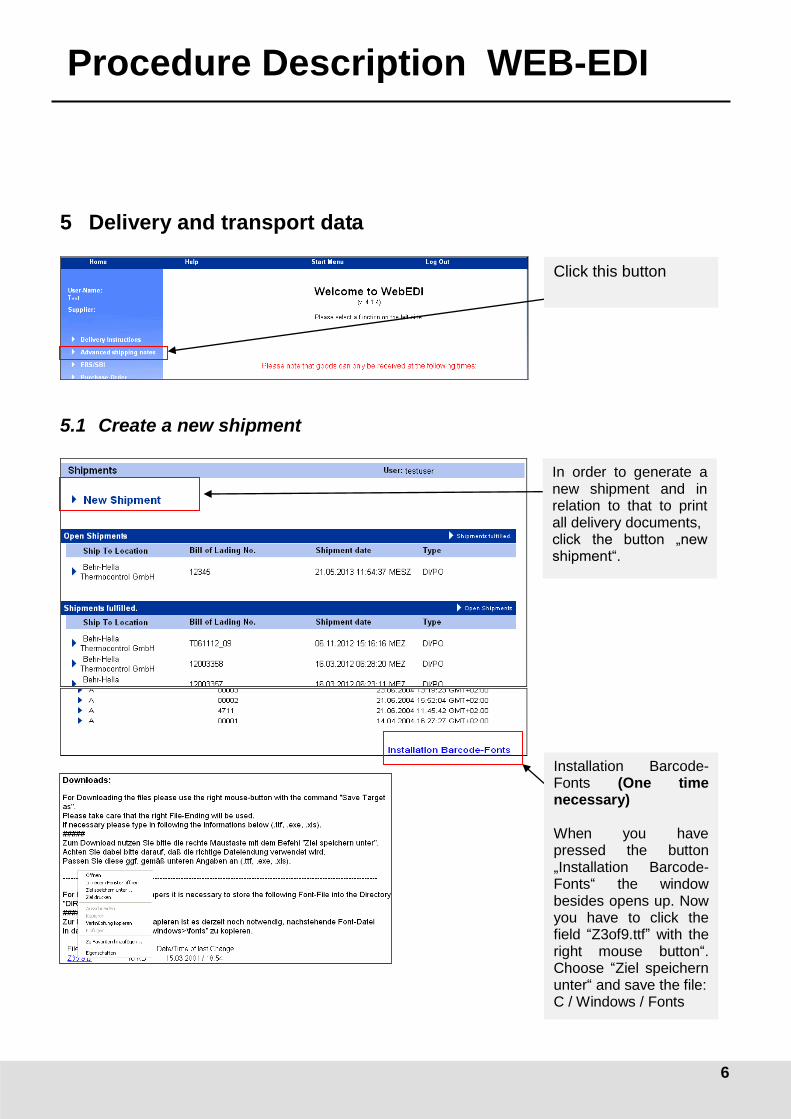
5 Delivery and transport data
5.1 Create a new shipment
Click this button
In order to generate a new shipment and in relation to that to print all delivery documents, click the button „new shipment“.
Installation Barcode-Fonts (One time necessary) When you have pressed the button „Installation Barcode-Fonts“ the window besides opens up. Now you have to click the field “Z3of9.ttf” with the right mouse button“. Choose “Ziel speichern unter“ and save the file: C / Windows / Fonts

Procedure Description WEB-EDI
7
5.2 Handling a shipment
5.2.1 Choosing an order
[1] Bill of Lading No.
Internal (consecutive) shipment no. of the supplier.
[1] [2]
[2] Kind of Transport
Choose the type of transport
[3] Packing Slip No.
Numeral clear Packing Slip No.
[3] [4] [5] [6] [7] [8]
[9] [10]
[4] PS-Pos
Always position 1 because one Packing Slip must be generated for each component
[5] PS-Date
Current Date
[6] Part No. Customer
Click „select“ for selecting the BHTC part no.
[7] Delivery quantity
Delivery quantity of the component
[8] Unit of Measure
ST for pieces
[9] Estimated Arrival Date
Arrival date at BHTC
[10] InCoTerms
Choose the Incoterm
Choose the part no. And click on „selection“.
All blue fields (red marked) must be filled in (MUST fields)

Procedure Description WEB-EDI
8
Sind alle Pflichtfelder ausgefüllt, muss durch den Button „go“ der Lieferschein zur weiteren Bearbeitung ausgewählt werden.

Procedure Description WEB-EDI
9
5.2.2 Choosing a Pack Unit
[1]
[1] Pack Unit (Customer)
Enter the BHTC packaging no. The number can enter manually or if you click on the Button […] a window will open to choose the packaging:
Position 10 = pallet Position 20 = container
[2] Qty per Pack Unit
Position 10 Quantity per pallet Position 20 Quantity per container
[3] Quant.
Position 10 Complete Quantity of pallets in this delievery Position 20 Complete Quantity of boxes in this delivery
[2] [3] [5]
[4] LI Labelprint Position 10 palett = Master Position 20 Box = Small load…
[6] Gross weight
Enter the gross weight per position
[6]
[7] Line Location
LHU1
[7]
[8]
[8] Ship Date
Date of the shipping day
[4]
[5] Qty PU
Position 10 Quantity of boxes per pallet Example: 12 EL-Boxes per pallet
[9]
[9] assign additional packaging
Because additional packaging doesn’t get a Label, you have to enter these on a separate sheet. (Description on the next page)
The sum of Quantity per Pack Unit and Quantity must be the same as Delivery Quantity.

Procedure Description WEB-EDI
10
5.2.3 Enter assign additional packaging
Because additional packaging doesn’t get a Label, you have to enter this information on a separate sheet. Since you have enter all packaging information you have to enter the additional packaging:
[1]
[1] assign additional packaging
To enter the additional packaging you have to click on the [Go] Button. Example: To enter the orange pallet cover you have to click the [Go] Button at position 10 for the pallet.
[2] Pack Unit (Customer)
Enter the BHTC packaging no. For the additional packaging. The number can enter manually or if you click on the Button […] a window will open to choose the packaging:
[2]
[3] Quant.
Complete quantity of the additional packaging in the delivery. Example: Quantity = 1 for one pallet cover per pallet (will sum with the pallet quantity automatically)
If the pallet will fill up with empty boxes, these empty boxes must also enter in the additional packaging field. Example: Quantity = 3 for 3 empty boxes on the pallet. (Pay attention: Enter empty boxes only on pallet quantity 1, because the boxes will sum with the pallet quantity.)
[3]
[4] [5]
[4] Store
After you entered the necessary information you can store the delivery.
[5] Commit
After all necessary information are entered you can commit the delivery.

Procedure Description WEB-EDI
11
5.2.4 Commit the delivery
After all necessary information’s are entered the delivery has to commit.
To commit click on the -Button. After you clicked the Commit-Button, the Single-Units will assign to the Master-Units.
[1]
M1 = Master 1 = pallet 1 M2 = Master 2 = pallet 2
[2]
Assignment of the Single-Units to the Master-Unit (automatically).
[1] [2]
[3]
[3]
Store the Assignment.

Procedure Description WEB-EDI
12
5.2.5 Send Order
GTL-Master-Label GTL-Single-Label
[1] Print
EDI-Delivery note, Packing Slips and the Forwarder Instruction
In this view it is possible to control the complete data and to change some things via the “back” button if necessary.
[1] [2] [3]
[2] GTL-Label-Printing
GTL-Print A4 = Print on A4 Paper GTL-Print A5 = Print on A5 Paper
[3] Transmit
Send the EDI-Message with delivery- and packing informations
Procedure Description WEB-EDI
13
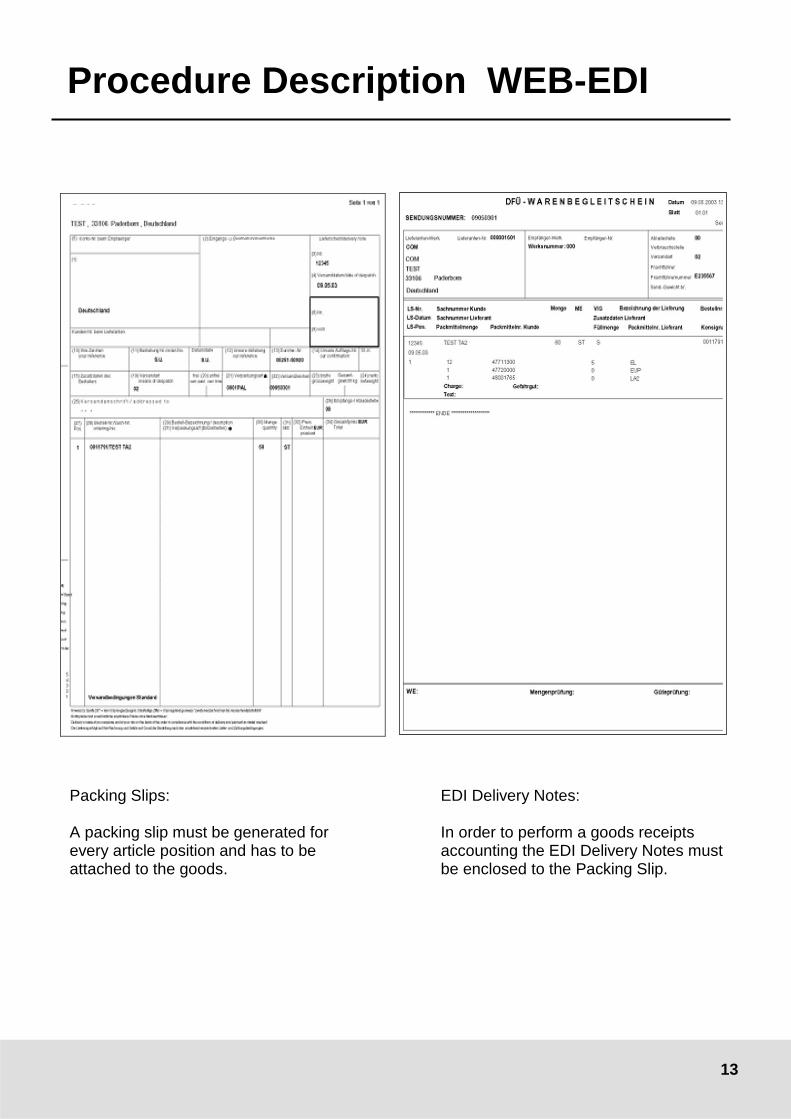
Packing Slips: A packing slip must be generated for every article position and has to be attached to the goods.
EDI Delivery Notes: In order to perform a goods receipts accounting the EDI Delivery Notes must be enclosed to the Packing Slip.

Procedure Description WEB-EDI
14
Forward instructions: Order with quantity of pallets for the shipper.

Procedure Description WEB-EDI
15
6 Consignment
Click on the menu Consignation/VMI
Menu description Inventory reports: Report of the Consignment stock (daily stock report) Gross requirements: Actually not relevant Goods movement: Report of incoming goods and stock requisition

Procedure Description WEB-EDI
16
6.1 Inventory reports
The Menu „Inventory reports“ shows the daily consignment stock.
For detailed information, choose the plant
1. localisation by date (= report of all part numbers)
2. localization by part number and by date

Procedure Description WEB-EDI
17
Sample report 1 = localisation by date (= report of all part numbers)
Sample report 2 = localization by part number and by date
For printing click the Button .
6.2 Goods movement
The Menu „Goods movement“ show the report of incoming goods and stock requisition.
For detailed information, choose the plant

Procedure Description WEB-EDI
18
Sample report 1 = Report of all incoming goods - Part number = part number - BWA = movement type (101 = incoming goods / 102, 122 = cancellation of incoming goods) - Material slip no. = SAP material slip - Delivery note no. = delivery note of the supplier - No. of package = actually not in use - Warehouse = SAP Warehouse no. - Booking date = SAP date of booking - Quantity = qunatity of booking - UM = unit of quantity
Selektionsmöglichkeiten:
1. Report of all incoming goods
2. Report of all stock requisition

Procedure Description WEB-EDI
19
- Part number = part number - BWA = movement type (411 = stock requisition / 412 = actually not in use) - Material slip no. = daily accumulative delivery note - Delivery note no. = delivery note of the supplier - No. of package = actually not in use - Warehouse = SAP Warehouse no. - Booking date = SAP date of booking - Quantity = qunatity of booking - UM = unit of quantity
7 credit note The Menu „ERS/SBI“ show the credit note reports for the material. – Please note: These informations are not invoices according §14UStG.
Click on the menu ERS/SBI

Procedure Description WEB-EDI
20
Report of the credit notes
1. All types of credit
notes
2. Only consignment
credit notes
3. Only ERS-credit notes (= standard deliveries)
For detailed information, choose the plant
For a detailed report, choose „Details“.

Procedure Description WEB-EDI
21
8 General Information
8.1 Handbook and help
If any problems occur or if you need any more information please click the button “help”. The menu will lead you to “contact person” or “handbook”.
The Start Menu contains the button “change password”. When clicking the button this window opens up. Now you have the opportunity to change your password.

Procedure Description WEB-EDI
22
9 Contact person User Support Tel.: (02941) 38-1600 E-Mail: [email protected]