Windows 2008 R2 & ESXi 5.0 Pass-thru Configuration with Highpoint

Probe Installation and Configuration Guide, Release 5.0 Introduction
June 15, 2015 Page 1 of 26
PROBE INSTALLATION AND CONFIGURATION GUIDE
RELEASE 5.0
DOCUMENT DATE: JUNE 15, 2015

Probe Installation and Configuration Guide, Release 5.0 Introduction
June 15, 2015 Page 2 of 26
Notice
The information contained in this document is believed to be accurate in all respects but is not warranted by Martello Technologies
Corporation. The information is subject to change without notice and should not be construed in any way as a commitment by Martello Technologies or any of its affiliates or subsidiaries. Martello Technologies and its affiliates and subsidiaries assume no responsibility for any errors or omissions in this document. Revisions of this document or new editions of it may be issued to incorporate such changes.
No part of this document can be reproduced or transmitted in any form or by any means - electronic or mechanical - for any purpose without
written permission from Martello Technologies Corporation.
Trademarks
MarWatch™, Martello Technologies, and the Martello Technologies logo are trademarks of Martello Technologies Corporation.
The Mitel word and logo are trademarks of Mitel Networks Corporation.
Windows and Microsoft are trademarks of Microsoft Corporation.
Other product names mentioned in this document may be trademarks of their respective companies and are hereby acknowledged.
© Copyright 2015 Martello Technologies Corporation, all rights reserved.

Probe Installation and Configuration Guide, Release 5.0 Introduction
June 15, 2015 Page 3 of 26
Table of Contents
Introduction ............................................................................................................................................ 4
Revision History ....................................................................................................................................... 4 Documentation Conventions ................................................................................................................... 4
Probe Installation ................................................................................................................................... 5
Server Requirements ............................................................................................................................... 5 LAN Connectivity Requirements .............................................................................................................. 5 Internet Connectivity Requirements ........................................................................................................ 7 Probe Software Installation Procedures ................................................................................................... 7 Probe Appliance Installation .................................................................................................................. 19 Probe Device Connectivity Check ........................................................................................................... 22
Probe Configuration.............................................................................................................................. 25

Probe Installation and Configuration Guide, Release 5.0 Introduction
June 15, 2015 Page 4 of 26
Introduction
This document provides information required to install and configure a MarWatch Probe.
The Probe enables communication between MarWatch and the customer network. It also acts a data collector between MarWatch and the monitored devices. The monitored devices send their data to the Probe which then relays it to MarWatch.
For information required to administer and use a MarWatch monitoring system, refer to the MarWatch System Guide.
Note that screen captures in this document may not reflect the latest MarWatch User Interface updates.
Revision History
Document Date Description
June 15, 2015 Updated to reflect MarWatch R5.0
Documentation Conventions
The following are the conventions used in this document:
Description Example
Links are underlined and colored Click on the New Admin link.
Elements that require user input (text fields, checkboxes, etc…) are bold
The Authorities section designates…
Buttons and tabs are in quotes Click “Save”, click on the “Locations” tab
Martello constructs are capitalized Customer, Admin, Probe, Location etc.
Important notes are called out with italics and color
Note: A Probe…

Probe Installation and Configuration Guide, Release 5.0 Probe Installation
June 15, 2015 Page 5 of 26
Probe Installation
The Probe is software that runs on a server in the customer LAN or on a dedicated appliance server, the Probe Appliance. The Probe monitors customer devices and reports to MarWatch, as well as providing Remote Access to a Customer LAN, if this capability is enabled.
This chapter describes how to install various types of Probes. For details on configuring Probes, see “Probe Configuration” on page 25.
Server Requirements The Probe is designed to be lightweight and to impose minimal server requirements. Recommended server configurations are listed in the following table. The Probe is a Java application and requires the Oracle JRE or OpenJDK JRE Release 1.8, or later. Martello recommends Java Release 1.8 release 40 or later. For MX-ONE support, ensure the server uses Java Release 1.8, release 25 only.
No of Devices to monitor
CPU RAM Disk Java Environment
< 10 monitored devices per Probe Appliance
ARM5, 1GHz 512 MB total 512 MB total OpenJDK 1.8 or later.
< 10 monitored devices per Server
Core2 Duo / i3 1 GHz or faster
256 MB Service, 512 MB Server
5 GB free space
Oracle Java Runtime Environment (JRE) 1.8 or OpenJDK 1.8 or later.
< 80 monitored devices per Server
Dual Core i5, 2 GHz or faster
1 GB Service, 2 GB Server
20 GB free space
Oracle Java Runtime Environment (JRE) 1.8 or OpenJDK 1.8 or later.
≥ 80 monitored devices per Server
Contact Martello for engineering guideline.
LAN Connectivity Requirements To provide monitoring and remote access, the Probe must be able to connect to the LAN devices.
The Probe uses the following IP protocols:
Application IP Protocol / Port IP Session Initiator
SNMP UDP, port 161 Probe
SNMP UPD port 162 Device
HTTPS TCP, port 443 Probe
HTTP TCP, port 80 Probe
MCD MiXML TCP, port 443 Probe
MCD Miscellaneous TCP, ports 1752, 15373 Probe
Mitel 5000 TCP, ports 4000, 44000 Probe
Avaya IP Office TCP, port 50802 and ports in the range 50804 to 50813 (defaults, actual ports may range between 49152 and 65289 depending on IP Office services base port) UDP, ports 50794, 50798
Probe
PathSolutions TCP, port 8084 (default) Probe
FTP TCP, port 21 Probe, Device
SSH TCP, port 22 Probe
Ping ICMP Echo Probe

Probe Installation and Configuration Guide, Release 5.0 Probe Installation
June 15, 2015 Page 6 of 26
Other Protocols and Ports If the Probe is used for Remote Access, the Probe must have network connectivity to the LAN Devices for the appropriate TCP/IP protocol and port used by the Remote Application.
Receipt of SNMP Traps To receive SNMP traps, the Probe must receive the SNMP packets. These are sent by default on port 162.
The Probe attempts to bind to port 162. If it cannot, it binds to port 1162 instead.
The Probe Status panel shows the port that the Probe has bound to. The Probe Status panel is available under the Tools icon of the Probe dashboard:
The following is a typical Probe Status panel:
To ensure receipt of traps, configure the trap sender to send traps on the port the Probe has bound to.
Probe Installation and Configuration Guide, Release 5.0 Probe Installation
June 15, 2015 Page 7 of 26
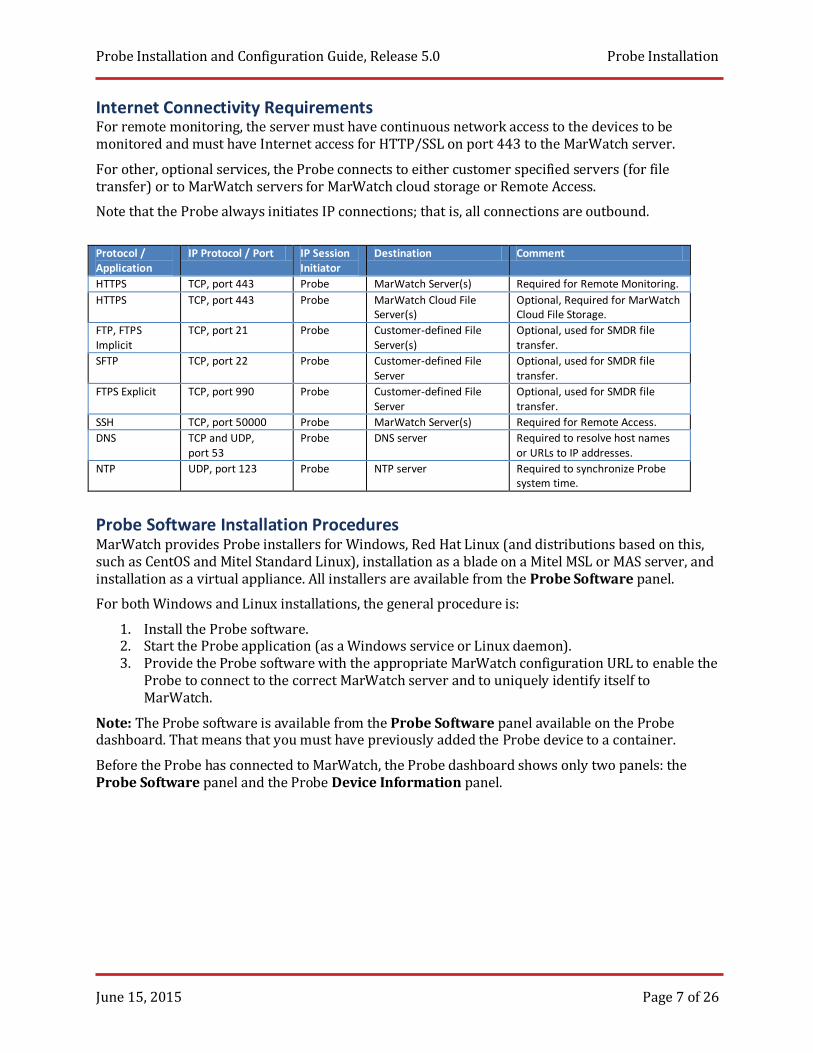
Internet Connectivity Requirements For remote monitoring, the server must have continuous network access to the devices to be monitored and must have Internet access for HTTP/SSL on port 443 to the MarWatch server.
For other, optional services, the Probe connects to either customer specified servers (for file transfer) or to MarWatch servers for MarWatch cloud storage or Remote Access.
Note that the Probe always initiates IP connections; that is, all connections are outbound.
Protocol / Application
IP Protocol / Port IP Session Initiator
Destination Comment
HTTPS TCP, port 443 Probe MarWatch Server(s) Required for Remote Monitoring.
HTTPS TCP, port 443 Probe MarWatch Cloud File Server(s)
Optional, Required for MarWatch Cloud File Storage.
FTP, FTPS Implicit
TCP, port 21 Probe Customer-defined File Server(s)
Optional, used for SMDR file transfer.
SFTP TCP, port 22 Probe Customer-defined File Server
Optional, used for SMDR file transfer.
FTPS Explicit TCP, port 990 Probe Customer-defined File Server
Optional, used for SMDR file transfer.
SSH TCP, port 50000 Probe MarWatch Server(s) Required for Remote Access.
DNS TCP and UDP, port 53
Probe DNS server Required to resolve host names or URLs to IP addresses.
NTP UDP, port 123 Probe NTP server Required to synchronize Probe system time.
Probe Software Installation Procedures MarWatch provides Probe installers for Windows, Red Hat Linux (and distributions based on this, such as CentOS and Mitel Standard Linux), installation as a blade on a Mitel MSL or MAS server, and installation as a virtual appliance. All installers are available from the Probe Software panel.
For both Windows and Linux installations, the general procedure is:
1. Install the Probe software. 2. Start the Probe application (as a Windows service or Linux daemon). 3. Provide the Probe software with the appropriate MarWatch configuration URL to enable the
Probe to connect to the correct MarWatch server and to uniquely identify itself to MarWatch.
Note: The Probe software is available from the Probe Software panel available on the Probe dashboard. That means that you must have previously added the Probe device to a container.
Before the Probe has connected to MarWatch, the Probe dashboard shows only two panels: the Probe Software panel and the Probe Device Information panel.

Probe Installation and Configuration Guide, Release 5.0 Probe Installation
June 15, 2015 Page 8 of 26
The following is a typical Probe dashboard before it has connected to MarWatch:
The Probe Dashboard shows only these two panels to highlight the fact that the Probe has not yet connected to MarWatch. Use the Probe Software panel to install the Probe software.
If a Probe is already connected to MarWatch, the Probe Software panel is available under the Tools icon of the Probe dashboard:
Windows Installation
The Windows Installer runs on Windows (XP, Vista, 7) and Windows Server (2003 and Server 2008). To install the software on Windows:
1. Log into the Windows system using an account with administration privileges.

Probe Installation and Configuration Guide, Release 5.0 Probe Installation
June 15, 2015 Page 9 of 26
2. Go to the dashboard for the Probe you want to install. 3. Go to the Probe Software panel, select on the Windows tab and download the Probe
installer to the Windows system.
4. Copy the Probe URL, either manually or by clicking on the Copy URL button. 5. Run the Probe Windows installer. 6. Paste the Probe URL when requested during the installation process.
When the installer has finished, the Probe software is configured to run as a Windows service.

Probe Installation and Configuration Guide, Release 5.0 Probe Installation
June 15, 2015 Page 10 of 26
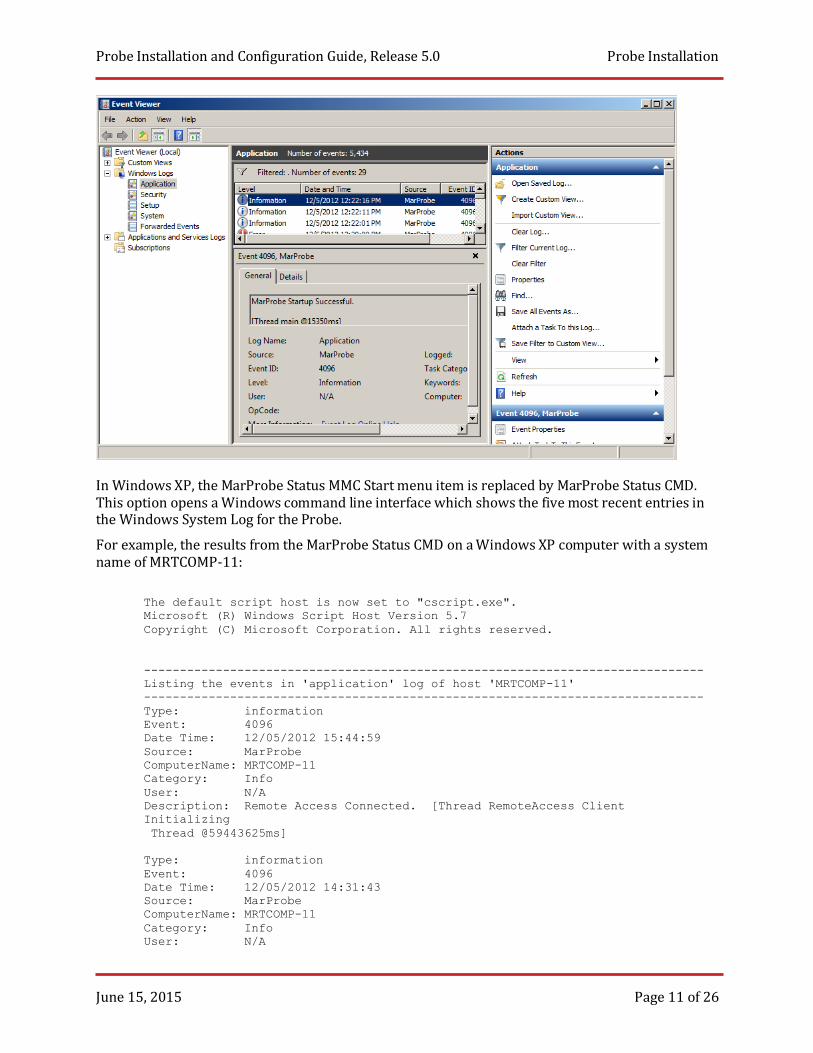
Confirm Installation To confirm that the software is running, go to the Martello Technologies folder in the Start Menu, and click on the MarProbe Status MMC link.
This action opens the Microsoft Management Console and shows recent Windows events related to the Probe. In the following example, the Probe has been misconfigured with a bad URL. This condition is shown in the MMC Console.
To correct the URL, uninstall and reinstall the Probe software with the correct URL. This time, the MarProbe Status MMC command shows that the Probe startup has been successful.
Probe Installation and Configuration Guide, Release 5.0 Probe Installation
June 15, 2015 Page 11 of 26
In Windows XP, the MarProbe Status MMC Start menu item is replaced by MarProbe Status CMD. This option opens a Windows command line interface which shows the five most recent entries in the Windows System Log for the Probe.
For example, the results from the MarProbe Status CMD on a Windows XP computer with a system name of MRTCOMP-11:
The default script host is now set to "cscript.exe".
Microsoft (R) Windows Script Host Version 5.7
Copyright (C) Microsoft Corporation. All rights reserved.
------------------------------------------------------------------------------
Listing the events in 'application' log of host 'MRTCOMP-11'
------------------------------------------------------------------------------
Type: information
Event: 4096
Date Time: 12/05/2012 15:44:59
Source: MarProbe
ComputerName: MRTCOMP-11
Category: Info
User: N/A
Description: Remote Access Connected. [Thread RemoteAccess Client
Initializing
Thread @59443625ms]
Type: information
Event: 4096
Date Time: 12/05/2012 14:31:43
Source: MarProbe
ComputerName: MRTCOMP-11
Category: Info
User: N/A

Probe Installation and Configuration Guide, Release 5.0 Probe Installation
June 15, 2015 Page 12 of 26
Description: Remote Access Connected. [Thread RemoteAccess Client
Initializing
Thread @55047297ms]
Type: information
Event: 4096
Date Time: 12/05/2012 14:00:23
Source: MarProbe
ComputerName: MRTCOMP-11
Category: Info
User: N/A
Description: Remote Access Connected. [Thread RemoteAccess Client
Initializing
Thread @53167797ms]
Type: information
Event: 4096
Date Time: 12/05/2012 13:37:33
Source: MarProbe
ComputerName: MRTCOMP-11
Category: Info
User: N/A
Description: Remote Access Connected. [Thread RemoteAccess Client
Initializing
Thread @51797656ms]
C:\Program Files\Martello Technologies\MarProbe>
Linux Installation The Probe is supported on Red Hat Enterprise Linux or a derivative platform such as Fedora, CentOS or Mitel Standard Linux.
1. Log into the Linux system using an account with administration privilege (root). 2. Go to the dashboard for the Probe that you want to install. 3. Go to the Probe Software window, select the Linux tab and download the MarProbe RPM
to the Linux system.
4. Copy the Probe URL, either manually or by clicking on the Copy URL button. 5. Open a terminal window. 6. Type rpm -ivh <path_to_Probe_file/Probe_file_name>.rpm" to install the Probe,
resulting in the following output. [root@localhost ~]# rpm -ivh MarProbe-MarWatch-3.5.0.i386.rpm
Preparing... ########################################### [100%]
java version "1.6.0_22"
OpenJDK Runtime Environment (IcedTea6 1.10.4) (fedora-61.1.10.4.fc16-i386)
OpenJDK Client VM (build 20.0-b11, mixed mode)

Probe Installation and Configuration Guide, Release 5.0 Probe Installation
June 15, 2015 Page 13 of 26
1:MarProbe ########################################### [100%]
================================
Type /etc/init.d/MarProbe config to configure the Probe and provide it with the Probe URL from the Probe Software:[root@localhost ~]# /etc/init.d/MarProbe config
========== Martello Technologies MarProbe Configuration ==========
Enter Probe URL from MarWatch []:
https://Probe-shelley01:[email protected]/sprint-
demo/MarCentral/rest/regions/Canada%20East/customers/Shelley%20Shipping/devices
/Probe/shelley01/
Writing config to /usr/local/martello/marProbe.conf... OK
7. Type /etc/init.d/MarProbe start to start the Probe [root@localhost ~]# /etc/init.d/MarProbe start
Starting MarProbe (via systemctl): [ OK ]
8. To confirm that the software is running, type ps -Af | grep MarProbe to display the running Probe processes. [root@localhost ~]# ps -Af | grep MarProbe
root 1873 1 0 10:18 ? 00:00:00 /usr/local/martello/bin/marProbe -debug -pidfile
/var/run/marProbe.pid -DmarProbe.logfile.prefix=/var/log/ -cp
/usr/local/martello/MarProbe-Fat.jar
com.martellotech.bootstrap.startup.JSVCDaemon https://Probe-
shelley01:[email protected]/sprint-
demo/MarCentral/rest/regions/Canada%20East/customers/Shelley%20Shipping/devices
/Probe/shelley01/
root 1874 1873 25 10:18 ? 00:00:00 /usr/local/martello/bin/marProbe -debug -
pidfile /var/run/marProbe.pid -DmarProbe.logfile.prefix=/var/log/ -cp
/usr/local/martello/MarProbe-Fat.jar
com.martellotech.bootstrap.startup.JSVCDaemon https://Probe-
shelley01:[email protected]/sprint-
demo/MarCentral/rest/regions/Canada%20East/customers/Shelley%20Shipping/devices
/Probe/shelley01/
Note: you can also download the Probe using the wget command from a terminal window:
[root@localhost ~]# wget https://d3lno0et4zhxmw.cloudfront.net/MarProbe-
MarWatch-3.5.0.i386.rpm
--2012-01-16 10:29:51-- https://d3lno0et4zhxmw.cloudfront.net/MarProbe-
MarWatch-3.5.0.i386.rpm
Resolving d3lno0et4zhxmw.cloudfront.net... 204.246.169.166, 204.246.169.191,
204.246.169.186, ...
Connecting to d3lno0et4zhxmw.cloudfront.net|204.246.169.166|:443... connected.
HTTP request sent, awaiting response... 200 OK
Length: 898566 (878K) [application/x-rpm]
Saving to: “MarProbe-MarWatch-3.5.0.i386.rpm”
100%[==========================================================================
===============================================>] 898,566 3.07M/s in 0.3s
2012-01-16 10:29:51 (3.07 MB/s) - “MarProbe-MarWatch-3.5.0.i386.rpm” saved
[898566/898566]
MSL Blade Installation The Probe MSL blade installs the Probe software on an MSL or MAS Server as an MSL blade.

Probe Installation and Configuration Guide, Release 5.0 Probe Installation
June 15, 2015 Page 14 of 26
Note: Mitel does not provide support or warranty for the Probe MSL blade installation on an MSL/ MAS Server.
MSL Version Support The Probe MSL blade is supported on MSL R9.3 and later.
Blade Packaging The blade is distributed as an ISO CD image file. The image file can be either burned to a CD or installed using a VMWare CD image mounting utility for Virtual MSL installation.
Installation To install the Probe MSL blade:
1. Go to the dashboard for the Probe that you wish to install. 2. Go to the Probe Software panel, select the MSL Blade tab and download the MSL blade ISO
image.
3. Copy the Probe URL, either manually or by clicking on the Copy URL button. 4. Open a Web browser and navigate to the MSL server manager URL (for example,
http://<MSL_server_FQDN>/server-manager). 5. Log in to the MSL server manager interface. 6. If you are installing the blade from CD, insert the CD in the server CD ROM drive. 7. In the left navigation pane under ServiceLink, click Blades. The available list of blades is
displayed.
8. Click on Install. 9. Review and accept the software license terms by clicking on Accept All Licenses.

Probe Installation and Configuration Guide, Release 5.0 Probe Installation
June 15, 2015 Page 15 of 26
10. The installation process for the Probe blade begins. The installation screen shows installation progress.
11. When the blade is completely installed, the following message appears on the screen:
12. Click on Clear this report.
This completes the Probe blade installation.
After the Probe blade installation is complete, the Probe service starts and is available for configuration.
Probe Installation and Configuration Guide, Release 5.0 Probe Installation
June 15, 2015 Page 16 of 26
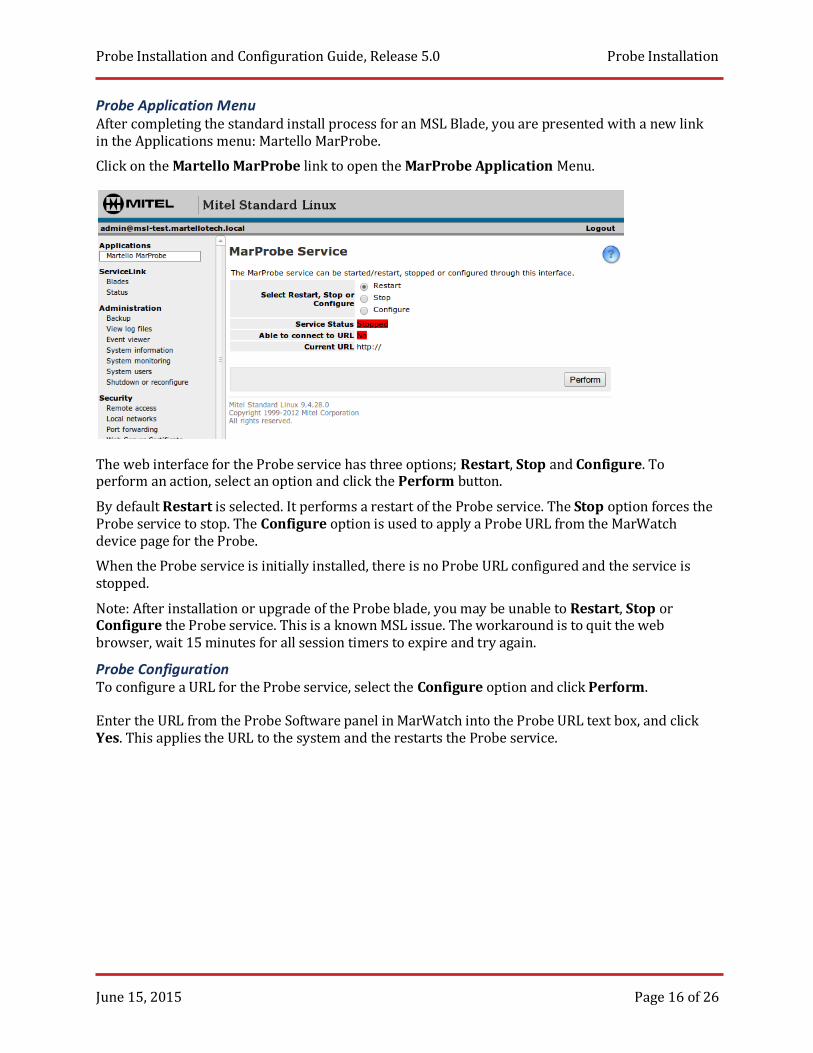
Probe Application Menu After completing the standard install process for an MSL Blade, you are presented with a new link in the Applications menu: Martello MarProbe.
Click on the Martello MarProbe link to open the MarProbe Application Menu.
The web interface for the Probe service has three options; Restart, Stop and Configure. To perform an action, select an option and click the Perform button.
By default Restart is selected. It performs a restart of the Probe service. The Stop option forces the Probe service to stop. The Configure option is used to apply a Probe URL from the MarWatch device page for the Probe.
When the Probe service is initially installed, there is no Probe URL configured and the service is stopped.
Note: After installation or upgrade of the Probe blade, you may be unable to Restart, Stop or Configure the Probe service. This is a known MSL issue. The workaround is to quit the web browser, wait 15 minutes for all session timers to expire and try again.
Probe Configuration To configure a URL for the Probe service, select the Configure option and click Perform.
Enter the URL from the Probe Software panel in MarWatch into the Probe URL text box, and click Yes. This applies the URL to the system and the restarts the Probe service.

Probe Installation and Configuration Guide, Release 5.0 Probe Installation
June 15, 2015 Page 17 of 26
After the service is restarted, the MarProbe Application interface shows the Probe service status and whether or not MarWatch is reachable from the Probe (that is, that the Probe can resolve the hostname in the URL and establish a connection to the MarWatch server identified by that hostname).
The Service Status shows the status of the Probe, either Running or Stopped.
If the MSL server can connect to the URL specified, the Able to connect to URL field shows Yes. If not, it shows No.
This feature facilitates troubleshooting connectivity issues by allowing arbitrary URLs to be tested, similar to pinging a server. For example, if http://www.google.com is entered as the configured URL, the MSL server attempts to retrieve the contents of http://www.google.com and report the result of that action.
Virtual Appliance Installation The Probe can also be downloaded as a Virtual Appliance. The system provides a VMware OVA that can be installed as Virtual Machine. The Virtual Machine contains an Ubuntu 14.04 Linux installation with the Probe software preinstalled.

Probe Installation and Configuration Guide, Release 5.0 Probe Installation
June 15, 2015 Page 18 of 26
Before installing the Virtual Appliance, configure the memory and resource allocation for the VM so that it meets the RAM requirements shown in “Server Requirements” on page 5.
To install and configure the Virtual Appliance:
1. Go to the dashboard for the Probe that you wish to install. 2. Go to the Probe Software panel, select the Virtual Appliance tab and download the OVA
file.
3. Install the OVA file according to VMware instructions. 4. Start the VM and connect to it using SSH or the VMware console. 5. Log in as config with password config.
For the first log in, you are prompted to change passwords. 6. By default, the VM is configured to use DHCP. You can optionally change this setting to use
static IP addressing. To do so, do the following steps: a. Set a static IP address by running the following command and providing the
following fields: Command: sudo vi /etc/network/interfaces.d/eth0 Fields:
auto eth0
iface eth0 inet
static
address <IP address>
netmask <network mask>
gateway <Gateway IP Address>
Press Esc and enter :wq to write and and exit from the file. b. Configure DNS server by running the following command and providing the
following fields: Command: sudo vi /etc/resolv.conf Fields:
nameserver <DNS server IP Address 1>
nameserver <DNS server IP Address 2>
Enter as many DNS server IP addresses as required. Press Esc and enter :wq to write and and exit from the file.
c. Bring up the network interface by running the following command: Command: sudo ifdown eth0 && sudo ifup eth0
7. Type sudo /etc/init.d/marprobe config to configure the Probe and provide it with the Probe URL from the Probe Software panel: [root@localhost ~]# sudo /etc/init.d/marprobe config
========== Martello Technologies MarProbe Configuration ==========

Probe Installation and Configuration Guide, Release 5.0 Probe Installation
June 15, 2015 Page 19 of 26
Enter Probe URL from MarWatch []:
https://Probe-shelley01:[email protected]/sprint-
demo/MarCentral/rest/regions/Canada%20East/customers/Shelley%20Shipping/devices
/Probe/shelley01/
Writing config to /usr/local/martello/marprobe.conf... OK
8. Type sudo /etc/init.d/marprobe start to start the Probe. [root@localhost ~]# sudo /etc/init.d/marprobe start
Starting marprobe (via systemctl): [ OK ]
9. To confirm that the software is running, type sudo ps -Af | grep marprobe to display the running Probe processes. [root@localhost ~]# sudo ps -Af | grep marprobe
root 1873 1 0 10:18 ? 00:00:00 /usr/local/martello/bin/marprobe -debug -pidfile
/var/run/marprobe.pid -Dmarprobe.logfile.prefix=/var/log/ -cp
/usr/local/martello/marprobe-Fat.jar
com.martellotech.bootstrap.startup.JSVCDaemon https://Probe-
shelley01:[email protected]/sprint-
demo/MarCentral/rest/regions/Canada%20East/customers/Shelley%20Shipping/devices
/Probe/shelley01/
root 1874 1873 25 10:18 ? 00:00:00 /usr/local/martello/bin/marprobe -debug -
pidfile /var/run/marprobe.pid -Dmarprobe.logfile.prefix=/var/log/ -cp
/usr/local/martello/marprobe-Fat.jar
com.martellotech.bootstrap.startup.JSVCDaemon https://Probe-
shelley01:[email protected]/sprint-
demo/MarCentral/rest/regions/Canada%20East/customers/Shelley%20Shipping/devices
/Probe/shelley01/
10. If you need to configure the Linux system (IP address DNS, system name etc.), use standard Red Hat or CentOS instructions.
These are available at: http://wiki.centos.org/FAQ/CentOS6
Probe Appliance Installation The Probe Appliance is a small form-factor server with pre-installed Probe software. The Probe Appliance uses Debian Linux as its operating system.
The Probe Appliance has connectors for:
Power, 110/240 VAC, 50/60 Hz Ethernet (10, 100, 1000 BASE-T) USB 2.0 type A
The Probe Appliance is shipped with:
Standard US Power Cord Two-pin US Power Connector Ethernet Cable
The Probe Appliance must be configured for use with MarWatch. The configuration details for a Probe are entered in the property page for that Probe device and are visible on the device dashboard page for that Probe.
You must have the Probe configuration URL to configure a Probe.

Probe Installation and Configuration Guide, Release 5.0 Probe Installation
June 15, 2015 Page 20 of 26
Configuration with SSH To configure the Probe Appliance using SSH:
1. Connect power and Ethernet to the Probe Appliance. The Probe Appliance uses DHCP to obtain its Ethernet address. To configure a Probe Appliance, you need to know its IP address.
2. The IP address can be obtained by scanning the network in which the Probe Appliance has been installed, and looking for devices with a MAC address that starts with F0-AD-4E or 00-50-43.
3. Connect to the Probe using SSH to its IP address. 4. Login to the system as user “config” with password “config”. The first time you login to the
system, it prompts you to change the shipped default password. The “config” user has sudo privileges. The following is an example of the password change dialog. (Note that IP addresses and Linux version numbers may be different. This is not significant). Using username "config".
[email protected]'s password:
You are required to change your password immediately (root enforced)
Linux marProbe 2.6.32-5-kirkwood #1 Sat Dec 11 05:09:52 UTC 2010 armv5tel
The programs included with the Debian GNU/Linux system are free software;
the exact distribution terms for each program are described in the
individual files in /usr/share/doc/*/copyright.
Debian GNU/Linux comes with ABSOLUTELY NO WARRANTY, to the extent permitted by
applicable law.
Last login: Wed Jul 6 14:37:29 2011 from 10.4.50.7
WARNING: Your password has expired.
You must change your password now and login again!
Changing password for config.
(current) UNIX password:
Enter new UNIX password:
Retype new UNIX password:
passwd: password updated successfully
5. The system now terminates the SSH session. You need to reconnect and login as the user “config” with the password you have chosen.
6. The terminal now shows a menu: (Note the PID and Release numbers may be different. This is not significant) MarProbe Appliance Release 3.0.0 r65
Martello Technologies MarProbe Appliance Configuration
------------------------------------------------------
Available Commands:
config - Configure the Probe
restart Restart the Probe software
reboot - Reboot the Probe device
status - Status of the Probe software
Checking for MarProbe: running PID=###
(c) Martello Technologies, 2011
7. To configure the Probe Appliance, enter “config” at the config@marProbe:-$ prompt. The following menu is displayed: ========== Martello Technologies MarProbe Configuration ==========

Probe Installation and Configuration Guide, Release 5.0 Probe Installation
June 15, 2015 Page 21 of 26
Enter Probe URL from MarWatch []:
8. Enter the Probe URL from the Probe Status page as above, hit Return. The system displays:
Writing config to /home/marProbe/etc/marProbe.conf...
OK
MarProbe service is now restarting
Stopping MarProbe stopped PID=###
Starting MarProbe started PID=###
This completes the Probe configuration using SSH.
Configuration with USB Drive The Probe Appliance can also be configured using a USB drive. To configure the Probe Appliance, you need a USB drive formatted as FAT32 and the configuration URL supplied by the MarWatch Probe Status page.
1. Create a file called marprobe.config. on the root directory of the USB drive. 2. Edit the file to contain the following lines:
url=
force=
Note that these options are case sensitive and must not contain quotation marks. After the url= option, enter the Probe configuration URL supplied by MarWatch. The file dates are used to determine if the configuration URL should be applied. This can be overridden by placing YES after the force= option. Any other value in the force option field is ignored. Also note that only the first url and force options are read.
3. Save the file in the root directory of the USB drive and eject it. 4. Insert the drive into the USB port of the Probe Appliance. The indicator LED on the top of
the appliance starts to blink as data is being read from, and written to the USB drive. When the LED stops blinking, it is safe to remove the drive from the appliance. Note: if the LED does not blink, the USB drive is not being read properly.
Static IP Addressing The Probe Appliance can be optionally configured with a static IP address using the USB drive configuration method. The following additional configuration variables are supported in the marprobe.config file:
address_assignment={static|dynamic}
address={dotted quad ip address}
netmask={dotted quad mask}
gateway={dotted quad ip address}
dns1={dotted quad ip address}
dns2={dotted quad ip address}
If address_assignment is set to static, the rest of the variables are used to define the network interface configuration.
If address_assignment is set to dynamic, the default dhcp configuration is used.
The following is an example marprobe.config file:
address_assignment=static
address=10.0.10.25
netmask=255.255.255.0
gateway=10.0.10.1
dns1=10.0.10.2
dns2=10.0.10.3

Probe Installation and Configuration Guide, Release 5.0 Probe Installation
June 15, 2015 Page 22 of 26
It assigns IP address 10.0.10.25/24 with default gateway 10.0.10.1 and DNS server addresses 10.0.10.2 and 10.0.10.3 to the Probe Ethernet interface.
Log Collection To assist in troubleshooting, the Probe collects log information. Martello support may ask for these logs to assist in problem resolution. The logs can be accessed through SSH or using a FAT-formatted USB drive.
SSH Log Access The logs are stored in the /var/log/marprobe/ directory. This is accessible from the “config” user account.
USB drive Log Access When a FAT formatted USB drive is connected to the Probe Appliance, the system automatically copies logs and configuration data to the USB drive.
Probe Device Connectivity Check The device Connectivity check is used to verify that the Probe can establish connections to the devices it is configured to monitor.
The Connectivity check is available under the Tools icon of the Probe dashboard:

Probe Installation and Configuration Guide, Release 5.0 Probe Installation
June 15, 2015 Page 23 of 26
The following is a typical Connectivity check panel:
The checks verify both the IP network connectivity and the access credentials that have been configured for the device. The system runs this check for all of the connection protocols used by the device.
This capability can be used during installation to verify that local devices are properly configured and reachable from the Probe.
When a Device is created or edited, it can take up to 15 minutes for the configuration changes to propagate to the Probe. To check sooner, press the Reload Devices button to cause the Probe to request its configuration data from MarWatch.

Probe Installation and Configuration Guide, Release 5.0 Probe Installation
June 15, 2015 Page 24 of 26
The following is an example of the device Connectivity check output.

Probe Installation and Configuration Guide, Release 5.0 Probe Configuration
June 15, 2015 Page 25 of 26
Probe Configuration
A single Probe enables monitoring of multiple devices on the same IP network. If the container in which the Probe is added contains subcontainers, the Probe can monitor the devices in the subcontainers also.
For information on installation of Probes, see “Probe Installation” on page 5.
To configure a Probe, do the following steps:
1. Access the Probe’s dashboard. 2. From the Probe’s dashboard, select Settings under the Settings icon.
The Probe’s settings sheet is displayed. 3. Edit and change property settings as required. In addition to general settings available to all
MarWatch device, Probe settings include: IP SLA Monitoring: Enable the checkbox and enter up to four IP SLA targets, using
either dotted quad notation or FQDN. Probe Diagnostics: Enabling these settings displays additional diagnostic tools. The
tools should be used and interpreted with assistance from Martello support. Probe Software Override JAR URL field: This field is used for troubleshooting
purposes. It allows for installation of special software. It is used only with assistance from Martello support.
Probe Password: When a Probe is first added to MarWatch, MarWatch generates a random security password for Server to Probe communications. Afterwards, when the Probe is installed, it is automatically configured to use this password. At this stage, when first adding a Probe but before it is installed, users may choose to replace the random password with their own. The security password can contain only alphanumeric characters. Spaces or other special characters cannot be used. Changing the password after the Probe is installed and configured is not recommended because it disables Server to Probe communications.
Remote Access Control: See “Remote Access Control Configuration” on page 26. 4. Click the Save button when done.

Probe Installation and Configuration Guide, Release 5.0 Probe Configuration
June 15, 2015 Page 26 of 26
Remote Access Control Configuration MarWatch allows remote access controls on the Probe settings sheet. The following is a typical settings sheet area for interface filtering configuration:
Users can configure the Probe to:
Never allow port forwarding, thereby blocking all remote access capabilities Allow port forwarding only to those devices monitored by the Probe Allow port forwarding for all devices on the subnet the Probe is connected to, thereby allow
remote access to devices not monitored by the Probe