future.dj pro, stress-free manual - Xylio pro, stress-free manual Deck A Deck B Mixer Sidelist/...
15
future.dj pro, stress-free manual Deck A Deck B Mixer Sidelist/ AutoMix playlist Current playlist Browser Modular panels Modular panels
Transcript of future.dj pro, stress-free manual - Xylio pro, stress-free manual Deck A Deck B Mixer Sidelist/...
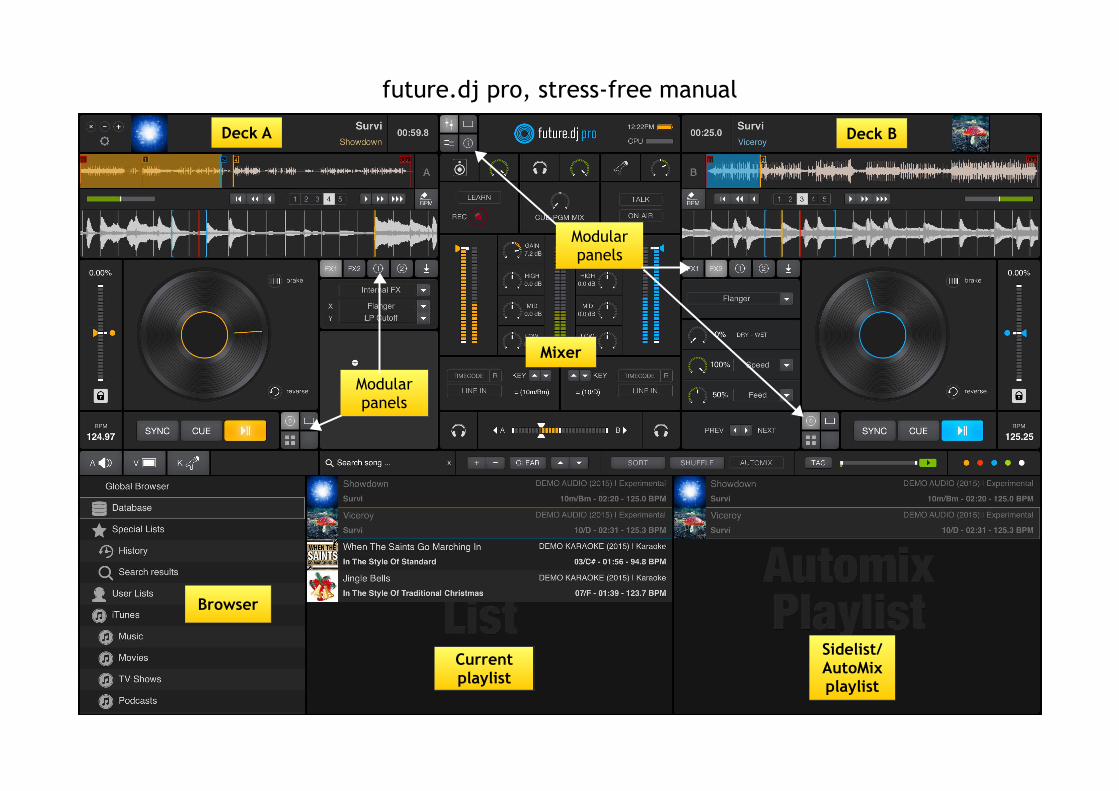
future.dj pro, stress-free manual
Deck A Deck B
Mixer
Sidelist/AutoMixplaylist
Currentplaylist
Browser
Modularpanels
Modularpanels

Waveform Display – graphical overview of the track with loop (blue lines)
and cue points (orange lines) and a separate track overview; you can also use the mouse
to scratch on the waveform display.
Cue-point / Loop markers -lets you see exactly wherecue-points and loops are placed within the track.
(the red bar is the currentposition of the track)
BPM – displays the currentBPM value and tempoalterations/changes.
Edit BPM – press the BPMvalue to edit the bpm, either
by tapping in the value orby choosing a BPM frame.
Pitch – increases or decreases the tempo (speed);
you can temporarily speed up or slow down
the tempo by momentarily right clicking on the slider.
CUE – goes to theselected cue-point and stops.
KeyLock – activate this to keepthe track in the same key,
no matter the speed orleave it off to get to some
hilarious voice keys.
Play-Pause – starts/stopsplayback at the currentposition of the track.
SYNC – instantly synchronizesa song (monitor) with the one
that's playing (master).
Skip Beat – advances theplayback with one beat.
Uhhh...mushroomy.If your music has artwork
it's gonna be here ...and inseveral other places.
Remaining time/Elapsed time – showsyou the remaining/
elapsed time of a track.
Skip Bar – advancesthe deck's playbackposition by 4 beats.
Search – fast-forward through the song
Hot Cue-points – saved cuesthat can be instantly triggered.
How you place them makes them hot or not.
(press and hold a cue-pointto delete it)
Back to top – instantlybrings the track tothe beginning andstops playback.
Reset Pitch – when pressedit will smoothly reset thetrack's pitch to 0%; if you
double click it will immediatelyreset the pitch to 0%.
DECKS
One of the many modular panelsthat await you
(to be continuedbelow).
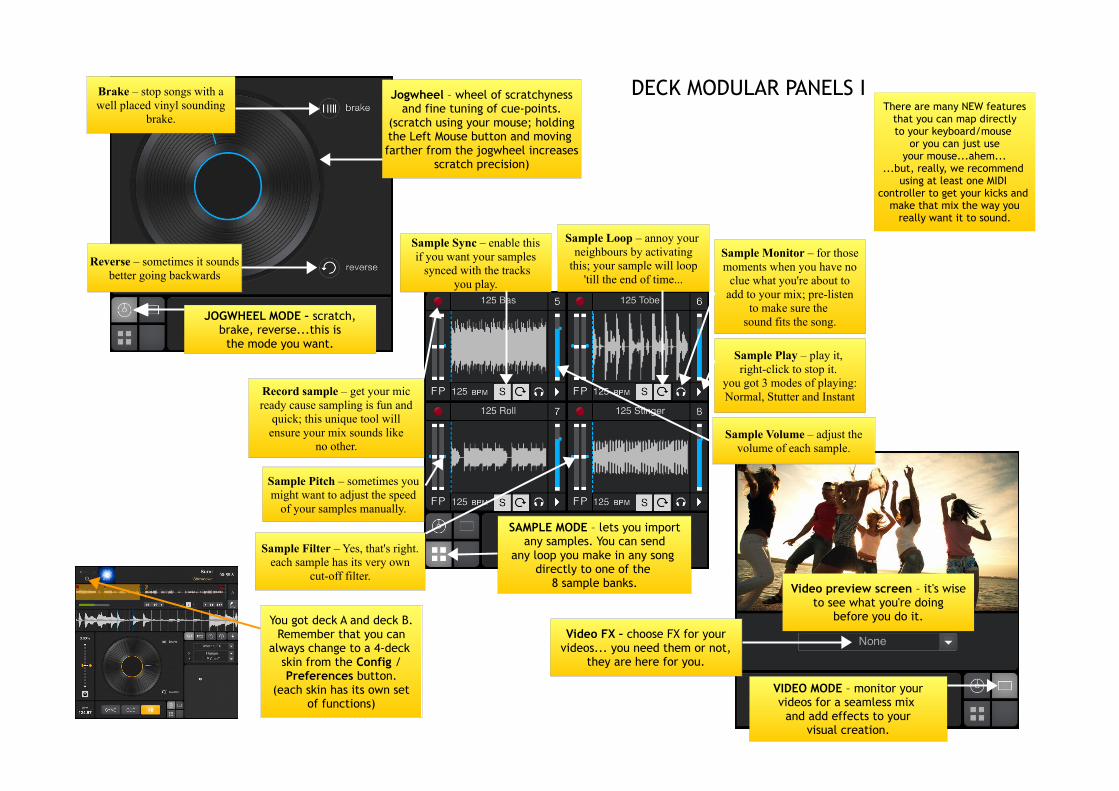
DECK MODULAR PANELS I
JOGWHEEL MODE – scratch,brake, reverse...this isthe mode you want.
VIDEO MODE – monitor yourvideos for a seamless mix
and add effects to yourvisual creation.
Brake – stop songs with awell placed vinyl sounding
brake.
Reverse – sometimes it soundsbetter going backwards
SAMPLE MODE – lets you importany samples. You can send
any loop you make in any song directly to one of the
8 sample banks.
Record sample – get your micready cause sampling is fun and
quick; this unique tool willensure your mix sounds like
no other.
Sample Filter – Yes, that's right.each sample has its very own
cut-off filter.
Sample Volume – adjust thevolume of each sample.
Sample Pitch – sometimes youmight want to adjust the speed
of your samples manually.
Sample Sync – enable thisif you want your samples synced with the tracks
you play.
Sample Loop – annoy your neighbours by activating
this; your sample will loop'till the end of time...
Sample Monitor – for thosemoments when you have no
clue what you're about toadd to your mix; pre-listen
to make sure the sound fits the song.
Sample Play – play it, right-click to stop it.
you got 3 modes of playing:Normal, Stutter and Instant
You got deck A and deck B.Remember that you can
always change to a 4-deck skin from the Config /Preferences button.
(each skin has its own setof functions)
There are many NEW featuresthat you can map directlyto your keyboard/mouse
or you can just useyour mouse...ahem...
...but, really, we recommend using at least one MIDI
controller to get your kicks and make that mix the way you
really want it to sound.
Jogwheel – wheel of scratchynessand fine tuning of cue-points.
(scratch using your mouse; holdingthe Left Mouse button and moving farther from the jogwheel increases
scratch precision)
Video preview screen – it's wiseto see what you're doing
before you do it.
Video FX – choose FX for yourvideos... you need them or not,
they are here for you.

DECK MODULAR PANELS II
Loop controls – used forseamless beat accurateloops. You can performnormal loops, as well asinstant loops with the1/16 to 16 instant loop
buttons.
Send Loop – enables you to sendany loop made into the sample player. You can assign a loop to
any of the 8 sample players.
In/Out – allows you to create an individualloop. Press it once to
begin the loop, again toset the end of the loop
and press it again to makeit smaller and smaller.
X2 – pressing it doublesthe size of the loop.
Save / Call Loops – you can save upto 3 loops, as you'd store cue-points.This allows you to recall any of the
3 saved loops at any time.
Delete loops / cues – press the
corresponding X to deleteany of the 3 loops
X/Y effects pad – move thecursor within the pad
to achieve subtle or extremeeffect results.
(the upper left corner of the pad is the place where no effect applies)
FX Select 1 – this is where youset what effects you want
for the X/Y axis.
Add FX – you can add externalFX (VSTs/AUs) from here or
select the use of thesoftware's internal FX.
FX Select 2 – this is where youset what individual effect
you want.
Dry–Wet FX Parameter – this knobGoverns how much you want
The effect to be heard.
Loop Previous / Next – (the two arrow buttons on either
side of the X2 button)once you have a loop, use these
buttons to move the loop position back and forth within the track.
Loop Exit / Reloop – press itto exit the loop. Press it again
to recreate the last loop.
Speed/Feed FX parameter -sometimes it is fun to tryfor yourself than to read a
manual.
Hot Cue-points – saved cuesthat can be instantly triggered.
How you place them makes them hot or not.
(press and hold a cue-pointto delete it or use the
corresponding X)
Cue In/Out Points – you can set thestart and end points for each song.This is especially useful if you're
using the AutoMix feature.(press X to delete and create
new in/out points)
Cue-point, Mix In/Out position -shows the point where the savedcue-points and cue in/out point
are; soon you will be able toassign names to your cue points...nothing more clearer than a
cue-point name DROP.
Loop less (-) / more (+)Loop to left (<) / right (>) -
pretty self-explanatory.
Vinyl/Slip loop modes – a switchbetween the two; one of them
lets the song slip along while the loop is running... but which one?
Previous/Next Effect - for those who don't
want to use FX select.

MIXERYou got 4 modular mixer panels.This is what you start off with.
You have your Eqs, Mic controls,timecode for your turntables/CDJs
and...
Learn – DJ software can act a foolsometimes. Make it learn what you want
it to do. Press Learn. All mappable functionswill turn blue; then simply click on what
you want to map and press the button, twistthe knob or slide the fader you want to map.Press Learn again. Saved. Done. Mix away!
Record – press this to begin recordingyour session; great for making memories
or for learning from mistakes.
Eq High/Mid/Low – a DJ's bread and butter.Each one goes from -36 db to +12db.
Timecode – got turntables ?connect them to your soundcard
input ; select an ASIO user interfacefrom the Config window ; choose yourtimecode engine ; you're good to go.
(same applies for CDJs)
Line In - a special featurethat allows you to mix a
file with an analog signal from turntables or CDJs;
you can even mix two analoginputs if you want.
Relative – when this mode is active you can rest assured that no matterwhere the needle drops, the trackwill play from the same position ;
this is great for turntablists.
VU-meters – displays the signal strength from each deck
(left and right) and for themaster.
Cue-Pgm Mix – use your headphonesand twist this knob to hear the master,
the monitor or both.
Input Gain – if you feel a trackhas low volume and you've already
pumped up the volume,this is the knob to twist.
Master / Monitor / Microphone Gain -try fiddling with these if you're
not pleased about a certain volume.
Talk – once pressed the mastersignal will drop by 12db.
On Air – press this to enableyour microphone input.
Volume – modify the signalvolume, whatever your
purpose may be.
Pitch Scaling – this is greatif you want to mix harmonically.
Want to mix harmonically ?Just remember this:
if the key value is 10, it will sound great with the values 9,
10 Or 11.
(no m = major key); (m = minor key)
Want to mix a song that's in majorkey with one that's in a minor key ?
Mix tracks with the same number:e.g. 2 songs, one is 10, the otherIs in the key 10m; perfect sound.

It's important to tell time. Who knowswhen you'll run out of battery while
your CPU yells HELP!
SYNC – instantly synchronizesa song (monitor) with the one that's playing (master) ; thisis the holy grail of «I screwedup and need to fix it NOW».
MATCH – matches the speed (BPM)Of a song to the one of the
track that's playing ; nobeatgrid matching though. You'll
need to press Sync for that.
This is the Match Panel, the best windowto have when you need to focus on
well-executed transitions.
Cue-point / Loop markers -lets you see exactly wherecue-points and loops are placed within the track.
(the red bar is the currentposition of the track)
Vertical waveforms – alwayshelpful when you're manually
mixing and need to noticethe slightest changes In beatgrid alignment.
Beat-sync bar – the greenrepresents the difference
between the two beatgrid'sPosition ; keeping the greenIn the middle is usually best.
However, it's best to trust yourears.
Current beat – and 1, 2, 3, 4...you will never be taken by
surprise when mixing, knowingexactly what song is at what
beat; another helpfulinstrument that keeps yourmoves precise and your mix
subtle.
Pitch Bend – manually adjust the speed, slowing or speeding
up when needed to correctand perfect your sound.
Crossfader – the bridge betweenDeck A and deck B; fades the
audio... slide it with no remorse.
Monitor – this needs to be colourfulto hear the preview in your headphones;
if it's white, try pressing it.

If it's information you want,this is the panel for you.
Tag – press it to edit any informationabout any track. That mushroomwill still be the artwork though.
Preview – this is great when youbuild playlists and need to hear
a song for a bit; this is alsocalled the lazy Play button.
Master Video preview –click it to open a separate
video screen that you can mounton a projector, huge TV or on
a secondary screen ; pressFULL SCREEN...shiny.
Video Transition FX – OH YEEE!That's what I want to see.
Sorry, but this is a feature I'vealways wanted.
Audio/Video Crossfader LOCK -it's all up to you... lock themand they move together or
Choose to alternate betweenVideo and audio sources.
Video crossfader – same asthe audio crossfader, only
video.
About...the software and us.
This panel is perfect whenyou plan on mixing video ;
combined with the deck videopanels, it is a video force
to be reckoned with.
Mix Left / Mix Right – no morewaiting, no manual mix ; you're
telling the software to MIX the NEXTsong; left for deck A or right ifyou want deck B to play next.
That's right; this section repeatsitself in all 4 panels... we need
that crossfader in every moment.

PLAYLIST & BROWSER
Audio/Video/Karaoke – filter yourplaylists quickly according to
what you want to find.
Search – you can search fora track by entering its
partial name; press space to enter search mode and press Esc
to exit search mode.
Color markers – colouring has alwaysbeen fun. It can also be useful when
you need a song to pop up the momentyou need it ; this is why it'simportant to highlight the
«precious» ones.
Browser – allows you toexplore and import tracks
from your computer orother portable devices; right-click to create as
many new playlistsas you want.
(rename and rearrangewhenever you feel)
AutoMix – if enabled the softwarewill automatically start mixing
the tracks in the right-side playlist,so take your time to choose and
arrange your playlists well.
Shuffle – ain't nothing wrong witha little chaos in your list ; after all, chaos is an order yet undeciphered.
Sort – by artist, title, BPM, key,comment, time, album, genre,
year, filename, track... then reset.
Search – useful knowledge :write « k » for key,
« b » for bpm, followedby the values that interest
you; timesaving filters.
Playlist – shows you theselected playlist/tracks;
it acts like a virtual recordholder.
Add – press it to add files,folders, playlist or to import
your music directly from Itunes.
Remove – removes theselected song from
the playlist.
Clear – the playlistbecomes emptyafter this click.
Drag Up/Down – movesthe selected trackup or down within
the playlist.
Tag – press it to edit any informationabout any track.
Preview – this is great when youbuild playlists and need to hear
a song for a bit ; use the barTo skip quickly through the song
The list on the right is yourpersonal sidelist ; use it forwhatever purpose, be it for
Automixing or simply to placecertain tracks in another list
as a reminder for later.
The HISTORY list allows youto see what you played in
specific days/months/years.
Use this to your advantage.

PREFERENCES
1
2
3
4
5
6
7
8
9
10
11
12
13
14
15
16
17
18
19
20
21
22

Select User Interface – this is the software's dressing room where you get to pick the outfit that you see appropriate for any occasion; just like a woman's wardrobe, every dress has its own advantages and functionalities (go to www.xylio.com to find more skins).
Show Hints – if you need to see an explanation for every button/knob/slider that you hover on with your mouse, leave this on ; it gets annoying after a while.
Reset Deck after Load – if enabled, any new song that you load will be placed in a freshly reset deck: pitch, volume, eq-kills and cut-off filter.
Reset Pitch after Auto-Mix – when a transition between two songs has been made with Auto-Mix, the pitch (BPM) resets seamlessly to its initial value
Beat-Matching when Auto-Mixing – this option beatmatches the two tracks before cross-fading between them in Auto-Mix mode.
Use slow speed/pitch reset - if enabled, after you press the pitch reset button on a deck, the pitch/speed will gradually (instead of immediately) reset to 0.
Remember History – all the songs you have ever played in our software will be remembered; check your History list to see what you played at any party from any date.
Remember Song Equalizer Settings – when activated, the software remembers any alterations/changes to the High/Mid/Low frequencies of an individual song/any song.
Use Perceptual Automatic Gain – an advanced algorithm that once activated knows what's loud and what's low in volume, automatically correcting the gain levels.
Use Auto-Cueing when loading/Auto-Mix – songs are automatically cued upon loading at the earliest Cue or Mix-In point.
Use Soft sounds for Auto-Cue detection – detects the start or end of the track by using sounds of any frequency (instead of only bass/drums); perfect for accapella lovers.
Use Slip Mode for Looping – this lets the track carry on while the loop plays, disengage the loop and the track continues from where it was supposed to be; just don't let this loopception tempt you into thinking the song isn't going to end.
Use old BPM mode – enable this mode if you have tracks with irregular or changing BPM; or if you like seeing the word « old » checked.
High-quality Time-stretching – unfortunately, we couldn't get this feature to stretch time, so we repurposed it in such a way that you can make use of pitch scaling (key semitones modifier) and high quality time-stretching (tempo adjustments); with this off you'll be hearing low rumble and squeaky sounds, rather than the same key regardless of the speed of the track.
Search in the middle of words – lets you search files by taking the middles of words into account; you can't say «awesome» without «eso», but you can write «eso» to find «awesome».
Auto-Mix fade time – when Auto-Mix mode is active and makes a transition, this parameter controls how long it takes for the crossfader to move between decks.
Auto-Mix Limit Track – this is the Auto-Mix setting that lets you choose how long you want a song to play before it mixes to the next one (30 sec? 1 min? no limit?)
Pitch/Tempo range – by fiddling with this the pitch slider allows 4, 8, 16, 24, 32 or 50% pitch change; the smaller the pitch change, the finer the adjustments.
Cutoff Filter mode – lets you choose the type of cut-off filter that you prefer. You can select between Low Pass, High Pass and a combined Low Pass & High Pass filter mode. If the filter mode is changed, the two cut-off filters are set to Filter OFF.
Key Stepper – adjust the amount you can modify the key of a song by (full tone, semi-tone, quarter tone) ?
Crossfader curve – this controls the way the crossfader is modifying the volume of the 2 decks. If this is set to hard, the volume will jump abruptly from mute to full volume (or from full volume to mute). If the curve is soft, the volume will change smoothly.
Sampler Mode – lets you choose between 3 modes that you can play samples: Normal (press «play» for playback, press it again to stop) Stutter (press «play» for playback, each press acts like Cue-play) and Instant (hold «play» for playback, let go to stop; best for mash-ups).
12
1
2
3
4
5
6
7
8
9
10
11
13
14
15
16
17
18
19
20
21
22

1
2
3
4
5
6
7

Select audio device – selects the audio output where the Master signal comes out. Usually, you will select the soundcard / audio device where your speakers are connected. If you have internal speakers, the device is usually called “Built-in”, “Internal Speakers” or has a similar name. Optionally, if you have a multi-channel sound device you can also use this to output the Monitor signal as well. (remember that the ASIO variant is always the best choice; no ASIO? Try choosing WASAPI for better sound and latency).
Output Routing – this lets you select how you want each deck, the sampler and the heaphones to be handled by the master device. This refers to the device that you selected at the Select audio device.
Disable crossfader/volume faders (external mixer mode) – if you don't want to use future.dj pro's internal mixer, you have theoption of using an external mixer. If your soundcard has enough outputs you can have independent outputs for Deck A, Deck B, Sampler + Mic, Monitor. You can then mix these as you see fit on your external mixer. Please note that mix recording will not work in this case, since the software doesn't do the actual mix itself.
Select an additional audio device for previewing / monitoring – in case you don't have a multi-channel sound device you can still connect your headphones to a secondary output by selecting it here. It is, however, recommended that you have one sound device or hardware controller with multiple audio outputs (multi-channel) than to have two different audio devices (sync problems may occur in this scenario).
Latency – this is the amount of time from giving/issuing a command to its actual execution. For example, if the latency is 100ms (0.1 seconds), after you press the Play button it will take another 100ms until the sound is actually heard in the speakers / headphones. A lower latency will increase the interactivity by making the program respond faster to the commands (e.g. more naturalsounding scratch, etc.); on slower systems, sound dropouts and glitches tend to occur.
Input Routing – this lets you change how your inputs are set (microphones and inputs you can set on each deck); the settings depend on the audio interface that you selected from the Select audio device.
Current audio settings – this simply states the possibilities or limitations that your setup has from the way you set your outputs/inputs.
1
2
1
1
3
4
5
6
7

Select the time-coded vinyl/CD type - you can use different types / brands /
marks of timecoded vinyls/CDs. Here, you can choose the desired
timecoded disk that you want to use;try choosing the option that works best with your timecode vinyl/CD.
Connected external controllers – this iswhere you will see the controllers and other
devices that are connected and can be used inthe software; you can connect and use
up to 8 devices at once.
The devices that are natively supported(all functions ready mapped) will have
the 'using script' text at the end. The onesthat don't can still be used just as well
by using the Learn function to map themto almost any feature.

1
2
3
4
5
6
7
8
9
10
11
12
13
14