Privileged Account Management for the Financial Services ... · Privileged account management (PAM)...
114
NIST SPECIAL PUBLICATION 1800-18C Privileged Account Management for the Financial Services Sector Volume C: How-To Guides Karen Waltermire National Cybersecurity Center of Excellence Information Technology Laboratory Tom Conroy Marisa Harriston Chinedum Irrechukwu Navaneeth Krishnan James Memole-Doodson Benjamin Nkrumah Harry Perper Susan Prince Devin Wynne The MITRE Corporation McLean, VA September 2018 DRAFT This publication is available free of charge from: https://www.nccoe.nist.gov/projects/use-cases/privileged-account-management
Transcript of Privileged Account Management for the Financial Services ... · Privileged account management (PAM)...

NIST SPECIAL PUBLICATION 1800-18C
Privileged Account Management for the Financial Services Sector Volume C: How-To Guides
Karen Waltermire National Cybersecurity Center of Excellence Information Technology Laboratory
Tom Conroy Marisa Harriston Chinedum Irrechukwu Navaneeth Krishnan James Memole-Doodson Benjamin Nkrumah Harry Perper Susan Prince Devin Wynne The MITRE Corporation McLean, VA
September 2018 DRAFT This publication is available free of charge from: https://www.nccoe.nist.gov/projects/use-cases/privileged-account-management

DRAFT
NIST SP 1800-18C: Privileged Account Management for the Financial Services Sector i
DISCLAIMER
Certain commercial entities, equipment, products, or materials may be identified in this document in
order to describe an experimental procedure or concept adequately. Such identification is not intended
to imply recommendation or endorsement by NIST or NCCoE, nor is it intended to imply that the
entities, equipment, products, or materials are necessarily the best available for the purpose.
National Institute of Standards and Technology Special Publication 1800-18C, Natl. Inst. Stand. Technol.
Spec. Publ. 1800-18C, 104 pages, September 2018, CODEN: NSPUE2
FEEDBACK
You can improve this guide by contributing feedback. As you review and adopt this solution for your
own organization, we ask you and your colleagues to share your experience and advice with us.
Comments on this publication may be submitted to: [email protected].
Public comment period: September 28, 2018 through November 30, 2018
All comments are subject to release under the Freedom of Information Act (FOIA).
National Cybersecurity Center of Excellence
National Institute of Standards and Technology
100 Bureau Drive
Mailstop 2002
Gaithersburg, MD 20899
Email: [email protected]

DRAFT
NIST SP 1800-18C: Privileged Account Management for the Financial Services Sector ii
NATIONAL CYBERSECURITY CENTER OF EXCELLENCE
The National Cybersecurity Center of Excellence (NCCoE), a part of the National Institute of Standards
and Technology (NIST), is a collaborative hub where industry organizations, government agencies, and
academic institutions work together to address businesses’ most pressing cybersecurity issues. This
public-private partnership enables the creation of practical cybersecurity solutions for specific
industries, as well as for broad, cross-sector technology challenges. Through consortia under
Cooperative Research and Development Agreements (CRADAs), including technology partners—from
Fortune 50 market leaders to smaller companies specializing in information technology (IT) security—
the NCCoE applies standards and best practices to develop modular, easily adaptable example
cybersecurity solutions using commercially available technology. The NCCoE documents these example
solutions in the NIST Special Publication 1800 series, which maps capabilities to the NIST Cyber Security
Framework and details the steps needed for another entity to recreate the example solution. The NCCoE
was established in 2012 by NIST in partnership with the State of Maryland and Montgomery County,
Md.
To learn more about the NCCoE, visit https://www.nccoe.nist.gov/. To learn more about NIST, visit
https://www.nist.gov.
NIST CYBERSECURITY PRACTICE GUIDES
NIST Cybersecurity Practice Guides (Special Publication Series 1800) target specific cybersecurity
challenges in the public and private sectors. They are practical, user-friendly guides that facilitate the
adoption of standards-based approaches to cybersecurity. They show members of the information
security community how to implement example solutions that help them align more easily with relevant
standards and best practices, and provide users with the materials lists, configuration files, and other
information they need to implement a similar approach.
The documents in this series describe example implementations of cybersecurity practices that
businesses and other organizations may voluntarily adopt. These documents do not describe regulations
or mandatory practices, nor do they carry statutory authority.
ABSTRACT
Privileged account management (PAM) is a domain within identity and access management (IdAM) that
focuses on monitoring and controlling the use of privileged accounts. Privileged accounts include local
and domain administrative accounts, emergency accounts, application management, and service
accounts. These powerful accounts provide elevated, often nonrestricted, access to the underlying IT
resources and technology, which is why external and internal malicious actors seek to gain access to
them. Hence, it is critical to monitor, audit, control, and manage privileged account usage. Many
organizations, including financial sector companies, face challenges in managing privileged accounts.

DRAFT
NIST SP 1800-18C: Privileged Account Management for the Financial Services Sector iii
The goal of this project is to demonstrate a PAM capability that effectively protects, monitors, and
manages privileged account access, including life-cycle management, authentication, authorization,
auditing, and access controls.
KEYWORDS
Access control, auditing, authentication, authorization, life-cycle management, multifactor
authentication, PAM, privileged account management, provisioning management
ACKNOWLEDGMENTS
We are grateful to the following individuals for their generous contributions of expertise and time.
Name Organization
Dan Morgan Bomgar (formerly Lieberman Software)
David Weller Bomgar (formerly Lieberman Software)
Oleksiy Bidniak Ekran System
Oleg Shomonko Ekran System
Karl Kneis IdRamp
Eric Vinton IdRamp
Michael Fagan NIST
Will LaSala OneSpan (formerly VASCO)
Michael Magrath OneSpan (formerly VASCO)
Jim Chmura Radiant Logic
Don Graham Radiant Logic
Timothy Keeler Remediant
Paul Lanzi Remediant

DRAFT
NIST SP 1800-18C: Privileged Account Management for the Financial Services Sector iv
Name Organization
Michael Dalton RSA
Timothy Shea RSA
Adam Cohn Splunk
Pam Johnson TDi Technologies
Clyde Poole TDi Technologies
Sallie Edwards The MITRE Corporation
Sarah Kinling The MITRE Corporation
The Technology Partners/Collaborators who participated in this build submitted their capabilities in
response to a notice in the Federal Register. Respondents with relevant capabilities or product
components were invited to sign a Cooperative Research and Development Agreement (CRADA) with
NIST, allowing them to participate in a consortium to build this example solution. We worked with:
Technology Partner/Collaborator Build Involvement
Bomgar (formerly Lieberman Software) Red Identity Suite
Ekran System Ekran System Client
IdRamp Secure Access
OneSpan (formerly VASCO) DIGIPASS
Radiant Logic RadiantOne FID
Remediant SecureONE
RSA SecureID Access

DRAFT
NIST SP 1800-18C: Privileged Account Management for the Financial Services Sector v
Technology Partner/Collaborator Build Involvement
Splunk Splunk Enterprise
TDi Technologies ConsoleWorks

DRAFT
NIST SP 1800-18C: Privileged Account Management for the Financial Services Sector vi
Contents 1
1 Introduction ........................................................................................1 2
1.1 Practice Guide Structure ............................................................................................... 1 3
1.2 Build Overview .............................................................................................................. 2 4
1.3 Typographic Conventions .............................................................................................. 3 5
2 Product Installation Guides ..................................................................3 6
2.1 Microsoft Active Directory ............................................................................................ 3 7
2.1.1 How It’s Used ................................................................................................................ 3 8
2.1.2 Virtual Machine Configuration ..................................................................................... 3 9
2.1.3 Installation .................................................................................................................... 4 10
2.1.4 DNS Configuration ........................................................................................................ 4 11
2.1.5 Group Policy Object Configuration ............................................................................... 5 12
2.1.6 Scripts ........................................................................................................................... 5 13
2.1.7 Splunk Universal Forwarder ......................................................................................... 8 14
2.2 Bomgar Privileged Identity ............................................................................................ 8 15
2.2.1 How It’s Used ................................................................................................................ 8 16
2.2.2 Virtual Machine Configuration ..................................................................................... 8 17
2.2.3 Prerequisites ................................................................................................................. 9 18
2.2.4 Installing Privileged Identity ......................................................................................... 9 19
2.2.5 Configuration .............................................................................................................. 13 20
2.2.6 Installing Privileged Identity Application Launcher .................................................... 16 21
2.2.7 Configure Bomgar Privileged Identity with IdRamp SAML Authentication ............... 17 22
2.2.8 Configuring Microsoft SQL Server Access ................................................................... 20 23
2.2.9 Configuring Twitter Account Launching ..................................................................... 33 24
2.2.10 Configuring Multifactor Authentication with RSA ...................................................... 36 25
2.2.11 Splunk Universal Forwarder ....................................................................................... 40 26
2.3 TDi ConsoleWorks ....................................................................................................... 41 27
2.3.1 How It’s Used .............................................................................................................. 41 28
2.3.2 Virtual Machine Configuration ................................................................................... 41 29

DRAFT
NIST SP 1800-18C: Privileged Account Management for the Financial Services Sector vii
2.3.3 Installation .................................................................................................................. 42 30
2.3.4 Configuration of Back-End Authentication ................................................................. 42 31
2.3.5 Creating Users............................................................................................................. 45 32
2.3.6 Creating Tags .............................................................................................................. 47 33
2.3.7 Creating SSH Consoles ................................................................................................ 47 34
2.3.8 Creating Web Consoles............................................................................................... 49 35
2.3.9 Assigning Tags to Consoles ......................................................................................... 50 36
2.3.10 Creating Profiles for Users .......................................................................................... 51 37
2.3.11 Assigning Permissions to Profiles ............................................................................... 52 38
2.4 Ekran System ............................................................................................................... 53 39
2.4.1 How It’s Used .............................................................................................................. 54 40
2.4.2 Virtual Machine Configuration ................................................................................... 54 41
2.4.3 Prerequisites ............................................................................................................... 54 42
2.4.4 Installing Ekran System ............................................................................................... 54 43
2.5 Radiant Logic ............................................................................................................... 55 44
2.5.1 How It’s Used .............................................................................................................. 55 45
2.5.2 Virtual Machine .......................................................................................................... 55 46
2.5.3 Prerequisites ............................................................................................................... 55 47
2.5.4 Installation .................................................................................................................. 56 48
2.5.5 Configure FID .............................................................................................................. 56 49
2.5.6 Configure Logging ....................................................................................................... 58 50
2.5.7 Configure SSL .............................................................................................................. 61 51
2.5.8 Splunk Universal Forwarder ....................................................................................... 62 52
2.6 IdRamp ........................................................................................................................ 63 53
2.6.1 How It’s Used .............................................................................................................. 63 54
2.6.2 Prerequisites ............................................................................................................... 63 55
2.6.3 Installation .................................................................................................................. 63 56
2.7 OneSpan IDENTIKEY Authentication Server ................................................................ 65 57
2.7.1 How It’s Used .............................................................................................................. 65 58
2.7.2 Virtual Machine Configuration ................................................................................... 65 59
2.7.3 Prerequisites ............................................................................................................... 65 60

DRAFT
NIST SP 1800-18C: Privileged Account Management for the Financial Services Sector viii
2.7.4 Installation .................................................................................................................. 66 61
2.7.5 Configuration .............................................................................................................. 66 62
2.7.6 Creating a Domain and Policies .................................................................................. 68 63
2.7.7 Importing DIGIPASSes ................................................................................................. 72 64
2.7.8 Configuring to Use Radiant Logic as a Back-End Authentication Server .................... 73 65
2.7.9 Integration with TDi ConsoleWorks ........................................................................... 77 66
2.7.10 Installing User Websites ............................................................................................. 77 67
2.7.11 Creating Component Records in IDENTIKEY Authentication Server .......................... 78 68
2.8 Base Linux OS .............................................................................................................. 80 69
2.8.1 Virtual Machine Configuration ................................................................................... 80 70
2.8.2 Domain Join Configuration ......................................................................................... 81 71
2.9 Microsoft SQL Server Installation on Ubuntu Linux .................................................... 83 72
2.9.1 How It’s Used .............................................................................................................. 83 73
2.9.2 Virtual Machine Configuration ................................................................................... 83 74
2.9.3 Firewall Configuration ................................................................................................ 84 75
2.9.4 Installation and Initial Configuration .......................................................................... 84 76
2.10 Samba File Server ........................................................................................................ 86 77
2.10.1 How It’s Used .............................................................................................................. 86 78
2.10.2 Virtual Machine Configuration ................................................................................... 86 79
2.10.3 Firewall Configuration ................................................................................................ 87 80
2.10.4 Installation and Configuration .................................................................................... 87 81
2.11 Remediant SecureONE ................................................................................................ 89 82
2.11.1 How It’s Used .............................................................................................................. 89 83
2.11.2 Virtual Machine Configuration ................................................................................... 89 84
2.11.3 Installation and Initial Configuration .......................................................................... 90 85
2.11.4 Domain Configuration ................................................................................................ 90 86
2.11.5 Managing Systems ...................................................................................................... 91 87
2.11.6 Adding New Users ...................................................................................................... 92 88
2.11.7 Requesting Privileged Access to Protected System ................................................... 93 89
2.12 RSA Authentication Manager ...................................................................................... 95 90
2.12.1 How It’s Used .............................................................................................................. 95 91

DRAFT
NIST SP 1800-18C: Privileged Account Management for the Financial Services Sector ix
2.12.2 Installation and Initial Configuration .......................................................................... 95 92
2.12.3 LDAP Integration ......................................................................................................... 98 93
2.12.4 Token Assignment ...................................................................................................... 99 94
2.12.5 Software Token Profiles and Token Distribution ..................................................... 100 95
2.13 Splunk ........................................................................................................................ 101 96
2.13.1 How It’s Used ............................................................................................................ 101 97
2.13.2 Installation ................................................................................................................ 101 98
2.13.3 Queries...................................................................................................................... 101 99
2.13.4 DemoBomgar-AD-Auth-UnauthV1 ........................................................................... 101 100
2.13.5 DemoRadiant-AD-Event-Details ............................................................................... 102 101
2.13.6 SSL Forwarding ......................................................................................................... 102 102
Appendix A List of Acronyms ............................................................... 103103

DRAFT
NIST SP 1800-18C: Privileged Account Management for the Financial Services Sector 1
1 Introduction 104
The following volumes of this guide show information technology (IT) professionals and security 105
engineers how we implemented this example solution. We cover all of the products employed in this 106
reference design. We do not recreate the product manufacturers’ documentation, which is presumed to 107
be widely available. Rather, these volumes show how we incorporated the products together in our 108
environment. 109
Note: These are not comprehensive tutorials. There are many possible service and security configurations 110
for these products that are out of scope for this reference design. 111
1.1 Practice Guide Structure 112
This National Institute of Standards and Technology (NIST) Cybersecurity Practice Guide demonstrates a 113
standards-based reference design and provides users with the information they need to replicate the 114
privileged account management (PAM) example solution. This reference design is modular and can be 115
deployed in whole or in part. 116
This guide contains three volumes: 117
▪ NIST Special Publication (SP) 1800-18A: Executive Summary 118
▪ NIST SP 1800-18B: Approach, Architecture, and Security Characteristics – what we built and why 119
▪ NIST SP 1800-18C: How-To Guides – instructions for building the example solution (you are 120 here) 121
Depending on your role in your organization, you might use this guide in different ways: 122
Business decision makers, including chief security and technology officers, will be interested in the 123
Executive Summary, NIST SP 1800-18A, which describes the following topics: 124
▪ challenges enterprises face in managing privileged accounts 125
▪ example solution built at the National Cybersecurity Center of Excellence (NCCoE) 126
▪ benefits of adopting the example solution 127
Technology or security program managers who are concerned with how to identify, understand, assess, 128
and mitigate risk will be interested in NIST SP 1800-18B, which describes what we did and why. The 129
following sections will be of particular interest: 130
▪ Section 3.4, Risk, provides a description of the risk analysis we performed 131
▪ Section 3.4.2, Security Control Map, maps the security characteristics of this example solution to 132 cybersecurity standards and best practices 133

DRAFT
NIST SP 1800-18C: Privileged Account Management for the Financial Services Sector 2
You might share the Executive Summary, NIST SP 1800-18A, with your leadership team members to help 134
them understand the importance of adopting standards-based PAM. 135
IT professionals who want to implement an approach like this will find this whole practice guide useful. 136
You can use this How-To portion of the guide, NIST SP 1800-18C, to replicate all or parts of the build 137
created in our lab. This How-To portion of the guide provides specific product installation, configuration, 138
and integration instructions for implementing the example solution. We do not recreate the product 139
manufacturers’ documentation, which is generally widely available. Rather, we show how we 140
incorporated the products together in our environment to create an example solution. 141
This guide assumes that IT professionals have experience implementing security products within the 142
enterprise. While we have used a suite of commercial products to address this challenge, this guide does 143
not endorse these particular products. Your organization can adopt this solution or one that adheres to 144
these guidelines in whole, or you can use this guide as a starting point for tailoring and implementing 145
parts of a PAM system to manage and monitor the use of privileged accounts. Your organization’s 146
security experts should identify the products that will best integrate with your existing tools and IT 147
system infrastructure. We hope that you will seek products that are congruent with applicable standards 148
and best practices. Section 3.6, Technologies, of Volume B lists the products that we used and maps 149
them to the cybersecurity controls provided by this reference solution. 150
A NIST Cybersecurity Practice Guide does not describe “the” solution, but a possible solution. This is a 151
draft guide. We seek feedback on its contents and welcome your input. Comments, suggestions, and 152
success stories will improve subsequent versions of this guide. Please contribute your thoughts to 153
[email protected]. 154
1.2 Build Overview 155
The NCCoE built a hybrid virtual-physical laboratory environment to explore methods to effectively 156
manage and monitor the authorized use of privileged accounts and to explore techniques to protect 157
against and detect the unauthorized use of these accounts. The NCCoE also explored the issues of 158
auditing and reporting that IT systems use to support incident recovery and investigations. The servers 159
in the virtual environment were built to the hardware specifications of their specific software 160
components. 161
The NCCoE worked with members of the Financial Sector Community of Interest to develop a diverse 162
(but noncomprehensive) set of use-case scenarios against which to test the reference implementation. 163
These use-case scenarios are detailed in Volume B, Section 5.5. For a detailed description of our 164
architecture, see Volume B, Section 4. 165

DRAFT
NIST SP 1800-18C: Privileged Account Management for the Financial Services Sector 3
1.3 Typographic Conventions 166
The following table presents typographic conventions used in this volume. 167
Typeface/Symbol Meaning Example
Italics file names and path names; references to documents that are not hyperlinks; new terms; and placeholders
For detailed definitions of terms, see the NCCoE Glossary.
Bold names of menus, options, command buttons, and fields
Choose File > Edit.
Monospace command-line input, on-screen computer output, sample code examples, and status codes
mkdir
Monospace Bold command-line user input contrasted with computer output
service sshd start
blue text link to other parts of the document, a web URL, or an email address
All publications from NIST’s NCCoE are available at https://www.nccoe.nist.gov.
2 Product Installation Guides 168
This section of the practice guide contains detailed instructions for installing and configuring all of the 169
products used to build an instance of the example solution. 170
2.1 Microsoft Active Directory 171
2.1.1 How It’s Used 172
Microsoft Active Directory (AD) serves as the privileged account identity repository, the Domain Name 173
System (DNS) server, and the certificate authority (CA). 174
2.1.2 Virtual Machine Configuration 175
The Microsoft AD virtual machine is configured as follows: 176
▪ 4 central processing unit (CPU) cores 177
▪ 16 gigabytes (GB) of random-access memory (RAM) 178

DRAFT
NIST SP 1800-18C: Privileged Account Management for the Financial Services Sector 4
▪ 120 GB hard disk drive (HDD) 179
▪ 1 network adapter 180
Network Configuration (Interface 1): 181
▪ Internet protocol version 4 (IPv4): manual 182
▪ Internet protocol version 6 (IPv6): disabled 183
▪ Internet protocol (IP) address: 172.16.3.10 184
▪ Netmask: 255.255.255.0 185
▪ Gateway: 172.16.3.1 186
▪ DNS name servers: 172.16.3.10 187
▪ DNS-search domains: AcmeFinancial.com 188
2.1.3 Installation 189
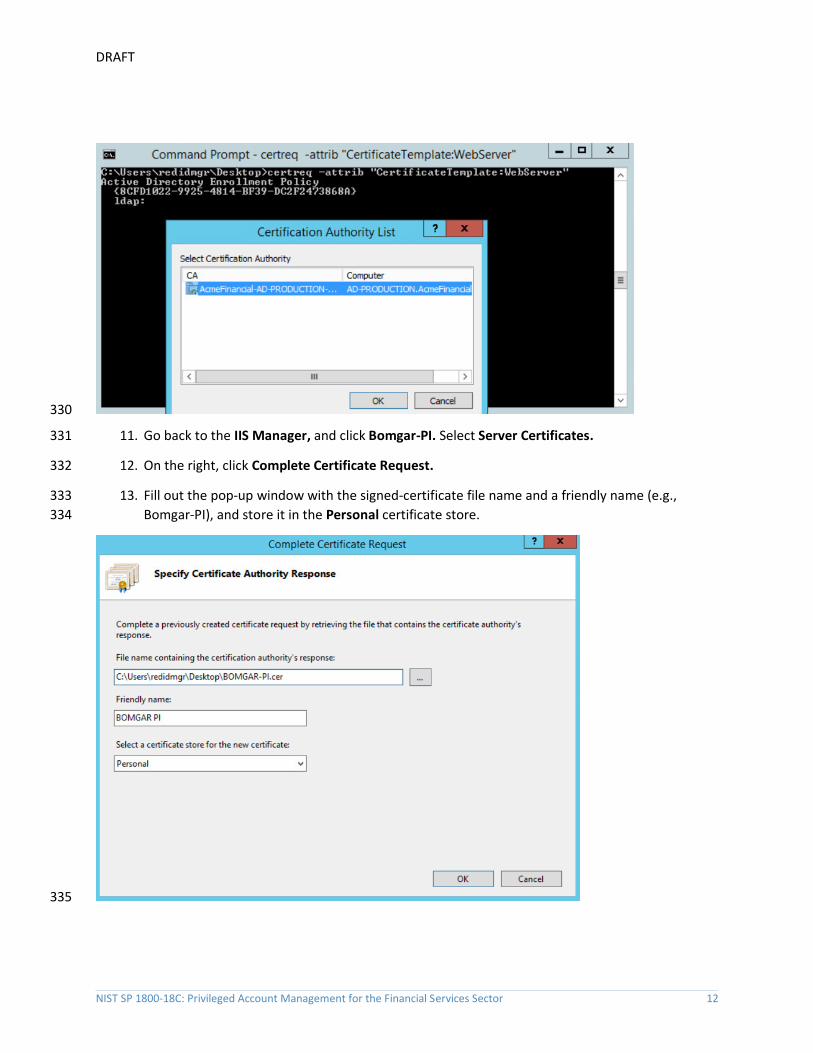
Install the AD domain services and CA according to the instructions provided at the following links: 190
https://docs.microsoft.com/en-us/windows-server/identity/ad-ds/deploy/install-active-directory-191
domain-services--level-100- 192
https://docs.microsoft.com/en-us/windows-server/networking/core-network-guide/cncg/server-193
certs/install-the-certification-authority 194
2.1.4 DNS Configuration 195
1. Create the host records and reverse entries in the AcmeFinancial.com DNS service for the 196
following servers: 197
a. Bomgar Privileged Identity 198
b. TDi ConsoleWorks 199
c. Splunk Enterprise 200
d. Radiant Logic Federated Identity (FID) 201
e. Ekran System 202
f. Remediant SecureONE 203
g. RSA Authentication Manager 204
h. OneSpan IDENTIKEY 205

DRAFT
NIST SP 1800-18C: Privileged Account Management for the Financial Services Sector 5
2.1.5 Group Policy Object Configuration 206
1. Open Group Policy Management. 207
2. Under the Default Domain Policy, make the following changes under Computer Configuration > 208
Policies > Windows Settings > Security Settings > Advanced Audit Configuration: 209
210
2.1.6 Scripts 211
The following scripts were created to easily import and correlate data once forwarded to Splunk 212
Enterprise. 213
The following Python script parses data extracted from the Windows security event log. The script is 214
located at c:\. 215
import csv 216
import re 217
from subprocess import check_output 218

DRAFT
NIST SP 1800-18C: Privileged Account Management for the Financial Services Sector 6
csvfile = open('Final_AD.csv', 'w+') 219
wr = csv.writer(csvfile, quoting=csv.QUOTE_ALL) 220
csvlist = ["Event", "UserSubject", "UserObject", "Timestamp"] 221
wr.writerow(csvlist) 222
with open('ADLOG.csv', 'r') as f: 223
reader = csv.reader(f) 224
zerothrow = 1 225
for row in reader: 226
csvlist = [] 227
if zerothrow == 1: 228
zerothrow = 0 229
else: 230
parse_list = row[1].split('\n') 231
#print parse_list 232
#break 233
csvlist.append(parse_list[0].replace('\t', '').replace('\r', '')) 234
csvlist.append(parse_list[4].replace('\t', '').replace('\r', 235 '').replace('Account Name:', '')) 236
if row[4] == "4728": 237
win_command = parse_list[10].replace('\t', '').replace('\r', 238 '').replace('Account Name:', '') 239
win_command = win_command[:3] + '"' + win_command[3:] 240
sec_index = win_command.index(",CN=") 241
win_command = win_command[:sec_index] + '"' + 242 win_command[sec_index:] 243
win_command = "dsquery * " + win_command + " -scope base -attr 244 sAMAccountName" 245
account = check_output(win_command, shell = True).decode() 246
account = account.replace('sAMAccountName', '').replace('\n', 247 '').replace(' ', '') 248
csvlist.append(account) 249
else: 250

DRAFT
NIST SP 1800-18C: Privileged Account Management for the Financial Services Sector 7
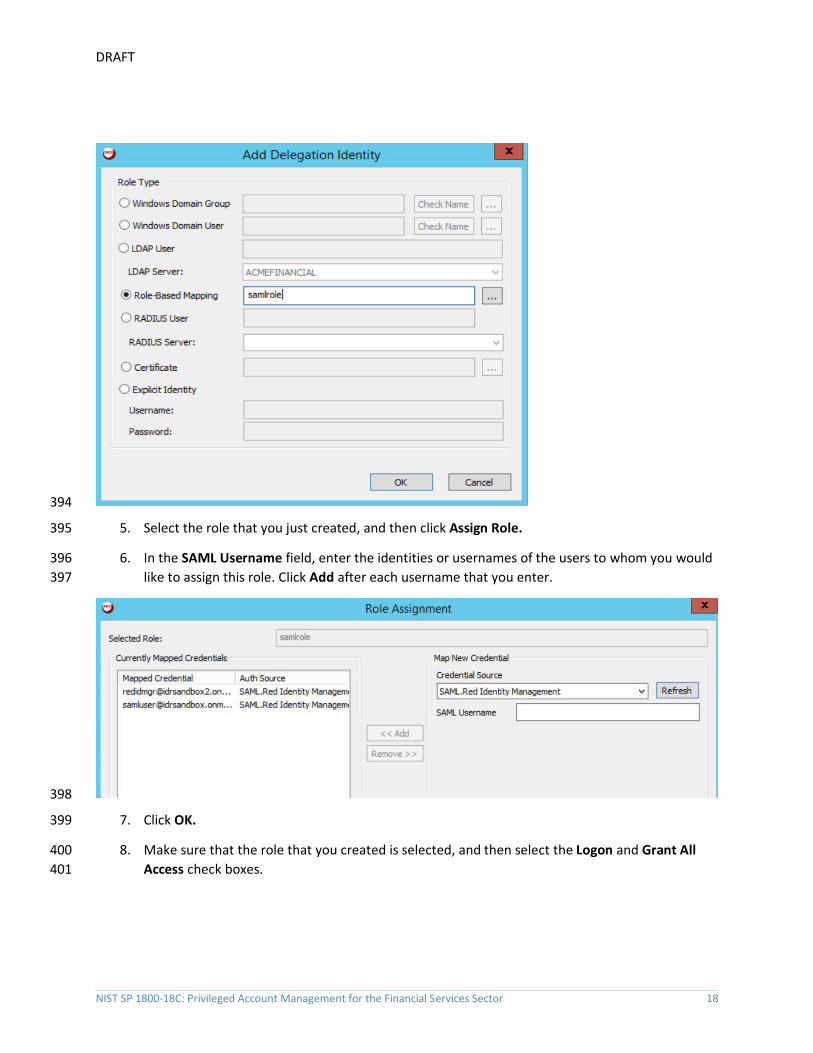
csvlist.append(parse_list[10].replace('\t', '').replace('\r', 251 '').replace('Account Name:', '')) 252
csvlist.append(row[2].replace('\t', '').replace('\r', '')) 253
wr.writerow(csvlist) 254
#temp = check_output("dir C:", shell=True).decode() 255
#print(temp) 256
csvfile.close() 257
The following PowerShell script extracts data from the Windows security event log and executes the 258
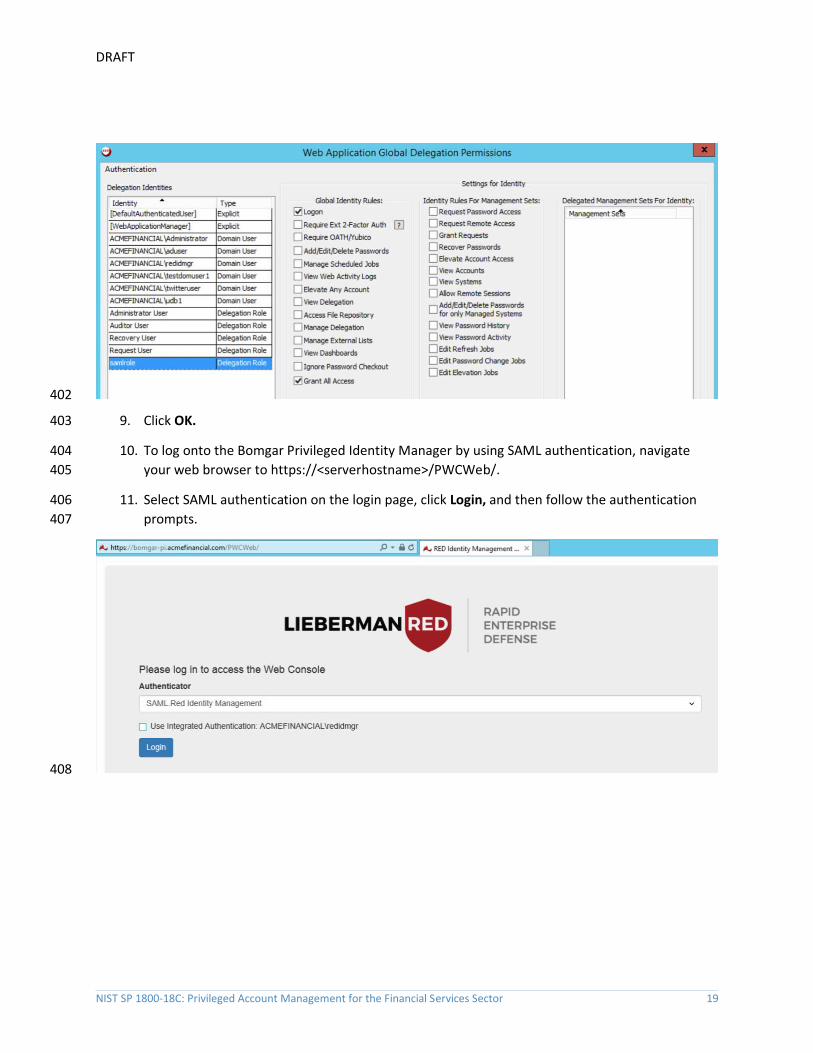
Python script above: 259
Set-Variable -Name EventAgeDays -Value 2 #we will take events for the latest 2 days 260
Set-Variable -Name Computer -Value "AD-Production" # replace it with your server 261 names 262
Set-Variable -Name LogNames -Value "Security" # Checking app and system logs 263
Set-Variable -Name EventTypes -Value @(7001, 7002, 4720, 4722, 4725, 4726, 4728, 4738) 264
# Loading only Errors and Warnings 265
Set-Variable -Name ExportFolder -Value "C:\" 266
$el_c = @() #consolidated error log 267
$now=get-date 268
$startdate=$now.adddays(-$EventAgeDays) 269
$ExportFile=$ExportFolder + "ADLOG.csv" # we cannot use standard delimiteds like ":" 270
Write-Host Processing $Computer\$LogNames 271
$el = get-eventlog -ComputerName $Computer -log $Lognames -After $startdate -272 InstanceId $EventTypes 273
$el_c += $el #consolidating 274
$el_sorted = $el_c | Sort-Object TimeGenerated #sort by time 275
Write-Host Exporting to $ExportFile 276
$el_sorted|Select EntryType, Message, TimeGenerated, Source, EventID, MachineName | 277 Export-CSV $ExportFile -NoTypeInfo #EXPORT 278
Write-Host Done! 279
python adparse.py 280

DRAFT
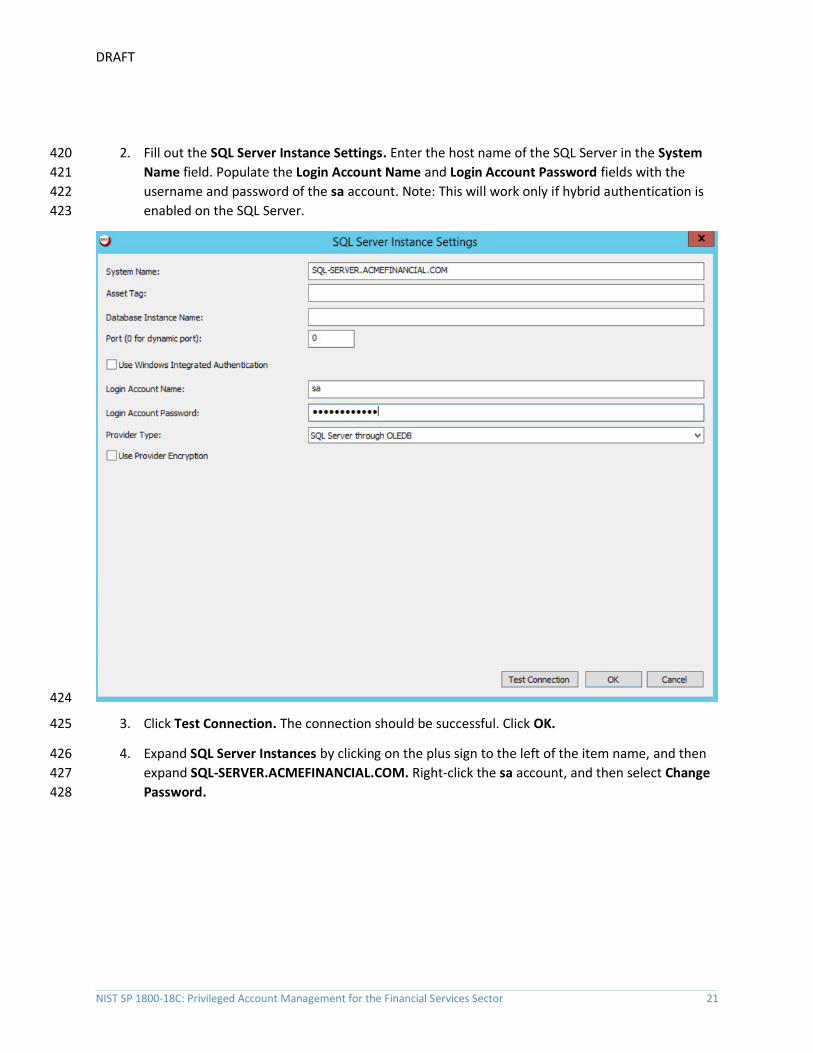
NIST SP 1800-18C: Privileged Account Management for the Financial Services Sector 8
2.1.7 Splunk Universal Forwarder 281
Install Splunk Universal Forwarder by following the instructions provided at 282
http://docs.splunk.com/Documentation/Forwarder/7.1.3/Forwarder/Abouttheuniversalforwarder. 283
Edit the inputs.conf file to monitor the Final_AD.csv file created from the Python script above and to 284
forward logs to the demo index at Splunk Enterprise. 285
286
2.2 Bomgar Privileged Identity 287
Bomgar Privileged Identity is a PAM solution that manages account passwords in Microsoft AD. 288
2.2.1 How It’s Used 289
Privileged Identity is used as a PAM provider in the example implementation. It provides a web 290
application server that users log into with unprivileged accounts. These users are then allowed to launch 291
applications as privileged users, based on the policy and configuration in Privileged Identity. 292
2.2.2 Virtual Machine Configuration 293
The Privileged Identity virtual machine is configured as follows: 294
▪ Windows Server 2012 R2 295
▪ 4 CPU cores 296
▪ 16 GB of RAM 297
▪ 60 GB of storage 298
▪ 1 network interface controller/card (NIC) 299

DRAFT
NIST SP 1800-18C: Privileged Account Management for the Financial Services Sector 9
Network Configuration (Interface 1): 300
▪ IPv4: manual 301
▪ IPv6: disabled 302
▪ IPv4 address: 172.16.1.10 303
▪ Netmask: 255.255.255.0 304
▪ Gateway: 172.16.1.1 305
▪ DNS name servers: 172.16.3.10 306
▪ DNS-search domains: not applicable (N/A) 307
2.2.3 Prerequisites 308
▪ Before Privileged Identity can be installed, Microsoft Structured Query Language (SQL) Server 309 must be installed. In a test environment, Microsoft SQL Server Express also is acceptable. 310
▪ The web application server’s requirements include Internet Information Services (IIS) and 311 Microsoft .NET Framework 4.5.2 or later. 312
▪ A full list of requirements can be found in the Installation Guide on Bomgar’s website. 313
2.2.4 Installing Privileged Identity 314
To configure IIS for use with Bomgar’s web application server, a certificate signed by AD Certificate 315
Services was created. 316
1. Open Server Manager. 317
2. Click Tools > Internet Information Services (IIS) Manager. 318
3. Click on the name of the server (in this case, Bomgar-PI), and select Server Certificates. 319

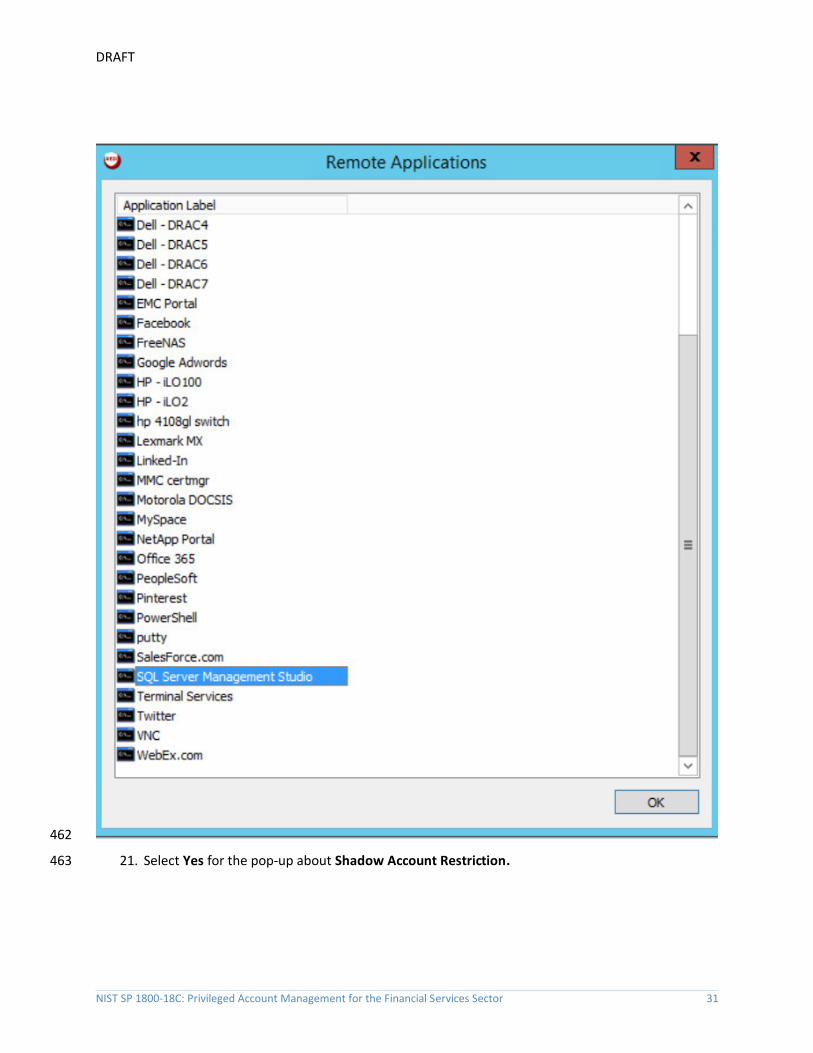
DRAFT
NIST SP 1800-18C: Privileged Account Management for the Financial Services Sector 10
320
4. On the right, click Create Certificate Request. 321
5. Fill out the Distinguished Name Properties, and then click Next. 322
6. Select a bit length of 2048, and then click Next. 323
7. Give the certificate a file name, and then click Finish. 324
8. Using the certreq command in the Command Prompt, enter certreq -attrib 325
“CertificateTemplate:WebServer”. 326
9. Select the certificate file that was created in Step 7, and then click Open. 327

DRAFT
NIST SP 1800-18C: Privileged Account Management for the Financial Services Sector 11
328
10. Choose the Domain Controller CA from the Certification Authority List, and then click OK. 329
DRAFT
NIST SP 1800-18C: Privileged Account Management for the Financial Services Sector 12
330
11. Go back to the IIS Manager, and click Bomgar-PI. Select Server Certificates. 331
12. On the right, click Complete Certificate Request. 332
13. Fill out the pop-up window with the signed-certificate file name and a friendly name (e.g., 333
Bomgar-PI), and store it in the Personal certificate store. 334
335

DRAFT
NIST SP 1800-18C: Privileged Account Management for the Financial Services Sector 13
14. Click OK 336
15. Create a Secure Sockets Layer (SSL) binding with that certificate by following documentation 337
from Microsoft. 338
You are now ready to begin following further installation instructions that are publicly available on 339
Bomgar’s website. 340
2.2.5 Configuration 341
Using the Bomgar Privileged Identity Admin Guide, complete the configuration steps provided in the 342
following subsections. 343
2.2.5.1 Management Set 344
1. Create a new management set for the AD domain. 345
2. Configure the management set to include systems by querying AD. 346
3. Configure the management set to scan for the target type by scanning for a Secure Shell (SSH) 347
server. Set the default to Windows if there is no match. 348

DRAFT
NIST SP 1800-18C: Privileged Account Management for the Financial Services Sector 14
349
4. Configure the management set to have a second inclusion from a Static list of targets, and 350
include the domain name (AcmeFinancial.com). Manually set the target type to Windows. 351
5. Set the management set to update dynamically each day. 352

DRAFT
NIST SP 1800-18C: Privileged Account Management for the Financial Services Sector 15
353
2.2.5.2 Delegation Identities 354
To allow a user to have access to the web console, a Delegation Identity must be created for that user. 355
Add the following users as Delegation Identities by following the steps provided below: 356
1. Add the following regular user accounts as Delegation Identities by selecting Delegation > 357
Delegation Identities and then clicking Add. 358
a. ACMEFINANCIAL\udb1 359

DRAFT
NIST SP 1800-18C: Privileged Account Management for the Financial Services Sector 16
b. ACMEFINANCIAL\twitteruser 360
2. For the Role Type, select Windows Domain User, and then enter the username in the field next 361
to it. 362
3. Click OK. 363
2.2.6 Installing Privileged Identity Application Launcher 364
To allow users to proxy connections as privileged users, the Privileged Identity application launcher must 365
be installed on another server. Detailed prerequisite and installation instructions are available on 366
Bomgar’s website. 367
Using the Bomgar documentation, complete the following steps: 368
1. Create a new virtual machine: 369
a. Windows Server 2012 R2 370
b. 1 CPU core 371
c. 4 GB of RAM 372
d. 60 GB of storage 373
e. 1 NIC 374
i. IPv4: manual 375
ii. IPv6: disabled 376
iii. IPv4 address: 172.16.1.31 377
iv. Netmask: 255.255.255.0 378
v. Gateway: 172.16.1.1 379
vi. DNS-search domains: N/A 380
2. Install Remote Desktop Services. 381
3. DO NOT install Desktop Experience. 382
4. Install Application Launcher without Session Recording. 383
5. Configure Remote Desktop Services to publish LiebsoftLauncher.exe and ssms.exe. 384
6. Configure the web launcher settings in the Bomgar RED Identity Management Console. 385

DRAFT
NIST SP 1800-18C: Privileged Account Management for the Financial Services Sector 17
2.2.7 Configure Bomgar Privileged Identity with IdRamp SAML Authentication 386
Use the following steps to configure the Security Assertion Markup Language (SAML) authentication for 387
the Bomgar Privileged Identity Manager, using IdRamp as an identity provider and broker to Azure AD. 388
1. Open the Bomgar RED Identity Management Console desktop application. 389
2. Navigate to Delegation > Web Application Global Delegation Permissions. 390
391
3. Click Add at the lower left corner. 392
4. Select Role-Based Mapping, enter a friendly name in the field, and then click OK. 393
DRAFT
NIST SP 1800-18C: Privileged Account Management for the Financial Services Sector 18
394
5. Select the role that you just created, and then click Assign Role. 395
6. In the SAML Username field, enter the identities or usernames of the users to whom you would 396
like to assign this role. Click Add after each username that you enter. 397
398
7. Click OK. 399
8. Make sure that the role that you created is selected, and then select the Logon and Grant All 400
Access check boxes. 401
DRAFT
NIST SP 1800-18C: Privileged Account Management for the Financial Services Sector 19
402
9. Click OK. 403
10. To log onto the Bomgar Privileged Identity Manager by using SAML authentication, navigate 404
your web browser to https://<serverhostname>/PWCWeb/. 405
11. Select SAML authentication on the login page, click Login, and then follow the authentication 406
prompts. 407
408

DRAFT
NIST SP 1800-18C: Privileged Account Management for the Financial Services Sector 20
2.2.8 Configuring Microsoft SQL Server Access 409
Prerequisites: 410
▪ Microsoft SQL Server has hybrid authentication. 411
▪ Microsoft SQL Server Management Studio (SSMS) has already been added as an application in 412 the application launcher. 413
The following instructions configure Bomgar Privileged Identity to allow the udb1 to request permission 414
to launch Microsoft SSMS and to log in as the sa account on Microsoft SQL Server in the production 415
environment. 416
1. Open the Bomgar RED Identity Management Console on Bomgar-PI. Right-click SQL Server 417
Instances, and then select Add SQL Server Instance. 418
419
DRAFT
NIST SP 1800-18C: Privileged Account Management for the Financial Services Sector 21
2. Fill out the SQL Server Instance Settings. Enter the host name of the SQL Server in the System 420
Name field. Populate the Login Account Name and Login Account Password fields with the 421
username and password of the sa account. Note: This will work only if hybrid authentication is 422
enabled on the SQL Server. 423
424
3. Click Test Connection. The connection should be successful. Click OK. 425
4. Expand SQL Server Instances by clicking on the plus sign to the left of the item name, and then 426
expand SQL-SERVER.ACMEFINANCIAL.COM. Right-click the sa account, and then select Change 427
Password. 428

DRAFT
NIST SP 1800-18C: Privileged Account Management for the Financial Services Sector 22
429
5. Select strong password policy options, such as increasing both the length of the password and 430
its compliance with password standards. 431
6. On the Schedule tab, set the Job Scheduling Period to Immediately, and write a Job Comment 432
to describe why this action is being taken. 433
7. Click OK, and then let the operation complete. 434
8. Click Delegation > Web Application Identity to Shadow Account Mappings. 435

DRAFT
NIST SP 1800-18C: Privileged Account Management for the Financial Services Sector 23
436
9. Click Add Mapping. 437

DRAFT
NIST SP 1800-18C: Privileged Account Management for the Financial Services Sector 24
438
10. Choose the ACMEFINANCIAL\udb1 account, and then click OK. Choose the sa account from the 439
list on the next screen, and then click OK. 440
441
11. Click OK again. 442

DRAFT
NIST SP 1800-18C: Privileged Account Management for the Financial Services Sector 25
12. Click Delegation > Web Application Per-Account Permissions. 443
444
13. Right-click the sa account, and then select Edit Managers for Account. 445

DRAFT
NIST SP 1800-18C: Privileged Account Management for the Financial Services Sector 26
446
14. Click Add Identity to List. 447

DRAFT
NIST SP 1800-18C: Privileged Account Management for the Financial Services Sector 27
448
15. Select the ACMEFINANCIAL\udb1 account. You should see it appear in the list. Click OK. 449
450

DRAFT
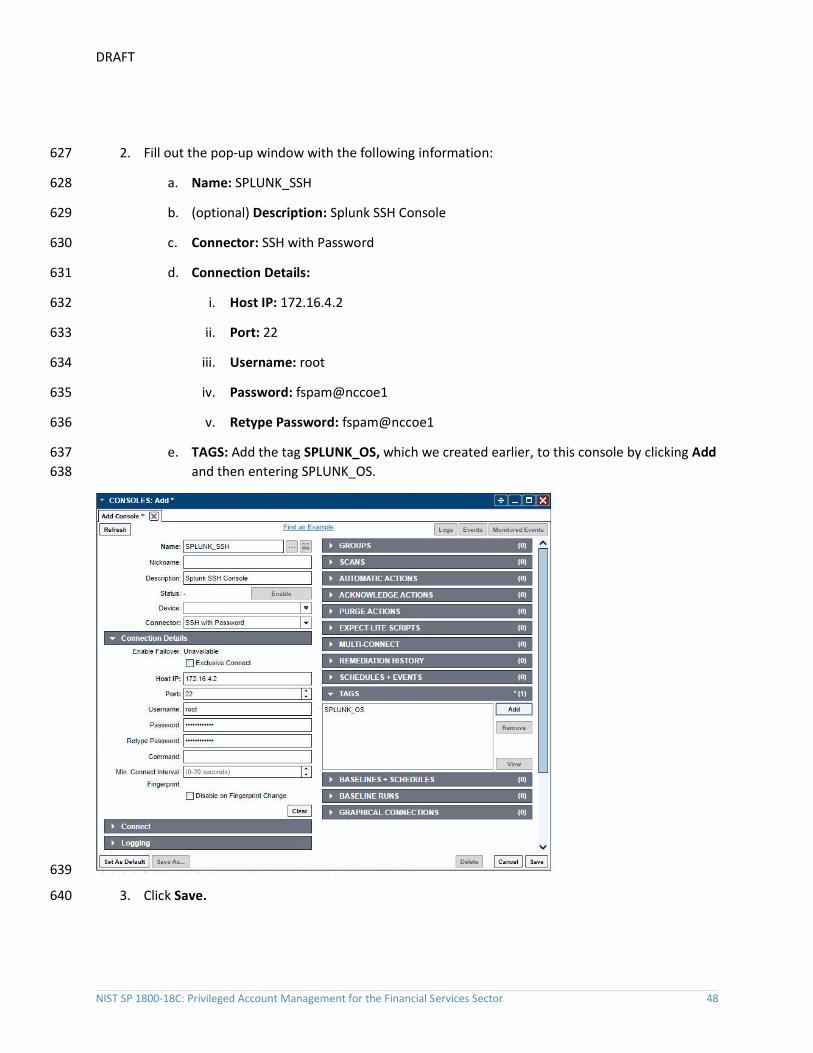
NIST SP 1800-18C: Privileged Account Management for the Financial Services Sector 28
16. Expand the sa account by clicking the plus sign to the left, right-click the ACMEFINANCIAL\udb1 451
account, and then select Edit Permissions of Manager. 452
453
17. Give the account the View Account and Request Remote Access permissions. Click OK. Click OK 454
again to exit the Web Application Per-Account Permissions window. 455
18. Click Delegation > Web Application Remote Application Permissions. 456

DRAFT
NIST SP 1800-18C: Privileged Account Management for the Financial Services Sector 29
457
19. Click Add. 458

DRAFT
NIST SP 1800-18C: Privileged Account Management for the Financial Services Sector 30
459
20. Select the ACMEFINANCIAL\udb1 account from the list of Delegation Identities. Click OK. Next, 460
select SQL Server Management Studio from the list of Remote Applications. 461
DRAFT
NIST SP 1800-18C: Privileged Account Management for the Financial Services Sector 31
462
21. Select Yes for the pop-up about Shadow Account Restriction. 463

DRAFT
NIST SP 1800-18C: Privileged Account Management for the Financial Services Sector 32
22. Select the ACMEFINANCIAL\udb1 to [SQL Server]\sa shadow account mapping, and then click 464
OK. 465
466
23. Select No for pop-up about the System Target Restriction. 467
24. You should see that the ACMEFINANCIAL\udb1 user now has access to SQL Server 468
Management Studio with the [SQL Server]\sa shadow account. Click OK. 469

DRAFT
NIST SP 1800-18C: Privileged Account Management for the Financial Services Sector 33
470
2.2.9 Configuring Twitter Account Launching 471
The Bomgar application launcher comes with some premade scripts to launch various applications. One 472
of these scripts launches Internet Explorer and automatically signs the user into a Twitter account. The 473
following steps detail the process of configuring the script. 474
To launch Twitter, Bomgar-PI needs the Twitter account password. The following steps detail how to 475
add an external password to Bomgar-PI: 476
1. In the RED Identity Management Console, select Manage > Import Password Information > 477
Import Password into Password Store. 478
2. In the Import Single Account Password window, enter the following configuration: 479
a. Account type: OS_TYPE_EXTERNAL 480
b. System Name: Twitter 481

DRAFT
NIST SP 1800-18C: Privileged Account Management for the Financial Services Sector 34
c. Account Name: <the Twitter account username> 482
d. Password: <the Twitter account password> 483
e. Re-enter Password: <the Twitter account password> 484
485
3. Click Import Account. 486
We can now configure Bomgar-PI to use that account to launch Twitter: 487
1. Go to Settings > Manage Web Application > Application Launch. 488
2. Scroll down, and double-click Twitter. 489
3. In the Remote Application Configuration window, enter the following information: 490
a. Run on the jump server: BOMGAR-APPLNCH.AcmeFinancial.com 491
i. This check box should be selected. 492
b. Automation URL: https://twitter.com/login 493
c. Always use the specified account when starting this application: This check box should 494
be selected. 495
d. System Name: Twitter 496
e. Namespace: [External] 497
f. Account Name: <the Twitter account username> 498

DRAFT
NIST SP 1800-18C: Privileged Account Management for the Financial Services Sector 35
499
4. Click OK, then OK, and then OK again. 500
To allow users to launch Twitter, follow these steps: 501
1. Open Delegation > Web Application Remote Application Permissions. 502
2. Click Add. 503
3. Select the identity that should be allowed to launch Twitter. More identities can be added by 504
clicking Add Identity. 505
4. Click OK. 506
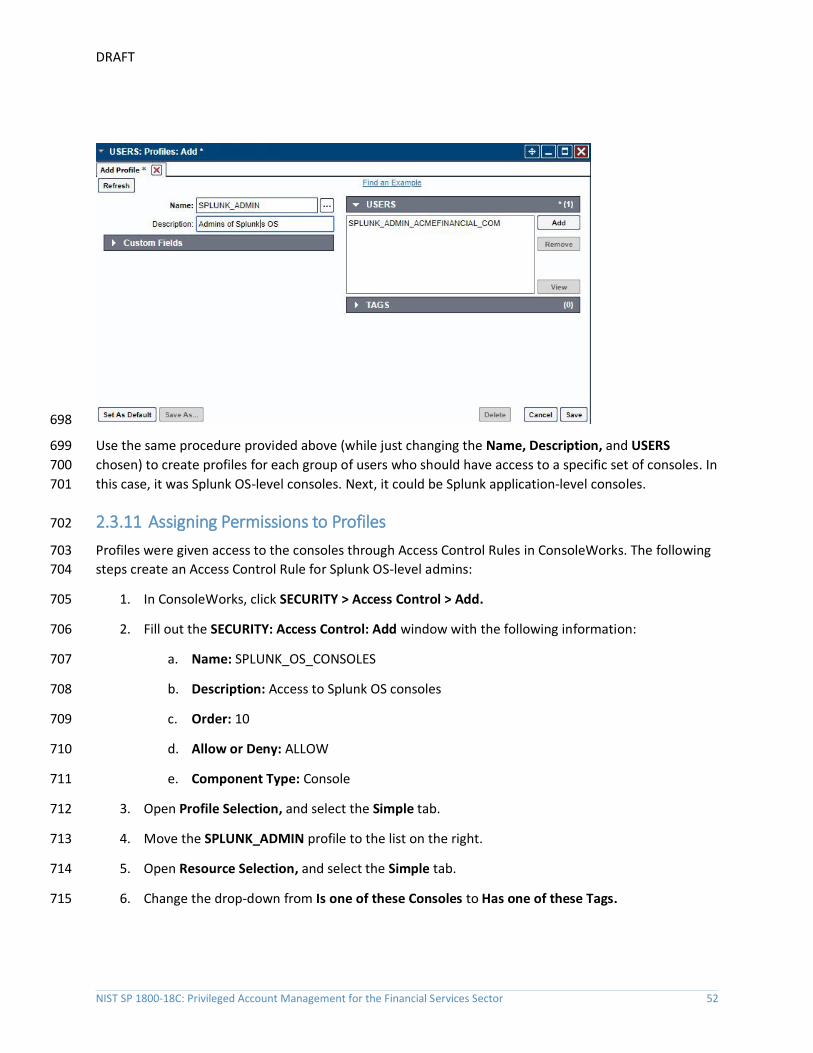
5. Select the Remote Application Twitter, and then click OK. 507
6. Select No for the pop-up about Shadow Account Restriction. 508
7. Select No for the pop-up about System Target Restriction. 509
8. Click OK. 510

DRAFT
NIST SP 1800-18C: Privileged Account Management for the Financial Services Sector 36
2.2.10 Configuring Multifactor Authentication with RSA 511
The following steps detail how Bomgar Privileged Identity was configured to authenticate users by using 512
a SecurID from RSA. In summary, Bomgar acts as a RADIUS client to an RSA Authentication Manager. 513
Bomgar is configured to prompt for a onetime passcode after authenticating the user with AD. 514
1. In the RED Identity Management Console, select Delegation > External 2 Factor Configuration. 515
516
2. Fill out the Configure 2 Factor Authentication window with the following settings: 517
a. Authenticator Type: RADIUS 518
b. Authenticator Label: RSA Auth 519
c. IP address: 172.16.2.15 (the IP address of the RSA Authentication Manager) 520

DRAFT
NIST SP 1800-18C: Privileged Account Management for the Financial Services Sector 37
d. Port: 1812 521
e. Shared Secret: <the shared secret from RSA for RADIUS clients> 522
f. Timeout: 6 523
g. Connection Retry Count: 3 524
h. PAP Communication: This check box should be selected. 525
526
3. Click OK. 527
4. Click Manage Web App. 528

DRAFT
NIST SP 1800-18C: Privileged Account Management for the Financial Services Sector 38
529
5. In the Manage Web Application Instances window, double-click the Web Application Instance. 530

DRAFT
NIST SP 1800-18C: Privileged Account Management for the Financial Services Sector 39
531
6. Click Yes. 532
7. Click the tab labeled Multi-Factor Authentication (MFA). 533
534
8. Select Enable external MFA (RADIUS and native integrations), Use simple username for 535
external MFA login checks, and Require MFA for all interactive web application logins. 536

DRAFT
NIST SP 1800-18C: Privileged Account Management for the Financial Services Sector 40
537
9. Click OK. Click OK again in the pop-up window. 538
10. Click Close. 539
2.2.11 Splunk Universal Forwarder 540
Install Splunk Universal Forwarder by following the instructions provided at 541
http://docs.splunk.com/Documentation/Forwarder/7.1.3/Forwarder/Abouttheuniversalforwarder. 542
Edit the inputs.conf file to monitor and forward logs from the UsageLog.txt file to the demo index at 543
Splunk Enterprise. Use the built-in _json sourcetype. 544

DRAFT
NIST SP 1800-18C: Privileged Account Management for the Financial Services Sector 41
545
2.3 TDi ConsoleWorks 546
TDi ConsoleWorks is a PAM solution that allows for proxying terminal and web connections through a 547
web interface. 548
2.3.1 How It’s Used 549
TDi ConsoleWorks provides PAM for accounts accessing Splunk and the router/firewall configuration 550
web page. 551
2.3.2 Virtual Machine Configuration 552
The TDi ConsoleWorks virtual machine is configured as follows: 553
▪ CentOS 7 554
▪ 2 CPU cores 555
▪ 8 GB of RAM 556
▪ 75 GB of storage 557
▪ 1 NIC 558
Network Interface Configuration: 559
▪ IPv4: manual 560
▪ IPv6: disabled 561
▪ IPv4 address: 172.16.4.11 562
▪ Netmask: 255.255.225.0 563

DRAFT
NIST SP 1800-18C: Privileged Account Management for the Financial Services Sector 42
▪ Gateway: 172.16.4.1 564
▪ DNS servers: 172.16.3.10 565
▪ DNS-search domain: N/A 566
2.3.3 Installation 567
Installation documentation is provided on TDi’s website, but an account with TDi Technologies is 568
necessary to access it. A basic installation was used in this project. 569
2.3.4 Configuration of Back-End Authentication 570
The following steps describe how ConsoleWorks was configured to authenticate users with the 571
IDENTIKEY Authentication Server. 572
1. Log in as a user with the CONSOLE_MANAGER role. 573
2. Click SECURITY > External Authentication. 574

DRAFT
NIST SP 1800-18C: Privileged Account Management for the Financial Services Sector 43
575
3. Click Add. 576
4. Fill out the External Authentication Record with the following information for the IDENTIKEY 577
Authentication Server: 578
a. Record Name: IDENTIKEY 579
b. Enabled: This check box should be selected. 580

DRAFT
NIST SP 1800-18C: Privileged Account Management for the Financial Services Sector 44
c. Library: radius 581
d. Parameter 1: 172.16.2.208:1812/fspam 582
Note: Parameter 1 specifies the IP address (or host name) of the RADIUS server, 583
followed by the port and then the shared secret in the format [ip 584
address]:[port]/[shared secret]. 585
586
5. Click Next, and then click Next again. 587
6. Check that the verification passed. The user should be denied. Click Next. 588
589

DRAFT
NIST SP 1800-18C: Privileged Account Management for the Financial Services Sector 45
7. Click Save. 590
8. Make sure that the Enable External Authentication check box is selected in the SECURITY: 591
External Authentication window. 592
593
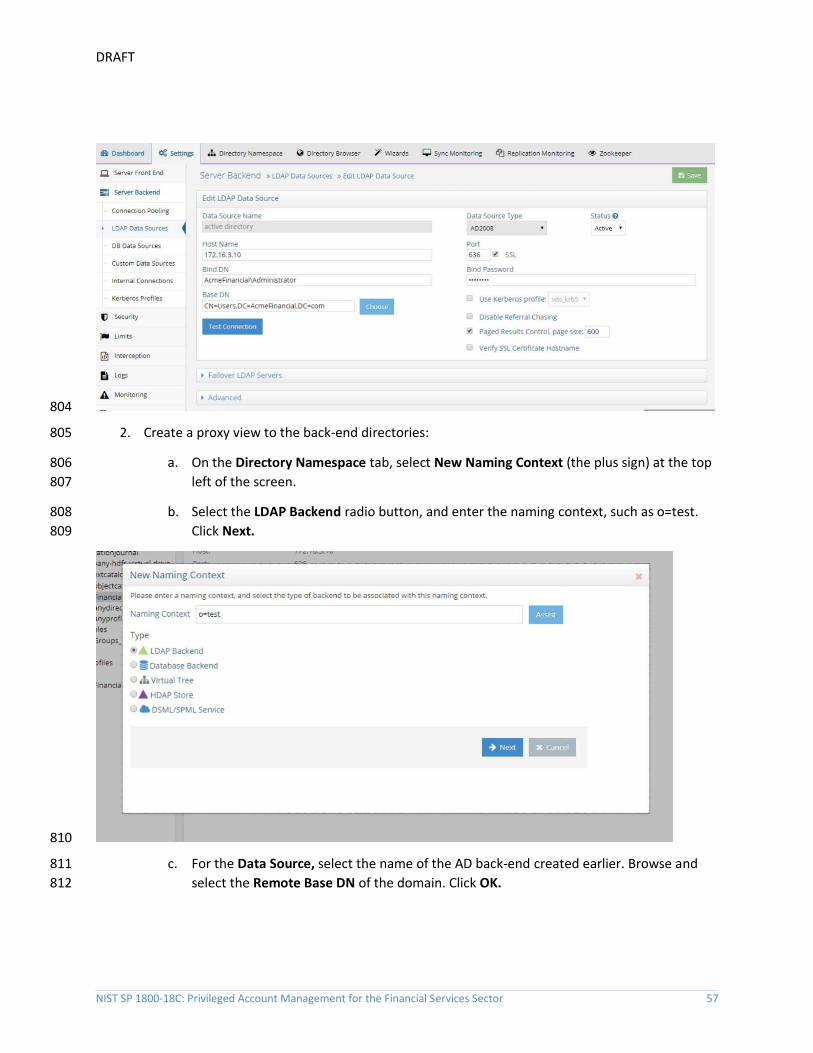
9. Click Save if available. 594
2.3.5 Creating Users 595
Each privileged user must have an account in ConsoleWorks to log into ConsoleWorks. The following 596
steps detail the process of creating accounts for AD users in ConsoleWorks. For this example, we will 597
create a ConsoleWorks account for the [email protected] AD account. This user will 598
manage the Splunk virtual-machine OS. 599
1. In ConsoleWorks, click USERS > Add as a CONSOLE_MANAGER account. 600

DRAFT
NIST SP 1800-18C: Privileged Account Management for the Financial Services Sector 46
601
2. Fill out the pop-up window with the following information: 602
a. Name: SPLUNK_ADMIN_ACMEFINANCIAL_COM 603
b. Use External Authentication: This check box should be selected. 604
c. Enter a dummy password in the Password field, and then retype it in the Retype 605
Password field. 606
d. Require Password Change on Next Login: This check box should not be selected. 607
Note: The format USERNAME_DOMAIN_NAME is important. This is how ConsoleWorks expects 608
a user with the fully qualified domain name (FQDN) [email protected] to be named in 609
the product. 610
3. Click Save. 611

DRAFT
NIST SP 1800-18C: Privileged Account Management for the Financial Services Sector 47
612
2.3.6 Creating Tags 613
Tags in ConsoleWorks allow consoles to be easily identified as part of a certain group. We will create a 614
tag for the consoles that should be accessible to users who need OS-level access to the Splunk virtual 615
machine. 616
1. Click SECURITY > Tags > Add. 617
2. Fill out the pop-up window with the following information: 618
a. Name: SPLUNK_OS 619
b. (optional) Description: Splunk OS Consoles 620
3. Click Save. 621
2.3.7 Creating SSH Consoles 622
Managed assets must have a “console” entry in ConsoleWorks for privileged users to connect to them. 623
The following steps detail how to create a console for SSH access to the Splunk virtual machine that an 624
administrator (admin) (e.g., splunk_admin) would use. 625
1. Click CONSOLES > Add. 626
DRAFT
NIST SP 1800-18C: Privileged Account Management for the Financial Services Sector 48
2. Fill out the pop-up window with the following information: 627
a. Name: SPLUNK_SSH 628
b. (optional) Description: Splunk SSH Console 629
c. Connector: SSH with Password 630
d. Connection Details: 631
i. Host IP: 172.16.4.2 632
ii. Port: 22 633
iii. Username: root 634
iv. Password: fspam@nccoe1 635
v. Retype Password: fspam@nccoe1 636
e. TAGS: Add the tag SPLUNK_OS, which we created earlier, to this console by clicking Add 637
and then entering SPLUNK_OS. 638
639
3. Click Save. 640

DRAFT
NIST SP 1800-18C: Privileged Account Management for the Financial Services Sector 49
2.3.8 Creating Web Consoles 641
The following steps describe how to create a console for a web application. ConsoleWorks will proxy a 642
connection to the managed asset, allowing for monitoring of user activity on the managed asset. These 643
steps were completed twice: once for the Splunk web interface and again for a pfSense router/firewall. 644
The following steps describe the configuration for pfSense: 645
1. On the AD Domain Controller, which acts as a DNS server, open DNS Manager. 646
2. Double-click the AcmeFinancial.com object. 647
3. Double-click the Forward Lookup Zone object. 648
4. Right-click in the area with DNS records, and select New Host (A or AAAA). 649
5. In the Name field, enter pfsenseweb. 650
6. In the IP address field, enter the IP address of the ConsoleWorks virtual machine. In this case, it 651
is 172.16.4.11. 652
7. Click Add Host. 653
8. In ConsoleWorks’ web interface, log in as a CONSOLE_MANAGER. 654
9. Click CONSOLES > Add. 655
10. Fill out the window CONSOLES: Add window with the following information: 656
a. Name: PFSENSE 657
b. Description: Web Console for pfSense 658
c. Connector: Web Forward 659
d. Connection Details: 660
i. Bind Name: DEFAULTWEB 661
ii. Host Header: pfsenseweb.acmefinancial.com 662
iii. URL: https://172.16.4.1 663
iv. Profile: CONSOLE_MANAGER 664

DRAFT
NIST SP 1800-18C: Privileged Account Management for the Financial Services Sector 50
665
Note: In the case where the URL is not just the host name, the rest of the URL after the 666
forward slash should be put in Relative URL. 667
11. Click Save. 668
2.3.9 Assigning Tags to Consoles 669
We created a unique tag to identify each group of consoles. Specifically, we created tags for the 670
following console groups: 671
▪ pfSense consoles 672
▪ Splunk application-level consoles 673
▪ Splunk OS-level consoles 674
▪ Ekran Server consoles 675
Even though each of these groups has only one console in it, organizing the consoles this way makes it 676
easy to add more consoles to the groups later. 677

DRAFT
NIST SP 1800-18C: Privileged Account Management for the Financial Services Sector 51
The following steps describe the process for assigning a tag to a console: 678
1. In ConsoleWorks, click CONSOLES > View. 679
2. Select a console (e.g., PFSENSE). 680
3. Click Edit. 681
4. Open the TAGS menu, and then click Add. 682
5. Move the pfSense consoles’ tag to the list on the right, and then click OK. 683
6. Click Save. 684
2.3.10 Creating Profiles for Users 685
Profiles in ConsoleWorks are like groups in Windows. Users can be added to profiles, and those profiles 686
can be assigned permissions, such as access to a specific set of consoles. 687
The following steps describe creating a SPLUNK_ADMIN profile that will eventually allow users who have 688
access to this profile to access the Splunk OS-level console: 689
1. Click USERS > Profiles > Add. 690
2. Fill out the USERS: Profiles: Add pop-up window with the following information: 691
a. Name: SPLUNK_ADMIN 692
b. Description: Admins of Splunk’s OS 693
3. Under USERS, click Add. 694
4. Move the SPLUNK_ADMIN_ACMEFINANCIAL_COM user to the list on the right, and then click 695
OK. 696
5. Click Save. 697
DRAFT
NIST SP 1800-18C: Privileged Account Management for the Financial Services Sector 52
698
Use the same procedure provided above (while just changing the Name, Description, and USERS 699
chosen) to create profiles for each group of users who should have access to a specific set of consoles. In 700
this case, it was Splunk OS-level consoles. Next, it could be Splunk application-level consoles. 701
2.3.11 Assigning Permissions to Profiles 702
Profiles were given access to the consoles through Access Control Rules in ConsoleWorks. The following 703
steps create an Access Control Rule for Splunk OS-level admins: 704
1. In ConsoleWorks, click SECURITY > Access Control > Add. 705
2. Fill out the SECURITY: Access Control: Add window with the following information: 706
a. Name: SPLUNK_OS_CONSOLES 707
b. Description: Access to Splunk OS consoles 708
c. Order: 10 709
d. Allow or Deny: ALLOW 710
e. Component Type: Console 711
3. Open Profile Selection, and select the Simple tab. 712
4. Move the SPLUNK_ADMIN profile to the list on the right. 713
5. Open Resource Selection, and select the Simple tab. 714
6. Change the drop-down from Is one of these Consoles to Has one of these Tags. 715

DRAFT
NIST SP 1800-18C: Privileged Account Management for the Financial Services Sector 53
7. Move the SPLUNK_OS tag to the list on the right. 716
8. Open Privileges, and select the following privileges (these are the same for both SSH and web 717
consoles): 718
a. Aware 719
b. Connect 720
c. Disconnect 721
d. View 722
723
9. Click Save. 724
2.4 Ekran System 725
Ekran System is a monitoring solution that provides session recording and playback. A server records the 726
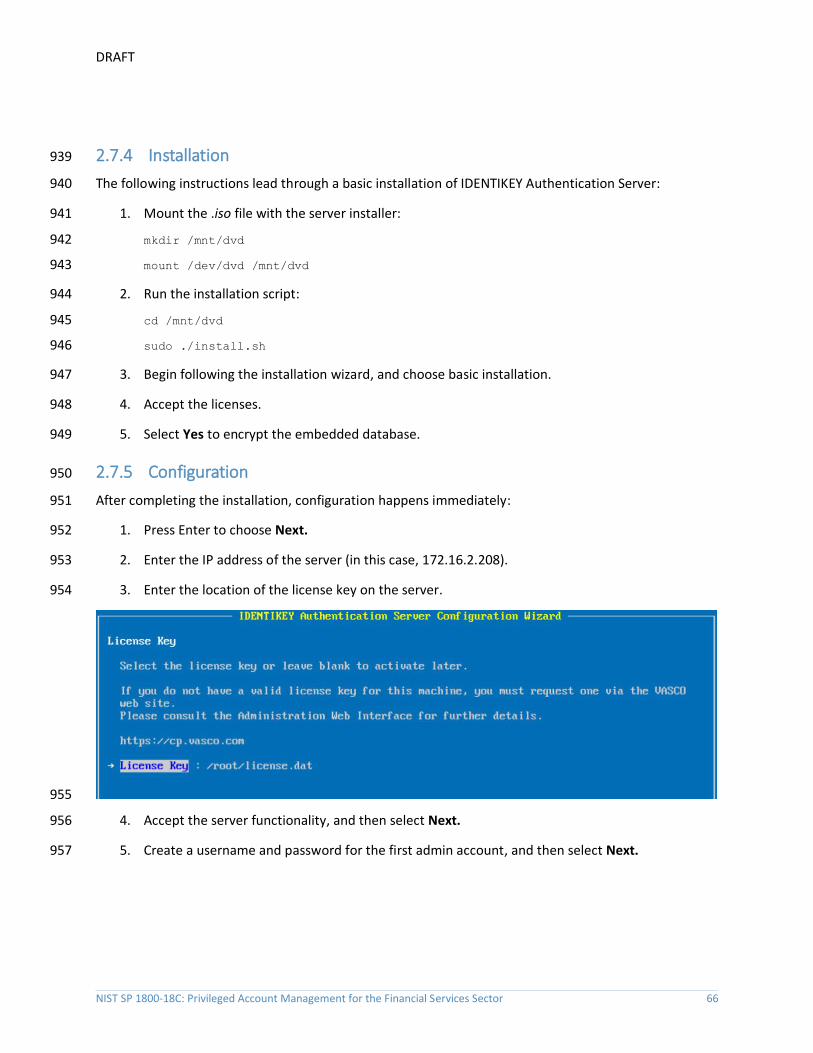
actions of users on multiple clients. 727

DRAFT
NIST SP 1800-18C: Privileged Account Management for the Financial Services Sector 54
2.4.1 How It’s Used 728
Ekran System is used to create “privileged stations” that privileged users use to access their privileged 729
accounts. Ekran monitors the actions taken by privileged users, and reports to Splunk. 730
2.4.2 Virtual Machine Configuration 731
The Ekran System server is installed on one virtual machine, while the client is on another virtual 732
machine. Ekran recommends increasing the storage of the virtual machine based on how many clients 733
are being monitored. 734
The Ekran System server virtual machine is configured as follows: 735
▪ Windows Server 2016 736
▪ 1 CPU core 737
▪ 8 GB of RAM 738
▪ 150 GB of storage 739
▪ 1 NIC 740
Network Configuration (Interface 1): 741
▪ IPv4: manual 742
▪ IPv6: disabled 743
▪ IPv4 address: 172.16.1.20 744
▪ Netmask: 255.255.255.0 745
▪ Gateway: 172.16.1.1 746
▪ DNS name servers: 172.16.3.10 747
▪ DNS-search domains: N/A 748
2.4.3 Prerequisites 749
Ekran System requires Microsoft SQL Server, although, in the lab environment, Microsoft SQL Server 750
Express was used. Ekran System also requires IIS to be installed. A full list of requirements can be found 751
on Ekran’s website. 752
2.4.4 Installing Ekran System 753
Full installation instructions are available on Ekran’s website. 754
The Ekran System server and agent are installed in the privileged user station and are used to monitor 755
privileged users. 756

DRAFT
NIST SP 1800-18C: Privileged Account Management for the Financial Services Sector 55
2.5 Radiant Logic 757
Radiant Logic FID is a virtual directory that performs a federated identity service. 758
2.5.1 How It’s Used 759
Radiant Logic FID is used in two capacities in this example implementation. First, FID acts as the identity 760
provider for users accessing TDi ConsoleWorks to view security dashboards within Splunk. Users are 761
forced to use MFA with VASCO IDENTIKEY. Second, FID acts as a monitoring service where privileged 762
user accounts are monitored for changes, logged, and forwarded to Splunk. 763
2.5.2 Virtual Machine 764
The Radiant Logic virtual machine is configured as follows: 765
▪ Windows Server 2016 766
▪ 3 CPU cores 767
▪ 20 GB of RAM 768
▪ 120 GB of storage 769
▪ 1 NIC 770
Network Configuration (Interface 1): 771
▪ IPv4: manual 772
▪ IPv6: disabled 773
▪ IPv4 address: 172.16.3.218 774
▪ Netmask: 255.255.255.0 775
▪ Gateway: 172.16.1.1 776
▪ DNS name servers: 172.16.3.10 777
▪ DNS-search domains: N/A 778
2.5.3 Prerequisites 779
The minimum system requirements are as follows: 780
▪ Hardware 781
• Cluster nodes must be deployed on hardware that is configured for optimal redundancy and 782 highly reliable connectivity between the cluster nodes/machines. 783
• Processor: Intel Pentium or AMD Opteron, minimum dual core 784

DRAFT
NIST SP 1800-18C: Privileged Account Management for the Financial Services Sector 56
• Processor speed: 2 gigahertz or higher 785
• Memory: 16 GB minimum. For most production deployments, more than 16 GB of memory 786 is required. 787
• Hard drive: 100 GB of disk space. The hard-disk usage will vary depending on the log 788 types/levels that are enabled and the desired log history to maintain. 789
▪ Software 790
• OS: Windows 2008 R2 Server, Windows Server 2012 R2, Windows Server 2016 791
2.5.4 Installation 792
To install FID, see the documentation provided with the software. The FID installation guide can also be 793
found on the Radiant Logic support website. A support account is required. 794
2.5.5 Configure FID 795
The steps for configuring FID are as follows: 796
1. Add server back-ends: 797
a. While logged in as the Directory Manager, navigate to Settings > Server Backend > LDAP 798
Data Sources. 799
b. Click Add. 800
801
c. Name the data source, and then enter the parameters. For AD, the parameters used are 802
shown in the following screenshot. Click Save. 803
DRAFT
NIST SP 1800-18C: Privileged Account Management for the Financial Services Sector 57
804
2. Create a proxy view to the back-end directories: 805
a. On the Directory Namespace tab, select New Naming Context (the plus sign) at the top 806
left of the screen. 807
b. Select the LDAP Backend radio button, and enter the naming context, such as o=test. 808
Click Next. 809
810
c. For the Data Source, select the name of the AD back-end created earlier. Browse and 811
select the Remote Base DN of the domain. Click OK. 812

DRAFT
NIST SP 1800-18C: Privileged Account Management for the Financial Services Sector 58
813
2.5.6 Configure Logging 814
To log changes to each directory object, you must create a cache for the proxy view created in the 815
previous section. To create the cache and to log changes made to the back-end directories, complete 816
the following steps: 817
1. Navigate to the Sync Monitoring tab. Press the play ( )button to start the glassfish server. 818
819
2. In the Directory Namespace tab, highlight Cache in the left window pane. Select Persistent 820
Cache with Automated Refresh. Click Create Persistent Cache. 821

DRAFT
NIST SP 1800-18C: Privileged Account Management for the Financial Services Sector 59
822
3. Browse and select the Lightweight Directory Access Protocol (LDAP) proxy created in the 823
previous steps. Click OK. FID creates the cache. 824
825
4. Under Cache in the lower left window, select the cache that you created. Click Initialize to make 826
the cache active. 827

DRAFT
NIST SP 1800-18C: Privileged Account Management for the Financial Services Sector 60
828
829
5. Select Create a new LDIF file from a snapshot of the virtual directory branch. Click OK. This 830
step may take a few minutes. 831
6. Once complete, click Save. 832

DRAFT
NIST SP 1800-18C: Privileged Account Management for the Financial Services Sector 61
7. Select the Connectors tab. 833
834
8. There will be a connector for the back-end directory and for the connector itself. Highlight the 835
AD connector. Click Configure. Change the connector type to Capture [Snapshot]. Click OK. 836
837
9. Install Splunk Universal Forwarder to monitor the file at 838
C:\radiantone\vds\r1syncsvcs\log\cf_o_acmefinancial\object_generic_dv_so_o_acmefinancial_c839
apture.log 840
2.5.7 Configure SSL 841
In this implementation, AD serves as the CA. 842
1. Create the initial FID private key: 843
Navigate to c:\radiantone\vds\jdk\jre\bin, and run keytool -genkey -alias rli -844 keyalg RSA -keystore C:\radiantone\vds\vds_server\conf\rli.keystore -dname 845
“cn=radiant-logic, dc=acmefinancial,dc=com". 846
2. Download the certificate from the CA. 847

DRAFT
NIST SP 1800-18C: Privileged Account Management for the Financial Services Sector 62
3. Create the certificate signing request: 848
Navigate to c:\radiantone\vds\jdk\jre\bin, and run keytool -certreq -alias rli –849 keystore C:\radiantone\vds_server\conf\rli.keystore -file 850 C:\radiantone\vds_server\conf\vdsserver.csr. 851
4. Submit the request to the CA. 852
5. Import the trusted CA certificate into the keystore and cacerts database on FID: 853
a. Navigate to c:\radiantone\vds\jdk\jre\bin, and run keytool -import -trustcacerts -854 file C:\radiantone\vds\vds_server\conf\certca.cer -keystore 855
C:\radiantone\vds\vds_server\conf\rli.keystore. 856
b. Run keytool -import -trustcacerts -file 857 C:\radiantone\vds\vds_server\conf\certca.cer -keystore 858
C:\radiantone\vds\jdk\jre\lib\security\cacerts. 859
6. Import the signed server certificate from the request into FID: 860
Navigate to c:\radiantone\vds\jdk\jre\bin, and run keytool -import -file 861 C:\radiantone\vds\vds_server\conf\rli.cer -keystore 862
C:\radiantone\vds\vds_server\conf\rli.keystore -v -alias rli. 863
7. Restart FID. 864
2.5.8 Splunk Universal Forwarder 865
Install Splunk Universal Forwarder by following the instructions provided at 866
http://docs.splunk.com/Documentation/Forwarder/7.1.3/Forwarder/Abouttheuniversalforwarder. 867
Edit the inputs.conf file to monitor the object_generic_dv_so_o_acmefinancial_capture.txt file created 868
by Radiant Logic FID and to forward logs to the demo index at Splunk Enterprise. 869

DRAFT
NIST SP 1800-18C: Privileged Account Management for the Financial Services Sector 63
870
2.6 IdRamp 871
2.6.1 How It’s Used 872
IdRamp is used for MFA in this build. The majority of the IdRamp configuration is performed by the 873
IdRamp team. 874
2.6.2 Prerequisites 875
▪ premium Azure account 876
▪ AD installed 877
2.6.3 Installation 878
1. Set up Azure AD sync with password hash synchronization: 879
https://docs.microsoft.com/en-us/azure/active-directory/connect/active-directory-aadconnect-880
get-started-express 881
2. Enable MFA in Azure for certain privileged users: 882
a. In the Azure AD admin center at https://aad.portal.azure.com, click Azure Active 883
Directory. 884
b. Click SECURITY > Conditional access. 885
c. Click New policy. 886

DRAFT
NIST SP 1800-18C: Privileged Account Management for the Financial Services Sector 64
d. Give the policy a name, such as Privileged 2FA. 887
e. Click Users and groups. Under Include, click users and groups, and select Users and 888
groups check box. 889
f. Click the region labeled as Select. 890
g. Select the privileged users from the list. 891
h. Once all of those users are selected, click Done. 892
i. Click Cloud apps, and then select All cloud apps. Click Done. 893
j. Under Access Controls, click Grant. 894
k. Make sure that the Grant access check box is selected, and select the check box labeled 895
as Require multi-factor authentication. 896
l. Click Select. 897
m. Click On under Enable policy, and then click Create. 898
3. Disable logins of all other accounts: 899
a. For each user that you do not want to allow to sign in with Azure AD at all, click their 900
user account under All users in the Azure AD admin center. 901
b. Click Yes next to Block sign in. 902
4. Configure sign-in to block incoming requests, except from your organization’s network: 903
a. Under SECURITY > Conditional access in the Azure AD admin center, select Named 904
locations. 905
b. Click New location, and then give the location a name. 906
c. Select the check box labeled as Mark as trusted location. 907
d. Enter the IP range of the network to which you want to restrict access. 908
e. Click Create. 909
f. Complete steps 2a–2c above. 910
g. Give the policy a name, such as Block Remote Access. 911
h. For users of this policy, select the privileged users. 912
i. Select all cloud apps for the Cloud apps assignment. 913

DRAFT
NIST SP 1800-18C: Privileged Account Management for the Financial Services Sector 65
j. Under Conditions, select Locations. 914
k. Select Yes under Configure, and select Any location under Include. 915
l. Click Exclude, and then click Select. 916
m. Select the Named location that we just created, and then click Select. 917
n. Click Done. 918
o. Click Grant under Access controls, and then click Block access. 919
p. Click Select. 920
q. Click On under Enable policy, and then click Create. 921
2.7 OneSpan IDENTIKEY Authentication Server 922
OneSpan IDENTIKEY Authentication Server, now known as OneSpan Authentication Server, is a two-923
factor authentication (2FA) solution with user, policy, and token management. DIGIPASS is the name of 924
their two-factor token, and it can be hardware-based or software-based. 925
2.7.1 How It’s Used 926
IDENTIKEY Authentication Server provides 2FA to TDi ConsoleWorks. The Authentication Server acts as a 927
RADIUS server, which allows a variety of clients to authenticate through it. The Authentication Server, 928
based on a user-defined policy, checks the onetime passcode from a DIGIPASS. Additionally, the server 929
binds to Radiant Logic by using LDAPS to authenticate the user’s password. 930
2.7.2 Virtual Machine Configuration 931
The IDENTIKEY Authentication Server virtual machine is configured with Ubuntu Server 16.04 LTS. 932
The text search acmefinancial.com should be saved in resolv.conf file. 933
2.7.3 Prerequisites 934
The product can be installed on both Windows and Linux. This project used Linux. 935
The prerequisite software for a basic installation could be installed with the following command: 936
sudo apt install unixodbc libaio1 libdbi-perl socat openjdk-8-jre-headless 937
The license key should be located on the server where the Authentication Server is going to be installed. 938
DRAFT
NIST SP 1800-18C: Privileged Account Management for the Financial Services Sector 66
2.7.4 Installation 939
The following instructions lead through a basic installation of IDENTIKEY Authentication Server: 940
1. Mount the .iso file with the server installer: 941
mkdir /mnt/dvd 942
mount /dev/dvd /mnt/dvd 943
2. Run the installation script: 944
cd /mnt/dvd 945
sudo ./install.sh 946
3. Begin following the installation wizard, and choose basic installation. 947
4. Accept the licenses. 948
5. Select Yes to encrypt the embedded database. 949
2.7.5 Configuration 950
After completing the installation, configuration happens immediately: 951
1. Press Enter to choose Next. 952
2. Enter the IP address of the server (in this case, 172.16.2.208). 953
3. Enter the location of the license key on the server. 954
955
4. Accept the server functionality, and then select Next. 956
5. Create a username and password for the first admin account, and then select Next. 957

DRAFT
NIST SP 1800-18C: Privileged Account Management for the Financial Services Sector 67
958
6. Create a password for the certificate, and then select Next. 959
960
7. Set up the server to act as a stand-alone RADIUS server, and then select Next. 961
8. Create the first RADIUS client, with the IP address and a shared secret. The first client will be 962
ConsoleWorks. Select Next. 963
9. Verify that all of the options shown on the screen are consistent with the above instructions. 964
Select Proceed. 965
10. Verify that the configuration succeeded as shown below. 966

DRAFT
NIST SP 1800-18C: Privileged Account Management for the Financial Services Sector 68
967
11. Respond No to the question “Do you want to import a DIGIPASS file? (yes/no)” as you will do 968
this later. 969
2.7.6 Creating a Domain and Policies 970
After completing installation and basic configuration with the terminal, the following steps are 971
completed with the web interface: 972
1. Open the web interface at https://172.16.2.208:8443. 973
2. Log in by using the admin account that was created during configuration. 974
3. Click ORGANIZATION > Add domain. 975

DRAFT
NIST SP 1800-18C: Privileged Account Management for the Financial Services Sector 69
976
4. Enter the Domain Name acmefinancial.com and then click CREATE. 977

DRAFT
NIST SP 1800-18C: Privileged Account Management for the Financial Services Sector 70
978
5. Click POLICIES > Create. 979
6. Enter the Policy ID ACME_2FA, write a short Description, and choose for it to inherit from 980
Identikey Back-End Authentication. Click CREATE. 981

DRAFT
NIST SP 1800-18C: Privileged Account Management for the Financial Services Sector 71
982
7. Choose to manage the policy, and click EDIT. 983
8. Select Digipass Only for Local Authentication, Always for Back-End Authentication, and 984
Microsoft Active Directory for Back-End Protocol. Click SAVE. 985
986
9. Click CLIENTS > List. 987

DRAFT
NIST SP 1800-18C: Privileged Account Management for the Financial Services Sector 72
10. Click the RADIUS client. 988
11. Select ACME_2FA for the Policy ID, which was just created. Click SAVE. 989
990
2.7.7 Importing DIGIPASSes 991
The following steps import demo DIGIPASSes that were included in the installation .iso file: 992
1. In the web interface, click DIGIPASS > Import. 993
2. Click Choose File next to Get DPX file, and select the demo DIGPASSApp.dpx file, which came in 994
the .iso file. Within the DIGPASSApp.dpx file is a set of mobile-application DIGIPASSes. Click 995
Open. 996

DRAFT
NIST SP 1800-18C: Privileged Account Management for the Financial Services Sector 73
997
3. Enter the transport key for that file. For the demo files, the transport key is 998
11111111111111111111111111111111 (32 1s). 999
4. Click UPLOAD. 1000
5. Select ACTIVATION as the application name. Click NEXT. 1001
6. On the next screen, import the DIGIPASSes as ACTIVE, and set the Domain to be 1002
acmefinancial.com. 1003
7. Click IMPORT. 1004
8. Choose to run the task immediately. 1005
2.7.8 Configuring to Use Radiant Logic as a Back-End Authentication Server 1006
With Radiant Logic configured to replicate users and groups from AD, OneSpan can use Radiant Logic as 1007
an AD back-end. This works, as OneSpan connects to Radiant by using LDAP over SSL, and Radiant Logic 1008
contains a virtual directory that presents like AD. 1009
2.7.8.1 Installing the AD CA Certificate in the OneSpan Server OS 1010
For OneSpan to trust the certificate used by Radiant Logic during the SSL handshake, the AD CA 1011
certificate needs to be installed. Because the Radiant Logic certificate was signed by the AD CA, once 1012
OneSpan trusts the CA, it trusts Radiant Logic. The following instructions detail how to export the AD CA 1013
certificate and how to install it in Ubuntu: 1014
1. On AD-PRODUCTION, the AD Domain Controller, open Server Manager. 1015

DRAFT
NIST SP 1800-18C: Privileged Account Management for the Financial Services Sector 74
2. In the top right corner, click Tools > Certification Authority. 1016
1017
3. Under Certification Authority (Local), right-click AcmeFinancial-AD-PRODUCTION-CA, and then 1018
select Properties. 1019

DRAFT
NIST SP 1800-18C: Privileged Account Management for the Financial Services Sector 75
1020
4. Click Certificate #0, and then click View Certificate. 1021
5. Tab over to Details, and then click Copy to File. 1022
6. Click Next. 1023
7. Select the format option Base-64 encoded X.509 (.CER), and then click Next. 1024
8. Select a location and file name for saving the certificate. For example, 1025
C:\Users\Administrator\Desktop\AD-PRODUCTION-CA-PEM.cer. 1026
9. Click Next, and then click Finish. 1027
10. Copy the file over to the OneSpan server. 1028
11. On the OneSpan server, copy the file to the /usr/local/share/ca-certificates directory, and give it 1029
a .crt file extension. 1030
12. Update the trusted CA certificates with the following command: 1031
sudo update-ca-certificates --fresh 1032

DRAFT
NIST SP 1800-18C: Privileged Account Management for the Financial Services Sector 76
13. Reboot the OneSpan server machine. 1033
2.7.8.2 Configuring OneSpan to Use Radiant Logic 1034
Once the certificate for Radiant Logic will be trusted, the final step (before OneSpan will authenticate 1035
with Radiant Logic as a back-end) is to add a back-end server entry in OneSpan. The following procedure 1036
completes this step: 1037
1. In the IAS Web Administration interface, click BACK-END > Register Active Directory Back-End. 1038
2. Fill out the pop-up window with the following information: 1039
a. Back-End Server ID: RADIANT LOGIC 1040
b. Domain Name: acmefinancial.com 1041
c. Enable SSL: This check box should be selected. 1042
d. Location: radiant-logic 1043
e. Port: 636 1044
f. Search Base DN: o=AcmeFinancial 1045
g. Security Principal DN: cn=Directory Manager 1046
h. Security Principle Password: <the Security Principal Password from Radiant Logic> 1047
i. Confirm Principle Password: <the Security Principal Password from Radiant Logic> 1048

DRAFT
NIST SP 1800-18C: Privileged Account Management for the Financial Services Sector 77
1049
3. Click CREATE. 1050
2.7.9 Integration with TDi ConsoleWorks 1051
Integrating TDi ConsoleWorks with OneSpan required disabling the NAS-IP-Address RADIUS attribute. 1052
Instructions for completing this step are available online from OneSpan. 1053
2.7.10 Installing User Websites 1054
To allow users to register their own DIGIPASS device without the need of an admin being present, User 1055
Websites must be installed and then configured with a corresponding license. The following steps detail 1056
how to install the User Websites on the same server as the Authentication Server: 1057
1. Mount the .iso file with the server installer: 1058
mkdir /mnt/dvd 1059
sudo mount /dev/dvd /mnt/dvd 1060
2. Run the installation script: 1061
cd /mnt/dvd/IDENTIKEY\ User\ Websites/ 1062
sudo ./install-uws.sh 1063

DRAFT
NIST SP 1800-18C: Privileged Account Management for the Financial Services Sector 78
3. Accept the licenses for the server. 1064
2.7.11 Creating Component Records in IDENTIKEY Authentication Server 1065
Before User Websites can be used to assign a user a DIGIPASS, the IDENTIKEY Authentication Server 1066
must be configured to accept connections from the User Websites. We will create two component 1067
records for the websites: one general User Websites client record and another UWS MDL Provisioning 1068
client record for provisioning DIGIPASSes. 1069
1. In IAS Web Administration, click CLIENTS > Register. 1070
2. Fill out the Create new Client page with the following information: 1071
a. Client Type: IDENTIKEY User Websites 1072
b. Location: 172.16.2.208 1073
c. Policy ID: IDENTIKEY Provisioning for Multi-Device Licensing 1074
1075
3. Click CREATE. 1076

DRAFT
NIST SP 1800-18C: Privileged Account Management for the Financial Services Sector 79
4. Click Click here to manage IDENTIKEY User Websites. 1077
5. Tab over to License. 1078
6. Click LOAD LICENSE KEY. 1079
7. Click Choose File, and then provide it with the User Websites license. 1080
8. Click FINISH. 1081
9. Click CLIENTS > Register again. 1082
10. Fill out the Create new Client page with the following information: 1083
a. Client Type: UWS MDL Provisioning (type it in) 1084
b. Location: 172.16.2.208 1085
c. Policy ID: IDENTIKEY Provisioning for Multi-Device Licensing 1086
1087
11. Click CREATE. 1088

DRAFT
NIST SP 1800-18C: Privileged Account Management for the Financial Services Sector 80
12. Click POLICIES > List. 1089
13. Find the policy IDENTIKEY Provisioning for Multi-Device Licensing, and then click it. 1090
14. Click EDIT. 1091
15. Change the Back-End Protocol from RADIUS to Microsoft AD. 1092
16. Click SAVE. 1093
17. Tab over to User. 1094
18. Click EDIT, and change Dynamic User Registration to No. This way, only users added by admins 1095
in IDENTIKEY Authentication Server will be assigned DIGIPASSes. 1096
19. Click SAVE. 1097
Users are now able to go to https://vasco.acmefinancial.com:9443/selfmgmt to assign themselves 1098
DIGIPASSes. Details about and instructions for using the DIGIPASS application are available from 1099
OneSpan. 1100
2.8 Base Linux OS 1101
The base Linux image used in this project is an Ubuntu 16.04 Server OS. It is open-source and freely 1102
available. 1103
2.8.1 Virtual Machine Configuration 1104
The base Linux virtual machine is configured as follows: 1105
▪ Ubuntu Linux 16.04 LTS 1106
▪ 1 CPU core 1107
▪ 8 GB of RAM 1108
▪ 40 GB of storage 1109
▪ 1 NIC 1110
Network Configuration: 1111
▪ IPv4: manual 1112
▪ IPv6: disabled 1113
▪ IPv4 address: 172.16.x.x 1114
▪ Netmask: 255.255.255.0 1115
▪ Gateway: 172.16.x.1 1116

DRAFT
NIST SP 1800-18C: Privileged Account Management for the Financial Services Sector 81
▪ DNS name servers: 172.16.3.10 1117
▪ DNS-search domain: acmefinancial.com 1118
2.8.2 Domain Join Configuration 1119
The base system used was configured to be a part of the project’s AD domain, as demonstrated by the 1120
following steps: 1121
1. Ensure that the system has the DNS IP address pointing to the AD server IP address. 1122
1123
2. Restart the networking by entering the following command: 1124
systemctl restart networking 1125
3. Verify changes by checking the /etc/resolv.conf file. Enter the following command: 1126
cat /etc/resolv.conf 1127
4. Install the packages required for the AD domain join as described above, using the following 1128
command: 1129
1130
5. If prompted to enter your Kerberos 5 realm name, enter your domain name in capital letters. 1131
The Kerberos 5 default realm is ACMEFINANCIAL.COM. 1132

DRAFT
NIST SP 1800-18C: Privileged Account Management for the Financial Services Sector 82
6. Install the chrony ntp client by entering the following command: 1133
1134
7. Add the following line, which points to the NTP server: 1135
server 172.16.3.10 1136
1137
8. Restart the chrony service as shown below: 1138
1139
9. Request an AD domain join by using a domain admin account or a user with appropriate 1140
privileges. Perform the domain join by running the following commands: 1141
a. kinit [email protected] 1142
b. Enter the password when prompted. 1143
c. realm -v join acmefinancial.com –user-principal = 1144 yourlinuxhost.acmefinancial.com/[email protected] 1145
d. systemctl restart realmd 1146
10. Set fallback-homedir = /home/%u/%d to create Linux home directories for domain users, and 1147
access_provider = ad to allow domain users to log into Linux end points via SSH: 1148

DRAFT
NIST SP 1800-18C: Privileged Account Management for the Financial Services Sector 83
1149
2.9 Microsoft SQL Server Installation on Ubuntu Linux 1150
Microsoft SQL Server is a relational database management system developed and provided by the 1151
Microsoft Corporation. Microsoft SQL Server has different editions that target different audiences. The 1152
Express edition, which is freely available, was used in this build. 1153
2.9.1 How It’s Used 1154
Microsoft SQL Server is used in the example implementation as a managed asset. It represents a critical 1155
asset that would naturally exist in most enterprises. Access to the server by privileged users is controlled 1156
by the policies configured on the PAM system. 1157
2.9.2 Virtual Machine Configuration 1158
The Microsoft SQL Server virtual machine is configured as follows: 1159
▪ Ubuntu Linux 16.04 LTS 1160
▪ 1 CPU core 1161
▪ 4 GB of RAM 1162
▪ 40 GB of storage 1163
▪ 1 NIC 1164
Network Configuration: 1165
▪ IPv4: manual 1166
▪ IPv6: disabled 1167

DRAFT
NIST SP 1800-18C: Privileged Account Management for the Financial Services Sector 84
▪ IPv4 address: 172.16.3.12 1168
▪ Netmask: 255.255.255.0 1169
▪ Gateway: 172.16.3.1 1170
▪ DNS name servers: 172.16.3.10 1171
▪ DNS-search domain: acmefinancial.com 1172
2.9.3 Firewall Configuration 1173
ufw allow 1433/tcp 1174
ufw allow 22/tcp 1175
ufw default deny incoming 1176
2.9.4 Installation and Initial Configuration 1177
Use the following steps to install Microsoft SQL Server Express 2017 and to configure it to authenticate 1178
to AD: 1179
1. Install Microsoft SQL Server on Ubuntu Linux by using the instructions provided at 1180
https://docs.microsoft.com/en-us/sql/linux/quickstart-install-connect-ubuntu?view=sql-server-1181
linux-2017. 1182
2. Create a service account by entering the following Powershell command: 1183
New-ADuser mssql -AccountPassword (Read_host -AsSecureString “Enter password”) 1184 -PasswordNeverExpires $true -Enabled $true. 1185
a. Enter the password when prompted. 1186
3. Give the account the Log on as a service right by going to Server Manager > Group Policy 1187
Management > Edit > Computer Configuration > Policies > Windows Settings > Security 1188
Settings > Local Policies > User Rights Assignment. 1189

DRAFT
NIST SP 1800-18C: Privileged Account Management for the Financial Services Sector 85
1190
4. Create a Service Principal Name by entering the following command: 1191
setspn -A MSSQLSvc/sql-server.acmefinancial.com:1433 mssql 1192
5. Request the information needed to create a keytab file by entering the following commands: 1193
a. Enter the following command: 1194
kinit [email protected] 1195
i. Enter the account password when prompted. 1196
b. Retrieve the kvno value by entering the following command: 1197
kvno MSSQLSvc/sql-server.acmefinancial.com:1433 1198
1199
6. Create a keytab file by entering the commands shown below: 1200
1201
7. Exit the ktutil tool by entering the following command: 1202
quit 1203

DRAFT
NIST SP 1800-18C: Privileged Account Management for the Financial Services Sector 86
8. Restart SQL Server by entering the following command: 1204
systemctl restart mssql-server 1205
9. Install SQL Server command-line tools by using the instructions provided at 1206
https://docs.microsoft.com/en-us/sql/linux/quickstart-install-connect-ubuntu?view=sql-server-1207
linux-2017#tools. 1208
10. Log into the database by entering the following command: 1209
./sqlcmd -S localhost -U sa 1210
11. To enable AD-based logins to the database, use the instructions provided at 1211
https://docs.microsoft.com/en-us/sql/linux/sql-server-linux-active-directory-1212
authentication?view=sql-server-linux-2017#createsqllogins. 1213
2.10 Samba File Server 1214
Samba is an open-source tool that provides file and print services by using the Server Message Block 1215
(SMB) / Common Internet File System protocol. Samba can also be used to emulate Windows domain 1216
controllers and member servers in AD environments. 1217
2.10.1 How It’s Used 1218
Samba was used in this example implementation to provide file services for AD domain clients. As a file 1219
server potentially holding confidential information, it was also used as a managed asset for which 1220
privileged user access was controlled by policies configured on the PAM system. 1221
2.10.2 Virtual Machine Configuration 1222
The Samba virtual machine is configured as follows: 1223
▪ Ubuntu Linux 16.04 LTS 1224
▪ 1 CPU core 1225
▪ 8 GB of RAM 1226
▪ 40 GB of storage 1227
▪ 1 NIC 1228
Network Configuration: 1229
▪ IPv4: manual 1230
▪ IPv6: disabled 1231
▪ IPv4 address: 172.16.3.21 1232

DRAFT
NIST SP 1800-18C: Privileged Account Management for the Financial Services Sector 87
▪ Netmask: 255.255.255.0 1233
▪ Gateway: 172.16.3.1 1234
▪ DNS name servers: 172.16.3.10 1235
▪ DNS-search domain: acmefinancial.com 1236
2.10.3 Firewall Configuration 1237
ufw allow 137 1238
ufw allow 138 1239
ufw allow 139 1240
ufw allow 445 1241
ufw allow 22/tcp 1242
ufw default deny incoming 1243
2.10.4 Installation and Configuration 1244
1. Ensure that the DNS server is set to the AD domain controller IP address. Enter the following 1245
command to verify: 1246
cat /etc/resolv.conf 1247
2. Ensure that the search domain is set to your domain (e.g., acmefinancial.com). Enter the 1248
following command to verify: 1249
cat /etc/resolv.conf 1250
1251
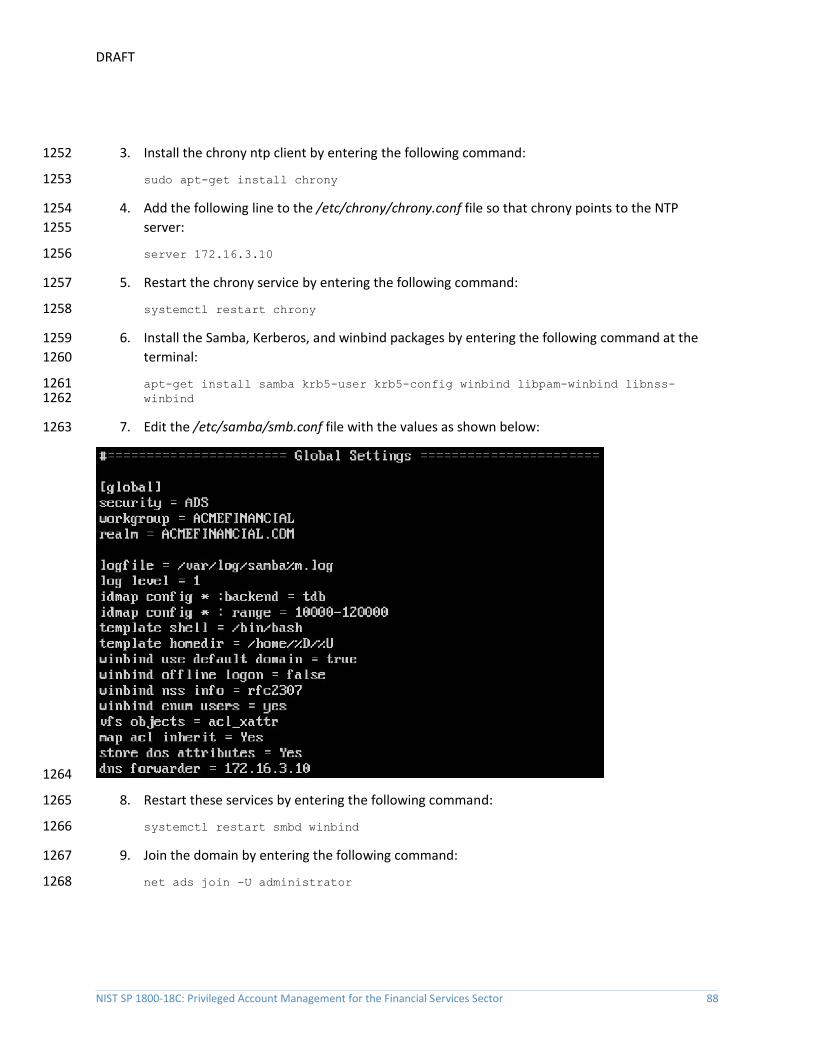
DRAFT
NIST SP 1800-18C: Privileged Account Management for the Financial Services Sector 88
3. Install the chrony ntp client by entering the following command: 1252
sudo apt-get install chrony 1253
4. Add the following line to the /etc/chrony/chrony.conf file so that chrony points to the NTP 1254
server: 1255
server 172.16.3.10 1256
5. Restart the chrony service by entering the following command: 1257
systemctl restart chrony 1258
6. Install the Samba, Kerberos, and winbind packages by entering the following command at the 1259
terminal: 1260
apt-get install samba krb5-user krb5-config winbind libpam-winbind libnss-1261 winbind 1262
7. Edit the /etc/samba/smb.conf file with the values as shown below: 1263
1264
8. Restart these services by entering the following command: 1265
systemctl restart smbd winbind 1266
9. Join the domain by entering the following command: 1267
net ads join -U administrator 1268

DRAFT
NIST SP 1800-18C: Privileged Account Management for the Financial Services Sector 89
10. Enter the domain admin password when prompted. 1269
11. Enter the following command at the terminal to create a folder to be shared via Samba: 1270
mkdir /PII2 1271
12. Enter the following command to change the owning group to domain users: 1272
chgrp “domain users” /PII2 1273
13. Enter the following command to ensure that only domain admins have access to the folder: 1274
chmod 660 /PII2 1275
14. Edit the /etc/samba/smb.conf file with the information shown below: 1276
1277
15. Restart these services by entering the following command: 1278
systemctl restart smbd winbind 1279
2.11 Remediant SecureONE 1280
SecureONE is a PAM system that controls privileged access to managed assets by adding accounts to or 1281
removing accounts from administrative groups on the asset’s OSes. SecureONE does not require an 1282
agent on the managed asset but instead uses Windows Remote Procedure Call and SSH to make 1283
privilege escalation and de-escalation changes on the end point. 1284
2.11.1 How It’s Used 1285
In the example implementation, SecureONE was used as a PAM system that controls administrative 1286
access to the managed asset’s OS. SecureONE was not used for managing administrative access to any 1287
application. 1288
2.11.2 Virtual Machine Configuration 1289
The Remediant SecureONE virtual machine is configured as follows: 1290
▪ Ubuntu Linux 16.04 LTS 1291
▪ 4 CPU cores 1292
DRAFT
NIST SP 1800-18C: Privileged Account Management for the Financial Services Sector 90
▪ 16 GB of RAM 1293
▪ 100 GB of storage 1294
▪ 1 NIC 1295
Network Configuration: 1296
▪ IPv4: manual 1297
▪ IPv6: disabled 1298
▪ IPv4 address: 172.16.2.10 1299
▪ Netmask: 255.255.255.0 1300
▪ Gateway: 172.16.2.1 1301
▪ DNS name servers: 172.16.3.10 1302
▪ DNS-search domain: acmefinancial.com 1303
2.11.3 Installation and Initial Configuration 1304
In the example implementation, SecureONE was deployed as a prebuilt virtual-machine appliance from 1305
the vendor. The appliance was still configured with parameters necessary for our environment. You can 1306
connect to the SecureONE appliance by navigating your web browser to https://10.33.51.227. Replace 1307
the IP address with your appliance’s IP address. 1308
2.11.4 Domain Configuration 1309
SecureONE needs to be configured to manage systems in an AD environment. The configuration details 1310
are provided in the following steps: 1311
1. Create a service account in AD. Name the service account as secureone, and add it to the 1312
domain admins group. This account will be used by the SecureONE appliance. 1313
2. Click Configure > Server > Edit Configuration, and fill out the pop-up window with the relevant 1314
information: 1315

DRAFT
NIST SP 1800-18C: Privileged Account Management for the Financial Services Sector 91
1316
2.11.5 Managing Systems 1317
SecureONE manages systems by enrolling them into protected mode. Once a system is enrolled, 1318
SecureONE can change a user’s group memberships. SecureONE can add or remove users from the local 1319
admins group or the local sudoers group. Use the following steps to enroll a domain computer: 1320
1. Navigate to Access > System Search. 1321
2. In the search bar, enter the host name of the system to be managed. 1322
3. Change the setting under Protect Mode to Enabled. 1323

DRAFT
NIST SP 1800-18C: Privileged Account Management for the Financial Services Sector 92
1324
2.11.6 Adding New Users 1325
1. Once logged in, navigate to Configure > Server > Add User/Group. 1326
2. In the search bar, type the name of the domain user, and then click Add User/Group. 1327
1328

DRAFT
NIST SP 1800-18C: Privileged Account Management for the Financial Services Sector 93
3. SecureONE uses a built-in Google Authenticator for 2FA. Once the new user attempts to log in 1329
with their domain password, a Quick Response (QR) code is presented. 1330
1331
4. Scan the QR code with the Google Authenticator mobile application to receive your onetime 1332
passcode, which changes every 60 seconds. 1333
5. Enter your onetime passcode in the 6-Digit Token field below the QR code. 1334
2.11.7 Requesting Privileged Access to Protected System 1335
A user can request privileged access to a system by using the following steps: 1336
1. Navigate to Access > System Search. 1337
2. In the search bar, enter the host name of the protected system. 1338
3. Click Access System. 1339

DRAFT
NIST SP 1800-18C: Privileged Account Management for the Financial Services Sector 94
1340
4. Once access is granted, the session expiration time will be displayed under Expiration. 1341
1342
5. At this point, the user can log onto the protected system with administrative privileges. 1343

DRAFT
NIST SP 1800-18C: Privileged Account Management for the Financial Services Sector 95
2.12 RSA Authentication Manager 1344
RSA Authentication Manager is responsible for maintaining and managing user profiles, personal 1345
identification numbers (PINs), and tokens. Using its web interface, users can be activated or deactivated, 1346
PINs can be configured, and tokens can be assigned to users. Users can be created locally or retrieved 1347
from identity repositories. 1348
2.12.1 How It’s Used 1349
In the example implementation, RSA Authentication Manager was configured to retrieve user account 1350
information from AD. Only accounts for privileged users were retrieved and configured. Tokens that had 1351
time-sensitive onetime passcodes were assigned to these user accounts, providing 2FA. 1352
2.12.2 Installation and Initial Configuration 1353
Authentication Manager was deployed as an appliance in the example implementation. Once the 1354
appliance boots successfully, the operator will have the opportunity to change or verify the IP address 1355
settings. Use the following steps to complete the initial configuration: 1356
1. To log into the system, use the link and the Quick Setup Access Code that are displayed after 1357
boot: 1358
1359
2. Enter the Quick Setup Access Code, click Next, and then accept the license agreement. 1360

DRAFT
NIST SP 1800-18C: Privileged Account Management for the Financial Services Sector 96
1361
3. Click Start Primary Quick Setup. 1362
1363
4. Review the information, and then click Start Step 1. 1364

DRAFT
NIST SP 1800-18C: Privileged Account Management for the Financial Services Sector 97
1365
5. Upload the License File by clicking Choose File, selecting the appropriate file and clicking Open, 1366
and then clicking Upload. 1367
1368
6. Enter the Hostname or IP Address of the NTP server in your environment, and then click Next. 1369
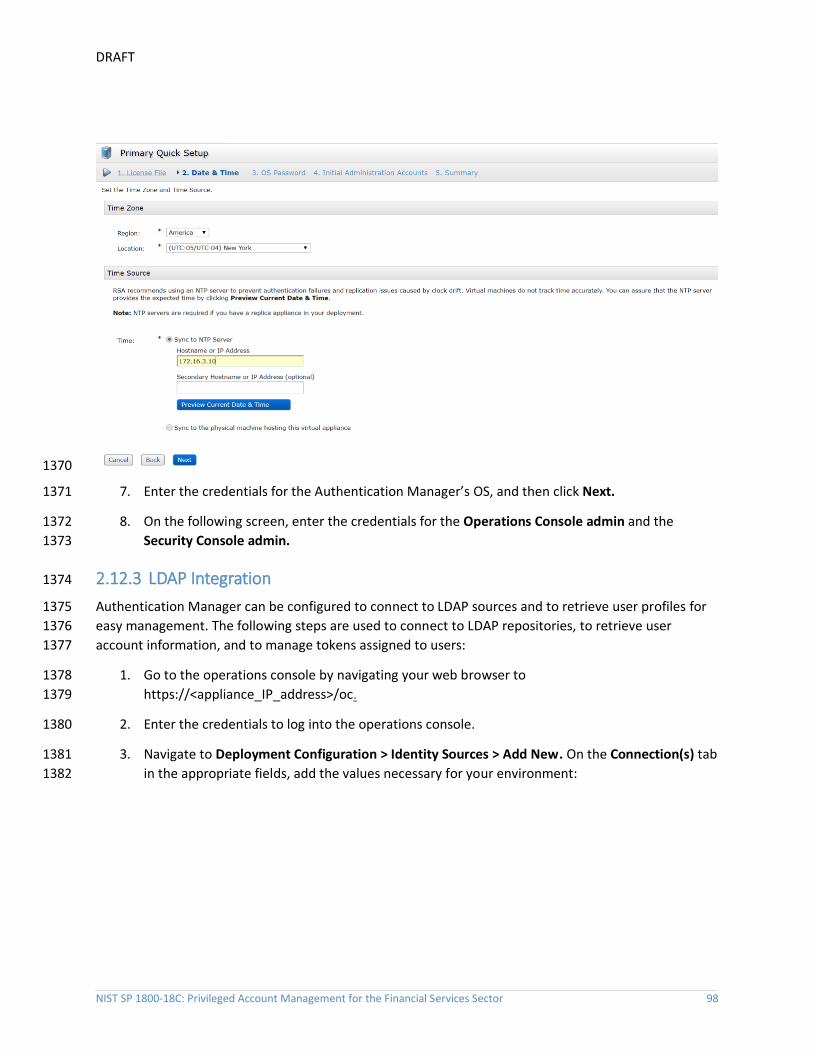
DRAFT
NIST SP 1800-18C: Privileged Account Management for the Financial Services Sector 98
1370
7. Enter the credentials for the Authentication Manager’s OS, and then click Next. 1371
8. On the following screen, enter the credentials for the Operations Console admin and the 1372
Security Console admin. 1373
2.12.3 LDAP Integration 1374
Authentication Manager can be configured to connect to LDAP sources and to retrieve user profiles for 1375
easy management. The following steps are used to connect to LDAP repositories, to retrieve user 1376
account information, and to manage tokens assigned to users: 1377
1. Go to the operations console by navigating your web browser to 1378
https://<appliance_IP_address>/oc. 1379
2. Enter the credentials to log into the operations console. 1380
3. Navigate to Deployment Configuration > Identity Sources > Add New. On the Connection(s) tab 1381
in the appropriate fields, add the values necessary for your environment: 1382

DRAFT
NIST SP 1800-18C: Privileged Account Management for the Financial Services Sector 99
1383
4. Enter the value of a domain admin, such as [email protected], in the 1384
Directory User ID field. 1385
5. Click Test Connection. 1386
2.12.4 Token Assignment 1387
To assign a token to a user, use the following steps: 1388
1. Go to the security console by navigating your web browser to 1389
https://<appliance_IP_address>/sc. 1390
2. Enter the credentials to log into the security console. 1391
3. Navigate to Identity > Users > Manage Existing. 1392
4. Ensure that the Identity Source field points to your AD server, identified by its unique name 1393
given in the operations console. 1394
5. In the Where field, select User ID. 1395
6. In the search bar, enter the User ID for which you would like to search. 1396
7. The user account will be retrieved and displayed. 1397

DRAFT
NIST SP 1800-18C: Privileged Account Management for the Financial Services Sector 100
1398
8. Click on the User ID (by selecting the check box to the left of the User ID), and then click SecurID 1399
Tokens. 1400
9. Click Assign Token. 1401
1402
10. Select a serial number (by selecting the check box to the left of the serial number), and then 1403
click Assign. 1404
2.12.5 Software Token Profiles and Token Distribution 1405
Software Token Profiles specify parameters that enable the secure distribution of assigned tokens to 1406
users. Use the information provided at https://community.rsa.com/docs/DOC-77084 to create a 1407
software token profile. To distribute an assigned token to a user, follow the instructions provided at 1408
https://community.rsa.com/docs/DOC-77090. 1409

DRAFT
NIST SP 1800-18C: Privileged Account Management for the Financial Services Sector 101
2.13 Splunk 1410
Splunk is a security information and event management system that allows collecting and parsing logs 1411
and data from multiple systems. 1412
2.13.1 How It’s Used 1413
Splunk can receive data from a plethora of different sources. The most reliable option is installing 1414
Splunk’s Universal Forwarder on each system from which you want to collect data. Other options 1415
include syslogs, file and directory monitoring, and network events. Once data has been collected by 1416
Splunk, it can then be parsed and displayed by using prebuilt rules or custom criteria. Splunk is used to 1417
report and alert on unauthorized activity. 1418
2.13.2 Installation 1419
Note: You will need a Splunk account to download Splunk Enterprise. The account is free and can be set 1420
up at https://www.splunk.com/page/sign_up. 1421
Download Splunk Enterprise from https://www.splunk.com/en_us/download/splunk-enterprise.html. 1422
This build uses Version 7.0.3. Splunk can be installed on Windows, Linux, Solaris, and Mac OS X. Each of 1423
these installation instructions is provided at 1424
http://docs.splunk.com/Documentation/Splunk/7.1.3/Installation/Beforeyouinstall. 1425
2.13.3 Queries 1426
Two Splunk reports were created for this build. One of the reports is named DemoBomgar-AD-Auth-1427
UnauthV1, which captures activities that are authorized or activities that violate the workflow. The 1428
other report is named DemoRadiant-AD-Event-Details, which captures more details of those events and 1429
can be used as a secondary monitor for AD. 1430
2.13.4 DemoBomgar-AD-Auth-UnauthV1 1431
index="demo" sourcetype=_json OR sourcetype="csv" NOT host="radiant-logic" NOT ("A 1432 user account was changed" OR "A user account was enabled")|where NOT like(UserObject, 1433 "UserObject%")|eval BomgarUserSubject=substr('Event.@sOriginatingAccount',15)|table 1434 _time host Event.@sEventID Event.@sLoginName Event.@sMessage BomgarUserSubject 1435 UserSubject UserObject Event|eval 1436 UserSubject=if(isnotnull(BomgarUserSubject),BomgarUserSubject,UserSubject)|transaction 1437 UserSubject maxspan=240s|eval 1438 Policy=if((BomgarUserSubject==UserSubject),"Authorized","Unauthorized")|table _time 1439 host Policy Event.@sEventID Event.@sLoginName UserSubject UserObject Event 1440

DRAFT
NIST SP 1800-18C: Privileged Account Management for the Financial Services Sector 102
2.13.5 DemoRadiant-AD-Event-Details 1441
index="demo" 1442 source="C:\\radiantone\\vds\\r1syncsvcs\\log\\cf_o_acmefinancial\\object_generic_dv_so1443 _o_acmefinancial_capture.log" OR source="c:\\final_ad.csv" NOT ("A user account was 1444 changed" OR "A user account was enabled") |rex 1445 "\<sAMAccountName\>(?P<LDAPObject>.+)\<\/sAMAccountName\>" |rex 1446 "\<RLICHANGETYPE\>(?P<RLICHANGETYPE>\w+)"|rex 1447 "<RLICHANGES>(?P<RLICHANGES>.+)\<\/RLICHANGES\>"|rex 1448 "\<userPrincipalName\>(?P<UserObject>\w+)\@"|table _time host UserSubject LDAPObject 1449 UserObject Event RLICHANGETYPE RLICHANGES|where isnotnull(UserSubject) OR 1450 isnotnull(UserObject)| where NOT like(UserObject, "MSOL%")|where NOT like(UserObject, 1451 "UserObject%")|table _time host UserSubject LDAPObject UserObject Event RLICHANGETYPE 1452 RLICHANGES|where NOT like(RLICHANGES, "replace: logonCount%")|eval 1453 RLICHANGETYPE=if(LIKE(Event,"%added%"),"update",RLICHANGETYPE)|eval 1454 RLICHANGETYPE=if(LIKE(Event,"%created%"),"insert",RLICHANGETYPE)|table _time host 1455 UserSubject UserObject LDAPObject Event RLICHANGETYPE RLICHANGES|eval 1456 UserObject=if(LIKE(LDAPObject,"%Admin%"),"",UserObject) 1457
2.13.6 SSL Forwarding 1458
We took advantage of Splunk’s built-in SSL forwarding capability and configured SSL encryption between 1459
forwarders and the indexer. Instructions to enable SSL forwarding are provided at 1460
http://docs.splunk.com/Documentation/Splunk/7.1.3/Security/ConfigureSplunkforwardingtousesignedc1461
ertificates. 1462

DRAFT
NIST SP 1800-18C: Privileged Account Management for the Financial Services Sector 103
Appendix A List of Acronyms 1463
2FA Two-Factor Authentication
AD Active Directory
CA Certificate Authority
CPU Central Processing Unit
DNS Domain Name System
FID Federated Identity
FQDN Fully Qualified Domain Name
GB Gigabyte(s)
HDD Hard Disk Drive
IIS Internet Information Services
IP Internet Protocol
IPv4 Internet Protocol Version 4
IPv6 Internet Protocol Version 6
IT Information Technology
LDAP Lightweight Directory Access Protocol
MFA Multi-Factor Authentication
N/A Not Applicable
NCCoE National Cybersecurity Center of Excellence
NIC Network Interface Controller/Card
NIST National Institute of Standards and Technology
OS Operating System
PAM Privileged Account Management
PIN Personal Identification Number
QR Quick Response
RAM Random-Access Memory

DRAFT
NIST SP 1800-18C: Privileged Account Management for the Financial Services Sector 104
SAML Security Assertion Markup Language
SMB Server Message Block
SP Special Publication
SQL Structured Query Language
SSH Secure Shell
SSL Secure Sockets Layer
URL Uniform Resource Locator