Printing Floato™ with the Epson Workforce WF-7110...1/27/17 9:28 AM 1 Floato is a foil balloon...
18
1/27/17 9:28 AM 1 Floato™ is a foil balloon that has been coated on one side with an ink-jet receptive material so the balloon can be printed onto directly with an inkjet printer. The balloon is assembled into a patented structure that guides the balloon through the printer. Either 5 or 20 assembled Floato™ balloons are vacuum-packed into a poly bag for protection while in transit. Anagram recommends the use of 3 Printer Models with Floato™. In fact, Anagram assumes no responsibility for results when any printer model other than those recommended are used. 32279-73 is intended to be printed with the Epson Workforce WF-7110 AND the Canon Pixma Pro-100 inkjet printers and is supplied in a trade package, packed 5 to a vacuum-bag. Please see the separate document for instructions for using the Canon Pixma Pro-100. 32279-76 is intended to be printed with the Epson Stylus Pro 4900 inkjet printer and is supplied in a trade package, packed 20 to a vacuum-bag. This Epson printer is a more expensive, professional-grade machine and requires additional set-up. IMPORTANT! Floato™ CANNOT be printed with a laserjet printer. The heat produced by a laserjet printer will damage the Floato™ balloon! Printing Floato™ with the Epson Workforce WF-7110 Following are instructions for printing Floato™ 32279-73 with the Epson Workforce WF-7110 printer and the free Floato™ App with WINDOWS 10 (other Windows versions will be similar but not exactly the same).
Transcript of Printing Floato™ with the Epson Workforce WF-7110...1/27/17 9:28 AM 1 Floato is a foil balloon...

1/27/17 9:28 AM
1
Floato™ is a foil balloon that has been coated on one side with an ink-jet receptive material so the balloon can be printed onto directly with an inkjet printer. The balloon is assembled into a patented structure that guides the balloon through the printer. Either 5 or 20 assembled Floato™ balloons are vacuum-packed into a poly bag for protection while in transit. Anagram recommends the use of 3 Printer Models with Floato™. In fact, Anagram assumes no responsibility for results when any printer model other than those recommended are used. 32279-73 is intended to be printed with the Epson Workforce WF-7110 AND the Canon Pixma Pro-100 inkjet printers and is supplied in a trade package, packed 5 to a vacuum-bag. Please see the separate document for instructions for using the Canon Pixma Pro-100. 32279-76 is intended to be printed with the Epson Stylus Pro 4900 inkjet printer and is supplied in a trade package, packed 20 to a vacuum-bag. This Epson printer is a more expensive, professional-grade machine and requires additional set-up. IMPORTANT! Floato™ CANNOT be printed with a laserjet printer. The heat produced by a laserjet printer will damage the Floato™ balloon!
Printing Floato™ with the Epson Workforce WF-7110 Following are instructions for printing Floato™ 32279-73 with the Epson Workforce WF-7110 printer and the free Floato™ App with WINDOWS 10 (other Windows versions will be similar but not exactly the same).

2
1) Download the latest printer driver from Epson, noting the correct operating system of your computer
• Quick Set-up Guide is available at Epson: o http://files.support.epson.com/docid/cpd3/cpd39213.pdf
• Epson user guide • Once the Installation is complete and the driver downloaded, set
up the printer using the menu window on the printer (not on your computer) using Buttons and Arrows
o In Menu Select: ! Maintenance:
" Select Thick Paper and ON o Next select Paper Guide:
! Set to Cassette1 A3+ Envelope

3
After setting up the printer, apply the following settings on your computer: • Open your PC Settings and then Control Panel
o Opening the Control Panel and adjusting Settings is different on other versions of Windows, but what you must select remains the same
• Click on the Windows Icon on the left hand side corner of the Desktop
• Click Settings • Click on Devices Bluetooth Printers Mouse
o Scroll to bottom of page and select Devises and Printers o Select Epson WF-7110 and Right Click
! Select Printing Preferences ! In Paper Source select:
" Rear Tray ! In Document Size select:
" A3+ 13” x 19” (33cm x 48cm) • DO NOT select Borderless
! In Paper Type select: " Photo Papers
• and then Matte Photo Papers ! In Quality select:
" Standard or High (uses more ink)
• Select More Options and De-Select High Speed • Finally click Add/Remove Presets and name a Printing Preset
“Floato”, and OK to save settings

4
To complete the set-up on your computer apply these basic settings in PRINTER PREFERENCES:
• In PRINT UTILITIES choose: o Prevent Paper Abrasion o Reset Ink Drying Wait Time as directed o IMPORTANT! Repeat this procedure each time the
printer is turned on for printing Floato™
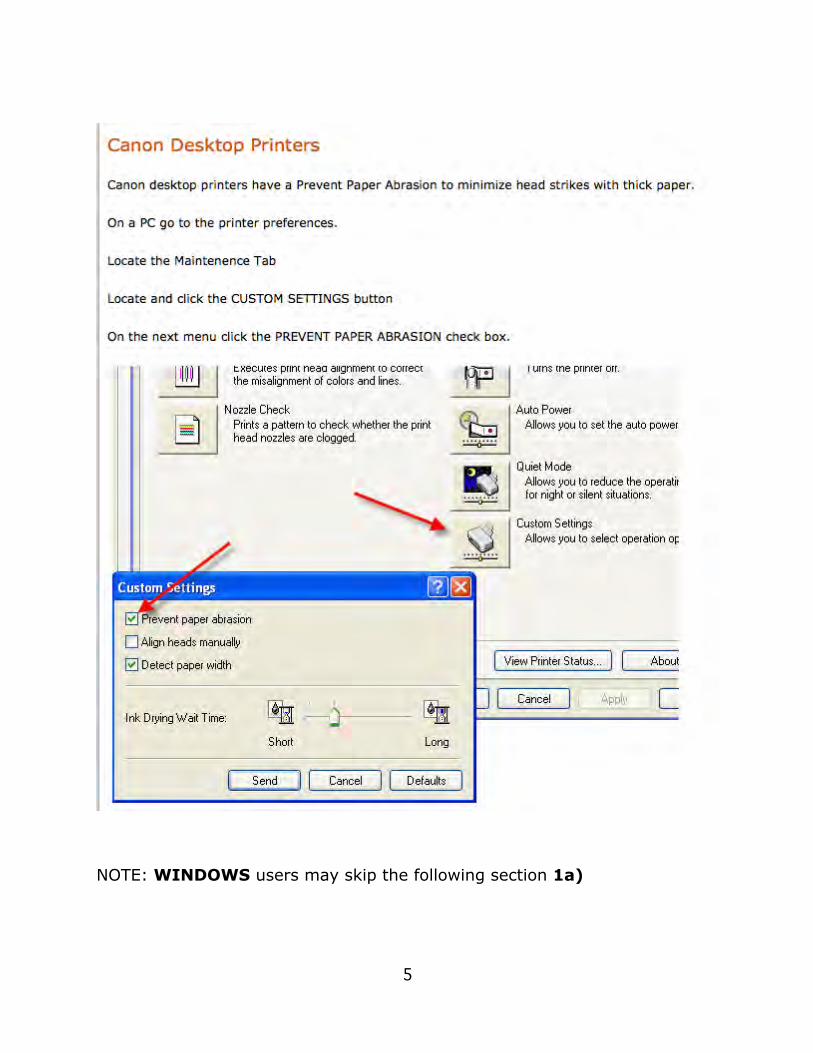
5
NOTE: WINDOWS users may skip the following section 1a)

6
1a) If using an Apple/MAC to print Floato™ 32279-73, connect the printer then set up the printer using the menu window on the printer (not on your computer) using Buttons and Arrows
• In Menu Select: o Maintenance:
• Select Thick Paper and ON • Next select Paper Guide: • Set to Cassette1 A3+ Envelope
To complete the set-up on your computer apply these basic settings in PRINTER PREFERENCES:
• In PRINT UTILITIES choose: o Prevent Paper Abrasion o Reset Ink Drying Wait Time as directed o IMPORTANT! Repeat this procedure each time the
printer is turned on for printing Floato™

7
• When printing, in the Print Window set: o Paper Size is A3+ Borderless (329mm x 483mm) o Paper Type is Matte Photo Paper o Print Quality is Standard or High Quality (uses more ink)
2) Download the App free-of-charge at anagramballoon.com
• Apple and Windows version both available • Install on computer as directed per Windows or Apple • Printing is done from the computer – not from the website
o IMPORTANT: please note that the Floato™ App 2.0 version, while operating on your computer, uses an internet connection to download the art templates and search for template updates each time it is opened
3) When ready to print Floato™ cut open the plastic bag
• Be careful not to cut into the product itself • Remove only the balloon(s) you plan to print
o Leaving balloons in the bag until ready for printing will keep them protected from dirt and stains

8
4) To Print Floato™
• Place balloon into printer with arrows pointing downwards towards the printer and blank printable surface facing you – so that the blank BALLOON side is printed when in the printer

9
• WARNING:
o Before printing the first balloon of the day print the reverse paper side of a Floato™ first with the arrows pointing downward (you won’t hurt the balloon) or use throw-away paper instead
o This is important - the inkjet heads may be clogged when not used for several hours (same with a new printer) and this will clear the heads
o You can then insert and print a balloon in the normal way o You can also use the reverse of the Floato™ balloon to
practice printing or to proof a design before printing on the actual balloon side
5) Click on the App and Design your balloon
• “Drag” your photo (jpg) or Upload Image into the display window

10
• Adjust the size of the image with the bar in the upper right of the Tools section and its placement by clicking on it and dragging within the “circle”
• Type your message in the Top Text and Bottom Text boxes o Choose from 8 different fonts
11
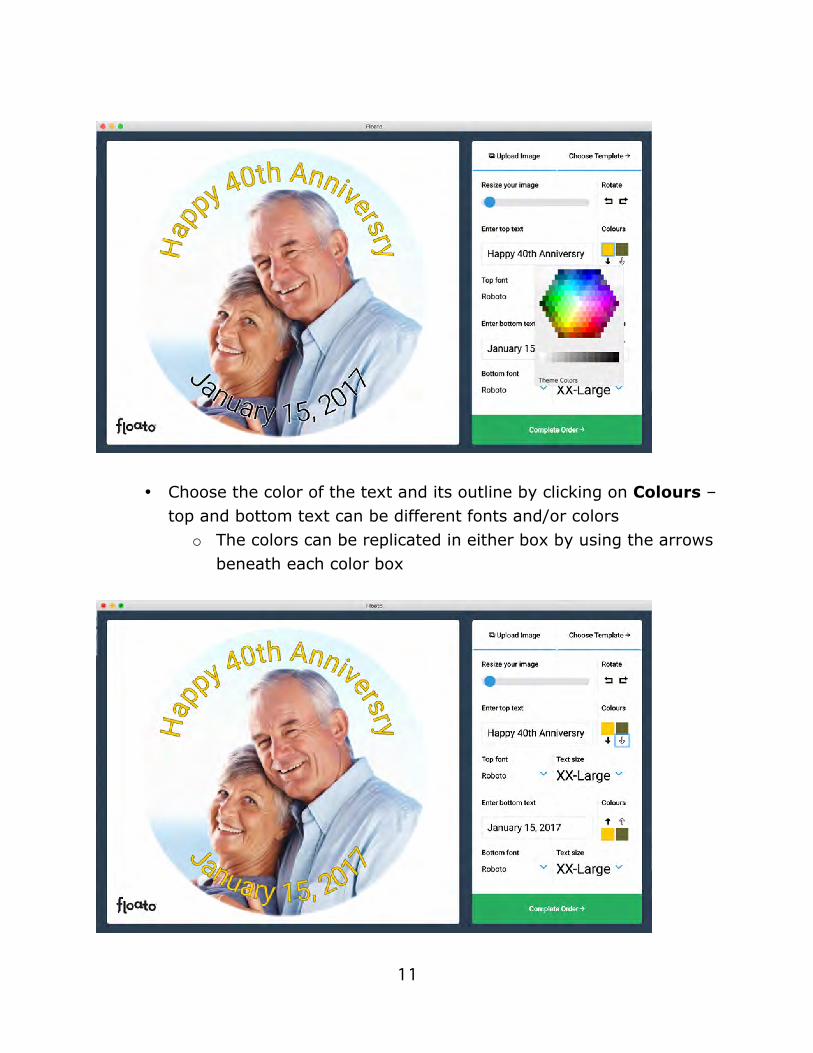
• Choose the color of the text and its outline by clicking on Colours – top and bottom text can be different fonts and/or colors
o The colors can be replicated in either box by using the arrows beneath each color box

12
• You’re ready to print your Floato™ balloon now, but what if you want to use one of the pre-loaded border templates instead?
o Click on Choose Template in upper right corner of app window and scroll down to choose a template

13
• “Drag” your photo (jpg) or Upload Image into the template window and move and re-size it as in the previous example
• Add text and move it and choose its colors as in the previous example
o Note that some templates do not have the option to add text, and some only have text top or bottom – the text box in the app window will be grayed out if text is unavailable there
14
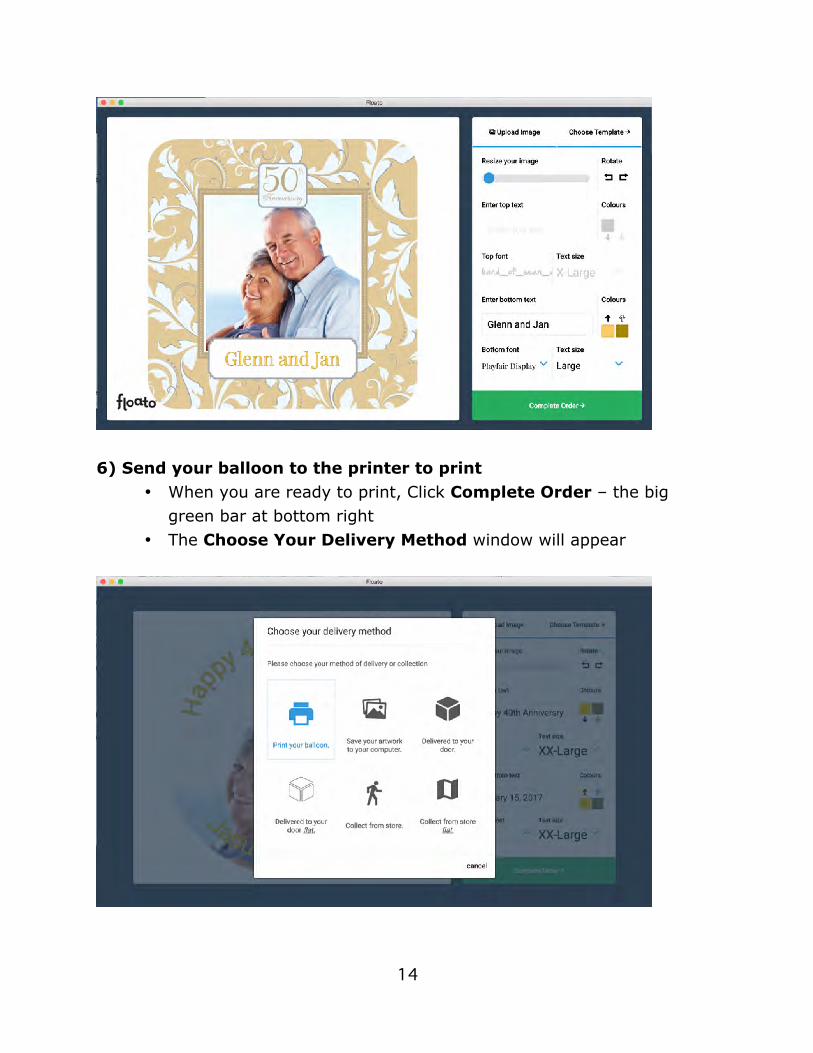
6) Send your balloon to the printer to print
• When you are ready to print, Click Complete Order – the big green bar at bottom right
• The Choose Your Delivery Method window will appear
15
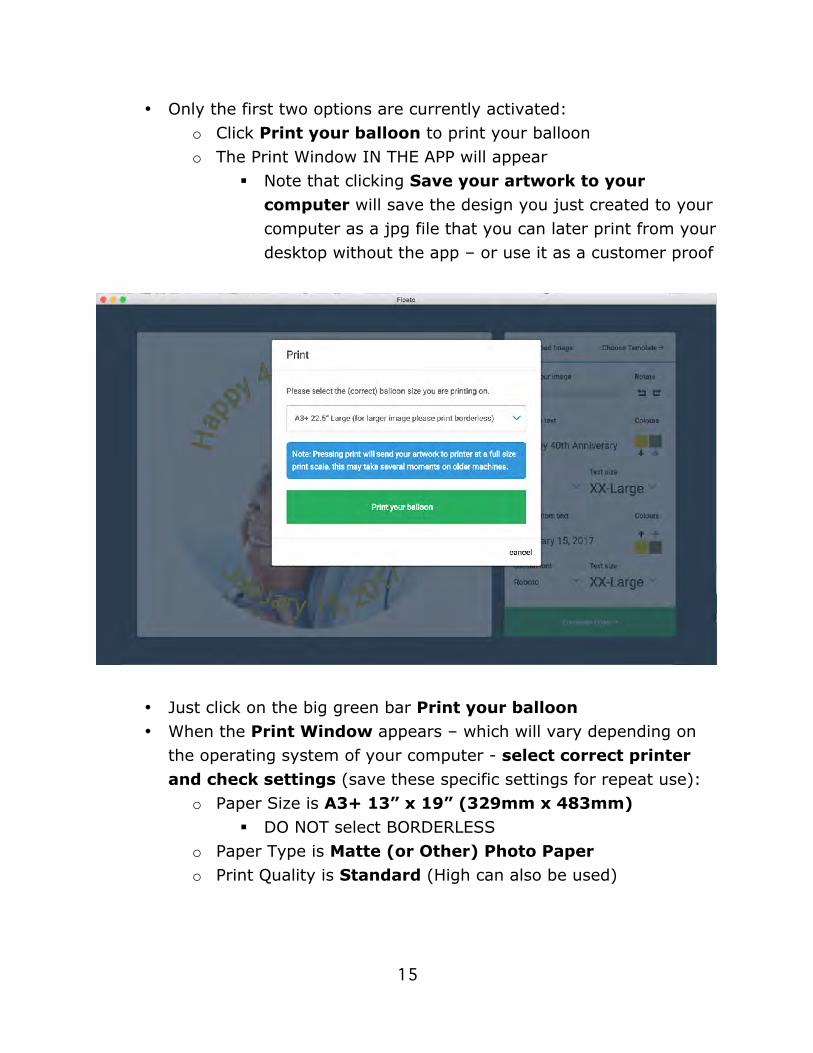
• Only the first two options are currently activated: o Click Print your balloon to print your balloon o The Print Window IN THE APP will appear
! Note that clicking Save your artwork to your computer will save the design you just created to your computer as a jpg file that you can later print from your desktop without the app – or use it as a customer proof
• Just click on the big green bar Print your balloon • When the Print Window appears – which will vary depending on
the operating system of your computer - select correct printer and check settings (save these specific settings for repeat use):
o Paper Size is A3+ 13” x 19” (329mm x 483mm) ! DO NOT select BORDERLESS
o Paper Type is Matte (or Other) Photo Paper o Print Quality is Standard (High can also be used)

16
• The print file is now sent to the printer for printing 7) Remove the balloon from the printer tray after the printing is complete
8) Remove the balloon from the paper carrier assembly
• Slowly and gently peel the top sheet from the folded balloon

17
• Slowly unfold the balloon “flaps” from the carrier paper and slowly peel the paper from the balloon
9) Floato™ is ready for helium and a ribbon! If you need any additional direction or specific help, please contact your distributor, or Anagram directly, at the contact information below:
Anagram International, Inc.
A division of Amscan®
7700 Anagram Drive
Minneapolis, MN 55344-7305 USA
phone: (952) 949-5600
fax: (952) 874-3082
customer service: (800) 554-4711
anagramballoons.com

18


![6819 BT Freestyle 7110 [1]](https://static.fdocuments.net/doc/165x107/61937a87410d5970372554ae/6819-bt-freestyle-7110-1.jpg)