Prime Central Managing the Certificates · THE SPECIFICATIONS AND INFORMATION REGARDING THE...
25
Americas Headquarters Cisco Systems, Inc. 170 West Tasman Drive San Jose, CA 95134-1706 USA http://www.cisco.com Tel: 408 526-4000 800 553-NETS (6387) Fax: 408 527-0883 Cisco Prime Central Managing Certificates Version 1.0.7 April, 2016
Transcript of Prime Central Managing the Certificates · THE SPECIFICATIONS AND INFORMATION REGARDING THE...
Americas Headquarters Cisco Systems, Inc. 170 West Tasman Drive San Jose, CA 95134-1706 USA http://www.cisco.com Tel: 408 526-4000 800 553-NETS (6387) Fax: 408 527-0883
Cisco Prime Central Managing Certificates
Version 1.0.7
April, 2016

1
Abstract
The Cisco Prime Central Managing Certificates gives information on managing CA signed certificates for Prime Central and Prime Central Fault Management server. THE SPECIFICATIONS AND INFORMATION REGARDING THE PRODUCTS IN THIS MANUAL ARE SUBJECT TO CHANGE WITHOUT NOTICE. ALL STATEMENTS, INFORMATION, AND RECOMMENDATIONS IN THIS MANUAL ARE BELIEVED TO BE ACCURATE BUT ARE PRESENTED WITHOUT WARRANTY OF ANY KIND, EXPRESS OR IMPLIED. USERS MUST TAKE FULL RESPONSIBILITY FOR THEIR APPLICATION OF ANY PRODUCTS. THE SOFTWARE LICENSE AND LIMITED WARRANTY FOR THE ACCOMPANYING PRODUCT ARE SET FORTH IN THE INFORMATION PACKET THAT SHIPPED WITH THE PRODUCT AND ARE INCORPORATED HEREIN BY THIS REFERENCE. IF YOU ARE UNABLE TO LOCATE THE SOFTWARE LICENSE OR LIMITED WARRANTY, CONTACT YOUR CISCO REPRESENTATIVE FOR A COPY. NOTWITHSTANDING ANY OTHER WARRANTY HEREIN, ALL DOCUMENT FILES AND SOFTWARE OF THESE SUPPLIERS ARE PROVIDED “AS IS” WITH ALL FAULTS. CISCO AND THE ABOVE-NAMED SUPPLIERS DISCLAIM ALL WARRANTIES, EXPRESSED OR IMPLIED, INCLUDING, WITHOUT LIMITATION, THOSE OF MERCHANTABILITY, FITNESS FOR A PARTICULAR PURPOSE AND NON-INFRINGEMENT OR ARISING FROM A COURSE OF DEALING, USAGE, OR TRADE PRACTICE. IN NO EVENT SHALL CISCO OR ITS SUPPLIERS BE LIABLE FOR ANY INDIRECT, SPECIAL, CONSEQUENTIAL, OR INCIDENTAL DAMAGES, INCLUDING, WITHOUT LIMITATION, LOST PROFITS OR LOSS OR DAMAGE TO DATA ARISING OUT OF THE USE OR INABILITY TO USE THIS MANUAL, EVEN IF CISCO OR ITS SUPPLIERS HAVE BEEN ADVISED OF THE POSSIBILITY OF SUCH DAMAGES. Cisco and the Cisco logo are trademarks or registered trademarks of Cisco and/or its affiliates in the U.S. and other countries. To view a list of Cisco trademarks, go to this URL:www.cisco.com/go/trademarks. Third-party trademarks mentioned are the property of their respective owners. The use of the word partner does not imply a partnership relationship between Cisco and any other company. (1110R) Any Internet Protocol (IP) addresses and phone numbers used in this document are not intended to be actual addresses and phone numbers. Any examples, command display output, network topology diagrams, and other figures included in the document are shown for illustrative purposes only. Any use of actual IP addresses or phone numbers in illustrative content is unintentional and coincidental. Cisco Prime Central Managing Certificates © 1999–2016 Cisco Systems, Inc. All rights reserved.

Contents
Cisco Prime Central Managing Certificates
iii
Table of Contents
Table of Contents ................................................................................................................... iii
1 Replacing the Certificates for Prime Central ..................................................................... 4
2 Rollback the Certificates for Prime Central ....................................................................... 6
3 Procedure to change Keystore default Password ............................................................. 6
4 Replacing the Certificates for Prime Central Fault Management ...................................... 6
4.1 Back up the Default Keystore File ........................................................................................ 6
4.2 Back up the Signer certificate .............................................................................................. 7
4.3 Procedure to get Prime Central Certificate in Fault Management ......................................... 8
4.4 Generating Certificates for Fault Management .................................................................. 12 4.4.1 Creating a Request for the Certificate ................................................................................................. 12
4.5 Obtaining the certificate from the CA ................................................................................ 13 4.5.1 Receiving the Certificate ...................................................................................................................... 14
4.6 Activating the SSL certificate.............................................................................................. 15
4.7 Adding the signer certificate to the store ........................................................................... 16
4.8 Restarting the Fault Management ..................................................................................... 18
4.9 Delete the old Personal Certificate .................................................................................... 19
5 Rollback Procedure for Prime Central Fault Management .............................................. 21
5.1 Adding the signer certificate to the store ........................................................................... 21
5.2 Activating the SSL certificate.............................................................................................. 22
6 Procedure to change KeyStore default Password (Fault Management) .......................... 23
6.1 Change the default password for NodeDefaultKeyStore .................................................... 23
6.2 Change the default password for NodeDefaultTrustStore .................................................. 24
7 Troubleshooting ............................................................................................................. 25
7.1 Prime Provisioning cross launch fails after applying Prime Central certificate .................... 25

Cisco Prime Central Managing Certificates 4
1 Replacing the Certificates for Prime Central
Note: For HA setup, virtual IP/Cluster IP shall be used for certificates hostname. Prime Central Host:
1. Login as primeusr 2. Navigate to <PRIME_HOME>/install/utils/sslgen 3. Take a backup of all files:
#> cd <PRIME_HOME>/install/utils/sslgen/ #> mkdir backup #> cp * backup/ #> rm -rf prime.keystore prime.cer
4. Generate new keystore file. The alias_name value used for generating keystore file in this step, must be used similarly in subsequent steps. # keytool -genkey -keyalg RSA -alias <alias_name> -keystore prime.keystore -storepass changeit -keysize 2048
5. Generate a Certificate Signing Request for the tomcat key: keytool -certreq -keyalg RSA –alias <alias_name> -file <serverName>.csr –keystore <PRIME_HOME>/install/utils/sslgen/prime.keystore
6. Enroll the CSR with your CA URL, fetch the signed certificate and place them in <PRIME_HOME/install/utils/sslgen directory. CA can provide the signed certificate in .cer or .p7b format. Example files list for .cer : gbapanap-lnx.cisco.com.cer test-root-ca-2048.cer test-ssl-ca.cer Example files list for .p7b: gbapanap-lnx.cisco.com.p7b root-ca-2048.p7b
7. Copy the signed certificate file to below locations:
<PRIME_HOME>/SHARED/certificate/prime.cer
<PRIME_HOME>/install/utils/sslgen/prime.cer
a) If the signed certificate provided is .cer format, use the below commands to
replace the certificates:
# cp gbapanap-lnx.cisco.com.cer
<PRIME_HOME>/SHARED/certificate/prime.cer

Cisco Prime Central Managing Certificates
5
# cp gbapanap-lnx.cisco.com.cer
<PRIME_HOME>/install/utils/sslgen/prime.cer
b) If the signed certificate provided is .p7b format, convert the .p7b file to .cer
certificate format using the below command:
#openssl pkcs7 -print_certs -in gbapanap-lnx.cisco.com.p7b -out
gbapanap-lnx.cisco.com.cer
then, replace old prime.cer files
# cp gbapanap-lnx.cisco.com.cer
<PRIME_HOME>/SHARED/certificate/prime.cer
# cp gbapanap-lnx.cisco.com.cer
<PRIME_HOME>/install/utils/sslgen/prime.cer
8. Import certificates in keystore prime.keystore: a) If the signed certificate provided is .cer format, continue with 9. b) If the signed certificate provided is .p7b format, skip steps 9,10 and continue with 11.
9. Import the root CA certificate: # keytool -import -alias root-ca -trustcacerts -file test-root-ca-2048.cer -keystore prime.keystore
10. Import the intermediate CA certificate second: # keytool -import -alias test-ssl-ca -trustcacerts –file test-ssl-ca.cer –keystore prime.keystore
11. Import your new CA signed certificate: a) If the signed certificate provided is .cer format, run the below command to
import: # keytool -import -alias <alias_name> -trustcacerts -file prime.cer -keystore prime.keystore
b) If the signed certificate provided is .p7b format, run the below command to import:
keytool -import -alias <alias_name> -trustcacerts -file gbapanap-lnx.cisco.com.p7b -keystore prime.keystore
12. Add root certificate to portal: a. Navigate to <PRIME_HOME>/XMP_Platform/jre/lib/security b. Import the root CA certificate:
If the signed certificate provided is .cer format, use the below command to import:
# keytool -import -alias root-ca -trustcacerts –file <PRIME_HOME>/install/utils/sslgen/test-root-ca-2048.cer -keystore cacerts
If the signed certificate provided is .p7b format, run the below command to import:

Cisco Prime Central Managing Certificates 6
# keytool -import -alias <alias_name> -trustcacerts –file <PRIME_HOME>/install/utils /sslgen/root-ca-2048.p7b -keystore cacerts
13. Restart PortalCtl services:
# portalctl stop # portalctl start
2 Rollback the Certificates for Prime Central
1. Login as primeusr . 2. Navigate to <PRIME_HOME>/install/utils/sslgen/
#> cd <PRIME_HOME>/install/utils/sslgen/ 3. Restore from backup folder.
#> rm -rf prime.keystore #> cp backup/prime.keystore backup/prime.cer <PRIME_HOME>/install/utils/sslgen/ #> cp backup/prime.cer <PRIME_HOME>/SHARED/certificate/prime.cer
4. Restart PortalCtl services: portalctl stop portalctl start
3 Procedure to change Keystore default Password
1. Navigate to <PRIME_HOME>/install/utils/sslgen/ 2. Execute the below command
# keytool -storepasswd -keystore prime.keystore 3. Enter keystore password: changeit 4. New keystore password: <new-password> 5. Re-enter new keystore password: <new-password>
Note: “changeit” is the default password for keystore. Once changed, user shall remember the new password and use it as existing password incase they wish to change it again in future.
4 Replacing the Certificates for Prime Central Fault Management
4.1 Back up the Default Keystore File

Cisco Prime Central Managing Certificates
7
1. In the navigation pane of the Tivoli Integrated Portal, click Settings > WebSphere Administrative Console, and click Launch WebSphere administrative console.
2. Click Security > SSL certificate and key management. 3. On the "SSL certificate and key management" page, click Manage endpoint
security configurations. 4. On the "Manage endpoint security configurations" page expand the Inbound node,
if necessary, then click on TIPNode(NodeDefaultSSLSettings) under that node. 5. On the "TIPNode" page, click Key stores and certificates and on the page that
appears, click NodeDefaultKeyStore in the table at the center of the page. 6. On the "NodeDefaultKeyStore" page, click Personal certificates and on the page
that appears. 7. Select the “default” alias certificate and click on Export button. 8. Give the keystore password (Default Password is ‘WebAS’). 9. Select the key store file option and provide the required values. 10. Click Ok.
4.2 Back up the Signer certificate
1. Click Security > SSL certificate and key management. 2. On the "SSL certificate and key management" page, click Manage endpoint
security configurations. 3. In the "Manage endpoint security configurations" page expand the Inbound. 4. Click on TIPNode(NodeDefaultSSLSettings) under that node.

Cisco Prime Central Managing Certificates 8
5. On the "TipNode" page, click Key stores and certificates and on the page that appears click NodeDefaultTrustStore in the table at the center of the page.
6. Click Signer Certificates and on the page that appears, select “default_signer” certificate and click Extract.
7. Provide the File Name with path. For Example:
<Prime_HOME>/faultmgmt/default_signer.p12 8. Click Ok.
4.3 Procedure to get Prime Central Certificate in Fault Management
1. Login to WebSphere console as primefm.

Cisco Prime Central Managing Certificates
9
2. On Console go to “Security > SSL Security and key management > Manage endpoint security configurations”.

Cisco Prime Central Managing Certificates 10
3. Click “Key stores and Certificates”.
4. Click on “NodeDefaultTrustStore”.
5. Click on “Signer Certificate”.
6. Fill in the details on Prime Central details:

Cisco Prime Central Managing Certificates
11
Host: FQDN of Prime Central server Port: 8443 (It should be 8443. Prime Central tomcat server is running on 8443 port) Alias: Alias name used in Prime Central to generate certificate
7. Click on “Retrieve from Port” .
8. Click Apply and Save.

Cisco Prime Central Managing Certificates 12
4.4 Generating Certificates for Fault Management
4.4.1 Creating a Request for the Certificate
1. Navigate to Settings > WebSphere Administrative Console > Launch WebSphere administrative console.
2. Click Security > SSL certificate and key management > Manage endpoint Security Configuration > Inbound > TIPNode(NodeDefaultSSLSettings).
3. On the "SSL certificate and key management" page, click Key stores and certificates > NodeDefaultKeyStore > Personal certificate requests.
4. Click New and enter the required details as per your server to generate CSR for Prime Central Fault Management.
5. In File for certificate request enter the path name for the file to hold the certificate request. Use the following form: tip_home_dir/profiles/TIPProfile/config/cells/TIPCell/nodes/TIPNode/request_file_name.p12 Replace request_file_name with a suitable name for the request. For example: ca-cert-request
6. Click Apply. 7. On the "SSL certificate and key management" page, click Back. 8. Set the check box for the entry containing the new key label and click Extract. 9. On the "Extract certificate request" page enter the path of the file to hold the
certificate request that you can send to the CA. Use the following form:

Cisco Prime Central Managing Certificates
13
tip_home_dir/profiles/TIPProfile/config/cells/TIPCell/nodes/TIPNode/ca_request_file_name.p12 Replace ca_request_file_name with a suitable name for the request. For example: cert-request-to-send-to-CA
10. Click Ok.
Results:
The system creates the file containing the request to send to the CA.
Send the certificate signing request to a certificate authority (CA).
4.5 Obtaining the certificate from the CA
Apply to your chosen Certification Authority (CA) for the certificate, typically using their web site. When asked to supply the request use the complete contents of the certificate request file. This is the file:
tip_home_dir/profiles/TIPProfile/config/cells/TIPCell/nodes/TIPNode/<SSL file from CA>
Certification Authority can provide the signed certificate in .cer or .p7b format. Example files list for .cer: gbapanap-lnx.cisco.com.cer test-root-ca-2048.cer test-ssl-ca.cer
Example files list for .p7b: gbapanap-lnx.cisco.com.p7b root-ca-2048.p7b
If the signed certificate is in .p7b format, convert the .p7b file to .cer certificate format
using the below command:
#openssl pkcs7 -print_certs -in gbapanap-lnx.cisco.com.p7b -out gbapanap-lnx.cisco.com.cer
Now, copy server certificate (gbapanap-lnx.cisco.com.cer) to a suitably named file, with a
filename extension of .p12 (gbapanap-lnx.cisco.com.p12), in:
tip_home_dir/profiles/TIPProfile/config/cells/TIPCell/nodes/TIPNode

Cisco Prime Central Managing Certificates 14
4.5.1 Receiving the Certificate
1. In the navigation pane of the Tivoli Integrated Portal, click Settings > WebSphere
Administrative Console, and click Launch WebSphere administrative console. 2. Click Security > SSL certificate and key management. 3. On the "SSL certificate and key management" page, click Manage endpoint
security configurations. 4. On the "Manage endpoint security configurations" page expand the Inbound node,
if necessary, then click on TIPNode(NodeDefaultSSLSettings) under that node. 5. On the "TIPNode" page, click Key stores and certificates and on the page that
appears, click NodeDefaultKeyStore in the table at the center of the page. 6. On the "NodeDefaultKeyStore" page, click Personal certificates and on the page
that appears, click Receive a certificate from a certificate authority.
7. In the displayed form, enter the path of the file that contains the certificate from the CA then click Apply. For example: tip_home_dir/profiles/TIPProfile/config/cells/TIPCell/nodes/TIPNode/<SSL file from CA>.p12
8. On the "SSL certificate and key management" page, click Save.

Cisco Prime Central Managing Certificates
15
Results:
The new certificate appears in the list of certificates on the "Personal certificates" page.
Note: If there is a problem with the new SSL certificate you will be unable to log on to the TIP server.
4.6 Activating the SSL certificate
1. On the "Signer certificates" page, click Manage endpoint security configurations in the series of links at the top of the page.
2. On the "Manage endpoint security configurations" page expand the Inbound node,if necessary, then click on TIPNode(NodeDefaultSSLSettings) under that node.
3. On the "TIPNode" page choose the alias name of the certificate from the drop-down list in Certificate alias in key store and click Apply.
4. On the "TIPNode" page, click Save. Perform steps (1-4) for Outbound Node and click Save.

Cisco Prime Central Managing Certificates 16
4.7 Adding the signer certificate to the store
1. On the "Manage personal certificates" page, click TIPNode in the series of links at
the top of the page. 2. On the "TipNode" page, click Key stores and certificates and on the page that
appears click NodeDefaultTrustStore in the table at the center of the page. 3. Click Signer Certificates and on the page that appears click Retrieve from port.
4. Complete the fields in the "Configuration" panel as follows: Host : Hostname of the Prime Central Fault Management Server Port: 16311 Alias: Alias name for this certificate.
5. Click “Retrieve Signer Information”.

Cisco Prime Central Managing Certificates
17
6. On the “SSL certificate and key management” page, click Apply. 7. Click “Save”.
8. Delete the default-signer certificate; keep only the newly added certificate.

Cisco Prime Central Managing Certificates 18
Results: The certificate appears in the list of certificates on the "Signer certificates" page.
4.8 Restarting the Fault Management
Stop the Fault manager TIP Server
Login as primeusr
Navigate to ~/faultmgmt/tipv2/profiles/TIPProfile/bin
./stopServer.sh server1
When prompt to add the trust singer type “Y “
When prompt the username and password enter primefm and its password.
Wait until the server stops
Sample Output [root@anuraga-lnx TIPNode]# su – primeusr primeusr@anuraga-lnx [~]# cd ~/faultmgmt/tipv2/profiles/TIPProfile/bin primeusr@anuraga-lnx [~/faultmgmt/tipv2/profiles/TIPProfile/bin]# ./stopServer.sh server1 ADMU0116I: Tool information is being logged in file /opt/primeusr/faultmgmt/tipv2/profiles/TIPProfile/logs/server1/stopServer.log ADMU0128I: Starting tool with the TIPProfile profile ADMU3100I: Reading configuration for server: server1 *** SSL SIGNER EXCHANGE PROMPT ***

Cisco Prime Central Managing Certificates
19
SSL signer from target host 10.131.17.26 is not found in trust store /opt/primeusr/faultmgmt/tipv2/profiles/TIPProfile/etc/trust.p12. Here is the signer information (verify the digest value matches what is displayed at the server): Subject DN: CN=anuraga-lnx.cisco.com, OU=Medium Assurance Level, OU=NCN Production PrimeFM, OU=Operations, OU=Network and Service Operations, O=NBN Co Limited Issuer DN: CN=NBN Co Medium Assurance Issuing CA, O=NBN Co Limited, C=AU Serial number: 76836815926645099439777448740625650123 Expires: Sun Apr 09 23:59:59 UTC 2017 SHA-1 Digest: 95:14:7F:8C:0B:25:41:D2:11:1A:59:73:29:B9:9B:5B:F8:85:18:EB MD5 Digest: 67:E3:9A:7E:7B:9F:39:F2:EC:EC:25:35:0C:8F:FE:32 Add signer to the trust store now? (y/n) y A retry of the request may need to occur if the socket times out while waiting for a prompt response. If the retry is required, note that the prompt will not be redisplayed if (y) is entered, which indicates the signer has already been added to the trust store. Realm/Cell Name: <default> Username: primefm Password: xxxxxx ADMU3201I: Server stop request issued. Waiting for stop status. ADMU4000I: Server server1 stop completed.
Stop the Fault manager
Login as primeusr
fmctl stop
Start the Fault manager
Login as primeusr
fmctl start
4.9 Delete the old Personal Certificate
1. Login to WebSphere console as primefm. 2. In the navigation pane of the Tivoli Integrated Portal, click Settings > WebSphere
Administrative Console, and click Launch WebSphere administrative console. 3. Click Security > SSL certificate and key management. 4. On the "SSL certificate and key management" page, click Manage endpoint security
configurations. 5. On the "Manage endpoint security configurations" page expand the Inbound node,
if necessary, then click on TIPNode(NodeDefaultSSLSettings) under that node.

Cisco Prime Central Managing Certificates 20
6. On the "TIPNode" page, click Key stores and certificates and on the page that appears, click NodeDefaultKeyStore in the table at the center of the page.
7. On the "NodeDefaultKeyStore" page, click Personal certificates and on the page that appears.
8. Delete the old certificate, keep only the newly import certificate.

Cisco Prime Central Managing Certificates
21
5 Rollback Procedure for Prime Central Fault Management
9. In the navigation pane of the Tivoli Integrated Portal, click Settings > WebSphere
Administrative Console, and click Launch WebSphere administrative console. 10. Click Security > SSL certificate and key management. 11. On the "SSL certificate and key management" page, click Manage endpoint security
configurations. 12. On the "Manage endpoint security configurations" page expand the Inbound node,
if necessary, then click on TIPNode(NodeDefaultSSLSettings) under that node. 13. On the "TIPNode" page, click Key stores and certificates and on the page that
appears, click NodeDefaultKeyStore in the table at the center of the page. 14. On the "NodeDefaultKeyStore" page, click Personal certificates and on the page that
appears. 15. Click Import button.
16. Select the key store file option and provide the key file password. 17. Press the “Get Key File Aliases” and select the “default” value from the drop down. 18. Click Ok.
5.1 Adding the signer certificate to the store
1. On the "Manage personal certificates" page, click TIPNode in the series of links at the top of the page.
2. On the "TipNode" page, click Key stores and certificates and on the page that appears click NodeDefaultTrustStore in the table at the center of the page.
3. Click Signer Certificates and on the page that appears click Add.

Cisco Prime Central Managing Certificates 22
4. Complete the fields in the "Configuration" panel as follows: Alias Enter an alias name for the certificate that is unique among the signer certificates in the key store. File Name Enter the path of the file where you stored the certificate while taking backup. For example: <Prime_HOME>/faultmgmt/default_signer.p12
5. Click Apply. 6. On the "SSL certificate and key management" page, click Save.
5.2 Activating the SSL certificate
1. On the "Signer certificates" page, click Manage endpoint security configurations in the series of links at the top of the page.
2. On the "Manage endpoint security configurations" page expand the Inbound node, if necessary, then click on TIPNode(NodeDefaultSSLSettings) under that node.

Cisco Prime Central Managing Certificates
23
3. On the "TIPNode" page choose the “default”alias name of the certificate from the drop-down list in Certificate alias in key store and click Apply.
4. On the "TIPNode" page, click Save. 5. Perform steps (1-4) for Outbound node and click Save. 6. Restart the Prime Central FM. Follow steps as mentioned in Section “Restarting the
Fault Management”.
6 Procedure to change KeyStore default Password (Fault Management)
6.1 Change the default password for NodeDefaultKeyStore
1. Click Security > SSL certificate and key management. 2. On the "SSL certificate and key management" page, click Manage endpoint
security configurations. 3. On the "Manage endpoint security configurations" page expand the Inbound node,
if necessary, then click on TIPNode(NodeDefaultSSLSettings) under that node. 4. On the "TipNode" page, click Key stores and certificates and on the page that
appears select NodeDefaultKeyStore in the table at the center of the page and click on Change Password button.
5. Provide the New Password and Confirm Password and click Ok.

Cisco Prime Central Managing Certificates 24
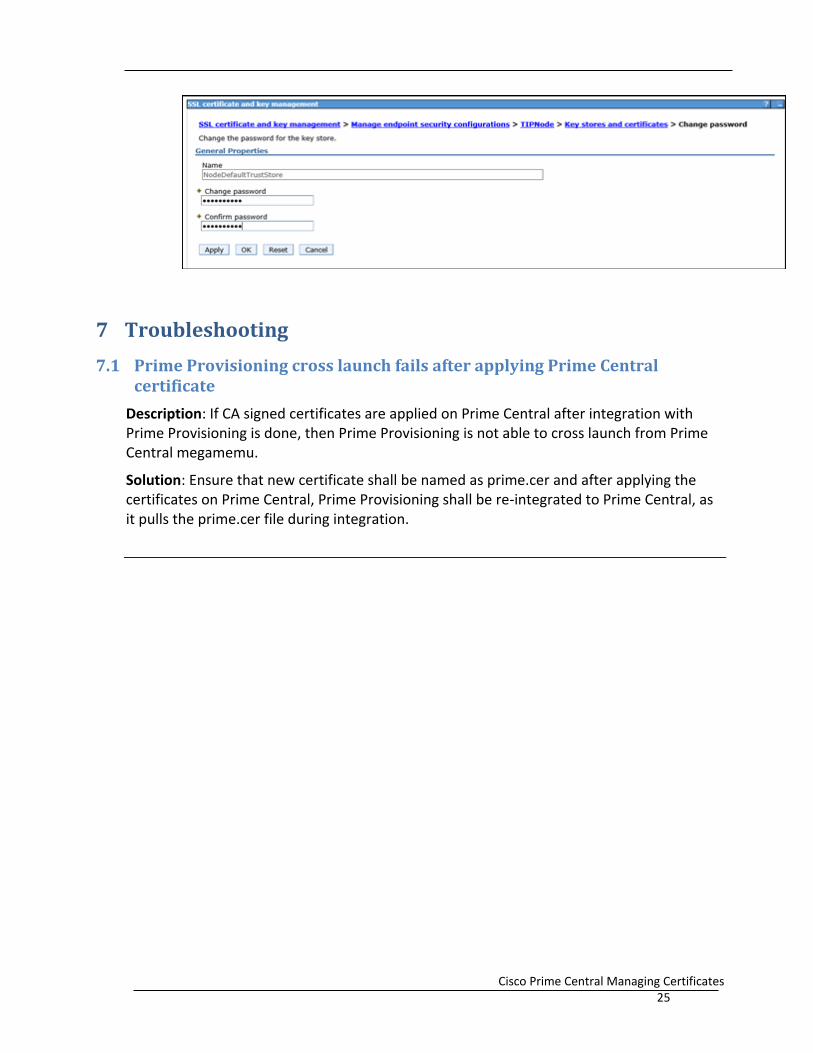
6.2 Change the default password for NodeDefaultTrustStore
1. Click Security > SSL certificate and key management. 2. On the "SSL certificate and key management" page, click Manage endpoint
security configurations. 3. On the "Manage endpoint security configurations" page expand the Inbound node,
if necessary, then click on TIPNode(NodeDefaultSSLSettings) under that node. 4. On the "TipNode" page, click Key stores and certificates and on the page that
appears select NodeDefaultTrustStore in the table at the center of the page and click on Change Password button.
5. Provide the New Password and Confirm Password and click on Ok.
Cisco Prime Central Managing Certificates
25
7 Troubleshooting
7.1 Prime Provisioning cross launch fails after applying Prime Central certificate
Description: If CA signed certificates are applied on Prime Central after integration with Prime Provisioning is done, then Prime Provisioning is not able to cross launch from Prime Central megamemu.
Solution: Ensure that new certificate shall be named as prime.cer and after applying the certificates on Prime Central, Prime Provisioning shall be re-integrated to Prime Central, as it pulls the prime.cer file during integration.