Pressworks - JOG1 6 · 003 = A03 013 = B03 023 = C03 033 = ... You can use either of the}~keys to...
28
(TM) CableJoG64 Version 1.6 FEB 2004
Transcript of Pressworks - JOG1 6 · 003 = A03 013 = B03 023 = C03 033 = ... You can use either of the}~keys to...

(TM)
CableJoG64
Version 1.6 FEB 2004


INTRODUCTIONFUNDAMENTALS GETTING STARTED MENU LEARNMENU LEARN - ONE PRESSMENU TEST MENU RECALL MENU STORE MENU EDIT MENU PRINT BATCHMENU PRINT CABLE/LIST MENU RECEIVEMENU RECEIVE Remote LinkMENU SEND BATCHMENU SEND CABLE MENU SETUP DATE & TIMEMENU SETUP BEEPMENU SETUP POWER DOWNMENU SETUP TEST DISPLAYMENU SETUP TEST LOOPMENU SETUP PASSWORDSMENU SETUP OPERATORSMENU SETUP RESULTSMENU SETUP SERIAL No. MENU PROBE SPECIAL USES / DIN 41612 SPECIAL USES / SINGLE ENDED TESTSAPPENDIX - A BATTERY REPLACEMENTAPPENDIX - B CONNECTOR TYPES APPENDIX - C SELF TEST CABLESAPPENDIX - D PRINT OUT EXAMPLES APPENDIX - E ERROR MESSAGES APPENDIX - F CONNECTING CableJoG 64DECLARATION OF CONFORMITY (CE)
Page 1
Contents
2368111216171827282930313233343536373839404142444546474849505152
CableJoG - Declaration of Conformity
Manufacturers Name: CableJoG Ltd.Address: 18 Browmere Drive, Croft, WARRINGTON. WA3 7HT.
Declare that;
Product: CableJoGModel: JoG64/CT/BLOptions: Serial Comms, RTC & Backlit display
conforms to the following Product Specification:
EN55022 (1995) Class B / CISPR 22 (1993) - Conducted & Radiated EmissionsIEC 1000-4-2 (1995) / EN61000-4-2 (1995) - ESD 4kV CD, 8kV ADIEC 801-3 (1984) / EN55024-3 (1992) - Radiated Immunity, 3V/mIEC 1000-4-4 (1995) / EN61000-4-4 (1995) - Fast Transient, 1kV Power Lines
Supplementary Information:
Radiated immunity test carried out on 1m ribbon all wires connected toCableJoG, long unterminated wires may cause random 'OPEN' failure inLOOP test modes.
The products herewith comply with the requirements of the EMCDirective 89/336/EC.
Dated: 1 September 1996
Eddie ZychDirector.
Page 52

CableJoG64 takes the concept of truly portable intelligent ribbon cable & cableharness testing a step further by increasing the number of test points and incorporatinga PC/Printer link. CableJoG will identify any pattern of connections between any ofthe 64 connector points. The display will identify each connection made in terms of theconnectors true pin number. These connections can then be stored and retrieved at alater time. Using connectors crimped onto ribbon cable, CableJoG is both robust in useand simple to repair when worn out .
CableJoG64:
CABLEJOG PSU:If the PSU supplied is of theswitchable voltage and polaritytype then please make sure theplug polarity is set to + at the cen-tre and the voltage switch is set to9V.
CableJoG - Introduction
Page 2
Appendix f
Connecting to C.C.P.
CableJoG's RS232 communication port has been designed as a DTE (DataTerminal Equipment) and so a 'one to one' cable is all that is required toCannect CableJoG64 to a PC Serial Communications Port.
A suitable cable :
CableJoG649 way 'd' type femalePin Signal2......... RXD...............3......... TXD...............5......... GND..............7......... RTS................8......... CTS................
Connecting to a Serial Printer.
CableJoG's RS232 communication port has been designed as a DTE (DataTerminal Equipment) and so a 'cross over' cable is required to CannectCableJoG64 to a Serial Printer Port.
A suitable cable :CableJoG649 way 'd' type femalePin Signal2......... RXD...............3........ TXD...............5......... GND..............7........ RTS................8......... CTS................
PC Comms Port9 way 'd' type femalePin23578
Serial Printer Port25 way 'd' type malePin327206
Page 51
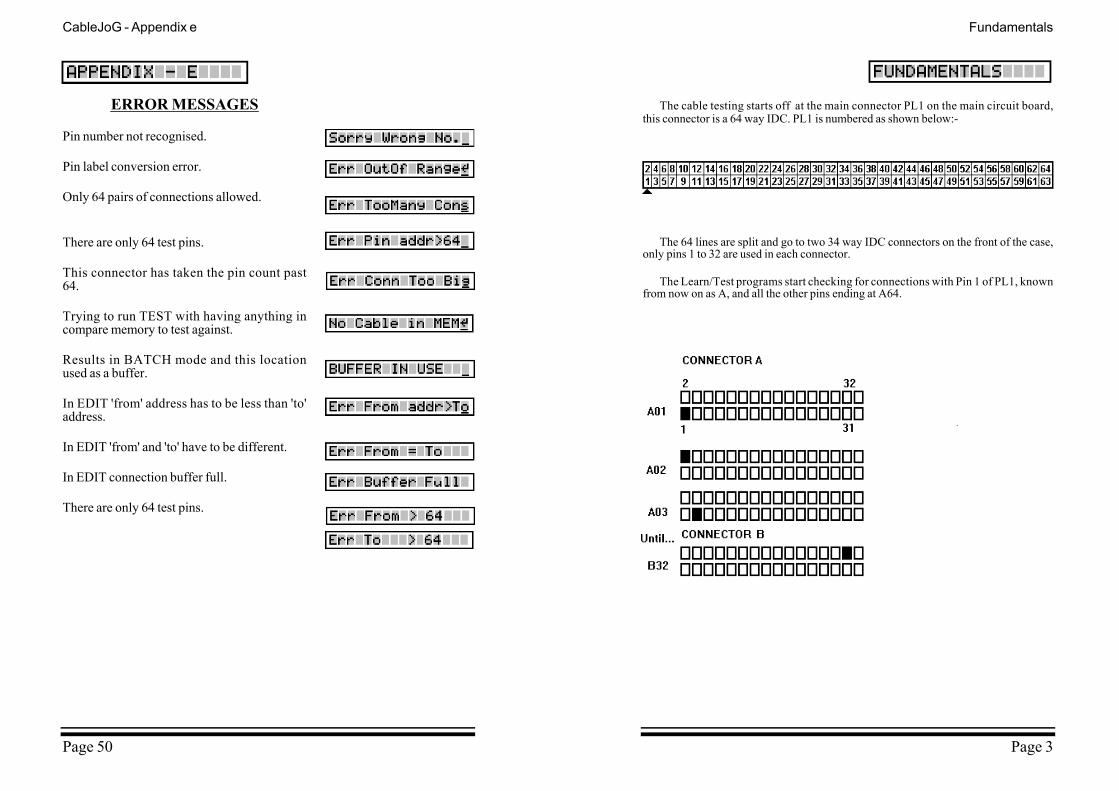
The cable testing starts off at the main connector PL1 on the main circuit board,this connector is a 64 way IDC. PL1 is numbered as shown below:-
The 64 lines are split and go to two 34 way IDC connectors on the front of the case,only pins 1 to 32 are used in each connector.
The Learn/Test programs start checking for connections with Pin 1 of PL1, knownfrom now on as A, and all the other pins ending at A64.
Fundamentals
Page 3
ERROR MESSAGES
Pin number not recognised.
Pin label conversion error.
Only 64 pairs of connections allowed.
There are only 64 test pins.
This connector has taken the pin count past64.
Trying to run TEST with having anything incompare memory to test against.
Results in BATCH mode and this locationused as a buffer.
In EDIT 'from' address has to be less than 'to'address.
In EDIT 'from' and 'to' have to be different.
In EDIT connection buffer full.
There are only 64 test pins.
CableJoG - Appendix e
Page 50

Using the ribbon or IDC versions of the popular multipin connectors it is very easy toassemble a customised test box enabling a great variety of cables/harnesses to betested. The pin numbering varies between these connector types and normally a 'lookup' chart would have to be used to identify a real connection. The figure below showssome of the possibilities:-
All of these connectors and more are supported by CableJoG so once the connectortype has been selected the number displayed will be the actual pin number on theconnector. To be of any use CableJoG has to have the relevant connections in itscompare memory.
The connections can be entered into the compare memory four different ways. Firstlyusing EDIT the details can be entered, via the keyboard, off a wire list or circuitdiagram. Secondly, using a known actual cable you can LEARN the details. Thirdly ifthe details have been previously stored they can be retrieved by using RECALL andfinally if you have the CableJoG Command Program the connections can be trans-ferred from a database of cables held on the PC.
Page 4
CableJoG - Fundamentals Appendix d
ONCE
CONTIN.
CableJoG64 1.2CableJoG Serial Number 00001234 Operator: J Brown Date 10/04/03Time 11:36:30Cable 23 TEST CABLE PASSED 00000001 11:38:22 10/04/03Cable 23 TEST CABLE PASSED 00000002 11:38:24 10/04/03Cable 23 TEST CABLE PASSED 00000003 11:38:26 10/04/03Cable 23 TEST CABLE PASSED 00000004 11:38:28 10/04/03Cable 23 TEST CABLE PASSED 00000005 11:38:29 10/04/03
CableJoG64 1.2CableJoG Serial Number 00001234 Operator: J Brown Date 10/04/03Time 11:36:30Cable 23 TEST CABLE PASSED 00000001 11:38:22 10/04/03PASSED 00000002 11:38:24 10/04/03PASSED 00000003 11:38:26 10/04/03PASSED 00000004 11:38:28 10/04/03PASSED 00000005 11:38:29 10/04/03
Page 49
Once the compare memory has the details it can use them to test an unknown cablethrough the TEST menu option. Testing can be configured to either a one pass/fail test,or to carry on testing if the cable passes, but to stop once a fail has been detectedenabling the cable to be shaken to possibly identify intermittent connections. Or incontinuous testing where the test is run continuously regardless of the presence, or not,of the cable. This enables 'hands free' use of CableJoG.
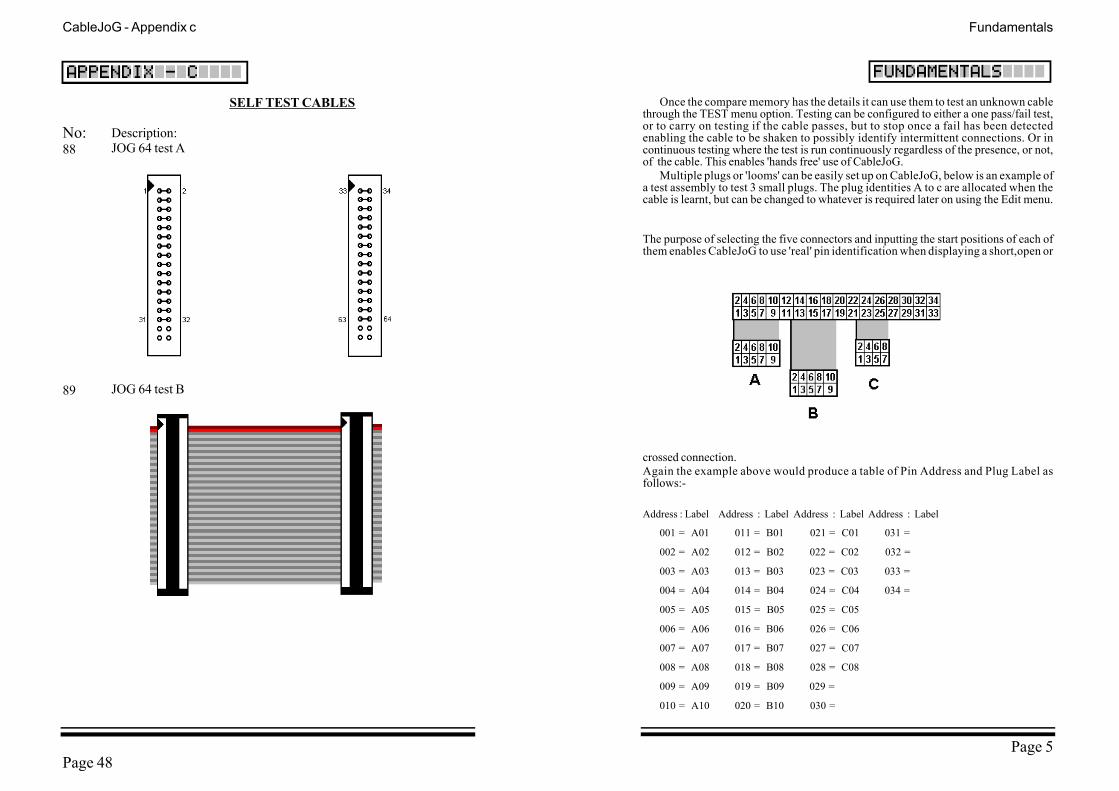
Multiple plugs or 'looms' can be easily set up on CableJoG, below is an example ofa test assembly to test 3 small plugs. The plug identities A to c are allocated when thecable is learnt, but can be changed to whatever is required later on using the Edit menu.
The purpose of selecting the five connectors and inputting the start positions of each ofthem enables CableJoG to use 'real' pin identification when displaying a short,open or
crossed connection. Again the example above would produce a table of Pin Address and Plug Label asfollows:-
Address : Label Address : Label Address : Label Address : Label
001 = A01 011 = B01 021 = C01 031 =
002 = A02 012 = B02 022 = C02 032 =
003 = A03 013 = B03 023 = C03 033 =
004 = A04 014 = B04 024 = C04 034 =
005 = A05 015 = B05 025 = C05
006 = A06 016 = B06 026 = C06
007 = A07 017 = B07 027 = C07
008 = A08 018 = B08 028 = C08
009 = A09 019 = B09 029 =
010 = A10 020 = B10 030 =
Fundamentals
Page 5
CableJoG - Appendix c
Page 48
SELF TEST CABLES
Description:JOG 64 test A
JOG 64 test B
No:88
89

CableJoG - Getting Started
Unpack the CableJoG unit and its power supply. Please make sure the polarity switchon the power supply is set to + and the voltage switch is set to 9V. It is recommendedthat the power supply be plugged in and left switched ON to charge the internal batteryfor at least 6 hours before use.
Whilst the unit is charging itself, it would be a good time to make any adaptors or non standard connectors. CableJoG comes with two 64way IDC connectors as
standard.
On switching the CableJoG unit ON, the display will show the current software ver-sion followed by the current date and time. PressEnter to move from date to time and then onto theMain Menu:
followed by:-
You can use either of the }~ keys to move through the menu options, or pressthe number that corresponds with the menu optionyou require. On first switch ON the menu promptswill follow a Learn, Store and Test sequence.Should you see:-
then refer to Appendix A on replacing the memorybattery backup unit and reprogramming CableJoG.Or should the following appear after the Timedisplay:-
then the operator private identity number (pin) hasbeen set, if you have a valid number you can enter itnow, otherwise contact your supervisor. If thenumber was correctly entered your name will bedisplayed briefly before moving onto the mainmenu's:-
Should a wrong pin number be entered the displaywill show:-
Press ENTER to try again.
Page 6
CONNECTOR TYPES
64way IDC60way IDC50way IDC40way IDC34way IDC30way IDC26way IDC20way IDC16way IDC14way IDC10way IDC
37way 'd' type25way 'd' type15way 'd' type9way 'd' type
50way Centronics36way Centronics24way Centronics14way Centronics
1 way
Appendix b
Page 47
Should the display show:-
just after the CableJoG version display, then one ofthe options using the serial interface has been activated and the Printer/PC is notconnected or On-Line. Either sort out the problem with the Printer/PC or press CLEARon the keyboard. The display will show:-
Press ENTER to stop CableJoG trying to connect.
If one or more of the menus do not appear it may bethat someone has set the password option on it/them you will need to know thepassword to gain access. If you have just received CableJoG from sales or repair thenplease contact CableJoG for further instructions.
The CLEAR key will always take you back to the main menu.
If there has been no activity for more than 1 minute (default setting) the unit will beepand then go into power down mode to conserve battery power. The display will show:-
To restore the unit to a working state switch OFFand then ON again, to change the power down time see the chapter MENU SETUPoption 2.
After familiarising yourself with the concept/fundamentals of CableJoG it may beuseful to move onto the MENU SETUP chapter to set the unit up to your requirements.
Page 7
Getting started
Battery Replacement
There are two batteries in the CableJoG unit.1. PP3 type rechargeable NiCD or NiMH type. This battery is used during normaloperation of the unit. Should this need replacing, only replace with a rechargeable typeas detailed earlier. DO NOT USE a standard 'dry' or 'alkaline' type as damage to theunit will result.2. CMOS memory and clock battery. This can be one of three types:- a) Lithium CR2430 horizontal PCB mount cell. b) Two 'AA' type alkaline cell wired in series and protected in a sleeve. c) Lithium CR AA PCB mount cell.Should this need replacing you will need to use a soldering iron to remove the oldbattery and insert the new. DO NOT USE a rechargeable battery in this case.
To change the battery the plastic box needs to be 'split' open without damaging itsconstruction. The preferred method is:-
a) Stand the box upright on the side opposite the ON/OFF switch.
b) Press hard in the middle of the box, on the switch half. The two halves should start to separate.
c) Whilst still pressing in the middle, unhook one end of separating halves, this should stay open.
d) Whilst still pressing in the middle, unhook the other end. The two halves are now partly open.
e) Turn the box over and repeat the process, but care must be taken NOT to press down on the ON/OFF switch.
If the battery hasn't actually died then it can be replaced without loss of data. This issimply achieved by having the unit powered and switch ON during the battery changeover.
To re-assemble the box, align the two halves and press gently until the halves click intoplace.
If in doubt contact CableJoG.
CableJoG - Appendix a
Page 46

This menu deals with the process of determining which pins of connector A areconnected to connector B (and any internal linkswithin connectors A & B). If the display shows:-
Enter the four digit password, if the password isincorrect then you will be taken back to the mainmenu. If the password is correct or has not been setthen the display changes to:-
If you see this display and you don't want to pro-ceed then use the ¤ key to move the cursor under the n character and then pressENTER this will return you to the main menu.
Press ENTER to continue, the display will show:-
If there are diodes in the cable then press £ tomove the cursor under Y then press ENTER, oth-erwise just press ENTER. With or without diodesthe display shows:-
As described in earlier chapters CableJoG works on a three character label for eachpin, if you don't want to use this system use the ¤ key to move the cursor under then character and then press ENTER . Each pin label will now be it's actual pin number.The program move onto Cable Ready.
Otherwise, the next step is to choose the type ofconnectors used, press ENTER again the displaywill show the first connector type:-
Press ENTER or ~ if this is not the correct connector type, otherwise press £ tomove the cursor under Y then press ENTER to accept that connector. The connectortypes currently supported can be seen in Appendix B.Once one of the options has been accepted you have to choose the connectors positionwithin the two 64 way IDC connectors. ConnectorA has pins with address numbers 001 to 064.
The display will show:-
Page 8
CableJoG - Menu learn Special uses / single ended tests
Using a shorting plug it is possible to test cables where access to both ends simultane-ously is not possible. There are three basic types of shorting plug each has its place inthe cable testers tool kit.
DIODE SHORTING PLUGUsing a diode to connect a pair of wires has theadvantage that a short between the pair of wireswill be detected and also is the wires are crossed.The cable details need only to be stored once. Toenable CableJoG to recognise that a diode test is tobe carried out the cable needs to be 'marked' suchby including a % character in the cables title whenbeing stored.
SPECIFIC WIRED PLUGIf the connections are known, but a diode plug isnot available then a specific wired plug will iden-tify correct connections along the cable. Two testwill need to be carried out. One with the shortingplug on and one with the shorting plug off. Unfortunately to test for crossed wires afurther specific wired plug will be needed with a different wiring pattern to the first andthree test to fully check the cable out. This sort of plug can be made on site requiringonly a plug, wire and a soldering iron. When learning the various patterns the character% MUST NOT BE USED as it will probably overflow the compare memory.
SHORTING PLUGThis is the most universal shorting plug and noprior knowledge of the connections to be tested isneeded. However, don't exceed the cable connec-tion buffer limit of 64 pairs of connections. Thisgives a maximum number of wires as 7.
A FEW FURTHER POINTS:-
a. Unless using the diode specific plug, check each end for shorts within that end byLearning/Testing that end without the shorting plug on at the far end.
b. don't forget that the loop configuration is still valid, therefore the cable can still be checked for intermittent faults.
c. Again unless using the diode specific plug, Learn the two ends with and with out shorting plugs on a known good cable, this will make testing much easier as the r e -sults are slightly confusing because all the permutation of connections will bedisplayed.
Page 45
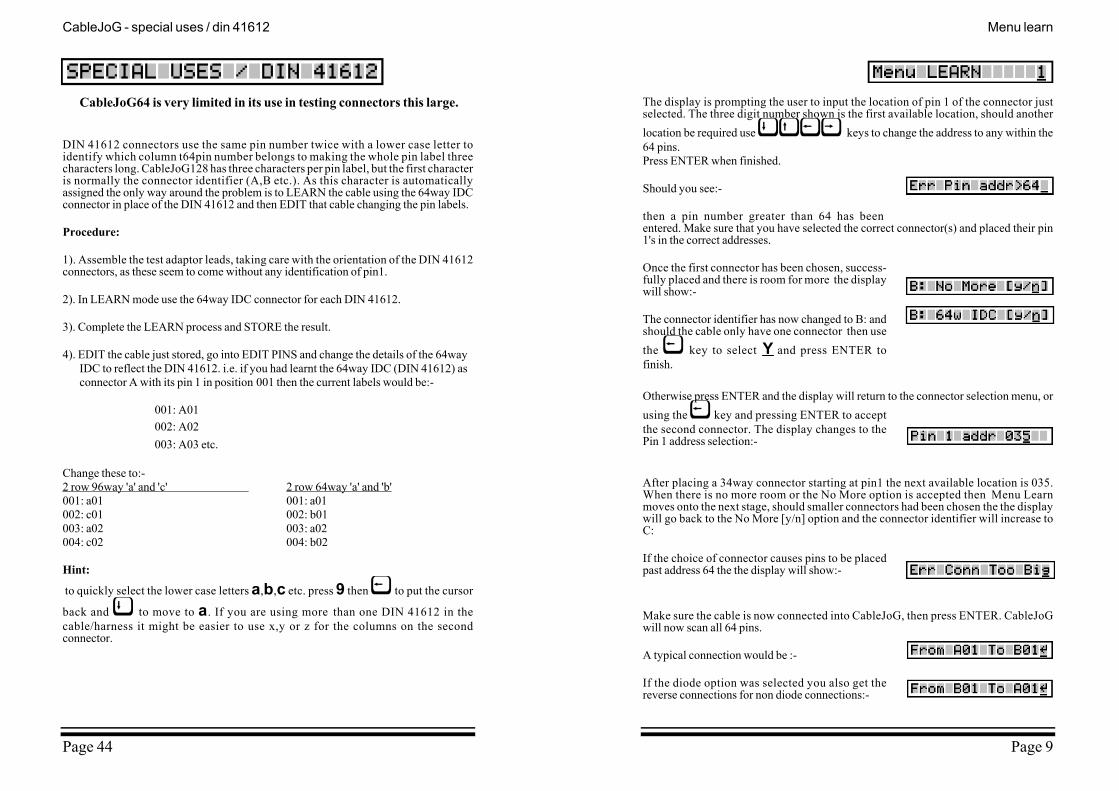
The display is prompting the user to input the location of pin 1 of the connector justselected. The three digit number shown is the first available location, should anotherlocation be required use ~}£¤ keys to change the address to any within the64 pins. Press ENTER when finished.
Should you see:-
then a pin number greater than 64 has beenentered. Make sure that you have selected the correct connector(s) and placed their pin1's in the correct addresses.
Once the first connector has been chosen, success-fully placed and there is room for more the displaywill show:-
The connector identifier has now changed to B: andshould the cable only have one connector then usethe £ key to select Y and press ENTER tofinish.
Otherwise press ENTER and the display will return to the connector selection menu, orusing the £ key and pressing ENTER to acceptthe second connector. The display changes to thePin 1 address selection:-
After placing a 34way connector starting at pin1 the next available location is 035.When there is no more room or the No More option is accepted then Menu Learnmoves onto the next stage, should smaller connectors had been chosen the the displaywill go back to the No More [y/n] option and the connector identifier will increase toC:
If the choice of connector causes pins to be placedpast address 64 the the display will show:-
Make sure the cable is now connected into CableJoG, then press ENTER. CableJoGwill now scan all 64 pins.
A typical connection would be :-
If the diode option was selected you also get thereverse connections for non diode connections:-
Page 9
Menu learnCableJoG - special uses / din 41612
CableJoG64 is very limited in its use in testing connectors this large.
DIN 41612 connectors use the same pin number twice with a lower case letter toidentify which column t64pin number belongs to making the whole pin label threecharacters long. CableJoG128 has three characters per pin label, but the first characteris normally the connector identifier (A,B etc.). As this character is automaticallyassigned the only way around the problem is to LEARN the cable using the 64way IDCconnector in place of the DIN 41612 and then EDIT that cable changing the pin labels.
Procedure:
1). Assemble the test adaptor leads, taking care with the orientation of the DIN 41612connectors, as these seem to come without any identification of pin1.
2). In LEARN mode use the 64way IDC connector for each DIN 41612.
3). Complete the LEARN process and STORE the result.
4). EDIT the cable just stored, go into EDIT PINS and change the details of the 64wayIDC to reflect the DIN 41612. i.e. if you had learnt the 64way IDC (DIN 41612) asconnector A with its pin 1 in position 001 then the current labels would be:-
001: A01 002: A02 003: A03 etc.
Change these to:-2 row 96way 'a' and 'c' 2 row 64way 'a' and 'b'001: a01 001: a01002: c01 002: b01003: a02 003: a02004: c02 004: b02
Hint:
to quickly select the lower case letters a,b,c etc. press 9 then £ to put the cursor
back and ~ to move to a. If you are using more than one DIN 41612 in thecable/harness it might be easier to use x,y or z for the columns on the secondconnector.
Page 44
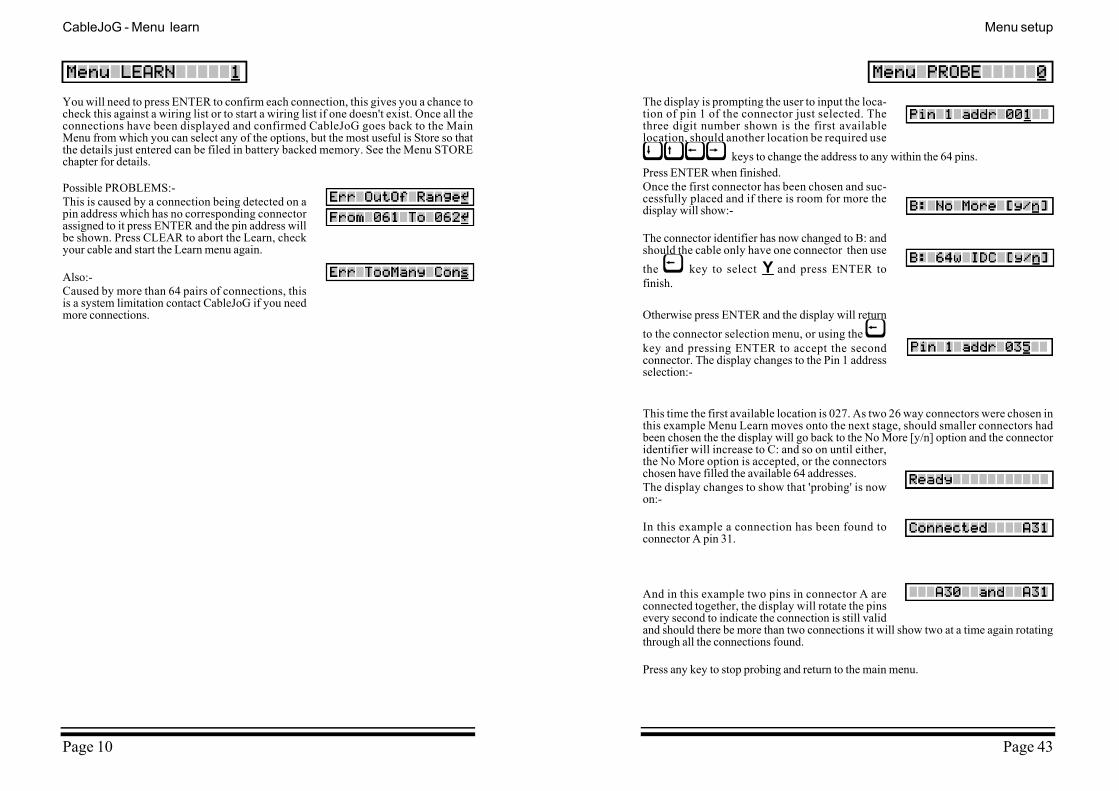
You will need to press ENTER to confirm each connection, this gives you a chance tocheck this against a wiring list or to start a wiring list if one doesn't exist. Once all theconnections have been displayed and confirmed CableJoG goes back to the MainMenu from which you can select any of the options, but the most useful is Store so thatthe details just entered can be filed in battery backed memory. See the Menu STOREchapter for details.
Possible PROBLEMS:-This is caused by a connection being detected on apin address which has no corresponding connectorassigned to it press ENTER and the pin address willbe shown. Press CLEAR to abort the Learn, checkyour cable and start the Learn menu again.
Also:-Caused by more than 64 pairs of connections, thisis a system limitation contact CableJoG if you needmore connections.
Page 10
CableJoG - Menu learn Menu setup
The display is prompting the user to input the loca-tion of pin 1 of the connector just selected. Thethree digit number shown is the first availablelocation, should another location be required use~}£¤ keys to change the address to any within the 64 pins. Press ENTER when finished.Once the first connector has been chosen and suc-cessfully placed and if there is room for more thedisplay will show:-
The connector identifier has now changed to B: andshould the cable only have one connector then usethe £ key to select Y and press ENTER tofinish.
Otherwise press ENTER and the display will returnto the connector selection menu, or using the £key and pressing ENTER to accept the secondconnector. The display changes to the Pin 1 addressselection:-
This time the first available location is 027. As two 26 way connectors were chosen inthis example Menu Learn moves onto the next stage, should smaller connectors hadbeen chosen the the display will go back to the No More [y/n] option and the connectoridentifier will increase to C: and so on until either,the No More option is accepted, or the connectorschosen have filled the available 64 addresses.The display changes to show that 'probing' is nowon:-
In this example a connection has been found toconnector A pin 31.
And in this example two pins in connector A areconnected together, the display will rotate the pinsevery second to indicate the connection is still validand should there be more than two connections it will show two at a time again rotatingthrough all the connections found.
Press any key to stop probing and return to the main menu.
Page 43
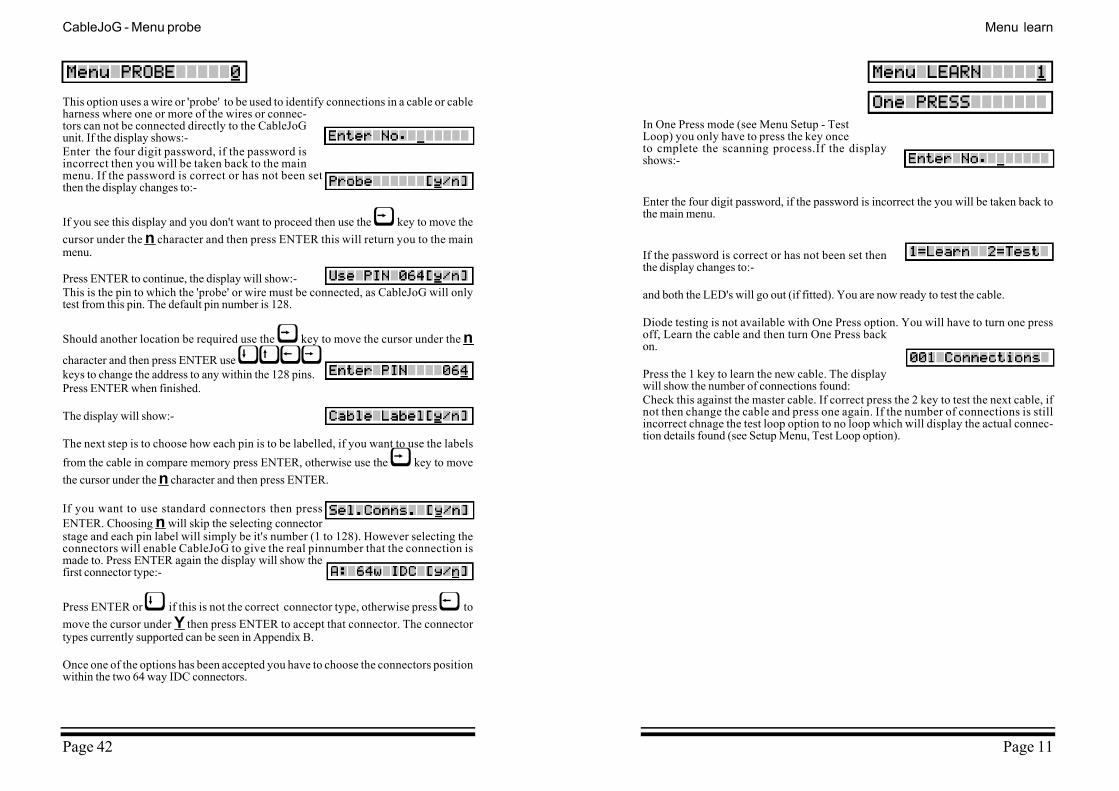
In One Press mode (see Menu Setup - TestLoop) you only have to press the key onceto cmplete the scanning process.If the displayshows:-
Enter the four digit password, if the password is incorrect the you will be taken back tothe main menu.
If the password is correct or has not been set thenthe display changes to:-
and both the LED's will go out (if fitted). You are now ready to test the cable.
Diode testing is not available with One Press option. You will have to turn one pressoff, Learn the cable and then turn One Press backon.
Press the 1 key to learn the new cable. The displaywill show the number of connections found:Check this against the master cable. If correct press the 2 key to test the next cable, ifnot then change the cable and press one again. If the number of connections is stillincorrect chnage the test loop option to no loop which will display the actual connec-tion details found (see Setup Menu, Test Loop option).
Menu learn
Page 11
CableJoG - Menu probe
This option uses a wire or 'probe' to be used to identify connections in a cable or cableharness where one or more of the wires or connec-tors can not be connected directly to the CableJoGunit. If the display shows:-Enter the four digit password, if the password isincorrect then you will be taken back to the mainmenu. If the password is correct or has not been setthen the display changes to:-
If you see this display and you don't want to proceed then use the ¤ key to move thecursor under the n character and then press ENTER this will return you to the mainmenu.
Press ENTER to continue, the display will show:-This is the pin to which the 'probe' or wire must be connected, as CableJoG will onlytest from this pin. The default pin number is 128.
Should another location be required use the ¤ key to move the cursor under the ncharacter and then press ENTER use ~}£¤keys to change the address to any within the 128 pins. Press ENTER when finished.
The display will show:-
The next step is to choose how each pin is to be labelled, if you want to use the labelsfrom the cable in compare memory press ENTER, otherwise use the ¤ key to movethe cursor under the n character and then press ENTER.
If you want to use standard connectors then pressENTER. Choosing n will skip the selecting connectorstage and each pin label will simply be it's number (1 to 128). However selecting theconnectors will enable CableJoG to give the real pinnumber that the connection ismade to. Press ENTER again the display will show thefirst connector type:-
Press ENTER or ~ if this is not the correct connector type, otherwise press £ tomove the cursor under Y then press ENTER to accept that connector. The connectortypes currently supported can be seen in Appendix B.
Once one of the options has been accepted you have to choose the connectors positionwithin the two 64 way IDC connectors.
Page 42
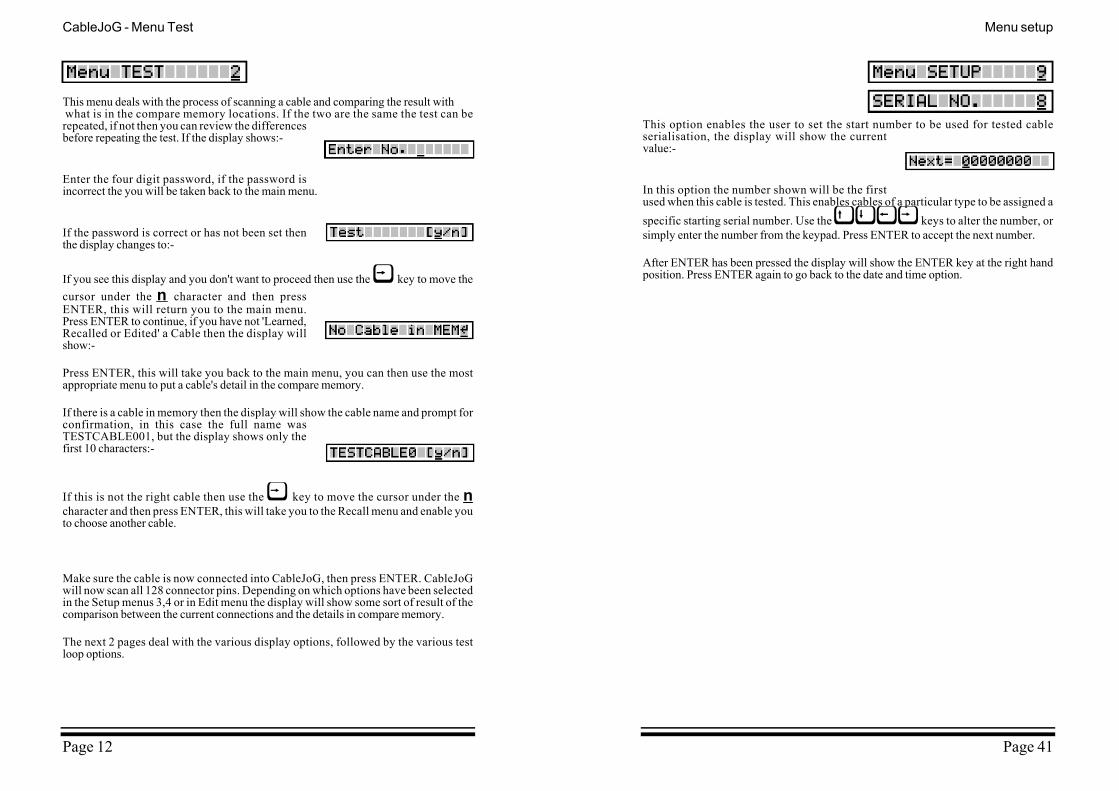
This menu deals with the process of scanning a cable and comparing the result with what is in the compare memory locations. If the two are the same the test can berepeated, if not then you can review the differencesbefore repeating the test. If the display shows:-
Enter the four digit password, if the password isincorrect the you will be taken back to the main menu.
If the password is correct or has not been set thenthe display changes to:-
If you see this display and you don't want to proceed then use the ¤ key to move thecursor under the n character and then pressENTER, this will return you to the main menu.Press ENTER to continue, if you have not 'Learned,Recalled or Edited' a Cable then the display willshow:-
Press ENTER, this will take you back to the main menu, you can then use the mostappropriate menu to put a cable's detail in the compare memory.
If there is a cable in memory then the display will show the cable name and prompt forconfirmation, in this case the full name wasTESTCABLE001, but the display shows only thefirst 10 characters:-
If this is not the right cable then use the ¤ key to move the cursor under the ncharacter and then press ENTER, this will take you to the Recall menu and enable youto choose another cable.
Make sure the cable is now connected into CableJoG, then press ENTER. CableJoGwill now scan all 128 connector pins. Depending on which options have been selectedin the Setup menus 3,4 or in Edit menu the display will show some sort of result of thecomparison between the current connections and the details in compare memory.
The next 2 pages deal with the various display options, followed by the various testloop options.
CableJoG - Menu Test
Page 12
Menu setup
This option enables the user to set the start number to be used for tested cableserialisation, the display will show the currentvalue:-
In this option the number shown will be the firstused when this cable is tested. This enables cables of a particular type to be assigned aspecific starting serial number. Use the }~£¤ keys to alter the number, orsimply enter the number from the keypad. Press ENTER to accept the next number.
After ENTER has been pressed the display will show the ENTER key at the right handposition. Press ENTER again to go back to the date and time option.
Page 41
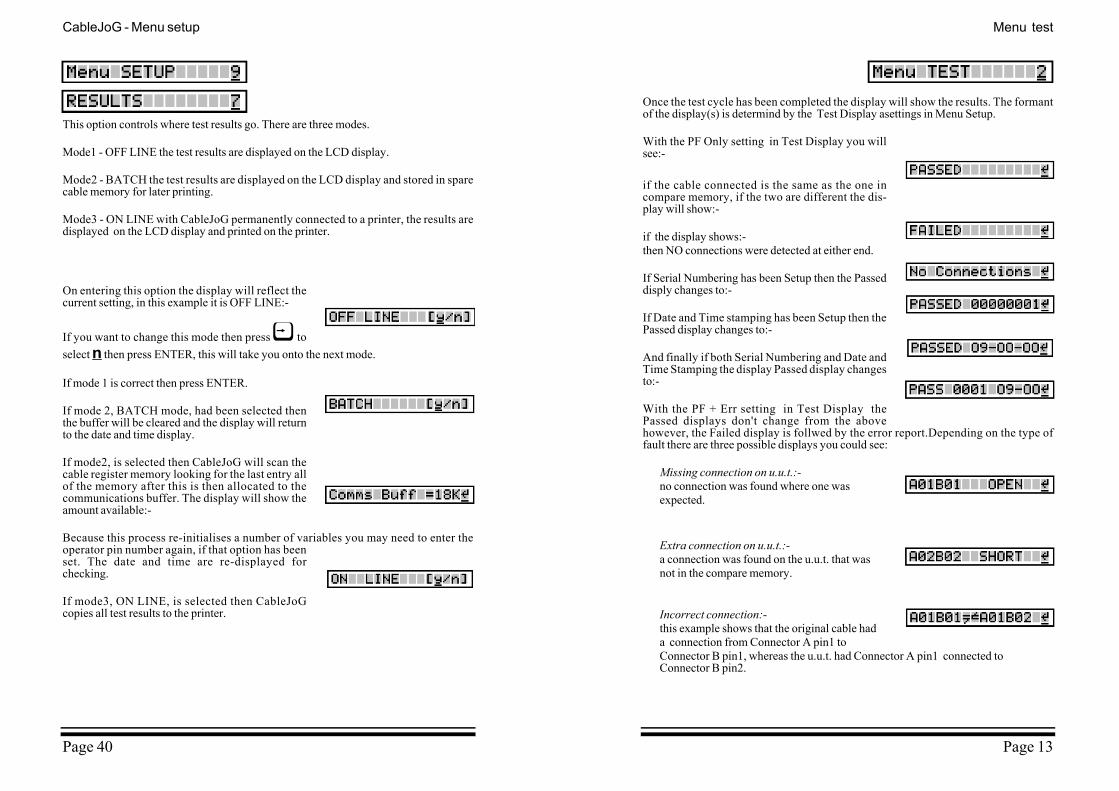
Once the test cycle has been completed the display will show the results. The formantof the display(s) is determind by the Test Display asettings in Menu Setup.
With the PF Only setting in Test Display you willsee:-
if the cable connected is the same as the one incompare memory, if the two are different the dis-play will show:-
if the display shows:-then NO connections were detected at either end.
If Serial Numbering has been Setup then the Passeddisply changes to:-
If Date and Time stamping has been Setup then thePassed display changes to:-
And finally if both Serial Numbering and Date andTime Stamping the display Passed display changesto:-
With the PF + Err setting in Test Display thePassed displays don't change from the abovehowever, the Failed display is follwed by the error report.Depending on the type offault there are three possible displays you could see:
Missing connection on u.u.t.:-no connection was found where one wasexpected.
Extra connection on u.u.t.:-a connection was found on the u.u.t. that wasnot in the compare memory.
Incorrect connection:-this example shows that the original cable had a connection from Connector A pin1 toConnector B pin1, whereas the u.u.t. had Connector A pin1 connected to Connector B pin2.
Page 13
Menu testCableJoG - Menu setup
This option controls where test results go. There are three modes.
Mode1 - OFF LINE the test results are displayed on the LCD display.
Mode2 - BATCH the test results are displayed on the LCD display and stored in sparecable memory for later printing.
Mode3 - ON LINE with CableJoG permanently connected to a printer, the results aredisplayed on the LCD display and printed on the printer.
On entering this option the display will reflect thecurrent setting, in this example it is OFF LINE:-
If you want to change this mode then press ¤ toselect n then press ENTER, this will take you onto the next mode.
If mode 1 is correct then press ENTER.
If mode 2, BATCH mode, had been selected thenthe buffer will be cleared and the display will returnto the date and time display.
If mode2, is selected then CableJoG will scan thecable register memory looking for the last entry allof the memory after this is then allocated to thecommunications buffer. The display will show theamount available:-
Because this process re-initialises a number of variables you may need to enter theoperator pin number again, if that option has beenset. The date and time are re-displayed forchecking.
If mode3, ON LINE, is selected then CableJoGcopies all test results to the printer.
Page 40
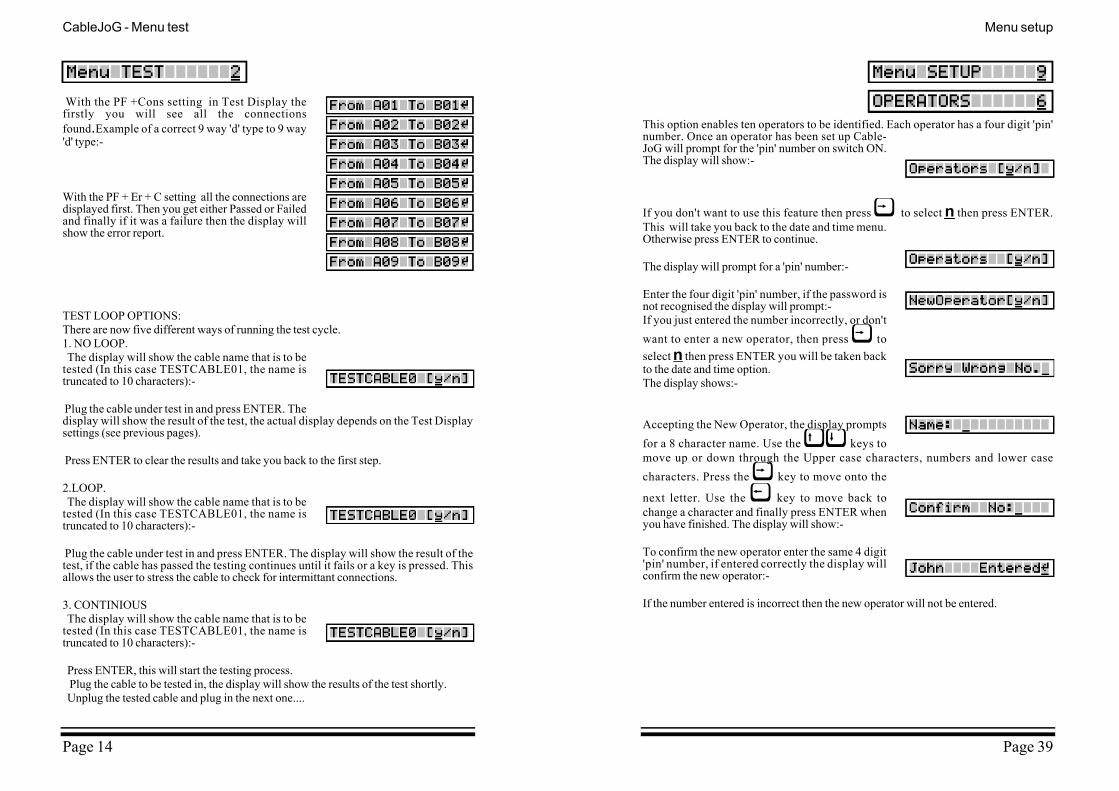
With the PF +Cons setting in Test Display thefirstly you will see all the connectionsfound.Example of a correct 9 way 'd' type to 9 way'd' type:-
With the PF + Er + C setting all the connections aredisplayed first. Then you get either Passed or Failedand finally if it was a failure then the display willshow the error report.
TEST LOOP OPTIONS:There are now five different ways of running the test cycle.1. NO LOOP. The display will show the cable name that is to betested (In this case TESTCABLE01, the name istruncated to 10 characters):-
Plug the cable under test in and press ENTER. Thedisplay will show the result of the test, the actual display depends on the Test Displaysettings (see previous pages).
Press ENTER to clear the results and take you back to the first step.
2.LOOP. The display will show the cable name that is to betested (In this case TESTCABLE01, the name istruncated to 10 characters):-
Plug the cable under test in and press ENTER. The display will show the result of thetest, if the cable has passed the testing continues until it fails or a key is pressed. Thisallows the user to stress the cable to check for intermittant connections.
3. CONTINIOUS The display will show the cable name that is to betested (In this case TESTCABLE01, the name istruncated to 10 characters):-
Press ENTER, this will start the testing process. Plug the cable to be tested in, the display will show the results of the test shortly. Unplug the tested cable and plug in the next one....
CableJoG - Menu test
Page 14
Menu setup
This option enables ten operators to be identified. Each operator has a four digit 'pin'number. Once an operator has been set up Cable-JoG will prompt for the 'pin' number on switch ON.The display will show:-
If you don't want to use this feature then press ¤ to select n then press ENTER.This will take you back to the date and time menu.Otherwise press ENTER to continue.
The display will prompt for a 'pin' number:-
Enter the four digit 'pin' number, if the password isnot recognised the display will prompt:-If you just entered the number incorrectly, or don'twant to enter a new operator, then press ¤ toselect n then press ENTER you will be taken backto the date and time option. The display shows:-
Accepting the New Operator, the display promptsfor a 8 character name. Use the }~ keys tomove up or down through the Upper case characters, numbers and lower casecharacters. Press the ¤ key to move onto the
next letter. Use the £ key to move back tochange a character and finally press ENTER whenyou have finished. The display will show:-
To confirm the new operator enter the same 4 digit'pin' number, if entered correctly the display willconfirm the new operator:-
If the number entered is incorrect then the new operator will not be entered.
Page 39
TEST LOOP OPTIONS (Continued):
4.STAGED This is a varient of the Continious testing mode with the added feature of stringingmore than one test together.Assuming we have a two stage test procedure thenthe sequence of events could be:4.1 Recall the first cable and run the test. With outanything connected you will see:4.2 Plug in the first stage, if all is well the displaywill change to:4.3 Depending on how quickly you can plug thenext stage in you might see a Failedmessage,probably an OPEN circuit.4.4 Once the last stage has passed the display re-verts to the normal PASSED one, with all it'spossibilities.4.5 Remove the Cable under test, once the No Connection display shows the first stagewill be automatically recalled and run.
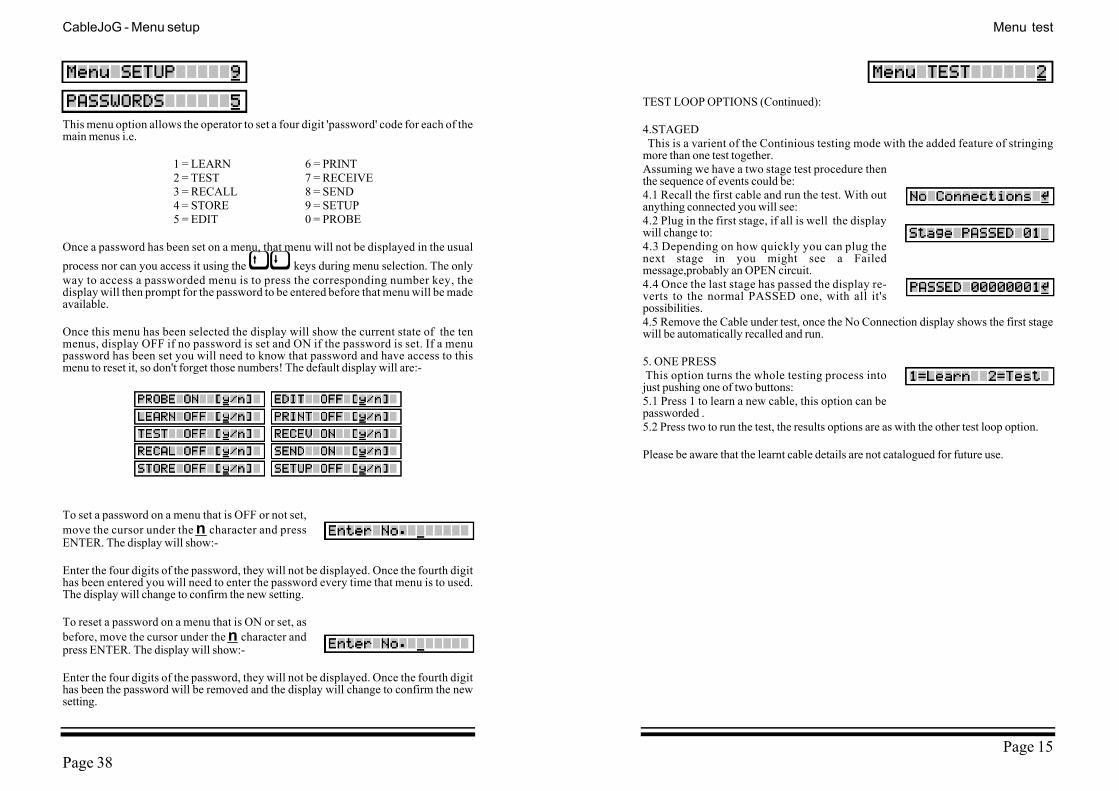
5. ONE PRESSThis option turns the whole testing process intojust pushing one of two buttons:5.1 Press 1 to learn a new cable, this option can bepassworded .5.2 Press two to run the test, the results options are as with the other test loop option.
Please be aware that the learnt cable details are not catalogued for future use.
Menu test
Page 15
CableJoG - Menu setup
Page 38
This menu option allows the operator to set a four digit 'password' code for each of themain menus i.e.
1 = LEARN 6 = PRINT 2 = TEST 7 = RECEIVE 3 = RECALL 8 = SEND 4 = STORE 9 = SETUP 5 = EDIT 0 = PROBE
Once a password has been set on a menu, that menu will not be displayed in the usualprocess nor can you access it using the }~ keys during menu selection. The onlyway to access a passworded menu is to press the corresponding number key, thedisplay will then prompt for the password to be entered before that menu will be madeavailable.
Once this menu has been selected the display will show the current state of the tenmenus, display OFF if no password is set and ON if the password is set. If a menupassword has been set you will need to know that password and have access to thismenu to reset it, so don't forget those numbers! The default display will are:-
To set a password on a menu that is OFF or not set,move the cursor under the n character and pressENTER. The display will show:-
Enter the four digits of the password, they will not be displayed. Once the fourth digithas been entered you will need to enter the password every time that menu is to used.The display will change to confirm the new setting.
To reset a password on a menu that is ON or set, asbefore, move the cursor under the n character andpress ENTER. The display will show:-
Enter the four digits of the password, they will not be displayed. Once the fourth digithas been the password will be removed and the display will change to confirm the newsetting.
This menu deals with the selection of a cable from the stored list and putting the detailsinto the compare memory ready to be used by either the Test or Edit menus.
If the display shows:-
Enter the four digit password, if the password is incorrect the you will be taken backto the main menu. If the password is correct or hasnot been set then the display changes to:-
If you see this display and you don't want to proceed then use the ¤ key to move thecursor under the n character and then pressENTER, this will return you to the main menu.Press ENTER to continue, the display will show:-
The two digit figure on the left is the cable file number. There is now a choice ofmethods to move through the file index.
Using the }~ keys you can scan through until you have recognised the cable you
require. The other method is to enter the cable number directly, using the £¤keys to move between digits.
Press ENTER once you are on the right cable, the cable details will be transferred intothe compare memory and you will go back to the main menu.
Self Test cables. There are two self test cables stored in the EPROM. They startwith cable number 88. It is possible to edit these details, but the changed cable willhave to be stored under a new cable number below 88. For a full list of the standardcables see Appendix C.
CableJoG - Menu recall
Page 16
Menu setup
This option allows the default test modes to be set, this default value is used when anew cable is learnt.
Mode 1 - NO LOOP the test is run just once and theresults displayed.
if this is what you require then press ENTER, otherwise use the }~ keys to movethrough the following modes.
Mode 2 - LOOP the test is run continually untileither the unit under test fails or noconnections are found. The display will show:-
This is the same display as would be shown if test looping was ON in the first instance,again if this is what you require then press ENTER, otherwise use the }~ keys tomove through the following modes.
Mode 3 - Contin. the test runs continually givingthe current results, pressing any key will stop thetest. The display will show:-
This is the same display as would be shown if continuous testing was ON in the firstinstance, again if this is what you require then press ENTER, otherwise use the}~ keys to move through the following modes.
Mode 4 - Staged the test runs continually like mode3 giving the current results, oncethe cable under test has passed CableJoG looksthrough the cable store for any more cables with thesame first 8 characters in the name. If one is found thestage number is check to see if it is the next one to the current, if so that cable isrecalled and the test re-started automatically.After the last stage the Passed ticket isprinted (if the printer [y/n] is selected) and the first stage recalled. The display willshow:-
Page 37

This menu deals with the transfer of a cables details from compare memory into thecable database. If the display shows:-Enter the four digit password, if the password isincorrect the you will be taken back to the mainmenu. If the password is correct or has not been setthen the display changes to:-
If you don't need to keep a record of this cable then press ¤ to select n then pressENTER. This will take you back to the main menu. Otherwise press ENTER tocontinue.
Press ENTER the display will prompt:-
Press ENTER. The display will show the first cablee.g.:-
The two digit figure on the left is the cable filenumber, press the ~ key to move onto the first entry. There is now a choice of
methods to move through the file index. Using the }~ keys you can scan throughuntil you either have a vacant position or are over a cable that is no longer relevant. Theother method is to enter the cable number directly, using the £¤ keys to movebetween digits. Press ENTER once you are on theright file, the cursor will move into the filenamefirst character. If this hasn't been used before youwill see the letter A :-
Use the }~ keys to move up or down through the Upper case characters,
numbers & lower case characters. Press the ¤ key to move onto the next letter. Use
the £ key to move back to change a character and finally press ENTER when youhave finished. To select a single ended test, enter the % character anywhere in the title,but not the first character. The % character is available by pressing the } key whenmoving onto a previously blank entry. For furtherdetails see the chapter 'SPECIAL USES / SINGLEENDED TESTS'.
Press ENTER to store the cable details and returnto the main menu. Or use the ¤ key to select n andpress ENTER the display will show:-
This gives you the option to remove a cable from the register, again use the ¤ key toselect n and press ENTER if you don't want to delete this cable.
Menu store
Page 17
CableJoG - Menu setup
Page 36
This menu allows you to set the amount of information to be displayed during theTEST operation, the options vary from simply shown Passed or Failed, to shown theconnections found and if failed an analysis of the errors. the first display after selectingthis menu will depend on what the current setting is.
The possible options are:-
If the option shown is what you require then pressENTER, other wise use the ¤ key to move under the n character and press ENTER,the display will move onto the next option. Thevarious options are:-This means PASSED or FAILED messages onlywill be displayed at the end of the Test program.This is particularly useful if there is a large numberof cables to be sorted.
This means that PASSED or FAILED messageswill be displayed along with an ERROR report atthe end of the Test program.
This means that PASSED or FAILED messageswill be displayed along with any connections foundduring the test program. This is particularly usefulif used in conjunction with the Loop test option, as it will shown the test progressing.
This option will produce a display of all the con-nections found as well as a full ERROR report atthe end of the test program.
Press ENTER over a Y to accept that option, the display will return to the date andtime option.

This menu deals with the process of changing the details of an existing cable orentering details of a new cable from a wire list.If the display shows:-
Enter the four digit password, if the password isincorrect the you will be taken back to the mainmenu. If the password is correct or has not been setthen the display changes to:-
If you don't want to proceed then use the ¤ keyto move the cursor under the n character and thenpress ENTER, this will return you to the main menu.
Press ENTER to continue, if there is no cable in the compare memory the display willshow:-
If you intended to edit an existing cable then use the¤ key to move the cursor under the n characterand then press ENTER, this will take you to the recall menu. If you wish to enter acable's details from a wiring list then press ENTER to continue, the display will show:-
To choose the type of connectors used, press EN-TER again the display will show the first connectortype:-
Press ENTER if this is not the correct connectortype, otherwise press £ to move the cursor un-der the Y character, then press ENTER to move onto the next connector. Theconnector types currently supported can be seen in Appendix B.
Once one of the options has been accepted you have to choose the connectors positionwithin the 64 way IDC connector. Connector A has pins with address numbers 001 to064, connector B is not used. The display will show:-
The display is prompting the user to input the loca-tion of pin 1 of the connector just selected. Thethree digit number shown is the first availablelocation, should another location be required usethe }~£¤ keys to change the address to any within the 64 pins. PressENTER when finished.
CableJoG - Menu edit
Page 18
CableJoG has a power down feature where the microprocessor is switched off after aset period of inaction, this menu allows you to set that period from a minimum of 1minute (factory setting) through to 99 minutes or never powering down (00).
The display will show the current setting and thecursor will appear under the least significant digit.:-
you can use the }~£¤ keys to adjust the time, or enter the digits from thekeyboard.
will leave the unit powered on all the time.
Once you have set the time amount press ENTER,the display will show the result:-
Press ENTER, the display will return to the date and time option.
Page 35
Menu setup

Should you see:-
then a pin number greater than 64 has been entered.Make sure that you have selected the correctconnector(s) and placed their pin 1's in the correct addresses.
Once the first connector has been chosen and suc-cessfully placed the display will show:-
The connector identifier has now changed to B: andshould the cable only have one connector then usethe £ key to select Y and press ENTER to finish. Otherwise press ENTER and thedisplay will return to the connector selection menu.
Using the £ key and pressing ENTER to acceptthe second connector the display changes to the Pin1 address selection:-
After placing a 34way connector starting at pin1 the next available location is 035.When there is no more room or the No More [y/n] option is accepted then Menu Learnmoves onto the next stage, should smaller connectors had been chosen the the displaywill go back to the No More [y/n] option and the connector identifier will increase toC:
If the choice of connectors causes pins to be placedpast address 64 then the the display will show:-
In either case Edit moves onto editing the serial number option.
CableJoG - Menu setup
The beeper will normally sound after a key has been pressed, or to warn the user of afault condition, this feature can be turned off or set for a single long beep for a PASS .
If the display shows:-
then the beeper is OFF, if this is what you require then press ENTER, otherwise use the¤ key to move the cursor under the n character and press ENTER.
The display will show:-The beeper will only sound on a PASSED test, ifthis is what you require then press ENTER, other-wise use the ¤ key to move the cursor under then character and press ENTER.
The display will show:-The beeper is OFF, if this is what you require thenpress ENTER, otherwise use the ¤ key to movethe cursor under the n character and press ENTER.
Pressing ENTER when the cursor is under the Y character will cause that option to beset and the display will return to the date and time option.
Page 19
Menu edit
Page 34

If a cable is already in compare memory the displaywill show it and prompt the operator to edit it:-
If this is not the right cable then use the ¤ key toposition the cursor under the n character and press ENTER, this will enable you tochoose another cable using the Recall menu.
If this is the correct cable then press ENTER, thedisplay will show:-
This option allows the user change any or all of the128 pin labels. If there is no need to modify the pinlabels then use the ¤ key to position the cursor under the n character and pressENTER, otherwise the display will show:-
The first three numbers (001) represent the pinaddress, see the Fundamentals chapter for whendetails on pin addresses and connector pins, use the}~£¤ keys to move around the addresses until the correct one is displayed,press ENTER.
The cursor is now under the label that will representpin address 001. Using the arrow and numeric keysthe label can be changed to whatever is required.This feature means that connectors using letters for pin numbers can easily beaccommodated. Press ENTER when the label is correct. The display will show theENTER symbol, if you have made a mistake press the £ key to go back to editingthe label, otherwise press ENTER again to accept the new label.
The display will change from:-
To:-
And:-If another label is to be edited then press ENTER,other wise press the £ key to move the cursorunder the n key and press ENTER.
CableJoG - Menu edit
This menu deals with the setting/changing of system parameters.
If the display shows:-
Enter the four digit password, if the password isincorrect the you will be taken backto the main menu. If the password is correct or has not been set thenthe display changes to:- If you don't want to change the system parametersthen press ¤ to select n then press ENTER.This will take you back to the main menu. Other-wise press ENTER to continue. The display willshow the first option:-
If you don't want to change the date and time values then either use the }~ keysto select another sub-menu or enter the number corresponding to the subs-menunumber you require.
Setting the date and time, the display will show thecurrent date and time:-
Using the numeric keys and the keys adjust thedate and time to the correct value, when finishedpress ENTER. The display verifies the new date:-
and new time:-
Press ENTER:-
If everything is correct press ENTER, If there is an error then press ¤to select nthen press ENTER. This will take you back to changing the date and time.
Page 33
Menu setup
Page 20

One of the test options that can be set for each cabletype individually is the serialisation of each cabletested:-
If you do not want to edit this option then use the ¤ key to position the cursor underthe n character and press ENTER, this will take you to the next option.If you you do want to edit the serial number option,then press ENTER, the display will show:-
Press ENTER, there are three option for the serialnumber, Continue (default):-With the option set to continue each tested cablewill be numbered and the number will be a continu-ation of the fundamental serial number (see SETUPfor details on the fundamental serial number). Use the £ key to move onto the nextoption, or press ENTER to accept the continue option.
The second option is :-
In this option the tested cables will NOT benumbered. Use the £ key to move onto the nextoption, or press ENTER to accept the off option.
The third option is:-
In this option the number shown will be the firstused when this cable is tested. This enables cables of a particular type to be assigned aspecific starting serial number. Use the }~£¤ keys to alter the number, orsimply enter the number from the keypad. To change the option to OFF or CON-TINUE press the £ key until the display changes. Press ENTER to accept the nextnumber.
After ENTER has been pressed the display will show the ENTER key at the right handposition. Press ENTER again to move onto the next cable option.
CableJoG - Menu send
This menu allows the transfer of cable details from CableJoG to CableJoG CommandProgram (C.C.P.).If the display shows:-
Enter the four digit password, if the password isincorrect the you will be taken back to the mainmenu. If the password is correct or has not been setthen the display changes to:-
If you see this display and you don't want to pro-ceed then use the ¤ key to move the cursor under the n character and then pressENTER, this will return you to the main menu.
Press ENTER to send the cable, CableJoG tries tosend the details for the cable in compare memory.In this example it is number 01:-
If this is not the cable you want to send the details of then use the ¤ key to move thecursor under the n character and then press ENTER, this will take you into the cableregister and allow selection of the cable to send.
The two digit figure on the left is the cable file number. There is now a choice ofmethods to move through the file index. Using the }~ keys you can scanthrough until you have recognised the cable you require. The other method is to enterthe cable number directly, using the £¤ keysto move between digits.Press ENTER, if you see:-then the link is either not ready or not connected,correct this fault or press any key to break out ofprinting. The display will change to:-
If sending has taken place the display will changeto:-
press ENTER, to go back to testing:-
Page 21
Menu edit
Page 32
Another of the test options that can be set for eachcable type individually is the Date and Time stamp-ing of each cable tested:-
If you do not want to edit this option then use the¤ key to position the cursor under the n character and press ENTER, this will takeyou to the next option.If you you do want to edit the Date and Time stamp,then press ENTER, the display will show:-
Press ENTER, if this has not been set before thenthe display will show (default):-
Using the }~ keys you scroll through thedate and time options.
Y = YearM = MonthD = Dayh = hoursm = minutess = seconds
Once a value has been set, that value will be attached to each cable tested, there are 6positions giving a maximum of hmsDMY. Press ENTER when the correct date andtime format has been entered. The display will show the ENTER key at the right handposition.
Press ENTER the display will confirm thechanges:-
Press ENTER again to move onto the next cable option.
Example of full time and date stamp:-
Example of just the time stamp:-
CableJoG - Menu edit
This menu deals with the transfer of Batch test results from CableJoG to CableJoGCommand Program (C.C.P.). When enabled, CableJoG uses any spare cable memoryarea past the last cable as a print buffer. During testing the results are stored away andheld even if the unit is switched off. Then when a PC running C.C.P. is available theresults can be transferred. For details on how to set this see chapter menu SETUPRESULTS.
If the display shows:-Enter the four digit password, if the password isincorrect the you will be taken back to the mainmenu. If the password is correct or has not been setthen the display changes to:-
If you see this display and you don't want to pro-ceed then use the ¤ key to move the cursorunder the n character and then press ENTER, this will return you to the main menu.Press ENTER to continue, if there are any results toprint from the batch buffer then the display willshow:-
If you don't want to send the results use the ¤key to move the cursor under the n character and then press ENTER the display willshow (For details on this option see page 71.).If you do want to send the batch results then makesure you have CableJoG connected and ready.Press ENTER, if you see:-then the link is either not ready or not connected,correct this fault or press any key to break out ofprinting.
The display will change to:-
If sending has taken place the display will changeto:-
press ENTER, CableJoG then re-initialises itself going through the power on sequenceof date, time, operator and password (if used).
Page 31
Menu send
Page 22

Another of the options that can be set for each cable type individually is the test routineitself. The test routine operates in one of fivemodes. The display will show:-
If you do not want to edit this option then use the¤ key to position the cursor under the n charac-ter and press ENTER, this will take you to the next option.
Press ENTER, the first and default mode will bedisplayed:-
Mode 1 - NO LOOP the test is run just once and theresults displayed. If this is what you require then press ENTER, otherwise use the ~key to move onto the next mode.
Mode 2 - LOOP the test is run continually until either the unit under test fails or noconnections are found.The display will show:-
If this is what you require then press ENTER, oth-erwise use the ~ key to move onto the nextmode.
Mode 3 - Cont. the test runs continually giving thecurrent results, pressing any key will stop the test.The display will show:-
If this is what you require then press ENTER, oth-erwise use the ~ key to move onto the nextmode.Mode 4 - Staged testing, actual test mode is as forconitinuous, but once passed the NEXT stage isautomaticaly loaded. The display will show:-
If this is what you require then press ENTER, oth-
erwise use the ~ key to move back to the firstmode.After confirming the option the display will show:-Select the stage number for this cable, 1 is the first stage option.NOTE:1.The first 8 characters of the cable name need to be the same for each cable stage. 2.The passed display and printout will happen on completion of the last stage.
CableJoG - Menu receive
If you entered to the Receive prompt the display willshow:-
This allows the CableJoG unit to be controlled from CableJoG Command Program(C.C.P.). If you see you don't want to proceed then use the ¤ key to move the cursorunder the n character and then press ENTER, this will return you to the main menu.
Press ENTER to continue, the display will show:-
Page 23
Menu edit
Page 30

Mode 5 - PRESS ONE BUTTON
This mode set the CableJoG unit to use only onebutton to run the test, everytime the 1 key is pressedthe test will run. This option also makes learninginto a one button press. However, you can not assign any labels at the learning stage.
If there are no results to display you wil see:
All of the other menu s still work but, can't beaccessed using the arrow keys.
CableJoG - Menu edit
This menu allows the transfer of cable details from CableJoG Command Program(C.C.P.) into the cable register, if the displayshows:-
Enter the four digit password, if the password isincorrect then you will be taken back to the mainmenu. If the password is correct or has not been setthen the display changes to:-
If you see this display and you don't want to proceed then use the ¤ key to move thecursor under the n character and then press ENTER, this will give you the option ofrunning the CableJoG unit from a PC using C.C.P. (see below).
Otherwise, press ENTER to continue, the displaywill show:-
Following the instructions for C.C.P. a Cable Pro-file is chosen and sent to CableJoG64. During re-ceiving the display reflects the number of cablescurrently received.:-
Finishing off with:-
Page 29
Menu receive
Page 24

This option allows the actual connectionsof this cable to be edited.
If you do not want to edit the connections then usethe ¤ key to position the cursor under the ncharacter and press ENTER, this will take out of the edit cable menu. Remember thatthe editing is carried out on the details in compare memory and although you will beable to test cables against these settings you have not saved them, to do so use menuSTORE.
If you you do want to edit the Connections, thenpress ENTER, the display will show:-
Press ENTER, if you are editing a new cable thenthere won't actually be any connections and thedisplay will show:-
This of course isn't an actual connection, but identifies a vacant entry.If you are editing a cable that is already in compare memory (in this example it is cablenumber 01) the display might show:-
The two digit figure on the left is the cable connection number, press the ~ key tomove onto the first entry.
Use the }~£¤ keys to select the correct line entry, if you are just starting toenter a wire list then only line 01 is valid. Press ENTER to move into the details area.The cursor will move underneath the first 'A' character. To change this to 'B' press the~ key, continue to use the }~£¤ keys to move along the line andchange any or all the details. The only rule to remember is that the left handdetail must be less than the right hand detail. Forexample:-
Is valid,but:-
is not because B01 has an address of 65 and A02 is
This option enables the details of a particular cableto be printed.
If you see this display and you don't want to pro-ceed then use the ¤ key to move the cursor under the n character and then pressENTER the display will show:-
This option prints out the cable store catalogue with any staged details.
Press ENTER to print or use the ¤ key to move the cursor under the n characterand then press ENTER the display will show:-
Press ENTER to print a cable, CableJoG tries toprint the details for the cable in compare memory.In this example it is number 01:-
If this is not the cable you want to print the detailsof then use the ¤ key to move the cursor underthe n character and then press ENTER, this will take you into the cable register andallow selection of the cable to print.The two digit figure on the left is the cable file number. There is now a choice ofmethods to move through the file index. Using the }~ keys you can scanthrough until you have recognised the cable you require. The other method is to enterthe cable number directly, using the £¤ keys to move between digits.
Press ENTER once you are on the right cable, the cable details will be transferred tothe printer, when finished the display will show:-
For examples of print out's see Appendix D.
Page 28
CableJoG - Menu print
Page 25
Menu edit
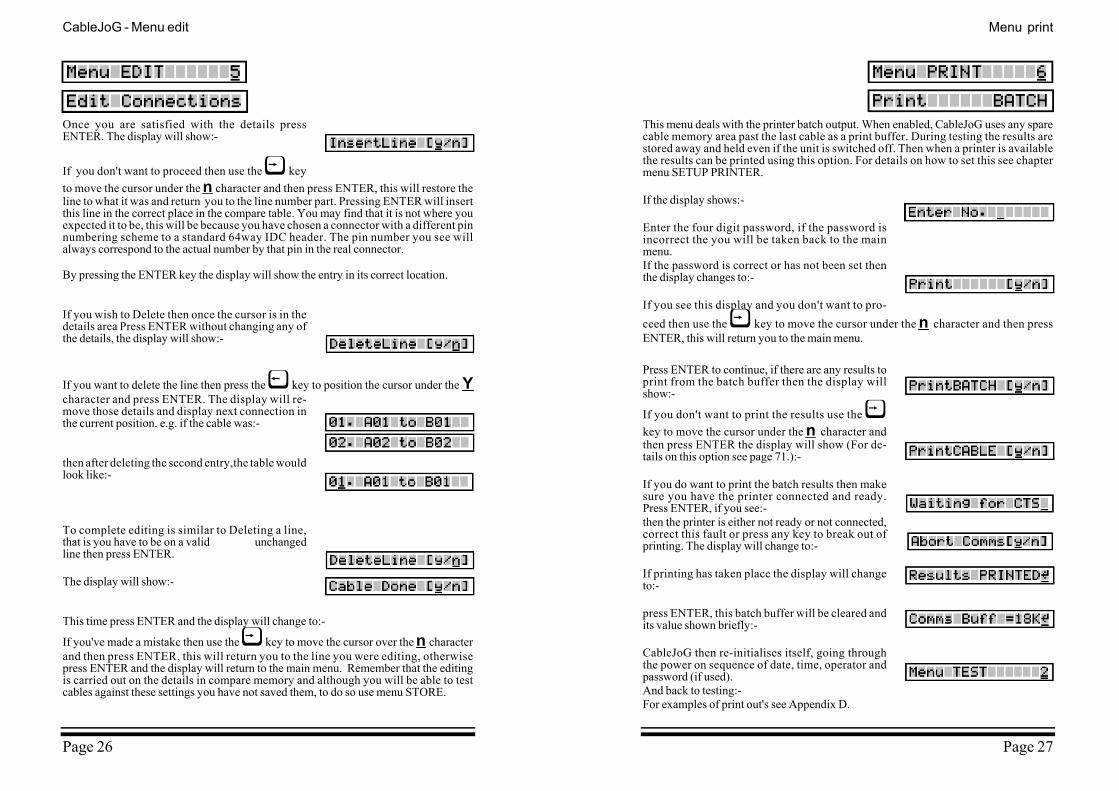
Once you are satisfied with the details pressENTER. The display will show:-
If you don't want to proceed then use the ¤ keyto move the cursor under the n character and then press ENTER, this will restore theline to what it was and return you to the line number part. Pressing ENTER will insertthis line in the correct place in the compare table. You may find that it is not where youexpected it to be, this will be because you have chosen a connector with a different pinnumbering scheme to a standard 64way IDC header. The pin number you see willalways correspond to the actual number by that pin in the real connector.
By pressing the ENTER key the display will show the entry in its correct location.
If you wish to Delete then once the cursor is in thedetails area Press ENTER without changing any ofthe details, the display will show:-
If you want to delete the line then press the £ key to position the cursor under the Ycharacter and press ENTER. The display will re-move those details and display next connection inthe current position. e.g. if the cable was:-
then after deleting the second entry,the table wouldlook like:-
To complete editing is similar to Deleting a line,that is you have to be on a valid unchangedline then press ENTER.
The display will show:-
This time press ENTER and the display will change to:-
If you've made a mistake then use the ¤ key to move the cursor over the n characterand then press ENTER, this will return you to the line you were editing, otherwisepress ENTER and the display will return to the main menu. Remember that the editingis carried out on the details in compare memory and although you will be able to testcables against these settings you have not saved them, to do so use menu STORE.
CableJoG - Menu edit
Page 26
This menu deals with the printer batch output. When enabled, CableJoG uses any sparecable memory area past the last cable as a print buffer. During testing the results arestored away and held even if the unit is switched off. Then when a printer is availablethe results can be printed using this option. For details on how to set this see chaptermenu SETUP PRINTER.
If the display shows:-
Enter the four digit password, if the password isincorrect the you will be taken back to the mainmenu. If the password is correct or has not been set thenthe display changes to:-
If you see this display and you don't want to pro-ceed then use the ¤ key to move the cursor under the n character and then pressENTER, this will return you to the main menu.
Press ENTER to continue, if there are any results toprint from the batch buffer then the display willshow:-
If you don't want to print the results use the ¤key to move the cursor under the n character andthen press ENTER the display will show (For de-tails on this option see page 71.):-
If you do want to print the batch results then makesure you have the printer connected and ready.Press ENTER, if you see:-then the printer is either not ready or not connected,correct this fault or press any key to break out ofprinting. The display will change to:-
If printing has taken place the display will changeto:-
press ENTER, this batch buffer will be cleared andits value shown briefly:-
CableJoG then re-initialises itself, going throughthe power on sequence of date, time, operator andpassword (if used).And back to testing:-For examples of print out's see Appendix D.
Page 27
Menu print