
Presents Electric Sitar - Bolder · PDF fileOther artists who have used the electric sitar on...
25
Presents Electric Sitar for NI Kontakt 4+ Go to Index: 2 1
-
Upload
truongdiep -
Category
Documents
-
view
217 -
download
1
Transcript of Presents Electric Sitar - Bolder · PDF fileOther artists who have used the electric sitar on...

Presents
Electric Sitarfor NI Kontakt 4+
Go to Index: 2 1

Index
Index 2
About the Electric Sitar 3
General Stuff 6
About the Presets 7
The Instrument Panel 8
The Articulation Page 8
About the String Selection 9
About the Auto Fret Selection 10
The Pickup/Mic. Page 12
The Settings Page 14
The P.B./Vibrato Page 16
The Key Switch Page 18
The Effects Panel 19
The Compressor Page 20
The EQ Page 20
The Chorus Page 21
The Delay Page 22
The Reverb Page 23
The Cabinet Page 23
The Space Page 24
License Agreement 25
Go to Index: 2 2

This is a sample library project I've been wanting to complete for some timeand I believe we have something really special here for you! This instrumenthas a distinct and unique voice. Now that it is available as a virtual instrumentI have no doubt that it's musical effectiveness can be greatly expanded beyondof solely creating a groovy 60s vibe.
Electric Sitar Background
The New Jersey-based Danelectro company produced an electric sitar and gaveJohn Lennon and George Harrison the first two made. The instrument wasdesigned by New York session musician Vinnie Bell.
The Danelectro company was originally an amp manufacturer and laterexpanded into guitar production. Their goal was to make a guitar that soundedlike a sitar made famous by on Beatles recordings, but in an easily playableform.
Below is an excerpt from a terrific book called Beatles Gear by Andy Babiuk:Commenting on his guitar collection for a magazine feature in the 1980s,George Harrison pointed to an instrument and said: “ There's the electric sitarthey gave me because of the Ravi Shankar thing. It is supposedly the very firstone; it's got a strip on the back saying ‘Patent Pending’. Spencer Davis saw itonce and said, ‘oh can I borrow that for a night’? And hijacked it. I never sawit for about two years-by which time everybody had used one so I neveractually used it.”
After doing quite a bit of research on the electric sitar, I realized that the list ofsongs featuring this instrument is quite extensive. I've also noticed that thisinstrument is frequently used in introductions to songs to give them a distinctflavor. However in no way should it be limited to this kind of use - thisinstrument is the primary sound of Pat Metheny's “Last Train Home” as well asSteely Dan's “Do It Again” where the electric sitar is played in very much ajazz fusion/bebop context. Below is a small list of songs where this distinctinstrument’s voice is heard.
The Games People Play - Joe South (Duane Allman plays electric sitar on ainstrumental version of this song)I Was Made To Love Her / Signed Sealed Delivered - Stevie WonderLast Train Home - Pat MethenyDo It Again - Steely DanDon't Come Around Here No More - Tom PettyTo Be Over & It Can Happen - Yes (Steve Howe)Hooked On A Feeling - BJ ThomasIt's A Shame - The SpinnersCry Like A Baby - The Box TopsSteal Away - Robbie DupreeCat’s In The Cradle (intro) - Harry ChapinSpinal Tap - Listen To The Flower People (very funny solo)
Go to Index: 2 3

Other artists who have used the electric sitar on their recordings include:Beck, Steppenwolf, Kronos Quartet, Genesis, The Clash, Todd Rundgren, GunsN' Roses, Lenny Kravitz, R.E.M, Metallica, Santana, Eric Johnson, Pearl Jam ,Alice in Chains, Steve Vai, Rory Gallagher and Eddie Van Halen.
The 1971 album Somethin' Else recorded by Danny Davis and the NashvilleBrass prominently featured an electric sitar, a first for the country musicindustry. The instrument provided accompaniment on such songs as"Snowbird", "Rose Garden" and ”Are You from Dixie”?
About The Sampling Process
3 independent sample sources were recorded - neck and bridge pickupsamples as well as microphone samples. I had this guitar rewired so I coulduse a stereo jack and record the neck and bridge pickups simultaneously.I noticed when playing this instrument unplugged it had quite a charmingacoustic quality, yet very soft. And I thought it would be ideal if I could capturethis acoustic signal. The mic samples really make this sample library unique.They give this instrument a very animated top end with the result being a bitof a acoustic-electric hybrid, giving us a closer emulation of a real sitar.
Since we are now dealing with a virtual instrument and interesting sounddesign option is to assign a controller to each of the three independent samplesources and manipulate them in real time or in a sequence. Something thatwould be quite impossible to do while actually playing the instrument.
This sampling process coupled with creative and flexible KSP scripting by BoClausen will give you many creative opportunities. Have fun!
Go to Index: 2 4

Features of the Electric Sitar Sample Library
• 3 independent sample sources – neck and bridge pickup samples as wellas microphone samples.
• 3 x independent round-robin per key, for each of the 6 strings of theElectric Sitar. Strings 1 - 4 were sampled chromatically up to the 12 th
fret. The second string up to the 15th fret and the first string wassampled all the way up to the 20th fret.
• 3 velocity layers for all the sustain samples.
• Independent Volume and Tone/EQ control of each sample source.
• A very advanced scripted Pitch Bend and Vibrato control.
• Detailed Articulation control to emulate slurs (hammer-ons and pull-offs)
• Sampled Slides – both ascending and descending in half, whole and oneand a half steps.
• Detailed KSP scripted control of Fretting Position on the neck of theguitar, including an Auto Fret Selection feature.
• A Key Switch Page where you can freely assign which key will trigger thevarious Key Switches.
• 9 different effects - each with its own Preset menus, so you can save andrecall all the various parameters.
• And much more!
The full uncompressed size of this library is 2.6 GB. It has been Kontaktcompressed (.ncw) down to 1.45 GB for convenience of downloading and rapidloading into Kontakt.
Go to Index: 2 5

General StuffKONTAKT Compatibility:
This library requires NI KONTAKT version 4.2.4 or higher, and has been testedfor compatibility in KONTAKT 5. This library is NOT compatible with theKONTAKT 4 or 5 sample PLAYER, only the full retail KONTAKT SAMPLER. It willonly run in demo mode for 15 minutes on the KONTAKT PLAYER.
Hover Over Mouse Help:
If you turn on the Show Info Pane, you can simply ‘hover’ your mouse over aparticular control and the information on that control will be displayed in theInfo Pane at the bottom of the KONTAKT window.
Reset Knobs:
All knobs can be reset to their default value, if you CTRL + Click (PC) orCommand + Click (Mac) on the knob.
MIDI Learn CC#:
All the buttons and knobs can be automated by a MIDI control. Just Right +Click (PC) or Control + Click (Mac) the button or knob and select Learn MIDICC# Automation, and then move your hardware MIDI controller.
Panels:
The User Interface has two Panels. Click on the Panel Tab Name to open thePanel.
The About Page:
Each Panel has an About Page that gives you a quick overview of the Panel.
Go to Index: 2 6

About the Presets
There are a total of 14 Preset drop-down Menus.
On the Instrument Panel:Neck EQ Presets, Bridge EQ Presets, Mic. EQ Presets, Slide Presets and Art.Presets.
On the Effect Panel:Compressor Presets, Global EQ Presets, Chorus Presets, Flanger Presets,Phaser Presets, Delay Presets, Reverb Presets, Cabinet Presets and SpacePresets.
The Preset Menu:
You can Save and Recall up to six Presets per Preset drop-down Menu.
To Save a Preset, first edit the settings as you like, and then select the as Preset # in the Preset Menu.
To Recall/Select a Preset, open the Preset Menu and select the Preset #
When you Save a Preset, the changes are written into the data folder and thenautomatically loaded the next time you load the instrument in Kontakt. Sothere is no need to save the instrument.
The six Presets can also be Saved and Loaded as a Bank.
To Save the six Presets as a Bank, select the Save Bank in the Preset Menu.A save dialog box opens, pointing to the default Data folder inside the mainInstrument folder. For better organization, give the file a name that refers tothe Effect – ex. “EQ - my presets”.
To Load a Bank, select the Load Bank in the Preset Menu. A open dialog boxopens, pointing to the default Data folder.
If you have loaded a Bank and you want this Bank to be loaded the next timeyou load the instrument in Kontakt, then select the Set as Def. Bank
The Reset All Knobs sets all the knobs to their default setting.
PS: All the default Banks are stored in the sub-folder “Default Banks” insidethe Data folder.
Go to Index: 2 7

The Instrument Panel
The Instrument Panel has five different Pages that can be selected from thePage drop-down Menu.
The Articulation Page:
On the Articulation Page you find a Position Display, that shows the FretPosition and the currently Playing String.
You also get a visual indication of the selected Slide, Articulation or ImposedString button.
Each string can be Imposed via a Key Switch (red color code), and herebyoverride the Auto String Selection.
The Fret Position can be select via a Key Switch (yellow color code).
You can select between six different Slides via Key Switches (cyan color code),and adjust the speed/tempo of the Slide articulations.
Here you also find two Art. buttons that will give you different attacks on thesustain notes, and they can be controlled via Key Switch (green color code).
You can turn the String Muting On/Off, either by mouse-click or via Key Switch(green color code), and the amount of the Muting effect can be adjusted.
Go to Index: 2 8

About String Selection
With string instruments, like the guitar, a certain note can often be played onmultiple strings. For example, A2 can be played on three different strings ofthe guitar, with each string having its own very distinctive sound.
When a real guitar player plays a note on the guitar, he will typically choosethe string on which the note can be played with a minimum of effort. That is,without moving the left hand too much.
When you play the sampled guitar instrument from a keyboard, it's a littlemore difficult to deal with the string selection.So we've made a script that will help you taking care of the string selection.
There are two different ways to select the strings that will be played:1.You can either set/select a Fret Position, and then the scripted string-algorithmwill automatically select the correct string according to the Fret Position.The Fret Position is set/selected with Key Switches (Yellow color code).2.Or you can override the Fret Position and Force/Impose the string that youwant to play. You Impose a string by holding down a Key Switch (Red colorcode).When you release the Impose String Key Switch key, the Fret Position willreturn back to the last selected position.
About the scripted String-algorithm
Here's a diagram that shows the note/string pattern, the string-algorithm useswhen it selects strings. (In the example below, the 5th Fret Position is selected).
Go to Index: 2 9
1.
2.
1.
3.
4.
5.
6. x x x x x
x x x x x
x x x x x
x x x x
x x x x x
x x x x x (x) (x) (x) (x) (x) (x)
(x) (x) (x) (x)
5. Fret
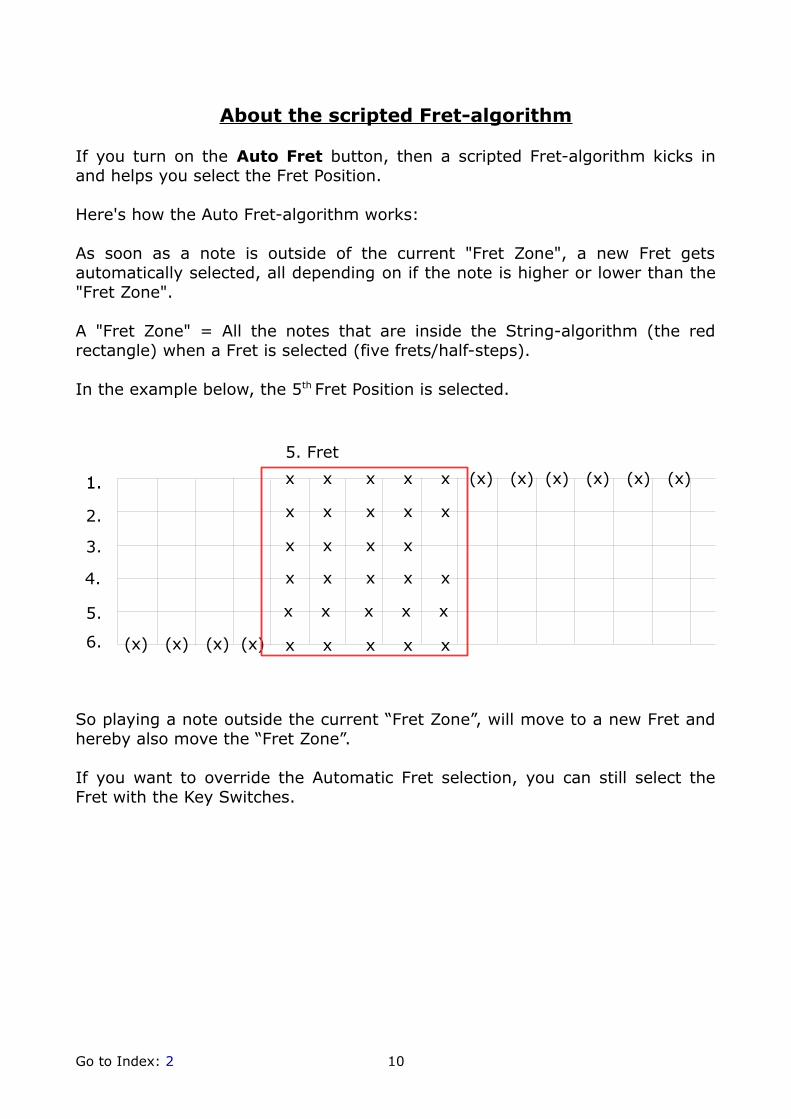
About the scripted Fret-algorithm
If you turn on the Auto Fret button, then a scripted Fret-algorithm kicks inand helps you select the Fret Position.
Here's how the Auto Fret-algorithm works:
As soon as a note is outside of the current "Fret Zone", a new Fret getsautomatically selected, all depending on if the note is higher or lower than the"Fret Zone".
A "Fret Zone" = All the notes that are inside the String-algorithm (the redrectangle) when a Fret is selected (five frets/half-steps).
In the example below, the 5th Fret Position is selected.
So playing a note outside the current “Fret Zone”, will move to a new Fret andhereby also move the “Fret Zone”.
If you want to override the Automatic Fret selection, you can still select theFret with the Key Switches.
Go to Index: 2 10
1.
2.
1.
3.
4.
5.
6. x x x x x
x x x x x
x x x x x
x x x x
x x x x x
x x x x x (x) (x) (x) (x) (x) (x)
(x) (x) (x) (x)
5. Fret
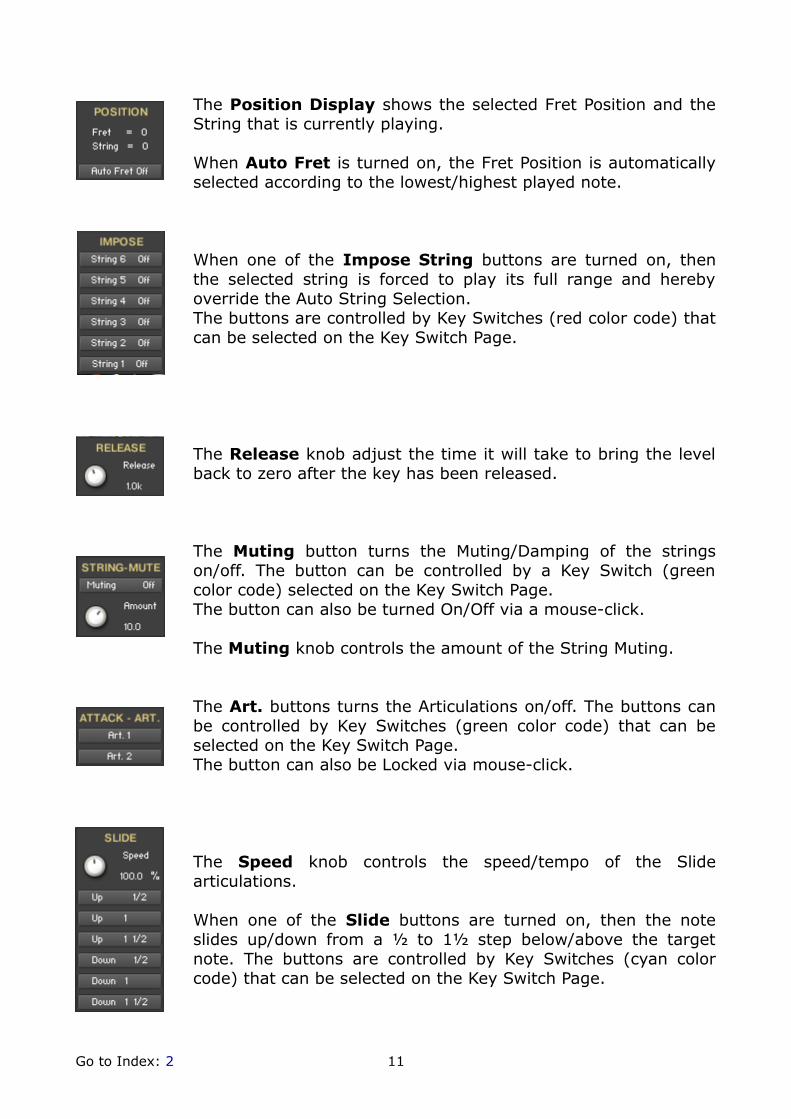
The Position Display shows the selected Fret Position and theString that is currently playing.
When Auto Fret is turned on, the Fret Position is automaticallyselected according to the lowest/highest played note.
When one of the Impose String buttons are turned on, thenthe selected string is forced to play its full range and herebyoverride the Auto String Selection.The buttons are controlled by Key Switches (red color code) thatcan be selected on the Key Switch Page.
The Release knob adjust the time it will take to bring the levelback to zero after the key has been released.
The Muting button turns the Muting/Damping of the stringson/off. The button can be controlled by a Key Switch (greencolor code) selected on the Key Switch Page.The button can also be turned On/Off via a mouse-click.
The Muting knob controls the amount of the String Muting.
The Art. buttons turns the Articulations on/off. The buttons canbe controlled by Key Switches (green color code) that can beselected on the Key Switch Page.The button can also be Locked via mouse-click.
The Speed knob controls the speed/tempo of the Slidearticulations.
When one of the Slide buttons are turned on, then the noteslides up/down from a ½ to 1½ step below/above the targetnote. The buttons are controlled by Key Switches (cyan colorcode) that can be selected on the Key Switch Page.
Go to Index: 2 11

The Pickup/Mic. Page:
On the Pickup/Microphone Page you can turn the Neck and Bridge Pickups and the Microphone samples On/Off and control their Volume and Tone.
Each of the three pickup/mic types has its own independent Equalizer, that youcan open and then adjust as you like.
The Neck and Bridge Pickups can both be Phase Inverted. This will give you all the possible Phase Inverted combinations between the three pickup/mic types.
The NECK button turns the Neck Pickup samples On/Off.
The Neck Phase Invert button shifts the phase of the Neck Pickup samples.
The Neck Volume knob adjusts the Volume of the Neck Pickup samples.
The Neck Tone knob adjusts the Tone (LP Filter) of the Neck Pickup samples.
The Edit Neck EQ button Opens/Closes the Equalizer for the Neck Pickup samples.
Go to Index: 2 12

The BRIDGE button turns the Bridge Pickup samples On/Off.
The Bridge Phase Invert button shifts the phase of the Bridge Pickup samples.
The Bridge Volume knob adjusts the Volume of the Bridge Pickup samples.
The Bridge Tone knob adjusts the Tone (LP Filter) of the Bridge Pickup samples.
The Edit Bridge EQ button Opens/Closes the Equalizer for the Bridge Pickup samples.
The MIC. button turns the Microphone samples On/Off.
The Mic. Volume knob adjusts the Volume of the Microphone samples.
The Mic. Tone knob adjusts the Tone (LP Filter) of the Microphone samples.
The Edit Mic. EQ button Opens/Closes the Equalizer for the Microphone samples.
The EQ On/Off button turns the EQ On/Off.
When the EQ is turned On, then the Tone (LP Filter) is turned Off.
The Freq. knob chooses the frequency at which boosting or cutting will appear.
The Bandw. knob sets the width of the frequency band in octaves to boost orcut.
The Gain knob controls the amount of boost at positive values, or the amountof cut at negative values.
Go to Index: 2 13
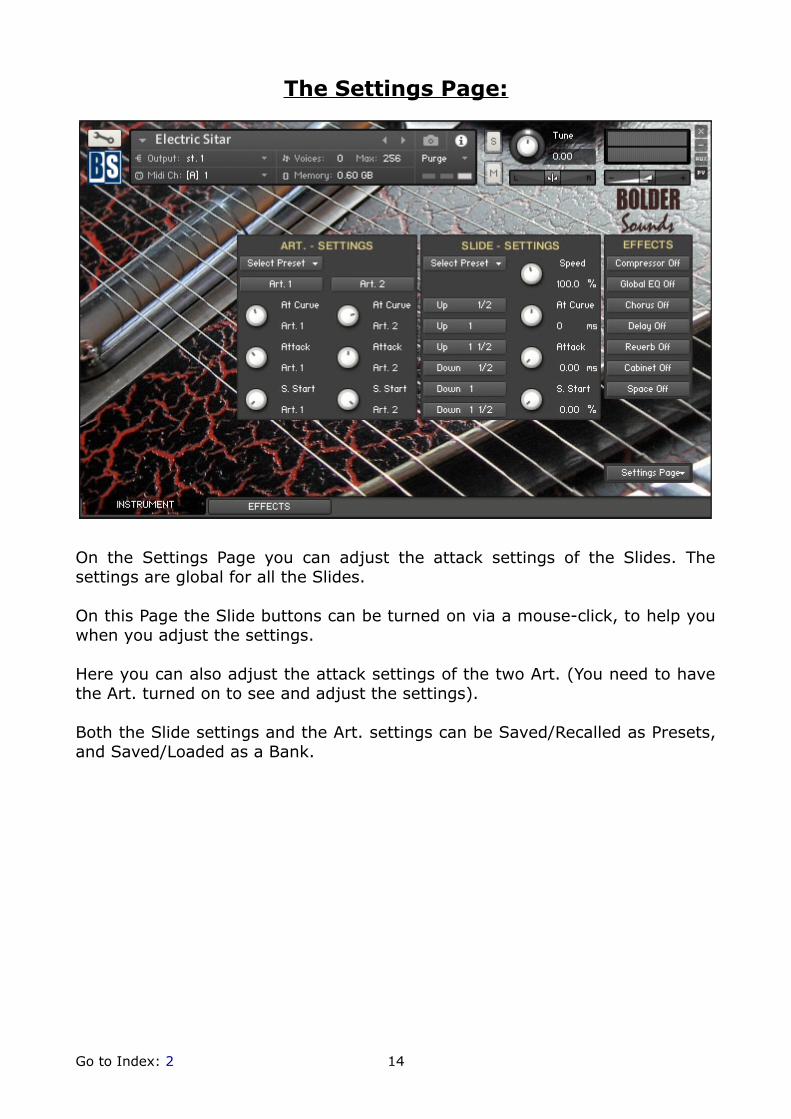
The Settings Page:
On the Settings Page you can adjust the attack settings of the Slides. Thesettings are global for all the Slides.
On this Page the Slide buttons can be turned on via a mouse-click, to help youwhen you adjust the settings.
Here you can also adjust the attack settings of the two Art. (You need to havethe Art. turned on to see and adjust the settings).
Both the Slide settings and the Art. settings can be Saved/Recalled as Presets,and Saved/Loaded as a Bank.
Go to Index: 2 14

The At. Curve knob adjusts the curve shape of theattack phase. A value of zero results in a linearcurve, negative values make the shape moreconcave, and positive values make it more convex.
The Attack knob adjusts the initial time it will takethe envelope to reach its maximum level after it hasbeen triggered.
The Sample Start knob adjusts the start point ofthe samples.
The Speed knob controls the speed/tempo of theSlide articulations.
The At. Curve knob adjusts the curve shape of theattack phase. A value of zero results in a linearcurve, negative values make the shape moreconcave, and positive values make it more convex.
The Attack knob adjusts the initial time it will takethe envelope to reach its maximum level after it hasbeen triggered.
The Sample Start knob adjust the start point of thesamples.
Go to Index: 2 15

The P.B./Vibrato Page
On the P.B./Vibrato Page you select and adjust all the various Pitch Bend andVibrato settings.
The Pitch Bend range is set manually, and can be set independently for Up andDown Bend.
Moving the Pitch Wheel will only bend the last playing note.
The Pitch Bend can also have a scripted P.B. Vibrato added, when the PitchWheel is moved up or down and reaches its maximum.
The P.B. Vibrato can select between seven different waveforms.
The Vibrato can either work as a Global Vibrato or only add Vibrato to the lastplayed, and still held, note.
You can freely choose a CC# to control the Vibrato Amount, and set the Rangeof the controlled Vibrato Amount.
The Global Vibrato can select between two different waveforms.
The Last Note Vibrato can select between seven different waveforms.
Go to Index: 2 16

When the Link button is On, the PB Up and PB Down knobs arelinked, and they behave like one knob.
The PB Up knob controls how many semitones which will bebent, when the Pitch Wheel is moved upward. The knob isbipolar (+-), CTRL/Command + Click sets the knob to zero.
The PB Down knob controls how many semitones which will bebent, when the Pitch Wheel is moved downward. The knob isbipolar (+-), CTRL/Command + Click sets the knob to zero.
If the Pitch Bend Vibrato is turned on, a scripted LFO vibratowill be added, to only the last played note, when the Pitch Bendreaches its maximum.
The P.B. Vibrato Fade In knob controls the fade in time for thescripted LFO Vibrato that is added to the last played note, whenthe Pitch Bend reaches its maximum.
The Pitch Bend Amount knob controls the amount of thescripted LFO Vibrato that is added to the last played note, whenthe Pitch Bend reaches its maximum.
The P.B. Vibrato Freq knob controls the speed of the scriptedLFO Vibrato that is added to the last played note, when the PitchBend reaches its maximum.
With the P.B. Waveform Menu you can select between thedifferent waveforms that will control the P.B. Vibrato.
With the Vibrato Menu you can select between a Global Vibratothat is added to all ringing notes, or a Last Held Note Vibratothat is added to the last played, and still held, note.
The Vibrato CC Control knob selects the CC# that willmodulate the Vibrato Amount.
The CC# Range knob controls the LFO Vibrato Amount range,when you move the selected CC# controller.
The Vibrato Freq knob controls the speed of the Vibrato.
With the Vibrato Waveform Menu you can select between thedifferent waveforms that will control the Vibrato.
Go to Index: 2 17

The Key Switch Page:
On the Key Switch Page, you can freely assign which key that will trigger the various Key Switches.
Each Key Switch group has its own display, that shows the selected keys for the KS, and also has its own key color coding.
All the Key Switches work in Touch Mode.
To assign a Key Switch, do this:
1. Activate the Learn button.
2. Then play the Key that you would like to be the Key-Switch for thePreset. You can either play your connected MIDI keyboard, or click onthe virtual keyboard in KONTAKT.
The Display now shows the new note name of the Key-Switch, and the colorcode on the virtual keyboard updates to the selected key.
Go to Index: 2 18

The Effects Panel
The Effect Panel has seven different Pages. Here you select and edit all thevarious Effect parameters. You can also Save/Recall up to six Presets for eachEffect, and Save/Load the Presets as Banks.
The Effects On/Off and the Pages:
The seven Effect buttons turn the variousEffects On and Off, and opens thecorresponding Page when the Effect getsturned On.
You can also navigate between the differentEffect Pages, using the Page Menu.
Go to Index: 2 19
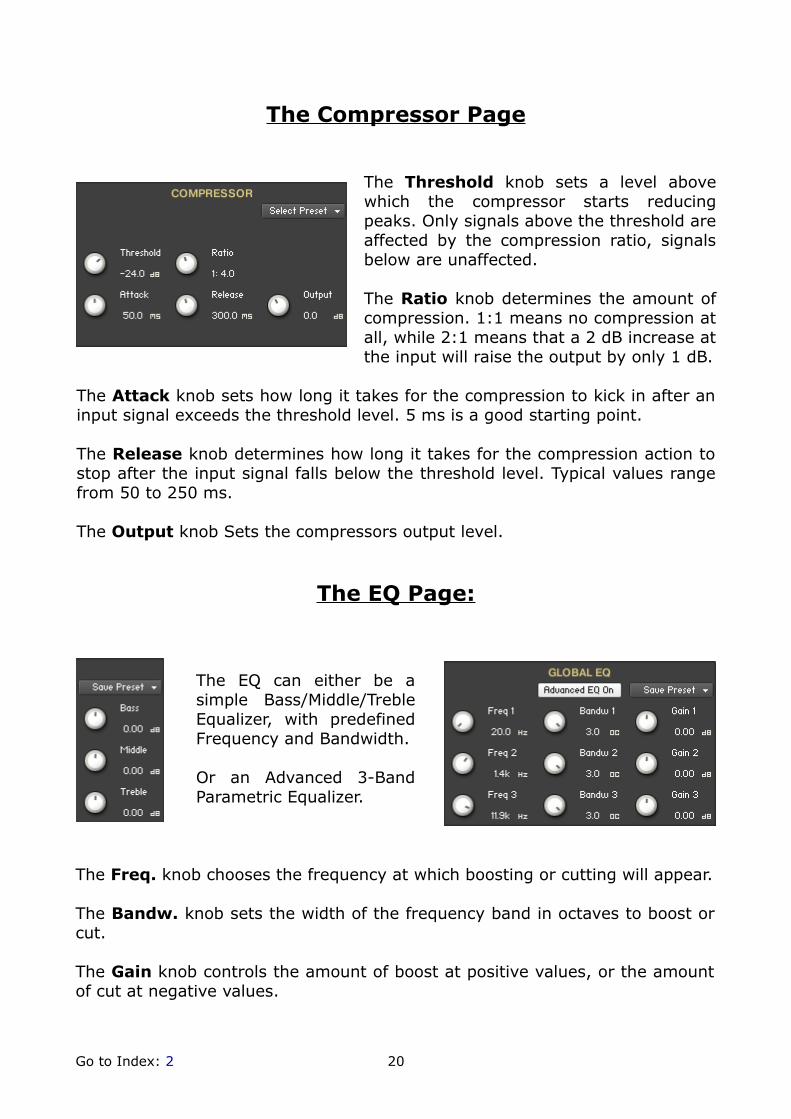
The Compressor Page
The Threshold knob sets a level abovewhich the compressor starts reducingpeaks. Only signals above the threshold areaffected by the compression ratio, signalsbelow are unaffected.
The Ratio knob determines the amount ofcompression. 1:1 means no compression atall, while 2:1 means that a 2 dB increase atthe input will raise the output by only 1 dB.
The Attack knob sets how long it takes for the compression to kick in after aninput signal exceeds the threshold level. 5 ms is a good starting point.
The Release knob determines how long it takes for the compression action tostop after the input signal falls below the threshold level. Typical values rangefrom 50 to 250 ms.
The Output knob Sets the compressors output level.
The EQ Page:
The EQ can either be asimple Bass/Middle/TrebleEqualizer, with predefinedFrequency and Bandwidth.
Or an Advanced 3-BandParametric Equalizer.
The Freq. knob chooses the frequency at which boosting or cutting will appear.
The Bandw. knob sets the width of the frequency band in octaves to boost orcut.
The Gain knob controls the amount of boost at positive values, or the amountof cut at negative values.
Go to Index: 2 20

The Modulation Page:
On the Modulation Page, you can choose between threedifferent modulation types.
Chorus:
The Depth knob sets the amount of LFOmodulation applied to a signal. Higheramounts result in a stronger effect.
The Speed knob sets the speed of theLFO modulating the signal.
The Phase knob adjusts the phasedifference between the two LFOs thatdrive the left and right stereo channels.
The Amount knob sets the amount of processed signal sent to the mainoutput.
Flanger:
The Depth knob sets the amount of LFOmodulation applied to a signal. Higheramounts result in a stronger effect.
The Speed knob sets the speed of the LFOmodulating the signal.
The Phase knob adjusts the phasedifference between the two LFOs that drivethe left and right stereo channels.
The Color knob adjusts the range of the flanging effect. Lower values sweepthe effect toward the higher end of the flanging range, while larger valuessweep the effect toward the lower end.
The Feedback knob routes the processed signal back to the Module's input.Higher values create a sharper, more intense effect.
Go to Index: 2 21

Phaser:
The Depth knob sets the amount of LFOmodulation applied to a signal. Higheramounts result in a stronger effect.
The Speed knob sets the speed of the LFOmodulating the signal.
The Phase knob adjusts the phasedifference between the two LFOs that drivethe left and right stereo channels.
The Feedback knob routes the processed signal back to the Module's input.Higher values create a sharper, more intense effect.
The Delay Page:
The Feedback knob sends a portion ofthe output back into the input of thedelay line, which creates repeatingechoes. A value of 0 produces only oneecho, higher values give multiple echoes.
The Damping knob reduces highfrequencies in the delayed signal. Withfeedback applied, each successive echohas a progressively lower high-frequencyresponse.
The Time knob sets the interval of the delay, in either milliseconds orrhythmical values synchronized to external MIDI Clock, depending on the Syncbutton state.
The Pan knob - setting a value higher than 0 results in a panning effect whereeach consecutive echo alternates between the left and right channel. Thehigher the value, the greater the stereo spread.
The Amount knob sets the amount of processed signal sent to the mainoutput.
If the Sync button is turned on, the Delay is synchronized to an external MIDIClock.
Go to Index: 2 22

The Reverb Page:
The Predelay knob introduces a shortamount of delay before the reverb takeseffect. Increase this parameter tosimulate larger rooms, decrease it forsmaller rooms.
The Color knob determines the type ofmaterial used to construct the room.Lower values are softer surfaces, highervalues are harder surfaces.
The Size knob determines the room size by setting the length of the effect.Higher values simulate larger rooms, lower values smaller rooms.
The Stereo knob - higher values increase the stereo effect. Use lower valuesto simulate sitting closer to the stage, and higher values for sitting furtherback in the hall.
The Damping knob sets the amount of absorption in the room. Higher valuessimulate more absorption.
The Amount knob sets the amount of processed signal sent to the mainoutput.
The Cabinet Page:
With the Cabinet Menuyou can choose betweenthe different cabinetsimulations.
The Size knob adjusts thesize of the simulatedcabinet. Larger cabinetstend to have a morepronounced bass response,
while smaller cabinets sounds thin and tinny.
The Air knob controls the level of the early reflections in the room response,adding a sense of space to the sound.
The Treble knob boots or cuts the level of the higher frequencies.
The Bass knob boots or cuts the level of the lower frequencies.
The Output knob sets the cabinets output level.
Go to Index: 2 23

The Space Page:
With the Select Space Menu, you canchoose between eighteen different ImpulseResponses, that can be loaded into theconvolution plugin.
The eighteen Impulses are divided into sixdifferent categories.
With the Space Size Menu, you can choose between fivedifferent sizes of the selected Impulse Response.
The Pre Delay knob determines the room size by setting thelength of the effect. Higher values simulate larger rooms, lowervalues smaller rooms.
The High Pass knob attenuates frequencies below the chosen cutofffrequency.
The Low Pass knob attenuates frequencies above the chosen cutoff frequency.
The Amount knob sets the amount of processed signal sent to the mainoutput.
Go to Index: 2 24

==============================================
Script, Patch and Presets by Bo Clausen.
Enjoy the Electric Sitar!
Dennis Burns - Bolder Sounds – March 2015
==============================================
Customer Support
For any questions, technical issues inquiries etc .... Please contact BolderSounds via email at [email protected].
==============================================
LICENSE AGREEMENT (EULA)
You have purchased a single-user license use these samples to be used in anytype of music production, i.e. making demos, records, remixes, commercials,jingles, post productions, commissioned pieces, sound tracks for film, theater,musicals, live performances, computer games or multimedia. Samples may notbe utilized or resold in the form of Sample Library Music or Sample-relatedendeavors (e.g. “Joe’s Sample Collection” which contains our products).Written permission from Bolder Sounds is required. You CAN NOT trade, re-sell,lend, rent, copy, duplicate, upload or download to any database, BBS, orServer any of our sounds because Bolder Sounds owns the rights to thesamples and programs, Bolder is licensing these to a single user for musicproduction. Use of these samples MAY NOT be utilized in separate commercialapplications such as the Apple ipad or the Android etc.. without written consentfrom Bolder Sounds.
Installation of this library constitutes full acceptance of these terms.
Creative Sample Libraries Since 1992
Go to Index: 2 25


