Preparing for CWM Installation - Cisco · Chapter 2 Preparing for CWM Installation CWM Server...
30
CHAPTER 2-1 Cisco WAN Manager Installation Guide Release 15.1, Part Number OL-6259-01, Rev. A0, January 25, 2005 2 Preparing for CWM Installation This chapter describes items that should be checked and/or taken care of before Cisco WAN Manager (CWM) can be installed. This chapter contains the following sections: Section Description CWM Server Prerequisite Checklist Provides details about how to gather the information you will require during the installation of the software. CWM Server Workstation Requirements Lists minimum workstation requirements to install and achieve the desired performance. CWM Standalone Statistics Manager and Collector Requirements Lists all the software required on a workstation to run Release 15.1 Standalone Statistics Manager and Standalone Statistics Collector. CWM Client System Requirements Lists the hardware and software requirements to install and operate the CWM Client. Solaris Operating System 8 Installation Lists pre-installation tasks and describes the installation process up to the disk partitioning process. Disk Partitioning Describes how to partition the disks for a CWM operation. Installing Solaris on Newly Partitioned Disks Describes the Solaris installation process after the disks have been partitioned. Solaris Operating System 9 Installation Lists pre-installation tasks and describes the installation process up to the disk partitioning process. Disk Partitioning Describes how to partition the disks for a CWM operation. Installing Solaris on Newly Partitioned Disks Describes the Solaris installation process after the disks have been partitioned. Installing Solaris patches Identifies Solaris patch requirements and how to install them. HP OpenView 6.2 (or later) Installation Provides installation and setup procedures. HP OpenView is optional. If used, it is used for viewing the Event Log. It is not required for CWM. Netscape Communicator 4.7 Installation Provides installation and setup procedures. Netscape Communicator 4.7 is required for CWM Server on-line help.
Transcript of Preparing for CWM Installation - Cisco · Chapter 2 Preparing for CWM Installation CWM Server...
C H A P T E R
2-1Cisco WAN Manager Installation Guide
Release 15.1, Part Number OL-6259-01, Rev. A0, January 25, 2005
2Preparing for CWM Installation
This chapter describes items that should be checked and/or taken care of before Cisco WAN Manager (CWM) can be installed.
This chapter contains the following sections:
Section Description
CWM Server Prerequisite Checklist
Provides details about how to gather the information you will require during the installation of the software.
CWM Server Workstation Requirements
Lists minimum workstation requirements to install and achieve the desired performance.
CWM Standalone Statistics Manager and Collector Requirements
Lists all the software required on a workstation to run Release 15.1 Standalone Statistics Manager and Standalone Statistics Collector.
CWM Client System Requirements
Lists the hardware and software requirements to install and operate the CWM Client.
Solaris Operating System 8 Installation
Lists pre-installation tasks and describes the installation process up to the disk partitioning process.
Disk Partitioning Describes how to partition the disks for a CWM operation.
Installing Solaris on Newly Partitioned Disks
Describes the Solaris installation process after the disks have been partitioned.
Solaris Operating System 9 Installation
Lists pre-installation tasks and describes the installation process up to the disk partitioning process.
Disk Partitioning Describes how to partition the disks for a CWM operation.
Installing Solaris on Newly Partitioned Disks
Describes the Solaris installation process after the disks have been partitioned.
Installing Solaris patches Identifies Solaris patch requirements and how to install them.
HP OpenView 6.2 (or later) Installation
Provides installation and setup procedures. HP OpenView is optional. If used, it is used for viewing the Event Log. It is not required for CWM.
Netscape Communicator 4.7 Installation
Provides installation and setup procedures. Netscape Communicator 4.7 is required for CWM Server on-line help.
2-2Cisco WAN Manager Installation Guide
Release 15.1, Part Number OL-6259-01, Rev. A0, January 25, 2005
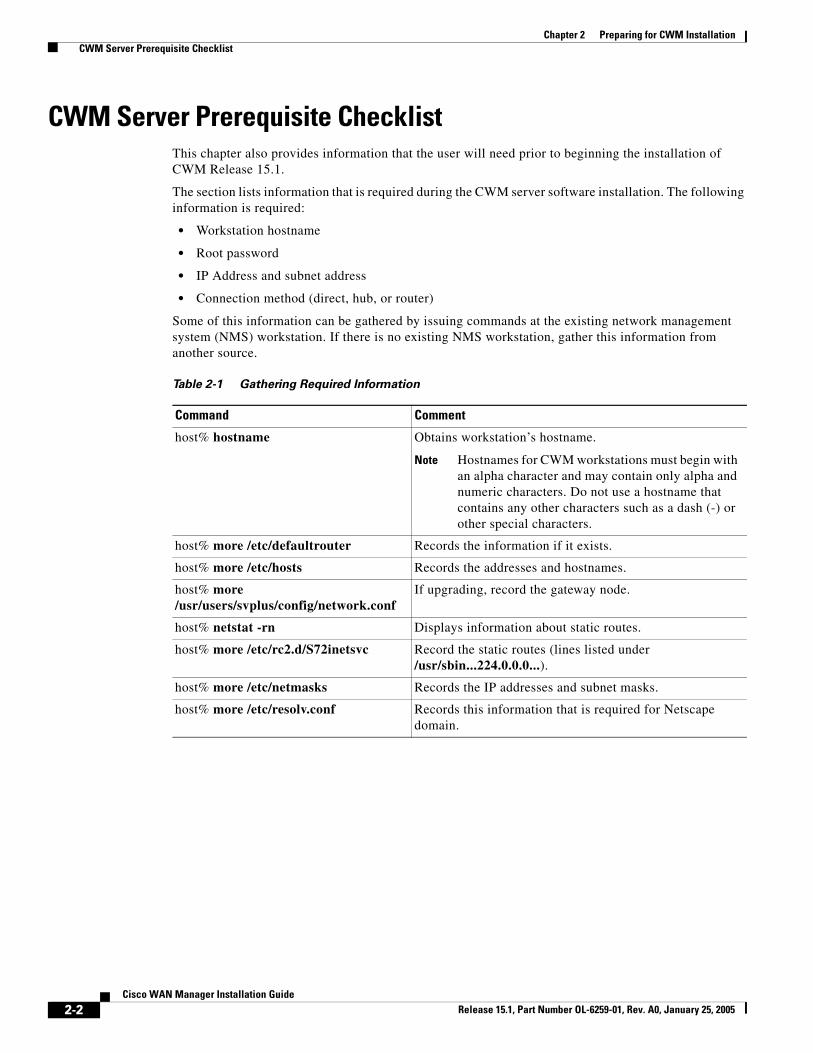
Chapter 2 Preparing for CWM Installation CWM Server Prerequisite Checklist
CWM Server Prerequisite ChecklistThis chapter also provides information that the user will need prior to beginning the installation of CWM Release 15.1.
The section lists information that is required during the CWM server software installation. The following information is required:
• Workstation hostname
• Root password
• IP Address and subnet address
• Connection method (direct, hub, or router)
Some of this information can be gathered by issuing commands at the existing network management system (NMS) workstation. If there is no existing NMS workstation, gather this information from another source.
Table 2-1 Gathering Required Information
Command Comment
host% hostname Obtains workstation’s hostname.
Note Hostnames for CWM workstations must begin with an alpha character and may contain only alpha and numeric characters. Do not use a hostname that contains any other characters such as a dash (-) or other special characters.
host% more /etc/defaultrouter Records the information if it exists.
host% more /etc/hosts Records the addresses and hostnames.
host% more /usr/users/svplus/config/network.conf
If upgrading, record the gateway node.
host% netstat -rn Displays information about static routes.
host% more /etc/rc2.d/S72inetsvc Record the static routes (lines listed under /usr/sbin...224.0.0.0...).
host% more /etc/netmasks Records the IP addresses and subnet masks.
host% more /etc/resolv.conf Records this information that is required for Netscape domain.
2-3Cisco WAN Manager Installation Guide
Release 15.1, Part Number OL-6259-01, Rev. A0, January 25, 2005
Chapter 2 Preparing for CWM Installation CWM Server Workstation Requirements
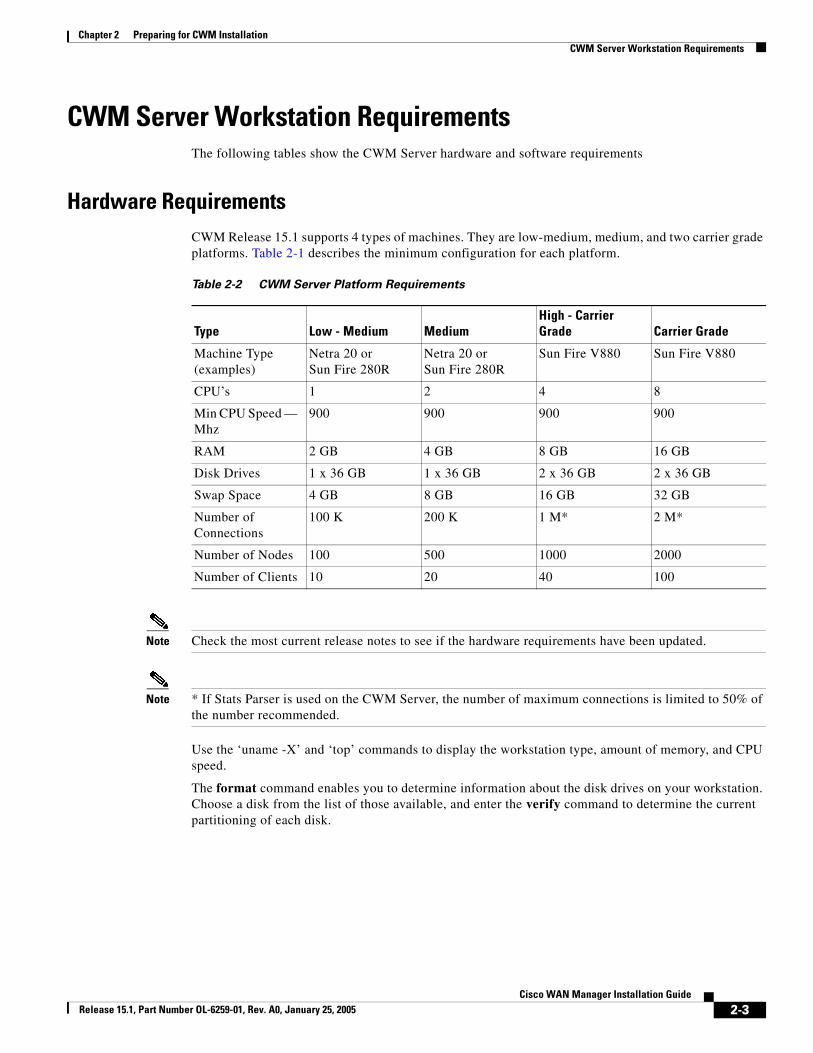
CWM Server Workstation RequirementsThe following tables show the CWM Server hardware and software requirements
Hardware RequirementsCWM Release 15.1 supports 4 types of machines. They are low-medium, medium, and two carrier grade platforms. Table 2-1 describes the minimum configuration for each platform.
Note Check the most current release notes to see if the hardware requirements have been updated.
Note * If Stats Parser is used on the CWM Server, the number of maximum connections is limited to 50% of the number recommended.
Use the ‘uname -X’ and ‘top’ commands to display the workstation type, amount of memory, and CPU speed.
The format command enables you to determine information about the disk drives on your workstation. Choose a disk from the list of those available, and enter the verify command to determine the current partitioning of each disk.
Table 2-2 CWM Server Platform Requirements
Type Low - Medium MediumHigh - Carrier Grade Carrier Grade
Machine Type(examples)
Netra 20 or Sun Fire 280R
Netra 20 or Sun Fire 280R
Sun Fire V880 Sun Fire V880
CPU’s 1 2 4 8
Min CPU Speed — Mhz
900 900 900 900
RAM 2 GB 4 GB 8 GB 16 GB
Disk Drives 1 x 36 GB 1 x 36 GB 2 x 36 GB 2 x 36 GB
Swap Space 4 GB 8 GB 16 GB 32 GB
Number of Connections
100 K 200 K 1 M* 2 M*
Number of Nodes 100 500 1000 2000
Number of Clients 10 20 40 100
2-4Cisco WAN Manager Installation Guide
Release 15.1, Part Number OL-6259-01, Rev. A0, January 25, 2005
Chapter 2 Preparing for CWM Installation CWM Server Workstation Requirements
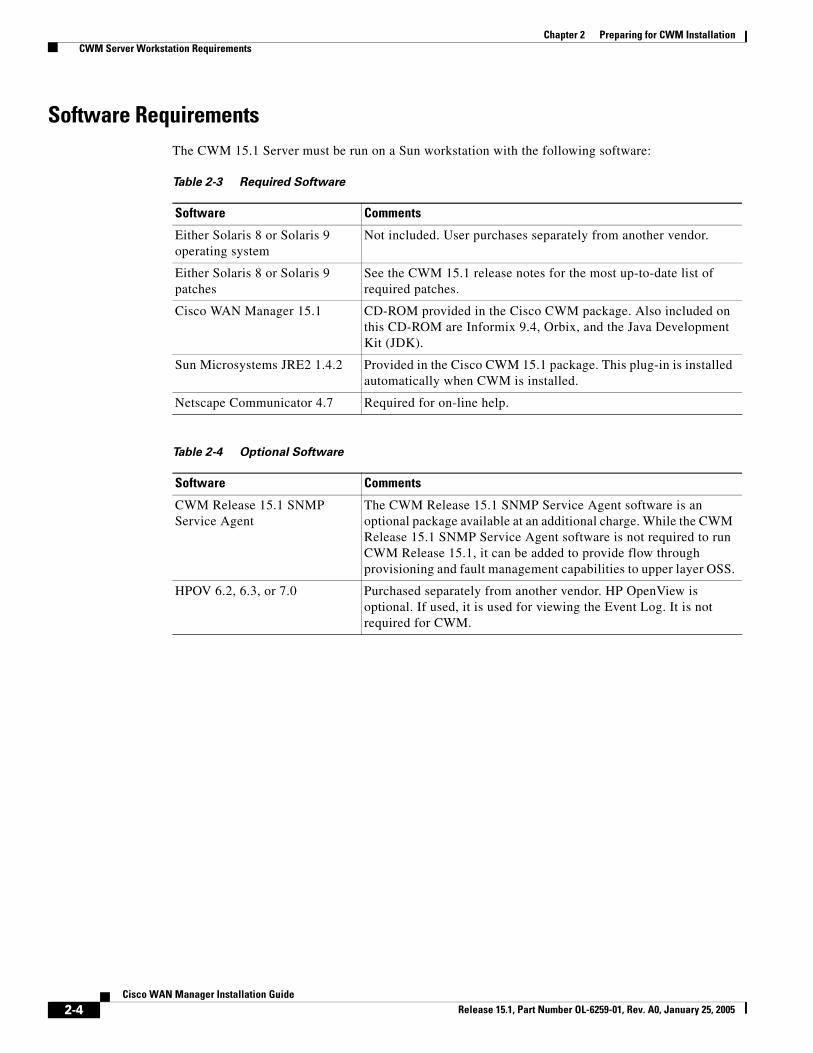
Software RequirementsThe CWM 15.1 Server must be run on a Sun workstation with the following software:
Table 2-3 Required Software
Software Comments
Either Solaris 8 or Solaris 9 operating system
Not included. User purchases separately from another vendor.
Either Solaris 8 or Solaris 9 patches
See the CWM 15.1 release notes for the most up-to-date list of required patches.
Cisco WAN Manager 15.1 CD-ROM provided in the Cisco CWM package. Also included on this CD-ROM are Informix 9.4, Orbix, and the Java Development Kit (JDK).
Sun Microsystems JRE2 1.4.2 Provided in the Cisco CWM 15.1 package. This plug-in is installed automatically when CWM is installed.
Netscape Communicator 4.7 Required for on-line help.
Table 2-4 Optional Software
Software Comments
CWM Release 15.1 SNMP Service Agent
The CWM Release 15.1 SNMP Service Agent software is an optional package available at an additional charge. While the CWM Release 15.1 SNMP Service Agent software is not required to run CWM Release 15.1, it can be added to provide flow through provisioning and fault management capabilities to upper layer OSS.
HPOV 6.2, 6.3, or 7.0 Purchased separately from another vendor. HP OpenView is optional. If used, it is used for viewing the Event Log. It is not required for CWM.
2-5Cisco WAN Manager Installation Guide
Release 15.1, Part Number OL-6259-01, Rev. A0, January 25, 2005
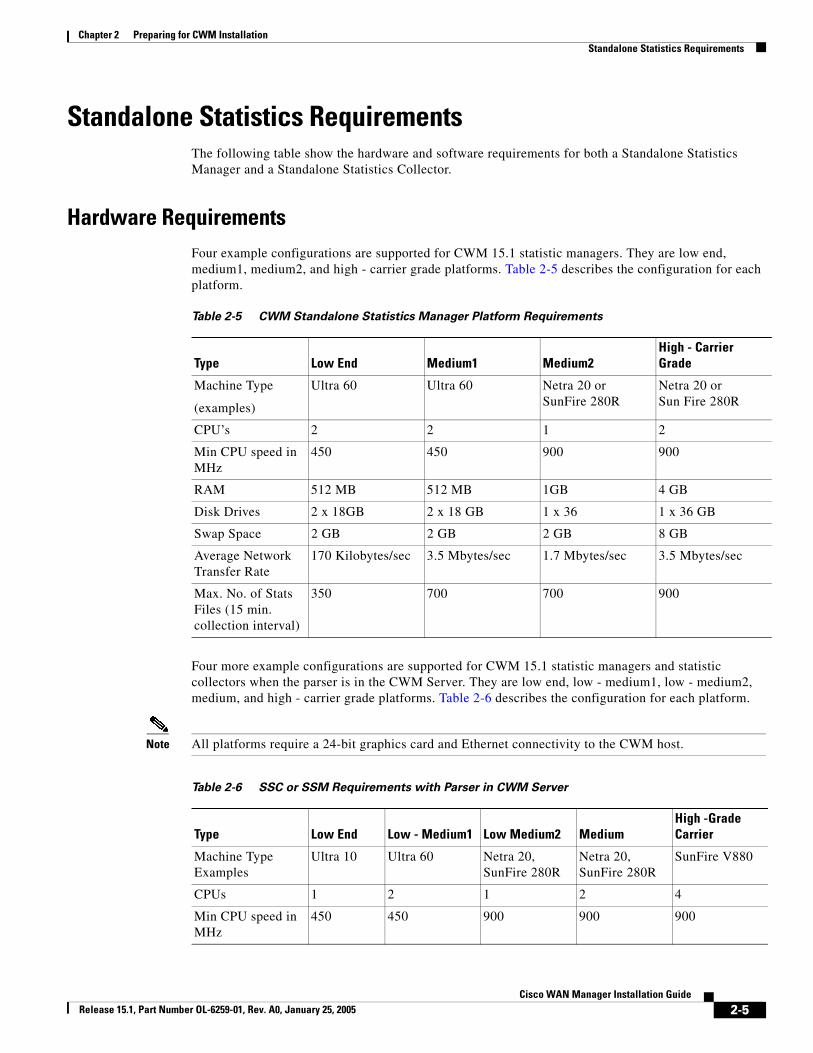
Chapter 2 Preparing for CWM Installation Standalone Statistics Requirements
Standalone Statistics RequirementsThe following table show the hardware and software requirements for both a Standalone Statistics Manager and a Standalone Statistics Collector.
Hardware RequirementsFour example configurations are supported for CWM 15.1 statistic managers. They are low end, medium1, medium2, and high - carrier grade platforms. Table 2-5 describes the configuration for each platform.
Four more example configurations are supported for CWM 15.1 statistic managers and statistic collectors when the parser is in the CWM Server. They are low end, low - medium1, low - medium2, medium, and high - carrier grade platforms. Table 2-6 describes the configuration for each platform.
Note All platforms require a 24-bit graphics card and Ethernet connectivity to the CWM host.
Table 2-5 CWM Standalone Statistics Manager Platform Requirements
Type Low End Medium1 Medium2High - Carrier Grade
Machine Type
(examples)
Ultra 60 Ultra 60 Netra 20 or SunFire 280R
Netra 20 or Sun Fire 280R
CPU’s 2 2 1 2
Min CPU speed in MHz
450 450 900 900
RAM 512 MB 512 MB 1GB 4 GB
Disk Drives 2 x 18GB 2 x 18 GB 1 x 36 1 x 36 GB
Swap Space 2 GB 2 GB 2 GB 8 GB
Average Network Transfer Rate
170 Kilobytes/sec 3.5 Mbytes/sec 1.7 Mbytes/sec 3.5 Mbytes/sec
Max. No. of Stats Files (15 min. collection interval)
350 700 700 900
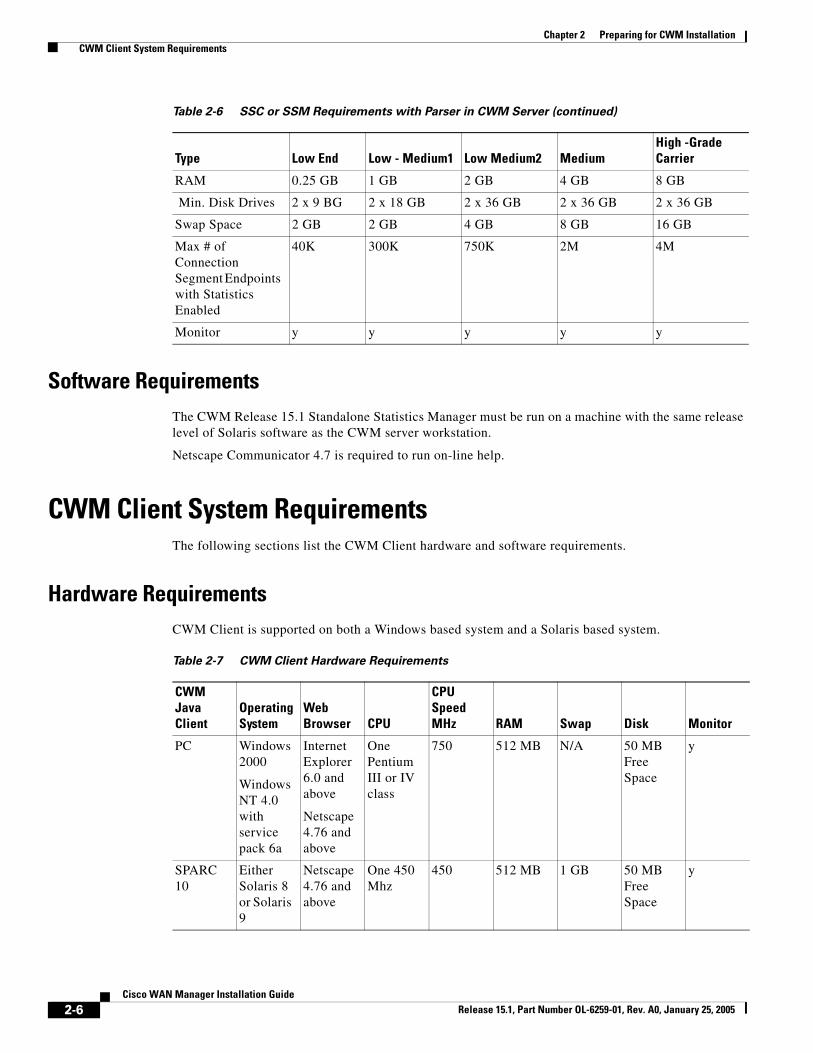
Table 2-6 SSC or SSM Requirements with Parser in CWM Server
Type Low End Low - Medium1 Low Medium2 MediumHigh -Grade Carrier
Machine Type Examples
Ultra 10 Ultra 60 Netra 20, SunFire 280R
Netra 20, SunFire 280R
SunFire V880
CPUs 1 2 1 2 4
Min CPU speed in MHz
450 450 900 900 900
2-6Cisco WAN Manager Installation Guide
Release 15.1, Part Number OL-6259-01, Rev. A0, January 25, 2005
Chapter 2 Preparing for CWM Installation CWM Client System Requirements
Software RequirementsThe CWM Release 15.1 Standalone Statistics Manager must be run on a machine with the same release level of Solaris software as the CWM server workstation.
Netscape Communicator 4.7 is required to run on-line help.
CWM Client System RequirementsThe following sections list the CWM Client hardware and software requirements.
Hardware RequirementsCWM Client is supported on both a Windows based system and a Solaris based system.
RAM 0.25 GB 1 GB 2 GB 4 GB 8 GB
Min. Disk Drives 2 x 9 BG 2 x 18 GB 2 x 36 GB 2 x 36 GB 2 x 36 GB
Swap Space 2 GB 2 GB 4 GB 8 GB 16 GB
Max # of Connection Segment Endpoints with Statistics Enabled
40K 300K 750K 2M 4M
Monitor y y y y y
Table 2-6 SSC or SSM Requirements with Parser in CWM Server (continued)
Type Low End Low - Medium1 Low Medium2 MediumHigh -Grade Carrier
Table 2-7 CWM Client Hardware Requirements
CWM Java Client
Operating System
Web Browser CPU
CPU Speed MHz RAM Swap Disk Monitor
PC Windows 2000
Windows NT 4.0 with service pack 6a
Internet Explorer 6.0 and above
Netscape 4.76 and above
One Pentium III or IV class
750 512 MB N/A 50 MB Free Space
y
SPARC 10
Either Solaris 8 or Solaris 9
Netscape 4.76 and above
One 450 Mhz
450 512 MB 1 GB 50 MB Free Space
y
2-7Cisco WAN Manager Installation Guide
Release 15.1, Part Number OL-6259-01, Rev. A0, January 25, 2005
Chapter 2 Preparing for CWM Installation Solaris Operating System 8 Installation
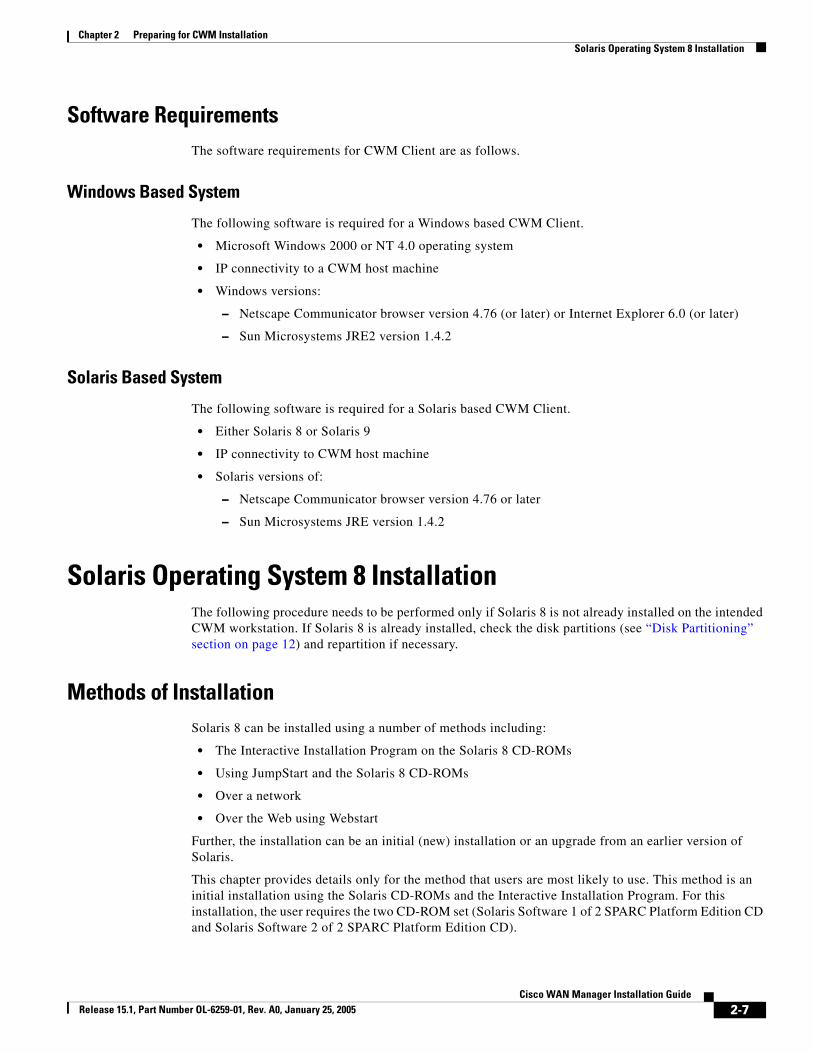
Software RequirementsThe software requirements for CWM Client are as follows.
Windows Based System
The following software is required for a Windows based CWM Client.
• Microsoft Windows 2000 or NT 4.0 operating system
• IP connectivity to a CWM host machine
• Windows versions:
– Netscape Communicator browser version 4.76 (or later) or Internet Explorer 6.0 (or later)
– Sun Microsystems JRE2 version 1.4.2
Solaris Based System
The following software is required for a Solaris based CWM Client.
• Either Solaris 8 or Solaris 9
• IP connectivity to CWM host machine
• Solaris versions of:
– Netscape Communicator browser version 4.76 or later
– Sun Microsystems JRE version 1.4.2
Solaris Operating System 8 Installation The following procedure needs to be performed only if Solaris 8 is not already installed on the intended CWM workstation. If Solaris 8 is already installed, check the disk partitions (see “Disk Partitioning” section on page 12) and repartition if necessary.
Methods of InstallationSolaris 8 can be installed using a number of methods including:
• The Interactive Installation Program on the Solaris 8 CD-ROMs
• Using JumpStart and the Solaris 8 CD-ROMs
• Over a network
• Over the Web using Webstart
Further, the installation can be an initial (new) installation or an upgrade from an earlier version of Solaris.
This chapter provides details only for the method that users are most likely to use. This method is an initial installation using the Solaris CD-ROMs and the Interactive Installation Program. For this installation, the user requires the two CD-ROM set (Solaris Software 1 of 2 SPARC Platform Edition CD and Solaris Software 2 of 2 SPARC Platform Edition CD).
2-8Cisco WAN Manager Installation Guide
Release 15.1, Part Number OL-6259-01, Rev. A0, January 25, 2005
Chapter 2 Preparing for CWM Installation Solaris Operating System 8 Installation
Cisco strongly recommends that the procedure described in this chapter be used to install Solaris 8. However, if the user’s circumstances are such that a different installation method is more suitable, please refer to the documentation you received from Sun Microsystems for Solaris 8 installation instructions (Solaris 8 (SPARC Platform Edition) Installation Guide, part number 806-0955-xx and Solaris 8 Advanced Installation Guide, part number 806-0957-xx).
Note Users who have CWM Servers and Clients running under Solaris 7 (also known as Solaris 2.7) cannot merely upgrade from Solaris 7 to Solaris 8 and expect the CWM system to run. CWM for Solaris 7 and CWM for Solaris 8 are two different releases. Moving from Solaris 7 to Solaris 8 always involves installing Solaris 8 and then installing the Solaris 8 version of the CWM software.
Warning The Solaris installation procedure that follows will destroy any existing files on the workstation’s disks.If you have an existing CWM databases and configuration files or files from another application that must be preserved, STOP NOW!
To preserve data files on the disk, first save the files either to an NFS mounted directory, to an external media (such as a tape) or FTP them to another machine. After the installation has been completed, the files can be restored. Details for saving and restoring CWM files are provided in Chapter 4.
Preparing to Install Solaris 8If the Solaris 8 operating system needs to be installed, the starting point is always to have:
• The Solaris Software 1 of 2 SPARC Platform Edition CD-ROM is in the CD drive.
• The Sun Workstation ok prompt is displayed on the screen.
How the user gets to this starting point depends upon the workstation type onto which Solaris 8 is being installed. The procedure for installing Solaris 8 on a regular workstation is different from that on a so-called “headless” workstation which is typically rack mounted and does not support a local display and keyboard.
If the workstation supports a local display and keyboard (for example an Ultra 60), the user can use the following procedure.
Step 1 Log in to the system as the root user.
Step 2 Insert the CD-ROM labeled Solaris 8 Software 1 of 2 SPARC Platform Edition into the CD-ROM drive.
Step 3 Enter the sync command to line up all the cylinders and the halt command to halt the system. As user root, type the following commands:
# sync ;sync ;halt
The system displays the ok prompt.
ok
Step 4 If Step 3 fails, as a last resort, depress the stop key and the a key simultaneously.
This will display the ok prompt.
2-9Cisco WAN Manager Installation Guide
Release 15.1, Part Number OL-6259-01, Rev. A0, January 25, 2005
Chapter 2 Preparing for CWM Installation Solaris Operating System 8 Installation
Getting Started on a Headless Workstation
If the workstation is of the headless type (for example, a Netra 20) and does not support a local display and keyboard, the user can use the following procedure.
Step 1 Connect an alphanumeric terminal (or a PC capable of emulating an alphanumeric terminal) to the primary asynchronous serial interface on the workstation (in the case of a Netra 20 this would be the serial interface). This attached terminal can now be used as a console device.
Note Alternatively, a second Sun workstation can be used as a console using a telnet connection to a terminal adapter (such as a Cisco 2500) which, in turn, is connected to the asynchronous interface of the intended CWM workstation.
Step 2 Reboot the intended CWM workstation by powering off and on again.
Step 3 Use the console to send a break signal while the boot firmware is still in control of the workstation (before any existing Solaris is launched).
Note Systems such as the Netra 20 do not recognize the stop a keystroke combination.
Installing Solaris 8When the Solaris 8 Software 1 of 2 SPARC Platform Edition CD-ROM is in the drive and the ok prompt is displayed, install Solaris 8 using the following procedure.
Step 1 Boot the system from the CD-ROM using the following command.
ok boot cdrom
The installation process for Solaris 8 consists of answering a series of questions as they are displayed on the screen.
Note The following steps apply to an installation that supports a local display and keyboard (and mouse). When using a terminal or terminal emulator as a console, the user cannot use a mouse. Use the up and down arrow keys, the Escape key, and other keys to respond to the questions. At the beginning of the installation process, the user is asked to indicate the type of terminal being used by selecting from a displayed list (for example, ASCII, DEC VT100 and so on). Make sure that your terminal, or terminal emulator, match the terminal type that you select. After that, for each question, the install program will indicate which keys to use for a response. For more details, see Sun Microsystem’s Netra and Solaris documentation.
Step 2 The Set Language and Locale dialog box is the first window to be displayed. Enter the number for your chosen Language. Press Return. Enter the number for your selected Locale. Press Return.
The Welcome window and then the Solaris Installation Program banner are displayed.
Step 3 Read the information displayed. Click Continue.
The Identify This System dialog box is displayed.
2-10Cisco WAN Manager Installation Guide
Release 15.1, Part Number OL-6259-01, Rev. A0, January 25, 2005
Chapter 2 Preparing for CWM Installation Solaris Operating System 8 Installation
Step 4 Read the information displayed. Click Continue.
The Network Connectivity dialog screen is displayed
Step 5 Read the information on the screen and Select Yes or No, (generally Yes). Click Continue.
The DHCP screen is displayed.
Step 6 Select No. Click Continue.
The Host Name dialog box is displayed.
Step 7 Enter the hostname for the CWM workstation. Click Continue.
Note Do not begin the host name with a number or use a “-” sign in the name.
The IP Address dialog box is displayed.
Step 8 Enter the IP address of the CWM workstation. Click Continue.
The Subnet screen is displayed.
Step 9 Enter Yes. Click Continue.
The Subnet mask screen is displayed.
Step 10 Enter the subnet mask (for example, 255.255.255.0), click Continue.
The Enable IPv6 screen is displayed.
Step 11 Select No. Click Continue.
The Confirm Information dialog box is displayed. This dialog box displays the network choices the user has made in the previous steps.
Step 12 Read the displayed information. If you are satisfied with the displayed information, click Continue.
If not, click Change and repeat the steps changing the information as necessary. The Confirm Information dialog box is displayed again. Click Continue if the information is correct or, if the information is not correct, click Change and repeat the process.
When Continue is clicked, the Configure Security Policy dialog box is displayed.
Step 13 Choose No, click Continue.
The Confirm Information dialog box is displayed.
Step 14 Read the displayed information. If you are satisfied with the displayed information, click Continue.
If not, click Change and change the information as necessary. The Confirm Information dialog box is displayed again. Click Continue if the information is correct or, if the information is not correct, click Change and repeat the process.
When Continue is clicked, the Name Service dialog box is displayed.
Step 15 Select None and click Continue.
The Confirm Information dialog box is displayed.
Step 16 Read the information displayed. If you are satisfied with the information displayed, click Continue.
If not, click Change and change the information as necessary. The Confirm Information dialog box is displayed again. Click Continue if the information is correct or, if not, click Change and repeat the process.
When Continue is clicked, the Time Zone dialog box is displayed.
Step 17 Read the information displayed. Choose Geographic Region. Click the Set button.
2-11Cisco WAN Manager Installation Guide
Release 15.1, Part Number OL-6259-01, Rev. A0, January 25, 2005
Chapter 2 Preparing for CWM Installation Solaris Operating System 8 Installation
The Geographic Region dialog box is displayed.
Note Alternatively, the user can select Greenwich Mean Time (GMT) offset and specify the time zone as the number of hours offset from GMT.
Step 18 If the Geographic Region was selected in the previous step, choose the appropriate Geographic Region and Time Zone. Click Continue. If GMT offset was selected, set the slider on the screen to the appropriate offset and click Continue.
The Date and Time dialog box is displayed.
Step 19 Read the displayed information, enter today’s date and the current time at the Date and Time prompt. Click Continue.
Another Confirm Information dialog box is displayed. This dialog box contains the choices you made in the previous steps.
Step 20 Carefully examine the information displayed. If you are satisfied with the information displayed, click Continue.
If you are not satisfied, click Change. The Subnets dialog box is displayed. Repeat the steps, correcting any values. Once you have reentered the corrected values, the Confirm Information dialog box is displayed, with the revised values you just entered. If you are satisfied with the information now displayed, click Continue.
The Solaris Interactive Install dialog box is displayed.
Step 21 Read the information displayed, choose Initial at the Initial Install or Upgrade prompt. Click Continue.
The Solaris Interactive Installation dialog box is displayed.
Step 22 Click Continue.
The Geographic Regions dialog box is displayed.
Step 23 Select the appropriate region. Click Continue.
The Select Software dialog box is displayed.
Step 24 Read the information displayed, select Entire Distribution, and click Continue.
Note Do NOT choose Entire Distribution plus OEM. Leave default for 64-bit support.
The Select Disks dialog box is displayed.
This display shows an Available Disks pane on the left of the display and a Selected Disks pane on the right. Listed disks can be moved from one pane to the other by clicking the arrows which are located between the two panes. Make sure that all the disks to be used for CWM are shown in the Selected Disks pane. At least two-9.1-GB disks or one-18-GB disk should be displayed in the Selected Disks pane.
When the disks are in the correct pane, and the correct disk unit is specified as the boot disk, click Continue.
The Preserve Data? dialog box is displayed.
Step 25 Read the information displayed. Click Continue.
The Automatically Layout File Systems? dialog box is displayed.
Step 26 Read the information displayed, select Manual Layout. Click Continue.
The File System and Disk Layout dialog box is displayed.
2-12Cisco WAN Manager Installation Guide
Release 15.1, Part Number OL-6259-01, Rev. A0, January 25, 2005
Chapter 2 Preparing for CWM Installation Solaris Operating System 8 Installation
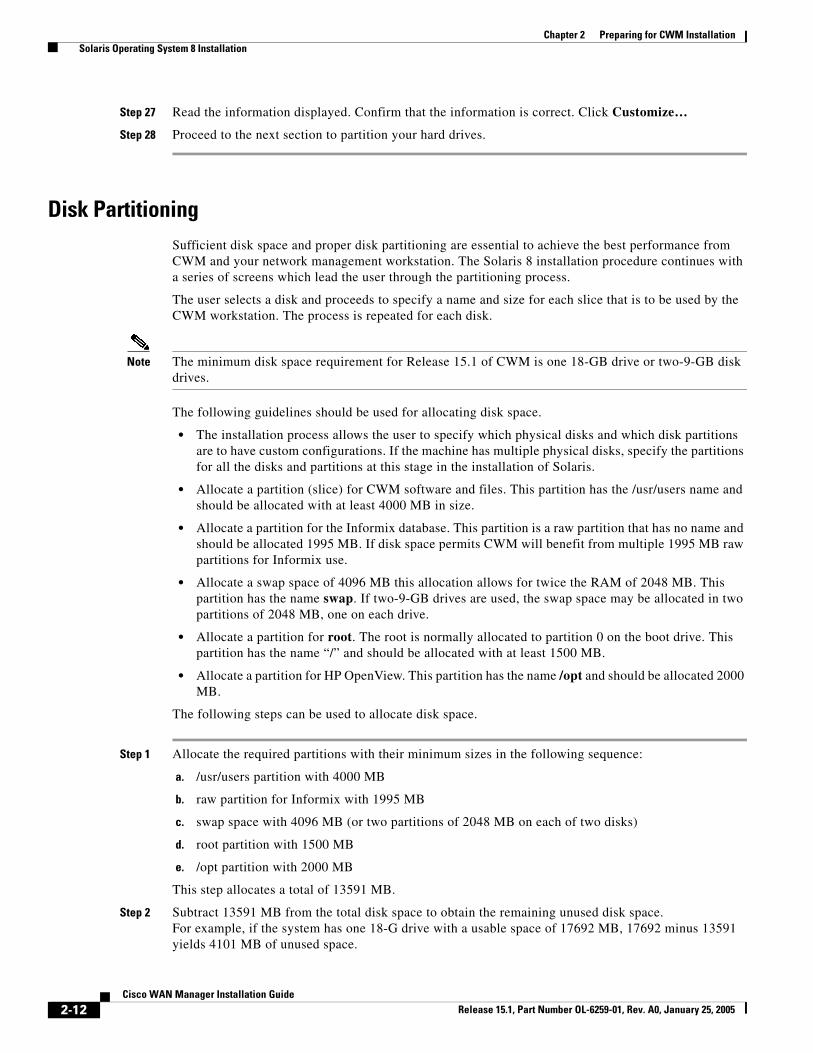
Step 27 Read the information displayed. Confirm that the information is correct. Click Customize…
Step 28 Proceed to the next section to partition your hard drives.
Disk PartitioningSufficient disk space and proper disk partitioning are essential to achieve the best performance from CWM and your network management workstation. The Solaris 8 installation procedure continues with a series of screens which lead the user through the partitioning process.
The user selects a disk and proceeds to specify a name and size for each slice that is to be used by the CWM workstation. The process is repeated for each disk.
Note The minimum disk space requirement for Release 15.1 of CWM is one 18-GB drive or two-9-GB disk drives.
The following guidelines should be used for allocating disk space.
• The installation process allows the user to specify which physical disks and which disk partitions are to have custom configurations. If the machine has multiple physical disks, specify the partitions for all the disks and partitions at this stage in the installation of Solaris.
• Allocate a partition (slice) for CWM software and files. This partition has the /usr/users name and should be allocated with at least 4000 MB in size.
• Allocate a partition for the Informix database. This partition is a raw partition that has no name and should be allocated 1995 MB. If disk space permits CWM will benefit from multiple 1995 MB raw partitions for Informix use.
• Allocate a swap space of 4096 MB this allocation allows for twice the RAM of 2048 MB. This partition has the name swap. If two-9-GB drives are used, the swap space may be allocated in two partitions of 2048 MB, one on each drive.
• Allocate a partition for root. The root is normally allocated to partition 0 on the boot drive. This partition has the name “/” and should be allocated with at least 1500 MB.
• Allocate a partition for HP OpenView. This partition has the name /opt and should be allocated 2000 MB.
The following steps can be used to allocate disk space.
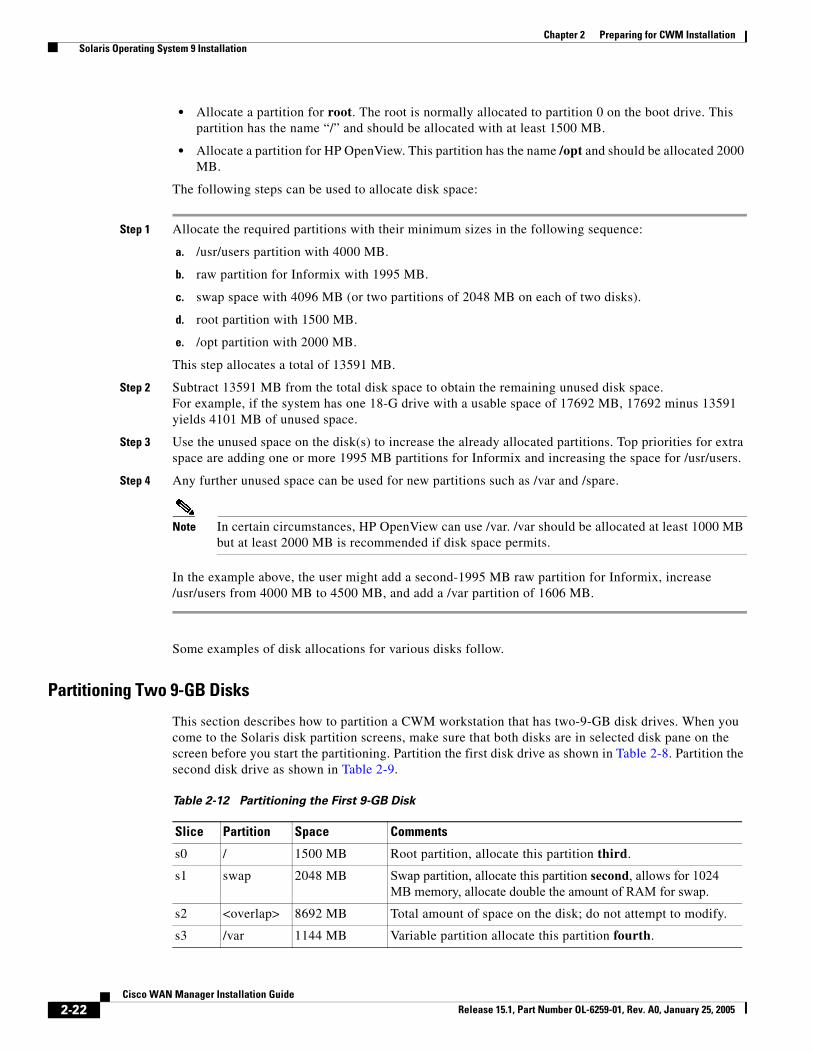
Step 1 Allocate the required partitions with their minimum sizes in the following sequence:
a. /usr/users partition with 4000 MB
b. raw partition for Informix with 1995 MB
c. swap space with 4096 MB (or two partitions of 2048 MB on each of two disks)
d. root partition with 1500 MB
e. /opt partition with 2000 MB
This step allocates a total of 13591 MB.
Step 2 Subtract 13591 MB from the total disk space to obtain the remaining unused disk space. For example, if the system has one 18-G drive with a usable space of 17692 MB, 17692 minus 13591 yields 4101 MB of unused space.
2-13Cisco WAN Manager Installation Guide
Release 15.1, Part Number OL-6259-01, Rev. A0, January 25, 2005
Chapter 2 Preparing for CWM Installation Solaris Operating System 8 Installation
Step 3 Use the unused space on the disk(s) to increase the already allocated partitions. Top priorities for extra space are adding one or more 1995 MB partitions for Informix and increasing the space for /usr/users.
Step 4 Any further unused space can be used for new partitions such as /var and /spare.
Note In certain circumstances, HP OpenView can use /var. /var should be allocated at least 1000 MB but at least 2000 MB is recommended if disk space permits.
In the example above, the user might add a second-1995 MB raw partition for Informix, increase /usr/users from 4000 MB to 4500 MB, and add a /var partition of 1606 MB.
Some examples of disk allocations for various disks follow.
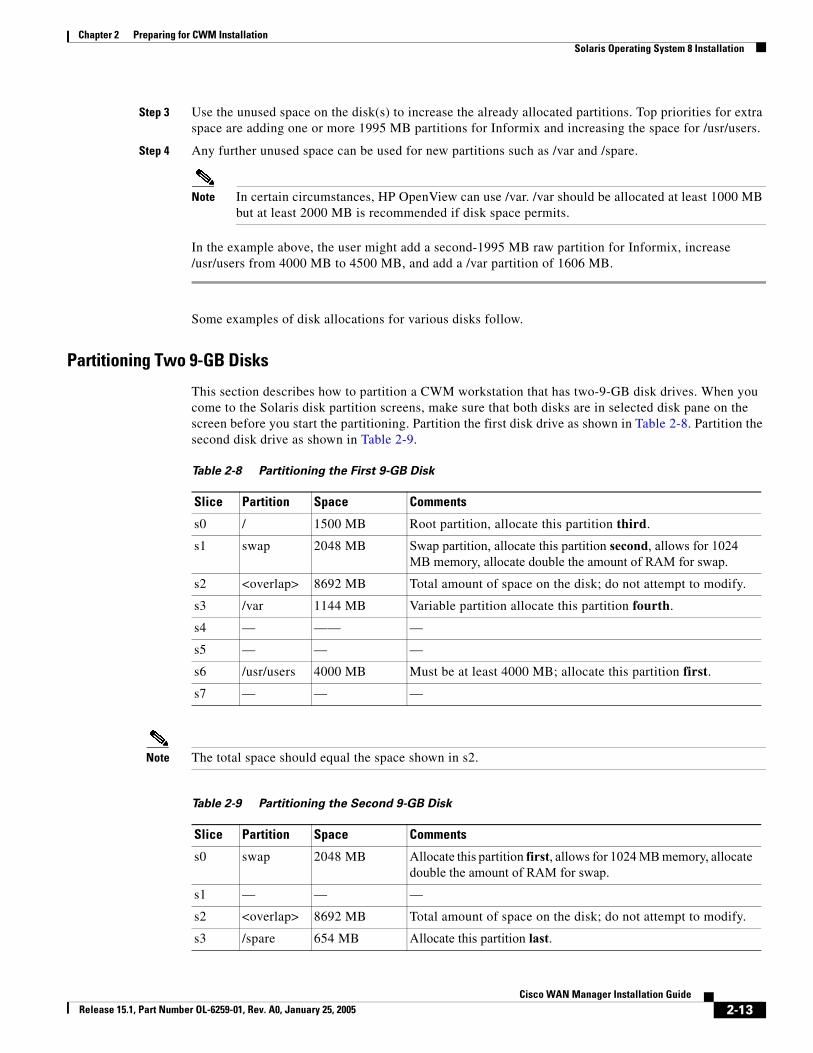
Partitioning Two 9-GB Disks
This section describes how to partition a CWM workstation that has two-9-GB disk drives. When you come to the Solaris disk partition screens, make sure that both disks are in selected disk pane on the screen before you start the partitioning. Partition the first disk drive as shown in Table 2-8. Partition the second disk drive as shown in Table 2-9.
Note The total space should equal the space shown in s2.
Table 2-8 Partitioning the First 9-GB Disk
Slice Partition Space Comments
s0 / 1500 MB Root partition, allocate this partition third.
s1 swap 2048 MB Swap partition, allocate this partition second, allows for 1024 MB memory, allocate double the amount of RAM for swap.
s2 <overlap> 8692 MB Total amount of space on the disk; do not attempt to modify.
s3 /var 1144 MB Variable partition allocate this partition fourth.
s4 — —— —
s5 — — —
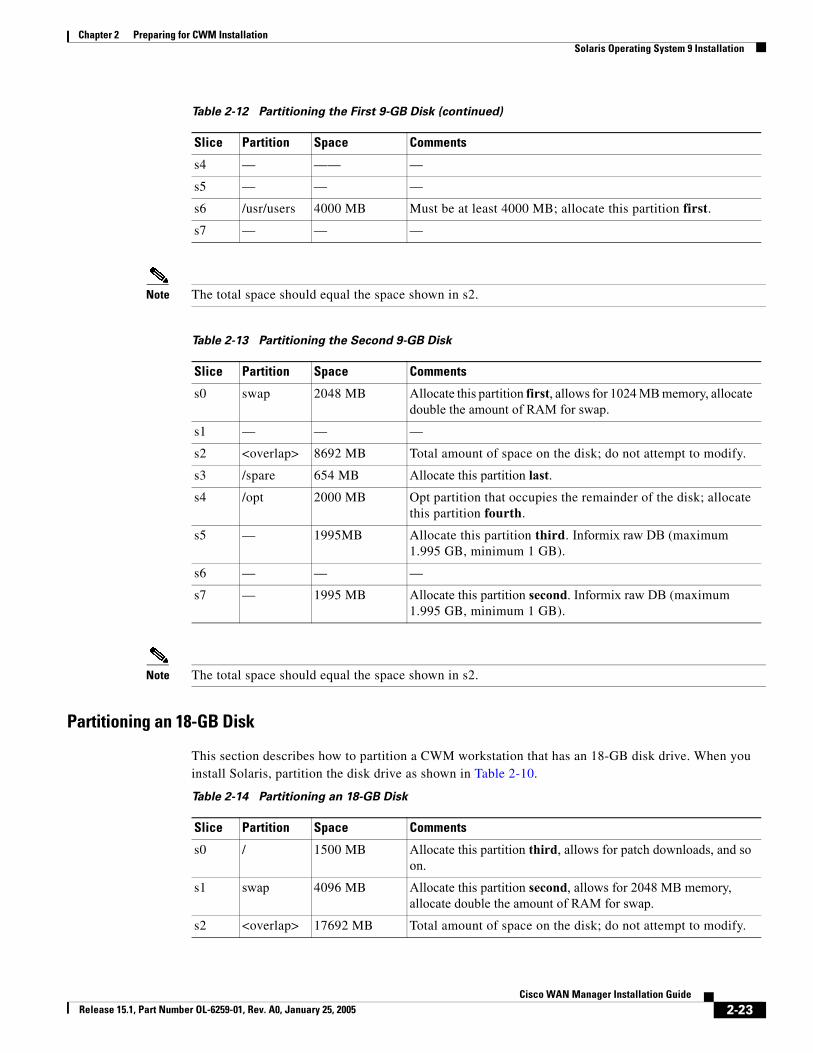
s6 /usr/users 4000 MB Must be at least 4000 MB; allocate this partition first.
s7 — — —
Table 2-9 Partitioning the Second 9-GB Disk
Slice Partition Space Comments
s0 swap 2048 MB Allocate this partition first, allows for 1024 MB memory, allocate double the amount of RAM for swap.
s1 — — —
s2 <overlap> 8692 MB Total amount of space on the disk; do not attempt to modify.
s3 /spare 654 MB Allocate this partition last.
2-14Cisco WAN Manager Installation Guide
Release 15.1, Part Number OL-6259-01, Rev. A0, January 25, 2005
Chapter 2 Preparing for CWM Installation Solaris Operating System 8 Installation
Note The total space should equal the space shown in s2.
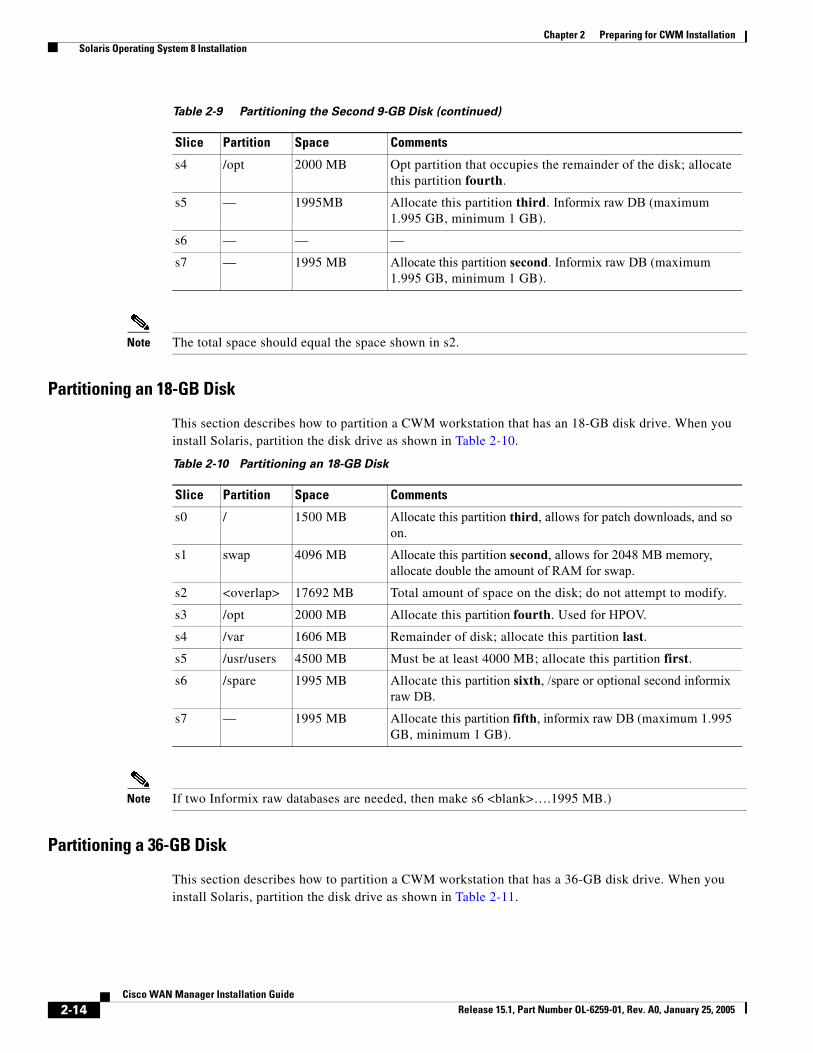
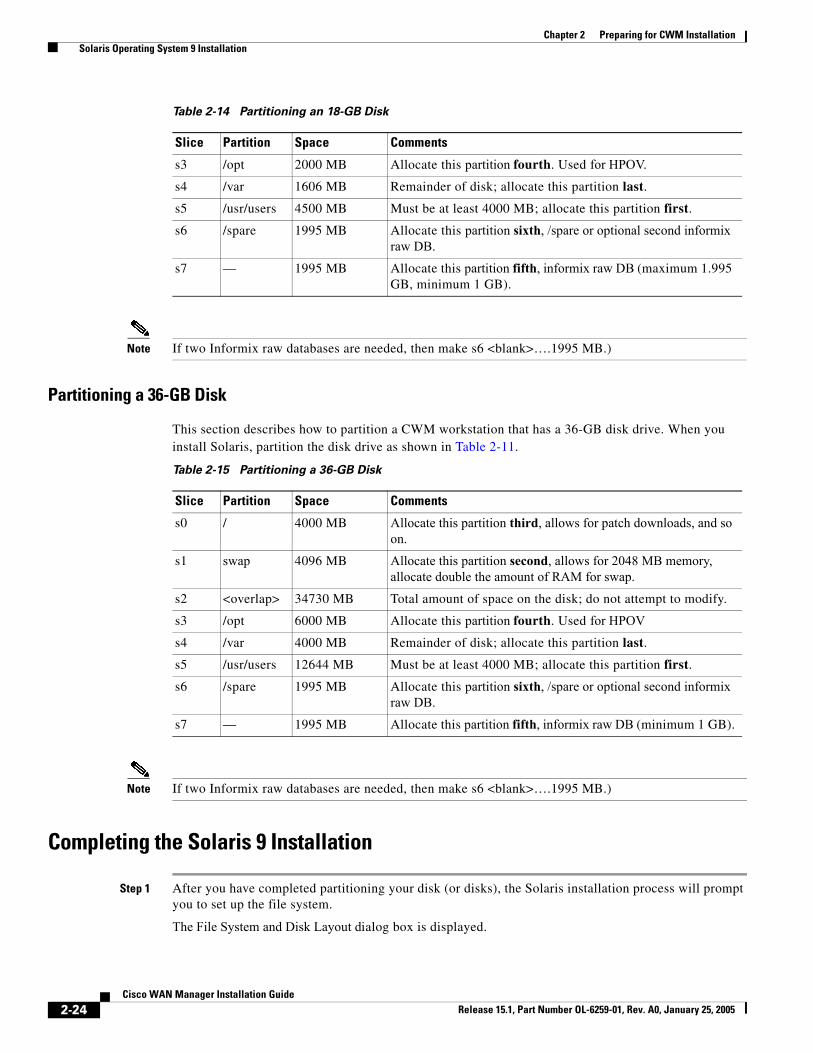
Partitioning an 18-GB Disk
This section describes how to partition a CWM workstation that has an 18-GB disk drive. When you install Solaris, partition the disk drive as shown in Table 2-10.
Note If two Informix raw databases are needed, then make s6 <blank>….1995 MB.)
Partitioning a 36-GB Disk
This section describes how to partition a CWM workstation that has a 36-GB disk drive. When you install Solaris, partition the disk drive as shown in Table 2-11.
s4 /opt 2000 MB Opt partition that occupies the remainder of the disk; allocate this partition fourth.
s5 — 1995MB Allocate this partition third. Informix raw DB (maximum 1.995 GB, minimum 1 GB).
s6 — — —
s7 — 1995 MB Allocate this partition second. Informix raw DB (maximum 1.995 GB, minimum 1 GB).
Table 2-9 Partitioning the Second 9-GB Disk (continued)
Slice Partition Space Comments
Table 2-10 Partitioning an 18-GB Disk
Slice Partition Space Comments
s0 / 1500 MB Allocate this partition third, allows for patch downloads, and so on.
s1 swap 4096 MB Allocate this partition second, allows for 2048 MB memory, allocate double the amount of RAM for swap.
s2 <overlap> 17692 MB Total amount of space on the disk; do not attempt to modify.
s3 /opt 2000 MB Allocate this partition fourth. Used for HPOV.
s4 /var 1606 MB Remainder of disk; allocate this partition last.
s5 /usr/users 4500 MB Must be at least 4000 MB; allocate this partition first.
s6 /spare 1995 MB Allocate this partition sixth, /spare or optional second informix raw DB.
s7 — 1995 MB Allocate this partition fifth, informix raw DB (maximum 1.995 GB, minimum 1 GB).
2-15Cisco WAN Manager Installation Guide
Release 15.1, Part Number OL-6259-01, Rev. A0, January 25, 2005
Chapter 2 Preparing for CWM Installation Solaris Operating System 8 Installation
Note If two Informix raw databases are needed, then make s6 <blank>….1995 MB.)
Completing the Solaris Installation
Step 1 After you have completed partitioning your disk (or disks), the Solaris installation process will prompt you to set up the file system.
The File System and Disk Layout dialog box is displayed.
Step 2 Read the information displayed, confirm that it is correct. Click Continue.
The Mount Remote File Systems? dialog box is displayed.
Step 3 Read the information displayed and confirm that it is correct. Click Continue to accept the default. Do not select Remote Mounts.
Step 4 The Profile screen is displayed. Choose Begin Installation
The Solaris installation process the reboot options after installing the files:
AutoReboot/manualReboot
Step 5 Choose AutoReboot.
Note This part of the process (downloading the files) displays a progress and may take up to 1 hour. There is no input required.
The system reboots and the Root Password window is displayed.
Step 6 Enter the password to be used for root. Press Enter.
Step 7 Re-enter the root password. Press Enter.
Step 8 The Solaris installation process prompts you to setup automatic power saving shutdown.
Table 2-11 Partitioning a 36-GB Disk
Slice Partition Space Comments
s0 / 4000 MB Allocate this partition third, allows for patch downloads, and so on.
s1 swap 4096 MB Allocate this partition second, allows for 2048 MB memory, allocate double the amount of RAM for swap.
s2 <overlap> 34730 MB Total amount of space on the disk; do not attempt to modify.
s3 /opt 6000 MB Allocate this partition fourth. Used for HPOV
s4 /var 4000 MB Remainder of disk; allocate this partition last.
s5 /usr/users 12644 MB Must be at least 4000 MB; allocate this partition first.
s6 /spare 1995 MB Allocate this partition sixth, /spare or optional second informix raw DB.
s7 — 1995 MB Allocate this partition fifth, informix raw DB (minimum 1 GB).
2-16Cisco WAN Manager Installation Guide
Release 15.1, Part Number OL-6259-01, Rev. A0, January 25, 2005
Chapter 2 Preparing for CWM Installation Solaris Operating System 9 Installation
Step 9 Choose No.
The installation process then asks if the user should be asked again about autoshutdown on reboot.
Step 10 Choose No.
The Specify Media window is displayed.
Step 11 Choose CD. Click Next.
Follow the instructions to remove Solaris Software 1 of 2 SPARC Platform Edition CD. Insert Solaris Software 2 of 2 SPARC Platform Edition CD.
When the second CD is inserted, click OK.
Step 12 The files on the second CD are installed (approximately 5 minutes). When completed, the Installation Summary window is displayed, click Next.
The Specify Media window is displayed.
Step 13 Click Skip.
The Reboot window is displayed.
Step 14 Select Reboot Now.
The installation process is now complete and the system reboots.
Solaris Operating System 9 Installation The following procedure needs to be performed only if you intend to run CWM on a Solaris 9 platform and Solaris 9 is not already installed on the intended CWM workstation. If Solaris 9 is already installed, check the disk partitions (see “Disk Partitioning” section on page 21) and repartition if necessary.
Methods of InstallationSolaris 9 can be installed using a number of methods including:
• The Interactive Installation Program on the Solaris 9 CD-ROMs
• Using JumpStart and the Solaris 9 CD-ROMs
• Over a network
• Over the Web using Webstart
Further, the installation can be an initial (new) installation or an upgrade from an earlier version of Solaris.
This chapter provides details only for the method that users are most likely to use. This method is an initial installation using the Solaris 9 CD-ROMs and the Interactive Installation Program. For this installation, the user requires the two CD-ROM set (Solaris Software 1 of 2 SPARC Platform Edition CD and Solaris Software 2 of 2 SPARC Platform Edition CD).
Cisco strongly recommends that the procedure described in this chapter be used to install Solaris 9. However, if the user’s circumstances are such that a different installation method is more suitable, please refer to the Sun Microsystems documentation for Solaris 9 installation instructions (Solaris 9 Installation Guide, part number 816-7171-xx). Solaris 9 documentation can be browsed on the web at www.sun.com.
2-17Cisco WAN Manager Installation Guide
Release 15.1, Part Number OL-6259-01, Rev. A0, January 25, 2005
Chapter 2 Preparing for CWM Installation Solaris Operating System 9 Installation
Note Users who have CWM Servers and Clients running under Solaris 8 (also known as Solaris 2.8) cannot merely upgrade from Solaris 8 to Solaris 9 and expect the CWM system to run. CWM for Solaris 8 and CWM for Solaris 9 are two different releases. Moving from Solaris 8 to Solaris 9 always involves saving the necessary data files, installing Solaris 9, and then installing the Solaris 9 version of the CWM software.
Warning The Solaris installation procedure that follows will destroy any existing files on the workstation’s disks. If you have an existing CWM databases and configuration files or files from another application that must be preserved, STOP NOW!
To preserve data files on the disk, first save the files either to an NFS mounted directory, to an external media (such as a tape) or FTP them to another machine. After the installation has been completed, the files can be restored. Details for saving and restoring CWM files are provided in Chapter 4.
Preparing to Install Solaris 9If the Solaris 9 operating system needs to be installed, the starting point is always to have:
• The Solaris Software 1 of 2 SPARC Platform Edition CD-ROM is in the CD drive.
• The Sun Workstation ok prompt is displayed on the screen.
How the user gets to this starting point depends upon the workstation type onto which Solaris 9 is being installed. The procedure for installing Solaris 9 on a regular desktop Solaris workstation (one that included a display and a keyboard) is different from that on a so-called “headless” workstation which is typically rack mounted and does not support a local display and keyboard.
Getting Started on a Workstation with a display and keyboard
If the workstation supports a local display and keyboard (for example an Ultra 60), the user can use the following procedure.
Step 1 Log in to the system as the root user.
Step 2 Insert the CD-ROM labeled Solaris 9 Software 1 of 2 SPARC Platform Edition into the CD-ROM drive.
Step 3 Enter the sync command to line up all the cylinders and the halt command to halt the system. As user root, type the following commands:
# sync ;sync ;halt
The system displays the ok prompt.
ok
Step 4 If Step 3 fails, as a last resort, depress the stop key and the a key simultaneously.
This will display the ok prompt.
2-18Cisco WAN Manager Installation Guide
Release 15.1, Part Number OL-6259-01, Rev. A0, January 25, 2005
Chapter 2 Preparing for CWM Installation Solaris Operating System 9 Installation
Getting Started on a Headless Workstation
If the workstation is of the headless type (for example, a Netra 20) and does not support a local display and keyboard, the user can use the following procedure.
Step 1 Connect an alphanumeric terminal (or a PC capable of emulating an alphanumeric terminal) to the primary asynchronous serial interface on the workstation (in the case of a Netra 20 this would be the serial interface). This attached terminal can now be used as a console device.
Note Alternatively, a second Sun workstation can be used as a console using a telnet connection to a terminal adapter (such as a Cisco 2500) which, in turn, is connected to the asynchronous interface of the intended CWM workstation.
Step 2 Reboot the intended CWM workstation by powering off and on again.
Step 3 Use the console to send a break signal while the boot firmware is still in control of the workstation (before any existing Solaris is launched).
Note Systems such as the Netra 20 do not recognize the stop a keystroke combination.
This will display the ok prompt.
Installing Solaris 9When the Solaris 9 Software 1 of 2 SPARC Platform Edition CD-ROM is in the drive and the ok prompt is displayed, install Solaris 9 using the following procedure.
Step 1 Boot the system from the CD-ROM using the following command.
ok boot cdrom
The installation process for Solaris 9 consists of answering a series of questions as they are displayed on the screen. Note the following procedures:
• When using a terminal or terminal emulator as a console, the user is first asked to indicate the type of terminal being used by selecting from a displayed list (for example, ASCII, DEC VT100, and so on). Make sure that your terminal, or terminal emulator, match the terminal type that you select.
• During the installation the user is not allowed to use a mouse (even if there is one).
• When the question on the screen requires the user to choose from several options, use the up, down, left, and right arrow keys to position the cursor over the desired option. Then select the option with the Enter key.
• Make sure that the selected option is marked with an X (as in [X]) before moving to the next question.
• Moving to the next or previous screen, displaying Help information, and other operations, require the use of the Function keys. The uses of these keys are displayed on each screen.

2-19Cisco WAN Manager Installation Guide
Release 15.1, Part Number OL-6259-01, Rev. A0, January 25, 2005
Chapter 2 Preparing for CWM Installation Solaris Operating System 9 Installation
• If installing from a terminal device, the keyboard’s function keys may not be recognized. If this is the case, the user is requested to use ESC key sequences instead. The ESC key sequences and their uses are displayed along the bottom of the screen.
In the following steps, substitute the appropriate ESC key sequence for the Function key if the keyboard’s function keys do not work.
Step 2 The Set Language and Locale dialog box is the first window to be displayed. Enter the number for your chosen Language. Press Return. Enter the number for your selected Locale. Press Return.
The Welcome window and then the Solaris Installation Program banner are displayed.
Step 3 Read the information displayed. Press F2 To Continue.
The Identify This System dialog box is displayed.
Step 4 Read the information displayed. Press F2 To Continue.
The Network Connectivity dialog screen is displayed
Step 5 Read the information on the screen and Select Yes or No, (generally Yes). Press F2 To Continue.
The DHCP screen is displayed.
Step 6 Select No. Press F2 To Continue.
The Host Name dialog box is displayed.
Step 7 Enter the hostname for the CWM workstation. Press F2 To Continue.
Note Do not begin the host name with a number or use a “-” sign in the name.
The IP Address dialog box is displayed.
Step 8 Enter the IP address of the CWM workstation. Press F2 To Continue.
The Subnet screen is displayed.
Step 9 Enter Yes. Press F2 To Continue.
The Subnet mask screen is displayed.
Step 10 Enter the subnet mask (for example, 255.255.255.0), press F2 to continue.
The Enable IPv6 screen is displayed.
Step 11 Select No. Press F2 To Continue. The Set Default Router screen is displayed.
Step 12 Select one of the default router choices. These choices are Detect one on next boot, Specify one, and None. Press F2 to continue. The Default Router IP screen is displayed
Step 13 If Specify was selected in the previous step, enter the IP address of the default router. Press F2 to continue.
The Confirm Information dialog box is displayed. This dialog box displays the network choices the user has made in the previous steps.
Step 14 Read the displayed information. If you are satisfied with the displayed information, press F2 to continue.
If not, click Change and repeat the steps changing the information as necessary. The Confirm Information dialog box is displayed again. Press F2 To Continue, if the information is correct or, if the information is not correct, click Change and repeat the process.
When Continue is clicked, the Configure Security Policy dialog box is displayed.
Step 15 Choose No, press F2 to continue.
2-20Cisco WAN Manager Installation Guide
Release 15.1, Part Number OL-6259-01, Rev. A0, January 25, 2005
Chapter 2 Preparing for CWM Installation Solaris Operating System 9 Installation
The Confirm Information dialog box is displayed.
Step 16 Read the displayed information. If you are satisfied with the displayed information, press F2 to continue.
If not, click Change and change the information as necessary. The Confirm Information dialog box is displayed again. Press F2 To Continue if the information is correct or, if the information is not correct, click Change and repeat the process.
When Continue is clicked, the Name Service dialog box is displayed.
Step 17 Select None and press F2 to continue.
The Confirm Information dialog box is displayed.
Step 18 Read the information displayed. If you are satisfied with the information displayed, press F2 to continue.
If not, click Change and change the information as necessary. The Confirm Information dialog box is displayed again. Press F2 To Continue if the information is correct or, if not, click Change and repeat the process.
When Continue is clicked, the Time Zone dialog box is displayed.
Step 19 Read the information displayed. Choose Geographic Region. Click the Set button.
The Geographic Region dialog box is displayed.
Note Alternatively, the user can select Greenwich Mean Time (GMT) offset and specify the time zone as the number of hours offset from GMT.
Step 20 If the Geographic Region was selected in the previous step, choose the appropriate Geographic Region and Time Zone. Press F2 To Continue. If GMT offset was selected, set the slider on the screen to the appropriate offset and press F2 to continue.
The Date and Time dialog box is displayed.
Step 21 Read the displayed information, enter today’s date and the current time at the Date and Time prompt. Press F2 To Continue.
Another Confirm Information dialog box is displayed. This dialog box contains the choices you made in the previous steps.
Step 22 Carefully examine the information displayed. If you are satisfied with the information displayed, press F2 to continue.
If you are not satisfied, click Change. The Subnets dialog box is displayed. Repeat the steps, correcting any values. Once you have reentered the corrected values, the Confirm Information dialog box is displayed, with the revised values you just entered. If you are satisfied with the information now displayed, press F2 to continue.
The Solaris Interactive Install dialog box is displayed.
Step 23 Read the information displayed, choose Initial at the Initial Install or Upgrade prompt. Press F2 To Continue.
The Solaris Interactive Installation dialog box is displayed.
Step 24 Press F2 To Continue.
The Geographic Regions dialog box is displayed.
Step 25 Select the appropriate region. Press F2 To Continue.
The Select Software dialog box is displayed.
Step 26 Read the information displayed, select Entire Distribution, and press F2 to continue.
2-21Cisco WAN Manager Installation Guide
Release 15.1, Part Number OL-6259-01, Rev. A0, January 25, 2005
Chapter 2 Preparing for CWM Installation Solaris Operating System 9 Installation
Note Do NOT choose Entire Distribution plus OEM. Leave default for 64-bit support.
The Select Disks dialog box is displayed.
This display shows an Available Disks pane on the left of the display and a Selected Disks pane on the right. Listed disks can be moved from one pane to the other by clicking the arrows which are located between the two panes. Make sure that all the disks to be used for CWM are shown in the Selected Disks pane. At least two-9.1-GB disks or one-18-GB disk should be displayed in the Selected Disks pane.
When the disks are in the correct pane, and the correct disk unit is specified as the boot disk, press F2 to continue.
The Preserve Data? dialog box is displayed.
Step 27 Read the information displayed. Press F2 To Continue.
The Automatically Layout File Systems? dialog box is displayed.
Step 28 Read the information displayed, select Manual Layout. Press F2 To Continue.
The File System and Disk Layout dialog box is displayed.
Step 29 Read the information displayed. Confirm that the information is correct. Click Customize…
Step 30 Proceed to the next section to partition your hard drives.
Disk PartitioningSufficient disk space and proper disk partitioning are essential to achieve the best performance from CWM and your network management workstation. The Solaris 8 installation procedure continues with a series of screens which lead the user through the partitioning process.
The user selects a disk and proceeds to specify a name and size for each slice that is to be used by the CWM workstation. The process is repeated for each disk.
Note The minimum disk space requirement for Release 15.1 of CWM is one 18-GB drive or two-9-GB disk drives.
The following guidelines should be used for allocating disk space:
• The installation process allows the user to specify which physical disks and which disk partitions are to have custom configurations. If the machine has multiple physical disks, specify the partitions for all the disks and partitions at this stage in the installation of Solaris.
• Allocate a partition (slice) for CWM software and files. This partition has the /usr/users name and should be allocated with at least 4000 MB in size.
• Allocate a partition for the Informix database. This partition is a raw partition that has no name and should be allocated 1995 MB. If disk space permits CWM will benefit from multiple 1995 MB raw partitions for Informix use.
• Allocate a swap space of 4096 MB this allocation allows for twice the RAM of 2048 MB. This partition has the name swap. If two-9-GB drives are used, the swap space may be allocated in two partitions of 2048 MB, one on each drive.
2-22Cisco WAN Manager Installation Guide
Release 15.1, Part Number OL-6259-01, Rev. A0, January 25, 2005
Chapter 2 Preparing for CWM Installation Solaris Operating System 9 Installation
• Allocate a partition for root. The root is normally allocated to partition 0 on the boot drive. This partition has the name “/” and should be allocated with at least 1500 MB.
• Allocate a partition for HP OpenView. This partition has the name /opt and should be allocated 2000 MB.
The following steps can be used to allocate disk space:
Step 1 Allocate the required partitions with their minimum sizes in the following sequence:
a. /usr/users partition with 4000 MB.
b. raw partition for Informix with 1995 MB.
c. swap space with 4096 MB (or two partitions of 2048 MB on each of two disks).
d. root partition with 1500 MB.
e. /opt partition with 2000 MB.
This step allocates a total of 13591 MB.
Step 2 Subtract 13591 MB from the total disk space to obtain the remaining unused disk space. For example, if the system has one 18-G drive with a usable space of 17692 MB, 17692 minus 13591 yields 4101 MB of unused space.
Step 3 Use the unused space on the disk(s) to increase the already allocated partitions. Top priorities for extra space are adding one or more 1995 MB partitions for Informix and increasing the space for /usr/users.
Step 4 Any further unused space can be used for new partitions such as /var and /spare.
Note In certain circumstances, HP OpenView can use /var. /var should be allocated at least 1000 MB but at least 2000 MB is recommended if disk space permits.
In the example above, the user might add a second-1995 MB raw partition for Informix, increase /usr/users from 4000 MB to 4500 MB, and add a /var partition of 1606 MB.
Some examples of disk allocations for various disks follow.
Partitioning Two 9-GB Disks
This section describes how to partition a CWM workstation that has two-9-GB disk drives. When you come to the Solaris disk partition screens, make sure that both disks are in selected disk pane on the screen before you start the partitioning. Partition the first disk drive as shown in Table 2-8. Partition the second disk drive as shown in Table 2-9.
Table 2-12 Partitioning the First 9-GB Disk
Slice Partition Space Comments
s0 / 1500 MB Root partition, allocate this partition third.
s1 swap 2048 MB Swap partition, allocate this partition second, allows for 1024 MB memory, allocate double the amount of RAM for swap.
s2 <overlap> 8692 MB Total amount of space on the disk; do not attempt to modify.
s3 /var 1144 MB Variable partition allocate this partition fourth.
2-23Cisco WAN Manager Installation Guide
Release 15.1, Part Number OL-6259-01, Rev. A0, January 25, 2005
Chapter 2 Preparing for CWM Installation Solaris Operating System 9 Installation
Note The total space should equal the space shown in s2.
Note The total space should equal the space shown in s2.
Partitioning an 18-GB Disk
This section describes how to partition a CWM workstation that has an 18-GB disk drive. When you install Solaris, partition the disk drive as shown in Table 2-10.
s4 — —— —
s5 — — —
s6 /usr/users 4000 MB Must be at least 4000 MB; allocate this partition first.
s7 — — —
Table 2-13 Partitioning the Second 9-GB Disk
Slice Partition Space Comments
s0 swap 2048 MB Allocate this partition first, allows for 1024 MB memory, allocate double the amount of RAM for swap.
s1 — — —
s2 <overlap> 8692 MB Total amount of space on the disk; do not attempt to modify.
s3 /spare 654 MB Allocate this partition last.
s4 /opt 2000 MB Opt partition that occupies the remainder of the disk; allocate this partition fourth.
s5 — 1995MB Allocate this partition third. Informix raw DB (maximum 1.995 GB, minimum 1 GB).
s6 — — —
s7 — 1995 MB Allocate this partition second. Informix raw DB (maximum 1.995 GB, minimum 1 GB).
Table 2-12 Partitioning the First 9-GB Disk (continued)
Slice Partition Space Comments
Table 2-14 Partitioning an 18-GB Disk
Slice Partition Space Comments
s0 / 1500 MB Allocate this partition third, allows for patch downloads, and so on.
s1 swap 4096 MB Allocate this partition second, allows for 2048 MB memory, allocate double the amount of RAM for swap.
s2 <overlap> 17692 MB Total amount of space on the disk; do not attempt to modify.
2-24Cisco WAN Manager Installation Guide
Release 15.1, Part Number OL-6259-01, Rev. A0, January 25, 2005
Chapter 2 Preparing for CWM Installation Solaris Operating System 9 Installation
Note If two Informix raw databases are needed, then make s6 <blank>….1995 MB.)
Partitioning a 36-GB Disk
This section describes how to partition a CWM workstation that has a 36-GB disk drive. When you install Solaris, partition the disk drive as shown in Table 2-11.
Note If two Informix raw databases are needed, then make s6 <blank>….1995 MB.)
Completing the Solaris 9 Installation
Step 1 After you have completed partitioning your disk (or disks), the Solaris installation process will prompt you to set up the file system.
The File System and Disk Layout dialog box is displayed.
s3 /opt 2000 MB Allocate this partition fourth. Used for HPOV.
s4 /var 1606 MB Remainder of disk; allocate this partition last.
s5 /usr/users 4500 MB Must be at least 4000 MB; allocate this partition first.
s6 /spare 1995 MB Allocate this partition sixth, /spare or optional second informix raw DB.
s7 — 1995 MB Allocate this partition fifth, informix raw DB (maximum 1.995 GB, minimum 1 GB).
Table 2-14 Partitioning an 18-GB Disk
Slice Partition Space Comments
Table 2-15 Partitioning a 36-GB Disk
Slice Partition Space Comments
s0 / 4000 MB Allocate this partition third, allows for patch downloads, and so on.
s1 swap 4096 MB Allocate this partition second, allows for 2048 MB memory, allocate double the amount of RAM for swap.
s2 <overlap> 34730 MB Total amount of space on the disk; do not attempt to modify.
s3 /opt 6000 MB Allocate this partition fourth. Used for HPOV
s4 /var 4000 MB Remainder of disk; allocate this partition last.
s5 /usr/users 12644 MB Must be at least 4000 MB; allocate this partition first.
s6 /spare 1995 MB Allocate this partition sixth, /spare or optional second informix raw DB.
s7 — 1995 MB Allocate this partition fifth, informix raw DB (minimum 1 GB).
2-25Cisco WAN Manager Installation Guide
Release 15.1, Part Number OL-6259-01, Rev. A0, January 25, 2005
Chapter 2 Preparing for CWM Installation Solaris Operating System 9 Installation
Step 2 Read the information displayed, confirm that it is correct. Press F2 To Continue.
The Mount Remote File Systems? dialog box is displayed.
Step 3 Read the information displayed and confirm that it is correct. Press F2 To Continue to accept the default. Do not select Remote Mounts.
Step 4 The Profile screen is displayed. Choose Begin Installation
The Solaris installation process the reboot options after installing the files:
AutoReboot/manualReboot
Step 5 Choose AutoReboot.
Note This part of the process (downloading the files) displays a progress and may take up to 1 hour. There is no input required.
The system reboots and the Root Password window is displayed.
Step 6 Enter the password to be used for root. Press Enter.
Step 7 Re-enter the root password. Press Enter.
Step 8 The Solaris installation process prompts you to setup automatic power saving shutdown.
Step 9 Choose No.
The installation process then asks if the user should be asked again about autoshutdown on reboot.
Step 10 Choose No.
The Specify Media window is displayed.
Step 11 Choose CD. Click Next.
Follow the instructions to remove Solaris Software 1 of 2 SPARC Platform Edition CD. Insert Solaris Software 2 of 2 SPARC Platform Edition CD.
When the second CD is inserted, click OK.
Step 12 The files on the second CD are installed (approximately 5 minutes). When completed, the Installation Summary window is displayed, click Next.
The Specify Media window is displayed.
Step 13 Click Skip.
The Reboot window is displayed.
Step 14 Select Reboot Now.
The installation process is now complete and the system reboots.
Installing Solaris PatchesSolaris patches may be required to be installed before CWM 15.1 can be launched. Consult the most up-to-date CWM release notes for details.
2-26Cisco WAN Manager Installation Guide
Release 15.1, Part Number OL-6259-01, Rev. A0, January 25, 2005
Chapter 2 Preparing for CWM Installation Solaris Operating System 9 Installation
If patches are required, you can display the patches that are already installed in the CWM workstation by entering the Solaris showrev -p command. Patches can be obtained from SunService (if the user has a SunSpectrum contract) or from the SunSolve Recommended and Security Patches web site.
Patches are available to Sun Microsystems customers over the World Wide Web at the following URL:www.sunsolve.sun.COM/pub-cgi/show.pl?target=home
If the search facility on the SunSolve site is used, search for the search ID number and do not include the two-digit patch version number. Patches with the highest version numbers should be used.
Note If the CWM workstation is behind a corporate firewall, it may not be possible to connect to the Internet. In this case the workstation should be removed and set to a location where an Internet connection can be made. After the patches have been downloaded, the workstation can be located behind the firewall again.
Step 1 At the Sun Microsystems web site, click on Patch Finder.
Step 2 Under “Recommended and Security Patches” click on X (nn.nM), [where nn.n is a size in Mbytes, and X is 8 for Solaris 8 and 9 for Solaris 9.For example 8 (48.9M)].
Step 3 Download the file. The file downloads under the filename of X_recommended.zip. Again X is 8 for Solaris 8 and 9 for Solaris 9.
Step 4 Unzip the file on the workstation and, in the newly created X_recommended directory, enter the./install_cluster command.
Note A cluster is a set of patches distributed by Sun Microsystem to bring Solaris up to a certain level.
Step 5 Alternatively, individual patches can be installed by entering the patchadd command.
ok patchadd <patch number>Reboot the systemok sync ;sync ;reboot
Post Solaris Installation TasksWhen Solaris has been installed, the following tasks should be performed to ensure that the system will operate correctly over a network.
Step 1 Login as root
Step 2 Use an editor to open the /etc/default/login file. Comment out the line that saysconsole = /dev/console.This action permits a login from other workstations.
Step 3 Setup the machine’s IP address and netmask with the command# ifconfig hme0 <IP Addr> netmask <network mask> broadcast <broadcast address> up
Note The following additional steps should be performed when the machine uses a domain name naming service.
2-27Cisco WAN Manager Installation Guide
Release 15.1, Part Number OL-6259-01, Rev. A0, January 25, 2005
Chapter 2 Preparing for CWM Installation HP OpenView Installation
Step 4 Ensure that the machine’s domain name is entered into the /etc/domainname and /etc/defaultdomainname files.
Step 5 Ensure that the /etc/nsswitch.conf contains the entryhost: files dns nis
Step 6 Ensure that the /etc/resolv.conf contains the machine’s domain name and the nis servers, for example
search company.comnameserver 192.168.1.2nameserver 192.168.1.3
Step 7 Specify a default router using the following command.# route add net 0.0.0.0 <IP address of the default router>
Step 8 Bind the NIS servers as follows
a. Enter the commandypint -cFor example, if there are two NIS servers the command would be#ypint -cnext host to add <NIS server 1>next host to add <NIS server 2>next host to add <enter>
b. Verify that the displayed list of NIS servers is OK by entering y.
c. Enter the command# /usr/lib/netsvc/ypstart
Note The NIS servers can be verified by using the ypwhich command.
Step 9 Reboot the system.
HP OpenView Installation The installation of HP Open View is optional and is not required to operate CWM. HP OpenView is used for viewing the Event Log. It is not required for any other CWM procedures. Before installing the HP OpenView 6.2, 6.3, or 7.0 software, ensure that either the Solaris 8 or Solaris 9 operating system software is installed.
Obtaining HP OpenView SoftwareYou can purchase the HP OpenView software via FTP or by ordering the CD-ROM from the Hewlett Packard external website at the following URL.
http://openview.hp.com/products/nnm/
Installing HP OpenView SoftwareTo install the HP OpenView software, complete the following steps:
2-28Cisco WAN Manager Installation Guide
Release 15.1, Part Number OL-6259-01, Rev. A0, January 25, 2005
Chapter 2 Preparing for CWM Installation HP OpenView Installation
Step 1 Insert the HP Openview CD-ROM into the CD-ROM drive.
Step 2 Enter the following commands:
# cd /cdrom/cdrom0# ls
Step 3 Check for the install file.
Step 4 Begin the install process by entering the following command:
# ./install
Step 5 Reply to the following questions that are displayed during the installation process:
Install man pages? y
Install on line manuals n
Discover network? y
snmp string default gateway? s
display interface? n
Web browser? s
continue? y
No further interaction is required. The installation ends with the Install Successful!! message.
Note If HP OpenView is not installed at this stage, it can be installed later by running the SV+_HPOV.install script which, after CWM is installed, is located in /usr/users/svplus/install.
Check the /etc/services FileExamine the /etc/services file, and check to see if an entry exists for snmp 8161/udp. Enter the following command:
# more /etc/services
If an entry exists for snmp 8161/udp, change it to the following value (so that it conforms to the OpenView port number):
snmp 161/udp
Note To save your changes while using the vi Editor, remember to press Esc, colon (:), then wq!.
If you changed the /etc/services file, you must reboot the CWM workstation for the changes to take effect. Enter the following command:
# sync;sync ;reboot
2-29Cisco WAN Manager Installation Guide
Release 15.1, Part Number OL-6259-01, Rev. A0, January 25, 2005
Chapter 2 Preparing for CWM Installation Installing Netscape Communicator
Starting HP OpenViewComplete the following steps to start HP OpenView.
Step 1 Open a terminal window as user svplus.
Step 2 Enter the following command:
hostname% ovw &
Step 3 When Alarm Manager is displayed, look for the “CWM Alarms” option.
Step 4 Select the CWM Alarms option to display CWM events.
Installing Netscape CommunicatorThe Solaris version of Netscape Communicator is used to run on-line help on the CWM Server and Standalone Statistics workstations.
The Sun Microsystems Netscape Communicator for the Solaris package (version 4.76 or later) is included on the Cisco-provided CWM Documentation CD-ROM under the file name of NSCPcom.476.sparc.tar
Install Netscape Communicator using the following steps.
Step 1 Log in to the CWM workstation as user root.
Step 2 Insert the CWM Documentation CD-ROM into the CD-ROM drive.
Step 3 The NSCPcom.476.sparc.tar file is located on the CD-ROM in the 1500tools directory. You can check that it is present by changing to the tools directory and listing the files by entering the following commands.
# cd /cdrom/cdrom0/500tools# ls
Step 4 Copy the Netscape file to the workstation hard drive.
cp /cdrom/cdrom0/1500tools/NSCPcom.476.sparc.tar /tmp
Step 5 Copy the gzip utility to the workstation hard drive.
cp /cdrom/cdrom0/1500tools/gzip /tmp
Note If the CWM CD-ROMs are not available at the site of the client machine, the CD-ROM should be inserted in the CWM server machine. FTP the NSCPcom.476.sparc.tar and the gzip files to the /tmp directory in the client machine. This method has the same effect as performing Steps 1–4.
Step 6 Change to the tmp directory.
cd /tmp
Step 7 Change the permission of the copied gzip file so that it can be executed.
chmod 1555 /tmp gzip
2-30Cisco WAN Manager Installation Guide
Release 15.1, Part Number OL-6259-01, Rev. A0, January 25, 2005
Chapter 2 Preparing for CWM Installation Installing Netscape Communicator
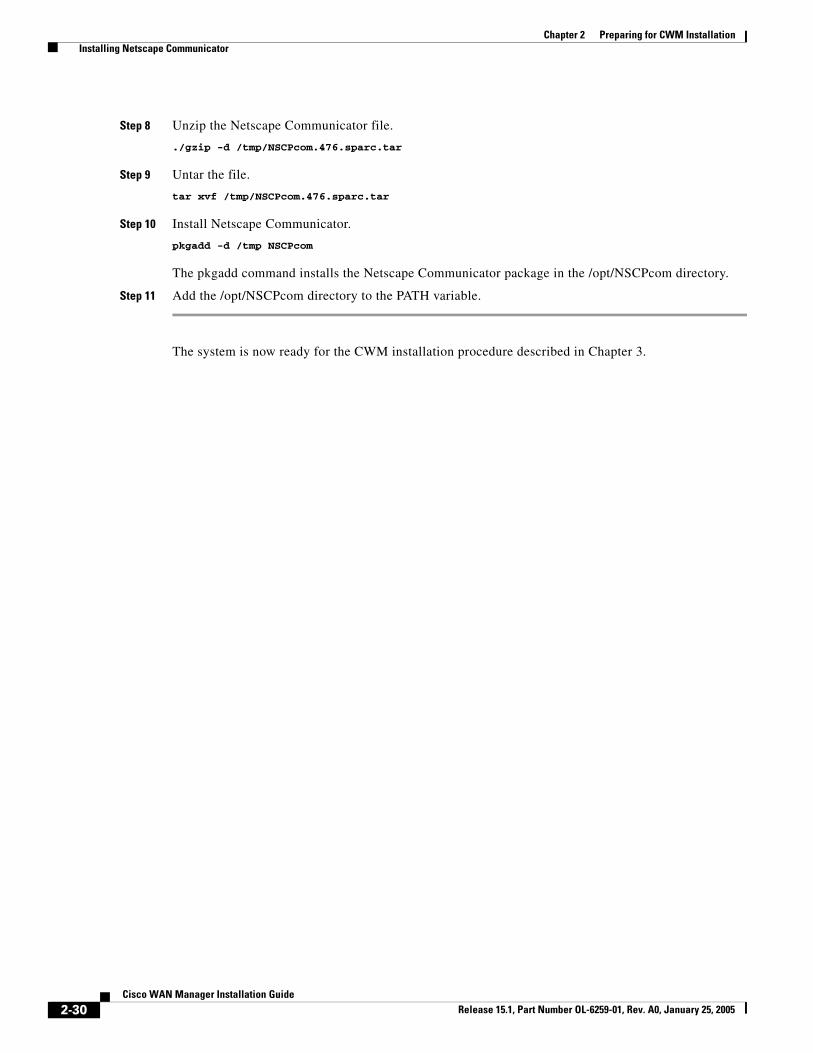
Step 8 Unzip the Netscape Communicator file.
./gzip -d /tmp/NSCPcom.476.sparc.tar
Step 9 Untar the file.
tar xvf /tmp/NSCPcom.476.sparc.tar
Step 10 Install Netscape Communicator.
pkgadd -d /tmp NSCPcom
The pkgadd command installs the Netscape Communicator package in the /opt/NSCPcom directory.
Step 11 Add the /opt/NSCPcom directory to the PATH variable.
The system is now ready for the CWM installation procedure described in Chapter 3.