Premium Volleyball & Badmint on Set - ALDI US · Premium Volleyball & Badmint on Set Now you have...
13
User Guide Premium Volleyball & Badminton Set Now you have purchased an CRANE product you can rest assured in the knowledge that as well as your Manufacturer’s warranty you have the added peace of mind of dedicated helplines and web support ® USA AFTER SALES SUPPORT 1-877-472-4296 MODEL: 05/14, 45082 [email protected]
Transcript of Premium Volleyball & Badmint on Set - ALDI US · Premium Volleyball & Badmint on Set Now you have...

User GuidePremium Volleyball & Badminton Set Now you have purchased an CRANE product you can rest assured in the knowledge that as well as your Manufacturer’s warranty you have the added peace of mind of dedicated helplines and web support
®
USA
AFTER SALES SUPPORT
1-877-472-4296
MODEL: 05/14, 45082

1
Contents
FAQ1 1
Other Useful Information1 11 2 Warranty Card
02 Introduction03 General Information and Safety Instructions 03 Assembly and Parts List09 Badminton Rules1 0 Volleyball Rules
1-877-472-4296AFTER SALES SUPPORT [email protected]

2
i. Introduction
1-877-472-4296AFTER SALES SUPPORT [email protected]
Congratulations!
You have made an excellent choice with the purchase of this quality Crane® product. By doing so you now have the assurance and peace of mind which comes from purchasing a product that has been manufactured to the highest standards of performance and safety, supported by the high quality standards of ALDI.
This product is covered by a limited warranty that is effective for 2 years from the date of purchase. If, during the limited warranty period, a part is found to be defective or breaks, we will offer replacement part at no cost to you, the customer.
The above warranty will not apply in cases of damages due to improper usage, alteration, misuse, abuse, accidental damage or neglect.
This limited warranty gives you specific legal rights and you may also have other rights which vary from one State (province) to another.
Please save these instructions. A purchase receipt (or other proof of purchase date) will be required before any warranty service is initiated. All requests for warranty service, please feel free to contact our Consumer Service Department at 1-877-472-4296.
Please be aware of your product’s limited warranty for the return/refund policy from the store, We can not handle the product which is out of product’s limited warranty since we only provide available parts.

3
ii. General Information and Safety Instructions
WARNING:Adult supervision is required at all times when children are in the area.
WARNING: CHOKING HAZARD - Small Parts Not for children under 3 years.
WARNING:This is not a child’s toy. Adult supervision is required for children playingthis game. Please read instructions carefully. Proper use of this can avoid damage or injury.
1-877-472-4296AFTER SALES SUPPORT [email protected]
iii. Assembly and Parts List
1 2 3 4 5
6 7 8 9 10
11 13 1412
Racket4 PCS
Shuttlecock2 PCS
Push Button6 PCS
Guide Rope2 PCS
Second Guide Rope2 PCS
Pole Cap2 PCS
Top Pole2 PCS
Second Pole2 PCS
Bottom Pole2 PCS
Third Pole2 PCS
Pole Anchor2 PCS
Net1 PC
Pump1 PC
Volleyball 1 PC

4
1. POLE ASSEMBLY Insert the push buttons (#7) into Top, Second and Third Poles (#2, #3, #4). Make sure buttons protrude through holes.See FIG. 1 and 1A.
Assemble the pole sections as follows: A. Insert the top pole (#2) into the second pole (#3), the second pole (#3) into the third pole (#4) and the third pole (#4) into the bottom pole (#5) by aligning the holes and push buttons. See FIG. 1.
B. Depress each push button and slide poles together until the button snaps through the hole in its mating pole section.
TIP: Don’t put pole caps (#1) on top poles (#2) until after net has been attached.
TIP: Don’t use pole anchors (#6) on poles until step 5 of instructions is begun.
1-877-472-4296AFTER SALES SUPPORT [email protected]
FIG. 1
Top Pole
Pole Cap
Second Pole
Third Pole
First Hole - Guide Rope
Pole Anchor
Push Button
Wide
Push Button Hole
Second GuideRope Hole
Push Button
5 ft 1 in. Hole
5 ft 1 in / 6 ft. Hole
6 ft. Hole / 7 ft. Hole
Bottom Pole
PushButton
7 ft. Hole
FIG. 1A
1
2
3
4
5
6
7
7
7
Narrow

5
2. NET ATTACHMENT A. Slide the net sleeve over the top pole of assembled pole making sure the net top with Connecting Loop is at the top end of the pole. See FIG. 2.
1-877-472-4296AFTER SALES SUPPORT [email protected]
FIG. 2
ConnectingLoop
8
2
Net

1-877-472-4296AFTER SALES SUPPORT [email protected]
6
3. GUIDE ROPE ATTACHMENT A. Insert the eye bolt, with guide rope (#9) and pre-attached tension clips and stakes through the hole in the Top Pole (#2) as shown in FIG. 3. Secure with wing nut. Rotate and tighten the wing nut so that the loop is positioned vertically as shown in FIG. 3. Pull the net upward and hook the connecting cord loop onto the lower wing nut loop to secure the net. Pole cap (#1) can now be placed on top pole (#2). See FIG .3A.
B. Insert eyebolt, with second guide rope (#10) and pre-attached tension clips, through hole in second pole (#3) and secure with wing nut.
FIG. 3
FIG. 3A
TensionClip
Stake
Eyebolt
Guide Ropes
Wing Nut
SecondGuide Ropes
9
3
10
Pole Cap
ConnectingCord Loop
1
2
FIG.3A

1-877-472-4296AFTER SALES SUPPORT [email protected]
7
4. NET SET UP A. Stretch assembled net and poles across playing area until net is taught. Press pole anchors into ground where poles touch ground. Slip poles onto anchors. Holding poles in vertical position, press guide rope stakes into ground at 45-degree angle, 3 feet to 5 feet from pole and 3 feet to 5 feet apart. Make sure hooks on stakes are facing away from poles. See FIG. 4 and 5.
FIG. 4
3 FT - 5 FT 3 FT - 5 FT
GuideRopes
SecondGuideRope

1-877-472-4296AFTER SALES SUPPORT [email protected]
8
5. SECOND GUIDE ROPE SET UP A. Make loop on second guide rope tension clip large enough to slip over stake already in ground. Make sure guide rope loop is placed under stake hook as shown in FIG. 5.
6. NET HEIGHT ADJUSTMENT Adjust the net height to 5 ft 1 in., 6 ft. or 7 ft. by aligning the push buttons with the proper holes in the second, third and bottom poles as shown in FIG. 1 and here.
FIG. 6
5 ft. 1 in. pole 7 ft. pole6 ft. pole
PushButton
PushButton
PushButton
FIG. 5
Second Guide Rope
TIP: After net is completely assembled, youcan adjust net tension by sliding tension clipsup or down along guide ropes.
GroundStakeHook
GuideRope
Loop
GroundStakes
iv. BADMINTON RULES
9
1-877-472-4296AFTER SALES SUPPORT [email protected]
2 FT- 6 IN
2 FT- 6 IN
13 FT
13 FT
44 FT
20 FT
6 FT - 6 IN
6 FT - 6 IN
FAULTS:It is a fault:
If the shuttle is served overhand. The shuttle must be struck at a point not higher than the servers waist.
If in serving, the shuttle falls into wrong service court or falls short of the service line or beyond the long service line or out side the side boundary lines.
If the server or person receiving the service does not serve from within their right or left half court, whichever the case may be.
If the server or player intentionally distracts, balks or obstructs his opponent.
If the server in attempting to serve, misses the shuttle.
If during service or play the shuttle falls outside the boundaries of the court, passes through or under the net or fails to pass over the net.
If a player reaches over the net and hits the shuttle on their opponents side of the court. However a player may hit the shuttle on their side of the court and follow through on theswing over the net.
If the shuttle is hit twice in succession by the same player or the shuttle is hit by a player and his teammate successively.
NOTE. It is not a fault if the shuttle hits the net during service or play and goes over the net. If this occurs during the serve it is just reserved.
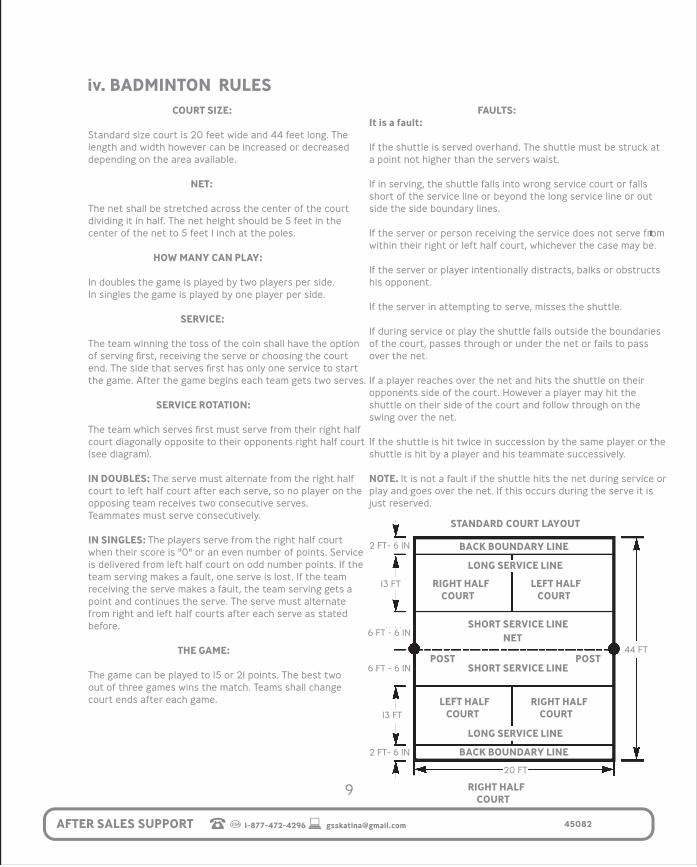
COURT SIZE:
Standard size court is 20 feet wide and 44 feet long. The length and width however can be increased or decreased depending on the area available.
NET:
The net shall be stretched across the center of the court dividing it in half. The net height should be 5 feet in the center of the net to 5 feet 1 inch at the poles.
HOW MANY CAN PLAY:
In doubles the game is played by two players per side.In singles the game is played by one player per side.
SERVICE:
The team winning the toss of the coin shall have the option of serving first, receiving the serve or choosing the court end. The side that serves first has only one service to start the game. After the game begins each team gets two serves.
SERVICE ROTATION:
The team which serves first must serve from their right half court diagonally opposite to their opponents right half court (see diagram).
lN DOUBLES: The serve must alternate from the right half court to left half court after each serve, so no player on the opposing team receives two consecutive serves. Teammates must serve consecutively.
IN SINGLES: The players serve from the right half court when their score is "0" or an even number of points. Service is delivered from left half court on odd number points. If the team serving makes a fault, one serve is lost. If the team receiving the serve makes a fault, the team serving gets a point and continues the serve. The serve must alternate from right and left half courts after each serve as stated before.
THE GAME:
The game can be played to 15 or 21 points. The best two out of three games wins the match. Teams shall change court ends after each game.
STANDARD COURT LAYOUT
BACK BOUNDARY LINE
BACK BOUNDARY LINE
LONG SERVICE LINE
LONG SERVICE LINE
SHORT SERVICE LINE
SHORT SERVICE LINE
RIGHT HALF COURT
RIGHT HALF COURT
RIGHT HALF COURT
LEFT HALF COURT
LEFT HALF COURT
NET
POST POST

v. VOLLEYBALL RULES
10
1-877-472-4296AFTER SALES SUPPORT [email protected]
COURT SIZE:
Standard size of court is 30 feet wide and 60 feet long.Width and length, however, can be increased or decreaseddepending on the area available.
NET:
The net shall be stretched across the center of the courtdividing it in half. The net height can vary from the official8 feet 0 inch height to other popular heights such as 7 feet 1 inch or 5 feet 1 inch or any desired height.
HOW MANY CAN PLAY:
Not more than 6 on each team-equal amounts of players oneach side.
SERVICE:
Each player shall serve in turn and will continue to serveuntil side is out. When serving, the ball must go over thenet; if the ball hits the net when served and goes over thenet, the ball must be re-served. If the ball does not go overthe net when served or is out of bounds or touches anyteam-mate before touching an opponent or opponent’scourt, the side is out and the opponent takes possessionand becomes the serving team.
SERVICE AREA:
The service area should be a minimum of 5 feet in depthbehind the end boundary court and in the event the playingarea does not provide space for such depth, then the servingarea shall extend into the court to whatever distance isnecessary to provide such a minimum service area. Theservice area should be located in the right end section ofeach court, the width not to exceed 8 feet. (see diagram).
VOLLEY:
Maximum of three team contacts-each team is allowed amaximum of three (3) successive contacts of the ball inorder to return the ball to the opponent’s area.
ROTATION:
After a team has lost its serve, the team receiving the ballfor the first serve shall, before serving, rotate one positionclockwise.
ERRORS:
When a player and/or when the ball is in play:1) Does not clearly hit the ball or allows the ball to come to
rest in any part or parts of the body.2) Hits the ball out of boundaries of the court.3) Allows the ball to hit the floor, or any object outside or
over the court (except net), before being legally returned to the opponent’s court.
4) Touches the ball twice in succession.5) Fails to make a good serve.
FOULS:
1) Holding the ball or throwing it.2) If the ball touches any part of the body, except the hands
or forearms.3) Touching the net with any part of the body or hands, or
reaching over the net.4) If a player plays out of position when ball is being served.
SCORING:
Only the serving team can score. When the serving teamfails to score, it is “side out” and the receiving teambecomes the serving team.
PENALTY:
The penalty for fouls or errors committed shall be “point” or“side out”, as the case may be.
GAME:
The game shall be played for 21 points or, upon agreementby both teams, 15 points may constitute a game. A matchconsists of two out of three games.
STANDARD COURT LAYOUT
CENTER
FORW
AR
D
LEFT
FORW
AR
D
CEN
TER
FORW
AR
D
RIG
HT
FORW
AR
D
NET CENTER LINE
30 FT 30 FT
30 FT
LEFT
BACK
CEN
TER
BACK
RIGHTBACK
LEFTBA
CKCEN
TERBA
CK
8 FT
SERVING AREA
SERVING AREA
RIGH
TBA
CK
8 FT
LEFTFO
RWA
RD
RIG
HT
FORW
AR
D
Caution: Stand clear of the court area to avoid being injured while a player is taking his or her turn.
11
vi. FAQ
vii. Other Useful Information
In order to care and protect this item please store the item after use. This item should not be left out in the elements as this will affect the integrity of the product and cause the item to not work correctly.
Please read the instructions carefully, and follow all assembly, operation or safety instructions properly in order to avoid damage or injury. For the assembly, at least one adult is required.
Some figures or drawings may not look exactly like your product. Please read and understand the text before beginning each assembly step.
Please Keep Your Instructions! Your Model number is necessary when you need to contact us. Please read through this instruction manual to familiarize yourself with all parts and assembly steps. Kindly refer to the parts list and be sure that all parts have been included.
If you are missing parts, or, if you have any questions, please contact our fast and friendly service center on: 1-877-472-4296
1-877-472-4296AFTER SALES SUPPORT [email protected]

1-877-472-4296AFTER SALES SUPPORT [email protected]
Premium Volleyball & Badminton Set Warranty Card
Your details:
Date of purchase** We recommend you keep the receipt with this warranty card
Name
Address
Medal Sports (B.V.I.) Ltd.
1300 Melissa Drive Suite 124, Bentonville, Arkansas 72712, USA
E-mail: [email protected]
Description of malfunction:
Location of purchase
Return your completed warranty card to:
USA
AFTER SALES SUPPORT
1-877-472-4296
MODEL: 45082
x. Warranty Card
12
2 YEARS
WARRANTY