Ppt2013 ch09
65
Chapter 9 Modifying a Presentation Using Graphical Elements Microsoft PowerPoint 2013
-
Upload
kristin-harrison -
Category
Education
-
view
133 -
download
0
Transcript of Ppt2013 ch09
Chapter 9
Modifying a Presentation Using Graphical Elements
Microsoft
PowerPoint 2013
• Change a text box outline color, weight, and style
• Set text box formatting as the default for new text boxes
• Apply a gradient, texture, pattern, and effects to a text box
• Convert WordArt to SmartArt
• Reorder SmartArt shapes
• Promote and demote SmartArt text
Modifying a Presentation Using Graphical Elements 2
Objectives
• Add and remove SmartArt shapes
• Convert a SmartArt graphic to text
• Customize the ribbon
• Combine and subtract shapes
• Create a handout by exporting files to Microsoft Word
• Save the presentation as a picture presentation
Modifying a Presentation Using Graphical Elements 3
Objectives
Modifying a Presentation Using Graphical Elements 4
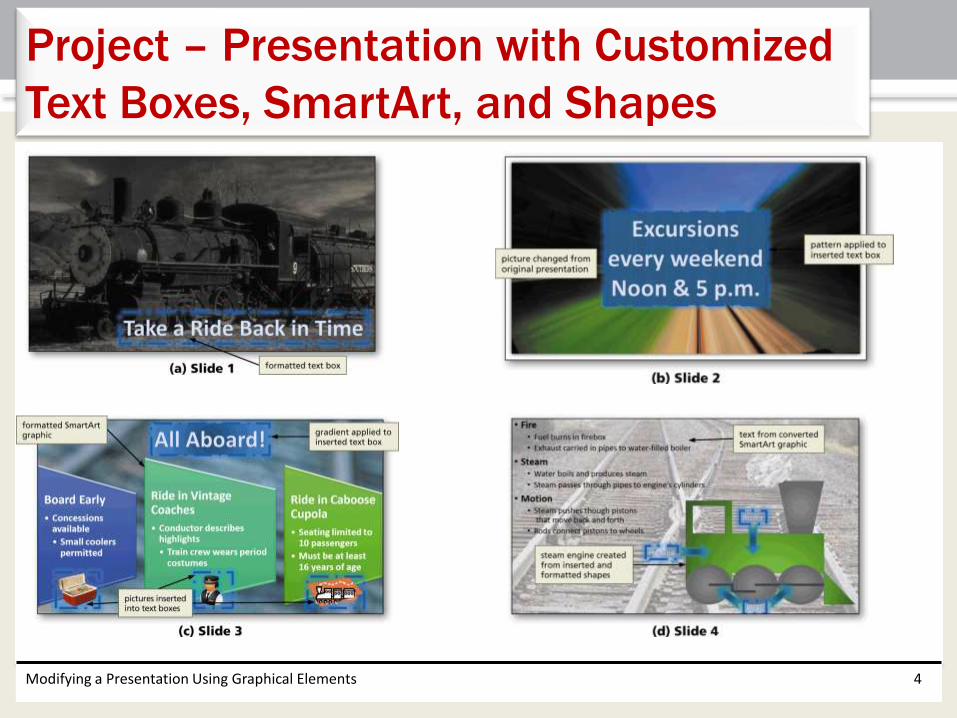
Project – Presentation with Customized
Text Boxes, SmartArt, and Shapes
Modifying a Presentation Using Graphical Elements 5
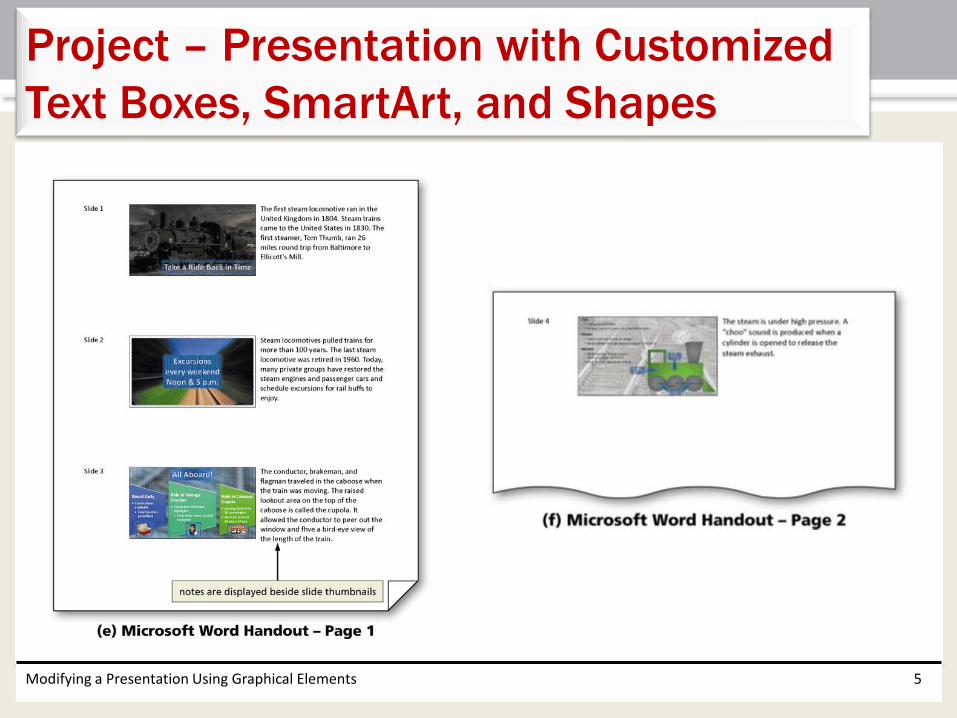
Project – Presentation with Customized
Text Boxes, SmartArt, and Shapes
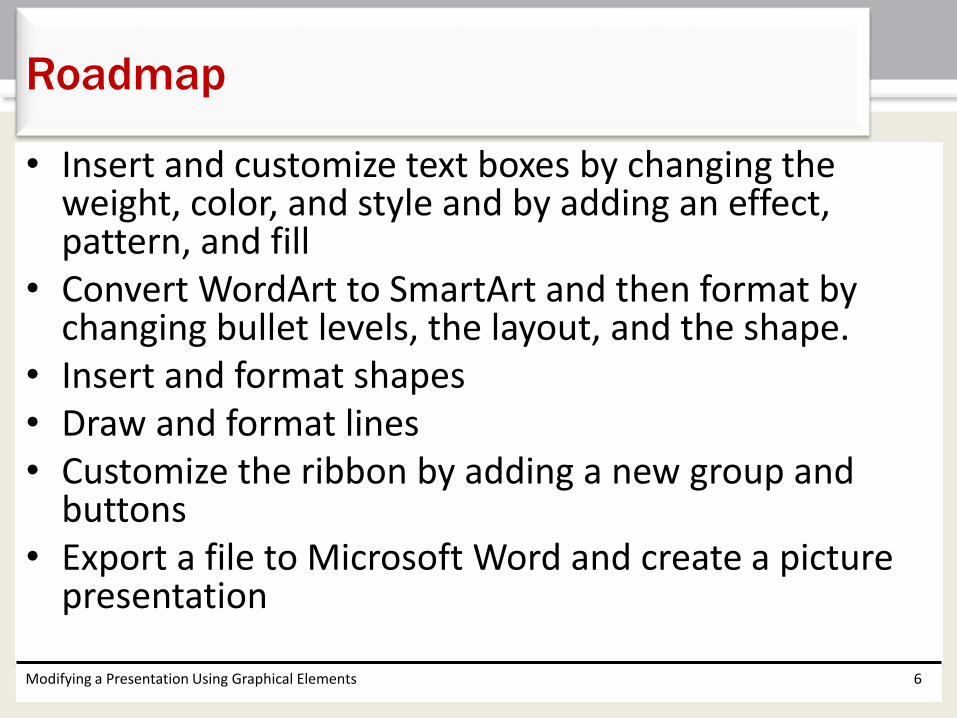
• Insert and customize text boxes by changing the weight, color, and style and by adding an effect, pattern, and fill
• Convert WordArt to SmartArt and then format by changing bullet levels, the layout, and the shape.
• Insert and format shapes• Draw and format lines• Customize the ribbon by adding a new group and
buttons• Export a file to Microsoft Word and create a picture
presentation
Modifying a Presentation Using Graphical Elements 6
Roadmap
• Tap or click the desired text box to select it
• Tap or click the Shape Outline arrow (DRAWING TOOLS FORMAT tab | Shape Styles group) to display the Shape Outline gallery
• Tap or click Weight in the Shape Outline gallery to display the Weight list
• Tap or click the desired line weight to add an outline around the text box
Modifying a Presentation Using Graphical Elements 7
Changing a Text Box Outline Weight
Modifying a Presentation Using Graphical Elements 8
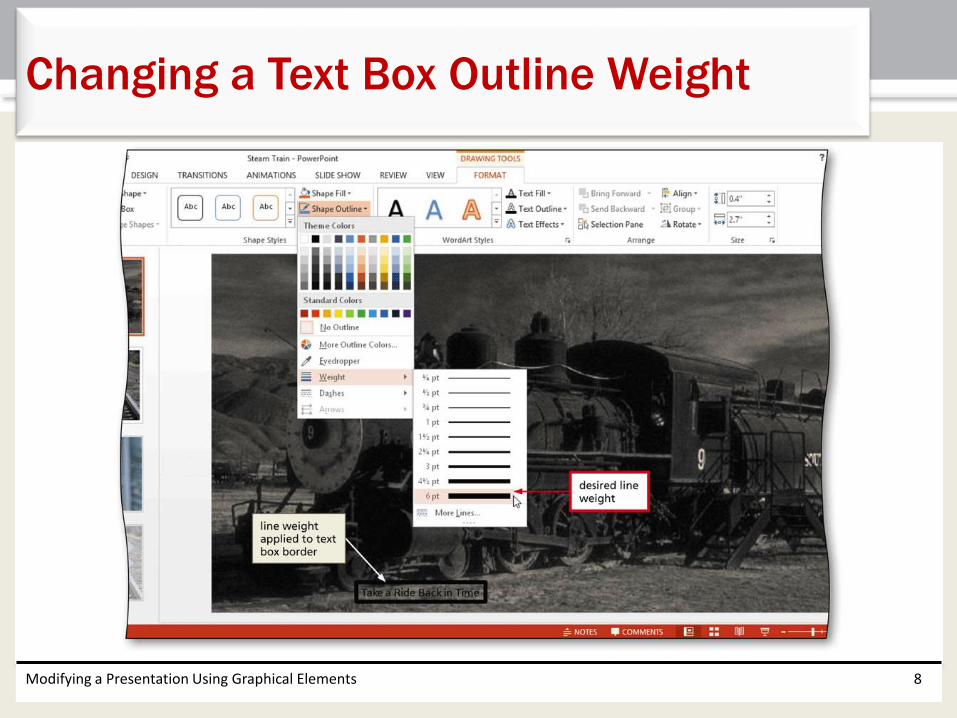
Changing a Text Box Outline Weight
• Tap or click the desired text box to select it
• Tap or click the Shape Outline arrow (DRAWING TOOLS FORMAT tab | Shape Styles group) to display the Shape Outline gallery and then tap or click the desired color to change the text box border color
Modifying a Presentation Using Graphical Elements 9
Changing a Text Box Outline Color
Modifying a Presentation Using Graphical Elements 10
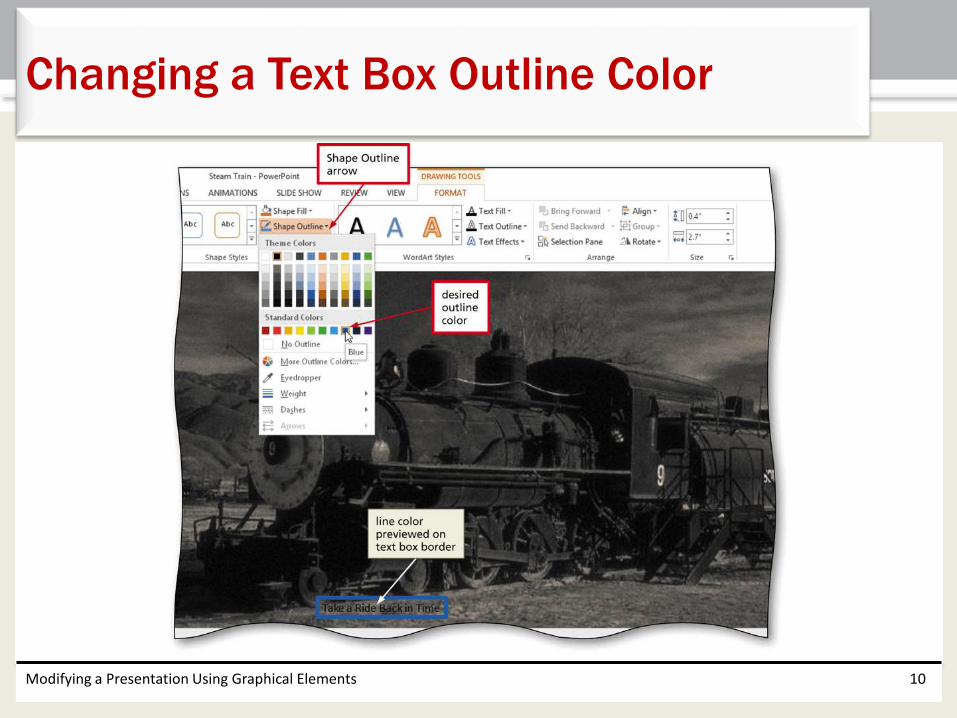
Changing a Text Box Outline Color
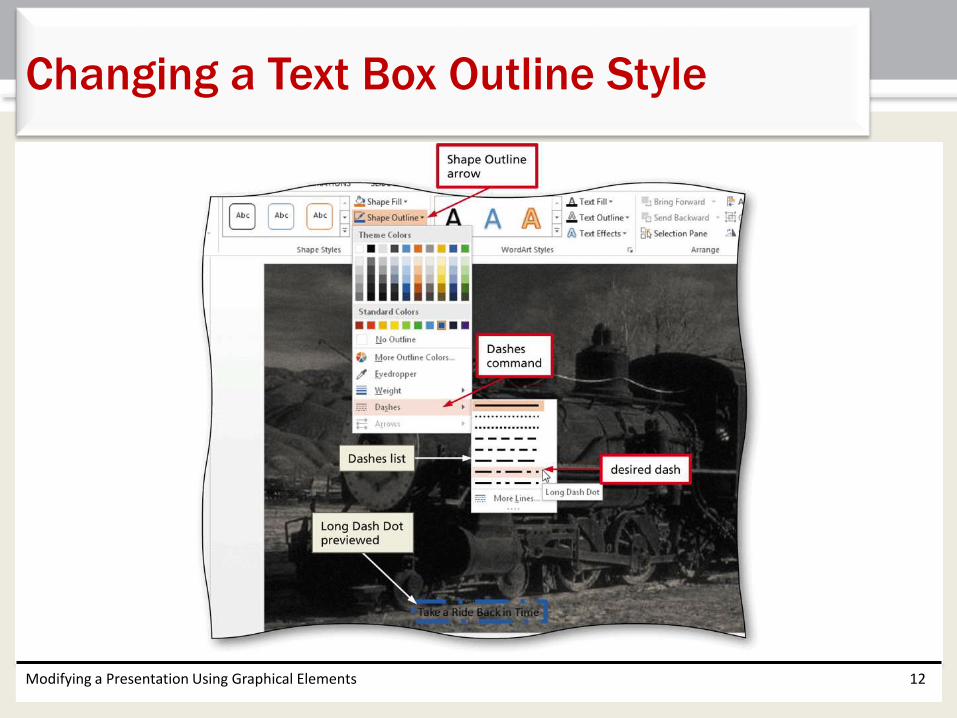
• Tap or click the desired text box to select it
• Tap or click the Shape Outline arrow (DRAWING TOOLS FORMAT tab | Shape Styles group) to display the Shape Outline gallery and then tap or click the desired text box border style to change the text box border style
Modifying a Presentation Using Graphical Elements 11
Changing a Text Box Outline Style
Modifying a Presentation Using Graphical Elements 12
Changing a Text Box Outline Style
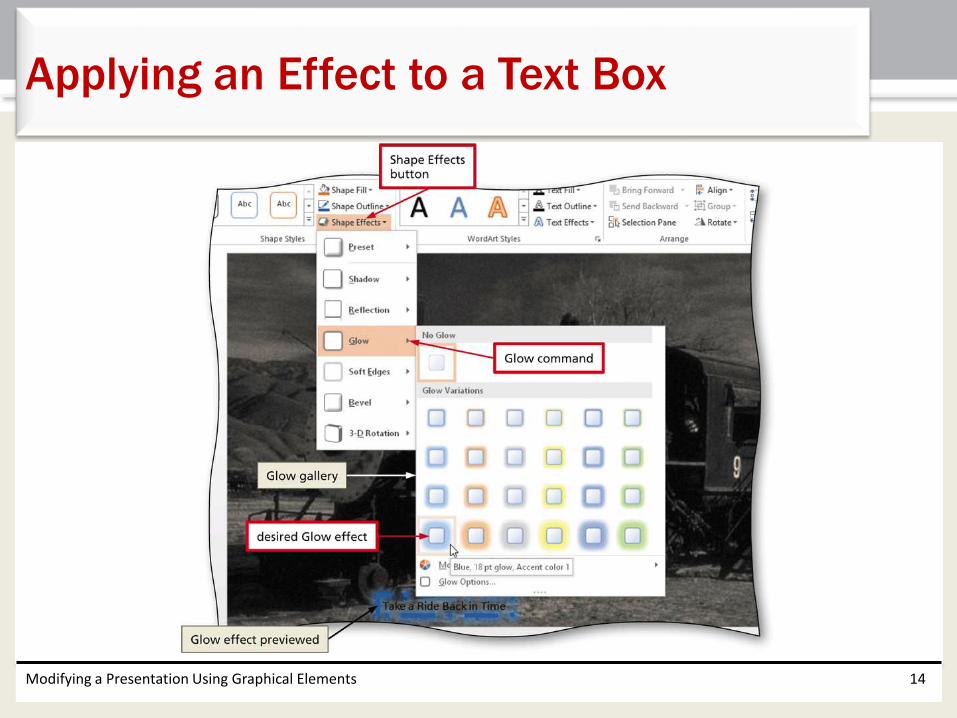
• Tap or click the desired text box to select it
• Tap or click the Shape Effects button (DRAWING TOOLS FORMAT tab | Shape Styles group) to display the Shape Effects gallery
• Tap or click the desired effect to apply it
Modifying a Presentation Using Graphical Elements 13
Applying an Effect to a Text Box
Modifying a Presentation Using Graphical Elements 14
Applying an Effect to a Text Box
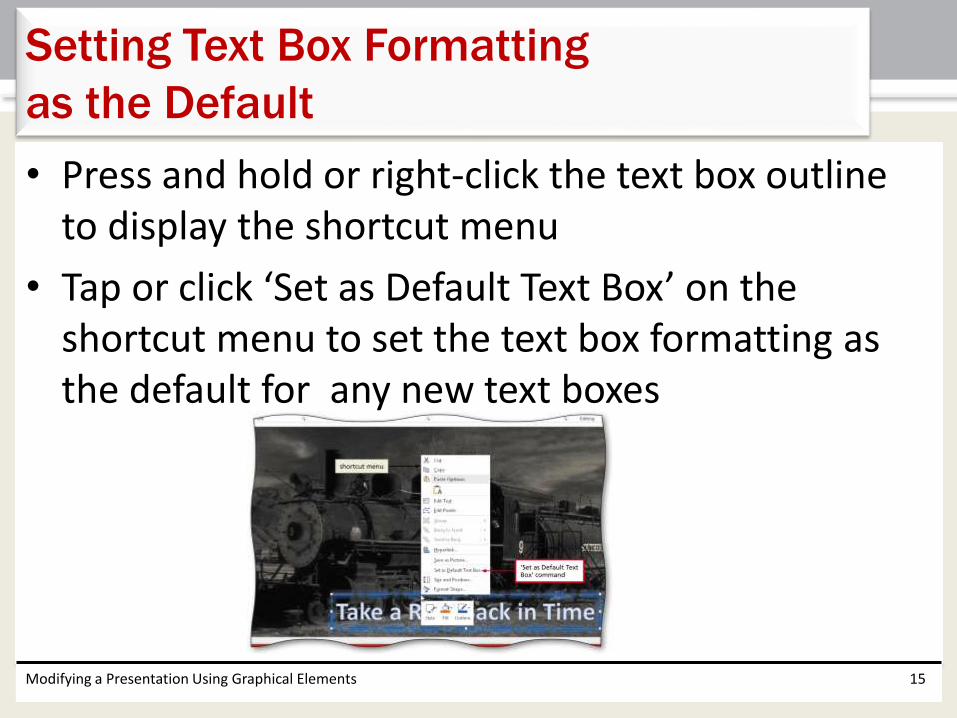
• Press and hold or right-click the text box outline to display the shortcut menu
• Tap or click ‘Set as Default Text Box’ on the shortcut menu to set the text box formatting as the default for any new text boxes
Modifying a Presentation Using Graphical Elements 15
Setting Text Box Formatting
as the Default
• Press and hold or right-click anywhere on the text box to display the shortcut menu
• Tap or click Format Shape on the shortcut menu to display the Format Shape pane
• Tap or click Pattern fill in the FILL section to display the Pattern gallery and then tap or click the desired pattern
• Tap or click the Foreground button to display a color gallery
• Tap or click the desired color to apply the color to the text box pattern and display the Pattern gallery with the new foreground color
Modifying a Presentation Using Graphical Elements 16
Applying a Pattern to a Text Box
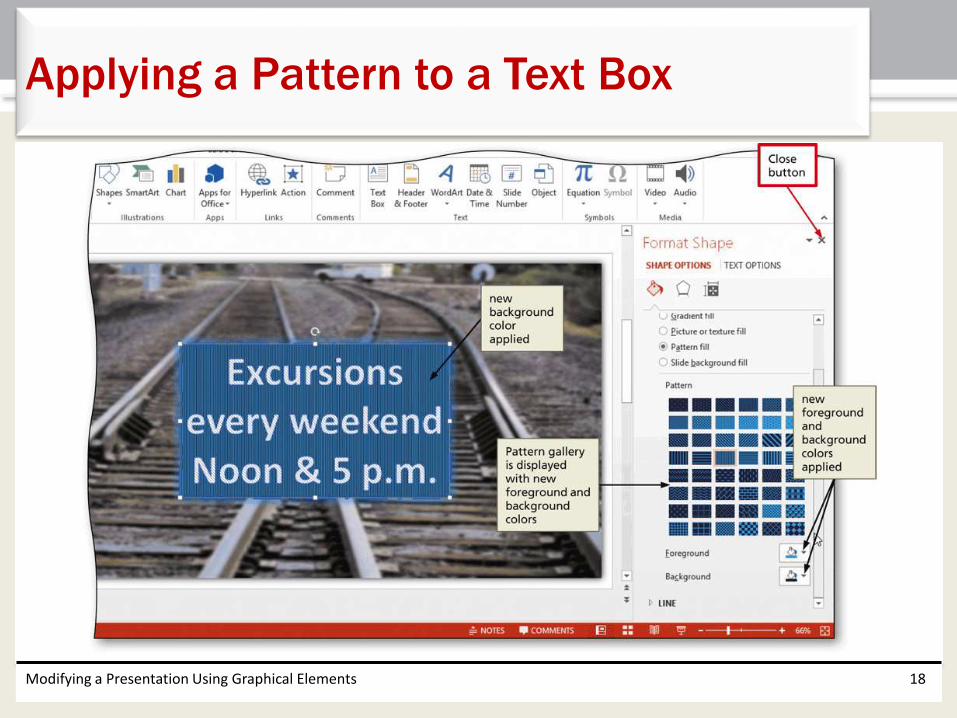
• Tap or click the Background Color button to display a color gallery
• Tap or click the desired color to apply the color to the text box background and to display the Pattern gallery with the new background color
• Tap or click the Close button to close the Format Shape pane
Modifying a Presentation Using Graphical Elements 17
Applying a Pattern to a Text Box
Modifying a Presentation Using Graphical Elements 18
Applying a Pattern to a Text Box
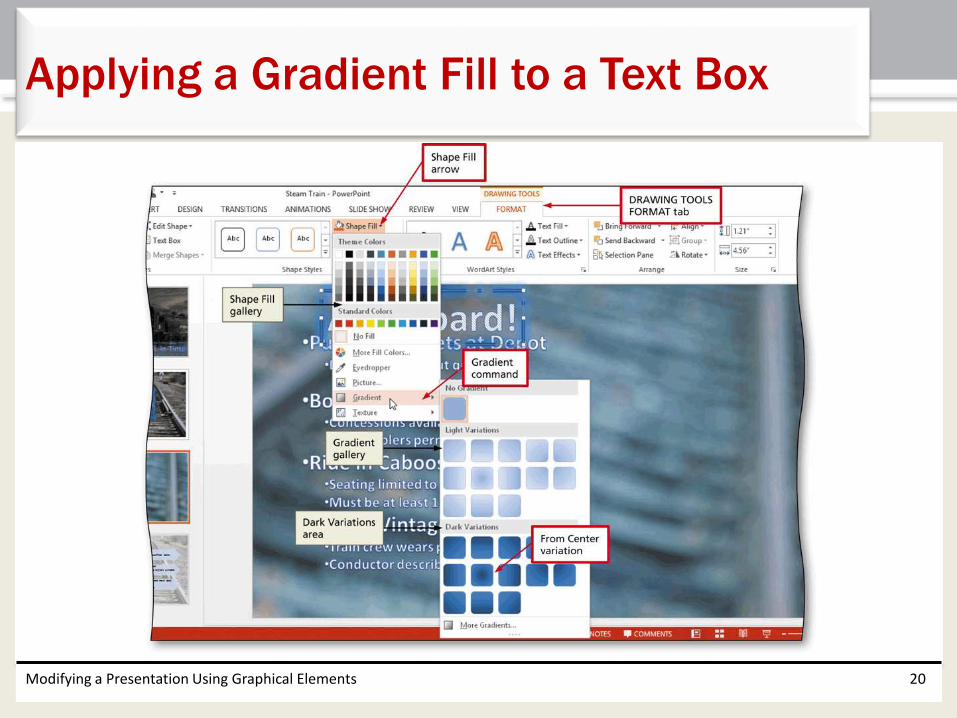
• Tap or click the desired text box to select it
• Tap or click the Shape Fill arrow (DRAWING TOOLS FORMAT tab | Shape Styles group) to display the Shape Fill gallery
• Tap or click Gradient to display the Gradient gallery
• Tap or click the desired variation to apply the gradient fill
Modifying a Presentation Using Graphical Elements 19
Applying a Gradient Fill to a Text Box
Modifying a Presentation Using Graphical Elements 20
Applying a Gradient Fill to a Text Box
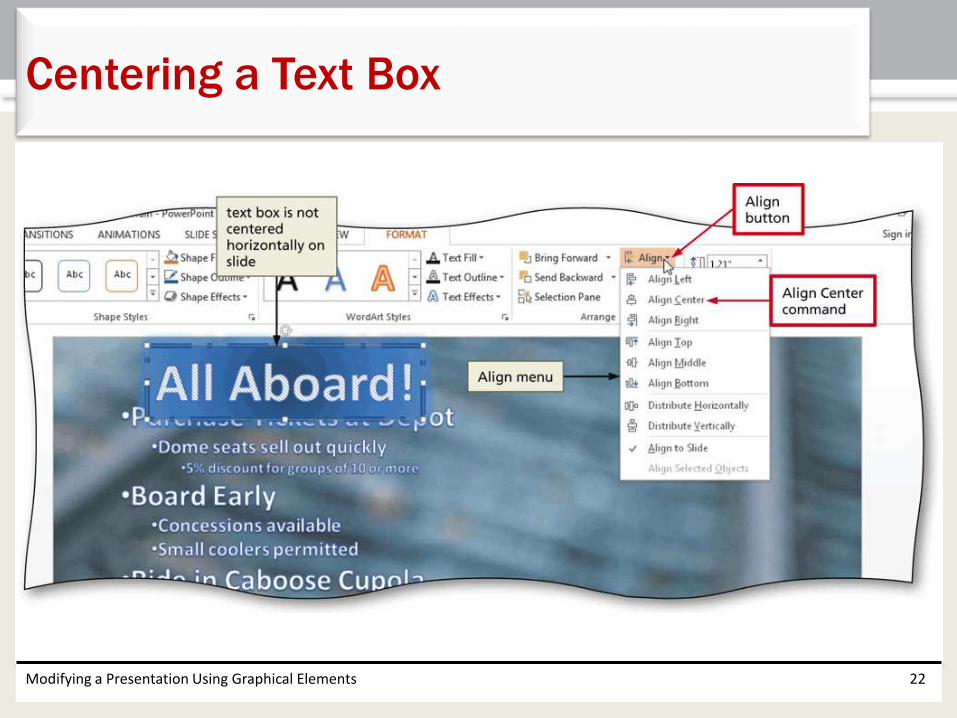
• With the text box selected, tap or click the Align button (DRAWING TOOLS FORMAT tab | Arrange group) to display the Align menu
• Tap or click Align Center to center the text box horizontally on the slide
Modifying a Presentation Using Graphical Elements 21
Centering a Text Box
Modifying a Presentation Using Graphical Elements 22
Centering a Text Box
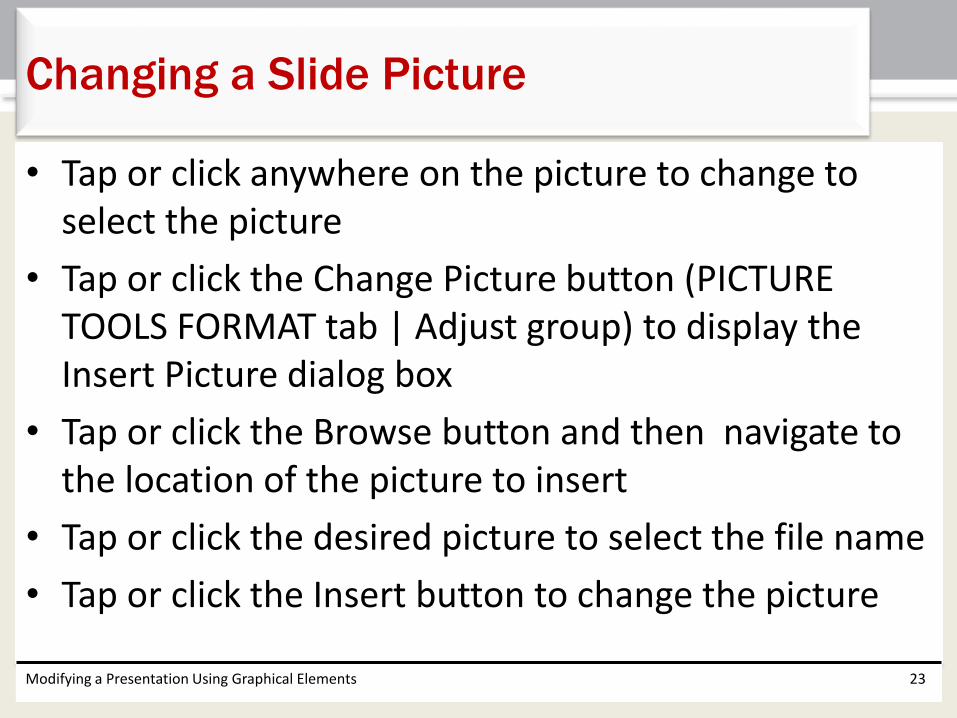
• Tap or click anywhere on the picture to change to select the picture
• Tap or click the Change Picture button (PICTURE TOOLS FORMAT tab | Adjust group) to display the Insert Picture dialog box
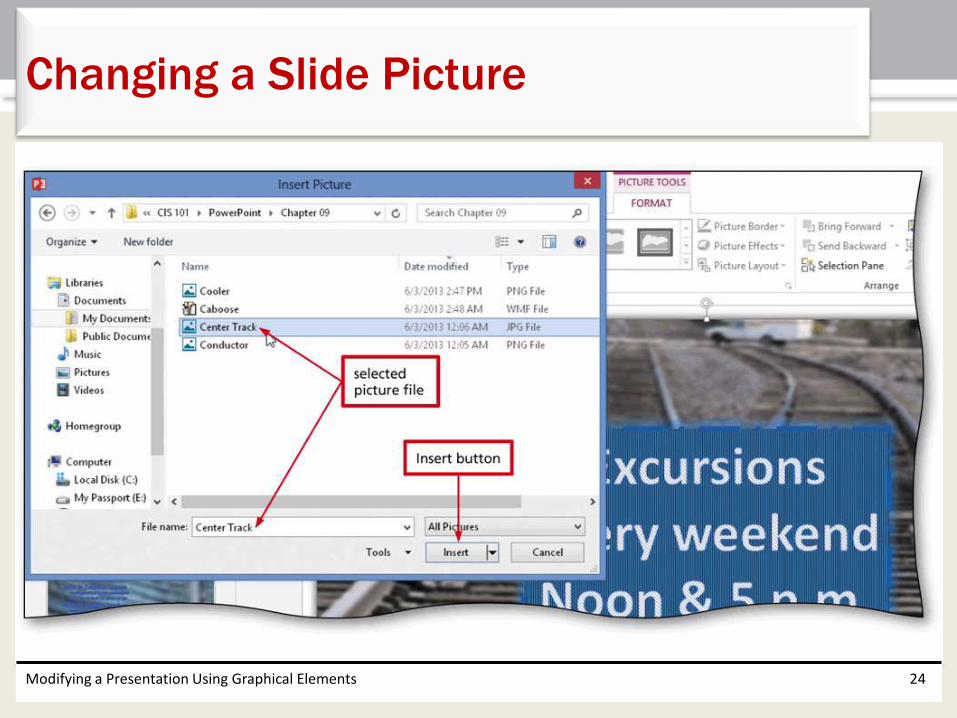
• Tap or click the Browse button and then navigate to the location of the picture to insert
• Tap or click the desired picture to select the file name
• Tap or click the Insert button to change the picture
Modifying a Presentation Using Graphical Elements 23
Changing a Slide Picture
Modifying a Presentation Using Graphical Elements 24
Changing a Slide Picture
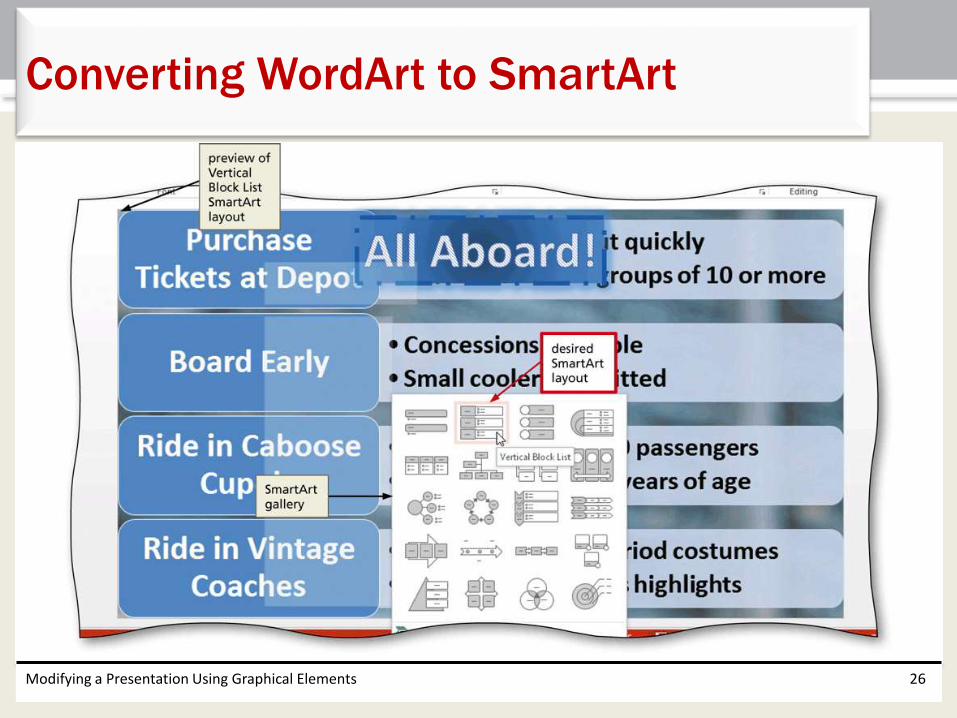
• Press and hold or right-click anywhere in the WordArt bulleted list paragraphs to display the shortcut menu, and then tap or click ‘Convert to SmartArt’ to display the SmartArt gallery
• Tap or click the desired SmartArt layout to convert the WordArt to that layout
Modifying a Presentation Using Graphical Elements 25
Converting WordArt to SmartArt
Modifying a Presentation Using Graphical Elements 26
Converting WordArt to SmartArt
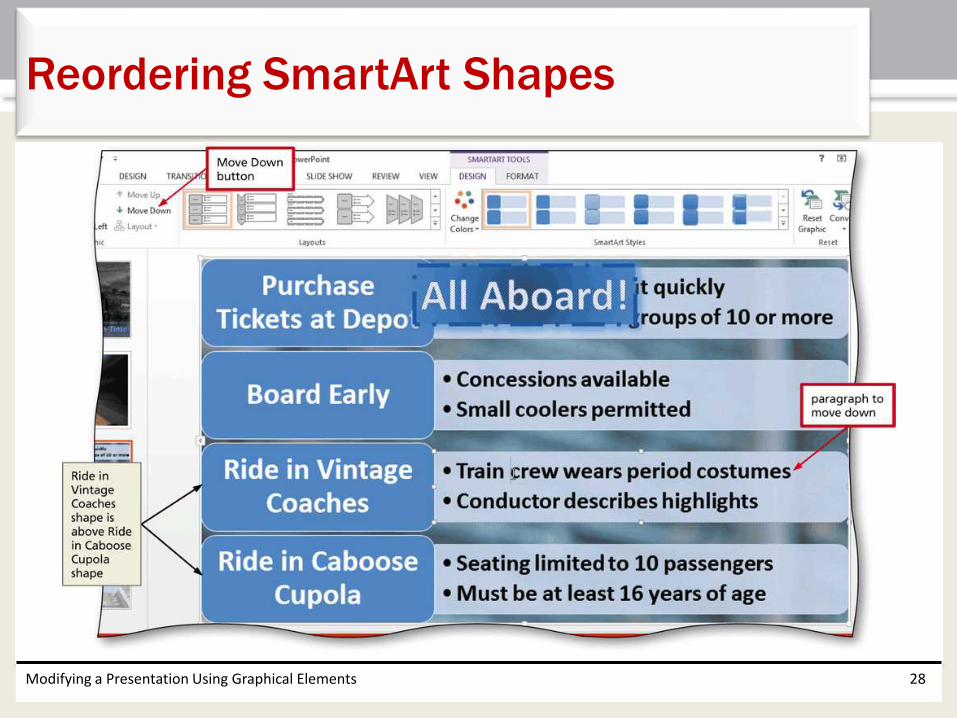
• Tap or click to select the desired shape to reorder
• With the SMARTART TOOLS DESIGN tab displayed, tap or click the Move Up button or Move Down button (SMARTART TOOLS DESIGN tab | Create Graphic group) to reorder the shape
Modifying a Presentation Using Graphical Elements 27
Reordering SmartArt Shapes
Modifying a Presentation Using Graphical Elements 28
Reordering SmartArt Shapes
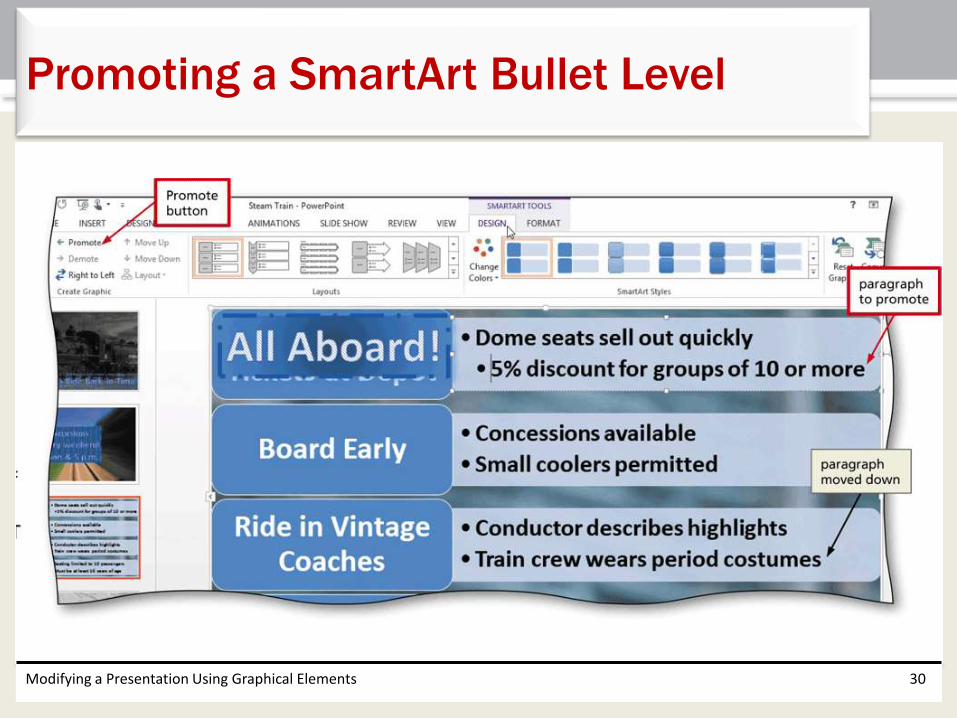
• Position the pointer in the bulleted paragraph to be promoted
• Tap or click the Promote button (SMARTART TOOLS DESIGN tab | Create Graphic group) to decrease the indent of the bulleted paragraph
Modifying a Presentation Using Graphical Elements 29
Promoting a SmartArt Bullet Level
Modifying a Presentation Using Graphical Elements 30
Promoting a SmartArt Bullet Level
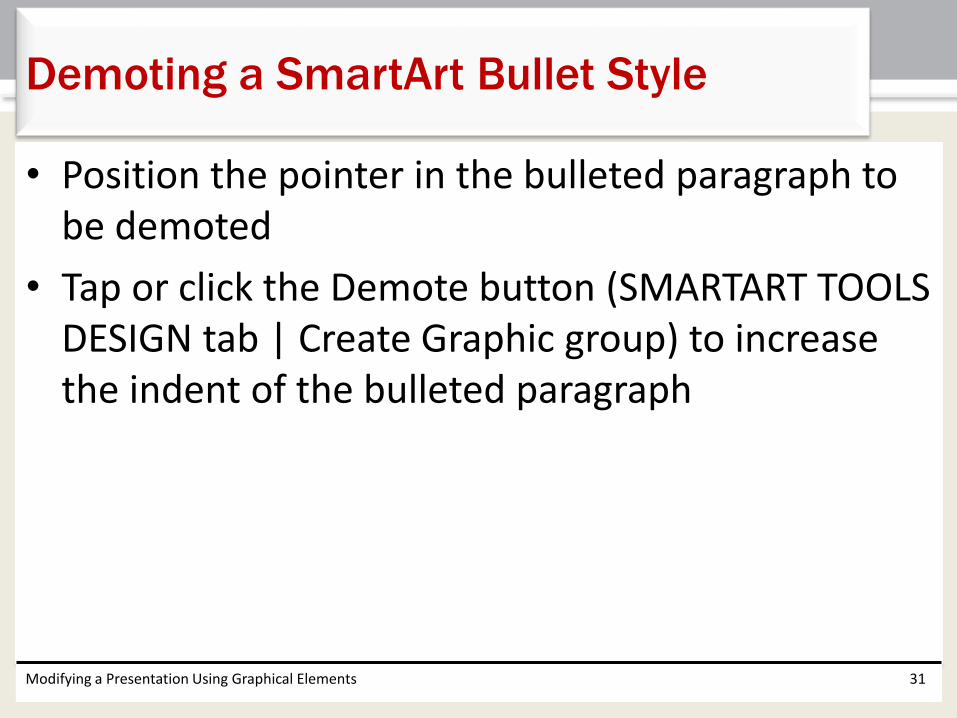
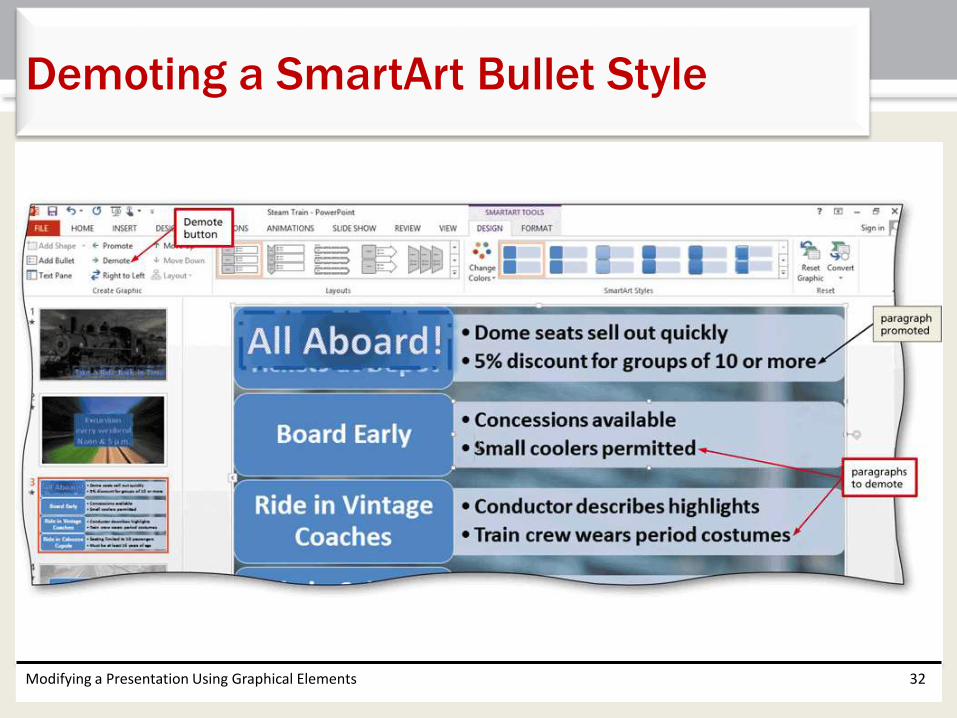
• Position the pointer in the bulleted paragraph to be demoted
• Tap or click the Demote button (SMARTART TOOLS DESIGN tab | Create Graphic group) to increase the indent of the bulleted paragraph
Modifying a Presentation Using Graphical Elements 31
Demoting a SmartArt Bullet Style
Modifying a Presentation Using Graphical Elements 32
Demoting a SmartArt Bullet Style
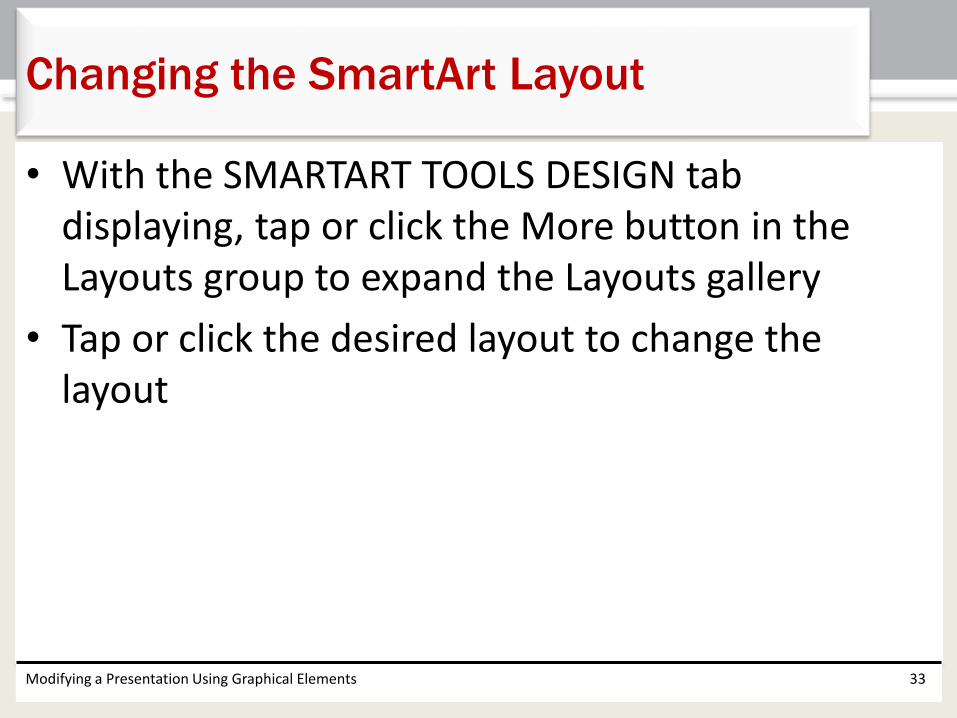
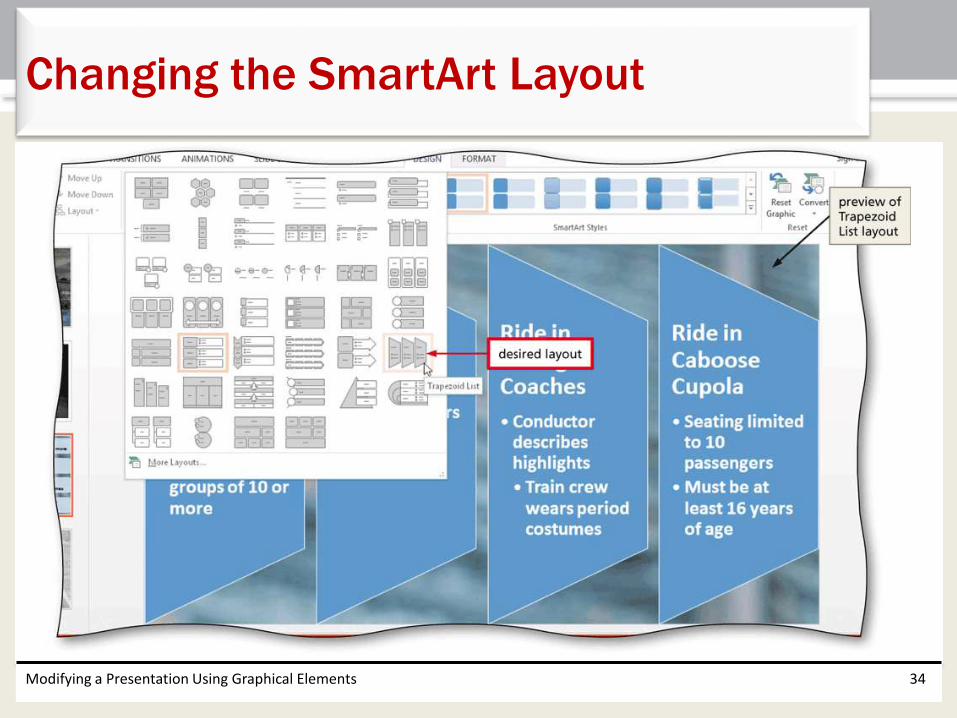
• With the SMARTART TOOLS DESIGN tab displaying, tap or click the More button in the Layouts group to expand the Layouts gallery
• Tap or click the desired layout to change the layout
Modifying a Presentation Using Graphical Elements 33
Changing the SmartArt Layout
Modifying a Presentation Using Graphical Elements 34
Changing the SmartArt Layout
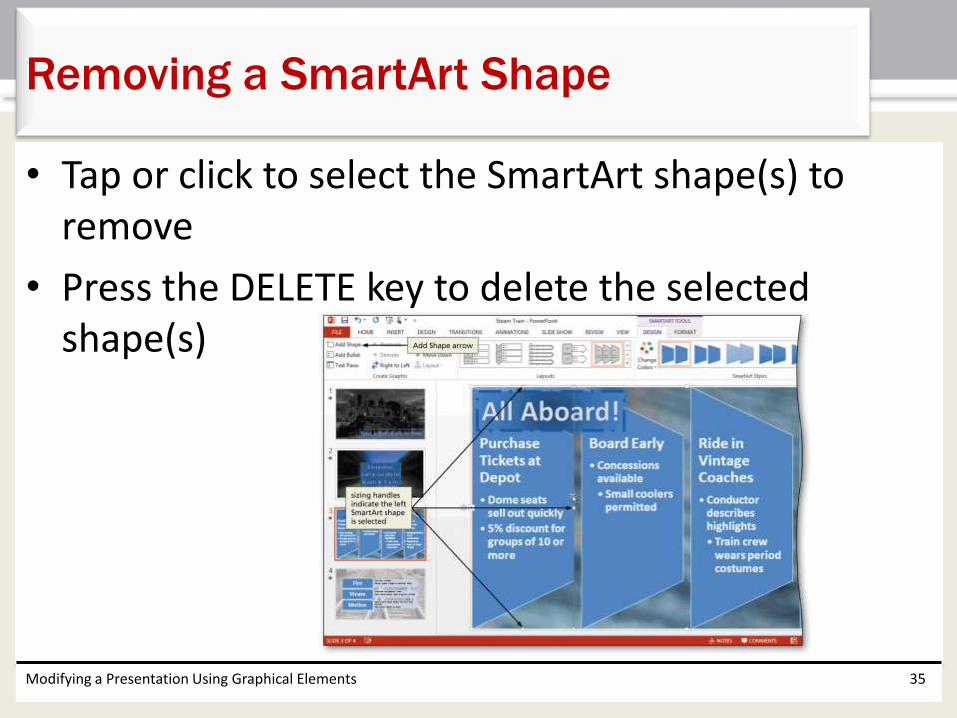
• Tap or click to select the SmartArt shape(s) to remove
• Press the DELETE key to delete the selected shape(s)
Modifying a Presentation Using Graphical Elements 35
Removing a SmartArt Shape
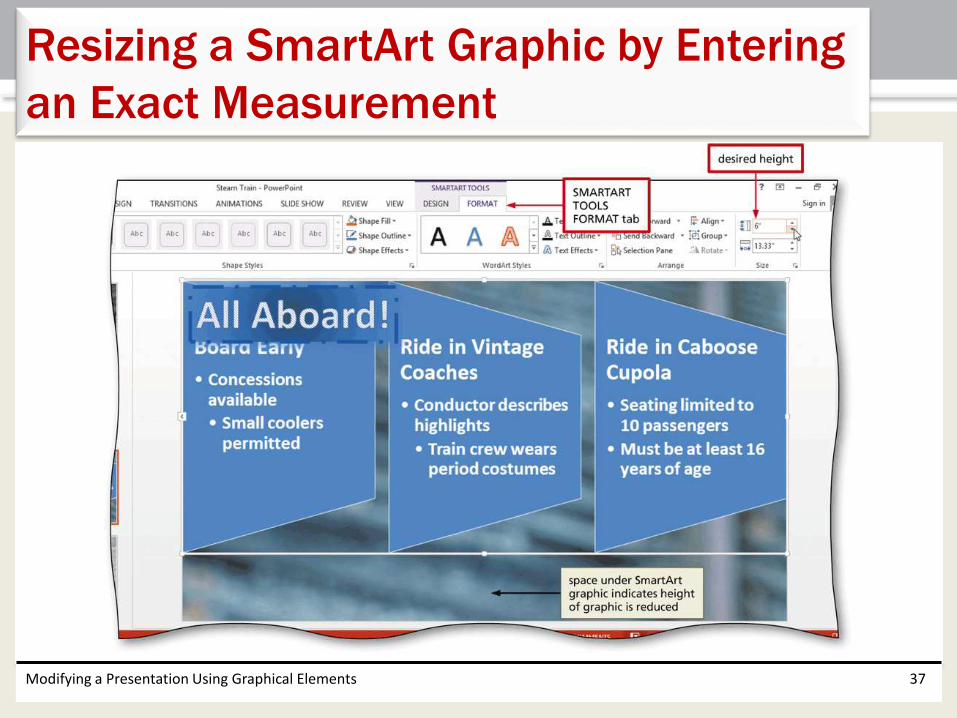
• Select the entire SmartArt graphic by tapping or clicking an outer edge of the graphic
• Display the SMARTART TOOLS FORMAT tab
• Change the setting in the Height box
• Change the setting in the Width box
Modifying a Presentation Using Graphical Elements 36
Resizing a SmartArt Graphic by Entering
an Exact Measurement
Modifying a Presentation Using Graphical Elements 37
Resizing a SmartArt Graphic by Entering
an Exact Measurement
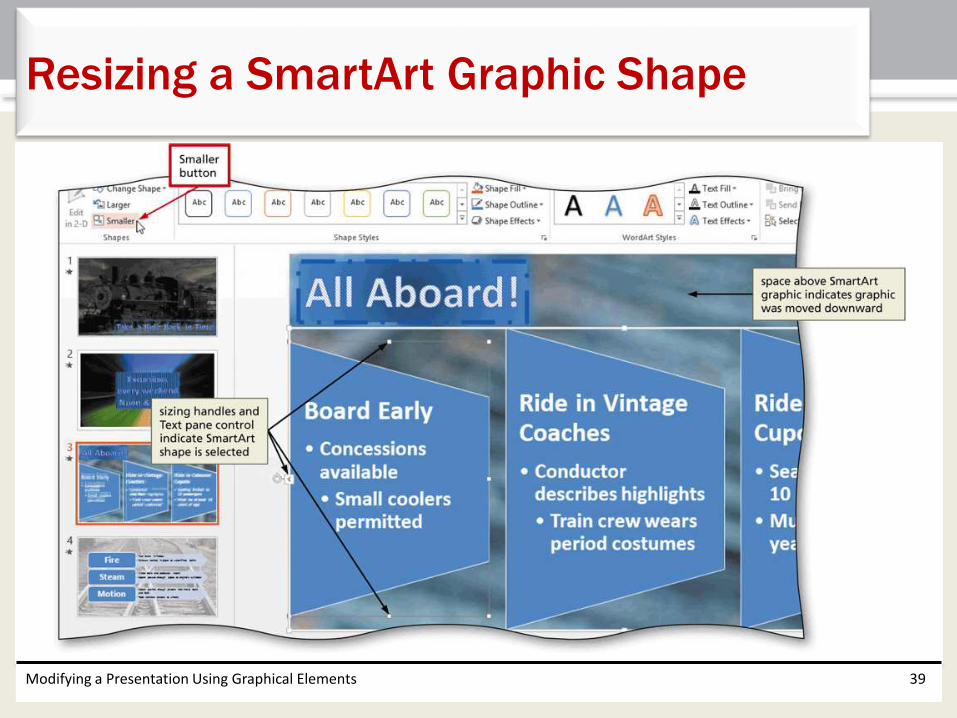
• Tap or click the SmartArt graphic shape to resize
• With the SMARTART TOOLS FORMAT tab displaying, tap or click the Smaller button or Larger button (SMARTART TOOLS FORMAT tab | Shapes group) to decrease or increase the shape size
Modifying a Presentation Using Graphical Elements 38
Resizing a SmartArt Graphic Shape
Modifying a Presentation Using Graphical Elements 39
Resizing a SmartArt Graphic Shape
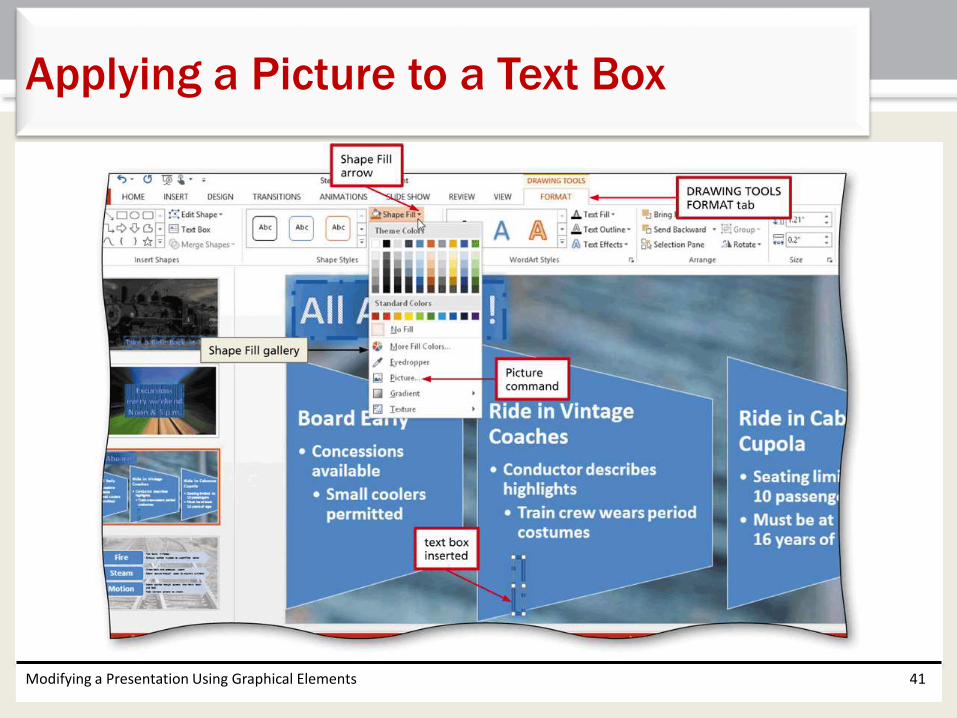
• Insert a text box
• Tap or click the Shape Fill button (DRAWING TOOLS FORMAT tab | Drawing group) to display the Shape Fill gallery
• Tap or click Picture in the Shape Fill gallery to display the Insert Picture dialog box. Tap or click the Browse button and then click the desired picture
• Tap or click the Insert button to insert the picture into the text box
Modifying a Presentation Using Graphical Elements 40
Applying a Picture to a Text Box
Modifying a Presentation Using Graphical Elements 41
Applying a Picture to a Text Box
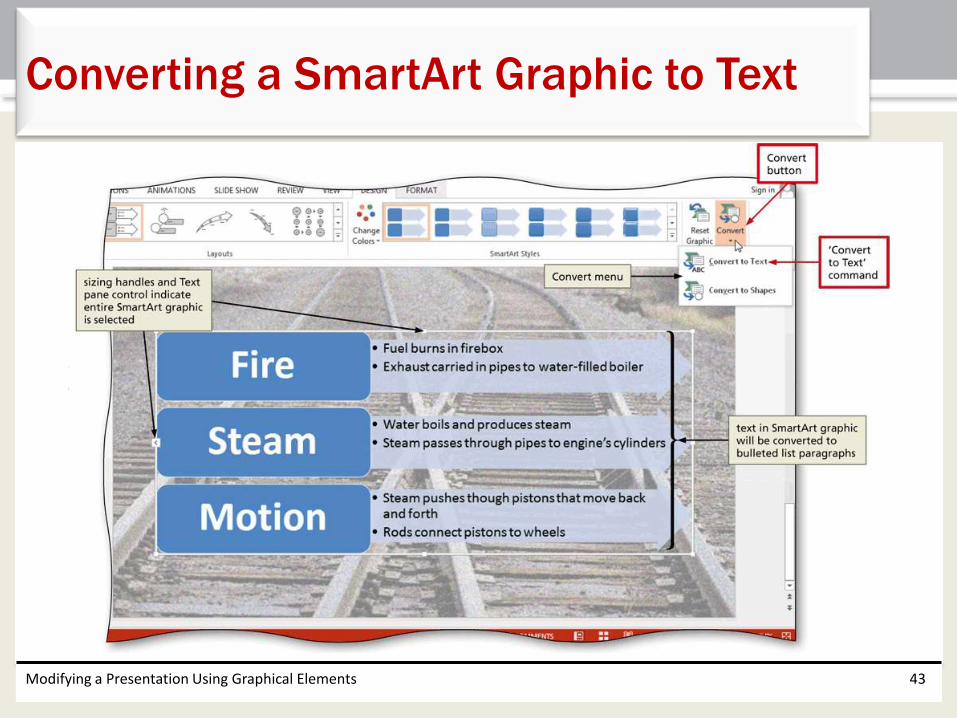
• Select the entire SmartArt graphic
• With the SMARTART TOOLS DESIGN tab displaying, tap or click the Convert button (SMARTART TOOLS DESIGN tab | Reset group) to display the Convert menu
• Tap or click ‘Convert to Text’ to display the SmartArt text as paragraphs
Modifying a Presentation Using Graphical Elements 42
Converting a SmartArt Graphic to Text
Modifying a Presentation Using Graphical Elements 43
Converting a SmartArt Graphic to Text
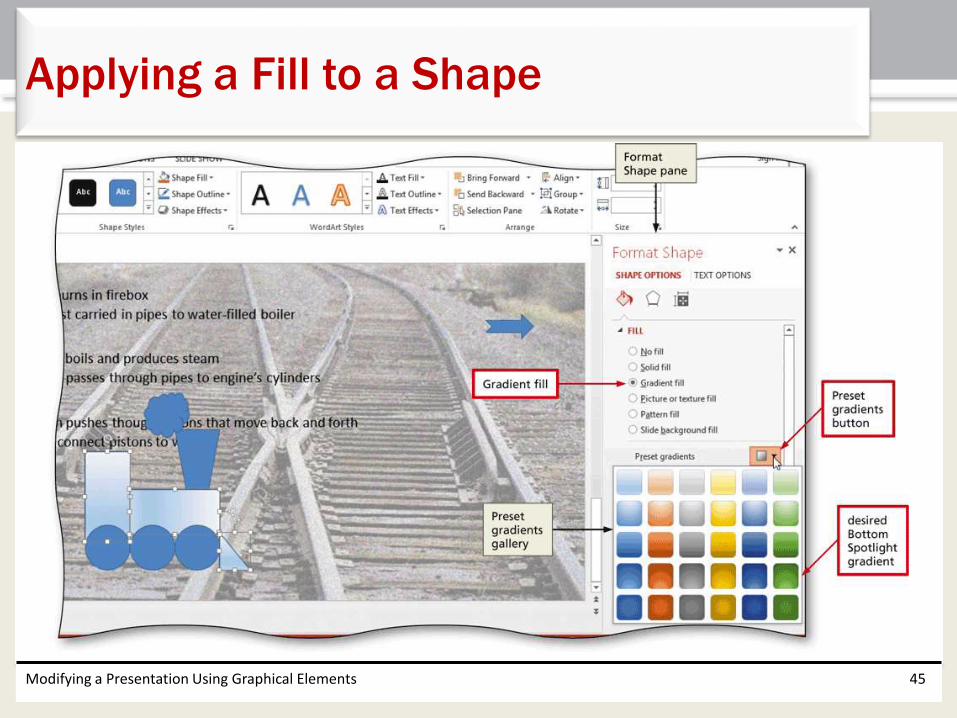
• Click the shape to which you wish to apply a fill
• Tap or click the Shape Fill arrow (DRAWING TOOLS FORMAT tab | Drawing group) to display the Shape Fill gallery, and then tap or click Gradient to display the Gradient gallery
• Tap or click More Gradients in the Gradient gallery to display the Format Shape pane
• With the Fill section displaying, tap or click Gradient fill to expand the gradient options and then tap or click the Preset gradients button to display the Preset gradients gallery
• Tap or click the desired gradient fill to apply it to the selected shape
Modifying a Presentation Using Graphical Elements 44
Applying a Fill to a Shape
Modifying a Presentation Using Graphical Elements 45
Applying a Fill to a Shape
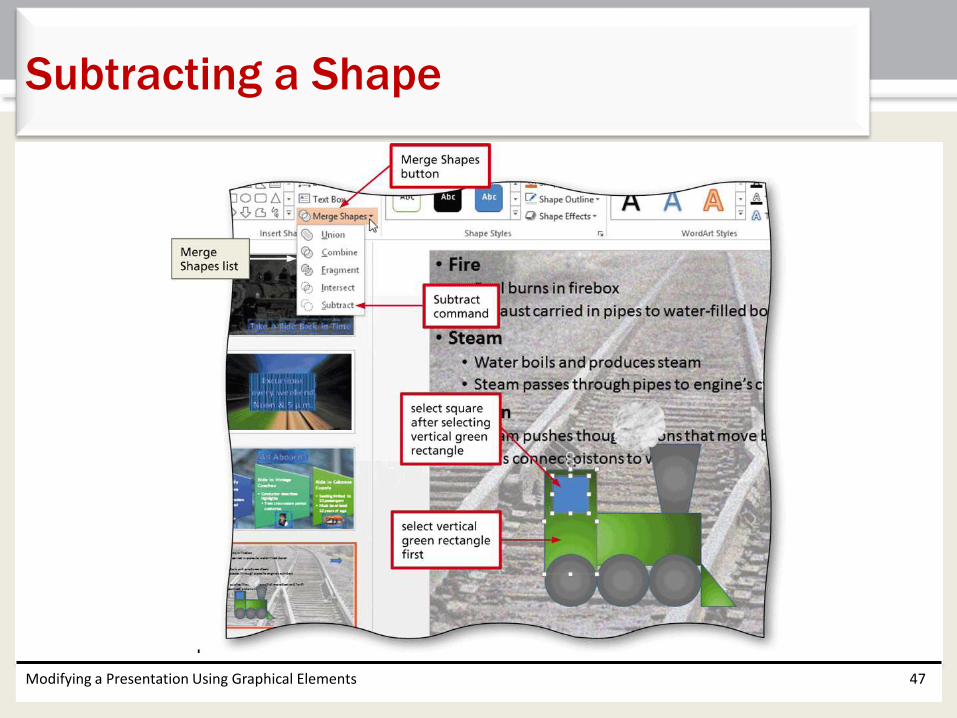
• Select the desired shape
• Click to select the portions of the shape to delete
• Tap or click the Merge Shapes button (DRAWING TOOLS FORMAT tab | Insert Shapes group) to display the Merge Shapes list
• Tap or click Subtract in the Merge Shapes list to delete the selected portions of the shape
Modifying a Presentation Using Graphical Elements 46
Subtracting a Shape
Modifying a Presentation Using Graphical Elements 47
Subtracting a Shape
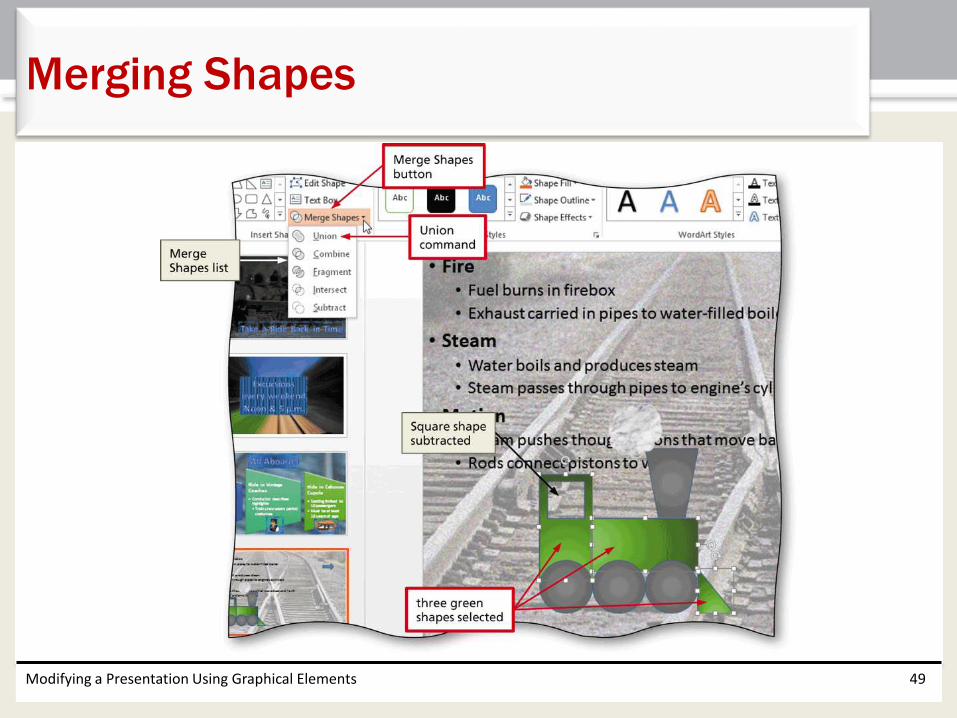
• Select the shapes to merge
• Tap or click the Merge Shapes button (DRAWING TOOLS FORMAT tab | Insert Shapes group) to display the Merge Shapes list
• Tap or click the desired command in the Merge Shapes list
Modifying a Presentation Using Graphical Elements 48
Merging Shapes
Modifying a Presentation Using Graphical Elements 49
Merging Shapes

• Display the Shapes gallery and then point to the desired line
• Drag across the slide to draw the line
Modifying a Presentation Using Graphical Elements 50
Drawing a Line
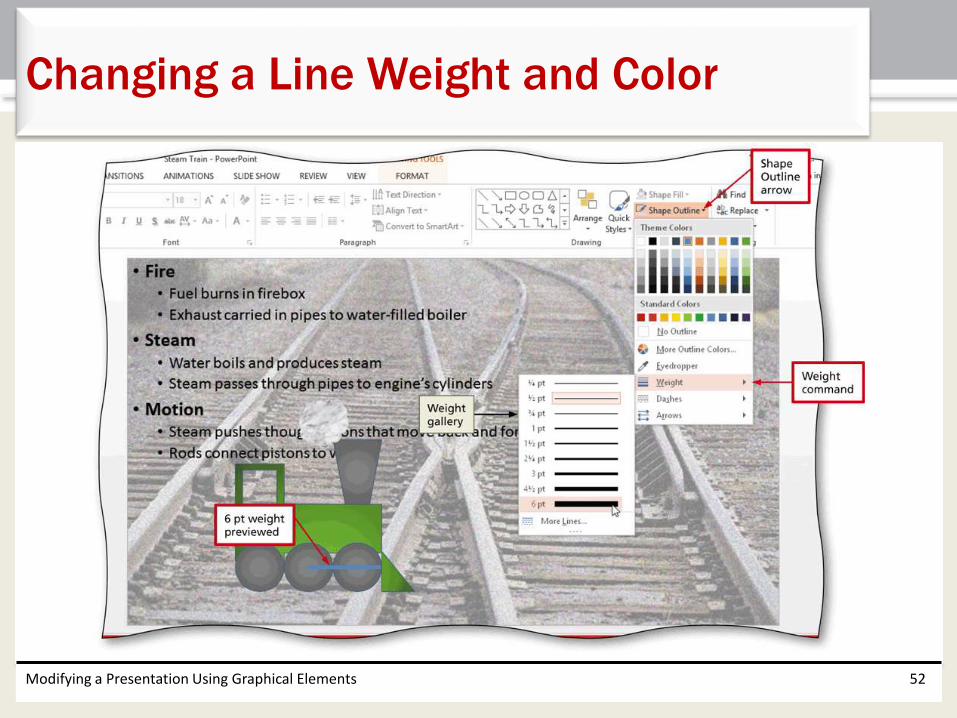
• With the line selected, tap or click the Shape Outline arrow (DRAWING TOOLS FORMAT tab | Drawing group) and then tap or click Weight to display the Weight gallery
• Tap or click the desired weight
• Tap or click the Shape Outline button again and then tap or click the desired color
Modifying a Presentation Using Graphical Elements 51
Changing a Line Weight and Color
Modifying a Presentation Using Graphical Elements 52
Changing a Line Weight and Color
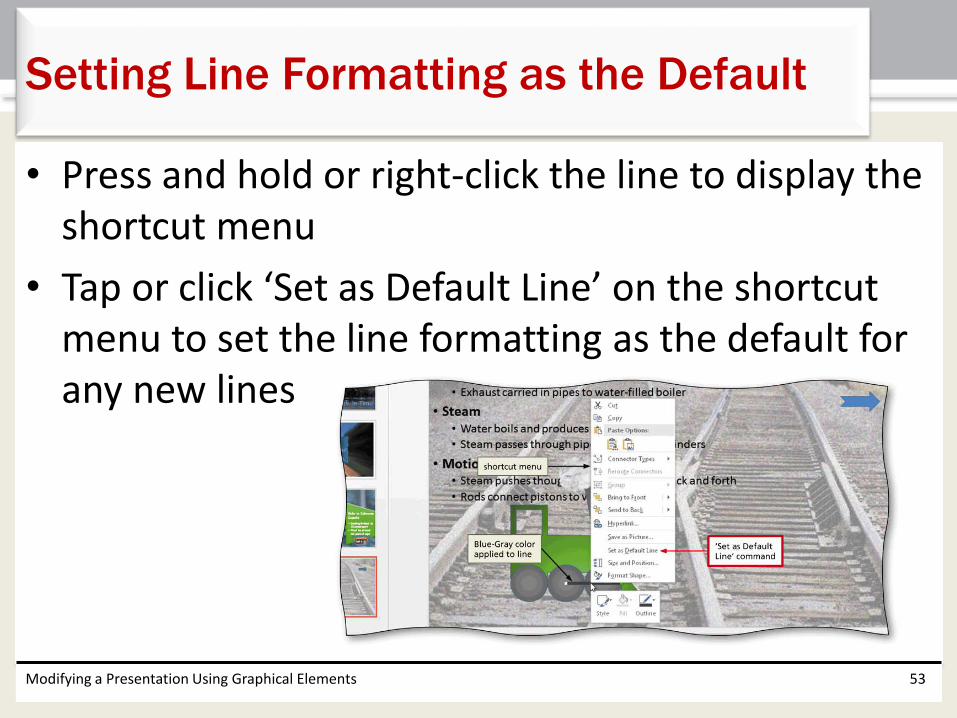
• Press and hold or right-click the line to display the shortcut menu
• Tap or click ‘Set as Default Line’ on the shortcut menu to set the line formatting as the default for any new lines
Modifying a Presentation Using Graphical Elements 53
Setting Line Formatting as the Default
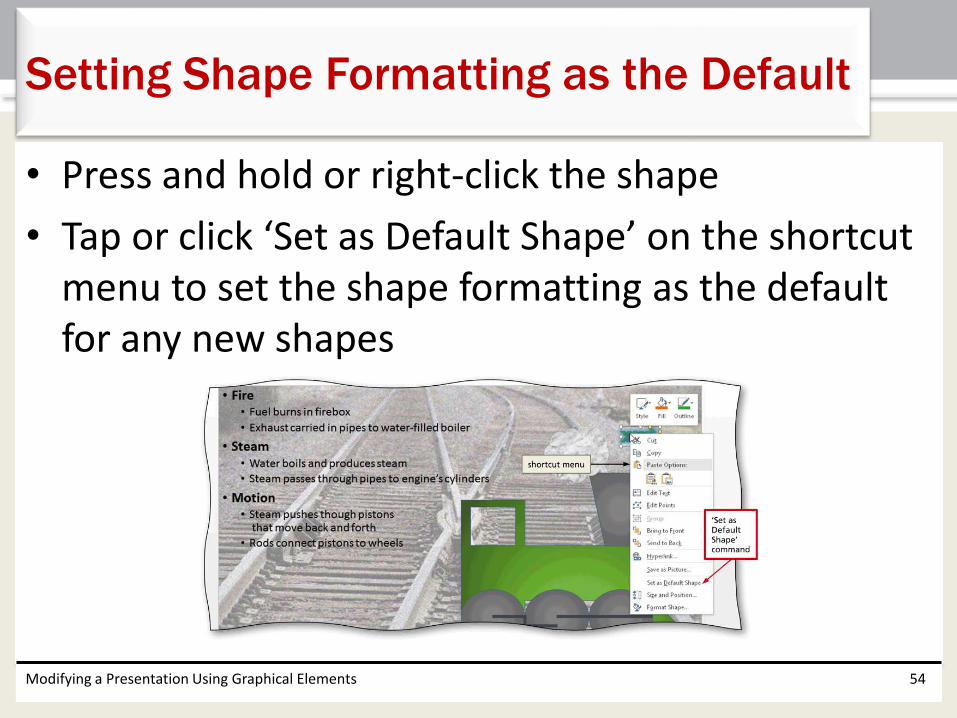
• Press and hold or right-click the shape
• Tap or click ‘Set as Default Shape’ on the shortcut menu to set the shape formatting as the default for any new shapes
Modifying a Presentation Using Graphical Elements 54
Setting Shape Formatting as the Default
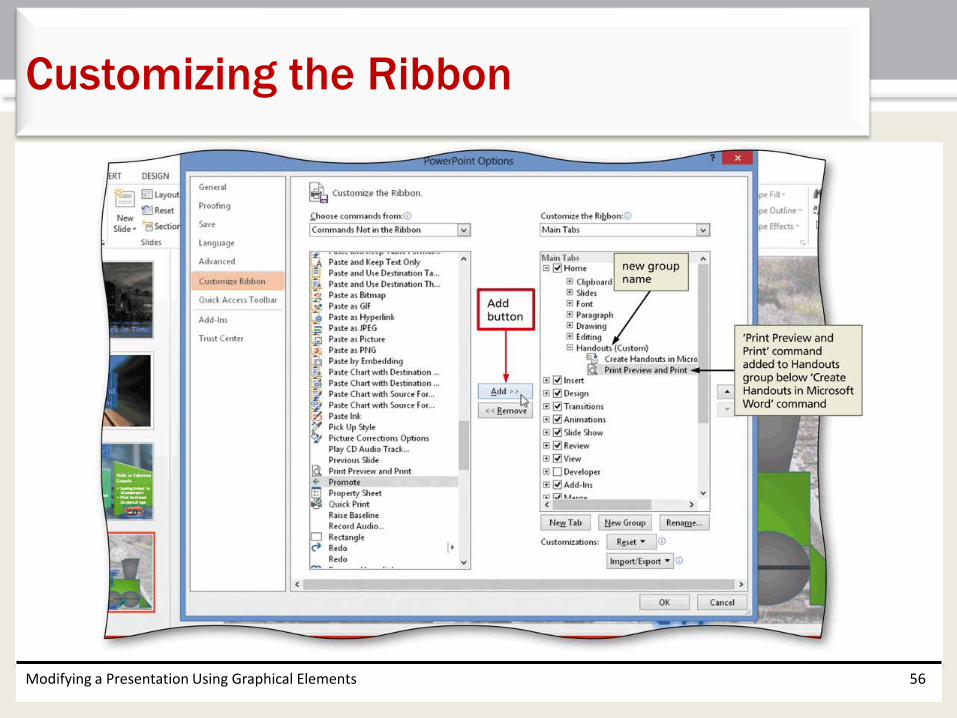
• With the HOME tab displaying, open the Backstage view and then tap or click Options to display the PowerPoint Options dialog box
• Tap or click Customize Ribbon in the left pane to display the Customize the Ribbon pane
• Tap or click the ‘Choose commands from’ arrow to display the ‘Choose commands from’ list
• Tap or click ‘Commands Not in the Ribbon’ in the ‘Choose commands from’ list to display a list of commands that do not display on the ribbon
Modifying a Presentation Using Graphical Elements 55
Customizing the Ribbon
Modifying a Presentation Using Graphical Elements 56
Customizing the Ribbon
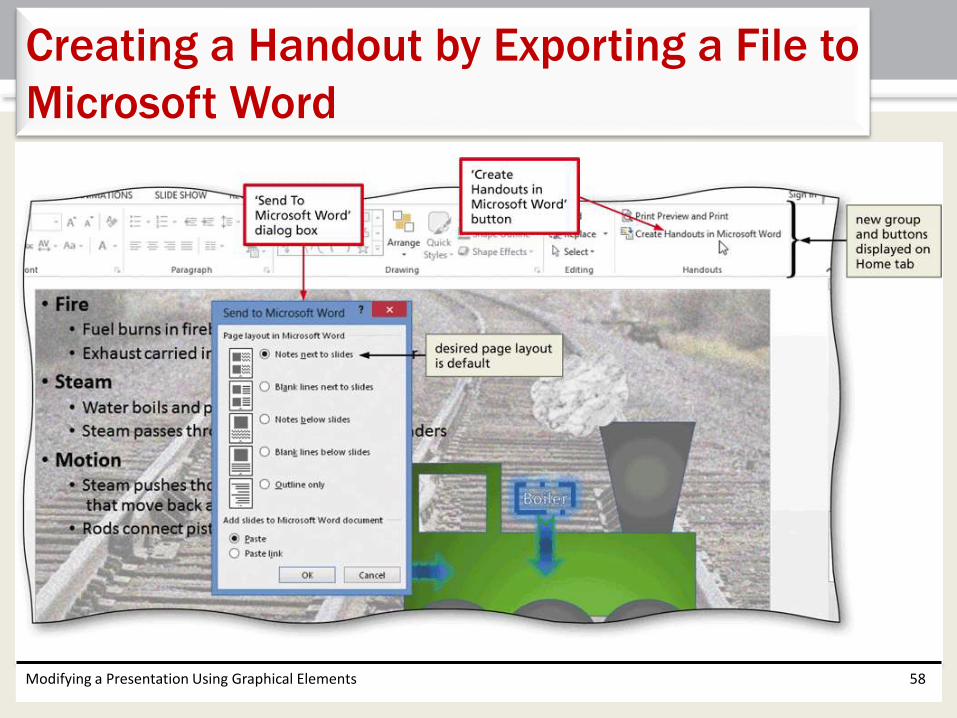
• Tap or click the ‘Create Handouts in Microsoft Word’ button to display the ‘Send to Microsoft Word’ dialog box
• Tap or click the OK button to save the file with the default ‘Notes next to slides’ layout
• If the handout does not display in a new Microsoft Word window, tap or click the Microsoft Word program button on the Windows taskbar to see a live preview of the handout
Modifying a Presentation Using Graphical Elements 57
Creating a Handout by Exporting a File to
Microsoft Word
Modifying a Presentation Using Graphical Elements 58
Creating a Handout by Exporting a File to
Microsoft Word
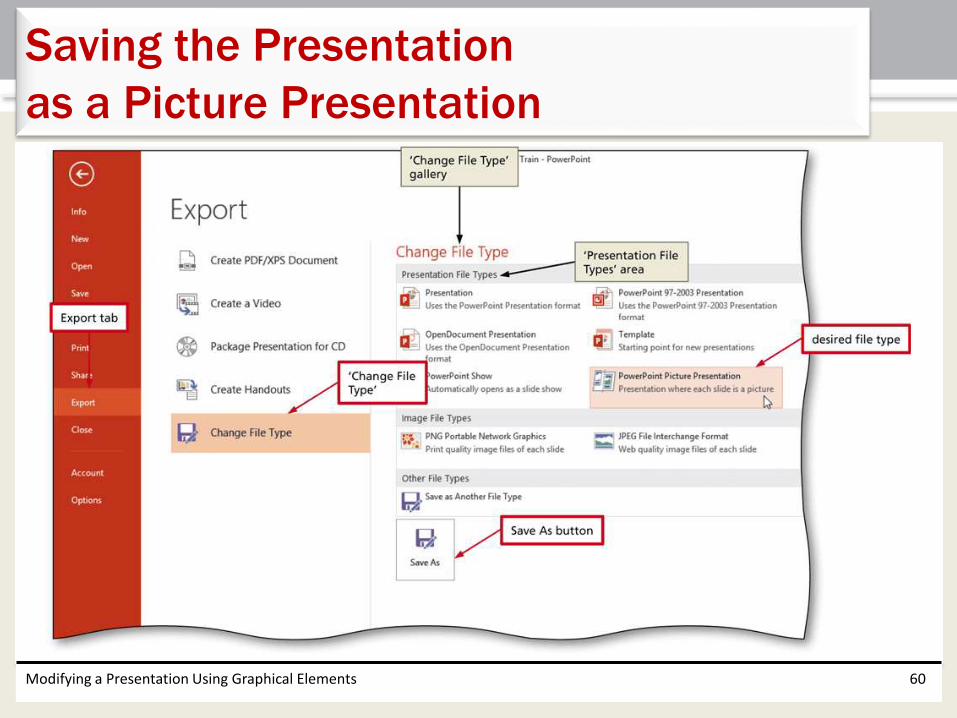
• Open the Backstage view, display the Export tab, and then tap or click ‘Change File Type’ to display the ‘Change File Type’ gallery
• Tap or click ‘PowerPoint Picture Presentation’ in the Presentation File Types area
• Tap or click the Save As button to display the Save As dialog box
• Type the desired file name in the File name text box• Tap or click the Save button to save the presentation
as a picture presentation• Tap or click the OK button
Modifying a Presentation Using Graphical Elements 59
Saving the Presentation
as a Picture Presentation
Modifying a Presentation Using Graphical Elements 60
Saving the Presentation
as a Picture Presentation
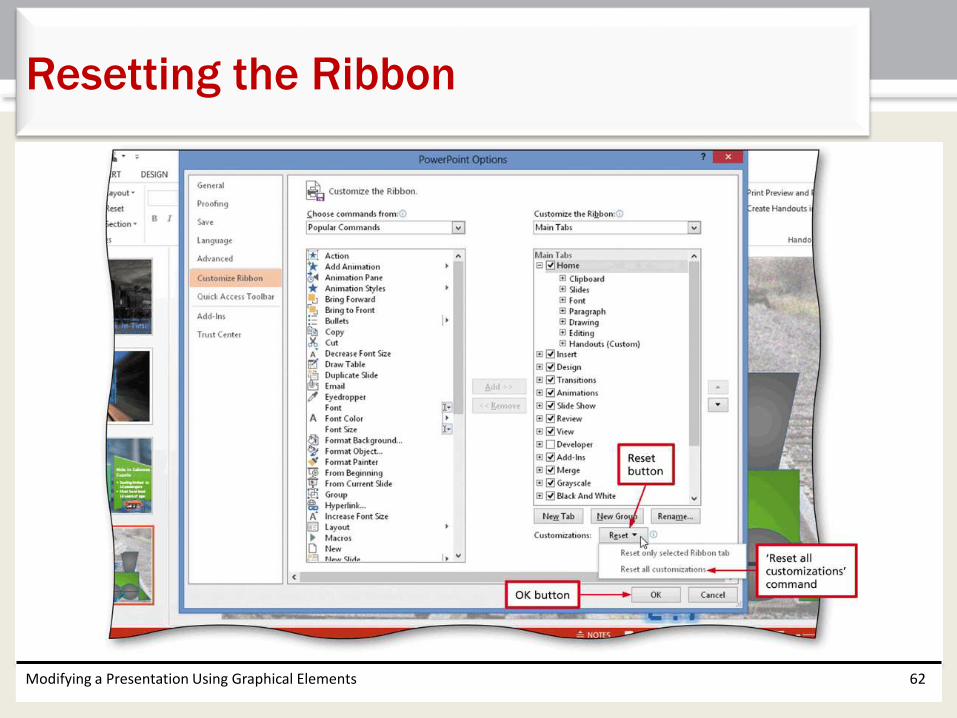
• Open the Backstage view, tap or click Options to display the PowerPoint Options dialog box, and then tap or click Customize Ribbon in the left pane to display the Customize the Ribbon area
• Tap or click the Reset button to display the Reset menu
• Tap or click ‘Reset all customizations’
• Tap or click the Yes button to delete all customizations
• Tap or click the OK button to close the dialog box
Modifying a Presentation Using Graphical Elements 61
Resetting the Ribbon
Modifying a Presentation Using Graphical Elements 62
Resetting the Ribbon
• Change a text box outline color, weight, and style
• Set text box formatting as the default for new text boxes
• Apply a gradient, texture, pattern, and effects to a text box
• Convert WordArt to SmartArt
• Reorder SmartArt shapes
• Promote and demote SmartArt text
Modifying a Presentation Using Graphical Elements 63
Chapter Summary
• Add and remove SmartArt shapes
• Convert a SmartArt graphic to text
• Customize the Ribbon
• Combine and subtract shapes
• Create a handout by exporting files to Microsoft Word
• Save the presentation as a picture presentation
Modifying a Presentation Using Graphical Elements 64
Chapter Summary
Chapter 9 Complete
Microsoft
PowerPoint 2013