PP01001306-04-说明书-Zino快速入门(六国) Version 201801120
12
Transcript of PP01001306-04-说明书-Zino快速入门(六国) Version 201801120

E N
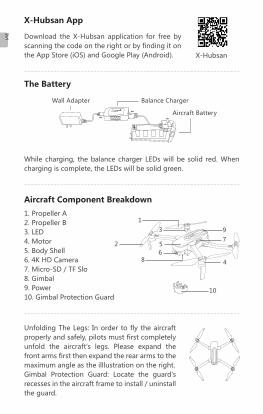
X-Hubsan App
X-Hubsan
Unfolding The Legs: In order to fly the aircraft properly and safely, pilots must first completely unfold the aircraft's legs. Please expand the front arms first then expand the rear arms to the maximum angle as the illlustration on the right.Gimbal Protection Guard: Locate the guard's recesses in the aircraft frame to install / uninstall the guard.
The Battery
Wall Adapter Balance Charger
Aircraft Battery
1. Propeller A2. Propeller B3. LED4. Motor5. Body Shell6. 4K HD Camera7. Micro-SD / TF Slo8. Gimbal9. Power10. Gimbal Protection Guard
Aircraft Component Breakdown
Download the X-Hubsan application for free by scanning the code on the right or by finding it on the App Store (iOS) and Google Play (Android).
While charging, the balance charger LEDs will be solid red. When charging is complete, the LEDs will be solid green.
4
79
10
3
2
1
65
8
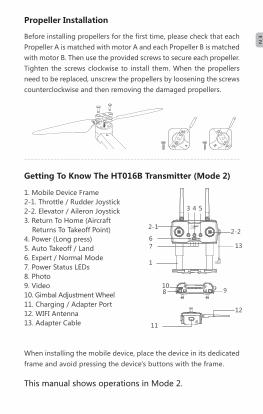
E NBefore installing propellers for the first time, please check that each
Propeller A is matched with motor A and each Propeller B is matched with motor B. Then use the provided screws to secure each propeller. Tighten the screws clockwise to install them. When the propellers need to be replaced, unscrew the propellers by loosening the screws counterclockwise and then removing the damaged propellers.
When installing the mobile device, place the device in its dedicated frame and avoid pressing the device's buttons with the frame.
Propeller Installation
Getting To Know The HT016B Transmitter (Mode 2)
1. Mobile Device Frame2-1. Throttle / Rudder Joystick 2-2. Elevator / Aileron Joystick3. Return To Home (Aircraft Returns To Takeoff Point)4. Power (Long press)5. Auto Takeoff / Land6. Expert / Normal Mode7. Power Status LEDs8. Photo 9. Video10. Gimbal Adjustment Wheel11. Charging / Adapter Port12. WIFI Antenna13. Adapter Cable
This manual shows operations in Mode 2.
B B
B
AA
A
9108
12
11
3 54
2-26
1
7
2-1
13

E N
Pairing The Mobile Device
① Long press the power button on the aircraft to power it on.
③ Run X-Hubsan App, In the main settings at the top right corner, select Control settings then choose WIFI and "Set up transmitter connection to aircraft" to set up the connection between aircraft and the transmitter.
Transmitter Cable Connection
Controls
Transmitter connection Bluetooth WIFI
Transmitter firmware version
Transmitter hardware version
Set up transmitter connection to aircraft
Transmitter model
② Long press the transmitter power button to power it on. Use the adapter cable to connect the transmitter to the aircraft.
Before Pairing After Pairing
Not connected
N00.0000000,E000.0000000
45.877503 , -106.123984,65m Pitch 0° Yaw 0°Roll 0°
Speed 0.0m/s
H: 0.0m D: 0.0m
T: 0%E: 0% R: 0%
A: 0%
Connected
N00.0000000,E000.0000000
45.877503 , -106.123984,65m Pitch 0° Yaw 0°Roll 0°
Speed 0.0m/s
H: 0.0m D: 0.0m
T: 0%E: 0% R: 0%
A: 0%
A compartment for extra cables
®
E N
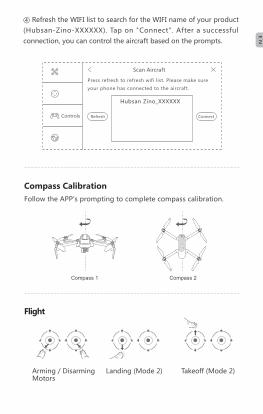
Follow the APP's prompting to complete compass calibration.
Compass Calibration
Flight
Arming / Disarming Motors
Takeoff (Mode 2)Landing (Mode 2)
④ Refresh the WIFI list to search for the WIFI name of your product (Hubsan-Zino-XXXXXX). Tap on "Connect". After a successful connection, you can control the aircraft based on the prompts.
Connect
Scan Aircraft
Refresh
Press refresh to refresh wifi list. Please make sure
your phone has connected to the aircraft.
Hubsan Zino_XXXXXX
Controls

E N
LEDs flash in vertical pairs, alternatelyAll 4 LEDs flash simultaneously
Compass Calibration
Calibrate Compass 1Calibrate Compass 2
Rear red LEDs flash once
Rear red LEDs flash alternately
When the aircraft is not connected to a transmitter or has been disconnected from a transmitter, the fore LEDs will flash blue. Upon connection with a transmitter, the fore LEDs will turn solid.
Function LED status indicationPower On And Start Up
All 4 LEDs flash slowly
Horizontal Calibration All 4 LEDs flash slowly
Flight mode All 4 LEDs are solidly lit
Headless Mode
Fore / frontal LEDs are solid blue and rear red LEDs flash alternately
Return To Home
Fore LEDs are solid blue and rear LEDs slowly flash red
Photo
Fore / frontal blue LEDs stay solidly lit and the rear red LEDs flash rapidly
Low Power
Flight Control Connection Status
Video
Zino has 4 LEDs; the fore / frontal LEDs are blue and the rear LEDs are red. The LED status indications are defined as follows:
Auto Takeoff / Land / Return To Home
Aircraft LED Indications
Auto Takeoff Auto Land Return To Home
Takeoff: After arming the motors, release the joysticks. Smoothly and slowly pull the throttle upwards to take off.

1. Transmitter and aircraft are not pairingReinitialize the aircraft and transmitter.2. Cannot arm motorsMake sure that you have completed compass calibration.3. Weak or nonexistent GPS signal / few or no GPS satellitesCheck the surrounding environment for sources of high frequently signal interference.4. The aircraft does not return to the home pointWhen the aircraft takes off, be sure that the aircraft has received 6 or more satellites.5. Aircraft / video feed is shaking / shaky① Check if the aircraft propellers or motor shafts are deformed / broken. Please replace if applicable.② Check that all aircraft body screws are firmly in place.6. Cannot take videos or pictures① Check to see that the SD card is installed in the aircraft prior to power on.② Make sure the SD card is formatted correctly (Recommended SD cards: SanDisk, Kingston, Samsung, U1 and 32GB or higher).③ Check if the SD card storage is full.
E N
Frequently Asked Questions
● Never leave units unattended when charging● Unplug the charging cable immediately after charging● Propellers may cause injury● This product is not a toy and is not suitable for children under14 years of age
Please read the operating instructions carefully before use!
Product name: Zino
Product Standard Number: Q / HBS 001-2017
Vendor: Shenzhen Hubsan Technology Co., Ltd
Address: 13th Floor, Block C, Shenzhen Software Industrial Base,
Xuefu Road, Nanshan District, Shenzhen, Guangdong Province, China
Email: [email protected]