PowerSoil -htp 96 Well Soil DNA Isolation Kit · 96 Well Soil DNA Isolation Kit ... 12955-12 12...
22
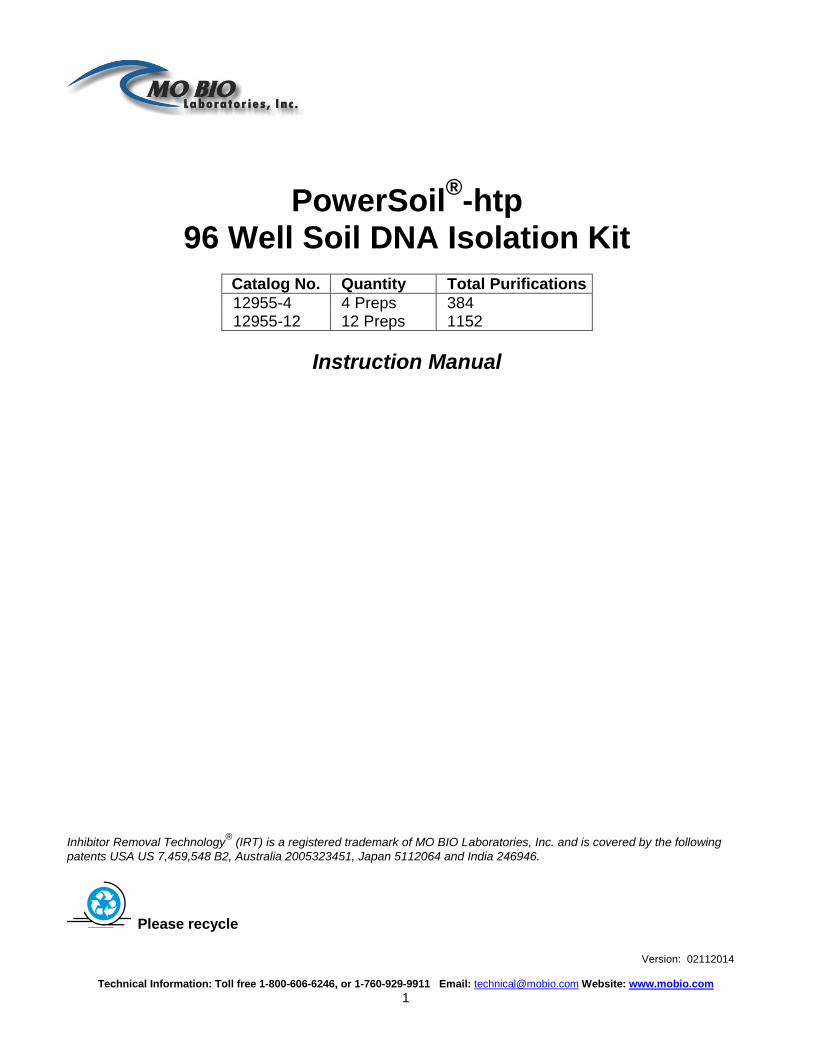
Technical Information: Toll free 1-800-606-6246, or 1-760-929-9911 Email: [email protected] Website: www.mobio.com 1 PowerSoil ® -htp 96 Well Soil DNA Isolation Kit Catalog No. Quantity Total Purifications 12955-4 4 Preps 384 12955-12 12 Preps 1152 Instruction Manual Inhibitor Removal Technology ® (IRT) is a registered trademark of MO BIO Laboratories, Inc. and is covered by the following patents USA US 7,459,548 B2, Australia 2005323451, Japan 5112064 and India 246946. Please recycle Version: 02112014
Transcript of PowerSoil -htp 96 Well Soil DNA Isolation Kit · 96 Well Soil DNA Isolation Kit ... 12955-12 12...
Technical Information: Toll free 1-800-606-6246, or 1-760-929-9911 Email: [email protected] Website: www.mobio.com
1
PowerSoil®-htp
96 Well Soil DNA Isolation Kit
Catalog No. Quantity Total Purifications
12955-4 4 Preps 384 12955-12 12 Preps 1152
Instruction Manual Inhibitor Removal Technology
® (IRT) is a registered trademark of MO BIO Laboratories, Inc. and is covered by the following
patents USA US 7,459,548 B2, Australia 2005323451, Japan 5112064 and India 246946.
Please recycle
Version: 02112014
Technical Information: Toll free 1-800-606-6246, or 1-760-929-9911 Email: [email protected] Website: www.mobio.com
2
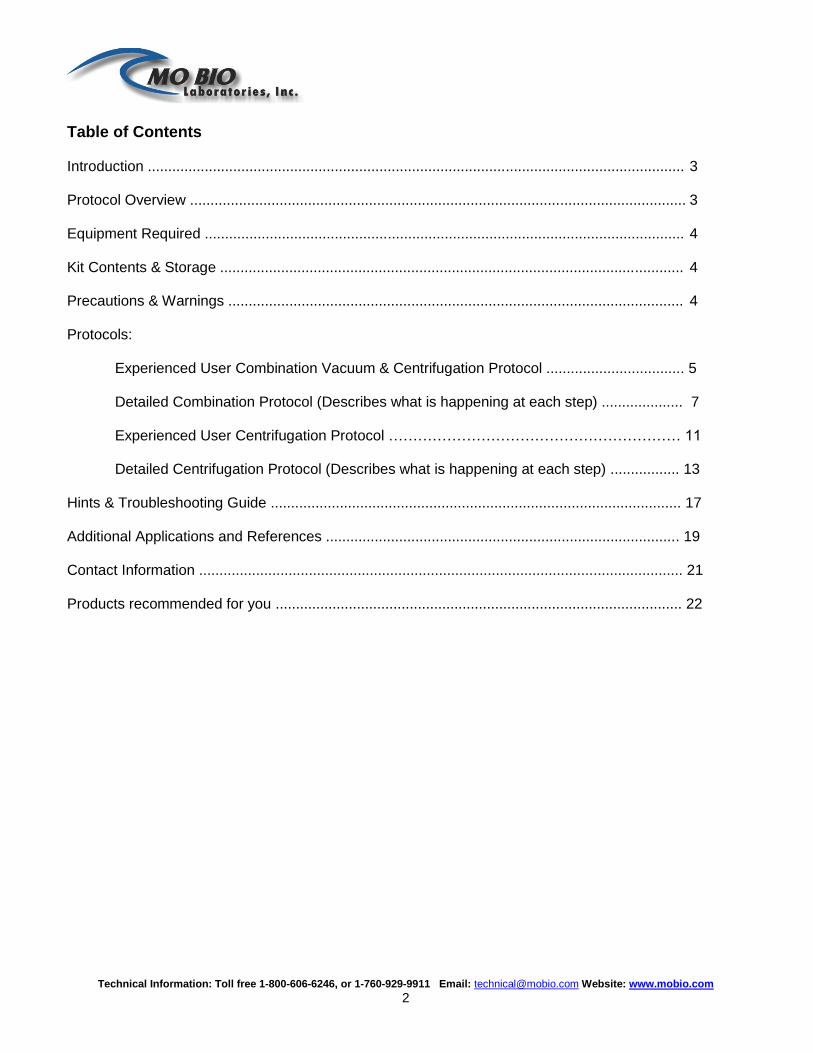
Table of Contents Introduction .................................................................................................................................... 3 Protocol Overview .......................................................................................................................... 3 Equipment Required ...................................................................................................................... 4 Kit Contents & Storage .................................................................................................................. 4 Precautions & Warnings ................................................................................................................ 4 Protocols:
Experienced User Combination Vacuum & Centrifugation Protocol .................................. 5
Detailed Combination Protocol (Describes what is happening at each step) .................... 7 Experienced User Centrifugation Protocol …………………………………………………… 11 Detailed Centrifugation Protocol (Describes what is happening at each step) ................. 13
Hints & Troubleshooting Guide ..................................................................................................... 17 Additional Applications and References ....................................................................................... 19 Contact Information ....................................................................................................................... 21 Products recommended for you .................................................................................................... 22

Technical Information: Toll free 1-800-606-6246, or 1-760-929-9911 Email: [email protected] Website: www.mobio.com
3
Introduction The PowerSoil
®-htp 96 Well Soil DNA Isolation Kit can be used for isolating genomic DNA from up to
0.25 grams of soil. Two protocols are included for use with this product. The first protocol involves a combination of vacuum and centrifugation steps. The second protocol uses centrifugation exclusively. This kit requires the use
of a specialized plate shaker in order to facilitate the bead beating process in the PowerSoil®-htp Bead
Plates. We recommend the Retsch 96 Well Plate Shaker (MO BIO Catalog# 11996 in the USA only) and Adapters (MO BIO Catalog# 11990). For information outside the USA, contact [email protected].
The PowerSoil®-htp 96 Well Soil DNA Isolation Kit provides researchers with a novel and proprietary
high throughput method for isolating genomic DNA from environmental samples. The PowerSoil®-htp 96
Well Soil DNA Isolation Kit distinguishes itself with a patented Inhibitor Removal Technology® (IRT)
procedure that is much more efficient at removing humic substances that inhibit PCR. This procedure is effective at removing PCR inhibitors from even the most difficult soil types allowing for more successful PCR amplification of DNA. Tested sample types include compost, sediment, and manure among many others. Isolated DNA was successfully used as template DNA to amplify members of a wide range of microbial groups in soils. These include bacteria (gram positive, gram negative, and spore formers), actinomycetes, and fungi.
Protocol Overview
Environmental samples are added to a 96 well bead beating plate for rapid and thorough homogenization. Cell lysis occurs by a combination of mechanical and chemical methods. Humics are removed by a specialized precipitation process. Total genomic DNA is captured on a 96 well silica membrane in a spin column plate format. DNA is then washed and eluted from the membrane. The eluted DNA is ready for PCR analysis and other downstream applications.
NOTE: The estimated time from start to finish required to process two 96 well plates for this protocol is approximately 8 hours. Stopping points at appropriate steps are mentioned in the protocol. The majority of the time is for weighing and loading the soil samples into the 96 well plates. This kit is for research purposes only. Not for diagnostic use.
Other Related Products Catalog No. Quantity
96 Well Plate Shaker 11996 1 unit (120 V)
Vacuum Pump 11998 11998-220
1 unit (120 V) 1 unit (220 V)
Plate Adapter Set 11990 1 set
Technical Information: Toll free 1-800-606-6246, or 1-760-929-9911 Email: [email protected] Website: www.mobio.com
4
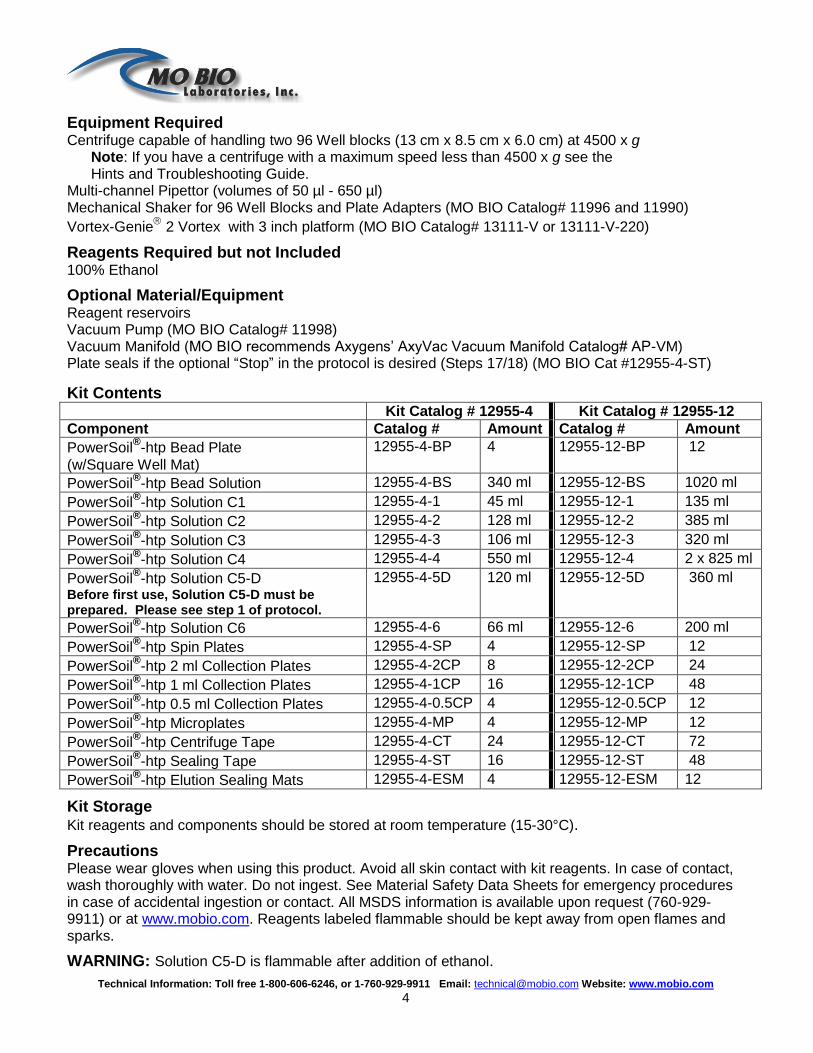
Equipment Required Centrifuge capable of handling two 96 Well blocks (13 cm x 8.5 cm x 6.0 cm) at 4500 x g
Note: If you have a centrifuge with a maximum speed less than 4500 x g see the Hints and Troubleshooting Guide.
Multi-channel Pipettor (volumes of 50 µl - 650 µl) Mechanical Shaker for 96 Well Blocks and Plate Adapters (MO BIO Catalog# 11996 and 11990)
Vortex-Genie
2 Vortex with 3 inch platform (MO BIO Catalog# 13111-V or 13111-V-220)
Reagents Required but not Included 100% Ethanol
Optional Material/Equipment Reagent reservoirs Vacuum Pump (MO BIO Catalog# 11998) Vacuum Manifold (MO BIO recommends Axygens’ AxyVac Vacuum Manifold Catalog# AP-VM) Plate seals if the optional “Stop” in the protocol is desired (Steps 17/18) (MO BIO Cat #12955-4-ST)
Kit Contents Kit Catalog # 12955-4 Kit Catalog # 12955-12
Component Catalog # Amount Catalog # Amount
PowerSoil®-htp Bead Plate
(w/Square Well Mat)
12955-4-BP 4 12955-12-BP 12
PowerSoil®-htp Bead Solution 12955-4-BS 340 ml 12955-12-BS 1020 ml
PowerSoil®-htp Solution C1 12955-4-1 45 ml 12955-12-1 135 ml
PowerSoil®-htp Solution C2 12955-4-2 128 ml 12955-12-2 385 ml
PowerSoil®-htp Solution C3 12955-4-3 106 ml 12955-12-3 320 ml
PowerSoil®-htp Solution C4 12955-4-4 550 ml 12955-12-4 2 x 825 ml
PowerSoil®-htp Solution C5-D
Before first use, Solution C5-D must be prepared. Please see step 1 of protocol.
12955-4-5D 120 ml 12955-12-5D 360 ml
PowerSoil®-htp Solution C6 12955-4-6 66 ml 12955-12-6 200 ml
PowerSoil®-htp Spin Plates 12955-4-SP 4 12955-12-SP 12
PowerSoil®-htp 2 ml Collection Plates 12955-4-2CP 8 12955-12-2CP 24
PowerSoil®-htp 1 ml Collection Plates 12955-4-1CP 16 12955-12-1CP 48
PowerSoil®-htp 0.5 ml Collection Plates 12955-4-0.5CP 4 12955-12-0.5CP 12
PowerSoil®-htp Microplates 12955-4-MP 4 12955-12-MP 12
PowerSoil®-htp Centrifuge Tape 12955-4-CT 24 12955-12-CT 72
PowerSoil®-htp Sealing Tape 12955-4-ST 16 12955-12-ST 48
PowerSoil®-htp Elution Sealing Mats 12955-4-ESM 4 12955-12-ESM 12
Kit Storage Kit reagents and components should be stored at room temperature (15-30°C).
Precautions Please wear gloves when using this product. Avoid all skin contact with kit reagents. In case of contact, wash thoroughly with water. Do not ingest. See Material Safety Data Sheets for emergency procedures in case of accidental ingestion or contact. All MSDS information is available upon request (760-929-9911) or at www.mobio.com. Reagents labeled flammable should be kept away from open flames and sparks.
WARNING: Solution C5-D is flammable after addition of ethanol.
Technical Information: Toll free 1-800-606-6246, or 1-760-929-9911 Email: [email protected] Website: www.mobio.com
5
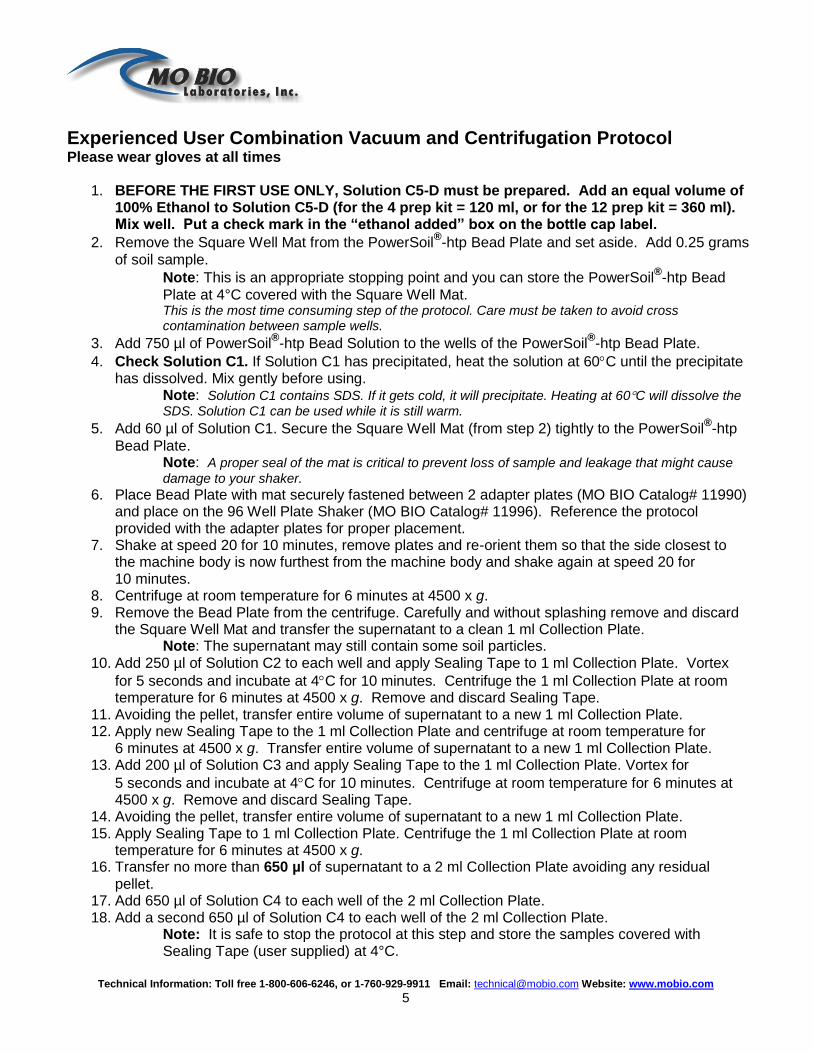
Experienced User Combination Vacuum and Centrifugation Protocol
Please wear gloves at all times
1. BEFORE THE FIRST USE ONLY, Solution C5-D must be prepared. Add an equal volume of 100% Ethanol to Solution C5-D (for the 4 prep kit = 120 ml, or for the 12 prep kit = 360 ml). Mix well. Put a check mark in the “ethanol added” box on the bottle cap label.
2. Remove the Square Well Mat from the PowerSoil®-htp Bead Plate and set aside. Add 0.25 grams
of soil sample.
Note: This is an appropriate stopping point and you can store the PowerSoil®-htp Bead
Plate at 4°C covered with the Square Well Mat. This is the most time consuming step of the protocol. Care must be taken to avoid cross contamination between sample wells.
3. Add 750 µl of PowerSoil®-htp Bead Solution to the wells of the PowerSoil
®-htp Bead Plate.
4. Check Solution C1. If Solution C1 has precipitated, heat the solution at 60C until the precipitate has dissolved. Mix gently before using.
Note: Solution C1 contains SDS. If it gets cold, it will precipitate. Heating at 60C will dissolve the SDS. Solution C1 can be used while it is still warm.
5. Add 60 µl of Solution C1. Secure the Square Well Mat (from step 2) tightly to the PowerSoil®-htp
Bead Plate. Note: A proper seal of the mat is critical to prevent loss of sample and leakage that might cause
damage to your shaker.
6. Place Bead Plate with mat securely fastened between 2 adapter plates (MO BIO Catalog# 11990) and place on the 96 Well Plate Shaker (MO BIO Catalog# 11996). Reference the protocol provided with the adapter plates for proper placement.
7. Shake at speed 20 for 10 minutes, remove plates and re-orient them so that the side closest to the machine body is now furthest from the machine body and shake again at speed 20 for 10 minutes.
8. Centrifuge at room temperature for 6 minutes at 4500 x g. 9. Remove the Bead Plate from the centrifuge. Carefully and without splashing remove and discard
the Square Well Mat and transfer the supernatant to a clean 1 ml Collection Plate. Note: The supernatant may still contain some soil particles.
10. Add 250 µl of Solution C2 to each well and apply Sealing Tape to 1 ml Collection Plate. Vortex
for 5 seconds and incubate at 4C for 10 minutes. Centrifuge the 1 ml Collection Plate at room temperature for 6 minutes at 4500 x g. Remove and discard Sealing Tape.
11. Avoiding the pellet, transfer entire volume of supernatant to a new 1 ml Collection Plate. 12. Apply new Sealing Tape to the 1 ml Collection Plate and centrifuge at room temperature for
6 minutes at 4500 x g. Transfer entire volume of supernatant to a new 1 ml Collection Plate. 13. Add 200 µl of Solution C3 and apply Sealing Tape to the 1 ml Collection Plate. Vortex for
5 seconds and incubate at 4C for 10 minutes. Centrifuge at room temperature for 6 minutes at 4500 x g. Remove and discard Sealing Tape.
14. Avoiding the pellet, transfer entire volume of supernatant to a new 1 ml Collection Plate. 15. Apply Sealing Tape to 1 ml Collection Plate. Centrifuge the 1 ml Collection Plate at room
temperature for 6 minutes at 4500 x g. 16. Transfer no more than 650 µl of supernatant to a 2 ml Collection Plate avoiding any residual
pellet. 17. Add 650 µl of Solution C4 to each well of the 2 ml Collection Plate. 18. Add a second 650 µl of Solution C4 to each well of the 2 ml Collection Plate.
Note: It is safe to stop the protocol at this step and store the samples covered with Sealing Tape (user supplied) at 4°C.

Technical Information: Toll free 1-800-606-6246, or 1-760-929-9911 Email: [email protected] Website: www.mobio.com
6
19. Remove the top portion of the vacuum manifold and place a new 2 ml Collection Plate in the
bottom of the vacuum manifold. Note: If you are using the Axygen AP-VM, use the Waste Reservoir provided with the manifold in place of the 2 ml Collection Plate.
20. Replace the top of the manifold and place a Spin Plate on top of the manifold and turn the vacuum pump on.
21. Test that you have a good seal with the manifold and the Spin Plate by gently lifting up on the Spin Plate. You should be able to lift the entire unit without the Spin Plate separating from the manifold.
22. Pipet samples from step 18 “up and down” to mix. 23. Load approximately 650 µl into the wells of each row of the Spin Plate until all the samples have
been processed. Allow the liquid to pass through the wells. 24. Once the liquid has passed through the wells, continue loading 650 µl volumes into the wells of
each row of the Spin Plate until the entire volume of each sample is processed. Turn off the vacuum.
25. Remove the Spin Plate from the manifold and set aside, discard the flow through from the 2 ml Collection Plate or Waste Reservoir in the bottom of the manifold and then place it back in the manifold.
26. Reassemble the manifold with the Spin Plate back on top of the manifold and turn the vacuum on. Test the seal by lifting gently.
27. Confirm that ethanol has been added to Solution C5-D (see step 1). Add 500 µl of Solution C5-D to each well of the Spin Plate. After the entire volume of Solution C5-D has passed through the wells of the Spin Plate, turn off the vacuum.
28. Apply Centrifuge Tape to the Spin Plate to cover the wells. 29. Place a 0.5 ml Collection Plate under the Spin Plate. Centrifuge at room temperature for 6
minutes at 4500 x g. 30. Carefully place Spin Plate onto a Microplate. Remove Centrifuge Tape and discard. 31. Allow to air dry for 10 minutes at room temperature. 32. Add 100 µl of Solution C6 to the center of each well of the Spin Plate and apply Centrifuge Tape. 33. Centrifuge at room temperature for 3 minutes at 4500 x g. Remove Centrifuge Tape and discard. 34. Cover wells of Microplate with the Elution Sealing Mat provided. DNA is now ready for any
downstream application. No further steps are required.
Prolonged storage at 4°C will result in the evaporation of eluted DNA. We recommend storing
DNA frozen (-20C or -80°C). Solution C6 does not contain EDTA. To concentrate the DNA see the Hints and Troubleshooting Guide.
Thank you for choosing the PowerSoil®-htp 96 Well Soil DNA Isolation Kit.
Technical Information: Toll free 1-800-606-6246, or 1-760-929-9911 Email: [email protected] Website: www.mobio.com
7
Detailed Combination Vacuum and Centrifugation Protocol (Describes what is happening at each step)
Please wear gloves at all times
1. BEFORE THE FIRST USE ONLY, Solution C5-D must be prepared. Add an equal volume of 100% Ethanol to Solution C5-D (for the 4 prep kit = 120 ml, or for the 12 prep kit = 360 ml). Mix well. Put a check mark in the “ethanol added” box on the bottle cap label.
2. Remove the Square Well Mat from the PowerSoil®-htp Bead Plate and set aside. Add 0.25 grams
of soil sample.
Note: This is an appropriate stopping point and you can store the PowerSoil®-htp Bead
Plate at 4°C covered with the Square Well Mat. What’s happening: This is the most time consuming step of the protocol. Care must be taken to avoid cross contamination between sample wells.
3. Add 750 µl of PowerSoil®-htp Bead Solution to the wells of the PowerSoil
®-htp Bead Plate.
What’s happening: The soil sample has now been loaded into the PowerSoil
®-htp Bead Plate. This is the
first part of the lysis procedure. The PowerSoil®-htp Bead Solution is a buffer that will disperse the soil
particles and begin to dissolve humic acids.
4. Check Solution C1. If Solution C1 has precipitated, heat the solution at 60C until the precipitate has dissolved.
What’s happening: Solution C1 contains SDS. If it gets cold, it will precipitate. Heating at 60C will dissolve the SDS. Solution C1 can be used while it is still warm.
5. Add 60 µl of Solution C1. Secure the Square Well Mat (from step 2) tightly to the PowerSoil®-htp
Bead Plate.
What’s happening: Solution C1 contains SDS. This is a detergent that aids in cell lysis. The detergent breaks down fatty acids and lipids associated with the cell membrane of several organisms.
6. Place Bead Plate with mat securely fastened between 2 adapter plates (MO BIO Catalog# 11990) and place on the 96 Well Plate Shaker (MO BIO Catalog# 11996). Reference the protocol provided with the adapter plates for proper placement. What’s happening: Mechanical lysis is introduced at this step. The protocol uses a combination of mechanical and chemical lysis. By randomly shaking the beads, they collide with one another and with microbial cells causing them to break open.
7. Shake at speed 20 for 10 minutes, remove plates and re-orient them so that the side closest to the machine body is now furthest from the machine body and shake again at speed 20 for 10 minutes.
8. Centrifuge at room temperature for 6 minutes at 4500 x g.
What’s happening: Particulates including cell debris, soil, beads, and humic acids, will form a pellet at this point. DNA is in the liquid supernatant.
Technical Information: Toll free 1-800-606-6246, or 1-760-929-9911 Email: [email protected] Website: www.mobio.com
8
9. Remove the Bead Plate from the centrifuge. Carefully and without splashing, remove and discard the Square Well Mat and transfer the supernatant to a clean 1 ml Collection Plate.
Note: The supernatant may still contain some soil particles.
10. Add 250 µl of Solution C2 to each well and apply Sealing Tape to 1 ml Collection Plate. Vortex
for 5 seconds and incubate at 4C for 10 minutes. Centrifuge the 1 ml Collection Plate at room temperature for 6 minutes at 4500 x g. Remove and discard Sealing Tape.
What’s happening: Solution C2 contains a reagent to precipitate non-DNA organic and inorganic material including humic substances, cell debris, and proteins. It is important to remove contaminating organic and inorganic matter that may reduce DNA purity and inhibit downstream DNA applications.
11. Avoiding the pellet, transfer entire volume of supernatant to a new 1 ml Collection Plate.
Apply Sealing Tape to the 1 ml Collection Plate. Centrifuge the 1 ml Collection Plate at room temperature for 6 minutes at 4500 x g. Transfer entire volume of supernatant to another new 1 ml Collection Plate.
12. Add 200 µl of Solution C3 and apply Sealing Tape to the 1 ml Collection Plate. Vortex for
5 seconds and incubate at 4C for 10 minutes. Centrifuge at room temperature for 6 minutes at 4500 x g. Remove and discard Sealing Tape.
What’s happening: Solution C3 is a second reagent to precipitate additional non-DNA organic and inorganic material including humic substances, cell debris, and proteins. It is important to remove contaminating organic and inorganic matter that may reduce DNA purity and inhibit downstream DNA applications.
13. Avoiding the pellet, transfer entire volume of supernatant to a new 1ml Collection Plate. What’s happening: The pellet at this point contains residues of humic substances, cell debris, and proteins. For the best DNA yield and quality, avoid transferring any of the pellet.
14. Apply Sealing Tape to the 1 ml Collection Plate. Centrifuge the 1 ml Collection Plate at room temperature for 6 minutes at 4500 x g.
15. Transfer no more than 650 µl of supernatant to a 2 ml Collection Plate avoiding any residual
pellet. 16. Add 650 µl of Solution C4 to each well of the 2 ml Collection Plate.
What’s happening: Solution C4 is a high concentration salt solution. Since DNA binds tightly to silica at high salt concentrations, this solution will adjust the salt concentration to allow binding of DNA, but not non-DNA organic and inorganic material that may still be present at low levels, to the Spin Plate.
17. Add a second 650 µl of Solution C4 to each well of the 2 ml Collection Plate.
Note: It is safe to stop the protocol at this step and store the samples covered with Sealing Tape (user supplied) at 4°C.
18. Remove the top portion of the vacuum manifold and place a new 2 ml Collection Plate in the bottom of the vacuum manifold.
Note: If you are using the Axygen AP-VM, use the Waste Reservoir provided with the manifold in place of the 2 ml Collection Plate.
Technical Information: Toll free 1-800-606-6246, or 1-760-929-9911 Email: [email protected] Website: www.mobio.com
9
19. Replace the top of the manifold and place a Spin Plate on top of the manifold and turn the vacuum pump on.
20. Test that you have a good seal with the manifold and the Spin Plate by gently lifting up on the Spin Plate. You should be able to lift the entire unit without the Spin Plate separating from the manifold.
21. Pipet samples from step 17 “up and down” to mix.
22. Load approximately 650 µl into the wells of each row of the Spin Plate until all the samples have been processed. Allow the liquid to pass through the wells.
23. Once the liquid has passed through the wells continue loading 650 µl volumes into the wells of each row of the Spin Plate until the entire volume of each sample is processed. Turn off the vacuum.
What’s happening: DNA is selectively bound to the silica membrane in the Spin Plate device in the high salt solution. Contaminants pass through the filter membrane, leaving only DNA bound to the membrane.
24. Remove the Spin Plate from the manifold and set aside, discard the flow through from the 2 ml Collection Plate or Waste Reservoir in the bottom of the manifold and then place it back in the manifold.
25. Reassemble the manifold with the Spin Plate back on top of the manifold and turn the vacuum on.
Test the seal by lifting gently. 26. Confirm that ethanol has been added to Solution C5-D (see step 1). Add 500 µl of Solution
C5-D to each well of the Spin Plate. After the entire volume of Solution C5-D has passed through the wells of the Spin Plate, turn off the vacuum.
What’s happening: Solution C5-D is an ethanol based wash solution used to further clean the DNA that is bound to the silica membrane in the Spin Plate. This wash solution removes residues of salt, humic acid, and other contaminants while allowing the DNA to stay bound to the silica membrane. This flow through is just waste containing ethanol wash solution and contaminants that did not bind to the silica Spin Plate membrane.
Note: You can wash more than one time to further clean DNA if desired. In some cases where soils have very high humic acid content, it will be beneficial to repeat this wash step. There is 10% extra Solution C5-D in the bottle for this purpose. Solution C5-D is also sold separately (MO BIO Catalog# 12955-4-5D & 12955-12-5D).
27. Apply Centrifuge Tape to the Spin Plate to cover the wells. 28. Place a 0.5 ml Collection Plate under the Spin Plate. Centrifuge at room temperature for
6 minutes at 4500 x g. What’s happening: This step removes residual Solution C5-D (ethanol wash solution). It is critical to remove all traces of wash solution because it can interfere with many downstream DNA applications.
29. Carefully place Spin Plate onto a Microplate. Remove Centrifuge Tape and discard. Allow to air dry for 10 minutes at room temperature.
What’s happening: This step removes residual Solution C5-D (ethanol wash solution). It is critical to remove all traces of wash solution because it can interfere with many downstream DNA applications.

Technical Information: Toll free 1-800-606-6246, or 1-760-929-9911 Email: [email protected] Website: www.mobio.com
10
30. Add 100 µl of Solution C6 to the center of each well of the Spin Plate and apply Centrifuge Tape. What’s happening: Placing the Solution C6 (sterile elution buffer) in the center of the small white membrane will make sure the entire membrane is wetted. This will result in more efficient and complete release of the DNA from the Spin Plate membrane.
31. Centrifuge at room temperature for 3 minutes at 4500 x g. Remove Centrifuge Tape and discard. What’s happening: As the Solution C6 (elution buffer) passes through the silica membrane, DNA that was bound in the presence of high salt is selectively released by Solution C6 (10 mM Tris pH 8.0) which is a low salt solution.
32. Cover wells of Microplate with the Elution Sealing Mat provided. DNA is now ready for any
downstream application. No further steps are required.
Prolonged storage at 4°C will result in the evaporation of eluted DNA. We recommend storing
DNA frozen (-20C or -80°C). Solution C6 does not contain EDTA. To concentrate the DNA see the Hints and Troubleshooting Guide.
Thank you for choosing the PowerSoil®-htp 96 Well Soil DNA Isolation Kit.
Technical Information: Toll free 1-800-606-6246, or 1-760-929-9911 Email: [email protected] Website: www.mobio.com
11
Experienced User Centrifugation Protocol Please wear gloves at all times 1. BEFORE THE FIRST USE ONLY, Solution C5-D must be prepared. Add an equal amount of
100% Ethanol to Solution C5-D (for the 4 prep kit = 120 ml, or for the 12 prep kit = 360 ml). Mix well. Put a check mark in the “ethanol added” box on the bottle cap label.
2. Remove the Square Well Mat from the PowerSoil®-htp Bead Plate and set aside. Add 0.25 grams of
soil sample.
Note: This is an appropriate stopping point and you can store the PowerSoil®-htp Bead
Plate at 4°C covered with the Square Well Mat. This is the most time consuming step of the protocol. Care must be taken to avoid cross contamination between sample wells.
3. Add 750 µl of PowerSoil®-htp Bead Solution to the wells of the PowerSoil
®-htp Bead Plate.
4. Check Solution C1. If Solution C1 has precipitated, heat solution at 60C until the precipitate has dissolved.
Note: Solution C1 contains SDS. If it gets cold, it will precipitate. Heating at 60C will dissolve the SDS. Solution C1 can be used while it is still warm.
5. Add 60 µl of Solution C1. Secure the Square Well Mat (from step 2) tightly to the plate. 6. Place Bead Plate with mat securely fastened between 2 adapter plates (MO BIO Catalog# 11990)
and place on the 96 Well Plate Shaker (MO BIO Catalog# 11996). Reference the protocol provided with the adapter plates for proper placement.
7. Shake at speed 20 for 10 minutes, remove plates and re-orient them so that the side closest to the machine body is now furthest from the machine body and shake again at speed 20 for 10 minutes.
8. Centrifuge at room temperature for 6 minutes at 4500 x g. 9. Remove and discard the Square Well Mat. Transfer the supernatant to a clean 1 ml Collection Plate.
Note: The supernatant may still contain some soil particles.
10. Add 250 µl of Solution C2 and apply Sealing Tape to plate. Vortex for 5 seconds and incubate at 4C for 10 minutes. Centrifuge the plate at room temperature for 6 minutes at 4500 x g. Remove and discard Sealing Tape.
11. Avoiding the pellet, transfer entire volume of supernatant to a new 1 ml Collection Plate. 12. Apply Sealing Tape to plate. Centrifuge the plate again at room temperature for 6 minutes at
4500 x g. Transfer entire volume of supernatant to another new 1 ml Collection Plate.
13. Add 200 µl of Solution C3 and apply Sealing Tape to plate. Vortex for 5 seconds and incubate at 4C for 10 minutes. Centrifuge at room temperature for 6 minutes at 4500 x g. Remove and discard Sealing Tape.
14. Avoiding the pellet, transfer entire volume of supernatant to a new 1 ml Collection Plate. 15. Apply Sealing Tape to plate. Centrifuge the plate again at room temperature for 6 minutes at
4500 x g. 16. Transfer no more than 650 µl of supernatant to a 2 ml Collection Plate avoiding any residual pellet. 17. Add 650 µl of Solution C4 to each well of the plate. 18. Add a second 650 µl of Solution C4 to each well of the plate.
Note: It is safe to stop the protocol at this step and store the samples covered with Sealing Tape (user supplied) at 4°C.
19. Pipet samples “up and down” to mix. 20. Place Spin Plate onto a new 0.5 ml Collection Plate. 21. Load approximately 650 µl into each well of the Spin Plate and apply Centrifuge Tape. 22. Centrifuge at room temperature for 3 minutes at 4500 x g. Discard the flow through and place the
Spin Plate back on the same 0.5 ml Collection Plate. Discard the Centrifuge Tape. 23. Repeat steps 20-21 until all the supernatant has been processed. Discard the final flow through.

Technical Information: Toll free 1-800-606-6246, or 1-760-929-9911 Email: [email protected] Website: www.mobio.com
12
24. Place the Spin Plate back on the same 0.5 ml Collection Plate. 25. Confirm that ethanol has been added to Solution C5-D (see step 1). Add 500 µl of Solution C5-D
to each well of the Spin Plate. Apply Centrifuge Tape to the Spin Plate. 26. Centrifuge at room temperature for 3 minutes at 4500 x g. Discard the flow through and place the
same 0.5 ml Collection Plate beneath the Spin Plate. 27. Centrifuge again at room temperature for 5 minutes at 4500 x g. Discard the flow through. 28. Carefully place the Spin Plate onto a Microplate. Remove Centrifuge Tape and discard. 29. Allow to air dry for 10 minutes at room temperature. 30. Add 100 µl of Solution C6 to the center of each well of the Spin Plate. Apply Centrifuge Tape. 31. Centrifuge at room temperature for 3 minutes at 4500 x g. Remove Centrifuge Tape and discard. 32. Cover wells of Microplate with the Elution Sealing Mat provided. DNA is now ready for any
downstream application. No further steps are required.
Prolonged storage at 4°C will result in the evaporation of eluted DNA. We recommend storing DNA
frozen (-20C or -80°C). Solution C6 does not contain EDTA. To concentrate the DNA see the Hints and Troubleshooting Guide.
Thank you for choosing the PowerSoil®-htp 96 Well Soil DNA Isolation Kit.

Technical Information: Toll free 1-800-606-6246, or 1-760-929-9911 Email: [email protected] Website: www.mobio.com
13
Detailed User Centrifugation Protocol (Describes what is happening at each step) Please wear gloves at all times
1. BEFORE THE FIRST USE ONLY, Solution C5-D must be prepared. Add an equal amount of 100% Ethanol to Solution C5-D (for the 4 prep kit = 120 ml, or for the 12 prep kit = 360 ml). Mix well. Put a check mark in the “ethanol added” box on the bottle cap label.
2. Remove the Square Well Mat from the PowerSoil®-htp Bead Plate and set aside. Add 0.25 grams
of soil sample.
Note: This is an appropriate stopping point and you can store the PowerSoil®-htp Bead
Plate at 4°C covered with the Square Well Mat.
What’s happening: This is the most time consuming step of the protocol. Care must be taken to avoid cross contamination between sample wells.
3. Add 750 µl of PowerSoil®-htp Bead Solution to the wells of the PowerSoil
®-htp Bead Plate.
What’s happening: The soil sample has now been loaded into the PowerSoil®-htp Bead Plate. This is the
first part of the lysis procedure. The PowerSoil®-htp Bead Solution is a buffer that will disperse the soil
particles.
4. Check Solution C1. If Solution C1 has precipitated, heat solution at 60C until precipitate has dissolved.
What’s happening: Solution C1 contains SDS. If it gets cold, it will precipitate. Heating at 60C will dissolve the SDS. Solution C1 can be used while it is still warm.
5. Add 60 µl of Solution C1. Secure the Square Well Mat (from step 2) tightly to the plate. What’s happening: Solution C1 contains SDS. This is a detergent that aids in cell lysis. The detergent breaks down fatty acids and lipids associated with the cell membrane of microorganisms.
6. Place Bead Plate with mat securely fastened between 2 adapter plates (MO BIO Catalog# 11990)
and place on the 96 Well Plate Shaker (MO BIO Catalog# 11996). Reference the protocol provided with the adapter plates for proper placement. What’s happening: Mechanical lysis is introduced at this step. The protocol uses a combination of mechanical and chemical lysis. By randomly shaking the beads, they collide with one another and with microbial cells causing them to break open.
7. Shake at speed 20 for 10 minutes, remove plates and re-orient them so that the side closest to the machine body is now furthest from the machine body and shake again at speed 20 for 10 minutes.
8. Centrifuge at room temperature for 6 minutes at 4500 x g.
What’s happening: Particulates including cell debris, soil, beads, and humic acids, will form a pellet at this point. DNA is in the liquid supernatant.
Technical Information: Toll free 1-800-606-6246, or 1-760-929-9911 Email: [email protected] Website: www.mobio.com
14
9. Remove and discard the Square Well Mat. Transfer the supernatant to a clean 1 ml Collection
Plate. Note: The supernatant may still contain some soil particles.
10. Add 250 µl of Solution C2 and apply Sealing Tape to plate. Vortex for 5 seconds and incubate at
4C for 10 minutes. Centrifuge the plate at room temperature for 6 minutes at 4500 x g. Remove and discard Sealing Tape.
What’s happening: Solution C2 contains a reagent to precipitate non-DNA organic and inorganic material including humic substances, cell debris, and proteins. It is important to remove contaminating organic and inorganic matter that may reduce DNA purity and inhibit downstream DNA applications.
11. Avoiding the pellet, transfer entire volume of supernatant to a new 1 ml Collection Plate. 12. Apply Sealing Tape to plate. Centrifuge the plate again at room temperature for 6 minutes at
4500 x g. Transfer entire volume of supernatant to another new 1 ml Collection Plate. 13. Add 200 µl of Solution C3 and apply Sealing Tape to plate. Vortex for 5 seconds and incubate at
4C for 10 minutes. Centrifuge at room temperature for 6 minutes at 4500 x g. Remove and discard Sealing Tape. What’s happening: Solution C3 is a second reagent to precipitate additional non-DNA organic and inorganic material including humic substances, cell debris, and proteins. It is important to remove contaminating organic and inorganic matter that may reduce DNA purity and inhibit downstream DNA applications.
14. Avoiding the pellet, transfer entire volume of supernatant to a new 1 ml Collection Plate.
What’s happening: The pellet at this point contains residues of humic substances, cell debris, and proteins. For best DNA yield and quality, avoid transferring any of the pellet.
15. Apply Sealing Tape to plate. Centrifuge the plate again at room temperature for 6 minutes at 4500 x g.
16. Transfer no more than 650 µl of supernatant to a 2 ml Collection Plate avoiding any residual
pellet. 17. Add 650 µl of Solution C4 to each well of the plate.
What’s happening: Solution C4 is a high concentration salt solution. Since DNA binds tightly to silica at high salt concentrations, this solution will adjust the salt concentrations to allow binding of DNA, but not non-DNA organic and inorganic material that may still be present at low levels, to the Spin Plate.
18. Add a second 650 µl of Solution C4 to each well of the plate.
Note: It is safe to stop the protocol at this step and store the samples covered with Sealing Tape (user supplied) at 4°C.
19. Pipet samples “up and down” to mix. 20. Place Spin Plate onto a new 0.5 ml Collection Plate.

Technical Information: Toll free 1-800-606-6246, or 1-760-929-9911 Email: [email protected] Website: www.mobio.com
15
21. Load approximately 650 µl into each well of the Spin Plate and apply Centrifuge Tape. 22. Centrifuge at room temperature for 3 minutes at 4500 x g. Discard the flow through and place the
Spin Plate back on the same 0.5 ml Collection Plate. Discard the Centrifuge Tape. 23. Repeat steps 20-21 until all the supernatant has been processed. Discard the final flow through.
What’s happening: DNA is selectively bound to the silica membrane in the Spin Plate device in the high salt solution. Contaminants pass through the filter membrane, leaving only DNA bound to the membrane.
24. Place the Spin Plate back on the same 0.5 ml Collection Plate. 25. Confirm that ethanol has been added to Solution C5-D (see step 1). Add 500 µl of Solution
C5-D to each well of the Spin Plate. Apply Centrifuge Tape to the Spin Plate.
What’s happening: Solution C5-D is an ethanol based wash solution used to further clean the DNA that is bound to the silica membrane in the Spin Plate. This wash solution removes residues of salt, humic acid, and other contaminants while allowing the DNA to stay bound to the silica membrane. This flow through is waste containing ethanol wash solution and contaminants that did not bind to the silica Spin Plate membrane.
Note: You can wash more than one time to further clean DNA if desired. In some cases where soils have very high humic acid content, it will be beneficial to repeat this wash step. There is 10% extra Solution C5-D in the bottle for this purpose. Solution C5-D is also sold separately (MO BIO Catalog# 12955-4-5D & 12955-12-5D).
26. Centrifuge at room temperature for 3 minutes at 4500 x g. Discard the flow through and place the
same 0.5 ml Collection Plate beneath the Spin Plate.
What’s happening: This step removes residual Solution C5-D (ethanol wash solution). It is critical to remove all traces of wash solution because it can interfere with downstream DNA applications.
27. Centrifuge again at room temperature for 3 minutes at 4500 x g. Discard the flow through.
What’s happening: Once again it is important to avoid any traces of the ethanol based wash solution.
28. Carefully place the Spin Plate onto a Microplate. Remove Centrifuge Tape and discard. Allow to air dry for 10 minutes at room temperature. What’s happening: This step removes residual Solution C5-D (ethanol wash solution). It is critical to remove all traces of wash solution because it can interfere with downstream DNA applications.
29. Add 100 µl of Solution C6 to the center of each well of the Spin Plate and apply Centrifuge Tape.
What’s happening: Placing the Solution C6 (sterile elution buffer) in the center of the small white membrane will make sure the entire membrane is wetted. This will result in more efficient and complete release of the DNA from the silica Spin Plate membrane.
30. Centrifuge at room temperature for 3 minutes at 4500 x g. Remove Centrifuge Tape and discard.
What’s happening: As the Solution C6 (elution buffer) passes through the silica membrane, DNA that was bound in the presence of high salt is selectively released by Solution C6 (10 mM Tris pH 8.0) which is a low salt solution.

Technical Information: Toll free 1-800-606-6246, or 1-760-929-9911 Email: [email protected] Website: www.mobio.com
16
31. Cover wells of Microplate with the Elution Sealing Mat provided. DNA is now ready for any
downstream application. No further steps are required.
Prolonged storage at 4°C will result in the evaporation of eluted DNA. We recommend storing
DNA frozen (-20C or -80°C). Solution C6 does not contain EDTA. To concentrate the DNA see the Hints and Troubleshooting Guide.
Thank you for choosing the PowerSoil®-htp 96 Well Soil DNA Isolation Kit.
Technical Information: Toll free 1-800-606-6246, or 1-760-929-9911 Email: [email protected] Website: www.mobio.com
17
Hints and Troubleshooting Guide
Amount of Soil to Process This kit is designed to process 0.25 gram of soil. Recommended starting amounts for different soil types are described in the table below. For wet soils, see information under “Wet Soil Sample” below.
Soil type Recommended maximum to process
Dry sandy soil 0.5 gm
Dry clay 0.25 gm
Wet clay 0.25 gm
Potting soil 0.1 gm
Sediment 0.25 gm
Loam 0.25 gm
Peat moss 0.1 gm
Rich farm soil 0.25 gm
Amended soil 0.150 gm
Compost samples 0.1 gm
For larger sample sizes, up to 5 grams, try using our single prep PowerMax® Soil DNA Isolation Kit (MO BIO
Catalog# 12988-10). Wet Soil Sample If soil sample is high in water content, weigh the slurry and dispense into the wells. It is suggested to restrict the starting amount to 0.25 g. Increasing the amount used will increase the amount of volume in the subsequent steps. Cells are Difficult to Lyse When working with organisms that are proven to be difficult to lyse using mechanical or chemical
methods, a 10 minute incubation at 70C, after adding Solution C1, can be performed. Continue by proceeding with the mechanical lysis step using the 96 Well Plate Shaker. Preparation Methods for Processing Samples (Conventional Freezing)
Add the samples to the PowerSoil®-htp Bead Plate and maintain at either -70C or at -20C until the
samples are completely frozen. Immediately float the PowerSoil®-htp Bead Plate in a 65C water bath.
Repeat the freeze-thaw a second time and proceed with the addition of Solution C1. Optional: After the second freeze-thaw, Solution C1 can be added along with Proteinase-K (MO BIO Catalog# 1222-2) to improve the lysis efficiency for some organisms.
Vacuum Hints If a vacuum step seems to be taking a long time, turn off the vacuum source and lift the filter plate off the vacuum to release any back pressure. Replace the filter plate and turn the vacuum source back on. Be sure there are no air leaks around the plate. If slow vacuum continues, you can centrifuge the filter plate as an alternative. Be sure any unused wells are covered with the Sealing Tape provided. Centrifuge with a Maximum Speed Less Than 4500 x g Multiply the protocol time and speed to determine total x g. Divide the total by the maximum speed of your centrifuge (round up if necessary). This will be the number of minutes your centrifuge will need to run to achieve the appropriate overall force.
Example: 10 minutes at 4500 x g = 45000. If your centrifuge has a maximum speed of 2500 x g, divide 45000 ÷ 2500 = 18 minutes of centrifugation.

Technical Information: Toll free 1-800-606-6246, or 1-760-929-9911 Email: [email protected] Website: www.mobio.com
18
Hints and Troubleshooting Guide cont. If DNA does not PCR amplify
Check DNA yield by gel electrophoresis and spectrophotometer reading. Template is typically added to 10 ng per reaction, although more or less may be needed depending on the reaction conditions, enzyme activity, and copy number of the target sequence.
If DNA does not amplify after altering the amount of template in the reaction, PCR optimization (i.e. changing reaction conditions, validating primers, or testing a different polymerase) should be attempted.
Eluted DNA Sample has Color If you are working with a soil sample that has an extremely high humic acid content, there is the unlikely possibility that your eluted solution may contain some color. If this occurs, increase the number of washes with Solution C5-D to two or three washes. If you are still encountering coloring, please contact MO BIO Laboratories, Inc. for technical assistance. DNA Floats Out of Well When Loaded on a Gel This usually occurs because some residual Solution C5-D remains in the final sample. Prevent this by being careful not to transfer liquid onto the bottom of the spin plate. Ethanol precipitation (described in “Concentrating the DNA”) is the best way to remove residual Solution C5-D. Concentrating the DNA
The final volume of eluted DNA will be 100 µl. The DNA may be concentrated by adding 5l of 5M NaCl and inverting 3-5 times to mix. Next, add 200 µl of 100% cold ethanol and invert 3-5 times to mix. Incubate at -20°C for at least 10 minutes to overnight. Centrifuge at 13,000 x g for 15 minutes. Decant all liquid. Wash the DNA pellet with 70% cold ethanol. Centrifuge at 13,000 x g for 10 minutes to re-pellet the sample. Decant ethanol and dry in a speed vacuum, dessicator, or ambient air. Resuspend precipitated DNA in sterile water or sterile 10 mM Tris.
Note: This procedure must be done individually after transferring the eluted sample to a microcentrifuge tube.
Storing DNA
DNA is eluted in Solution C6 (10 mM Tris). Store the DNA at -20C to prevent degradation. DNA can be eluted in TE without DNA loss, but the EDTA may inhibit downstream reactions such as PCR and automated sequencing. DNA may also be eluted with sterile DNA-Free PCR Grade Water (MO BIO Catalog# 17000-10). DNA that has been eluted into sterile water should be stored at -70°C. Prolonged storage in the Microplates at 4°C will result in the loss of liquid due to evaporation. MO BIO offers TE-4 (10 mM Tris, 0.1 mM EDTA pH 8.0) which will allow for maximal protection of DNA during storage with no PCR inhibition (Catalog# 17320-1000).
Technical Information: Toll free 1-800-606-6246, or 1-760-929-9911 Email: [email protected] Website: www.mobio.com
19
Additional Applications and References
Root tips/Mycorrhizae Microbial colonization of root tips and microbial growth penetrating the root tips, are both common phenomenon occurring in many plant species. For optimal processing of these samples, please follow
the suggested sample processing method above. Transfer the powdered mass into the PowerSoil®-htp
Bead Plate supplied with this kit and proceed with the soil protocol. This procedure ensures that organisms colonizing the root tips, both externally and internally, are released for efficient lysis. Reference De Souza, F.A., G.A. Kowalchuk, P. Leeflang, J.A. van Veen, and E. Smit. 2004. PCR-Denaturing Gradient Gel Electrophoresis Profiling of Inter- and Intraspecies 18s rRNA Gene Sequence heterogeneity is an Accurate and Sensitive method to Assess Species Diversity of Arbuscular Mycorrhizal Fungi of the Genus Gigaspora. Appl. Environ. Microbiol. 70 (3): 1413-1424.
Microbial Mats and Biofilms Microbial mats and biofilms are a common occurrence in many natural environments. The mats or biofilms provide protection for the microbial community that is growing within the biofilms; direct lysis of the microbial cells within this protected community is inefficient. For processing biofilm and biomat
samples, we recommend the PowerBioFilm® DNA and RNA kits. For more information go to
www.mobio.com/biofilm. Fungal Mats
The PowerSoil®-htp 96 Well Soil DNA Isolation Kit is suitable for isolating DNA from fungi grown in pure
culture. Harvesting a freshly grown culture is suggested because the growing hyphal tips of the fungal mat are a rich source of DNA. This is accomplished by harvesting the fungal mat using cheesecloth; this will separate single cell organisms from the fungal mat. After filtering, transfer an appropriate amount of
the retained moist fungal mat into the PowerSoil®-htp Plate. To improve the lysing efficiency of this kit,
freeze/thaw cycles may be performed after adding samples to the bead plate and adding the Bead
Solution. Store the plate at -70C or -20C until the samples are completely frozen. Immediately float the
PowerSoil®-htp Bead Plate in a 65C water bath to thaw. Repeat the freeze-thaw a second time and
proceed with the addition of Solution C1.
Spores (bacterial and fungal) in Soils Fungal spores are tougher than bacterial spores because of their high polysaccharide content. Follow
the freeze-thaw protocol detailed above and heating the samples to 70C for 15 minutes before bead beating may also be helpful. When dealing with spores harvested from pure cultures, please use the
UltraClean® Microbial DNA Isolation Kit (MO BIO Catalog# 12224-50).
Fecal Samples and Cattle Manure
The PowerSoil®-htp 96 Well Soil DNA Isolation Kit can be used without significant modifications on a
wide variety of fecal materials. References
1. Clement, B.G., and C.L. Kitts. 2000. Isolating PCR Quality DNA from Human Feces with a Soil DNA Kit. Biotechniques 28(4): 640-644.
2. Ibekwe, A.M., P. Watt, C. Grieve, V. Sharma, and S. Lyons. 2002. Multiplex Fluoregenic Real-Time PCR for Detection and Quantification of Escherichia coli O157:H7 in Dairy Wastewater Wetlands. Appl. Environ. Microbiol. 68(10): 4853-4862.
3. Ibekwe, A.M., C.M. Grieve, and S.R. Lyon. 2003. Characterization of Microbial Communities and Composition in Constructed Dairy Wetland Wastewater Effluent. Appl. Environ. Microbiol. 69(9): 5060-5069.
4. Trochimchuk, T., J. Fotheringham, E. Topp, H. Schraft, and K.T. Leung. 2003. A comparison of DNA extraction and purification methods to detect Escherichia coli O157:H7 in cattle manure. J. Microbiol. Methods 54: 165-175.
Technical Information: Toll free 1-800-606-6246, or 1-760-929-9911 Email: [email protected] Website: www.mobio.com
20
Additional Applications and References cont. Rumen Samples
The PowerSoil®-htp 96 Well Soil DNA Isolation Kit can be used to extract PCR-quality DNA from rumen
samples as described in the reference below. Rumen has an actively metabolizing microbial community; unfortunately it is also rich in phenolic compounds and polysaccharides. These contaminants often inhibit
downstream molecular analyses. Using the MO BIO Laboratories UltraClean® Soil DNA Isolation Kit or
PowerSoil® DNA Isolation Kit, with the modifications in the publication below, will result in application
ready DNA. Reference Mackie, R.I.. R.I. Aminov, W. Hu, A.V. Klieve, D. Ouwerkerk, M.A. Sundest, and Y. Kamagata. 2003. Ecology of Uncultivated Oscillospira Species in the Rumen of Cattle, Sheep and Reindeer as Assessed by Microscopy and Molecular Approaches. Appl. Environ. Microbiol. 69(11): 6808-6815.
Insects
The UltraClean® Tissue & Cells DNA Isolation Kit, (MO BIO Catalog# 12334-50), is recommended for
this type of starting material. Coral Reef
The PowerSoil®-htp 96 Well Soil DNA Isolation Kit is also suitable for isolating PCR-quality DNA from
microbial communities living within Coral reef samples. Briefly, 1.3 cm diameter core samples were drilled from coral reefs and the microorganisms were washed off the cores in 10X TE buffer. Both the
slurry and pelleted microbial cells were directly used to extract microbial DNA using the UltraClean® Soil
DNA Isolation Kit. The methodology employed is described in more detail in the following reference. Reference Rohwer, F., M. Breitbart, J. Jara, F. Azam, and N. Knowlton. 2001. Diversity of bacteria associated with the Caribbean coral Montastraea franksi. Coral Reefs 20: 85-91.
Note: Kit components have been used with the sample types listed above. This 96 Well version of the kit has been developed based on the success of the single prep kit.
Technical Information: Toll free 1-800-606-6246, or 1-760-929-9911 Email: [email protected] Website: www.mobio.com
21
Contact Information Technical Support: Phone MO BIO Laboratories, Inc. Toll Free 800-606-6246, or 760-929-9911 Email: [email protected] Fax: 760-929-0109 Mail: MO BIO Laboratories, Inc, 2746 Loker Ave West, Carlsbad, CA 92010 Ordering Information: Direct: Phone MO BIO Laboratories, Inc. Toll Free 800-606-6246, or 760-929-9911
Email: [email protected]
Fax: 760-929-0109 Mail: MO BIO Laboratories, Inc, 2746 Loker Ave West, Carlsbad, CA 92010
For the distributor nearest you, visit our website at www.mobio.com/distributors

Technical Information: Toll free 1-800-606-6246, or 1-760-929-9911 Email: [email protected] Website: www.mobio.com
22
Products recommended for you
For a complete list of products available from MO BIO Laboratories, Inc., visit www.mobio.com
Description Catalog No. Quantity
PowerSoil® Soil DNA Isolation Kit 12888-50
12888-100
50 preps
100 preps
PowerLyzer® PowerSoil® DNA Isolation Kit 12855-50
12855-100
50 preps
100 preps
PowerMag™ Soil DNA Isolation Kit (Optimized for KingFisher®)
27000-4-KF 4 x 96 preps
PowerMag™ Soil DNA Isolation Kit (Optimized for epMotion®)
27100-4-EP 4 x 96 preps
PowerMax® Soil DNA Isolation Kit 12988-10 10 preps
PowerClean® DNA Clean-Up Kit 12877-50 50 preps