Powerlifting Quick Start Guide - Special...
42
POWERLIFTING QUICK START GUIDE
Transcript of Powerlifting Quick Start Guide - Special...
POWERLIFTING QUICK START GUIDE
2 Special Olympics Powerlifting Quick Start Guide – July 2011
Special Olympics Powerlifting Coaches Quick Start Guide
Table of Contents Acknowledgements ............................................................................................................................................3 Introduction ........................................................................................................................................................4 Planning a Powerlifting Training & Competition Season ..................................................................................5
Sample Training Plan ......................................................................................................................................5 Sample Practice Session ..................................................................................................................................6 In-Season Planning ..........................................................................................................................................8 Overtraining .....................................................................................................................................................8 Training to a Weight Class ..............................................................................................................................8
Weight Room Safety ..........................................................................................................................................9 Safety Responsibilities Equipment/Facility Care Responsibilities ..................................................................9 Responsibilities of the Lifting Athlete .............................................................................................................9 Responsibilities of the Coach/Spotter ............................................................................................................ 10
Powerlifting Attire ............................................................................................................................................ 12 Powerlifting Equipment ................................................................................................................................... 17 Teaching Powerlifting Rules ............................................................................................................................ 21 Protest Procedures ............................................................................................................................................ 21 Powerlifting Protocol & Etiquette .................................................................................................................... 21 Sportsmanship .................................................................................................................................................. 22 Powerlifting Glossary of Terms ....................................................................................................................... 23 Appendix: Skill Development Tips .................................................................................................................. 25
Warming Up and Stretching .......................................................................................................................... 25 Training for Muscle Balance ......................................................................................................................... 25 High Risk Exercises ...................................................................................................................................... 25
Basic Skills ....................................................................................................................................................... 26 Squat ................................................................................................................................................................. 26
Faults & Fixes Chart – Squat ......................................................................................................................... 29 Bench Press ...................................................................................................................................................... 30
Faults & Fixes Chart – Bench Press .............................................................................................................. 33 Deadlift ............................................................................................................................................................. 34
Faults & Fixes Chart – Deadlift ..................................................................................................................... 36 Supplementary Exercises ................................................................................................................................. 37 Weekly Workout Schedule ............................................................................................................................... 42
Special Olympics Powerlifting Quick Start Guide – July 2011 3
Special Olympics PowerliftingCoaches Quick Start Guide
Acknowledgements The Special Olympics movement is profoundly grateful for the support of the Annenberg Foundation which has underwritten the production of this guide and resource, supporting our global goals for coaches’ excellence.
Special Olympics would also like to thank the professionals, volunteers, coaches and athletes who helped in the production of the Powerlifting Coaching Guide. They have helped fulfill the mission of Special Olympics: to provide year-round sports training and athletic competition in a variety of Olympic-type sports for people 8 years of age and older with intellectual disabilities, giving them continuing opportunities to develop physical fitness, demonstrate courage, experience joy and participate in a sharing of gifts, skills and friendship with their families, other Special Olympics athletes and the community.
Special Olympics welcomes your ideas and comments for future revisions of this guide. We apologize if, for any reason, an acknowledgement has been inadvertently omitted.
Contributing Authors Members of the Special Olympics Powerlifting Sport Resource Team:
Charles “Chip” Hultquist, Powerlifting SRT Chairman
William Clelland
Richard Frazier
Billy Keel
Alexander Matheison
James Mutrie
Yelian “Carol” Xu
Special Thanks To the Following for All of Your Help and Support Dion Thomas, Starring Athlete
Todd Youngblood, Special Olympics Powerlifting Coach
Christopher Seivard, Videography
Paul Whichard, Web buildout
Sherman Ledford, Owner of Quest Gym in Duluth, Georgia – site of the Powerlifting Coaching Guide video shoot

4 Special Olympics Powerlifting Quick Start Guide – July 2011
Special Olympics Powerlifting Coaches Quick Start Guide
Introduction This online guide is intended to provide Special Olympics coaches with comprehensive guidance for developing a Powerlifting Training and Competition Season and Teaching Powerlifting Skills. An understanding of effective powerlifting training processes, schedules, activities, facilities and equipment, will provide the Special Olympics Powerlifting coach with the foundation for developing successful powerlifting athletes. With the addition of an understanding of how to train the Special Olympics athletes to develop skills in each of the three powerlifts, as well as how to correct faults in performance of a lift, the powerlifting coach will be better prepared to guide the athlete toward successful competition in the squat, bench press and deadlift.
While this resource provides a great background to effective coaching, it is important that the Special Olympics powerlifting coach learn from NGB (United States Powerlifting – USAPL) officials and coaches about the sport and apply that learning in the context of Special Olympics powerlifting. By applying an informed, positive and goal oriented approach to training in Special Olympics powerlifting, athletes will demonstrate great improvement in strength, confidence and the reward of continuing to exceed expectation in their sport.
Special Olympics Powerlifting Quick Start Guide – July 2011 5
Special Olympics PowerliftingCoaches Quick Start Guide
Planning a Powerlifting Training & Competition Season There will be many different skills to teach athletes during the course of a season. A season-long training plan will help coaches present skills in a systematic and effective way. The sessions in the plan below are organized in a twice-a-week format.
Sample Training Plan A powerlifting training program can extend through-out the entire year. The athlete can compete in Special Olympics competitions at the sub-program level before advancing to the program level. If desirable, an athlete may also choose to compete in an open competition.
It is important that the athlete use a system that provides for maximum gain and success throughout the training year. During the training cycle of 8-12 weeks, Periodization allows for accomplishing this goal. Periodization refers to the change in the total number of repetitions (volume) and the amount of weight used to increase either muscle size, strength, or power. Periodization also refers to the frequency of training.
• Early in the training cycle, the athlete should train more for muscle development or size (8 to 15 repetitions and lighter weight). This increase in muscle size provides the foundation for the strength and power training to follow.
• Later in the training cycle, the athlete should train more for strength (4 to 7 repetitions and medium weight).
• The athlete finally trains for power (1 to 3 repetitions and heavy weight) as he or she prepares for competition. Power training should only be used to peak for competitions and for no more than four weeks.
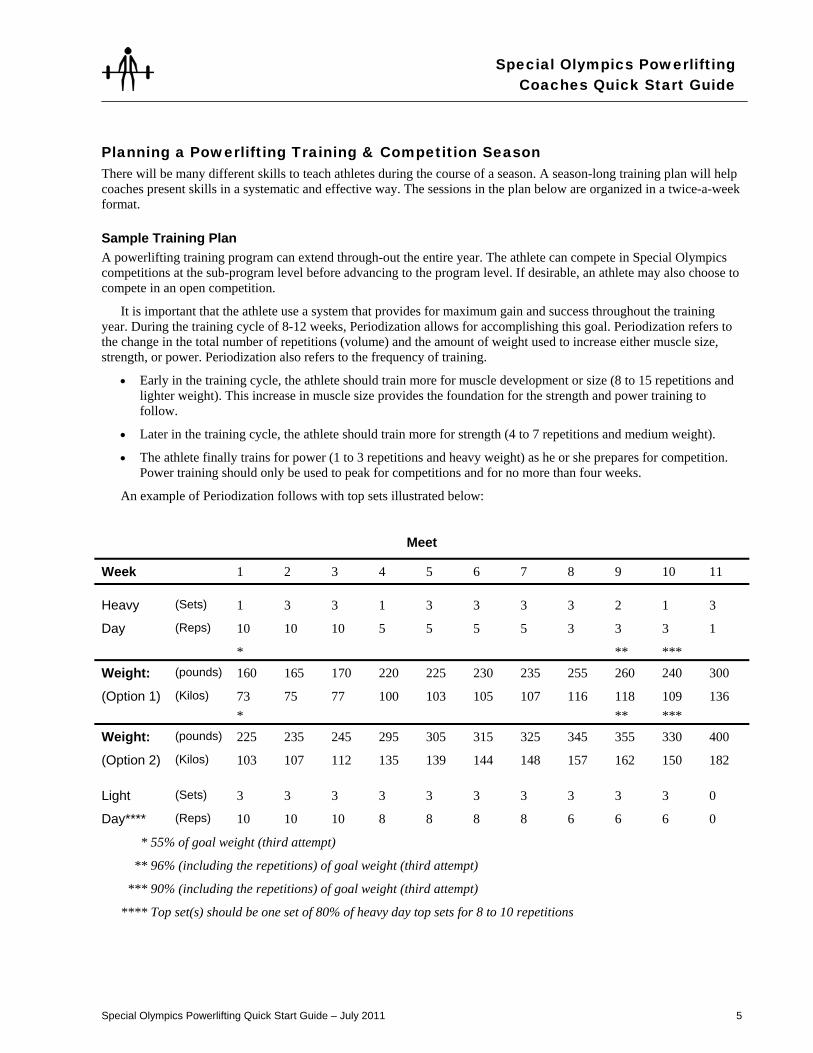
An example of Periodization follows with top sets illustrated below:
Meet
Week 1 2 3 4 5 6 7 8 9 10 11 Heavy (Sets) 1 3 3 1 3 3 3 3 2 1 3
Day (Reps) 10 10 10 5 5 5 5 3 3 3 1
* ** *** Weight: (pounds) 160 165 170 220 225 230 235 255 260 240 300
(Option 1) (Kilos) 73 75 77 100 103 105 107 116 118 109 136 * ** *** Weight: (pounds) 225 235 245 295 305 315 325 345 355 330 400
(Option 2) (Kilos) 103 107 112 135 139 144 148 157 162 150 182
Light (Sets) 3 3 3 3 3 3 3 3 3 3 0
Day**** (Reps) 10 10 10 8 8 8 8 6 6 6 0
* 55% of goal weight (third attempt)
** 96% (including the repetitions) of goal weight (third attempt)
*** 90% (including the repetitions) of goal weight (third attempt)
**** Top set(s) should be one set of 80% of heavy day top sets for 8 to 10 repetitions
6 Special Olympics Powerlifting Quick Start Guide – July 2011
Special Olympics Powerlifting Coaches Quick Start Guide
The chart above incorporates an 11-week training cycle and illustrates the sets and repetitions along with the highest set for the heavy day for each training week. Note that other warm-up and workload sets are provided in pounds below. Additionally, in the chart, sets and repetitions are included for the light day. Weights lifted for the light day can be estimated by using 80 percent of that week’s heavy day as the top set and the warm-up and load progression chart below to estimate warm-ups and other workload sets. Some athletes may respond better to only one top set while others may respond better to three top sets.
NOTE: Off-season powerlifting training should use repetitions and sets similar to weeks one through seven. This training should be repeated until 11 weeks prior to the main competition. A two-day-a-week routine may be best during high intensity sport activity. This would combine days of the four-day routine and drop some exercises.
If an athlete competes in a second competition in less than the full 11 weeks, encourage the athlete to take a week or two off. Start back on the chart with the appropriate number of sets and repetitions based on number of weeks remaining.
Options 1 and 2 (above/previous) provide for different amounts of weight increase each week (5 lbs./2.5 kg vs. 10 lbs./5 kg). Generally, the more weight lifted, the more the athlete can increase his/her top set per week. Goals for competition (third attempt) should be set by using the single repetition maximum established prior to the competition cycle. Each goal should be increased by 3 percent, 5 percent, or even 10 percent over the athlete’s previous best.
The above pattern of Periodization can be repeated after at least a one-week layoff of training following the competition. The number of cycles of this pattern is determined by the number of competitions during a year. Entering too many competitions within the year may result in injury or burnout.
Sample Practice Session A variety of workouts is effective. The following are two suggested weekly workout schedules: The warm-up and load progression chart illustrates a recommended weight progression sequence for each of the primary lifts.
• Generally, the heavier the weight, the more warm-up sets are required.
• It is important for athletes to not perform too many warm-up sets as this may fatigue the athlete before he or she reaches the top set or sets.
• With lighter weights, the athlete may use multiple sets of the same weight for top sets.
• As the athlete becomes more advanced, the weight progression is more like the sequence in the warm-up and load progression chart with the last three sets being the workload sets and the highest workload sets using not more than the goal weight set for that workout.
• It is important that a record is kept of all workouts so that the athletes’ training can be planned and documented. The weight training record chart tracks the athletes’ development as they progress through increasing workloads in their training. It is recommended that the chart be filled out in pencil so that changes can be made to the chart if necessary to the goal weight set for that workout.

Special Olympics Powerlifting Quick Start Guide – July 2011 7
Special Olympics PowerliftingCoaches Quick Start Guide
Warm-up and Load Progression Chart (expressed in pounds. For kilos multiply pounds by 2.2)
Warm-up (lb) Workload Warm-up (lb) Workload 75 85 95 105 115 125 135 225 275 325 355 375
75 90 105 115 125 135 135 225 275 335 365 385
85 95 110 125 135 145 135 225 315 345 375 395
85 105 115 135 145 155 135 225 315 355 385 405
95 110 125 140 155 165 135 225 315 365 395 415
95 115 130 145 160 175 135 225 315 375 405 425
95 125 140 155 170 185 135 225 315 385 415 435
95 135 150 165 180 195 135 225 315 385 415 445
135 145 160 175 190 205 135 225 315 385 425 455
135 155 170 185 200 215 135 225 315 405 435 465
135 155 180 195 210 225 135 225 315 405 445 475
135 155 185 195 215 235 135 225 315 365 425 455 485
135 155 185 205 225 245 135 225 315 365 435 465 495
135 155 185 215 235 255 135 225 315 365 445 475 505
135 155 185 225 245 265 135 225 315 405 455 485 515
135 155 195 235 255 275 135 225 315 405 465 495 525
135 185 225 245 265 285 135 225 315 405 465 505 535
135 185 225 255 275 295 135 225 315 405 475 515 545
135 185 225 265 285 305 135 225 315 405 485 525 555
135 185 225 275 295 315 135 225 315 405 485 525 565
135 185 245 285 305 325 135 225 315 405 495 535 575
135 225 255 295 315 335 135 225 315 405 495 545 585
135 225 255 305 325 345 135 225 315 405 495 555 595
135 225 275 315 335 355 135 225 315 405 495 565 605
135 225 275 325 345 365
Adapted from Pauletto (1986)
8 Special Olympics Powerlifting Quick Start Guide – July 2011
Special Olympics Powerlifting Coaches Quick Start Guide
In-Season Planning The number of athletes training in a single session will dictate the length of the session. As in competition the time between each athlete’s sets should allow adequate time for recovery but not too much time so that the athlete cools down.
Body’s Response to Weight Training The athlete should experience an increase in strength, power, or size from training with weights. However, overtraining and even injury can occur if the athlete attempts to lift too much weight too fast. Therefore, it is important for the coach to understand the principles of weight training while effectively planning the athlete’s training cycle.
• Generally, the body adapts to higher repetitions of eight to 15 by increasing muscle size with some increase in strength.
• Repetitions of four to seven tend to build strength with some increase in muscle size.
• Repetitions of one to three tend to produce power and strength gains with very little increase in muscle size.
• Each of these objectives has a place in an athlete’s training. Trying to achieve all of these at the same time will often cause overtraining.
• Periodization is a way to effectively mix these objectives over time.
Training with an Adequate Workload The athlete should periodically increase the weight lifted so that muscle adaptation and thus muscle strength, power, or size occurs. This should not be at the expense of poor form, overtraining, or possible injury.
• A good rule of thumb is to be able to increase the weight of top sets (heaviest sets) at least 2.5 kg to 5 kg on each lift each week.
• The most effective strength training weight ranges from about 80 percent to 95 percent or 96 percent of the next competition’s training goal.
• A training period or cycle should begin with the lower weight and increase to a higher weight as the athlete is closer to competition.
• When setting goals for a training cycle, it is important to realize that athletes may make increases in some lifts from 20 percent to 38 percent when the athlete is learning the lifts.
• After an athlete has trained for six months to a year he or she may only be able to increase from 3 percent to 10 percent over the previous goal. It is best to be conservative when setting goals.
Overtraining After four to six weeks of steady hard lifting, an athlete could experience extreme soreness or loss of energy. If this condition extends beyond 48 hours, after a heavy workout, overtraining may have occurred. Should overtraining be experienced, a short active rest phase should be considered as well as to reduce competition expectations and lower weights and or the number of sets and repetitions. A complete rest week should be included at least every 12 to 15 weeks.
Training to a Weight Class Powerlifting competitions provide for athletes to complete against other athletes of similar bodyweight. Special Olympics powerlifting weight classes are found here. In competition where there are not enough athletes of each weight class to create a division, athletes from different weight classes may be combined. The Wilks Formula “equalizes” athletes of different body weight classes. To use the Wilks Formula, find the athletes body weight coefficient number from the list and multiply this number by the individual lift or total. Placing is determined by the highest resulting score. The Wilks Formula can found at the IPF Web site.
Special Olympics Powerlifting Quick Start Guide – July 2011 9
Special Olympics PowerliftingCoaches Quick Start Guide
Weight Room Safety Without a doubt, one of the most important considerations for operating a weight training facility is that of safety! A key element to a successful strength and conditioning program is the safe use and care of equipment. Not only the health and welfare of the athlete are at stake, but also the legal liabilities of those operating the facility. It is the responsibility of the strength and conditioning coach and weight room administrators to ensure that the following guidelines are enforced.
Cleanliness Cleanliness is an important factor that is overlooked in many weight rooms. All weights are to be put away! This includes dumbbells that are often left for “someone else to put away.” Weights are to be returned after each exercise, not after the entire workout is completed. Tripping over scattered weights can be a serious hazard in the weight room. Jackets, gym bags, and other clothing belong in the locker room. They are not to be draped over the squat rack, tossed onto a nearby bench, or piled in a heap in the corner. Use chalk sparingly, and clean up any chalk from the floor and equipment after every workout.
Conduct The first and most important rule is appropriate conduct! The weight room is not a playground! Someone could be seriously injured or expensive equipment could be broken. This rule cannot be stressed enough. It is also important to respect the rights of others using or owning the facility. Casual observers (friends, etc.) can be a distraction in the weight room. They often get in the way of other athletes, especially during busy times.
Safety Responsibilities Equipment/Facility Care Responsibilities Maintenance of the equipment is a never-ending job. Here is a safety checklist to help maintain the facility:
• Regularly lubricate the equipment with a light-weight oil or silicone lubricant to add to its life. If oil is used on lifting bars, make sure to wipe off any excess. Weights may slip off despite have a collar in place.
• Check for potentially loose nuts and bolts, broken welds, worn pulleys, and frayed cables daily and repair as needed.
• Check wall or floor-mounted equipment for stability and tighten regularly. • Replace broken barbell plates and weight stack plates. Welding broken plates may increase the weight of the
plate, and the welds do not always hold. • Replace worn or torn covers or padding. (Most fabric stores carry heavy vinyl materials and high-density foam
padding.) The cover and padding can be cut to fit the bench and fastened in place with a staple-gun. • Check Olympic bars for loose end pieces constantly and keep tight. This also must be done with dumbbells that
are bolted together. If these come apart, serious injury can occur. • Check platforms and flooring that may have been damaged from regular pounding for they could collapse.
Underlying support boards and surface materials should be replaced as needed. • Use mild soap and water to clean padded areas with which the athletes come in contact regularly. This helps to
keep the equipment clean and to prevent bacterial growth.
Responsibilities of the Lifting Athlete Each power lifting coach should make sure that all athletes know the rules and responsibilities for lifting and spotting. Each athlete should be aware of the following:
• Know the proper use of all the equipment and how to adjust the equipment correctly. • Dress properly, including wearing a shirt, sweat pants or tight-fitting stretch shorts, and shoes. • Wear a lifting belt when squatting or dead lifting.
10 Special Olympics Powerlifting Quick Start Guide – July 2011
Special Olympics Powerlifting Coaches Quick Start Guide
• Always use spotters for squatting, bench pressing. And other lifts where injury could occur without a spotter. The old adage “better safe than sorry. Applies here.
• Always use collars when plates are on the bar. • Use safety equipment when available, especially when no spotter is available. (For example, these include step-
down squat racks, safety racks for squatting and benching, etc.) • Use proper lifting form. This will help prevent injuries. • Know the limits. No one should try to lift beyond his or her capabilities, a common problem with beginning
athletes. • Stay with the bar on a missed lift. Do not let go of the bar and walk off, leaving the spotters hanging on. Finish
the lift and stay with the bar until it is safety back in the racks. • Do not drop weights (dumbbells and machine weight stacks included)! Remember, if you can lift it, you can set
it down. If you have a problem with the lift, get a spotter. This may be especially important with dumbbell exercises. Dropped weights can cause injury to athletes and spotters, damage floors, and even damage the weights.
Responsibilities of the Coach/Spotter The coach should train athletes to be constantly aware of potential problems. The athletes must be able to use the equipment and the weight room in a proper way to promote personal safety. It is the coach’s responsibility to instruct and supervise athletes for proper spotting techniques and methods. The athlete depends on his spotter for safety. Therefore, it is very important that the spotters know what they are doing. Some of the items listed below are the responsibility of the coach as well as the spotter:
• Grip the bar with the “thumbs around” grip, thus locking the bar safely in the palms of the hands during the bench press. Without a safety grip, the bar could slide out of the lifter’s hands and cause serious injury.
• Load the barbell properly. The correct weight is loaded when end of the bar are equally loaded, the plates are pushed all the way onto the bar, and collars are used, especially with heavy weight. A good rule of thumb is to put the hollow sides of the plates toward the middle of the bar, assuring an even distribution of weight across the bar.
• Insert pins completely when using machines with weight stacks. • Do not have the athlete work out next to a mirror. It doesn’t take much of a tap with a weight to break a mirror. • Allow athletes to lift without distraction. • Report problems with the equipment immediately to the weight room supervisor. • BE ALERT! No daydreaming is allowed. Keep your mind on the task at hand. • Be sure there are enough spotters. As a spotter, if you are not sure that you can handle a missed lift by yourself,
then get more help. • Know how many repetitions the athlete will attempt. • Determine in advance the signals to be used with the athlete. Often the athlete is barely coherent when he grunts
out a call for assistance. • Help the lifter return the bar to the rack when the athlete has completed a lift or when he signals for assistance
in a failed lift. (Use of a lift off by the spotter is up to the individual athlete.) • Know the proper technique for lifting the bar from the rack. • Have a solid stance. Be prepared for anything. • Use two hands to spot or assist, particularly when spotting the bench press. If you are using only one hand or
one finger, it is difficult to assist if the athlete suddenly needs help. • Watch the athlete’s form. Be his or her best critic. • Encourage the athlete. Be a cheerleader.
Special Olympics Powerlifting Quick Start Guide – July 2011 11
Special Olympics PowerliftingCoaches Quick Start Guide
• If you have just finished a set, allow enough time to catch your breath and regain your energy before trying to spot someone else.
• Know how to spot dumbbell exercises. (It is often best to assist by gently pushing on the athlete’s elbows.) If the athlete gives out completely, be ready to grab the dumbbells. Keep the surrounding area clear of dumbbells and other obstructions.
• Do not rest your hand on the bar support when spotting the bench press. If the athlete decides to return the bar to the rack suddenly and without notice, the spotter’s fingers may get caught between the bar and the rack.
• Do not allow the athlete to lift more than has been programmed for that athlete’s workout. Overloading the athlete beyond his or her capabilities can be dangerous.

12 Special Olympics Powerlifting Quick Start Guide – July 2011
Special Olympics Powerlifting Coaches Quick Start Guide
Powerlifting Attire Proper clothing and equipment are important in keeping the athlete warm or cool depending upon the environment or in providing the proper stability or support as needed. A cold weight room can cause the athlete to cool off between sets leading to muscle tears or cramps. Covering the legs with sweat pants and wearing a T-shirt that covers the shoulders are important in these conditions. On the other hand, if the workout environment is hot, shorts and a T-shirt would be more appropriate.
Shirt A T Shirt of any color or colors must be worn under the lifting suit during the performance of the squat and bench press, but is optional for the men in the deadlift. Women must wear a T Shirt while competing on all lifts. The T Shirt is subject to the following conditions:
• Does not consist of any rubberized or similar stretch material.
• Does not have any pockets, buttons, zippers, collar, or v neck.
• Does not have reinforced seams.
• Is made of cotton or polyester or a mixture of cotton and polyester. Denim is not acceptable.
• It shall not have sleeves which terminate either below the elbow or at the deltoid. Lifters may not push or roll the sleeves of the T-Shirt up to the deltoid. T-Shirts must not be worn inside out.
• Is plain or the official T Shirt of the contest in which the lifter is competing. That which is offensive or likely to bring the sport into disrepute is not allowed.
Support shirts are NOT allowed.
Special Olympics Powerlifting Quick Start Guide – July 2011 13
Special Olympics PowerliftingCoaches Quick Start Guide
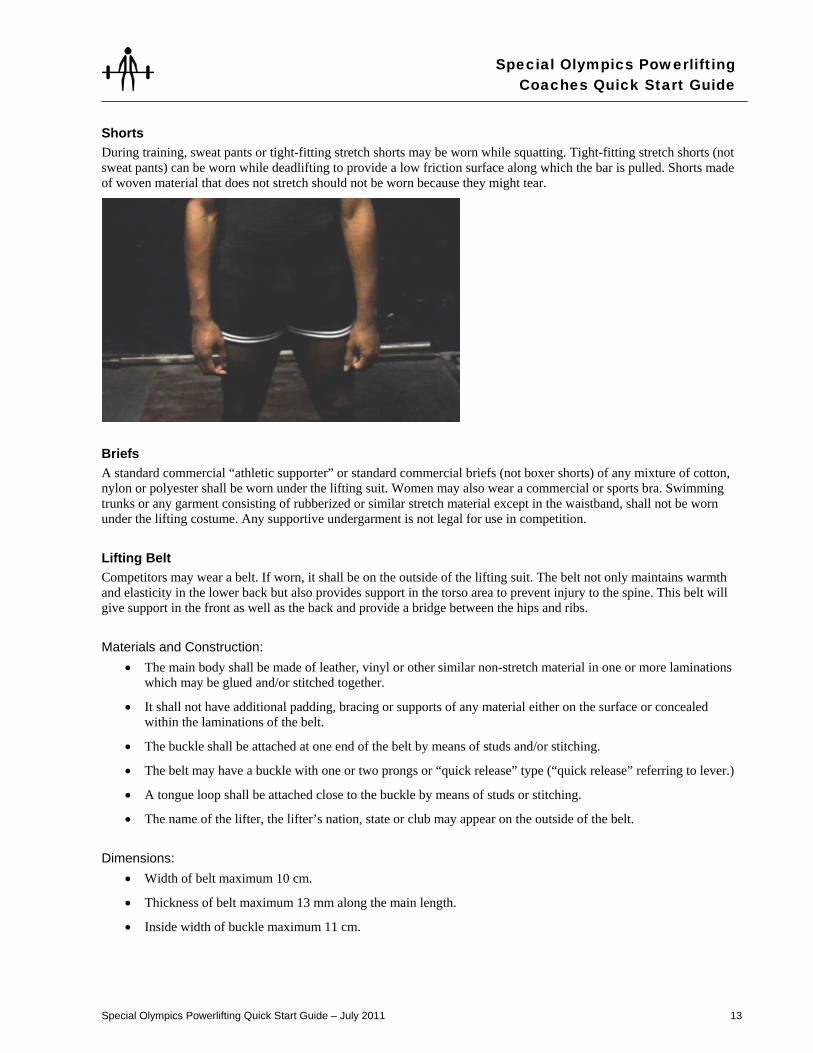
Shorts During training, sweat pants or tight-fitting stretch shorts may be worn while squatting. Tight-fitting stretch shorts (not sweat pants) can be worn while deadlifting to provide a low friction surface along which the bar is pulled. Shorts made of woven material that does not stretch should not be worn because they might tear.
Briefs A standard commercial “athletic supporter” or standard commercial briefs (not boxer shorts) of any mixture of cotton, nylon or polyester shall be worn under the lifting suit. Women may also wear a commercial or sports bra. Swimming trunks or any garment consisting of rubberized or similar stretch material except in the waistband, shall not be worn under the lifting costume. Any supportive undergarment is not legal for use in competition.
Lifting Belt Competitors may wear a belt. If worn, it shall be on the outside of the lifting suit. The belt not only maintains warmth and elasticity in the lower back but also provides support in the torso area to prevent injury to the spine. This belt will give support in the front as well as the back and provide a bridge between the hips and ribs.
Materials and Construction: • The main body shall be made of leather, vinyl or other similar non-stretch material in one or more laminations
which may be glued and/or stitched together.
• It shall not have additional padding, bracing or supports of any material either on the surface or concealed within the laminations of the belt.
• The buckle shall be attached at one end of the belt by means of studs and/or stitching.
• The belt may have a buckle with one or two prongs or “quick release” type (“quick release” referring to lever.)
• A tongue loop shall be attached close to the buckle by means of studs or stitching.
• The name of the lifter, the lifter’s nation, state or club may appear on the outside of the belt.
Dimensions: • Width of belt maximum 10 cm.
• Thickness of belt maximum 13 mm along the main length.
• Inside width of buckle maximum 11 cm.

14 Special Olympics Powerlifting Quick Start Guide – July 2011
Special Olympics Powerlifting Coaches Quick Start Guide
• Outside width of buckle maximum 13 cm.
• Tongue loop maximum width 5 cm.
• Distance between end of belt and far end of tongue loop maximum 25 cm.
Wraps Only wraps of one ply commercially woven elastic that is covered with polyester, cotton or a combination of both materials or medical crepe are permitted.
Knee Wraps Wraps provide elastic rebound and limited protection to the knees. Knee wraps can assist an athlete to lift more weight. However, they may actually weaken the athlete’s knees by preventing certain muscles and attachments from experiencing fully the natural stress from all angles at the joint when squatting, on a regular training basis. Very tight wraps left on for too long can cause tissue damage.
• Wraps not exceeding 2 m in length and 8 cm in width may be used. A knee wrap shall not extend beyond 15 cm above and 15 cm below the centre of the knee joint and shall not exceed a total covering width of 30 cm. Alternatively; an elasticized knee cap supporter not exceeding 30 cm in length may be worn. Knee sleeves 30 cm in length are also legal and the medical/surgical sleeve is also an option. A combination of the two is strictly forbidden.
• Neoprene may be “synthetic” rubber but is only acceptable in the knee sleeve.
• Wraps shall not be in contact with the socks or lifting suit.
• Wraps shall not be used elsewhere on the body.
Wrist Wraps Wrist wraps may be worn at any time when training with relatively heavy weights during any of the lifts.
• Wrists wraps shall not exceed 1 m. in length and 8 cm in width. Any sleeves and Velcro patches/tabs for securing must be incorporated within the one meter length. A loop may be attached as an aid to securing. The loop shall not be over the thumb or fingers during the actual lift.
• Standard commercial sweat bands may be worn, not exceeding 12 cm in width. A combination of wrist wraps and sweat bands is not allowed.
Special Olympics Powerlifting Quick Start Guide – July 2011 15
Special Olympics PowerliftingCoaches Quick Start Guide
• A wrist covering shall not extend beyond 10 cm above and 2 cm below the center of the wrist joint, and shall not exceed a covering width of 12 cm.
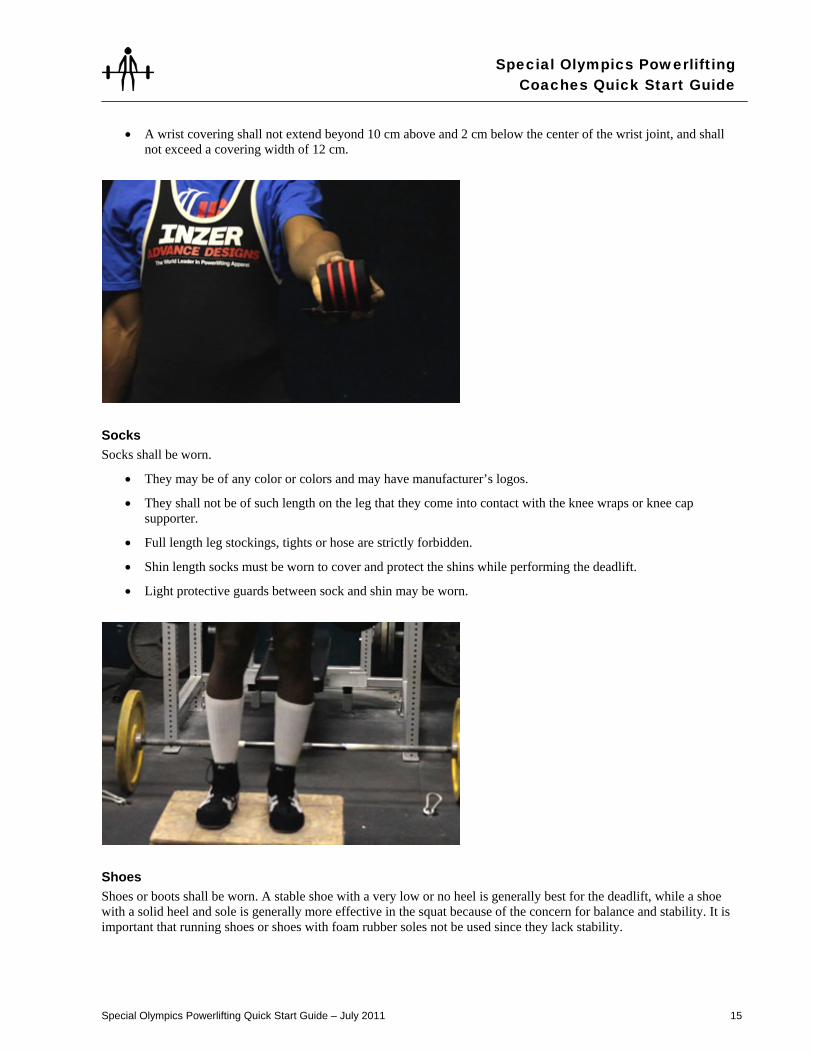
Socks Socks shall be worn.
• They may be of any color or colors and may have manufacturer’s logos.
• They shall not be of such length on the leg that they come into contact with the knee wraps or knee cap supporter.
• Full length leg stockings, tights or hose are strictly forbidden.
• Shin length socks must be worn to cover and protect the shins while performing the deadlift.
• Light protective guards between sock and shin may be worn.
Shoes Shoes or boots shall be worn. A stable shoe with a very low or no heel is generally best for the deadlift, while a shoe with a solid heel and sole is generally more effective in the squat because of the concern for balance and stability. It is important that running shoes or shoes with foam rubber soles not be used since they lack stability.
16 Special Olympics Powerlifting Quick Start Guide – July 2011
Special Olympics Powerlifting Coaches Quick Start Guide
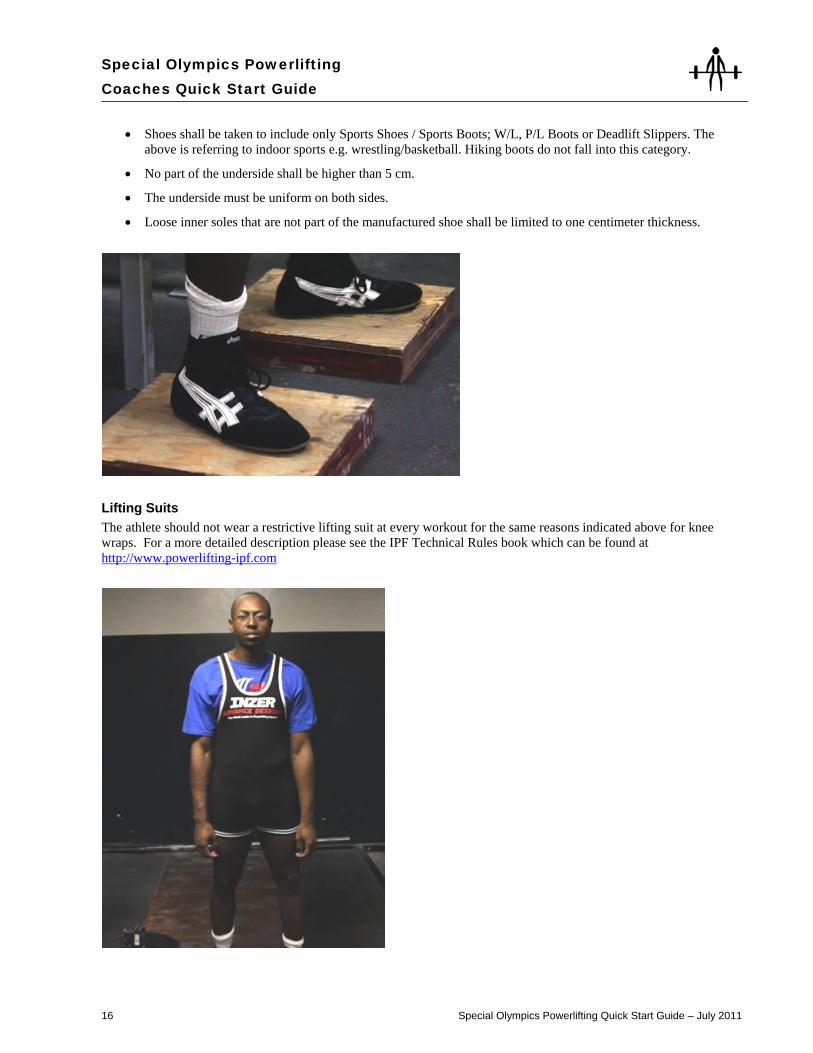
• Shoes shall be taken to include only Sports Shoes / Sports Boots; W/L, P/L Boots or Deadlift Slippers. The above is referring to indoor sports e.g. wrestling/basketball. Hiking boots do not fall into this category.
• No part of the underside shall be higher than 5 cm.
• The underside must be uniform on both sides.
• Loose inner soles that are not part of the manufactured shoe shall be limited to one centimeter thickness.
Lifting Suits The athlete should not wear a restrictive lifting suit at every workout for the same reasons indicated above for knee wraps. For a more detailed description please see the IPF Technical Rules book which can be found at http://www.powerlifting-ipf.com

Special Olympics Powerlifting Quick Start Guide – July 2011 17
Special Olympics PowerliftingCoaches Quick Start Guide
Powerlifting Equipment An adequate training facility is necessary for safe and effective training of Special Olympics powerlifters. The facility should have enough space and equipment to accommodate athletes and coaches. It is important that the facility be capable of separating powerlifting from other forms of exercise. Effective powerlifting training requires a wide variety of resistance equipment including machines with pulleys, cams, levers, cylinders, and free weights or barbells is available at many weightlifting facilities or for purchase. All serve a purpose and can produce some degree of muscle strength and size. Free weights are more effective and are recommended. Free weights allow for the natural change in speed and work done by a particular set of muscles. Additionally, free weight movement demands multi-plane control exerted by secondary muscles that provide control, balance, and assistance to the prime movers, which do most of the work.
Platform All lifts shall be carried out on a platform measuring between 2.5 m x 2.5 m minimum and 4.0 m x 4.0 m maximum. It must not exceed 10 cm in height from the surrounding stage or floor. The surface of the platform must be flat, firm and level and covered with a material of non-slip smooth carpet (i.e. free from irregularities and projections). Rubber matting or similar sheeting materials are not permitted.
Bars and Discs For all powerlifting contests organized under the rules of the IPF, only disc barbells are permitted. The bar shall not be changed during the competition unless it is bent or damaged in some way as determined by the Technical Committee, Jury or Referees.
The bar shall be straight and well knurled and grooved and shall conform to the following dimensions:
• Total overall length not to exceed 2.2 m.
• Distance between the collar faces is not to exceed 1.32 m or be less than 1.31 m.
• Diameter of the bar is not to exceed 29 mm or be less than 28 mm.
• Weight of the bar and collars are to be 25 kg.
• Diameter of the sleeve not to exceed 52 mm or be less than 50 mm.
• There shall be a diameter machined marking or the bar taped so as to measure 81 cm between marking or tape.
18 Special Olympics Powerlifting Quick Start Guide – July 2011
Special Olympics Powerlifting Coaches Quick Start Guide
Discs shall conform as follows:
• All discs used in competition must weigh within 0.25 percent or 10 grams of their face value.
• The whole size in the middle of the disc must not exceed 53 mm or be less than 52 mm.
• Discs must be within the following range: 1.25 kg, 2.5 kg, 5 kg, 10 kg, 15 kg, 20 kg, 25 kg, and 50 kg.
• For record purposes, lighter discs may be used to achieve a weight of at least 0.5 kg more than the existing record.
• Discs weighing 20 kg and over must not exceed 6 cm in thickness. Discs weighing 15 kg and under must not exceed 3 cm in thickness. Rubber discs do not have to conform to the stated thickness.
• Discs must conform to the following color code : 10kg and under - any color, 15kg - yellow, 20kg - blue, 25kg - red, 50kg - green.
• All discs must be clearly marked with their weight and loaded in the sequence of heavier discs innermost with the smaller discs in descending weight arranged so that the referees can read the weight on each disc.
• The first and heaviest discs loaded on the bar must be loaded face in; with the rest of the discs loaded face out.
• The diameter of the largest discs shall not be more than 45 cm.
• Rubber or rubber covered discs are acceptable provided there is a minimum of 10 cm from the outside of the collars to the end of the bar, for spotter grip outside of the discs.
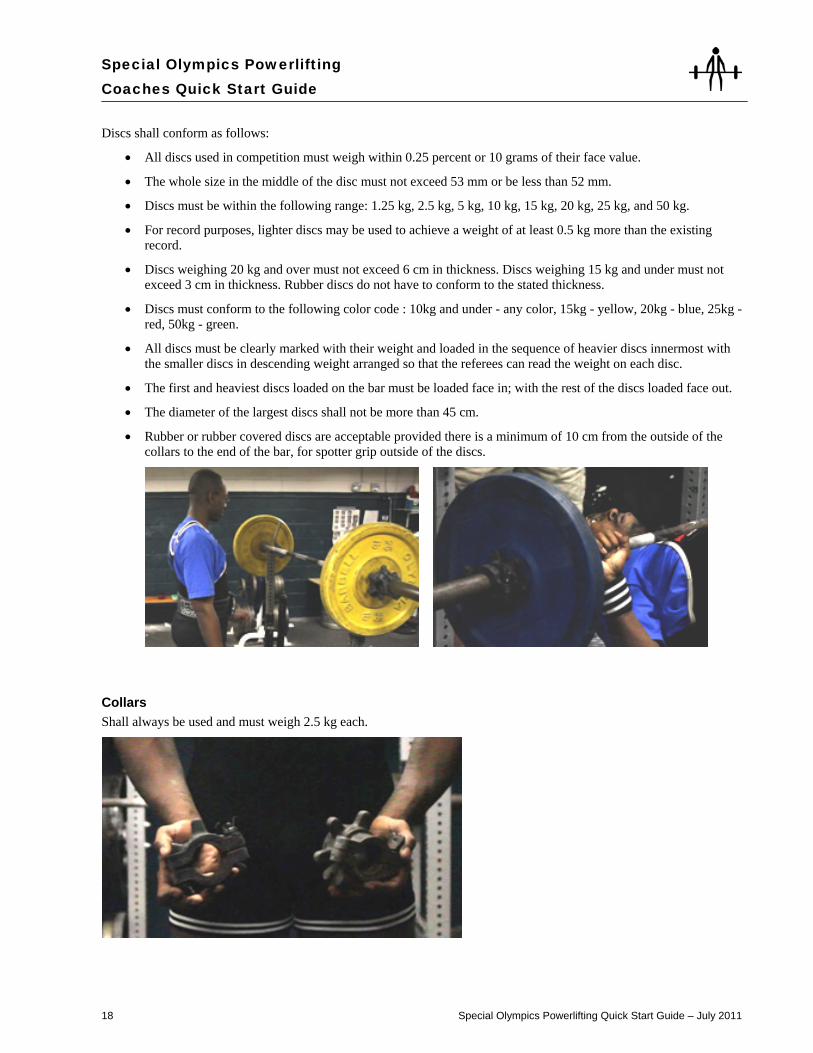
Collars Shall always be used and must weigh 2.5 kg each.
Special Olympics Powerlifting Quick Start Guide – July 2011 19
Special Olympics PowerliftingCoaches Quick Start Guide
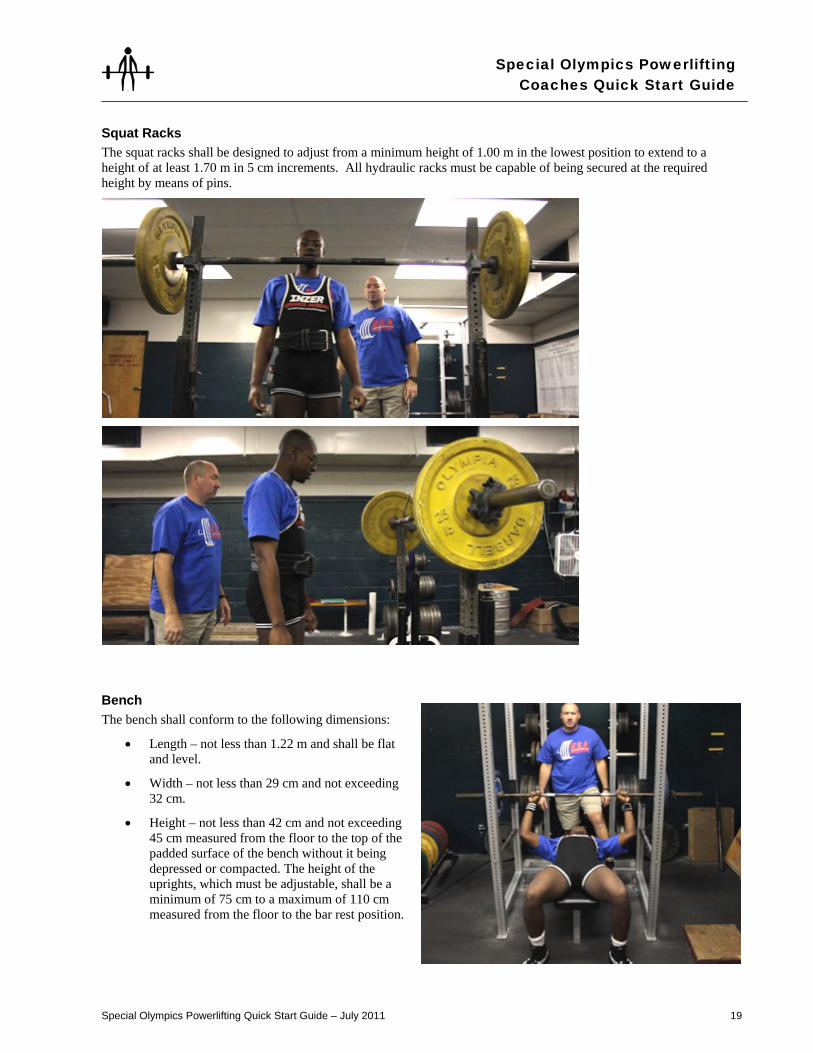
Squat Racks The squat racks shall be designed to adjust from a minimum height of 1.00 m in the lowest position to extend to a height of at least 1.70 m in 5 cm increments. All hydraulic racks must be capable of being secured at the required height by means of pins.
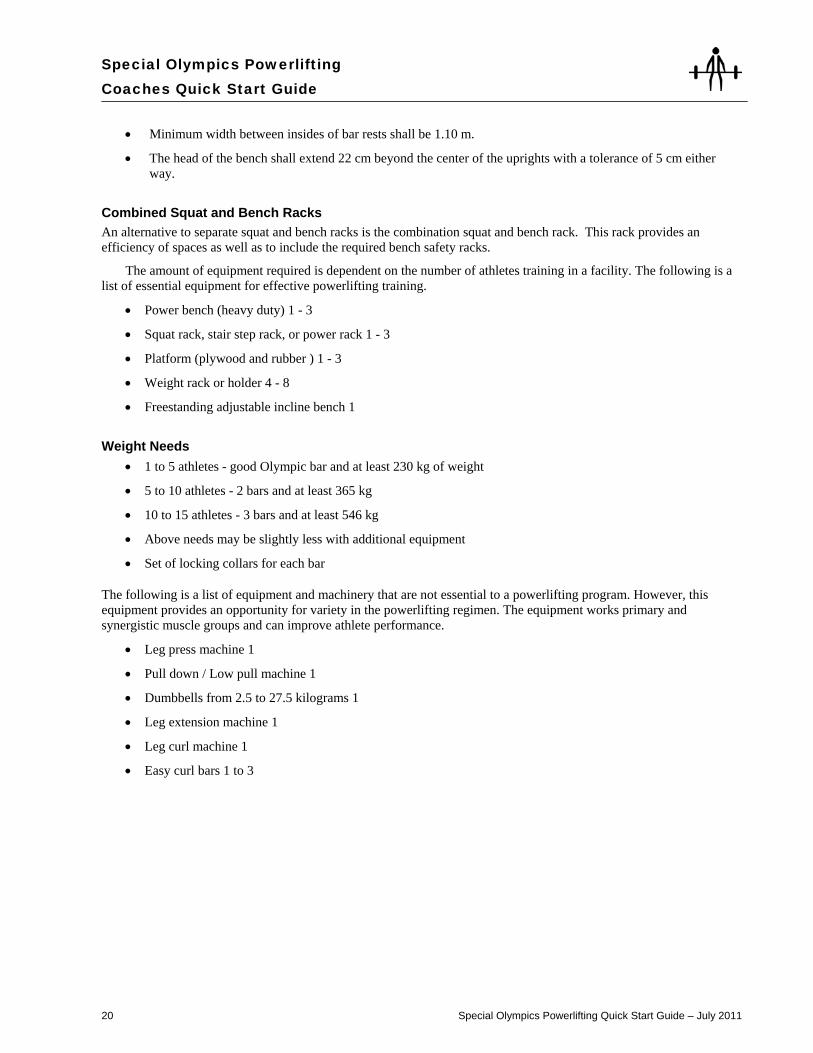
Bench The bench shall conform to the following dimensions:
• Length – not less than 1.22 m and shall be flat and level.
• Width – not less than 29 cm and not exceeding 32 cm.
• Height – not less than 42 cm and not exceeding 45 cm measured from the floor to the top of the padded surface of the bench without it being depressed or compacted. The height of the uprights, which must be adjustable, shall be a minimum of 75 cm to a maximum of 110 cm measured from the floor to the bar rest position.
20 Special Olympics Powerlifting Quick Start Guide – July 2011
Special Olympics Powerlifting Coaches Quick Start Guide
• Minimum width between insides of bar rests shall be 1.10 m.
• The head of the bench shall extend 22 cm beyond the center of the uprights with a tolerance of 5 cm either way.
Combined Squat and Bench Racks An alternative to separate squat and bench racks is the combination squat and bench rack. This rack provides an efficiency of spaces as well as to include the required bench safety racks.
The amount of equipment required is dependent on the number of athletes training in a facility. The following is a list of essential equipment for effective powerlifting training.
• Power bench (heavy duty) 1 - 3
• Squat rack, stair step rack, or power rack 1 - 3
• Platform (plywood and rubber ) 1 - 3
• Weight rack or holder 4 - 8
• Freestanding adjustable incline bench 1
Weight Needs • 1 to 5 athletes - good Olympic bar and at least 230 kg of weight
• 5 to 10 athletes - 2 bars and at least 365 kg
• 10 to 15 athletes - 3 bars and at least 546 kg
• Above needs may be slightly less with additional equipment
• Set of locking collars for each bar
The following is a list of equipment and machinery that are not essential to a powerlifting program. However, this equipment provides an opportunity for variety in the powerlifting regimen. The equipment works primary and synergistic muscle groups and can improve athlete performance.
• Leg press machine 1
• Pull down / Low pull machine 1
• Dumbbells from 2.5 to 27.5 kilograms 1
• Leg extension machine 1
• Leg curl machine 1
• Easy curl bars 1 to 3
Special Olympics Powerlifting Quick Start Guide – July 2011 21
Special Olympics PowerliftingCoaches Quick Start Guide
Teaching Powerlifting Rules The best time to teach the rules of powerlifting is during practice. The Official Special Olympics Sports Rules for Powerlifting shall govern all Special Olympics competitions. As an international sports program, Special Olympics has created these rules based upon International Powerlifting Federation (IPF) rules for powerlifting found at http://www.powerlifting-ipf.com/. IPF or National Governing Body (NGB) rules shall be employed except when they are in conflict with the Official Special Olympics Sports Rules for Powerlifting or Article I. In such cases, the Official Special Olympics Sports Rules for Powerlifting shall apply. Please refer to the official Special Olympics Sports Rules, which can be found at www.specialolympics.org for the complete listing of Powerlifting rules as modified and approved by SOI. As a coach, it is your responsibility to know and understand the rules and to teach these rules to your athletes and other coaches.
Protest Procedures Protest procedures are governed by the rules of competition. The role of the competition management team is to enforce the rules. As a coach, your duty to your athletes is to protest any action or events that occur while your athletes are competing that you think violated the Official Powerlifting Rules. It is extremely important that you do not make protests because you and your athlete did not get your desired outcome. Protests are serious matters that impact a competition’s schedule. Only rules violations can be protested. Judgment calls made by officials or divisioning decisions cannot be protested. The protest must site specific violations from the rulebook and a clear definition of why the coach feels the rule was not followed. Check with the competition manager prior to competition to learn the protest procedures for that competition.
There are generally two types of protests: Eligibility and Rules of the Game.
Eligibility Protests regarding eligibility shall be filed according to the procedures approved by the competition management team.
Powerlifting Protocol & Etiquette
During Practice Good Powerlifting etiquette and protocol start at practice. Teaching your team good sportsmanship and respect for officials, teammates, opponents and volunteers will carry over to when an actual competition takes place. Your role as coach sets the standard that your team will follow. Always strive to set a good example.
When practicing, make sure your team is following the rules they will expect to have enforced in competition. The better your athletes understand the rules, the better equipped they will be to understand why a given call was made. The coach needs to set a high standard of sportsmanship.

22 Special Olympics Powerlifting Quick Start Guide – July 2011
Special Olympics Powerlifting Coaches Quick Start Guide
Sportsmanship “Let me win. But if I cannot win, let me be brave in the attempt.”
Good sportsmanship is the coaches’ and athletes’ commitment to fair play, ethical behavior and integrity. In perception and practice, sportsmanship is defined as those qualities which are characterized by generosity and genuine concern for others. Lead by example. Below we highlight a few focus points and ideas on how to teach and coach sportsmanship to your athletes.
Competitive Effort Put forth maximum effort during each event.
Practice the skills with the same intensity as you would perform them in competition.
Always finish the competition - Never quit.
Fair Play at All Times Always comply with the rules.
Demonstrate sportsmanship and fair play at all times.
Respect decisions of the officials at all times.
Expectations of Coaches 1. Always set a good example for participants and fans to follow. 2. Give positive reinforcement of athlete performance. 3. Respect the judgment of officials and abide by rules of the event. 4. Develop and enforce penalties for participants who do not abide by sportsmanship standards, in training and in
competition.
Expectations of Athletes 1. Treat teammates with respect. 2. Encourage teammates when they make a mistake. 3. Respect judgment of officials and abide by rules of the event. 4. Cooperate with officials, coaches or directors and fellow participants to conduct a fair contest. 5. Accept seriously the responsibility and privilege of representing Special Olympics. 6. Define winning as doing your personal best. 7. Live up to the high standard of sportsmanship established by your coach.
Remember Sportsmanship is an attitude that is shown by the way you and your athletes act on and off the field of play.
Be positive about competing.
Respect your opponents and yourself.
Always stay under control, even if you are feeling mad or angry.

Special Olympics Powerlifting Quick Start Guide – July 2011 23
Special Olympics PowerliftingCoaches Quick Start Guide
Powerlifting Glossary of Terms
Term Definition
Adaptation Body/muscle adjust to increased workload or training stress
Ascent Raising of the bar in any lift
Commands Referees instructions prior to, during and after lifts, as per the International Powerlifting Federation Rules
Descent Lowering the bar in any lift
Erect Position Standing upright, legs locked
Hitching Excessive supporting of the bar on the legs during the dead lift, usually as a ratcheting motion up the leg
Leverage The mechanical advantage or disadvantage applied during the lift by the position of the body part (upper leg, upper arm, lower back) based upon hand placements, foot placement, or joint positioning
Muscle Endurance Ability of muscle to produce work for a relatively long period of time
Negatives Exercises that focus most of the energy of the lift toward the extension of the muscle and not the contraction. An example is allowing the lifter to lift the bar in the bench press from extended position to the chest and then have spotter assist to extension. Negatives can result in soreness and injury and should be avoided
Overcompensation Tendency of body to elevate performance capability as a response to workload or increased training stress
Overload Workload exceeds that previously experienced
Parallel The point in the squat where the lifter’s hip joint is even with the knee joint. To perform an acceptable lift, the lifter must go lower than parallel
Peaking Training at 90 percent or higher, usually only in the last three to four weeks prior to competition
Periodization Change in volume and intensity of workload over time
Power Strength with speed
Primary Lifts Squat, bench press, and deadlift or exercises that are basically irreplaceable for their contribution to overall strength development
Primary Muscles Largest muscles capable of producing the most work in the squat, bench press, and deadlift (thigh, chest, and back muscles) or that contribute to overall strength development (bent row, stiff leg deadlift)
Recuperation Muscles return to normal state or homeostasis

24 Special Olympics Powerlifting Quick Start Guide – July 2011
Special Olympics Powerlifting Coaches Quick Start Guide
Term Definition
Repetitions Number of consecutive movements in an exercise between rest periods
Secondary Lifts All supplementary lifts other than the squat, bench press, and deadlift or that directly contribute to overall strength development (bent row, stiff leg deadlifts)
Secondary Muscles Smaller muscles (sometimes called synergists) that contribute to the work produced by the primary muscles directly or help with balance or control
Sets Number of times a group of repetitions is performed
Spotting The process of closely following the movement of the athlete during the lift with hands ready to assist if necessary. Except for during the learning period or for assisting when the athlete appears unable to make the lift, the hands should not be placed upon the bar or the athlete’s body
Strength Ability of muscle to produce force
Top Set Heaviest set
Wilks Formula Formulas that use historically based numbers by which different body weights can be reconciled or leveled to compare lifting competition results. A coefficient is calculated based upon the lifter’s formula number and the amount of weight lifted. The resulting coefficient score is used to place the lifter. The Wilks Formula has one table for male lifters and one table for female lifters
Special Olympics Powerlifting Quick Start Guide – July 2011 25
Special Olympics PowerliftingCoaches Quick Start Guide
Appendix: Skill Development Tips
Warming Up and Stretching The correct sequence of preparation for exercise is warming up, stretching, exercising, stretching, and cooling down. The importance of warming up prior to exercise cannot be stressed enough.
• From a physiological aspect, warm-up prepares the muscles, nervous system, tendons, ligaments, and cardiovascular system by raising the body temperature.
• From a psychological aspect, warm-up helps prepare the athlete mentally by beginning the concentration necessary to complete the exercise routine or weight training workout.
• Further, warm-up reduces injury, since warm muscles and their connectors are more flexible and easily stretched.
Flexibility is the ability to move a joint through the full range of movement it is designed to do. Hold stretches from 10 to 20 seconds, repeating as necessary. Do not bounce while stretching. Stretching exercises should be safe, easy, and increase flexibility.
Partner stretching is a fun way for athletes to work through what is sometimes the most tedious part of the workout. Variations of the stretches can be done with other athletes or a coach with excellent results. As with the individual stretching, it is important that the athlete (or coach) does not bounce when stretching. Caution should be used, and the athletes should not stretch beyond their limits.
Training for Muscle Balance For every push exercise, a pull exercise should be performed. Balance of opposite muscle groups will help prevent injuries in short-term as well as long-term training. Training for balance will also prevent the over work of one group of muscles or the wear on joints that occurs from the lack of balanced muscle training.
• For balanced shoulders (one of the areas of the body most vulnerable to injury), make sure bent rows or low pulls are done regularly to balance the push exercises such as the bench press and incline bench press.
• Leg curls and stiff-legged deadlifts should be done to balance the work done with the front of the thighs from squatting.
• Crunches and bent leg sit-ups should be performed to balance the work done with the lower back from squats and deadlifts.
High Risk Exercises Some weight training exercises may have a relatively high degree of risk or hazard and should only be done with extreme care or not at all.
• Dips or behind-the-neck presses place a high degree of stress on the shoulder joint and should be avoided.
• Behind-the-neck press places the neck and shoulders in a vulnerable positions.
• Bench squats place a high amount of stress on the spine and should also be avoided.
• Negatives and overloads place a lot of stress on the athletes ’joints, ligaments, and muscles and should not be done. These exercises are generally overrated when considering the risks and long-term problems they can create.

26 Special Olympics Powerlifting Quick Start Guide – July 2011
Special Olympics Powerlifting Coaches Quick Start Guide
Basic Skills Proper form is critical to receive maximum benefit from each primary and secondary exercise and to improve efficiency of lifts. Good form and technique are essential for preventing injuries. Because of particular body type or physical limitations, form may vary to a degree between athletes.
All lifts should be done slowly with the athlete under control through the entire range of motion. Rapid lifts should be limited and should only be done by advanced athletes approaching competition. This type of training should not be done at the expense of proper form or whenever pain or discomfort is felt by the athlete.
Squat This is probably the most difficult of the three power-lifts for Special Olympics athletes to master. However, with patience and repetition, most athletes can perform this lift. This exercise contributes to the overall strength of the athlete more than any other exercise. Even if the athlete is not going to compete in the lift, the squat should be included in training because of its many benefits. It is often beneficial to have the athlete develop a base level of muscle tone through the use of easier-to-learn exercises (leg press, leg extension, and leg curl) prior to squatting. When the athlete has developed this base, it is important to work on the form with no weight before actually squatting with the Olympic bar and plates, no matter how light. Repetition is the key here! Find the proper stance for the athlete through trying both the narrow and wide stances. Because of the relative inflexibility at the calf and Achilles tendon, many athletes will not be able to squat with any degree of control with less than a shoulder-width stance. Use a wider stance with toes out, buttocks and knees back to allow the lower leg to be vertical with the ground, chest high, back straight, and chin up. This is easier for the athlete to learn and is more mechanically efficient.
As a way to teach the squat, instruct the athletes to start with hands straight ahead to improve balance. Also, the use of a mirror in front of the athlete while learning to squat can be beneficial.
The powerlifting athlete should train for the squat the same way the athlete would compete in a squat competition. The signal “squat” at the beginning of the lift and “rack” at the completion of the lift allow the athlete to become completely familiar with the signals of the movement.
The following describes a competition format; athletes should be trained accordingly.
• The lifter shall face the front of the platform. The bar shall be held horizontally across the shoulders, hands and fingers gripping the bar, and the top of the bar not more than the thickness of the bar below the outer edge of the shoulders. The diagram below indicates the legal position of the bar across the shoulders. The hands may be positioned anywhere on the bar inside and or in contact with the inner collars.
• After removing the bar from the racks, (the lifter may be aided in removal of the bar from the racks by the spotter / loaders) the lifter must move backwards to establish the starting position.
• When the lifter is motionless, erect (erect to mean not leaning forward from the waist more than an angle of 15 degrees) with knees locked, and the bar properly positioned the Chief Referee will give the signal to begin the lift. The signal shall consist of a downward movement of the arm and the audible command “Squat”. Before receiving the signal to “squat” the lifter may make any position adjustments within the rules, without penalty. For reasons of safety the lifter will be requested to “Replace” the bar, together with a backward movement of the arm, if after a period of five seconds he is not in the correct position to begin the lift. The Chief Referee will then convey the reason why the signal was not given.
• Upon receiving the Chief Referee’s signal the lifter must bend the knees and lower the body until the top surface of the legs at the hip joint is lower than the top of the knees. Only one decent attempt is allowed. The attempt is deemed to have commenced when the lifters knees have unlocked. The bar may move from its starting position downwards on the lifters back the thickness / diameter of the bar during the performance of the lift.
• The lifter must recover at will to an upright position with the knees locked. Double bouncing at the bottom of the squat attempt or any downward movement is not permitted.
• When the lifter is motionless (in the apparent final position) the Chief Referee will give the signal to rack the bar.

Special Olympics Powerlifting Quick Start Guide – July 2011 27
Special Olympics PowerliftingCoaches Quick Start Guide
The signal to rack the bar will consist of a backward motion of the arm and the audible command “Rack.”
• The lifter must then return the bar to the racks. For reasons of safety the lifter may request the aid of the spotter/loaders in returning the bar to, and replacing it in the racks. The lifter must stay with the bar during this process.
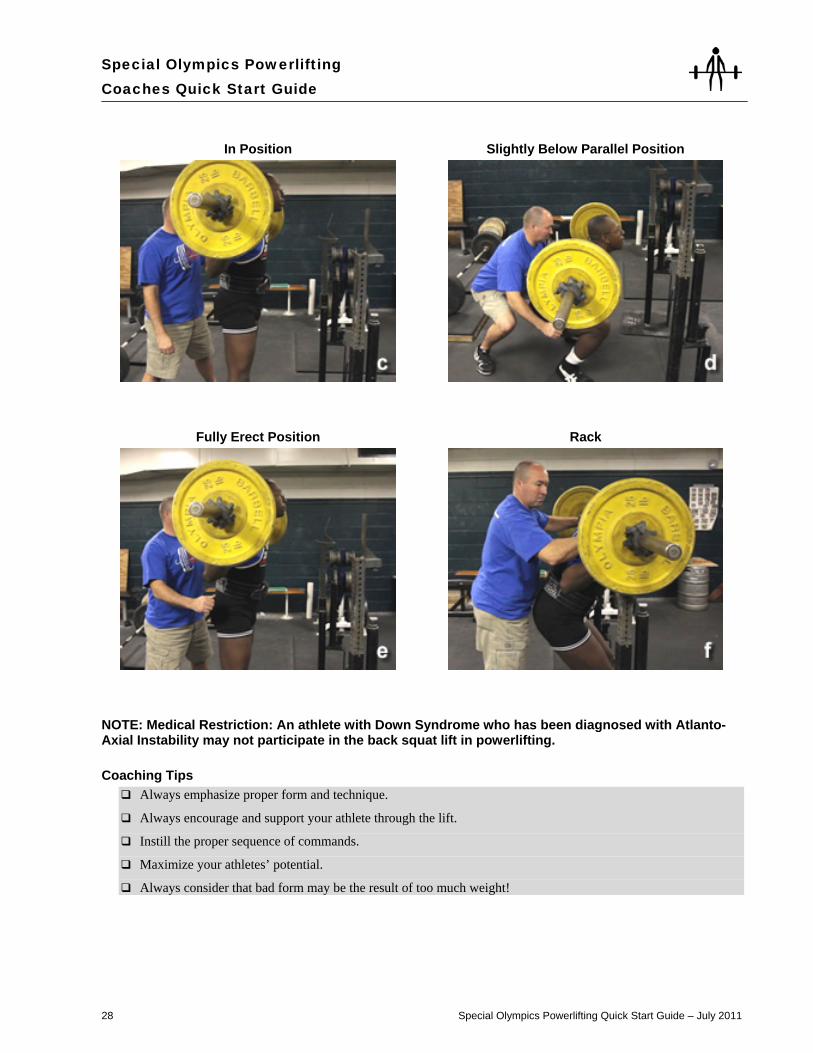
The diagrams below indicate the legal bar position and required depth in the squat:
The coach’s use of touch control and holding the athlete by the belt and shoulder can be effective in getting him or her into proper position and form. This should only be done in the early stages of learning the lift. If the athlete becomes dependent on a touch control or assistance, this will affect his or her performance in competition where touch and assistance are not allowed.
Although not necessary, an athlete may wear a belt and wraps while squatting. Make sure the athlete does not bounce at the bottom of the movement.
When doing repetitions, the use of the “squat” command is appropriate at each repetition. However, the “rack” command is used only after the completion of the last repetition. The athlete should pause between every two repetitions so as to master the technique of the squat lift.
The spotter should stand behind the athlete. No assistance should be given to the athlete by the spotter unless it is for the purpose of teaching the technique or helping an athlete who cannot complete the lift. Always encourage your athlete to complete the lift.
Facing the Bar Getting Under the Bar
28 Special Olympics Powerlifting Quick Start Guide – July 2011
Special Olympics Powerlifting Coaches Quick Start Guide
In Position Slightly Below Parallel Position
Fully Erect Position Rack
NOTE: Medical Restriction: An athlete with Down Syndrome who has been diagnosed with Atlanto-Axial Instability may not participate in the back squat lift in powerlifting.
Coaching Tips Always emphasize proper form and technique.
Always encourage and support your athlete through the lift.
Instill the proper sequence of commands.
Maximize your athletes’ potential.
Always consider that bad form may be the result of too much weight!
Special Olympics Powerlifting Quick Start Guide – July 2011 29
Special Olympics PowerliftingCoaches Quick Start Guide
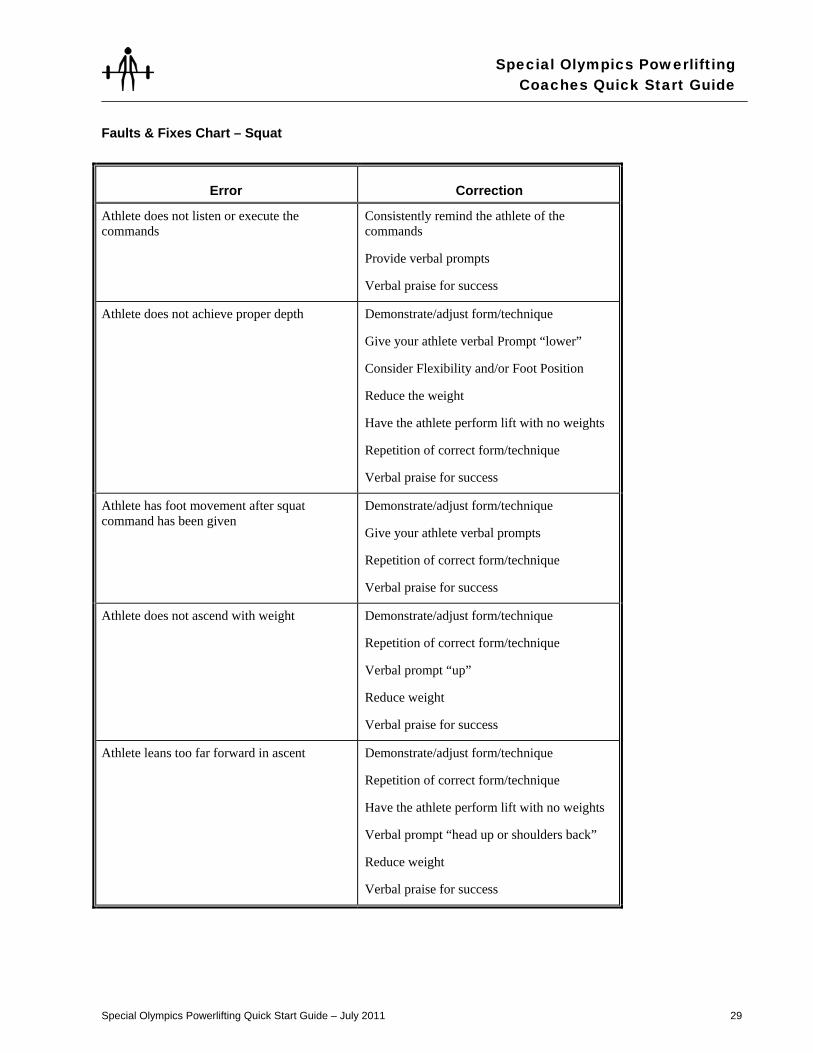
Faults & Fixes Chart – Squat
Error Correction
Athlete does not listen or execute the commands
Consistently remind the athlete of the commands
Provide verbal prompts
Verbal praise for success
Athlete does not achieve proper depth Demonstrate/adjust form/technique
Give your athlete verbal Prompt “lower”
Consider Flexibility and/or Foot Position
Reduce the weight
Have the athlete perform lift with no weights
Repetition of correct form/technique
Verbal praise for success
Athlete has foot movement after squat command has been given
Demonstrate/adjust form/technique
Give your athlete verbal prompts
Repetition of correct form/technique
Verbal praise for success
Athlete does not ascend with weight Demonstrate/adjust form/technique
Repetition of correct form/technique
Verbal prompt “up”
Reduce weight
Verbal praise for success
Athlete leans too far forward in ascent Demonstrate/adjust form/technique
Repetition of correct form/technique
Have the athlete perform lift with no weights
Verbal prompt “head up or shoulders back”
Reduce weight
Verbal praise for success

30 Special Olympics Powerlifting Quick Start Guide – July 2011
Special Olympics Powerlifting Coaches Quick Start Guide
Bench Press The following describes a competition format; athletes should be trained accordingly.
• The lifter must lie on his back with head, shoulders and buttocks in contact with the bench surface. The feet must be flat on the floor (as flat as the shape of the shoe will allow). His hands and fingers must grip the bar positioned in the rack stands with a thumbs around grip. This position shall be maintained throughout the lift. To achieve firm footing the lifter may use flat surfaced plates or blocks not exceeding 30 cm in total height to build up the surface of the platform. Blocks in the range of 5 cm, 10 cm, 20 cm, 30 cm, should be made available for foot placement at all international competitions.
• The spacing of the hands shall not exceed 81 cm measured between the forefingers (both forefingers must be within the 81 cm marks and the whole of the forefingers must be in contact with the 81 cm marks if maximum grip is used). If in the case of some old injury or anatomically the lifter is unable to grip the bar equally with both hands he must inform the referees prior to lift-off for each attempt and if necessary the bar will be marked accordingly. The use of the reverse grip is forbidden.
• After removing the bar from the racks, with or without the help of the spotter/loaders, the lifter shall wait with elbows locked for the Chief Referee’s signal.
• The signal shall be given as soon as the lifter is motionless and the bar properly positioned. For reasons of safety the lifter will be requested to “Re-place” the bar, together with a backward movement of the arm, if after a period of five seconds he is not in the correct position to begin the lift. The Chief Referee will then convey the reason why the signal was not given.
• The signal to begin the attempt shall consist of a downward movement of the arm together with the audible command “Start.”
• After receiving the signal, the lifter must lower the bar to the chest (the chest, for the purpose of the rule, finishes at the base of the sternum/breastbone), hold it motionless on the chest, after which the Chief referee will signal the audible command “Press.”
• The lifter must then return the bar to arms length with no excessive/immoderate uneven extension of the arms. • When held motionless in this position the audible command “Rack” shall be given together with a backward
motion of the arm.
Any change in the elected lifting position during the lift proper (i.e. any raising movement of the head, shoulders, or buttocks, from the bench, or movement of the feet on the floor/blocks/plates or lateral movement of hands on the bar) will result in a no-lift.
If, anatomically, the arms cannot be fully extended, the lifter must declare this at weigh-ins prior to competition. The maximum allowable is 15 degrees out of true.
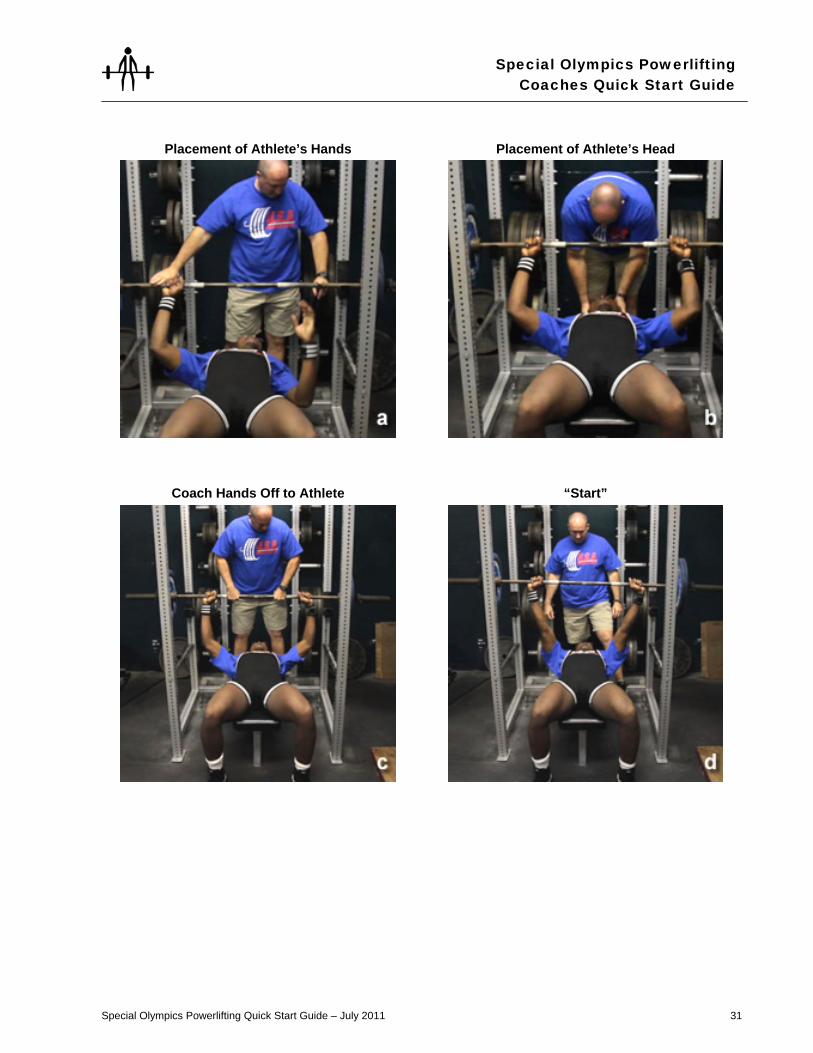
As with the squat, the athlete should learn to perform the bench press with little or no initial resistance. A stick can be used to simulate the bar while the athlete performs a high number of repetitions. For the athlete to learn where the bar should rest, the coach may touch the athlete’s chest at the sternum to illustrate where the athlete should bring the bar down.
Additionally, the coach may place a hand at the point where the bar will be locked out to give the athlete a target for completing the lift.
Special Olympics Powerlifting Quick Start Guide – July 2011 31
Special Olympics PowerliftingCoaches Quick Start Guide
Placement of Athlete’s Hands Placement of Athlete’s Head
Coach Hands Off to Athlete “Start”

32 Special Olympics Powerlifting Quick Start Guide – July 2011
Special Olympics Powerlifting Coaches Quick Start Guide
Bar Motionless at Chest “Press”
“Rack”
Coaching Tips Always emphasize proper form and technique.
Always encourage and support your athlete through the lift.
Instill the proper sequence of commands.
Maximize your athletes’ potential.
Always consider that bad form may be the result of too much weight!
Special Olympics Powerlifting Quick Start Guide – July 2011 33
Special Olympics PowerliftingCoaches Quick Start Guide
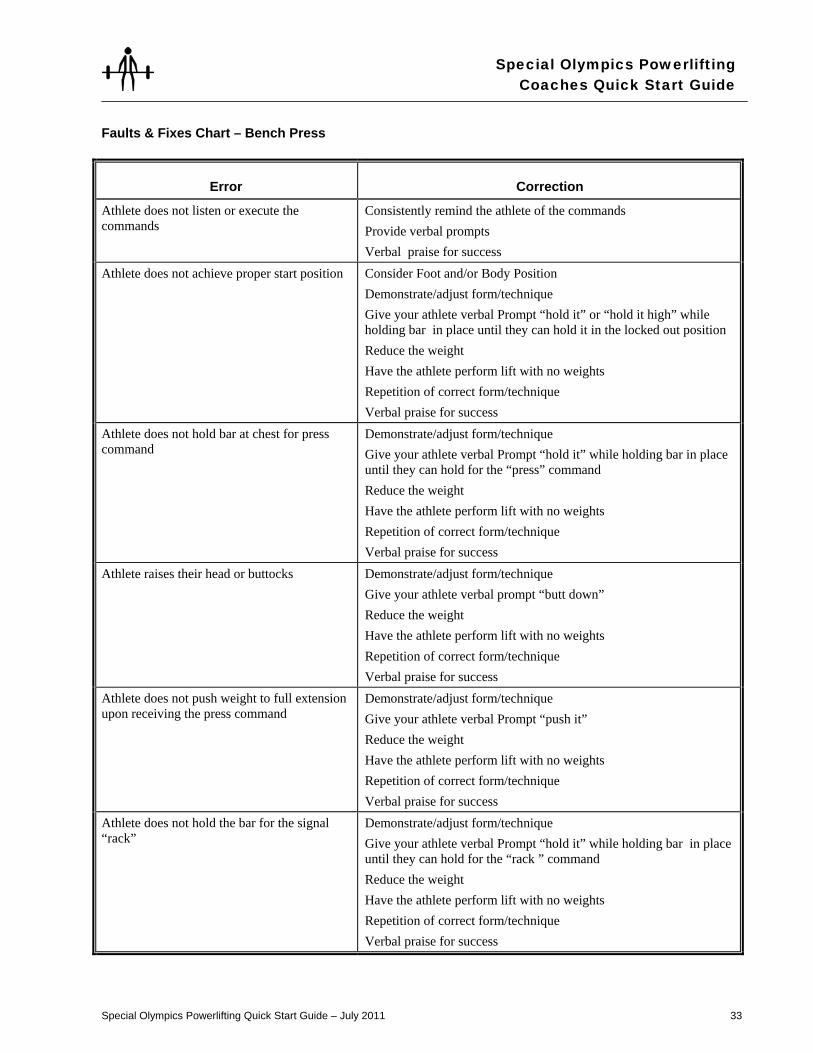
Faults & Fixes Chart – Bench Press
Error Correction
Athlete does not listen or execute the commands
Consistently remind the athlete of the commands Provide verbal prompts Verbal praise for success
Athlete does not achieve proper start position Consider Foot and/or Body Position Demonstrate/adjust form/technique Give your athlete verbal Prompt “hold it” or “hold it high” while holding bar in place until they can hold it in the locked out position Reduce the weight Have the athlete perform lift with no weights Repetition of correct form/technique Verbal praise for success
Athlete does not hold bar at chest for press command
Demonstrate/adjust form/technique Give your athlete verbal Prompt “hold it” while holding bar in place until they can hold for the “press” command Reduce the weight Have the athlete perform lift with no weights Repetition of correct form/technique Verbal praise for success
Athlete raises their head or buttocks Demonstrate/adjust form/technique Give your athlete verbal prompt “butt down” Reduce the weight Have the athlete perform lift with no weights Repetition of correct form/technique Verbal praise for success
Athlete does not push weight to full extension upon receiving the press command
Demonstrate/adjust form/technique Give your athlete verbal Prompt “push it” Reduce the weight Have the athlete perform lift with no weights Repetition of correct form/technique Verbal praise for success
Athlete does not hold the bar for the signal “rack”
Demonstrate/adjust form/technique Give your athlete verbal Prompt “hold it” while holding bar in place until they can hold for the “rack ” command Reduce the weight Have the athlete perform lift with no weights Repetition of correct form/technique Verbal praise for success
34 Special Olympics Powerlifting Quick Start Guide – July 2011
Special Olympics Powerlifting Coaches Quick Start Guide
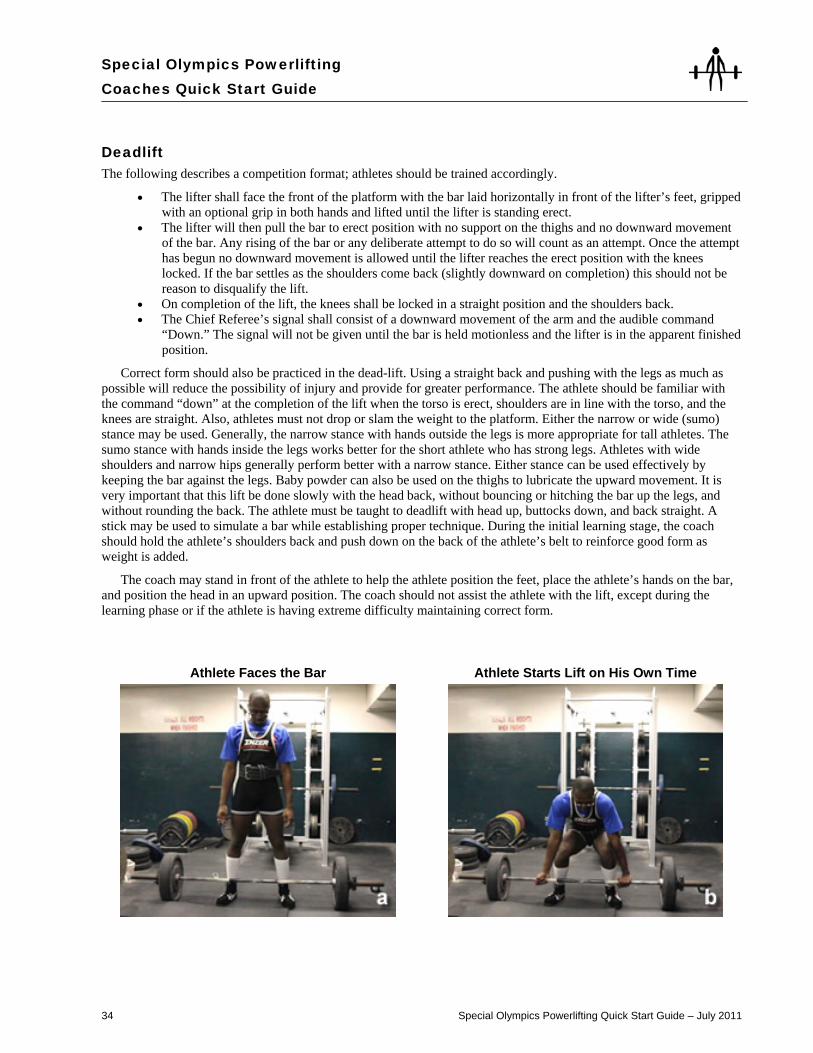
Deadlift The following describes a competition format; athletes should be trained accordingly.
• The lifter shall face the front of the platform with the bar laid horizontally in front of the lifter’s feet, gripped with an optional grip in both hands and lifted until the lifter is standing erect.
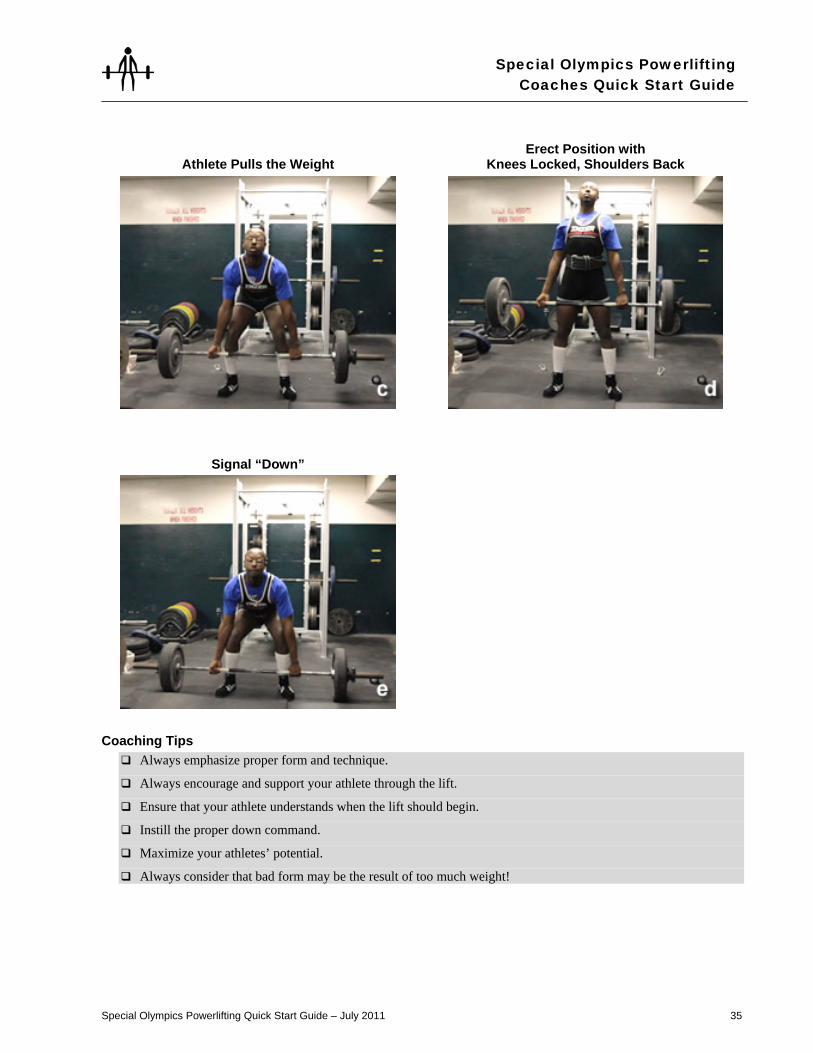
• The lifter will then pull the bar to erect position with no support on the thighs and no downward movement of the bar. Any rising of the bar or any deliberate attempt to do so will count as an attempt. Once the attempt has begun no downward movement is allowed until the lifter reaches the erect position with the knees locked. If the bar settles as the shoulders come back (slightly downward on completion) this should not be reason to disqualify the lift.
• On completion of the lift, the knees shall be locked in a straight position and the shoulders back. • The Chief Referee’s signal shall consist of a downward movement of the arm and the audible command
“Down.” The signal will not be given until the bar is held motionless and the lifter is in the apparent finished position.
Correct form should also be practiced in the dead-lift. Using a straight back and pushing with the legs as much as possible will reduce the possibility of injury and provide for greater performance. The athlete should be familiar with the command “down” at the completion of the lift when the torso is erect, shoulders are in line with the torso, and the knees are straight. Also, athletes must not drop or slam the weight to the platform. Either the narrow or wide (sumo) stance may be used. Generally, the narrow stance with hands outside the legs is more appropriate for tall athletes. The sumo stance with hands inside the legs works better for the short athlete who has strong legs. Athletes with wide shoulders and narrow hips generally perform better with a narrow stance. Either stance can be used effectively by keeping the bar against the legs. Baby powder can also be used on the thighs to lubricate the upward movement. It is very important that this lift be done slowly with the head back, without bouncing or hitching the bar up the legs, and without rounding the back. The athlete must be taught to deadlift with head up, buttocks down, and back straight. A stick may be used to simulate a bar while establishing proper technique. During the initial learning stage, the coach should hold the athlete’s shoulders back and push down on the back of the athlete’s belt to reinforce good form as weight is added.
The coach may stand in front of the athlete to help the athlete position the feet, place the athlete’s hands on the bar, and position the head in an upward position. The coach should not assist the athlete with the lift, except during the learning phase or if the athlete is having extreme difficulty maintaining correct form.
Athlete Faces the Bar Athlete Starts Lift on His Own Time
Special Olympics Powerlifting Quick Start Guide – July 2011 35
Special Olympics PowerliftingCoaches Quick Start Guide
Athlete Pulls the Weight Erect Position with
Knees Locked, Shoulders Back
Signal “Down”
Coaching Tips Always emphasize proper form and technique.
Always encourage and support your athlete through the lift.
Ensure that your athlete understands when the lift should begin.
Instill the proper down command.
Maximize your athletes’ potential.
Always consider that bad form may be the result of too much weight!
36 Special Olympics Powerlifting Quick Start Guide – July 2011
Special Olympics Powerlifting Coaches Quick Start Guide
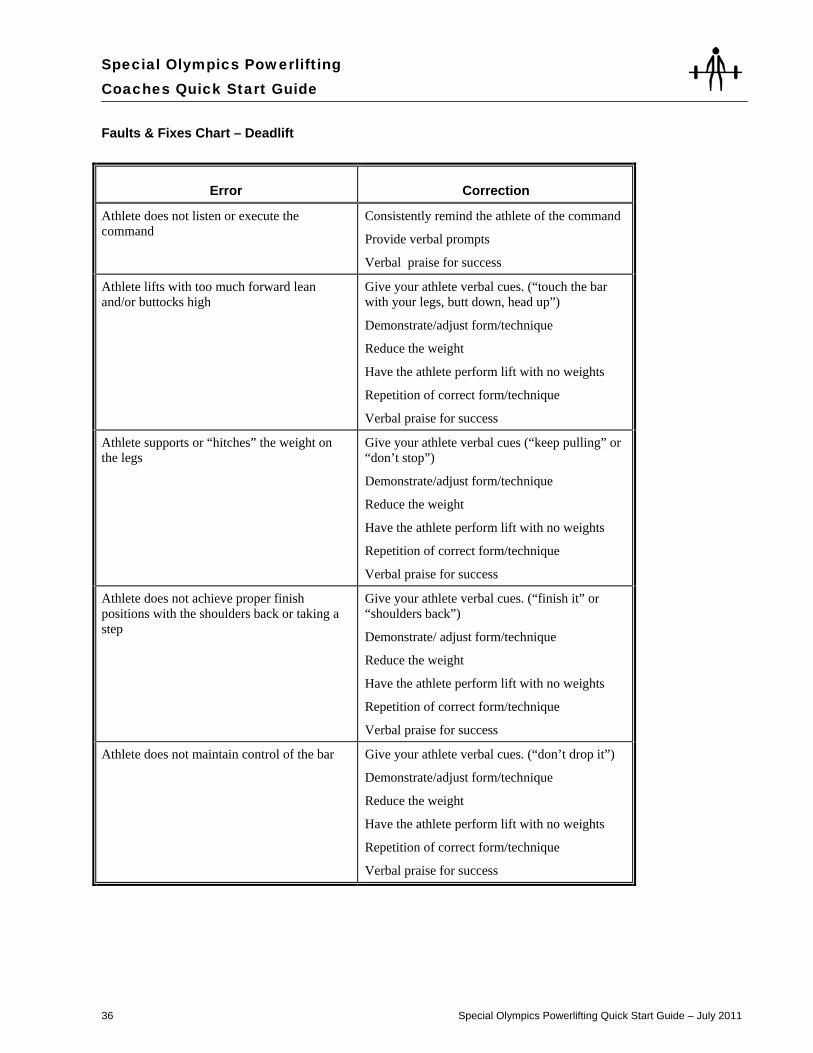
Faults & Fixes Chart – Deadlift
Error Correction
Athlete does not listen or execute the command
Consistently remind the athlete of the command
Provide verbal prompts
Verbal praise for success
Athlete lifts with too much forward lean and/or buttocks high
Give your athlete verbal cues. (“touch the bar with your legs, butt down, head up”)
Demonstrate/adjust form/technique
Reduce the weight
Have the athlete perform lift with no weights
Repetition of correct form/technique
Verbal praise for success
Athlete supports or “hitches” the weight on the legs
Give your athlete verbal cues (“keep pulling” or “don’t stop”)
Demonstrate/adjust form/technique
Reduce the weight
Have the athlete perform lift with no weights
Repetition of correct form/technique
Verbal praise for success
Athlete does not achieve proper finish positions with the shoulders back or taking a step
Give your athlete verbal cues. (“finish it” or “shoulders back”)
Demonstrate/ adjust form/technique
Reduce the weight
Have the athlete perform lift with no weights
Repetition of correct form/technique
Verbal praise for success
Athlete does not maintain control of the bar Give your athlete verbal cues. (“don’t drop it”)
Demonstrate/adjust form/technique
Reduce the weight
Have the athlete perform lift with no weights
Repetition of correct form/technique
Verbal praise for success
Special Olympics Powerlifting Quick Start Guide – July 2011 37
Special Olympics PowerliftingCoaches Quick Start Guide
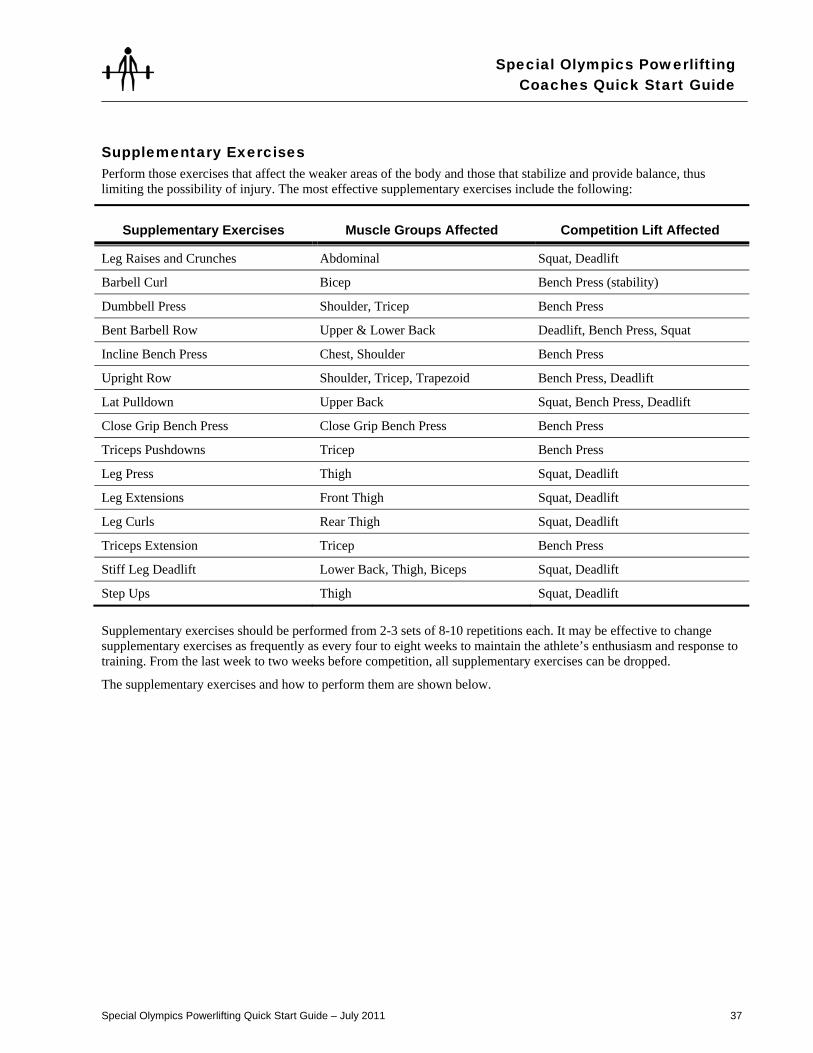
Supplementary Exercises Perform those exercises that affect the weaker areas of the body and those that stabilize and provide balance, thus limiting the possibility of injury. The most effective supplementary exercises include the following:
Supplementary Exercises Muscle Groups Affected Competition Lift Affected
Leg Raises and Crunches Abdominal Squat, Deadlift
Barbell Curl Bicep Bench Press (stability)
Dumbbell Press Shoulder, Tricep Bench Press
Bent Barbell Row Upper & Lower Back Deadlift, Bench Press, Squat
Incline Bench Press Chest, Shoulder Bench Press
Upright Row Shoulder, Tricep, Trapezoid Bench Press, Deadlift
Lat Pulldown Upper Back Squat, Bench Press, Deadlift
Close Grip Bench Press Close Grip Bench Press Bench Press
Triceps Pushdowns Tricep Bench Press
Leg Press Thigh Squat, Deadlift
Leg Extensions Front Thigh Squat, Deadlift
Leg Curls Rear Thigh Squat, Deadlift
Triceps Extension Tricep Bench Press
Stiff Leg Deadlift Lower Back, Thigh, Biceps Squat, Deadlift
Step Ups Thigh Squat, Deadlift
Supplementary exercises should be performed from 2-3 sets of 8-10 repetitions each. It may be effective to change supplementary exercises as frequently as every four to eight weeks to maintain the athlete’s enthusiasm and response to training. From the last week to two weeks before competition, all supplementary exercises can be dropped.
The supplementary exercises and how to perform them are shown below.
38 Special Olympics Powerlifting Quick Start Guide – July 2011
Special Olympics Powerlifting Coaches Quick Start Guide
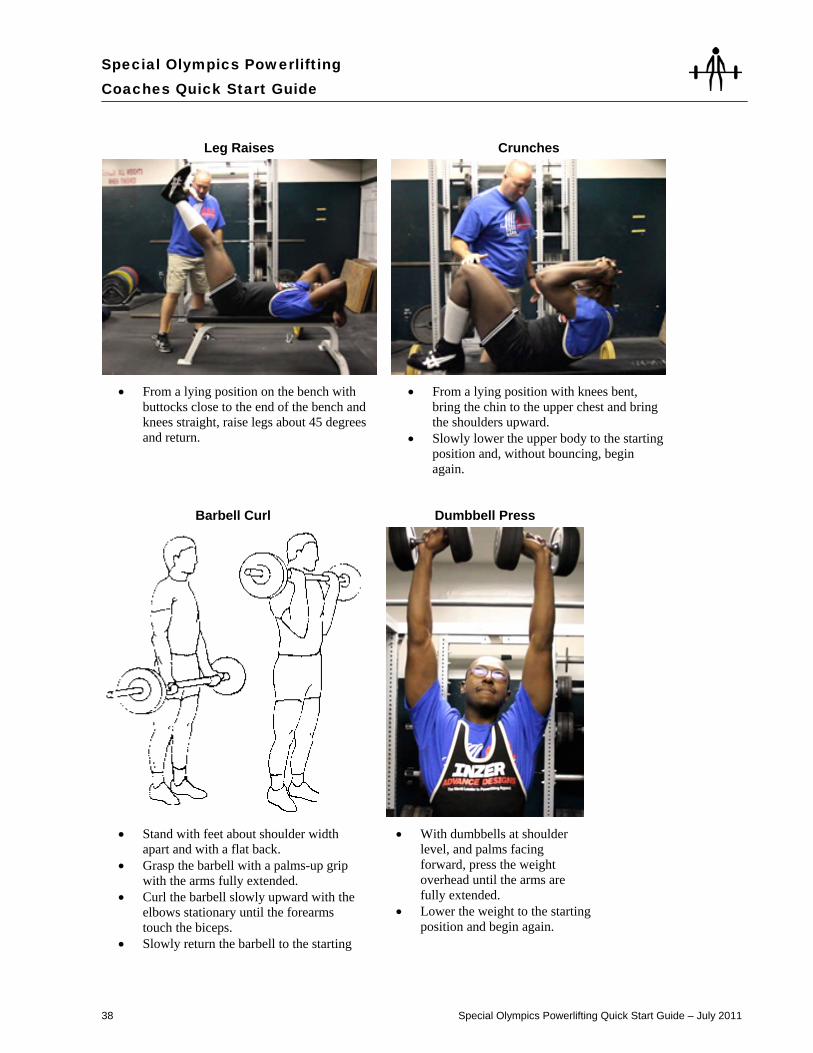
Leg Raises Crunches
• From a lying position on the bench with
buttocks close to the end of the bench and knees straight, raise legs about 45 degrees and return.
• From a lying position with knees bent, bring the chin to the upper chest and bring the shoulders upward.
• Slowly lower the upper body to the starting position and, without bouncing, begin again.
Barbell Curl Dumbbell Press
• Stand with feet about shoulder width
apart and with a flat back. • Grasp the barbell with a palms-up grip
with the arms fully extended. • Curl the barbell slowly upward with the
elbows stationary until the forearms touch the biceps.
• Slowly return the barbell to the starting
• With dumbbells at shoulder level, and palms facing forward, press the weight overhead until the arms are fully extended.
• Lower the weight to the starting position and begin again.

Special Olympics Powerlifting Quick Start Guide – July 2011 39
Special Olympics PowerliftingCoaches Quick Start Guide
post and, without any swinging or body assist, begin again.
• This lift may also be done with dumbbells.
Bent Barbell Row Incline Bench Press
• Stand in a bent over position, with back flat, feet
shoulder width apart, and knees slightly bent. • Holding the barbell with an overhand, shoulder
width grip, bring the bar slowly to the chest. • Slowly lower the barbell to the starting position
and start again.
• Lying on the incline press bench, with feet flat on floor and hands on the barbell at about shoulder width, begin the lift with a spotter closely following the bar.
• Slowly take the bar from the rack and bring it to the chest.
• Without a pause or a bounce, push the bar to full extension and start again.
Upright Row Lat Pulldown
• Stand in an erect position with hands in an overhand grip holding the barbell at slightly less than shoulder width against the thighs.
• Lift the bar upward with a flat back, and without assisting with legs, along the abdomen and chest
• From a kneeling or seated position, and leaning slightly back, grasp the lat bar with a wide grip and arms straight and slowly pull the bar to the upper chest.
• Slowly return the bar to the starting position and start again.
• More weight can be used if the legs are
40 Special Olympics Powerlifting Quick Start Guide – July 2011
Special Olympics Powerlifting Coaches Quick Start Guide
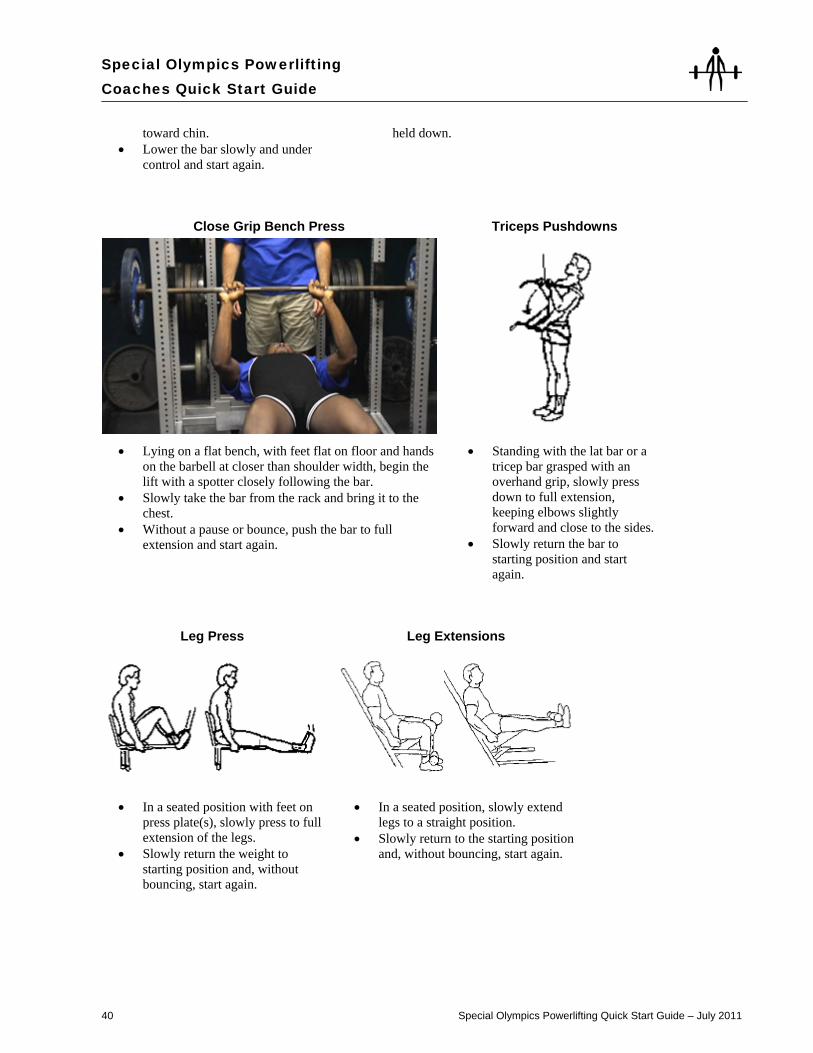
toward chin. • Lower the bar slowly and under
control and start again.
held down.
Close Grip Bench Press Triceps Pushdowns
• Lying on a flat bench, with feet flat on floor and hands
on the barbell at closer than shoulder width, begin the lift with a spotter closely following the bar.
• Slowly take the bar from the rack and bring it to the chest.
• Without a pause or bounce, push the bar to full extension and start again.
• Standing with the lat bar or a tricep bar grasped with an overhand grip, slowly press down to full extension, keeping elbows slightly forward and close to the sides.
• Slowly return the bar to starting position and start again.
Leg Press Leg Extensions
• In a seated position with feet on
press plate(s), slowly press to full extension of the legs.
• Slowly return the weight to starting position and, without bouncing, start again.
• In a seated position, slowly extend legs to a straight position.
• Slowly return to the starting position and, without bouncing, start again.
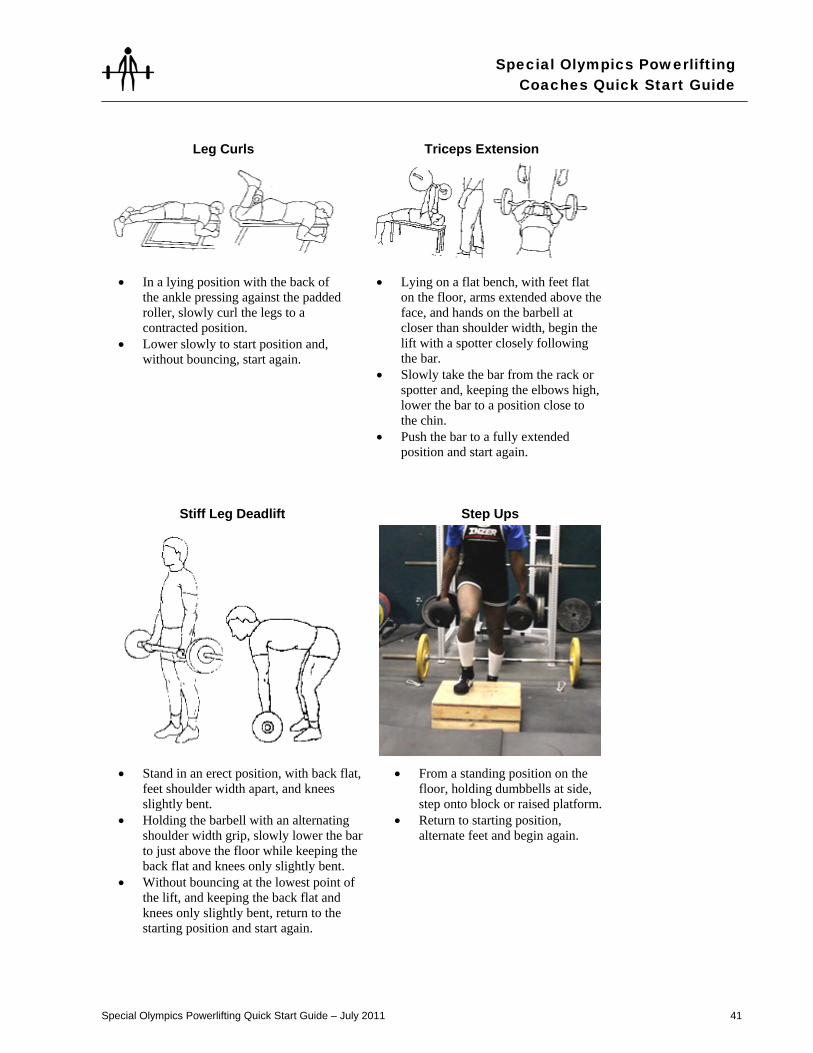
Special Olympics Powerlifting Quick Start Guide – July 2011 41
Special Olympics PowerliftingCoaches Quick Start Guide
Leg Curls Triceps Extension
• In a lying position with the back of
the ankle pressing against the padded roller, slowly curl the legs to a contracted position.
• Lower slowly to start position and, without bouncing, start again.
• Lying on a flat bench, with feet flat on the floor, arms extended above the face, and hands on the barbell at closer than shoulder width, begin the lift with a spotter closely following the bar.
• Slowly take the bar from the rack or spotter and, keeping the elbows high, lower the bar to a position close to the chin.
• Push the bar to a fully extended position and start again.
Stiff Leg Deadlift Step Ups
• Stand in an erect position, with back flat,
feet shoulder width apart, and knees slightly bent.
• Holding the barbell with an alternating shoulder width grip, slowly lower the bar to just above the floor while keeping the back flat and knees only slightly bent.
• Without bouncing at the lowest point of the lift, and keeping the back flat and knees only slightly bent, return to the starting position and start again.
• From a standing position on the floor, holding dumbbells at side, step onto block or raised platform.
• Return to starting position, alternate feet and begin again.
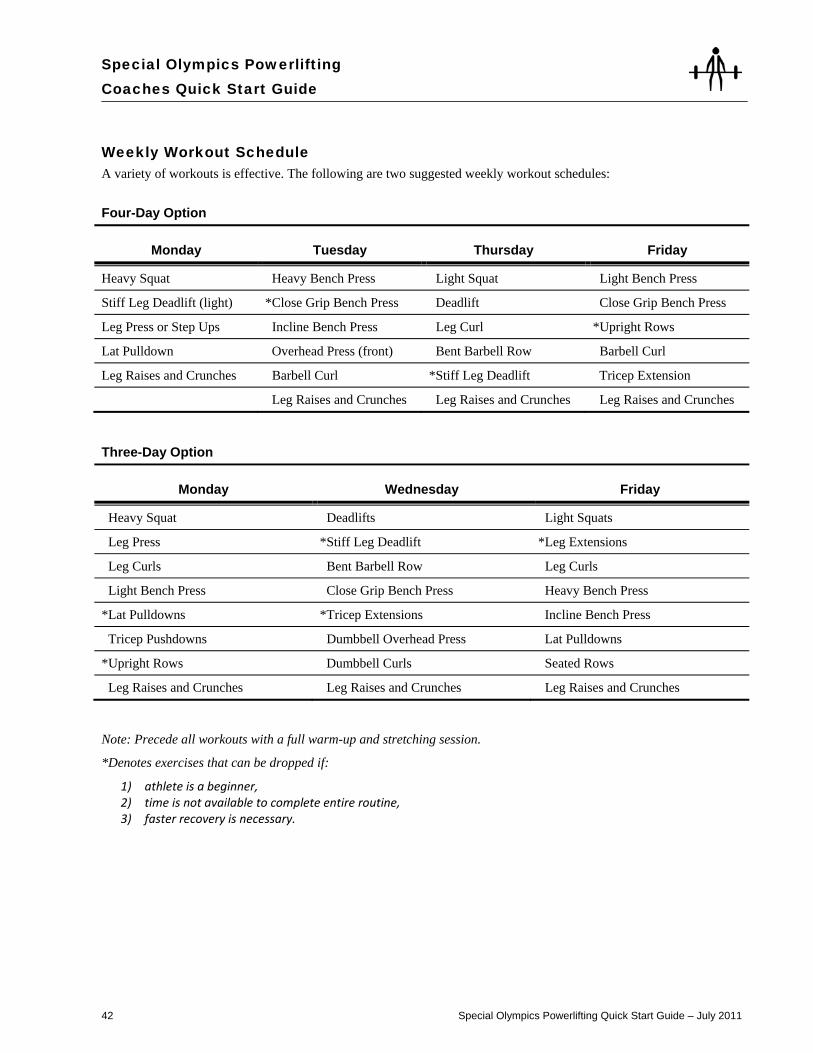
42 Special Olympics Powerlifting Quick Start Guide – July 2011
Special Olympics Powerlifting Coaches Quick Start Guide
Weekly Workout Schedule A variety of workouts is effective. The following are two suggested weekly workout schedules:
Four-Day Option
Monday Tuesday Thursday Friday
Heavy Squat Heavy Bench Press Light Squat Light Bench Press
Stiff Leg Deadlift (light) *Close Grip Bench Press Deadlift Close Grip Bench Press
Leg Press or Step Ups Incline Bench Press Leg Curl *Upright Rows
Lat Pulldown Overhead Press (front) Bent Barbell Row Barbell Curl
Leg Raises and Crunches Barbell Curl *Stiff Leg Deadlift Tricep Extension
Leg Raises and Crunches Leg Raises and Crunches Leg Raises and Crunches
Three-Day Option
Monday Wednesday Friday
Heavy Squat Deadlifts Light Squats
Leg Press *Stiff Leg Deadlift *Leg Extensions
Leg Curls Bent Barbell Row Leg Curls
Light Bench Press Close Grip Bench Press Heavy Bench Press
*Lat Pulldowns *Tricep Extensions Incline Bench Press
Tricep Pushdowns Dumbbell Overhead Press Lat Pulldowns
*Upright Rows Dumbbell Curls Seated Rows
Leg Raises and Crunches Leg Raises and Crunches Leg Raises and Crunches Note: Precede all workouts with a full warm-up and stretching session.
*Denotes exercises that can be dropped if:
1) athlete is a beginner, 2) time is not available to complete entire routine, 3) faster recovery is necessary.