PowerBroker Databases: Monitor & Audit User Guide · 2019-10-30 · This software is provided “AS...
238
PowerBroker Databases Monitor and Audit User Guide
Transcript of PowerBroker Databases: Monitor & Audit User Guide · 2019-10-30 · This software is provided “AS...

PowerBroker Databases
Monitor and Audit
User Guide
Revision/Update Information: March 2017Software Version: PowerBroker Databases: Monitor & Audit 6.8.6Document Revision: 0
COPYRIGHT NOTICECopyright © 2005–2017 BeyondTrust Software, Inc. All rights reserved. Use of this software and/or document, as and when applicable,is also subject to the terms and conditions of the license between the licensee and BeyondTrust Software, Inc. (“BeyondTrust”) orBeyondTrust’s authorized remarketer, if and when applicable.
TRADE SECRET NOTICEThis software and/or documentation, as and when applicable, and the information and know-how they contain constitute theproprietary, confidential and valuable trade secret information of BeyondTrust and/or of the respective manufacturer or author, andmay not be disclosed to others without the prior written permission of BeyondTrust. This software and/or documentation, as and whenapplicable, have been provided pursuant to an agreement that contains prohibitions against and/or restrictions on copying, modificationand use.
DISCLAIMERBeyondTrust makes no representations or warranties with respect to the contents hereof. Other than, any limited warranties expresslyprovided pursuant to a license agreement, NO OTHER WARRANTY IS EXPRESSED AND NONE SHALL BE IMPLIED,INCLUDING WITHOUT LIMITATION THE WARRANTIES OF MERCHANTABILITY AND FITNESS FOR USE OR FORA PARTICULAR PURPOSE.
LIMITED RIGHTS FARS NOTICE (If Applicable) If provided pursuant to FARS, this software and/or documentation, as and when applicable, are submitted with limited rights. Thissoftware and/or documentation, as and when applicable, may be reproduced and used by the Government with the express limitationthat it will not, without the permission of BeyondTrust, be used outside the Government for the following purposes: manufacture,duplication, distribution or disclosure. (FAR 52.227.14(g)(2)(Alternate II))
LIMITED RIGHTS DFARS NOTICE (If Applicable)If provided pursuant to DFARS, use, duplication, or disclosure of this software and/or documentation by the Government is subject tolimited rights and other restrictions, as set forth in the Rights in Technical Data – Noncommercial Items clause at DFARS 252.227-7013.
TRADEMARK NOTICESPowerBroker, PowerPassword, and PowerKeeper are registered trademarks of BeyondTrust. PowerSeries, PowerADvantage,PowerBroker Password Safe, PowerBroker Directory Integrator, PowerBroker Management Console, PowerBroker for Desktops,PowerBroker for Virtualization, and PowerBroker Express are trademarks of BeyondTrust.SafeNet and SafeNet logo are registered trademarks of SafeNet, Inc. Copyright 2009, by SafeNet, Inc. All rights reserved. Product names of any third party remain the trademarks of such third party manufacturers and/or distributors, respectively.The Ready for IBM Power Systems Software logo is a registered trademark or International Business Machines Corporation and is usedunder license from IBM."JBoss" and the JBoss logo are registered trademarks of Red Hat, Inc. Copyright 2006 Red Hat, Inc. All rights reserved. The PDP runs on JBOSS Application Server 6.0. License: Lesser General Public License version 2.1 (LGPL v2.1)
FICTITIOUS USE OF NAMESAll names of persons mentioned in this document are used fictitiously. Any resemblance to actual persons, living or dead is entirelycoincidental.
OTHER NOTICESIf and when applicable the following additional provisions are so noted:Copyright 2003 Sun Microsystems, Inc. All Rights Reserved.Redistribution and use in source and binary forms, with or without modification, are permitted provided that the following conditionsare met:1. Redistribution of source code must retain the above copyright notice, this list of conditions and the following disclaimer.2. Redistribution in binary form must reproduce the above copyright notice, this list of conditions and the following disclaimer in thedocumentation and/or other materials provided with the distribution.Neither the name of Sun Microsystems, Inc. or the names of contributors may be used to endorse or promote products derived fromthis software without specific prior written permission.
This software is provided “AS IS,” without a warranty of any kind. ALL EXPRESS OR IMPLIED CONDITIONS, REPRESENTATIONS AND WARRANTIES, INCLUDING ANY IMPLIED WARRANTY OF MERCHANTABILITY, FITNESS FOR A PARTICULAR PURPOSE OR NON-INFRINGEMENT, ARE HEREBY EXCLUDED. SUN MICROSYSTEMS, INC. (“SUN”) AND ITS LICENSORS SHALL NOT BE LIABLE FOR ANY DAMAGES SUFFERED BY LICENSEE AS A RESULT OF USING, MODIFYING OR DISTRIBUTING THIS SOFTWARE OR ITS DERIVATIVES. IN NO EVENT WILL SUN OR ITS LICENSORS BE LIABLE FOR ANY LOST REVENUE, PROFIT OR DATA, OR FOR DIRECT, INDIRECT, SPECIAL, CONSEQUENTIAL, INCIDENTAL OR PUNITIVE DAMAGES, HOWEVER CAUSED AND REGARDLESS OF THE THEORY OF LIABILITY, ARISING OUT OF THE USE OF OR INABILITY TO USE THIS SOFTWARE, EVEN IF SUN HAS BEEN ADVISED OF THE POSSIBILITY OF SUCH DAMAGES.
You acknowledge that this software is not designed or intended for use in the design, construction, operation or maintenance of anynuclear facility.
Locators in the product use the following libraries:1. Microsoft SQL Server JDBC Driver 3.0: License: in attached (Microsoft SQL Server JDBC Driver 3.02. JBOSS PicketLink 1.04: Identity Management Framework License: Lesser General Public License version 2.1 (LGPL v2.1) Details about product: http://www.jboss.org/picketlink/downloads.html3. JBOSS PicketBox 3.0: PicketBox is a Java Security Framework. License: Lesser General Public License version 2.1 (LGPL v2.1) Details about product: http://www.jboss.org/picketbox/downloads.html4.Apache Log4j: Logging License: http://logging.apache.org/log4j/1.2/license.html

Contents
PBDB‐MA User Guide 4 © 2017. BeyondTrust Software, Inc.
Introduction .................................................................................................................11
Conventions Used in This Guide .............................................................................................11Font Conventions ................................................................................................................11Linespacing Conventions ....................................................................................................12
Where to Go Next? ....................................................................................................................12Documentation Set for PowerBroker Databases: Monitor & Audit ...........................12Getting Additional Help .....................................................................................................12
Introduction to PowerBroker Databases .................................................................... 14
What’s New? ................................................................................................................................14PowerBroker Databases Components ...................................................................................14
Understanding the Administration Console ....................................................................15Understanding Agents .........................................................................................................15
Understanding the Central Configuration Agent Role ............................................16Understanding the Collection Agent Role ................................................................17Understanding the Monitor Agent Role ....................................................................17Understanding the Loader Agent Role ......................................................................17
Understanding Audit Sources ............................................................................................17Understanding Audit Policies .............................................................................................17Understanding the Central Configuration Database ......................................................18Understanding Repositories ...............................................................................................18Understanding the Report Server ......................................................................................19Understanding the lmConsole Utility ...............................................................................19
Using the Administration Console ............................................................................. 21
Connecting to the Administration Console ............................................................................21Logging In ....................................................................................................................................22Updating the Password ..............................................................................................................23Understanding the Administration Console ...........................................................................24
PowerBroker Databases Roles and Privileges .................................................................24Understanding the Admin Tab ..........................................................................................25Understanding the Configure Tab .....................................................................................25Understanding the Monitor Tab ........................................................................................26Understanding the Report Tab ..........................................................................................27Understanding the Help Tab ..............................................................................................27
Administering PowerBroker Databases ..................................................................... 28
Administering Users ...................................................................................................................29Adding a New User .............................................................................................................29Removing a User ..................................................................................................................31Updating User Information ................................................................................................31
Contents
PBDB‐MA User Guide 5 © 2017. BeyondTrust Software, Inc.
Administering Global Security Policies ...................................................................................32Administering Licenses ..............................................................................................................33Administering the Audit Trail Report ......................................................................................34
Viewing Audit Trail Reports for a Particular Time Period ............................................35Discarding Old Audit Trail Reports ..................................................................................35
Administering Mail Servers .......................................................................................................36Modifying Mail Server Configurations .............................................................................37Removing Mail Server Configurations ..............................................................................37
Configuring E-mail Notifications .............................................................................................37Configuring System E-mail Notifications ........................................................................38Adding New E-mail Notifications ....................................................................................40Modifying E-mail Notifications .........................................................................................40Generating a Support Report .............................................................................................41
Modifying the Administration Console Time-out .................................................................42
Configuring Repositories ............................................................................................ 44
Publishing Collected Data .........................................................................................................44(Oracle) Creating a Repository ..................................................................................................45(SQL Server) Creating a Repository .........................................................................................49Editing Repository Settings .......................................................................................................52(SQL Server) Moving a Repository to a New Computer .....................................................54Removing a Repository ..............................................................................................................54
Configuring Audit Sources ......................................................................................... 56
DB2 Audit Sources .....................................................................................................................56(DB2) Audit Source Prerequisites .....................................................................................56(DB2) Adding an Audit Source .........................................................................................57(DB2) Understanding the Summary Screen .....................................................................61(DB2) Editing the List of Audited Databases .................................................................62(DB2) Selecting Specific Columns for Auditing .............................................................63(DB2) Selecting a Set of Key Columns in an Object .....................................................64(DB2) DDL Collection with DB2 Versions 9.5 and 9.7 ................................................64
(DB2) Grant Security Permissions for DDL Collections .......................................65(DB2) Create a DB2 Audit Policy for DDL Collections ........................................65(DB2) Assigning the DB2 Audit Policy to an Object .............................................66
Oracle Audit Sources ..................................................................................................................66(Oracle) Audit Source Prerequisites ..................................................................................66(Oracle) Adding an Audit Source ......................................................................................67(Oracle) Understanding the Summary Screen .................................................................71(Oracle 12C) Configuring Include pre-filter for auditing ..............................................72(Oracle) Selecting Specific Columns for Auditing ..........................................................72
(Oracle 12C) Pre-Filters for Auditing ......................................................................................73(Oracle RAC) Auditing Data on Oracle RAC .................................................................74(Oracle RAC) Audit Source Prerequisites ........................................................................74(Oracle RAC) Configuring Oracle RAC for Auditing ....................................................75

Contents
PBDB‐MA User Guide 6 © 2017. BeyondTrust Software, Inc.
SQL Server Audit Sources .........................................................................................................77(SQL Server) Adding an Audit Source .............................................................................77(SQL Server) Understanding the Summary Screen ........................................................81(SQL Server) Editing the List of Audited Databases .....................................................82(SQL Server) Selecting Specific Columns for Auditing .................................................83(SQL Server) Selecting a Set of Key Columns in an Object .........................................84(SQL Server) Editing E-mail Notifications ......................................................................85(SQL Clusters) Audit Source Prerequisites ......................................................................86(SQL Clusters) Configuring SQL Server Clusters for Auditing ...................................89
Understanding the PowerBroker Databases Summary Screen ............................................94Editing Existing Audit Sources ..........................................................................................95Viewing All Repositories .....................................................................................................95
Auditing Selects ...........................................................................................................................96Auditing Select Queries Using Advanced SQL Server Audit ..............................................97Removing an Audit Source ........................................................................................................97
Starting the Auditing Process ..................................................................................... 99
Default Audit Polices and Rules ...............................................................................................99Configuring Data Collection for an Audit Source ...............................................................100
Selecting an Audit Policy ..................................................................................................101Assigning an Audit Policy to an Audit Source ..............................................................103Deploying an Audit Policy ................................................................................................105Starting Data Collection Immediately .............................................................................107
Undeploying an Audit Policy ..................................................................................................107Unassigning an Audit Policy ...................................................................................................108Audit Policy Status ....................................................................................................................109Audit Rule Status ......................................................................................................................109Configuration Overviews .........................................................................................................111
Configuration Summary ....................................................................................................111Policy Relations View ........................................................................................................112Audit Source Relations View ............................................................................................112
Advanced Options ....................................................................................................................113Searching for a Policy ........................................................................................................113Searching for a Rule ...........................................................................................................113
Creating Custom Audit Rules and Policies ...............................................................115
Understanding Audit Rules .....................................................................................................115Audit Rule Conditions .......................................................................................................115Audit Rule Actions .............................................................................................................115Audit Rule Types ................................................................................................................116Applying Multiple Audit Rules to a Single Log Record ...............................................118
Creating a New Audit Rule ......................................................................................................118Entering Users ....................................................................................................................121Entering Objects ................................................................................................................123Entering Operations ..........................................................................................................124

Contents
PBDB‐MA User Guide 7 © 2017. BeyondTrust Software, Inc.
Entering Applications ........................................................................................................125Entering Hosts ...................................................................................................................126Setting Rule Times .............................................................................................................127Rule Examples ....................................................................................................................127
Audit Rule Example 1 ................................................................................................128Audit Rule Example 2 ................................................................................................129User Profile Rule Example ........................................................................................130Override Rule Example ..............................................................................................131
Editing an Audit Rule ...............................................................................................................132Deleting an Audit Rule .............................................................................................................132Creating a New Audit Policy ...................................................................................................132Assigning an Audit Rule to Audit Policies ............................................................................134Assigning Several Rules to an Audit Policy ..........................................................................136Policy Example with Multiple Rules ......................................................................................137Editing an Audit Policy ............................................................................................................138Deleting an Audit Policy ..........................................................................................................139
Monitoring Data Collection .......................................................................................140
Checking the Status of an Audit Source ................................................................................140Checking the Status of a Repository ......................................................................................141Understanding the Dashboard Tab ........................................................................................141
Dashboard Navigation ......................................................................................................142Understanding Dashboard Audit Source Statuses ........................................................142Understanding Dashboard Agent Statuses ....................................................................144
Viewing Agent Status ..................................................................................................145Understanding Dashboard Repository Statuses ............................................................145
Generating Configuration Reports .........................................................................................146Audit Source Configuration Reports ..............................................................................146Repository Configuration Reports ..................................................................................146
Monitoring Reports ..................................................................................................................147Generating Monitoring Reports ......................................................................................147
Generating Monitor Reports for Specific Dates ....................................................148Sorting Columns in Monitor Reports ......................................................................148
Understanding the Event Monitor Report .....................................................................149Viewing Event Monitor Report Details ...................................................................150Purging Event Monitor Data .....................................................................................150
Understanding the Collection History Report ...............................................................151Understanding the Load History Report ........................................................................152
Checking Agent Log Files .......................................................................................................152Regenerating Published Reports .............................................................................................153
Using PowerBroker Databases Report Server ...........................................................154
Understanding PowerBroker Databases Reporting .............................................................154Understanding Report Server User Roles .............................................................................155Accessing the PowerBroker Databases Report Server ........................................................155

Contents
PBDB‐MA User Guide 8 © 2017. BeyondTrust Software, Inc.
Configuring the Report Server ................................................................................................156Creating a Report Server Connection to PowerBroker Databases Repository ........157Modifying a PowerBroker Databases Repository Connection ...................................161Restarting the Report Server ............................................................................................162Deploying PowerBroker Databases Report Server Templates ...................................162Recommended Report Server Properties .......................................................................163Modifying Server Properties .............................................................................................164
Understanding the Report Server ...........................................................................................164Generating Reports ...................................................................................................................165
Understanding Report Icons ............................................................................................165Entering Report Parameters .............................................................................................165
Standard Report Parameters ......................................................................................165Saved Report Parameters ...........................................................................................166
Scheduling Reports ............................................................................................................167Initial Report Scheduling ............................................................................................167Adding Schedules ........................................................................................................169Modifying Schedules ...................................................................................................169Deleting Schedules ......................................................................................................169
Generating a Report Using the Quick Run Option ......................................................169Generating a Standard Report Using the Run Option .................................................170Understanding Report Delivery Options .......................................................................171Viewing Reports .................................................................................................................172
Viewing a Standard Report ........................................................................................172Exporting Reports .............................................................................................................173Publishing Reports .............................................................................................................173Viewing Published Reports ..............................................................................................174E-mailing Reports ..............................................................................................................174Adding Comments to Reports .........................................................................................175Viewing Report Comments ..............................................................................................175Understanding Session Information in Reports ............................................................175
Understanding PowerBroker Databases Reports ................................................................177Accessory Reports ..............................................................................................................177Accessory Report Parameters ..........................................................................................178General IT Reports ............................................................................................................178General IT Report Parameters .........................................................................................179Standard Audit Reports .....................................................................................................181Understanding Audit Gaps in Reports ...........................................................................182
Using the Report Server Dashboard ......................................................................................183Designing a New Report Server Dashboard .................................................................184Editing Report Descriptions ............................................................................................187
Troubleshooting PowerBroker Databases ................................................................188
Error Information for Audit Sources and Agents ...............................................................188Error Information for Repositories .......................................................................................188Troubleshooting Collections - General .................................................................................189Troubleshooting DB2 Collections .........................................................................................189
Contents
PBDB‐MA User Guide 9 © 2017. BeyondTrust Software, Inc.
Troubleshooting Oracle Collections ..................................................................................190Identifying Missing Redo Logs ........................................................................................190Collecting Oracle Redo Logs Reported as Part of a Gap ............................................191Unable to Collect from Oracle when AUA Enabled ...................................................192
Troubleshooting the Report Server .......................................................................................192Troubleshooting Report Errors .......................................................................................193
User Missing db_owner Role ...................................................................................193Reports Missing or Cut Off Characters ..........................................................................193
Replacing the Default SSL based Certificate .............................................................194
Security Certificate Configuration ..........................................................................................194Security Certificate Update Procedure ...................................................................................195
Application User Auditing .........................................................................................197
AUA for Oracle .........................................................................................................................197(Oracle) Enabling AUA ....................................................................................................197
(Oracle 12C) Enabling AUA .....................................................................................198(Oracle) Verifying that AUA is Enabled .................................................................199(Oracle) Setting the Application Identifier ..............................................................199(Oracle) Resetting the Application Identifier ..........................................................199(Oracle) AUA - Usage Scenario ................................................................................199
(Oracle) Disabling AUA ...................................................................................................201(Oracle 12C) Disabling AUA ...........................................................................................201
AUA for SQL Server ................................................................................................................202(SQL Server) AUA Limitations .......................................................................................202(SQL Server) Enabling AUA ............................................................................................203
(SQL Server) Verifying that AUA is Enabled .........................................................204(SQL Server) Setting CONTEXT_INFO ...............................................................204(SQL Server) Verifying That AUA is Working ......................................................205(SQL Server) Viewing Application User Information in the Repository ...........206(SQL Server) Resetting CONTEXT_INFO Back to Null ...................................206
(SQL Server) Disabling AUA ...........................................................................................207
Using DML Tracing for PowerBroker Databases .................................................... 208
Enable Extended Auditing ......................................................................................................208Create a DML Audit Rule ........................................................................................................208Configure the Audit Source Options for Trace ...................................................................208
Create a Template XML File ............................................................................................209Set the UseTraceOnly Option ..........................................................................................210Setting Up the Traced Users ............................................................................................211Set the TraceOnlyUserFile Option .................................................................................212
Verifying Trace Configuration ................................................................................................213
Audit Source Options .................................................................................................214
Audit Source Option Reference ......................................................................................215
Contents
PBDB‐MA User Guide 10 © 2017. BeyondTrust Software, Inc.
SQL Server Database Options .........................................................................................225Related Audit Source Options .........................................................................................226
Column Level Auditing ..............................................................................................226DDL Trace ...................................................................................................................226DML Trace ...................................................................................................................226NetWatch Optimization .............................................................................................226Oracle Transaction Management ..............................................................................226Real-Time Alert Messaging ........................................................................................226SQL Server Cache Management ...............................................................................227
Glossary ..................................................................................................................... 228
Index ......................................................................................................................... 233

Introduction
PBDB‐MA User Guide 11 © 2017. BeyondTrust Software, Inc.
Introduction
This guide provides information about the system environment required to install and support PowerBroker Databases: Monitor & Audit, as well as detailed installation and configuration instructions for both Windows and Unix platforms.
In this manual, the product name is shortened to PowerBroker Databases or PBDB-MA.
This guide provides information for consultants, database administrators, network administrators, and others who are responsible for evaluating and preparing an environment and installing PBDB-MA. This guide provides information about hardware requirements, software requirements, required permissions, recommended configurations, and installation procedures.
This section includes the document conventions, list of documentation for the product, and where to get additional product information.
Conventions Used in This Guide
Specific font and linespacing conventions are used in this book to ensure readability and to highlight important information such as commands, syntax, and examples.
Font Conventions
The font conventions used for this document are:
• Courier New Font is used for program names, commands, command arguments, folder paths, variable names, text input, text output, configuration file listings, and source code. For example:/etc/poweradvantage/product.cfg
• Courier New Bold Font is used for information that should be entered into the system exactly as shown. For example: paadmin
• Courier New Italics Font is used for input variables that need to be replaced by actual values. In the following example, variable-name, must be replaced by an actual environment variable name. For example:result = getenv (variable-name);
• Bold is used for Windows buttons. For example:Click OK.
Introduction
PBDB‐MA User Guide 12 © 2017. BeyondTrust Software, Inc.
Linespacing Conventions
The linespacing of commands, syntax, examples, and computer code in this manual may vary from actual Windows and Unix/Linux usage because of space limitations. For example, if the number of characters required for a single line does not fit within the text margins for this book, the text is displayed on two lines with the second line indented as shown in the following sample:pkrun –c pathToCert –a someproc password=”PKUserPassword”
path=”/tmp/sp”
Where to Go Next?
For an overview of PowerBroker Databases: Monitor & Audit, detailed instructions on performing audit tasks including configuring the databases for auditing, and collecting data, see the PowerBroker Databases: Monitor & Audit User Guide.
Documentation Set for PowerBroker Databases: Monitor & Audit
The complete PowerBroker Databases: Monitor & Audit documentation set includes the following:
• PowerBroker Databases: Monitor & Audit Installation Guide - Provides detailed information about the system environment required to install and support PowerBroker Databases: Monitor & Audit, as well as detailed installation instructions on both Windows and UNIX platforms.
• PowerBroker Databases: Monitor & Audit User Guide• PowerBroker Databases: Monitor & Audit lmConsole User Guide - Intended for
advanced users, this book describes how to set up, configure, and manage PowerBroker Databases: Monitor & Audit from the command line rather than through the Administration Console.
• PowerBroker Databases: Monitor & Audit Upgrade Guide• PowerBroker Databases: Monitor & Audit Assessment User Guide• Online help (for Windows)• Man pages (for Unix/Linux)
Getting Additional Help
If you encounter problems that are not covered in the documentation, contact BeyondTrust support and provide this information: your name, your company name, your phone number, your email address, description of the problem, and the steps you have taken to resolve it.
To contact BeyondTrust technical support, use any of the following methods:
• Email - [email protected]• Phone - If you are located in the United States, call 800-234-9072.
Outside the United States, call +1 818-575-4040.
Introduction
PBDB‐MA User Guide 13 © 2017. BeyondTrust Software, Inc.
• BeyondTrust Customer Support Portal - Enables you to create and view your support incidents, access the BeyondTrust Knowledge Database for your products, view BeyondTrust news and events, or complete a survey about BeyondTrust Support Services. To access the Customer Support Portal, do the following:1.Go to the BeyondTrust Web site at www.beyondtrust.com.
2.Click Login at the top of any page.
3.On the Login page, scroll down and click the orange Login button in the Customer Support Portal section.
4.On the BeyondTrust Login window, specify your email address in the Username field.
5.Enter your password and click Continue.or
Click Send Me My Password to have a password sent to your email address. When you receive the password, enter it and click Continue.

Introduction to PowerBroker Databases
PBDB‐MA User Guide 14 © 2017. BeyondTrust Software, Inc.
Introduction to PowerBroker Databases
PowerBroker Databases: Monitor & Audit monitors access to your information assets and issues alerts when fraud (as defined by your rules and policies) is detected. PowerBroker Databases provides an audit trail that supports your data security requirements, including the following:
• Viewing of your data• Changes to your data• Changes to database schemas• Changes to database permissions
PowerBroker Databases provides an organizational view of compliance to your rules and policies, and generates alerts when your policies are violated. All data collected by PowerBroker Databases is stored in one or more PowerBroker Databases repositories where it is available for reporting and analysis. You use the PowerBroker Databases Administration Console to manage all of your audit sources and repositories.
What’s New?
Version 6.8 includes the following new features:
• Support log reading collections against databases that use Microsoft SQL Server 2008/2012 Transparent Data Encryption feature through the CDC method.
• Assessment Support for SQL Server 2012 component/package.• Support SQL Server 2012 as AuditDB CCDB and AuditDB Repository.• Support for auditing user defined server roles (Create Server Role, Alter
Server Role, drop server role) in SQL Server 2012.
Note: PowerBroker Databases: Monitor & Audit version 6.8 does not support auditing DB2 LUW v9.5 (and earlier).To audit DB2 LUW 9.5 (and earlier) use PBDB Monitor Agent version 6.6.3.
PowerBroker Databases Components
When you install PowerBroker Databases, you install and configure the following components:
• Administration Console• Agents• Audit sources• Audit policies• Central Configuration Database (CCDB)• Repository• Report Server and report templates
Introduction to PowerBroker Databases
PBDB‐MA User Guide 15 © 2017. BeyondTrust Software, Inc.
• lmConsole utility
These components are described in detail in the following sections.
Understanding the Administration Console
The PowerBroker Databases Administration Console is a Web-based application that lets you set up, configure, and manage your PowerBroker Databases environment. The Administration Console communicates with the Central Configuration Database (CCDB), which stores your PowerBroker Databases configuration information. You use the Administration Console to perform the following tasks:
• add, configure, manage, and remove audit sources• create, configure, manage, and remove repositories• create, modify, and delete audit policies and rules• monitor the data collection process• access the PowerBroker Databases Report Server to generate and view
reports
You install the Administration Console as part of the PowerBroker Databases installation process. The Console must be installed after the Central Configuration Agent is installed and running.
Understanding Agents
An agent is a generic term for a service that runs continuously and performs both scheduled and on-demand tasks.
• On Windows, an agent runs as a service and appears in the Services list with a Service Name of “lmEntegraAgent” and a Display Name of “Lumigent Agent.”.
• On UNIX, an agent is a daemon process.
In PowerBroker Databases, the agent is the process that manages all PowerBroker Databases activity on a given computer. You install one or more agents on each Tier of your environment. Agents are distributed across multiple computers and can perform different “roles” based on the configuration. Agents should be deployed as described in the PowerBroker Databases Installation Guide.
Note: Each computer in your configuration can have only one PowerBroker Databases agent installed. However, each agent can perform all four roles, or any subset of these roles, depending on your PowerBroker Databases configuration.

Introduction to PowerBroker Databases
PBDB‐MA User Guide 16 © 2017. BeyondTrust Software, Inc.
The following table shows the different agent roles and the functions that correspond to each role:
Understanding the Central Configuration Agent Role
The first PowerBroker Databases agent that you install is, by default, the Central Configuration Agent. The Central Configuration Agent creates the Central Configuration Database (CCDB) on the same computer where the Central Configuration Agent is installed.
The Central Configuration Agent is responsible for managing the CCDB and communicating configuration information to the other PowerBroker Databases agents in your environment. All other PowerBroker Databases Agents connect to the Central Configuration Agent for configuration information.
Table 1. Agent Roles
Agent Role Agent Location Agent Function
Central Configuration Agent
PBDB Server core software
• Managing the Central Configuration Database (CCDB).
• Communicating configuration information to other agents.
Loader Agent Repository Tier • Reporting repository status to the Central Configuration Agent.
• Loading and publishing collected data into the repository.
Collection Agent Collection Tier • Provide database information used when creating and configuring audit sources.
• Provide database information when creating rules.
• Reporting audit source status to the Central Configuration Agent.
• Collecting data from the audit source log files and preparing it to be loaded into the PBDB Repository.
Monitor Agent Audit Source Tier • Provide database user and object information used when creating rules.
• Report audit source status to the Central Configuration Agent.
Introduction to PowerBroker Databases
PBDB‐MA User Guide 17 © 2017. BeyondTrust Software, Inc.
Understanding the Collection Agent Role
A Collection Agent is responsible for collecting data from the audit source, normalizing the data, executing filter based analysis, and preparing it to be loaded into the Repository. The Collection Agent transfers ECZ files to the Repository. As soon as an ECZ file is transferred, the collected data is loaded into the Repository database. The data is published on a schedule, at which point it is available to the Report Server for reporting. The Collection Agent also reports the audit source status to the Central Configuration Agent.
Understanding the Monitor Agent Role
The Monitor role is involved with distributed management of agents. On most platforms the Monitor role and the Collector role are performed by the same agent. The exception to this is SQL Server audit sources, which require an agent installation on the audit source computer.
Understanding the Loader Agent Role
A Loader Agent is responsible for loading and publishing collected data into the Repository. The agent installed on the Repository always fulfills the Loader Agent role.
The Loader Agent also reports the status of the Repository to the Central Configuration Agent.
Understanding Audit Sources
An audit source is one database server instance that is monitored (audited) by an agent. The agent gathers information about database activity based on the policies and rules that you have configured for the audit source.
You use the Administration Console to set up and configure audit sources. This configuration information is stored in the Central Configuration Database. When you add an audit source, you must specify the Repository to store the data collected from that audit source. Therefore you must create at least one Repository before you add audit sources to PowerBroker Databases.
Each audit source in your configuration uses or consumes an PowerBroker Databases license. When you are planning your PowerBroker Databases implementation, you should estimate the number of audit sources that will be monitored, and plan your licensing accordingly.
Understanding Audit Policies
An audit policy is a uniquely named group of audit rules. You use an audit rule to define what data to audit and what to do with the collected data. An audit rule specifies a set of conditions for evaluating database activity and a list of actions to carry out when activity matches the rule conditions.

Introduction to PowerBroker Databases
PBDB‐MA User Guide 18 © 2017. BeyondTrust Software, Inc.
You can group audit rules into audit policies according to your needs. For example, if you have several audit sources in your PowerBroker Databases configuration, you can create a separate audit policy for each audit source. You can also have several audit policies assigned to a single audit source.
Audit rules are assigned to audit policies and audit policies are assigned to audit sources.
For your convenience, PowerBroker Databases provides several pre-populated audit policies to use for the most common auditing tasks. Each audit policy has one or two pre-populated audit rules assigned to it. You can also create custom audit rules and policies for your own specific auditing needs.
Understanding the Central Configuration Database
The Central Configuration Database (CCDB) is a set of database tables that PowerBroker Databases uses to store metadata about your PowerBroker Databases environment. The information that is stored in the CCDB includes the following:
• Network connectivity information for all computers in your configuration• Login information for each server• Configuration options for each component• History information about PowerBroker Databases tasks performed on
each server
When you install the Central Configuration Agent, the installer creates the Central Configuration Database on the same computer. By default, the Central Configuration Database is named lumigent.
Understanding Repositories
An PowerBroker Databases Repository stores data collected by one or more Collection Agents. A single Repository may store audit data from multiple audit sources, including a mixture of DB2, Oracle, SQL Server, and Sybase data.
A Repository consists of an offline portion and an online portion:
• The offline portion is a set of encrypted flat files (.ecz files) which contain collected data. These files are used to populate the Repository, and for archiving purposes.
• The online portion is the Repository database. This is a set of SQL tables that contains recent audit data, as well as metadata used by other PowerBroker Databases functions.
Introduction to PowerBroker Databases
PBDB‐MA User Guide 19 © 2017. BeyondTrust Software, Inc.
An PowerBroker Databases Repository is associated with one or more Collection Agents, which collect the data that is stored in the Repository. The PowerBroker Databases agent that is installed on the Repository computer performs the role of the Loader Agent. To make collected data available to the PowerBroker Databases Report Server, you must publish the data after it has been loaded into the Repository. When you create a Repository, you specify publishing schedule and data retention period for this Repository. At publishing time, data loaded since last publish becomes available to the PowerBroker Databases Report Server and data that remained in the Repository longer than the specified retention period is purged. For more information about the Report Server, see "Understanding the Report Server" on page 19.
You create and configure a repository using the PowerBroker Databases Administration Console. Configuration information about the Repository is stored in the Central Configuration Database.
Each PowerBroker Databases Repository in your configuration uses or consumes an PowerBroker Databases license. When you are planning your PowerBroker Databases implementation, you should estimate the number of Repositories that will be required, and plan your licensing accordingly.
Understanding the Report Server
The Report Server is the application you use to view your audited data collected in the Repository. Using prepared reports, you can view your audited data in aggregate and apply filters to easily find the data you need. The Report Server offers many scheduling and report delivery options.
Warning:The Report Server is installed on the PBDB Server.
Understanding the lmConsole Utility
The lmConsole Utility provides a command line interface that you can use instead of the Administration Console to configure and manage PowerBroker Databases components. You can use the lmConsole to perform the following tasks:
• Create and manage audit sources• Monitor status for
– agents– audit sources– Repositories
The lmConsole is useful for managing large installations. Its batch operations make it easier to create and manage hundreds of audit sources.

Introduction to PowerBroker Databases
PBDB‐MA User Guide 20 © 2017. BeyondTrust Software, Inc.
The lmConsole supports configuring audit sources in clustered and non-clustered environments.
Using the Administration Console
PBDB‐MA User Guide 21 © 2017. BeyondTrust Software, Inc.
Using the Administration Console
The Administration Console is a Web application that enables you to configure and manage your PowerBroker Databases environment. You connect to the Administration Console using a Web browser.
Connecting to the Administration Console
There are two ways to connect to the Administration Console, using the Windows Start menu or accessing it from a Web browser.
To use the Start menu:
• Select Start, Programs, PowerBroker Databases Server, Administration Console, Administration Console The Administration Console starts in your default browser. Make sure that Internet Explorer is the default browser on the Administration Console computer.
To use a Web browser to access the Admin Console or Report Server, on both Windows and Unix installations:
• Admin Console– http://localhost:10080/eac/jsp/login.jsp– https://localhost:10081/eac/jsp/login.jsp
• Report Server:– http://localhost:10090/auditdb/– https://localhost:10091/auditdb/
If the Admin Console is hosted on a different system, replace localhost with the host name of the system hosting the Admin Console.

Using the Administration Console
PBDB‐MA User Guide 22 © 2017. BeyondTrust Software, Inc.
Logging In
To log into PowerBroker Databases:
1. On the Administration Console Login screen, provide your Username and Password. The first time you run the Administration Console, log in as the default administrator using the username and password "auditdb". As a best practice, the first time you log in as the default "auditdb" administrator you should change this default password. For instructions, see "Updating the Password" on page 23.
2. Click LOGIN. The PowerBroker Databases Home screen opens.

Using the Administration Console
PBDB‐MA User Guide 23 © 2017. BeyondTrust Software, Inc.
The PowerBroker Databases Home screen provides links, tabs, and a Navigation Path that let you navigate the various PowerBroker Databases functions. Your PowerBroker Databases login privileges determine which links and tabs are visible to you when you log into PowerBroker Databases. For more information about PowerBroker Databases roles and privileges, see "PowerBroker Databases Roles and Privileges" on page 24.
Updating the Password
To update your password in the PowerBroker Databases Login screen:
1. Click Update Password. The Change Password screen opens.
2. In the Username field, type your username.
3. In the Old Password field, type your old password.
Tip: Logging in with SQL Server 2005
On SQL Server 2005, if you are having problems logging in, verify that the SQL Server 2005 Browser Service is running on the computers where the CCDB is installed. This service must be started manually. PowerBroker Databases Agents need the Browser Service to communicate with CCDB.

Using the Administration Console
PBDB‐MA User Guide 24 © 2017. BeyondTrust Software, Inc.
4. In the New Password and Confirm Password fields, type your new password. The Password must be at least 6 characters and must be different than your Username.
5. Click Update Password.
Note: You must enter your license key before performing any other tasks. For instructions, see "Administering Licenses" on page 33.
Understanding the Administration Console
When you log into the Administration Console, the tabs and functions that are available to you depend on your role and the privileges that the system administration has granted your user ID.
PowerBroker Databases Roles and Privileges
In a large organization, a number of people are involved at various levels of data management depending upon their responsibilities. PowerBroker Databases supports these responsibilities by letting you assigning privileges to PowerBroker Databases users. These privileges let the user to perform certain functions while restricting others based on security and data integrity considerations.
The PowerBroker Databases privileges are as follows:
• Admin: Full access to all PowerBroker Databases functions. Only a user with Admin privileges can perform PowerBroker Databases administration tasks, which include administering users, defining global security policies, adding license keys, accessing internal trail report, and setting up system e-mail notifications.
• Auditor: Access to configuration functions for existing audit sources and Repositories to determine what data needs to be audited. No access to Admin functions. No access to PowerBroker Databases environment configuration functions.
• DBA: Access to PowerBroker Databases environment configuration functions, such as adding audit sources and Repositories. No access to Admin functions. No access to configuring existing audit sources and Repositories.
• Monitor: Access to PowerBroker Databases internal reports and PowerBroker Databases Report Server only.
Tip: auditdb
You can use auditdb with the new password or create a different user with Admin privileges.

Using the Administration Console
PBDB‐MA User Guide 25 © 2017. BeyondTrust Software, Inc.
There is an overlap between DBA and Auditor which allows either of them to see the full audit source and audit configuration although only the DBA can setup the PowerBroker Databases environment and only the auditor can configure what is audited.
The privileges are assigned to users by the Admin user. The privileges can be combined. For example you can give a user all privileges except the Admin privileges.
Understanding the Admin Tab
You use the Admin Tab to perform PowerBroker Databases System Administrator functions.
Note: You must have Admin level privileges to view and use the Admin Tab. If your login privileges are DBA, Auditor, or Monitor you will not see the Admin Tab.
The Admin tab includes the following subtabs:
• Administration Options — The landing page when you click the Admin Tab. This subtab displays links to PowerBroker Databases administration functions.
• Users — Click to add, view, modify, and remove PowerBroker Databases users and assign user privileges.
• Global Security — Click to view or modify the PowerBroker Databases password expiration policy.
• Licenses — Click to add, view, or remove PowerBroker Databases license keys.
• Audit Trail Report — Click to view or purge the Internal Audit Trail Report. This report lists actions that have modified the PowerBroker Databases Configuration Database.
• Email Notifications — Click to add, modify, or remove users who will receive e-mail notifications for PowerBroker Databases system alerts and PowerBroker Databases alerts.
• Mail Server — Click to view or modify the mail server configuration for e-mail notifications.
• Generate Support Report — Click to generate a .CSV file that contains information about your PowerBroker Databases configuration.
Understanding the Configure Tab
You use the Configure Tab to perform configuration functions for PowerBroker Databases.

Using the Administration Console
PBDB‐MA User Guide 26 © 2017. BeyondTrust Software, Inc.
Note: You must have Admin, DBA or Auditor level privileges to view and use the Configure Tab. However, only users with Admin or DBA privileges can add audit sources and Repositories, and only users with Admin or Auditor privileges can edit audit sources and Repositories, and configure PowerBroker Databases rules and policies.
The Configure Tab includes the following subtabs:
• Audit Sources — Click to create, view, and manage the list of audited databases (audit sources). Also used to add, view, manage PBDB Repositories.
• Applications — Click to • Policies — Click to • Audit Policy — Click to create, view, and manage audit policies. • Audit Rules — Click to create, view, and manage audit rules.• Overviews — Click to view graphical overviews of your
PowerBroker Databases system.– Configuration Summary — Click to view the Configuration
Summary, which shows how many policies, rules, and audit sources of each status your PowerBroker Databases configuration contains.
– Policy Relations View — Click to view the Policy Relations view, which shows the list of all policies in your PowerBroker Databases configuration and their related rules and audit sources.
– Audit Source Relations view — Click to view the Audit Source Relations view, which shows the list of all audit sources in your PowerBroker Databases Configuration and their related policies and rules.
• Advanced Options — Click to search for policies and rules in your PowerBroker Databases configuration.
Understanding the Monitor Tab
You use the Monitor Tab to view the PowerBroker Databases Dashboard and reports that monitor your PowerBroker Databases system.
Note: You must have Admin or Monitor level privileges to view and use the Monitor Tab.
The Monitor Tab includes the following functions:
• Report Options — Displays links to functions available on the Monitor subtabs.
• Event Monitor — Click to view the Event Monitor Report, which contains information from PowerBroker Databases Agents’ event logs. The Event Monitor Report contains unfiltered information and historical data that comes from multiple audit sources and Repositories. This report includes the list of Event Logs for all the components in your PowerBroker Databases configuration.
Using the Administration Console
PBDB‐MA User Guide 27 © 2017. BeyondTrust Software, Inc.
• Collection History — Click to view the Collection History Report, which contains information on both successful and failed collections. The Collection History Report produces collection history reports for all audit sources in your PowerBroker Databases configuration. The Collection History Report contains unfiltered information and historical data that comes from multiple audit sources.
• Load History — Click to view the Load History report, which provides information about the success or failure of ECZ files loading to and publishing from the PBDB Repositories in your PowerBroker Databases configuration. The Load History report provides load history information for all Repositories in your PowerBroker Databases configuration. The Load History Report contains unfiltered information and historical data that comes from multiple Repositories.
• Dashboard — Click to view an overview of your PowerBroker Databases environment on a single screen. You can quickly see the number of repositories, agents, and audit sources, and the status of each component.
Understanding the Report Tab
Click the Report Tab to access the PowerBroker Databases Report Server and run reports on audit data collected by PowerBroker Databases. The Report Server launches a new browser session. Users with any privileges may access the Report Server, however the privileges of the user ID that you use to log into the Report Server determine which Report Server features are available to you.
For information about using the Report Server, see "Using PowerBroker Databases Report Server" on page 154.
Understanding the Help Tab
Click the Help Tab to access PowerBroker Databases component version information, a PDF copy of the PowerBroker Databases User’s Guide, and support contact information.
Administering PowerBroker Databases
PBDB‐MA User Guide 28 © 2017. BeyondTrust Software, Inc.
Administering PowerBroker Databases
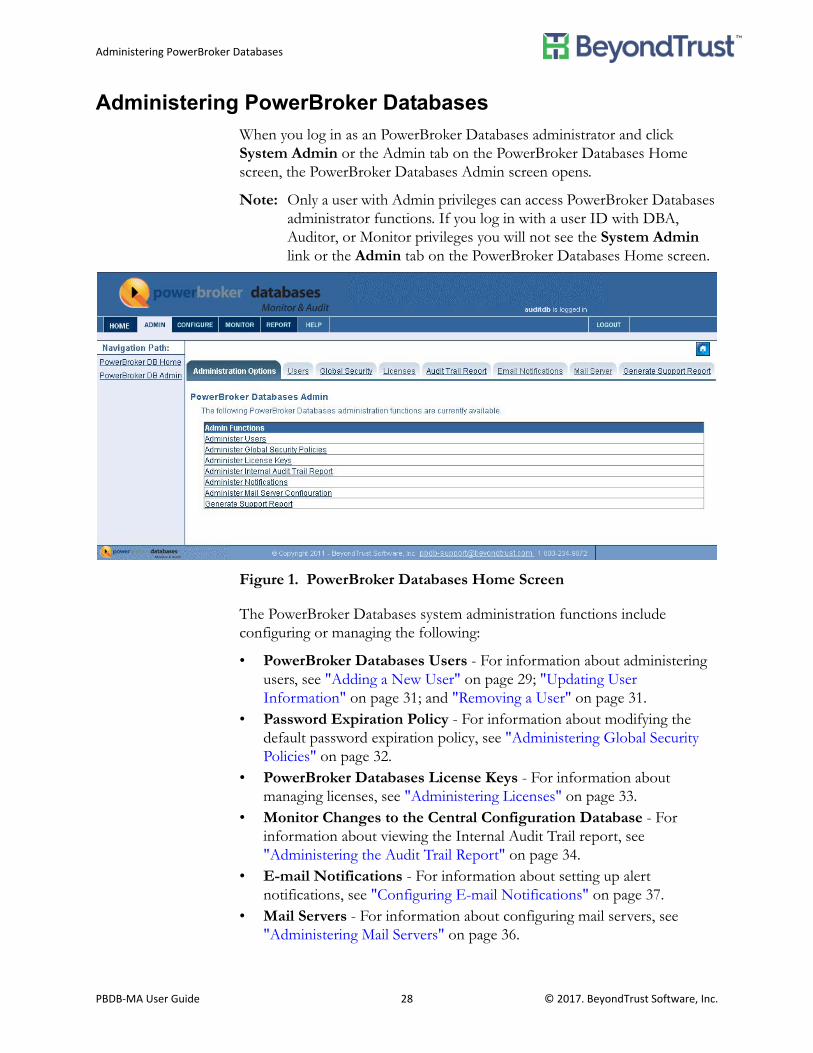
When you log in as an PowerBroker Databases administrator and click System Admin or the Admin tab on the PowerBroker Databases Home screen, the PowerBroker Databases Admin screen opens.
Note: Only a user with Admin privileges can access PowerBroker Databases administrator functions. If you log in with a user ID with DBA, Auditor, or Monitor privileges you will not see the System Admin link or the Admin tab on the PowerBroker Databases Home screen.
Figure 1. PowerBroker Databases Home Screen
The PowerBroker Databases system administration functions include configuring or managing the following:
• PowerBroker Databases Users - For information about administering users, see "Adding a New User" on page 29; "Updating User Information" on page 31; and "Removing a User" on page 31.
• Password Expiration Policy - For information about modifying the default password expiration policy, see "Administering Global Security Policies" on page 32.
• PowerBroker Databases License Keys - For information about managing licenses, see "Administering Licenses" on page 33.
• Monitor Changes to the Central Configuration Database - For information about viewing the Internal Audit Trail report, see "Administering the Audit Trail Report" on page 34.
• E-mail Notifications - For information about setting up alert notifications, see "Configuring E-mail Notifications" on page 37.
• Mail Servers - For information about configuring mail servers, see "Administering Mail Servers" on page 36.
Administering PowerBroker Databases
PBDB‐MA User Guide 29 © 2017. BeyondTrust Software, Inc.
You can access each function either by clicking the link in the list of Admin Functions or in the Navigation Path, or by clicking the corresponding tab.
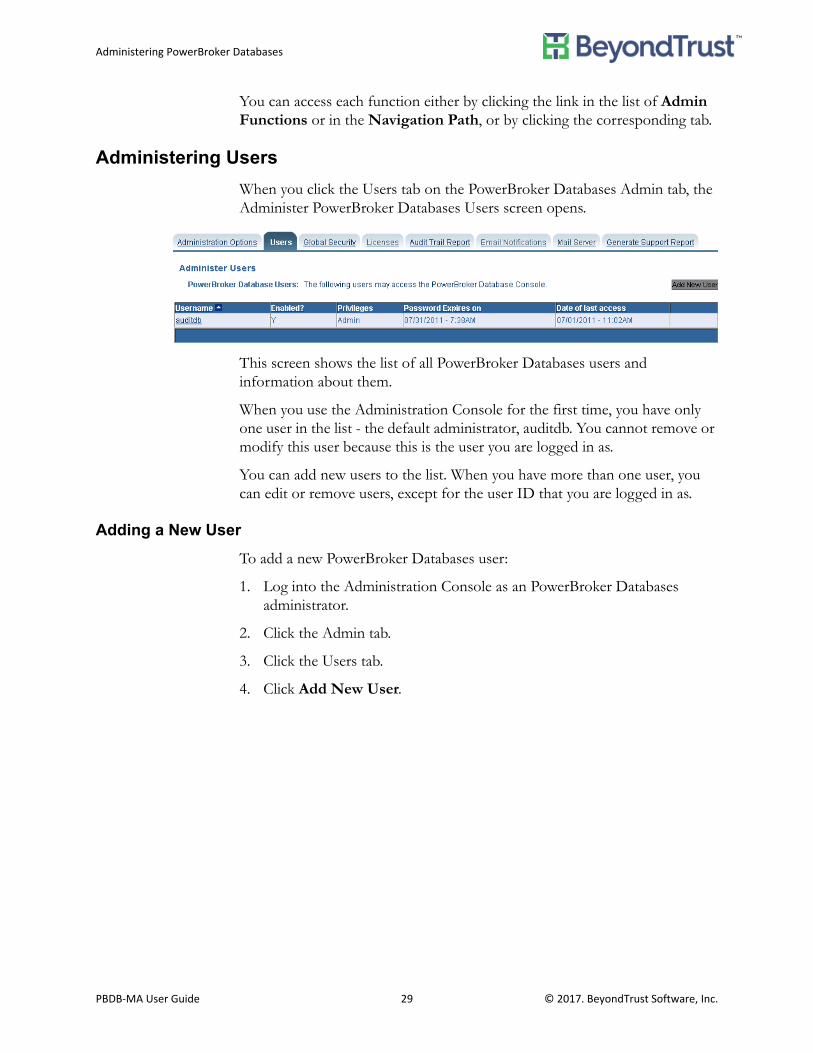
Administering Users
When you click the Users tab on the PowerBroker Databases Admin tab, the Administer PowerBroker Databases Users screen opens.
This screen shows the list of all PowerBroker Databases users and information about them.
When you use the Administration Console for the first time, you have only one user in the list - the default administrator, auditdb. You cannot remove or modify this user because this is the user you are logged in as.
You can add new users to the list. When you have more than one user, you can edit or remove users, except for the user ID that you are logged in as.
Adding a New User
To add a new PowerBroker Databases user:
1. Log into the Administration Console as an PowerBroker Databases administrator.
2. Click the Admin tab.
3. Click the Users tab.
4. Click Add New User.
Administering PowerBroker Databases
PBDB‐MA User Guide 30 © 2017. BeyondTrust Software, Inc.
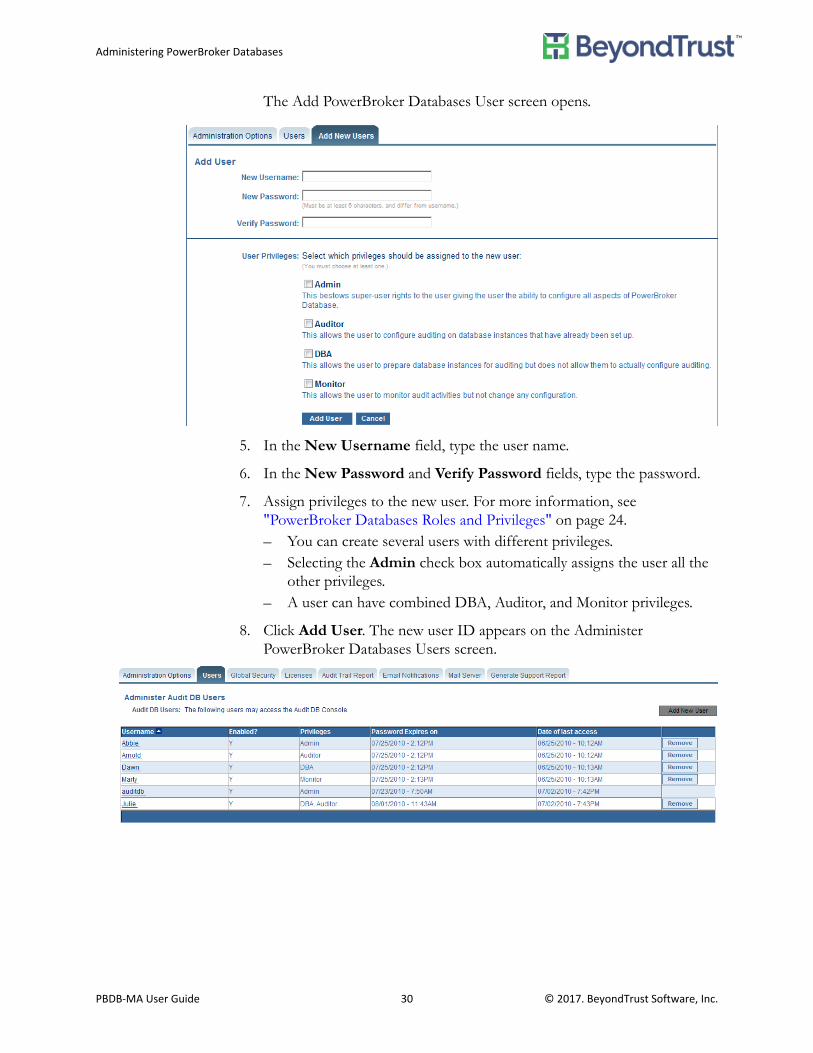
The Add PowerBroker Databases User screen opens.
5. In the New Username field, type the user name.
6. In the New Password and Verify Password fields, type the password.
7. Assign privileges to the new user. For more information, see "PowerBroker Databases Roles and Privileges" on page 24.– You can create several users with different privileges.– Selecting the Admin check box automatically assigns the user all the
other privileges.– A user can have combined DBA, Auditor, and Monitor privileges.
8. Click Add User. The new user ID appears on the Administer PowerBroker Databases Users screen.
Administering PowerBroker Databases
PBDB‐MA User Guide 31 © 2017. BeyondTrust Software, Inc.
Removing a User
Once you have more than one user, you can remove a user (other than the user ID you are logged in as and the "auditdb" user) or modify user information. Usernames cannot be changed. If you need to change a username, add a user with the new name and delete the old username.
Note: You cannot delete the PowerBroker Databases Administrator you are signed in as.
To remove an PowerBroker Databases user:
1. Log into the Administration Console as an PowerBroker Databases administrator.
2. Click the Admin tab.
3. Click the Users tab.
4. Locate the user ID you want to delete and click Remove in the corresponding row. The Delete PowerBroker Databases User screen opens.
5. Click Delete This User. A confirmation dialog box appears.
6. Click OK. PowerBroker Databases deletes the user ID.
Updating User Information
Note: You cannot modify privileges for the PowerBroker Databases Administrator you are signed in as, but you can modify the password.
To update information:
1. Log into the Administration Console as an PowerBroker Databases administrator.
2. Click the Admin tab.
3. Click the Users tab.

Administering PowerBroker Databases
PBDB‐MA User Guide 32 © 2017. BeyondTrust Software, Inc.
4. Click the username of the user you want to update. The Edit PowerBroker Databases User screen opens.
5. To change the user's password, type the new password in the New Password and Verify Password fields and click Update Password.
6. To temporarily restrict a user from accessing PowerBroker Databases without removing the user, click Disable. In the list of users, this user's status in the Enabled? column changes to N.
7. To enable a previously disabled user, click the username to open the Edit PowerBroker Databases User screen for this user and click Enable.
8. To change user privileges, select new privileges and click Update Privileges.
Administering Global Security Policies
Use this option to modify the PowerBroker Databases password expiration policy. The default password expiration policy is every 30 days.
To administer global security policies:
1. Log into the Administration Console as an PowerBroker Databases administrator.
2. Click the Admin tab.

Administering PowerBroker Databases
PBDB‐MA User Guide 33 © 2017. BeyondTrust Software, Inc.
3. Click the Global Security tab. The Administer PowerBroker Databases Global Security Policies screen opens.
4. Specify how frequently PowerBroker Databases users should change their passwords. The default value is 30 days.
5. Click Save.
Administering Licenses
You need a valid license to run PowerBroker Databases. Each audit source and each Repository in your PowerBroker Databases configuration uses a license. License count is cumulative. For example, if you have 2 licenses - each one holding 4 audit sources and 1 Repository, you are allowed to audit 8 audit sources and 2 Repositories. You can add additional license keys at any time. The license is provided to you from BeyondTrust.
All license keys are valid for DDL, DML, Selects, and Stored Procedures collection and processing.
To enter your license key:
1. Log into the Administration Console as an PowerBroker Databases administrator.
2. Click the Admin tab.
3. Click the Licenses tab. The Administer PowerBroker Databases License Keys screen opens.
4. Enter your license in the New License Key field.
5. Click Add Key. PowerBroker Databases displays your license information in the table.

Administering PowerBroker Databases
PBDB‐MA User Guide 34 © 2017. BeyondTrust Software, Inc.
Administering the Audit Trail Report
The Audit Trail Report lists all administrative operations performed.
To view the Audit Trail report:
1. Log into the Administration Console as an PowerBroker Databases administrator.
2. Click the Admin tab.
3. Click the Audit Trail Report tab. The Administer Internal Audit Trail Report screen opens.
This screen contains a list of all events resulted in CCDB modifications. You can sort the list based on:
Tip: Additional Details About Changes to CCDB.
The PowerBroker Databases Audit Trail Report provides basic information about changes that have been made to the Central Configuration Database. If you need additional details about changes made to your CCDB, you add the CCDB to your list of audited databases.

Administering PowerBroker Databases
PBDB‐MA User Guide 35 © 2017. BeyondTrust Software, Inc.
• Timestamp - time and date of the action based on the local server time.• Username - user ID of the user who performed the action.• Action - description of the activity resulted in Central Configuration
Database modification.• Target - name of the PowerBroker Databases object on which the action
was performed.• Target Type - type of the PowerBroker Databases object on which the
action was performed — for example, PowerBroker Databases Agent, audit source, or Repository. Target types are as follows:– Agent or AgentRef - the event modified the
PowerBroker DatabasesPowerBroker Databases Agent.– AuditSource or AuditSourceRef - the event modified the audit
source.– Repository or RepositoryRef - the event modified the Repository.– * - the event applies to all agents
If the Target and Target Type field for an event are blank, it means the event modified something not tied to a specific target; for example, a login or logout event.
Viewing Audit Trail Reports for a Particular Time Period
To view events for a particular period of time:
1. Log into the Administration Console as an PowerBroker Databases administrator.
2. Click the Admin tab.
3. Click the Audit Trail Report tab.
4. Select or Specify the Start Date and the End Date.
5. Click Search.
Discarding Old Audit Trail Reports
To discard the old records:
1. Log into the Administration Console as an PowerBroker Databases administrator.
2. Click the Admin tab.
3. Click the Audit Trail Report tab.
4. Type the number of days in the Older than _days field.
5. Click Purge. All records older than the specified number of days will be permanently deleted.

Administering PowerBroker Databases
PBDB‐MA User Guide 36 © 2017. BeyondTrust Software, Inc.
Administering Mail Servers
You can define one or more Mail Server configurations to be used for sending e-mail notifications.
To define a Mail Server configuration:
1. Log into the Administration Console as an PowerBroker Databases administrator.
2. Click the Admin tab.
3. Click the Mail Server tab. The Administer Mail Server Configuration screen opens.
In this screen you see the list of available Mail Server configurations.
4. Click Add New Mail Server. The Add Mail Server screen opens.
5. Type the name of the new Mail Server in the Name filed.
6. Type the e-mail address from which e-mail notifications should be sent in the From Address field.
7. Type the name of the server from which e-mail notifications should be sent in the Host field.
8. Type the number of the port used by the server in the Port No field.
9. Click Add Mail Server. PowerBroker Databases enables the mail server and adds it to the list.
Administering PowerBroker Databases
PBDB‐MA User Guide 37 © 2017. BeyondTrust Software, Inc.
Modifying Mail Server Configurations
To edit an existing Mail Server configuration:
1. Log into the Administration Console as an PowerBroker Databases administrator.
2. Click the Admin tab.
3. Click the Mail Server tab.
4. On the Administer Mail Server Configuration screen, click the name of the Mail Server you want to edit. The Edit Mail Server screen opens.
5. Edit the necessary information.
6. Select the status - Enabled or Disabled - from the Status list.
7. Click Save.
Removing Mail Server Configurations
To remove an existing Mail Server configuration:
1. Log into the Administration Console as an PowerBroker Databases administrator.
2. Click the Admin tab.
3. Click the Mail Server tab.
4. On the Administer Mail Server Configuration screen, click Remove next to the mail server you want to remove. PowerBroker Databases removes the mail server from the list.
Configuring E-mail Notifications
You must configure the mail server before you can configure e-mail notifications. You can send three types of e-mail notifications from PowerBroker Databases:
• System E-mail Notifications - notifications about server-based system problems, like "agent going down" or "network no longer working." You can have only one uniquely named system e-mail notification configuration. For example, auditdb operator.
• PowerBroker Databases E-mail Notification - notifications about collected data that are generated according to PowerBroker Databases policies and rules at collection time. You can have more than one PowerBroker Databases E-mail Notification configuration, each with a unique name. For example, one for each type of policy.
• DDL E-mail Notifications - real-time notifications about specified DDL operations.

Administering PowerBroker Databases
PBDB‐MA User Guide 38 © 2017. BeyondTrust Software, Inc.
For Oracle audit sources, you configure these notifications by installing the PowerBroker Databases Alerts Module when you add an Oracle audit source. For more information, see "(Oracle) Adding an Audit Source" on page 67.
For SQL Server, DB2 and Sybase audit sources, you configure these notifications on the Edit E-mail Notifications tab that opens from the audit source Summary screen. For more information, see "(SQL Server) Understanding the Summary Screen" on page 81.
Caution: Make sure that the recipient’s e-mail application does not filter PowerBroker Databases e-mail notifications as junk-mail or spam.
Configuring System E-mail Notifications
To configure System E-mail Notifications:
1. Log into the Administration Console as an PowerBroker Databases administrator.
2. Click the Admin tab.
3. Click the E-mail Notifications tab.
The Administer PowerBroker Databases E-mail Notification screen opens.
In this screen you can see one System E-mail Notification and a list of available PowerBroker Databases Notifications. The default name and recipient for the System E-mail Notification is auditdb operator.
Note: The list of PowerBroker Databases E-mail Notifications initially contains no data.
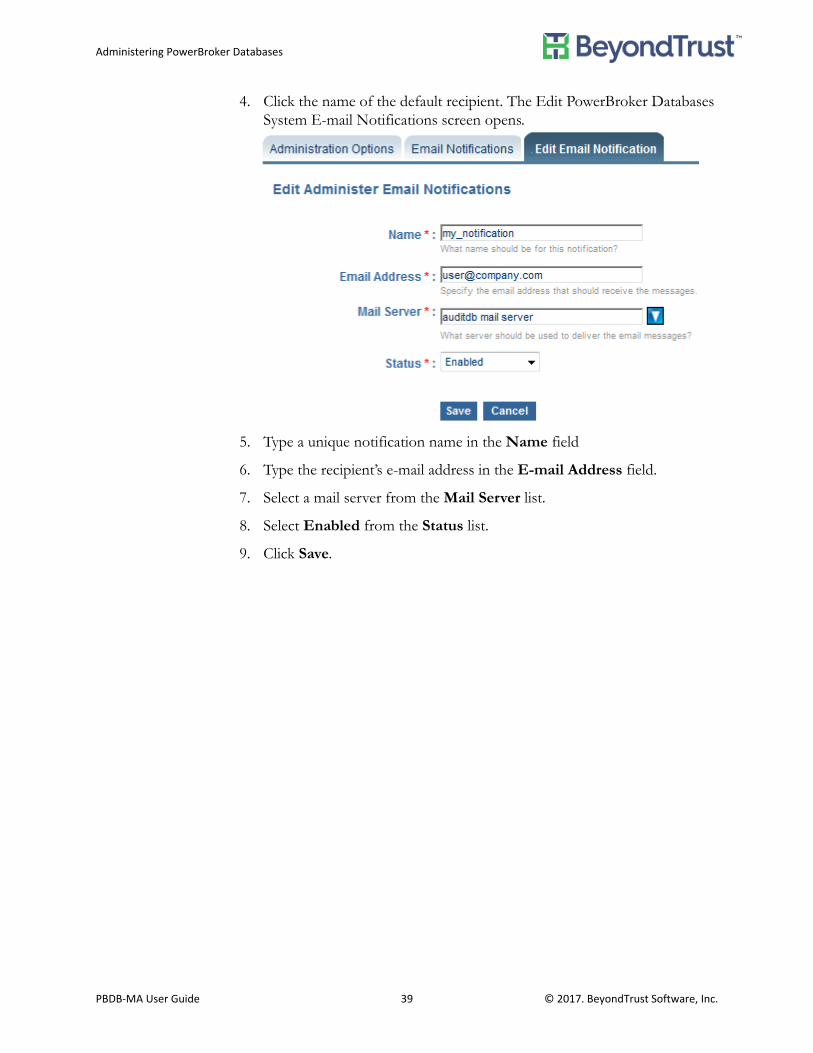
Administering PowerBroker Databases
PBDB‐MA User Guide 39 © 2017. BeyondTrust Software, Inc.
4. Click the name of the default recipient. The Edit PowerBroker Databases System E-mail Notifications screen opens.
5. Type a unique notification name in the Name field
6. Type the recipient’s e-mail address in the E-mail Address field.
7. Select a mail server from the Mail Server list.
8. Select Enabled from the Status list.
9. Click Save.

Administering PowerBroker Databases
PBDB‐MA User Guide 40 © 2017. BeyondTrust Software, Inc.
Adding New E-mail Notifications
To add a new PowerBroker Databases E-mail Notification:
1. Log into the Administration Console as an PowerBroker Databases administrator.
2. Click the Admin tab.
3. Click the E-mail Notifications tab.
4. On the Administer PowerBroker Databases System E-mail Notification screen, click Add New Notification. The Add PowerBroker Databases E-mail Notification screen opens.
5. Type a unique notification name in the Name field
6. Type the recipient’s e-mail address in the E-mail Address field.
7. Select a mail server from the Mail Server list.
8. Click Add Notification.
Modifying E-mail Notifications
To edit an existing PowerBroker Databases E-mail Notification:
1. Log into the Administration Console as an PowerBroker Databases administrator.
2. Click the Admin tab.
3. Click the E-mail Notifications tab.
4. On the Administer PowerBroker Databases E-mail Notification screen, click the name of the notification you want to edit. The Edit Administer PowerBroker Databases E-mail Notification screen opens.
5. Edit the necessary information.

Administering PowerBroker Databases
PBDB‐MA User Guide 41 © 2017. BeyondTrust Software, Inc.
6. Select the status - Enabled or Disabled - from the Status list.
7. Click Save.
Generating a Support Report
You use the Generate Support Report tab to generate a .CSV file that contains the following information:
• Audit source name • Audit source type (log reading or network capture)• Database server instance• Host name• Clustered? (clustered or nonclustered)• Operating system (OS) platform• Operating system version• Database management system (DBMS) platform• Database management system version• Central processing unit (CPU) count
BeyondTrust Support may request this file for support and license auditing purposes.
To generate a Support Report, complete the following steps:
1. Log into the Administration Console as an PowerBroker Databases administrator.
2. Click the Admin tab.
3. On the Admin tab, click the Generate Support Report tab.
4. Enter your company name in the Customer Name field.
5. (Optional) If you are generating the report for BeyondTrust Support in regards to a specific issue, enter your Salesforce case number.
6. To send an e-mail that contains the generated support report to BeyondTrust Support:a. Check the Send the Report to check box. b. Ensure that [email protected] is selected.
Administering PowerBroker Databases
PBDB‐MA User Guide 42 © 2017. BeyondTrust Software, Inc.
c. Select a mail server from the menu.
7. Click Generate Report. PowerBroker Databases creates a CSV file and the file download dialog box appears. By default the file name is <customer name>- <Salesforce number or 0>- <timestamp>.CSV. If you are saving the file, you can modify the default file name. If you are sending the file to BeyondTrust Support, the file name is entered in as the subject of the e-mail and the file is sent as an attachment.
8. To view the file, click Open. Note that in order to view the file you must have software installed that can open .CSV files, for example, Microsoft Excel or OpenOffice Calc.
9. To save the file, click Save and select where you want to save the file.
Modifying the Administration Console Time-out
By default, the PowerBroker Databases Administration Console logs out the user after 20 minutes of inactivity. This time-out applies to both the main screen and pop-up windows used to select values. You can modify the time-out by editing the home.jsp file.
To modify the Administration Console time-out, complete the following steps:
1. Stop the Administration Console service.– Windows: Stop the Windows service that has the display name
Lumigent Admin Console
– Linux: net stop lmAuditDBGUI
2. Locate the home.jsp file in the following directory:
Windows
<installation directory>\BeyondTrust\PowerBroker Databases\AdminConsole\tomcat\webapps\eac\jsp\home.jsp
Linux
<installation directory>/BeyondTrust/AdminConsole/tomcat/webapps/eac/jsp/home.jsp
3. Make a backup copy of the original file and rename it, for example home_original.jsp.
4. Open the home.jsp file using a text editor.
5. Search for the string setTimeout('killUserSession() which appears twice in the following section of the file:<SCRIPT LANGUAGE="JavaScript">sessionTO = setTimeout('killUserSession()', 1200000);function killUserSession() {

Administering PowerBroker Databases
PBDB‐MA User Guide 43 © 2017. BeyondTrust Software, Inc.
document.location.href="/eac/logout.do?action=sessionTimeout";}
function resetTimeoutByPopup() {clearTimeout(sessionTO);sessionTO = setTimeout('killUserSession()', 1200000);}
<logic:empty name="token" scope="session">document.location.href="/eac/jsp/login.jsp?action=
sessionTimeout";</logic:empty></SCRIPT>
6. Modify the value of both setTimeout values, for example, to set the new value to 60 minutes, enter the following:setTimeout('killUserSession()', 3600000);
The default time-out value is set to 1200000 milliseconds, or 20 minutes. The following table shows sample values in both minutes and milliseconds.
7. Save the file.
8. Restart the PowerBroker Databases Administration Console service.– Windows: - Start the Windows servicethat has the display name
Lumigent Admin Console
– Linux: net start lmAuditDBGUI
Table 2. Sample values in minutes and milliseconds
Minutes Milliseconds
15 900000
30 1800000
45 2700000
60 3600000

Configuring Repositories
PBDB‐MA User Guide 44 © 2017. BeyondTrust Software, Inc.
Configuring RepositoriesBefore you start the auditing process, you need to configure your PowerBroker Databases environment using the Administration Console. All the configuration information that you enter in Administration Console is saved in the Central Configuration Database.
Creating a Repository is the first task in PowerBroker Databases workflow. When you add a new audit source, you need to specify a Repository for the collected data. That is why you should create a Repository before you add an audit source.
Note: Creating Repositories requires PowerBroker Databases Admin or DBA privileges. Editing existing Repositories requires PowerBroker Databases Admin or Auditor privileges.
Restriction:The number of Repositories you can create is limited by your license.
Publishing Collected Data
A Repository stores collected data. It consists of an offline portion and an online portion:
• The offline portion is a set of ECZ files - encrypted files containing collected data used to populate the Repository.
• The online portion is the Repository database - a set of SQL tables containing collected data, as well as metadata used by other PowerBroker Databases functions.
The Collection Agent transfers ECZ files to the computer hosting the Repository. As soon as an ECZ file is transferred, collected data is loaded into the Repository database and you can see it online.
To make collected data available to the PowerBroker Databases Report Server, you must publish the data after it has been loaded into the Repository. When you create a Repository, you specify a publishing schedule and data retention period for the Repository. The data retention period is the number of days that collected data should remain in the Repository after it has been loaded. When PowerBroker Databases begins auditing is automatically publishes data according to the specified schedule. At publishing time, data loaded since the last publish becomes available to the PowerBroker Databases Report Server and data that remained in the Repository longer than the specified retention period is purged.
You can also start publishing into a Repository immediately by clicking the Publish button on the Repository Summary page.
For an Oracle audit source you select a Repository on the database instance level. All data collected on a single Oracle audit source is stored in a single Repository.

Configuring Repositories
PBDB‐MA User Guide 45 © 2017. BeyondTrust Software, Inc.
For a Microsoft SQL Server audit source you select a Repository on the database level. Each database that belongs to the audit source can have its own Repository. Thus, data collected on a single SQL Server database may be stored in several Repositories.
A single Repository may store audit data from multiple audit sources, including a mixture of SQL Server, Oracle, DB2, and Sybase data. You may set up several Repositories to host data collected from different audit sources. Since reporting and viewing of collected data are done on a per-Repository basis, direct all data that you want to view in a single report to the same Repository.
(Oracle) Creating a Repository
Before creating a new Oracle Repository:
• Identify an Oracle instance to host the Repository. Make sure this instance has partitioning.
• Make sure that an PowerBroker Databases Agent is installed on the computer selected to host the Repository.
• Decide which tablespaces to use for storing the data and for temporary operations. The Add Repository screen displays a list of the tablespaces available for the selected database.
• Decide what user name to use for accessing the Repository tables. A user with this name will be created by the Add Repository process and this user name will be the name of the Oracle Schema containing the Repository tables. You will specify this user in the following procedure.
Caution: For Oracle RAC the Repository must be created on a non-clustered instance.
When you open the PowerBroker Databases Summary screen for the first time, it displays a message prompting you to create a Repository. Creating a Repository is the first step in the configuration process. If you already have one or more Repositories, you can still add more.

Configuring Repositories
PBDB‐MA User Guide 46 © 2017. BeyondTrust Software, Inc.
To create a new Oracle Repository:
1. Log into the Administration Console with Admin or DBA privileges.
2. Click the Configure tab. The PowerBroker Databases Summary screen opens.
3. In the Repositories (View All/Add) area, click Add. The Create Repository screen opens. This screen is divided into three areas. The third

Configuring Repositories
PBDB‐MA User Guide 47 © 2017. BeyondTrust Software, Inc.
area is initially disabled. Fill in information in the first two areas and click Login to enable input fields in the third area.
4. In the first two areas of the screen provide the following information:a. Select Oracle from the Database Type list.b. Type the name that will uniquely identify the Repository to
PowerBroker Databases in the Repository Name field.Caution: Repository names cannot begin with a number.
Configuring Repositories
PBDB‐MA User Guide 48 © 2017. BeyondTrust Software, Inc.
c. Select the PowerBroker Databases Agent that is installed and running on the computer hosting the repository database from the Agent Name drop-down list. This list includes all the agents controlled by the CCDB.
d. Type the network service name for the Oracle instance hosting the new Repository schema in the Service Name field. This should be the same name as in the tnsnames.ora file.
e. Type the username with DBA privileges in the Username field. This user will run the scripts that create a repository user and the repository schema.
f. Type the password for the specified username in the Password field.
5. Click Login. The Add Repository screen refreshes, changing the input fields in the first two areas to read only and enabling the input fields in the third area.
6. In the third area of the screen provide the following information:a. Type the name to be created for the user who will own the new
Repository tables and access them for auditing in the Repository Username field. You were asked to decide what username to use here before creating the Repository. This username will also be the name of the Oracle Schema containing the repository tables.
b. Type the password for the Repository Username in the New Password and Verify Password fields.
c. Select the tablespaces to use for storing the tables and for temporary operations from the Default Tablespace and Temporary Tablespace lists.
d. Select the units (days, months, etc.) for how often you want to publish from the Publish Every list. Then specify the number of units in the Publish Every field and type the date and time when to start publishing data in the Start Publishing field. These fields specify how often to transfer loaded data from unpublished tables into published tables in the Repository. Collected data becomes available to the PowerBroker Databases Report Server only after it has been published.
e. Type the number of days the audit data will remain available in your on-line Repository for viewing and reporting in the Data Retention Period. Use this option to manage the size of the Repository by removing old records. If you set Data Retention Period to 0, all data will remain in the Repository forever and eventually you will run out of space.Note: Data is purged if it was PUBLISHED at least 24 hours *retain
days ago.
7. Click Create Repository. The View All Repositories screen opens. The new Repository appears in the table listing all repositories. Initially the

Configuring Repositories
PBDB‐MA User Guide 49 © 2017. BeyondTrust Software, Inc.
Status is uninitialized and the value of # Audit Sources for the new Repository is 0, since no audit source has been assigned to this Repository yet.
To open the Repository Summary screen:
1. Click the name of the Repository.
(SQL Server) Creating a Repository
Before creating a new Microsoft SQL Server Repository you need to:
• Identify a Microsoft SQL Server Instance to host the Repository.• Make sure that an PowerBroker Databases Agent is installed on the
computer selected to host the Repository.• Select which SQL Server user will own the Repository tables and access
the Repository during auditing. This user must exist before you add a new Repository. You will specify this user in the following procedure.
Warning: When auditing Microsoft Cluster Service (MSCS) clusters, the Repository must be created on a non-clustered computer.
To create a new Microsoft SQL Server Repository:
1. Log into the Administration Console with Admin or DBA privileges.
2. Click the Configure tab. The PowerBroker Databases Summary screen opens.
When you open the PowerBroker Databases Summary screen for the first time, you are prompted to create a Repository. Creating a Repository is the first step in the configuration process. If you already have one or more repositories, you can still add more.
Tip: Repository Configuration Settings
In the Repository Summary screen you can edit Repository configuration settings. For more information, see "Editing Repository Settings" on page 52.
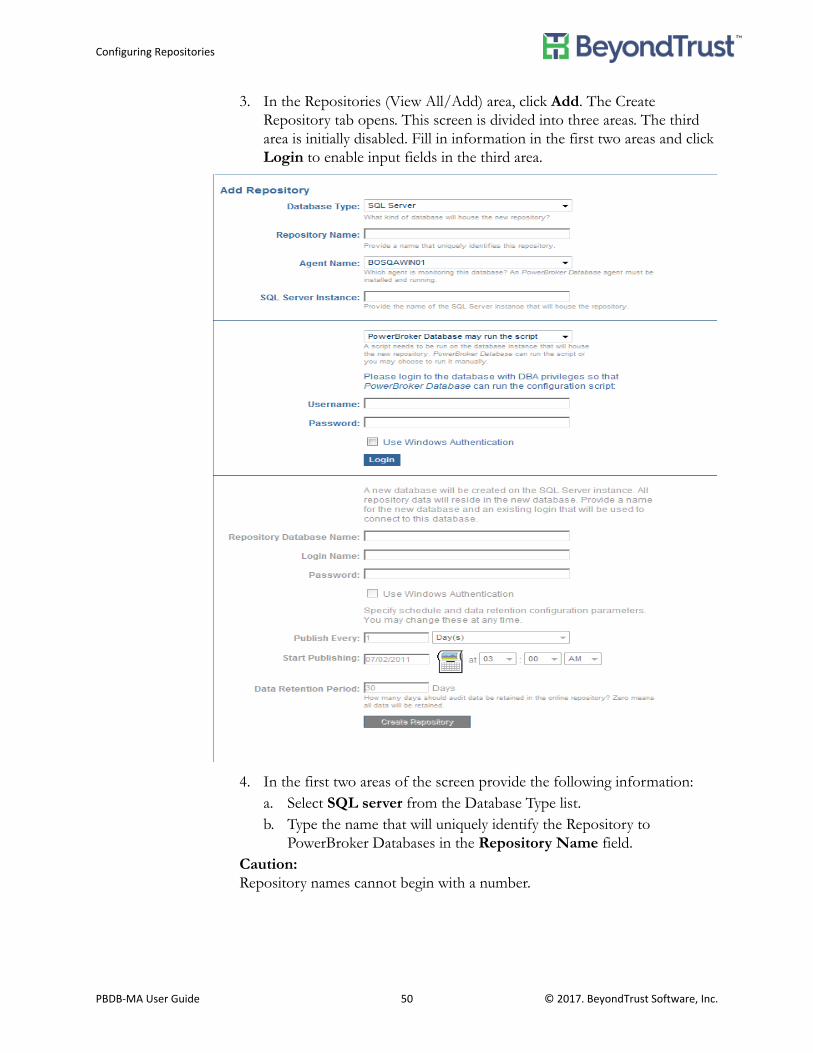
Configuring Repositories
PBDB‐MA User Guide 50 © 2017. BeyondTrust Software, Inc.
3. In the Repositories (View All/Add) area, click Add. The Create Repository tab opens. This screen is divided into three areas. The third area is initially disabled. Fill in information in the first two areas and click Login to enable input fields in the third area.
4. In the first two areas of the screen provide the following information:a. Select SQL server from the Database Type list.b. Type the name that will uniquely identify the Repository to
PowerBroker Databases in the Repository Name field. Caution: Repository names cannot begin with a number.

Configuring Repositories
PBDB‐MA User Guide 51 © 2017. BeyondTrust Software, Inc.
c. Select the PowerBroker Databases Agent that is installed and running on the computer hosting the repository database from the Agent Name drop-down list. This list includes all the agents controlled by the CCDB.
d. Type the network service name for the database instance that will house the new Repository in the SQL Server Instance field.
e. Type the username in the Username field. This user must have privileges to run the script that creates the new Repository database.
f. Type the password for the specified username in the Password field.
5. Click Login. The Add Repository screen refreshes, changing the input fields in the first two areas to read only and enabling the input fields in the third area.
6. In the third area of the screen, provide the following information:a. Type the name of the SQL Server database in the Repository
Database Name field. This database will be created in the SQL Server instance to hold the Repository tables.
b. Type the name of an existing SQL Server user in the Login Name field. This name will be used to connect to this Repository. You were asked to select this user before creating the Repository.
c. Type the password for the specified login name in the Password field. d. Select the units (days, months, etc.) for how often you want to publish
from the Publish Every list, specify the number of units in the Publish Every field, and type the date and time when to start publishing data in the Start Publishing field. Collected data becomes available to the PowerBroker Databases Report Server only after it has been published.
e. Type the number of days the audit data will remain available in your on-line Repository for viewing and reporting in the Data Retention Period. Use this option to manage the size of the Repository by removing old records. If you set Data Retention Period to 0, all data will remain in the Repository forever and eventually you will run out of space.
Note: Data is purged according to transaction timestamp (lumActivities.Time). The alorithm is as follows:
1. Find the minimum activityID for data that is not older than 24 hours * Retain Days from now.
2. Delete all data with a lower activityID #.Since the first 10 digits of activityID is the load number which is increases sequentially in order of load time and SQL Server data is collected in reverse chronological order, there is almost ALWAYS some data older than Retain Days but purged because some lower numbered transaction exists that is not supposed to be purged.

Configuring Repositories
PBDB‐MA User Guide 52 © 2017. BeyondTrust Software, Inc.
3. Click Create Repository. The View All Repositories screen opens. The new Repository appears in the table listing all repositories. The View All Repositories screen opens. The new Repository appears in the table listing all repositories. Initially the Status is uninitialized and the value of # Audit Sources for the new Repository is 0, since no audit source has been assigned to this Repository yet.
To open the Repository Summary screen:
1. Click the name of the Repository.
Editing Repository Settings
To edit Repository settings:
1. Log into the Administration Console with Admin or Auditor privileges.
2. Click the Configure tab. The PowerBroker Databases Summary screen opens.
3. In the Repositories (View All/Add) area, click View All. The list of all Repositories is displayed.
4. Click the name of the Repository to be configured. The Repository Summary screen opens.
– To start publishing into this Repository immediately, click Publish.– To delete the Repository, click Delete This Repository. For
instructions, see "Removing a Repository" on page 54.
Tip: Repository Configuration Settings
In the Repository Summary screen you can edit Repository configuration settings. For more information, see "Editing Repository Settings" on page 52.
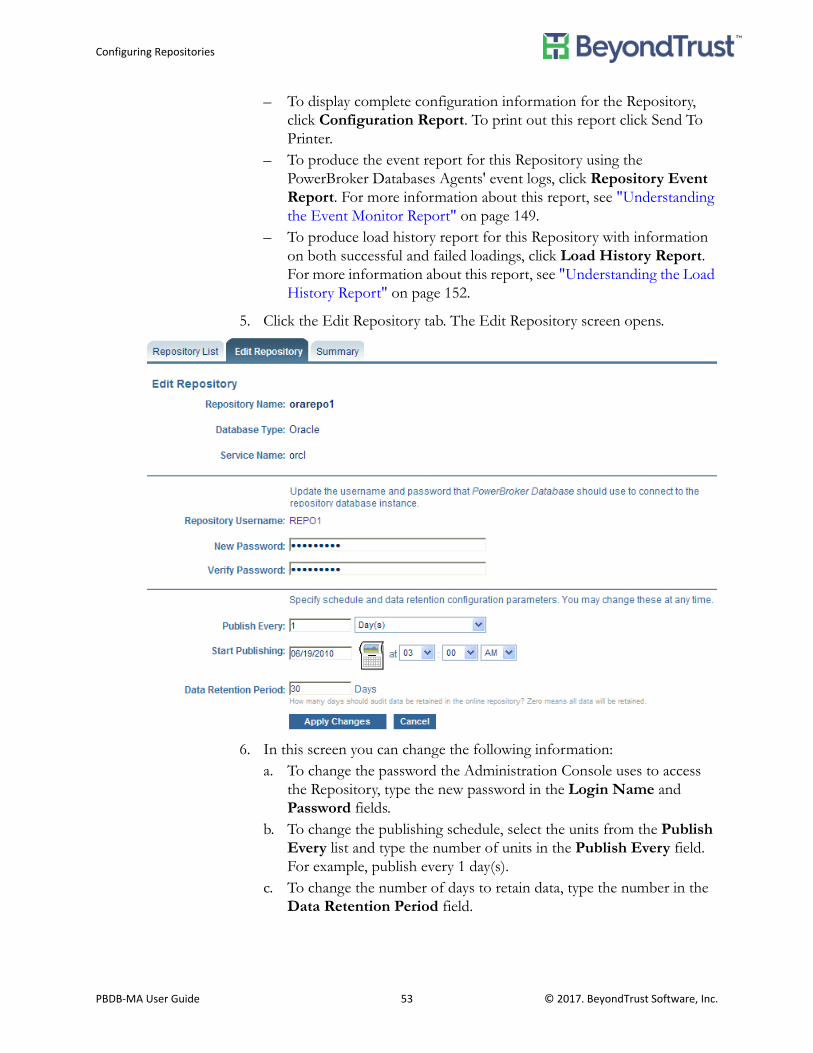
Configuring Repositories
PBDB‐MA User Guide 53 © 2017. BeyondTrust Software, Inc.
– To display complete configuration information for the Repository, click Configuration Report. To print out this report click Send To Printer.
– To produce the event report for this Repository using the PowerBroker Databases Agents' event logs, click Repository Event Report. For more information about this report, see "Understanding the Event Monitor Report" on page 149.
– To produce load history report for this Repository with information on both successful and failed loadings, click Load History Report. For more information about this report, see "Understanding the Load History Report" on page 152.
5. Click the Edit Repository tab. The Edit Repository screen opens.
6. In this screen you can change the following information:a. To change the password the Administration Console uses to access
the Repository, type the new password in the Login Name and Password fields.
b. To change the publishing schedule, select the units from the Publish Every list and type the number of units in the Publish Every field. For example, publish every 1 day(s).
c. To change the number of days to retain data, type the number in the Data Retention Period field.
Configuring Repositories
PBDB‐MA User Guide 54 © 2017. BeyondTrust Software, Inc.
Note: The Data Retention Period is based on the time the data was loaded into the Repository, and not on the time the events occurred. So, if you audit data from 90 days ago and load it into your repository with the Retention Period of 30 days, it will stay in the repository for 30 days after it was loaded.
7. Click Apply Changes.
(SQL Server) Moving a Repository to a New Computer
Warning: If you want to move an existing SQL Server PowerBroker Databases Repository to new computer, you must keep all the data in the back up Repository database on the existing server and restore on the new server.
To move the SQL Server PowerBroker Databases repository to a new computer:
1. Keep all the data in the Repository database on the existing server and restore on a new computer server, using SQL Management studio.
2. Install the PowerBroker Databases Agent on the new server. For instructions, refer to the PowerBroker Databases Installation Guide.
3. Install the Administration Console on the new server. In the Administration Console:a. Create a new repository for the new server.b. Edit each audit source to use the new repository instead of the old
one.c. Delete the old repository.
4. Uninstall the PowerBroker Databases Agent from the old server.
5. Run a collection and publish to make sure everything is working.
Removing a Repository
To remove a Repository:
1. Log into the Administration Console with Admin, DBA, or Auditor privileges.
2. Click the Configure tab. The PowerBroker Databases Summary screen opens.
3. In the Repositories (View All/Add) area click View All. The list of all Repositories is displayed.
4. Click the name of the Repository you want to delete. The Repository Summary screen opens.

Configuring Repositories
PBDB‐MA User Guide 55 © 2017. BeyondTrust Software, Inc.
5. Click Delete This Repository. The Delete Repository screen opens.
6. Select the type of delete you want:– Delete all collected audit data within this repository to delete all data
in the Repository.If you select this option, the Username and Password fields are displayed. Provide your username and password.
– Retain collected audit data within this repository to delete the link from Administration Console to the Repository, but will not delete the actual data.Username and password are not required.
7. Click Apply Changes.
Configuring Audit Sources
PBDB‐MA User Guide 56 © 2017. BeyondTrust Software, Inc.
Configuring Audit Sources
Adding an audit source is the second step in the PowerBroker Databases workflow. As soon as you have created an PowerBroker Databases Repository, you can add audit sources to your PowerBroker Databases environment.
All the configuration information that you enter in PowerBroker Databases Administration Console is saved in the Central Configuration Database.
Note: Adding audit sources requires PowerBroker Databases Admin privileges. Editing existing audit sources requires PowerBroker Databases Admin or Auditor privileges.
PowerBroker Databases can audit DB2, Oracle, and SQL Server databases and store the audited information in a single Oracle or SQL Server Repository.
DB2 Audit Sources
(DB2) Audit Source Prerequisites
Before adding a new DB2 audit source:
• Make sure that the DB2 utility program db2audit is started. The Collection Agent must have Execute permission to this utility.
• For UNIX, the Collection Agent must have Read permissions to the archive data logs and the db2archive.log file.– For DB2 8.x, type chmod g+r db2audit.log in the following
directory:<DB2 home>/sqllib/security
– For DB2 9.5 and DB2 9.7, Type chmod g+r db2audit.* in the following directory:<DB2 home>/sqllib/security/auditdata
• For UNIX, to collect DML, a database must be configured to archive transaction logs. For PowerBroker Databases to audit this data, you need to grant Read/Write access to the DB2 administration group.
Type chmod g+w in the directory containing the archived transaction log files - typically: <archive directory>/<DB2 instance name>/<database name>/NODE0000/C0000000.
• Make sure a back up has been performed on the database to be audited. Copy the name of the directory where the archive log files are stored. The input field used for entering the backup directory does not allow browsing; copying and pasting this location prevents typing mistakes.
• Select a DB user that will manage the collection process. This user must exist before you create the audit source and must have privileges to access the audited database.

Configuring Audit Sources
PBDB‐MA User Guide 57 © 2017. BeyondTrust Software, Inc.
Note: For DB2 9.5 and DB2 9.7, this user must have the SECADM privilege. Note that in versions 9.5 and 9.7 you must specifically grant this privilege to your user. The SYSADM user no longer has this permission.
(DB2) Adding an Audit Source
To add a new DB2 audit source:
1. Log into the Administration Console with Admin privileges.
2. Click the Configure tab. The PowerBroker Databases Summary screen opens.
3. In the Audited DBMSs (Add) area, click Add. The Add Audit Source screen opens. This screen is divided into three areas. The third area is initially disabled. Fill in information in the first two areas to enable input fields in the third area.

Configuring Audit Sources
PBDB‐MA User Guide 58 © 2017. BeyondTrust Software, Inc.
4. In the first two areas provide the following information:a. In the Audit Source Name field, type a name that uniquely identifies
the audit source to PowerBroker DatabasesWarning: Do not type a space after the audit source name as this can cause system errors.
b. From the Database Type list., select IBM DB2.c. From the Agent Name drop-down list, select the
PowerBroker Databases Agent that is monitoring the database. The list includes all the agents controlled by the CCDB. This agent must be installed and running on the computer hosting the database.
d. In the DB2 Instance field, type the name of the DB2 instance for the database to be audited.
e. In the Username field, type the user name for the DB2 instance. This user must have privileges to run the configuration script.
f. In the Password field, type the password for the specified user name.
5. Click Login. The Add Audit Source screen refreshes, changing the input fields in the first two areas to read only and enabling the input fields in the third area.
6. In the Collection Database Username field, type the user name that PowerBroker Databases should use to connect to the instance for collections. This user ID will manage data collection.
7. In the Password field, type the password for the collection user name.

Configuring Audit Sources
PBDB‐MA User Guide 59 © 2017. BeyondTrust Software, Inc.
8. Click Create Audit Source. The Edit Audit Source screen opens.
9. In the Edit Audit Source screen, you can modify the following information:a. In the OS Directory field, type the security directory.
For Windows, this is usually the <installation directory>\SQLLIB\<instance
name>\security directory.
For UNIX, this is usually the <installation directory>/<instance
name>/sqllib/security directory.
Note: The default Collection Agent is the PowerBroker Databases Agent installed on the audit source computer. Do not change the default. Remote auditing is not supported for DB2.
b. To specify a collection schedule, select the units from the Collect Every list and type the number of units in the Collect Every field.

Configuring Audit Sources
PBDB‐MA User Guide 60 © 2017. BeyondTrust Software, Inc.
c. To specify when to start the collection, type the date and time in the Start Collection field.Note: PowerBroker Databases can also collect data on demand at
any time. For instructions, see "Starting Data Collection Immediately" on page 107.
10. Select databases for auditing:
a. In the Unaudited Databases list, highlight one or more databases. The list includes all unaudited databases available on this DB2 instance.
b. Click Configure Database For Auditing. The databases are added to the table below that contains Audited Database Names. To remove a database from the list, click Remove in the corresponding line.
c. In the Archive Log Directory field for each audited database, type the complete directory path for the archive log. Make sure to use the archive log directory here, not the live log directory.
d. Select the Repository for each audited database from the Repository list.
11. Click Apply Changes. The Audit Source Summary screen opens. For more information about this screen, see "(DB2) Understanding the Summary Screen" on page 61.
You can further configure your audit source by electing specific columns for auditing. For instructions, see "(DB2) Selecting Specific Columns for Auditing" on page 63.
Tip: DB2 Client Configuration
If the list of databases selected for auditing is not retrieved, make sure your DB2 Client/Server configuration meets the requirements. The DB2 Client does not support a lower version of DB2 Server. For example, DB2 8.2.x as Client supports DB2 9.x as a Server; however, DB2 9.x as a Client does not support DB2 8.2.x as a Server.
Tip: Copy & Paste Directory Name
Copy and paste the name of the directory where the archive log files are stored. The Archive Log Directory field does not allow browsing; copying and pasting the path prevents typing mistakes.
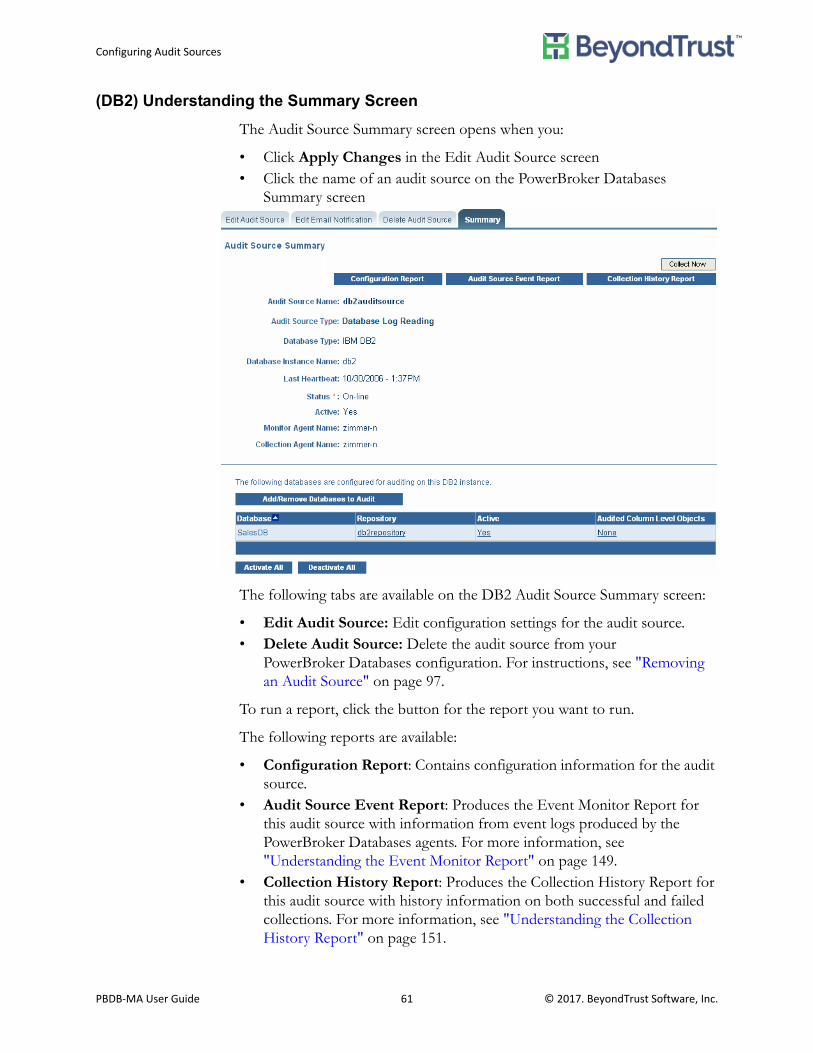
Configuring Audit Sources
PBDB‐MA User Guide 61 © 2017. BeyondTrust Software, Inc.
(DB2) Understanding the Summary Screen
The Audit Source Summary screen opens when you:
• Click Apply Changes in the Edit Audit Source screen• Click the name of an audit source on the PowerBroker Databases
Summary screen
The following tabs are available on the DB2 Audit Source Summary screen:
• Edit Audit Source: Edit configuration settings for the audit source. • Delete Audit Source: Delete the audit source from your
PowerBroker Databases configuration. For instructions, see "Removing an Audit Source" on page 97.
To run a report, click the button for the report you want to run.
The following reports are available:
• Configuration Report: Contains configuration information for the audit source.
• Audit Source Event Report: Produces the Event Monitor Report for this audit source with information from event logs produced by the PowerBroker Databases agents. For more information, see "Understanding the Event Monitor Report" on page 149.
• Collection History Report: Produces the Collection History Report for this audit source with history information on both successful and failed collections. For more information, see "Understanding the Collection History Report" on page 151.

Configuring Audit Sources
PBDB‐MA User Guide 62 © 2017. BeyondTrust Software, Inc.
In the list of audited databases, the following information is available to view for each audited database:
• Database: Name of the database to be audited. • Repository: Name of the Repository for the audited data from this
database. Click the name of a Repository in the list to open the Repository Summary screen.
• Active: Status of the database. Yes - active, No - deactivated. To change the status, click Yes or No. When you click Yes to deactivate, you are prompted that disabling this database will cause all DDL and DML auditing to cease until it is manually enabled.
Click Activate All or Deactivate All to activate/deactivate all databases in the list.
• Audited Objects: Number of objects selected for auditing. Click this number to open the Select Columns for Auditing screen. You can use this screen to select specific columns for auditing on Audited Objects and disregard the rest of the columns.
(DB2) Editing the List of Audited Databases
To edit the list of audited DB2 databases:
1. In the Audit Source Summary screen, click Add/Remove Databases To Audit. The list of Unaudited Databases available on this DB2 instance is displayed.
2. In the Unaudited Databases list, highlight one or more databases. The list includes all unaudited databases available on this DB2 instance.
3. Click Configure Database For Auditing. The selected names are added to the Audited Database Names.
To remove a database from the list, click Remove in the corresponding line.

Configuring Audit Sources
PBDB‐MA User Guide 63 © 2017. BeyondTrust Software, Inc.
4. In the Archive Log Directory field for each audited database, type the complete directory path for the archive log. Make sure to use the archive log directory here, not the live log directory.
5. Select the Repository for each audited database from the Repository list.
6. Click Apply Changes. The Audit Source Summary screen opens.
(DB2) Selecting Specific Columns for Auditing
You can specify objects that you want to audit in audit rules, such as tables or views. By default, a rule applies to all columns in selected objects.
To select specific columns for auditing in an object and disregard the rest of the columns:
1. On the Audit Source Summary screen, locate the list of databases configured for auditing on this DB2 Instance.
2. Under Audited Column Level Objects, click the number of audited columns. The Select Columns for Auditing screen opens. The default value in this column is None. None means that no specific columns have been selected for auditing on this database; therefore, all the columns will be audited.
3. Click Choose Additional Objects For Column Selection. The Select Columns For Auditing (Choose Tables/Objects) screen opens.
4. Check the Tables check box to search for tables, or the Views check box to search for views.
To search for both, tables and views, check both check boxes.
5. Optionally, specify search criteria for object names in the Object Named field.
6. Click Search. The first (up to) 250 objects are displayed.
7. Check the objects to audit. You may use the Check/Uncheck All objects button at the bottom of the screen.
8. Click Save. The list of objects selected for auditing is displayed.
9. To select specific columns in an object for auditing:a. Click All under Columns. The Select Columns for Auditing (Choose
Columns) screen opens. b. To audit all columns, select All columns.
Tip: Copy & Paste Directory Name
Copy and paste the name of the directory where the archive log files are stored. The Archive Log Directory field does not allow browsing; copying and pasting the path prevents typing mistakes.

Configuring Audit Sources
PBDB‐MA User Guide 64 © 2017. BeyondTrust Software, Inc.
c. To audit specific columns, select Just these selected columns, and check the columns to audit.
d. Click Save. The list of selected columns is displayed.
10. To remove an object from the list in the Select Columns for Auditing screen, check the box next to the object, then click Remove Select.
To select/deselect all columns in the list, use the Select All/Deselect All button.
11. Click Apply Changes.Note: You can not select objects for auditing in the Audit Source Summary
screen. Objects for auditing are selected in audit rules. You can only select specific columns for auditing.
(DB2) Selecting a Set of Key Columns in an Object
Selecting key columns in an object is very useful for reporting. In reports, it allows you to show the key columns for a row that has been modified in addition to showing the modified columns.
For example, you have a table called "Employees" that contains the following columns - Name, Social Security Number (SSN), Address, Salary. When the Salary column is modified, if no key columns are selected, the report will only show the modified salary. However, if Name and SSN are selected as key columns, the report will show the employee name, SSN and the modified salary.
To select key columns:
1. On the Audit Source Summary screen, locate the list of databases configured for auditing on this DB2 Instance.
2. In the Audited Objects column, click the number of audited objects for a database. The list of objects selected for auditing is displayed.
3. Click the number in the Key column. The list of available columns is displayed.
4. Select the key columns.
5. Click Save.
(DB2) DDL Collection with DB2 Versions 9.5 and 9.7
DB2 versions 9.5 and 9.7 introduced changes to the security audit facility that serves as the source for PowerBroker Databases DDL data. This section describes how to configure DB2 versions 9.5 and 9.7 so that PowerBroker Databases can perform DDL collections. Configuring DB2 versions 9.5 and 9.7 for DDL collection consists of the following tasks:

Configuring Audit Sources
PBDB‐MA User Guide 65 © 2017. BeyondTrust Software, Inc.
1. Grant security permissions.
2. Create a DB2 audit policy.
3. Assign the DB2 audit policy to an object.
For additional information about the DB2 audit facility, refer to the IBM DB2 Information Center.
(DB2) Grant Security Permissions for DDL Collections
With versions 9.5 and 9.7, a DB2 user must be granted the SECADM privilege in order to manage the audit facility. The SYSADM user no longer has this permission. Because a user cannot grant this permission to themselves, it may be necessary to create a separate Security Administrator user to manage the audit facility.
To grant SECADM to a user, use the following commands:
CONNECT TO <audited database> USER <user name>GRANT SECADM ON <audited database> TO USER <different
user name>CONNECT RESET
(DB2) Create a DB2 Audit Policy for DDL Collections
You must create a DB2 audit policy that describes the data you wish to capture.
Connect to the database as a user with the SECADM privilege and create a DB2 audit policy to capture all database activity. Follow the syntax as described in the IBM DB2 Information Center page for the CREATE AUDIT POLICY statement. For example,
CREATE AUDIT POLICY <policy name>CATEGORIES EXECUTE WITH DATA STATUS BOTH,
AUDIT STATUS BOTH,CHECKING STATUS BOTH,OBJMAINT STATUS BOTH,SECMAINT STATUS BOTH,SYSADMIN STATUS BOTH,VALIDATE STATUS BOTH,
ERROR TYPE NORMAL;COMMIT;
Note: If you do not explicitly set the status of a category, DB2 sets the status to NONE. In order for PowerBroker Databases to be able to collect all DDL statements, you must set the status of both CHECKING and OBJMAINT to BOTH. For example, if you set the status of CHECKING to NONE and OBJMAINT to BOTH, you cannot collect ALTER_TABLE statements.

Configuring Audit Sources
PBDB‐MA User Guide 66 © 2017. BeyondTrust Software, Inc.
Warning: Enabling the CONTEXT category can have a performance impact on the DB2 instance.
(DB2) Assigning the DB2 Audit Policy to an Object
You must assign the DB2 audit policy to a database object. The following command assigns a policy to the currently connected database:
AUDIT DATABASE USING POLICY <policy name>
After you have assigned the audit policy to the database, the DB2 audit facility will begin to capture activity in the online security audit log. Activity that has been captured by the DB2 audit policy can be archived to offline log files, which the PowerBroker Databases Collector can scan for audit events.
Oracle Audit Sources
(Oracle) Audit Source Prerequisites
Before adding a new Oracle audit source you need to decide:
• Which tablespaces to use for storing audited information and for temporary operations. PowerBroker Databases provides a list of tablespaces in the Edit Audit Source screen.Note: PowerBroker Databases will need this tablespace to create a user
to connect to the instance.• What user name to use for accessing the audited information and
managing the collection process. PowerBroker Databases will create a user with this name during the Add Audit Source process.
• Whether you want to collect SELECT statements against this audit source. To collect SELECT statements you need to create the audit source using the SYS or SYSTEM account.
• For audit source on Oracle 12C, sys user account is required to create collect user and to grant XStream admin privileges to collect user.
• Prepare Oracle 12C database for audit source by extracting the dictionary to archive logfile. Auditing will be started from the oldest archived log file with redo dictionary extracted in it. To extract redo dictionary, execute this query as sys user exec dbms_logmnr_d.build(options=>
dbms_logmnr_d.store_in_redo_logs);
• Archive logs should be available in oracle recovery destination. Verify the existence of logfiles by executing RMAN commands. RMAN crosscheck archivelog all;

Configuring Audit Sources
PBDB‐MA User Guide 67 © 2017. BeyondTrust Software, Inc.
(Oracle) Adding an Audit Source
To add a new Oracle audit source:
1. Log into the Administration Console with Admin privileges.
2. Click the Configure tab. The PowerBroker Databases Summary screen opens.
3. In the Audited DBMSs (Add) area, click Add. The Add Audit Source screen opens. This screen is divided into three areas. The third area is initially disabled. Fill in information in the first two areas to enable input fields in the third area.
4. In the first two areas of the screen provide the following information:a. In the Audit Source Name field, type a name that uniquely identifies
the audit source to PowerBroker Databases.
Warning: Do not type a space after the audit source name, as this can cause system errors.
b. From the Database Type list, select Oracle.

Configuring Audit Sources
PBDB‐MA User Guide 68 © 2017. BeyondTrust Software, Inc.
c. In the Monitor Agent Name field, select the name of the PowerBroker Databases Agent. The list contains the names of all available agents.Note: If the audit source is a cluster (part of Oracle RAC), the Agent
Name should be the name of the computer where the Collection Agent is running including the domain name.
d. If the audit source is an Oracle Real Application Cluster, select Yes, this is a cluster (RAC) in the Oracle RAC field.
e. In the Service Name field, type the Oracle Service name for the audited Oracle instance. This typically is the same name as in the tnsnames.ora file.
f. In the Username field, type a database user name. This user must have privileges to run the configuration script. Note: To enable auditing of Oracle SELECT statements, you must
log in as SYS or SYSTEM. Only these accounts have the privileges to run the script enabling Oracle select-auditing.
g. In the Password field, type the password for the specified user name.
5. Click Login. The Add Audit Source screen refreshes, changing the input fields in the first two areas to read only and enabling the input fields in the third area.
6. In the third area of the screen, provide the following information:a. In the PowerBroker Databases Agent Username field, type a new
user name.b. In the New Password and Verify Password fields, type a password.
PowerBroker Databases will create a user with this name and password and the PowerBroker Databases Agent will use this user name to log into the audited database to collect data.
c. In the Default Tablespaces list, select the tablespaces to use for storing audited information.
d. In the Temporary Tablespaces list, select the tablespaces to use for temporary operations.
e. To collect more detailed information about audited events, select Enable Supplemental Auditing. Oracle supplemental logging enables PowerBroker Databases to better handle auditing of certain types of data, such as chained rows and clustered tables. It will also enable the identification key logging feature, which allows PowerBroker Databases to collect the primary or unique column key data for updates done to tables with primary and/or unique keys.Note: Supplemental logging is required for Oracle 10g, highly
recommended for Oracle 9i, and not available for Oracle 8i.
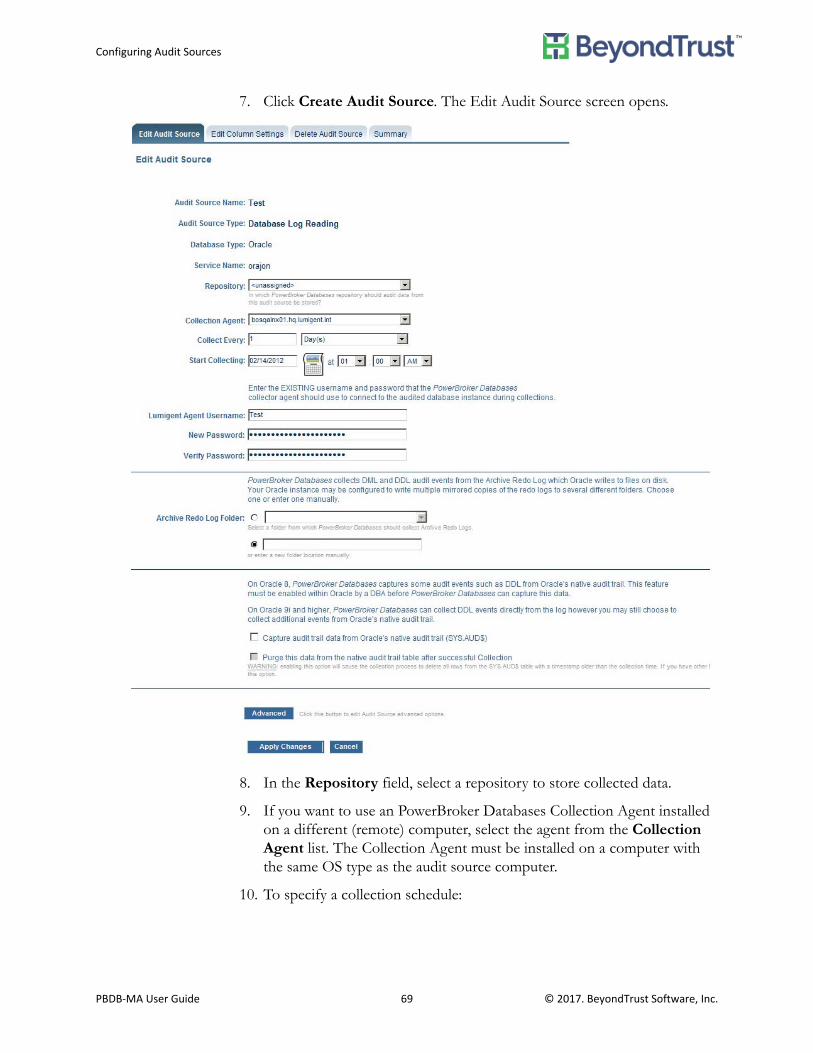
Configuring Audit Sources
PBDB‐MA User Guide 69 © 2017. BeyondTrust Software, Inc.
7. Click Create Audit Source. The Edit Audit Source screen opens.
8. In the Repository field, select a repository to store collected data.
9. If you want to use an PowerBroker Databases Collection Agent installed on a different (remote) computer, select the agent from the Collection Agent list. The Collection Agent must be installed on a computer with the same OS type as the audit source computer.
10. To specify a collection schedule:

Configuring Audit Sources
PBDB‐MA User Guide 70 © 2017. BeyondTrust Software, Inc.
a. Select the units from the Collect Every list and type the number of units in the Collect Every field.
b. Type the date and time in the Start Collection field.
11. To change the audit source DB user, type the user name in the PowerBroker Databases Agent Username field. The PowerBroker Databases Collection Agent will use this user name to connect to the audit source to collect data.Note: This must be an existing user; you cannot create a new user in this
screen.
12. To change the password, type the new password in the New Password and Verify Password fields.
13. In the Archive Redo Log Folder field, specify the path to the archive Redo Log files on the audit source. The specified path must be relative to the Collection Agent.Note: For an audit source on Oracle 12C, this field is not required.
Xstream APIs will read the archive log files from database recovery folder where archived log files are created.
14. To capture data from Oracle's native audit trail, select Capture audit trail data from Oracle's native audit trail (SYS.AUD$).
Note: Not applicable for audit source on Oracle 12C. Session information is captured without enabling audit trail.
15. To remove the captured data after a successful collection, select Purge this data from the native audit trail table after successful collection.Note: To purge data, sysdba must grant the delete privileges on sys.aud$
to the PowerBroker Databases Agent Username.
16. Click Apply Changes. The Audit Source Summary screen opens. For more information about this screen, see "(Oracle) Understanding the Summary Screen" on page 71.
You can further configure your audit source by selecting specific columns for auditing. For instructions, see "(Oracle) Selecting Specific Columns for Auditing" on page 72.

Configuring Audit Sources
PBDB‐MA User Guide 71 © 2017. BeyondTrust Software, Inc.
(Oracle) Understanding the Summary Screen
The Audit Source Summary screen opens when you:
• Click Apply Changes in the Edit Audit Source screen• Click the name of an audit source on the Audit Source Summary screen
Figure 2. Audit Source Summary Screen
The following tabs are available on the Audit Source Summary screen for Oracle audit sources:
• Edit Audit Source: Edit settings for the audit source. • Edit Column Settings: Select specific columns for auditing in Audited
Objects and disregard the rest of the columns. For instructions, see "(Oracle) Selecting Specific Columns for Auditing" on page 72..
• Delete Audit Source: Delete the audit source from your PowerBroker Databases configuration. For instructions, see "Removing an Audit Source" on page 97..
To run a report, click the button for the report you want to run.
The following reports are available:
• Configuration Report: Contains complete configuration information for the audit source.
• Audit Source Event Report: Produces the Event Monitor Report for this audit source with information from event logs produced by the PowerBroker Databases agents. For more information, see "Understanding the Event Monitor Report" on page 149.

Configuring Audit Sources
PBDB‐MA User Guide 72 © 2017. BeyondTrust Software, Inc.
• Collection History Report: Produces the Collection History Report for this audit source with history information on both successful and failed collections. For more information, see "Understanding the Collection History Report" on page 151.
To stop activity on the source database but keep the audit source in the PowerBroker Databases configuration:
• Click Deactivate This Audit Source.Note: On the deactivated audit source, this button changes to Activate
Audit Source.
(Oracle 12C) Configuring Include pre-filter for auditing
You should specify Oracle users and/or tables in include pre-filter for collections to work on Oracle 12C audit source. Include pre-filters to avoid enabling supplemental logging for all the tables in the database instance. By configuring include pre-filters, supplemental logging will be enabled only for filtered schema/objects.
See "(Oracle 12C) Pre-Filters for Auditing" on page 73 for configuring include pre-filters.
(Oracle) Selecting Specific Columns for Auditing
You can specify objects that you want to audit in audit rules, such as tables or views. By default, the rule applies to all columns in selected objects.
To select specific columns for auditing in an object and disregard the rest of the columns:
1. On the Audit Source Summary screen click the Edit Column Settings tab. The Select Columns for Auditing screen opens.
2. Click Choose Additional Tables for Column Selection. The Select Columns for Auditing (Choose Tables) screen opens.
3. In the Tables owned by drop-down list, select a user name.
4. In the Tables Named field, type the search criteria for the tables. PowerBroker Databases supports wildcard searches, for example, *user*.
5. Click Search. The first (up to) 250 tables are displayed.
6. Select tables from the list.
Use the Check/Uncheck All Items button to check/uncheck all tables.
7. Click Save. The Select Columns for Auditing screen opens.
8. To select specific columns for auditing:

Configuring Audit Sources
PBDB‐MA User Guide 73 © 2017. BeyondTrust Software, Inc.
a. Click All under Columns. The Select Columns for Auditing (Choose Columns) screen opens.
b. To audit all columns in the table, select the All columns radio button. c. To audit specific columns, select the Just selected columns radio
button and check the columns to audit. d. Click Save to return to the previous screen.
9. Click Apply Changes.
(Oracle 12C) Pre-Filters for Auditing
In Oracle 12C, you can specify pre-filters tables and users that you want to audit. Pre-filtering will improve the collection performance on Oracle 12C databases.
The precedence of Audit Source filters:
1. Exclude pre-filter
2. Include pre-filter
3. AuditDB Rule/Policies and column filtering
To enable exclude pre-filter, execute the following query on Collect User at Audited database.
insert into <Collect User>.PBDB_EXCLUDE_USERS (USERNAME, TABLENAME) values ('<SCHEMA NAME>' , '<TABLE NAME>');
To enable include pre-filter on non-container database, execute the following query on Collect User at Audited database.
insert into <Collect User>.PBDB_INCLUDE_USERS (USERNAME, TABLENAME) values ('<SCHEMA NAME>' , '<TABLE NAME>');

Configuring Audit Sources
PBDB‐MA User Guide 74 © 2017. BeyondTrust Software, Inc.
(Oracle RAC) Auditing Data on Oracle RAC
Please refer to the PowerBroker Databases Installation Guide for information on how to install PowerBroker Databases on Oracle RAC.
You can audit Oracle RAC in one of two ways:
• Install an PowerBroker Databases Collection Agent for each node of the cluster on a shared drive.
• Install one PowerBroker Databases Collection Agent on a non-clustered server and set up all nodes of the cluster so that this Collection Agent has Read access to the archived Redo Logs on each clustered node.
Note: The PowerBroker Databases CCDB, Administration Console, and Repository must reside on a non-clustered server.
(Oracle RAC) Audit Source Prerequisites
Before you begin configuring Oracle RAC for auditing
1. Determine the following information:– Oracle Network Service Name of your RAC.– Instance name of every clustered instance.– Path to the Archived Redo Log folder for each clustered instance.
This path should be relative to the Collection Agent.
2. Make sure that PowerBroker Databases is properly installed for auditing Oracle RAC:– PowerBroker Databases Central Configuration Agent must be
installed on a non-clustered server. – PowerBroker Databases Collection Agents must be installed either
locally (an PowerBroker Databases Collection Agent per each clustered node installed on a shared drive) or remotely (one PowerBroker Databases Collection Agent for the entire cluster installed on a non-clustered server).
– Oracle Networking must be set up to ensure that PowerBroker Databases Collection Agents can connect to audit sources. Typically this is done with the tnsnames.ora file.
– The PowerBroker Databases Collection Agent must have Read access to the Archive Redo Logs for all clustered nodes.
– The Administration Console must be installed on a computer that has connection to the CCDB.
3. Create a Repository on a non-clustered computer. For more information see "Configuring Repositories" on page 44.

Configuring Audit Sources
PBDB‐MA User Guide 75 © 2017. BeyondTrust Software, Inc.
(Oracle RAC) Configuring Oracle RAC for Auditing
To configure Oracle RAC for auditing:
1. Create a new audit source for a clustered node following instructions in "(Oracle) Adding an Audit Source" on page 67. Make sure to correctly specify the following information:a. In the Oracle RAC field, select Yes, this is a cluster (RAC) from
the drop-down list. b. In the Collection Host field, select the proper Collection Agent for
your cluster. If auditing locally, choose one of the agents that reside on the shared drive of the cluster. If auditing remotely, choose an agent that resides on a non-clustered server.
c. In the Service Name field, specify the Oracle Network Service Name of your RAC.
d. Check the Enable Supplement Auditing check box. Oracle supplemental logging enables PowerBroker Databases to better handle auditing of certain types of data, such as chained rows and clustered tables. It will also enable the identification key logging feature, which allows PowerBroker Databases to collect the primary or unique column key data for updates done to tables with primary and/or unique keys.Note: Supplemental logging is required for Oracle 10g, highly
recommended for Oracle 9i, and not available for Oracle 8i.
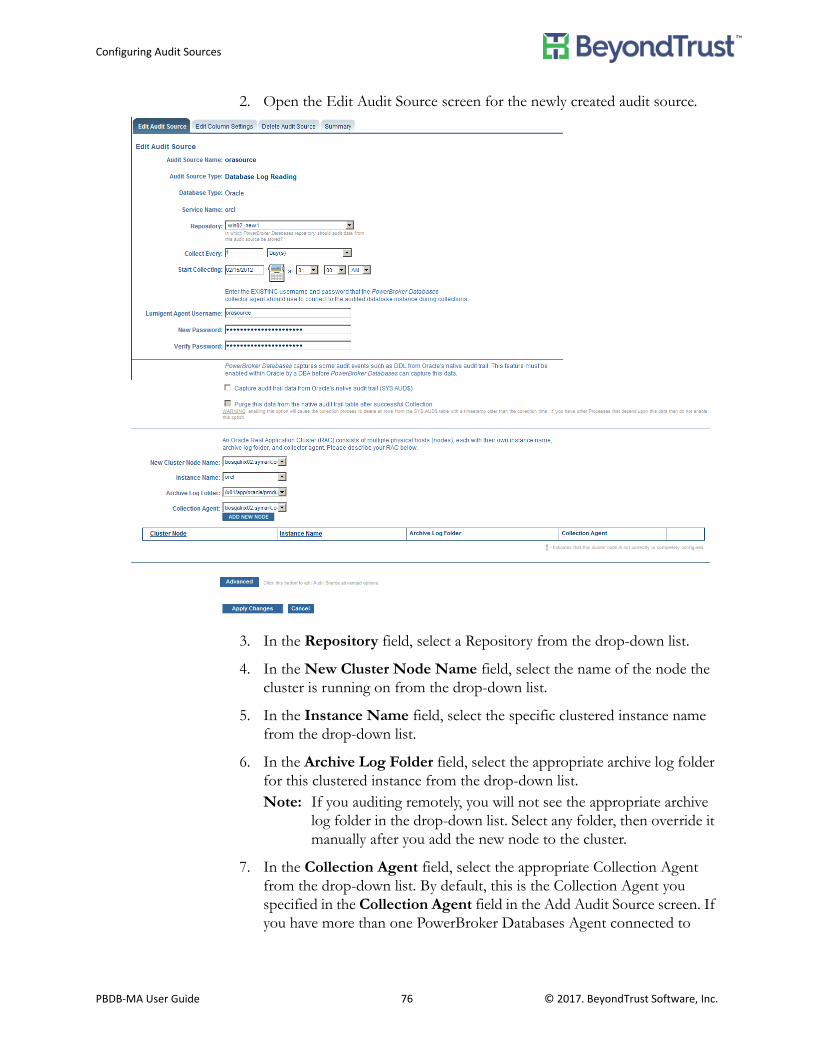
Configuring Audit Sources
PBDB‐MA User Guide 76 © 2017. BeyondTrust Software, Inc.
2. Open the Edit Audit Source screen for the newly created audit source.
3. In the Repository field, select a Repository from the drop-down list.
4. In the New Cluster Node Name field, select the name of the node the cluster is running on from the drop-down list.
5. In the Instance Name field, select the specific clustered instance name from the drop-down list.
6. In the Archive Log Folder field, select the appropriate archive log folder for this clustered instance from the drop-down list. Note: If you auditing remotely, you will not see the appropriate archive
log folder in the drop-down list. Select any folder, then override it manually after you add the new node to the cluster.
7. In the Collection Agent field, select the appropriate Collection Agent from the drop-down list. By default, this is the Collection Agent you specified in the Collection Agent field in the Add Audit Source screen. If you have more than one PowerBroker Databases Agent connected to
Configuring Audit Sources
PBDB‐MA User Guide 77 © 2017. BeyondTrust Software, Inc.
your CCDB, you may select a different agent from the drop-down list to use as the Collection Agent for this audit source.
8. Click Add New Node.
9. For remote auditing, specify the correct Archive Log Folder.
10. Repeat steps 4-9 for each node in the cluster.
SQL Server Audit Sources
Before adding a new Microsoft SQL Server audit source:
• Make sure an PowerBroker Databases Agent is installed on the computer hosting the audited database.
• Select a DB user that will manage the collection process. This user must exist before you create the audit source and must have privileges to access the audited database.
• Make sure that the audited database is in Full Recovery Mode. In Simple Recovery Mode, Data Modifications are not available and PowerBroker Databases cannot collect data.
• Make sure that regular backups are performed on the database to be audited. When scheduling backups, follow these guide lines:– backups and collections should not overlap.– if you perform at least one collection per week, keep a week’s worth of
transaction log backup files available to PowerBroker Databases before you move or delete them.
– when auditing multiple databases in one instance, create a separate backup folder for each database.
(SQL Server) Adding an Audit Source
To add a new Microsoft SQL Server audit source:
1. Log into the Administration Console with Admin privileges.
2. Click the Configure tab. The PowerBroker Databases Summary screen opens.
3. In the Audited DBMSs (Add) area, click Add. The Add Audit Source screen opens. This screen is divided into three areas. The third area is initially disabled. Fill in information in the first two areas to enable input fields in the third area.

Configuring Audit Sources
PBDB‐MA User Guide 78 © 2017. BeyondTrust Software, Inc.
Note: Use sys oracle user account to create Audit Source on Oracle 12C databases
4. In the first two areas provide the following information:a. In the Audit Source Name field, type a name that uniquely identifies
the audit source to PowerBroker Databases.Warning: Do not type a space after the audit source name, as this can cause system errors.
b. From the Database Type list, select SQL Server.c. In the Agent Name field, select the PowerBroker Databases Agent to
monitor the database. The list includes all the agents controlled by the CCDB. The agent you select must be installed and running on the computer hosting the database. Note: If auditing on MSCS clusters, the Agent Name must be the
DNS host name of the physical node where the database instance is currently running.
d. In the SQL Server Instance field, type the name of the SQL Server instance for the database to be audited.
e. In the Username field, type a user name with DBA privileges. This user will run the configuration script.

Configuring Audit Sources
PBDB‐MA User Guide 79 © 2017. BeyondTrust Software, Inc.
f. In the Password field, type the password for the specified user name.
5. Click Login. The Add Audit Source screen refreshes, changing the input fields in the first two areas to read only and enabling the input fields in the third area.
6. In the Collection Database Username field, type the user name for the user that will manage data collection. This must be an existing user name.
7. In the Password field, type the password.
8. Click Create Audit Source. The Edit Audit Source screen opens.
9. In the Edit Audit Source screen, you can edit the following information:a. To use an PowerBroker Databases Agent installed on a different
(remote) computer, select the agent from the Collection Agent list. The Collection Agent must be installed on a computer with the same

Configuring Audit Sources
PBDB‐MA User Guide 80 © 2017. BeyondTrust Software, Inc.
OS type as the audit source computer and have permissions to access the audited database.
b. To specify a collection schedule, select the units from the Collect Every list and type the number of units in the Collect Every field.
c. To specify when to start the collection, type the date and time in the Start Collection field.
d. To use a Collection Agent on a different computer than the audit source, clear the Use Default Agent Data Directory check box. The Agent Data Directory field appears. Specify the correct directory in the displayed Agent Data Directory field. The directory must be on a shared drive accessible by both computers. Note: For MSCS Clusters configuration, you have to override this
directory manually in the XML configuration file. For more information, see "(SQL Clusters) Configuring SQL Server Clusters for Auditing" on page 89..
10. Select databases for auditing:a. Highlight one or more databases in the Unaudited Databases list.
The list includes all unaudited databases available on this SQL Server instance.
b. Click Configure Database For Auditing. The databases are added to the table below that contains Audited Database Names. To remove a database from the list, click Remove in the corresponding line.
c. Type the complete directory for the backup log in the Backup Log Folder field for each audited database. The Backup Log Folder input field does not allow browsing. Copying and pasting the backup log folder location prevents typing mistakes.
d. Select the Repository for each audited database from the Repository list.
11. Click Apply Changes. The Audit Source Summary screen opens.
You can further configure your audit source by:
• Editing e-mail notifications. For instructions, see "(SQL Server) Editing E-mail Notifications" on page 85.
• Editing the list of audited databases. For instructions, see "(SQL Server) Editing the List of Audited Databases" on page 82.
Tip: Remote Auditing
For remote auditing, type the UNC path to each directory containing transaction log backup files for audited databases. This directory must be on a shared drive. Each UNC path starts with \\ followed by the virtual network name of the SQL Server Instance.
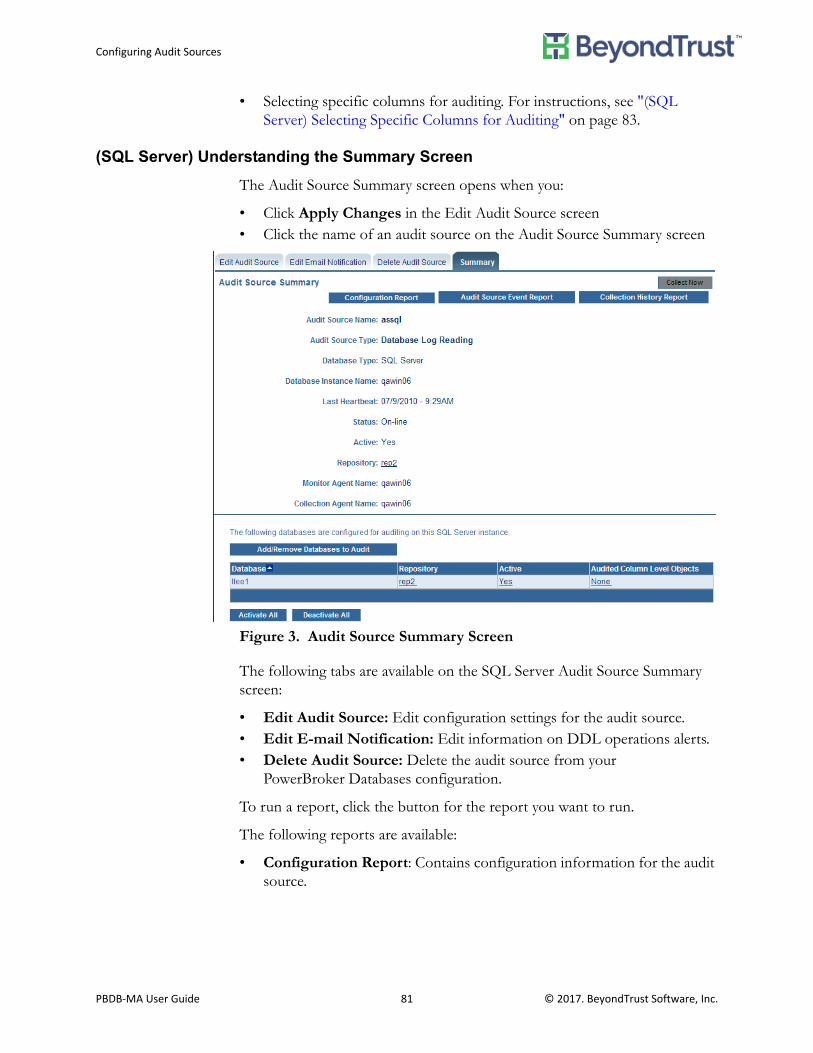
Configuring Audit Sources
PBDB‐MA User Guide 81 © 2017. BeyondTrust Software, Inc.
• Selecting specific columns for auditing. For instructions, see "(SQL Server) Selecting Specific Columns for Auditing" on page 83.
(SQL Server) Understanding the Summary Screen
The Audit Source Summary screen opens when you:
• Click Apply Changes in the Edit Audit Source screen• Click the name of an audit source on the Audit Source Summary screen
Figure 3. Audit Source Summary Screen
The following tabs are available on the SQL Server Audit Source Summary screen:
• Edit Audit Source: Edit configuration settings for the audit source. • Edit E-mail Notification: Edit information on DDL operations alerts. • Delete Audit Source: Delete the audit source from your
PowerBroker Databases configuration.
To run a report, click the button for the report you want to run.
The following reports are available:
• Configuration Report: Contains configuration information for the audit source.
Configuring Audit Sources
PBDB‐MA User Guide 82 © 2017. BeyondTrust Software, Inc.
• Audit Source Event Report: Produces the Event Monitor Report for this audit source with information from event logs produced by the PowerBroker Databases agents. For more information, see "Understanding the Event Monitor Report" on page 149.
• Collection History Report: Produces the Collection History Report for this audit source with history information on both successful and failed collections. For more information, see "Understanding the Collection History Report" on page 151.
In the list of audited databases, the following information is available to view for each audited database:
• Database: Name of the database to be audited. • Repository: Name of the Repository for the audited data from this
database. Click the name of a Repository in the list to open the Repository Summary screen.
• Active: Status of the database. Yes - active, No - deactivated.– To change the status, click Yes or No. When you click Yes to
deactivate, you are prompted that disabling this database will cause all DDL and DML auditing to cease until it is manually enabled.
– Click Activate All or Deactivate All to activate/deactivate all databases in the list.
• Audited Column Level Objects: Number of objects selected for auditing. Click this number to open the Select Columns for Auditing screen. You can use this screen to select specific columns for auditing on Audited Objects and disregard the rest of the columns. For more information, see "(SQL Server) Selecting Specific Columns for Auditing" on page 83.
(SQL Server) Editing the List of Audited Databases
To edit the list of SQL Server audited databases:
1. Click the Configure tab, then the audit source name, to open the Audit Source Summary screen.
2. Click Add/Remove Databases To Audit. The Edit Audit Source screen opens and displays the list of unaudited databases available on this SQL Server instance.
3. To add a database to the list:

Configuring Audit Sources
PBDB‐MA User Guide 83 © 2017. BeyondTrust Software, Inc.
a. In the Unaudited Databases field, select one or more databases you want to audit.
b. Click Configure Database for Auditing. The selected names are added to the table containing Audited Database Names.
c. Type the complete directory for the backup log in the Backup Log Folder field for each audited database. The Backup Log Folder input field does not allow browsing. Copying and pasting the backup log folder location prevents typing mistakes.
Note: For remote auditing, type the UNC path to each directory containing transaction log backup files for audited databases. This directory must be on a shared drive. Each UNC path starts with \\ followed by the virtual network name of the SQL Server instance.
d. Select a repository from the Repository drop-down list for each audited database.
e. To remove a database from the list, click Remove in the corresponding line.
4. Click Apply Changes.
(SQL Server) Selecting Specific Columns for Auditing
You can specify objects that you want to audit in audit rules, such as tables or views. By default, a rule applies to all columns in selected objects.
To select specific columns for auditing in an object and disregard the rest of the columns:
1. On the Audit Source Summary screen, locate the list of databases configured for auditing on this SQL Server Instance.
2. Under Audited Column Level Objects, click the number of audited columns. The default value in this column is None. None means that no specific columns have been selected for auditing on this database; therefore, all the columns will be audited. The Select Columns for Auditing screen opens.
3. In the Select Columns for Auditing screen, click Choose Additional Objects For Column Selection. The Select Columns For Auditing (Choose Tables/Objects) screen opens.
4. Check the Tables check box to search for tables, or the Views check box to search for views.
To search for both, tables and views, check both check boxes.
5. Optionally, specify search criteria for object names in the Object Named field. PowerBroker Databases supports wildcard searches, for example, *user*.
6. Click Search. The first (up to) 250 objects are displayed.

Configuring Audit Sources
PBDB‐MA User Guide 84 © 2017. BeyondTrust Software, Inc.
7. Check the objects to audit. You may use the Check/Uncheck All Items button.
8. Click Save. The list of objects selected for auditing is displayed.
9. To select specific columns in an object for auditing:a. In the Select Columns for Auditing screen, click All under Columns.
The Select Columns for Auditing (Choose Columns) screen opens. b. To audit all columns, select All columns.c. To audit specific columns, select Just these selected columns, and
check the columns.d. Click Save. The list of selected columns is displayed.
10. To remove an object from the list, select the check box next to the object, then click Remove Select.
To select/deselect all columns in the list, use the Select All/Deselect All button.
11. Click Apply Changes.Note: You can not select objects for auditing in the Audit Source Summary
screen. Objects for auditing are selected in audit rules. In the Audit Source Summary screen, you can only select specific columns for auditing.
(SQL Server) Selecting a Set of Key Columns in an Object
Selecting key columns in an object is very useful for reporting. In reports, it allows you to show the key columns for a row that has been modified in addition to the modified columns.
For example, you have a table called "Employees" that contains the following columns - Name, SSN, Address, Salary. When the Salary column is modified, if no key columns are selected, the report will only show the modified salary. However, if Name and SSN are selected as key columns, the report will show the employee name, SSN and the modified salary.
To select key columns:
1. On the Audit Source Summary screen, locate the list of databases configured for auditing on this SQL Server Instance.
2. In the Audited Column Level Objects column, click the number of audited objects for a database. The Select Columns for Auditing screen opens.
3. In the Key column for the object, click the number. The Select Columns for Auditing (Choose Keys) screen opens.
4. Select the key columns.
5. Click Save.

Configuring Audit Sources
PBDB‐MA User Guide 85 © 2017. BeyondTrust Software, Inc.
(SQL Server) Editing E-mail Notifications
To edit your e-mail notifications:
1. On the Audit Source Summary screen, click the Edit E-mail Notification tab.
2. In the first section of the tab, select the activities (DDL operations) that you want to trigger e-mail notifications.
3. To add the alert to the event log, select the Add alert events to the event log on the database host check box.
4. Select the Send e-mail on alert check box.
Configuring Audit Sources
PBDB‐MA User Guide 86 © 2017. BeyondTrust Software, Inc.
5. In the Recipient list, select the user who should receive the notification. The rest of the fields: From, SMTP Host, and SMTP Port, are filled in automatically from the selected e-mail notification configuration.
6. Click Apply Changes.
(SQL Clusters) Audit Source Prerequisites
PowerBroker Databases can audit SQL Server instances that run on Microsoft Cluster Service (MSCS) clusters.
Cluster support is an advanced feature of PowerBroker Databases. Setting it up requires use of command-line tools and manually editing XML files. SQL Server DBA and MSCS expertise is needed to apply the following instructions.
Table 3. Tasks to do before configuring Microsoft SQL Server clusters for auditing
On the Microsoft SQL Server Side:
1. Determine the DNS hostname of the physical node where the database instance is running.
DNS hostname: ____________________________________________________
To determine the DNS host name of your computer, open the command line and run the command:
C:\>hostname

Configuring Audit Sources
PBDB‐MA User Guide 87 © 2017. BeyondTrust Software, Inc.
2. Select a directory that PowerBroker Databases will use for shared data files. This directory must meet the following requirements:
1. It must be on one of the shared drives for the specific SQL Server audit source instance.
To find out what the shared drives are, execute this query against the clustered SQL Server instance:
select * from ::fn_servershareddrives()
This returns a list of shared drive letters.
2. It must be visible to the PowerBroker Databases Collection Agent over a UNC share.
3. This directory must be an administrative share, for example C$.
4. PowerBroker Databases needs to have FULL permissions to this directory.
5. The SQL Server User Account under which the PowerBroker Databases components are running needs to have READ and WRITE permissions to this directory.
Determine the local path to the PowerBroker Databases data directory. The PowerBroker Databases Monitor Agent, which is running on the local computer, will use this path.
Local path to the PowerBroker Databases data directory: _________________________________________________________________
Determine the UNC path to PowerBroker Databases data directory. The PowerBroker Databases Collection Agent, which is running on a remote computer, will use this path.
UNC path starts with the characters \\ followed by the virtual network name of the SQL Server instance.
UNC path to the PowerBroker Databases data directory:
_________________________________________________________________
Table 3. Tasks to do before configuring Microsoft SQL Server clusters for auditing

Configuring Audit Sources
PBDB‐MA User Guide 88 © 2017. BeyondTrust Software, Inc.
3. Determine the UNC path to each directory containing transaction log backup files for audited databases. This directory must be on a shared drive.
UNC path starts with the characters \\ followed by the virtual network name of the SQL Server instance. For example, if the clustered SQL Server instance is named SQLTOKYO7\HR, then location of the backup files for the master database will be \\SQLTOKYO7\F$\<Installation_Directory>\MSSQL_HR\BACKUP.
Avoid using Administrative (or hidden) shares for specific directories. For example, \\myserver\e$\data$. The $symbol at the end of the directory name may cause a problem when running the script.
PowerBroker Databases requires at least READ/WRITE permissions on the files in this directory.
UNC share to transaction log backup directories:
__________________________________________________________________
__________________________________________________________________
On the PowerBroker Databases side:
4. Make sure that you install the PowerBroker Databases Central Configuration Agent, the Central Configuration Database, and the Administration Console on a non-clustered server. These PowerBroker Databases components are not supported on clustered servers.
5. Determine which PowerBroker Databases Agent to use as a Collection Agent for the cluster.
• The Collection Agent must be installed on a non-clustered Windows server.• If you are using Windows Authentication to connect to the audit source, the
Collection Agent must be running under a Windows domain account that has Admin privileges on the audited database and on the computer hosting the data file share directory described in step 2 and the backup directories described in step 3.
A Windows Domain Admin account is recommended. The default Local System account should not be used since it has Admin privileges only on the local computer but does not have sufficient privileges on other computers in the configuration.
The domain account must be specified during the PowerBroker Databases Collection Agent installation in the Logon Information screen. It can also be changed after the installation using Control Panel, Administrative Tools, Services, on the Log On tab of the Agent properties dialog.
For more information, refer to the PowerBroker Databases Installation Guide.
Table 3. Tasks to do before configuring Microsoft SQL Server clusters for auditing
Configuring Audit Sources
PBDB‐MA User Guide 89 © 2017. BeyondTrust Software, Inc.
(SQL Clusters) Configuring SQL Server Clusters for Auditing
Warning: Before you perform this procedure, complete all the steps in "(SQL Clusters) Audit Source Prerequisites" on page 86.
To configure SQL Server clusters for auditing:
1. Create a new audit source for a clustered node following the instructions in "(SQL Server) Adding an Audit Source" on page 77 and the cluster specific instructions in steps a and b below. Note: To use an existing audit source for the clustered node, make sure
that all the information described in steps a and b is specified correctly.
a. In the Add Audit Source screen, in the Agent Name field, select the PowerBroker Databases Agent installed on the computer where the database instance is currently running. This name must be the DNS host name of the local computer as described in Step 1 of "Tasks to do before configuring Microsoft SQL Server clusters for auditing" on page 86.
b. In the Edit Audit Source screen:• In the Collection Agent field, specify the Collection Agent
running on a non-clustered server. The default value in the Collection Agent field is the local PowerBroker Databases Agent. Change the default to specify a Collection Agent running on a non-clustered Windows server.
• Leave the Use the Default Agent Data Directory check box checked. You will later change the default setting manually in the XML configuration file, see step 4 below.
• Add databases for auditing. In the Backup Log Folder column of the list of audited databases, specify the UNC path to the transaction backup log folder for each audited database. This is the UNC path described in step 3 of the "Tasks to do before
6. Make sure that you install an PowerBroker Databases Agent on each physical node of the cluster. These agents will work as Monitor Agents and they must have connection to the Central Configuration Agent.
The Central Configuration Agent information must be specified during the PowerBroker Databases Agent installation in the Agent Information screen.
For more information, refer to the PowerBroker Databases Installation Guide.
7. Make sure that you create a Repository on a non-clustered server. Repositories are not supported on clustered servers. To create a new Repository, see "Configuring Repositories" on page 44.
Table 3. Tasks to do before configuring Microsoft SQL Server clusters for auditing
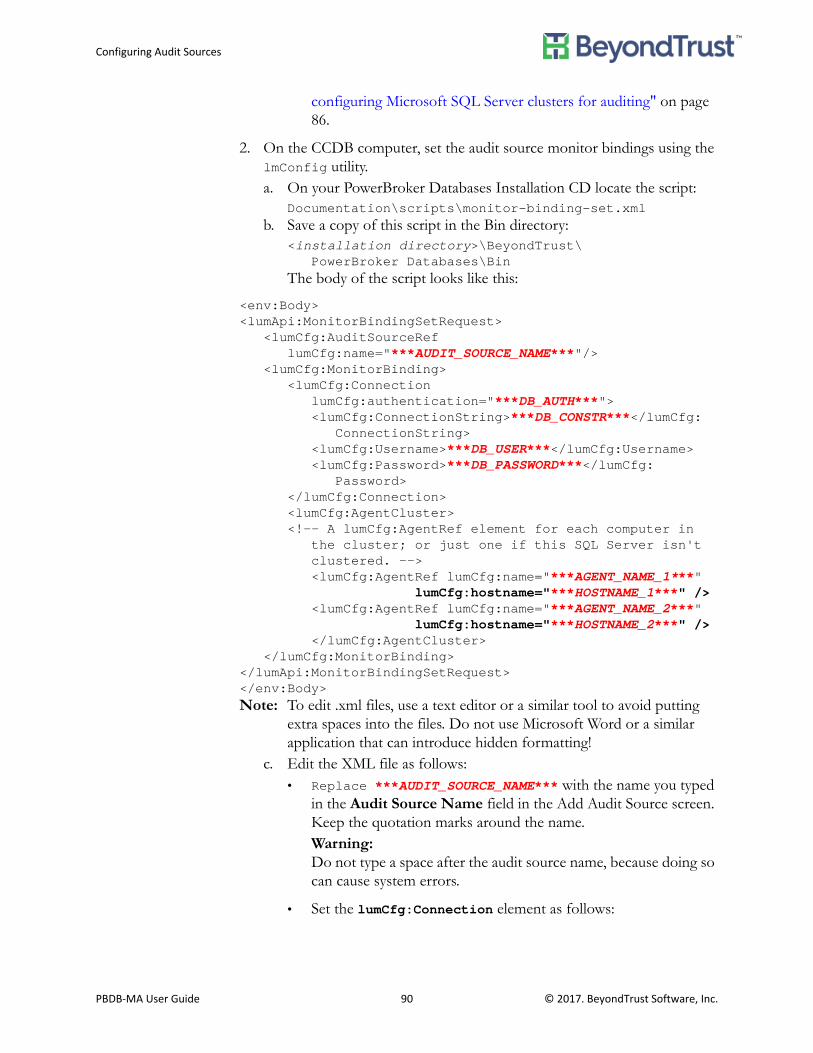
Configuring Audit Sources
PBDB‐MA User Guide 90 © 2017. BeyondTrust Software, Inc.
configuring Microsoft SQL Server clusters for auditing" on page 86.
2. On the CCDB computer, set the audit source monitor bindings using the lmConfig utility. a. On your PowerBroker Databases Installation CD locate the script:
Documentation\scripts\monitor-binding-set.xmlb. Save a copy of this script in the Bin directory:
<installation directory>\BeyondTrust\PowerBroker Databases\Bin
The body of the script looks like this:
<env:Body><lumApi:MonitorBindingSetRequest>
<lumCfg:AuditSourceRef lumCfg:name="***AUDIT_SOURCE_NAME***"/>
<lumCfg:MonitorBinding><lumCfg:Connection
lumCfg:authentication="***DB_AUTH***"><lumCfg:ConnectionString>***DB_CONSTR***</lumCfg:
ConnectionString><lumCfg:Username>***DB_USER***</lumCfg:Username><lumCfg:Password>***DB_PASSWORD***</lumCfg:
Password></lumCfg:Connection><lumCfg:AgentCluster><!-- A lumCfg:AgentRef element for each computer in
the cluster; or just one if this SQL Server isn't clustered. --><lumCfg:AgentRef lumCfg:name="***AGENT_NAME_1***"
lumCfg:hostname="***HOSTNAME_1***" /><lumCfg:AgentRef lumCfg:name="***AGENT_NAME_2***"
lumCfg:hostname="***HOSTNAME_2***" /></lumCfg:AgentCluster>
</lumCfg:MonitorBinding></lumApi:MonitorBindingSetRequest></env:Body>Note: To edit .xml files, use a text editor or a similar tool to avoid putting
extra spaces into the files. Do not use Microsoft Word or a similar application that can introduce hidden formatting!
c. Edit the XML file as follows:• Replace ***AUDIT_SOURCE_NAME*** with the name you typed
in the Audit Source Name field in the Add Audit Source screen. Keep the quotation marks around the name.Warning: Do not type a space after the audit source name, because doing so can cause system errors.
• Set the lumCfg:Connection element as follows:

Configuring Audit Sources
PBDB‐MA User Guide 91 © 2017. BeyondTrust Software, Inc.
– Set DB_AUTH to either os or db. (See examples below.)
• Set DB_CONSTR to the database connection string. Use the following format:dbtype:instance.schemaWhere dbtype = Oracle, mssql, or sybase.instance = the database specific instance name.and schema = (Oracle) The schema or the owner or
(SQL Server) the name of the database running on a specific instance.
Example if you use Windows Authentication:
<lumCfg:Connection lumCfg:authentication="os"><lumCfg:ConnectionString>mssql:SQL Server Name</lumCfg:ConnectionString></lumCfg:Connection>Example if you use SQL Authentication:
<lumCfg:Connection lumCfg:authentication="db"><lumCfg:ConnectionString>mssql:SQL Server Name</lumCfg:ConnectionString><lumCfg:Username>username</lumCfg:Username><lumCfg:Password>password</lumCfg:Password></lumCfg:Connection>
• Replace ***AGENT_NAME_1*** and ***HOST_NAME_1*** with the DNS host name of the first cluster node.
• Replace, ***AGENT_NAME_2*** and ***HOST_NAME_2*** with the DNS host name of the second cluster node.
• If the audited cluster comprises more than two nodes, add more lumCfg:AgentRef tags to have one for every node of the cluster.
d. Save the edited file to the Bin directory:<installation directory>\BeyondTrust\
PowerBroker Databases\Bin
For os authentication
SQL Server will use the operating system account to log into the database in which case the lumCfg:Username and lumCfg:Password elements are not required.
For db authentication
The SQL Server database will use a database user account to log into the database in which case a valid DB_USER and DB_PASSWORD are required.
Tip: Obtain SQL Server Name
To obtain the SQL Server Name for your instance, run SELECT @@SERVERNAME against the instance on the cluster computer.

Configuring Audit Sources
PBDB‐MA User Guide 92 © 2017. BeyondTrust Software, Inc.
e. Use the command line to move to the Bin directory:cd "<installation directory>\BeyondTrust\
PowerBroker Databases\Bin" f. Execute the edited monitor-binding-set.xml by running
lmConfig:lmConfig --exec monitor-binding-set.xml
--login username --password password • Do not use line breaks within this command.• Use your PowerBroker Databases administrator login and
password. The default for both, login and password, is auditdb.The expected result of the lmConfig command is:
$AuditDB:Success$AuditDB:SuccessNote: If only one Success line appears, this means a part of the
command failed. This usually indicates a typo in the XML file. Troubleshoot the error before proceeding.
If you add a database password to this XML file, be sure to delete it after completing this step.
3. On the CCDB computer, set the audit source cluster type. a. On the PowerBroker Databases Installation CD locate the script:
Documentation\scripts\cluster-type-set.xml. b. Save a copy of this script in the Bin directory:
<installation directory>\BeyondTrust\PowerBroker Databases\Bin
The body of the script looks like this: <env:Body>
<lumApi:WriteAuditRequest><lumCfg:AuditSourceRef lumCfg:name="***AUDIT_SOURCE_NAME***"/><lumCfg:AuditSource lumCfg:cluster="mscs"/>
</lumApi:WriteAuditRequest></env:Body>
c. In the body of the script replace ***AUDIT_SOURCE_NAME*** with the name you typed in the Audit Source Name field in the Add Audit Source screen.
d. Save the edited file to the Bin directory: <installation directory>\BeyondTrust\
PowerBroker Databases\Bin e. Set the cluster type with the following command:
lmConfig --exec cluster-type-set.xml --login username --password password
Use the same user name and password as in step 2.f.
4. On the CCDB computer, set the Data Directories.a. On the PowerBroker Databases Installation CD locate the script:
Documentation\scripts\data-directory-set.xml.

Configuring Audit Sources
PBDB‐MA User Guide 93 © 2017. BeyondTrust Software, Inc.
b. Save a copy of this script in the Bin directory: <installation directory>\BeyondTrust\
PowerBroker Databases\Bin
The body of the script looks like this:<env:Body> <lumApi:EditConfigRequest>
<lumCfg:Target lumCfg:auditSource.name="***AUDIT_SOURCE_NAME***" />
<lumCfg:Options> <lumCfg:Option lumCfg:name="DataFileDirectory" lumCfg:value="***DATA_DIRECTORY***" /> <lumCfg:Option lumCfg:name="DataFileShare" lumCfg:value="***UNC_SHARE_DIRECTORY***" />
</lumCfg:Options> </lumApi:EditConfigRequest>
</env:Body>
c. Edit the body of the script in the following way:• Replace ***AUDIT_SOURCE_NAME*** with the name you typed
in the Audit Source Name field in the Add Audit Source screen.• Replace ***DATA_DIRECTORY*** with the Data directory
described in step 2 of "Tasks to do before configuring Microsoft SQL Server clusters for auditing" on page 86.
• Replace ***UNC_SHARE_DIRECTORY*** with the UNC share to data directory described in step 2 of "Tasks to do before configuring Microsoft SQL Server clusters for auditing" on page 86.
d. Save the edited file to the Bin directory:<installation directory>\BeyondTrust\
PowerBroker Databases\Bine. Set the Data Directory with the following command:
lmConfig --exec data-directory-set.xml --login username --password password
Use the same user name and password as in step 2.f.
5. To audit an active-active cluster configuration, repeat this entire procedure, including the steps in the "Tasks to do before configuring Microsoft SQL Server clusters for auditing" section, for each clustered SQL instance you wish to audit.
6. To test your MSCS auditing configuration:a. Assign an audit policy to the audit source as described in "Assigning
an Audit Policy to an Audit Source" on page 103.b. Deploy the audit policy as described in "Deploying an Audit Policy"
on page 105.c. Collect data using the Collect Now button as described in "Starting
Data Collection Immediately" on page 107.
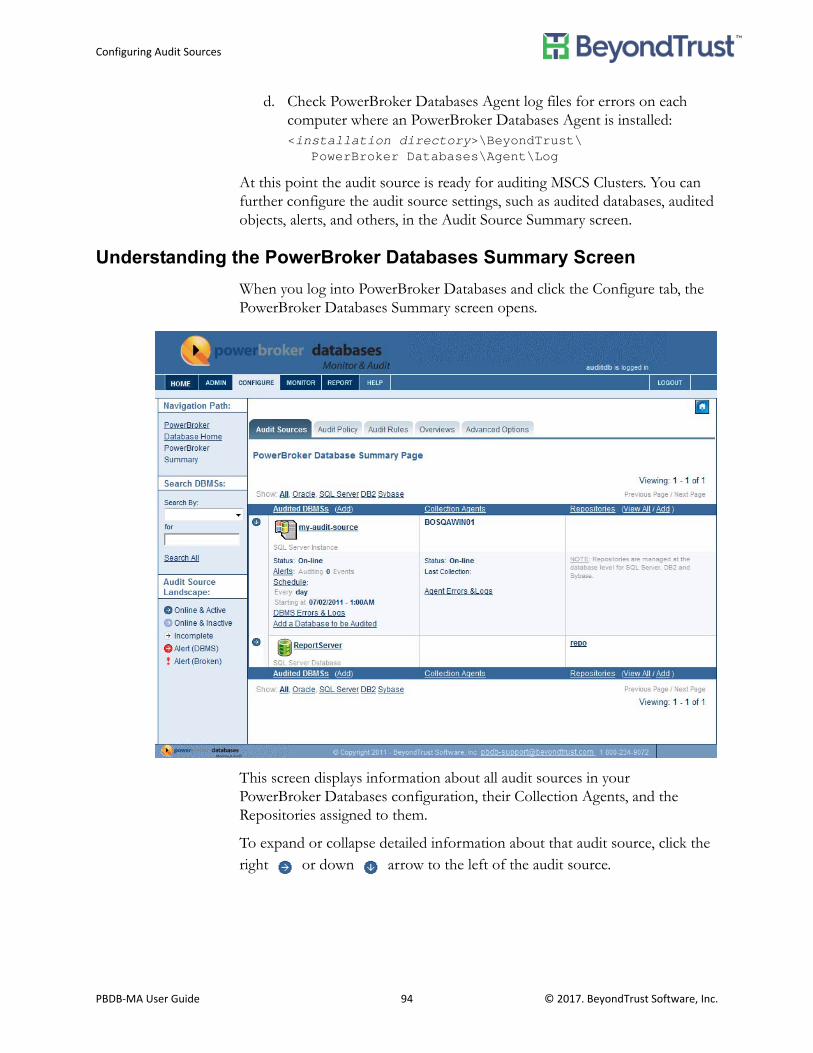
Configuring Audit Sources
PBDB‐MA User Guide 94 © 2017. BeyondTrust Software, Inc.
d. Check PowerBroker Databases Agent log files for errors on each computer where an PowerBroker Databases Agent is installed: <installation directory>\BeyondTrust\
PowerBroker Databases\Agent\Log
At this point the audit source is ready for auditing MSCS Clusters. You can further configure the audit source settings, such as audited databases, audited objects, alerts, and others, in the Audit Source Summary screen.
Understanding the PowerBroker Databases Summary Screen
When you log into PowerBroker Databases and click the Configure tab, the PowerBroker Databases Summary screen opens.
This screen displays information about all audit sources in your PowerBroker Databases configuration, their Collection Agents, and the Repositories assigned to them.
To expand or collapse detailed information about that audit source, click the right or down arrow to the left of the audit source.

Configuring Audit Sources
PBDB‐MA User Guide 95 © 2017. BeyondTrust Software, Inc.
Note: Oracle audit sources are managed on the instance level, SQL audit sources are managed on the database level, and DB2 audit sources are a mixture of both. Different SQL databases within same SQL instance may be assigned to different Repositories.
Editing Existing Audit Sources
To edit an audit source:
1. Click the name of the audit source. The Audit Source Summary screen opens.
2. Click the Edit Audit Source tab, E-mail Notifications tab, or Edit Column Settings tab.Note: The tabs available on the Audit Source Summary screen vary
based on the DBMS of the audit source.
3. Make the desired edits.
4. Click Apply Changes.
Viewing All Repositories
To see the list of all Repositories in your PowerBroker Databases Configuration, in the Repositories (View All/Add) area, click View All. The View All Repositories screen opens.
Figure 4. View All Repositories Screen
On this screen you see the following Repository information:
• Repository Name: The name you have given to the Repository.• DB Type: The Repository's DBMS type.• Status: Status of the Repository. Possible statuses include:
– Uninitialized - create action requested but not begun.– Initializing - initialization in progress.

Configuring Audit Sources
PBDB‐MA User Guide 96 © 2017. BeyondTrust Software, Inc.
– On-line - Repository online and communicating with the Central Configuration Agent.
– On-line_with_Warnings - online and communicating with the Central Configuration Agent., but with one or more warnings of possible problems.
– Offline - no communication with the Central Configuration Agent.– Unreachable - indicates a network problem.– Broken - indicates a configuration problem.
• Last Heartbeat: Last time the Administration Console received Repository status information from the Central Configuration Agent. Heartbeats occur on a regular interval (set in the EntegraInit.xml configuration file), to continually assess the status of your Repository.
• # Audit Sources: Number of audit sources assigned to this Repository, that is, sending audited data to this Repository.
Auditing Selects
PowerBroker Databases does not automatically enable auditing for SELECTs. You must explicitly enable SELECTS auditing by setting the EnableExtendedAuditing audit source option.
Warning: Turning on SELECTS auditing can severely impact the performance of the server being audited.
To enable SELECTS auditing, you edit the data-directory-set.xml file. This file is located in the Documentation\examples directory on your installation CD.
1. Make a backup copy of the data-directory-set.xml file and name it something like data-directory-set_original.xml file.
2. Open the data-directory-set.xml file in a text editor or XML editor.<env:Body>
<lumApi:EditConfigRequest><lumCfg:Target
lumCfg:auditSource.name="***AUDIT_SOURCE_NAME***"/><lumCfg:Options><lumCfg:Option lumCfg:name="DataFileDirectory"
lumCfg:value="***DATA_DIRECTORY***"/><lumCfg:Option lumCfg:name="DataFileShare"
lumCfg:value="***UNC_SHARE_DIRECTORY***"/></lumCfg:Options>
</lumApi:EditConfigRequest></env:Body>
3. Change the string ***AUDIT_SOURCE_NAME*** to the name of the audit source you want to audit selects. Be sure to match the case of the audit
Configuring Audit Sources
PBDB‐MA User Guide 97 © 2017. BeyondTrust Software, Inc.
source name as it appears in the PowerBroker Databases Administration Console.
4. Change the string DataFileDirectory to EnableExtendedAuditing.
5. Change the string ***DATA_DIRECTORY*** to true.
6. Delete this line: <lumCfg:Option lumCfg:name="DataFileShare"
lumCfg:value="***UNC_SHARE_DIRECTORY***"/>
7. Save the file into the directory where lmConfig is installed.
Windows default location
<installation directory>\BeyondTrust\PowerBroker Databases\Bin
UNIX default location
<installation directory>/BeyondTrust/bin
8. Open a command prompt in and change directory to the bin directory.
9. Execute the following command: lmConfig exec data-directory-set.xml -login auditdb
-password <password> -novalidate
Auditing Select Queries Using Advanced SQL Server Audit
Starting with PBDB-MA V6.7.0 , you can use the advanced Audit features of SQL Server 2008 and 2012 to audit Select queries. With this feature, only the tables being audited will have the data collected.
In order to use this feature, you need to disable extended auditing. Then, specify the specific object table names in the rule to audit Selects queries on that table (or tables). Focusing the select Audits results in significant performance improvements.
If you want to audit for all tables, select extended auditing.
Caution! If you have enabled extended auditing and try to use the advanced Audit features of SQL Server 2008/2012 , the extended auditing will take higher precedence.
Removing an Audit Source
Note: Before you can remove an audit source, you must first remove (unassign) all policies assigned to the audit source. For more information about audit policies, see "Starting the Auditing Process" beginning on page 99.
To remove a policy from an audit source, complete the following steps:

Configuring Audit Sources
PBDB‐MA User Guide 98 © 2017. BeyondTrust Software, Inc.
1. Log into the Administration Console with Admin privileges.
2. Click the Configure tab. The PowerBroker Databases Summary screen opens.
3. On the Configure tab, click the Overviews subtab.
4. On the Overviews subtab click Audit Source Relations View.
5. On the Audit Source Relations View, click the Plus Sign (+) next to a database to view the policies associated with the database.
6. Click the eyeglass icon next to a policy . The Summary for the policy "<policy name>" subtab appears.
7. Click the Assign to Audit Sources/DB subtab.
8. Click the Unassign button for the audit source that you intend to remove.
9. In the confirmation dialog box, click Yes.
10. On the Audit Source Relations View, click Done.
11. To unassign another policy click the Overviews subtab and repeat steps 4. - 10.
To remove an audit source with no associated policies, complete the following steps:
1. In the Administration Console, click the Configure tab. The PowerBroker Databases Summary screen opens.
2. Click the name of the audit source you want to remove. The Audit Source Summary screen opens.
3. Click the Delete Audit Source tab. The Delete Audit Source screen opens.
4. Click Delete.
5. Click OK in the confirmation dialog.Note: For Microsoft SQL Server Database audit source, you need to
enter a user name and password with DBA privileges to delete the audit source.

Starting the Auditing Process
PBDB‐MA User Guide 99 © 2017. BeyondTrust Software, Inc.
Starting the Auditing Process
To start auditing an audit source, you need to specify to the PowerBroker Databases Agent what data to collect and what to do with the collected data. You provide this information to the PowerBroker Databases Agent by assigning audit policies to an audit source.
Default Audit Polices and Rules
For your convenience, PowerBroker Databases provides nine pre-populated audit policies to use for the most common auditing tasks. Each audit policy has one or two pre-populated audit rules assigned to it.
You can also create custom audit rules and policies for your own specific auditing needs. For information about creating custom rules and policies, see "Creating Custom Audit Rules and Policies" beginning on page 115.
Default pre-populated policies are listed in the following table.
Table 4. Default Pre-Populated Policies
Policy Name Policy Description Assigned Rules
Administrator Account DDL Activities
Collect all DDL operations performed by system administrators every day at any time.
• SA Account DDL Activities
• Sys and System Account DDL Activities
All DDL Activities Collect all DDL operations performed every day at any time.
• ALL DDL Activities
DDL Activities Outside Normal Business Hours
Collect DDL operations performed outside of normal business hours.
• DDL Activities on Saturday and Sunday
• DDL Activities Outside Normal Business Hours
DML Activities Collect all DML operations, except SELECT and Execute Procedure, performed every day at any time
• DML Activities
DML Activities Outside Normal Business Hours
Collect DML operations performed outside of normal business hours.
• DML Activities on Saturday and Sunday
• DML Activities Outside Normal Business Hours
Object Creation and Modification
Collect object creation and modification operations performed every day at any time.
• Object Creation and Modification

Starting the Auditing Process
PBDB‐MA User Guide 100 © 2017. BeyondTrust Software, Inc.
Configuring Data Collection for an Audit Source
To start collecting data from an audit source you must complete the following tasks:
1. Select an audit policy. For instructions, see "Selecting an Audit Policy" on page 101.
2. Assign the selected audit policy to the audit source. For instructions, see "Assigning an Audit Policy to an Audit Source" on page 103.
3. Deploy the audit policy. For instructions, see "Deploying an Audit Policy" on page 105.
Once the audit policy is deployed, data collection on the audit source begins according to the schedule specified in the Edit Audit Source screen. You can also start data collection immediately. For instructions, see "Starting Data Collection Immediately" on page 107.
Privilege Grants Collect privilege grant operations performed every day at any time.
• Privilege Grants
Security DDL Collect security related DDL operations performed every day at any time.
• Security DDL
User Creation and Properties Change
Collect user creation and modification operations performed every day at any time.
• User Creation and Modification
Table 4. Default Pre-Populated Policies
Policy Name Policy Description Assigned Rules

Starting the Auditing Process
PBDB‐MA User Guide 101 © 2017. BeyondTrust Software, Inc.
Selecting an Audit Policy
To select an audit policy:
1. On the PowerBroker Databases Home screen, click the Configure tab. The PowerBroker Databases Summary screen opens.
2. Click the Audit Policy tab. The Audit Policies screen opens.The Audit Policies screen shows the list of existing policies and information about them. Initially, the list contains only the pre-populated audit policies included with PowerBroker Databases. Information in the audit policies list includes:– Name: Name that uniquely identifies the policy. For pre-populated
policies, the name of the policy is usually the same as the name of the rule, or one of the rules, assigned to it.
– Category: If you categorize your policies, this column contains the name of the category the policy belongs to.
– #Rules: Number of audit rules assigned to this policy. Each default policy has at least one rule assigned to it.
– #Audit Src: Number of audit sources this policy is assigned to.– Owner: Username of the user who created the policy. For pre-
populated policies, the owner is the default user 'auditdb'. – Status: Status of the policy. The status may be:
• Draft - Not deployed. • Live - Deployed and is being used for data collection on at least
one audit source. If you un-deploy a policy from every audit source it is assigned to, the status reverts to Draft.
Tip: Show and Hide Policies
To show only the policies of a certain status, click the status name in the Show line above or below the list.

Starting the Auditing Process
PBDB‐MA User Guide 102 © 2017. BeyondTrust Software, Inc.
– Last Modify Date: The date when the policy was last modified.
3. To see the detailed information on an audit policy, click the audit policy name. The Edit Policy screen opens. This screen contains policy description and notification information.
4. To see the list of rules assigned to the policy, click the Assign Audit Rules tab.
5. To see the list of rules assigned to a given policy:a. Click the policy name.b. Click the Assign Audit Policies tab. The Assign Audit Rules To The
Policy screen opens. It shows the list of audit rules assigned to the policy.
Information in the audit rules list includes:– Name: Name that uniquely identifies the rule. – Type: Rule type. For more information, see "Audit Rule Types" on
page 116. All the pre-populated rules have the Type 'Audit Rule'. – Owner: Username of the user who created the rule. For all pre-
populated rules, the owner is the default user 'auditdb'. – #Policy: Number of audit policies this rule is assigned to. Each pre-
populated rule is assigned to one policy. – Status: Status of the rule. For more information, see "Audit Rule
Status" on page 109. The status may be:• Un-Assigned - not assigned to any audit policy.• Assigned - assigned to at least one audit policy. All pre-populated
rules have this status since they are assigned to at least one pre-populated policy.
• Active - assigned to at least one Live policy.– Last Modify Date: The date when the rule was last modified.
6. Examine available audit policies and audit rules assigned to them to select the audit policy you want to use and proceed to assigning this audit policy to the audit source. For instructions, see "Assigning an Audit Policy to an Audit Source" on page 103.
Note: Alternatively, you can create a new policy and assign it to the audit source. For instructions, see "Creating a New Audit Policy" on page 132.
Tip: Show and Hide Audit Rule Details
Click the plus icon to the left of the Name column to show/hide audit rule details.

Starting the Auditing Process
PBDB‐MA User Guide 103 © 2017. BeyondTrust Software, Inc.
Assigning an Audit Policy to an Audit Source
To assign an audit policy to an audit source:
1. On the PowerBroker Databases Home screen click the Configure tab. The PowerBroker Databases Summary screen opens.
2. Click the Audit Policy tab. The Audit Policies screen opens. This screen shows the list of existing policies and information about them.
3. Click the policy which you want to assign to an audit source. The Edit Policy screen opens.
4. Click the Assign to Audit Sources/DB tab. The Assign Policy <name> to Audit Sources/DB screen opens.

Starting the Auditing Process
PBDB‐MA User Guide 104 © 2017. BeyondTrust Software, Inc.
On this screen you see the list of audit sources this policy is assigned to. Before you assign the policy to the first audit source, the list contains no data.
5. Click Select From Existing Audit Sources. The list of existing audit sources opens.
6. Select one or more audit sources.
Tip: Data Collection
If you opened the Assign Policy screen for a Live policy, you can start data collection on any audit source this policy is assigned to by clicking the Collect Now button for this audit source. For draft policies, the Collect Now button is unavailable.
Starting the Auditing Process
PBDB‐MA User Guide 105 © 2017. BeyondTrust Software, Inc.
Note: You can assign a policy to an SQL Server audit source at the instance level or at the database level. If you assign a policy at the instance level, the policy is assigned to all databases within that instance. If you assign a policy at the database level, the policy is assigned only to the selected databases within the instance.
7. Click Assign Selected Audit Sources. PowerBroker Databases displays a progress dialog and then returns you to the Assign Policy to Audit Sources/DB screen.
8. To un-assign a policy from an audit source, click Unassign in the corresponding line. Note: If you assigned a policy to an SQL Server audit source at the
instance level, you can un-assign the policy at the instance level only, you cannot un-assign individual databases within the instance.
If you assigned a policy to an SQL Server audit source at the database level, you can un-assign the policy at the database level only and not at the instance level.
9. Click Done to save your changes and return to the Audit Policies tab, or click Continue to proceed to the Audit Policy Summary screen where you can deploy the policy. For instructions, see "Deploying an Audit Policy" on page 105.
Deploying an Audit Policy
Before deploying an audit policy, make sure that the following are true:
• The policy has at least one rule assigned to it.• The policy is assigned to at least one audit source.
To deploy an audit policy:
1. On the PowerBroker Databases Home screen, click the Configure tab. The PowerBroker Databases Summary screen opens.

Starting the Auditing Process
PBDB‐MA User Guide 106 © 2017. BeyondTrust Software, Inc.
2. Click the Audit Policy tab. The Audit Policies screen opens.
3. Locate the policy you want to deploy and click Deploy in the corresponding line. The Summary screen for the policy opens. This screen has three sections: Policy Information, Assigned Audit Source/DB Information, and Assigned Rules Information.

Starting the Auditing Process
PBDB‐MA User Guide 107 © 2017. BeyondTrust Software, Inc.
4. Click Deploy. The Deploy Policy confirmation message appears.
5. Click Yes. PowerBroker Databases deploys the policy, changes the policy status top Live, and starts data collection according to the schedule specified in the Edit Audit Source screen. PowerBroker Databases also enables the Collect Now button for every audit source the policy is assigned to. – To immediately start data collection, click Collect Now for the audit
source. – To undeploy the policy, click Undeploy.– To view the Collection History report, click View Collection.– To view the history of policy deployments, click Policy History.– To go back to the list of policies, click Policy Home.– To print out the Policy Summary, click Print.
Starting Data Collection Immediately
You can start collecting data immediately using the Collect Now button available on the following screens:
• Audit Source Summary screenNote: The audit source must have at least one Live audit policy assigned
to it. If there is no Live audit policy assigned to the audit source, nothing will be collected.
• Assign Policy to audit source screen for any Live policy• Audit Policy Summary screen for any Live policy
Note: For Draft policies, the Collect Now button is not available.
To start data collection immediately:
1. Click Collect Now. PowerBroker Databases displays the message: “A collection has been started. Please select audit source Event Report to monitor its progress”.
2. Click OK.
Undeploying an Audit Policy
To undeploy an audit policy:
1. On the PowerBroker Databases Home screen, click the Configure tab. The PowerBroker Databases Summary screen opens.
2. Click the Audit Policy tab. The Audit Policies screen opens.
3. Locate the Live policy you want to undeploy and click Undeploy in the corresponding line. The Summary screen for the policy opens.
4. Click Undeploy. The Undeploy Policy dialog box appears.
Starting the Auditing Process
PBDB‐MA User Guide 108 © 2017. BeyondTrust Software, Inc.
5. Click Yes. PowerBroker Databases undeploys the policy, changes the policy status to Draft, and disables the Collect Now button. PowerBroker Databases will not use the policy for data collection until you redeploy it.
Unassigning an Audit Policy
Note: Note that a policy can be assigned to more than one audit source. If you unassign a Live policy from an audit source, this policy will be automatically redeployed for all the other audit sources it is assigned to.
To unassign an audit policy from an audit source:
1. On the PowerBroker Databases Home screen, click the Configure tab. The PowerBroker Databases Summary screen opens.
2. Click the Audit Policies tab.
3. Click the audit policy that you want to unassign. The Edit Policy screen appears.
4. Click the Assign Audit Source/DB tab. This tab contains the list of audit sources to which this policy is assigned.
5. Locate the audit source from which you want to unassign the policy and click Unassign in the corresponding row. The following message is displayed:– For a policy that has not been deployed and has status Assigned:
Are you sure you want to unassign audit source: audit_source_name
With Status : Assigned
– For a policy that has been deployed and has status Active:You are modifying Live policy configuration, which requires Re-Deployment of the policy into the system.
Are you sure you want to unassign audit source: audit_source_name
With Status : Live
6. Click Yes.
Tip: Locate Policies
To locate the policy you want to unassign, use Policy Relations View and Audit Source Relations View. For more information., see "Policy Relations View" on page 112 and "Audit Source Relations View" on page 112.

Starting the Auditing Process
PBDB‐MA User Guide 109 © 2017. BeyondTrust Software, Inc.
Audit Policy Status
An audit policy can have one of two statuses:
• Draft. When a policy is created, its initial status is Draft. • Live. When you successfully deploy a policy, its status changes to Live.
You can perform the following actions on a Draft policy:
• Edit. Does not change the policy status. • Assign/Un-assign Rules and Audit Sources. Does not change the
policy status to Live.• Deploy. Changes the status to Live. The policy must have at least one rule
assigned to it and must be assigned to at least one audit source in order to be deployed.
PowerBroker Databases will change the status of a policy from Live back to Draft if:
• You un-deploy the policy on all audit sources.• You un-assign the policy from all audit sources.• You un-assign or drop all rules assigned to the policy.
The following actions cause re-deployment of a Live policy:
• Edit Policy• Assign/Un-assign Rules• Assign/Un-assign Audit Sources• Edit assigned Rules• Drop assigned Rules
Audit Rule Status
An audit rule has three statuses that describe its state in relation to audit policies:
• Un-Assigned - When a rule is created, its initial status is Un-Assigned. Un-Assigned status can change to:– Assigned, when you assign the rule to a Draft policy. – Active, when you assign the rule to a Live policy. When you un-assign the rule from all policies, or the policies the rule is assigned to are dropped, the rule status becomes Un-Assigned again.
• Assigned - When a rule is assigned to one or more Draft policies, its status is Assigned.Assigned status can change to:– Active, when you assign the rule to one or more Live policies, or when
one or more Draft policies the rule is assigned to is deployed and becomes Live.
Starting the Auditing Process
PBDB‐MA User Guide 110 © 2017. BeyondTrust Software, Inc.
– Un-Assigned, when you un-assign the rule from all policies, or all policies the rule is assigned to are dropped.
• Active - When a rule is assigned to one or more Live policies, its status is Active. Active status can change to:– Assigned, if all Live policies this rule is assigned to are un-deployed or
dropped; or when the rule is un-assigned from all Live policies but remains assigned to at least one Draft policy.
– Un-Assigned, when you un-assign the rule from all policies, or all policies the rule is assigned to are dropped.
The following actions can be performed on an audit rule:
• Edit. Does not change the status of the rule but requires re-deployment of all Live policies the rule is assigned to.
• Assign a Rule to a Draft Policy.– If the rule was Un-assigned, the status changes to Assigned. – If the rule was Assigned or Active, does not change the status of the
rule.• Assign Rule to a Live Policy.
– If the rule was Un-assigned or Assigned, the status changes to Active. – If the rule was Active, does not change the status of the rule.Assigning a rule to a Live policy causes re-deployment of the policy.
• Un-assigning a Rule from a Draft Policy. If the Draft policy was the only policy the rule was assigned to, the status changes to un-assigned. Otherwise, the status does not change.
• Un-assigning a Rule from a Live Policy.– If the rule is assigned to more Live policies, the status does not
change.– If the rule is assigned to more Draft but not Live policies, the status
changes to Assigned. – If the rule is not assigned to any more policies, the status changes to
Un-assigned. Un-assigning a rule from a Live policy causes re-deployment of the policy.
• Drop. Causes re-deployment of all Live policies the rule was assigned to.

Starting the Auditing Process
PBDB‐MA User Guide 111 © 2017. BeyondTrust Software, Inc.
Configuration Overviews
The Administration Console provides the following ways to view the configuration of your PowerBroker Databases environment:
• Configuration Summary• Policy Relations View• Audit Source Relations View
To see your PowerBroker Databases Configuration overviews:
1. On the PowerBroker Databases Home screen, click the Configure tab. The PowerBroker Databases Summary screen opens.
2. Click the Overviews tab.
3. Click the name of the overview to display it.
Configuration Summary
The Configuration Summary overview shows how many audit sources, policies and rules of each available status you have in your PowerBroker Databases configuration.
Tip: See the Details of Rules, Policies and Audit Sources.
Click the binoculars icon in any row to see the details for that rule, policy, or audit source.

Starting the Auditing Process
PBDB‐MA User Guide 112 © 2017. BeyondTrust Software, Inc.
Policy Relations View
The Policy Relations View shows the list of all policies in your PowerBroker Databases configuration and their related rules and audit sources.
Click the plus sign or the name of a policy to display the list of audit sources and audit rules assigned to the policy.
Click the glasses icon next to the name of an audit source, policy, or rule to display its Summary screen.
Audit Source Relations View
The Audit Source Relations View shows the list of all audit sources in your PowerBroker Databases Configuration and their related policies and rules.
• Click the plus sign or the name of an audit source to display the list of audit policies assigned to it.
• Click the plus sign or the name of a policy to see the list of audit rules assigned to the policy.
• Click the glasses icon next to the name of an audit source, policy, or rule to display its Summary screen.

Starting the Auditing Process
PBDB‐MA User Guide 113 © 2017. BeyondTrust Software, Inc.
Advanced Options
You can use the Advanced Options tab to search for policies and rules in your PowerBroker Databases configuration.
Searching for a Policy
To search for a policy:
1. On the PowerBroker Databases Home screen, click the Configure tab. The PowerBroker Databases Summary screen opens.
2. Click the Advanced Options tab. The Policy Search screen opens
3. Type or select the search criteria. You can search by Policy Name, Category, Policy Description, or Status.Note: The search function is not case sensitive. PowerBroker Databases
will also find partial matches. For example, if you enter "user" your search results will also contain "Users." However, if you enter "users" (plural) as your search term, the search will not return "user" (singular).
4. Click Search. PowerBroker Databases displays your search results.
Searching for a Rule
To search for a rule:
1. On the PowerBroker Databases Home screen, click the Configure tab. The PowerBroker Databases Summary screen opens.
2. Click the Advanced Options tab. The Policy Search screen opens.

Starting the Auditing Process
PBDB‐MA User Guide 114 © 2017. BeyondTrust Software, Inc.
3. Click Rules Search. The Search Rule screen opens.
4. Type or select the search criteria. You can search by the Rule Name, Rule Description, Rule Type, Status, Condition Type, and Action Type. Note: The search function is not case sensitive. PowerBroker Databases
will find a match if the attribute matches part of all of the search term. For example, if you enter "user" your search results will also contain "Users." However, if you enter "users" (plural) as your search term, the search will not return "user" (singular).
5. Click Search. PowerBroker Databases displays your search results.
Creating Custom Audit Rules and Policies
PBDB‐MA User Guide 115 © 2017. BeyondTrust Software, Inc.
Creating Custom Audit Rules and Policies
An audit policy is a uniquely named group of audit rules. In audit rules you define what to audit and what to do with collected data. Audit rules are assigned to audit policies and audit policies are assigned to audit sources.
You can group audit rules into audit policies according to your needs. For example, if you have several audit sources in your PowerBroker Databases configuration, you can create a separate audit policy for each audit source. You can also have several audit policies assigned to a single audit source.
Understanding Audit Rules
An audit rule specifies a set of conditions for filtering database log records and a list of actions to carry out when a log record matches the rule conditions.
Audit Rule Conditions
In a database log file, a transaction is fully described by the following six attributes:
• User ID - the ID of the user who performed the operation.• Operation - name of the operation performed, for example INSERT or
DELETE.• Object Name - name of the object affected by the operation, for
example a table or a stored procedure.• Application Name - name of the application used to perform the
operation.• DNS name - host name of the computer used to perform the operation.• Time Stamp - time when the operation was performed.
These six attributes, which correspond to fields in the transaction log record, constitute the conditions of an audit rule. The audit rule specifies a value or a range of values for each of the six conditions. The PowerBroker Databases Agent evaluates every log record comparing its attributes with rule conditions. When a log record matches the rule conditions, the actions specified in the rule are executed.
Audit Rule Actions
Rule actions define what to do with a log record that matches the rule conditions. You can choose one of the following actions:
• Do Not Take Any Action to skip the log record. • Collect Data to collect the log record and put it into the Repository.
Creating Custom Audit Rules and Policies
PBDB‐MA User Guide 116 © 2017. BeyondTrust Software, Inc.
• Notify to send E-mail alert notification to a specified address.
• Mark Data Severity As to collect the log record, put it into the Repository and flag it with the severity level of Low, Medium, High, or Critical. The flag is used by the PowerBroker Databases Report Server. You can see the severity level of collected data in the Audit Policy Report.
Audit Rule Types
Audit rules are divided into three types:
• Audit Rule: An audit rule defines exceptional or suspicious behavior conditions for users and objects and specifies actions to be executed when such behavior is detected. For example, an audit rule may specify to collect activity of all privileged users and alert on all DDL commands.
• Override Rule: An override rule defines exceptions from profile and audit rules. For example, an audit rule specifies to collect all DDL activity of all users; then the override rule instructs to take no action if the activity is performed by system administrator.
• Profile Rules: Profile rules define valid behavior conditions in respect to a particular attribute of log records and specify actions to be executed when these conditions are violated. Profile rules are further categorized into five types according to one of the five attributes they are anchored on:– User Profile Rule: A User Profile Rule defines valid behavior
conditions for users and specifies actions to be executed when these conditions are violated. A User Profile Rule only applies to the user specified in the rule. For example, a User Profile Rule for user Joe specifies a list of valid tables and host names. If user Joe accesses a table that is not on the list, a profile deviation is detected and rule actions are executed. If user Joe accesses a valid table from the host that is not on the list, again this deviation is detected and actions are executed. If a different user accesses a table that is not specified in this rule, no action is taken, since this rule applies only to user Joe.
Tip: Collecting and/or Alerting
You can alert on records without collecting them. If you want to collect records and alert on them, select both Collect Data and Notify.

Creating Custom Audit Rules and Policies
PBDB‐MA User Guide 117 © 2017. BeyondTrust Software, Inc.
– Object Profile Rule: An Object Profile Rule defines valid behavior conditions for objects and specifies actions to be executed when these conditions are violated. An Object Profile Rule only applies to the object specified in the rule. For example, an Object Profile Rule for table HR specifies a list of valid users and operations. If the HR table is accessed by a user who is not on the list, a profile deviation is detected and rule actions are executed. If a valid user performs an operation that is not on the list, again a profile deviation is detected and rule actions are executed. If same actions are performed on a different table, this rule is not applied.
– Operation Profile Rule: An Operation Profile Rule defines valid behavior conditions for operations and specifies actions to be executed when these conditions are violated. An Operation Profile Rule only applies to the operation specified in the rule. For example, an Operation Profile Rule specifies that operations CHANGE USER PASSWORD and CHANGE USER SETTINGS may be performed only by the database administrator. If one of these operations is performed by a different user, a profile deviation is detected and rule actions are executed. This rule does not apply to any other operations.
– Application Profile Rule: An Application Profile Rule defines valid behavior conditions for applications and specifies actions to be executed when these conditions are violated. An Application Profile Rule only applies to the application specified in the rule. For example, an Application Profile Rule specifies that application UserApplication must not be used to perform any DDL or DML operations. If this application is used to perform a DDL or DML operation, a profile deviation is detected and rule actions are executed. This rule does not apply to any other applications.
– Host Profile Rule: A Host Profile Rule defines valid behavior conditions for hosts and specifies actions to be executed when these conditions are violated. A Host Profile Rule only applies to the host specified in the rule. For example, a Host Profile Rule specifies the list of objects that can be accessed from Host1. If an object that is not on the list is accessed from Host1, a profile deviation is detected and rule actions are executed. This rule does not apply to any other hosts.

Creating Custom Audit Rules and Policies
PBDB‐MA User Guide 118 © 2017. BeyondTrust Software, Inc.
Applying Multiple Audit Rules to a Single Log Record
A log record is matched against every audit rule in the audit policy. Multiple audit rules in the audit policy may apply to a single log record. In this case, actions from all the matching audit rules are aggregated together and applied to the log record without duplication.
Override rules prevail over profile and audit rules. If a log record matches one or more Override Rules in the audit policy, then Audit and Profile Rules for this record are not evaluated, since the Override Rule overrides them. If an audit policy has several Override Rules, and a log record matches some of them, actions from all the matching Override Rules are aggregated together and applied to the log record without duplication.
Example of a policy that consists of two rules:
• An audit rule instructing to collect all DDL operations performed from Host 1.
• An Override Rule instructing to do nothing if a DDL operation was performed by the system administrator.
This policy would result in collecting log records of all DDL operations performed from the Host 1 by anyone except the system administrator.
Creating a New Audit Rule
To create a new audit rule:
1. Log into the Administration Console with Admin or Auditor privileges.
2. On the PowerBroker Databases Home screen, click the Configure tab. The PowerBroker Databases Summary screen opens.
Table 5. Examples of Audit Rule Results
Collect Data If several matching audit rules specify Collect Data as one of the actions, the log record is moved to the Repository only once.
Notify If several matching audit rules specify Notify as one of the actions, the E-mail notification is sent only once. If a different Data Severity level is selected for different rules, the E-mail notification is sent with the highest severity level.
Collect Data and Notify
If one matching audit rule specifies Collect Data only, and another matching rule specifies Notify only, the log record is collected and moved to the Repository, and an E-mail notification is generated.

Creating Custom Audit Rules and Policies
PBDB‐MA User Guide 119 © 2017. BeyondTrust Software, Inc.
3. Click the Audit Rules tab. The Audit Rules screen opens. It shows the list of existing rules and information about them. Before you create your first rule, the list contains only pre-populated rules included with PowerBroker Databases.
4. Click Add New Rule. The Add New Rule screen opens.
5. Type a unique name for the rule in the Rule Name field.
6. Type a description of the rule conditions and actions in the Rule Description field.
7. Select a rule type from the Rule Type list. Your options are:
Tip: New Rule Based On An Existing Rule
To base a new rule on an existing rule, click Clone. The fields are populated with the existing rule’s information that you can edit.

Creating Custom Audit Rules and Policies
PBDB‐MA User Guide 120 © 2017. BeyondTrust Software, Inc.
– Audit Rule. Defines suspicious behavior. If all the rule conditions are true, the actions are executed.
– Override Rule. A rule of this type takes precedence over User Profile and audit rules.
– User Profile Rule. Defines valid behavior for specified user(s). If at least one of the rule conditions is violated, the actions are executed. Applies only to the specified users.
– Object Profile Rule. Defines valid behavior for specified object(s). If at least one of the rule conditions is violated, the actions are executed. Applies only to the specified objects.
– Operation Profile Rule. Defines valid behavior for specified operation(s). If at least one of the rule conditions is violated, the actions are executed. Applies only to the specified operations.
– Application Profile Rule. Defines valid behavior for specified application(s). If at least one of the rule conditions is violated, the actions are executed. Applies only to the specified applications.
– Host Profile Rule. Defines valid behavior for specified host(s). If at least one of the rule conditions is violated, the actions are executed. Applies only to the specified hosts.
8. In the What Are Rule Conditions? section of the screen, enter rule conditions for Users (see "Entering Users" on page 121), Objects (see "Entering Objects" on page 123), Operations (see "Entering Operations" on page 124), Applications (see "Entering Applications" on page 125), and Hosts (see "Entering Hosts" on page 126). You cannot type in the fields. To enter information, click the arrow next to the condition field to open a list where you can select values for this condition. – You can select All or populate a list from the server and select specific
values. – Leaving the field empty is the same as selecting all the available values. – If you select All in the condition field, you can use the Exclude field
to exclude specific value.
9. In the What Time Should Rule Consider? section of the screen specify the time periods that transactions should be considered. Information on how to accomplish this may be found on "Setting Rule Times" on page 127
10. In the What Actions Should Rule Take? section of the screen, specify what PowerBroker Databases should do when a log record matches the Rule Conditions.a. To not to take any action, select the Do Not Take Any Action check
box.b. To collect the log record and put it into the Repository, select the
Collect Data check box.

Creating Custom Audit Rules and Policies
PBDB‐MA User Guide 121 © 2017. BeyondTrust Software, Inc.
c. To send an e-mail notification to a specified address, select the Notify check box. You can notify on records without collecting them. If you want to collect records and notify on them, select both Collect Data and Notify.
d. To collect the log record, put it into the Repository, and flag it as an exception with a severity level, select the Mark Data Severity As check box and select a priority from the list. The PowerBroker Databases Report Server uses this flag to produce the Exceptions Report.
11. Click Save to save the rule and return to the Audit Rules screen or click Continue to assign the rule to a policy. For more information, see "Assigning an Audit Rule to Audit Policies" on page 134.
Entering Users
1. Click the arrow next to the Users field. The Users dialog box opens. Initially, All or None are your only choices.
2. To populate the list of users from the server:a. Select the database from the Database Type list and the Audit source
from the Audit Source Name list. Note: Since DB2 users are OS Users, if you want to enter a DB2
user, go to the next step.b. Click the check box next to one or more user IDs.
• To choose all but a few users, select All in the Users field, then select the users to exclude in the Exclude field. For example, to select all users except for the system administrator, click the down
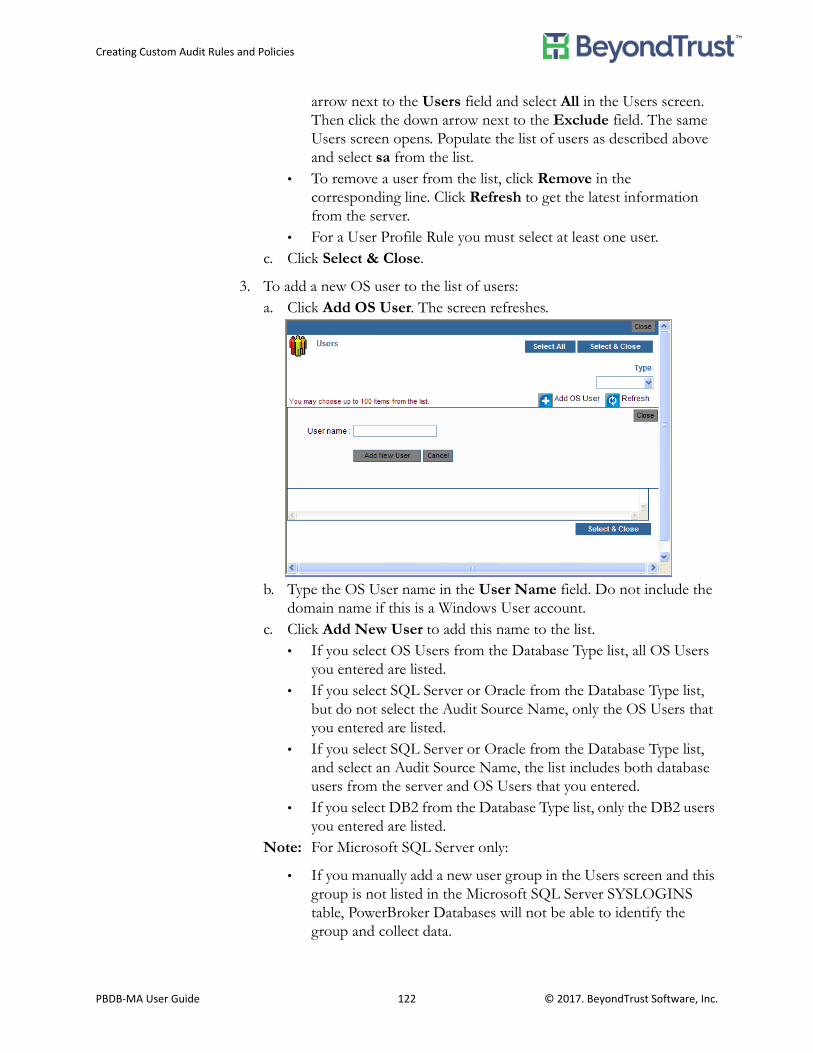
Creating Custom Audit Rules and Policies
PBDB‐MA User Guide 122 © 2017. BeyondTrust Software, Inc.
arrow next to the Users field and select All in the Users screen. Then click the down arrow next to the Exclude field. The same Users screen opens. Populate the list of users as described above and select sa from the list.
• To remove a user from the list, click Remove in the corresponding line. Click Refresh to get the latest information from the server.
• For a User Profile Rule you must select at least one user. c. Click Select & Close.
3. To add a new OS user to the list of users:a. Click Add OS User. The screen refreshes.
b. Type the OS User name in the User Name field. Do not include the domain name if this is a Windows User account.
c. Click Add New User to add this name to the list. • If you select OS Users from the Database Type list, all OS Users
you entered are listed.• If you select SQL Server or Oracle from the Database Type list,
but do not select the Audit Source Name, only the OS Users that you entered are listed.
• If you select SQL Server or Oracle from the Database Type list, and select an Audit Source Name, the list includes both database users from the server and OS Users that you entered.
• If you select DB2 from the Database Type list, only the DB2 users you entered are listed.
Note: For Microsoft SQL Server only:
• If you manually add a new user group in the Users screen and this group is not listed in the Microsoft SQL Server SYSLOGINS table, PowerBroker Databases will not be able to identify the group and collect data.

Creating Custom Audit Rules and Policies
PBDB‐MA User Guide 123 © 2017. BeyondTrust Software, Inc.
• If you manually add a new user in the Users screen and this user is not listed in the Microsoft SQL Server SYSLOGINS table and does not belong to any of the groups listed in the Microsoft SQL Server SYSLOGINS table, PowerBroker Databases will not be able to identify the user and collect data.
Entering Objects
1. Click the arrow next to the Objects field. The Objects dialog box opens. Initially, All or None are your only choices.
2. To view the list of objects, select the database from the Database Type field, select an object from the Object Type list, and audit source from the Audit Source Name list.
3. Click the check box next to one or more object names.– To choose all but a few objects, select All in the Objects field, then
select the objects to exclude in the Exclude field. – Click Refresh to get the latest information from the server.
Note: For DB2 v9.7, the All option is NOT supported for DML auditing. If all DB2 v9.7 tables need to be audited, they must be individually configured. However, this approach is not recommended unless it is required because doing so can degrade performance.
– If your Audit source is SQL Server 2008 and above, to Audit Select queries, select the table names here and deploy the rule/policy at the database level.• Only the tables being Audited will have the data collected.
Focusing the Select Audits results in significant performance improvements.
• To use this method you need to disable Extended Auditing. If Extended Auditing is enabled then you do not set the table names here.

Creating Custom Audit Rules and Policies
PBDB‐MA User Guide 124 © 2017. BeyondTrust Software, Inc.
– To remove an object from the list, click Remove in the corresponding line.
4. Click Select & Close.
Entering Operations
1. Click the arrow next to the Operations field. The Operations dialog box opens. Initially, the list is populated for Any Database.
2. Select a database type from the Database Type list. Your options are: – Any Database: All operations supported on at least one of the
following databases: DB2, SQL Server, or Oracle. – All Database: Only operations supported on all three databases -
DB2, SQL Server and Oracle. – DB2: All operations supported on DB2. This includes DB2 specific
operations plus operations also supported on SQL Server and/or Oracle.
– Oracle: All operations supported on Oracle. This includes Oracle specific operations plus operations also supported on SQL Server and/or DB2.
– SQL Server: All operations supported on SQL Server. This includes SQL Server specific operations plus operations also supported on DB2 and/or Oracle.
Note: When you select All operations, the following operations are excluded by default:
• On DB2: UPDATE_Internal• On Oracle: SELECT• On SQL Server: SELECT, EXECUTE_PROCEDURETo include these operations, you need to select them specifically.
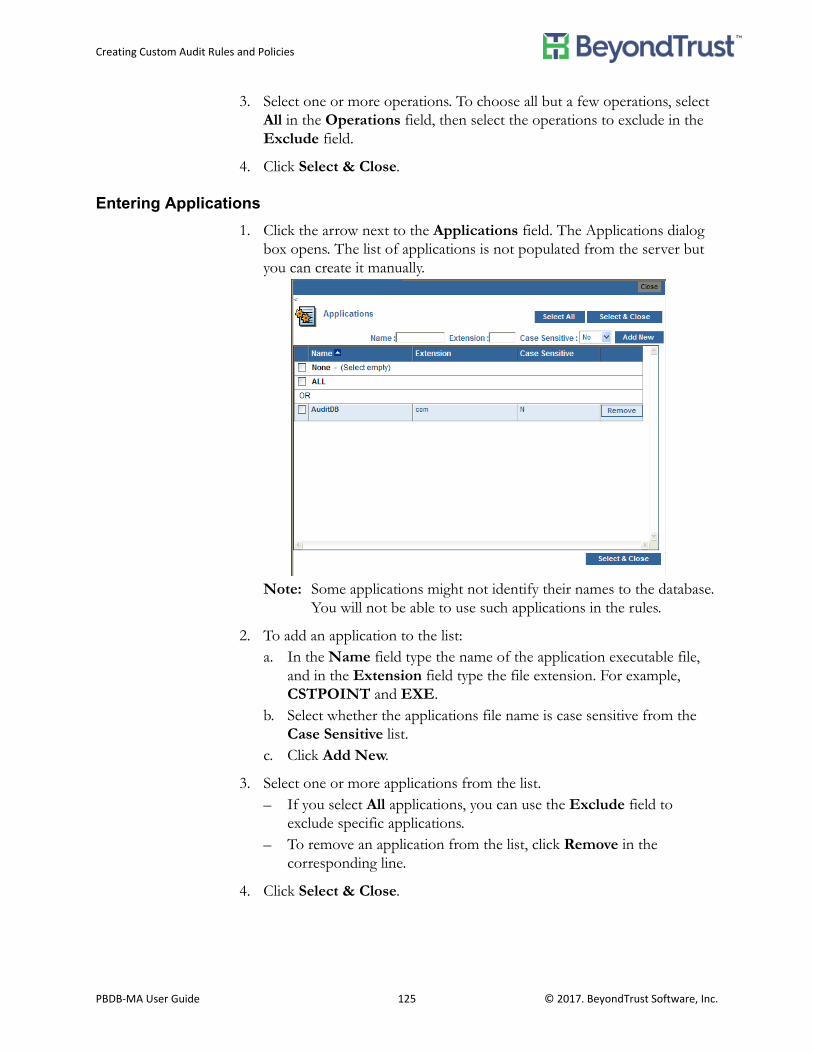
Creating Custom Audit Rules and Policies
PBDB‐MA User Guide 125 © 2017. BeyondTrust Software, Inc.
3. Select one or more operations. To choose all but a few operations, select All in the Operations field, then select the operations to exclude in the Exclude field.
4. Click Select & Close.
Entering Applications
1. Click the arrow next to the Applications field. The Applications dialog box opens. The list of applications is not populated from the server but you can create it manually.
Note: Some applications might not identify their names to the database. You will not be able to use such applications in the rules.
2. To add an application to the list:a. In the Name field type the name of the application executable file,
and in the Extension field type the file extension. For example, CSTPOINT and EXE.
b. Select whether the applications file name is case sensitive from the Case Sensitive list.
c. Click Add New.
3. Select one or more applications from the list.– If you select All applications, you can use the Exclude field to
exclude specific applications.– To remove an application from the list, click Remove in the
corresponding line.
4. Click Select & Close.

Creating Custom Audit Rules and Policies
PBDB‐MA User Guide 126 © 2017. BeyondTrust Software, Inc.
Entering Hosts
1. Click the arrow next to the Host field. The Hosts screen opens. The list of hosts is not populated from the server but you can create it manually.
2. To create a list entry, type the host name in the Name field and click Add New.
3. Select one or more hosts. – If you select All hosts, you can use the Exclude field to exclude
specific hosts.– To remove a host from the list, click Remove in the corresponding
line.
4. Click Select & Close.
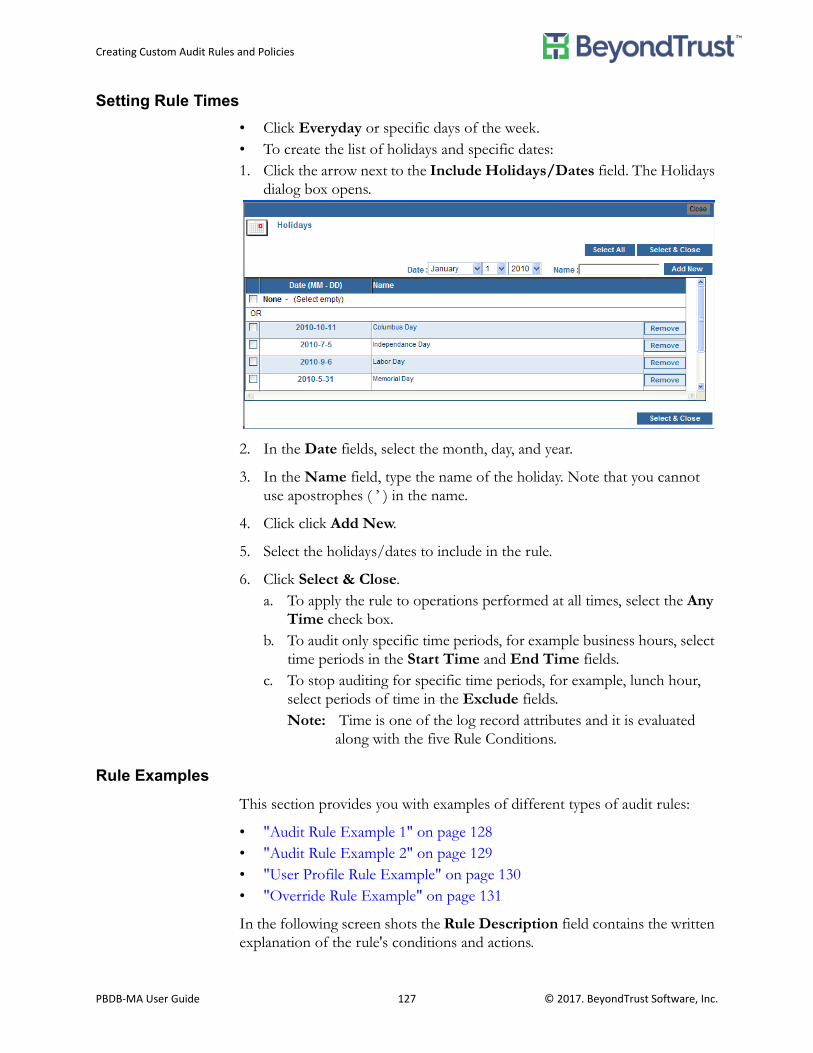
Creating Custom Audit Rules and Policies
PBDB‐MA User Guide 127 © 2017. BeyondTrust Software, Inc.
Setting Rule Times
• Click Everyday or specific days of the week.• To create the list of holidays and specific dates: 1. Click the arrow next to the Include Holidays/Dates field. The Holidays
dialog box opens.
2. In the Date fields, select the month, day, and year.
3. In the Name field, type the name of the holiday. Note that you cannot use apostrophes ( ’ ) in the name.
4. Click click Add New.
5. Select the holidays/dates to include in the rule.
6. Click Select & Close.a. To apply the rule to operations performed at all times, select the Any
Time check box.b. To audit only specific time periods, for example business hours, select
time periods in the Start Time and End Time fields. c. To stop auditing for specific time periods, for example, lunch hour,
select periods of time in the Exclude fields.Note: Time is one of the log record attributes and it is evaluated
along with the five Rule Conditions.
Rule Examples
This section provides you with examples of different types of audit rules:
• "Audit Rule Example 1" on page 128• "Audit Rule Example 2" on page 129• "User Profile Rule Example" on page 130• "Override Rule Example" on page 131
In the following screen shots the Rule Description field contains the written explanation of the rule's conditions and actions.

Creating Custom Audit Rules and Policies
PBDB‐MA User Guide 128 © 2017. BeyondTrust Software, Inc.
Audit Rule Example 1
For all uses except system administrator, collect all operations except SELECT, performed on all objects, by all applications, on all hosts except Host 1, every day at any time.
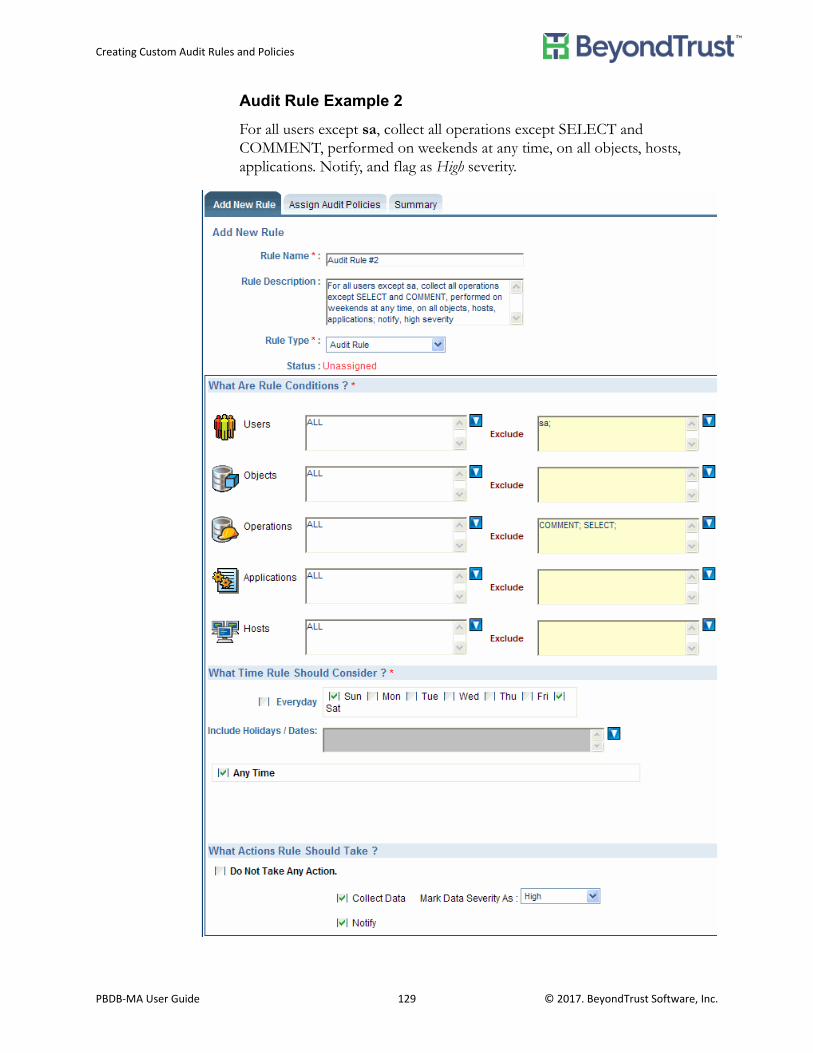
Creating Custom Audit Rules and Policies
PBDB‐MA User Guide 129 © 2017. BeyondTrust Software, Inc.
Audit Rule Example 2
For all users except sa, collect all operations except SELECT and COMMENT, performed on weekends at any time, on all objects, hosts, applications. Notify, and flag as High severity.
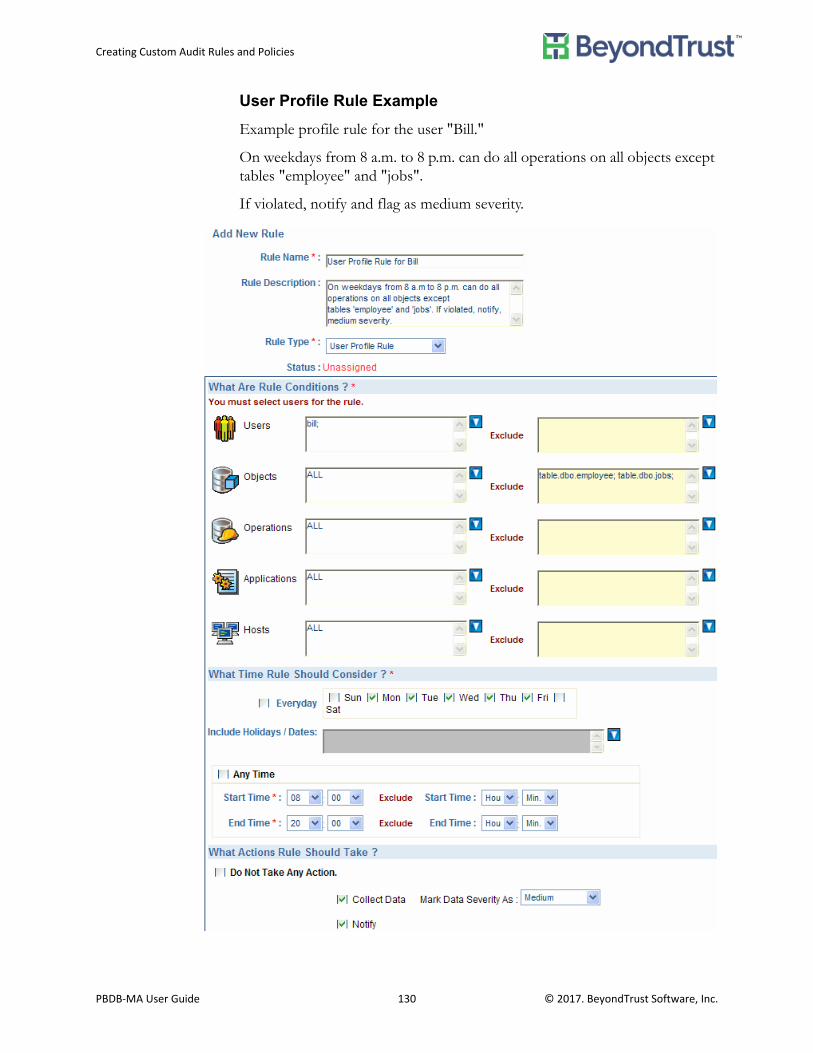
Creating Custom Audit Rules and Policies
PBDB‐MA User Guide 130 © 2017. BeyondTrust Software, Inc.
User Profile Rule Example
Example profile rule for the user "Bill."
On weekdays from 8 a.m. to 8 p.m. can do all operations on all objects except tables "employee" and "jobs".
If violated, notify and flag as medium severity.
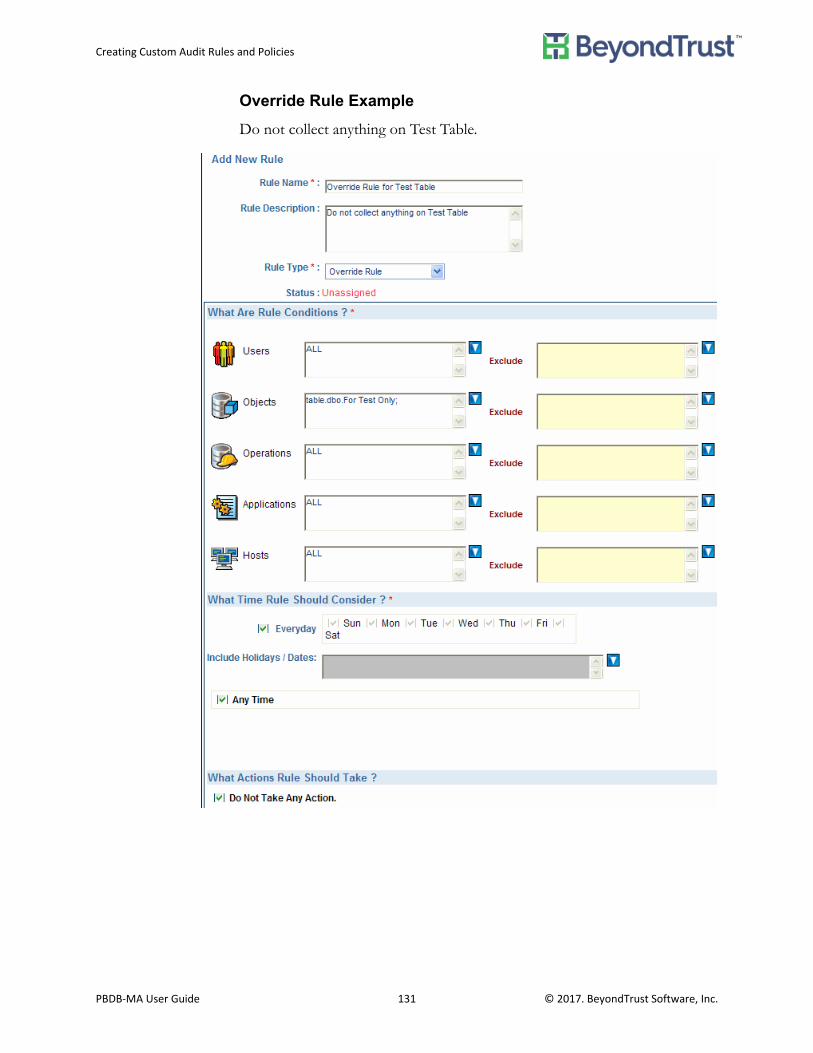
Creating Custom Audit Rules and Policies
PBDB‐MA User Guide 131 © 2017. BeyondTrust Software, Inc.
Override Rule Example
Do not collect anything on Test Table.

Creating Custom Audit Rules and Policies
PBDB‐MA User Guide 132 © 2017. BeyondTrust Software, Inc.
Editing an Audit Rule
Note: If you edit an active rule, all live policies using this rule re-deploy automatically.
To edit an audit rule:
1. On the PowerBroker Databases Home screen, click the Configure tab. The PowerBroker Databases Summary screen opens.
2. Click the Audit Rules tab. The Audit Rules screen opens.
3. Click the rule you want to edit. The Edit Rule screen opens.
4. Edit the information you want.
5. Click Save to save your changes and return to the Audit Rules screen, or click Continue to proceed to the Assign Audit Policies screen.
Deleting an Audit Rule
Note: If you delete an Active rule, all live policies using this rule re-deploy automatically.
To delete an audit rule:
1. On the PowerBroker Databases Home screen click the Configure tab. The PowerBroker Databases Summary screen opens.
2. Click the Audit Rules tab. The Audit Rules screen opens.
3. Locate the rule you want to delete and click Drop in the corresponding line. The Drop Rule confirmation dialog opens.
4. Click Yes to confirm dropping the rule.
Creating a New Audit Policy
An audit policy is essentially a container for one or more audit policies. You use an audit rule to define what data to audit and what to do with the collected data. You can group audit rules into audit policies according to your needs. You assign audit rules to audit policies, then assign audit policies to audit sources.
To create an audit policy:
1. Log into the Administration Console with Admin or Auditor privileges.
2. Click the Configure tab. The PowerBroker Databases Summary screen opens.
3. Click the Audit Policy tab. The Audit Policies screen opens. The Audit Policies screen shows the list of existing policies and information about
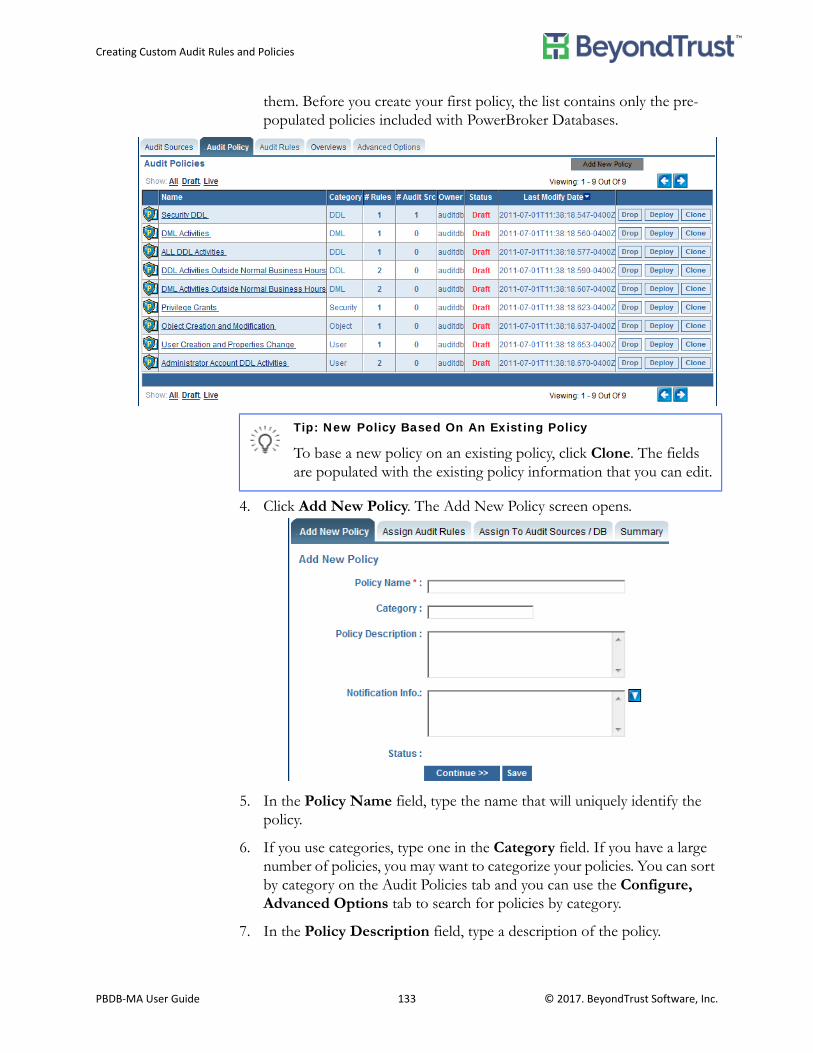
Creating Custom Audit Rules and Policies
PBDB‐MA User Guide 133 © 2017. BeyondTrust Software, Inc.
them. Before you create your first policy, the list contains only the pre-populated policies included with PowerBroker Databases.
4. Click Add New Policy. The Add New Policy screen opens.
5. In the Policy Name field, type the name that will uniquely identify the policy.
6. If you use categories, type one in the Category field. If you have a large number of policies, you may want to categorize your policies. You can sort by category on the Audit Policies tab and you can use the Configure, Advanced Options tab to search for policies by category.
7. In the Policy Description field, type a description of the policy.
Tip: New Policy Based On An Existing Policy
To base a new policy on an existing policy, click Clone. The fields are populated with the existing policy information that you can edit.
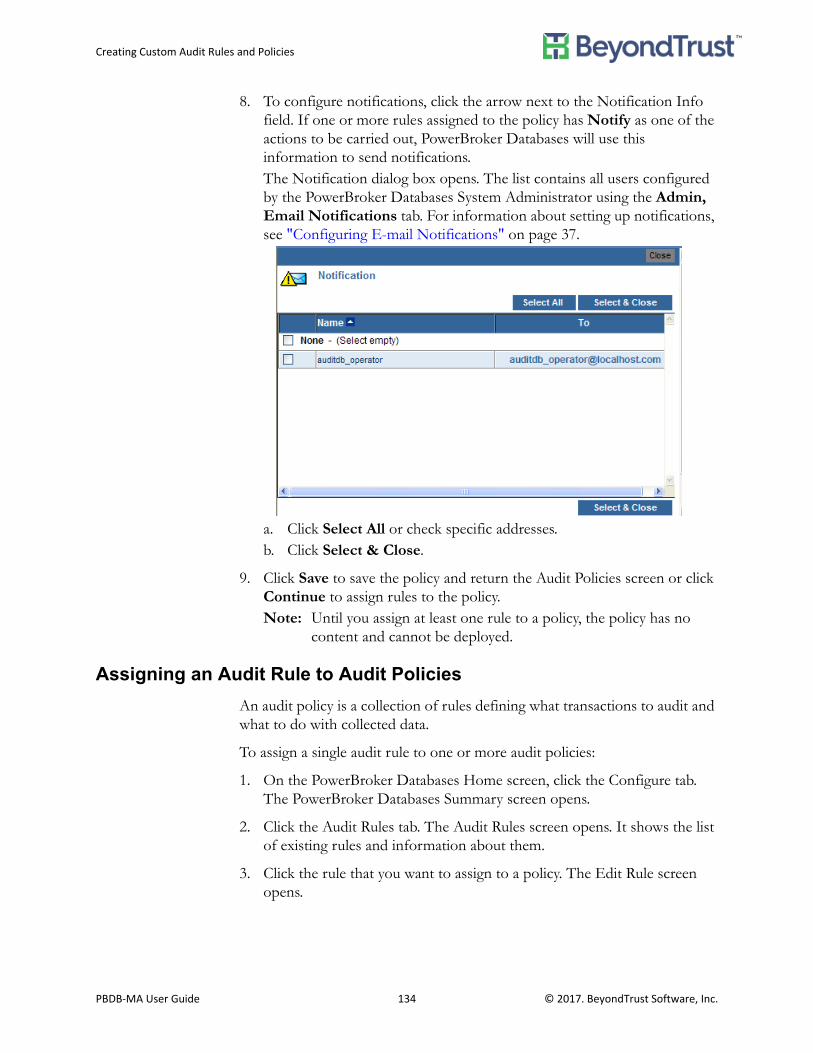
Creating Custom Audit Rules and Policies
PBDB‐MA User Guide 134 © 2017. BeyondTrust Software, Inc.
8. To configure notifications, click the arrow next to the Notification Info field. If one or more rules assigned to the policy has Notify as one of the actions to be carried out, PowerBroker Databases will use this information to send notifications. The Notification dialog box opens. The list contains all users configured by the PowerBroker Databases System Administrator using the Admin, Email Notifications tab. For information about setting up notifications, see "Configuring E-mail Notifications" on page 37.
a. Click Select All or check specific addresses.b. Click Select & Close.
9. Click Save to save the policy and return the Audit Policies screen or click Continue to assign rules to the policy. Note: Until you assign at least one rule to a policy, the policy has no
content and cannot be deployed.
Assigning an Audit Rule to Audit Policies
An audit policy is a collection of rules defining what transactions to audit and what to do with collected data.
To assign a single audit rule to one or more audit policies:
1. On the PowerBroker Databases Home screen, click the Configure tab. The PowerBroker Databases Summary screen opens.
2. Click the Audit Rules tab. The Audit Rules screen opens. It shows the list of existing rules and information about them.
3. Click the rule that you want to assign to a policy. The Edit Rule screen opens.

Creating Custom Audit Rules and Policies
PBDB‐MA User Guide 135 © 2017. BeyondTrust Software, Inc.
4. Click the Assign Audit Policies tab. The Assigned Policy Information screen opens. It shows the list of policies this rule is assigned to. Before you assign the rule to a policy, the list contains no data.
5. Click Select From Existing Policy. The list of existing policies opens.
You can filter the list of policies by status. Click the status link next to the word Show.
6. Click the check box for one or more policies to select it.
7. To assign the rule to all policies click Select All.
8. Click Assign Selected Policy. The Assign Policy Information screen opens.
9. Click Save to save the changes and return to the Audit Rules screen or click Continue to display the Audit Rule Summary screen.
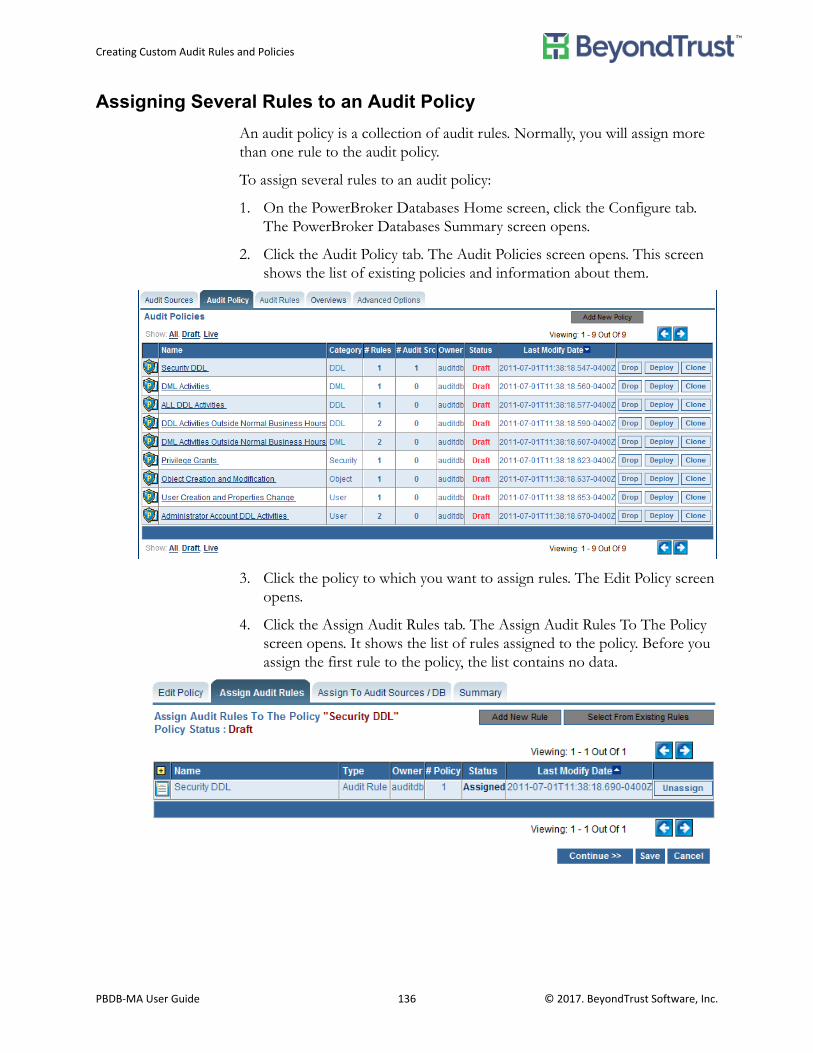
Creating Custom Audit Rules and Policies
PBDB‐MA User Guide 136 © 2017. BeyondTrust Software, Inc.
Assigning Several Rules to an Audit Policy
An audit policy is a collection of audit rules. Normally, you will assign more than one rule to the audit policy.
To assign several rules to an audit policy:
1. On the PowerBroker Databases Home screen, click the Configure tab. The PowerBroker Databases Summary screen opens.
2. Click the Audit Policy tab. The Audit Policies screen opens. This screen shows the list of existing policies and information about them.
3. Click the policy to which you want to assign rules. The Edit Policy screen opens.
4. Click the Assign Audit Rules tab. The Assign Audit Rules To The Policy screen opens. It shows the list of rules assigned to the policy. Before you assign the first rule to the policy, the list contains no data.

Creating Custom Audit Rules and Policies
PBDB‐MA User Guide 137 © 2017. BeyondTrust Software, Inc.
5. Click Select From Existing Rules. The Audit Rules dialog box opens.
6. Click the check box for one or more rules to select it.You can filter the list of rules by status. Click the status link next to the word Show.To assign the rule to all policies click Select All.
To view the next page of rules, click the Next or Previous buttons.
7. Click Assign Selected Rules. PowerBroker Databases returns you to the Assign Audit Rules To The Policy screen.
8. Click Save to save your changes and return to the Audit Policies screen. Or click Continue to proceed to the Assign Policy to Audit Sources screen. For instructions, see "Assigning an Audit Policy to an Audit Source" on page 103.
Policy Example with Multiple Rules
PowerBroker Databases matches log records against every rule in the audit policies assigned to the audit source. Multiple rules in the audit policy may apply to the same log record. In this case, PowerBroker Databases combines actions from all the matching audit rules and applies them to the log record without duplication.
Example:You can assign the following rules, described in "Rule Examples" on page 127, to the same audit policy:
• Audit Rule Example 1 is an audit rule which instructs to collect data under these conditions:– Users: all except system administrator.

Creating Custom Audit Rules and Policies
PBDB‐MA User Guide 138 © 2017. BeyondTrust Software, Inc.
– Objects: all tables– Operations: all– Applications: all– Hosts: all except Host 1The time the rule should consider is weekdays from 8:00 till 20:00.
• Audit Rule Example 2 is an audit rule which instructs to collect data, mark data severity as High, and notify under same conditions as audit rule #1, but the time the rule should consider is weekends at any time.
• Override Rule Example is an Override Type Rule which instructs that for operations performed on the table “For Test Only”, no action should ever be taken.
Deploying this audit policy will produce the following results:
• No data will be collected on the table “For Test Only”.• For all other tables information about all operations performed on any
day, at any time, by any user except for the system administrator, and from any host except for the Host 1 will be collected and saved in the Repository.
• Information about operations performed on weekends will also be marked as high severity and e-mail notifications will be sent to the specified address. Note, that although two rules in the policy instruct to collect this information, it will be collected only once, since the rules are applied without duplication.
Editing an Audit Policy
Note: A live policy automatically re-deploys after editing.
To edit an audit policy:
1. On the PowerBroker Databases Home screen, click the Configure tab. The PowerBroker Databases Summary screen opens.
2. Click the Audit Policy tab. The Audit Policies screen opens.
3. Click the policy you want to edit. The Edit Policy screen opens.
4. You can edit the policy definition on the Edit Policy screen. For more information, see "Creating a New Audit Policy" on page 132.
5. To modify the rules assigned to the policy, click the Assign Audit Rules tab. For more information, see "Assigning an Audit Rule to Audit Policies" on page 134 or "Editing an Audit Rule" on page 132.
6. To edit the audit sources that the audit policy has been assigned to, click the Assign to Audit Sources/DB tab.
7. Click Save.

Creating Custom Audit Rules and Policies
PBDB‐MA User Guide 139 © 2017. BeyondTrust Software, Inc.
Deleting an Audit Policy
When you delete a policy, you are only deleting the "container" not the rules associated with the policy. All rules assigned to that policy remain in the system.
However, deleting a policy has the following effect on rule statuses:
• If the deleted policy was the only policy a rule was assigned to, the rule's status changes to Un-assigned.
• If the deleted policy was the only Live policy a rule was assigned to but it was also assigned to one or more Draft policies, the rule changes status to Assigned.
If a Live policy is dropped, the audit sources it was assigned to will force information synchronization to related PowerBroker Databases Agents, so that the configuration change in the audit sources can take effect.
To delete an audit policy:
1. On the PowerBroker Databases Home screen, click the Configure tab. The PowerBroker Databases Summary screen opens.
2. Click the Audit Policy tab. The Audit Policies screen opens.
3. Locate the policy you want to delete and click Drop in the corresponding line. The Drop Policy confirmation message appears.
4. Click Yes to confirm dropping the policy.
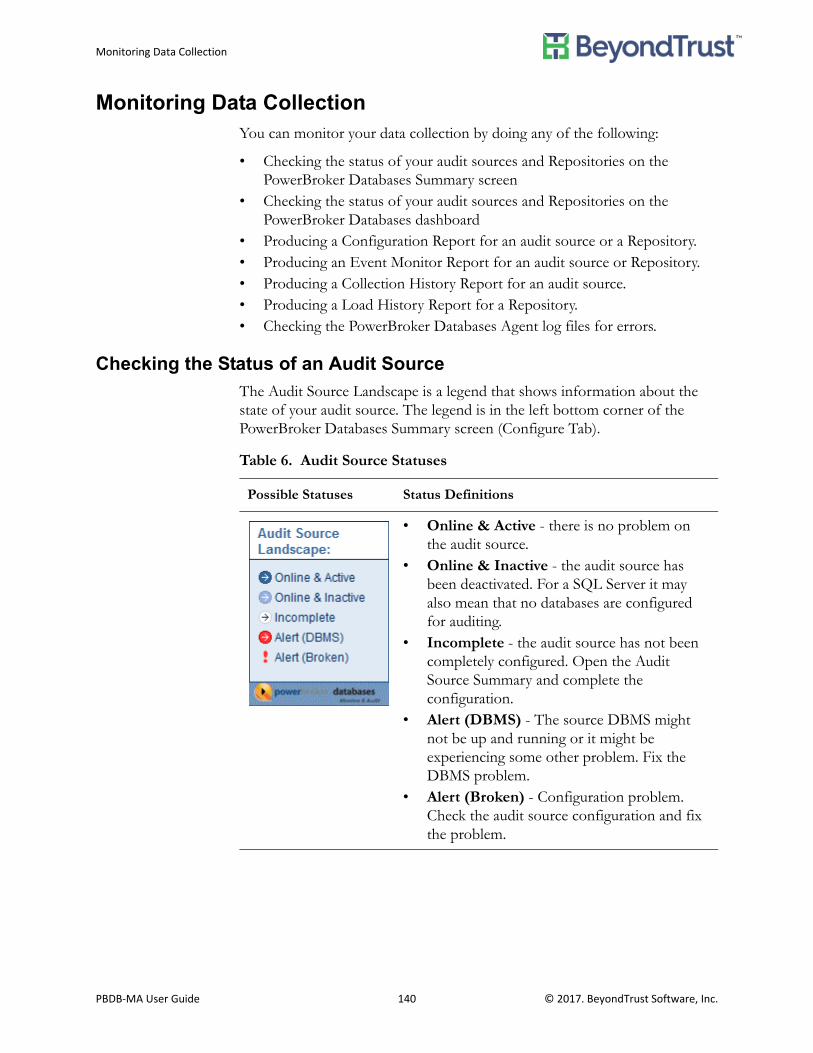
Monitoring Data Collection
PBDB‐MA User Guide 140 © 2017. BeyondTrust Software, Inc.
Monitoring Data CollectionYou can monitor your data collection by doing any of the following:
• Checking the status of your audit sources and Repositories on the PowerBroker Databases Summary screen
• Checking the status of your audit sources and Repositories on the PowerBroker Databases dashboard
• Producing a Configuration Report for an audit source or a Repository.• Producing an Event Monitor Report for an audit source or Repository.• Producing a Collection History Report for an audit source.• Producing a Load History Report for a Repository.• Checking the PowerBroker Databases Agent log files for errors.
Checking the Status of an Audit Source
The Audit Source Landscape is a legend that shows information about the state of your audit source. The legend is in the left bottom corner of the PowerBroker Databases Summary screen (Configure Tab).
Table 6. Audit Source Statuses
Possible Statuses Status Definitions
• Online & Active - there is no problem on the audit source.
• Online & Inactive - the audit source has been deactivated. For a SQL Server it may also mean that no databases are configured for auditing.
• Incomplete - the audit source has not been completely configured. Open the Audit Source Summary and complete the configuration.
• Alert (DBMS) - The source DBMS might not be up and running or it might be experiencing some other problem. Fix the DBMS problem.
• Alert (Broken) - Configuration problem. Check the audit source configuration and fix the problem.

Monitoring Data Collection
PBDB‐MA User Guide 141 © 2017. BeyondTrust Software, Inc.
Checking the Status of a Repository
An PowerBroker Databases Repository can have one of the following statuses:
• Broken - Repository has a configuration problem.• Initializing - Repository initialization is in progress.• Offline - Repository has no communication with PowerBroker Databases
Agent.• Online - Repository can communicate with PowerBroker Databases Agent.• Online_with_Warnings - Repository can communicate with the
PowerBroker Databases Agent, but with warning of possible problem.• Uninitialized - Repository create action has been requested but not begun.• Unreachable - Repository has a network problem.
To view the status of a Repository, complete the following steps:
1. Click the Configure Tab.
2. In the Repositories (View All/Add) area, click View All. The View All Repositories dialog opens. The Repository status can be viewed in the Status column.
Understanding the Dashboard Tab
The Dashboard tab provides an overview of your PowerBroker Databases environment on a single screen. The Dashboard Tab lets you see the status of your agents, audit sources, and repositories, and quickly identify when there are collection, transfer, or load issues within your PowerBroker Databases system.

Monitoring Data Collection
PBDB‐MA User Guide 142 © 2017. BeyondTrust Software, Inc.
Dashboard Navigation
The Dashboard contains separate panes to display the statuses of audit sources, agents, and Repositories. Each pane includes buttons in the top right-hand corner to help you view and navigate the information that is displayed in the pane.
Figure 5. Pane Navigation Buttons
From left to right, the navigation buttons are as follows:
• Refresh• Maximize/Minimize (horizontal)• Expand/Collapse (vertical)
Understanding Dashboard Audit Source Statuses
The Audit Source Status pane displays a list of audit sources, their current status, the last time a successful collection was performed, and the last successful update.
Figure 6. Audit Source Status Pane

Monitoring Data Collection
PBDB‐MA User Guide 143 © 2017. BeyondTrust Software, Inc.
The audit source icons reflect the current status of the audit source based on the statuses of the databases associated with the audit source.
You can click the Audit Source name to display the Database Status pane which displays further details about the monitored databases. This pane provides additional details about the audit source status.
Figure 7. Database Status for Audit Source Pane
Table 7. Audit Source Icons
Icon Audit Source Status
OK - Audit source is online and active. The last collection succeeded on schedule and without errors or warnings.
Warning - Indicates that the last collection succeeded with warnings.
Failed - Indicates one of the following problems with the audit source:
• Collection Agent is broken, offline, or unreachable.• Monitor Agent is broken, offline, or unreachable.• Last collection failed.• Last collection was missed (last successful collection is more
than 1 schedule period in the past)• Last collection succeeded but with errors.• Last expected collection unknown.• Last collection transfer failed.• Last collection submit failed.

Monitoring Data Collection
PBDB‐MA User Guide 144 © 2017. BeyondTrust Software, Inc.
The database icons reflect the current status of the database.
Understanding Dashboard Agent Statuses
The Agent Status pane displays a list of agents, their current status, the host name of the computer where they are installed, the last status update (heartbeat message to the Central Configuration Agent), and the last configuration update.
Figure 8. Agent Status Pane
Tip: Expand the Database Status Pane.
You can further expand the Database Status pane by clicking the
Maximize button at the top right corner of the pane.
This makes it easier to view the Detail column.
Table 8. Database Status Icons
Icon Database Status
OK - Database is online.
Warning - Database is initializing or on-line with warnings.
Failed - Indicates that the database is broken, uninitialized, offline, or broken.
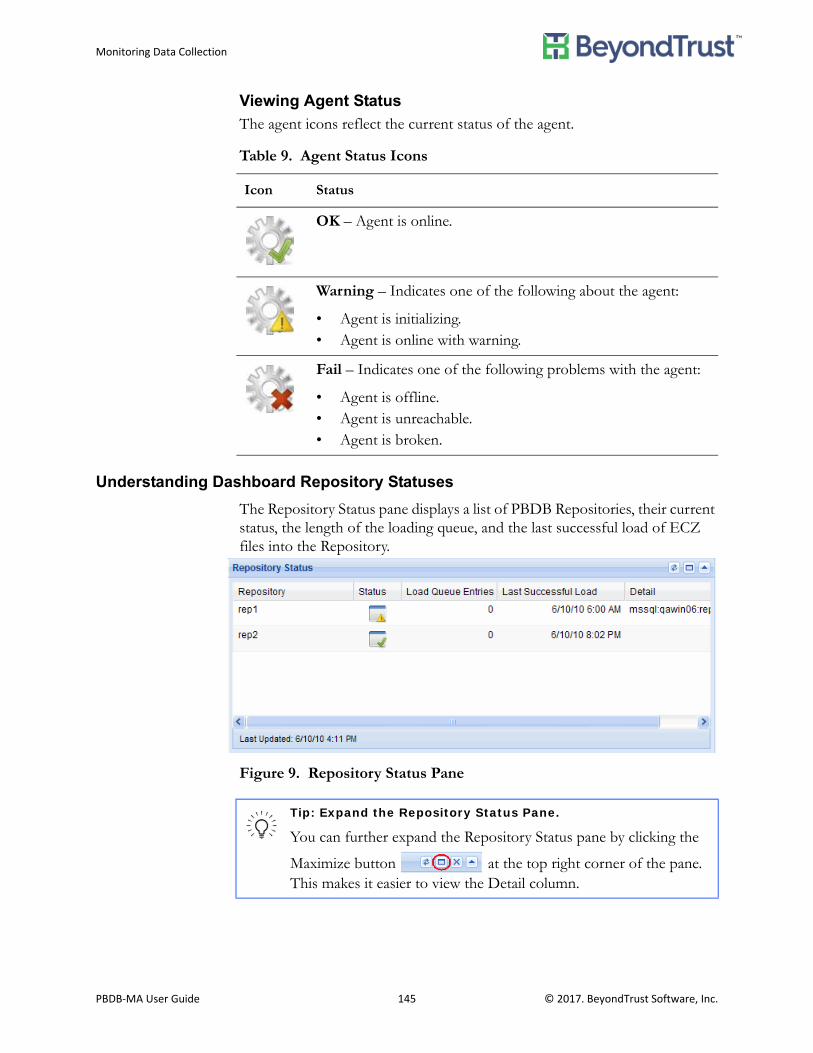
Monitoring Data Collection
PBDB‐MA User Guide 145 © 2017. BeyondTrust Software, Inc.
Viewing Agent Status
The agent icons reflect the current status of the agent.
Understanding Dashboard Repository Statuses
The Repository Status pane displays a list of PBDB Repositories, their current status, the length of the loading queue, and the last successful load of ECZ files into the Repository.
Figure 9. Repository Status Pane
Table 9. Agent Status Icons
Icon Status
OK – Agent is online.
Warning – Indicates one of the following about the agent:
• Agent is initializing.• Agent is online with warning.
Fail – Indicates one of the following problems with the agent:
• Agent is offline.• Agent is unreachable.• Agent is broken.
Tip: Expand the Repository Status Pane.
You can further expand the Repository Status pane by clicking the
Maximize button at the top right corner of the pane. This makes it easier to view the Detail column.
Monitoring Data Collection
PBDB‐MA User Guide 146 © 2017. BeyondTrust Software, Inc.
The Repository icons reflect the current status of the Repository.
Generating Configuration Reports
PowerBroker Databases provides configuration reports for both audit sources and Repositories.
Audit Source Configuration Reports
To generate a configuration report for an audit source:
1. Click the Configure Tab.
2. In the Audited DBMS area, click the name of an audit source.
3. In the Audit Source Summary screen, click Configuration Report.The report opens in another browser window. To print the report, click Send to Printer.
Repository Configuration Reports
To generate a configuration report for a Repository:
1. Click the Configure Tab.
2. In the Repositories section of the PowerBroker Databases Summary Page, click View All.
3. In the Repository List, click a Repository name.
4. In the Repository Summary screen, click Configuration Report. The report opens in another browser window.
Table 10. Repository Status Icons
Icon Repository Status
OK – Repository is online.
Warning – Indicates one of the following about the Repository:
• Repository is initializing.• Repository is online with warning.
Failure - Indicates one of the following problems with the Repository:
• Repository is broken.• Repository is unreachable.

Monitoring Data Collection
PBDB‐MA User Guide 147 © 2017. BeyondTrust Software, Inc.
The report opens in another browser window. To print the report, click Send to Printer.
Monitoring Reports
The following monitoring reports are provided with PowerBroker Databases:
• Event Monitoring Report. For more information, see "Understanding the Event Monitor Report" on page 149.
• Collection History Report. For more information, see "Understanding the Collection History Report" on page 151.
• Load History Report. For more information, see "Understanding the Collection History Report" on page 151.
Generating Monitoring Reports
When you generate monitoring reports from the Monitor tab, the report contains consolidated information from all of your audit sources and Repositories.
To generate a monitoring report for a specific audit source or Repository, generate the report from the Audit Source Summary or Repository Summary screen.
To produce a consolidated monitoring report:
1. Log into the Administration Console with Admin or Monitor privileges. If you log in as DBA or Auditor without Monitor privileges, the Monitor tab is hidden.
2. Click the Monitor tab. The PowerBroker Databases Monitor screen opens.
3. Click the name of the Report to generate it.

Monitoring Data Collection
PBDB‐MA User Guide 148 © 2017. BeyondTrust Software, Inc.
Generating Monitor Reports for Specific Dates
To display information for a particular period of time:
1. Generate a report as described in "Generating Monitoring Reports" on page 147.
2. In the report page header, specify a Start Date.
3. In the report page header, specify an End Date.
4. Click Search. The page refreshes to display only the selected date range.
Sorting Columns in Monitor Reports
You can sort Event Monitor and Load History Report results based on Timestamp, Category, Source, Source Type, or Agent, by clicking the corresponding column title.
You can sort Collection History Report results based on Timestamp, Agent, Audit Source, Database, or File Name by clicking the corresponding column title.
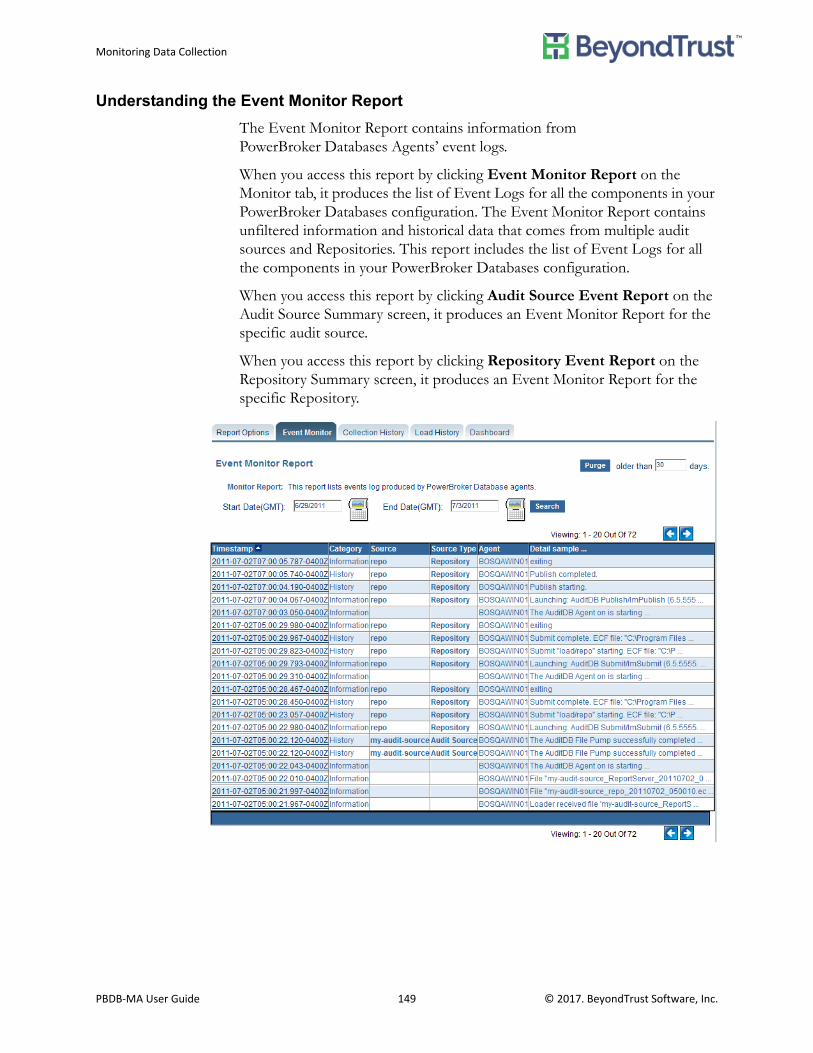
Monitoring Data Collection
PBDB‐MA User Guide 149 © 2017. BeyondTrust Software, Inc.
Understanding the Event Monitor Report
The Event Monitor Report contains information from PowerBroker Databases Agents’ event logs.
When you access this report by clicking Event Monitor Report on the Monitor tab, it produces the list of Event Logs for all the components in your PowerBroker Databases configuration. The Event Monitor Report contains unfiltered information and historical data that comes from multiple audit sources and Repositories. This report includes the list of Event Logs for all the components in your PowerBroker Databases configuration.
When you access this report by clicking Audit Source Event Report on the Audit Source Summary screen, it produces an Event Monitor Report for the specific audit source.
When you access this report by clicking Repository Event Report on the Repository Summary screen, it produces an Event Monitor Report for the specific Repository.

Monitoring Data Collection
PBDB‐MA User Guide 150 © 2017. BeyondTrust Software, Inc.
Viewing Event Monitor Report Details
To display details about a particular event:
1. Generate an Event Monitoring report as described in "Generating Monitoring Reports" on page 147.
2. Click the event's timestamp. The Event Detail tab opens.
3. To go back to the report, click the Event Monitor tab.
Purging Event Monitor Data
Caution: Purging data will permanently remove records from your database.
To purge old data:
1. Generate a report as described in "Generating Monitoring Reports" on page 147.
2. Specify the number of days in the older than __ days field.
3. Click Purge.

Monitoring Data Collection
PBDB‐MA User Guide 151 © 2017. BeyondTrust Software, Inc.
Understanding the Collection History Report
The Collection History Report contains information on both successful and failed collections.
When you access this report by clicking Collection History Report on the Monitor tab, it produces collection history reports for all audit sources in your PowerBroker Databases configuration. The Collection History Report contains unfiltered information and historical data that comes from multiple audit sources.
When you access this report by clicking Collection History Report on the Audit Source Summary screen it provides a Collection History Report for the specific audit source.
Tip: Show Only Failed Collections.
To show only failed collections, select the Show Failed Collections Only check box.

Monitoring Data Collection
PBDB‐MA User Guide 152 © 2017. BeyondTrust Software, Inc.
Understanding the Load History Report
The Load History report provides information about the success or failure of ECZ files loading to and publishing from the Repositories in your PowerBroker Databases configuration.
When you access this report by clicking Load History Report on the Monitor tab, it provides load history information for all Repositories in your PowerBroker Databases configuration. The Load History Report contains unfiltered information and historical data that comes from multiple Repositories.
When you access this report by clicking Load History Report on the Repository Summary screen, it produces the load history for the specific Repository.
Checking Agent Log Files
The PowerBroker Databases Agent generates log files that include error messages. Agent log files can be found in the following directory:
Windows
<installation directory>\BeyondTrust\PowerBroker Databases\Agent\Log
UNIX
<installation directory>/BeyondTrust/agent.<server>/log
Note: Each agent generates its own log file. Thus, there will be an agent log file on each computer where an PowerBroker Databases agent is installed.
Tip: Show Only Failed Loads.
To show only failed loads, select the Show Failed Loads Only check box.

Monitoring Data Collection
PBDB‐MA User Guide 153 © 2017. BeyondTrust Software, Inc.
If you are auditing MSCS Clusters, check the lmEntegraAgent#.log on the Collection Agent computer and the lms21.log and LMServer1.log on the audited server’s active node.
Regenerating Published Reports
To regenerate a published report that was generated by a scheduled job, do the following:
1. Select Schedule, History to view the Schedule ->History dialog in the report server as shown in the following example:
2. Select the reports to regenerate by marking the check box in the Rerun column.
3. Click the Rerun link in the column header.
4. Click Yes in the confirmation dialog.

Using PowerBroker Databases Report Server
PBDB‐MA User Guide 154 © 2017. BeyondTrust Software, Inc.
Using PowerBroker Databases Report Server
The primary method of viewing your audit data is via reports. PowerBroker Databases: Monitor & Audit uses the Intellicus Report Server as its reporting tool.
Understanding PowerBroker Databases Reporting
The Report Server is the application that you use to view your audited data. Audit data is collected on a regular schedule by the Collection Agent, loaded into the Repository by the Loader Agent, then published to the Report Server by the Loader Agent. Once data has been published, it is available for reporting.

Using PowerBroker Databases Report Server
PBDB‐MA User Guide 155 © 2017. BeyondTrust Software, Inc.
When you create a Repository, you specify a publishing schedule and data retention period for the Repository. At publishing time, data loaded since last publish becomes available to the PowerBroker Databases Report Server and data that remained in the Repository longer than the specified retention period is purged.
Using prepared reports, you can view your audited data in aggregate and apply filters to easily find the data you need. PowerBroker Databases includes a number of reports and you can create your own custom reports. The Report Server offers many scheduling and report delivery options. You can run reports manually, or schedule reports to run once or on a regular basis.
Understanding Report Server User Roles
Your user security privileges determine which features of the Report Server are available to you.
• End user – User with limited access rights and security privileges to the Report Server.
• Administrator – User with administrator privileges to their own organization. Can manage access rights of user and user created items belonging to only their organization.
• Super Administrator – User with access to all system privileges, and administrator privileges to users and user created items in all organizations.Note: The default PowerBroker Databases user has Super Administrator
rights.
Accessing the PowerBroker Databases Report Server
Note: Make sure that Internet Explorer is the default browser on the computer you use to run the Report Server.
There are three ways to access the PowerBroker Databases Report Server:
Using the Start menu:
1. Select Start, Programs, PBDB Server, Report Server, Report Portal.
Continue with step 2 below.
Using Internet Explorer:
1. In the Internet Explorer’s Address field enter the URL http://localhost:10090/auditdb
If the PowerBroker Databases Report Server is hosted on a different system, replace localhost with the host name or IP address of the system hosting the PowerBroker Databases Report Server.
Continue with step 2 below.

Using PowerBroker Databases Report Server
PBDB‐MA User Guide 156 © 2017. BeyondTrust Software, Inc.
From the PowerBroker Databases Administration Console:
1. On the PowerBroker Databases Home page, click the Report tab.
The Login screen opens.
In order to configure the Report Server you must log into the PowerBroker Databases Report Server as a user with Super Administrator privileges.
2. In the Login Name field, type the PowerBroker Databases username, auditdb.
3. In the Password field, type the PowerBroker Databases password auditdb.
4. (Optional) Click OPTIONS to select a different organization or language.
– Organization: The options are Lumigent or Intellica. Login Name and Password for PowerBroker Databases is auditdb. Login Name and Password for Intellica is Admin.
– Language: The options are English, Arabic, German, or Hindi.
5. Click Login.
Configuring the Report Server
Before you can start generating reports with the Report Server you must first complete the following initial configuration tasks:
1. Create a repository connection. For instructions, see "Creating a Report Server Connection to PowerBroker Databases Repository" on page 157.
2. Deploy PowerBroker Databases Report Templates. For instructions, see "Deploying PowerBroker Databases Report Server Templates" on page 162.

Using PowerBroker Databases Report Server
PBDB‐MA User Guide 157 © 2017. BeyondTrust Software, Inc.
Creating a Report Server Connection to PowerBroker Databases Repository
The PowerBroker Databases Report Server needs a connection to the PowerBroker Databases Repository in order to generate reports from the data loaded in the Repository. The Report Server also needs its own repository for the metadata created while generating reports. The default Intellicus repository is an HSQLDB database. The PowerBroker Databases Report Server supports multiple database connections. One of the connections must be the Report Server's repository connection.
You can create a separate repository for the Report Server configuration information. In this case you need to create two connections - one to PowerBroker Databases data Repository and the other one the Report Server configuration repository. We recommend that you create a separate repository for your Report Server if either of the following applies to your PowerBroker Databases implementation:
• If you have a substantial amount of data in your PowerBroker Databases Repository and plan to generate lots of reports.
• If you anticipate moving your Report Server from one server to another (for example, to upgrade to a newer or more powerful computer). If the configuration information used by the Report Server (schedules, jobs, tasks, customizations, parameter value groups, etc.) is stored in a database rather than the default HSQLDB flat file, then it is much easier to migrate the Report Server.
Each of the instances of Microsoft SQL Server hosted on the same computer listens on a specific port. To use multiple instances of Microsoft SQL Server in the PowerBroker Databases Report Server, create one database connection for each of the instances. The server name, which is the name of the computer hosting multiple instances, for these connections will be the same, but port will be unique to each of the connections.

Using PowerBroker Databases Report Server
PBDB‐MA User Guide 158 © 2017. BeyondTrust Software, Inc.
To create a connection to a repository:
1. Log into the PowerBroker Databases Report Server as a user with Super Administrator privileges.
2. Select Administration, Configure, Databases. The Connection Configuration screen opens.
In this screen you see the list of existing connections. Configuration information about the highlighted connection is displayed.
3. Click Add.
4. In the Connection Name field, type the name that uniquely identifies this connection.
Select the database platform from the Provider drop-down list. If you do not know the database provider, select Others. The screen refreshes to display the data entry fields that are required for the selected database platform.

Using PowerBroker Databases Report Server
PBDB‐MA User Guide 159 © 2017. BeyondTrust Software, Inc.
5. Enter the appropriate details for the repository database platform:
For SQL Server, in the Server field, enter the name of the host computer only, not the host_computer/server_instance name.
– To obtain the port number on SQL Server 2000:a. On the Microsoft SQL Server 2000 server, start the SQL Server
Network Utility.b. Click the General tab.c. Click the instance you want from the Instances drop-down list.d. Click TCP/IP—Properties. The port number for this instance
appears in the Properties dialog box
– To obtain the port number on SQL Server 2005:a. On the Microsoft SQL Server 2005 server, go to the Microsoft
SQL Server 2005 Configuration Tool.b. Run SQL Server 2005 Configuration Manager.c. Click the instance you want from the SQL Server 2005 Network
Configuration drop-down list.d. Double click TCP/IP.e. Click IP Address. The port number for this instance appears in
TCP Port dialog box.
If you work with multiple SQL Server Instances hosted on the same computer, create a separate connection for each instance. For each connection make sure to accurately specify the following information:
– In the Server field, specify the name of the computer hosting multiple instances. The Server will be the same for all instances.
– In the Port field, specify the port number for the instance you are connecting to. Each instance has its own port number.
Table 11. Repository Database Details
HSQLDB Oracle SQL Server
Database
Driver Version
Port
Server Host computer name only
SID

Using PowerBroker Databases Report Server
PBDB‐MA User Guide 160 © 2017. BeyondTrust Software, Inc.
Example:If you have two SQL Server instances on your computer, my_computer\instance_1 and my_computer\instance_2, create two connections. In the Server field for both connections, specify my_computer. In the Port field for each connection specify the port number for the instance you are connecting to.
6. In the User Name and Password fields, type user name and password that should be used to connect to the repository database if the database requires specific user name and password for connection.Note: For Oracle, in the User Name field, enter the name of the
repository schema to which you are connecting. In the Password field, enter the password for the repository schema user.
7. The URL value is filled in automatically based on the provided information. You can specify a different URL by editing this field.
8. Check the Is Default box to set this connection as the default. When you start the Report Server, it will connect to this repository by default and all reports will run on this repository, unless a different connection is specified. For more information, see "Modifying a PowerBroker Databases Repository Connection" on page 161.
9. Check the Is Repository box to set this connection as the Report Server configuration repository connection. The Report Server creates a set of tables for the repository and stores its metadata in this repository. At least one of the Report Server connections must be a configuration repository connection.
10. In the Pool Settings group, specify the following settings that are used to optimize the Report Server performance:a. In the Initial Connections field, type the number of connections to
be opened up initially. If this is a default or repository connection, this number of connections is opened at start up.
b. In the Incremental Size field, type the number of additional connections to open when the number of requests exceeds the number of initial connections.
c. In the Maximum Connections field, type the maximum number of connections that can be opened. Excess requests are queued until connections are made available. Please check with usage licensing from your database vendor about valid maximum connections.
Tip: User Name Options
• Check the Blank checkbox if user name and password are not required to connect to the database.
• Check the Runtime checkbox to ask for the user name and password at run time.
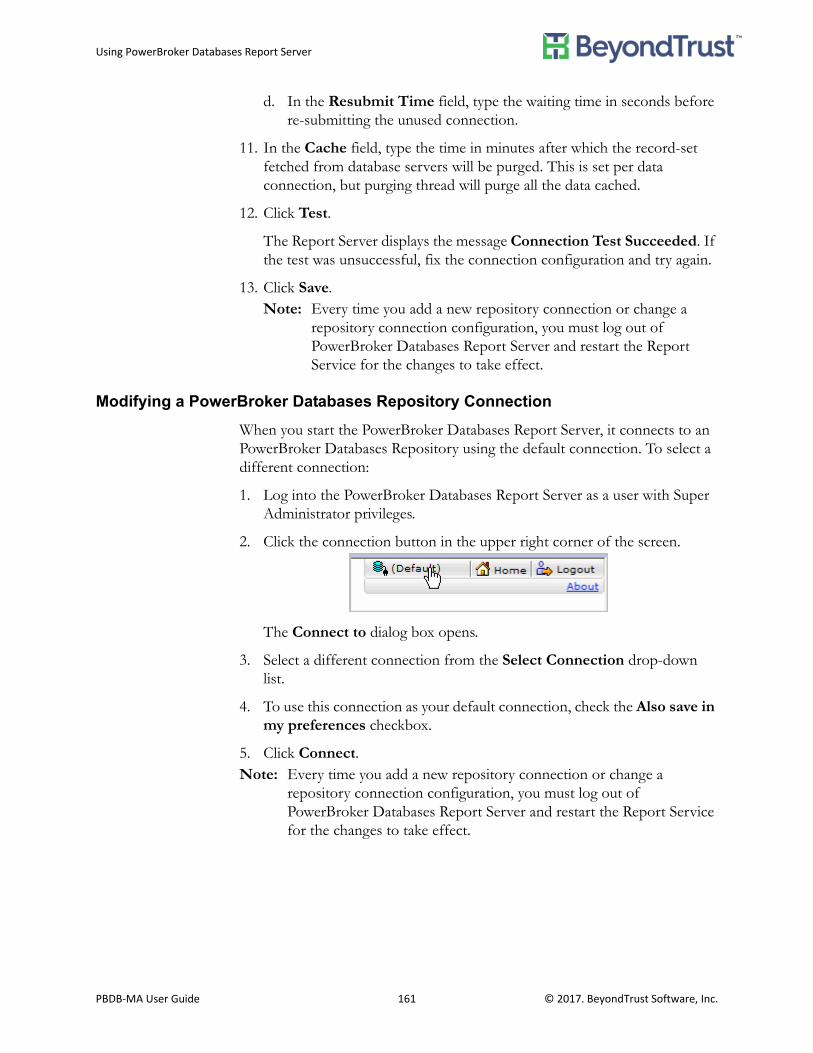
Using PowerBroker Databases Report Server
PBDB‐MA User Guide 161 © 2017. BeyondTrust Software, Inc.
d. In the Resubmit Time field, type the waiting time in seconds before re-submitting the unused connection.
11. In the Cache field, type the time in minutes after which the record-set fetched from database servers will be purged. This is set per data connection, but purging thread will purge all the data cached.
12. Click Test.
The Report Server displays the message Connection Test Succeeded. If the test was unsuccessful, fix the connection configuration and try again.
13. Click Save. Note: Every time you add a new repository connection or change a
repository connection configuration, you must log out of PowerBroker Databases Report Server and restart the Report Service for the changes to take effect.
Modifying a PowerBroker Databases Repository Connection
When you start the PowerBroker Databases Report Server, it connects to an PowerBroker Databases Repository using the default connection. To select a different connection:
1. Log into the PowerBroker Databases Report Server as a user with Super Administrator privileges.
2. Click the connection button in the upper right corner of the screen.
The Connect to dialog box opens.
3. Select a different connection from the Select Connection drop-down list.
4. To use this connection as your default connection, check the Also save in my preferences checkbox.
5. Click Connect.Note: Every time you add a new repository connection or change a
repository connection configuration, you must log out of PowerBroker Databases Report Server and restart the Report Service for the changes to take effect.

Using PowerBroker Databases Report Server
PBDB‐MA User Guide 162 © 2017. BeyondTrust Software, Inc.
Restarting the Report Server
Every time you add a new repository connection or change a repository connection configuration, you must log out of PowerBroker Databases Report Server and restart the Report Service for the changes to take effect.
To restart the Report Server on Windows:
1. Log out of the Report Server.
2. Select Start, Programs, PBDB Server, Report Server, Stop Server. A console window opens. Wait until the Report Server stops and the console window closes.
3. Select Start, Programs, PBDB Server, Report Server, Start Server. A console window opens. Wait until the Report Server starts and the console window closes.
To restart the Report Server service on Linux:
1. Log out of the Report Server.
2. Stop the Report Server by running the following file<installation directory>/ReportServer/reportengine/bin/
run.sh.
3. Restart the Report Server by running the following file:<installation directory>/ReportServer/jakarta/bin/
startup.sh.
Deploying PowerBroker Databases Report Server Templates
For every new repository connection you need to deploy PowerBroker Databases Report Server Templates. The Report Server Templates are installed as CAB files.
To deploy PowerBroker Databases Report Server Templates:
1. Log into the PowerBroker Databases Report Server as a user with Super Administrator privileges.
2. Select Repository, Deploy_Report_Bundle.
3. Click Browse and find the file
Windows
Tip: Restarting Reoprt Server
You can also use the Windows Services dialog box (Start, Settings, Control Panel, Administrative Tools, Services) to restart the PBDB Report Server.

Using PowerBroker Databases Report Server
PBDB‐MA User Guide 163 © 2017. BeyondTrust Software, Inc.
<Installation Directory>\BeyondTrust\PowerBroker Databases\Report Templates\lumigent_report_templates.cab
4. Click Upload. The information derived from the cab file is displayed.
5. Click Deploy. The list of successfully updated reports is displayed.
To access the uploaded reports use the Reports menu.
Recommended Report Server Properties
BeyondTrust recommends that you make the following adjustment to the default Report Server properties:
1. Log into the PowerBroker Databases Report Server as a user with Super Administrator privileges, for example, user auditdb.
2. Select Administration, Configure, Server.
3. Modify the following properties:
Database Connection TimeOut (seconds)
– Oracle= 3600 (the default)
– SQL Server = 0 (zero)
Client Session Timeout (seconds) = 7200
4. Click Save.
5. Select Administration, Configure, Client.
Report Server Timeout = 7200
HTML Viewer Timeout = 30
Report Server Chunk Timeout = 7200
6. Click Save.
Tip: Templates in a non-standard location
• If you changed the default directory during the PowerBroker Databases Report Server installation, find this file in the Report Templates folder in that directory.
• If you access the PowerBroker Databases Report Server from a remote Windows computer that is not on the same network as the computer where the Report Server is installed, you must copy the lumigent_report_templates.cab file on the local computer to be able to deploy the templates.
Using PowerBroker Databases Report Server
PBDB‐MA User Guide 164 © 2017. BeyondTrust Software, Inc.
Modifying Server Properties
PowerBroker Databases Report Server has a set of default server properties that it uses when it starts up. To change the default server properties:
1. Select Administration, Configure, Server.
2. Edit the desired server properties.
3. Click Save.Note: To e-mail your reports, you must specify the name of your mail
server in the SMTP SERVER field. If your mail server requires login to send mail, you must also provide your username in the SMTP SERVER USER field and password in the SMTP SERVER PASSWORD field.
Understanding the Report Server
When you log in to the Report Server you see your home page, also known as My Reports. Depending on your user privileges, you may also see several tabs across the top of the screen. Many other Report Server configuration and administration options are available via these tabs:
• Dashboard Tab – Used to design and manage customized dashboards. See "Using the Report Server Dashboard" on page 183. For more detailed information, refer to the Intellicus Suite Dashboards manual.
• Reports Tab – Used to view and run reports. See "Generating Reports" on page 165.
• Schedule Tab – Used to schedule reports. See "Scheduling Reports" on page 167. For more detailed information, refer to the Intellicus Suite Enduser Reference.
• Design Tab – Used to design custom reports. For more detailed information, refer to the Intellicus Suite Enduser Reference.
• Repository Tab – Used to manage reports. For more detailed information, refer to the Intellicus Suite Administration Manual and Enduser Reference.
• Administration Tab – Used to manage Report Server configuration and users. For more detailed information, refer to the Intellicus Suite Administration Manual.
• Personalization Tab – Used to change the look and feel, and manage some personalized settings For more detailed information, refer to the Intellicus Suite Customizing Intellicus and Enduser Reference.
Tip: Intellicus Documentation
Intellicus documentation can be found in the following directory:
<installation directory>\BeyondTrust\PowerBroker Databases\Report Server\Docs\Manuals

Using PowerBroker Databases Report Server
PBDB‐MA User Guide 165 © 2017. BeyondTrust Software, Inc.
Generating Reports
Understanding Report Icons
The Reports subtabs includes the following icons for each report:
Entering Report Parameters
To run a report you need to specify Report Parameters. Each report has its own set of mandatory and optional parameters that define what activities should be included in the report.
Standard Report Parameters
When you run a report you have the option of inputting parameters for the report, for example the time period that you want the report to cover. The parameters you can input are different for each of the PowerBroker Databases reports.
Most of the parameters can be selected from pre-populated lists. Some fields have everything in the list selected by default. Use the Ctrl and Shift keys to select multiple items from a list.
Table 12. Report Icons
Icon Name Description
Quick Run Click to run a report. This option generates a report in HTML format using the current connection.
Run Click to run a report. This option lets you select the report connection and report delivery format.
Published Click to display published copies of a report.
Schedule Click to run a report on a schedule.
Description Click to change the description of a report.

Using PowerBroker Databases Report Server
PBDB‐MA User Guide 166 © 2017. BeyondTrust Software, Inc.
The following image is an example of a Standard Report Parameters screen.
Saved Report Parameters
After you have selected parameters for a report, you can save those parameters to use again the next time you run the report.
• To save your parameters, check the Save Form As checkbox at the bottom of the page and type a name for the parameter set.
• To load a set of previously saved parameters, select the name from the Select Form drop down list at the top of the screen and click the Load
Form icon.• To reset all the parameters to default, click Reset.
• To delete the loaded form, click the Delete icon.

Using PowerBroker Databases Report Server
PBDB‐MA User Guide 167 © 2017. BeyondTrust Software, Inc.
Scheduling Reports
You can use the Schedule Tab of the Report Server to create, modify, and delete report schedules.
Initial Report Scheduling
Use the following procedure when you schedule a report for the first time.
1. Select an PowerBroker Databases Repository connection. For more information, see "Modifying a PowerBroker Databases Repository Connection" on page 161.
2. On the Reports tab, select a report to schedule and click the Schedule icon for this report. The Schedule Job screen opens. This screen contains scheduling information, Delivery Operations, and Report Parameters.

Using PowerBroker Databases Report Server
PBDB‐MA User Guide 168 © 2017. BeyondTrust Software, Inc.
3. Specify the schedule. You can schedule to run the report once or at regular intervals:
– To run the report once:a. Select Once. b. In the Run report on date and at fields, specify date and time to
run the report.
– To run the report on regular intervals:a. Select Recurring.b. In the Schedule starts at and Schedule ends at fields, specify
the start and end dates for the schedule.c. Select one of the Frequency option buttons to run the report
daily, weekly, or monthly; or type the number of days in the frequency interval in the Every ... Day(s) field.
d. In the at field, select the time of day at which to generate the report.
e. Choose one of the following Delivery operations:
– To send the report as an e-mail attachment: a. Check E-mail.b. Select the Report Format from the drop-down list of available
formats.c. Select whether to send the report as a link or attachment.d. Type e-mail address and subject, and, optionally, a message.
– To upload the report to a shared folder or over FTP to a specified server:a. Check Upload.b. Select the Report Format from the drop-down list of available
formats.c. Select whether the upload is FTP or Shared Folder.d. In the Server Name field, type the name of the server where to
send the report.e. In the Folder Name and File Name fields, type the name of the
folder and file where to save the report.
– To publish the report:a. Check Publish.b. Select the Report Format from the drop-down list of available
formats.c. Specify a File Name for the report.d. Specify whether the file is public or private.e. In the Valid Upto field, specify expiration date for the published
report.
Using PowerBroker Databases Report Server
PBDB‐MA User Guide 169 © 2017. BeyondTrust Software, Inc.
f. Specify Report Parameters for the scheduled report. See parameter details for specific reports.
g. Click Save.
Adding Schedules
1. Select a report that already has at least one schedule and click the
Schedule icon for this report. The list of existing schedules opens.
2. Click Add New.
3. Follow steps 2-5 from "Initial Report Scheduling" on page 167.
Modifying Schedules
1. Select a report that already has at least one schedule and click the
Schedule icon for this report. The list of existing schedules opens.
2. Click the select button in the left column to select the schedule to be modified.
3. Click Modify.
4. Follow steps 2-5 from "Initial Report Scheduling" on page 167.
Deleting Schedules
1. Select a report that already has at least one schedule and click the
Schedule icon for this report. The list of existing schedules opens.
2. Click the select button in the left column to select a schedule to be deleted.
3. Click Delete.
4. Click OK to confirm delete.
Generating a Report Using the Quick Run Option
The Quick Run option generates are report using the current connection and is displayed in HTML format in your browser.
To use a different connection or delivery option, generate the report using the Run option.
To generate a report using the Quick Run option:
1. Click the Quick Run icon or the name of the report. The Report Parameters screen opens.
2. Enter report parameters as described in "Entering Report Parameters" on page 165.
3. Click Run Now.

Using PowerBroker Databases Report Server
PBDB‐MA User Guide 170 © 2017. BeyondTrust Software, Inc.
The Report Server generates the report and displays in the browser.
Generating a Standard Report Using the Run Option
To generate a standard report using the Run option:
1. Click the Run icon for the report you want to run. The Report Delivery Options screen opens. In this screen you can select what connection to use for this report and how to deliver the report.
2. Select the connection from the Select Connection drop-down list that contains all connections to PowerBroker Databases Repositories created for the Report Server.
3. Select the delivery option. The list of report delivery options is located in the left part of the screen. When you select a specific option, the settings for this option are displayed in the right part of the screen.
– To view the report on the screen:a. Select the delivery option VIEW.b. Select one of the available viewing formats.c. Click VIEW NOW. The Report Parameters screen opens.
– To print the report on your local printer:a. Select the delivery option PRINT LOCALY.b. Select Print to specify printer settings, or Print Direct to use
default printer settings. The Report Parameters screen opens.
– To print the report on the network printer:a. Select the delivery option PRINT AT SERVER. b. Select the network printer and specify settings.c. Click PRINT NOW. The Report Parameters screen opens.
– To E-mail the report to a specified address:
Using PowerBroker Databases Report Server
PBDB‐MA User Guide 171 © 2017. BeyondTrust Software, Inc.
Note: To use e-mail as the delivery option, you need to specify your SMTP server under Administration, Configuration, Server. For more information, see "Modifying Server Properties" on page 164.
a. Select the delivery option E-MAIL.b. Select whether to send the report as a link or as a .pdf file
attachment.c. Specify the delivery address and e-mail subject.d. Click E-MAIL NOW. The Report Parameters screen opens.
– To save the generated report into a file:a. Select the delivery option PUBLISH.b. In the File Name field, type a name that will uniquely identify the
file.c. Specify Expiration Date and Time. On the expiration date, the
file will be deleted. By default, the expiration date is blank, which means the file is never deleted.
d. Select to save the file as Public - everyone can see the file, or Private - only the owner can see the file.
e. Click PUBLISH NOW. The Report Parameters opens. For more information , see "Viewing Published Reports" on page 174.
f. Enter report parameters. For more information, see "Entering Report Parameters" on page 165.
g. Click Run Now.
Understanding Report Delivery Options
When you generate a report, you have several options different options for how the report can be displayed or delivered.
You can generate a report in the following file formats:
• JVISTA- View the report in the Intellicus Report Viewer.• Acrobat PDF - View the report in portable document format (PDF).• Microsoft Excel - View the report as an Excel spreadsheet.• HTML - View the report as a Web page.• Interactive - View the report as an interactive Web page where you can
open and close details in the report.• Comma Separated - View the report as delimited (comma separated)
file.• Microsoft Word - View the report as a Word document.
You have the following options for viewing or delivering a report:
• View – Used to view the report in the browser.• Print locally – Used to send the report to a local printer.

Using PowerBroker Databases Report Server
PBDB‐MA User Guide 172 © 2017. BeyondTrust Software, Inc.
• Print at server – Used to send the report to a network printer. • E-mail – Used to send the report as a link or attachment to one or more
e-mail addresses.• Publish – Used to save the generated report to a file.• Upload – Used to upload the generated report to an FTP site or shared
folder.
Viewing Reports
When you run a report, you select the delivery option for that report. Report results can be viewed in one of the available viewing formats, printed on a local or network printer, e-mailed to a specified address, or published in the Report Server for future use. The default format for viewing newly generated or published reports is HTML format.
For information about generating reports, see "Generating a Standard Report Using the Run Option" on page 170.
Viewing a Standard Report
A standard on-line report looks like this:
Figure 10. Audit Trail Report

Using PowerBroker Databases Report Server
PBDB‐MA User Guide 173 © 2017. BeyondTrust Software, Inc.
• To drill down to the next level of detail, click the links in the report.• To open a link in a new window, hold down the Shift key while clicking
the link.• To go back to the report results, click the down arrow next to the Back
button in your browser and select the
report from the drop-down list.Note: If you use the Back button, the report will run again.
• To view the report in a different format, publish, e-mail, or print the report, click the corresponding icon in the toolbar above the report results.
Exporting Reports
To export a report:
1. Generate a report or view a published report.
2. In the report toolbar, click Export. The Export Options dialog opens.
3. Select the Export Format from the drop-down list.
4. Select or clear export options.
5. Click Generate. The File Download dialog box opens.
6. Click Save. The Save As dialog box opens.
7. Specify the file name and location where you want to save the file.
8. Click Save.
Publishing Reports
To publish a report:
1. Run a report.
2. In the Report Delivery Options screen, select Publish. The delivery options refresh.
3. In the File Name field, type a name that will uniquely identify the file.
Using PowerBroker Databases Report Server
PBDB‐MA User Guide 174 © 2017. BeyondTrust Software, Inc.
4. If you want the file to be deleted on a certain date, specify an Expiration Date and Time By default, the expiration date is blank, which means the file is never deleted.
5. Select who you want to be able to view the file:
– Public - everyone can see the file, or
– Private - only you (the owner) can see the file.
6. Click Publish Now. The Report Parameters screen opens.
7. Enter the appropriate report parameters.
8. Click Run Now. You will receive a message when the report has been successfully published.
Viewing Published Reports
To display the list of all published copies of a report, click the Published icon for a report. The list of all published copies of the report is displayed. The
list contains only the copies that have not expired yet.
To display a particular published report from the list, select the viewing format in the View column.
To delete a published report from the list, click the Delete icon.
E-mailing Reports
Note: To use e-mail as the delivery option, you need to specify your SMTP server under Administration, Configuration, Server. For more information, see "Modifying Server Properties" on page 164.
To send an e-mail message with the report:
1. Run a report.
2. In the Report Delivery Options screen, select E-mail. The delivery options refresh.
3. Select whether to send the report as a link or as a .pdf file attachment.
4. In the To and CC fields, enter the e-mail addresses of the recipients.
5. In the Subject field, enter a subject line for the e-mail.

Using PowerBroker Databases Report Server
PBDB‐MA User Guide 175 © 2017. BeyondTrust Software, Inc.
6. In the Message field, you can modify the generated message.
7. Click Email Now. The Report Parameters screen opens.
8. Enter the appropriate report parameters.
9. Click Run Now. You will receive a message when the report has been successfully published.
Adding Comments to Reports
To add comments to a report:
1. Generate a report or view a published report.
2. In the report toolbar, click Add Comment The Add Comment dialog box opens.
3. Type your comments in the Add Comment dialog box.
4. In the dialog box, click Access Right and select the users who can view your comments. The default is "Everyone."
5. Click Set to close the Access Right dialog box.
6. Click Add Comment.
Viewing Report Comments
To add view comments on a report:
1. Generate a report or view a published report.
2. In the report toolbar, click Show Comments . The Show Comments dialog box opens.
3. To refresh the comment view, click Refresh Comments .
Understanding Session Information in Reports
PowerBroker Databases Reports contain the following session information:
• OS User• Hostname• Application • DB User
PowerBroker Databases tracks session information by tracking logins and logouts associated with a SPID and uses the session trace to create the session map. If there was a problem tracking session information, you may see "ambiguous" or "lum_unknown" in the session information fields.
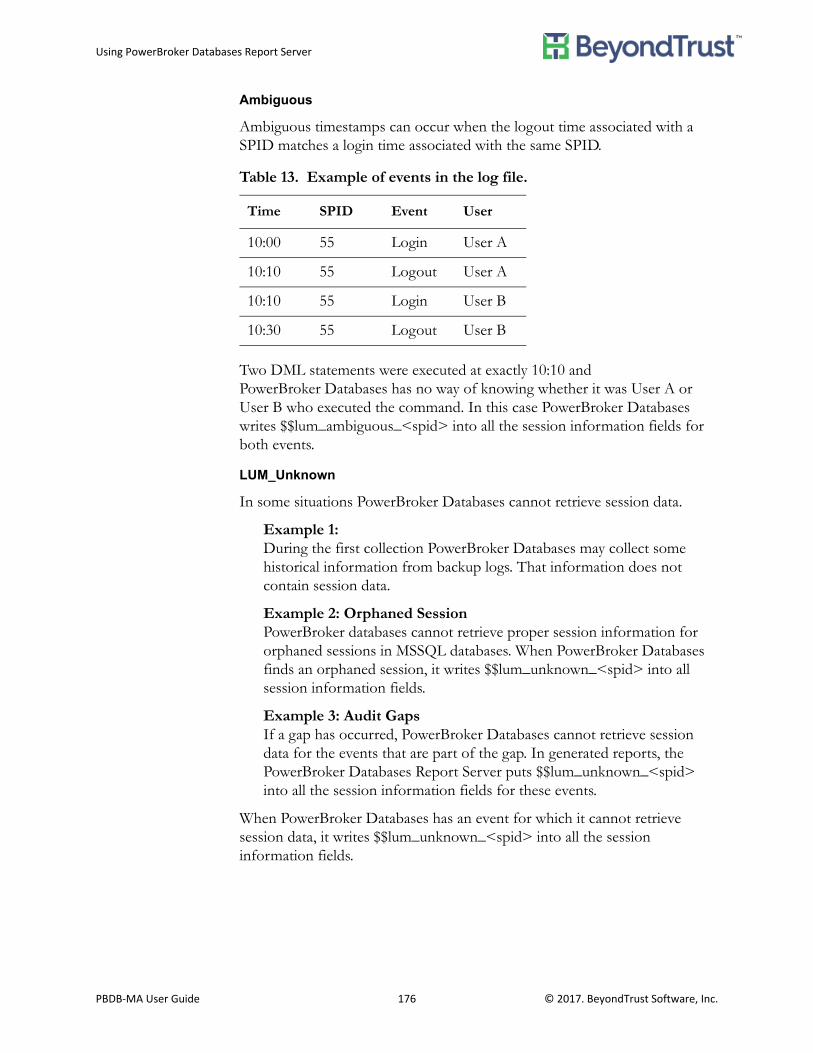
Using PowerBroker Databases Report Server
PBDB‐MA User Guide 176 © 2017. BeyondTrust Software, Inc.
Ambiguous
Ambiguous timestamps can occur when the logout time associated with a SPID matches a login time associated with the same SPID.
Two DML statements were executed at exactly 10:10 and PowerBroker Databases has no way of knowing whether it was User A or User B who executed the command. In this case PowerBroker Databases writes $$lum_ambiguous_<spid> into all the session information fields for both events.
LUM_Unknown
In some situations PowerBroker Databases cannot retrieve session data.
Example 1:During the first collection PowerBroker Databases may collect some historical information from backup logs. That information does not contain session data.
Example 2: Orphaned SessionPowerBroker databases cannot retrieve proper session information for orphaned sessions in MSSQL databases. When PowerBroker Databases finds an orphaned session, it writes $$lum_unknown_<spid> into all session information fields.
Example 3: Audit GapsIf a gap has occurred, PowerBroker Databases cannot retrieve session data for the events that are part of the gap. In generated reports, the PowerBroker Databases Report Server puts $$lum_unknown_<spid> into all the session information fields for these events.
When PowerBroker Databases has an event for which it cannot retrieve session data, it writes $$lum_unknown_<spid> into all the session information fields.
Table 13. Example of events in the log file.
Time SPID Event User
10:00 55 Login User A
10:10 55 Logout User A
10:10 55 Login User B
10:30 55 Logout User B

Using PowerBroker Databases Report Server
PBDB‐MA User Guide 177 © 2017. BeyondTrust Software, Inc.
Understanding PowerBroker Databases Reports
To access the reports that you uploaded into the PowerBroker Databases Report Server, click Reports and select a report category.
PowerBroker Databases Reports are grouped into the following categories:
• Accessory Reports• General IT Reports• SOX 404 Reports• Standard Audit Reports
If you have a standard PowerBroker Databases Reports Server license, you can only produce standard reports. Reports in all categories are available in Standard mode. To produce a standard report you must enter report parameters. To change the parameters, you need to run a new report.
Contact BeyondTrust Support for information on how to upgrade to a professional license.
For information on how to design your own reports, refer to the Intellicus Suite End User Reference.
Accessory Reports
Accessory Reports are designed to produce reports on specific DML and DDL operations, operations performed by a specific application or server, operations captured according to a specific rule or policy, failed command and failed login operations.
Accessory Reports include:
• Application Summary Report - a summary of operations performed by a specified application.
• Data Access Activity Summary Report - a summary of Select operations.
• Data Change Activity Summary Report - a summary of DDL operations.
• Data Change Summary Report - a summary of DML operations.• Failed Command Summary Report - a summary of failed commands.• Failed Logon Summary Report - a summary of failed logons.• Policy Summary Report - a summary of activities captured according to
a specified policy.• Rule Summary Report - a summary of activities captured according to a
specified rule.• Server Summary Report - a summary of activities performed from a
specified application.
Using PowerBroker Databases Report Server
PBDB‐MA User Guide 178 © 2017. BeyondTrust Software, Inc.
Accessory Report Parameters
Accessory Report Mandatory parameters may include:
• Start Date: Enter the start date. The default is current date minus 7. • End Date: Enter the end date. The default is current date.• Start Time: Enter the start time.• End Time: Enter the end time.• Activity: Select Inserts or Deletes. This parameter is mandatory for Data
Inserts or Deletes Summary Report only.• Policy: The Report includes only data collected using selected policy. This
parameter is mandatory only for the Policy Summary Report and optional for some other reports.
• Rule: The Report includes only data collected using selected rule (s). This parameter is mandatory for Rule Summary Report only.
Accessory Report Optional parameters may include:
• Policy: The Report includes only data collected using selected policy(s).• Rule: The Report includes only data collected using selected rule (s). • User or Login Name: The Report includes only operations performed
by selected user(s).• Application Host: The Report includes only operations performed on
selected Hosts. • Severity: The Report includes only operations with selected severity.• Objects: The Report includes only operations performed on selected
objects. • Column Name: The Report includes only operations performed on
selected columns.• Instance: The Report includes only operations performed on selected
instances.
General IT Reports
General IT Reports provide you with a number of ways to view the audit source activity data collected in the PowerBroker Databases Repository. General IT Reports include:
Tip: Reports marked with an asterisk (*)
Reports marked with an asterisk (*) have been rewritten. For optimum performance, you should use the revised version of the report that appears under the Standard Audit Reports heading.

Using PowerBroker Databases Report Server
PBDB‐MA User Guide 179 © 2017. BeyondTrust Software, Inc.
• *Activity Details Report – The Activity Details Report shows the list of all activities collected in the PowerBroker Databases Repository with detailed information on every activity. The default grouping option is to group activities by DB User. You can also group activities by Activity Type, Application, Application Host, Column Name, Database, Instance, Instance Type, Object Host, OS User, Schema, Table and Time. The default number of retrieved rows is 10,000. You can increase that value to view more records in the same report, however this can impact performance. To limit the number of returning rows, narrow your parameter values.
• Activity Inventory Report – The Activity Inventory Report shows types of activities performed and number of activities of each type. You can click links to open the Activity Details Report for the respective activities.
• *Activity Summary Report – The Activity Summary Report produces a summarized list of activities grouped by application, server, domain, or user. This report provides no activity details.
• Audit Policy Report – The Audit Policy Report shows the list of activities performed using selected audit policies and rules. You can click links to open the Activity Details Report for the respective activities. If some activities were flagged with a severity level, you will see the severity level in the Activity Details Report.
• *Audit Trail Report – The Audit Trail Report shows the list of activities performed during the specified period of time. You can also select a number of optional parameters to filter activities.
• Data Privacy Report –The Data Privacy Report tracks user who accessed specified information. You can click links to produce the Select Statement Report for the respective statements.
• Management Report – The Management Report provides a graphical representation of user activity.
• *Row History Report – The Row History Report is for DML operations only. This report produces a list of changes made to columns. The list includes old values and new values of changed columns.
• Session Report – The Session Report produces a list of sessions and shows the number of activities per each session. By clicking the links you can open the Activity Details for these activities. You can click links to open the Activity Details Report for the respective activities.
General IT Reports are only available in Standard mode.
General IT Report Parameters
General IT Report Mandatory parameters may include:
• Start Date: Enter the start date of the interval to be included in the report. The default is current date minus 7.

Using PowerBroker Databases Report Server
PBDB‐MA User Guide 180 © 2017. BeyondTrust Software, Inc.
• End Date: Enter the end date of the interval to be included in the report. The default is current date.
• Start Time: Enter the start time of the interval to be included in the report.
• End Time: Enter the end time of the interval to be included in the report.
• Order By: • Include Links Details: Select Yes to include links to activity details. The
default is No.• Grouping Arrangements: The default is to group activities by User. You
can also group activities by Activity Type, Server, and Instance Type. (Management Report)
General IT Report Optional parameters may include:
• Relative Time Interval: Unit of time to measure time intervals; may be months, weeks, or days.
• Start Time Intervals Ago and End Time Intervals Ago: Include only activities performed within this time interval.
• Alert: Include only activities on which e-mail notifications were generated.
• Exception: Include only activities on which e-mail notifications with this level of data severity were generated.
• Column Name: Include only selected columns.• Instance Type: Include only selected types of instances.• Old Value: Include only activities on the column with the specified old
value. • New Value: Include only activities on the column with the specified new
value.• Most Recent Activities: Include no more than the specified number of
most recent activities.• Maximum Number Of Detail Rows: (Required) Include no more than
the specified number of rows. The default value is 10,000. You can increase this number to see more records in the same report. Due to the performance issues, it is recommended to narrow down your report results by providing more specific values for other parameters.
• Policy Name: Include only information collected using the selected audit policy.
• Rule Name: Include only information collected using the selected audit rule.
Tip: See all available detail rows
To see all available detail rows in a report, enter a value of 9,999,999 in the Maximum Number of Detail Rows field.

Using PowerBroker Databases Report Server
PBDB‐MA User Guide 181 © 2017. BeyondTrust Software, Inc.
• DBMS Type: Include only activities performed on selected types of databases
• Audit Type: Select log for auditing • Database Name: Include only activities performed on selected
databases.• Server or Instance Name: Include only activities performed on selected
servers or instances.• User or Login Name: Include only activities performed by selected
users.• Application Name: Include only activities performed using selected
applications.• OSUsers name: Include only activities performed by selected OS users.• Objects: Include only activities performed on selected objects. • Schema: Include only activities performed on selected schemas.• Object Host: Include only activities performed on selected hosts.• Application Host: Include only activities performed from selected hosts.• Activity Type: Include only selected types of activity.
Standard Audit Reports
• Activity Details Report – The Activity Details Report shows the list of all activities collected in the PowerBroker Databases Repository with detailed information on every activity. The default grouping option is to group activities by DB User. You can also group activities by Activity Type, Application, Application Host, Column Name, Database, Instance, Instance Type, Object Host, OS User, Schema, Table and Time. The default number of retrieved rows is 10,000. You can increase that value to view more records in the same report, however this can impact performance. To limit the number of returning rows, narrow your parameter values.Note: The Activity Details Report should be used rather than the Data
Change Summary report found under Accessory Reports.• Activity Summary Report – The Activity Summary Report produces a
summarized list of activities grouped by application, server, domain, or user. This report provides no activity details.
• Audit Trail Report – The Audit Trail Report shows the list of database activities performed during the specified period of time. You can also select a number of optional parameters to filter activities.
• Recent Activity Report– The Recent Activity Report shows application activities performed during the specified period of time. You can also select a number of optional parameters to filter activities, including filtering by Schema.

Using PowerBroker Databases Report Server
PBDB‐MA User Guide 182 © 2017. BeyondTrust Software, Inc.
• Row History Report – The Row History Report is for DML operations only. This report produces a list of changes made to columns. The list includes old values and new values of changed columns.
Understanding Audit Gaps in Reports
Audit Gaps are seen when PBDB fails to validate the database transactions/activities in database log files. If transactions/activities are missing it results in a discontinuity in database transactions. In such cases the PowerBroker Database reports a gap in the audit trail. A few general scenarios where audit gaps will be generated are illustrated below.
MSSQL trace stop:
PowerBroker Databases reads the MSSQL database transactions from the trace file. If the trace stops in MSSQL, PowerBroker Databases reports a gap in the audit trail.
Example:
SQL Server shutdown
If the SQL Server instance shuts down it stops the trace file. The discontinuity in trace reports a gap in the audit trail.
Manual stop of trace:
PowerBroker Database makes sure that any manual trace stopping is communicated to the Database administrator through the gaps in the audit trail.
Missing Redo Logs in Oracle:
Missing redo log files causes discontinuity in reading the database transactions performed on the database. PowerBroker Databases reports audit gaps for missing redo log files.
Missing archive logs in DB2:
Missing archive log files causes discontinuity in reading the database transactions performed on the database. PowerBroker Databases reports audit gaps for missing archive log files.
Missing Database transaction in files:
PowerBroker Database validates the continuity of database activity in the database log file and reports a gap in the audit trail if any activity is missing.

Using PowerBroker Databases Report Server
PBDB‐MA User Guide 183 © 2017. BeyondTrust Software, Inc.
Using the Report Server Dashboard
The Dashboard allows you to generate multiple reports upon logging into the Report Server, using the default PowerBroker Databases Repository connection. The number of the reports you can include in your Dashboard is limited by your license.
When you select Dashboard, Design, the Dashboard Designer opens:
The Dashboards list shows existing dashboards based on the user privileges and the status of the Show All Owners’ checkbox:
• If the user does not have Administrator or Super Administrator privileges, the Show All Owners’ checkbox is not displayed and the Dashboards list contains only the dashboards that this user designed.
• If the user has the Administrator privileges and the Show All Owners’ box is clear, the Dashboards list contains the dashboards created by this user, as well as public dashboards of other administrators. If Show All Owners’ is checked, the Administrator can also see the dashboards of all the end users.
• If the user has the Super Administrator privileges and the Show All Owners’ box is clear, the Dashboards list contains the dashboards created by this user, as well as public dashboards of all other administrators. If Show All Owners’ is checked, the Super Administrator can also see the private dashboards of all other administrators and end users.
• Dashboard Properties: General dashboard information.

Using PowerBroker Databases Report Server
PBDB‐MA User Guide 184 © 2017. BeyondTrust Software, Inc.
• Layout: Items placed on this area will be displayed on your dashboard viewer.
• Widget Properties: A layout may have one or multiple areas known as Widgets. Various dashboard items are placed on widgets. A widget may have properties based on the type of information placed on a widget. For example, parameters for a report, URL for an external link, etc.
Designing a New Report Server Dashboard
For more information about the dashboard, refer to the Intellicus Dashboards manual located in the following directory:
<installation directory>\BeyondTrust\PowerBroker Databases\Report Server\Docs\Manuals
To design a new dashboard:
1. Click the plus button on top right of Dashboard list. A dashboard with empty layout opens up.
2. Provide the following information in the Dashboard Properties area:a. Name: Type the name that will uniquely identify the dashboard.b. Public / Private: This option is available only to Administrator and
Super Administrator. Select Private to make this dashboard available only to the user who designed it and the Super Administrator. Select Public to make this dashboard available to everyone. For non- administrator users, the default setting is Private.
c. Description: Type information describing the dashboard. d. Border width: Check the checkbox to have border around the
widgets of the dashboard and select the width from the drop-down box.
e. Prompt on first run: This is applicable when any of the report placed on dashboard has parameter objects and they are set as dashboard parameters. Keep it clear to load the dashboard with default values of dashboard parameters. Check the checkbox to get parameter entry form when this dashboard is run for the first time after login.
f. Refresh Interval: Set the time interval (in minutes) to refresh all the reports on the dashboard. If the refresh interval for a report is longer than the refresh interval for the dashboard, the refresh interval set for the dashboard is used.
3. Create Widgets in the Layout area.
When a new dashboard is created, it has one widget on the layout.
Using PowerBroker Databases Report Server
PBDB‐MA User Guide 185 © 2017. BeyondTrust Software, Inc.
a. To create multiple widgets, split the existing widgets by clicking the Split Vertical and Split Horizontal buttons.
b. Click Remove Widget button to remove a widget. If there is only one widget on the dashboard, the content on the widget will be removed, but not the widget itself.
4. Put Dashboard Items on the widgets.
There are three categories in the Dashboard Items list - External Links, Use Cases, and Reports.
a. Click the name of the category to open the list of available items.
b. To put an item from the list into an empty widget, drag and drop the item or click the green arrow next to the item.
c. To swap items in the widgets, just drag the item to the widget where you want to place it.
5. For each widget, provide the item information in the Widget Properties area.
– For External Links, provide the following information:• Name: This field is filled in with the name of the external link as
it appears in the list. • Refresh Interval: The URL will be refreshed regularly according
to the specified interval. • Auto Refresh: Select Yes, to refresh the URL regularly according
to the specified Refresh Interval. Select No, to refresh URL only once, when the dashboard is loaded.
• URL: Type the URL for the external link. • Description: Type the description of the external link.
– For Use Cases, provide the following information:• Name: This field is filled in with the name of the use case as it
appears in the list. • Refresh Interval: The use case will be refreshed regularly
according to the specified interval. • Auto Refresh: Select Yes, to refresh the use case regularly
according to the specified Refresh Interval. Select No, to refresh the use case only once, when the dashboard is loaded.
• Show Scrollbar: Select Yes or No.• Description: Type the description of the use case.
– For Reports, provide the following information:
Tip: Display List of Saved Reports
In the Reports list, you can check the Saved Reports checkbox to display a list of saved reports.

Using PowerBroker Databases Report Server
PBDB‐MA User Guide 186 © 2017. BeyondTrust Software, Inc.
• Report Name: This field is filled in with the name of the report as it appears in the list.
• Refresh Interval: The report will be refreshed regularly according to the specified interval.
• Format: Select the output format to view the report. Available options are PDF, HTML, Interactive, Jvista.
• Auto Refresh: Select Yes, to refresh the report regularly according to the specified Refresh Interval. Select No, to refresh the generate the report only once, when the dashboard is loaded.
• Toolbar: This option is available for HTML and Interactive output formats. Select Yes to always show the toolbar; No to never show the toolbar; or MultiPage to show the toolbar only for multi page reports.
• Instance Type: Select Real Time to generate the latest report when the dashboard is loaded. Select Last Instance to display the last saved report when the dashboard is loaded.
• Instance Navigation: This option is available for reports that have been generated and saved more than once. Select Yes to get a drop-down box with the list of saved reports for viewing. Select No not have the drop down box and view the report according to the Instance Type setting.
• Ask at Runtime: Select Yes request report parameters at run time. Select No to use the report parameters provided in this screen as a part of dashboard design.
• Link Widgets: Click to link the report in this widget to other widgets on the dashboard dynamically at run time. A dialog box with the list of widgets that you can link this report to is displayed. You can only link to a widget that contains a chart. Select a widget from the list and click Ok. You can link to more than one widget.
This option is not available for saved reports.
• Description: Description of the report.
6. Select Dashboard Parameters and click Prompt. The input field for the selected parameters are displayed in the Report Parameters area for reports or Dashboard Level Parameters area for external links and use cases.
7. Enter Report Parameters for reports or Dashboard Level Parameters for external links and use cases. If you select not to ask for parameters at
Tip: Refresh and Saved Reports
Refresh Interval and Auto Refresh are disabled for saved reports.

Using PowerBroker Databases Report Server
PBDB‐MA User Guide 187 © 2017. BeyondTrust Software, Inc.
runtime, this parameters are used when generating the dashboard. For more information, see "Entering Report Parameters" on page 165.
8. To place this dashboard in the list of selected dashboards, check Add to my preferred list checkbox.
9. Click Save.
Editing Report Descriptions
To display a report description:
1. Click the Description icon in the corresponding line.
To change a report description:
1. Select Repository, Deploy Categories, Reports. The list of deploy categories is displayed.
2. Click the category that contains the report to be modified.
3. Click the name of the report.
4. Modify the description in the Description field.
5. Click Save.
Tip: Clear the widget
Click Clear to clear the Layout area, input parameters and widget properties.

Troubleshooting PowerBroker Databases
PBDB‐MA User Guide 188 © 2017. BeyondTrust Software, Inc.
Troubleshooting PowerBroker Databases
Error information is available through two sources; the Monitor tab in the Administration Console and the PowerBroker Databases Agent log file. You can find the Agent log file in the following directory:
Windows
<installation directory>\BeyondTrust\PowerBroker Databases\Agent\Log
UNIX
<installation directory>/BeyondTrust/agent.<server>/log
All error messages written to the PowerBroker Databases Agent log file are also initially stored in the Event Log. Error messages can be purged from the Event Log, making it necessary to access the log file for old error messages.
Error Information for Audit Sources and Agents
If there is a problem with your audit source, it is indicated by the status of that audit source.
To access error information for an audit source or an PowerBroker Databases Agent:
1. Log into the Administration Console.
2. Click the Configure tab. The PowerBroker Databases Summary Page opens.
3. Click the arrow to the left of an audit source. This expands the row showing more detailed information for the audit source.
4. Click DBMS Errors and Logs or Agent Errors and Logs. The Event Monitor Report for this audit source or PowerBroker Databases Agent opens.
Error Information for Repositories
If there is a problem with your repository, it is indicated by the status of that repository.
To access error information for a Repository:
Tip: Audit sources
For an audit source, you can also open Event Monitor Report and Collection History report from the Audit Source Summary screen. For more information, see "Understanding the Event Monitor Report" on page 149, and "Understanding the Collection History Report" on page 151.
Troubleshooting PowerBroker Databases
PBDB‐MA User Guide 189 © 2017. BeyondTrust Software, Inc.
1. Log into the Administration Console.
2. Click the Configure tab. The PowerBroker Databases Summary Page opens.
3. In the Repositories (View All/Add) area click View All. The list of all Repositories is displayed.
4. Click a Repository name.
5. Click Repository Event Report or Load History Report.
Troubleshooting Collections - General
When the number of ETZ files to be processed are large (for example, 25,000 or more), collections fail due to system resource limitations. However, if ETZ files are processed in very small batches, session information may be lost.
As a best practice, you should use a test environment that closely matches your production environment to determine the optimum collection schedule for your environment.
Troubleshooting DB2 Collections
In a default DB2 configuration, the Collector may fail to locate User information, reporting an error similar to the following:
"[ERROR] The Collector on <devsol14> was unable to locate user information for transactions in audit source 'aslog',
database 'db2inst2:TESTDB'. Please configure the audited database to record user information for subsequent collections."
This may be resolved with one of the following configuration changes (from the IBM DB2 web site):
• For DB2 versions prior to DB2 8.2.2, you must have had DATA CAPTURE CHANGES enabled in the DB2 table configuration when the changes occurred. This captures the AUTHID in the log and allows Log Analysis to filter on that column.For example, use the command: ALTER TABLE <table name> DATA CAPTURE CHANGES
• For DB2 8.2.2 or higher, set the DB2 environment variable DB2_LOGGING_DETAIL=AUTHID. For example, use the command: db2set DB2_LOGGING_DETAIL=AUTHIDNote: After setting the DB2 environment variable, you must stop and
restart the DB2 instance to make the definition take effect.
Troubleshooting PowerBroker Databases
PBDB‐MA User Guide 190 © 2017. BeyondTrust Software, Inc.
Troubleshooting Oracle Collections
PowerBroker Databases collects data from Oracle Redo Logs on Oracle audit sources. When you add an Oracle audit source to your PowerBroker Databases configuration, you specify the path to the Redo Logs in the Archive Redo Log Folder field in the Edit Audit Source Screen. For more information, see "(Oracle) Adding an Audit Source" on page 67.
If some Redo Logs were moved to a different location prior to the collection, or for some other reason ended up in a different folder than the one specified in the Edit Audit Source screen, PowerBroker Databases will report a gap in audit data with the following message in the PowerBroker Databases Agent log file, lmEntegraAgent.log:
The Collector on <computer-name> has detected a gap in audited data between log sequence numbers 00003b.0002f0e1.03a0 and 000044.00000002.0010 in database DBname
If a gap has occurred, PowerBroker Databases cannot retrieve session data for the events that are part of the gap. In generated reports, the PowerBroker Databases Report Server puts $$lum_unknown_<spid> into all the session information fields for these events.
To restore the continuity of your Oracle collection:
1. Identify the Redo Logs that are part of the gap, see "Identifying Missing Redo Logs" on page 190.
2. Locate the identified Redo Logs.
3. Collect the Redo Logs that are part of the gap , see "Collecting Oracle Redo Logs Reported as Part of a Gap" on page 191.
Identifying Missing Redo Logs
The error message from the lmEntegraAgent.log file gives you the sequence number for the Oracle archive files in hex:
log sequence numbers 00003b.0002f0e1.03a0 and 000044.00000002.0010 in database DBname
To convert the log sequence numbers to archive log file numbers:
1. Take the first part of the sequence and convert from hex to decimal.Hex 00003b = decimal 59Hex 000044 = decimal 68
2. Insert the decimal into the Oracle archive name dbname_arch/arc00059.arcdbname _arch/arc00068.arc

Troubleshooting PowerBroker Databases
PBDB‐MA User Guide 191 © 2017. BeyondTrust Software, Inc.
Collecting Oracle Redo Logs Reported as Part of a Gap
To collect Oracle Redo Logs reported as part of a gap:
1. Identify the name of the archive Redo Log folder for the audit source where a gap was reported. You will need to manage the logs in that folder while stepping through this procedure.
2. Do a log switch and run a manual collection to collect to current date and time. Do this to minimize the management of Redo Log files in the archive Redo Log folder. Note the name of the last collected redo file. We will refer to this file as REDO1.
3. From the DOS prompt on the Collection Agent computer, cd to the agent bin directory.
4. Run the following command:>>lmAgentbroker jobs list
5. In the list of jobs, find the job that relates to the audit source where the gap occurred and note the jobID and the ECZ file name. We will refer to this file as ECZ1.
6. Remove this job from the job list queue with the following command:lmagentBroker jobs remove <jobid>
7. Remove all Redo Logs from the archive Redo Log folder.
8. Locate the Redo Logs that were part of the gap and put them into the archive Redo Log folder. The archive Redo Log folder should contain only the Redo Logs that were reported as being part of the gap.
9. Run a collection for the gap Redo Logs.
Tip: Running this procedure
Perform this procedure at a time when the system is very quiet to reduce the management of Redo Log files. You do not want a log switch to occur during this collection.

Troubleshooting PowerBroker Databases
PBDB‐MA User Guide 192 © 2017. BeyondTrust Software, Inc.
10. Find the ECZ file associated with the collection just completed and note this file’s name. This must be the latest ECZ file. You can also use lmAgentBroker jobs list to find this ECZ file.
11. Rename or move the ECZ file associated with the collection just completed; this file is no longer required.
12. Rename the ECZ1 file (see step 5.) to match the filename you just removed.
13. Bring the REDO1 file (see step 2.) back to the archive redo folder.Collections will now continue on with no loss.
Unable to Collect from Oracle when AUA Enabled
Oracle AUA in PowerBroker Databases 5.1.2 and later relies on capturing INSERTs into the table LUMAUDITCOLLECTAPPUSERIDS. If this table is filtered out, activities will miss AUA.
Ensure that no rule explicitly excludes the LUMAUDITCOLLECTAPPUSERIDS table. If any of the rules defined excludes this table, the AUA information is not available to the Collector.
Troubleshooting the Report Server
If you are unable to access the PowerBroker Databases Report Server from the Administration Console take the following steps to correct the problem:
1. Make sure that PowerBroker Databases Report Server is installed and operational.
2. Make sure the PowerBroker Databases Report Server Services are started.
3. Check to see if you can access the PowerBroker Databases Report Server from the browser page:http://<computer name>/EntegraReportServer/en/
logonform.csp?action=logoff
Tip: Location of ECZ File
The ECZ files are usually located in the folder listed below.
Windows:
<installation directory>\PowerBroker Databases\Agent\Data\Collector\*.ecz
UNIX:
<installation directory>/BeyondTrust/agent.<server>/data/collector/*ecz
Troubleshooting PowerBroker Databases
PBDB‐MA User Guide 193 © 2017. BeyondTrust Software, Inc.
Troubleshooting Report Errors
When you install the Report Server you specify the user who owns the connection between the Report Server and the Repository. You must grant this user the db_owner, db_datareader, and db_datawriter roles.
User Missing db_owner Role
If the database user who owns the connection between the Report Server and the Repository has not been granted the db_owner role, this lack of correct privileges will generate errors.
Example error in Report Server:Status Code 350002 Description :
[Microsoft][SQLServer 2000 Driver for JDBC][SQLServer]Cannot open database requested in login 'Repo6'. Login fails Failed to create connection for username = <user name> Error in Data Provider Error in generating report.
Example error in the reportengine.log:Fri, 27 Mar 2009 14:35:18,187 EDT
[EXEC Thread 3]:DBConnPooling: Total DB connections in all pools of container:MyConnection are =0
Fri, 27 Mar 2009 14:35:18,187 EDT [EXEC Thread 3]:8127:Failed to create connection: for username = <user name>
java.sql.SQLException: [Microsoft][SQLServer 2000 Driver for JDBC][SQLServer]Cannot open database requested in login 'Repo6'. Login fails.
These errors are generated with the database user account used for the database connection to the Repository do not have the db_owner role in the PowerBroker Databases Repository.
To resolve this error, grant the a minimum of the db_owner role on the on the PowerBroker Databases Repository database to this user.
Reports Missing or Cut Off Characters
If your PowerBroker Databases reports show characters that do not display accurately (chopped off, etc.) make sure that you have the Unicode Arial font installed on the computer running the Report Server.
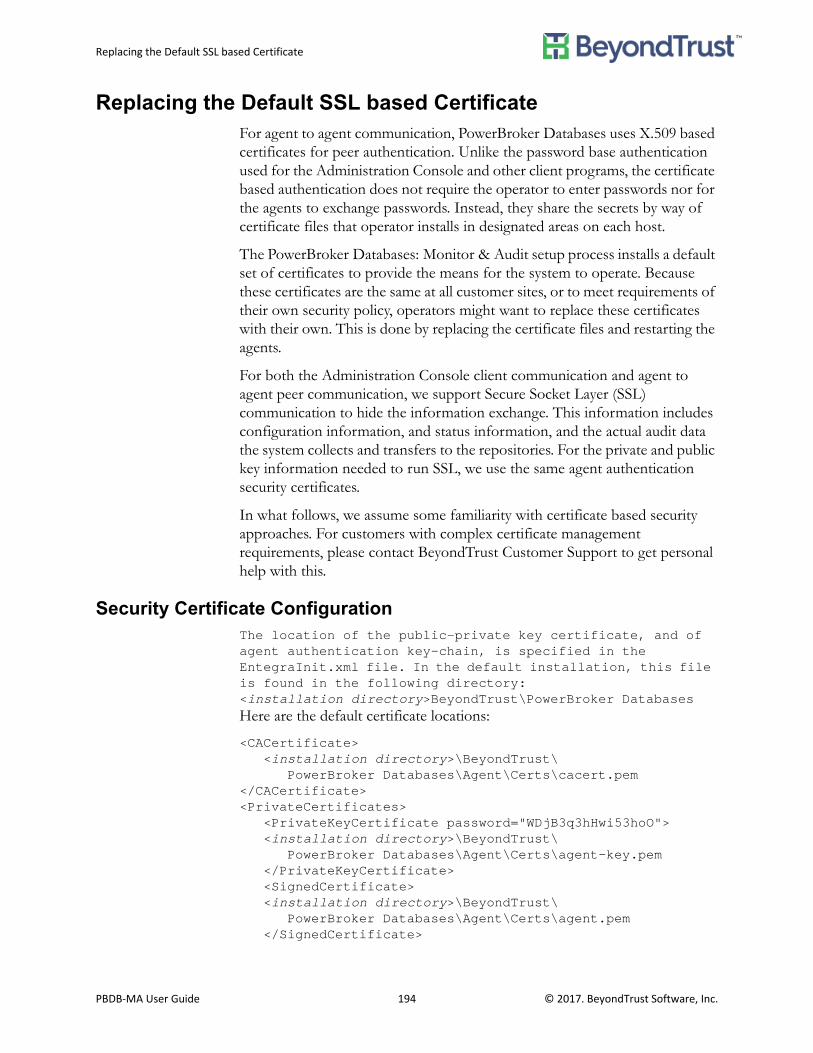
Replacing the Default SSL based Certificate
PBDB‐MA User Guide 194 © 2017. BeyondTrust Software, Inc.
Replacing the Default SSL based CertificateFor agent to agent communication, PowerBroker Databases uses X.509 based certificates for peer authentication. Unlike the password base authentication used for the Administration Console and other client programs, the certificate based authentication does not require the operator to enter passwords nor for the agents to exchange passwords. Instead, they share the secrets by way of certificate files that operator installs in designated areas on each host.
The PowerBroker Databases: Monitor & Audit setup process installs a default set of certificates to provide the means for the system to operate. Because these certificates are the same at all customer sites, or to meet requirements of their own security policy, operators might want to replace these certificates with their own. This is done by replacing the certificate files and restarting the agents.
For both the Administration Console client communication and agent to agent peer communication, we support Secure Socket Layer (SSL) communication to hide the information exchange. This information includes configuration information, and status information, and the actual audit data the system collects and transfers to the repositories. For the private and public key information needed to run SSL, we use the same agent authentication security certificates.
In what follows, we assume some familiarity with certificate based security approaches. For customers with complex certificate management requirements, please contact BeyondTrust Customer Support to get personal help with this.
Security Certificate ConfigurationThe location of the public-private key certificate, and of agent authentication key-chain, is specified in the EntegraInit.xml file. In the default installation, this file is found in the following directory: <installation directory>BeyondTrust\PowerBroker DatabasesHere are the default certificate locations:
<CACertificate><installation directory>\BeyondTrust\
PowerBroker Databases\Agent\Certs\cacert.pem</CACertificate><PrivateCertificates>
<PrivateKeyCertificate password="WDjB3q3hHwi53hoO"><installation directory>\BeyondTrust\
PowerBroker Databases\Agent\Certs\agent-key.pem</PrivateKeyCertificate><SignedCertificate><installation directory>\BeyondTrust\
PowerBroker Databases\Agent\Certs\agent.pem</SignedCertificate>
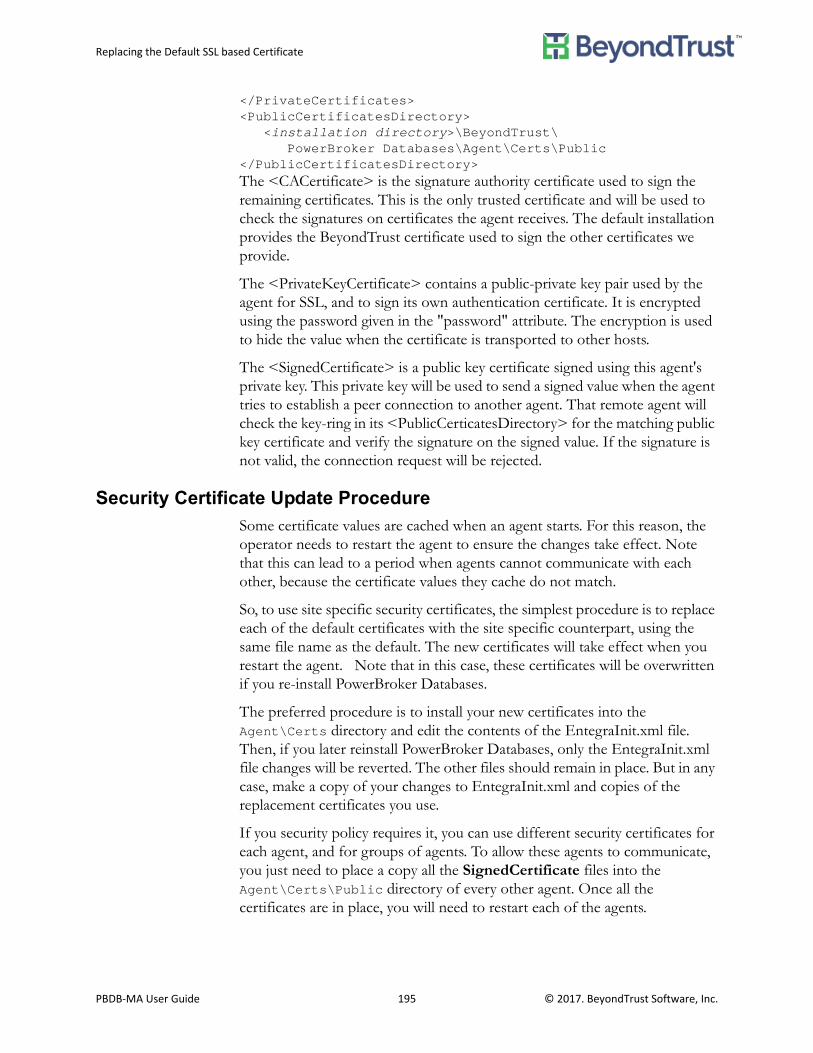
Replacing the Default SSL based Certificate
PBDB‐MA User Guide 195 © 2017. BeyondTrust Software, Inc.
</PrivateCertificates><PublicCertificatesDirectory>
<installation directory>\BeyondTrust\PowerBroker Databases\Agent\Certs\Public
</PublicCertificatesDirectory>The <CACertificate> is the signature authority certificate used to sign the remaining certificates. This is the only trusted certificate and will be used to check the signatures on certificates the agent receives. The default installation provides the BeyondTrust certificate used to sign the other certificates we provide.
The <PrivateKeyCertificate> contains a public-private key pair used by the agent for SSL, and to sign its own authentication certificate. It is encrypted using the password given in the "password" attribute. The encryption is used to hide the value when the certificate is transported to other hosts.
The <SignedCertificate> is a public key certificate signed using this agent's private key. This private key will be used to send a signed value when the agent tries to establish a peer connection to another agent. That remote agent will check the key-ring in its <PublicCerticatesDirectory> for the matching public key certificate and verify the signature on the signed value. If the signature is not valid, the connection request will be rejected.
Security Certificate Update Procedure
Some certificate values are cached when an agent starts. For this reason, the operator needs to restart the agent to ensure the changes take effect. Note that this can lead to a period when agents cannot communicate with each other, because the certificate values they cache do not match.
So, to use site specific security certificates, the simplest procedure is to replace each of the default certificates with the site specific counterpart, using the same file name as the default. The new certificates will take effect when you restart the agent. Note that in this case, these certificates will be overwritten if you re-install PowerBroker Databases.
The preferred procedure is to install your new certificates into the Agent\Certs directory and edit the contents of the EntegraInit.xml file. Then, if you later reinstall PowerBroker Databases, only the EntegraInit.xml file changes will be reverted. The other files should remain in place. But in any case, make a copy of your changes to EntegraInit.xml and copies of the replacement certificates you use.
If you security policy requires it, you can use different security certificates for each agent, and for groups of agents. To allow these agents to communicate, you just need to place a copy all the SignedCertificate files into the Agent\Certs\Public directory of every other agent. Once all the certificates are in place, you will need to restart each of the agents.

Replacing the Default SSL based Certificate
PBDB‐MA User Guide 196 © 2017. BeyondTrust Software, Inc.
The Agent\Certs\Public directory can also be used to implement key roll-over. If you want to roll some or all agents over to a new key, you can install both the old and new keys into the key ring directories. Those agents will then accept agents during the roll-over period. You may then roll the <SignedCertificate> files for each agent and restart them as need. Once the roll-over is complete, you should remove the old certificates from all the Agent\Certs\Public directories and perform one file restart of the agents.
Application User Auditing
PBDB‐MA User Guide 197 © 2017. BeyondTrust Software, Inc.
Application User Auditing
PowerBroker Databases Application User Auditing (AUA) allows PowerBroker Databases to audit changes made by multi-user applications on a per user basis. Using AUA you can audit transactions executed by each user when the application funnels operations from several users through one or several database sessions and the information about what user completed which operation is not registered in the DBMS.
This section provides guidance for application developers who want to enable PowerBroker Databases Application User Auditing.
AUA for Oracle
AUA for Oracle requires the application to call the PowerBroker Databases stored procedure, LUMAPPUSERAUDIT.SP_LUMIGENT_SET_APP_USER (VARCHAR userID), at each user context switch. This stored procedure inserts the user ID into the <Collect User>.lumAuditCollectAppuserIDs table.
At collection time, PowerBroker Databases searches the Archive Redo Log for inserts to the lumAuditCollectAppuserIDs table. When PowerBroker Databases detects inserts to this table, it sends the collected user IDs to the LUMAPPLICATIONUSERS table in the Repository and saves them in the APPLICATIONUSERNAME column. LUMCLIENTS.APPLICATIONUSERID points to this table.
PowerBroker Databases attributes all operations in a database session to the last user until the user ID is changed.
You setup the stored procedure and the new table by running the enable_lumigent_aua_oracle.sql script found in the following location:
• Windows<installation directory>\BeyondTrust\
PowerBroker Databases\Sql• Linux
home/<user name>/PowerBroker Databases/sql
Note: On Oracle 12C, run the script enable_lumigent_aua_oracle_12C.sql to set up the application user auditing stored procedure.
(Oracle) Enabling AUA
To enable AUA for Oracle, complete the following steps:
1. On the audited server, locate the enable_lumigent_aua_oracle.sql script:
– On Windows:
Application User Auditing
PBDB‐MA User Guide 198 © 2017. BeyondTrust Software, Inc.
<Installation Directory>\BeyondTrust\PowerBroker Databases\Sql\enable_lumigent_aua_oracle.sql
– On UNIX: <Installation Directory>\Sql\
enable_lumigent_aua_oracle.sql
2. Execute this script, passing the name of the collection user as the argument.
Example:If the name of the collection database user is LUMUSER, execute:
@enable_lumigent_aua_oracle LUMUSER
Warning: You must execute this script on the audit source on which you want to perform Application User Auditing. To use AUA for multiple audit sources located on the same server, execute this script for each audit source.
This script creates the following:
• LumAppUserAudit package containing a stored procedure SP_LUMIGENT_SET_APP_USER.
• lumAuditCollectAppUserIDs table in the collection user schema. • Grants EXECUTE permissions on the stored procedure to PUBLIC.
(Oracle 12C) Enabling AUA
To enable AUA for Oracle 12C, complete the following steps:
1. On the audited server, locate the enable_lumigent_aua_oracle_12C.sql script:
– On Windows:<Installation Directory>\BeyondTrust\PowerBroker Databases\Sql\enable_lumigent_aua_oracle_12C.sql
– On UNIX:<Installation Directory>\Sql\enable_lumigent_aua_oracle_12C.sql
2. Execute this script, passing the name of the collection user and LUMAPPUSERAUDIT as the arguments.
Example:
If the name of the collection database user is LUMUSER, execute:
@enable_lumigent_aua_oracle LUMUSER LUMAPPUSERAUDIT

Application User Auditing
PBDB‐MA User Guide 199 © 2017. BeyondTrust Software, Inc.
Warning:
You must execute this script on the audit source on which you want to perform Application User Auditing. To use AUA for multiple audit sources located on the same server, execute this script for each audit source.
This script creates the following:
• LumAppUserAudit package containing a stored procedure SP_LUMIGENT_SET_APP_USER.
• <Collect User>.lumAuditCollectAppUserIDs table in the collection user schema.
• Grants EXECUTE permissions on the stored procedure to PUBLIC.
(Oracle) Verifying that AUA is Enabled
To verify that AUA is enabled, complete the following steps:
1. Perform data collection.
2. On the audited server, open the PowerBroker Databases Agent log file:
– On Windows:<Installation Directory>\BeyondTrust\
PowerBroker Databases\Agent\Log\lmEntegraAgent#.log
– On UNIX: <Installation Directory>\agent.<hostname>\log\
lmEntegraAgent#.log
3. Look for the following line:App User Auditing enabled
(Oracle) Setting the Application Identifier
To set the application identifier for a user, the application must call the stored procedure, passing in the user name as a string (up to 127 characters):
EXEC LUMAPPUSERAUDIT.SP_LUMIGENT_SET_APP_USER(’USER01’)
(Oracle) Resetting the Application Identifier
To reset the application identifier for a session, the application must call the stored procedure with no argument:
EXEC LUMAPPUSERAUDIT.SP_LUMIGENT_SET_APP_USER()
(Oracle) AUA - Usage Scenario
The following scenario illustrates how Oracle AUA could be used to audit the actions of two different users.

Application User Auditing
PBDB‐MA User Guide 200 © 2017. BeyondTrust Software, Inc.
1. A multi-user application logs into the audited Oracle database, ORADB, using the login account SERVERAPP.
2. Application end users, USER01 and USER02, log into the application and perform some database operations against ORADB.
3. When USER01 starts, the application calls the stored procedure and sets the user ID to USER01:exec LUMAPPUSERAUDIT.SP_LUMIGENT_SET_APP_USER(‘USER01’);
4. The application carries out the database operations driven by USER01.
5. When USER02 starts, the application calls the stored procedure and sets the user ID to USER02:exec LUMAPPUSERAUDIT.SP_LUMIGENT_SET_APP_USER(‘USER02’);
6. The application carries out the database operations requested by USER02.
7. Both users log out of the application.
8. The application calls the stored procedure and resets the user ID to null: exec LUMAPPUSERAUDIT.SP_LUMIGENT_SET_APP_USER();
9. The application performs some administrative operations on ORADB.
10. PowerBroker Databases collection operation is performed.
The PowerBroker Databases Repository will contain the following activity detail records for the database ORADB in order by date/time:
• All database operations performed by USER01 with the DBUserName value set to SERVERAPP and the application user name set to USER01.
• All database operations performed by USER02 with the DBUserName value set to SERVERAPP and the application user name set to USER02.
• The administrative database operations with the DBUserName value set to SERVERAPP and the application user name set to null.

Application User Auditing
PBDB‐MA User Guide 201 © 2017. BeyondTrust Software, Inc.
(Oracle) Disabling AUA
To disable Oracle AUA, complete the following steps:
1. On the audited server, locate the script:
– On Windows:<Installation Directory>\BeyondTrust\
PowerBroker Databases\Sql\drop_lumigent_aua_oracle.sql
– On UNIX: <Installation Directory>\Sql\
drop_lumigent_aua_oracle.sql
2. Execute this script passing the name of the collection user as the argument.
Example:If the name of the collection user is LUMUSER, execute:
@drop_lumigent_aua_oracle LUMUSER
Note: As with enabling AUA, you must execute this script on the audit source on which you want to disable Application User Auditing. To disable AUA on multiple audit sources located on the same server, execute this script for each audit source.
(Oracle 12C) Disabling AUA
To disable Oracle AUA, complete the following steps:
1. On the audited server, locate the script:
– On Windows:<Installation Directory>\BeyondTrust\PowerBroker Databases\Sql\drop_lumigent_aua_oracle_12C.sql
– On UNIX:<Installation Directory>\Sql\drop_lumigent_aua_oracle_12C.sql
2. Execute this script passing the name of the collection user and LUMAPPUSERAUDIT as the arguments.
Example:
If the name of the collection user is LUMUSER, execute:
@drop_lumigent_aua_oracle_12C.sql LUMUSER LUMAPPUSERAUDIT

Application User Auditing
PBDB‐MA User Guide 202 © 2017. BeyondTrust Software, Inc.
Note: As with enabling AUA, you must execute this script on the audit source on which you want to disable Application User Auditing. To disable AUA on multiple audit sources located on the same server, execute this script for each audit source.
AUA for SQL Server
PowerBroker Databases Application User Auditing (AUA) for SQL Server allows auditing of the SET CONTEXT_INFO statement on a SQL Server database.
CONTEXT_INFO is a 128 byte variable. SQL Server provides the SET statement to modify the value stored in CONTEXT_INFO. This value remains unchanged through multiple SQL queries and stored procedure invocations within a single continuous database session (connection). The CONTEXT_INFO value for a specific SPID may be retrieved in any session routine by selecting the context_info column from the sysprocesses table, where the spid is the system variable @@SPID.
PowerBroker Databases AUA keeps running track of the milliseconds when the SET CONTEXT_INFO [parameter] statements are executed. If an application uses the SET CONTEXT_INFO to set a new value for the CONTEXT_INFO variable for each user, at collection time PowerBroker Databases correlates the time periods that CONTEXT_INFO held various values against the times database operations were executed. This “after the fact” time based correlation is how each database operation is assigned an application user value that ultimately is recorded in the PowerBroker Databases Repository.
(SQL Server) AUA Limitations
• Microsoft SQL Server allows the SET CONTEXT_INFO <parameter> statement to be used with a T-SQL variable as the <parameter>. The AUA feature will only work correctly if the value of <parameter> is a literal. It is always possible to construct the proper SET CONTEXT_INFO literal statement first in a text string using the T-SQL variable and then EXECUTE the text string including the literal.
• If multiple SET CONTEXT_INFO statements are executed on a single session within the space of a millisecond, and other activities occur during that same millisecond, PowerBroker Databases cannot determine which activities executed under which context info value. Therefore these activities will appear with $$lum_ambiguous_nn as the application user. An application can prevent this by sleeping for 100 milliseconds or so immediately before and immediately after executing the SET CONTEXT_INFO statement.

Application User Auditing
PBDB‐MA User Guide 203 © 2017. BeyondTrust Software, Inc.
(SQL Server) Enabling AUA
You use the lmConfig utility to enable AUA for SQL Server. The lmConfig utility is a command line tool that you use to communicate with the PowerBroker Databases central configuration database (CCDB) using SOAP requests in the form of XML files. The lmConfig utility is located in the following directory:
<installation directory>\BeyondTrust\PowerBroker Databases\Bin
To enable Application User Auditing (AUA) for SQL Server, complete the following steps:
1. Locate the file setaua.xml on your installation CD:\Documentation\scripts\setaua.xml
2. Save the setaua.xml file in the PowerBroker Databases bin directory on your computer:<Installation Directory>\BeyondTrust\
PowerBroker Databases\Bin
3. Open the setaua.xml file using a text editor or an XML editor.<env:Body>
<lumApi:EditConfigRequest><lumCfg:Target lumCfg:auditSource.name="***auditsourcename***"/><lumCfg:Options>
<lumCfg:Option lumCfg:name="ApplicationUserAuditing" lumCfg:value="true"/>
</lumCfg:Options></lumApi:EditConfigRequest>
</env:Body>
4. In the setaua.xml file, replace ***auditsourcename*** with the name of your audit source. Do not delete the quotation marks around the audit source name.
5. Save the XML file.
6. Execute the lmConfig utility from the PowerBroker Databases bin directory using the following command: lmConfig exec setaua.xml -login <user name>
-password <password>
for example,
lmConfig exec setaua.xml -login auditdb -password auditdb

Application User Auditing
PBDB‐MA User Guide 204 © 2017. BeyondTrust Software, Inc.
(SQL Server) Verifying that AUA is Enabled
1. Open the PowerBroker Databases central configuration database.
2. Check the LUMCFGAUDITSOURCEOPTIONS table and verify that ApplicationUserAuditing is listed and set to "true".
(SQL Server) Setting CONTEXT_INFO
To set CONTEXT_INFO, execute the SQL Server SET CONTEXT_INFO command and pass in the application user ID. The application user ID should be entered as a hexadecimal value. The hexadecimal data in the command is interpreted as ASCII text.
For example, to set the application user for the current session to user ID "ABCD" you would perform the following conversion:
You can use published conversion tables to determine the hexadecimal values. When you use the hex values to enter the user ID you start the string with the value "0x" to indicate that the string being passed is a hexadecimal value. So to set the application user ID to "ABCD" you would execute the following command:
set context_info 0x41424344
You can write a stored procedure to pass the user ID to the SET CONTEXT_INFO command. To allow PowerBroker Databases to correctly identify the application user, you should include a 100 millisecond delay between setting the CONTEXT_INFO and any other activity. For more information about why this is necessary, see "(SQL Server) AUA Limitations" on page 202.
Example:The following is the example of the proper SET CONTEXT_INFO syntax:
CREATE PROCEDURE [dbo].[lum_setappuser_example]@APPUSER VARCHAR(128)ASBEGINSET NOCOUNT ON
DECLARE @SQL_STRING NVARCHAR(255)DECLARE @HEX_VALUE VARBINARY(255)DECLARE @HEX_STRING VARCHAR(255)SET @HEX_VALUE = CAST(@APPUSER as VARBINARY(255))
Table 14. Example of application user ID as a hex value
User ID A B C D
ASCII value 65 66 67 68
Hex value 41 42 43 44
Application User Auditing
PBDB‐MA User Guide 205 © 2017. BeyondTrust Software, Inc.
SELECT @HEX_STRING = master.dbo.fn_varbintohexstr(@HEX_VALUE)
SET @SQL_STRING = 'SET CONTEXT_INFO ' + @HEX_STRINGWAITFOR DELAY '00:00:00:01'EXECUTE sp_executesql @SQL_STRINGWAITFOR DELAY '00:00:00:01'END
Caution: Make sure that the application sets a new CONTEXT_INFO variable value for every user who logs in.
(SQL Server) Verifying That AUA is Working
To verify that AUA is working:
1. Generate some activity under an application user.
2. Collect audit data.
3. Confirm that the application user appears in the Repository.
Application User Auditing
PBDB‐MA User Guide 206 © 2017. BeyondTrust Software, Inc.
(SQL Server) Viewing Application User Information in the Repository
To view application user information in the Repository, run the following query:
selectt2.Name, t4.TableName, t5.OldValue, t5.NewValue,t7.ApplicationUserName
from lumActivities t1left join lumActivityTypes t2
on t1.ActivityTypeId = t2.ActivityTypeIdleft join lumActivityTables t3
on t1.ActivityId = t3.ActivityIdleft join lumTables t4
on t3.TableId = t4.TableIdleft join lumColumnUpdates t5
on t1.ActivityId = t5.ActivityIdleft join lumClients t6
on t1.ClientId = t6.ClientIdleft join lumApplicationUsers t7
on t6.ApplicationUserID = t7.ApplicationUserIDwhere
t1.ActivityTypeId != 1001 and t1.ActivityTypeId != 1201order by t1.ActivityId;
Caution: In custom reports, it is important to use a LEFT JOIN when joining LUMCLIENTS and LUMAPPLICATIONUSERS, since not every activity has an associated application user.
(SQL Server) Resetting CONTEXT_INFO Back to Null
There are cases where an application uses the connection to execute something as a specific user and then uses the same connection to execute something generic that should not be tied back to a user. To reset the application user to null:
set context_info 0x00
CONTEXT_INFO always starts with an initial value of null.
Application User Auditing
PBDB‐MA User Guide 207 © 2017. BeyondTrust Software, Inc.
(SQL Server) Disabling AUA
To disable AUA for SQL Server, complete the following steps:
1. Locate the file setaua.xml on your installation CD:\Documentation\scripts\setaua.xml
2. Save the setaua.xml file under a different name, for example disableaua.xml, in the PowerBroker Databases bin directory on your computer: <Installed Directory>\BeyondTrust
\PowerBroker Databases\Bin
3. Edit the disableaua.xml file:a. Replace "auditsourcename" with the name of your audit source.b. Replace <lumCfg:Option
lumCfg:name="ApplicationUserAuditing" lumCfg:value="true"/> with <lumCfg:Option lumCfg:name="ApplicationUserAuditing" lumCfg:value="false"/>
4. Save the disable.xml file.
5. Run the following command from the PowerBroker Databases bin directory:lmConfig exec disable.xml -login <username>
-password <password>

Using DML Tracing for PowerBroker Databases
PBDB‐MA User Guide 208 © 2017. BeyondTrust Software, Inc.
Using DML Tracing for PowerBroker Databases
This appendix explains how to set up and use DML tracing for SQL Server audit sources. When you enable DML trace, PowerBroker Databases modifies the existing Selects (or Statement) trace to capture DML (INSERT/DELETE/UPDATE) statements without the need for transaction log backups.
Note: When you enable DML trace, PowerBroker Databases collects DML activity from the trace files and not the transaction logs.
To configure DML trace for an audit source you perform the following tasks:
1. Enable extended auditing for the audit source. For instructions, see "Application User Auditing" on page 197.
2. Create an audit rule to capture DML data from the audit source.
3. Use the lmConfig utility to configure the audit source options for trace.
Enable Extended Auditing
Enable extended auditing as described in "Auditing Selects" on page 96. The EnableExtendedAudited audit source option must be set to true.
Caution: AUA must be enabled for DML Trace to work.
Create a DML Audit Rule
Using the Administration Console create a rule and policy that captures DML statements (INSERT/UPDATE/DELETE) from the audit source. SELECT auditing is recommended to obtain a more complete audit especially when auditing DML operations that modify results based on the returned results of a SELECT.
To use the UseTraceOnly mode, SELECT auditing must be turned on and a rule must be present for the statement/select trace to be created
For more information about creating audit rules, see "Creating Custom Audit Rules and Policies" starting on page 115.
For more information about enabling auditing for SELECTs, see "Auditing Selects" on page 96.
Configure the Audit Source Options for Trace
You use the lmConfig utility to enable two audit source options for DML Trace:
• UseTraceOnly• TraceOnlyUserFile

Using DML Tracing for PowerBroker Databases
PBDB‐MA User Guide 209 © 2017. BeyondTrust Software, Inc.
The lmConfig utility is a command line tool that you use to communicate with the PowerBroker Databases central configuration database (CCDB) using SOAP requests in the form of XML files.
Note: Use lmconfig to turn on the DML trace options, then run lmconfig again to EnableExtendedAuditing AFTER you have enabled the DML trace options. This is true even if you already had this option enabled prior to setting up DML tracing.
Create a Template XML File
To create a template XML file for setting audit source options, complete the following steps:
1. Log on to the PBDB Server (system hosting the Central Configuration Agent) and open a text editor like Note Pad.
2. Copy and paste the following text into the editor.<?xml version="1.0" encoding="UTF-8"?> <env:Envelope xmlns:env="http://www.w3.org/2003/05/soap-
envelope" xmlns:lumApi="http://www.lumigent.com/namespace/ECXAPI" xmlns:lumCfg="http://www.lumigent.com/namespace/
EntegraCC" xmlns:xsi="http://www.w3.org/2001/XMLSchema-instance">
<env:Header> <lumApi:Version env:mustUnderstand="true" env:role="http://www.w3.org/2003/05/soap-
envelope/role/ultimateReceiver"><lumApi:API lumApi:name="ECSAPI">
<lumApi:major>5</lumApi:major> <lumApi:minor>0</lumApi:minor>
</lumApi:API> </lumApi:Version> <lumApi:Request lumApi:seqno="1">
<lumApi:Command>/editconfig/auditsource option?function=set&setflags=modify
</lumApi:Command> </lumApi:Request>
</env:Header> <env:Body>
<lumApi:EditConfigRequest> <lumCfg:Target
lumCfg:auditSource.name="**AUDITSRC**"/> <lumCfg:Options>
<lumCfg:Option lumCfg:name="**AUDITOPT**" lumCfg:value="**AUDITVAL**"/>
</lumCfg:Options> </lumApi:EditConfigRequest>
</env:Body> </env:Envelope>
3. Save the file as template.xml:

Using DML Tracing for PowerBroker Databases
PBDB‐MA User Guide 210 © 2017. BeyondTrust Software, Inc.
Set the UseTraceOnly Option
You use the lmConfig utility to add the audit source option UseTraceOnly to a SQL Server audit source. This option must be set to true for DML Trace. This option is needed to enable capture of DML events via the statement trace.
Setting this option to true does the following:
• enables DML trace for all users on the audited server• disables PowerBroker Databases’s processing of transaction logs
To use the UseTraceOnly mode, SELECT auditing must be turned on and a rule must be present for the statement/select trace to be created
To set the UseTraceOnly option, complete the following steps:
1. Log on to the PBDB Server (system hosting the Central Configuration Agent).
2. Using a text editor like Note Pad, open the template.xml file.
3. Modify the following sections marked in the file:– **AUDITSRC**: to the case-sensitive name of your audit source.– **AUDITOPT**: to the text "UseTraceOnly".– **AUDITVAL**: to the text "true".
4. Save the file as UseTraceOnly.xml, for example, C:\temp\UseTraceOnly.xml.
5. Launch the lmConfig utility found in the following directory<installation directory>\BeyondTrust\
PowerBroker Databases\Bin
6. Set the audit source option by running lmConfig with the XML file as the exec argument. For example:
lmConfig exec C:\Temp\UseTraceOnly.xml –login auditdb –password mypassword
7. Exit the lmConfig utility.
8. To monitor the progress of the following steps, open a session on the audited server and go to the <PowerBroker Databases installation>/Agent/Log directory.
9. To verify that the audit source option is set, using the session that you opened in step 8. on page 210, open the highest number lms2N.log and search the end for the following text “UseTraceOnly audit source option enabled” and it should be followed by “TraceOnlyUserFile option not set : ‘UseTraceOnly’ will audit all users on (the_instance_name).” where the_instance_name is the name of the instance.

Using DML Tracing for PowerBroker Databases
PBDB‐MA User Guide 211 © 2017. BeyondTrust Software, Inc.
Setting Up the Traced Users
To configure the traced users you create a local file on either of the following.
• the audited server (when the SQL Server service runs under the local system account)
• a UNC file (when SQL Server service run as a domain user)
Warning: If no users are listed in the security users file or if the file is unreachable, unreadable, etc., tracing is turned on for all system users.
This file will be read by LMS2.exe process (part of the PBDB server components) so it must reside on the audited server. The list of users found when the file is read printed out in the lms2 log file.
To properly audit trace switch overs, the account used to run the SQL Server (‘NT AUTHORITY\SYSTEM’ for SQL Server running as the local system account) or a specified domain user will be automatically added to the security file users.
The format of this file is shown in the sample below.
# comment lines must start with a ‘#’ and are ignored # One entry per line, multiple entries will result in the
filter # set incorrectly. # For SQL Server auth users, the following format is used # For PowerBroker Databases running as the local system
account # USER|NT AUTHORITY\SYSTEM # USER|<sql authenticated acct> USER|sa # For win auth local and domain accts the format is as
follows # USER|<COMPUTER>\<User> or # USER|<DOMAIN>\<User> USER|DEVBLADE06\AdministratorUSER|LUMIGENT-HQ\jstick01# For local Windows groups the format is as follows#LGROUP|<COMPUTER>\<GROUP> LGROUP|DEVBLADE06\Admins # And finally for domain groups the format is # GROUP|<DOMAIN>\<GROUP> GROUP|LUMIGENT-HQ\Engineering # The names case sensitive and must match the format
recorded by # Audited server or Windows

Using DML Tracing for PowerBroker Databases
PBDB‐MA User Guide 212 © 2017. BeyondTrust Software, Inc.
Set the TraceOnlyUserFile Option
You use the lmConfig utility to add the audit source option TraceOnlyUserFile to a SQL Server audit source. This option sets the PowerBroker Databases server components to collect activity of only the users specified in a security file. This option must be set to the path to a file which may contain SQL authenticated accounts, local Windows authentication users and groups and Windows domain users and groups.
Using DML tracing with the TraceOnlyUserFile limits the amount of data collected (at the SQL trace level). Only activity generated by users specified in the file will be collected. This helps to minimize impact on the server instance.
To set the TraceOnlyUserFile option, complete the following steps:
1. Log on to the PBDB Server (system hosting the Central Configuration Agent).
2. Using a text editor like Note Pad, open the template.xml file.
3. Modify the following sections marked in the file:– **AUDITSRC** : set to the case-sensitive name of the audit source – **AUDITOPT** : set to the text ‘TraceOnlyUserFile’ – **AUDITVAL** : set to the file path of the security file you created
in "Setting Up the Traced Users" on page 211.
4. Save the file as TraceUsers.xml, for example, C:\temp\TraceUsers.xml.
5. Launch the lmConfig utility found in the following directory<installation directory>\BeyondTrust\
PowerBroker Databases\Bin
6. Set the audit source option by running lmConfig with the XML file as the exec argument. For example: lmConfig exec C:\Temp\TraceUsers.xml –login auditdb
–password mypassword
7. Exit the lmConfig utility.
8. To verify that the audit source option is set, using the session that you opened in step 8. on page 210, open the highest number lms2N.log and search towards end for the following text “FbtUserConfig::ReadSecurityFile(the_user_filename)…” and a number of “FbtUserConfig::LoadUserInfo … read user ‘a_user_here’…” and “FbtUserConfig::LoadUserInfo …”. "Adding Domain group member ‘a_domain_user’…..” and then a final line “Configured <N> users from file ‘the_security_file’ for DML monitor trace” where N is the number of users found.Errors will be printed in the log file. Failing to find any users in the file results in tracing being enabled for all users.

Using DML Tracing for PowerBroker Databases
PBDB‐MA User Guide 213 © 2017. BeyondTrust Software, Inc.
Note: Use lmconfig to turn on the DML trace options, then run lmconfig again to EnableExtendedAuditing AFTER you have enabled the DML trace options. This is true even if you already had this option enabled prior to setting up DML tracing.
Verifying Trace Configuration
To verify that the Collection Agent is configured for trace collections, search the lmEntegraAgent log on the collection computer for the text (“UserTraceOnly audit option set on <audit source>”).
To verify that an audit source is configured for trace collections, search the LMS2 log for the following text strings:
• “Loading the filter options for DML Tracing”
• “Adding Domain group member”
• “Adding Local group member”
• “Read user xx from security file”

Audit Source Options
PBDB‐MA User Guide 214 © 2017. BeyondTrust Software, Inc.
Audit Source Options
Each PowerBroker Databases audit source has configuration options that control how PowerBroker Databases manages the data collected from that audit source. Audit source options vary depending on the database platform being monitored.
When you create an audit source using the Administration Console, on the Edit Audit Source subtab you can click the Advanced button at the bottom of the page to access the Advanced Options screen. This screen displays some, but not all, of the audit source options for an audit source. Note that some audit source options do not exist unless you explicitly add them.
Table 15. Audit Source Options by Database
DB2 Oracle SQL Server Sybase
AutoSwitchLogBeforeCollection AlertInterval BatchPreFilter BatchPreFilter
BatchPreFilter AlertThreshold CacheSizeMax CacheSizeMax
ETFOutputDirectory AutoSwitchLogBefore Collection
*ColumnRuleCaseSensitive ForwardQueryToNetWatch
ExcludeLumigentEvents BatchPreFilter *ColumnRuleEngineOff IgnoreMissingUser
ForwardQueryToNetWatch CollectOsAudFileData DataFileDirectory OpcodeExcludedFromALL
IgnoreMissingUser CollectSysAudTableData DataFileMax RegexpPreFilter
OpcodeExcludedFromALL *ColumnRuleCaseSensitive DataFileShare RuleEngineCacheOn
QueryNetArchiveOnly *ColumnRuleEngineOff DisableObjectFiltering RuleEngineOn
RegexpPreFilter DeleteSysAudTableData EnableExtendedAuditing UseColumnFilter
RuleEngingeCacheOn DisableObjectFiltering ETFOutputDirectory UseFalconParser
RuleEngineOn *EnableTransDB ExcludeLumigentEvents
UseColumnFilter ExcludeLumigentEvents FilterOnOsUsers
FilterOnOsUser ForwardQueryToNetWatch
ForwardQueryToNetWatch IgnoreDBCC
IgnoreMissingUser IgnoreMissingUser
*KeepSysAudLogonHrs IngnoreUpdateStats
OpcodeExcludedFromALL NumberOfCacheBuckets
QueryNetArchiveOnly OpcodeExcludedFromALL
RegexpPreFilter QueryNetArchiveOnly
RuleEngingeCacheOn RegexpPreFilter
RuleEngineOn RuleEngineCacheOn
SearchLogSubDirs RuleEngineOn
*TransDBSize SaveETFFile
Audit Source Option available through the User Interface.* Audit Source Option does not exist unless explicitly added by the user.

Audit Source Options
PBDB‐MA User Guide 215 © 2017. BeyondTrust Software, Inc.
Audit Source Option Reference
The following table lists the PowerBroker Databases audit source options alphabetically. Not all of these options apply to every audit source type, some are specific to particular database platforms.
Note: See the next section for more information about options that work together to enable or disable features.
*TransExpireTime SaveTraceFile
UseColumnFilter ShutdownServerOnError
TraceOnlyUserFile
UseColumnFilter
UseTraceOnly
Table 15. Audit Source Options by Database
DB2 Oracle SQL Server Sybase
Audit Source Option available through the User Interface.* Audit Source Option does not exist unless explicitly added by the user.
Table 16. Alphabetical List of Audit Source Options
Option Name Required? Default Value Valid Values Description
AlertQueueLayout Optional FORMAT_WITH_ TIMESTAMP,
FORMAT_WITH_ ORDINAL
FORMAT_WITH_ TIMESTAMP
FORMAT_WITH_ ORDINAL
FORMAT_WITH_ REVERSE_ ORDER
Real-Time Alert Messaging Option used to specify how queued alert messages are organized.
If FORMAT _WITH_ TIMESTAMP is specified, the event time is included for each alert message in the package.
If FORMAT_WITH_ ORDINAL is specified, each message in the package is numbered.
If FORMAT_WITH_ REVERSE_ORDER is specified, the latest events are listed first in the package.

Audit Source Options
PBDB‐MA User Guide 216 © 2017. BeyondTrust Software, Inc.
AlertQueueMaxItem Optional Integer values from 1 to 100.
Real-Time Alert Messaging Option used to specify how many total queued messages triggers PowerBroker Databases to send an alert message. Once PowerBroker Databases reaches the maximum wait time, a message will be send even if this limit has not been reached.
Note that the value cannot exceed 100. This is to prevent overly large messages.
AlertQueueMaxWaitTime
Optional 30000
(30 seconds)
Real-Time Alert Messaging Option used to specify, in milliseconds, the length of time real-time alerts should remain in the queue before being sent.
ApplicationUser Auditing
Optional false True /False Used to indicate whether or not PowerBroker Databases should capture the application user name.
AutoSwitchLog BeforeCollection
Required false True /False Used to specify whether or not the database should switch to a different redo log after collection. If set to true:
For DB2 - perform an "archive log for database" at the beginning of collection.
For Oracle - Perform an ALTER SYSTEM SWITCH LOGFILE at the beginning of collection.
CacheSizeMax Required NULL Integers Used to specify the maximum collector cache memory size.
Change this value only if instructed to do so by BeyondTrust Support.
Table 16. Alphabetical List of Audit Source Options
Option Name Required? Default Value Valid Values Description

Audit Source Options
PBDB‐MA User Guide 217 © 2017. BeyondTrust Software, Inc.
CollectOsAudFile Data
Required false True /False Used to specify whether to collect data from the OS audit file rather than from SYS.AUD$
Set to True to collect from the OS audit file.
Set to False to collect from SYS.AUD$
CollectSysAudTable Data
Optional false True /False Used to specify whether collection from the system audit table is enabled.
On Oracle 8, PowerBroker Databases captures some audit events such as DDL from Oracle's native audit trail. This feature must be enabled within Oracle by a DBA before PowerBroker Databases can capture this data.
On Oracle 9i and higher, PowerBroker Databases can collect DDL events directly from the log however you may still choose to collect additional events from Oracle's native audit trail.
*ColumnRuleCase Sensitive
Optional true True/False Used with column level filtering.
Set to false for a case-insensitive compare of Control Fields and the database columns
*ColumnRuleEngineOff
Optional false True/False Used with column level filtering.
Set to True to disable application of the secondary rule engine used for field level rules from PowerBroker Databases. This feature only applies to Oracle and SQL Server DML log collection.
Table 16. Alphabetical List of Audit Source Options
Option Name Required? Default Value Valid Values Description

Audit Source Options
PBDB‐MA User Guide 218 © 2017. BeyondTrust Software, Inc.
DataFileDirectory Optional NULL string (UNC Path)
Used to specify the directory for trace files.
The default value for audit sources created through the Administration Console is the PowerBroker Databases Agent data file directory.
<installation directory>\Agent\ Data\mssql\<instance name>
This option only needs to be explicitly set for clustered audit sources.
DataFileMax Required 500 Integer Used to specify the maximum size of a trace file in MB. If a trace file reaches this size, PowerBroker Databases will change to another file.
DataFileShare Required NULL string (UNC Path)
Used to specify the directory for ETF files.
The default value for audit sources created through the Administration Console is the PowerBroker Databases Agent data file directory.
<installation directory>\Agent\ Data\mssql\<instance name>
DeleteSysAudTable Data
Optional false True /False Used to specify whether to purge this data from the native audit trail after a successful collection
Table 16. Alphabetical List of Audit Source Options
Option Name Required? Default Value Valid Values Description

Audit Source Options
PBDB‐MA User Guide 219 © 2017. BeyondTrust Software, Inc.
DisableObject Filtering
Optional false True /False You can enable object filtering to reduce the amount of processing required for high volume DML activity by defining exclude and include filters to specify which activity records are processed.
Set to True to disable object filtering for the audit source.
Set to False (the default) to enable object filtering for the audit source.
You must also configure object filtering by defining include and exclude filters.
EnableAlertQueue Buffer
Optional True True/False Real-Time Alert Messaging Option used to specify whether PowerBroker Databases should queue real-time alert messages in a buffer and send multiple alerts in a single alert message.
Set to True to queue alerts and send as an aggregated message.
Set to False to send out alerts immediately (that is, send a single message for each alert).
EnableExtended Auditing
Required false True /False Used to enable auditing of additional server activity types, such as SELECTs and the KILL command. Also used for DML Trace collections.
Set to True to enable a trace of all statements executed in SQL Server.
Enabling this option can affect server performance.
Table 16. Alphabetical List of Audit Source Options
Option Name Required? Default Value Valid Values Description
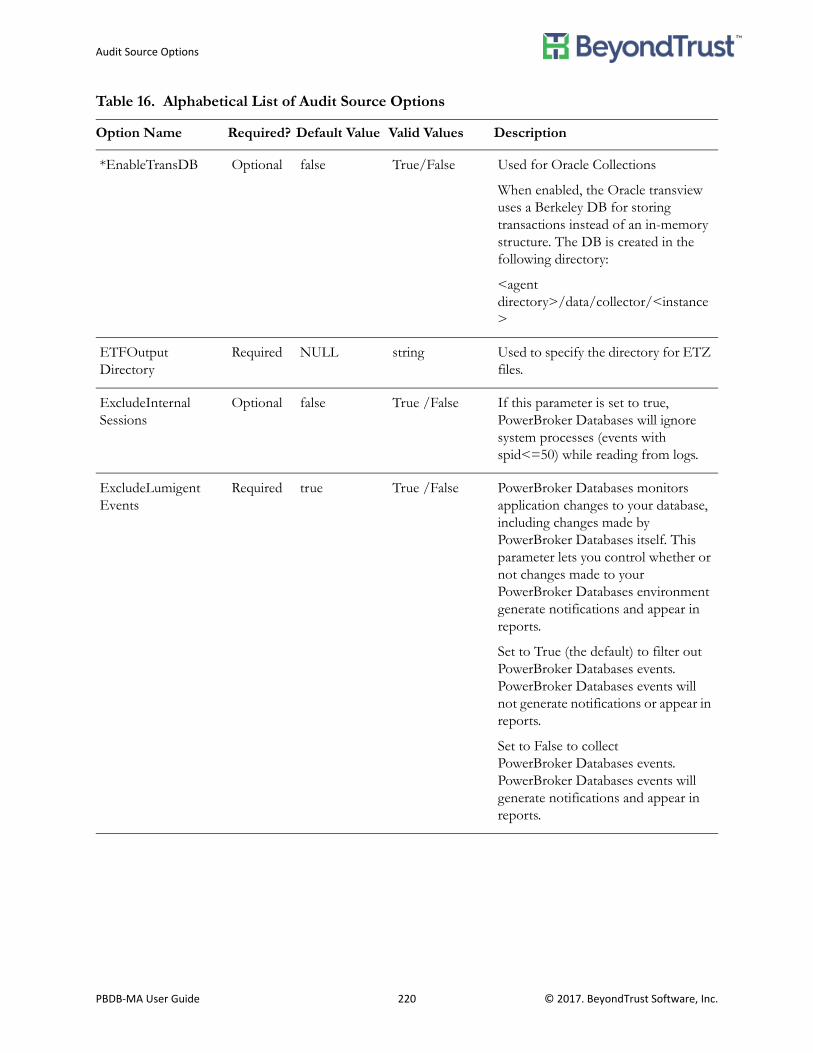
Audit Source Options
PBDB‐MA User Guide 220 © 2017. BeyondTrust Software, Inc.
*EnableTransDB Optional false True/False Used for Oracle Collections
When enabled, the Oracle transview uses a Berkeley DB for storing transactions instead of an in-memory structure. The DB is created in the following directory:
<agent directory>/data/collector/<instance>
ETFOutput Directory
Required NULL string Used to specify the directory for ETZ files.
ExcludeInternal Sessions
Optional false True /False If this parameter is set to true, PowerBroker Databases will ignore system processes (events with spid<=50) while reading from logs.
ExcludeLumigent Events
Required true True /False PowerBroker Databases monitors application changes to your database, including changes made by PowerBroker Databases itself. This parameter lets you control whether or not changes made to your PowerBroker Databases environment generate notifications and appear in reports.
Set to True (the default) to filter out PowerBroker Databases events. PowerBroker Databases events will not generate notifications or appear in reports.
Set to False to collect PowerBroker Databases events. PowerBroker Databases events will generate notifications and appear in reports.
Table 16. Alphabetical List of Audit Source Options
Option Name Required? Default Value Valid Values Description
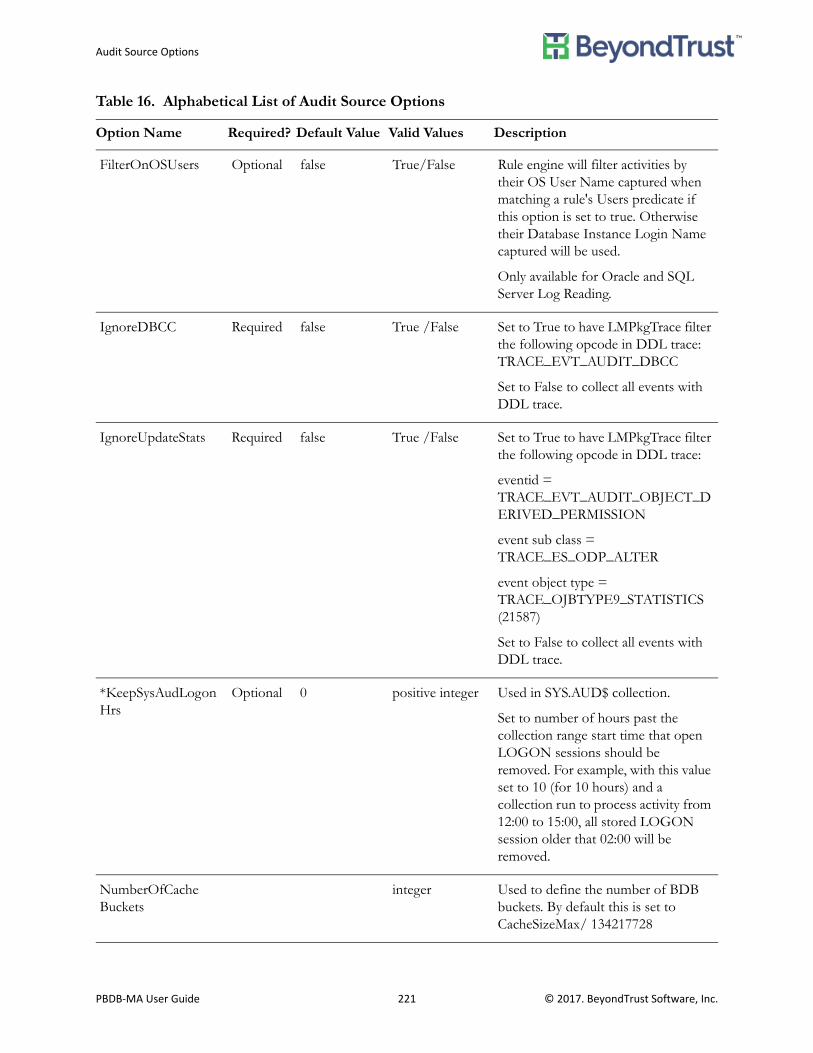
Audit Source Options
PBDB‐MA User Guide 221 © 2017. BeyondTrust Software, Inc.
FilterOnOSUsers Optional false True/False Rule engine will filter activities by their OS User Name captured when matching a rule's Users predicate if this option is set to true. Otherwise their Database Instance Login Name captured will be used.
Only available for Oracle and SQL Server Log Reading.
IgnoreDBCC Required false True /False Set to True to have LMPkgTrace filter the following opcode in DDL trace: TRACE_EVT_AUDIT_DBCC
Set to False to collect all events with DDL trace.
IgnoreUpdateStats Required false True /False Set to True to have LMPkgTrace filter the following opcode in DDL trace:
eventid = TRACE_EVT_AUDIT_OBJECT_DERIVED_PERMISSION
event sub class = TRACE_ES_ODP_ALTER
event object type = TRACE_OJBTYPE9_STATISTICS (21587)
Set to False to collect all events with DDL trace.
*KeepSysAudLogon Hrs
Optional 0 positive integer Used in SYS.AUD$ collection.
Set to number of hours past the collection range start time that open LOGON sessions should be removed. For example, with this value set to 10 (for 10 hours) and a collection run to process activity from 12:00 to 15:00, all stored LOGON session older that 02:00 will be removed.
NumberOfCache Buckets
integer Used to define the number of BDB buckets. By default this is set to CacheSizeMax/ 134217728
Table 16. Alphabetical List of Audit Source Options
Option Name Required? Default Value Valid Values Description

Audit Source Options
PBDB‐MA User Guide 222 © 2017. BeyondTrust Software, Inc.
OpcodeExcluded FromALL
Required 65 (DB2)
50 (Oracle)
50,3011 (SQL)
intlist Used to specify opcodes that should be ignored by "ALL" operations in a rule.
(DB2) Default will ignore the opcode 65 (UPDATE internal) for ALL operations.
(Oracle) Default will ignore opcode 50(SELECT) for ALL operations.
(SQL Server) Default will ignore 50,3011 (SELECT, EXECUTE PROCEDURE) for ALL operations.
RuleEngineCacheOn Required true True /False Used to enable or disable rule engine caching. This option should always be set to True.
RuleEngineOn Required true True /False Used to enable or disable rule engine analysis during collections. This option should always be set to True.
SaveETFFile Required false True /False By default ETF files are purged once they have been collected.
Set to True to if you do not want PowerBroker Databases to delete ETF/ETZ files after data has been collected from them.
This option should only be changed for troubleshooting purposes. Keeping this option enabled runs the risk of running out of disk space.
SaveTraceFile Optional false True /False By default SQL Server TRC files are purged once the collector has packed the data into ETZ files.
Set to True to if you do not want PowerBroker Databases to delete TRC files after data has been collected from them.
This option should only be changed for troubleshooting purposes. Keeping this option enabled runs the risk of running out of disk space.
Table 16. Alphabetical List of Audit Source Options
Option Name Required? Default Value Valid Values Description

Audit Source Options
PBDB‐MA User Guide 223 © 2017. BeyondTrust Software, Inc.
SearchLogSubDirs Required true True /False Set to True to have the collector read archive logs from the log directory and sub directories.
Set to False to have the collector only read the archive log directory.
ShutdownServerOn Error
Required false True /False Used to instruct the audited SQL Server instance to shut down rather than leave a gap in the audit trail.
This option can impact server availability. Under normal circumstances it should not be set to True.
TraceOnlyUserFile Optional Used with DML Trace.
This option must be set to the path to a file which may contain SQL authenticated accounts, local Windows authentication users and groups and Windows domain users and groups. For example,
value="C:\6.0\Enterprise\Bin\SECURITY_FILE.TXT"
Note: This file must reside on the audited server in order to be read by the PBDB server components. If the file path is wrong (missing file), unreadable or contains no users, tracing is turned on for ALL system users.
*TransDBSize Optional 16 positive integer between 1 - 127
Used for Oracle Collections
Used to set the size in megabytes of the BDB transaction cache when EnableTransDB option is enabled.
*TransExpireTime Optional 15 zero or positive integer
Used for Oracle Collections
Sets the collection time (time between records from redo log) interval, when the transview removes pending delete transactions.
Table 16. Alphabetical List of Audit Source Options
Option Name Required? Default Value Valid Values Description

Audit Source Options
PBDB‐MA User Guide 224 © 2017. BeyondTrust Software, Inc.
UseColumnFilter Required true True /False Used to determine whether or not unchanged columns should be collected with DML data.
Set to true to filter events where no column has changed when collecting DML.
Set to false to collect unchanged columns when collecting DML.
UseFalconParser Required false True /False Used to specify which parser PowerBroker Databases should use.
Set to True to use the newer ANTLR based SQL parser.
Set to False to use the older "Falcon" SQL parser.
UseTraceOnly Optional false True /False Used with DML Trace.
Set to True to collect DML Trace data from the transaction log. When this option is enabled, log reading is disabled: data is collected from the SQL Server trace mechanism only.
Note: You must also set the EnableExtendedAuditing option to True when using this option.
Table 16. Alphabetical List of Audit Source Options
Option Name Required? Default Value Valid Values Description
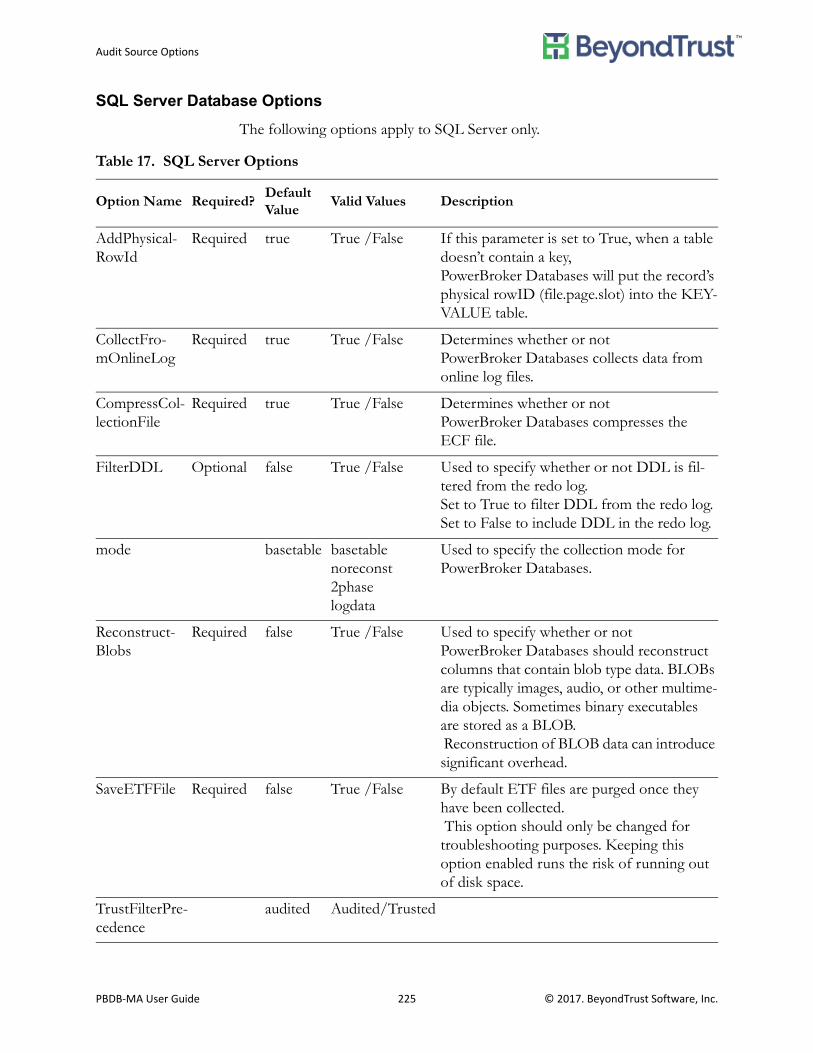
Audit Source Options
PBDB‐MA User Guide 225 © 2017. BeyondTrust Software, Inc.
SQL Server Database Options
The following options apply to SQL Server only.
Table 17. SQL Server Options
Option Name Required?Default Value
Valid Values Description
AddPhysical-RowId
Required true True /False If this parameter is set to True, when a table doesn’t contain a key, PowerBroker Databases will put the record’s physical rowID (file.page.slot) into the KEY-VALUE table.
CollectFro-mOnlineLog
Required true True /False Determines whether or not PowerBroker Databases collects data from online log files.
CompressCol-lectionFile
Required true True /False Determines whether or not PowerBroker Databases compresses the ECF file.
FilterDDL Optional false True /False Used to specify whether or not DDL is fil-tered from the redo log.Set to True to filter DDL from the redo log.Set to False to include DDL in the redo log.
mode basetable basetablenoreconst2phaselogdata
Used to specify the collection mode for PowerBroker Databases.
Reconstruct-Blobs
Required false True /False Used to specify whether or not PowerBroker Databases should reconstruct columns that contain blob type data. BLOBs are typically images, audio, or other multime-dia objects. Sometimes binary executables are stored as a BLOB. Reconstruction of BLOB data can introduce significant overhead.
SaveETFFile Required false True /False By default ETF files are purged once they have been collected. This option should only be changed for troubleshooting purposes. Keeping this option enabled runs the risk of running out of disk space.
TrustFilterPre-cedence
audited Audited/Trusted

Audit Source Options
PBDB‐MA User Guide 226 © 2017. BeyondTrust Software, Inc.
Related Audit Source Options
Some audit source options work together to enable or disable a feature. This section lists audit source options that may need to be set together in order to function properly.
Column Level Auditing
The following audit source options work together to enable column or field level auditing:
• ColumnRuleCaseSensitive• ColumnRuleEngineOff
DDL Trace
The following audit source options affect DDL collections:
• IgnoreDBCC• IgnoreUpdateStats
DML Trace
The following audit source options affect DML trace collections:
• EnableExtendedAuditing• TraceOnlyUserFile• UseTraceOnly
NetWatch Optimization
You can use the following settings to optimize NetWatch when collections result in a lot of unwanted data:
• BatchPreFilter• RegexpPreFilter
Oracle Transaction Management
The following audit source options work together to manage heavy volume Oracle collections.
• EnableTransDB• TransDBSize
Real-Time Alert Messaging
When you enable real-time alerts for an active database, the high level of activity can generate a large number of alerts. These options allow you to configure PowerBroker Databases to deliver individual real-time e-mail alerts, or collect and package multiple alerts into a single message.

Audit Source Options
PBDB‐MA User Guide 227 © 2017. BeyondTrust Software, Inc.
Caution: Real time alerts should not be confused with collection-time alerts.
The following audit source options control real-time alert messaging:
• AlertQueueLayout• AlertQueueMaxItem• AlertQueueMaxWaitTime• EnableAlertQueueBuffer
SQL Server Cache Management
The following options work together to manage the SQL Server cache.
• CacheSizeMax• NumberOfCacheBuckets

Glossary
PBDB‐MA User Guide 228 © 2017. BeyondTrust Software, Inc.
Glossary
Archived Redo Logs
Oracle redo files that have been dropped from use by the Oracle database but are available for backup and auditing.
PowerBroker Databases Agent
The process that manages all PowerBroker Databases activity on a given computer. On Windows, the PowerBroker Databases Agent runs as a service (it appears in Services under “PowerBroker Databases: Monitor & Audit Agent”). On UNIX, it is a daemon process. In a typical enterprise environment, the PowerBroker Databases Agent software is installed on many computers.
PowerBroker Databases Agent Roles
The type of activity performed by the PowerBroker Databases Agent within auditing environment. An PowerBroker Databases Agent can perform up to four roles - the Central Configuration Agent, Collection Agent, Loader Agent, and Monitor Agent.
PowerBroker Databases Administration Console
Web browser based graphical user interface used to set up, configure, and monitor PowerBroker Databases environment.
PowerBroker Databases GUI Service
The Web-based service that provides an interface for the configuration and monitoring of the PowerBroker Databases Agent back end via the Administration Console.
PowerBroker Databases User Privileges
Database-specific privileges that the PowerBroker Databases user needs in order to access database log files on the audit source to collect data.
Audit Policy
A uniquely named group of audit rules. An audit policy is assigned to an audit source to specify to the PowerBroker Databases Agent what exactly to audit and what to do with collected data.
Audit Rule
A set of conditions for filtering database log records and a list of actions to carry out when a log record matches the rule conditions. audit rules are assigned to audit policies according to specific auditing needs.
Audit Source
A database to be audited plus a set of parameters required by the PowerBroker Databases Collection Agent to collect audit information.
Glossary
PBDB‐MA User Guide 229 © 2017. BeyondTrust Software, Inc.
Central Configuration Agent
PowerBroker Databases Agent that creates the Central Configuration Database (CCDB) on the same computer where it is installed, manages the CCDB and communicates configuration information to all other PowerBroker Databases Agents.
Central Configuration Database (CCDB)
A set of SQL tables that store metadata about your PowerBroker Databases environment.
Cluster
A group of computers that are connected to each other and work together closely as though they are a single computer. In DBMS world clusters provide failover and increased availability of applications.
Collection Agent
PowerBroker Databases Agent that collects data from the audit source log files and prepares it to be loaded into Repository. Can be installed locally, on the same server with the audit source (Local Auditing); or remotely, on a different server than the audit source (Remote Auditing).
Collection Schedule
Schedule that specifies the date and time of the first data collection to be performed on an audit source and regular intervals to perform the following collections. Collection schedule must be specified for each audit source.
Database Instance
A set of processes and memory allocated for accessing a database.
For Oracle, database instance corresponds to a single database.
For DB2, SQL Server, and Sybase, database instance corresponds to multiple databases.
Database Server
A computer program that provides database services to other programs.
DB Authentication
Verifying a login name and password of a DB user attempting to access a database to ensure that the DB user has the appropriate rights saved in the security system.
DCL
Data Control Language - SQL statements used to control access to data in a database. Some examples:
GRANT - gives users access privileges to a database
REVOKE - withdraws access privileges given with the GRANT command

Glossary
PBDB‐MA User Guide 230 © 2017. BeyondTrust Software, Inc.
DDL
Data Definition Language - SQL statements used to define or delete database objects. Some examples:
CREATE TABLE - creates a table in a database
DROP TABLE - deletes a table from a database
DML
Data Manipulation Language - SQL statements used to retrieve, insert, delete and update data in a database. Some examples:
SELECT - retrieves data from a database
INSERT - inserts data into a table
UPDATE - updates existing data within a table
DELETE - deletes all records from a table, the space for the records remains
EntegraInit File
XML file created during PowerBroker Databases Agent installation that contains information needed for the communication between the Central Configuration Database and the installed PowerBroker Databases Agent.
Heartbeat
Status information on an PowerBroker Databases component that an PowerBroker Databases Agent sends to CCDB. By default, heartbeats occur every 5 minutes to continually assess the status of PowerBroker Databases components.
Loader Agent
PowerBroker Databases Agent that loads collected data into the Repository. Always installed on the Repository computer.
Local Auditing
PowerBroker Databases configuration where the Collection Agent resides on the same server with the Audit Source.
Monitor Agent
PowerBroker Databases Agent installed on a Microsoft SQL Server Audit Source to monitor the audit source activity.
OS Authentication
Verifying an OS user’s login name and password to ensure that the OS user is authorized to perform an attempted function, such as log into the operating system.

Glossary
PBDB‐MA User Guide 231 © 2017. BeyondTrust Software, Inc.
RAC
Oracle Real Application Clusters. Allows multiple computers to run the Oracle DBMS software simultaneously while accessing a single database. This is called a clustered database.
Redo Logs
Oracle files that record transactional changes to the database. Similar to Microsoft’s transaction logs, these files are used to recover a database to a previous point in its history.
Remote Auditing
PowerBroker Databases configuration where the Collection Agent resides on a different server than the audit source.
Report Server
A Web-based service that provides report generating functionality for the audited data stored in a repository.
Repository
A user-configured database into which PowerBroker Databases collections are deposited.
Stored Procedure
An executable set of SQL statements available to applications accessing a relational database. Stored procedures are physically stored in the database.
Trace
SQL Server functionality that records database activity. Traces serve as SQL Servers native auditing record for transactions. Typically traces are configured using Microsoft Profiler. SQL Server is not optimized for large scale tracing and its performance will decrease if excessive tracing is enabled. PowerBroker Databases turns on tracing only for information which is not saved in the transaction log backups.
Transaction Log
A history of actions executed by a database management system to guarantee integrity of the database over crashes or hardware failures. Physically, a transaction log is a file of updates done to the database, stored in stable storage.
Transaction Log Backup
A backup file created when the transaction log file exceeds the defined limit.
Transaction Log Backup Directory
Directory where transaction log backup files are saved.

Glossary
PBDB‐MA User Guide 232 © 2017. BeyondTrust Software, Inc.
Trigger
Procedural code that is automatically executed in response to certain events on a particular table in a database. Triggers can restrict access to specific data, perform logging, or audit access to data.

Index
PBDB‐MA User Guide 233 © 2017. BeyondTrust Software, Inc.
Symbols.ecz files 18
Aactions
audit rule 115multiple action handling 118
Admin tab 25, 28Administration Console 15, 21
launching 21logging in 22starting service 43URL 21
Advanced Options tab 113agents 15
Central Configuration Agent 16Collection Agent 17error information 188Loader Agent 17Monitor Agent 17PowerBroker Databases: Monitor & Audit
Agent 15roles 16
Application Profile Rule type 117AUA 197
disabling (Oracle) 201disabling (SQL Server) 207enabling (Oracle) 197enabling (SQL Server) 203for Oracle 197for SQL Server 202limitations (SQL Server) 202resetting Oracle application identifier 199resetting SQL Server CONTEXT_INFO to
null 206setting Oracle application identifier 199setting SQL Server CONTEXT_INFO 204usage scenario (Oracle) 199verifying enabled (Oracle) 199verifying enabled (SQL Server) 204
verifying working (SQL Server) 205viewing user information in repository (SQL
Server) 206Audit Rule type 116Audit Source Event report 61, 71, 82audit sources 17
Collection History report 61, 82DB2 56
add/remove audit sources 62adding 57prerequisites 56selecting columns for auditing 63selecting key columns 64Summary screen 61
error information 188Event report 61, 71, 82Oracle 66
adding 67prerequisites 66selecting columns for auditing 72Summary screen 71
Oracle RAC 74configuring 75prerequisites 74
Relations View 112removing 97SQL Server 77
add/remove databases 82adding 77e-mail notifications 85selecting columns for auditing 83selecting key columns 84Summary screen 81
SQL Server clustersconfiguring 89prerequisites 86
status 140Summary screen 94
Audit Trail Report, administering 34auditing
specific columns (DB2) 63
Index

Index
PBDB‐MA User Guide 234 © 2017. BeyondTrust Software, Inc.
specific columns (Oracle) 72specific columns (SQL Server) 83starting the process 99
Bbuttons, Administration Console
Activate Audit Source 72Add Key 33Add New Mail Server 36Add New Node 77Add New Notification 40Add New Policy 133Add New Rule 119Add New User 29Apply Changes 54Assign Selected Rules 137Audit Source Event Report 61, 71, 82Clone 119, 133Collect Now 93, 104, 107Collection History Report 61, 72, 82Configuration Report 53, 61, 71, 81Configure Database for Auditing 80Create Audit Source 79Create Repository 48, 52Deactivate This Audit Source 72Delete This Repository 52, 55Deploy 106Disable (users) 32Drop 132, 139Enable (users) 32icons
binoculars 111glasses 112
Load History Report 53Login 22, 47, 50Policy History 107Policy Home 107Print 107Publish 44, 52Purge 35Remove (mail server) 37Remove (users) 31Repository Event Report 53Rules Search 114Search 35, 113Select from Existing Policy 135
Select From Existing Rules 137Unassign 108Undeploy 107Update Password 23, 32Update Privileges 32View Collection 107
buttons, Report ServerAccess Right 175Add Comment 175Delete 174Description 165, 187Load 166Published 165, 174Quick Run 165, 169Refresh Comments 175Remove Widget 185Run 165, 170Schedule 165, 167Show Comments 175Split Horizontal 185Split Vertical 185
CCentral Configuration Agent 16Central Configuration Database 18Collection Agent 17Collection History report 61, 82, 151Collection History Report report 72columns
selecting key (DB2) 64selecting key (SQL Server) 84
command line tools 19comments, viewing 175components 14
Administration Console 15, 21agents 15audit sources 17, 56Central Configuration Database 18lmConsole 19Report Server 19repositories 44Repository 18
configurationconfiguration summary overview 111report 53, 61, 71viewing 111

Index
PBDB‐MA User Guide 235 © 2017. BeyondTrust Software, Inc.
Configuration report 81Configuration Summary overview 111Configure tab 25conventions, document 11Customer Support Portal 13
Ddaemon process 15dashboards
creating 184using 183widgets 184
data collectionmonitoring 140publishing 44retention period 44starting 107
DDLE-mail notifications 37
documentationconventions 11set 12
Ee-mail notifications 37
adding notifications 40administering 37configuring system notifications 38DDL 37editing (SQL Server) 85editing existing 40system 37
error informationrepositories 188
Event Monitor report 149
GGlobal Security Policies, administering 32
HHost Profile Rule type 117
Iicons
binoculars 111
glasses 112
Llicenses
administering 33audit sources 17repository 19
lmConsole 19Load History report 53, 152Loader Agent 17lumigent database 18
Mmail servers
administering 36configuring 36editing configuration 37removing 37
Monitor Agent 17Monitor tab 26
OObject Profile Rule type 117Operation Profile Rule type 117Override Rule type 116
Pparameters
report parameters 165standard report parameters 165
passwordschanging 23, 31Report Server 156setting expiration policy 32
policies 17assigning to audit sources 103creating 132default
Administrator Account DDL Activities99
All DDL Activities 99DDL Activities Outside Normal
Business Hours 99DML Activities 99DML Activities Outside Normal

Index
PBDB‐MA User Guide 236 © 2017. BeyondTrust Software, Inc.
Business Hours 99Object Creation and Modification 99Privilege Grants 100Security DDL 100User Creation and Properties Changes
100default pre-populated 99deleting 139deploying 105editing 138Relations View 112searching 113selecting 101status 101, 109un-assigning 108un-deploying 107
PowerBroker Databasescomponents 14troubleshooting 188
PowerBroker Databases: Monitor & Audit Agent(Windows) 15
privilegessecurity 24Super Administrator 156
Profile Rule type 116properties
dashboard widget 184, 185Report Server 164Report Server dashboard 183, 184
publishing 44
QQuick Run report option 169
RRelations View
audit policies 112audit sources 112
Report Server 19, 154accessing 155configuring properties 164connecting to repository 157dashboards 183icons 165selecting repository connection 161templates, deploying 162
troubleshooting 192Report tab 27reports
adding schedules 169deleting schedules 169displaying particular event 150displaying specific time period 148editing descriptions 187e-mailing 170, 174modifying schedules 169monitor 147printing (local printer) 170printing (network printer) 170purging old data 150saving to file 171scheduling 167viewing 172viewing comments 175viewing on screen 170
reports, agent generatedAudit Source Event 61, 71, 82Audit Trail 34Collection History 61, 72, 82Configuration 53, 61, 71, 81Event Monitor 149Load History 53, 152Repository Event 53
reports, Report Server generateddisplaying 174entering parameters 165generating 169, 170scheduling 167standard 177viewing results 172
repositories 18, 44editing settings 52error information 188Event report 53Load History report 53Oracle 45removing 54selecting connection for Report Server 161SQL Server 49status 95, 141
Repository Event report 53roles

Index
PBDB‐MA User Guide 237 © 2017. BeyondTrust Software, Inc.
agent 16Central Configuration Agent 16Collection Agent 16, 17Loader Agent 16, 17Monitor Agent 16, 17
user 24Admin 24Auditor 24DBA 24Monitor 24
rulesactions 115Application Profile Rule type 117assigning multiple rules to policy 136assigning single rule to policy 134Audit Rule type 116conditions 115creating 118definition 115deleting 132editing 132examples 127Host Profile Rule type 117how multiple rules are applied 118Object Profile Rule type 117Operation Profile Rule type 117Override Rule type 116Profile Rule type 116searching 113status 109types 116User Profile Rule type 116
Sscripts
drop_lumigent_aua_oracle.sql 201enable_lumigent_aua_oracle.sql 197
searchaudit policy 113audit rule 113
securityprivileges 24
Security Certificateconfiguration 194updating 195
session information
ambiguous 176reports 175unknown 176
SSL, replacing default certificate 194status
active 110assigned 109audit policy 109audit rule 109audit sources 140draft 109live 109policy 101repository 95, 141un-assigned 109
stored proceduresaudit rule collection and 115collection 33LUMAPPUSERAUDIT.SP_LUMIGENT_
SET_APP_USER 197SP_LUMIGENT_SET_APP_USER 198
Ttabs
Admin 25, 28Administration (Report Server) 164Advanced Options 113Audit Policy 101Configure 25Design (Report Server) 164Mail Server 36Monitor 26, 147Overview 111Personalization (Report Server) 164Report 27Repository (Report Server) 164Schedule (Report Server) 164Users 29
technical support 12Customer Support Portal 13
troubleshooting 188
UURL
Administration Console 21User Profile Rule type 116

Index
PBDB‐MA User Guide 238 © 2017. BeyondTrust Software, Inc.
usersadding 29administering 29modifying 31removing 31
Wwidgets 184Windows service 15
XXML files
cluster-type-set.xml 92data-directory-set.xml 92disableaua.xml 207EntegraInit.xml 194monitor-binding-set.xml 90setaua.xml 203template.xml 209