Portable Public Alert Radio Weather Station WRB603 10 … · EN 3 INTRODUCTION Thank you for...
29
EN 1 CONTENTS Introduction .......................................................... 3 Product Overview ................................................ 4 Weather Station WRB603 – Front View ............... 4 Weather Station WRB603 – Back View ................ 4 Weather Station WRB603 – LCD ........................ 5 Remote Sensor RTGR328NA – Front View ......... 5 Remote Sensor RTGR328NA – LCD ................... 5 Remote Sensor RTGR328NA – Back View .......... 5 Radio WR602 – Front View .................................. 6 Radio WR602 – Back View .................................. 7 Radio WR602 – Belt Clip ..................................... 7 Radio WR602 – Neck Strap ................................. 7 Getting Started ..................................................... 8 Batteries .......................................................... 8 AC / DC Adapter ................................................ 9 Remote Sensor RTGR328NA ................................ 9 Set Up Sensor ....................................................... 9 Data Transmission ................................................10 Portable Public Alert Radio with Weather Station Model: WRB603/WR602 USER MANUAL Search for Sensor .............................................. 10 Weather Station WRB603 ......................................... 10 Atomic Clock ..................................................... 11 Time Zones ....................................................... 11 Turn Atomic Clock ON / OFF ............................. 11 Set Clock ............................................................ 12 Switch Clock Display ........................................ 12 Alarm ................................................................. 12 Weather Forecast Display ................................. 13 Temperature and Humidity ................................ 13 Radio WR602 ............................................................. 14 About the National Weather Radio System ...... 14 Consumer Electronics Assoc. (CEA) ................ 14 Turn the Radio ON / OFF ................................ 14 Display Modes ................................................... 14 Change Settings ................................................ 15 Reception Signal Status .................................... 15 NOAA Alert Messages WR602 ................................ 16 Message Codes Used by the NWR .................... 16 Set Up Radio To Receive NOAAAlert Messages ...... 16 Finding Local Channels & Same Codes ......... 16 Radio WR602 – Channels ........................................ 17 About Radio Channels ....................................... 17 Setting the Radio Channel ................................. 17 Radio WR602 – Locations ....................................... 18 Setting the Location ........................................... 18 Activate / Deactivate Location .......................... 18 WRB603_EN_R0 27/6/07, 3:31 PM 1
Transcript of Portable Public Alert Radio Weather Station WRB603 10 … · EN 3 INTRODUCTION Thank you for...

EN
1
CONTENTS
Introduction .......................................................... 3
Product Overview ................................................ 4
Weather Station WRB603 – Front View ............... 4
Weather Station WRB603 – Back View ................ 4
Weather Station WRB603 – LCD ........................ 5
Remote Sensor RTGR328NA – Front View ......... 5
Remote Sensor RTGR328NA – LCD ................... 5
Remote Sensor RTGR328NA – Back View .......... 5
Radio WR602 – Front View .................................. 6
Radio WR602 – Back View .................................. 7
Radio WR602 – Belt Clip ..................................... 7
Radio WR602 – Neck Strap ................................. 7
Getting Started ..................................................... 8
Batteries .......................................................... 8
AC / DC Adapter ................................................ 9
Remote Sensor RTGR328NA ................................ 9
Set Up Sensor ....................................................... 9
Data Transmission ................................................10
Portable Public Alert Radiowith Weather Station
Model: WRB603/WR602
USER MANUAL
Search for Sensor .............................................. 10
Weather Station WRB603 ......................................... 10
Atomic Clock ..................................................... 11
Time Zones ....................................................... 11
Turn Atomic Clock ON / OFF ............................. 11
Set Clock ............................................................ 12
Switch Clock Display ........................................ 12
Alarm ................................................................. 12
Weather Forecast Display ................................. 13
Temperature and Humidity ................................ 13
Radio WR602 ............................................................. 14
About the National Weather Radio System ...... 14
Consumer Electronics Assoc. (CEA) ................ 14
Turn the Radio ON / OFF ................................ 14
Display Modes ................................................... 14
Change Settings ................................................ 15
Reception Signal Status .................................... 15
NOAA Alert Messages WR602 ................................ 16
Message Codes Used by the NWR .................... 16
Set Up Radio To Receive NOAA Alert Messages ...... 16
Finding Local Channels & Same Codes ......... 16
Radio WR602 – Channels ........................................ 17
About Radio Channels ....................................... 17
Setting the Radio Channel ................................. 17
Radio WR602 – Locations ....................................... 18
Setting the Location ........................................... 18
Activate / Deactivate Location .......................... 18
WRB603_EN_R0 27/6/07, 3:31 PM1

EN
2
SAME Code – What Each Digit Means .............. 19
Reception Test ........................................................... 20
Reception Problems And Solutions ....................... 20
Many Things Attect Reception! ........................... 20
Radio WR602 – Home / Travel Feature ................. 20
Radio WR602 – Interpreting NOAA Alert Messages .. 21
Radio WR602 – Clock & Calendar ....................... 25
Radio WR602 – Alarm ................................... 25
Radio WR602 – Volume ......................................... 25
Radio WR602 - External Speaker Jack .................. 26
Backlight ................................................. 26
Reset System .......................................... 26
Warnings ................................................... 26
Specifications ............................................. 27
About Oregon Scientific ............................... 28
FCC Statement ........................................ 28
WRB603_EN_R0 27/6/07, 3:31 PM2

EN
3
INTRODUCTION
Thank you for selecting the Oregon ScientificTM PortablePublic Alert Radio with Weather Station (WRB603/WR602).
This radio (WR602) operates on the same radiofrequencies used by the National Weather Radio (NWR)and can send you NOAA alert messages to warn youabout weather and other environmental dangers. Thislightweight, splashproof radio is constructed of durablematerials and has a reception range of up to 50 miles(64 km). It is also equipped with a digital clock and dailyalarm.
The weather station (WRB603) forecasts the weather,provides indoor / outdoor temperature and humidityreadings, a clock, calendar and alarm, as well as arecharging cradle for the radio.
The remote sensor (RTGR328NA) sends the atomicclock signal and outdoor temperature and humidityinformation to the weather station.
Keep this manual handy as you use your new product.It contains practical step-by-step instructions, as wellas technical specifications and warnings you shouldknow.
WRB603_EN_R0 27/6/07, 3:31 PM3

EN
4
PRODUCT OVERVIEW
WEATHER STATION WRB603 - FRONT VIEW
1. SNOOZE / LIGHT button
2. / : Increase or decrease setting; activate
or deactivate RF clock
3. CHANNEL: Switch between remote sensors
4. MODE: Change display / settings
5. MEMORY: View current max. / min. temperature
and humidity readings
6. : Display alarm time; enter alarm setting
mode
7. Weather Forecast Area
8. Temperature / Humidity Area
9. Clock / Alarm / Calendar Area
10. Recharging cradle
11. LED indicator: Shows red when radio is
charging
WEATHER STATION WRB603 - BACK VIEW
1. °C / °F switch
2. RESET hole
3. AC / DC adapter
WRB603_EN_R0 27/6/07, 3:31 PM4
EN
5
WEATHER STATION WRB603 - LCD
1. Weather display
2. Alarm 1
3. Alarm 2
4. Atomic clock signal status5. Time / alarm time / calendar
6. Low battery icon for remote sensor
7. Channel no. / reception status
8. Outdoor temperature
9. Outdoor humidity
10. Indoor area icon
11. Indoor temperature
12. Indoor humidity
REMOTE SENSOR RTGR328NA – FRONT VIEW
1. LCD display
2. LED status indicator
3. Ventilation duct
REMOTE SENSOR RTGR328NA – LCD
1. US time zone indicator
2. Reception
3. Channel no.
4. Low battery indicator
5. Time
6. Temperature (°C or °F)
7. Relative humidity
8. Temperature / humidity reading
REMOTE SENSOR RTGR328NA – BACK VIEW
1. Wall mount (recess hole)
2. Channel
3. RESET
4. °C/°F5. SEARCH
6. ZONE
7. Battery compartment
8. Fold-out stand
WRB603_EN_R0 27/6/07, 3:31 PM5

EN
6
RADIO WR602 – FRONT VIEW
1. LCD
2. TR / HM: Press and hold to select travel or home
mode
3. EXIT: Press to exit any display or setting (clock is
default setting)
4. / : Increase / decrease settings;
increase / decrease volume; enable / disable
alarm 1 or 2; scroll up or down to select county
code
5. LED indicator: Red / green LED indicates radio
ON / OFF and alert status
6. : Press and hold to activate / deactivate keypad
lock
7. : Press to toggle between NOAA alert
messages
8. MENU: Press to switch between clock, calendar,
alarm 1 and 2 displays; press and hold to enter
setting mode
9. Radio speaker
WRB603_EN_R0 27/6/07, 3:31 PM6

EN
7
RADIO WR602 – BACK VIEW
1. Antenna
2. Neck strap: Insertion point for neck strap
3. : Press to activate 8-minute snooze and / or
backlight for 5 seconds
4. : Press and hold to turn power ON / OFF; press
to switch between NOAA ON / Standby / Mute /
OFF modes
5. External speaker jack
6. RESET hole
7. Battery compartment
RADIO WR602 – BELT CLIP
RADIO WR602 – NECK STRAP
WRB603_EN_R0 27/6/07, 3:31 PM7
EN
8
GETTING STARTED
BATTERIES
RADIO (WR602)
Rechargeable batteries are included and must be usedif you want to use the recharging cradle. However, theradio can use 3 x UM-3 (AA) 1.5V batteries.
Insert the rechargeable battery by putting the piece atthe end of the wire into the indentation at the bottomright of the battery compartment:
REMOTE SENSOR
2 x UM-3 (AA) 1.5V batteries
Insert batteries before first use, matching the polarity (+and -) as shown in the battery compartment. PressRESET after each battery change.
shows when batteries are low.
UNIT LOCATION
Remote sensor Outdoor Temperature / Humidity Area
NOTE Do not use rechargeable batteries in the remotesensor. It is recommended that you use alkaline batterieswith this product for longer performance and lithiumbatteries in colder climates. Please dispose of usedbatteries properly to prevent harm to the environment.
WRB603_EN_R0 27/6/07, 3:31 PM8
EN
9
AC / DC ADAPTER
Insert the adapter into the weather station to turn it onand allow charging for the radio.
REMOTE SENSOR (RTGR328NA)
This remote temperature-humidity sensor can receiveand transmit atomic clock signals, collect outdoortemperature and humidity readings, and then relay themback to the weather station. It can be used with up to 4other remote temperature-humidity sensors.
NOTE Additional remote sensors that measuretemperature and humidity are sold separately.
SET UP SENSOR
1. Open the battery compartment with a small Phillips screwdriver.2. Set the channel number (1-5). If you are using more than one remote unit, select a different channel number for each unit
3. Insert the batteries.
4. Set the measurement unit (°F or °C) and select the
US time zone – Pacific (P), Mountain (M), Central
(C) and Eastern (E).
5. Press RESET.
6. Replace and secure the battery compartment lid.
7. Secure the sensor in the desired location using the
wall mount or table stand.
For best results:
• Insert the batteries and select the channel
before you mount the sensor.
• Place the sensor out of direct sunlight and moisture.
• Do not place the sensor more than 98 feet (30 meters)
from the weather station.
WRB603_EN_R0 27/6/07, 3:31 PM9

EN
10
• Position the sensor so that it faces the weather
station, minimizing obstructions such as doors,
walls, and furniture.
• Place the sensor in a location with a clear view
to the sky, away from metallic or electronicobjects.
• Position the sensor close to the weather station
during cold winter months as below-freezing
temperatures may affect battery performance and
signal transmission.
You may need to experiment with various locations toget the best reception.
Standard Alkaline batteries contain significant amountsof water. Because of this they will freeze in lowtemperatures of approximately 10°F (-12°C). Disposablelithium batteries have a much lower threshold fortemperature with an estimated freezing range of below-40°F (-40°C). The Liquid Crystal Display in outdoorthermometers will remain operational to -20°F (-28°C)with adequate power.
Wireless ranges can be impacted by a variety of factorssuch as extremely cold temperatures. Extreme cold maytemporarily reduce the effective range of the unit. If theunit’s performance fails due to low temperature, the unitwill resume proper functioning as the temperature risesto within the normal temperature range (i.e. nopermanent damage will occur to the unit due to lowtemperatures).
DATA TRANSMISSION
Data is sent from the sensor approx. every 60 seconds.The reception icon shown in the Outdoor Temperature /Humidity Area indicates the status.
ICON DESCRIPTION
Main unit is searching for sensors
Selected sensor has been found
Sensor 1 is sending data. (The
number shows which sensor is
selected)
--- shows in Temp / The selected sensor cannot be
Humidity Area found. Search for the sensor or
check batteries
SEARCH FOR SENSOR
To search for the temperature-humidity sensor,simultaneously press and hold MEMORY andCHANNEL on the weather station.
NOTE If the sensor is not found, check the batteries.
WEATHER STATION WRB603
This product tracks the time and date based on radio-controlled signals from the RTGR328NA sensor ormanual settings that you enter.
WRB603_EN_R0 27/6/07, 3:31 PM10

EN
11
ATOMIC CLOCK
The sensor automatically synchronizes the current timeand date on the clock when it is brought within range ofthe WWVB-60 atomic clock signal generated from FortCollins, Colorado. For more information, please visit:www.boulder.nist.gov/timefreq.stations/radioclocks.htmThe signals are collected by the remote sensor wheneverit is within 932 miles (1500 km) of a signal.
Initial reception takes 2-10 minutes, and is initiated whenyou first set up the sensor, and whenever you pressRESET. If the RF signal is weak, it can take up to 24hours to get a valid RF signal reception. Once complete,the reception icon will stop blinking.
The icon shown in the Clock Area indicates 2factors:
• Connection between the weather station and the
sensor that collects atomic clock signals ( )
• Atomic clock signal reception ( )
How these signals work together:
ICON MEANING
The unit has contact with the sensorand has synchronized the time
The unit has contact with the sensorbut the time has not beensynchronized
The unit has lost contact with theremote sensor but the time issynchronized
The unit has lost contact with theremote sensor and the time is notsynchronized
The unit cannot reach the remotesensor
NOTE To force a manual search for atomic clockreception, press and hold SEARCH on the sensor for 2seconds.
TIME ZONES
When the main unit receives an atomic clock signal (viathe sensor) for the first time, or when you force a manualsearch for the atomic clock reception, the time willautomatically be set to Pacific time. To change to anothertime zone (M - Mountain, C - Central or E- Eastern)simply
1. Press and hold MODE for 2 seconds.
2. Press or to change the setting.
3. Press to confirm and exit setting mode.
TURN ATOMIC CLOCK ON / OFF
If you wish to manually set the clock, you must firstdisable the atomic clock feature. To do this, press and
hold on the weather station for 2 seconds. To enable
WRB603_EN_R0 27/6/07, 3:31 PM11

EN
12
it, press and hold for 2 seconds. This icon ,will only appear on the display when the atomic clock isenabled.
SET CLOCK
You only need to do this if you have disabled the atomicclock, or if you are too far from the atomic clock signal.
1. Press and hold MODE for 2 seconds.
2. Press or to change the setting. (Press and
hold to scroll quickly through the options.)
3. Press MODE to confirm and move onto the next
one.
4. The settings will appear in the following order:
Time zone, 12 / 24 hour format, hour, minute,
year, month / day format, month, date, and
display language.
NOTE The time zones available are P (Pacific), M(Mountain), C (Central) and E (Eastern).
NOTE The language options are E (English), F (French)and S (Spanish). The language you select determinesthe weekday display.
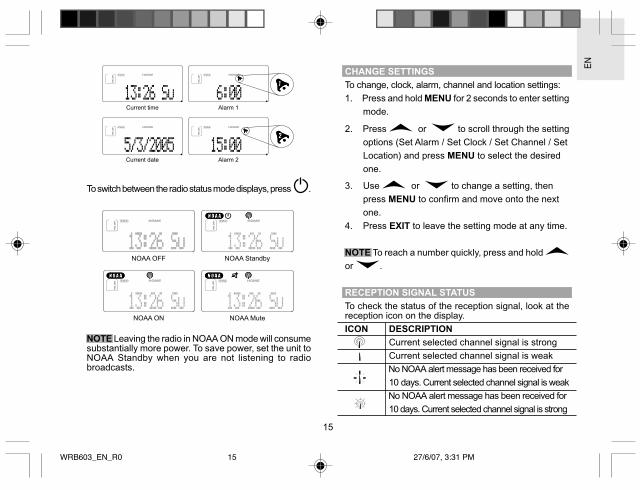
SWITCH CLOCK DISPLAY
Press MODE to toggle between Clock with Seconds,
Clock with Weekday and Calendar display.
ALARM
This product is equipped with 2 alarms.
To view alarm settings:
Press to toggle between alarm 1, alarm 2 and clockdisplay. The alarm time and status will show in the ClockArea.
To set the alarm:
1. Press once to select alarm 1 and twice to select
alarm 2.
2. Press and hold for 2 seconds to enter setting
mode.
3. The alarm settings will blink. Press or to
change settings – hour and minute. (Press and
hold to scroll quickly through the options.) Press
to confirm.
To activate or deactivate the alarm:
Press once to select alarm 1 and twice to select
alarm 2. Then press or to activate or deactivatethe alarm.
• “-:--“ appears when the alarm is deactivated.
WRB603_EN_R0 27/6/07, 3:31 PM12

EN
13
• or shows in the Clock / Alarm Area when
the alarm is activated.
To silence the alarm:
When the alarm time is reached, the crescendo alarmwill sound for 2 minutes. To silence the alarm:
• Press SNOOZE to silence it for 8 minutes.
OR
• Press any key on the weather station except SNOOZE to
mute the alarm and activate it again after 24 hours.
If no button is pressed, the alarm will automaticallysilence after 2 minutes. It will then sound again after 8minutes.
WEATHER FORECAST DISPLAY
This product forecasts the next 12 to 24 hours of weatherwithin a 30-50 km (19-31 mile) radius with 70 to 75percent accuracy. The weather forecast is alwaysdisplayed.
SUNNY PARTLY CLOUDY RAINY SNOWY
TEMPERATURE AND HUMIDITY
This product can display current, minimum, and NOTE
maximum temperatures and humidity percentageinformation collected by the remote sensor(s) andweather station (indoor).
Outdoor data is collected and displayed approx. every60 seconds. Indoor data is collected and displayed every10 seconds.
To select temperature unit:
Slide the °C / °F switch into the desired location. Theswitch is located on the back of the weather station. Thesetting for the weather station overrides the remotesensor setting.
To select channel:
Press CHANNEL to switch between sensors 1-5.
The icon shows the selected sensor:
INDOOR CHANNEL CHANNEL CHANNEL CHANNEL CHANNEL
1 2 3 4 5
To auto-scan between sensors:
Press and hold CHANNEL for 2 seconds. Each sensor'sdata will be displayed for 3 seconds. To end auto-scan,press CHANNEL or MEMORY.
NOTE If you use a sensor that collects only temperaturedata, humidity will not be shown.
WRB603_EN_R0 27/6/07, 3:31 PM13
EN
14
For more information on the sensor see Remote Sensorsection.
To view minimum / maximum records:
Press MEMORY to toggle between current, maximum(MAX) and minimum (MIN) records. To clear the records,press and hold MEMORY for 2 seconds. A beep willsound to confirm that the memory has been cleared.
To force a manual search for the sensor:
Press and hold CHANNEL and MEMORY. See AtomicClock section for how to check the signal status.
RADIO WR602
ABOUT THE NATIONAL WEATHER RADIO SYSTEM
The National Weather Service (NWS) is an agencywithin the National Oceanic & AtmosphericAdministration (NOAA) that operates a nationwidenetwork of radio stations known as the NOAA WeatherRadio (NWR). The NWR radio system broadcastswarning information for all types of hazards, both naturaland technological. Working in conjunction with theEmergency Alert System (EAS), NWR is an all-in-onehazards radio network and is considered to be the singlesource of all comprehensive weather and emergencyinformation.
A nationwide network, the NWR consists of more than800 stations in the United States, Puerto Rico, the USVirgin Islands and US Pacific Territories. Broadcastsare designed to meet local needs. Routine programmingis repeated every few minutes and consists of local
forecast, regional conditions and marine forecasts.
Additional information, including river stages and climaticdata, is also provided. During emergencies, these routinebroadcasts are interrupted to report specific warnings.
CONSUMER ELECTRONICS ASSOC. (CEA)
This product complies with the Consumer ElectronicsAssociation (CEA) testing standards.
TURN THE RADIO ON / OFF
To turn the radio ON / OFF, press and hold .
When the unit is first connected to the battery pack orreset, on it will immediately enter the clock / languagesetting mode (see Change Settings section). It isadvisable to set your preferred language English (E),French (F) or Spanish (S) at this time, so you can readthe NOAA alert messages.
DISPLAY MODES
There are 2 display modes:
1. Clock mode
2. Radio status mode
To switch between the clock mode displays, press MENU.
WRB603_EN_R0 27/6/07, 3:31 PM14
EN
15
To switch between the radio status mode displays, press .
NOTE Leaving the radio in NOAA ON mode will consumesubstantially more power. To save power, set the unit toNOAA Standby when you are not listening to radiobroadcasts.
CHANGE SETTINGS
To change, clock, alarm, channel and location settings:
1. Press and hold MENU for 2 seconds to enter setting
mode.
2. Press or to scroll through the setting
options (Set Alarm / Set Clock / Set Channel / Set
Location) and press MENU to select the desired
one.
3. Use or to change a setting, then
press MENU to confirm and move onto the next
one.
4. Press EXIT to leave the setting mode at any time.
NOTE To reach a number quickly, press and hold
or .
RECEPTION SIGNAL STATUS
To check the status of the reception signal, look at thereception icon on the display.
ICON DESCRIPTION
Current selected channel signal is strong
Current selected channel signal is weak
No NOAA alert message has been received for
10 days. Current selected channel signal is weak
No NOAA alert message has been received for
10 days. Current selected channel signal is strong
WRB603_EN_R0 27/6/07, 3:31 PM15

EN
16
NOTE When the radio is set to NOAA ON, Standby orMute, it will continually search for a NOAA signal.
NOAA ALERT MESSAGES WR602
MESSAGE CODES USED BY THE NWR
When the NWR airs urgent warnings, a digital codeknown as Specific Area Message Encoding (SAME) isincluded as part of the message. This coding systemcontains specific information including the localizedgeographical area affected and the expiration time ofthe message. The WR602 retrieves and interprets SAMEcode messages and alerts the user. When SAME codesfor a specific region have been entered into the unit, theunit alerts the user to relevant warning information forthe specified region. Once alerted, a voice broadcastcan be heard.
SET UP RADIO TO RECEIVE NOAA ALERT MESSAGES
To receive a NOAA alert message, press to set theradio to one of the following options:
• Radio ON [ ]: The radio is ON and voice
messages can be heard continuously.
• Radio Standby [ ]: The radio is in Standby and
will switch to ON when a NOAA alert message is
received.
• Radio Mute [ ]: The radio is in Standby with the
sound turned OFF. NOAA alert messages can be
viewed but not heard. Switch the radio ON to hear
messages.
• Radio OFF: The radio is turned OFF and will not
respond to NOAA alert messages.
Turning the radio off by setting it to Standby, Mute orOFF will help to save power.
FINDING LOCAL CHANNELS & SAME CODES
The codes are subject to change. Therefore, to ensuresuccessful operation you must obtain the mostappropriate, up-to-date NWR radio channels and SAMEcodes for a specific county or region, from the contactdetails listed below.
To contact the NWS by telephone:
1. Phone 1-888-NWR-SAME (1-888-697-7263).
2. Follow prompts through a simple voice menu.
To obtain NWS radio channels and SAME codes onthe internet:
1. Locate www.nws.noaa.gov/nwr/indexnw.htm
2. Click the State for which information is needed.
For example, clicking on “Montana” will give a list ofinformation relevant to the State of Montana including
WRB603_EN_R0 27/6/07, 3:31 PM16

EN
17
the names of counties, SAME codes, NWR transmitterlocations, the frequency of the transmitter, the strengthof the signal in WATTS, and any remarks as applicable.
Example of the first 10 county radio channels and SAMEcodes for Montana.
COUNTY/CITY/AREA
Beaverhead
Beaverhead
Big Horn
Blaine
Blaine
Broadwater
Carbon
Carter
Cascade
Choteau
NOTE Many counties have been subdivided into asmany as 9 smaller subsections. The numbers 1-9 in thefar left column of the SAME code identifies specificsubsections of a county. If a county has not beensubdivided, the first digit of the SAME code will be 0.
SAME#
030001
030001
030003
030005
030005
030007
030009
030011
030013
030015
NWRTRANSMITTER
Butte, MT
Dillon, MT
Billings, MT
Havre, MT
Malta, MT
Helena, MT
Billings, MT
Baker, MT
Great Falls, MT
BelgianHill, MT
FREQ.
162.550
162.475
162.550
162.400
162.475
162.400
162.550
162.550
162.550
162.500
CALL
WXL79
WXG638
WXL27
WXL53
WWG85
WXK66
WXL27
WXK57
WXJ43
WWG84
WATTS
100
150
300
300
100
1000
300
300
300
300
RE-MARKS
N
RADIO WR602 – CHANNELS
ABOUT RADIO CHANNELS
The NWR radio channels work in the same way as aregular radio channel. All of the NWR transmissionstations operate on 1 of 7 frequencies.
CHANNEL CORRESPONDING RADIO FREQUENCY
1 162.400 MHz
2 162.425 MHz
3 162.450 MHz
4 162.475 MHz
5 162.500 MHz
6 162.525 MHz
7 162.550 MHz
A Auto – the unit will tune to the strongest
RF signal available
The unit labels each frequency as a channel (1-7 orAuto). Once the radio frequency for a region has beenselected the unit will receive voice and code informationfrom that station.
The channel number in usecan be viewed on the top left-hand corner of the LCD.
SETTING THE RADIO CHANNEL
To change the radio channel, navigate to “Set Channel”setting mode and select the desired Channel, as shownin the Changing Settings section.
WRB603_EN_R0 27/6/07, 3:31 PM17

EN
18
RADIO WR602 – LOCATIONS
SETTING THE LOCATION
You need to set the location so that you can receiveweather and environmental information for an area thatis relevant to you.
You can choose the location by either the state andcounty name, or FIPS code. Up to 9 locations (1-9) canbe stored.
NOTE If you do not set a location, the radio will use thedefault setting “CO:All” for all counties.
To set the location:
1. Navigate to “Set Location” setting mode as shown
in the Changing Settings section.
2. Select where you want to store the location e.g.
C1.
3. Select the 6-digit number e.g. “000000”. (“----”
means the location is disabled.)
4. Select “Name” or “FIPS”.
• If you select “Name” you can select first the State
and then the County of your chosen location, then
press EXIT. (If you wish to receive State-wide
NOAA messages, press EXIT once you have
selected the State.)
• If you select “FIPS” you need to enter the 6-digit
SAME code of your chosen location and then
press EXIT (see Finding Local Channels & SAME
Codes section for how to obtain a SAME code).
NOTE If at step 2 you select “C0:All” you will receive allwarnings within the unit’s reception range. This mayresult in giving you information for regions that is notrelevant. The regions can be as large as 5,000 squaremiles (13 sq km). If you select “CO:----“ you will disablethe ALL option and will only receive warnings fromspecified local areas.
NOTE Once the location name is selected, thecorresponding FIPS code will be set into the memory.You cannot convert the code back to the location name.(FIPS is the Federal Information Processing Systemnumber assigned to each State, or open waters in oraround the US. The SAME code comprises of numbersgenerated by the FIPS system.)
ACTIVATE / DEACTIVATE LOCATION
You can activate / deactivate 1, some, or all of your storedlocations.
When a location is activated,the 6-digit SAME code canbe viewed in your storedlocations display.
When a location isdeactivated, “----” can beviewed in your storedlocations display.
WRB603_EN_R0 27/6/07, 3:31 PM18

EN
19
SAME CODE – WHAT EACH DIGIT MEANS
A SAME code is broken into six fields of numbers.
3 04 003
Code for Cochise County
Code for Arizona
Code for northeast sub-section of Cochise County
County Code of Cochise County, Arizona
State-county coding:
The 3 digits on the far right refer to the state countycoding. Each county within a state will have anindependent 3-digit code.
NOTE To receive all of the alerts for a given state, insert000 into the county section.
State codes:
Moving towards the left, the next 2 digits are for state
To switch between activated or deactivated locationstatus:
1. Navigate to “Set Location” setting mode as shown
in the Changing Settings section.
2. Select a stored location e.g. C4 and press MENU.
Then when “000000” or “----“ is blinking, press
or to activate or deactivate it and
press EXIT to confirm the setting.
NOTE If the county sub-section code is stated as 0,then that county is not sub-divided and all alerts for thatcounty will be received. To receive all of the alerts for agiven county, insert 0 into the county sub-section.
A county can be subdivided as follows:
1 Northwest
2 North Central
3 Northeast
4 West Central
5 Central
6 East Central
7 Southwest
8 South Central
9 Southeast
coding. Each of the 50 US states has their own 2-digitcode.County sub-section code:The last digit on the extreme left is the county sub-section. A county may be subdivided into 9 sub-section; each number between (1-9) represents a specificcounty sub-section.
1 2 3
4 5 6
7 8 9
WRB603_EN_R0 27/6/07, 3:31 PM19
EN
20
RADIO WR602 – HOME / TRAVEL MODE
When the unit is set to home mode, the NOAA radio willlock on the channel according to the Channel settings.
When the unit is set to travel mode, the NOAA radio willlock on the channel according to the setting. If the signalstrength is weak, the unit will switch to another channelthat has a good signal. The location will be set to“C0:All”. Therefore, in travel mode, you will not alwaysreceive relevant NOAA alert messages, but it does meanthat you can receive warning information when you aretraveling outside your home area.
To switch between travel and home mode, press andhold TR / HM.
RECEPTION TEST
The fact that you can get clear voice reception does notguarantee that an emergency alert will trigger your unit’salert tone. To test actual reception, your unit must receivea test or emergency alert signal broadcast. The NationalWeather Service (NWS) broadcasts a test alert everyweek on Wednesday between 11AM and 12PM (noon).To find out the specific test schedule in your area,contact your local National Oceanic and AtmosphericAdministration (NOAA) or National Weather Service(NWR) office. These offices are usually listed in thetelephone book under “US Government”.
REMEMBER For your system to be effective, you mustplace the emergency radio in a location where it canreceive an emergency alert signal, you can hear its siren,and see its flashing indicator lights.
RECEPTION PROBLEMS AND SOLUTIONS
MANY THINGS AFFECT RECEPTION!
Forests, deserts, and hills / mountains tend to greatlyreduce reception. Reception in cities may be reduceddue to steel and concrete, while higher elevations willenhance the signal. Reception can vary from room toroom. Moving even a few feet can enhance signalreception.
RECOMMENDATION Place the your weather radio neara window, away from other electronic equipment, andon an upper level of your house.
WRB603_EN_R0 27/6/07, 3:31 PM20

EN
21
RADIO WR602 - INTERPRETING NOAA ALERT MESSAGES
This product is equipped to receive all required NOAA and Emergency Alert System (EAS) events. When an EAS eventis sent by the NWS, any 1 of the following NOAA alert messages will be displayed on your radio: “WARNING”, “WATCH”,or “ADVISORY”. The unit can store up to 8 NOAA alert messages.
Additionally, to help you check that your radio is set-up and working properly, your local NOAA will release a Test NOAAmessage every Wednesday between 10am and noon, local time. To receive the Test message make sure that yourradio is set to NOAA ON, NOAA Standby or NOAA Mute mode, that a Channel has been selected and a SAME codeprogrammed in. If you have any questions regarding alarm tests or to verify if a test was conducted, contact theprogramming office of your local NOAA Weather Radio station.
To view NOAA alert messages, press .
For more information on how to interpret the NOAA alert messages, please refer to the list of National Events and Messages below:
NATURE OF ACTIVATION SPANISH FRENCH MESSAGE
Administrative Message Mensaje administrativo Message administratif ADVISORY
Avalanche Watch Vigilancia de avalancha Veille d'avalanche WATCH
Avalanche Warning Aviso de avalancha Alerte d'avalanche WARNING
Biological Hazard Warning Aviso de riesgo biológico Alerte risque biologique WARNING
Boil Water Warning Aviso de hervir agua Alerte d'ébullition de l'eau WARNING
Blizzard Warning Aviso de ventisca Alerte de blizzard WARNING
Child Abduction Emergency Emergencia de secuestro de menores Alerte de rapt d'enfant ADVISORY
Civil Danger Warning Aviso de peligro civil Alerte de danger civil WARNING
Civil Emergency Message Mensaje de emergencia civil Message d'urgence civile WARNING
Coastal Flood Watch Vigilancia de inundaciones costeras Veille d'inondation côtière WATCH
Coastal Flood Warning Aviso de inundaciones costeras Alerte d'inondation côtière WARNING
Chemical Hazard Warning Aviso de riesgo químico Alerte de risque chimique WARNING
Contaminated Water Warning Alerta de Agua Contaminada Alerte de contamination de l'eau WARNING
WRB603_EN_R0 27/6/07, 3:31 PM21
EN
22
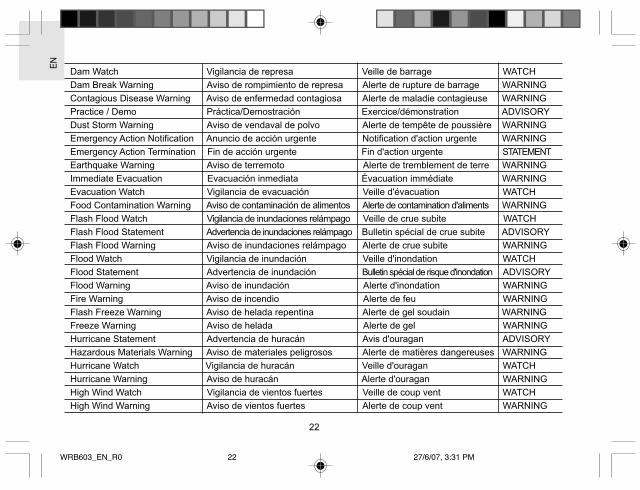
Dam Watch Vigilancia de represa Veille de barrage WATCH
Dam Break Warning Aviso de rompimiento de represa Alerte de rupture de barrage WARNING
Contagious Disease Warning Aviso de enfermedad contagiosa Alerte de maladie contagieuse WARNING
Practice / Demo Práctica/Demostración Exercice/démonstration ADVISORY
Dust Storm Warning Aviso de vendaval de polvo Alerte de tempête de poussière WARNING
Emergency Action Notification Anuncio de acción urgente Notification d'action urgente WARNING
Emergency Action Termination Fin de acción urgente Fin d'action urgente STATEMENT
Earthquake Warning Aviso de terremoto Alerte de tremblement de terre WARNING
Immediate Evacuation Evacuación inmediata Évacuation immédiate WARNING
Evacuation Watch Vigilancia de evacuación Veille d'évacuation WATCH
Food Contamination Warning Aviso de contaminación de alimentos Alerte de contamination d'aliments WARNING
Flash Flood Watch Vigilancia de inundaciones relámpago Veille de crue subite WATCH
Flash Flood Statement Advertencia de inundaciones relámpago Bulletin spécial de crue subite ADVISORY
Flash Flood Warning Aviso de inundaciones relámpago Alerte de crue subite WARNING
Flood Watch Vigilancia de inundación Veille d'inondation WATCH
Flood Statement Advertencia de inundación Bulletin spécial de risque d'inondation ADVISORY
Flood Warning Aviso de inundación Alerte d'inondation WARNING
Fire Warning Aviso de incendio Alerte de feu WARNING
Flash Freeze Warning Aviso de helada repentina Alerte de gel soudain WARNING
Freeze Warning Aviso de helada Alerte de gel WARNING
Hurricane Statement Advertencia de huracán Avis d'ouragan ADVISORY
Hazardous Materials Warning Aviso de materiales peligrosos Alerte de matières dangereuses WARNING
Hurricane Watch Vigilancia de huracán Veille d'ouragan WATCH
Hurricane Warning Aviso de huracán Alerte d'ouragan WARNING
High Wind Watch Vigilancia de vientos fuertes Veille de coup vent WATCH
High Wind Warning Aviso de vientos fuertes Alerte de coup vent WARNING
WRB603_EN_R0 27/6/07, 3:31 PM22

EN
23
Iceberg Warning Aviso de témpano de hielo Alerte d'iceberg WARNING
Industrial Fire Warning Aviso de incendio industrial Alerte de feu industriel WARNING
Local Area Emergency Emergencia de área local Urgence locale ADVISORY
Law Enforcement Warning Aviso de las autoridades de la ley Alerte des forces de l'ordre WARNING
Land Slide Warning Aviso de deslizamiento de tierra Alerte de glissement de terrain WARNING
National Audible Test Prueba nacional de audibilidad Essai Audible National ADVISORY
National Information Center Mensaje del NationalInformation Center Message du centre national d'information ADVISORY
Network Notification Anuncio de mensaje en red Notification de message réseau ADVISORY
National Periodic Test Prueba periódica nacional Essai périodique national ADVISORY
National Silent Test Prueba nacional de silencio Essai national de silence ADVISORY
Nuclear Power Plant Warning Aviso de riesgo nuclear Alerte de centrale nucléaire WARNING
Power Outage Advisory Notificación de interrupción eléctrica Avis d'une panne d'électricité ADVISORY
Radiological Hazard Warning Aviso de peligro radiológico Alerte de risque radiologique WARNING
Required Monthly Test Prueba mensual obligatoria Test mensuel obligatoire ADVISORY
Required Weekly Test Prueba semanal obligatoria Test hebdomadaire obligatoire ADVISORY
Special Marine Warning Aviso especial de la Marina Alerte martime spécial WARNING
Special Weather Statement Advertencia especial del estado del tiempo Bulletin météorologique spécial ADVISORY
Shelter In-Place Warning Aviso de refugio Alerte d'abri sur place WARNING
Severe Thunderstorm Watch Vigilancia de tormenta electrica severa Veille d'orage violent WATCH
Severe Thunderstorm Warning Aviso de tormenta electrica severa Alerte d'orage violent WARNING
Severe Weather Statement Advertencia de tiempo severo Bulletin météorologique violent ADVISORY
Tornado Watch Vigilancia de tornado Veille de tornade WATCH
911 Telephone Outage Emergency Interrupción telefónica 911 Interruption d'urgence service 911 ADVISORY
Tornado Warning Aviso de tornado Alerte de tornade WARNING
Tropical Storm Watch Vigilancia de tormenta tropical Veille de tempête tropicale WATCH
Tropical Storm Warning Aviso de tormenta tropical Alerte de tempête tropicale WARNING
WRB603_EN_R0 27/6/07, 3:31 PM23
EN
24
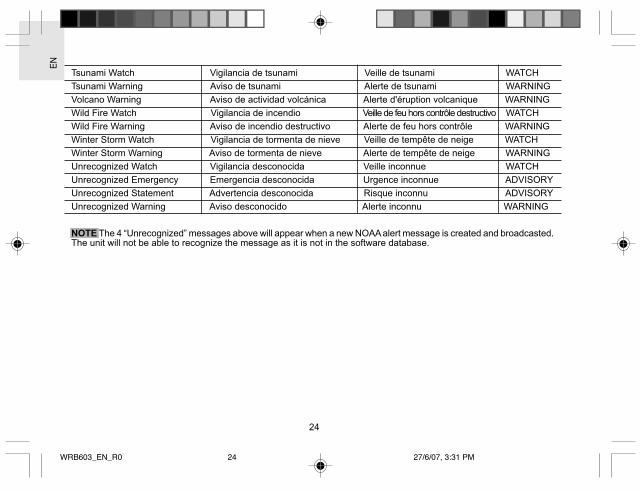
Tsunami Watch Vigilancia de tsunami Veille de tsunami WATCH
Tsunami Warning Aviso de tsunami Alerte de tsunami WARNING
Volcano Warning Aviso de actividad volcánica Alerte d'éruption volcanique WARNING
Wild Fire Watch Vigilancia de incendio Veille de feu hors contrôle destructivo WATCH
Wild Fire Warning Aviso de incendio destructivo Alerte de feu hors contrôle WARNING
Winter Storm Watch Vigilancia de tormenta de nieve Veille de tempête de neige WATCH
Winter Storm Warning Aviso de tormenta de nieve Alerte de tempête de neige WARNING
Unrecognized Watch Vigilancia desconocida Veille inconnue WATCH
Unrecognized Emergency Emergencia desconocida Urgence inconnue ADVISORY
Unrecognized Statement Advertencia desconocida Risque inconnu ADVISORY
Unrecognized Warning Aviso desconocido Alerte inconnu WARNING
NOTE The 4 “Unrecognized” messages above will appear when a new NOAA alert message is created and broadcasted.The unit will not be able to recognize the message as it is not in the software database.
WRB603_EN_R0 27/6/07, 3:31 PM24
EN
25
RADIO WR602 – CLOCK & CALENDAR
To set the time and date, navigate to “Set Clock” settingmode as shown in the Changing Settings section. Theorder of the settings is:
• 12 / 24 hour format, hour, minute, month / day
format, year, month, day and day of the week
language (English, French or Spanish).
NOTE The day of the week language you select willalso be used for the NOAA alert messages.
NOTE When the radio is placed in the recharging cradle,the weather station will automatically synchronize thetime with the atomic clock time (unless this feature hasbeen disabled).
RADIO WR602 – ALARM
The unit has 2 alarms (alarm 1 and 2). They can beused together or independently. Alarms 1 and 2 havedifferent sounds so that you can differentiate them. Thealarm will sound for 1 minute unless it is disabled.
To set the alarm:
Navigate to “Set Alarm” setting mode as shown in theChanging Settings section. The order of the settings is;alarm 1 or 2, hour and minute.
To silence the alarm:
• Press to silence it for 8 minutes.
• Press and hold , or press any button except
, to turn the alarm OFF and activate it again at
the same time the next day.
To enable or disable the alarm:
• Press MENU until you reach alarm 1 or 2 display.
• Press or to enable or disable the
alarm. “-:--” means disabled.
The alarm icon or will appear on the clockdefault display when the alarm is enabled.
RADIO WR602 – VOLUME
To set the radio volume:
1. In the clock display mode, set the radio to NOAA
ON by pressing .
2. Press or to adjust the volume.
(Maximum volume is 7 / minimum volume is 1.)
WRB603_EN_R0 27/6/07, 3:31 PM25

EN
26
RADIO WR602 - EXTERNAL SPEAKER JACK
The external speaker jack allows you to connect the radiowith an external speaker system so that braodcasts canbe announced in public areas i.e. schools, hotels, trainstations etc.
BACKLIGHT
Press to activate the radio backlight and SNOOZE/ LIGHT to activate the weather station backlight.
RESET SYSTEM
Press RESET when you change the batteries andwhenever performance is not behaving as expected.
WARNINGS
This product is designed to give you years of service ifhandled properly. Oregon Scientific will not beresponsible for any deviations in the usage of the devicefrom those specified in the user instructions or anyunapproved alterations or repairs of the product.Observe the following guidelines:
• Please note that placement of this product on wood
surfaces with certain types of finishes, such as
clear varnish, may result in damage to the finish.
Please consult the furniture manufacturer's care
instructions for direction as to the types of objects
that may safely be placed on the wood surface.
Oregon Scientific shall not be responsible for any
damage to wood surfaces from contact with this
product.
• The product is splash proof but do not immerse it in
water. This can cause electrical shock and damage
the product.
• Clean the product with a slightly damp cloth and
alcohol-free, mild detergent. Avoid dropping the product or placing it in a high-traffic location.
• Do not subject the product to extreme force, shock,
or fluctuations in temperature or humidity.
• Do not tamper with the internal components.
• Do not mix new and old batteries or batteries of
different types.
• Remove the batteries if storing this product for a
long period of time.
• Do not scratch the LCD screen.
NOTE The technical specification of this product andcontents of this user guide are subject to change withoutnotice. Images not drawn to scale.
WRB603_EN_R0 27/6/07, 3:31 PM26
EN
27
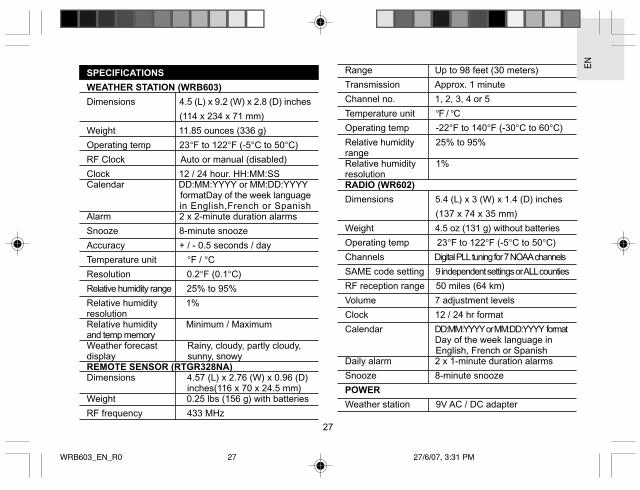
SPECIFICATIONS
WEATHER STATION (WRB603)
Dimensions 4.5 (L) x 9.2 (W) x 2.8 (D) inches
(114 x 234 x 71 mm)
Weight 11.85 ounces (336 g)
Operating temp 23°F to 122°F (-5°C to 50°C)
RF Clock Auto or manual (disabled)
Clock 12 / 24 hour. HH:MM:SSCalendar DD:MM:YYYY or MM:DD:YYYY
formatDay of the week language in English,French or SpanishAlarm 2 x 2-minute duration alarms
Snooze 8-minute snooze
Accuracy + / - 0.5 seconds / day
Temperature unit °F / °C
Resolution 0.2°F (0.1°C)
Relative humidity range 25% to 95%
Relative humidity 1%resolutionRelative humidity Minimum / Maximumand temp memoryWeather forecast Rainy, cloudy, partly cloudy,display sunny, snowyREMOTE SENSOR (RTGR328NA)Dimensions 4.57 (L) x 2.76 (W) x 0.96 (D) inches(116 x 70 x 24.5 mm)Weight 0.25 lbs (156 g) with batteries
RF frequency 433 MHz
Range Up to 98 feet (30 meters)
Transmission Approx. 1 minute
Channel no. 1, 2, 3, 4 or 5
Temperature unit °F / °C
Operating temp -22°F to 140°F (-30°C to 60°C)
Relative humidity 25% to 95%rangeRelative humidity 1%resolutionRADIO (WR602)
Dimensions 5.4 (L) x 3 (W) x 1.4 (D) inches
(137 x 74 x 35 mm)
Weight 4.5 oz (131 g) without batteries
Operating temp 23°F to 122°F (-5°C to 50°C)
Channels Digital PLL tuning for 7 NOAA channels
SAME code setting 9 independent settings or ALL counties
RF reception range 50 miles (64 km)
Volume 7 adjustment levels
Clock 12 / 24 hr format
Calendar DD:MM:YYYY or MM:DD:YYYY format Day of the week language in
English, French or SpanishDaily alarm 2 x 1-minute duration alarms
Snooze 8-minute snooze
POWER
Weather station 9V AC / DC adapter
WRB603_EN_R0 27/6/07, 3:31 PM27

EN
28
Remote sensor 2 x UM-3 or (AA) size 1.5V battery
Radio Rechargeable battery pack or 3 x UM-3 (AA) size 1.5V battery
ABOUT OREGON SCIENTIFIC
Visit our website (www.oregonscientific.com) to learnmore about Oregon Scientific products such as digitalcameras; MP3 players; children’s electronic learningproducts and games; projection clocks; health andfitness gear; weather stations; and digital and conferencephones. The website also includes contact informationfor our Customer Care department in case you need toreach us, as well as frequently asked questions andcustomer downloads.
We hope you will find all the information you need onour website, however if you’re in the US and would liketo contact the Oregon Scientific Customer Caredepartment directly, please visit:
www2.oregonscientific.com/service/support
OR
Call 1-800-853-8883.
For international enquiries, please visit:www2.oregonscientific.com/about/international
FCC STATEMENT
This device complies with Part 15 of the FCC Rules.Operation is subject to the following two conditions: (1)This device may not cause harmful interference, and(2) This device must accept any interference received,including interference that may cause undesiredoperation.
WARNING Changes or modifications not expresslyapproved by the party responsible for compliance couldvoid the user's authority to operate the equipment.
NOTE This equipment has been tested and found tocomply with the limits for a Class B digital device,pursuant to Part 15 of the FCC Rules. These limits aredesigned to provide reasonable protection againstharmful interference in a residential installation.
This equipment generates, uses and can radiate radiofrequency energy and, if not installed and used inaccordance with the instructions, may cause harmfulinterference to radio communications. However, thereis no guarantee that interference will not occur in aparticular installation. If this equipment does causeharmful interference to radio or television reception,which can be determined by turning the equipment offand on, the user is encouraged to try to correct theinterference by one or more of the following measures:
• Reorient or relocate the receiving antenna.
WRB603_EN_R0 27/6/07, 3:31 PM28

EN
29
• Increase the separation between the equipment
and receiver.
• Connect the equipment into an outlet on a circuit
different from that to which the receiver is
connected.
• Consult the dealer or an experienced radio / TV
technician for help.
DECLARATION OF CONFORMITY
The following information is not to be used as contactfor support or sales. Please call our customer servicenumber (listed on our website atwww.oregonscientific.com), or on the warranty card forthis product) for all inquiries instead.
We
Name: Oregon Scientific, Inc.
Address: 19861 SW 95th Ave.,
Oregon Tualatin, 97062 USA
Telephone No.: 1-800-853-8883
declare that the product
Product No.: WRB603
Product Name: Weather Station
Manufacturer: IDT Technology Limited
Address: Block C, 9/F, Kaiser Estate,
Phase 1,41 Man Yue St.,
Hung Hom, Kowloon,
Hong Kong
is in conformity with Part 15 of the FCC Rules. Operationis subject to the following two conditions: 1) This devicemay not cause harmful interference. 2) This device mustaccept any interference received, including interferencethat may cause undesired operation.
WRB603_EN_R0 27/6/07, 3:31 PM29