PORTABLE DIGITAL AUDIO PLAYER Basic Model : YP-K5 · PDF filePORTABLE DIGITAL AUDIO PLAYER...
76
PORTABLE DIGITAL AUDIO PLAYER Basic Model : YP-K5 PORTABLE DIGITAL AUDIO PLAYER - Confidential - SERVICE Manual Features - High-quality Stereo Speaker! - Touchpad - Easy & Simple Menu Structure - Longer Play Time and Shorter Downloading! - Supporting Various File Formats! - Convenience Model : YP-K5 * Application : YP-K5JZB/ZP(1GB) YP-K5JQB/QP(2GB) YP-K5JAB/AP(4GB)
Transcript of PORTABLE DIGITAL AUDIO PLAYER Basic Model : YP-K5 · PDF filePORTABLE DIGITAL AUDIO PLAYER...
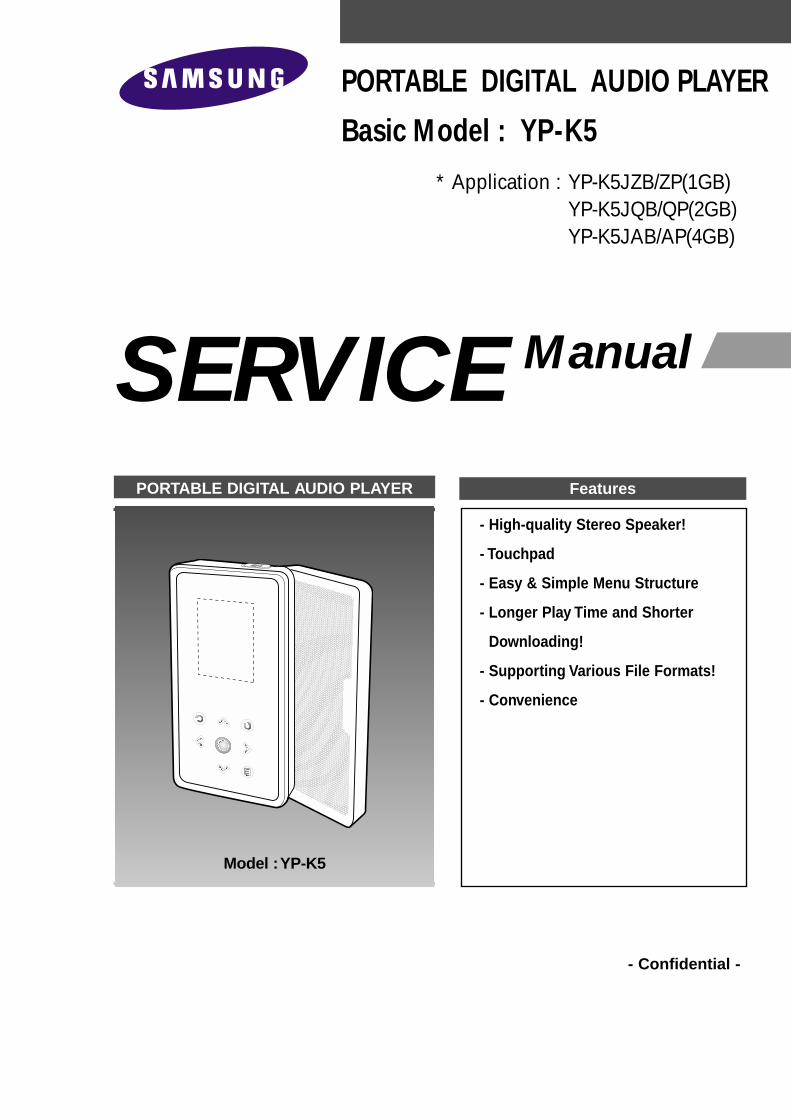
PORTABLE DIGITAL AUDIO PLAYER
Basic Model : YP-K5
PORTABLE DIGITAL AUDIO PLAYER
- Confidential -
SERVICE Manual
Features
- High-quality Stereo Speaker!
- Touchpad
- Easy & Simple Menu Structure
- Longer Play Time and Shorter
Downloading!
- Supporting Various File Formats!
- Convenience
Model :YP-K5
* Application : YP-K5JZB/ZP(1GB)YP-K5JQB/QP(2GB)YP-K5JAB/AP(4GB)

ELECTRONICS
© Samsung Electronics Co.,Ltd. AUG. 2006Printed in KoreaCode no. AH68-01819S

Ch1 Precautions1-1. Safety Precautions 1-11-2. Servicing Precautions 1-21-3. Precautions for Electrostatically
Sensitive Device (ESDs) 1-31-4. Special Precations and Waring
Lables for Laser Products 1-41-5. Special Precautions for HDD 1-5
INDEX
Ch2 Product Descriptions1. Product Feature 2-12. Specifications 2-23. Accessories 2-3
Ch3 Product Functions1. Basic Functions 3-12. New Functions 3-73. PC Connection 3-9
Ch4 Adjustments1. How to recover the device 4-1
2. How to upgrade Firmware 4-5
Ch5 How to disassembleHow to disassemble 5-1
Ch6 Troubleshooting1. Power failure 6-12. When you cannot hear through the earphones 6-23. When you cannot hear through the built-in speaker 6-34. When the Touch Pad does not work properly 6-45. When you cannot connect the player to the PC 6-5
Ch7 Exploded View & Parts List1. Total Exploded View 7-12. Parts List 7-2
Ch8 Electrical Parts ListElectrical Parts List 8-1
Ch9 Block DiagramBlock Diagram 9-1
Ch10 Wiring DiagramWiring Diagram 10-1
Ch11 PCB Diagram1. PCB Layout 11-1
2. PCB Pattern 11-4
Ch12 Schematic Diagram1. MAIN 12-1
2. Major Waveforms (Major Voltage Waveforms) 12-2
Ch13 Circuit Description1. Main Blocks in the Circuit Diagram 13-1
2. Main Functions by Block 13-2
Ch14 Basic Information of MP31. Operating Principle of yepp 14-1
2. MP3 Overview 14-5
3. Understanding of Digital Audio Format 14-6
4. Type of Storage 14-9
5. Copyright 14-11

1. PrecautionsFollow these safety, servicing and ESD precautions to prevent damage and protect against potential haz-ards such as electrical shock and X-rays.
Samsung Electronics1-1
1-1 Safety Precautions
1. Be sure that all of the built-in protectivedevices are replaced.
2. When reinstalling the chassis and its assemblies, be sure to restore all protectivedevices, including control knobs and compartment covers.
3. Make sure that there are no cabinet openings through which people--particularly children--might insert fingersand contact dangerous voltages. Suchopenings include the spacing between thepicture tube and the cabinet mask, excessively wide cabinet ventilation slots,and improperly fitted back covers.
4. Design Alteration Warning:Never alter or add to the mechanical orelectrical design of the unit. Example: Donot add auxiliary audio or video connectors.Such alterations might create a safety haz-ard. Also, any design changes or additionswill void the manufacturer's warranty.
5. Leakage Current Hot Check (Figure 1-1):Warning: Do not use an isolation transformer during this test. Use a leak-age-current tester or a metering systemthat complies with American NationalStandards Institute (ANSI C101.1, LeakageCurrent for Appliances), and UnderwritersLaboratories (UL Publication UL1410,59.7).
With the unit completely reassembled, plugthe AC line cord directly into a 120V ACoutlet. With the unit's AC switch first in theON position and then OFF, measure thecurrent between a known earth ground(metal water pipe, etc.) and all exposedmetal parts. Examples: Handle brackets,metal cabinets, screwheads and controlshafts. The current measured should notexceed 0.5 milliamp. Reverse the power-plug prongs in the AC outlet and repeat.
6. Insulation Resistance Cold Check: (1) With the unit's AC plug disconnectedfrom the AC source, connect an electricaljumper across the two AC prongs. (2) Setthe power switch to ON. (3) Measure theresistance between the shorted AC plug andany exposed metallic parts. Example:Screwheads, antenna, control shafts or handle brackets.
If any of the exposed metallic parts has areturn path to the chassis, the measuredresistance should be between 1 and 5.2megohms. If there is no return path, themeasured resistance should be "infinite." Ifthe resistance is outside these limits, ashock hazard might exist. See Figure 1-2
DeviceUnder
Test
(Reading shouldnot be above0.5mA)
LeakageCurrantTester
EarthGround
Test allexposed metal
surfaces
Also test withplug reversed(using AC adapterplug as required)
2-Wire Cord
AntennaTerminal
ExposedMetal Part
ohmOhmmeter
Fig. 1-1 AC Leakage Test
Fig. 1-2 Insulation Resistance Test

Samsung Electronics 1-2
1-1 Safety Precautions (Continued)
7. Components, parts and wiring that appear to have overheated or that are otherwise damaged should be replaced with parts that meet the original specifications. Always determine the cause of damage oroverheating, and correct any potential hazards
8. Observe the original lead dress, especially near the following areas: Antenna wiring, sharp edges, and especially theAC and high voltage power supplies. Always inspect for pinched, out-of-place, or frayed wiring. Do not change the spacing between components and the printed circuit board. Check the AC power cord for damage. Make sure that no wires or components touch thermally hot parts.
9. Product Safety Notice: Some electrical and mechanical parts have special safety-related characteristics
which might not be obvious from visual inspection. These safety features and the protection they give might be lost if the replacement component differs from the original--even if the replacement is rated for higher voltage, wattage, etc.
10 Components that are critical for safety are indicated in the circuit diagram by shading, or . Use replacement components that have the same ratings, especially for flame resistance and dielectric strength specifications. Areplacement part that does not have the same safety characteristics as the original might create shock, fire or other hazards.
1-2 Servicing Precautions
1. Servicing precautions are printed on the cabinet. Follow them.
2. Always unplug the unit's AC power cord fromthe AC power source before attempting to: (a) Remove or reinstall anycomponent or assembly, (b) Disconnect anelectrical plug or connector, (c) Connect atest component in parallel with an electrolytic capacitor.
3. Some components are raised above the printed circuit board for safety. An insulation tube or tape is sometimes used.The internal wiring may be clamped to prevent contact with thermally hot components. Reinstall all such elements totheir original position.
4. After servicing, always check that the screws, components and wiring have beencorrectly reinstalled. Make sure that the portion around the serviced part has notbeen damaged.
5. Check the insulation between the blades ofthe AC plug and accessible conductive parts(examples: metal panels, input terminalsand earphone jacks).
6. Insulation Checking Procedure: Disconnectthe power cord from the AC source and turn the power switch ON. Connect an insulation resistance meter (500V) to theblades of the AC plug.
The insulation resistance between each blade of the AC plug and accessible conductive parts (see above) should begreater than 1 megohm.
7. Never defeat any of the B+ voltage interlocks. Do not apply AC power to theunit (or any of its assemblies) unless allsolid-state heat sinks are correctly installed.
8. Always connect a test instrument's groundlead to the instrument chassis ground before connecting the positive lead; alwaysremove the instrument's ground lead last.
Precautions
Warning1: First read the "Safety Precautions" section of this manual. If some unforeseen circumstancecreates a conflict between the servicing and safety precautions, always follow the safety precautions.

Samsung Electronics1-3
1-3 Precautions for Electrostatically Sensitive Devices (ESDs)
1-4 Special Precautions and Warning Labels for Laser Products
1. Some semiconductor ("solid state") devicesare easily damaged by static electricity. Such components are called ElectrostaticallySensitive Devices (ESDs). Examplesinclude integrated circuits and some field-effect transistors. The following techniques willreduce the occurrence of component damage caused by static electricity.
2. Immediately before handling any semiconductor components or assemblies,drain the electrostatic charge from your body by touching a known earth ground.Alternatively, wear a dischargingwrist-strap device. (Be sure to remove itprior to applying power--this is an electricshock precaution.)
3. After removing an ESD-equipped assembly,place it on a conductive surface such as aluminum foil to prevent accumulation ofelectrostatic charge.
4. Do not use freon-propelled chemicals. These can generate electrical charges thatdamage ESDs.
5. Use only a grounded-tip soldering ironwhen soldering or unsoldering ESDs.
6. Use only an anti-static solder removal device. Many solder removal devices arenot rated as "anti-static" (these can accumulate sufficient electrical charge todamage ESDs).
7. Do not remove a replacement ESD from its protective package until you are ready toinstall it. Most replacement ESDs arepackaged with leads that are electricallyshorted together by conductive foam,aluminum foil or other conductivematerials.
8. Immediately before removing the protectivematerial from the leads of a replacementESD, touch the protective material to thechassis or circuit assembly into which thedevice will be installed.
9. Minimize body motions when handingunpackaged replacement ESDs. Motionssuch as brushing clothes together, or liftinga foot from a carpeted floor can generateenough static electricity to damage an ESD.
Precautions
UL : Manufactured for U.S.A. Market.CSA : Manufactured for Canadian Market.EU : Manufactured for European Market.SCAN : Manufactured for Scandinavian
Market.
This Product Complies withDHHS Rules 21CFR, Sub chapter J.At date of Manu-facture
(UL)
(UL,CSA,SCAN)
(EU)
CERTIFIED ONLY TO CANADIANELECTRICAL CODE.
CERTIFIE EN VERTU DU CODECANADIAN DE LELETRICITESEULEMENT
(CSA)
CLASS 1LASER PRODUCT
(UL,CSA,EU)
Fig. 1-3 Warning Labels (Location: Enclosure Block)
Fig. 1-4 Warning Labels (Location: Disc Clamper, Inner Side of Unit Door or Nearby Unit Chassis )
CAUTION : INVISIBLE LASER RADIATION WHEN OPEN AND INTERLOCKS DEFEATEO AVOIDEXPOSURE TO BEAM
ADVARSEL: USYNLIG LASERSTRÅLING VED ABNINGNÅR SIKKERHEDSAFBRYDERE ER UDE AF FUNKTIONUNDGA UDSAETTELSE FOR STRALING
VARO:AVATTAESSA JA SUOJALUKITUS OHITETTAESSAOLET ALTTINA NAKYMATTÖMALLE LASERSATEILYLLE ALAKATSO SATEESEEN!
VARNING:OSYNLIG LASERSTRÅLNING NAR DENNA DELAR OPPNAD OCH SPARREN AR URKOPPLAD BETRAKTAEJSTRÅLEN!
Samsung Electronics 1-4
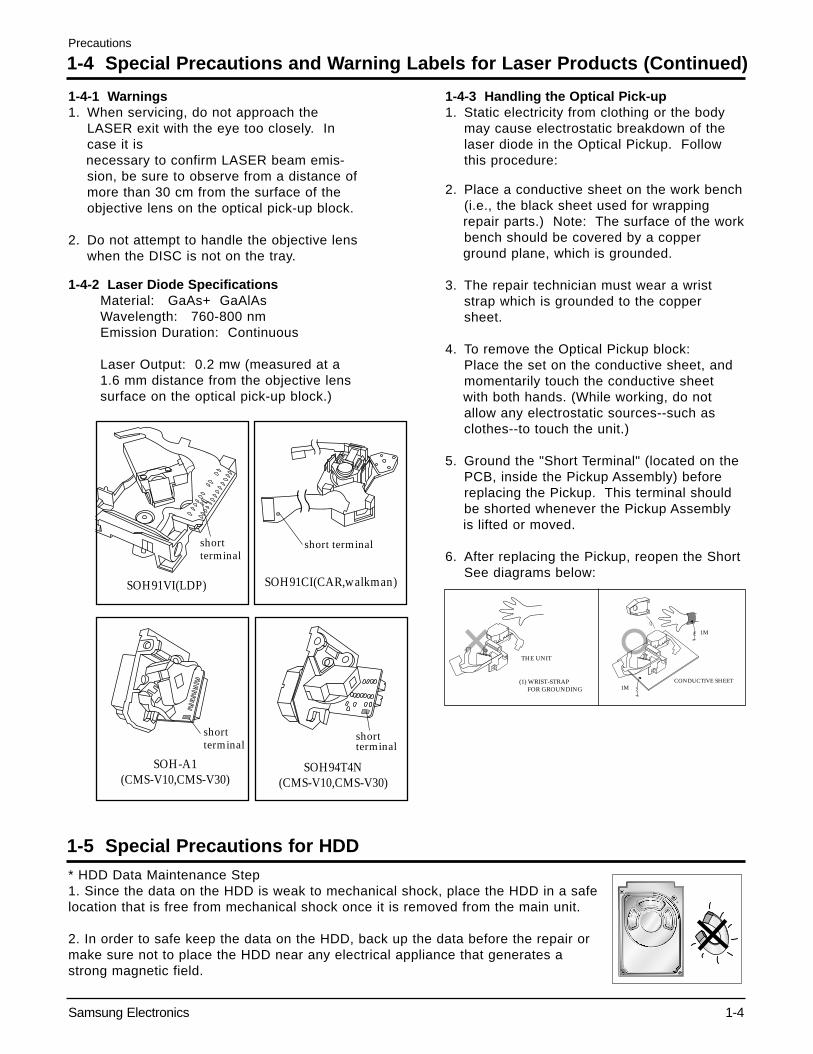
1-4 Special Precautions and Warning Labels for Laser Products (Continued)
1-4-1 Warnings1. When servicing, do not approach the
LASER exit with the eye too closely. Incase it is necessary to confirm LASER beam emis-sion, be sure to observe from a distance ofmore than 30 cm from the surface of theobjective lens on the optical pick-up block.
2. Do not attempt to handle the objective lenswhen the DISC is not on the tray.
1-4-2 Laser Diode SpecificationsMaterial: GaAs+ GaAlAsWavelength: 760-800 nmEmission Duration: Continuous
Laser Output: 0.2 mw (measured at a 1.6 mm distance from the objective lens surface on the optical pick-up block.)
1-4-3 Handling the Optical Pick-up1. Static electricity from clothing or the body
may cause electrostatic breakdown of thelaser diode in the Optical Pickup. Followthis procedure:
2. Place a conductive sheet on the work bench(i.e., the black sheet used for wrapping repair parts.) Note: The surface of the workbench should be covered by a copper ground plane, which is grounded.
3. The repair technician must wear a wriststrap which is grounded to the coppersheet.
4. To remove the Optical Pickup block: Place the set on the conductive sheet, andmomentarily touch the conductive sheet with both hands. (While working, do notallow any electrostatic sources--such asclothes--to touch the unit.)
5. Ground the "Short Terminal" (located on thePCB, inside the Pickup Assembly) beforereplacing the Pickup. This terminal shouldbe shorted whenever the Pickup Assembly is lifted or moved.
6. After replacing the Pickup, reopen the ShortSee diagrams below:
Precautions
THE UNIT
(1) WRIST-STRAP FOR GROUNDING 1M
1M
CONDUCTIVE SHEET
short terminal
short terminal
short terminal
short terminal
SOH91VI(LDP) SOH91CI(CAR,walkman)
SOH94T4N(CMS-V10,CMS-V30)
SOH-A1(CMS-V10,CMS-V30)
1-5 Special Precautions for HDD* HDD Data Maintenance Step1. Since the data on the HDD is weak to mechanical shock, place the HDD in a safelocation that is free from mechanical shock once it is removed from the main unit.
2. In order to safe keep the data on the HDD, back up the data before the repair ormake sure not to place the HDD near any electrical appliance that generates astrong magnetic field.

2. Product Descriptions
1. Product Feature
Product FeatureHigh-quality Stereo
Speaker!
Touchpad
Easy & Simple Menu
Structure
Longer Play Time and
Shorter Downloading!
Supporting Various File
Formats!
Convenience
Slide the speaker unit to reveal it, with which you can enjoy
a dynamic music.
You can share your favorite music anytime and anywhere.
You can tap on the touch pad to navigate through the menus.
Easy to use with a simple menu structure
You can set your own graphic display by taking advantage of the
screen saver and user equalizer.
A fully charged battery can play up to 30 hours of music
(when using the earphone).
The player supports USB 2.0 capability, much faster than USB 1.1,
to enable faster communication with the PC.
Supports various file formats including MP3, WMA.
The image file is converted to JPG format before transmitted to
the player.
You can take advantage of a variety of features including FM radio,
alarming, photo view, etc.
You can add your favorite music files to the alarm melody list.
2-1 Samsung Electronics
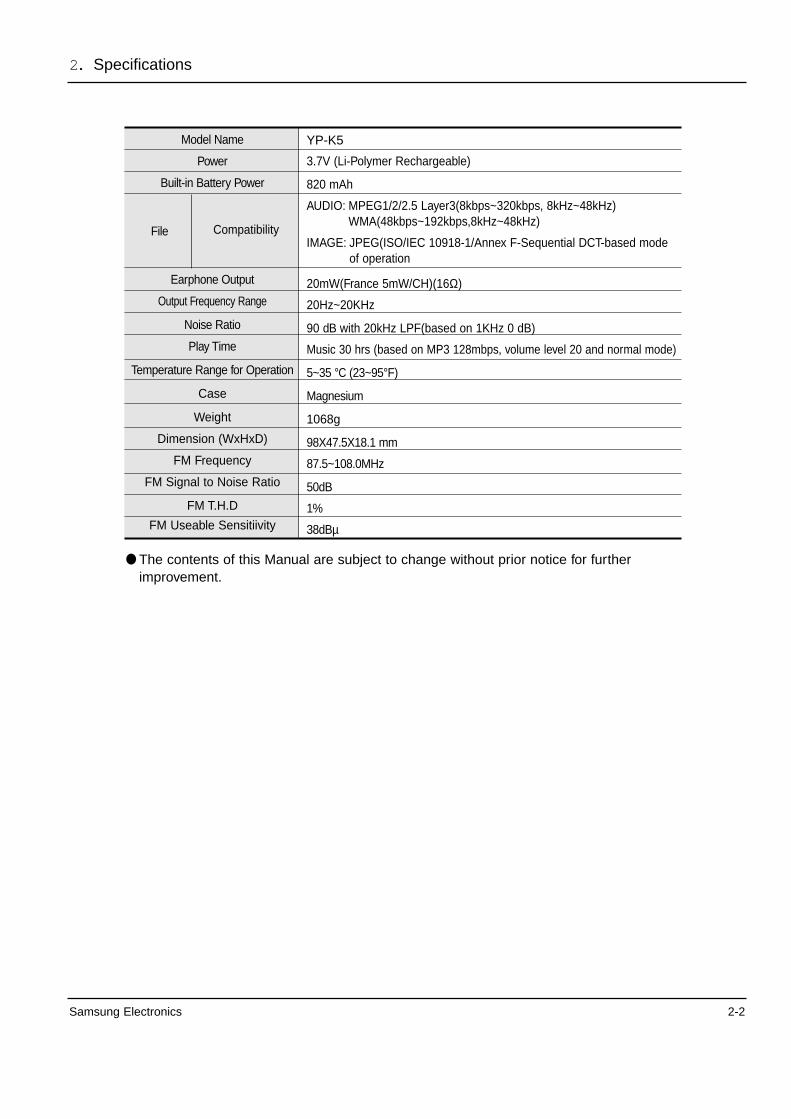
2. Specifications
Samsung Electronics 2-2
Model Name
Power
Built-in Battery Power
Earphone Output
Output Frequency Range
Noise Ratio
Play Time
Temperature Range for Operation
Case
Weight
Dimension (WxHxD)
FM Frequency
FM Signal to Noise Ratio
FM T.H.D
FM Useable Sensitiivity
File Compatibility
YP-K5
3.7V (Li-Polymer Rechargeable)
820 mAh
AUDIO: MPEG1/2/2.5 Layer3(8kbps~320kbps, 8kHz~48kHz)WMA(48kbps~192kbps,8kHz~48kHz)
IMAGE: JPEG(ISO/IEC 10918-1/Annex F-Sequential DCT-based modeof operation
20mW(France 5mW/CH)(16Ω)
20Hz~20KHz
90 dB with 20kHz LPF(based on 1KHz 0 dB)
Music 30 hrs (based on MP3 128mbps, volume level 20 and normal mode)
5~35 °C (23~95°F)
Magnesium
1068g
98X47.5X18.1 mm
87.5~108.0MHz
50dB
1%
38dBµ
The contents of this Manual are subject to change without prior notice for furtherimprovement.
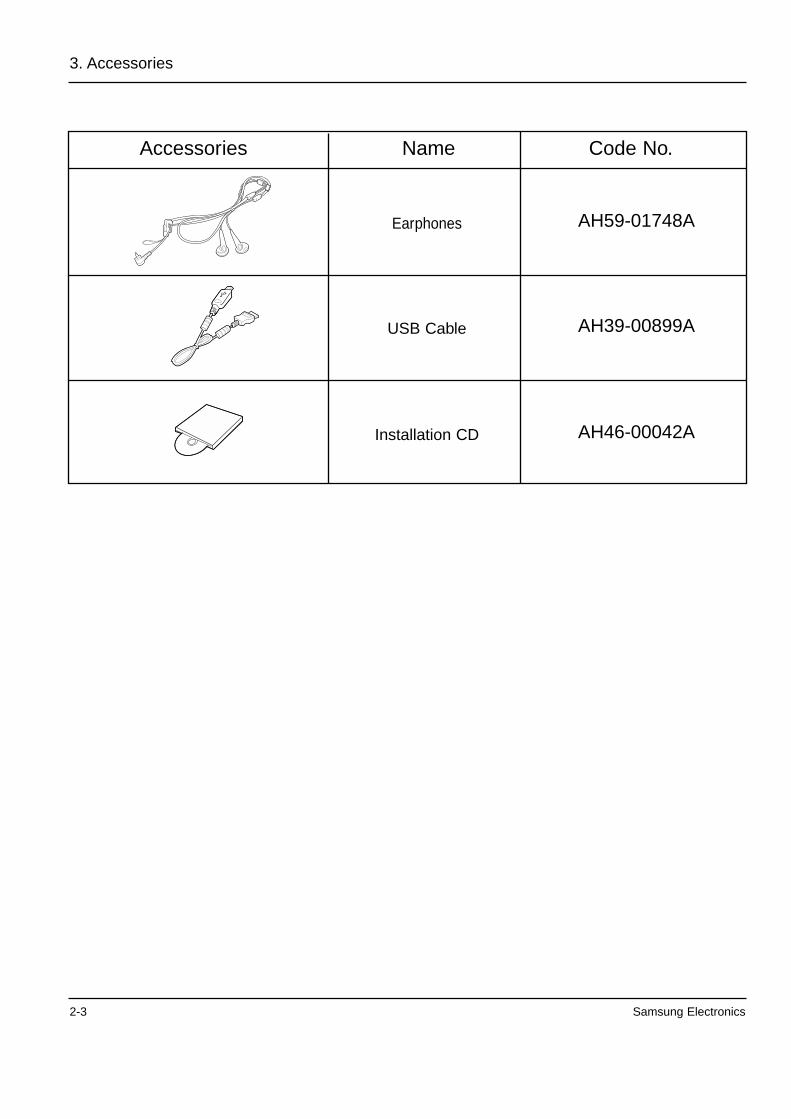
Accessories Name Code No.
3. Accessories
2-3 Samsung Electronics
AH59-01748AEarphones
AH39-00899AUSB Cable
AH46-00042AInstallation CD

Samsung Electronics 3-1
3. Product Functions
1. Basic Functions
Music
Checking the Accessories
Player Earphones USB Cable Installation CD
1 Repeat Play Display2 Equalizer3 Music Information4 Play StatusBar
5 Current Music Number/Total Number Display
6 BatteryDisplay
„
1.Life is cool
0002/0020 ¢” 00:02:20
ƒ
ƒ
ƒƒŁƒØ
ƒŒ
ƒºƒ
Components
ExpansionSpeaker
Power & Hold Button
Screen Display
Back Button
Menu Button
Reset Hole
Rear View
Play/Pause & Select Button
Front, Right Side and Top
Button
Bottom
EarphoneConnection Port
Power/USBConnection Port

3-2 Samsung Electronics
Basic Use
Turning the Power On & Off
Turning the Power OnPush and hold the [œ HOLD] switch in the opposite of the arrowdirection. Power is turned on.
Turning the Power OffPush and hold the [œ HOLD] switch in the opposite of the arrowdirection again. Power is turned off.
Power is automatically turned off when none of the buttons have been pressed for a preset period of time (Default: 10 seconds) in the pause mode. √ Page 72NOTE
Press the [ ] to move to the previous screen.
Press and hold the [ ] to move to the Menu screen.
Playing Music
1 Press and hold the [ ] button to move to the main menu.
2 Press the [ ] to select the <Music> and then press the [
].
The Music Menu will appear.3 press the [ ] and [ ] to select a music file of yourchoice.4 Press the [ ].
The music file will begin playing.
Normal
1.Life is cool
0002/0020 √00:02:20
Normal
1.Life is cool
0002/0020 √00:02:20
Volume Control
Lock Function
Press the [ ] button on the side of the unit. You will see a volume control icon.
Press the button to increase the volume or the button to decrease it.
In Hold mode, all buttons are disabled. This function is usefulwhen you are walking or jogging.
1 Push the [œ HOLD] button on the top of the unit in the direction of the arrow.
2 Push the [œ HOLD] button in the opposite direction of thearrow to release the Lock function.
Normal
1.Life is cool
0002/0020 √00:02:20
Normal
1.Life is cool
0002/0020 √00:02:20
Using an External Speaker
Slide the external speaker in the arrow direc-tion while listening to the music or radio. You can listen to the music through the external
speaker.
If you want to use the earphone for enjoying themusic, close the speaker by sliding it to the originalposition.
Please position the speaker horizontally when using it. You will see the lamps available turning on.
If a product malfunction occurs, youcan re-initialize the system by pressingthe Reset hole.
Reset Function
Reset hold
Listening to MusicListening to Music
Before you start! Connect the earphones, then switch on the player, and check the battery.
1 Press and hold the [ ] button to move to themain menu.
2 Press the [ ] to select the <Music> and then
press the [ ].
The Music Menu will appear.
Music Menu <Now Playing> : You can see information on the current
song. <Artists> : You can make you selection by the artist. <Albums> : You can make you selection by the album. <Tracks> : You can listen to the music in the order of the
number and alphabet. <Genres> : You can choose your favorite genre from club,
dance, hall, hiphop, etc. <Playlists> : You can enjoy the music files in your playlist.
NOTE
The music files compatible with the player are MP3, WMA and Ogg. MP1 or MP2 files which only have a changed extension to MP3, may not play on the player. A file without an ID3 Tag (Unknown) is displayed as [unknown].
3 aPress the [ ] to select the <Artists> and
then press the [ ].1
2,3
Music
Before you start! Connect the earphones, then switch on the player, and check the battery.
4 Press the [ ] to select an artist, then
press the [ ]. The albums for the artist will appear.
5 Press the [ ] to select an album, then
press the [ ]. The music files for the selected album will appear.
6 Press the [ ] to select a music file to play,
then press the [ ]. The music will start playing.
4,5,6
Music
Now Playing
Artists
Albums
Tracks
Genres
Playlists
To Pause
1 Press the [ ] while the music is playing. The music playback will be paused.
2 Press the [ ] again. The music will play from the point where it stopped.
NOTE
Screen Display window is automatically turned off when none of the buttons have been pressed for apreset period of time (Default: 1 minute) in the pause mode. You can set the time duration before closing the Screen Display window. √page 52
To search within a track
1 Press and hold the [ ] while the selected track is playing. It searches to the beginning or the end of the track.
2 Release the button at the point you wish to start. It starts playing from the point you release the button.

Samsung Electronics 3-3
To Play from the beginning of the current track
Press the [ ] button after 10 seconds of play.
The current track starts playing from the beginning.
To play the previous/next track
Press the [ ] button within 10 seconds of play. The previous track will start playing.
Press the [ ] button. The next track will start playing.
CAUTION
When playing VBR files, the previous track may not play even if you press the [ lœœ ] button within 10seconds of the play.
To Play a Playlist Make your own Playlist by genre or artist.
Listening to Music
Before you start! You can use <Media Studio> to create your selection of music files by the folderbefore downloading it to the player. Then, the selection will be added to the<Playlists> of the player. For more information on creating a playlist in <MediaStudio>, see the Help section.
Music
Now Playing
Artists
Albums
Tracks
Genres
Playlists
1 Press and hold the [ ] button to move to the main menu.
2 Press the [ ] to select the <Music> and then press the [ ].
The Music Menu will appear.
3 Press the [ ] to select the <Playlists> and then press the
[ ].
The Playlist(s) will appear.
4 Press the [ ] to select the playlist of your choice, then
press the [ ]. The music files saved in the selected Playlist will appear.
5 Press the [ ] to selecta music file to play, then press the
[ ]. The music file will start playing.
To select the sound effect
To select the graphic EQ
1 Press the [ ] while listening to the music.
The music tool menu appears.
2 Press the [ ] to select the <Sound Effect> and then
press the [ ].
The sound effect menu appears.
3 Press the [ ] to select Sound Effect and then press the [ ].
You can select either <Normal> <Vocal> <Bass Boost> <3D Sound> or <Concert Hall>.
1 Press the [ ] while listening to the music.
The music tool menu appears.
2 Press the [ ] to select the <Graphic EQ> and then
press the [ ].
The graphic equalizer menu appears.
3 Press the [ ] to select <Move> or <Remove> and then
press the [ ].
<On>: displays the graphic equalizer on the screen. <Off>: does not display the graphic equalizer on the screen.
Using the Music Tool MenuListening to Music
Sound Effect
Graphic EQ
Play Mode
Add to Alarm
Normal
Sound Effect
Graphic EQ
Play Mode
Add to Alarm
Normal
To select the play mode
To add to alarm melody
1 Press the [ ] while listening to the music.
The music tool menu appears.
2 Press the [ ] to select the <Play Mode> and then press
the [ ].
The play mode menu appears.
3 Press the [ ] to select Play Mode and then press
the [ ].
You can select either <Normal> <Repeat One> <Repeat> or <Shuffle>.
1 Press the [ ] while listening to the music.
The music tool menu appears.
You can add your favorite music files to the alarm melody list.
2 Press the [ ] to select the <Add to Alarm> and then
press the [ ].
You will see the <Alarm Melody> menu where you can add thedesired melody files to the list.
Sound Effect
Graphic EQ
Play Mode
Add to Alarm
Normal
Sound Effect
Graphic EQ
Play Mode
Add to Alarm
Normal
1
2,3
1,2
Photo
1 Press and hold the [ ] button to move tothe main menu.
2 Press the [ ] to select <Photo> and then
press the [ ]. The Picture Folder list will appear.
Tap on the [ ] to select a folder, then press the[Touch Pad] to display the pictures.
3 Press the [ ] to select the picture file of
your choice, then press the [ ]. The selected file will appear. Large pictures may take longer to display.
1 Press the [ ] in Picture Viewing mode. The slideshow will start.
2 Press the [ ] to stop the slideshow.
Slideshow Viewing
Press the [ ]. You can see the previous or next image on the display.
To view the previous / next imageNOTE
You will see the thumbnailimage for a file with theappropriate information inthe picture folder list. For a file with no thumbnail information, youwill see instead.
Picture ViewingPicture Viewing
To add a photo to the screen saver list
To listen to the music without leaving your photo
1 Select an image file that you want to add to the screen saver list.
2 Press the [ ] while viewing a photo.
The photo tool menu appears.
3 Press the [ ] to select the <Add to Screen Saver>
and then press the [ ].
The selected image file is added to the list.
1 Press the [ ] while viewing a photo.
The photo tool menu appears.
You can listen to the last played music while staying with your photo.
2 Press the [ ] button to select <Play Background Music> or
<Stop Playing Background Music>.
< Play Background Music >: You can listen to the last played musicwhile staying with your photo.
< Stop Playing Background Music>: No background music is playedwhile viewing an image.
Using the Photo Tool MenuPicture Viewing
XXXX
Add to Screen S
XXXX
Add to Screen S
NOTE
Select <Photo> from <Display Setting> → <Screen Saver> and the selected image is displayed on
the screen as a screen saver. √ page 58 Resetting the system will restore the factory default for the screen saver.

3-4 Samsung Electronics
1
2
FM Radio
Listening to FM Radio
Listening to FM Radio
Before you start! Connect the earphones, then switch on the player, and check the battery.
1 Press and hold the [ ] button to move tothe main menu.
2 Press the [ ] to select <FM Radio> and
then press the [ ].
FM radio reception will start.
Press [ ] button during listening to FM radio. sound is muted.
Press [ ] button once again to sound back.
To use Mute function
To switch to preset mode
To switch to manual mode
1 Press the [ ] in <Manual Mode>.
2 Press the [ ] to select the <Go to Preset Mode> and
then press the [ ].
You will see Preset List on the screen.
3 Press the [ ] to select the preset frequency and then
press the [ ].
Once <Preset Mode> appears on the screen, you can select a radio frequency and listen to it.
1 Press the [ ] in <Preset Mode>.
2 Press the [ ] to select the <Go to Manual Mode> and
then press the [ ].
You will see <Manual Mode> on the screen.
NOTE
If no preset frequency is ever set, you will see <No Preset List Found> and the system does notswitch to <Preset Mode>.
For more information on the preset setup, refer to pages 50-51.
Go to Manual M
Delete Preset
Auto Preset
Preset List
FM Sensitivity
Preset Mode
Preset List
89.1MHz
89.2MHz
89.3MHz
89.4MHz
To manually search for frequencies
To automatically search for frequencies
Press and hold the [ ] button in <Preset Mode> in<Manual Mode>.
The frequency nearest from the point the button is released will besearched.
Press the [ ] button in <Preset Mode>.
Moves to frequencies whenever the button is pressed.
Manual Mode
Manual Mode
To automatically set frequencies
1 Press the [ ] in FM Radio mode.
2 Press the [ ] to select the <Auto Preset> and then
press the [ ].
You will see the Auto Preset window on the screen.
3 Press the [ ] to select <Yes> and then press the [ ].
You can enable to set up to 30 frequencies automatically.
Setting a FrequencyListening to FM Radio
Up to 30 frequencies can be stored.
Go to Preset ..
Add Preset
Auto Preset
FM Sensitivity
Manual Mode
To cancel during setting
Press [ ] button to cancel during auto scanning. The auto preset setting is canceled and frequencies set up to then are stored.
Always connect your earphones to the player when searching or setting frequencies. The earphones areused as antennas to receive FM radio reception.CAUTION
To set <Auto Preset> again after setting preset, existing frequencies are deleted entirely and youcan reset from start.NOTE

Samsung Electronics 3-5
1 Press the [ ] in <Preset Mode>.
2 Press the [ ] to select the preset frequency to delete
and then press the [ ] button. You will see the appropriate menu.
3 Press the [ ] to select the <Yes> and then press the [ ].
The selected preset number will be deleted.
4 To select and delete other preset numbers, follow 1-3 stepsabove.
To Delete PresetsListening to FM Radio
«¡∏ƺ¬ªË¡
89.1MHz
89.2MHz
89.3MHz
89.4MHz
Go to Preset ..
Add Preset
Auto Preset
FM Sensitivity
Manual Mode
Listening to FM Radio
Setting FM Radio
To set FM Sensitivity
1 Press the [ ] in FM Radio mode.
2 Press the [ ] to select the <FM Sensitivity> and then
press the [ ].
The FM Sensitivity menu appears.
3 Press the [ ] to select the search level and then press
the [ ]. You can select from <High> <Low> and <Med>.
The higher FM search level is, the more frequencies can be received.
2. New Functions
Setting Alarm You can set to sound the alarm at the scheduled time.
Settings
Before you start! First, you should set the clock for the current time.
Alarm
New Alarm Set
AM 12:00
AM 09:00
AM 10:00
PM 03:00
New Alarm Set
Once
Alarm Sound 2
5 min
AM 12 00
1 Press and hold the [ ] button to move to the main menu.
2 Press the [ ] to select <Alarm> and then press the [ ].
7 Press the [ ] to select an interval and then press the [ ].
You will see the confirmation window for your setting.
8 Press the [ ] to select <Yes> and then press the [ ].
When done, the alarm setting is added to the alarm list.
3 Press the [ ] to select the <New Alarm Set> and then
press the [ ].
The Alarm Settings menu appears.
4 Press the [ ] to select a frequency and then press the [ ].
5 Press the [ ] to set the time and then press the [ ].
6 Press the [ ] to select a melody and then press the [ ].
You can set up to 30 alarm settings.NOTE
To edit the alarm setting
1 Press the [ ] to select the alarm setting to edit and then
press the [ ].
2 Use the [ ] and [ ] to edit the setting.
To delete the alarm setting
1 Press the [ ] to select the alarm setting to delete and then press the [ ].
You will see the context menu.
2 Press the [ ].
You will see the appropriate window.
3 Press the [ ] to select <Yes> and then press the [ ].
The selected alarm setting will be deleted.
If you use an USB cable for external connection, the alarm system does not work.CAUTION
The system will sound the alarm when it reaches the scheduled time. Then, press the [ ] button
and use the [ ] buttons to select <Alarm Again in 5 min> or <Alarm Off>.NOTE
New Alarm Set
Once
Alarm Sound 2
5 min
AM 12 00
Setting Display You can adjust the screen saver and the turn-off time for the screen display.
Settings
1 Press and hold the [ ] button to move to the main menu.
2 Press the [ ] to select <Settings> and then press the [ ].
The Settings menu appears.
3 Press the [ ] to select <Display> and then press the [ ].
The display menu appears.
4 Use the [ ] and [ ] to set necessary functions.
Settings
Display
Time
Language
System
Key Operation
Press the [ ] to move up or down in the list.
Press the [ ] button to select and confirm your settings.
Press the [ ] button to return to the previous level.
NOTE

3-6 Samsung Electronics
<Screen Saver>: You can set an image for the screen saver screen.Select one from <Analogue Clock> <(Normal)Animation1> <(Normal)Animation2><(Normal)Animation3> and <Photo> and set the wait time. The <Photo> is that you designatedas a screen saver in <Add Screen Saver>. √ page 46You can select from <10s>, <30s>, <1m>, <5m> and <Off>. If no keystroke is entered for theselected time, the system will switch to display the screen saver image. √ page 58
<Display Off> : If no keystroke is entered for a set time, the display light will automatically turnoff. Select one from <10s>, <30s> and <1m>.
Screen Saver Setting
Screen Saver
Photo
10 sec
1 Press the [ ] to select <Screen Saver> and then press
the [ ].
The screen saver menu appears.
2 Press the [ ] to select the desired screen saver image and
then press the [ ].
3 Press the [ ] to select a wait time and then press the [ ].
You will see the Add Screen Saver window.
4 Press the [ ] to select <Yes> and then press the [ ].
The screen saver setting is complete.
Setting Time You can set functions related to the Sleep Timer and Auto Power Off.
Settings
1 Press and hold the [ ] button to move to the main menu.
2 Press the [ ] to select <Settings> and then press the [ ].
The Settings menu appears.
3 Press the [ ] to select <Time> and then press the [ ].
The display menu appears.
4 Use the [ ] and [ ] to set necessary functions.
<Sleep Timer> : Turns off power automatically after the preset time.Select either <Off> <15 Min > <30 Min> <60 Min> <90 Min> or <120 Min>.
<Auto Power Off> : Automatically turns power off when there is no button operation after the preset time in the pause mode. Select either<Off> <05 Sec> <10 Sec> <15 Sec> <30 Sec> <01 Min> or <03 Min>.
<Date/Time Set> : You can set the current time and date. √ Page 72
Settings
Display
Time
Language
System
Date/Time Set
1 Press the [ ] to select <Date/Time set> and then press
the [ ].
The time format menu appears.
2 Press the [ ] to set the time format and then press the [ ].
YY indicates the year, MM for the month and DD for the day.
3 Press the [ ] to move to <YY, MM, DD, AM/PM, Hr, Min>
and use the [ ] to set the time and date. Press and release the [ ] button to set the time one level at a time
and press and hold it to set the time multi-levels at a time.
4 Press the [ ].
You will see the display.
5 Press the [ ] to select <Yes> and then press the [ ]. The set time/date will be saved.
«•±‚ «¸Ωƒ
Date/Time Set
YY MM DD
06 06 02
PM 06 35
Date/Time Set
1 Press the [ ] to select <Date/Time set> and then press
the [ ].
The time format menu appears.
2 Press the [ ] to set the time format and then press the [ ].
YY indicates the year, MM for the month and DD for the day.
3 Press the [ ] to move to <YY, MM, DD, AM/PM, Hr, Min>
and use the [ ] to set the time and date. Press and release the [ ] button to set the time one level at a time
and press and hold it to set the time multi-levels at a time.
4 Press the [ ].
You will see the display.
5 Press the [ ] to select <Yes> and then press the [ ]. The set time/date will be saved.
«•±‚ «¸Ωƒ
Date/Time Set
YY MM DD
06 06 02
PM 06 35
Setting the System You can set the last memorize and beep options.
Settings
1 Press and hold the [ ] button to move to the main menu.
2 Press the [ ] to select <Settings> and then press the [ ].
The Settings menu appears.
3 Press the [ ] to select <System> and then press the [ ].
The System menu appears.
4 Use the [ ] and [ ] to set necessary functions.
<Resume>: You can set the start point where the player resumes playback after you stop play-ing the music. Selecting <On> will resume playback from the last stopped point while <Off> willresume playback from the beginning of the last played music.
<Volume Limit>: Allows you to enjoy the music outdoors as clearly as indoors. You can selecteither <On> or <Off>.
On : If you turn on the system again while listening in higher than level 15 (default), the volume willreturn to the default. If you turn on the system again while listening in lower than level 15 (default), itresume playing the music in the last set volume level.
Off : When you turn on the system again, you can listen to the music in the last set volume level.
<FM Region>: You can select your regional area for FM radio. Select from <Others>,<Korea/USA> and <Japan>.
<Default Set> : Returns all settings to the default value. √ Page 77
<About>: You can check the firmware version, memory capacity and track number. Firmware Version : Informs you of the currently used firmware version. Memory : Indicates the remaining capacity of the memory. <Used> indicates the usage, <Remaining>
indicates the remaining capacity and <Total> means the whole capacity of the memory. Track: <Music> indicates the number of music files, <Photo> for the number of photos and <Total> forthe number of entire files.
Settings
Display
Time
Language
System
Default Set
1 Press the [ ] to select <Default Set> and then press
the [ ].
The Default Set menu appears.
2 Press the [ ] to select either <Yes> and then press the [ ]. <Yes> : Initializes all settings to default.
<No> : Cancels default settings.
Settings
Resume
Beep
FM Region
Default Set
About
Frequency range by region- Korea/USA: Search for FM frequencies in 100 kHz players between 87.5 MHz~108.0 MHz.- Japan: Search for FM frequencies in 100 kHz players between 76.0 MHz~108.0 MHz.- Other Countries: Search for FM frequencies in 50 kHz players between 87.50 MHz~108.00 MHz.
FM region can be deleted or changed according to the target region of the player. If you change the FM region, the previously stored radio frequencies are removed.
NOTE

Samsung Electronics 3-7
3. PC Connection
Installing Media Studio Use Media Studio to transfer music files from your PC to the player.
Loading Your Desired File
Before you start! Insert the installation CD provided with the player into the CD-ROM drive.
If Media Studio is not installed automatically Install the program on PCs running Windows 2000 or Windows XP after logging on with the
Administrator account. Please refer to the PC user manual on how to log on with the Administratoraccount.
CAUTION
1 Click <Install now>.
2 Click <NEXT>. An icon is created on the desktop after installation is
complete and Media Studio starts. Media Studio installation starts.
Connecting to your PCLoading Your Desired File
Before you start! Use the USB Cable provided when connecting the product to your PC.
1
1
Connect the USB cable to the USB port ( ) on your PC.
2
2
Connect the other end of the USB cable to the Power/USB Connection Port onbottom of the player. <Connected> appears on the screen display of the player.
For use in conjunction with your PC, the following is required:
Pentium 300MHz or higher USB Port 2.0 Windows 2000/XP DirectX 9.0 or higher 100MB of free hard disc space CD Rom Drive (2X or higher)
PC Requirements
CAUTION
If you connect the player through a USB hub, the connection may be unstable. Please connect theplayer to the computer directly.
Loading Fold/File to Media StudioLoading Your Desired File
Please refer to Help for more information on how to use Media Studio. Click <MENU> <Help> <Help> from the menu on the top of the Media Studio program.
33
2
1 Media Studio will automatically start when the player is connected to your PC. If the program does not start automatically, double Click the Media Studio icon on the desktop.
2 Click or which you want.
Click icon to display music list.
Click icon to display picture list
3 Click <Add Folder> on the bottom of Media Studio. <Load Folder> window is open.
Before you start! Connect the player to your PC. Media Studio must be installed on your PC.
Loading Folder
3 Click <Add File> on the bottom of Media Studio. <Load> window is open.
4 Select the folder to add and click <Open>. The selected folder is added to the list.
Loading File
4
4
4 Select the files to add and click <OK>. The selected files are added to the list.
Loading Auto Scan to Media StudioImporting Music Files
2
Auto Scan
Auto Scan
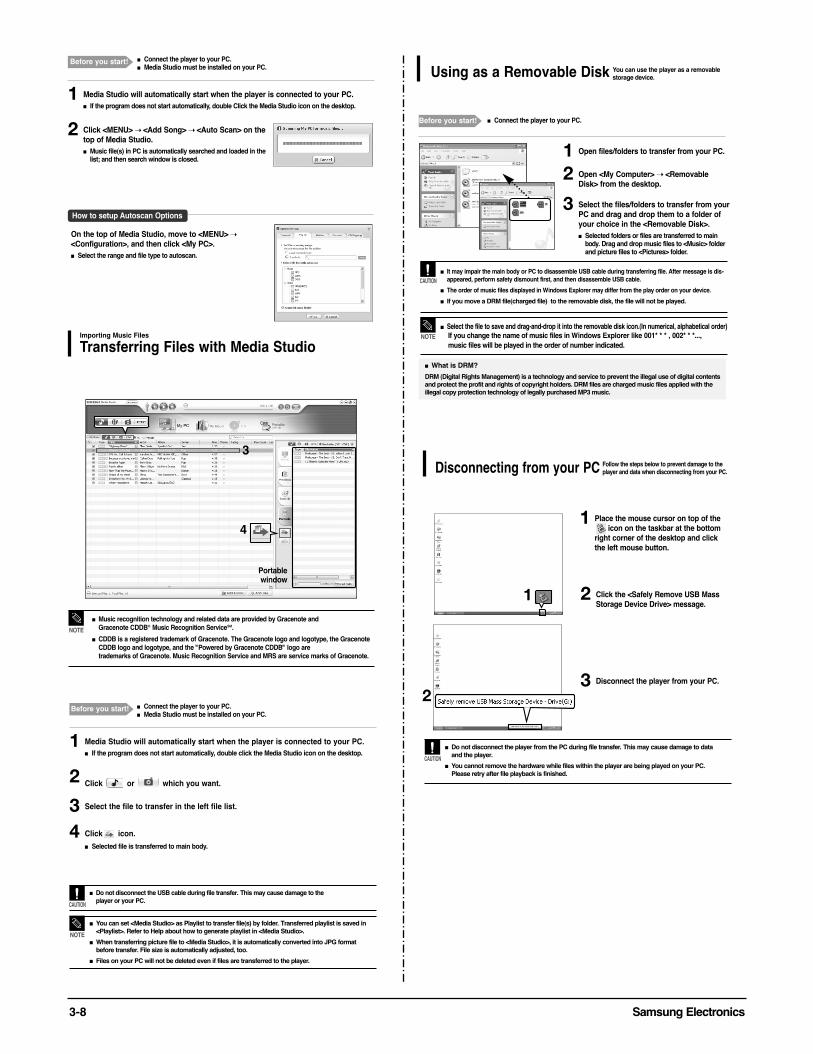
3-8 Samsung Electronics
1 Media Studio will automatically start when the player is connected to your PC. If the program does not start automatically, double Click the Media Studio icon on the desktop.
2 Click <MENU> <Add Song> <Auto Scan> on thetop of Media Studio. Music file(s) in PC is automatically searched and loaded in the
list; and then search window is closed.
On the top of Media Studio, move to <MENU> <Configuration>, and then click <My PC>. Select the range and file type to autoscan.
How to setup Autoscan Options
Before you start! Connect the player to your PC. Media Studio must be installed on your PC.
Transferring Files with Media StudioImporting Music Files
NOTE
Music recognition technology and related data are provided by Gracenote and Gracenote CDDB® Music Recognition ServiceSM.
CDDB is a registered trademark of Gracenote. The Gracenote logo and logotype, the GracenoteCDDB logo and logotype, and the "Powered by Gracenote CDDB" logo are trademarks of Gracenote. Music Recognition Service and MRS are service marks of Gracenote.
4
3
Portable window
1 Media Studio will automatically start when the player is connected to your PC. If the program does not start automatically, double click the Media Studio icon on the desktop.
2 Click or which you want.
3 Select the file to transfer in the left file list.
Do not disconnect the USB cable during file transfer. This may cause damage to the player or your PC.
CAUTION
You can set <Media Studio> as Playlist to transfer file(s) by folder. Transferred playlist is saved in<Playlist>. Refer to Help about how to generate playlist in <Media Studio>.
When transferring picture file to <Media Studio>, it is automatically converted into JPG formatbefore transfer. File size is automatically adjusted, too.
Files on your PC will not be deleted even if files are transferred to the player.
NOTE
4 Click icon.
Selected file is transferred to main body.
Before you start! Connect the player to your PC. Media Studio must be installed on your PC.
Using as a Removable Disk
Before you start! Connect the player to your PC.
1 Open files/folders to transfer from your PC.
2 Open <My Computer> <RemovableDisk> from the desktop.
3 Select the files/folders to transfer from yourPC and drag and drop them to a folder ofyour choice in the <Removable Disk>. Selected folders or files are transferred to main
body. Drag and drop music files to <Music> folderand picture files to <Pictures> folder.
What is DRM?
DRM (Digital Rights Management) is a technology and service to prevent the illegal use of digital contentsand protect the profit and rights of copyright holders. DRM files are charged music files applied with the illegal copy protection technology of legally purchased MP3 music.
You can use the player as a removablestorage device.
It may impair the main body or PC to disassemble USB cable during transferring file. After message is dis-appeared, perform safety dismount first, and then disassemble USB cable.
The order of music files displayed in Windows Explorer may differ from the play order on your device.
If you move a DRM file(charged file) to the removable disk, the file will not be played.
CAUTION
Select the file to save and drag-and-drop it into the removable disk icon.(In numerical, alphabetical order)If you change the name of music files in Windows Explorer like 001* * * , 002* * *..., music files will be played in the order of number indicated.
NOTE
Disconnecting from your PC Follow the steps below to prevent damage to the player and data when disconnecting from your PC.
1 Place the mouse cursor on top of the @ icon on the taskbar at the bottomright corner of the desktop and clickthe left mouse button.
2 Click the <Safely Remove USB MassStorage Device Drive> message.
3 Disconnect the player from your PC.
Do not disconnect the player from the PC during file transfer. This may cause damage to data and the player.
You cannot remove the hardware while files within the player are being played on your PC. Please retry after file playback is finished.
CAUTION
1
2

Samsung Electronics 4-1Samsung Electronics
4. Adjustments
1.How to recover the device

4-2 Samsung Electronics
4-3Samsung Electronics

4-4 Samsung Electronics
4-5Samsung Electronics
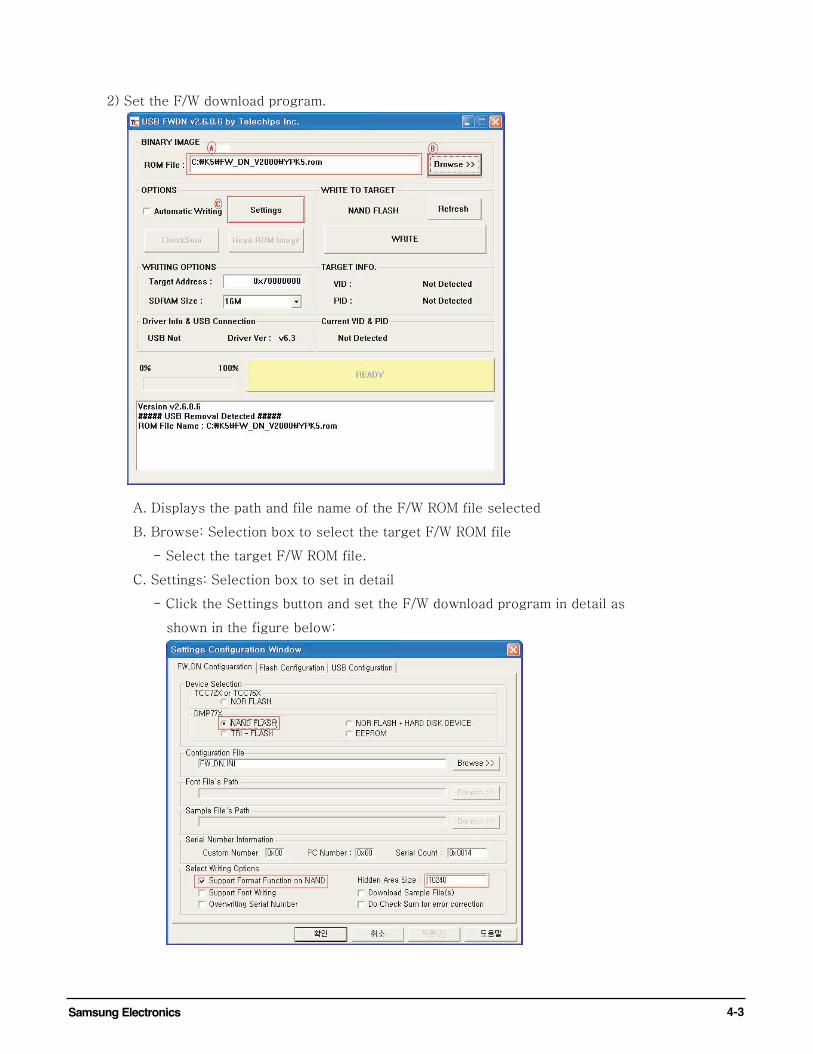
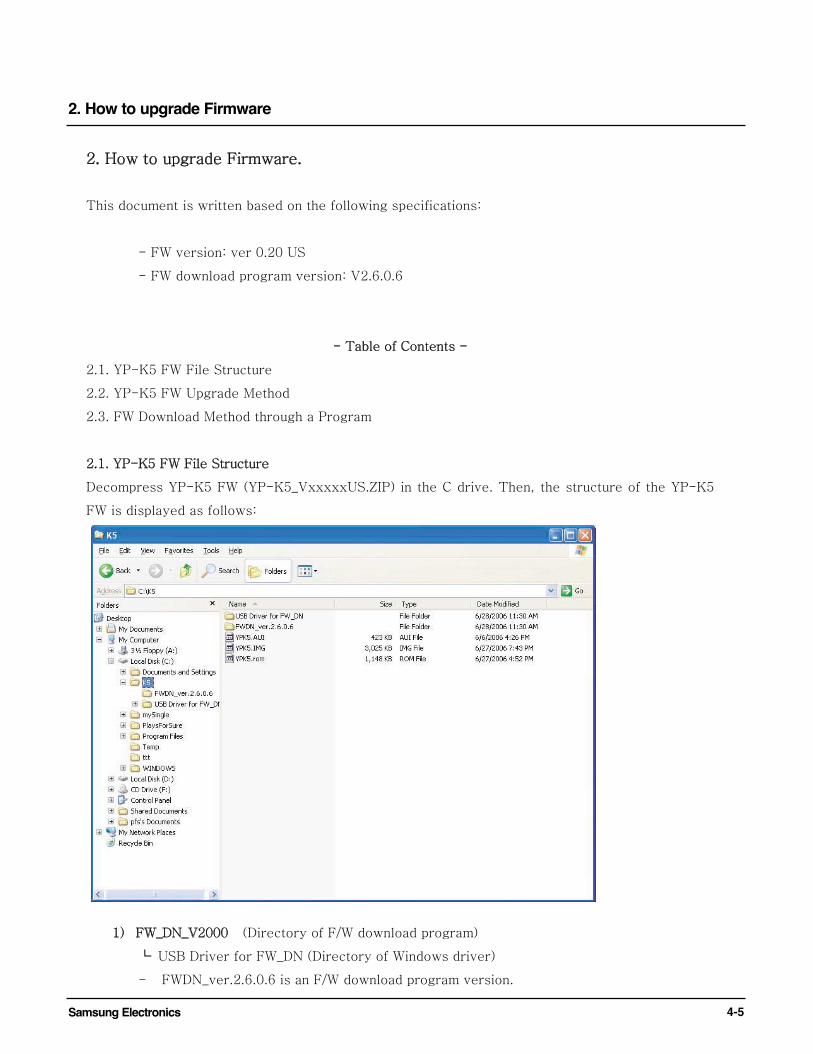
2. How to upgrade Firmware

4-6 Samsung Electronics

4-7Samsung Electronics

4-8 Samsung Electronics

4-9Samsung Electronics

4-10 Samsung Electronics

4-11Samsung Electronics

5. How to disassemble
5-1 Samsung Electronics
Order(Description) Picture
PHOTO BEFORE DISASSEMBLE
DISASSEMBLE 2 SHEET-BOTTOM FROM THE CABINET-D
UNSCREW 4 SCREW FROM THE CABINET-D
DISASSEMBLE COVER-SPEAKER FROM THE CABINET-C
DISASSEMBLE ASS'y CABINET-TOP FROM THEASS'y CABINET-BOTTOM
DISASSEMBLE FPCB-BATTERY FROM THE CONNECTOR OF PCB-SPEAKER

Samsung Electronics 5-2
Order(Description) Picture
UNSCREW 4 SCREW FROM THE CABINET-B
DISASSEMBLE HINGE FROM THE ASS'y CABINET-TOP
UNSCREW 2 SCREW FROM THE CABINET-B
UNSCREW 4 SCREW FROM THE CABINET-B
DISASSEMBLE ASS'y CABINET-A FROM THE CABINET-B
DISASSEMBLE PCB-MAIN FROM THE ASS'y CABINET-A
5-3 Samsung Electronics
Order(Description) Picture
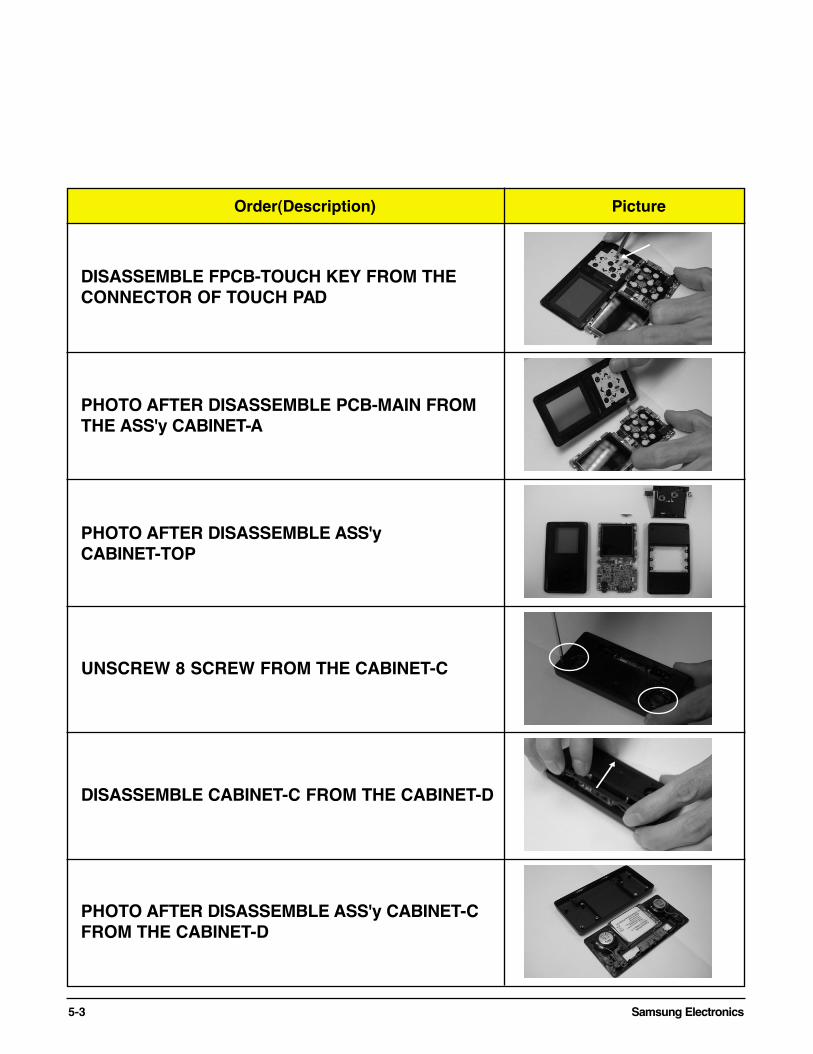
DISASSEMBLE FPCB-TOUCH KEY FROM THECONNECTOR OF TOUCH PAD
PHOTO AFTER DISASSEMBLE PCB-MAIN FROMTHE ASS'y CABINET-A
PHOTO AFTER DISASSEMBLE ASS'y CABINET-TOP
UNSCREW 8 SCREW FROM THE CABINET-C
DISASSEMBLE CABINET-C FROM THE CABINET-D
PHOTO AFTER DISASSEMBLE ASS'y CABINET-CFROM THE CABINET-D

Samsung Electronics 5-4
Order(Description) Picture
UNSCREW A SCREW FROM THE ASS'y CABINET-C
PULL 2 SPEAKERS OUT OF THE ASS'y CABINET-C
REMOVE A BATTERY WIRE AND 2 SPEAKERSWIRE FROM THE CONNECTOR OF PCB-SUB
PHOTO AFTER DISASSEMBLE PCB-SUB, 2 SPEAKERS, 2 RUBBER-SPEAKER ANDBATTERY FROM THE CABINET-C
PHOTO AFTER DISASSEMBLE ASS'y CABINET-BOTTOM
PHOTO AFTER DISASSEMBLE YP-K5
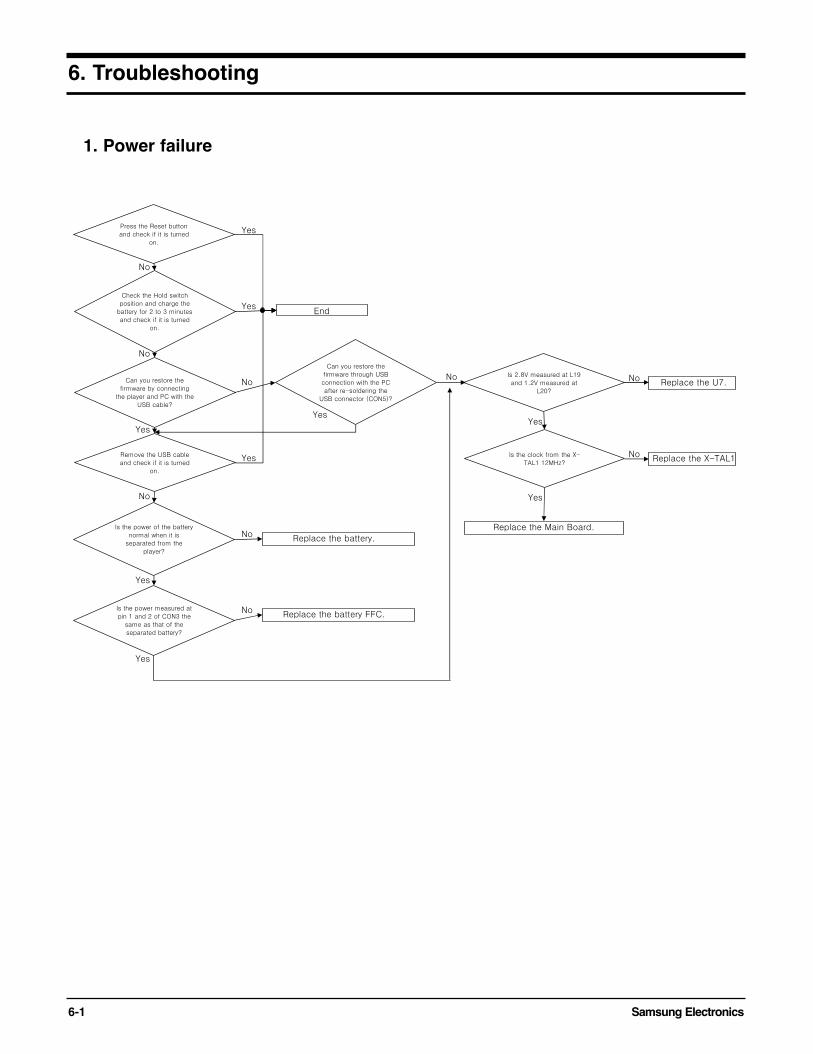
6. Troubleshooting
1. Power failure
Samsung Electronics6-1

2. When you cannot hear through the earphones
6-2Samsung Electronics

3. When you cannot hear through the built-in speaker
Samsung Electronics6-3

6-4Samsung Electronics
4. When the Touch Pad does not work properly

6-5 Samsung Electronics
5. When you cannot connect the player to the PC

Samsung Electronics 7-1
7.Exploded View & Parts List
1. Total Exploded View
AA260 AL197 AC001
AK290
AC002 AA135
AS062 AC004 AR087 AA004 AC304

7-2 Samsung Electronics
Part No. Description; Specification Q’TY
AA002 AH64-04106A CABINET-B;YP-K5,Mg,1.0,47.5,98,-,-,CASTI 1
AA004 AH97-01743A ASSY-CABINET,C;-,YP-K5,- 1
AA135 AH97-01740A ASSY-HINGE;-,YP-K5,- 1
AA260 AH97-01772A ASSY-WINDOW;ACRYL + PORON 0.5T,YP-K5,- 1
AB035 4302-001209 BATTERY-POLYMER;3.7V,830mAH,-,810,4.2V,8 1
AC001 AH64-04105A CABINET-A;YP-K5,AL,0.4,47.5,98,-,-,anodi 1
AC004 AH64-04108A CABINET-D;YP-K5,Mg,1.0,46.3,96.8,-,-,CAS 1
AC304 AH63-01251A COVER-SPK;YP-K5,SUS,0.3,39.1,88,-,-,-,Cr 1
AK290 AH64-04110A KNOB-POWER;YP-K5,ABS+PC,-,-,-,-,-,-,Cr P 1
AL197 AH67-00444A LENS-TOUCH;YP-K5,ACRYL+PC,MILKY+WHT,-,-, 1
AS062 AH63-01254A SHEET-BOTTOM;YP-K5,PC,0.3,10.1,58.3,BLAC 2
2. Parts List
LocationNo
- - This paThis pagge ince includes parludes par ts contents that serts contents that service is avice is avvailabailable - le -
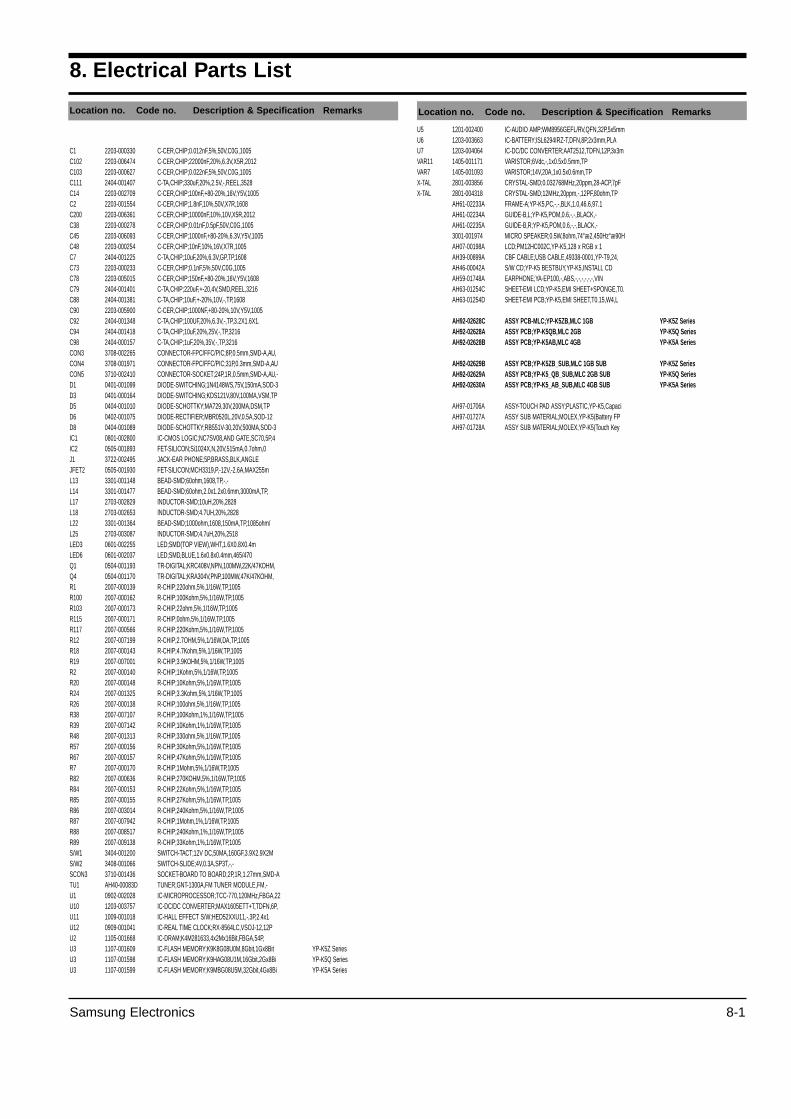
Samsung Electronics 8-1
C1 2203-000330 C-CER,CHIP;0.012nF,5%,50V,C0G,1005C102 2203-006474 C-CER,CHIP;22000nF,20%,6.3V,X5R,2012C103 2203-000627 C-CER,CHIP;0.022nF,5%,50V,C0G,1005C111 2404-001407 C-TA,CHIP;330uF,20%,2.5V,-,REEL,3528C14 2203-002709 C-CER,CHIP;100nF,+80-20%,16V,Y5V,1005C2 2203-001554 C-CER,CHIP;1.8nF,10%,50V,X7R,1608C200 2203-006361 C-CER,CHIP;10000nF,10%,10V,X5R,2012C38 2203-000278 C-CER,CHIP;0.01nF,0.5pF,50V,C0G,1005C45 2203-006093 C-CER,CHIP;1000nF,+80-20%,6.3V,Y5V,1005C48 2203-000254 C-CER,CHIP;10nF,10%,16V,X7R,1005C7 2404-001225 C-TA,CHIP;10uF,20%,6.3V,GP,TP,1608C73 2203-000233 C-CER,CHIP;0.1nF,5%,50V,C0G,1005C78 2203-005015 C-CER,CHIP;150nF,+80-20%,16V,Y5V,1608C79 2404-001401 C-TA,CHIP;220uF,+-20,4V,SMD,REEL,3216C88 2404-001381 C-TA,CHIP;10uF,+-20%,10V,-,TP,1608C90 2203-005900 C-CER,CHIP;1000NF,+80-20%,10V,Y5V,1005C92 2404-001348 C-TA,CHIP;100UF,20%,6.3V,-,TP,3.2X1.6X1.C94 2404-001418 C-TA,CHIP;10uF,20%,25V,-,TP,3216C98 2404-000157 C-TA,CHIP;1uF,20%,35V,-,TP,3216CON3 3708-002265 CONNECTOR-FPC/FFC/PIC;8P,0.5mm,SMD-A,AU,CON4 3708-001971 CONNECTOR-FPC/FFC/PIC;31P,0.3mm,SMD-A,AUCON5 3710-002410 CONNECTOR-SOCKET;24P,1R,0.5mm,SMD-A,AU,-D1 0401-001099 DIODE-SWITCHING;1N4148WS,75V,150mA,SOD-3D3 0401-000164 DIODE-SWITCHING;KDS121V,80V,100MA,VSM,TPD5 0404-001010 DIODE-SCHOTTKY;MA729,30V,200MA,DSM,TPD6 0402-001075 DIODE-RECTIFIER;MBR0520L,20V,0.5A,SOD-12D8 0404-001089 DIODE-SCHOTTKY;RB551V-30,20V,500MA,SOD-3IC1 0801-002800 IC-CMOS LOGIC;NC7SV08,AND GATE,SC70,5P,4IC2 0505-001893 FET-SILICON;Si1024X,N,20V,515mA,0.7ohm,0J1 3722-002495 JACK-EAR PHONE;5P,BRASS,BLK,ANGLEJFET2 0505-001930 FET-SILICON;MCH3319,P,-12V,-2.6A,MAX255mL13 3301-001148 BEAD-SMD;60ohm,1608,TP,-,-L14 3301-001477 BEAD-SMD;60ohm,2.0x1.2x0.6mm,3000mA,TP,L17 2703-002829 INDUCTOR-SMD;10uH,20%,2828L18 2703-002653 INDUCTOR-SMD;4.7UH,20%,2828L22 3301-001364 BEAD-SMD;1000ohm,1608,150mA,TP,1085ohm/L25 2703-003087 INDUCTOR-SMD;4.7uH,20%,2518LED3 0601-002255 LED;SMD(TOP VIEW),WHT,1.6X0.8X0.4mLED6 0601-002037 LED;SMD,BLUE,1.6x0.8x0.4mm,465/470Q1 0504-001193 TR-DIGITAL;KRC408V,NPN,100MW,22K/47KOHM,Q4 0504-001170 TR-DIGITAL;KRA304V,PNP,100MW,47K/47KOHM,R1 2007-000139 R-CHIP;220ohm,5%,1/16W,TP,1005R100 2007-000162 R-CHIP;100Kohm,5%,1/16W,TP,1005R103 2007-000173 R-CHIP;22ohm,5%,1/16W,TP,1005R115 2007-000171 R-CHIP;0ohm,5%,1/16W,TP,1005R117 2007-000566 R-CHIP;220Kohm,5%,1/16W,TP,1005R12 2007-007199 R-CHIP;2.7OHM,5%,1/16W,DA,TP,1005R18 2007-000143 R-CHIP;4.7Kohm,5%,1/16W,TP,1005R19 2007-007001 R-CHIP;3.9KOHM,5%,1/16W,TP,1005R2 2007-000140 R-CHIP;1Kohm,5%,1/16W,TP,1005R20 2007-000148 R-CHIP;10Kohm,5%,1/16W,TP,1005R24 2007-001325 R-CHIP;3.3Kohm,5%,1/16W,TP,1005R26 2007-000138 R-CHIP;100ohm,5%,1/16W,TP,1005R38 2007-007107 R-CHIP;100Kohm,1%,1/16W,TP,1005R39 2007-007142 R-CHIP;10Kohm,1%,1/16W,TP,1005R48 2007-001313 R-CHIP;330ohm,5%,1/16W,TP,1005R57 2007-000156 R-CHIP;30Kohm,5%,1/16W,TP,1005R67 2007-000157 R-CHIP;47Kohm,5%,1/16W,TP,1005R7 2007-000170 R-CHIP;1Mohm,5%,1/16W,TP,1005R82 2007-000636 R-CHIP;270KOHM,5%,1/16W,TP,1005R84 2007-000153 R-CHIP;22Kohm,5%,1/16W,TP,1005R85 2007-000155 R-CHIP;27Kohm,5%,1/16W,TP,1005R86 2007-003014 R-CHIP;240Kohm,5%,1/16W,TP,1005R87 2007-007942 R-CHIP;1Mohm,1%,1/16W,TP,1005R88 2007-008517 R-CHIP;240Kohm,1%,1/16W,TP,1005R89 2007-009138 R-CHIP;33Kohm,1%,1/16W,TP,1005S/W1 3404-001200 SWITCH-TACT;12V DC,50MA,160GF,3.9X2.9X2MS/W2 3408-001066 SWITCH-SLIDE;4V,0.3A,SP3T,-,-SCON3 3710-001436 SOCKET-BOARD TO BOARD;2P,1R,1.27mm,SMD-ATU1 AH40-00083D TUNER;GNT-1300A,FM TUNER MODULE,FM,-U1 0902-002028 IC-MICROPROCESSOR;TCC-770,120MHz,FBGA,22U10 1203-003757 IC-DC/DC CONVERTER;MAX1605ETT+T,TDFN,6P,U11 1009-001018 IC-HALL EFFECT S/W;HED52XXU11,-,3P,2.4x1U12 0909-001041 IC-REAL TIME CLOCK;RX-8564LC,VSOJ-12,12PU2 1105-001668 IC-DRAM;K4M281633,4x2Mx16Bit,FBGA,54P,U3 1107-001609 IC-FLASH MEMORY;K9K8G08U0M,8Gbit,1Gx8Bit YP-K5Z SeriesU3 1107-001598 IC-FLASH MEMORY;K9HAG08U1M,16Gbit,2Gx8Bi YP-K5Q SeriesU3 1107-001599 IC-FLASH MEMORY;K9MBG08U5M,32Gbit,4Gx8Bi YP-K5A Series
U5 1201-002400 IC-AUDIO AMP;WM8956GEFL/RV,QFN,32P,5x5mmU6 1203-003663 IC-BATTERY;ISL6294IRZ-T,DFN,8P,2x3mm,PLAU7 1203-004064 IC-DC/DC CONVERTER;AAT2512,TDFN,12P,3x3mVAR11 1405-001171 VARISTOR;6Vdc,-,1x0.5x0.5mm,TPVAR7 1405-001093 VARISTOR;14V,20A,1x0.5x0.6mm,TPX-TAL 2801-003856 CRYSTAL-SMD;0.032768MHz,20ppm,28-ACP,7pFX-TAL 2801-004318 CRYSTAL-SMD;12MHz,20ppm,-,12PF,80ohm,TP
AH61-02233A FRAME-A;YP-K5,PC,-,-,BLK,1.0,46.6,97.1AH61-02234A GUIDE-B,L;YP-K5,POM,0.6,-,-,BLACK,-AH61-02235A GUIDE-B,R;YP-K5,POM,0.6,-,-,BLACK,-3001-001974 MICRO SPEAKER;0.5W,8ohm,74°æ2,450Hz°æ90HAH07-00198A LCD;PM12HC002C,YP-K5,128 x RGB x 1AH39-00899A CBF CABLE;USB CABLE,49338-0001,YP-T9,24,AH46-00042A S/W CD;YP-K5 BESTBUY,YP-K5,INSTALL CDAH59-01748A EARPHONE;YA-EP100,-,ABS,-,-,-,-,-,-,VINAH63-01254C SHEET-EMI LCD;YP-K5,EMI SHEET+SPONGE,T0.AH63-01254D SHEET-EMI PCB;YP-K5,EMI SHEET,T0.15,W4,L
AH92-02628C ASSY PCB-MLC;YP-K5ZB,MLC 1GB YP-K5Z SeriesAH92-02628A ASSY PCB;YP-K5QB,MLC 2GB YP-K5Q SeriesAH92-02628B ASSY PCB;YP-K5AB,MLC 4GB YP-K5A Series
AH92-02629B ASSY PCB;YP-K5ZB_SUB,MLC 1GB SUB YP-K5Z SeriesAH92-02629A ASSY PCB;YP-K5_QB_SUB,MLC 2GB SUB YP-K5Q SeriesAH92-02630A ASSY PCB;YP-K5_AB_SUB,MLC 4GB SUB YP-K5A Series
AH97-01706A ASSY-TOUCH PAD ASSY;PLASTIC,YP-K5,CapaciAH97-01727A ASSY SUB MATERIAL;MOLEX,YP-K5(Battery FPAH97-01728A ASSY SUB MATERIAL;MOLEX,YP-K5(Touch Key
Location no. Code no. Description & Specification Remarks Location no. Code no. Description & Specification Remarks
8. Electrical Parts List

9-1 Samsung Electronics
9. BLOCK DIAGRAM
9. BLOCK DIAGRAM
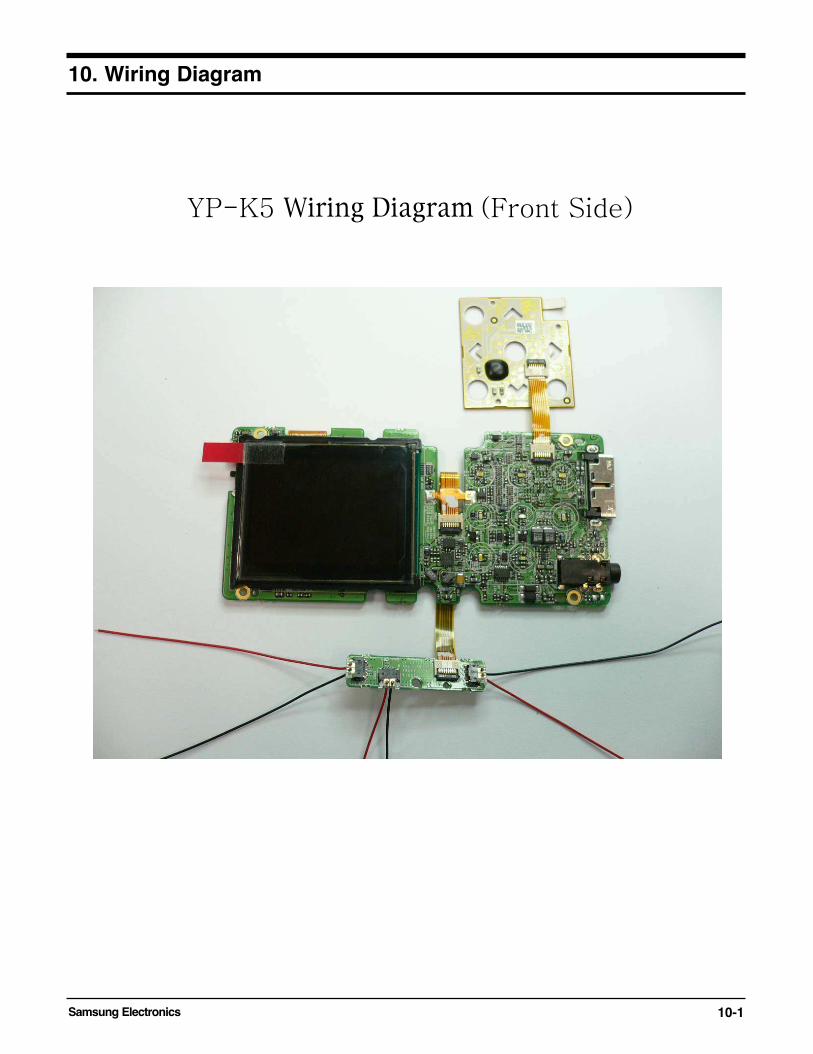
Samsung Electronics 10-1
10. Wiring Diagram

10-2 Samsung Electronics

10-3Samsung Electronics
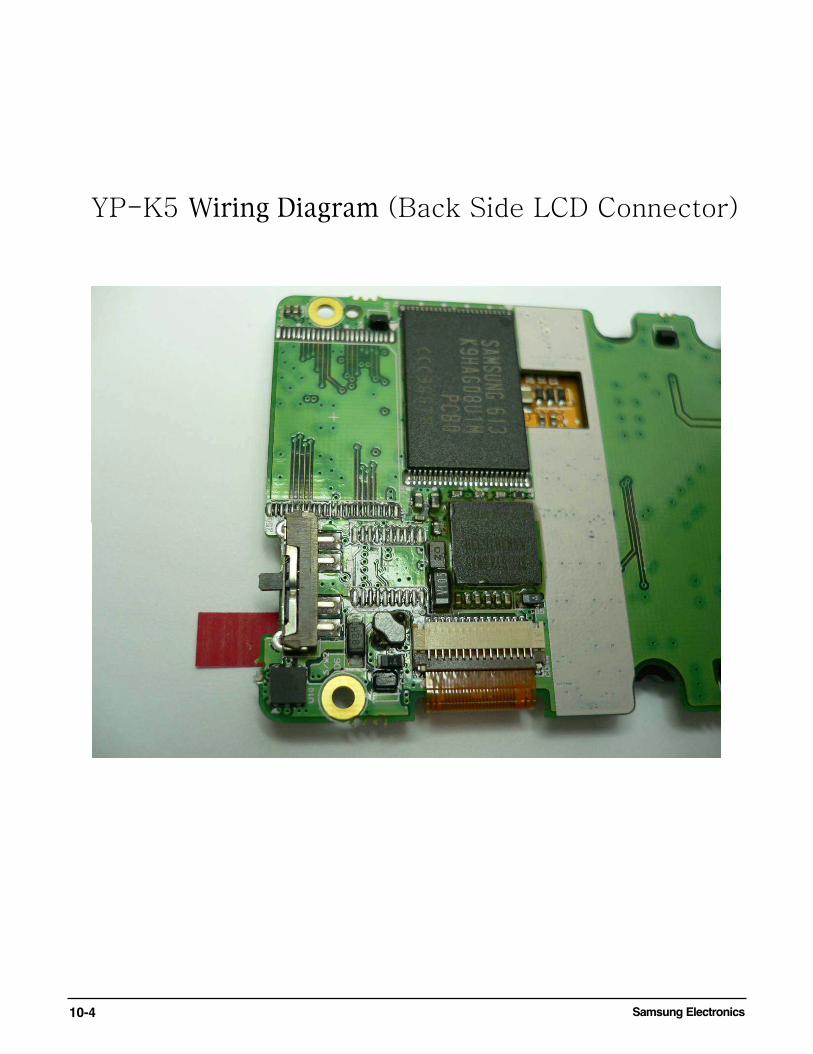
10-4 Samsung Electronics

Samsung Electronics 11-1
11. PCB Diagram

Samsung Electronics
- This Document can not be used without Samsung’s authorization -
12-1
12. Schematic Diagram
1-1. MAIN
1. MICOM

Samsung Electronics12-2
2. MEMORY
12-3Samsung Electronics
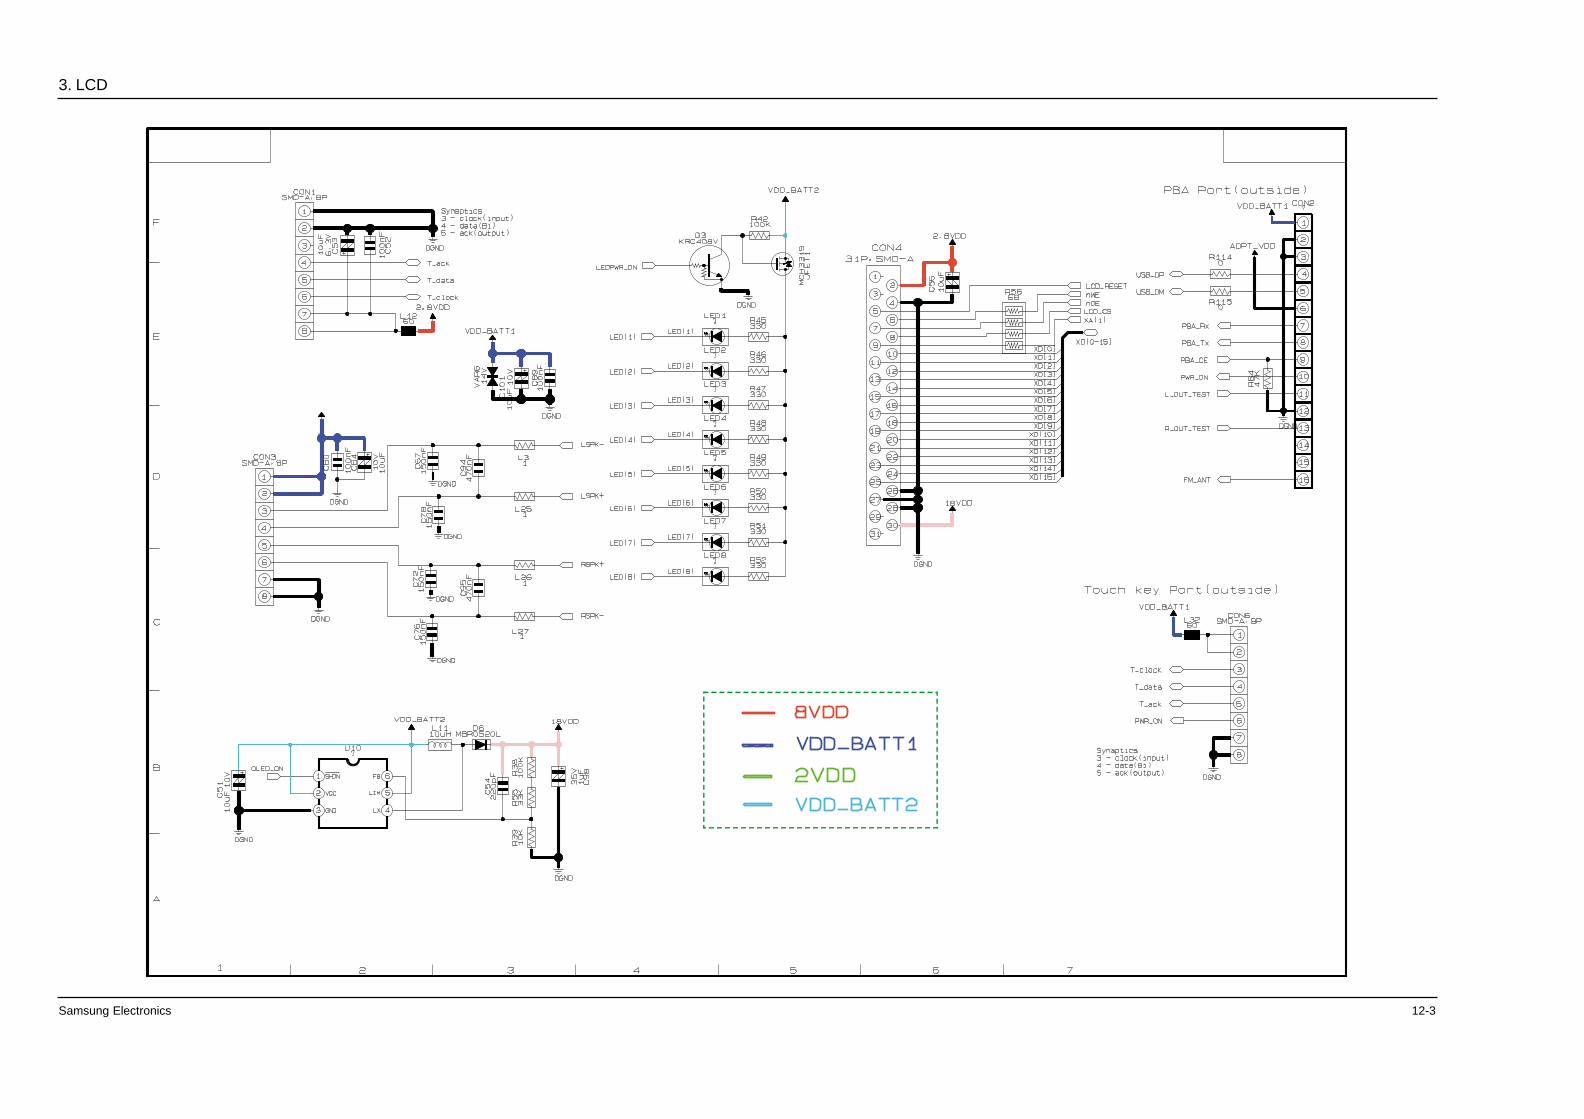
3. LCD

Samsung Electronics12-4
4. USB

12-5Samsung Electronics
5. AUDIO CODE
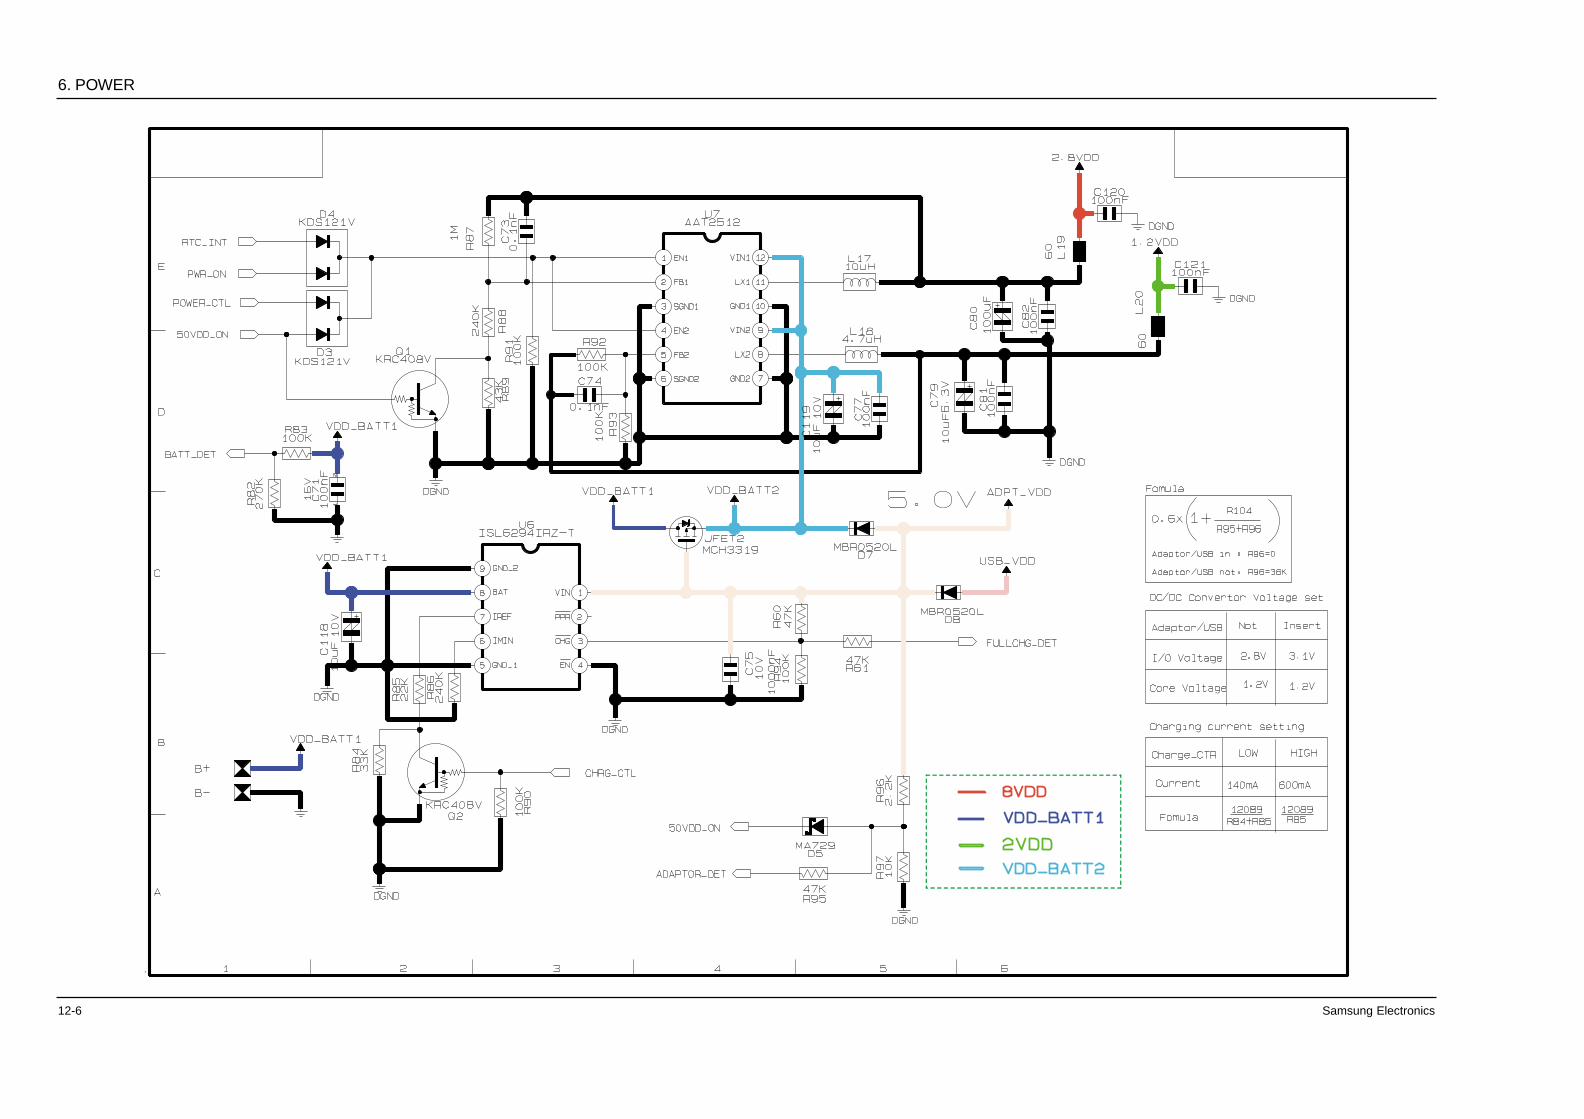
Samsung Electronics12-6
6. POWER

12-7Samsung Electronics
7. FM
12-8 Samsung Electronics
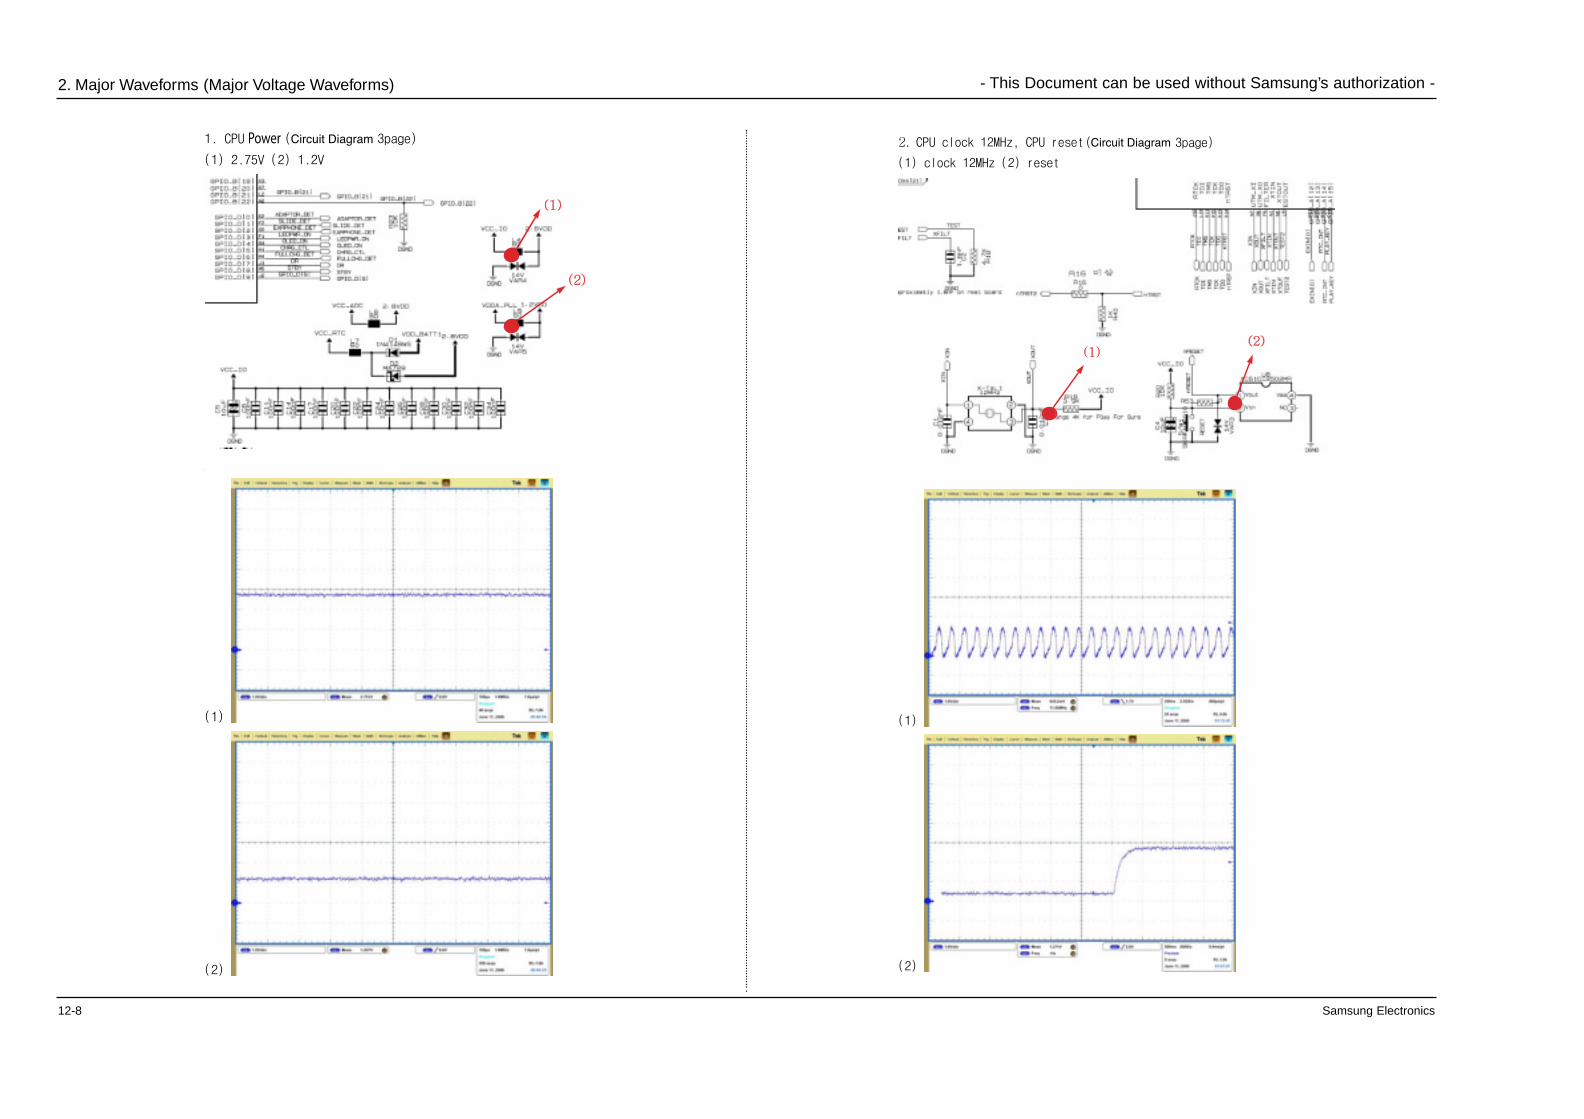
2. Major Waveforms (Major Voltage Waveforms) - This Document can be used without Samsung’s authorization -

Samsung Electronics 12-9
When you touch the Touch Pad

12-10 Samsung Electronics
It may differ depending on the battery voltage.
It may differ depending on the tune.

Samsung Electronics 12-11
Open, Landscape View
Close, Portrait View

12-12 Samsung Electronics

Samsung Electronics 13-1
13. Circuit Board Description
1. CPU Block
2. SDRAM
3. NAND Flash

13-2 Samsung Electronics
9. PBA Port
Samsung Electronics 13-3

13-4 Samsung Electronics

Samsung Electronics 13-5
2.Main Functions by Block
1. CPU BlockControls all the operations of YP-K5.
2. SDRAM3. NAND Flash
To use a Stack NAND flash memory, attach U9 and remove R27 and R28.4. Touch Pad FFC Connector
Connects the YP-K5 Touch Pad.5. Battery/Speaker FFC Connector
Connects the YP-K5 battery and speaker.6. LED
Lights the LED of the currently available touch button.7. OLED LCD Connector
Enables power connection and data transition for the OLED LCD.8. Change Pump (for OLED)
Supplies 18V power for OLED operation.9. PBA Port
The port used by the auto-examiner when YP-K5 is manufactured in a mass production facility.10. 24-Pin Connector
Used for USB connection of YP-K5. When an adapter is connected, the connection through this connector is used for power supply and data communication.
11. Hall SensorSwitches audio output to earphones or speakers according to whether the YP-K5 slide is open or closed.By detecting the magnetic field of the YP-K5 built-in speaker, it outputs audio to the earphones
when the slide is closed, and when the slide is open, to the built-in speaker.12. Logic IC (And Gate)
Used to forcibly upgrade YP-K5 firmware.Connect the YP-K5 with the USB cable, slide and hold the Power switch to the On position, and press the Reset button to start a forcible upgrade of the YP-K5 firmware.
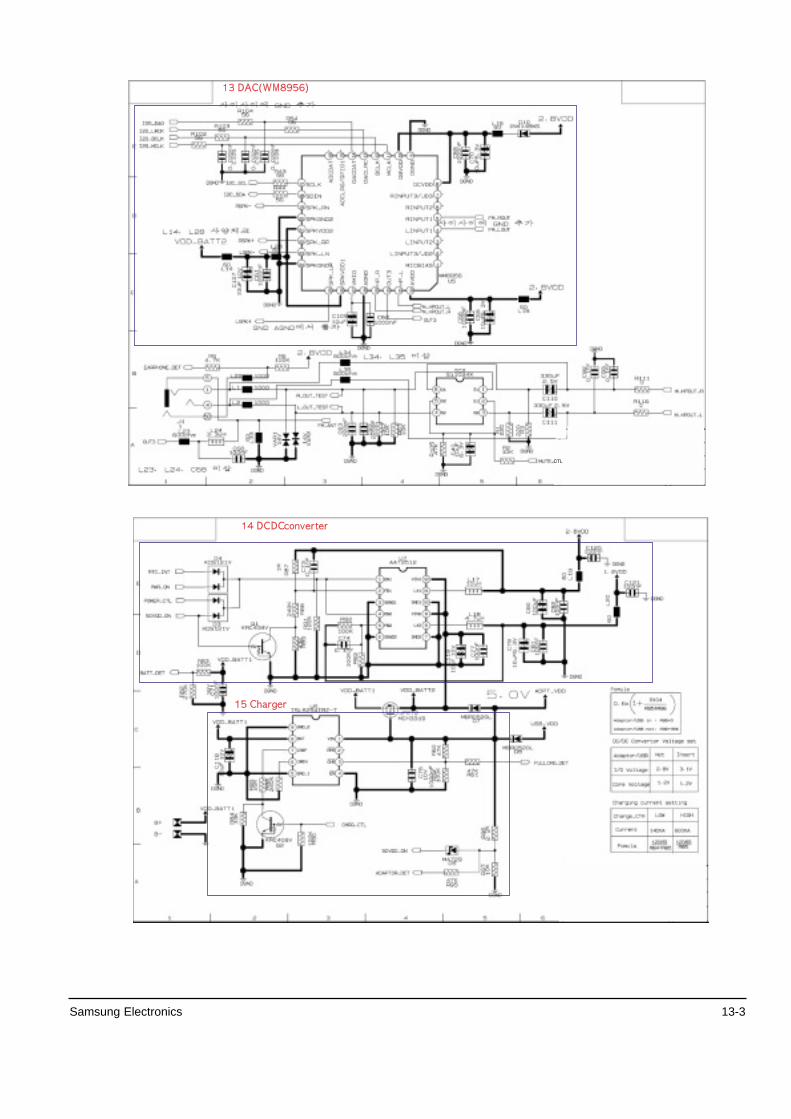
13. DAC (WM8956)Converts the I2S (digital audio data) from the CPU and outputs to the earphones or built-in speaker.Controlled by the CPU through I2C communication.
14. DCDC ConverterThe regulator that generates the main power - 2.8V and 1.2V – for the YP-K5.
15. ChargerCharges the YP-K5’s built-in battery through an external adapter or PC USB cable.The charging current from the external adapter is approximately 600mA and the currentfrom the PC USB cable is approximately 200mA. This is controlled by the CPU through GPIO.
16. FM Module (GNT – 1300A)The YP-K5 FM output module.It receives FM radio signals, and sends FM audio signals to the DAC so that sound is generated by the earphones or speaker.Controlled by the CPU through I2C communication.
17. RTCSupplies clock to the FM module.Controls the YP-K5 alarm operation.

Samsung Electronics 14-1
Terms and Overview
AV Conversion: process of converting Analog Data to Digital DataSAMPLING RATE : means precision rate of A/D conversion and is indicated in Hz, bit number and
channel number(for CD: 44.1 KHz, 16bit, 2channels)ENCODING : process of compressing and converting digital data obtained through A/D conversion
to audio format Compression rate: indicated in bps(bit per second)
(For MP3: sound quality of CD level with compression rate of 128kbps) ENCODING FORMAT : MP3 : MPEG Layer3
AAC : MPEG-2 AACWMA : Windows Media Audio (Microsoft)ATRAC(3) : Adaptive TRansform Acoustic Coding (SONY)EPAC : Enhanced Perceptual Audio Coder (Luscent Technology)OGG : Ogg Vorbis
DECODING : Process of recovering the digital data encoded to the data before encoding D/A : Process of converting Digital Data to Analog Data
14. Basic Information of MP3
1-1. Operating Principle of yepp

14-2 Samsung Electronics
Yepp Block Diagram

Samsung Electronics 14-3
Yepp Vocabulary
Yepp (Young Energetic Personal Passinate)MP3 player that enables you to enjoy audio data like music file in existing CD in high quality bycompressing it to 1/12 level without loss of quality using MPEG1 Layer3(audio compression technology of animation and sound compression technique). You can also use it for learning foreignlanguage and Internet broadcasting.
MPEGMPEG is an abbreviation of Moving Picture Expert Group and means specification defining thecompression and de-compression type of animation by MPEG established in 1988.
MP3MP3 means MPEG1 Layer3 and compression rate can be up to 96:1(phone) to 12:1(CD) dependingon sound quality with compression coding technique of audio of MPEG technology.(file extension: "mp3") That is, up to 150 pieces of songs can be recorded in one copy of CD withMP3 compression.
FLASH MemoryFlash memory is the memory chip where entered information will not be deleted even if the power isturned off while data is entered, and data can be freely entered or deleted.
Smart Media CardCompact and light semiconductor media card in dimension of 45.1 x 37.1 x 0.76mm and weight of2.0g. It is used as a storage of portable device and high quality media storage device of digital camera and music MP3 player.Flash memory is embedded to store the data even if the power is turned off and it is a super-highspeed product that can record up to 250 characters per second.(mass production of 8MB, 16MB,32MB currently at Samsung Electronics)
OTP (Once Time Programmable)OTP is one type of micro controller(MCU) and is the customer-oriented semi-conductor on whichthe customers can directly record the program. OTP type MCU is rapidly growing as its life cycle ofset product and multi-kind/small quantity production system is introduced. Since existing type of micro controller uses Mask ROM which cannot be played or recorded again, itrequires over 5 months to develop set products, and it is not suitable for products with rapid changeof product model.
FirmwareIt is a program that controls and manages hardware. Firmware is distinguished from hardware inthat it is a program but is distinguished from general applications in that it is closely related to hardware. In general, firmware is saved in ROM.
14-4 Samsung Electronics
IP (Information Provider)Company that provides information that users want through communication system with certain fee.
SecuMAXAs multimedia digital contents distributions become active in networks such as Internet and PCcommunication, copyright issue has appeared as an important topic. It is a system that can protectthe right of copyright holders and enables the user to conveniently use contents. To receive service,member registration is required at digital contents service site adopting SecuMAX.When completing member registration, customer ID, password and resident registration number willbe registered at SecuMAX server and utilized as a basic data for performing user certification role.After registration, download the dedicated player and decryption key to use service.Music drive developed by Samsung Electronics is embedded with SecuMAX decryption module.Decryption key will be registered during installation of music drive. Music file downloaded from digi-tal contents music service site with SecuMAX can be played back.
Yepp ExplorerThis software controls yepp player in PC. You can move or delete music list or voice saved in yeppcard or embedded memory. This software is required to use yepp.
Music DriveSoftware audio player for PC embedded with MPEG II AAC Decoder first in Korea. It supports notonly playback of MPEG audio format as well as SecuMAX, encryption protection system.
CD RipperMP3 compression software that converts CD music in PC to MP3 file.
OGG (Ogg Vorbis)OGG(Ogg Vorbis) is featured to have "higher compression rate than MP3', 'higher quality thanMP3', 'no limit in use, distribution and development due to open source type. The biggest feature ofOgg Vorbis is that it has no limit in use of format itself. The biggest feature that distinguishes Ogg Vorbis from existing music file is that it supports VBR(Variable Bit Rate) by default. Of course, MP3 also supports VBR format, but has effect of reducing capacity due to VBR based onexisting MP3. Ogg Vorbis file supports VBR by default and helps you enjoy high quality music without loss due to big width of bit rate.

Samsung Electronics 14-5
MP3 is one of file extension like .hwp, .wav, .txt used in computer.
Exactly, it is the abbreviation of MPEG Audio Layer-3.
Origin of MP3
MPEG is Motion Pictures Expert Group and is a standard made by experts in this area under inter-national standard organization like ISO(International Standard Organization) and IEC(InternationalElectric Committee). It is technical standard of compressing and transmitting video and audio sig-nals and recovering them again.
The first specification that MPEG made is MPEG-1 in 1988. It is the technology used to producevideo CD. MP3 means the audio compression part among specification of MPEG-1(1995). MPEG-2is used together with MPEG-1. AAC(Advanced Audio Coding or MP4) receives attention with itsexcellent digital audio and is derived from MPEG-2. MPEG-4(lastests standard on movie compres-sion for conference communication) is being established.
MP3 is most widely used and called "MPEG Audio Layer-3", which is version up from Layer-1 andLayer-2. In general, it is called MP3 since Layer-1 has compression rate of 1:4, Layer-2 of 1:61:8,Layer-3 of 1:101:12.
Using MP3 technology, up to 100 songs(7 hours) can be contained in one copy of empty CD of650MB.
Transition of Portable Player
1-2. MP3 Overview

14-6 Samsung Electronics
MP3
MP3 is most widely used and called "MPEG Audio Layer-3", which is version up from Layer-1 andLayer-2. In general, it is called MP3 since Layer-1 has compression rate of 1:4, Layer-2 of 1:61:8,Layer-3 of 1:101:12.
AAC
MP3 is most widely used and called "MPEG Audio Layer-3", which is version upfrom Layer-1 and Layer-2. In general, it is called MP3 since Layer-1 has compression rate of 1:4, Layer-2 of 1:61:8, Layer-3 of 1:101:12.
WMA (Windows Media Audio)
Multimedia compression type of Microsoft. Only music data is compressed from“WMT”. Streaming and file format also support this data. In a same quality as MP3,it is about 1/2 size and contains Windows Media Rights Manager with copyrightprotection technology. It can be played back with [Media Player] provided inWindows98.
ATRAC3
Sound compression type of MD and latest specification of [ATRAC (AdaptiveTRansform Acoustic Coding)] developed by SONY. Has about 2 compression ratethan existing ATRAC.
Real Audio G2
Format type developed by Real Network. High quality can be obtained at low trans-mission speed of 16Kbps-32Kbps using [RealAUDIO G2 Music Codec] as com-pression type. Since streaming play in Internet radio is the main purpose, file doesnot contain copyright protection technology. “Real Player G2” supports MP3 play-back and “Real Juke Box” supports encoding from CD to MP3.
1-3. Understanding of Digital Audio Format

Samsung Electronics 14-7
Tips
How MP3 can produce same quality as CD?Ears of human can listen to signal in the range of 20Hz~20KHz. It is called "audible frequency". Toconvey the audible sound in digital type CD, sampling frequency of 44.1KHz, about 2 times of audi-ble frequency, should be used. It is the task of dividing sound signal to 44,100 pieces per secondand making the signal to digital format of 0 and 1. How delicately the sample can be expressed willbe determined by number of bit per sample. Audio CD is 16 bit. It means that 1 sample can beexpressed in 65,536(16 square of 2) stage.
When converting CD music to WAV file, the capacity is about 40MB(for 4 minutes). By converting itto MP3, it reduces to 4MB since "loss compression", the feature of MP3, is used. Loss compressiontype removes the sound beyond the range of audible frequency(20Hz~20KHz). It uses the featuresthat small sound cannot be heard after very strong sound. <Figure 1> is the sound wave beforeloss compression. It can be regarded as the sound wave of music CD or cassette tape containingsound people cannot listen. When it is made into MP3, it is as shown in <Fig.2>.
Volume Control
Capacity can be reduced much by adjusting the degreeof loss. However, it causes deterioration of sound qual-ity. Music CD contains sound made with 16 bit44.1KHz of stereo sampling. Stereo is the type of divid-ing the sound into left and right. CD should changeanalog sound to digital.
Digital information is cut between sections and location information is saved in each section."Sampling rate" is the standard of how many sub-section it will divide 1section. Divided frequencypart is called 8 bit and 16 bit. 8 bit sampling means that frequency is divided into 2 stage, that is,sound pitch of 256 stage. 16 bit sampling divides into 65,536 sound pitch. In addition, 44.1KHzmeans sampling of 44,100 times per second. To reduce the amount of information made at digital,sampling bit number and frequency should be set low, but it will cause deterioration of sound quali-ty. There is no difference in sound quality between MP3 and CD since encoding(converting CDtrack to MP3) is done with 44.1KHz at 16 bit. Better CD sound quality cannot be obtained by lower-ing the sampling rate, but the capacity can be reduced.

14-8 Samsung Electronics
OGG(Ogg Vorbis)OGG(Ogg Vorbis) is featured to have "higher compression rate than MP3', 'higher quality thanMP3', 'no limit in use, distribution and development due to open source type. The biggest feature ofOgg Vorbis is that it has no limit in use of format itself. The biggest feature that distinguishes Ogg Vorbis from existing music file is that it supports VBR( Variable Bit Rate) by default. Of course, MP3 also supports VBR format, but has effect of reducing capacity due to VBR based onexisting MP3. Ogg Vorbis file supports VBR by default and helps you enjoy high quality music with-out loss due to big width of bit rate.

Samsung Electronics 14-9
MP3 is regarded as MP3.
Let's examine what are the types of storages currently used.
Optical Disc : CD, MD Player / Flash Memory : MP3 Player, Digital audio player
Type of Digital audio player storage.
Audio Format Table
* SSFDC (Solid State Floppy Disc Card) File System * Standard file system for support of SMC's compatibility(DOS/FAT adopted)
1-4. Type of Storage

14-10 Samsung Electronics
Small Form - factor Cards Comparison

Samsung Electronics 14-11
Various kinds of methods are combined to unify technical
specification to prevent digital music data from illegal reproduction.
Let's examine groups and vocabularies related to copyright.
SDMI (Secure Digital Music Initiative)
Internet music record company consortium to pursue development of digital music file format.World-class music makers and related groups are formed to protect copyright of music and to pre-vent illegal reproduction.-PD : Portable Device -PM : Portable Media (SMC,MMC,MS,SD Card)-UID : All PD, PM should have unique ID.-Binding : All Digital Audio should be bounded to PD or PM.
DRM (Digital Rights Management)
Manage interests of persons related to copyright that occurs due to use of digital contents protectedfrom illegal use of digital contents through various channels.
WaterMarking
Technology of inserting the specific data to claim copyright of multimedia contents so that eyes andears of human cannot be distinguished.
SecuMAX
Digital Security Total Solution adopting Snake encoding algorithm.Version1.0 contents in service in Korea (M4you.com, etc.)SDMI compliant vrsion2.0 development completed
Reproduction Prevention System
Reopening of MP3 music service.Lots of dispute have occurred in network due to copyright.However, as online MP3 sales have resolved, the number of legal Internet site has increased. However, reproduction prevention system is required for legal sales. All Internet sites servingKorean song in MP3 are introducing reproduction prevention system.
1-5. Copyright

14-12 Samsung Electronics
Meaning of SecuMAX System ApplicationMost legal Internet MP3 service sites adopt SecuMAX and YEPP of Samsung and several compa-nies have hardware supporting SecuMAX among MP3 players currently distributed. Then, userneeds to receive MP3 applied with SecuMAX to receive legal service. It is required to have programthat can play back MP3 applied with SecuMAX technology in MP3 player. For example, since YEPPsupports SecuMAX, it can play back, but it means that you cannot play back this at the players ofother companies that do not support SecuMAX.
At present, organization has been formed for standardization of reproduction prevention system inforeign countries. Samsung Electronics has also participated in this standard using SecuMAX andcompleted development of SecuMAX 2.0 with world compatibility.
SecuMAX
SecuMAX is the reproduction prevention system that is made for
protection of copyright in rapidly growing distribution of digital contents.
Reopening of MP3 Music Service-Digital contents copyright protection and management service.-Fundamentally prevent the illegal distribution
Only legal users can play back music Dedicated software required(ex.Samsung Electronics, Music Dreve)Prevention of usual illegal use such as file transfer, CD-R Copy and hardware reproduction.
-Report for copyright holderBasic data for collection of copyright fee and near copyright feeTrack sales of all publications through Internet, PC communication or 3rd path.Provide sales information per IP, song and hour real time.
-Can serve any type of files-Can applied to Internet and PC communication equally-Can provide copyright protection service for hardware at the same time.