Portable Balances€¢ Batteries must be disposed of properly, according to local regulations.Make...
20
Portable Balances PL-E User Manual
Transcript of Portable Balances€¢ Batteries must be disposed of properly, according to local regulations.Make...

Portable BalancesPL-E
User
Man
ual
30357040E 11/3/2017 11:10 AM - Schema ST4 PDF engine - Layout by Victor Mahler
Porta
ble
Bala
nces


u www.mt.com/pl-e-OI
u www.mt.com/library
3Portable Balances
Overview components
2
3
4
1
5
6
77 8 91011
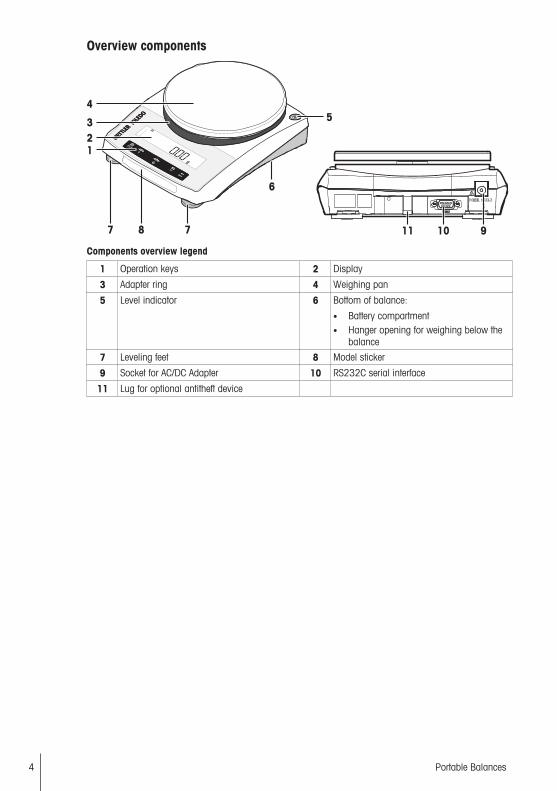
Components overview legend
1 Operation keys 2 Display
3 Adapter ring 4 Weighing pan
5 Level indicator 6 Bottom of balance:
• Battery compartment• Hanger opening for weighing below the
balance
7 Leveling feet 8 Model sticker
9 Socket for AC/DC Adapter 10 RS232C serial interface
11 Lug for optional antitheft device
4 Portable Balances

Overview operation keys
1 2 3 4 5
Terminal keys legend
No. Key Press briefly (less than 1.5 s) Press and hold (longer than 1.5 s)
1 • Printout display value• Transmit data• To navigate backward in the menu or
menu selection• Decrease parameters in menu or appli-
cations
• Open the application list and scrollamong the weighing applications incertain sequence for selecting an appli-cation
• Exits an active application and returnsto the selection for weighing mode
2 • Zero setting • Cancel and leave menu without saving• One step back in the menu• Cancel or leave application setting
3 • Tare• Switch on
• Switch off
4 • With entries, scroll down• To navigate forward menu topics or
menu selections• To toggle between unit 1, recall value (if
selected), unit 2 (if different from unit 1)and the application unit (if any)
• Increase parameters in menu or appli-cations
• Execute predefined adjustment(calibration) procedure
5 • Enter or leave menu selection• To enter application parameter and
switch to next parameter• To store parameter
• Enter or leave menu (parametersettings)
5Portable Balances

1 Safety InformationTwo documents named "User Manual" and "Operating Instructions" are available for this instrument.
• The User Manual shows you how to start using the instrument.• The Operating Instructions contain a full description of the instrument and its use.• Keep both documents for future reference.• Include both documents if you transfer the instrument to other parties.Only use the instrument according to the User Manual and the Operating Instructions. If you do not use theinstrument according to these documents or if the instrument is modified, the safety of the instrument maybe impaired and Mettler-Toledo GmbH assumes no liability.
Additional information about this balance can be found in the Operating Instructions on the CD-ROM or online.
u www.mt.com/pl-e-OI
1.1 Definitions of signal words and warning symbolsSafety notes contain important information on safety issues. Ignoring the safety notes may lead to personalinjury, damage to the instrument, malfunctions and false results. Safety notes are marked with the followingsignal words and warning symbols:
Signal words
WARNING A hazardous situation with medium risk, possibly resulting in death or severe injury ifnot avoided.
CAUTION A hazardous situation with low risk, resulting in minor or moderate injury if notavoided.
NOTICE A hazardous situation with low risk, resulting in damage to the instrument, othermaterial damage, malfunctions and erroneous results, or loss of data.
Warning symbols
Electrical shock
General hazard: read the Operating Instructions for information about the hazards and theresulting measures.
1.2 Product specific safety notesIntended useThis instrument is designed to be used in laboratories by trained staff. The instrument is intended forweighing purposes.
Any other type of use and operation beyond the limits of technical specifications without written consent fromMettler-Toledo GmbH is considered as not intended.
Responsibilities of the instrument ownerThe instrument owner is the person holding the legal title to the instrument and who uses the instrument orauthorizes any person to use it, or the person who is deemed by law to be the operator of the instrument.The instrument owner is responsible for the safety of all users of the instrument and third parties.
METTLER TOLEDO assumes that the instrument owner trains users to safely use the instrument in theirworkplace and deal with potential hazards. METTLER TOLEDO assumes that the instrument owner providesthe necessary protective gear.
6 Portable Balances

Safety notes
WARNINGDanger of death or serious injury due to electric shock!Contact with parts that carry a live current can lead to death or injury.1 Only use the METTLER TOLEDO power supply cable and AC/DC adapter designed for your
instrument.2 Connect the power cable to a grounded power outlet.3 Keep all electrical cables and connections away from liquids and moisture.4 Check the cables and power plug for damage and replace damaged cables and power
plugs.
NOTICERisk of damage to the instrument due to the use of unsuitable parts!Using unsuitable parts with the instrument can damage the Instrument or cause it tomalfunction.− Only use parts from METTLER TOLEDO that are intended to be used with your instrument.
2 Design and Function
2.1 Display
Application Icons
Wei
ghin
g-in a
id
Weight Value Field Unit Field
Status Icons
Application icons
Application weighing Application totaling
Application piece counting Application dynamic weighing
Application percent weighing Application multiplication factor
Application check weighing Application division factor
Application statistics Application density
Application formulation / Net total Menu locked
While an application is running, the corresponding application icon appears at the top of the display.
Status icons
Indicates stored value (Memory) Feedback for pressed keys
Indicates net weight values Service reminder
Adjustments (calibration) started
7Portable Balances

Weight value field and weighing-in aid
Brackets to indicate uncertified digits(approved models only)
SmartTrack (weighing-in aid)shows how much of the entire weighingrange has been used.
Indicates negative values Marking of nominal or target weight
Indicates unstable values Marking of tolerance limit T+
Indicates calculated values Marking of tolerance limit T-
Unit field
g gram ozt troy ounce tls Singapore taels
kg kilogram GN grain tlt Taiwan taels
mg milligram dwt pennyweight tola tola
ct carat mom momme baht baht
lb pound msg mesghal
oz ounce tlh Hong Kong taels
3 Installation and Putting into OperationFinding more information
Additional information about this balance can be found in the Operating Instructions on the CD-ROM or online.
u www.mt.com/pl-e-OI
Search for documents.
u www.mt.com/library
WARNINGDanger of death or serious injury due to electric shock!The instrument must be disconnected from the power supply before performing all setup andassembly work.
3.1 Unpacking and delivery inspection
NOTICERisk of damage to the instrument due to the use of unsuitable parts!Using unsuitable parts with the instrument can damage the Instrument or cause it tomalfunction.− Only use parts from METTLER TOLEDO that are intended to be used with your instrument.
1 Open the packaging and carefully remove all components.2 Check the delivered items.
The standard scope of delivery contains the following items• Balance• Weighing pan and weighing pan support• Protective cover for load cell cone (mounted)
8 Portable Balances

• Protective cover (mounted)• Stackable cover• Universal AC/DC adapter (country specific)• Operating Instructions or User Manual; printed or on CD-ROM, depending on country of use• Declaration of conformity
3.2 Selecting the locationA good location will enable the balance to work accurately and reliably. The surface must be able to safelytake the weight of the balance when fully loaded. The following local conditions must be observed:
If the balance is not horizontal at the outset, it must be leveled during commissioning.
• Operate the balance in indoor environments only and at an altitude of less than 4000 m above sealevel.
• Before switching on the balance, leave the parts to reach room temperature (+5 to 40°C).Ensure that the relative humidity is between 10% and 80% and non-condensing conditions are met.
• The power plug must be easily accessible.• No powerful vibrations• No direct sunlight• No excessive temperature fluctuations.• No powerful drafts.• No powerful electric or magnetic fields• Ensure that the surroundings as free from dust as
possible.
3.3 Installing the components
1
3
2
1 Remove the protective cover for weighing cone (1).Keep it for later use.
2 Place the following components on the balance in thespecified order:
• Pan support (2)• Weighing pan (3)
9Portable Balances

3.4 Installation of the protective cover− Install the protective cover according to the illustration
on, using a screwdriver.
3.5 Connecting the balance
WARNINGDanger of death or serious injury due to electric shock!Contact with parts that carry a live current can lead to death or injury.1 Only use the METTLER TOLEDO power supply cable and AC/DC adapter designed for your
instrument.2 Connect the power cable to a grounded power outlet.3 Keep all electrical cables and connections away from liquids and moisture.4 Check the cables and power plug for damage and replace damaged cables and power
plugs.
NOTICEDanger of damage to the AC/DC adapter due to overheating!If the AC/DC adapter is covered or in a container, it is not sufficiently cooled and will overheat.1 Do not cover the AC/DC adapter.2 Do not put the AC/DC adapter in a container.
The balance is supplied with an universal AC/DC adapter.
• Install the cables so that they cannot be damaged or interfere with operation.• Insert the power cable in a grounded power outlet that is easily accessible.
10 Portable Balances

− Connect the AC/DC adapter to the connection socketon the back of your balance (see figure) and to thepower line.
ð The balance is ready for use.
3.5.1 Battery operationThe balance can also operate with batteries. Under normal operation conditions, the balance works indepen-dently of the AC power line for about 8 to 15 hours (using alkaline batteries).
It is also possible to use rechargeable batteries. Charging batteries inside the balance is not possible.
Your balance uses 4 standard AA (LR6) batteries (alkaline batteries preferred).
Inserting / replacing batteries
WARNINGDanger of death or serious injury due to electric shock!Contact with parts that contain a live current can lead to injury and death.− Disconnect the instrument from the power supply when replacing batteries.
NOTICERisk of damage to the balanceDo not place the balance on the pan support location bolt.
• Read and follow all warnings and instructions supplied by the battery manufacturer.• Do not mix different types or brands of batteries. Performance of batteries varies depending on the
manufacturer.• Remove the batteries from the balance if the balance is not used for a long period of time.• Batteries must be disposed of properly, according to local regulations.
§ Make sure that the balance is off before removing or inserting batteries.
1 Remove weighing pan and pan support.2 Turn the balance carefully on its side.
11Portable Balances

+
-
+
-
+
-
+
-
3 Open and remove the battery-chamber cover.4 Insert / replace the batteries with the correct polarity as
shown in the battery holder.5 Insert and close the battery-chamber cover.6 Turn the balance carefully to its normal position.7 Reinstall all components in the reverse order.
3.6 Setting up the balance
3.6.1 Switching on the balanceBefore using the balance, it must be warmed up in order to obtain accurate weighing results. To reachoperating temperature, the balance must be acclimatized and connected to the power supply for at least 30minutes.
Mains operated (standby mode)
§ The balance is connected to the power supply.
0.00 g
MT.GREEN
− Press .ð The balance performs a display test. All segments
in the display light up briefly, WELCOME, Softwareversion. Maximum load and Readability appearsbriefly.
ð The balance is ready for weighing or for operation withthe last active application.
Battery operated1 Remove any load from weighing pan.2 Press .
ð The balance performs a display test (all segments in the display light up briefly), WELCOME,Software version, Maximum load and Readability appears briefly.
ð After the warm-up time, the balance is ready for weighing or for operation with the last active appli-cation.
Legal-for-tradeApproved balances will execute an initial zero.
3.6.2 Leveling the balanceThe balances have a level indicator and two or four adjustable leveling feet to compensate for slight irregu-larities in the surface of the weighing bench. The balance is exactly horizontal when the air bubble is in themiddle of the level glass.
The balance must be leveled and adjusted each time it is moved to a new location.
12 Portable Balances

1 Align the balance horizontally.2 Turning the leveling feet of the balance housing until
the air bubble is in the inner circle of the levelindicator.
3.6.3 Adjusting the balanceTo obtain accurate weighing results, the balance must be adjusted to match the gravitational acceleration atits location and depending on the ambient conditions. After reaching the operation temperature, adjusting isnecessary.
• before the balance is used for the first time.• after a change of the location.• at regular intervals during weighing service.
See also
2 Adjustment with external weight } Page 13
3.7 Adjustment with external weightLegal-for-tradeApproved models must be adjusted at the place of operation. Before putting in operation, and depending onparticular country certification legislation, the balance will then have to be checked and sealed by authorizedpersonnel. See the detailed information delivered with this balance.
§ In the menu topic CAL (Adjustment) of advanced menu ADJ.EXT must be selected.
§ Required adjustment weight is ready.
§ Weighing pan is unloaded.
------
2000.00 g
ADJ.DONE
0.00 g
0.00 g
------
Cal ADJ.EXT
1 Press and hold CAL to execute external adjustment.ð The required (predefined) adjustment weight value
flashes on the display.2 Place adjustment weight in center of pan.
ð The balance adjusts itself automatically.3 Remove adjustment weight, when 0.00 g flashes.ð The adjusting is finished when the message ADJ
DONE appears briefly on the display. The balancereturns to the last active application and is ready foroperation.
13Portable Balances

3.8 Performing a simple weighing
The weighing application allows you to perform simple weighings and how you canaccelerate the weighing process.
If your balance is not in the weighing mode, press and hold the key down until WEIGH appears in thedisplay. Press . Your balance is in the weighing mode.
1250.38 g
0.00 g
1182.03 g
0.00 g
1 Press to zero the balance.2 Place the sample on the weighing pan.3 Wait until the instability detector disappears and the
stability beep sounds.4 Read the result.
ZeroingUse the zeroing key before you start with a weighing.
121.01 g
0.01 g
0.00 g
1 Unload the balance.2 Press to zero the balance.
ð All weight values are measured in relation to thiszero point.
TaringIf you are working with a weighing container, first set the balance to zero.
14 Portable Balances
121.01 g
0.00 g
0.00 g
95.97 g
121.01 g-
Net
Net
Net
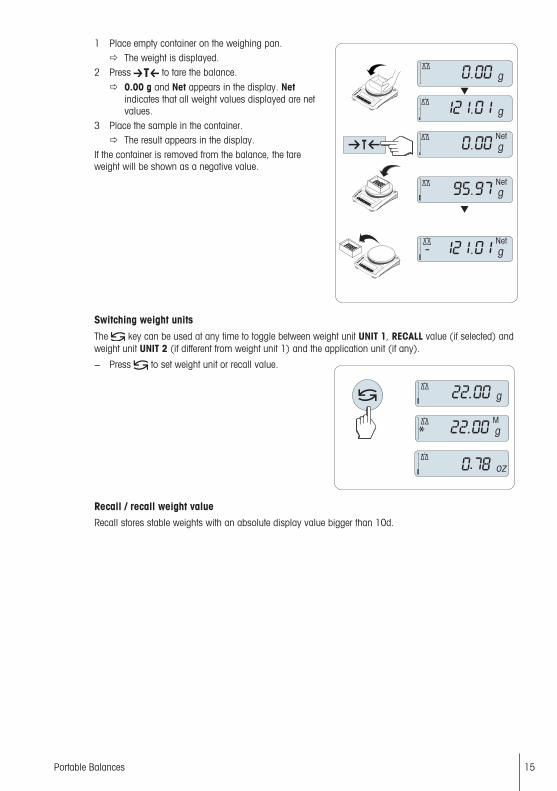
1 Place empty container on the weighing pan.ð The weight is displayed.
2 Press to tare the balance.ð 0.00 g and Net appears in the display. Net
indicates that all weight values displayed are netvalues.
3 Place the sample in the container.ð The result appears in the display.
If the container is removed from the balance, the tareweight will be shown as a negative value.
Switching weight unitsThe key can be used at any time to toggle between weight unit UNIT 1, RECALL value (if selected) andweight unit UNIT 2 (if different from weight unit 1) and the application unit (if any).
0.78 oz
22.00 g*
22.00 g
M
− Press to set weight unit or recall value.
Recall / recall weight valueRecall stores stable weights with an absolute display value bigger than 10d.
15Portable Balances

§ Function RECALL is in the menu activated.
121.01 g
0.00 g
0.00 g
M
121.01 g
0.00 g
1 Load weighing sample.ð The display shows weight value and stores stable
value.2 Remove weighing sample.
ð The display shows zero.3 Press .
ð The display shows last stored stable weight valuefor 5 seconds together with asterisk (*) andmemory (M) symbols. After 5 seconds the displaygoes back to zero. This can be repeated unlimitedtimes.
Delete last weight valueAs soon a new stable weight value is displayed, the old recall value becomes replaced by the new weightvalue.
− Press .ð The recall value is set to 0.
If the power is switched off, the recall value is lost. The recall value can not be printed.
Weighing with the weighing-in aidThe weighing-in aid is a dynamic graphic indicator which shows the used amount of the total weighingrange. You can thus recognize at a glance when the load on the balance approaches the maximum load.
0%
100%
Print / transmit dataPress the key to transmit the weighing results over the interface e.g. to a printer or a PC.
4 Maintenance
4.1 Cleaning and service
Every now and then, clean the weighing pan, draft shield element, bottom plate, draft shield (depending onthe model) and housing of your balance. Your balance is made from high-quality, durable materials andcan therefore be cleaned using a damp cloth or with a standard, mild cleaning agent.
16 Portable Balances

Please observe the following notes
WARNINGDanger of death or serious injury due to electric shock!Contact with parts carrying a live current can lead to injury and death.1 Disconnect the balance from the power supply prior to cleaning and maintenance.2 Only use METTLER TOLEDO power cables if they need to be replaced.3 Prevent liquid from entering the balance, terminal or AC/DC adapter.4 Do not open the balance, terminal or AC/DC adapter.
They do not contain any parts that can be serviced by the user.
NOTICERisk of damage to balance due to inappropriate cleaning methodsThe balance is made from high quality, resistant materials and can be damaged by certaincleaning agents, solvents or abrasives. Any liquid that enters the housing may damage thebalance.1 Use water and a mild detergent to clean the balance or terminal.2 Wipe off any spills immediately.3 Prevent liquid from entering the interior of the balance.
Contact a METTLER TOLEDO representative to find about the service options available – regular maintenanceby an authorized service engineer will ensure consistent weighing accuracy over the long term and extendthe service life of the balance.
5 Technical Data
5.1 General data
WARNINGDanger of death or serious injury due to electric shock!Contact with parts that contain a live current can lead to injury and death.1 Only use an approved AC/DC adapter with a current-limited SELV output.2 Ensure correct polarity
Standard power supply
AC/DC adapter: Primary: 100 – 240 V, ±10%, 50/60Hz, 0.3 ASecondary: 12 V DC, 0.84 A (with electronic overloadprotection)
Balance power supply: 12 V DC, 0.84 ACan be used up to 2000 m above mean sea level.
Battery operation: 4 standard AA (LR6) batteries (alkaline) for 8–15 hours of use
NOTICEIf the balance is used above 2000 m mean sea level, the optional power supply must beused.
Optional power supply
AC/DC adapter: Primary: 100 – 240 V, ±10%, 50/60HzSecondary: 12 V DC ±3%, 2.5 A (with electronic overloadprotection)
17Portable Balances

Cable for AC/DC adapter: 3-core, with country-specific plugBalance power supply: 12 V DC ±3%, 2.25 A, maximum ripple: 80 mVpp
Can be used up to 4000 m above mean sea level.
Protection and standards
Overvoltage category: IIDegree of pollution: 2Protection: Protected against dust and waterStandards for safety and EMC: See Declaration of ConformityRange of application: For use in closed interior rooms only
Environmental conditions
Height above mean sea level: Depending on the power adapter (2000 - 4000 m)Except for China: max. 2000 m
Ambient temperature: Operating conditions for ordinary lab application: +10 to 30°C(operability guaranteed between +5 and 40°C)
Relative air humidity: 10% up to 80% at 31°C with a linear decrease to 50% at40°C, non-condensing
Warm-up time: At least 30 minutes (60 minutes for 0.1 mg models) afterconnecting the balance to the power supply. When switched onfrom standby, the instrument is ready for operationimmediately.
Materials
Housing: Housing: Plastic (ABS/PC)Weighing pan: ø 160 mm: Stainless steel X5CrNi 18-10 (1.4301)
18 Portable Balances


Mettler-Toledo GmbHIm Langacher 448606 Greifensee, Switzerlandwww.mt.com/contact
Subject to technical changes.© Mettler-Toledo GmbH 11/201730357040E en
For more informationwww.mt.com/ple-precision
30357040
30357040E 11/3/2017 11:10 AM - Schema ST4 PDF engine - Layout by Victor Mahler