Polymeric Shake Tile Roof System - EcoStar · and listed by Underwriters Laboratories as a Class C...
4
This installation guide is written and provided for the use of professional roofing applicators and EcoStar ™ Gold Star Authorized Applicators. Contact the technical department for information on warranty availability and the requirements and benefits of the Gold Star program. SPECIAL NOTE: Seneca Shake ™ is made in two different formulations, one formula has been tested and listed by Underwriters Laboratories as a Class C roofing material and the other formula has been tested and listed as a Class A roofing material (UL 790). Please make sure of the type of material being installed since the method of installation is critical for the listing. Seneca Shake has been tested and listed by Underwriters Laboratories as a Class 4 impact resistance product (UL 2218). To maintain the requirements of these tests and their listings the roof system must be installed exactly as stated in this installation guide. WARRANTIES* EcoStar warrants this product to be free of manufactured defects at the time of shipment from EcoStar’s factory. EcoStar will at its option either supply new product or pay the reasonable cost of replacement products found to be defective hereunder. EcoStar’s limited warranties are the only warranties extended by EcoStar with respect to its materials. There are no other warranties, including the implied warranties of merchantability and fitness for a particular purpose. EcoStar specifically disclaims liability for any incidental, consequential, or other damages, including but not limited to, loss of profits or damages to a structure or its contents, arising under any theory of law whatsoever. The dollar value of EcoStar’s liability and buyer’s remedy under this limited warranty shall not exceed the purchase price of the EcoStar material in question. SHADE VARIATION All tiles come with a shade variation. This shade variation will occur from pallet to pallet and within individual pallets. Application of the product should not begin until ALL material has been delivered to the project site. Because of this shade variation the applicator must take precautions to insure that the various shades of the product are properly blended. Tiles must be taken from different pallets and bundles to guarantee consistency in application. Natural weathering will produce further shade variations, even in tiles appearing to be identical in color when new. NOTE: EcoStar will not be responsible for the improper blending or application of the product. * See www.ecostarllc.com for available warranties. TEMPERATURE It is recommended that the tiles not be stored in temperatures lower than 45˚ F since cold tiles will cause difficulty with the installation. If tiles have been stored in temperatures below 45˚ F, they must be restored to a temperature above 45˚ F before installation. The tiles will expand and contract with temperature variations. If the tiles are applied while cold, special precautions must be taken to insure a quality looking application. Proper spacing must be maintained throughout the project. For assistance with installations below 45˚ F please contact the technical department. SUBSTRATE The tiles should only be installed on a minimum of 1/2” plywood decking, 7/16” OSB or minimum 3/4” tongue and groove decking with end gaps not exceeding 1/4”. Contact the technical department for approved alternatives. Under all circumstances existing roof materials must be removed down to the deck, prior to installation. SLOPE The tiles are not recommended for slopes less than 3/12. If this is desired, contact the technical department for review. On roof slopes less than 6/12, the tiles must be installed with a maximum 7” exposure. On roof slopes of 6/12 or greater, the tiles may be installed with a 7”, 7 1/2” or 8” exposure. UNDERLAYMENT Glacier Guard ™ or equal must be applied to all eaves, rake edges, hips, valleys, ridges and protrusions. If a Class C roof system has been specified, cover the remaining exposed deck with Aqua Guard ™ or equal. If a Class A roof has been specified, GP Gypsum Corporation’s DensDeck ® roof board may be used, or Elk’s VersaShield ® underlayment. If VersaShield is used, it must be applied over the entire roof deck, after the installation of the Glacier Guard. Gold Star Warranty* requires the use of the above mentioned EcoStar specified products. FASTENERS Stainless Steel Ring Shank roofing nails are recommended for application of the tiles. Gold Star Warranty* application requires the use of EcoStar Ring Shank Fasteners. Hand drive and pneumatic coil nails are available. FLASHING MATERIAL EcoStar recommends that flashing be either copper or stainless steel. Flashing metal, however, is not covered by any EcoStar warranty. Like materials should be used when fastening metal flashings. SEALANTS If local codes require the use of a shingle sealant, the only material approved for use with EcoStar tiles is Dow Corning 790 silicone sealant. Polymeric Shake Tile Roof System INSTALLATION GUIDE PLEASE REMEMBER TO BEND AND BLEND TILES 42 Edgewood Drive | Holland, NY 14080 | Tel: 800.211.7170 | www.ecostarllc.com
Transcript of Polymeric Shake Tile Roof System - EcoStar · and listed by Underwriters Laboratories as a Class C...
This installation guide is written and provided for the use of professional roofing applicators and EcoStar™ Gold Star Authorized Applicators. Contact the technical department for information on warranty availability and the requirements and benefits of the Gold Star program.
SPECIAL NOTE: Seneca Shake™ is made in two different formulations, one formula has been tested and listed by Underwriters Laboratories as a Class C roofing material and the other formula has been tested and listed as a Class A roofing material (UL 790). Please make sure of the type of material being installed since the method of installation is critical for the listing. Seneca Shake has been tested and listed by Underwriters Laboratories as a Class 4 impact resistance product (UL 2218). To maintain the requirements of these tests and their listings the roof system must be installed exactly as stated in this installation guide.
WARRANTIES* EcoStar warrants this product to be free of manufactured defects at the time of shipment from EcoStar’s factory. EcoStar will at its option either supply new product or pay the reasonable cost of replacement products found to be defective hereunder.
EcoStar’s limited warranties are the only warranties extended by EcoStar with respect to its materials. There are no other warranties, including the implied warranties of merchantability and fitness for a particular purpose. EcoStar specifically disclaims liability for any incidental, consequential, or other damages, including but not limited to, loss of profits or damages to a structure or its contents, arising under any theory of law whatsoever.
The dollar value of EcoStar’s liability and buyer’s remedy under this limited warranty shall not exceed the purchase price of the EcoStar material in question.
SHADE VARIATION All tiles come with a shade variation. This shade variation will occur from pallet to pallet and within individual pallets. Application of the product should not begin until ALL material has been delivered to the project site. Because of this shade variation the applicator must take precautions to insure that the various shades of the product are properly blended. Tiles must be taken from different pallets and bundles to guarantee consistency in application. Natural weathering will produce further shade variations, even in tiles appearing to be identical in color when new.
NOTE: EcoStar will not be responsible for the improper
blending or application of the product.
* See www.ecostarllc.com for available warranties.
TEMPERATURE It is recommended that the tiles not be stored in temperatures lower than 45˚ F since cold tiles will cause difficulty with the installation. If tiles have been stored in temperatures below 45˚ F, they must be restored to a temperature above 45˚ F before installation. The tiles will expand and contract with temperature variations. If the tiles are applied while cold, special precautions must be taken to insure a quality looking application. Proper spacing must be maintained throughout the project. For assistance with installations below 45˚ F please contact the technical department.
SUBSTRATE The tiles should only be installed on a minimum of 1/2” plywood decking, 7/16” OSB or minimum 3/4” tongue and groove decking with end gaps not exceeding 1/4”. Contact the technical department for approved alternatives. Under all circumstances existing roof materials must be removed down to the deck, prior to installation.
SLOPE The tiles are not recommended for slopes less than 3/12. If this is desired, contact the technical department for review. On roof slopes less than 6/12, the tiles must be installed with a maximum 7” exposure. On roof slopes of 6/12 or greater, the tiles may be installed with a 7”, 7 1/2” or 8” exposure.
UNDERLAYMENT Glacier Guard™ or equal must be applied to all eaves, rake edges, hips, valleys, ridges and protrusions. If a Class C roof system has been specified, cover the remaining exposed deck with Aqua Guard™ or equal. If a Class A roof has been specified, GP Gypsum Corporation’s DensDeck® roof board may be used, or Elk’s VersaShield® underlayment. If VersaShield is used, it must be applied over the entire roof deck, after the installation of the Glacier Guard. Gold Star Warranty* requires the use of the above mentioned EcoStar specified products.
FASTENERS Stainless Steel Ring Shank roofing nails are recommended for application of the tiles. Gold Star Warranty* application requires the use of EcoStar Ring Shank Fasteners. Hand drive and pneumatic coil nails are available.
FLASHING MATERIAL EcoStar recommends that flashing be either copper or stainless steel. Flashing metal, however, is not covered by any EcoStar warranty. Like materials should be used when fastening metal flashings.
SEALANTS If local codes require the use of a shingle sealant, the only material approved for use with EcoStar tiles is Dow Corning 790 silicone sealant.
Polymeric Shake Tile Roof SystemIN
STA
LL
AT
ION
GU
IDE
PLEASE REMEMBER TO BEND AND BLEND TILES
42 Edgewood Drive | Holland, NY 14080 | Tel: 800.211.7170 | www.ecostarllc.com

Seneca Shake & Seneca Plus PLEASE REMEMBER TO BEND AND BLEND TILES
INSTALLATION STEPS EcoStar makes every effort to maintain the quality and consistency of all products, however, shade variations will occur within all tile products. Due to these shade variations it is extremely important that all members of the installation crew be aware of the fact that tiles must be blended between bundles and pallets. The entire lot of material must be blended evenly in rotation until all material is used. EcoStar recommends that a member of the crew be assigned the responsibility of blending tiles and insuring that no shade patterning or blotching occurs. This can best be accomplished by blending all tiles before installation, and by making periodic inspections of the roof from the ground.
Seneca Shake tiles are designed and manufactured to duplicate the look of natural wood shakes.
1. Install Glacier Guard in all valleys, eaves, rake edges, hips, ridges and protrusions. Gold Star Warranty* application requires the use of Glacier Guard.
2. Install a minimum of 30 lb. felt over the remaining area of the deck surface. If a Class C roof is required, the 30 lb. felt or equal must be UL Listed. Gold Star Warranty* application requires the use of EcoStar’s Aqua Guard underlayment for a Class C roof system. If a Class A roof is required install Elk’s VersaShield® or equivalent over the entire deck including areas already covered by the Glacier Guard. Gold Star Warranty* application requires the use of Elk’s VersaShield® for a Class A roof system.
3. Install metal edging at eaves and rake edges. Any corrosion resistant metal edging is acceptable. Copper and stainless steel are recommended. It should be noted that all EcoStar Warranties do NOT cover metal flashing.
Note: When using copper and stainless steel flashing material the appropriate corresponding nails should be used.
4. A critical step is BENDING. Every tile that is installed must be bent in a downward arch before applying it to the roof deck. Whatever position the tile is in when fastened to the roof deck, is the position it will maintain. It is recommended that each member of the installation crew be instructed on how to bend the tile to insure that it lies flat when fastened to the roof deck. While grabbing the top of the tile (textured side up) with the right hand and the bottom edge of the tile with the left hand, bend the tile in a downward motion until the tile maintains arch. The tiles must be curved under when installing.
5. Beginning at the eave edge, install a starter row of tiles with two nails per tile (in location shown on tiles). 1-1/2” long stainless steel ring shank roofing nails are recommended. Gold Star Warranty* application requires the use of EcoStar Ring Shank Fasteners.
6. If a pneumatic nailer is utilized for application of the tiles, care should be taken to determine that the proper pressure and depth setting is being used. Nails can be over driven causing tiles to lift and diminish the quality of the installation.
7. The initial layer of tiles becomes the starter row. This layer will be completely covered by the next row to be installed. When installing Seneca Plus tiles, Seneca Shake tiles must be used for the starter row. When the first course of tile is installed, tiles must be offset to cover the nails from the previous row.
SENECA SHAKE IS NOT RECOMMENDED FOR SLOPES LESS THAN
3/12. ON ROOFS LESS THAN 6/12 AND GREATER THAN 3/12,
SENECA SHAKE MUST BE INSTALLED WITH A MAXIMUM EXPOSURE
OF 7”. ON ROOFS 6/12 OR GREATER SENECA SHAKE TILES MAY BE
INSTALLED WITH EITHER A 7”, 7 1/2” OR 8” EXPOSURE.
8. CAUTION: Do not install the tiles with an upward curl. Whatever position the tile is in when fastened to the roof deck, it will maintain that position. It is required that each member of the installation crew be instructed on how to bend the tile manually to insure that it lies flat when fastened to the roof deck.
9. As the tiles are installed up the roof, the tile must be cut at rake edges, valleys and protrusions. The tiles may be cut using a straight edge and a utility or roofing knife. Once the tile has been scored with a knife it can be snapped along the scored line. Seneca Plus tiles require the use of a saw to cut.
10. As the tiles are installed up the roof slope, it is recommended that lines be snapped horizontally. The horizontal lines will keep the tiles looking straight and uniform. DO NOT USE RED CHALK. Red chalk will stain the tiles.
11. CAUTION: As the tiles are installed up the slope of the roof, the installation should be constantly checked from the ground to ensure there is no patterning developing and proper blending is occurring. Gold Star Warranty* application requires that the Authorized Applicator correct any blending problems prior to issuance of the warranty.
12. Continue to install the tiles up the roof slope. Be sure to place the nails directly in the position noted on the tiles. Stainless steel ring shank nails are recommended. Gold Star Warranty* application requires the use of EcoStar Rink Shank Fasteners. A minimum of 3⁄8” is required between tiles and between tiles and protrusions.
When using pneumatic nailing equipment, frequently check both the depth and pressure setting, so nails are not over driven, causing tiles to lift. Lifted tiles will diminish the aesthetic appearance of the finished roof system. The nail should not dent the tile. Tiles can be slippery when wet, caution should be exhibited with early morning dew and after rain. EcoStar suggests the use of toe boards, OSHA approved harnesses and safety equipment at all times. 13. When all tiles have been applied to the roof slopes, the pre-formed Seneca Shake Hip & Ridge tiles are applied to all hips and ridges. Seneca Shake Hip & Ridge tiles are always installed with a 6”exposure with two 2” or 2.5” nails per tile. The use of ridge vent will require 2.5” nails. Before installing the Seneca Shake Hip & Ridge tiles at the ridge, roof venting should be installed. Ridge venting systems are highly recommended. Mushroom cap style vents may be used, but ridge venting provides better venting and improves the aesthetic appearance of the roof system. Gold Star Warranty* covers Ecostar EcoVent if used.
14. As work progresses up roof slopes care should be taken to minimize traffic over completed areas of the roof. The tiles will show any mud or dirt tracked across them. This will cause aesthetic issues with the completed appearance of the roof. It is the responsibility of applicator or building owner to remove this mud or dirt. A mild detergent should be used in combination with a bucket of water to remove the mud or dirt. Clean water can then be used to finish the cleaning process. Do not use any chemicals or solvents without first checking with the EcoStar technical department. EcoStar is not responsible for the cleaning of any tiles. * See www.ecostarllc.com for available warranties.

PLEASE BEND AND BLEND TILES Seneca Shake & Seneca Plus Installation Guide
PRODUCT IDENTIFICATIONThis area provides identification of the product and a toll-free contact telephone number for questions or assistance with the product and installation.
QUALITY INFORMATIONThis area of the tile is used by the production department to denote the date the part was manufactured. This allows tracking of quality by production time.
INSTALLATION MEASUREMENTTwo marks are molded into every tile. When these marks are placed in alignment with the top edge of the previous row of tiles, proper tile exposure is provided automatically.
TILE FASTENINGMolded into each tile is a fastener locator. This assists during installation for proper positioning of the fastener. Each bundle of Seneca Shake contains all three sizes of tile in 8 different surface textures. When installing the tiles, care needs to be taken to ensure that no pattern is created by the repetition of tiles.
Seneca Shake 12” wide x 19” long x 3/8” nominal
Seneca Shake9” wide x 19” long x 3/8” nominal
Seneca Shake6” wide x 19” long x 3/8” nominal
Seneca Plus 12” wide x 19” long x 3/4” nominal
Seneca Plus 9” wide x 19” long x 3/4” nominal
Seneca Plus 6” wide x 19” long x 3/4” nominal
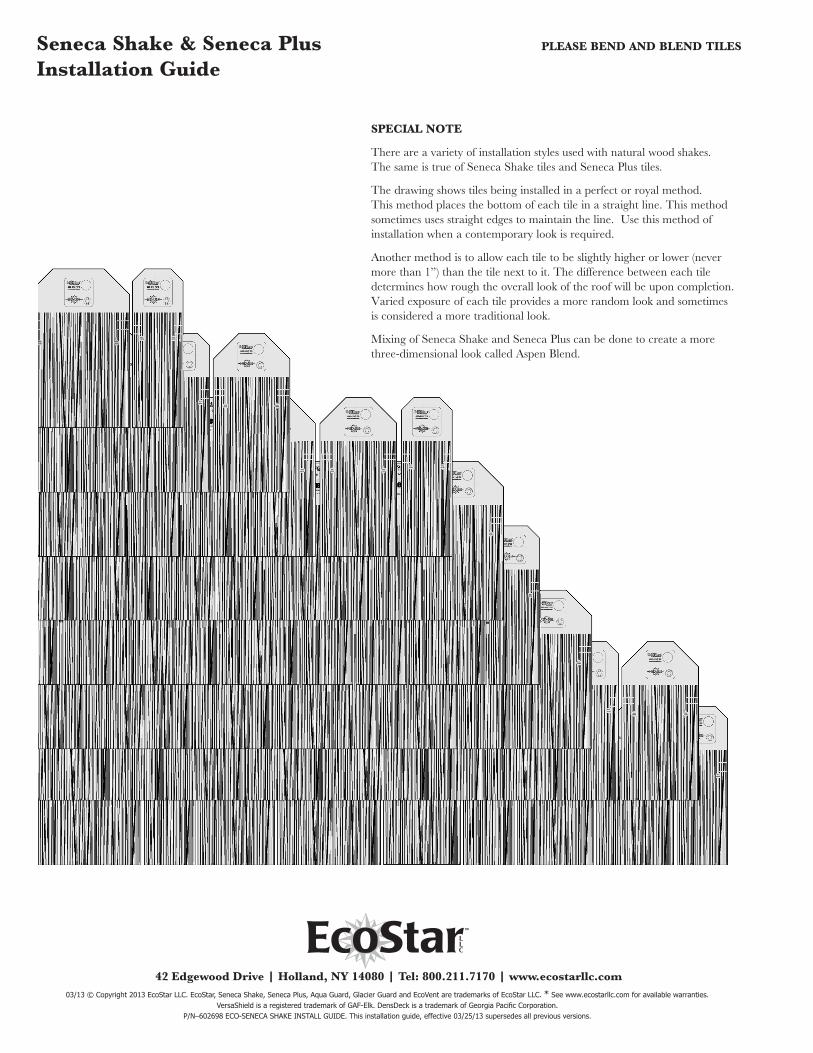
SPECIAL NOTE
There are a variety of installation styles used with natural wood shakes. The same is true of Seneca Shake tiles and Seneca Plus tiles.
The drawing shows tiles being installed in a perfect or royal method. This method places the bottom of each tile in a straight line. This method sometimes uses straight edges to maintain the line. Use this method of installation when a contemporary look is required.
Another method is to allow each tile to be slightly higher or lower (never more than 1”) than the tile next to it. The difference between each tile determines how rough the overall look of the roof will be upon completion. Varied exposure of each tile provides a more random look and sometimes is considered a more traditional look.
Mixing of Seneca Shake and Seneca Plus can be done to create a more three-dimensional look called Aspen Blend.
Seneca Shake & Seneca Plus Installation Guide
PLEASE BEND AND BLEND TILES
42 Edgewood Drive | Holland, NY 14080 | Tel: 800.211.7170 | www.ecostarllc.com
03/13 © Copyright 2013 EcoStar LLC. EcoStar, Seneca Shake, Seneca Plus, Aqua Guard, Glacier Guard and EcoVent are trademarks of EcoStar LLC. * See www.ecostarllc.com for available warranties. VersaShield is a registered trademark of GAF-Elk. DensDeck is a trademark of Georgia Pacific Corporation.
P/N–602698 ECO-SENECA SHAKE INSTALL GUIDE. This installation guide, effective 03/25/13 supersedes all previous versions.


![UHEHIl AD-A278By 1985, 111 sources of roofing systems were listed in the Roofing Materials Guide (National Roofing Contractors Association [NRCA] 1992) as shown in Table 1. Products](https://static.fdocuments.net/doc/165x107/5f3d6da296ed1057653a16f8/uhehil-ad-a278-by-1985-111-sources-of-roofing-systems-were-listed-in-the-roofing.jpg)