
Polycom Pano Administrator Guide · 2017-06-20 · Disclaimer. While Polycom uses reasonable...
60
ADMINISTRATOR GUIDE 1.0 | June 2017 | 3725-42460-002A Polycom Pano ® ™
Transcript of Polycom Pano Administrator Guide · 2017-06-20 · Disclaimer. While Polycom uses reasonable...

ADMINISTRATOR GUIDE 1.0 | June 2017 | 3725-42460-002A
Polycom Pano® ™

Copyright© 2017, Polycom, Inc. All rights reserved. No part of this document may be reproduced, translated into another language or format, or transmitted in any form or by any means, electronic or mechanical, for any purpose, without the express written permission of Polycom, Inc.
6001 America Center DriveSan Jose, CA 95002USA
Trademarks Polycom®, the Polycom logo and the names and marks associated with Polycom products are trademarks and/or service marks of Polycom, Inc. and are registered and/or common law marks in the United States and various other countries.
All other trademarks are property of their respective owners. No portion hereof may be reproduced or transmitted in any form or by any means, for any purpose other than the recipient's personal use, without the express written permission of Polycom.
Disclaimer While Polycom uses reasonable efforts to include accurate and up-to-date information in this document, Polycom makes no warranties or representations as to its accuracy. Polycom assumes no liability or responsibility for any typographical or other errors or omissions in the content of this document.
Limitation of Liability Polycom and/or its respective suppliers make no representations about the suitability of the information contained in this document for any purpose. Information is provided "as is" without warranty of any kind and is subject to change without notice. The entire risk arising out of its use remains with the recipient. In no event shall Polycom and/or its respective suppliers be liable for any direct, consequential, incidental, special, punitive or other damages whatsoever (including without limitation, damages for loss of business profits, business interruption, or loss of business information), even if Polycom has been advised of the possibility of such damages.
End User License Agreement BY USING THIS PRODUCT, YOU ARE AGREEING TO THE TERMS OF THE END USER LICENSE AGREEMENT (EULA) . IF YOU DO NOT AGREE TO THE TERMS OF THE EULA, DO NOT USE THE PRODUCT, AND YOU MAY RETURN IT IN THE ORIGINAL PACKAGING TO THE SELLER FROM WHOM YOU PURCHASED THE PRODUCT.
Patent Information The accompanying product may be protected by one or more U.S. and foreign patents and/or pending patent applications held by Polycom, Inc.
Open Source Software Used in this Product This product may contain open source software. You may receive the open source software from Polycom up to three (3) years after the distribution date of the applicable product or software at a charge not greater than the cost to Polycom of shipping or distributing the software to you. To receive software information, as well as the open source software code used in this product, contact Polycom by email at [email protected] (for video products) or [email protected] (for voice products).
Customer Feedback We are striving to improve our documentation quality and we appreciate your feedback. Email your opinions and comments to [email protected].
Polycom Support Visit the Polycom Support Center for End User License Agreements, software downloads, product documents, product licenses, troubleshooting tips, service requests, and more.

Contents
Before You Begin............................................................................................... 4Audience, Purpose, and Required Skills.............................................................................4Get Help.............................................................................................................................. 4
Getting Started with Polycom® Pano™...............................................................5Features and Capabilities................................................................................................... 5
Polycom Pano Hardware Features.......................................................................... 5System Indicator Lights.......................................................................................................7Powering On and Off...........................................................................................................7
Power On the System.............................................................................................. 8Power Off the System.............................................................................................. 8
Navigating the System........................................................................................................ 8Access the System Web Interface........................................................................... 8Access the Polycom Cloud Service Administration Portal....................................... 9
Setting Up System Hardware.......................................................................... 10Connecting a Monitor........................................................................................................ 10
Connect a Non-Touch Monitor............................................................................... 10Connect a Touch-Capable Monitor........................................................................ 10
Mount the System on a Table........................................................................................... 11Mount the System on a Wall............................................................................................. 11Mount the System on a Monitor........................................................................................ 12
Running the Setup Wizard...............................................................................14Modes of Operation...........................................................................................................14Run the Setup Wizard....................................................................................................... 14
Configuring General System Settings............................................................16Set the System Language.................................................................................................16Set the Web Interface Language...................................................................................... 16Set the Date and Time...................................................................................................... 16Set Device and Room Names...........................................................................................17Register a Polycom Pano Device with the Polycom Cloud Service.................................. 18Enable Screen Mirroring................................................................................................... 18Disable Screen Mirroring...................................................................................................19
Polycom, Inc. 1

Configuring the Network................................................................................. 20Connect to the LAN...........................................................................................................20LAN Status Lights............................................................................................................. 20Configure IP Address Settings.......................................................................................... 20Configure DNS Settings.................................................................................................... 22Configure LAN Options..................................................................................................... 22
Configuring Monitor Settings..........................................................................24Polycom Pano HDMI Interfaces........................................................................................ 24
Supported HDMI Input Resolutions........................................................................24Supported HDMI Output Resolutions..................................................................... 25
Supported Displays........................................................................................................... 25Recommendations for Using an Optional Touch-Capable Monitor........................ 25
Configure Monitor Settings................................................................................................25
Securing the System........................................................................................27Security Settings in the Web Interface.............................................................................. 27Manage System Access....................................................................................................27Set Local Account Details................................................................................................. 27Disable the Security Code.................................................................................................28Manage Wireless Communication Options....................................................................... 28
Enable Wireless Communication Settings............................................................. 28Disable Wireless Communication Settings.............................................................29
Content Sharing............................................................................................... 30Content Sharing Options...................................................................................................30
System Maintenance........................................................................................32Resetting a System........................................................................................................... 32
Perform a Factory Reset........................................................................................ 32Delete System Settings.......................................................................................... 33
Updating System Software................................................................................................33Update System Software from the Web Interface.................................................. 33Update System Software from a USB Storage Device.......................................... 35
Downgrade to an Older Software Version.........................................................................35Determine the Software Version............................................................................ 35
Port Usage........................................................................................................ 36
Contents
Polycom, Inc. 2

Port Usage........................................................................................................................ 36
Polycom Cloud Service................................................................................... 38Polycom Cloud Service Administration Portal...................................................................39Polycom Cloud Service Administration Account Activation Process.................................39
Request to Activate an Administrator Account....................................................... 39Activate Account.....................................................................................................40Sign In with Your Activated Administration Account...............................................40Reset Password..................................................................................................... 40
Integrate with Microsoft Office 365 OneDrive for Business...............................................41Authentication Providers................................................................................................... 43
Add an Authentication Provider..............................................................................43Edit or Delete a Connected Authentication Provider.............................................. 44
Document Services........................................................................................................... 45Add a Document Service........................................................................................45Edit or Delete an Integrated Document Service..................................................... 46
Device Management......................................................................................................... 46Account............................................................................................................................. 48
Change Password.................................................................................................. 48Sign Out................................................................................................................. 48
Sending Content to a Polycom Video System...............................................49Supported Polycom Video Systems..................................................................................49Connect a Polycom Video System Using Two Monitors................................................... 49
Connect a Polycom Video System Using Two Monitors (Non-Touch Monitor Setup)................................................................................................................49
Connect a Polycom Video System Using Two Monitors (Touch Monitor Setup)... 51Connect a Polycom Video System Using Three Monitors................................................ 54
Connect a Polycom Video System Using Three Monitors......................................55Test Content Sharing........................................................................................................ 57Unpair a Polycom Video System.......................................................................................57
Troubleshooting............................................................................................... 58Retrieve Log Files............................................................................................................. 58Contacting Polycom Support.............................................................................................58
Contents
Polycom, Inc. 3

Before You BeginTopics:
▪ Audience, Purpose, and Required Skills
▪ Get Help
This guide is for administrators who need to configure, customize, manage, and troubleshoot Polycom®
Pano™ systems.
Please read the Polycom Pano documentation before you operate the system. The following related documents are available from Polycom Support at support.polycom.com:
Note: Some of the documents listed below may not be available until the final release of the Polycom Pano system.
▪ Polycom Pano User Guide, which provides instructions about how to use Polycom Pano systems.▪ Setup sheets for your hardware.▪ Release notes.▪ Polycom Pano Safety and Regulatory Notices, which describes safety and legal considerations for
using Polycom Pano systems.
Polycom recommends that you record the serial number of your Polycom Pano system and keep it available as you will need it during the setup process and during troubleshooting. The serial number is printed on the system and the shipping container, and listed on the Dashboard of the Polycom Pano web interface.
Audience, Purpose, and Required SkillsThe primary audience for this guide are users who want to perform basic to intermediate tasks to configure, manage, and troubleshoot Polycom Pano systems.
Get HelpFor more information about installing, configuring, and administering Polycom products, contact Polycom Support at support.polycom.com.
Polycom, Inc. 4
Getting Started with Polycom® Pano™
Topics:
▪ Features and Capabilities
▪ System Indicator Lights
▪ Powering On and Off
▪ Navigating the System
The following topics provide an overview of the Polycom Pano system.
Features and CapabilitiesYour Polycom Pano is a real-time collaboration system that includes the following features:
▪ Up to full 4k performance for sending content streams onto high-definition, non-touch or touch-capable monitors. Meeting participants simultaneously stream content onto the monitor or use thetouchscreen to interactively annotate content.
▪ Support for multiple content streams: HDMI, AirPlay®, Miracast, Polycom® Pano™ App▪ Integration with supported Polycom video systems▪ Cloud connectivity for content sharing and remote administrator access▪ Integrated Toolbar with high-performance annotation capabilities▪ Remote administrator access for managing standalone Polycom Pano systems
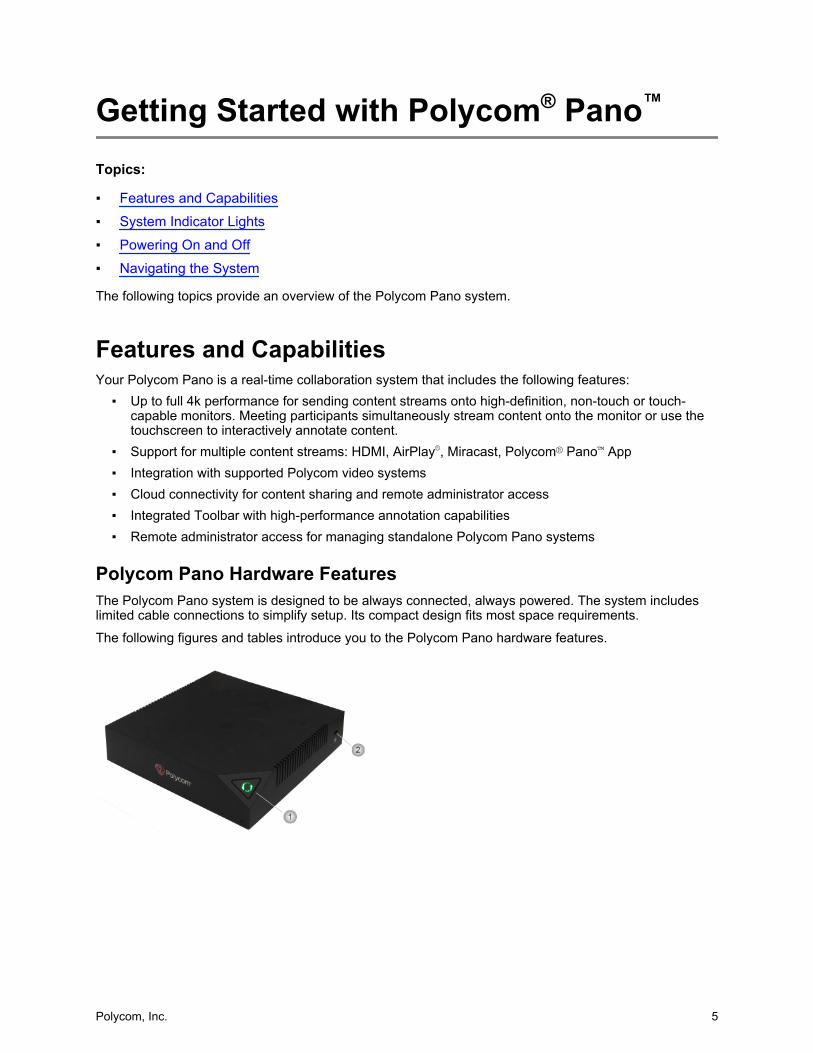
Polycom Pano Hardware FeaturesThe Polycom Pano system is designed to be always connected, always powered. The system includes limited cable connections to simplify setup. Its compact design fits most space requirements.
The following figures and tables introduce you to the Polycom Pano hardware features.
Polycom, Inc. 5

Front Feature Descriptions
Reference Number Feature
1 Button used to initiate a factory reset. Also LED indicator of system status.
2 Security cable lock slot.
Back Panel Feature Descriptions
Reference Number Feature
1 HDMI input port. Used for wired input.
2 Analog audio output that can be used as an alternative to HDMI.
3 HDMI output port that provides video and audio to a display.
4 USB 3.0 host port that is typically used for a touch monitor USB connection.
Note: If a dongle for a wireless pointing device is plugged into the USB 2.0 port and a USB flash drive is connected to this USB 3.0 port, the wireless pointing device may not funciton properly.
5 USB 2.0 host port
Note: If a dongle for a wireless pointing device is plugged into this USB 2.0 port and a USB 3.0 flash drive is connected to the USB 3.0 port, the wireless pointing device may not function properly.
6 10/100/1000 Ethernet port.
Note: The Polycom Pano device ships with a covering for this Ethernet port to indicate it is reserved for future use.
Getting Started with Polycom® Pano™
Polycom, Inc. 6

Reference Number Feature
7 10/100/1000 Ethernet port.
Supports IEEE 1588 for time synchronization with devices in a room. Powered with PoE+ PD.
8 2.0 mm jack for optional external 54v DC power adapter.
System Indicator LightsThe LED on the front of the Polycom Pano system provides the following information.
Indicator Light System Status
Off or blinking red light System is disconnected, cannot initialize, or has encountered a severe malfunction.
Steady white light System is initializing.
Steady blue light System is running.
Alternating blue and amber lights System is in software update or factory restore mode.
Powering On and OffPolycom Pano systems are designed to stay in a wake state and do not have a power button, or support monitor sleep or a power saving mode. The system is considered powered on when you connect the power source. After you have connected all of the related equipment that you intend to use, connect the power on the system.
You can power the Polycom Pano system with Power over Ethernet (PoE)+, IEEE 802.3at Type 2, or using a 2.0 mm power adapater.
Note: LLDP negotiation for PoE+ (IEEE 802.3at) power is not supported for those switches that require this secondary negotiation.
Keep the following in mind when powering the Polycom Pano system:▪ When both a PoE+ power source and power adapter are connected, power will be sourced from the
power adapter. The order the components were connected is not important. The power adapter always has precedence when both are connected.
▪ The system reboots when you connect or disconnect the power adapter.▪ LLDP negotiation for PoE+ (IEEE 802.3at) power is not supported for those switches that require
this secondary negotiation.▪ The Polycom Pano system supports only PoE 2-event classification mode. Depending on the
model, you may need to configure your switch to support the 2-event classifcation mode before the Polycom Pano system is able to receive proper power from the component. If necessary, check the switch user manual for instructions to activate this feature.
Getting Started with Polycom® Pano™
Polycom, Inc. 7

Power On the System
Note: You might experience a low signal strength when connecting the Polycom Pano system with a LAN cable that is longer than 100 feet. Polycom recommends that you use an externally powered Ethernet hub or PoE switch to limit the LAN cable length to shorter than 100 feet.
Procedure
1. Use the HDMI cable to connect the Polycom Pano system to the monitor.
2. Connect the USB cable that provides touch capability to the bottom USB port.
3. Connect the LAN cable to the system for network connectivity.
4. Connect the power adapter to the Polycom Pano system.
Power Off the SystemYou can power off the Polycom Pano system:
Procedure
1. Disconnect the power cord from the Polycom Pano system or disconnect the LAN cable when the system is powered by PoE+. If your system setup includes both connections, you must disconnect both cables.
Navigating the SystemAfter you run the setup wizard, you can configure, manage, and monitor Polycom Pano systems using the web interface.
Access the System Web InterfaceUsing a supported browser with cookies enabled, you access the Polycom Pano web interface from a computer with a network connection. The following Internet browsers are supported:
Note: A message is displayed when you attempt to access the web interface using a browser with cookies disabled. This message does not appear for Microsoft Edge browsers.
▪ Google Chrome™ 46.0.2490.86 and above▪ Mozilla® Firefox® 42.0 and above▪ Microsoft Edge™(all versions)▪ Apple® Safari® 9 and above
Procedure
1. In a web browser address line, enter the Polycom Pano system IP address using the format https://IPaddress (for example, https://10.11.12.13).
2. Enter your admin credentials. The default Admin ID is admin and the default admin password are the last six digits of the Polycom Pano serial number. The serial number is displayed on a sticker
Getting Started with Polycom® Pano™
Polycom, Inc. 8

on the back of the device, on the shipping container, and on the Dashboard screen in the Polycom Pano web interface.
3. Select Login.
Access the Polycom Cloud Service Administration PortalIf your organization has activated a Polycom Cloud Service account, you can access the Polycom Cloud Service Administration portal to manage registered devices and configure cloud capabilities.
The following Internet browsers are supported:
▪ Google Chrome™ 46.0.2490.86 and above▪ Mozilla® Firefox® 42.0 and above▪ Microsoft Edge™(all versions)
Access the Polycom Cloud Service Administration Portal from the Polycom Pano Web InterfaceYou can access the Polycom Cloud Service Administration portal from the web interface for a Polycom Pano system that is registered to the Polycom Cloud Service.
Procedure
1. Access the Polycom Pano web interface by opening a web browser and entering the IP address of the system using the format https://IPaddress (for example, https://10.11.12.13).
2. Go to General Settings > Cloud.
3. Select Launch the Polycom Cloud Service Portal.
4. In the Sign In box, enter your Email ID and Password, and then select Sign In.Related LinksPolycom Cloud Service on page 38
Access the Polycom Cloud Service Administration Portal from an Assigned URLYou can access the Polycom Cloud Service Administration portal from the following supported web browsers:
▪ Google Chrome™ (latest version)▪ Mozilla® Firefox® 42.0 and above▪ Microsoft Edge™(all versions)
Procedure
1. Access the Polycom Cloud Service Administration portal by opening a web browser and copying and pasting the URL you received in the Polycom Cloud Service Administration Account Activation email.
2. Enter your email address in the Email Address field and click Continue.
3. When the Sign In screen reappears, enter your password in the Password field and click Sign in.Related LinksPolycom Cloud Service on page 38
Getting Started with Polycom® Pano™
Polycom, Inc. 9

Setting Up System HardwareTopics:
▪ Connecting a Monitor
▪ Mount the System on a Table
▪ Mount the System on a Wall
▪ Mount the System on a Monitor
The following topics provide information on how to set up and configure the Polycom Pano system.
Note: Keep ventilation openings free of any obstructions and make sure there is ample space in front, above, and below the Polycom Pano system to prevent overheating.
Connecting a MonitorPolycom Pano systems support non-touch and touch-capable monitors.
Connect a Non-Touch MonitorThe Polycom Pano system is automatically configured to not use touch capability when it does not detect a connected touch-capable monitor or a pointing device with a USB interface, such as a USB mouse.
The non-touch experience is as follows:
▪ The Toolbar, content tray, and panel bar are unavailable.▪ Content is displayed in full-screen mode and according to the aspect ratio of the smart device or
connected system.▪ Users end a session by disconnecting the smart device(s) or connected system.
Procedure
1. Use the HDMI cable to connect the Polycom Pano system to the monitor.
2. Connect the LAN cable to the Polycom Pano system for network connectivity, or as a PoE+ power source.
3. Optionally, connect a power adapter to the Polycom Pano system as the power source.
Connect a Touch-Capable MonitorPolycom Pano systems are automatically configured to use touch user interface capability when they detect that a touch-capable monitor or a pointing device with a USB interface, such as a USB mouse, is connected.
Procedure
1. Use the HDMI cable to connect the Polycom Pano system to the monitor.
2. Connect the USB cable to the bottom USB port, which provides touch capability.
Polycom, Inc. 10

3. Connect the LAN cable to the Polycom Pano system for network connectivity, or as a PoE+ power source.
4. Optionally, connect a power adapter to the Polycom Pano system.
Mount the System on a TableYou can mount the Polycom Pano system on a tabletop, such as a desk or shelf.
Procedure
1. Place the system on the table.
2. Position the system cables so that they are kept neatly in place and away from heavy foot traffic to prevent accidental cable disconnections or damage.
Mount the System on a WallYou can mount the Polycom Pano system on a wall.
Setting Up System Hardware
Polycom, Inc. 11

Procedure
1. Make sure all cables are disconnected from the system, and then attach the two shoulder screws from the mounting kit to the bottom of the Polycom Pano system.
2. Draw a horizontal line on the wall to indicate the location of the mounting plate. Note that this line must be level to ensure the Polycom Pano system is properly installed. Use a level, if necessary. Add the screws:
a. Drill four 4.8 mm holes in the desired location on the wall where you want to position the system. These holes should be horizontal and vertical in alignment with the holes on the mounting plate. Insert expanding tubes into the four holes.
b. Using a #2 Phillips screwdriver and the screws in the mounting kit, screw the mounting plate to the wall.
3. With the back panel facing up, insert the heads of the two shoulder screws on the Polycom Pano system into the corresponding holes on the mounting plate. Then, gently push the device down until you hear a lock that indicates the system is secure.
4. Connect the cables, making sure to position them so that they are kept neatly in place and away from heavy foot traffic to prevent accidental cable disconnections or damage.
Mount the System on a MonitorYou can mount the Polycom Pano system on the back of a monitor. The Polycom Pano mounting kit includes a mounting plate with 50mm, 75mm, and 100mm VESA Mounting Interface Standard (MIS) hole patterns. If your monitor has a different VESA hole pattern, you may be able use a VESA adapter plate. Refer to the manufacturer’s documentation.
Setting Up System Hardware
Polycom, Inc. 12

Procedure
1. Make sure all cables are disconnected from the system, and then attach the two shoulder screws from the mounting kit to the bottom of the system.
2. Using the four 4.5mm screws included in the mounting kit, attach the mounting plate to the back of the monitor.
3. With the back panel facing up, insert the heads of the two shoulder screws on the Polycom Pano system into the corresponding holes on the mounting plate. Then, gently push the Polycom Pano system down until you hear a lock that indicates the device is secure.
4. Connect the cables, making sure to position them so that they are kept neatly in place and away from heavy foot traffic to prevent accidental cable disconnections or damage
Setting Up System Hardware
Polycom, Inc. 13

Running the Setup WizardTopics:
▪ Modes of Operation
▪ Run the Setup Wizard
The setup wizard, also known as the the out-of-box (OOB) state, walks you through the initial setup steps. You must launch and run the setup wizard to configure your Polycom Pano system.
Modes of OperationWhen you run the Polycom Pano setup wizard, you are presented with two setup options:
▪ Standalone You bypass Polycom Cloud Service registration and configure the Polycom Pano system as a standalone system. In this mode, you control system operations automatically or manually.
▪ Cloud You register a Polycom Pano system with the Polycom Cloud Service. System operations, such as software updates, are automatically controlled.
Polycom Cloud Service registration requires that your organization first complete the Polycom Cloud Service activation process.
Related LinksRegister a Polycom Pano Device with the Polycom Cloud Service on page 18
Run the Setup WizardKeep the following in mind about the setup wizard:
▪ You must have a web browser and a network connection to access the Polycom Pano web interface.
▪ The setup wizard allows you to set an Admin password to limit access to the administrator settings. The default Admin ID is admin and the default admin password consists of the last six characters of the Polycom Pano system serial number.
The Admin password is case-sensitive.
If you forget the Admin password, you must reset the system to run the setup wizard again. This will allow you to access the Admin settings and reset the password.
▪ The setup wizard is available during initial setup, after a system reset with system settings deleted, and after initiating factory reset.
Note: Make sure you complete the entire setup process. A timeout occurs after 10 minutes, and the system returns to the Sign In screen.
Procedure
1. Connect the monitor and network cables.
Polycom, Inc. 14

2. Plug in the power source to power on the device. A URL is displayed on the screen.
3. Using a PC or mobile device, open a browser and enter IP address of the system using the format https://IPaddress (for example, https://10.11.12.13).
4. The system is associated with a default admin username and password. You must change the default password during the initial setup process. If necessary, select the password visiblity icon
to hide or reveal the password.
5. Optionally, select the Change username checkbox to display an additional field for providing a new username.
6. Select a language for the system.
7. Select the country where the system is located.
8. The Polycom Cloud Service registration page appears. Select Sign In to register your system using the Polycom Cloud Service or Skip to continue to the next step and set up the Polycom Pano system as a standalone system: Enter the Email ID that was activated through the Polycom Cloud Service portal. This enables the system to locate your account. Enter your Email ID and Password.
9. Enter a Room Name that users will use to connect to the Polycom Pano system from a smart device or Polycom Pano App. Polycom recommends that you use a name that is associated with the location of the system. For example, use the name of the conference room.
10. Keep the automatically generated Device Name or enter a new one. This name identifies the Polycom Pano device in the Polycom Cloud Service portal dashboard.
11. When prompted, select Finish. The system will restart to complete the setup process.
Running the Setup Wizard
Polycom, Inc. 15

Configuring General System SettingsTopics:
▪ Set the System Language
▪ Set the Web Interface Language
▪ Set the Date and Time
▪ Set Device and Room Names
▪ Register a Polycom Pano Device with the Polycom Cloud Service
▪ Enable Screen Mirroring
▪ Disable Screen Mirroring
For detailed information about configuring general settings, see the following topics.
Set the System LanguageYou can change the language that appears on the Polycom Pano local interface.
Procedure
1. In a web browser, enter the IP address of the Polycom Pano system using the format https://IPaddress (for example, https://10.11.12.13).
2. In the Polycom Pano web interface, go to General Settings > System Language.
3. Select a language and save your setting.
Set the Web Interface LanguageYou can change the language that appears in the Polycom Pano web interface.
Procedure
1. In a web browser, enter the IP address of the Polycom Pano system using the format https://IPaddress (for example, https://10.11.12.13).
2. In the title bar, select a language from the drop-down list.
Set the Date and Time
Procedure
1. Access the web interface by opening a web browser and entering the IP address of the Polycom Pano system using the format https://IPaddress (for example, https://10.11.12.13).
Polycom, Inc. 16

2. In the Polycom Pano web interface, go to General Settings > Date Time.
3. Configure these settings:
Setting Description
Time Format Specifies how the time is displayed in the interface.
Auto Adjust for Daylight Saving Time Specifies the daylight saving time setting. When you enable this setting, the system clock automatically changes for daylight saving time.
Time Zone Specifies the time difference between GMT (Greenwich Mean Time) and your location.
Time Server Specifies whether the connection to a time server is automatic or manual for system time settings. You can also select Off to enter the date and time yourself.
Primary Time Server Address Specifies the address of the primary time server to use when Time Server is set to Manual.
Secondary Time Server Address Specifies the address of the time server to use when the Primary Time Server Address does not respond. This is an optional field.
Current Date and Current Time If Time Server is set to Manual or Auto, these settings are not displayed.
If Time Server is set to Off, Current Date and Current Time are configurable.
Set Device and Room NamesYou can set the device and room names associated with a standalone Polycom Pano system using the web interface. You must use the Polycom Cloud Service Administration portal to change the room name of systems that are registered with the Polycom Cloud Service.
Procedure
1. Access the web interface by opening a web browser and entering the IP adddress of the Polycom Pano system using the format https://IPaddress (for example, IPaddress).
2. In the Polycom Pano web interface, go to General Settings > Device and Room Name.
3. Enter values in the System Name or Room Name fields.
4. Select Save.
Configuring General System Settings
Polycom, Inc. 17

Register a Polycom Pano Device with the Polycom Cloud ServiceRegistering a Polycom Pano system with the Polycom Cloud Service allows users with the Polycom Pano App Cloud mode enabled to share content that is stored on an Office 365 OneDrive for Business folder with the system. Registering a Polycom Pano system also allows you to manage and monitor it from the Polycom Cloud Service Administration portal.
Procedure
1. Access the web interface by opening a web browser and entering the IP address of the Polycom Pano system using the format http://IPaddress (for example, https://10.11.12.13).
2. In the Polycom Pano web interface, go to General Settings > Cloud.
3. Select Sign In.
4. Enter the Email ID that was activated through the Polycom Cloud Service Administration portal. This enables the system to locate your account.
5. Enter your Email ID and Password.
6. Enter a Room Name that users will use to connect to the Polycom Pano device from a smart device or Polycom Pano App. Polycom recommends that you use a name that is associated with the location of the system. For example, use the name of the conference room.
7. Keep the automatically generated System Name or enter a new one. This name identifies the Polycom Pano system in the Polycom Cloud Service portal dashboard.
8. When prmpted, select Finish to complete the setup process.Related LinksModes of Operation on page 14Polycom Cloud Service Administration Portal on page 39
Enable Screen MirroringYou can enable the screen mirroring features that users connect to and share content. The enabled features are presented on the Polycom Pano home screen connection animation.
Note: The Polycom Pano system does not automatically enable the screen mirroring options when you enable the wireless settings.
Procedure
1. Access the web interface by opening a web browser and entering the IP address of the Polycom Pano system using the format https://IPaddress (for example, https://10.11.12.13).
2. In the Polycom Pano web interface, go to General Settings > Screen Mirroring
3. Select Enable AirPlay.
Configuring General System Settings
Polycom, Inc. 18

Disable Screen MirroringBy default, AirPlay and Miracast-compatible screen mirroring options are enabled. You can disable one or both of these services.
Note: The Polycom Pano system automatically updates the screen mirroring options when you disable the wireless settings.
Procedure
1. Access the web interface by opening a web browser and entering the IP address of the Polycom Pano system using the format https://IPaddress (for example, https://10.11.12.13).
2. In the Polycom Pano web interface, go to General Settings > Screen Mirroring.
3. Uncheck Enable AirPlay, Enable Miracast, or both. The Polycom Pano system is updated and the disabled option(s) are not displayed as connection options in the animation on the home screen.
Related LinksManage Wireless Communication Options on page 28
Configuring General System Settings
Polycom, Inc. 19

Configuring the NetworkTopics:
▪ Connect to the LAN
▪ LAN Status Lights
▪ Configure IP Address Settings
▪ Configure DNS Settings
▪ Configure LAN Options
The topics in this section cover network types used worldwide, but keep in mind that not all network types are available in all countries.
Connect to the LANYou must connect the Polycom Pano system to a LAN to share content and access the web interface.
LAN Status LightsThe LAN connector on the Polycom Pano device has two lights to indicate connection status and traffic.
Indicator Light Connection Status
Both lights off No 10/100/1000 Base-T connection and no network traffic.
Green and yellow lights on 10/100/1000 Base-T connection.
Green light on and blinking yellow light 10/100/1000 Base-T connection with network traffic
Configure IP Address SettingsYou can configure IPv4 and IPv6 settings in the web interface.
Procedure
1. Select one of the following options to specify how the IP address of the Polycom Pano system is obtained:
▪ Obtain IP address automatically.▪ Enter IP address manually.
2. Configure the following IPv4 settings:
Polycom, Inc. 20

Setting Description
Your IP Address Displays the system IP address.
If you need to create a static address, enter it here.
This field is disabled when the IP Address field is set to Obtain IP Address automatically.
Default Gateway Displays the gateway currently assigned to the system.
If you need to create a static address, enter it here.
This field is disabled when the IP Address field is set to Obtain IP Address automatically.
Subnet Mask Displays the subnet mask currently assigned to the system.
If you need to create a static address, enter it here.
This field is disabled when the IP Address field is set to Obtain IP Address automatically.
3. Configure the following IPv6 settings:
Setting Description
Enable IPv6 Enables the IPv6 network stack and makes the IPv6 settings available.
Enable SLAAC Specifies whether to use stateless address autoconfiguration (SLAAC) instead of DHCP to automatically obtain an IP address.
Link-Local Displays the IPv6 address used for local communication within a subnet.
This setting is configurable only when Enter IP address manually is selected.
Site-Local Displays the IPv6 address used for communication within the site or organization.
This setting is configurable only when Enter IP address manually is selected.
Global Address Displays the IPv6 Internet address.
This setting is configurable only when Enter IP address manually is selected.
Configuring the Network
Polycom, Inc. 21

Setting Description
Default Gateway Displays the gateway currently assigned to the system.
If the system does not automatically obtain a gateway IP address, enter one here.
This setting is configurable only when Enter IP address manually is selected.
4. Save your settings.
Configure DNS SettingsYou can configure DNS settings in the Polycom® Pano™ web interface.
Procedure
1. Configure the following DNS settings in the web interface:
Setting Description
Server Address 1, Server Address 2, Server Address 3, Server Address 4
If the system does not automatically obtain a DNS server address, you can enter one here. Up to four DNS server addresses are allowed. If all four address fields show addresses, you cannot add another.
2. Save your settings.
Configure LAN Options
Procedure
1. Configure the following LAN options in the web interface:
Setting Description
Host Name Indicates the system’s name
Domain Name Displays the domain name currently assigned to the system.
If the system does not automatically obtain a domain name, enter one here.
Autonegotiation Specifies whether the system should automatically negotiate the LAN Speed and Duplex Mode per IEEE 802.3 autonegotiation procedures. If this setting is enabled, the LAN
Configuring the Network
Polycom, Inc. 22

Setting Description
Speed and Duplex Mode settings become read-only.
Polycom recommends that you use autonegotiation to avoid network issues.
LAN Speed Specifies whether to use 10 Mbps, 100 Mbps, or 1000 Mbps for the LAN speed. Note that the duplex mode you choose must be supported by the switch.
Duplex Mode Specifies the duplex mode to use. Note that the duplex mode you choose must be supported by the switch.
Ignore Redirection Messages Enables the system to ignore ICMP redirect messages.
ICMP Transmission Rate Limit (millisec) Specifies the minimum number of milliseconds between transmitted packets. Enter a number between 0 and 1000. The default value of 1000 signifies that the system sends 1 packet per second. If you enter 0, the transmission rate limit is disabled.
This setting applies only to “error” ICMP packets. This setting has no effect on “informational” ICMP packets, such as echo requests and replies.
2. Save your settings.
Configuring the Network
Polycom, Inc. 23

Configuring Monitor SettingsTopics:
▪ Polycom Pano HDMI Interfaces
▪ Supported Displays
▪ Configure Monitor Settings
The following topics describe how to configure monitor settings in the Polycom Pano web interface.
Note: The Polycom Pano monitor must support a minimum of 1280 x 720 resolution.
Polycom Pano HDMI InterfacesThe Polycom Pano system includes two HDMI interfaces: one for wired content sharing (input) and another for the monitor connection (output). The Polycom Pano system only supports HDMI-to-HDMI connections; the system does not support conversions, such as VGA to HDMI cable connections.
Supported HDMI Input ResolutionsThe content sharing HDMI interface supports audio streaming. Sharing content from personal computing devices refers to sharing content using a computer with an HDMI connection. The Polycom Pano system supports a variety of resolutions.
Supported HDMI Input Resolutions and Frame Rates
Input Resolution Frame Rate(s)
UHD 3840 x 2160p 24, 25, 30
QHD 2560 x 1440p 50, 60
FHD 1920 x 1080p 50, 60
WSXGA+ 1680 x 1050 60
UXGA 1600 x 1200 60
SXGA 1280 x 1024 60
HD 1280 x 720p 50, 60
XGA 1024 x 768 60
SVGA 800 x 600 60
Polycom, Inc. 24

Supported HDMI Output ResolutionsThe HDMI monitor connection supports connection to the local interface. The Polycom Pano system supports the following output resolutions.
Supported HDMI Output Resolutions and Frame Rates
Resolution Frame Rate(s)
2160p 25, 30, 50, 60
1080p 25, 30, 50, 60
720p 25, 30, 50, 60
Supported DisplaysPolycom Pano systems can present content streams on user-supplied, non-touch and touch displays that support up to 4K (UHD) 60 frames per second (FPS) RGB444 output over HDMI 2.0. Polycom recommends that you use a display that supports the same input and visual output.
Recommendations for Using an Optional Touch-Capable MonitorThe Polycom Pano system supports single and multi-touch input from the USB port of an HID-compliant device. The following touch-capable monitors have been tested with Polycom Pano system and provide an optimal touch experience.
Tested Touch-Capable Monitors
Size (inches) Touch Technology Brand Model/Part Number
65 InGlass™ Volanti VD-6500/VD-6500-0B0C-1154
70 IR Sharp PN-L703B
Configure Monitor SettingsYou can configure Polycom Pano monitor settings to optimize the video image.
Procedure
1. Access the web interface by opening a web browser and entering the IP address of the Polycom Pano system using the format https://IPaddress (for example, https://10.11.12.13), and go to General > Settings > Monitor.
2. Configure the following settings:
Setting Description
Configure monitor Specifies the monitor setting:
Configuring Monitor Settings
Polycom, Inc. 25

▪ Automatic This is the default setting. Specifies that the Resolution setting is automatically detected and disables that setting.
▪ Manual Enables you to select the Resolution setting.
Resolution Specifies the resolution for the monitor.
This setting is unavailable when you select Automatic for the Configure monitor setting.
3. Save your settings.
Configuring Monitor Settings
Polycom, Inc. 26

Securing the SystemTopics:
▪ Security Settings in the Web Interface
▪ Manage System Access
▪ Set Local Account Details
▪ Disable the Security Code
▪ Manage Wireless Communication Options
For detailed information about configuring security settings, see the following topics.
Security Settings in the Web InterfaceTo configure your Polycom Pano system security settings using the system web interface, use one of the following supported browsers with cookies enabled:
▪ Google Chrome™ 46.0.2490.86▪ Mozilla® Firefox® 42.0▪ Apple® Safari® 9▪ Microsoft Edge (all versions)
Note: A message is displayed when you attempt to access the web interface using a browser with cookies disabled. This message does not appear for Microsoft Edge browsers.
You access the web interface from a web browser and enter the IP address of the Polycom Pano system using the format https://IPaddress (for example, https://10.11.12.13).
For more information about using the web interface, refer to Access the System Web Interface.
Caution: The HTTPS protocol ensures that the configuration of all login information is transmitted using an encrypted channel, including those user names and passwords used to communicate with third-party systems on your network. Using HTTPS severely limits the ability of anyone on the network to discover these credentials. For this reason, all attempts to use the Polycom Pano web interface via HTTP are redirected to the HTTPS interface.
Manage System AccessYou can configure system access options.
Set Local Account DetailsYou set up the Admin ID and password during out-of-box setup. You can change these values in the web interface.
Polycom, Inc. 27

Procedure
1. Access the web interface by opening a web browser and entering the IP address of the Polycom Pano system using the format https://IPaddress (for example, https://10.11.12.13), and go to Security > Local Accounts.
2. Save your settings.
Disable the Security CodeThe security code that is displayed on the Polycom Pano home screen is enabled by default. You can disable the code as needed in the Polycom Pano web interface or the Polycom Cloud Service Administration portal, depending on the system setup. For example, if the system is registered and connected to the Polycom Cloud Service, the option to disable the security code is read-only in the web interface.
Procedure
1. Do one of the following:▪ If the Polycom Pano system is not connected to the Polycom Cloud Service, access the web
interface by opening a web browser and entering the IP address of the Polycom Pano system using the format https://IPaddress (for example, https://10.11.12.13). Then, go to Security > Security Code and select Enable Security Code to clear the checkbox.
▪ Go to the Polycom Cloud Service Administration portal and edit the device settings.
Manage Wireless Communication OptionsThe Polycom Pano Wi-Fi and Bluetooth wireless communication hardware features allow Polycom Pano App, AirPlay, and Miracast-compatible devices to detect Polycom Pano systems on the network. You can enable or disable these features as needed. The animations that are displayed on the Polycom Pano home screen correspond to the system settings for wireless communication and screen mirroring.
Note: The Polycom Pano system does not support wireless LAN (WLAND). It cannot make direct Wi-Fi connections to external access points.
Related LinksDisable Screen Mirroring on page 19
Enable Wireless Communication SettingsYou can enable the wireless communication features.
Note: Enabling a wireless communication feature does not automatically turn it on. You must also enable screen mirroring in the web interface.
Procedure
1. Access the web interface by opening a web browser and entering the IP address of the Polycom Pano system using the format https://IPaddress (for example, https://10.11.12.13).
2. Go to Security Settings > Wireless.
Securing the System
Polycom, Inc. 28

3. Do one or more of the following:▪ Select the Enable Wi-Fi option enable all Miracast screen mirroring features.
▪ Select the Enable Bluetooth option to enable all AirPlay features.
4. Go to General Settings > Screen Mirroring.
5. Do one or more of the following:▪ Select Enable AirPlay.
▪ Select Enable Miracast.
Disable Wireless Communication SettingsBy default, the wireless communication features are enabled. You can disable them as needed.
Keep the following in mind when disabling the wireless features:
▪ Disabling the Wi-Fi hardware turns off all Miracast-compatible screen mirroring features.▪ Disabling the Bluetooth hardware turns off all AirPlay features and prevents Polycom Pano App
from automatically finding a Polycom Pano system. Polycom Pano App can still connect to the system when the user provides the IP address for the system.
Procedure
1. Access the web interface by opening a web browser and entering the IP address of the Polycom Pano system using the format https://IPaddress (for example, https://10.11.12.13).
2. Go to Security Settings > Wireless.
3. Specify your preferences:
a. Select the Enable Wi-Fi option to clear the checkbox and disable all Miracast screen mirroring features.
b. Select the Enable Bluetooth option to clear the checkbox and disable all AirPlay features.Your preferences are automatically updated for the Polycom Pano system.
Securing the System
Polycom, Inc. 29

Content SharingTopics:
▪ Content Sharing Options
The Polycom Pano collaboration system allows users to connect to it and share content from personal smartphones, tablets, laptops, and desktop systems. The following diagram provides an overview of the system's workflow.
Content Sharing OptionsOnce a Polycom Pano system is up and running, no additional administrator setup is required for users to share content from their personal devices and systems using the following methods:
▪ Wireless screen mirroring Users connect to the Polycom Pano system using AirPlay or a Miracast®-compatible device. The screen of the device is mirrored onto the Polycom Pano system, and any accompanying audio is also shared with the system. You can chooose to enable or disable one or more of these options in the system web interface. The connection animation on the home screen indicates to users which options are available.
▪ Wired input Using the HDMI interface for content sharing that is located on the back panel of the Polycom Pano system, users can connect a personal laptop or desktop system and share local content.
▪ Polycom Pano App Application a user installs on a Microsoft® Windows® or Apple® Mac® computer system that is not directly connected to the Polycom Pano system. Users are able to
Polycom, Inc. 30

share their screen, the window of a running application, or content from a Microsoft OneDrive for Business account. The latter option requires a Polycom Cloud Service account.
Polycom Cloud Service Content Sharing is a Polycom Labs feature. For more information, see the Polycom Pano Release Notes.
Content Sharing
Polycom, Inc. 31

System MaintenanceTopics:
▪ Resetting a System
▪ Updating System Software
▪ Downgrade to an Older Software Version
The following topics describe how to perform a factory reset and upgrade the system software.
Resetting a SystemIf a Polycom Pano system is not functioning correctly, you can perform a factory reset to return it to factory settings or reset the system to the default settings.
Perform a Factory ResetA factory reset completely erases the system flash memory and restores it to the software version and default configuration stored in its factory partition.
The following items are not saved:▪ Software updates▪ Logs
The Polycom Pano reset button that you use to initiate the factory reset process is located on the front of the device, as displayed in the following figure:
Polycom, Inc. 32

Perform a Factory Reset
Procedure
1. Do one of the following to restart the system:▪ Access the web interface by opening a web browser and entering the IP address of the
Pano device using the format https://IPaddress (for example, https://10.11.12.13), go to Diagnostics > System Reset, and then select Restart.
▪ Disconnect and reconnect the power cord or network cable, if the system is powered by PoE+.
2. When the LED on the reset button turns white, immediately press and hold it for ten seconds. Make sure your finger fully covers the button. This interrupts the system startup and initiates the factory reset process. The LED alternates blue and amber lights during the process. If the LED blinks a blue light after you press the reset button, an interruption of the system startup did not occur. Wait for the system startup to complete and then repeat the process. The system restarts automatically when the factory reset process is complete.
Delete System SettingsA system reset refreshes the system deleting all settings except the following:
▪ Current software version▪ Logs
Procedure
1. Access the web interface by opening a web browser and entering the IP address of the Polycom Pano system using the format https://IPaddress (for example, https://10.11.12.13).
2. Select Diagnostics > System Reset, and then select Reset All Sysem Configurations.After about 15 seconds, the system restarts and displays the setup wizard.
Updating System SoftwareYou can use the following methods to configure Polycom Pano systems to get software updates:
▪ A server on your network▪ The online software server hosted by Polycom▪ Software file obtained from http://support.polycom.com and uploaded to the web interface using a
USB 2.0 storage device.▪ Polycom Cloud Service
Update System Software from the Web InterfaceUsing the Polycom Pano web interface, you can manually or automatically update the software from the Polycom server, which has the latest released software version available.
Manually Update SoftwareYou can manually update the Polycom Pano software from the Polycom server.
System Maintenance
Polycom, Inc. 33

Procedure
1. Access the web interface by opening a web browser and entering the IP address of the Polycom Pano system using the format https://IPaddress (for example, https://10.11.12.13).
2. Select General Settings > Software Update.
3. Select Check for updates.
4. Select Update.
Automatically Update SoftwareYou can automatically update Polycom Pano software from the Polycom server
Procedure
1. Access the web interface by opening a web browser and entering the IP address of the Polycom Pano system using the format https://IPaddress (for example, https://10.11.12.13).
2. Select General Settings > Software Update.
3. To make automatic updates and update your software to the latest build on the server, select Enable automatic updates. An additional field appears for you to specify the IP address of the update server. You also have the option to specify that updates occur within a specific time range.
4. Enter the Update Server Address in the space provided.
5. Optionally, select Only check for updates during maintenance hours to specify a range of time to automatically update the software. When the date fields appear, select the desired time. Your changes are automatically saved. After the Maintenance hours begin and Maintenance hours end are configured, the Polycom Pano system calculates a random time within the defined update window at which to check for updates. It then checks for updates at this time on a daily basis as long as the Maintenance hours begin and Maintenance hours end values do not change. If the values change, a new random time within the new time window is calculated.
Disable System Software Updates from the Polycom Cloud ServiceWhen you register a system to the Polycom Cloud Service, automatic software updates are enabled by default. You can disable automatic software updates for a Polycom Pano system that is registered with the Polycom Cloud Service using the web interface.
Procedure
1. Access the web interface by opening a web browser and entering the IP address of the Polycom Pano device using the format https://IPaddress (for example, https://10.11.12.13).
2. Go to General Settings > Software Update.
3. To make automatic updates and update your software to the latest build on the server, select Enable automatic updates. An additional field appears for you to specify the IP address of the update server. You also have the option to specify that updates occur within a specific time range
4. Enter the Update Server Address in the space provided.
5. Optionally, select Only check for updates during maintenance hours to specify a range of time to automatically update the software. When the date fields appear, select the desired time. Your changes are automatically saved. After the Maintenance hours begin and Maintenance hours end values are configured, the Polycom Pano system calculates a random time within the defined update window at which to check for updates. It then checks for updates at this time on a daily
System Maintenance
Polycom, Inc. 34

basis as long as the Maintenance hours begin and Maintenance hours end values do not change. If the values change, a new random time within the new time window is calculated.
Update System Software from a USB Storage Device
Procedure
1. Obtain the software package from Polycom Support.
2. Save the software upgrade package to the root directory of a USB storage device.
3. Connect the USB storage device to the USB 2.0 port on the back of the device. This is the top USB port. The device detects the USB storage device and displays a prompt on the monitor for you to confirm that you want to update the software.
4. Select OK. Follow the setup wizard instructions to complete the update.
Downgrade to an Older Software VersionYou can downgrade the software on a Pano device to an earlier version using any of the supported software update methods.
Determine the Software VersionBefore you downgrade system software, Polycom recommends that you check the current system software version you are running.
Procedure
1. Do one of the following:▪ Go to the Polycom Pano web interface by opening a web browser and entering the IP
address of the Polycom Pano system using the format https://IPaddress (for example, https://10.11.12.13), go to Dashboard, and view the Software Version in the system summary table.
▪ Go to the Polycom Pano web interface, go to General Settings > Software Update, and view the Current Version in the Manual Update section.
System Maintenance
Polycom, Inc. 35

Port UsageTopics:
▪ Port Usage
The following topic on port usage is useful when you configure your network equipment for communication with the Polycom Pano system, Polycom Pano App, and AirPlay-compatible devices.
Port UsageThe following table describes the ports that are required to handle connections between the Polycom Pano system and other systems and network services.
Connections
Port Type Protocol Function
53 UDP Domain Name Service (DNS)
Dynamic IP assignment
80 TCP HTTP HTTP web server listener that redirects all sessions to HTTPS on port 443. Also used by AirPlay.
123 UDP Network Time Protocol (NTP)
Automatic time synchronization
443 TCP/SCTP SSL/HTTPS Static TCP HTTPS web server listener that provides TLS access to the Polycom Pano web user interface. Also used by AirPlay.
554 UDP/TCP Real Time Streaming Protocol (RTSP)
AirPlay
1900 UDP Simple Service Discovery Protocol (SSDP)
Bonjour
3689 TCP Digital Audio Access Protocol (DAAP)
iTunes Music Sharing/AirPlay
5001 TCP IPIPC Polycom Pano App for content sharing
5297 TCP Bonjour
5298 TCP Bonjour
Polycom, Inc. 36

Port Type Protocol Function
5353 UDP multicast Domain Name System (mDNS)
Bonjour/AirPlay
7000 TCP AirPlay AirPlay media (will use a dynamic port, if unavailable).
7100 TCP AirPlay AirPlay video mirroring (used only to support iOS 6 and older devices).
49152 - 65535 Dynamic Used by applications that use a dynamic, random, or configurable port. If a default port used by an application is already in use, it will dynamically use another port in this range that is available.
49159 UDP mDNS (Windows) Bonjour/AirPlay
49163 UDP mDNS (Windows) Bonjour/AirPlay
Port Usage
Polycom, Inc. 37

Polycom Cloud ServiceTopics:
▪ Polycom Cloud Service Administration Portal
▪ Polycom Cloud Service Administration Account Activation Process
▪ Integrate with Microsoft Office 365 OneDrive for Business
▪ Authentication Providers
▪ Document Services
▪ Device Management
▪ Account
The Polycom Cloud Service is an offering that enables users in an organization to securely share content with a registered Pano system from the Microsoft® OneDrive® for Business enterprise document storage service, using a locally installed copy of Polycom Pano App.
Keep the following in mind about the Polycom Cloud Service:▪ Polycom Pano systems use standard HTTPS connections to communicate with the Polycom Cloud
Service. The Polycom Cloud Service authenticates each Polycom Pano device prior to accepting connections from it; similarly Polycom Pano systems authenticate the Polycom Cloud Service's identity before completing a connection to it.
▪ Polycom Pano App uses standard HTTPS connections to communicate with the Polycom Cloud Service. Polycom Pano App authenticates the identity of the Polycom Cloud Service prior to connecting to it. The Polycom Cloud Service uses the industry-standard OAuth 2.0 protocol to enable access to your enterprise Office 365 services via the Polycom Pano App. This allows users to sign in directly to Office 365 without the Polycom Pano App or the Polycom Cloud Service ever having access to user credentials.
▪ Documents shared from the Polycom Cloud Service are rendered to Polycom Pano App and a Polycom Pano system over encrypted WebSocket Secure (WSS) connections, which keeps the information secure during transit.
▪ When a document is shared from the Polycom Cloud Service, the actual document is not sent or made available to either the Polycom Pano or the Polycom Pano App. Instead, a web view of the document is created in the cloud and rendered into a compressed video stream that is then sent to both Polycom Pano and Polycom Pano App. This keeps the document safe in the cloud, unaltered and inaccessible to those viewing it.
▪ When a content sharing session ends, the shared content is deleted from the Polycom Cloud Service and Polycom Pano App. The content remains in its original state on the OneDrive for Business system.
Related LinksAccess the Polycom Cloud Service Administration Portal from the Polycom Pano Web Interface on page 9Access the Polycom Cloud Service Administration Portal from an Assigned URL on page 9
Polycom, Inc. 38

Polycom Cloud Service Administration PortalThe Polycom Cloud Service Administration portal is the central point from which you can set up and utilize the Polycom Cloud Service.
Polycom Cloud Service Administration provides the following basic functions:▪ Integrating with your enterprise Microsoft® Office 365™ service▪ Registering and monitoring your Polycom Pano systems
You must activate your Polycom Cloud Service administration account before using the Polycom Cloud Service.
Related LinksRegister a Polycom Pano Device with the Polycom Cloud Service on page 18
Polycom Cloud Service Administration Account Activation ProcessYour Polycom Cloud Service account is created for you as part of your purchase of Polycom Pano and its maintenance service.
You should have received a “Welcome to Polycom Cloud Service Administration” email message that will guide you through the steps of activating your account, sent to the email address you provided at the time of purchase.
Important: China, Mexico, Brazil, Argentina: You must first activate your Polycom Pano maintenance service and provide an email address for Polycom Cloud Service Administration before your Polycom Cloud Service account can be created. You can activate the maintenance service on the Polycom Support Center .
If you have not received the “Welcome to Polycom Cloud Service Administration”, please contact Polycom Global Service at 1-800-Polycom (765-9266).
Request to Activate an Administrator AccountYou can request to activate an administrator account for yourself.
Procedure
1. In the Welcome to Polycom Cloud Service Administration email you received, click Activate Your Account.
2. Enter your email address in the Email Address field and click Continue.
An Activation screen will appear indicating that an Activation email has been sent to your email address with a link to complete the activation of your account. The link is active for two hours.
3. In the Activation screen, click Close.
Polycom Cloud Service
Polycom, Inc. 39

Activate AccountUpon receiving the account activation email, you can sign in to set up your password and finalize your account activation from the Activate Account screen.
Procedure
1. In the Polycom Cloud Service Account Activation email you received, click the Complete Account Activation button.You are directed to the Activate Account screen.
2. In the Set Password box, create a password.
Note: Password must be between 8 and 32 characters in length and must contain at least one uppercase letter, one lowercase letter, one number, and one special character.
3. In the Confirm Password box, enter the password again.
4. Click Submit.You will then be redirected to the Polycom Cloud Service Administration Sign In screen where you can sign in using your email address and the password you just configured for your account.
You will also receive a Polycom Cloud Service Administration Account Activated email containing additional information about your Polycom Cloud Service Administration account. Be sure to save this email for future reference.
Sign In with Your Activated Administration AccountAfter completing your account activation, you are redirected to the Sign In screen.
Always use your email address and the password (that you used to activate your account) for signing in.
Procedure
1. Now that your account is activated, you can sign into your account at any time in the Polycom Cloud Service Administration portal: https://console.plcm.cloudThis link is also included in your Polycom Cloud Service Administration Account Activated email message.
2. Enter your email address in the Email Address field and click Continue.
3. When the Sign In screen reappears, enter your password in the Password field and click Sign in.
Reset PasswordIf you forget your password, you can reset it from the Sign In screen.
Procedure
1. Enter your email address in the Email Address field and click Forgot Password.
2. In the Forgot Password field, enter your Email Address again and click Submit.
3. When prompted, click Close.You are emailed a link to change your password.
Polycom Cloud Service
Polycom, Inc. 40

4. Open the email and click the link.
5. In the Reset Password field, enter your Email Address and a new password.
Note: Password must be between 8 and 32 characters in length and must contain at least one uppercase letter, one lowercase letter, one number, and one special character.
6. Re-enter the new password to confirm it and click Submit.When the password is successfully reset, you are redirected to the Sign In screen.
Related LinksChange Password on page 48
Integrate with Microsoft Office 365 OneDrive for BusinessTo allow your users to share documents from their Microsoft OneDrive for Business folders, the Polycom Cloud Service supports integration with your Microsoft Office 365 service.
Integration with your Microsoft Office 365 service consists of three basic steps:
1. Retrieving some information from your Polycom Cloud Service account required for the integration (Redirect URLs for the Authentication and Document Service provider)
2. With the assistance of your company's Microsoft Azure Active Directory administrator, registering the Polycom Cloud Service as a trusted web application that allows users to sign in and access their OneDrive for Business folders and files.
3. Using information returned from this registration, configuring the Authentication and Document Service provider in your Polycom Cloud Service account.
Polycom Cloud Service Content Sharing is a Polycom Labs feature. For more information, see the Polycom Pano Release Notes.
You can use the following detailed steps to complete the integration:
Procedure
1. Sign in to the Polycom Cloud Service Administration portal.
2. You need to get the authentication provider redirect URL to use.
a. Click Authentication Provider.
b. In the Type drop-down menu, select O365OAuth.
c. Click Copy to Clipboard and paste the Redirect URL in a text file and save it for future use.
d. Click Cancel.
3. You need to get the Document Services redirect URL to use.
a. Click Document Services.
b. In the Type drop-down menu, select O365/OneDrive for Business.
Polycom Cloud Service
Polycom, Inc. 41

c. Click Copy to Clipboard and paste the Redirect URL in a text file and save it for future use.
d. Click Cancel.
4. Once you have saved the Redirect URLs, provide them to your Microsoft Azure Active Directory administrator. Ask the Active Directory administrator to perform an App registration of the Polycom Cloud Service within your company's Microsoft Azure Active Directory. Your Active Directory administrator can use the Redirect URLs by referring to the following mapping table ( The app registration can be performed via the Microsoft Azure portal https://portal.azure.com ).
Polycom Cloud Service URLs and Microsoft Azure Active Directory URLs
Polycom Cloud Service URLs Microsoft Azure Active Directory URLs
Authentication Provider>Redirect URL App registration > Sign-on URL
Document Services > Redirect URL App registration > Settings > GENERAL > Reply URLs
5. Collect the following Microsoft Azure Active Directory settings from your Microsoft Azure Active Directory administrator.
Polycom Cloud Service Settings and Microsoft Azure Active Directory Settings
Microsoft Azure Active Directory Settings Polycom Cloud Service Settings
App registration > Settings > Essentials > Application ID Client ID
App registration > Settings> API Access > Keys Client Secret
Properties > Directory ID Tenant ID
Domain names > Primary domain name in the Domain Name lists, for example <company-specific>.omnimicrosoft.com. You will enter just the company-specific part into the Tenant field but not the entire domain name.
Tenant
6. Return to the Polycom Cloud Service Administration portal and finish the rest of the authentication provider configurations.
a. Click Authentication Providers.
b. Enter a Name for your authentication provider.
c. Paste the Client ID, Client Secret, Tenant ID values according to the mapping table in Step 5.
7. Finish the rest of the document service configurations.
a. Click Document Services.
b. Enter a Name for your document service.
c. Paste the Client ID, Client Secret, Tenant ID, Tenant values according to the mapping table in Step 5.
Polycom Cloud Service
Polycom, Inc. 42

Authentication ProvidersAuthentication Providers is where you can connect the Polycom Cloud Service to the authentication providers.
You can connect the Polycom Cloud Service to the following authentication provider types:
ADFS3OAuth2 Microsoft Active Directory Federation Services 3.0
O365OAuth Microsoft Office 365 (Microsoft Azure)
Both providers use the OAuth 2.0 authorization framework to access the external authentication service. This ensures reliable and secure use of the provider's identity management services.
For the vast majority of the Office 365 integrations, the O365OAuth provider will be used.
Add an Authentication ProviderYou can add a single provider of each provider type from Authentication Providers.
Procedure
1. In the Polycom Cloud Service Administration portal, click Authentication Providers.
2. To add an authentication provider, click Add .
3. In the Type drop-down menu, select one of following authentication providers.▪ ADFS3OAuth2▪ O365OAuth
The configuration area will prompt with different settings depending on the selected authentication provider.
4. Register the Polycom Cloud Service as an OAuth 2.0 client using the procedures specific to the authentication service being integrated (either ADFS or Office 365/Azure Active Directory). To do this you will need to provide the following information to your Active Directory administrator and let them perform this registration:
▪ ADFS Registration: Callback URL (see the description in the ADFS3OAuth2 table below)▪ Microsoft Azure Active Directory Registration: Redirect URL (see the description in the
O365OAuth table below)
5. Under configuration area, configure the required fields for the authentication provider.
ADFS3OAuth2
Setting Description
Name Your authentication provider 's name.
Client ID Client Application ID is used to register the Polycom Cloud Service as an ADFS OAuth 2.0 client. Your Active Directory administrator will create this as part of performing the registration. It is a Globally Unique IDentifier (GUID), so any GUID generator can be used to create it.
Polycom Cloud Service
Polycom, Inc. 43

Setting Description
Client Secret This is the OAuth 2.0 client secret that is created as part of registering the Polycom Cloud Service as an ADFS OAuth 2.0 client. Your Active Directory administrator will provide this to you. Make sure you save the Client Secret in a text file. Once you entered the Client Secret, you cannot retrieve it from Polycom Cloud Service Administration portal.
Callback URL This is a read-only field. Supply the Callback URL to your Active Directory administrator as it is required for registering the Polycom Cloud Service as an ADFS OAuth 2.0 client.
Authorization URL Your Active Directory administrator will provide this URL to you. It is typically in the form of https://<company-adfs-domain> /adfs/oauth2/authorize.
Token URL Your Active Directory administrator will provide this URL to you. It is typically in the form of https://<company-adfs-domain>/adfs/oauth2/token.
Logout Redirect URL
Your Active Directory administrator will provide this URL to you. It is typically in the form of https://<company-adfs-domain>/adfs/ls/?wa=wsignout1.0.
Resource Your Active Directory administrator will provide this resource server identifier to you. It is registered as the “Identifier” parameter of the Relying Party Trust in ADFS, for example https://<myapplication>.
O365OAuth
Setting Description
Name Your authentication provider 's name.
Client ID This is the Application ID created for the Polycom Cloud Service as part of registering it within Microsoft Azure Active Directory.
Client Secret This is the API Access Key created for the Polycom Cloud Service as part of registering it within Microsoft Azure Active Directory. Make sure you save the Client Secret in a text file. Once you entered the Client Secret, you cannot retrieve it from Polycom Cloud Service Administration portal.
Tenant ID Your Microsoft Azure Active Directory ID.
Redirect URI This is a read-only field. Supply the Redirect URL to your Microsoft Azure Active Directory administrator as it is required for registering the Polycom Cloud Service within Microsoft Azure Active Directory.
6. Click Save.Related LinksIntegrate with Microsoft Office 365 OneDrive for Business on page 41
Edit or Delete a Connected Authentication ProviderYou can edit or delete a connected authentication provider from Authentication Providers.
Polycom Cloud Service
Polycom, Inc. 44

Procedure
1. In the Polycom Cloud Service Administration portal, click Authentication Providers.
2. To edit an authentication provider, click Edit .
a. Under configuration area, configure the required fields for the authentication provider.
b. Click Update.
3. To delete an authentication provider, click Delete .
Document ServicesDocument Services is where you can integrate the Polycom Cloud Service with the document service provider.
The Polycom Cloud Service supports a single document service provider: Microsoft Office 365 OneDrive for Business.
Configuring a Document Service is similar to configuring an Authentication Provider.
Polycom Cloud Service Content Sharing is a Polycom Labs feature. For more information, see the Polycom Pano Release Notes.
Add a Document ServiceYou can add a document service from Document Services.
Procedure
1. In the Polycom Cloud Service Administration portal, click Document Services.
2. To add a document service, click Add .
3. In the Type drop-down menu, select O365/OneDrive for Business.
4. Under Configure O365ORes Integration, configure the required fields for the document service.
Microsoft O365 OneDrive for Business
Setting Description
Name Your document service's name.
Client ID This is the Application ID created for the Polycom Cloud Service as part of registering it within Microsoft Azure Active Directory.
Client Secret This is the API Access Key created for the Polycom Cloud Service as part of registering it within Microsoft Azure Active Directory. Make sure you save the Client Secret in a text file. Once you entered the Client Secret, you cannot retrieve it from Polycom Cloud Service Administration portal.
Tenant ID Your Microsoft Azure Active Directory ID.
Polycom Cloud Service
Polycom, Inc. 45

Setting Description
Tenant The company-specific part of your default Microsoft Azure Active Directory domain name. This domain name is in the form of <company-specific>.onmicrosoft.com. You will enter just the <company-specific> part into the Tenant field but not the entire domain name.
Redirect URI This is a read-only field. Supply the Redirect URL to your Microsoft Azure Active Directory administrator as it is required for registering the Polycom Cloud Service within Microsoft Azure Active Directory.
5. Click Save.Related LinksIntegrate with Microsoft Office 365 OneDrive for Business on page 41
Edit or Delete an Integrated Document ServiceYou can edit or delete an integrated document service from Document Services.
Procedure
1. In the Polycom Cloud Service Administration portal, click Document Services.
2. To edit the document service, click Edit .
a. Under Configure O365ORes Integration, configure the required fields for the document service.
b. Click Update
3. To delete the document service, click Delete .
Device ManagementDevice Management is where you can monitor and edit your registered Polycom Pano devices.
Registered Device InformationEach registered Polycom Pano device is listed in a table with the following information:
Registered Device Information
Device Information Description
Status This column shows an icon that indicates the registration status of the device:
▪ (Online) — Indicates that the Polycom Pano device is currently connected to the Polycom Cloud Service
▪ (Offline) — Indicates that the Polycom Pano device has been disconnected from the Polycom Cloud Service
Name The Device Name of the Polycom Pano
Polycom Cloud Service
Polycom, Inc. 46

Device Information Description
IP Address The IPv4 Address of the Polycom Pano device. Clicking on this address will establish a web UI session to the Polycom Pano device (created in a separate tab in your browser)
Type Device Type (Polycom Pano)
MAC The MAC address of the Polycom Pano device
Serial Number The serial number of the Polycom Pano device
Action Two action icons are available. Click on the icon for the desired action:
▪ (Edit) — Edit device properties
▪ (Delete) — Delete device
Editing Device PropertiesOnce you click (Edit), additional information about the Polycom Pano device will display and you can edit part of the properties. The following tables show you the editable device properties and read-only properties respectively.
Editable Device Properties
Properties Description
Device Name This field can contain any Unicode string of up to 40 characters
Room This field can contain any Unicode string of up to 40 characters
Security Code Required
This checkbox controls whether a security code is required to connect to the Polycom Pano device.
Read-only Device Properties
Properties Description
Status Device Status
MAC ID Device MAC address
Serial Number Device Serial Number
IPv4 Device IPv4 IP Address
IPv6 Device IPv6 IP Address
Software Version Device Software Version
Hardware Version Device Hardware Version
Polycom Cloud Service
Polycom, Inc. 47

AccountYou can change your password or sign out of your account from the Account menu.
Change PasswordYou can change your password.
Procedure
1. In the Polycom Cloud Service Administration portal, select Account > Change Password.
2. Enter your current password and new password.
3. Click Update.Related LinksReset Password on page 40
Sign OutYou can sign out your account.
Procedure
1. In the Polycom Cloud Service Administration portal, select Account > Sign Out.
Polycom Cloud Service
Polycom, Inc. 48

Sending Content to a Polycom Video SystemTopics:
▪ Supported Polycom Video Systems
▪ Connect a Polycom Video System Using Two Monitors
▪ Connect a Polycom Video System Using Three Monitors
▪ Test Content Sharing
▪ Unpair a Polycom Video System
A Polycom Pano system can send content to a Polycom video system. Once the required setup is complete, no further action is required to enable content sharing. The Polycom Pano system detects when content is available and automatically presents to the Polycom video system.
You can pair a Polycom Pano system with a Polycom video system using two or three monitors:
▪ Two Monitors Configure the Polycom Pano and Polycom video system to present content on the second monitor
▪ Three Monitors Integrate the Polycom Pano system with the Polycom video system, and configure the Polycom Pano system to present content on the third monitor. Note that for this setup option, the Polycom Pano content displays on two monitors.
Keep the following in mind when enabling content on a Polycom video system:▪ The Polycom Pano system must initiate the content sharing request.▪ Far site annotations on the Polycom Pano content are not supported.▪ Make sure you disable the VisualBoard application in the web interface.
Supported Polycom Video SystemsPolycom Pano systems can pair with the following Polycom video systems:
▪ Polycom® RealPresence® Group Series 310, 500, 550, and 700 systems with software version 6.0 or later.
▪ Polycom® RealPresence Centro™ systems with software version 6.0 or later.
Connect a Polycom Video System Using Two MonitorsYou can pair a Polycom Pano system with a Polycom video system using two monitors.
Connect a Polycom Video System Using Two Monitors (Non-Touch Monitor Setup)You can connect a Polycom Pano system to a Polycom video system using two monitors when the Polycom Pano monitor does not have touch capability, as shown in the following diagram:
Polycom, Inc. 49

Keep the following in mind:
▪ Polycom recommends that you do not display the IP address on the Polycom video system local interface. This will prevent users with personal devices from attempting to use the IP address of the Polycom video system to connect to the Polycom Pano system.
▪ Polycom recommends that you create a printout with the Polycom Pano connection information (device name, security code, and enabled connection methods) for users who want to connect a personal device to share content. Alternatively, you can go to the web interface for the Polycom video system and select the Content, then Near monitor profile to view the Polycom Pano system.
Procedure
1. Make sure the Polycom Pano systerm is running the latest software.
2. Connect one end of an HDMI cable to the HDMI In port on the Polycom Pano monitor. Connect the other end to an HDMI Out port on the Polycom video system.
3. Connect one end of an HDMI cable to the HDMI In port on the Polycom video system. Connect the other end to the HDMI Out port on the Polycom Pano system.
4. Open a web browser and enter the IP address of the Polycom video system.
5. Set up the monitor profiles for the Polycom video system monitor:
a. Open a web browser and enter the IP address of the Polycom video system.
Sending Content to a Polycom Video System
Polycom, Inc. 50

b. Go to Admin Settings > Audio/Video > Monitors.
c. For Monitor 1 at Monitor Profile, select Far, then Near.
d. For Monitor 2 at Monitor Profile, select Content, then Far.
6. The Polycom Pano system will start presenting on the Polycom video system once the setup is complete. You must continue with the following steps to pair the systems and complete the setup process.
7. Open a supported web browser, enter the IP address of the Polycom Pano system, and go to General Settings > Pairing.
8. Enter the IP address, Admin ID, and Admin password that are associated with the Polycom video system. If no password is set, leave the Admin password field blank.
9. Select Connect. Information about the paired systems is displayed on the screen. You can modify the Polycom Pano system name, if desired.
10. Select Pair. The Pair button appears only when the connection in the step above is successful. Once pairing is successful, the Pair button changes to Update.
11. Test that content sharing functions properly.
Connect a Polycom Video System Using Two Monitors (Touch Monitor Setup)Optionally, use a prerequisite.
You can connect a Polycom Pano system to a Polycom video system using two monitors when the Polycom Pano monitor has touch capability, as shown in the diagram below.
Keep the following in mind:
▪ Monitor 2 is dedicated to showing Polycom Pano content. Far and near video are displayed on monitor 1.
▪ You must place the call on the Polycom video system first, then start content on the Polycom Pano system.
▪ VGA support is available on RealPresence Group 700 systems.▪ You will need three HDMI cables and a 4K HDMI splitter for this setup option.
Polycom has tested and recommends an HDMI splitter by CSRET with the following specifications:
▪ 1x2 HDMI Splitter Amplifier version 2.0▪ Certified for 4K x 2K (60Hz) and 3D 1080p▪ Supports 1 in 2 out signal distribution
You can choose to use a different 4K splitter. If you do, make sure the specifications of the model you choose are comparable to those for the CSRET product.
Sending Content to a Polycom Video System
Polycom, Inc. 51

Procedure
1. Make sure the Polycom Pano systerm is running the latest software.
2. Set the HDMI splitter to Scaler.
3. Connect one end of an HDMI cable to the splitter. Connect the other end of the HDMI cable to the HDMI Out port on the Polycom Pano system, shown in the following figure:
4. Connect one end of an HDMI cable to HDMI 1 on the splitter. Connect the other end of the HDMI cable to the HDMI In port on the Polycom Pano monitor.
5. Configure the Polycom Pano monitor settings:
a. Open a supported web browser and enter the IP address of the Polycom Pano system.
b. Go to General Settings > Monitor.
c. Select Manual for the Configure monitor option, and save your settings.
d. Select 3840x2160p 30 Hz for Resolution.
Sending Content to a Polycom Video System
Polycom, Inc. 52

e. Save your settings. The monitor will adjust to the resolution.
6. Set up the monitor profile for the Polycom video system monitor:
a. Open a web browser and enter the IP address of the Polycom video system.
b. Go to Admin Settings > Audio/Video > Monitors.
c. For Monitor 1 at Monitor Profile, select Content, then Far, then Near.
7. Restart the Polycom video system.
8. Connect one end of an HDMI cable to the HDMI Input port on the Polycom video system (see images below for port location). Connect the other end of the cable to an Output port on the splitter. For RealPresence Group 700 systems, you must connect the HDMI cable to Input port 3.
The Polycom Pano system will start presenting on the Polycom video system once the systems and monitors are connected. You must continue with the following steps to pair the systems and complete the setup process.
9. Open a supported web browser, enter the IP address of the Polycom Pano system, and go to General Settings > Pairing
10. Enter the IP address, Admin ID, and Admin password that are associated with the Polycom video system. If no password is set, leave the Admin password field blank.
11. Select Connect. The Pair button appears only when the connection in the step above is successful. Once pairing is successful, the Pair button changes to Update.
12. Test that content sharing functions properly.
Sending Content to a Polycom Video System
Polycom, Inc. 53

Connect a Polycom Video System Using Three MonitorsYou can pair a Polycom Pano system with a Polycom video system using a three-monitor setup that allows you to display Far video, Far and near content, and Polycom Pano content during a meeting.
Keep the following in mind when using the three-monitor setup:
▪ The monitor that is connected to the Polycom Pano system must be touch-capable.▪ You will need three HDMI cables and a 4K HDMI splitter for this setup option.
Polycom has tested and recommends an HDMI splitter by CSRET with the following specifications:
▪ 1x2 HDMI Splitter Amplifier Ver 2.0▪ Certified for 4K x 2K (60Hz) and 3D 1080P▪ Supports 1 in 2 out signal distribution
You can choose to use a different 4K splitter. If you do, make sure the model has specifications that are comparable to the CSRET recommended product.
Monitor and System Setup (3 Monitors)
Sending Content to a Polycom Video System
Polycom, Inc. 54

Room Setup (3 Monitors)
Connect a Polycom Video System Using Three Monitors
Procedure
1. Make sure the Polycom Pano system is running the latest software.
2. Set the HDMI splitter to Scaler.
3. Connect one end of an HDMI cable to the splitter. Connect the other end of the HDMI cable to theHDMI Out port on the Polycom Pano system, shown in the following figure:
4. Connect one end of an HDMI cable to HDMI 1 on the splitter. Connect the other end of the HDMIcable to the HDMI In port on the Polycom Pano monitor.
Sending Content to a Polycom Video System
Polycom, Inc. 55

5. Configure the Polycom Pano monitor settings:
a. Open a supported web browser and enter the IP address of the Polycom Pano system.
b. Go to General Settings > Monitor.
c. Select Manual for the Configure monitor option, and save your settings.
d. Select 3840x2160p 30 Hz for Resolution.
e. Save your settings. The monitor will adjust to the resolution.
6. Connect one end of an HDMI cable to the HDMI Input port on the Polycom video system (see images below for port location). Connect the other end of the cable to an Output port on the splitter. For RealPresence Group 700 systems, you must connect the HDMI cable to Input port 3.
The Polycom Pano system will start presenting on the Polycom video system once the systems and monitors are connected. You must continue with the following steps to pair the systems and complete the setup process.
7. Open a supported web browser, enter the IP address of the Polycom Pano system, and go to General Settings > Pairing.
8. Enter the IP address, Admin ID, and Admin password that are associated with the Polycom video system. If no password is set, leave the Admin password field blank.
9. Select Connect. The Pair button appears only when the connection in the step above is successful. Once pairing is successful, the Pair button changes to Update.
10. Test that content sharing functions properly.
Sending Content to a Polycom Video System
Polycom, Inc. 56

Test Content SharingYou can perform a test to confirm that content from a Polycom Pano system is displaying on a Polycom video system. This is helpful when you are pairing the systems from a remote location.
Procedure
1. Open a supported web browser, enter the IP address of the Polycom Pano system, and go to General Settings > Pairing.
2. Select Start Content. The Polycom Pano system screen should display on the Polycom video system monitor.
3. When the test is complete without errors, select Stop Content.
Unpair a Polycom Video SystemYou can unpair a Polycom video system from a Polycom Pano system when you no longer want to pair with it, such as to pair a different system.
Procedure
1. Open a web browser, enter the IP address of the Polycom Pano system usning the format https://IPaddress (for example, https://10.11.12.13), and go to General Settings > Pairing.
2. Select Unpair.
Sending Content to a Polycom Video System
Polycom, Inc. 57

TroubleshootingTopics:
▪ Retrieve Log Files
▪ Contacting Polycom Support
The following topics provide information to help you troubleshoot problems with Polycom Pano systems.
Retrieve Log FilesYou can use the web interface to download log files to a location on your computer.
Note: The date and time of the system log entries for Pano devices are shown in GMT.
Procedure
1. Access the web interface by opening a web browser and entering the IP address of the Polycom Pano system using the format https://IPaddress (for example, https://10.11.12.13), and go to Diagnostics > Logs.
2. Select Download system logs. A dialog window opens for you to specify how you want to open or save the .tgz file.
Contacting Polycom SupportIf you are not able to share content successfully and you have verified that the equipment is installed and set up correctly, contact Polycom Support. Be prepared to provide the Polycom Pano system logs an details about the issue you are experiencing.
Procedure
1. Make notes of any active alerts generated by the system, and any troubleshooting steps that you have already tried.
2. Go to the Polycom Support site and create a Problem Report ticket that includes the downloaded system logs and a description of the problem.
Polycom, Inc. 58