Tricine-Sodium Dodecyl Sulfate-Polyacrylamide Gel Electrophoresis ...

Polyacrylamide Gel Electrophoresis of RNA
Donald C. Rio, Manuel Ares Jr, Gregory J. Hannon, and Timothy W. Nilsen
INTRODUCTION
Perhaps the most important and certainly the most often used technique in RNA analysis is gelelectrophoresis. This technique is generally applicable for RNA detection, quantification, purificationby size, and quality assessment. Because RNAs are negatively charged, they migrate toward the anodein the presence of electric current. The gel acts as a sieve to selectively impede the migration of theRNA in proportion to its mass, given that its mass is generally proportional to its charge. Because massis approximately related to chain length, the length of an RNA is more generally determined by itsmigration. In addition, topology (i.e., circularity) can affect migration, making RNAs appear longer onthe gel than they actually are. Gels are used in a wide variety of techniques, including Northern blotting,primer extension, footprinting, and analyzing processing reactions. They are invaluable as preparativeand fractionating tools. There are two common types of gel: polyacrylamide and agarose. For mostapplications, denaturing acrylamide gels are most appropriate. These gels are extremely versatile andcan resolve RNAs from ~600 to 20 nucleotides (nt). In certain circumstances, e.g., resolving differentconformers of RNAs or RNA-protein complexes, native gels are appropriate. The only disadvantage toacrylamide gels is that they are not suitable for analyzing large RNAs (600 nt); for such applications,agarose gels are preferred. This protocol describes how to prepare, load, and run polyacrylamide gelsfor RNA analysis.
RELATED INFORMATION
In this protocol, we describe one specific example of a denaturing polyacrylamide gel. However, thisexample can be easily extrapolated to any size gel. In this regard, we prefer to run the same size (large)gels for all applications, whereas other investigators prefer to run smaller gels. For experimentsrequiring separation of large molecules (600 nt), a method for use of agarose gels is described inNondenaturing Agarose Gel Electrophoresis of RNA (Rio et al. 2010). It is imperative that goodpractices are used to avoid misshapen, streaky, or otherwise ugly gels. Because good habits areessential for obtaining good results, we recommend that the beginning investigator practice runninggels before investing valuable samples.
© 2010 Cold Spring Harbor Laboratory Press 1 Vol. 2010, Issue 6, June
Adapted from RNA: A Laboratory Manual, by Donald C. Rio, ManuelAres Jr, Gregory J. Hannon, and Timothy W. Nilsen. CSHL Press, ColdSpring Harbor, NY, USA, 2010.Cite as: Cold Spring Harb Protoc; 2010; doi:10.1101/pdb.prot5444 www.cshprotocols.org
Protocol
MATERIALS
CAUTIONS AND RECIPES: Please see Appendices for appropriate handling of materials marked with <!>, andrecipes for reagents marked with <R>.
Perform all procedures under RNase-free conditions, using RNase-free glassware and other equipment, andprepare all reagents with RNase-free H
2O.
Reagents
<R>Acrylamide stock for RNA gels (40%)
Cold Spring Harbor Laboratory Press on May 30, 2018 - Published by http://cshprotocols.cshlp.org/Downloaded from
www.cshprotocols.org 2 Cold Spring Harbor Protocols
We recommend purchasing premade solutions of acrylamide:bisacrylamide (BioRad Amresco) to avoid exposureto dry chemicals.
<!>Ammonium persulfate (10%, w/v, freshly prepared)H2O, RNAse-free
<!>N,N,N,N-Tetramethylethylenediamine (TEMED), electrophoresis grade<R>RNA gel-loading buffer (1.5X)
For additional information on loading buffers and dyes, see individual protocols regarding sample preparationand appropriate loading dyes.
RNA samplesFor large-scale purification (e.g., from in vitro transcription reactions), pellets contain high concentrations ofnucleotides and salt. Do not overload the gel with these samples; it is advisable to run such samples in multiple lanes.
<R>TBE electrophoresis buffer (10X)<!>Urea, ultrapure
Equipment
Beaker (200 mL), bakedBench paperBinder clipsCombs and spacers (0.4 mm)
If running preparative gels, use thicker spacers and combs, e.g., 0.8 mm.
Equipment for filtering acrylamide solutions (if using homemade solutions; see Step 3.iii)This includes Whatman No. 1 paper, a Buchner funnel, a 250-mL side-arm Erlenmeyer flask or a 0.45-µmbottle-top filter, and a rubber stopper for the flask.
Ethanol or glass cleaner (e.g., Windex) for cleaning gel platesGel drier or vacuum drierGel-loading tipsGel plates (20 × 40 cm)
We run 20- × 40-cm gels for almost every acrylamide application because these large gels are very versatileand afford maximal resolution for RNAs of any size 600 nt.
GlovesHeat block preset to 90°C-95°CHigh-voltage power suppliesIceLarge laboratory tissues (e.g., Kimwipes)Micropipettor (e.g. Pipetman)Pasteur pipette or syringe for rinsing wells (see Steps 6.ii and 6.iv)
A squirt bottle can be used as an alternative in Step 6.ii.
Phosphorimaging or autoradiography equipmentPlastic wrapRazor bladesSafety glassesSilicone grease (optional; see Step 8.i)Siliconizing agent (e.g., Rainex)Spatula, thin (dedicated for prying apart gel plates)Squirt bottleStir bar, bakedSyringe (60 mL) for pouring gelThermometer (optional; see Step 8.i)Tray (e.g., cafeteria-style)Vacuum system for degassing (if using homemade acrylamide solutions; see Step 3.iii)Vertical gel boxWater bath preset to 60°CWhatman 3MM paperYellow tape (Scotch 3M electrical, 1.5-in.)
Cold Spring Harbor Laboratory Press on May 30, 2018 - Published by http://cshprotocols.cshlp.org/Downloaded from

METHOD
1. Before beginning, assemble all equipment and solutions.
2. Prepare the gel plates; gel plates must be cleaned before each use.
i. For first-time use, wash with soap and water, then dry. Mark the outside of the plate andthen clean the inside surface with glass cleaner or ethanol. If there is any particulate materialor dried acrylamide evident, scrape clean with a new single-edge razor blade, but do notscratch the glass plates.
ii. Treat the inside of the shorter plate with a siliconizing agent or preferably a commercialsubstitute such as Rainex. Apply Rainex to the plate with a paper towel or large laboratorytissue. Cover evenly but do not allow Rainex to get on the edges or the other side of theplate. Air-dry and wipe clean with laboratory tissues. Rinse with water and dry for use.
The water should bead up, indicating that the surface has been properly treated. This treatment should lastfor many gel runs. Re-treat when the water fails to bead on the surface of the plate.
3. Prepare the gel solutions.The following protocol is for a 6% gel. This is enough gel solution to make a 20- × 40-cm × 0.4-mm-thick gelwith enough left to use in the event that some solution gets lost or is required to be used as refill after anyleakage. Adjust as necessary for other percentages.
i. For 100 mL, weigh out 48 g of urea (electrophoresis grade) in a 200-mL baked beaker; add15 mL of acrylamide stock for RNA gels (40%), 10 mL of 10X TBE electrophoresis buffer,and water to 100 mL. Stir to dissolve with a baked stir bar.
The final concentration of urea is 8 M.
ii. Heat briefly in a 60°C water bath.This helps the dissolving process, but do not heat for long because the solution should be at room temperaturefor the polymerization step.
iii. If you prepare your own acrylamide solutions, filter the gel mix through three layers ofWhatman No. 1 paper using a Buchner funnel and a 250-mL side-arm Erlenmeyer flask ora 0.45-µm bottle-top filter. Remove the funnel, place a rubber stopper over the top of theflask, and degas briefly under vacuum.
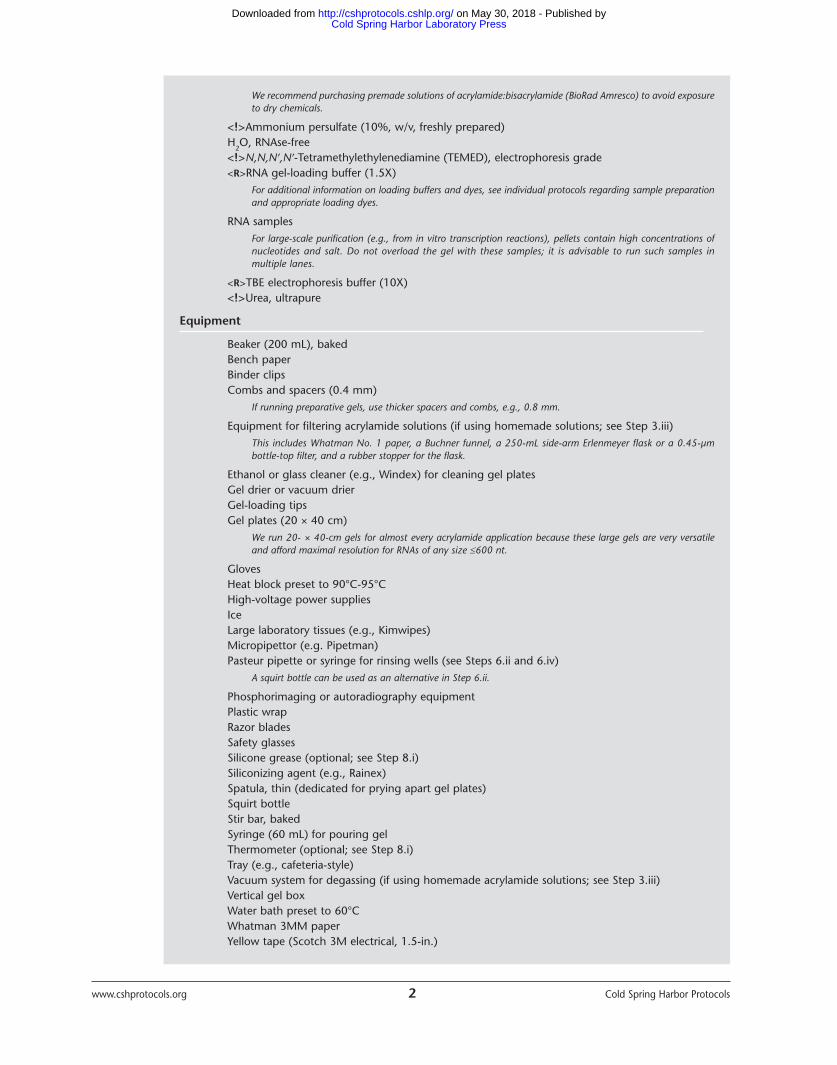
4. Assemble the plates (Fig. 1) as follows:
i. Place spacers on the edges of the inside surface of the long plate. Cover with a secondplate, with the treated side down; be careful not to move the spacers. Hold in place with abinder clip on one side (Fig. 1A).
ii. Tape the unclipped side and part of the bottom with yellow tape; use the nonsharp side ofa single-edge razor to smooth the tape. (Razor blades are the most useful for cutting tape.)If the small plate does not have “ears,” extend the tape over gel spacer tabs. Clip the tapedside one-third of the way up from the bottom. Make sure that the end of the clip is positionedover the tape and spacer.
iii. Unclip the other side and tape the plate as described above. Tape the bottom of the platesoverlapping a few inches up the sides. Check to ensure that the comb fits securely (Fig. 1B).
5. Pour the gel (see Fig. 1C) as follows:Have everything ready for pouring because the solution will polymerize quickly; the higher percentage the gel,the more quickly it will polymerize. Use a cafeteria tray or its equivalent to catch any spilled or overflow acrylamide solution.
i. Add 900 µL of 10% ammonium persulfate and 80 µL of TEMED and mix briefly with a stirbar. Fill a 60-mL syringe with the gel solution.
ii. Tip the assembled plates up and balance on one bottom corner. Using the syringe, slowlyand steadily run the gel solution down the side on which the plates are balanced. As thesolution reaches the bottom corner, rotate the bottom plates so that the solution spreadsacross the bottom to the other corner. As you continue to supply solution, slowly move theplates to a more level (horizontal) position so that the gel fills the plates from bottom to top.
www.cshprotocols.org 3 Cold Spring Harbor Protocols
Cold Spring Harbor Laboratory Press on May 30, 2018 - Published by http://cshprotocols.cshlp.org/Downloaded from

www.cshprotocols.org 4 Cold Spring Harbor Protocols
iii. When the solution reaches the top of the short plate (with no bubbles), lay the gel downin the tray with the top resting on the edge. Insert the comb and clamp both top cornersso that the comb is held tightly between the two plates (Fig. 1D).
If bubbles form around the wells, remove the comb and try again to ensure that the acrylamide solutioncovers the wells.
If the fit is not tight, a thin film of polymerized acrylamide will form between the wells and the plates andwill interfere with sample loading in Step 7.
iv. Leave the remainder of the gel solution in the beaker to check for polymerization. Once thesolution has completely polymerized (~15-20 min), leave the gel for another 5-10 min.Make sure that the partitions between the teeth of the comb are completely formed.
As polymerization proceeds, the refractive index of the gel changes and this can be visualized as a“Schlieren line” near the edge of the gel plate and comb. This effect is a result of a change in refractiveindex between the polymerized and unpolymerized acrylamide.
6. Set up the gel as follows once it is polymerized:
i. Remove all clips and the tape from the bottom edge (or slice with a razor blade) and rinsethe top of the gel around the comb using a squirt bottle filled with water.
ii. Remove the comb and rinse the wells with water (using a squirt bottle, syringe, orPasteur pipette).
iii. Attach the gel plates to the gel apparatus, with the short side in. Clamp in place with equalpressure on both sides.
iv. Add TBE electrophoresis buffer to the top and bottom chambers. Use a Pasteur pipette orsyringe to rinse the wells again, this time with TBE; make sure that there are no air bubblesin the wells and that no air bubbles are trapped under the bottom of the gel.
v. Close the lids, attach the electrodes (red on the bottom, black on the top), and prerun thegel at 45 mA for 20-45 min.
Prerunning removes excess persulfate and eliminates hyperfocusing. Longer preruns (45 min) are recommendedfor analyzing short RNAs of 50 nt.
7. Load the gel as follows after the prerun is completed:
i. Turn the power supply off.
FIGURE 1. Preparing the gel plates and pouring the gel. (A) Partially taped plates. (B) Fully taped plates. (C) Pouring thegel. (D) Clamped comb in place.
Cold Spring Harbor Laboratory Press on May 30, 2018 - Published by http://cshprotocols.cshlp.org/Downloaded from

ii. Add RNA gel-loading buffer to the RNA samples, heat the samples at 90°C-95°C, and chillon ice.
iii. Rinse the wells again to disperse the urea (which tends to diffuse out of the gel and remainin the bottom of the wells).
This will allow the sample to settle with as little upward spread as possible.
iv. Using a micropipettor, load the RNA samples quickly so that the wells remain free of urea.Avoid creating air bubbles, which will disturb the samples.
Thin gel-loading flat micropipette tips that fit between the 0.4-mm spacers and reach the bottom of thewell are available. In general, load minimal volumes of 10 µL per 0.8-cm-wide well with a 0.4-mm-thickgel. Adjust the loading volume according to thickness and width of the well. For preparative applications,run thicker gels.
8. Run the gel:
i. For a 20-cm-wide × 40-cm-long × 0.4-mm-thick gel, run the gel either at constant current(45 mA) or constant voltage (1600 V).
It is important not to run the gels too fast. Haste makes waste! A thermometer to monitor heating can beattached to the front plate with silicone grease. The temperature must remain under ~58°C. Increasing thecurrent or the voltage runs the risk of overheating the gel or even cracking the gel plates. Overheating orrunning too fast can greatly distort the appearance of bands and accentuates any irregularities in thegel matrix.
High-percentage gels must run at constant current to avoid overheating. The milliamps are determined bythe size and percentage of the gel.
ii. Run the appropriate gel distance to optimize the resolution of the bands of interest.The tracking dyes in the loading buffers (xylene cyanol and bromophenol blue) ALWAYS run to the sameposition, but depending on the percentage gel, they comigrate with different-sized nucleic acids. Gels arehighly reproducible when prepared and run under the same conditions; therefore, it is advisable to becomeaccustomed to the behavior of the specific gel you use.
See Troubleshooting.
9. Disassemble the gel:
i. Turn the power supply off and drain the buffer. If the RNA sample run was radioactive, thebottom buffer in particular may be radioactive and should be handled accordingly.
ii. Detach the plates and lay them down on bench paper, with the large plate down. Removethe yellow tape, either with a razor blade or by pulling it off, if possible. Slide the spacersout of the sides.
iii. Using a thin spatula (dedicated to this purpose only), pry the top plate up, starting from acorner. Do this slowly until it is clear that the gel remains on the bottom plate. Wear safetyglasses in the event that the corner of the glass chips.
See Troubleshooting.
iv. Trim a piece of Whatman 3MM paper to the size of the gel and carefully lay it over the gel.
Smooth the paper with a gloved hand to ensure uniform contact with the gel. Pick up thepaper (and gel) and lay them gel side up on clean bench paper.
Gels can be covered by plastic wrap and exposed to X-ray film at −80°C without drying. However, to preventdamage to phosphor screens, drying is recommended.
v. Cover the gel with plastic wrap and dry at 80°C using a vacuum-driven gel drier.Make sure that the gel is completely dry before opening the drier. If the drier is opened too soon, the gelmay crack or shrivel.
See Troubleshooting.
10. Expose the gel to the PhosphorImager or perform autoradiography.Gels dried without fixing and washing in methanol-acetic acid remain tacky after drying because of the urea.Leaving them on the plastic wrap will help to protect the phosphor screen or prevent the gel from sticking tothe film.
See Troubleshooting.
www.cshprotocols.org 5 Cold Spring Harbor Protocols
Cold Spring Harbor Laboratory Press on May 30, 2018 - Published by http://cshprotocols.cshlp.org/Downloaded from

www.cshprotocols.org 6 Cold Spring Harbor Protocols
TROUBLESHOOTING
Problem: “Smiling” of marker dyes is observed.[Step 8.ii]Solution: “Smiling” of marker dyes is caused by uneven heat distribution when using a gel apparatuswithout a metal backing plate. Other causes are improper taping or clamping of plates, a bowedplate, a bad spacer (unmatched), and running the gel too fast. To avoid heat-related problems, runthe gel more slowly or use a gel apparatus with a metal diffuser plate.
Problem: The tracking dye is hyperfocused.[Step 8.ii]Solution: A hyperfocused tracking dye indicates that the gel was not prerun for enough time. Prerungels adequately, making sure that running conditions are the same as those of the prerun.
Problem: Sample is trapped in the wells.[Step 8.ii]Solution: If the sample is trapped in the wells, this may be the result of inadequate resuspension of thesample, aggregates in the sample, or inadequate denaturation. Make sure that the sample is welldissolved and not overconcentrated. Denature properly.
Problem: The gel sticks to both plates.[Step 9.iii]Solution: This can be caused by inadequate “waterproofing” of the short plate or overheating duringthe run. Re-treat the top plate with Rainex and make sure that run conditions are correct.
Problem: The gel cracks after drying.[Step 9.v]Solution: If this occurs, the gel was not completely dry. Dry gels for a longer amount of time and makesure that the gel drier vacuum is sealed.
Problem: Lanes are distorted.[Step 10]Solution: Distortion of lanes is caused by inappropriate pulling of combs or acrylamide in wells, salt insamples, overloading the gel, or bubbles in the gel. Consider the following:
1. Make sure that the tops of the wells are wet when pulling the comb and rinse sample wells adequately.
2. For the problem of salt in the sample, reprecipitate with ethanol.
3. If overloading is the culprit, reduce the amount of sample loaded.
Problem: Streaks of radioactivity are seen.[Step 10]Solution: Streaking of radioactivity down the lanes can be the result of several of the above situations,including those mentioned in “smiling” of marker dyes, sample trapping in the wells and lanedistortion. See the solutions to these problems above.
REFERENCESRio DC, Ares M Jr, Hannon GJ, Nilsen TW. 2010. Nondenaturing
agarose gel electrophoresis of RNA. Cold Spring Harb Protoc (thisissue). doi: 10.1101/pdb.prot5445.
Cold Spring Harbor Laboratory Press on May 30, 2018 - Published by http://cshprotocols.cshlp.org/Downloaded from

doi: 10.1101/pdb.prot5444Cold Spring Harb Protoc; Donald C. Rio, Manuel Ares, Jr, Gregory J. Hannon and Timothy W. Nilsen Polyacrylamide Gel Electrophoresis of RNA
ServiceEmail Alerting click here.Receive free email alerts when new articles cite this article -
CategoriesSubject Cold Spring Harbor Protocols.Browse articles on similar topics from
(223 articles)RNA, general (57 articles)RNA Purification
(260 articles)RNA (115 articles)mRNA
(1133 articles)Molecular Biology, general (112 articles)Electrophoresis, general
(16 articles)Electrophoresis of RNA (32 articles)Electrophoresis of Nucleic Acids, general
(42 articles)Electrophoresis of Nucleic Acids (28 articles)Electrophoresis
http://cshprotocols.cshlp.org/subscriptions go to: Cold Spring Harbor Protocols To subscribe to
Cold Spring Harbor Laboratory Press on May 30, 2018 - Published by http://cshprotocols.cshlp.org/Downloaded from


![SDS-Polyacrylamide Gel Electrophoresis BCH 462 [practical] 4 th Lab.](https://static.fdocuments.net/doc/165x107/56649f005503460f94c15fa4/sds-polyacrylamide-gel-electrophoresis-bch-462-practical-4-th-lab.jpg)