PLX PCI HOST SDK SOFTWARE DEVELOPMENT KIT USER S...
69
PLX PCI HOST SDK SOFTWARE DEVELOPMENT KIT USER’S MANUAL
Transcript of PLX PCI HOST SDK SOFTWARE DEVELOPMENT KIT USER S...

PLX PCI HOST SDKSOFTWARE DEVELOPMENT KIT
USER’S MANUAL


PLX PCI HOST SDKSOFTWARE DEVELOPMENT KIT
USER’S MANUAL
Version 3.1
May 2000
Website: http://www.plxtech.comEmail: [email protected]
408 774-9060Phone:800 759-3735
Fax: 408 774-2169

1-2
© 2000, PLX Technology, Inc. All rights reserved.
PLX Technology, Inc. retains the right to make changes to this product at any time, without notice.Products may have minor variations to this publication. PLX assumes no liability whatsoever, includinginfringement of any patent or copyright, for sale and use of PLX products.
This document contains proprietary and confidential information of PLX Technology Inc. (PLX). Thecontents of this document may not be copied nor duplicated in any form, in whole or in part, without priorwritten consent from PLX Technology, Inc.
PLX provides the information and data included in this document for your benefit, but it is not possible forus to entirely verify and test all of this information in all circumstances, particularly information relating tonon-PLX manufactured products. PLX makes no warranties or representations relating to the quality,content or adequacy of this information. Every effort has been made to ensure the accuracy of thismanual, however, PLX assumes no responsibility for any errors or omissions in this document. PLX shallnot be liable for any errors or for incidental or consequential damages in connection with the furnishing,performance, or use of this manual or the examples herein. PLX assumes no responsibility for anydamage or loss resulting from the use of this manual; for any loss or claims by third parties which mayarise through the use of this SDK; and for any damage or loss caused by deletion of data as a result ofmalfunction or repair. The information in this document is subject to change without notice.
PLX Technology and the PLX logo are registered trademarks of PLX Technology, Inc.Other brands and names are the property of their respective owners.
Document number: PCI-SDK-MAN-P1-3.1

PLX SOFTWARE LICENSE AGREEMENTTHIS PLX SOFTWARE IS LICENSED TO YOUUNDER SPECIFIC TERMS AND CONDITIONS.CAREFULLY READ THE TERMS ANDCONDITIONS PRIOR TO USING THISSOFTWARE. OPENING THIS SOFTWAREPACKAGE OR INITIAL USE OF THISSOFTWARE INDICATES YOUR ACCEPTANCEOF THE TERMS AND CONDITIONS. IF YOUDO NOT AGREE WITH THEM, YOU SHOULDRETURN THE ENTIRE SOFTWARE PACKAGETO PLX.
LICENSE Copyright © 2000 PLX Technology,Inc.
This PLX Software License agreement is a legalagreement between you and PLX Technology,Inc. for the PLX Software, which is provided onthe enclosed PLX CD-ROM. PLX Technologyowns this PLX Software. The PLX Software isprotected by copyright laws and internationalcopyright treaties, as well as other intellectualproperty laws and treaties, and is licensed, notsold. If you are a rightful possessor of the PLXSoftware, PLX grants you a license to use thePLX Software as part of or in conjunction with aPLX chip on a per project basis. PLX grantsthis permission provided that the abovecopyright notice appears in all copies andderivatives of the PLX Software. Use of anysupplied runtime object modules or derivativesfrom the included source code in any productwithout a PLX Technology, Inc. chip is strictlyprohibited. You obtain no rights other than thosegranted to you under this license. You may copythe PLX Software for backup or archivalpurposes. You are not authorized to use, merge,copy, display, adapt, modify, execute, distributeor transfer, reverse assemble, reverse compile,decode, or translate the PLX Software except tothe extent permitted by law.
PLX Software License AgreementGENERAL
If you do not agree to the terms and conditionsof this PLX Software License Agreement, do notinstall or use the PLX Software and promptlyreturn the entire unused PLX Software to PLXTechnology, Inc. You may terminate your PLXSoftware license at any time. PLX Technologymay terminate your PLX Software license if youfail to comply with the terms and conditions ofthis License Agreement. In either event, youmust destroy all your copies of this PLXSoftware. Any attempt to sub-license, rent,lease, assign or to transfer the PLX Softwareexcept as expressly provided by this license, ishereby rendered null and void.WARRANTY
PLX Technology, Inc. provides this PLXSoftware AS IS, WITHOUT ANY WARRANTY,EXPRESS OR IMPLIED, INCLUDINGWITHOUT LIMITATION, AND ANY WARRANTYOF MERCHANTIBILITY OR FITNESS FOR APARTICULAR PURPOSE. PLX makes noguarantee or representations regarding the use of, orthe results based on the use of the software anddocumentation in terms of correctness, or otherwise;and that you rely on the software, documentation, andresults solely at your own risk. In no event shall PLXbe liable for any loss of use, loss of business, loss ofprofits, incidental, special or, consequential damagesof any kind. In no event shall PLX’s total liabilityexceed the sum paid to PLX for the product licensedhere under.PLX Copyright Message GuidelinesThe following copyright message along with thefollowing text must appear in all softwareproducts generated and distributed, which usethe PLX API libraries:
“Copyright © 2000 PLX Technology, Inc.”Requirements:
• Arial font
• Font size 12 (minimum)
• Bold type
• Must appear as shown above in the firstsection or the so called “IntroductionSection” of all manuals
• Must also appear as shown above in thebeginning of source code as a comment


Contents
PCI Host SDK User’s Manual v3.1© PLX Technology, Inc. All rights Reserved.
i
Table of Contents
Table of Contents ............................................................................................................................ i
1 General Information...............................................................................................................1-3
1.1 About This Manual ............................................................................................................................1-3
1.2 PCI SDK Features.............................................................................................................................1-3
1.3 Where To Go From Here...................................................................................................................1-3
1.4 Other PCI SDK Manuals ...................................................................................................................1-3
1.5 Conventions ......................................................................................................................................1-3
1.5.1 Windows Programming Conventions ..................................................................................1-4
1.6 Terminology.......................................................................................................................................1-4
1.7 Development Tools ...........................................................................................................................1-4
1.8 Customer Support .............................................................................................................................1-4
2 Getting Started.......................................................................................................................2-5
2.1 PCI SDK Compatibility ......................................................................................................................2-5
2.2 Uninstalling Previous Versions of the PCI SDK ................................................................................2-5
2.3 PCI SDK Installation..........................................................................................................................2-2
2.3.1 Unpacking............................................................................................................................2-2
2.3.2 Minimum System Requirements .........................................................................................2-2
2.3.3 Development Requirements................................................................................................2-2
2.3.4 Windows Software Installation ............................................................................................2-2
2.3.4.1 Windows NT Device Driver Installation......................................................................2-2
2.3.4.2 Windows 98/2000 Device Driver Installation .............................................................2-32.3.4.2.1 Driver Installation for PLX Reference Design Boards: ..................................................2-3
2.3.4.2.2 Driver Installation for Custom Reference Design Boards with PLX devices: ................2-5
2.4 Troubleshooting...............................................................................................................................2-10
2.4.1 Driver Interrupt Sharing .....................................................................................................2-10
2.5 Understanding The PCI SDK ..........................................................................................................2-11
2.5.1 Windows Based Host Software .........................................................................................2-11
2.5.1.1 Introduction ..............................................................................................................2-11
2.5.1.2 Windows NT Device Drivers ....................................................................................2-122.5.1.2.1 Starting And Stopping.................................................................................................2-12
2.5.1.2.2 Event Logging.............................................................................................................2-12

PCI Host SDK User’s Manual v3.1ii © PLX Technology, Inc. All rights Reserved.
2.5.1.2.3 Registry Configuration..................................................................................................................... 2-13
2.5.1.2.4 Driver Configuration ................................................................................................... 2-15
2.5.1.3 Windows 98/2000 WDM Device Drivers..................................................................2-162.5.1.3.1 Starting And Stopping ................................................................................................ 2-16
2.5.1.3.2 Event Logging ............................................................................................................ 2-16
2.5.1.3.3 Registry Configuration................................................................................................ 2-16
2.5.1.3.4 Known Problems in Windows 98 Device Drivers. ...................................................... 2-17
2.5.2 IOP Software .....................................................................................................................2-18
2.6 Using The PCI SDK With A New Board ..........................................................................................2-18
3 PCI SDK Software Architecture Overview ........................................................................... 3-1
3.1 Software Components.......................................................................................................................3-1
3.2 Software Architecture ........................................................................................................................3-2
3.3 Assumptions......................................................................................................................................3-3
3.3.1 PCI SDK Assumptions.........................................................................................................3-3
3.3.2 PCI API And Win32 Software Assumptions ........................................................................3-3
3.3.3 IOP API And IOP Software Assumptions ............................................................................3-3
4 Host Win32 Software Architecture....................................................................................... 4-1
4.1 PLX Chip Debug Utility - PlxMon.......................................................................................................4-1
4.1.1 Serial Communication .........................................................................................................4-1
4.1.2 PCI API/Device Driver Communication ...............................................................................4-2
4.1.2.1 PCI API Library ..........................................................................................................4-2
4.1.2.2 Win32 Device Driver ..................................................................................................4-2
4.2 Win32 Applications And The PCI SDK..............................................................................................4-2
4.3 Win32 Device Driver Overview..........................................................................................................4-2
4.3.1 PLX Chip Device Driver Module..........................................................................................4-3
4.3.2 PLX Chip Services Module..................................................................................................4-3
4.4 Creating A New Driver.......................................................................................................................4-3
4.5 Device Driver Features......................................................................................................................4-3
4.6 Distribution of PLX Device Drivers and PLXApi.Dll File ....................................................................4-4
4.6.1 Installation of PlxApi.dll File.................................................................................................4-4
4.6.2 Installation of PLX Device Driver .........................................................................................4-4
4.6.2.1 Installation of PLX Device Drivers On Windows NT ..................................................4-4
4.6.2.2 Installation of PLX Device Drivers On Windows 98/2000..........................................4-5

Contents
PCI Host SDK User’s Manual v3.1© PLX Technology, Inc. All rights Reserved.
iii
5 IOP Software Architecture ....................................................................................................5-1
5.1 Board Support Package (BSP) .........................................................................................................5-2
5.2 IOP API Library..................................................................................................................................5-2
5.3 Back-End Monitor..............................................................................................................................5-3
5.3.1 BEM Command Format and Commands ............................................................................5-4
5.3.2 BEM Command Format.......................................................................................................5-5
5.3.3 BEM Reply Format ..............................................................................................................5-5
5.3.4 BEM Command Protocols ...................................................................................................5-6
5.4 Methods For Debugging IOP Applications ......................................................................................5-14
5.4.1 Operation Of The Back-End Monitor In A System ............................................................5-14
5.5 IOP Applications..............................................................................................................................5-14
5.5.1 IOP Memory And IOP Applications ...................................................................................5-14
5.5.2 MiniBSP Application ..........................................................................................................5-15
5.6 Porting The PCI SDK To New Platforms.........................................................................................5-16
5.7 Support For Multiple PLX chips On One Board ..............................................................................5-16
6 Real Time Operating System Support..................................................................................6-1
6.1 General Information...........................................................................................................................6-1
7 RDK Software Quick Reference............................................................................................7-1
7.1 PCI and Compact PCI 9030 RDK-Lite ..............................................................................................7-1
7.2 IOP 480RDK......................................................................................................................................7-1
7.3 PCI 9054RDK-860.............................................................................................................................7-3
7.4 CompactPCI 9054RDK-860 ..............................................................................................................7-4
7.5 PCI 9080RDK-401B ..........................................................................................................................7-5
7.6 PCI 9080RDK-860.............................................................................................................................7-6


PCI Host SDK User’s Manual v3.1© PLX Technology, Inc. All rights Reserved.
1-1
List of Figures
Figure 2-1 Components of the PCI SDK ........................................................................................2-2Figure 2-2 Windows Host software Layout for PCI Host SDK V3.1..............................................2-11Figure 2-3 The Devices Utility Window. .......................................................................................2-12Figure 2-4 The Event View Window.............................................................................................2-13Figure 2-5 The Detailed Event Window .......................................................................................2-13Figure 2-6 Registry Information for PCI 9080 Device Driver (Windows NT) .................................2-14Figure 2-7 Registry Information for PCI 9054 Device Driver (Windows NT) .................................2-14Figure 2-8 Registry Informaion for IOP 480 Device Driver (Windows NT)....................................2-14Figure 2-9 The PCI SDK Device Driver Wizard............................................................................2-16Figure 3-1 The PCI SDK Software Architecture .............................................................................3-2Figure 4-1 The Host Software Architecture....................................................................................4-1Figure 4-2 The PLX Driver Layout .................................................................................................4-3Figure 5-1 IOP Software Architecture ............................................................................................5-1Figure 5-3 Diagram of the IOP Memory Usage............................................................................5-15Figure 7-1. Configuration EEPROM Settings for the IOP 480RDK.................................................7-2Figure 7-2. Configuration EEPROM Settings for the PCI 9054RDK-860........................................7-4Figure 7-3. Configuration EEPROM Settings for the CompatctPCI 9054RDK-860.........................7-5Figure 7-4. Configuration EEPROM Settings for the PCI 9080RDK-401B .....................................7-6Figure 7-5. Configuration EEPROM Settings for the PCI 9080RDK-860........................................7-7

Section 1
General Information Customer Support
PCI Host SDK User’s Manual v3.11-2 © PLX Technology, Inc. All rights Reserved.
List of Tables
Table 5-1. BEM Commands .......................................................................................................... 5-5Table 7-1. Basic Information About IOP 480RDK.......................................................................... 7-1Table 7-2. Basic Information About PCI 9054RDK-860 ................................................................. 7-3Table 7-3. Basic Information About CompactPCI 9054RDK-860................................................... 7-4Table 7-4. Basic Information About PCI 9080RDK-401B............................................................... 7-5Table 7-5. Basic Information About PCI 9080RDK-860 ................................................................. 7-6

PCI Host SDK User’s Manual v3.1© PLX Technology, Inc. All rights Reserved.
1-3
1 General InformationPLX Technology offers PCI bus interface chips that address a range of adapter and embedded systemapplications. Our PCI chips work well with a variety of CPUs and embedded controllers, including the IBMPowerPC 40x family, Motorola MPC860/850 and 68360, as well as the PowerPC 60x family, AnalogDevices Sharc, various Texas Instruments DSPs, the Intel i960 family, Hitachi SuperH family, IDT MIPS,and others. If the design does not require a microprocessor, our chips are easily configured to run withoutthe aid of a CPU. PLX provides Software Development Kits (SDK), Reference Design Kits (RDK) andHardware Design Kits (HDK) that facilitate your PCI design development.
1.1 About This ManualThis manual provides information about the functionality of the PCI SDK. Customers have the choice ofusing the PCI SDK with any PLX Reference Design Kit (RDK), or a generic device that uses a PLX chip.Users should consult this manual when installing the PCI SDK and for general information.
1.2 PCI SDK FeaturesThe PCI Host SDK contains software for a Windows host to access the PLX Chip across the PCI bus.This includes the following features:
• A PCI API and device drivers compatible with Windows NT/98/2000;• PLXMon 2000, a Windows Graphical User Interface (GUI) application used to configure, modify
PLX PCI devices, and download IOP applications to the local RAM.The PCI Pro SDK also contains software for a local CPU, or IOP (I/O Processor) to access the chip viathe local bus on a peripheral card. Additional components of the Pro SDK include:
• A feature based IOP API, with support for a variety of host processors and PLX PCI chips;• IOP DMA Resource Manager that supports three modes of operation;• A Back-End Monitor application used for basic debugging;• Board Support Package (BSP) that allows customization of the PCI SDK;• RTOS support for several PLX RDK boards, which can be used as a model for development of
RTOS BSPs for custom boards.For further details see the documentation for the Pro SDK.
1.3 Where To Go From HereThe following is a brief summary of the chapters to help guide your reading of this manual:Chapter 2, Getting Started, discusses how to start using the PCI SDK and some of the applicationsprovided. Chapter 3, PCI SDK Software Architecture Overview, describes the layout of the PCI SDKsoftware.
1.4 Other PCI SDK ManualsThe PCI Host SDK includes the following manuals that users should consult for design details:• PCI Host SDK Programmer’s Reference Manual: This manual covers all software design issues
regarding the device drivers, Host API and user applications.• PLXMon User’s Manual: This manual describes the usage of the PLXMon application.• PLX Device Driver Manual: This manual covers the PLX device drivers and service modules, which
are the core parts of the PLX device drivers. The manual will be created only a PDF file in Acrobatformat during the PCI SDK installation.
• PLX RDK Manufacturing Test Specification: This manual covers the basic information about the PLXRDK Manufacturing Test program and will be created only as a PDF file in Acrobat format during thePCI SDK installation.
1.5 ConventionsPlease note that when software samples are provided the following notations are used:
• italics are used to represent variables, function names, and program names;• courier is used to represent source code given as examples.

Section 1
General Information Customer Support
PCI Host SDK User’s Manual v3.11-4 © PLX Technology, Inc. All rights Reserved.
1.5.1 Windows Programming ConventionsSome designers may not be familiar with Windows programming conventions. Therefore, a fewconventions have been noted below, for example:
• PU32 data is analogous to U32 *data or unsigned long *data; and• IN and OUT are used to distinguish between parameters that are being passed into API functions
and parameters that are being returned by API functions.
1.6 TerminologyAll references to Windows NT assume Windows NT 4.0 or higher and may be denoted as WinNT.All references to Windows 98 may be denoted as Win98. References to Windows 2000 may be denotedas Win2000 or Win2K. Win32 references are used throughout this manual to mean any application that iscompatible with the Windows 32-bit environment. All references to IOP (I/O Platform) throughout thismanual denote a board containing a PLX PCI device and references to IOP software denote the softwarerunning on that board.
1.7 Development ToolsDevelopment tools used to develop the PCI Host SDK include:
• Win32 Applications: Microsoft Visual C++ 5.0, with Microsoft Developer Studio;• Windows NT 4.0 Drivers: Microsoft Windows NT 4.0 Device Driver Kit (DDK);• Windows 98/2000 WDM Drivers: Microsoft Windows 2000 Device Driver Kit (DDK);
1.8 Customer SupportPrior to contacting PLX customer support, please ensure that you are situated close to the computer thathas the PCI SDK installed and have the following information:
1. Model number of the PLX PCI RDK (if any);
2. PLX PCI SDK version (if any);
3. Host Operating System and version;
4. Description of your intended design:
• PLX chip used• Microprocessor• Local Operating System and version (if any)• I/O
5. Description of your problem; and
6. Steps to recreate the problem.
You may contact PLX customer support at:Address: PLX Technology, Inc. Attn. Technical Support
390 Potrero AvenueSunnyvale, CA 94086
Phone: 408-774-9060Fax: 408-774-2169Web: http://www.plxtech.com
You may send email to one of the following addresses:[email protected]@[email protected]@plxtech.com

PCI Host SDK User’s Manual v3.1© PLX Technology, Inc. All rights Reserved.
2-5
2 Getting Started
2.1 PCI SDK CompatibilityDue to interaction between host and IOP software components, it is recommended that major softwareversions are the same on the host and the IOP. PLXMon, for example, does not support serialconnections to devices running a BEM version previous to 3.0. Also, structures and API calls typicallychange between SDK version releases. However, Host SDK 3.1 is fully compatible with IOP softwarefrom PCI SDK 3.0.
PLX RDKs will contain the proper IOP software version to match the SDK version at the time of shipment;however, if the PCI SDK is purchased as an upgrade and intended for use with an earlier PLX RDKboard, the RDK’s FLASH code should be upgraded to the current version. This is necessary to ensurethat nothing unpredictable occurs due to incompatibilities with modules.Users who are upgrading their PCI SDK and intend to use it with an earlier PLX RDK board shouldupgrade the FLASH boot image of the RDK. To upgrade the FLASH image, use PLXMon to reprogramthe RDK FLASH, if supported. If PLXMon does not support programming of the FLASH device, a deviceI/O programmer must be used. The updated FLASH images are provided in<Sdk_Install_Dir>\RdkFlashFiles. Please refer to the PLXMon manual for detailed instructions regardingwhich boards are supported and the proper offset to program the FLASH.
2.2 Uninstalling Previous Versions of the PCI SDKWarning: If you have modified any files in the original PCI SDK install directory, such as .C program files,the uninstaller may delete them. Please be careful before uninstalling a previous SDK package.Installation of the latest SDK will update the registry and drivers in the Windows System and Driverdirectories.Prior to installing a new version of the PCI SDK, it is recommended to first uninstall any previouslyinstalled versions. Many files change between SDK releases and since these files are used fordevelopment purposes, they may be incompatible with a previous release. To remove all PCI SDKSoftware, including device drivers, complete the following:1. Stop all PLX applications;
2. Open the Windows Control Panel;
3. Double click on the Add/Remove Programs icon in the Control Panel window;
4. Choose the PCI SDK package from the item list; and
5. Click the Add/Remove... button.
Note: This only removes the files that were originally installed by the PCI SDK installation program. Forproper removal in WinNT, a user with “Administrator” user rights should remove the PCI SDK.

Section 2Getting Started PCI SDK Installation
PCI Host SDK User’s Manual v3.12-2 © PLX Technology, Inc. All rights Reserved.
2.3 PCI SDK Installation
2.3.1 UnpackingThe PCI SDK comes complete with the following items(see Figure 2-1)• PCI SDK User’s Manual (this document);• PCI SDK Programmer’s Reference Manual;• PLXMon 2000 User's Manual; and• PCI SDK CD-ROM.NOTE: The Host SDK provides these manuals only inelectronic form, on the Host SDK CD-ROM.Please take the time now to verify that your PCI SDK iscomplete. If not, please contact Customer Support.
2.3.2 Minimum System RequirementsMinimum host system requirements for the PCI SDK areas follows:• Windows NT 4.0 with Service Pack 3 or above,
Windows 98, or Windows 2000• 16MB of RAM, 32MB or more recommended• 80MB hard drive space• 1 RS 232 serial port, if serial communications will be used
2.3.3 Development RequirementsThe PCI SDK development environment is typically in the Window NT/98/2000 operating system.The PCI API was developed using Microsoft Developer Studio, supplied with Microsoft Visual C++ 5.0and the Microsoft Platform Software Development Kit.The WinNT device drivers were developed using the Microsoft Windows NT DDK, version 4.0 andMicrosoft Visual C++ 5.0.The Windows Driver Model (WDM) device drivers were developed using the Microsoft Windows 2000DDK and Microsoft Visual C++ 5.0.
2.3.4 Windows Software InstallationNote: All previous PCI SDK versions prior to 3.0 should be removed before installing a newer version ofthe PCI SDK. However, this Host SDK 3.1 is compatible with the IOP portion of the PCI SDK 3.0;therefore that SDK does not need to be uninstalled, if you plan to use the IOP software features.Refer to section 2.1 for more details.To install the PCI SDK Software package, complete the following:1. Insert the CD-ROM into the appropriate CD-ROM drive.
2. Follow the instructions in the HTML page, which should automatically load. If this does not load, useWindows Explorer or the Run option from the menu to execute Setup.exe, which is located on theinstallation CD-ROM.
3. Follow the prompts to complete the SDK installation.
4. Reboot the computer after the installation.
Note: For proper WinNT installation, a user with “Administrator” user rights should install the PCI SDK.
2.3.4.1 Windows NT Device Driver InstallationThe Windows NT installation wizard takes care of the device driver installation.
PCI SDK
Programmer's
Reference
Manual
PLXMon 99
User'sManual
PCI SDK
InstallationCD-ROM
PCI SDK
User'sManual
Figure 2-1 Components of the PCI SDK

Section 2PCI SDK Installation Getting Started
PCI Host SDK User’s Manual v3.1© PLX Technology, Inc. All rights Reserved.
2-3
2.3.4.2 Windows 98/2000 Device Driver InstallationA device driver is necessary for the PCI SDK software to communicate to the PCI boards. Windowsapplications cannot communicate to PCI devices without a device driver installed. The PCI SDK includesdrivers for all supported PLX PCI chips. In Windows 98/2000, however, the SDK installation packagecannot automatically assign device drivers for PLX devices. The Windows Plug ’n’ Play Manager isresponsible for detecting devices and prompting the user for the correct driver. To assign a driver to adevice, Windows refers to an INF file. The INF file provides instructions for Windows as to which driverfiles to install and which registry entries to insert. To install a driver for a board containing a PLX device,complete the following steps:1. After installing the PCI SDK successfully (see the previous section), shutdown the computer.
2. Insert the PLX RDK board or your custom board with a PLX device into a free PCI slot.
3. Reboot the computer. Windows should first detect the new hardware device with a “New HardwareFound” message box. Acknowledge this message box.
4. Windows displays the “Add New Hardware” Wizard, which will search for new drivers. g it. If you areusing a PLX RDK board proceed to section 2.3.4.2.1. If you are using a custom board with a PLXdevice, proceed to the section 2.3.4.2.2.
2.3.4.2.1 Driver Installation for PLX Reference Design Boards:
• Once Windows has completed its search, the following dialog is displayed: Select “Search for thebest driver for your device”. Click Next.
• Select the locations to search for INF the file. By default, PLX includes the INF file in<Sdk_Install_Dir>\Win32\Driver\Wdm. Click Next.

Section 2Getting Started PCI SDK Installation
PCI Host SDK User’s Manual v3.12-4 © PLX Technology, Inc. All rights Reserved.
• Windows will then scan through INF files to find a matching device driver. If one is found, thefollowing dialog is displayed. Click Next.

Section 2PCI SDK Installation Getting Started
PCI Host SDK User’s Manual v3.1© PLX Technology, Inc. All rights Reserved.
2-5
• When the following dialog is displayed, the device driver installation is complete. Click Finish.
2.3.4.2.2 Driver Installation for Custom Reference Design Boards with PLX devices:To install a driver for a custom board containing a PLX PCI device, perform the following steps:
• Unless the PCI class code is changed, the installation wizard will detect the custom device as aPCI Bridge. Click Next

Section 2Getting Started PCI SDK Installation
PCI Host SDK User’s Manual v3.12-6 © PLX Technology, Inc. All rights Reserved.
• Select Display a list of all… since this is a custom device and click Next.
• Select Other devices and click Next.
Section 2PCI SDK Installation Getting Started
PCI Host SDK User’s Manual v3.1© PLX Technology, Inc. All rights Reserved.
2-7
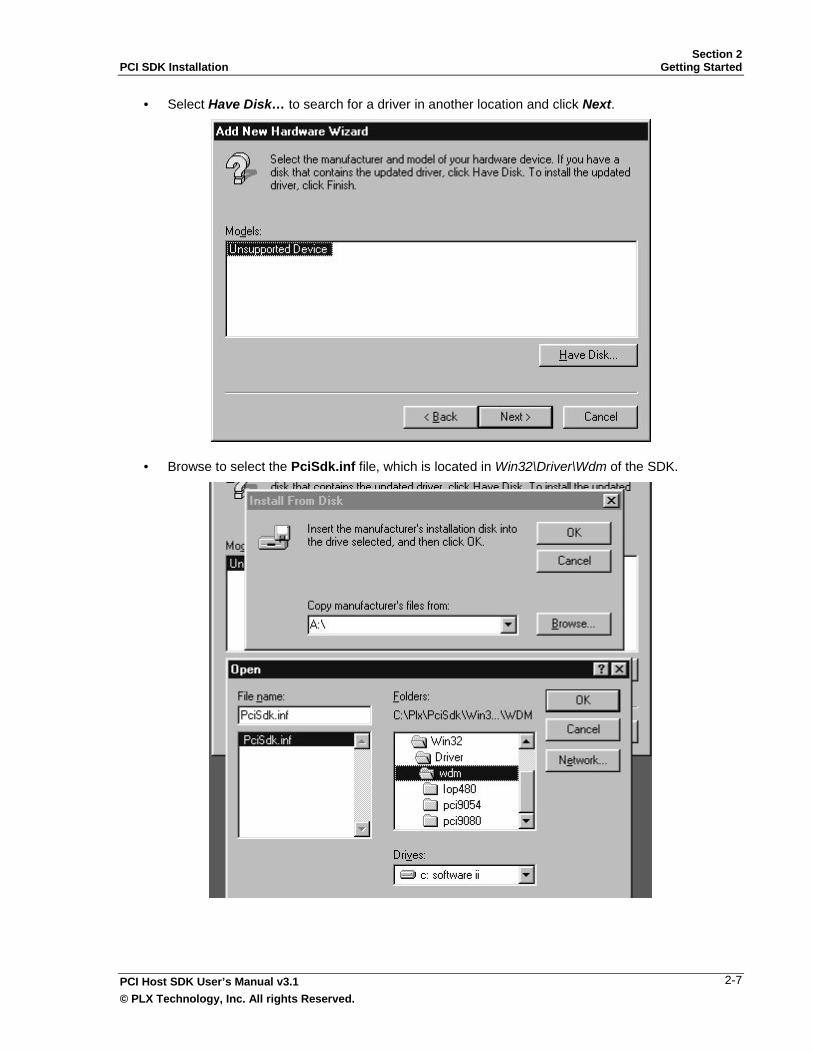
• Select Have Disk… to search for a driver in another location and click Next.
• Browse to select the PciSdk.inf file, which is located in Win32\Driver\Wdm of the SDK.

Section 2Getting Started PCI SDK Installation
PCI Host SDK User’s Manual v3.12-8 © PLX Technology, Inc. All rights Reserved.
• Once the file is located, Windows will parse it to provide a list of possible drivers. Selectthe driver that most closely matches the installed board type. Click Next.
• Windows will now inform the user of the driver selected. If a warning appears which states, “Thedriver…was not written specifically for this device…”, click Yes to install the driver anyway. Thiswarning arises because the ID in the INF file does not match the installed device’s ID. Click Next.
Section 2PCI SDK Installation Getting Started
PCI Host SDK User’s Manual v3.1© PLX Technology, Inc. All rights Reserved.
2-9
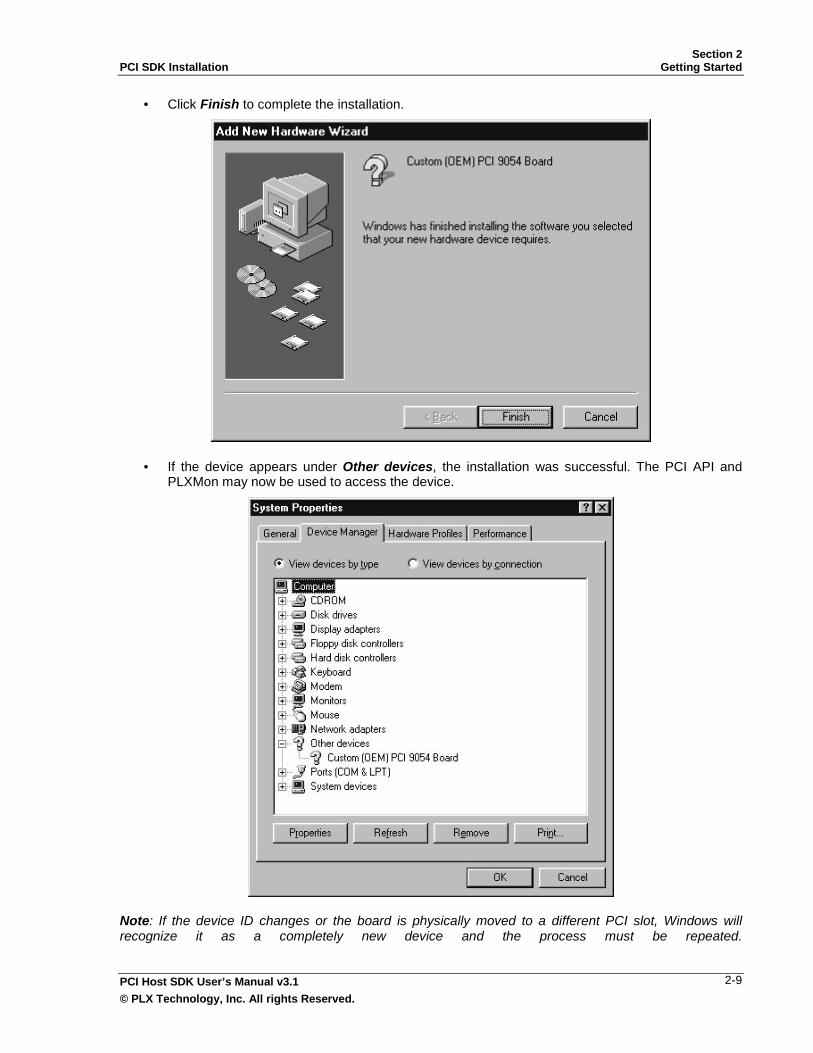
• Click Finish to complete the installation.
• If the device appears under Other devices, the installation was successful. The PCI API andPLXMon may now be used to access the device.
Note: If the device ID changes or the board is physically moved to a different PCI slot, Windows willrecognize it as a completely new device and the process must be repeated.

Section 2Getting Started Troubleshooting
PCI Host SDK User’s Manual v3.12-10 © PLX Technology, Inc. All rights Reserved.
2.4 TroubleshootingYou may experience difficulties using the PCI SDK with Windows NT with low memory and multiple PLXRDK boards. If you notice that one of your RDK boards is not being assigned the proper memoryresources by the PCI BIOS (e.g. no address provided to the Local Space 0 address) it is most likely dueto a common memory problem with WinNT. It is recommended that users increase the amount ofavailable system pages in their System Registry by following the steps below;1. From a command prompt type: regedt32. This will bring up the Registry Editor window. (This editor
looks similar to the Windows Explorer application.)
2. Select the HKEY_LOCAL_MACHINE on Local Machine window from within the Registry Editor.
3. Open the SYSTEM folder.
4. From the SYSTEM folder, open the CurrentControlSet folder.
5. From the CurrentControlSet folder, open the Control folder.
6. From the Control folder, open the Session Manager folder.
7. From the Session Manager folder, open the Memory Management folder.
8. From the Memory Management folder, change the value of the SystemPages key from 0x0 to0x13880.
If problems persist, please contact Customer Support.
2.4.1 Driver Interrupt SharingThe PCI SDK device drivers support PCI interrupt sharing. This allows PLX devices to share the sameinterrupt line as other devices. However, in order to share interrupts with non-PLX devices the devicedriver for the non-PLX device must also support sharing. Because many device drivers do not supportinterrupt sharing, the PCI SDK can only be guaranteed to function properly with other PLX devices.In PCI systems, the BIOS often assigns the same interrupt to multiple devices; however, the respectivedevice drivers must support these "shared interrupts". A driver that does not support this feature mayprevent the PLX driver from functioning correctly. A possible workaround for this condition is to manuallyconfigure the BIOS to assign a unique interrupt to the PLX device.

Section 2Understanding The PCI SDK Getting Started
PCI Host SDK User’s Manual v3.1© PLX Technology, Inc. All rights Reserved.
2-11
2.5 Understanding The PCI SDK
2.5.1 Windows Based Host Software
2.5.1.1 IntroductionThe PCI Host SDK contains eight distinct device drivers, an API, and a Windows monitor application (seeFigure 2-2). They are as follows:
• Four PLX WinNT Device Drivers supporting the PCI 9080, the PCI 9054, PCI 9030, and IOP 480;• Four PLX WDM Win98/Win2000 Device Drivers supporting the PCI 9080, the PCI 9054, PCI 9030,
and IOP 480 ;• PCI API, a powerful API compatible with all PLX devices and PLX device drivers; and• PLXMon, a Graphical User Interface (GUI) application that can be used to monitor and modify PLX
chip registers. It can also download software to a PLX RDK board, and communicate to the softwarerunning on the RDK board.
All Win32 executables included in the PCI SDK are located in <Sdk_Install_Dir>\Bin. Furthermore, thisdirectory is added to the PATH environment variables when the PCI SDK is installed.For more information on PLXMon, please refer to the PLXMon User's Manual.For information on writing a Win32 application using the PCI API, see the PCI Host SDK Programmer’sReference Manual.
PLXMon
PLX PCI API
Custom Application
Custom Application
Custom Application
Sample ApplicationSample Application
Sample Application
User SpaceKernel Space
Launched From PLXMon
Lauched From PLXMon
PCI 9080WDMDeviceDriver
IOP 480WinNTDeviceDriver
PCI 9080WinNTDeviceDriver
IOP 480WDMDeviceDriver
PCI9080RDK IOP480RDK PCI
9080RDK IOP480RDK
Win98/Win2000 WinNT
PCI 9054WDMDeviceDriver
PCI9054RDK
PCI 9054WinNTDeviceDriver
PCI9054RDK
Figure 2-2 Windows Host software Layout for PCI Host SDK V3.1

Section 2Getting Started Understanding The PCI SDK
PCI Host SDK User’s Manual v3.12-12 © PLX Technology, Inc. All rights Reserved.
2.5.1.2 Windows NT Device DriversThe PCI SDK includes Windows NT device drivers for each PLX device. All device drivers are located in<Sdk_Install_Dir>\Driver\WinNT. The naming convention used for the device drivers is:Pci<DeviceType>.sys. or Iop480.sys. For example, the device driver for the PCI 9080 device is“Pci9080.sys”.
2.5.1.2.1 Starting And StoppingThere may be times when you will need to restart the Windows NT device driver. For instance, you mustrestart the device driver after changing the supported device list.To restart the Windows NT device driver you should use the Windows NT Control Panel. The ControlPanel contains a utility called ‘Devices’ that allows you to start and stop the device driver (see Figure 2-3).Note: Before stopping the device driver, all PCI SDK applications should be closed.
By default, the device driver is configured to startup automatically at Windows NT boot time. You mayconfigure the device driver to start manually by selecting the ‘Startup…’ button. However, no PCI SDKapplications will function until the device driver has been started.You may also use the PCI SDK DriverWizard application to restart the device drivers. Consult section2.5.1.2.4 for more details.
2.5.1.2.2 Event LoggingThe Windows NT Device Driver has the capability to record errors into the Windows NT Event Viewer.When trouble shooting problems with the device driver it is recommended that the event viewer be used.Events can be viewed by selecting an event item. Figure 2-4 shows an example of the Event Viewer andFigure 2-5 shows details of an event.
Figure 2-3 The Devices Utility Window.

Section 2Understanding The PCI SDK Getting Started
PCI Host SDK User’s Manual v3.1© PLX Technology, Inc. All rights Reserved.
2-13
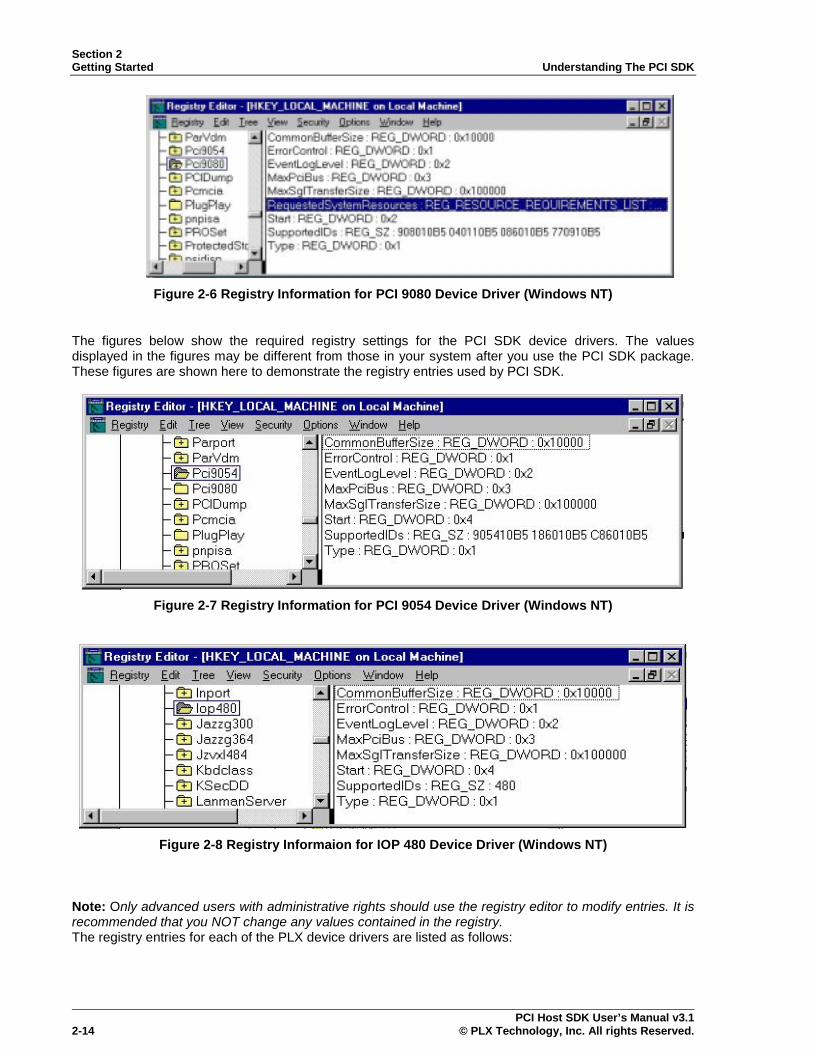
2.5.1.2.3 Registry ConfigurationEvery Windows NT device driver requires an entry in the registry. The registry contains lots of informationused by the operating system as well as information used by the PLX device driver if necessary. Thename in the registry for the PLX PCI SDK device driver will be the same as the driver name. For instance,the Pci9080.sys device driver has a Pci9080 registry item as shown in Figure 2-6 Registry Information forPCI 9080 Device Driver (Windows NT). All device drivers are located under theLocalMachine\System\CurrentControlSet\Services tree.
Figure 2-4 The Event View Window.
Figure 2-5 The Detailed Event Window
Section 2Getting Started Understanding The PCI SDK
PCI Host SDK User’s Manual v3.12-14 © PLX Technology, Inc. All rights Reserved.
The figures below show the required registry settings for the PCI SDK device drivers. The valuesdisplayed in the figures may be different from those in your system after you use the PCI SDK package.These figures are shown here to demonstrate the registry entries used by PCI SDK.
Note: Only advanced users with administrative rights should use the registry editor to modify entries. It isrecommended that you NOT change any values contained in the registry.The registry entries for each of the PLX device drivers are listed as follows:
Figure 2-6 Registry Information for PCI 9080 Device Driver (Windows NT)
Figure 2-7 Registry Information for PCI 9054 Device Driver (Windows NT)
Figure 2-8 Registry Informaion for IOP 480 Device Driver (Windows NT)
Section 2Understanding The PCI SDK Getting Started
PCI Host SDK User’s Manual v3.1© PLX Technology, Inc. All rights Reserved.
2-15
• CommonBufferSize: This value sets the size of the user buffer (the "hbuf" in PLXMon). Its defaultvalue is set to 64KB. Warning: First, the device driver makes a request to the operating system for abuffer with the size indicated by this registry entry. However, if the device driver fails to get the bufferrequested due to a lack of system resource, then it will decrement the size until it is given anallocated buffer by the operating system. You should use the PlxPciCommonBufferGet() API functionto determine the actual buffer size.
• ErrorControl: This value is required by the operating system and should not be modified.• EventLogLevel: This value sets the event-logging mode in the device drivers. If this value is 0 then
events will not be logged. If this value is 1 then high severity events will be logged. If this value is 2then all events will be logged.
• MaxPciBus: This value sets the highest PCI bus that the device driver will scan for PLX devices. Bydefault it is set to 0x3.
• MaxSglTransferSize: This value sets the size of an internal buffer that is required for SGL and ShuttleDMA transfers.
• Start: This value is required by the operating system and should not be modified.• SupportedIDs: This value contains the Vendor Ids and Device Ids for the PLX devices that the driver
supports. Users should use the PCI SDK application DriverWizard to modify this field. Modificationof this field directly might make the DriverWizard application run erratically.
• Type: This value is required by the operating system and should not be modified.
2.5.1.2.4 Driver ConfigurationBefore using the device driver with a customer board, the driver must first be configured with theappropriate Vendor ID and Device ID. PLXMon has a hot-link to a PCI SDK utility called the Device DriverWizard, which is also in the program menu for the PCI SDK package. This utility is used to add or removevendor and device IDs of the boards from the SupportedIds entry for the appropriate device driver. It alsolets you enable or disable the desired PLX device driver to start automatically at startup.Note: Since all PLX device drivers are enabled by default, it is recommended that you disable devicedrivers that will not be used. If a 9054 is the only PLX device you intend to use, for example, using theDriverWizard, you may disable PCI9080, PCI9030, and IOP480 drivers. The settings will take effect aftera reset.

Section 2Getting Started Understanding The PCI SDK
PCI Host SDK User’s Manual v3.12-16 © PLX Technology, Inc. All rights Reserved.
2.5.1.3 Windows 98/2000 WDM Device DriversThe PCI SDK includes Windows Driver Model (WDM) device drivers for Windows 98/2000. All devicedrivers are located in <Sdk_Install_Dir>\Driver\Wdm. The naming convention used for the device driversis: Pci<DeviceType>.sys or Iop480.sys. For example, the device driver for the PCI 9080 device is namedPci9080.sys.
2.5.1.3.1 Starting And StoppingUnlike Windows NT drivers, Windows 98/2000 device drivers are started and stopped as needed by theoperating system. The PLX device drivers are started when Windows detects a device that needs it. If, ata later time, the device is removed or uninstalled (from the Device Manager), the device driver will bestopped unless there is installed device associated with the same driver.There is no applet that controls the starting or stopping of a device driver under Windows 98/2000.
2.5.1.3.2 Event LoggingEvent logging is enabled in Windows 2000, but not supported under Windows 98.
2.5.1.3.3 Registry ConfigurationEvery Windows 98/2000 device driver requires an entry into the registry. The registry contains informationrequired by the operating system as well as information required by the device driver. All device driversare located in the registry under
HKEY_LOCAL_MACHINE\System\CurrentControlSet\Services\Class\Unknown\000X
, where 000X is the driver number within the “Unknown” class of drivers. The PLX device driver can be
Figure 2-9 The PCI SDK Device Driver Wizard

Section 2Understanding The PCI SDK Getting Started
PCI Host SDK User’s Manual v3.1© PLX Technology, Inc. All rights Reserved.
2-17
found within the Unknown class by looking at the NTMPDriver value of each key, which should describethe driver name (e.g. Pci9080.sys or Pci9054.sys, depending on the PLX chip in use).Note: Only advanced users should use the registry editor to modify the registry entries. It isrecommended that you NOT change any values contained in the registry.
2.5.1.3.4 Known Problems in Windows 98 Device Drivers.Windows 98 contains a few features that do not yet perform as expected. The following list contains someknown features that affect the operation of the PCI SDK.
• Scatter-Gather and Shuttle DMAThe Win98 device driver may periodically fail to transfer huge Scatter-Gather and Shuttle DMA databuffers. This affects the following PCI API functions: PlxDmaSglTransfer() and PlxDmaShuttleTransfer().It is recommended that all data buffers used in the DMA transfers NOT exceed 1 MB in size.
• Support of Power Management Features of the PLX chipsThe Windows 98 Power Management subsystem contains many compatibility issues. With regards toPower Management, the method recommended by Microsoft documentation to change the power level ofa device does not work as expected. To overcome the problem two possible methods can be used:1. Change the power level using a different method than the one recommended by Microsoft. The
intended behavior can be obtained. However, this could cause problems in future releases ofWindows 98.
2. Leave the device driver sections as is, in hopes that Microsoft will correct the problem in futurereleases of Windows 98.
The PCI SDK uses the first option in order to maintain Power Management capabilities.

Section 2Getting Started Using The PCI SDK With A New Board
PCI Host SDK User’s Manual v3.12-18 © PLX Technology, Inc. All rights Reserved.
2.5.2 IOP SoftwareIOP software is part of the local, or IOP, portion of our SDK offerings. These are included in the SDK Pro.See the SDK Pro documentation for details.
2.6 Using The PCI SDK With A New BoardThe following steps can be used as a guide on how to use the PCI SDK with a new board.3. Program the desired Vendor and Device IDs into the configuration EEPROM.
4. If using Windows NT, you will need to add the new Vendor and Device IDs to the Supported DeviceList. To add support for new IDs, use the Device Driver Wizard utility (see section 2.5.1.2.4).
5. If using Windows 98 or Windows 2000, you should consult section 0 for driver installation.
6. PLXMon can now access the board’s configuration EEPROM. Using PLXMon’s EEPROMConfiguration window, customize the EEPROM settings for the new board and reboot the system forthe changes to take effect.
7. Try accessing IOP memory by using the Direct Slave memory accesses to the board (This means thememory controller for the IOP memory has been set up and the PLX device has been initialized).
8. For boards with an IOP CPU, a MiniBSP is provided for minimal local-side initialization and boardboot-up. If you intend to use Serial Mode communication with PLXMon, the board must support theBEM communication protocol (not included in MiniBSP). Tailor the MiniBSP to the custom board andprogram the FLASH with this image.
When the above steps have been performed and are working properly, modify the IOP Board SupportPackage (BSP) module to begin porting the PCI SDK to the new board. Consult the PCI SDKProgrammer’s Manual for more information on porting the PCI SDK to new boards.
PCI Host SDK User’s Manual v3.1© PLX Technology, Inc. All rights Reserved.
3-1
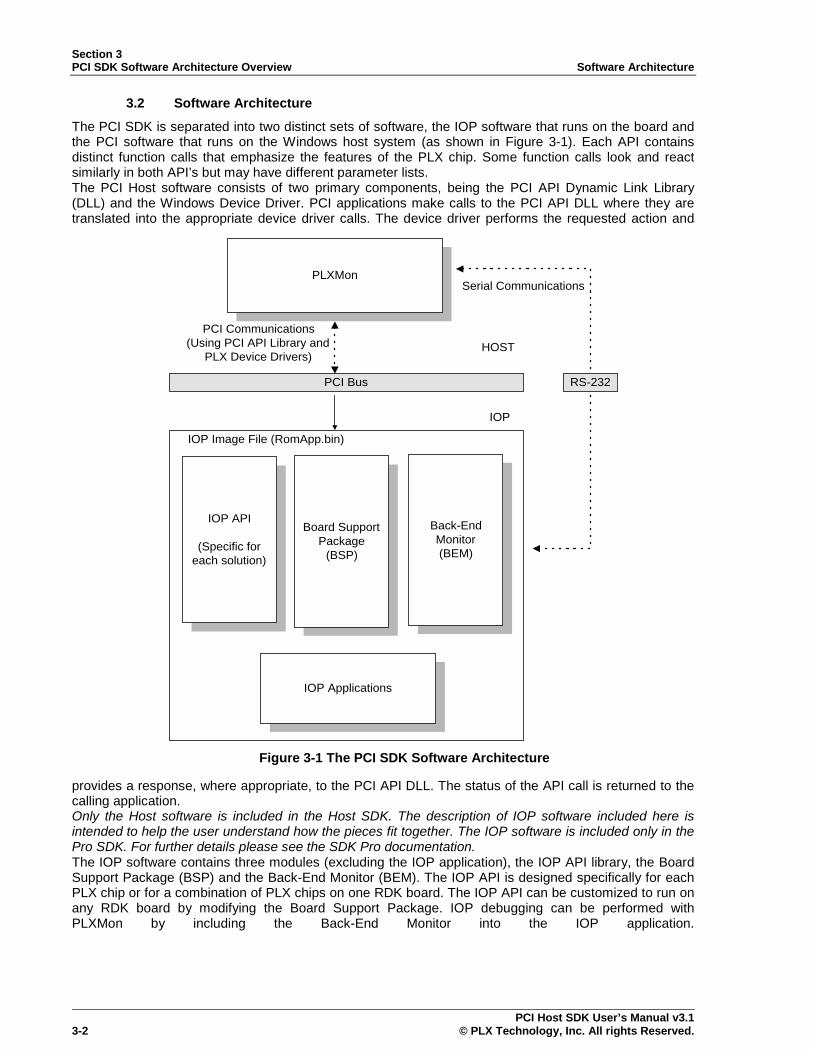
3 PCI SDK Software Architecture Overview3.1 Software ComponentsThe PCI SDK software architecture is shown in Figure 3-1.The SDK software is divided into the following major components.The following Host components are included in the Host SDK:• PLXMon: this module includes PCI Bus communication and serial communication to the Back-End
Monitor;• PCI API library file, PlxApi.dll, which translates API function calls into function calls to the PLX device
drivers;• PLX device drivers which actually control the access to the PLX devices;The following local, or IOP components are included in the Pro SDK:• IOP API Library: this library contains the code that performs the API functions and accesses the PLX
chip. There are at least two IOP APIs for each PCI device: Release and Debug. Both libraries are thesame except the release version eliminates many of the parameter validation steps that areperformed in the debug version, and hence performance is increased if the release version of the APIis used.
• BSP Module: this module contains all board specific code, including the IOP bus memory map, theboard and microprocessor initialization routines and the interrupt service routine for the PLX chip.
• Back-End Monitor: this module provides a monitor for debugging IOP applications which supportsPLXMon through the serial port; and,
• IOP Applications: this module contains the main application for the board and the IOP.
Section 3PCI SDK Software Architecture Overview Software Architecture
PCI Host SDK User’s Manual v3.13-2 © PLX Technology, Inc. All rights Reserved.
3.2 Software ArchitectureThe PCI SDK is separated into two distinct sets of software, the IOP software that runs on the board andthe PCI software that runs on the Windows host system (as shown in Figure 3-1). Each API containsdistinct function calls that emphasize the features of the PLX chip. Some function calls look and reactsimilarly in both API’s but may have different parameter lists.The PCI Host software consists of two primary components, being the PCI API Dynamic Link Library(DLL) and the Windows Device Driver. PCI applications make calls to the PCI API DLL where they aretranslated into the appropriate device driver calls. The device driver performs the requested action and
provides a response, where appropriate, to the PCI API DLL. The status of the API call is returned to thecalling application.Only the Host software is included in the Host SDK. The description of IOP software included here isintended to help the user understand how the pieces fit together. The IOP software is included only in thePro SDK. For further details please see the SDK Pro documentation.The IOP software contains three modules (excluding the IOP application), the IOP API library, the BoardSupport Package (BSP) and the Back-End Monitor (BEM). The IOP API is designed specifically for eachPLX chip or for a combination of PLX chips on one RDK board. The IOP API can be customized to run onany RDK board by modifying the Board Support Package. IOP debugging can be performed withPLXMon by including the Back-End Monitor into the IOP application.
PLXMon
IOP Applications
PCI Bus
IOP API
(Specific foreach solution)
Back-EndMonitor(BEM)
HOST
IOP
IOP Image File (RomApp.bin)
Board SupportPackage
(BSP)
PCI Communications(Using PCI API Library and
PLX Device Drivers)
Serial Communications
RS-232
Figure 3-1 The PCI SDK Software Architecture
Section 3Assumptions PCI SDK Software Architecture Overview
PCI Host SDK User’s Manual v3.1© PLX Technology, Inc. All rights Reserved.
3-3
3.3 AssumptionsThis section discusses some assumptions made in the design of the PCI SDK.
3.3.1 PCI SDK AssumptionsThe assumptions for the PCI SDK are as follows:• Mailbox register 5, 6 and 7 are reserved for communication between PLXMon and the IOP software
when PLXMon downloads RAM applications to the IOP.• When a PLX PCI device driver is started, mailbox register 3 of the device supported by the driver will
contain the address of the PCI common buffer, and mailbox register 4 will contain the size of thebuffer.
3.3.2 PCI API And Win32 Software AssumptionsThe assumptions for the PCI API and the Win32 software are as follows:• All Win32 applications supplied with the PCI SDK will provide full functionality to all PLX registered
devices.• The doorbell interrupts, QUERY_EEPROM_TYPE, DOORRBELL_KERNEL_RESET, FLASH_READ, and
FLASH_WRITE are reserved for PCI SDK purposes.
3.3.3 IOP API And IOP Software AssumptionsThe assumptions for the IOP API and the IOP software (included in the SDK Pro, but not the Host SDK)are as follows:• For the Back-End Monitor (BEM) to function properly, the IOP board must have one available serial
port, configurable by the Board Support Package software;• The data received by the serial port must be retrieved in a timely manner in order to eliminate any lost
data;• The initialization of the PLX chip is done only by the EEPROM and/or IOP software;• The data expected by the application will not contain any data that could be interpreted by the BEM
as a command if the BEM is linked into the application;• All IOP applications must relinquish the processor periodically to avoid starvation of the BEM
(cooperative or non-preemptive multitasking);• When an application is downloaded to the IOP RAM or the application wants to reprogram the on-
board FLASH using a serial connection, the IOP BSP must execute the CheckPciDownloadToRam()and the CheckSerialDownloadToRam() functions at microprocessor reset or re-execution of boot-upcode initialized by the software;
• The BlinkLed() function assumes that the LED is connected to the PLX chip’s USERo pin. Users cancomment this function out if there is no LED connected, or choose to provide another way to blink anLED.
• Supplied IOP Libraries are compiled only for specific CPUs in their default endian mode. Pleasecontact PLX technical support if you require support for additional processors.

PCI Host SDK User’s Manual v3.1© PLX Technology, Inc. All rights Reserved.
4-1
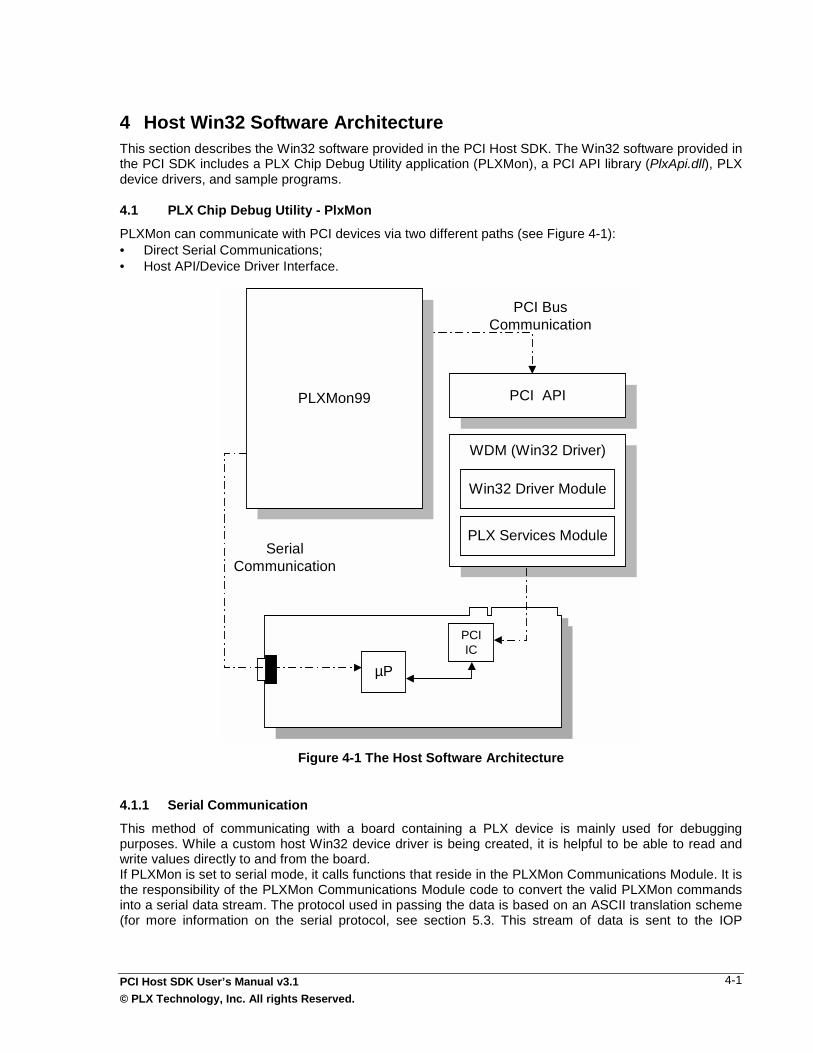
4 Host Win32 Software ArchitectureThis section describes the Win32 software provided in the PCI Host SDK. The Win32 software provided inthe PCI SDK includes a PLX Chip Debug Utility application (PLXMon), a PCI API library (PlxApi.dll), PLXdevice drivers, and sample programs.
4.1 PLX Chip Debug Utility - PlxMonPLXMon can communicate with PCI devices via two different paths (see Figure 4-1):• Direct Serial Communications;• Host API/Device Driver Interface.
4.1.1 Serial CommunicationThis method of communicating with a board containing a PLX device is mainly used for debuggingpurposes. While a custom host Win32 device driver is being created, it is helpful to be able to read andwrite values directly to and from the board.If PLXMon is set to serial mode, it calls functions that reside in the PLXMon Communications Module. It isthe responsibility of the PLXMon Communications Module code to convert the valid PLXMon commandsinto a serial data stream. The protocol used in passing the data is based on an ASCII translation scheme(for more information on the serial protocol, see section 5.3. This stream of data is sent to the IOP
SerialCommunication
PCI BusCommunication
PLX Services Module
Win32 Driver Module
WDM (Win32 Driver)
PCI API
PCIIC
µP
PLXMon99
Figure 4-1 The Host Software Architecture

Section 4Host Win32 Software Architecture PLX Chip Debug Utility - PlxMon
PCI Host SDK User’s Manual v3.14-2 © PLX Technology, Inc. All rights Reserved.
application. The Win32 operating system provides a device driver to control the serial port. TheWin32 SDK provides services to access this device driver.
When the data arrives, the IOP board’s microprocessor must have a means of handling the incomingdata. The Back-End Monitor calls UART service routines to retrieves data from the UART module, whichcan be implemented as interrupt-driven or polling. The Back-End Monitor decodes the command anddata, and acts on the command and returns a reply. If the data received by the Back-End Monitor is not acommand the data is queued for the IOP application.
4.1.2 PCI API/Device Driver CommunicationPCI Bus Communication is performed using the PCI API dynamical-link library (DLL) file (PlxApi.dll) andthe Win32 device driver supplied with the PCI SDK.
4.1.2.1 PCI API LibraryThe PCI API consists of a library of functions, from which multiple PLX chip-based PCI boards can beaccessed and used. The PCI API provides API function groups, which manage the features of each PLXchip. Groups such as DMA access, direct data transfers, and interrupt handling contain functions that canbe universal to any PLX PCI board.The PLXMon application makes extensive use of the PCI API functions. For the most part, the PCI API’spurpose is to translate application functions calls and send them to the appropriate device driver. Theonly functionality present in the PCI API is to connect to the various PLX device drivers. This includesopening, closing, and searching for PLX devices that are present on the PCI bus.
4.1.2.2 Win32 Device DriverThe device driver’s role in the system is to store device data within the kernel and to execute thecommands given to it from the PCI API. The device driver can be used as a framework to create customsoftware for managing PCI devices as well.The Windows Driver Model (WDM) is a new specification for developing device drivers on Windows 98and Windows 2000 operating systems. It is based on the device driver architecture found in Windows NT4.0 and allows for binary compatibility between Windows 98 and Windows 2000.The architecture of the device driver is designed to reduce the time needed to create a new device driverfor customer boards that contain a PLX device. If needed, the source code provided for the device drivermay be customized for specific boards in minimal time.
4.2 Win32 Applications And The PCI SDKAll Win32 applications connect to and use the PCI API DLL. The Win32 application can communicate toany PCI device with a PLX chip by using the PCI API DLL. Each Win32 application can be created likeany other Windows application. For more information on creating a Win32 application using the PCI APIDLL, see the PCI SDK Programmer's Manual.
4.3 Win32 Device Driver OverviewThis section describes the overall layout and concept of a PLX device driver. To accommodate the needfor one common PCI API as well as to reduce development time for device driver design for newReference Design Boards, the following device driver model was created.One device driver handles one type of PLX chip, as seen in Figure 4-2. Each device driver communicateswith the PCI API on a one-to-one basis; there is no device driver inter-communication. If a new devicedriver is developed and added to the system, it can be integrated simply by installing it into the Win32operating system. If more than one PLX chip is present on a Reference Design Board, the device drivercan only see the one that is directly connected to the PCI bus on which the Windows system is running.All PCI API functions will access this PLX chip only.

PCI Host SDK User’s Manual v3.1© PLX Technology, Inc. All rights Reserved.
4-3
PCI API
9080 ServicesModule
9080 DriverModule
PCI 9080Driver
9054 ServicesModule
9054 DriverModule
PCI 9054Driver
ServicesModule
Driver Module
Future PLXDriver
PCI9080
µPPCIIC
µP
PCI9054
480 ServicesModule
480 DriverModule
IOP 480Driver
PCIChipIOP
480
4.3.1 PLX Chip Device Driver ModuleThis module provides the management of the PLX chip-based PCI boards in Windows. This managementincludes storing device specific information, processing PCI API and system messages, handlinginterrupts, and allocating resources for each board. Some non-PLX specific functionality is handled in thismodule, such as reading from and writing to PCI configuration registers.
4.3.2 PLX Chip Services ModuleThis module contains the chip-specific API implementation in the device driver.
4.4 Creating A New DriverThis section briefly covers how a new device driver can be created using the existing device driver as atemplate. When a new PLX chip Services Module, which provides the real functionality for the devicedriver, is updated to support a new PLX chip, the old PLX chip Services Module is replaced. The newPLX chip Services Module would reflect the new register set of the PLX chip and would support theexisting PCI API by accessing the appropriate registers on the new PLX chip based on the PCI APIfunction requested.The PLX chip Device Driver Module would need some modifications to create a new PCI device driver.When a new API function is introduced, the Device Driver Module has to be modified to support the APIthe function.
4.5 Device Driver FeaturesThe Win32 device driver supports the sharing of interrupts between many PLX chip-based boards. Sincethe PCI specification allows multiple devices to share the same Interrupt Line, the device driver mustsupport this, as well. Specifically, the Interrupt Service Routine (ISR) is designed to support interruptsharing.
Figure 4-2 The PLX Driver Layout

Section 4Host Win32 Software Architecture Distribution of PLX Device Drivers and PLXApi.Dll File
PCI Host SDK User’s Manual v3.14-4 © PLX Technology, Inc. All rights Reserved.
The device driver supports event logging to the OS Event Log subsystem. When the devicedriver determines an error in operation, it registers event messages with the appropriate
information concerning the cause of the error. The Event Log may be used to debug the device driver ifproblems occur.
4.6 Distribution of PLX Device Drivers and PLXApi.Dll FileA Windows application, which uses PCI API functions from the PCI SDK package, requires 2 things:1. The PlxApi.dll file installed in the system-wide path.2. PLX Windows device driver(s) installed properly and started.It is legal to distribute PlxApi.dll and device driver files, i.e.Pci9080.sys; however it is ILLEGAL todistribute the entire PCI SDK without proper authorization from PLX. Customers must choose their owninstallation methods, such as using InstallShield® software to create installation disks, so that the devicedriver(s) and the DLL file can be correctly installed to their designated locations.
4.6.1 Installation of PlxApi.dll FilePlxApi.dll should be installed to:• <Windows_Dir>\System directory in Windows 98• <Windows_Dir>\System32 directory in Windows NT/2000.
4.6.2 Installation of PLX Device DriverThe installation of a device driver involves the following steps:• Copy relevant files to their proper destination locations• For Windows NT, setup the required registry entries (Refer to section 2.5.1.2.3 for registry entry
descriptions).
4.6.2.1 Installation of PLX Device Drivers On Windows NT
1. Copy the device driver file (e.g. Pci9054.sys, or Pci9030.sys) to<Windows_Dir>\System32\Drivers. The device driver files are located in <Sdk_Install_Dir>\Win32\Driver\WinNT\<Driver_Name>\Driver\i386\Free.
2. Add the following registry entries:Under HKEY_LOCAL_MACHINE\System\CurrentControlSet\Services, add:• Services\<Driver_Name>\CommonBufferSize = 65536 in decimal, data type
REG_DWORD;• Services\<Driver_Name>\ErrorControl = 1, data type REG_DWORD;• Services\<Driver_Name>\Start = 2, data type REG_DWORD;• Services\<Driver_Name>\Type = 1, data type REG_DWORD;• Services\<Driver_Name>\MaxSglTransferSize = 1048576 in decimal, data type
REG_DWORD;• Services\<Driver_Name>\MaxPciBus = 3, data type REG_DWORD• Services\<Driver_Name>\EventLogLevel = 2, data type REG_DWORD• Services\<Driver_Name>\SupportedIDs = Dev0Vend Dev1Vend …, data type
REG_SZ. Dev0 and Dev1 are the four hexadecimal letters for the device IDs, Vend is the fourhexadecimal letters for the vendor ID. One example is “908010B5 040110B5”. One pair ofdevice ID and vendor ID must be separated from another pair by a space. There is no tailingspace at the end of the string.
• Control\Session Manager\Memory Management\SystemPages = 80000 in decimal, datatype REG_DWORD.
The registry key <Driver_Name> is the name of the executable without the .sys suffix.In order for the Event Viewer under Windows NT to retrieve the messages logged by the PLXdevice drivers, the following registry values must be added as well.
Under HKEY_LOCAL_MACHINE\System\CurrentControlSet\Services\, add:
Section 4Distribution of PLX Device Drivers and PLXApi.Dll File Host Win32 Software Architecture
PCI Host SDK User’s Manual v3.1© PLX Technology, Inc. All rights Reserved.
4-5
• EventLog\System\<Driver_Name>\EventMessageFile =%SystemRoot%\System32\IoLogMsg.dll;%SystemRoot%\System32\Drivers\<Driver_Name>.sys, data type REG_EXPAND_SZ
• Services\EventLog\System\<Driver_Name>\TypesSupported = 7, data typeREG_DWORD
4.6.2.2 Installation of PLX Device Drivers On Windows 98/20001. Copy the device driver file (e.g. Pci9054.sys or Pci9030.sys) to <Windows_Dir>\System32\Drivers.
The device driver files are located in<Sdk_Install_Dir>\Win32\Driver\Wdm\<Driver_Name>\Driver\Free\i386.
2. Copy the setup information file (INF) PciSdk.inf to <Windows_Dir>\Inf\Other. PciSdk.inf is installed<Sdk_Install_Dir>\Win32\Driver\Wdm.
PciSdk.inf should be modified to include entries for the customized OEM board. Most importantly, thecustom Device and Vendor IDs must be added. When Windows detects the board, it will use the INF fileto assign the correct driver. Refer to the DDK or other documentation for INF files.


Section 5Board Support Package (BSP) IOP Software Architecture
PCI Host SDK User’s Manual v3.1© PLX Technology, Inc. All rights Reserved.
5-1
5 IOP Software ArchitectureOnly the Host software is included in the Host SDK. The description of IOP software included here isintended to help the user understand how the pieces fit together. The IOP software is included only in theSDK Pro. For further details please see the SDK Pro documentation.The IOP software architecture is separated into four modules, being:• The Board Support Package (BSP);• The IOP API library;• The Back-End Monitor (BEM); and,• The IOP application software (user application modules).The IOP software architecture is shown in Figure 5-1.
PLXChip
µP
IOP Image File (RomApp.bin)
User Applications
µP InitializationModule
BoardInitialization
Module
BSP
Back-End Monitor(BEM)
DMA ResourceManager
IOP API
PLXMon 99
Figure 5-1 IOP Software Architecture
Section 5IOP Software Architecture
5-2 PCI Host SDK User’s Manual v3.1© PLX Technology, Inc. All rights Reserved.
5.1 Board Support Package (BSP)The Board Support Package (BSP), included in the Pro SDK, contains all the information needed by theIOP API that is specific to the board. This module provides the necessary entry points needed to port thePCI SDK to new platforms.For complete details of the IOP BSP, please see the IOP software documentation, included in the ProSDK.
5.2 IOP API LibraryThe IOP API library contains the code for all the documented API functions. This code is standard for allIOP applications and is independent of the board configuration. The code directly calls the PLX chip (nointermediary functions).
Section 5Back-End Monitor IOP Software Architecture
PCI Host SDK User’s Manual v3.1© PLX Technology, Inc. All rights Reserved.
5-3
5.3 Back-End MonitorOnly the Host software is included in the Host SDK. The description of IOP software included here isintended to help the user understand how the pieces fit together. In particular, this section is included toclarify the interaction of the Host application, PLXMon, with the IOP BEM.The IOP software, including the BEM, is included only in the Pro SDK. For further details please see thePro SDK documentation.The Back-End Monitor (BEM) provides features that help debugging IOP applications. The BEM allowsthe host application PLXMon to send commands to the IOP application using a serial connection to aRDK board. The Back-End Monitor supports several commands, including reading from and writing toIOP memory locations (these commands support different data sizes), resetting the IOP software, readingfrom or writing to the EEPROM connected to the PLX chip, and reprogramming the on-board FLASH (ifsupported), etc. These commands provide a generic interface for an IOP application. PLXMon uses thismonitor to retrieve data from the IOP. In normal operation, the BEM accesses the UART Servicesfunctions to get a stream of data that has been received by the UART chip. The monitor extractscommands (that the monitor recognizes) from the data stream, performs the necessary action andprovides an appropriate response. The monitor provides the filtered data stream to the next task requiringserial data in the daisy chain if the data is not designed for the BEM.There are times when a task may not want other tasks to extract data (or commands) from the datastream. Other tasks are prevented from extracting data from the data stream passed by the UART if onetask access the UART support functions directly. A task, which wants to receive raw data and bypassesthe previous task in the daisy chain, can call PlxGetChars() to retrieve an unfiltered data stream. If a taskchooses to access the unfiltered data stream, it should take all the data necessary to perform the actionand return control back to the main routine (contained within the BSP) once the action is completed.The next application in the daisy chain, if required, retrieves the filtered data stream from the BEMmonitor. The application can do whatever it needs to do with the data. The application can choose toprovide a filtered stream of data from what is left over from its parsing of the data stream so that the datastream can be passed down to the next task in the chain.The Back-End Monitor (BEM) can recognize different commands coming from PLXMon: reset the IOPmicroprocessor; read a memory location and write to a memory location etc. The protocol for the serialcommunication between the IOP application and the host PLXMon is documented in the followingsections.Some commands use parameters. Parameters listed are normally necessary for the command exceptwhen a parameter is within square braces (‘[‘ and ‘]’). These parameters are optional to the command.Parameters listed with the vertical bar (‘|’) indicate that “one or another” parameter must be provided.Carriage returns are denoted as <CR>.

Section 5IOP Software Architecture Back-End Monitor
5-4 PCI Host SDK User’s Manual v3.1© PLX Technology, Inc. All rights Reserved.
5.3.1 BEM Command Format and CommandsPlease note:• All BEM commands are case sensitive except hexadecimal value parameters.• There will be no leading zero in the hex number string to speed up the serial communication.
Of course, if the data is zero, there will be only one zero ASCII letter.• If two consequent hexadecimal values are required, then they are separated by a space ASCII
letter (0x20h).• There is no space between a hexadecimal letter (0 . . 9, a . . f, or A . . F) and another non-
hexadecimal letter such as P.• Due to the fact the Microsoft Word automatically toggles the case of the first letter in the
sentence when you type, there is a possibility that the command letter in this document mightnot be accurate even though every effort is made to make it accurate. For the latest and mostaccurate information on BEM, please read <INSTALLPATH>\inc\Bem.h file.

Section 5Back-End Monitor IOP Software Architecture
PCI Host SDK User’s Manual v3.1© PLX Technology, Inc. All rights Reserved.
5-5
5.3.2 BEM Command FormatCommand Format|____2 Bytes____|____1 Byte____|____Extra Bytes___________|<CR>| Header (~p) | BEM Command | Command-Specific Info |
• BEMCommand
Definition
! Reset the IOP board@ Query the information for the board
g Read a 8-bit data from IOP local memoryh Read a 16-bit data from IOP local memoryi Read a 32-bit data from IOP local memoryj Read a 64-bit data from IOP local memoryk Read from EEPROM into the EEPROM data bufferm Read multiple 8-bit data from IOP local memoryn Read multiple 16-bit data from IOP local memoryo Read multiple 32-bit data from IOP local memoryp Read multiple 64-bit data from IOP local memoryz Read from IOP 480 or 401B CPU register
G Write a 8-bit data to IOP local memoryH Write a 16-bit data to IOP local memoryI Write a 32-bit data to IOP local memoryJ Write a 64-bit data to IOP local memoryK Write from the EEPROM data buffer into the EEPROMM Write multiple 8-bit data to IOP local memoryN Write multiple 16-bit data to IOP local memoryO Write multiple 32-bit data to IOP local memoryP Write multiple 64-bit data to IOP local memoryZ Write to IOP 480 or 401B CPU register
5.3.3 BEM Reply Format
Reply Format|___1 Byte _________|________ Extra Bytes ________|<CR>| REPLY_HEADER (0x1)| Data or message returned |
Message Symbols Explanation! Reply Success@ Reply Error
Table 5-1. BEM Commands

Section 5IOP Software Architecture Back-End Monitor
5-6 PCI Host SDK User’s Manual v3.1© PLX Technology, Inc. All rights Reserved.
5.3.4 BEM Command Protocols
• Single Read________________________________________________________Host to BEM:
~p<g | h | i | j><Address><CR>BEM to Host:
<REPLY_HEADER><DATA><CR>
• Single Write_______________________________________________________Host to BEM:
~p<G | H | I | J><Address><Space><Data><CR>BEM to Host:
None
• Read from EEPROM_____________________________________________Host to BEM:
~pk<ByteSize><CR>BEM to Host:
1. Data is stored at the local memory indicated by the BufferAddressLow andBufferAddressHigh to be mentioned later in this section.Note: The <ByteSize> cannot be bigger than the physical byte size of the on-boardEEPROM.
2. <REPLY_HEADER>!<CR> if OK3. <REPLY_HEADER>@<CR> if error
• Write to EEPROM_________________________________________________Host to BEM:
1. Data is stored by the host at the local memory indicated by the BufferAddressLow andBufferAddressHigh to be described in section.2. Then, the host issues the following string:~pK<ByteSize><CR>Note: The <ByteSize> cannot be bigger than the physical byte size of the on-board EEPROM.
BEM to Host:<REPLY_HEADER>!<CR> if OK<REPLY_HEADER>@<CR> if error

Section 5Back-End Monitor IOP Software Architecture
PCI Host SDK User’s Manual v3.1© PLX Technology, Inc. All rights Reserved.
5-7
• Block Read_________________________________________________________Host to BEM:
~p< m | n | o | p ><StartAddress><Space><ItemCount><CR>BEM to Host:
The following data themselves are used to demonstrate.For 8-bit read, the output will be:
<REPLY_HEADER>0 1 10 20 30 0 4 5 60. . .<CR>For 16-bit read, the output will be:
<REPLY_HEADER>0 1 1234 104 0 1345 890 798. . .<CR>For 32-bit read, the output will be:
<REPLY_HEADER>0 12345678 0 1234 78900 0. . .<CR>For 64-bit read, the output will be:
<REPLY_HEADER>0 123456789abcdef0 . . . <CR>
• Block Write________________________________________________________Host to BEM:The following data themselves are used to demonstrate.
8 bits:~pM<StartAddress> 0 10 2 3 45 67 89 90 a . . . <CR>
16 bits:~pN<StartAddress> 0 10 2 3 4 5 7890 1234 6789 . . .<CR>
32 bits:~pO<StartAddress> 0 12345678 12 48 90000 12345 . . . <CR>
64 bits:~pP<StartAddress> 0 123456789abcdef0 4 567890. . .<CR>
The input data can be as long as it is necessary, the BEM will continuously write datauntil it receives the ending <CR> or the format does not fit. For example, 16-bit data cannot be longer than 5 hexadecimal numbers.
BEM to Host:None.

Section 5IOP Software Architecture Back-End Monitor
5-8 PCI Host SDK User’s Manual v3.1© PLX Technology, Inc. All rights Reserved.
• Read from IOP 480 CPU or IBM401GF Registers____________________Host to BEM:
~pz<IOP480_CPU_INDEX><CR>BEM to Host:
<REPLY_HEADER><DATA><CR>
• Write to IOP 480 CPU or IBM401GF Registers_______________________Host to BEM:
~pZ<IOP480_CPU_INDEX><Space><Data><CR>BEM to Host: NoneThe IOP 480 CPU Registers are indexed as follows:
/* 32 General Purpose Register */#define CPU480_R0 0#define CPU480_R1 1#define CPU480_R2 2#define CPU480_R3 3#define CPU480_R4 4#define CPU480_R5 5#define CPU480_R6 6#define CPU480_R7 7#define CPU480_R8 8#define CPU480_R9 9#define CPU480_R10 10#define CPU480_R11 11#define CPU480_R12 12#define CPU480_R13 13#define CPU480_R14 14#define CPU480_R15 15#define CPU480_R16 16#define CPU480_R17 17#define CPU480_R18 18#define CPU480_R19 19#define CPU480_R20 20#define CPU480_R21 21#define CPU480_R22 22#define CPU480_R23 23#define CPU480_R24 24#define CPU480_R25 25#define CPU480_R26 26#define CPU480_R27 27#define CPU480_R28 28#define CPU480_R29 29#define CPU480_R30 30#define CPU480_R31 31
/* Machine State Register */#define CPU480_MSR 32
/* Condition Register */
#define CPU480_CR 33
/* Special Purpose Registers */#define CPU480_CDBCR 34#define CPU480_CTR 35#define CPU480_DAC 36#define CPU480_DBCR37#define CPU480_DBSR 38#define CPU480_DCCR 39#define CPU480_DCWR 40#define CPU480_DEAR 41#define CPU480_ESR 42#define CPU480_EVPR 43#define CPU480_IAC 44#define CPU480_ICCR 45#define CPU480_ICDBDR 46#define CPU480_LR 47#define CPU480_PID 48#define CPU480_PIT 49#define CPU480_PVR 50#define CPU480_SGR 51#define CPU480_SKR 52#define CPU480_SLER 53#define CPU480_SPRG0 54#define CPU480_SPRG1 55#define CPU480_SPRGR 56#define CPU480_SPRG3 57#define CPU480_SRR0 58#define CPU480_SRR1 59#define CPU480_SRR2 60#define CPU480_SRR3 61#define CPU480_TBHI 62#define CPU480_TBHU 63#define CPU480_TBLO 64#define CPU480_TBLU 65#define CPU480_TCR 66#define CPU480_TSR 67#define CPU480_XER 68

Section 5Back-End Monitor IOP Software Architecture
PCI Host SDK User’s Manual v3.1© PLX Technology, Inc. All rights Reserved.
5-9
#define CPU480_ZPR 69
Note: Because the General Purpose Registers (GPRs) of IOP 480 are used constantly by the local CPU,it is probably meaningless to read any one of them. It is EXTREMLY DANGEROUS to modify IOP 480CPU registers, no matter what registers are, GPRs or Special Purpose Registers (SPRs) unless you havea hardware or software debugger running.

Section 5IOP Software Architecture Back-End Monitor
5-10 PCI Host SDK User’s Manual v3.1© PLX Technology, Inc. All rights Reserved.
• Query Information About The Board Connected._________________________Host to BEM:
~p@<CR>BEM to Host:1. Interface structure between PLXMon and BEMThe following structure is an interface used by the PLXMon and the BEM to pass information from theBEM to the PLXMon. The exact information passed from BEM to PLXMon will be described in detail later.
typedef struct _PLATFORM_PARAMS{
U32 Version; /* BEM Version & Platform type */U32 PlxAddressLow; /* Lower 32-bits of PLX Chip base address */U32 PlxAddressHigh; /* Upper 32-bits of PLX Chip base address */U16 PlxChipType; /* PLX Chip Type */U16 Capability; /* Capabilities of the BEM */U8 EEPROMType; /* EEPROM type, not used by BEM */U8 FlashType; /* FLASH type, not used by BEM */U16 Reserved; /* Space for future use */U32 FlashAddressLow; /* Lower 32-bits of FLASH base address */U32 FlashAddressHigh; /* Upper 32-bits of FLASH base address */U32 BufferAddressLow; /* Perm. buffer for EEPROM programming */U32 BufferAddressHigh;U32 BufferSize; /* Permanent Buffer size */U32 FlashBufferAddressLow; /* Temp Buffer for FLASH programming */U32 FlashBufferAddressHigh;U32 FlashBufferSize; /* Temp FLASH buffer size */
} PLATFORM_PARAMS, * PPLATFORM_PARAMS;
Version is defined as follows:31
30
29
28
27
26
25
24
23
22
21
20
19
18
17
16
15
14
13
12
11
10 9 8 7 6 5 4 3 2 1 0
Version Major Version Minor Version RevisionPlat-form*
Reserved
Platform:Bit 6: 0 = 32-bit addressing
1 = 64-bit addressingBit 7: 0 = 32-bit data size
1 = 64-bit data sizeCapability is defined as follows:15 14 13 12 11 10 9 8 7 6 5 4 3 2 1 0Read from or
Write toMemory
FLASHProgramming
EEPROMProgramming
Reserved
3-Bit Field Description
0Specifies whether operation is supported.0 : Not supported1 : Supported
2:1 Reserved
Example:

Section 5Back-End Monitor IOP Software Architecture
PCI Host SDK User’s Manual v3.1© PLX Technology, Inc. All rights Reserved.
5-11
0x2080 (Memory R/W , No FLASH programming, EEPROM programming)0 0 1 0 0 0 0 0 1 0 0 0 0 0 0 0
2. BEM responds to the inquiry posed by PLXMon.BEM will respond to the PLXMon inquiry with the following information separated by a space charbetween the consequent two items in the bolded block.
<REPLY_HEADER>Version InformationPlxAddressLowPlxAddressHighPlxChipTypeCapabilitiesEEPROMType (Note: An ASCII string from EEPROM_TYPE defined in PlxTypes.h)FLASHType (Note: An ASCII string from FLASH_TYPE defined in PlxTypes.h)FlashAddressLowFlashAddressHighBufferAddressLowBufferAddressHighBufferSizeFlashBufferAddressLowFlashBufferAddressHighFlashBufferSize<CR>
For example:Version Information = 3000000 (Major 3, Minor 0, Rev0, 32-bit data and address)PlxAddressLow = 20000000PlxAddressHigh = 0PlxChipType = IOP 480Capabilities = 2480 (All programming supported: EEPROM, FLASH, Memory R/W)EEPROMType (String: e.g. Eeprom93CS66)FLASHType (String: e.g. AT49LV040)FlashAddressLow = FFF80000FlashAddressHigh = 0BufferAddressLow = 10000BufferAddressHigh = 0BufferSize = 100FlashBufferAddressLow = 10000000FlashBufferAddressHigh = 0FlashBufferSize = 80000
IOP 480 BEM would respond with the following data:<REPLY_HEADER>3010000 20000000 0 480 2480 Eeprom93CS66 AT49LV040FFF80000 0 10000 0 100 10000000 0 80000<CR>
Section 5IOP Software Architecture Back-End Monitor
5-12 PCI Host SDK User’s Manual v3.1© PLX Technology, Inc. All rights Reserved.
• FLASH Programming__________________________________________________Because of serial mode communication properties, the host has to write the data, either for EEPROM orFLASH programming, into the local memory first, and it then informs the local CPU to program eitherEEPROM or FLASH. That’s the reason why buffers are provided.Query the local CPU for the data structure mentioned above. If the Capabilities bits indicate the BEMsupports FLASH programming, then continue.Write IOP_SERIAL_FLASH_PROTOCOL to the MailBox 6 and write the starting FLASH offset to programat to the MailBox 7, and write the FLASH image size to the MailBox 5. Finally, the host resets the localCPU.When the local CPU is reset, it checks MailBox 6 for the IOP_SERIAL_FLASH_PROTOCOL. If theMailBox 6 contains IOP_SERIAL_FLASH_PROTOCOL, then the local CPU initializes and begins toreceive FLASH image data through serial mode using X-Modem file transfer protocol.When all the FLASH image data has been received, the local CPU begins to reprogram the FLASH.When the reprogramming is done, it resets itself.Note:The protocol for downloading a FLASH image from the host program to the embedded follows the sameguidance as the downloading of a RAM application through a serial channel. Both targets of the serialdownloading download a file in the Binary Block Format defined in the protocol.h. For FLASH, theblock reads like this:
FlashBufferAddressLow | BlockImageSize | . . data . . | 0 | 0U32 | U32 | U32 units | U32 | U32
Please notice that the buffer for the FLASH programming is to the DRAM or SDRAM buffer for storingFLASH image instead of directly to the FLASH itself.

Section 5Back-End Monitor IOP Software Architecture
PCI Host SDK User’s Manual v3.1© PLX Technology, Inc. All rights Reserved.
5-13
• EEPROM Programming_________________________________________________1. Query the local CPU for the BufferAddressLow, BufferAddressHigh, BufferSize parameters as well as
whether EEPROM programming is supported or not.2. If the IOP side supports the EEPROM programming, write EEPROM data to the local Buffer using
BEM commands if the host wants to write data to the EEPROM;3. Issue WRITE_TO_EEPROM command for writing to the EEPROM or READ_FROM_EEPROM
command for reading from EEPROM to the BEM module or issue;4. Read EEPROM data from the local Buffer using BEM commands if the host wants to read data from
the EEPROM.

Section 5IOP Software Architecture IOP Applications
5-14 PCI Host SDK User’s Manual v3.1© PLX Technology, Inc. All rights Reserved.
5.4 Methods For Debugging IOP ApplicationsThe PCI SDK supports two methods for debugging IOP applications. They are:• Win32 Debugging: Using PLXMon. This method assumes that there is no IOP application running on
the RDK board. With new RDK boards, this method provides the preliminary debugging andvalidation of new RDK boards.
• PLXMon with the BEM: With the BEM linked into the IOP application, PLXMon can communicate tothe RDK board through the PC’s COM port to the serial port on the RDK board. PLXMon can be setup to communicate to the RDK board or IOP application using either the serial port or the PCI bus.
5.4.1 Operation Of The Back-End Monitor In A SystemThis section describes how the BEM can be used on an RDK board and how it affects systemperformance.The Back-End Monitor combinations are as follows:1. AppMain() only: the IOP application is running without any BEM tasks; and,2. BemMain() and AppMain(): the IOP application is running with BEM debugger.Method 1: This method is used once the application has been fully tested and is working properly. Thereis no monitor task running so this method provides the best performance for the application. PLXMon canbe used to debug the application if the RDK board is inserted into a free slot in the host system's PCI Busand PLXMon's PCI Communication is turned on.Method 2: PLXMon is used to debug the application through the serial port. IOP application performancewill be affected using this method because the BEM monitor is processing commands and copy data toand from different memory buffers. There is a possibility of lost data destined for the IOP application. IfIOP application data matches BEM commands, the monitor will remove them from the serial data stream.When the IOP application requires data that could be captured by the monitor, the IOP application shouldaccess the UART Services module directly, bypassing the monitor (by calling PlxGetChars()).
5.5 IOP ApplicationsThe IOP API, the BSP and the Back-End Monitor libraries are linked with the IOP application objects tocreate the binary image. This image is then programmed into FLASH memory, or downloaded to RAMmemory and executed.All IOP applications have an AppMain() function which is the main application function. The main()function is kept within the BSP module. This limitation is imposed on all applications because of the waythe Back-End Monitor (BEM) is implemented. The BEM needs to run periodically to operate properly.Since there can only be one execution thread running at one time, a cycle is created using the main()function. This cycle loops forever calling the BEM and then the main application function sequentially(cooperative multitasking or non-preemptive multitasking). The AppMain() function should be cyclic innature and should return control periodically back to the main() function.
5.5.1 IOP Memory And IOP ApplicationsIOP applications running in ROM or in RAM use memory in different ways. When an IOP application isexecuted as a ROM program, it contains all the modules it needs, such as the Back-End Monitor. A ROMapplication contains:• The main IOP application module;• The IOP API;• The BSP module; and,• The Back-End Monitor.Figure 5-2 shows how the ROM application uses memory.IOP RAM applications are built differently from IOP ROM applications. The IOP RAM applications lookvery similar to IOP ROM applications as far as the source code is concerned, but they differ when the IOPRAM application is linked to the libraries. IOP RAM type applications borrow the Back-End Monitor fromthe resident IOP ROM application. The size of IOP RAM applications is normally smaller because a lot of
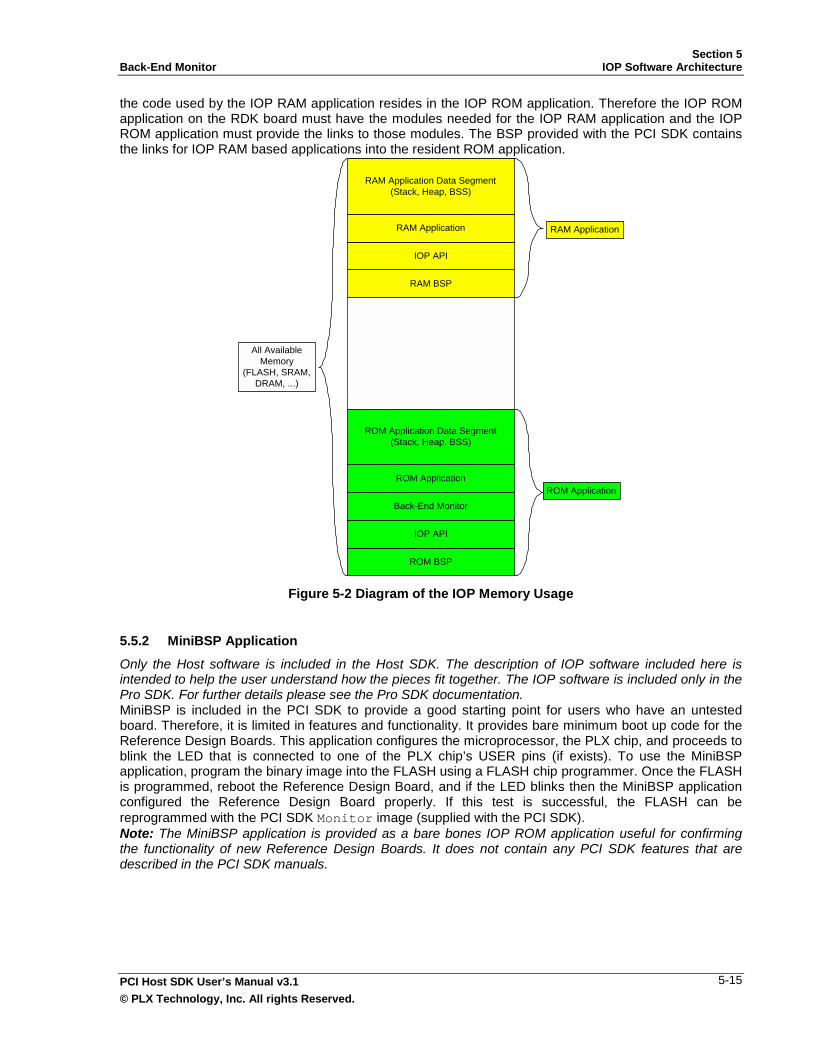
Section 5Back-End Monitor IOP Software Architecture
PCI Host SDK User’s Manual v3.1© PLX Technology, Inc. All rights Reserved.
5-15
the code used by the IOP RAM application resides in the IOP ROM application. Therefore the IOP ROMapplication on the RDK board must have the modules needed for the IOP RAM application and the IOPROM application must provide the links to those modules. The BSP provided with the PCI SDK containsthe links for IOP RAM based applications into the resident ROM application.
All AvailableMemory
(FLASH, SRAM,DRAM, ...)
RAM BSP
IOP API
RAM Application
RAM Application Data Segment(Stack, Heap, BSS)
RAM Application
ROM BSP
IOP API
Back-End Monitor
ROM Application
ROM Application Data Segment(Stack, Heap, BSS)
ROM Application
5.5.2 MiniBSP ApplicationOnly the Host software is included in the Host SDK. The description of IOP software included here isintended to help the user understand how the pieces fit together. The IOP software is included only in thePro SDK. For further details please see the Pro SDK documentation.MiniBSP is included in the PCI SDK to provide a good starting point for users who have an untestedboard. Therefore, it is limited in features and functionality. It provides bare minimum boot up code for theReference Design Boards. This application configures the microprocessor, the PLX chip, and proceeds toblink the LED that is connected to one of the PLX chip’s USER pins (if exists). To use the MiniBSPapplication, program the binary image into the FLASH using a FLASH chip programmer. Once the FLASHis programmed, reboot the Reference Design Board, and if the LED blinks then the MiniBSP applicationconfigured the Reference Design Board properly. If this test is successful, the FLASH can bereprogrammed with the PCI SDK Monitor image (supplied with the PCI SDK).Note: The MiniBSP application is provided as a bare bones IOP ROM application useful for confirmingthe functionality of new Reference Design Boards. It does not contain any PCI SDK features that aredescribed in the PCI SDK manuals.
Figure 5-2 Diagram of the IOP Memory Usage

Section 5IOP Software Architecture IOP Applications
5-16 PCI Host SDK User’s Manual v3.1© PLX Technology, Inc. All rights Reserved.
5.6 Porting The PCI SDK To New PlatformsOnly the Host software is included in the Host SDK. The description of IOP software included here isintended to help the user understand how the pieces fit together. The IOP software, including the BSP, isincluded only in the Pro SDK. For further details please see the Pro SDK documentation.All information needed to port the PCI SDK to new platforms is contained within the BSP module, which isincluded in the Pro SDK. Some of the information contained within the BSP includes:• The memory map of the IOP bus;• The microprocessor boot code;• The PLX chip interrupt service routine;• The UART interrupt service routine or the polling mechanism for retrieving data from UART;• The board initialization routine; and,• The board and/or application specific controls for the IOP API and the Back-End Monitor.The IOP API and the Back-End Monitor need to know where certain devices are located on the IOP bus,such as the PLX chip, DRAM, SRAM and the UART. These values need to be updated when creating anapplication for new boards.When the microprocessor is changed on a board, the microprocessor boot code must be modified tosupport the new microprocessor. This boot code is provided within the BSP module.Most interrupt service routines are customized to the application. To customize the PCI ISR for anapplication, either modify the interrupt trigger service routines or modify the main ISR.The Back-End Monitor relies on the UART to send and receive data from the serial port. Modify the UARTcode to support the UART on the board.To initialize the PLX chip, modify the parameters for the IOP API initialization functions contained withinthe board initialization routine.Within the BSP, there is some control parameters for the IOP API and the Back-End Monitor that can bemodified to improve performance of the PCI SDK. These parameters are platform and applicationdependent and can affect the operation of the application differently on different systems.
5.7 Support For Multiple PLX chips On One BoardEach PLX chip has its own IOP API library. When two or more chips are present on one ReferenceDesign Board, a new IOP API library must be created. This library will contain the normal API functions(defined in this document) and some new or modified functions that represent new features madeavailable by combining the features of the multiple chips. Some multiple chip libraries will be available (forthe more popular implementations), however it will be up to the designer to create his/her own library formulti-chip combinations not currently supported.

PCI Host SDK User’s Manual v3.1© PLX Technology, Inc. All rights Reserved.
6-1
6 Real Time Operating System Support
6.1 General InformationThe PCI Host SDK contains software for a Windows host to access the PLX Chip across the PCI bus.The PCI Pro SDK also contains software for a local CPU, or IOP (I/O Processor) to access the chip viathe local bus on a peripheral card.As part of the IOP support, PCI Pro SDK contains VxWorks BSP for PCI 9054RDK-860 and CompactPCI9054RDK-860 boards. We will provide a VxWorks BSP for IOP 480RDK in the near future. Please sendan email if you are interested in VxWorks BSP for IOP 480RDK to [email protected] you are interested in developing a driver for other RTOS, then you can use almost all of the IOP APIlibrary functions from the PCI Pro SDK. The IOP API library is a set of functions that can be called fromwithin a RTOS. The RTOS code needs to call the PlxInitApi() function to initialize the PLX API. Thiswill integrate the IOP API with your RTOS.For further details see the documentation for the Pro SDK.


PCI Host SDK User’s Manual v3.1© PLX Technology, Inc. All rights Reserved.
7-1
7 RDK Software Quick ReferenceThe information below should be used as a guide to the PCI SDK software requirements for each PLXRDK board.
7.1 PCI and Compact PCI 9030 RDK-LiteThe following below details the 9030 RDK-Lite memory map.
0000 2000 -> FFFF FFFF Unused
0000 0000 -> 0000 2000 DPRAM (8 Kbytes)
The following EEPROM values are used in the 9030 RDK-Lite. The Compact PCI EEPROM values areidentical, except for the Device ID, which is 30C1h versus 3001h of the PCI board.
7.2 IOP 480RDKThe table below describes the memory requirements of the PCI SDK for the IOP 480RDK.
Item IOP 480RDK
SDRAM Address0x0000 0000 –> 0x01FF FFFF(32MB)
FLASH Type ATMEL AT49LV040
FLASH Address0xFFF8 0000 –> 0xFFFF FFFF(512KB)
FLASH Image Offset at which toreprogram the FLASH
0x0006 0000 (If the user has abigger FLASH image, this has tobe decreased to proper offset.)
EEPROM Type 93CS66LEN
Table 7-1. Basic Information About IOP 480RDK

Section 7RDK Software Quick Reference IOP 480RDK
7-2 PCI Host SDK User’s Manual v3.1© PLX Technology, Inc. All rights Reserved.
Item IOP 480RDK
Memory space used by ROM code 0x0000 0000 –> 0x0003 FFFFMemory space used by RAM code(PCI SDK Samples)
0x0004 0000 –> 0x0007 FFFF
Direct Master to PCI memoryspace Address
0x4000 0000 –> 0x4FFF FFFF(256MB)
Direct Master to PCI IO spaceAddress
0x5000 0000 –> 0x5FFF FFFF(256MB)
IOP 480 Configuration RegisterBase Address
0x5000 0000 (default and EEPROMsettings)
IOP 480 Configuration RegisterBase Address in PCI SDK
0x3000 0000 (re-initialized fromdefault and used in SDK)
IOP 480 Serial Port Unit BaseAddress
0x1000 0000
Memory space recommend foruser’s use.
0x0008 0000 -> 0x01FF FFFF(31.5MB)
Users, who have upgraded the PCI SDK and intend to use it with an existing PLX RDK, must firstreprogram the configuration EEPROM connected to the PLX chip. Skipping this step can causeunpredictable behavior of the PCI SDK. If you have purchased the PCI SDK with a PLX RDK then there isno need to upgrade the EEPROM because it was programmed at the factory before shipping. Thefollowing diagram shows the default EEPROM settings for the RDK.
Figure 7-1. Configuration EEPROM Settings for the IOP 480RDK

Section 6PCI 9054RDK-860 RDK Software Quick Reference
PCI Host SDK User’s Manual v3.1© PLX Technology, Inc. All rights Reserved.
7-3
7.3 PCI 9054RDK-860The table below describes the memory requirements of the PCI SDK for the PCI 9054RDK-860.
Item PCI 9054RDK-860SDRAM Address 0x0000 0000 –> 0x01FF FFFF (32MB)FLASH Type AT49LV040(default as shipped)
AM29F040 also supported in softwareFLASH Address 0xFFF0 0000 –> 0xFFF7 FFFF (512KB)FLASH Image Offset at which toreprogram the FLASH
0x0000 0000
Memory space used by ROM code 0x0000 0000 –> 0x0003 FFFFMemory space used by RAM code (PCISDK Samples)
0x0004 0000 –> 0x0007 FFFF
Direct Master to PCI memory spaceAddress
0x4000 0000 –> 0x40FF FFFF (16MB)
Direct Master to PCI IO spaceAddress
0x5000 0000 –> 0x50FF FFFF (16MB)
PCI 9054 Register Address 0x3000 0000 -> 0x3000 01FFMemory space recommend for user’suse.
0x0008 0000 -> 0x01FF FFFF(31.5MB)
Users, who have upgraded the PCI SDK and intend to use it with an existing PLX RDK, must firstreprogram the configuration EEPROM connected to the PLX chip. Skipping this step can causeunpredictable behavior of the PCI SDK. If you have purchased the PCI SDK with a PLX RDK then there isno need to upgrade the EEPROM because it was programmed at the factory before shipping. Thefollowing diagram shows the default settings for the RDK.
Table 7-2. Basic Information About PCI 9054RDK-860

Section 6RDK Software Quick Reference CompactPCI 9054RDK-860
7-4 PCI Host SDK User’s Manual v3.1© PLX Technology, Inc. All rights Reserved.
7.4 CompactPCI 9054RDK-860The table below describes the memory requirements of the PCI SDK for the CompactPCI 9054RDK-860.
Item CompactPCI 9054RDK-860SDRAM Address 0x0000 0000 –> 0x01FF FFFF (32MB)SBSRAM Address 0x2000 0000 –> 0x2007 FFFF (512KB)FLASH Type AT49LV040(default as shipped)
AM29F040 also supported in softwareFLASH Address 0xFFF0 0000 –> 0xFFF7 FFFF (512KB)FLASH Image Offset at which toreprogram the FLASH
0x0000 0000
Memory space used by ROM code 0x0000 0000 –> 0x0003 FFFFMemory space used by RAM code (PCISDK Samples)
0x0004 0000 –> 0x0007 FFFF
Direct Master to PCI memory spaceAddress
0x4000 0000 –> 0x40FF FFFF (16MB)
Direct Master to PCI IO spaceAddress
0x5000 0000 –> 0x50FF FFFF (16MB)
PCI 9054 Register Address 0x3000 0000 -> 0x3000 01FFMemory space recommend for user’suse.
0x0008 0000 -> 0x01FF FFFF(31.5MB)
Figure 7-2. Configuration EEPROM Settings for the PCI 9054RDK-860
Table 7-3. Basic Information About CompactPCI 9054RDK-860

Section 6PCI 9080RDK-401B RDK Software Quick Reference
PCI Host SDK User’s Manual v3.1© PLX Technology, Inc. All rights Reserved.
7-5
Users, who have upgraded the PCI SDK and intend to use it with an existing PLX RDK, must firstreprogram the configuration EEPROM connected to the PLX chip. Skipping this step can causeunpredictable behavior of the PCI SDK. If you have purchased the PCI SDK with a PLX RDK then there isno need to upgrade the EEPROM because it was programmed at the factory before shipping. Thefollowing diagram shows the default settings for the RDK.
7.5 PCI 9080RDK-401BThe table below describes the memory requirements of the PCI SDK for the PCI 9080RDK-401B.
Item PCI 9080RDK-401BSDRAM Address 0x0000 0000 –> 0x00FF FFFF (16MB)SRAM Address 0x1000 0000 –> 0x1007 FFFF (512KB)FLASH Type AM29F040FLASH Address 0xFFF8 0000 –> 0xFFFF FFFF (512KB)FLASH Image Offset at which toreprogram the FLASH
0x0006 0000 (If the user has abigger FLASH image, this has to bedecreased to proper offset.)
Memory space used by ROM code 0x1000 0000 –> 0x1003 FFFFMemory space used by RAM code (PCISDK Samples)
0x1004 0000 –> 0x1007 FFFF
Direct Master to PCI memory spaceAddress
0xB800 0000 –> 0xBFFF FFFF (8MB)
Direct Master to PCI IO spaceAddress
0xB000 0000 –> 0xB7FF FFFF (8MB)
PCI 9080 Register Address 0x2000 0000 -> 0x2000 01FF
Memory space recommend for user’suse.
0x0 -> 0x00FF FFFF (16MB)
Figure 7-3. Configuration EEPROM Settings for the CompatctPCI 9054RDK-860
Table 7-4. Basic Information About PCI 9080RDK-401B

Section 6RDK Software Quick Reference PCI 9080RDK-860
7-6 PCI Host SDK User’s Manual v3.1© PLX Technology, Inc. All rights Reserved.
Users, who have upgraded the PCI SDK and intend to use it with an existing PLX RDK, must firstreprogram the configuration EEPROM connected to the PLX chip. Skipping this step can causeunpredictable behavior of the PCI SDK. If you have purchased the PCI SDK with a PLX RDK then there isno need to upgrade the EEPROM because it was programmed at the factory before shipping. Thefollowing diagram shows the default settings for the RDK.
7.6 PCI 9080RDK-860The table below describes the memory requirements of the PCI SDK for the PCI 9080RDK-860.
Item PCI 9080RDK-860DRAM Address 0x1000 0000 –> 0x10FF FFFF (16MB)SRAM Address 0x0000 0000 –> 0x0007 FFFF (512KB)FLASH Type AM29F040 (IOP programming only)FLASH Address 0xFFF8 0000 –> 0xFFFF FFFF (512KB)FLASH Image Offset at which toreprogram the FLASH
0x0000 0000
Memory space used by ROM code 0x0000 0000 –> 0x0003 FFFFMemory space used by RAM code (PCISDK Samples)
0x0004 0000 –> 0x0007 FFFF
Direct Master to PCI memory spaceAddress
0x4000 0000 –> 0x40FF FFFF (16MB)
Direct Master to PCI IO spaceAddress
0x5000 0000 –> 0x50FF FFFF (16MB)
PCI 9080 Register Address 0xC000 0000 -> 0xC000 01FFMemory space recommend for user’suse.
0x1000 0000 -> 0x10FF FFFF (16MB)
Table 7-5. Basic Information About PCI 9080RDK-860
Figure 7-4. Configuration EEPROM Settings for the PCI 9080RDK-401B

Section 6PCI 9080RDK-860 RDK Software Quick Reference
PCI Host SDK User’s Manual v3.1© PLX Technology, Inc. All rights Reserved.
7-7
Users, who have upgraded the PCI SDK and intend to use it with an existing PLX RDK, must firstreprogram the configuration EEPROM connected to the PLX chip. Skipping this step can causeunpredictable behavior of the PCI SDK. If you have purchased the PCI SDK with a PLX RDK then there isno need to upgrade the EEPROM because it was programmed at the factory before shipping. Thefollowing diagram shows the default settings for the RDK.
Figure 7-5. Configuration EEPROM Settings for the PCI 9080RDK-860

PCI Host SDK User’s Manual v3.1© PLX Technology, Inc. All rights Reserved.
IX
Appendix A. IndexA
AppMain ..................................................... 5-15
BBEM3-2, 5-2, 5-4, 5-5, 5-6, 5-7, 5-8, 5-9, 5-11, 5-13, 5-14, 5-15BemMain .................................................... 5-15Boot up code.............................................. 5-16BSP1-3, 2-18, 3-1, 3-2, 3-1, 5-2, 5-3, 5-4, 5-15, 5-16, 5-18
C
CompactPCI................................................. 7-4
D
Direct Master..........................7-2, 7-1, 7-4, 7-6Direct Slave................................................ 2-18
I
IOP 480............. 2-11, 5-6, 5-9, 5-10, 5-12, 7-2IOP 480RDK ................................................ 7-1ISR ............................................................. 5-18
L
LED .....................................................3-1, 5-16
M
Microprocessor ............................................ 1-4
MiniBSP.............................................2-18, 5-16
P
PCI 9054RDK-860 .......................................7-1PCI 9080RDK-401B .....................................7-5PCI 9080RDK-860 .......................................7-6PCI API DLL..........................................3-2, 4-2PCI BIOS....................................................2-10PLXMon1-3, 2-5, 2-2, 2-9, 2-11, 2-15, 2-18, 3-1, 3-2, 3-1, 4-Power Management ...................................2-17Protocols ......................................................5-7
R
Registry ................................... 2-10, 2-13, 2-16
S
SGL DMA ...................................................2-17Shuttle DMA ......................................2-15, 2-17
U
UART......................................... 5-4, 5-15, 5-18
W
WDM ........................................... 2-2, 2-11, 4-2