
PL10972 Becoming a Master at Vault Administration
15
PL10972 Becoming a Master at Vault Administration Jason Summerfield Autodesk Irvin Hayes Autodesk Learning Objectives Learn how to successfully implement Vault the first time Learn tips and tricks from the experts, from basic to advanced configurations Learn how to properly maintain your Vault infrastructure to ensure stability and optimize performance Learn how to plan and execute a successful migration Description Whether you’re planning your first installation or maintaining a global replicated network, this class will walk you through the implementation, configuration, maintenance, and migration of your Vault software implementation. Learn how to properly plan for the growth of your deployment and how to maintain your Vault software to match the evolving needs of your business. As your system grows over time, you will need to migrate from version to version of the product as well as of the SQL and the operating system. Class topics will include capacity planning, disaster recovery, system monitoring, and SQL optimization. Learn from the experts to ensure your Vault software success. Your AU Experts Prior to Autodesk, Jason Summerfield spent over 10 years working in the AEC Industry with roles ranging from a CAD Designer to CAD Manager. After working for several years as a CAD Manger he transitioned into the IT world as a Systems Administrator. He joined Autodesk in 2006 as a Product Support Specialist supporting Vault and Productstream. Irvin Hayes Jr. is a product manager for the Data Management Group at Autodesk, Inc., in Novi, Michigan. Irvin has worked at Autodesk for 10 years, starting in product support and as a user experience designer. Irvin is a Microsoft Certified Professional, and he has been working in the information technology field for more than 20 years.
Transcript of PL10972 Becoming a Master at Vault Administration
PL10972
Becoming a Master at Vault Administration Jason Summerfield Autodesk Irvin Hayes Autodesk
Learning Objectives Learn how to successfully implement Vault the first time
Learn tips and tricks from the experts, from basic to advanced configurations
Learn how to properly maintain your Vault infrastructure to ensure stability and optimize performance
Learn how to plan and execute a successful migration
Description Whether you’re planning your first installation or maintaining a global replicated network, this class will walk you through the implementation, configuration, maintenance, and migration of your Vault software implementation. Learn how to properly plan for the growth of your deployment and how to maintain your Vault software to match the evolving needs of your business. As your system grows over time, you will need to migrate from version to version of the product as well as of the SQL and the operating system. Class topics will include capacity planning, disaster recovery, system monitoring, and SQL optimization. Learn from the experts to ensure your Vault software success.
Your AU Experts
Prior to Autodesk, Jason Summerfield spent over 10 years working in the AEC Industry with roles ranging from a CAD Designer to CAD Manager. After working for several years as a CAD Manger he transitioned into the IT world as a Systems Administrator. He joined Autodesk in 2006 as a Product Support Specialist supporting Vault and Productstream.
Irvin Hayes Jr. is a product manager for the Data Management Group at Autodesk, Inc., in Novi, Michigan. Irvin has worked at Autodesk for 10 years, starting in product support and as a user experience designer. Irvin is a Microsoft Certified Professional, and he has been working in the information technology field for more than 20 years.
PL10972 - Becoming a Master at Vault Administration
2
Learn how to successfully implement Vault the first time
SQL Pre-Install
Microsoft SQL 2008 R2 / 2012 (Standard or Enterprise)
1. Start the installation process for Microsoft SQL 2008 R2 / SQL Server 2012 (Standard or Enterprise) by selecting New SQL Server stand-alone installation or add features to an existing installation from the installation menu.
2. The installation process installs any necessary prerequisites and begins running the pre-installation checks. Note any errors and take the necessary corrective actions before continuing.
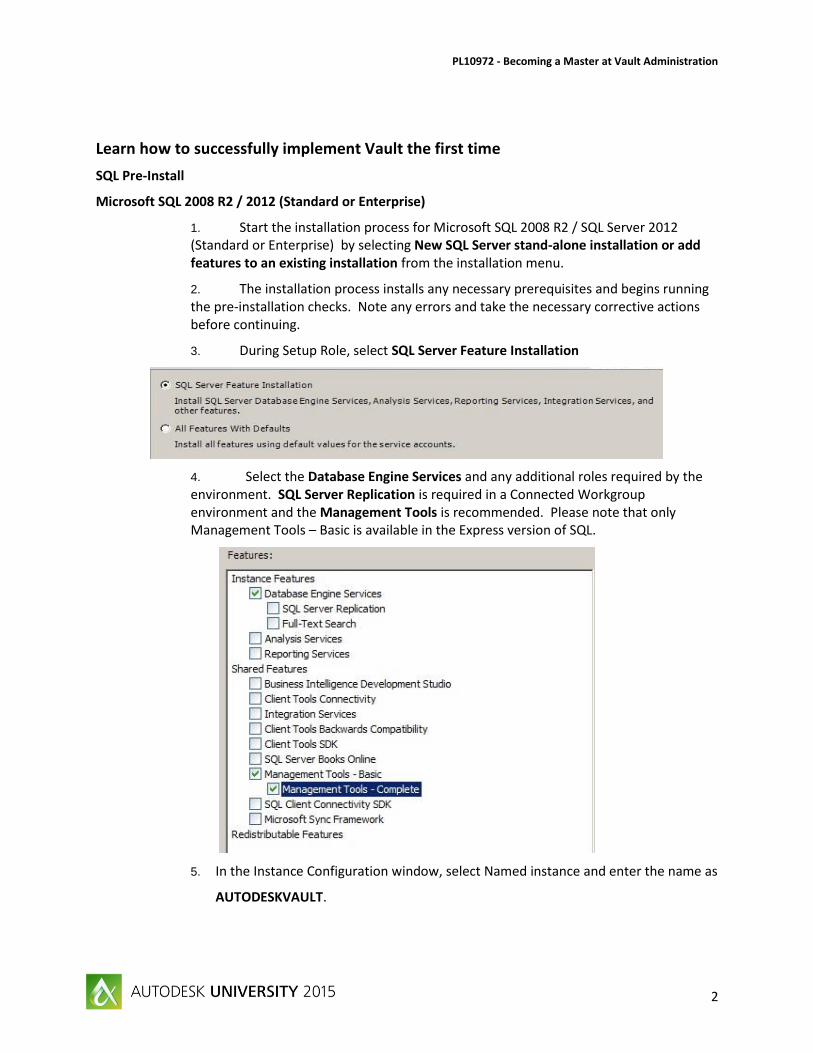
3. During Setup Role, select SQL Server Feature Installation
4. Select the Database Engine Services and any additional roles required by the environment. SQL Server Replication is required in a Connected Workgroup environment and the Management Tools is recommended. Please note that only Management Tools – Basic is available in the Express version of SQL.
5. In the Instance Configuration window, select Named instance and enter the name as
AUTODESKVAULT.
PL10972 - Becoming a Master at Vault Administration
3
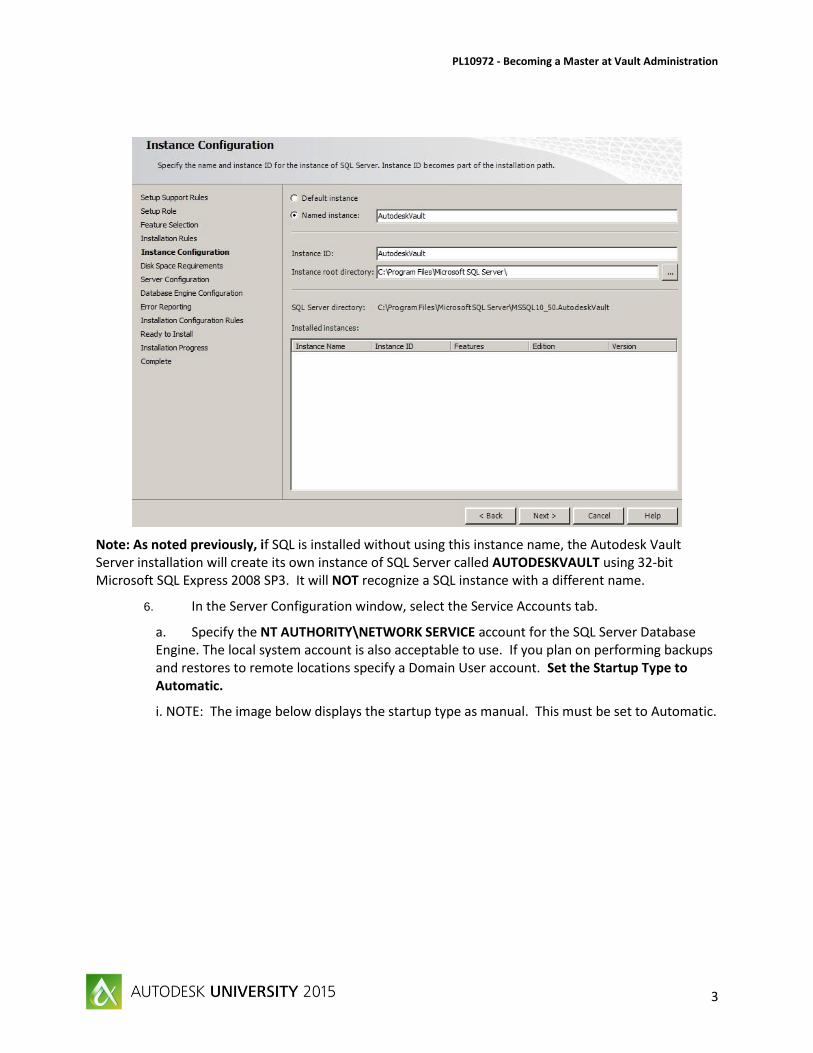
Note: As noted previously, if SQL is installed without using this instance name, the Autodesk Vault Server installation will create its own instance of SQL Server called AUTODESKVAULT using 32-bit Microsoft SQL Express 2008 SP3. It will NOT recognize a SQL instance with a different name.
6. In the Server Configuration window, select the Service Accounts tab.
a. Specify the NT AUTHORITY\NETWORK SERVICE account for the SQL Server Database Engine. The local system account is also acceptable to use. If you plan on performing backups and restores to remote locations specify a Domain User account. Set the Startup Type to Automatic.
i. NOTE: The image below displays the startup type as manual. This must be set to Automatic.
PL10972 - Becoming a Master at Vault Administration
4
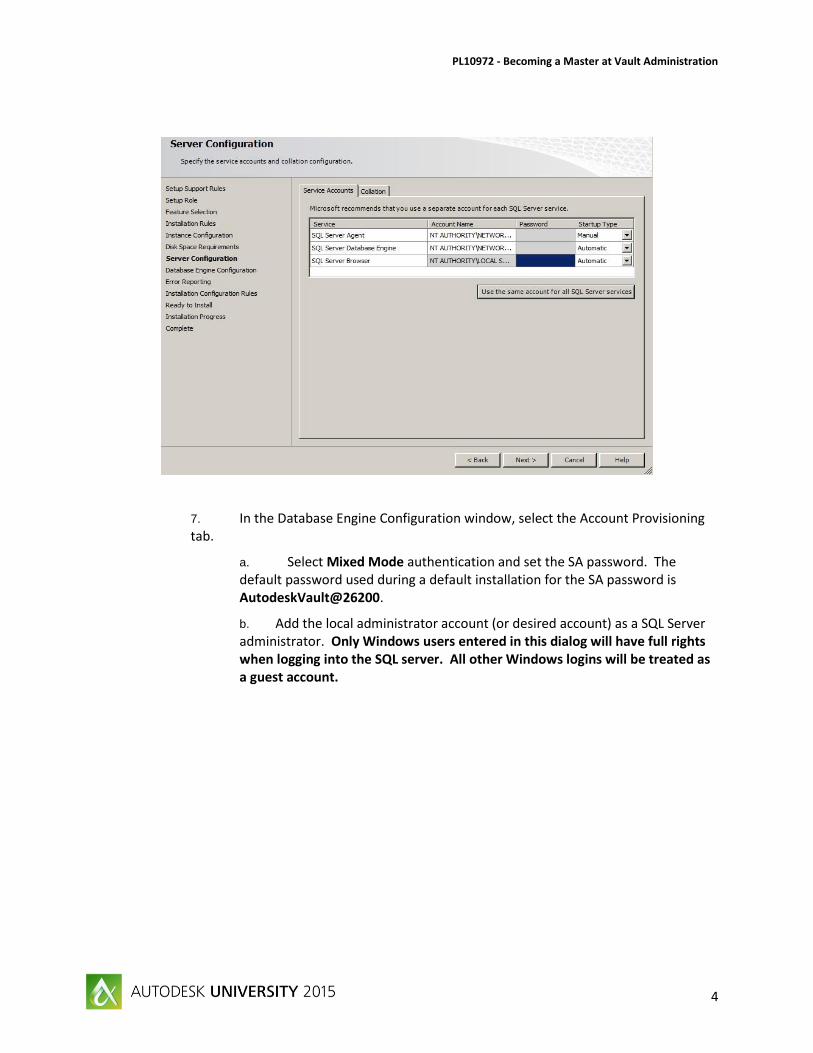
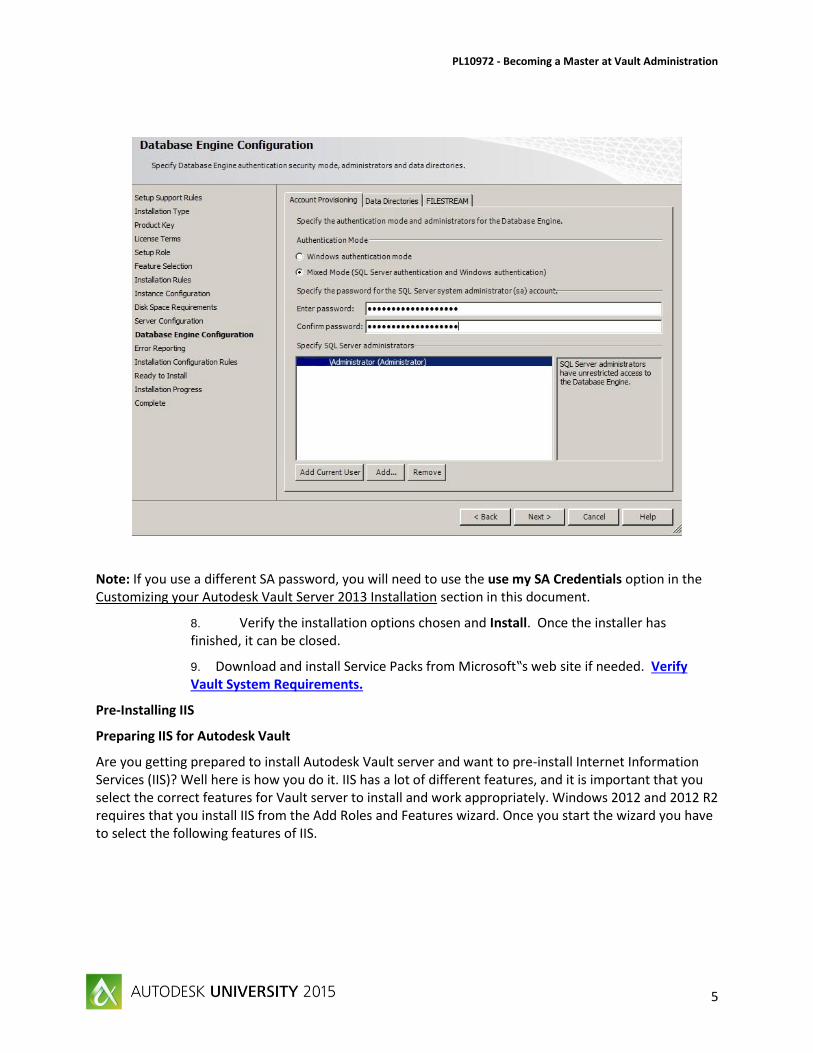
7. In the Database Engine Configuration window, select the Account Provisioning tab.
a. Select Mixed Mode authentication and set the SA password. The default password used during a default installation for the SA password is AutodeskVault@26200.
b. Add the local administrator account (or desired account) as a SQL Server administrator. Only Windows users entered in this dialog will have full rights when logging into the SQL server. All other Windows logins will be treated as a guest account.
PL10972 - Becoming a Master at Vault Administration
5
Note: If you use a different SA password, you will need to use the use my SA Credentials option in the Customizing your Autodesk Vault Server 2013 Installation section in this document.
8. Verify the installation options chosen and Install. Once the installer has finished, it can be closed.
9. Download and install Service Packs from Microsoft‟s web site if needed. Verify Vault System Requirements.
Pre-Installing IIS
Preparing IIS for Autodesk Vault
Are you getting prepared to install Autodesk Vault server and want to pre-install Internet Information Services (IIS)? Well here is how you do it. IIS has a lot of different features, and it is important that you select the correct features for Vault server to install and work appropriately. Windows 2012 and 2012 R2 requires that you install IIS from the Add Roles and Features wizard. Once you start the wizard you have to select the following features of IIS.

PL10972 - Becoming a Master at Vault Administration
6
<
While you can select all of these settings manually, there is a quicker way to install all the features needed. Copy the following into a command line and run it on the server.
DISM.EXE /enable-feature /all /online /featureName:IIS-WebServerRole /featureName:IIS-WebServer /featureName:IIS-CommonHttpFeatures /featureName:IIS-DefaultDocument /featureName:IIS-DirectoryBrowsing /featureName:IIS-HttpErrors /featureName:IIS-StaticContent /featureName:IIS-HealthAndDiagnostics /featureName:IIS-HttpLogging /featureName:IIS-Security /featureName:IIS-RequestFiltering /featureName:IIS-WindowsAuthentication /featureName:IIS-Performance /featureName:IIS-HttpCompressionStatic /featureName:IIS-WebServerManagementTools /featureName:IIS-ManagementConsole /featureName:IIS-ApplicationDevelopment /featureName:IIS-ASPNET /featureName:IIS-NetFxExtensibility /featureName:IIS-ASPNET45 /featureName:IIS-NetFxExtensibility45 /featureName:IIS-ISAPIExtensions /featureName:IIS-ISAPIFilter /featureName:IIS-IIS6ManagementCompatibility /featureName:IIS-Metabase /featureName:IIS-LegacyScripts /featureName:IIS-WMICompatibility /featureName:IIS-ManagementScriptingTools
Note: This is a one line command line. If they copy and paste this into the command line, they must remove any carriage returns or line feeds.
After that line, you can run the following command line to set the IIS timeout high enough to pass the Vault pre-checks.
set-webconfigurationproperty '/system.applicationHost/sites/site[@name="Default Web Site"]' -PSPath IIS:\ -Name Limits -Value (@{connectionTimeout="00:15:00"})

PL10972 - Becoming a Master at Vault Administration
7
- See more at: http://underthehood-autodesk.typepad.com/blog/2015/10/preparing-iis-for-autodesk-vault.html#sthash.3WKcdhzw.dpuf
Learn tips and tricks from the experts, from basic to advanced configurations Reconfiguring Application Pools
The application pools that are created during the installation can be reconfigured as needed by using the following procedure.
1) Limit 1x Application to 1x Application Pool (the following images are all from VP2014)
2) Regularly Recycle Application Pools.

PL10972 - Becoming a Master at Vault Administration
8

PL10972 - Becoming a Master at Vault Administration
9
Learn how to properly maintain your Vault infrastructure to ensure stability and optimize performance
Vault Backups The primary tool to back up your vault is to use the backup tool available in the ADMS (Autodesk Data Management Server). This can be found under the “Tools” dropdown within the ADMS window.
It is important to note that this tool backs up not only the vault database and settings but also your file store so the backup size can be quite large.
Within ADMS there are two types of ways to back up the vault they are detailed below.
Full Backup
The best method is that of a Full backup. This backs up the entire database, settings and file store at the point in time of the backup. Always make sure you check the “Validate the backed up files”, shown below, to ensure that your backup is successful and can be recovered.
A Full backup can take a significant amount of time depending on the size of your database/file store and should not be run during production hours as the extra activity may impact normal vault activities.
Incremental Backup
An Incremental backup only backs up changes that have occurred since the last backup. It is much faster than a full backup but you cannot restore from it unless you have both the Full backup it reference AND any other Incremental backups that have occurred since then. An Incremental backup is best suited for the performance hit of a Full backup makes it unrealistic to run during production hours. As with a Full backup make sure to validate the file.
Config File backups Make sure you are backing up your web.config file if it has been customized as well as any configuration files for add-ins you may be using. These will not be backed up as part of the ADMS backup tool.
Multi-Site Environment backups There are special Considerations that must be accounted for when backing up a multi-site environment replication:

PL10972 - Becoming a Master at Vault Administration
10
Autodesk best practice is to perform all backup and restore operations at a single site that is a publisher in a multi-site environment. However this is not possible for organizations with global locations that have slow or limited network connectivity.
If you have a large vault installation with many instances across the world with limited connectivity you should work with your Autodesk team to develop the best backup plan for you.
The items below are best practice recommendations by Autodesk.
Before you create a backup, enable all vaults at a site.
Before you create a backup, replicate the data. If any of the vaults are not replicated, you are prompted to either continue with the backup or cancel the backup operation. If you choose to continue, the data is synchronized automatically during the backup process; however, this extends the time required to back up the data, and other sites cannot access the database for the duration of the backup process.
For best performance, create the backup on a server that is in close network proximity to the SQL database.
As before you will use the ADMS console to create the full backup
Backing up Individual Subscribers If your subscribers and publishers are geographically far apart it may not make sense to sync all data to the main site. In this case you may back up subscribers individually using the built in backup tool or a 3rd party tool.
Backing up AVFS servers No special backups are needed to backup AVFS servers other than making sure the local copy of the filestore is backed up.
Third Party Backups A whitepaper detailing how to backup with Third party tools can be found here: http://download.autodesk.com/us/vault/Backup_and_Restore_Autodesk_Vault.pdf
Tracking delete and download file events with Vault
This article provides documentation on how to configure Autodesk Vault to enable tracking of download / delete file events and provide a mechanism to archive Vault server logs on a schedule using a PowerShell script.
This is an especially interesting configuration for customers who need to audit file download / delete activities in their production Vault.
The high-level process can be summarized by:
A PowerShell script is copied to Vault server for doing managed clean up of Vault server logs

PL10972 - Becoming a Master at Vault Administration
11
PowerShell script is executed once to create new job configuration file to define log directories, desired retention time in days, and other parameters
Windows task scheduler is used to create new task to execute the script in batch mode against job configuration file on a chosen schedule
Emails with the run results will be sent to the email address configured in the job
Setup
In Active Directory, create a new domain user to run the log rotation task in Windows task scheduler. Make sure this user's password is not set to expire.
Create a new network folder that can be accessed from the Vault server and grant read-write NTFS and share permissions to the new domain user account.
Configure Vault In the Web.Config file (first make a copy before making changes) located by default here: "C:\Program Files\Autodesk\ADMS Professional <Version>\Server\Web\Services" Add the following lines after <switches> <add name="LogFileDeletesBooleanSwitch" value="1"/> <add name="LogFileDownloadsBooleanSwitch" value="1"/> Once the lines are added, restart IIS (IISRESET) and you will begin seeing this information logged in the server logs. 08/02/2014 15:56:10 Files have been deleted from the vault. User:'Administrator'; Vault name:'Vault'; Vault filestore root:'C:\ProgramData\Autodesk\VaultServer\FileStore\Vault' Vault file:'$/Designs/05699952/TEST1-ISO 7047 (Z) - M4x16 - 4.8 - Z.ipt'; Relative filestore location:'000\000\000\000\000\000\128'
Configure script
A direct consequence of tracking download and delete file events in the Vault server logs is that the server’s local disk will fill up faster. To account for that, the provided PowerShell script can be run on a schedule to move the old server logs to a network folder of your choice.
The default location of the Vault server logs is:
“C:\ProgramData\Autodesk\VaultServer\FileStore”
1. Download PowerShell script 2. Open script in notepad

PL10972 - Becoming a Master at Vault Administration
12
3. Edit the file to change SMTP server value on line 40
4. Save to new file C:\Bin\Vault_Logs_Rotation_Util.ps1
NOTE: The server security settings for PowerShell may have to be changed to allow unsigned scripts to run If this is the case, run below command in new PowerShell window Set-ExecutionPolicy RemoteSigned
Create job configuration file
1. Open a PowerShell prompt and change directory to C:\Bin 2. Run .\Vault_Logs_Rotation_Util.ps1 and choose to create new config
3. Specify script configuration parameters
LogDir: C:\ProgramData\Autodesk\VaultServer\FileStore TargetDir: <destination network folder> Days to retain files: 5 Disk space limit: 500 Enforce disk space limit: y Archive by: W – LastWriteTime Keep event history file? : y Notification email recipient: <IT admin email>
4. Review the parameters and enter x to exit. A new job configuration XML file has been created
in C:\Bin.
Create a scheduler task
In this section, we will create a new task in Windows scheduler to execute the script on a schedule.
1. Launch Windows Task Scheduler and select Create Task… 2. Under General tab, Security options, When running the task use the following user account, click
on Change User or Group to specify domain user account created earlier 3. Configure the task action to use
Start a program Program/script: %SystemRoot%\system32\WindowsPowerShell\v1.0\powershell.exe Add arguments (optional): C:\Bin\Vault_Logs_Rotation_Util.ps1 –batch Start in (optional): C:\Bin
4. Define a schedule

PL10972 - Becoming a Master at Vault Administration
13
5. Complete and review new scheduled task configuration
Validate
1. Either wait for the results email 2. Or open PowerShell window and execute below command
C:\Bin\Vault_Logs_Rotation_Util.ps1 -batch
Monitor Your Job Processor The Job Processor is a separate application, installed on a computer with the Vault client, the processes jobs in the Job Server queue. The jobs that can be processed by the Job Process include DWF creation, property synchronization, and custom jobs. Each processed job gets recorded in the JobProcessor.log file in the <installed dir>\Vault Professional 2016\Explorer directory. There isn’t an easy way to be notified when jobs fail due to errors or issues. There are a couple of methods which will allow you to get notified of Job Processor failures. First you have to configure the Job Processor, with Vault 2016, to log all jobs to the Windows Event Viewer. To configure the Job Processor to log to the Event Viewer Application log perform the following steps.
1. Navigate to the <installed dir>\Vault Professional 2016\Explorer directory. 2. Locate and copy the logging_JobProcessor.config file to have a backup copy. 3. Using Notepad, under the configuration/loggingConfiguration/listeners section you will find
server lines that have <add name=”Event Log Listener”> that are commented out (via <!-- -->). Uncomment each of these lines.
4. Find the line that has source=”Enterprise Library Logging” and change it to source=”Autodesk Job Processor”.
5. You need to run the Job Processor at least one time using the “Run as Administrator” option and have it execute at least one job. You can then close the Job Processor and restart it in a normal mode for processing jobs.
6. Open the Event Viewer and look into the Application log. You will see log entries created by the Job Processor for each job processed.
Now that you have the jobs being logged in the Event Viewer, the Event Viewer has a couple of methods that can use to alert you on specific types of events. The first method would be to use the Attach Task To This Event option in the Actions panel. The second option would be to create a Subscription to collect events from remote computers and store them in logs on the local computer. Take a look at these two options on Microsoft web pages. Manage Subscriptions Run a Task in Response to a Given Event - See more at: http://underthehood-autodesk.typepad.com/blog/2015/09/monitor-your-job-processor.html#sthash.6sdxTlhl.dpuf
Learn how to plan and execute a successful migration

Autodesk Vault Upgrade Guide Autodesk recommends that every Vault upgrade starts with a validated backup. This validation will ensure that if the upgrade process fails, there is a backup that can be restores. It is also recommended that you have a test environment that is close to your production environment as possible. The reason for this is to allow you to better estimate how long the actual migration may take. You should add a buffer to the migration time so that you can report back your estimation of downtime to the reset of the business. Also, testing your backup and migration will help you identify potential pitfalls prior to executing the migration in the production environment.
Prior to the upgrade, you may want the various business units to sign-off on the migration. It is recommended to create a document containing the key features that the business uses. Testing workflows, customizations and integrations should all be done the test environment to make sure that everyone understands the changes and can be trained prior to upgrading the production server.
Using the test environment provides a safe option to experience the migration process and discover unexpected hurdles. Although this process takes time it can, in the long run, save time and stress by avoiding impact to the production environment. You can use this environment to create documentation that is necessary for a successful migration. This can come in handy in case something happens to any of the key players involved with the migrations.
Vault Upgrade Process The upgrade process for an Autodesk Vault is comprised of 5 steps:
1. Validating a Backup 2. Upgrading SQL 3. Upgrading Vault Server 4. Upgrading Clients 5. Creating a backup
Test Environment A test environment provides a lot of different benefits. These includes verification that backups can be successfully restore, testing different product configuration and testing product upgrades. A test upgrade provides confidence that the backup is valid and identifies potential pitfalls with no impact on the production environment. Following is an overview of test environment benefits.
Test Machine Settings Benefits
Similar CPU, memory, disk space Provides an estimate of how long the migration can take.
Gives insight into migration settings, such as time-out
values to be changed. Exposes other configuration
settings that may require changes.
Database Test machines that need access to a vault that is 2 GB or
more also need a similar version of full Microsoft SQL
server installed.
Other applications that are installed on
the production server
Test for compatibility with various proxy clients, firewalls,
anti-virus programs, etc.

PL10972 - Becoming a Master at Vault Administration
15
Operating System, Service Packs,
firewalls, etc.
Compatibility testing.
Microsoft® Windows® Administration
settings
Check for compatibility with Windows Domain policies,
login scripts, permissions, and other settings.
If a test environment similar to production is not attainable, a low cost alternative is virtual machines like VMware or Virtual PC from Microsoft. Virtual machines lack many of the benefits outlined above but are far better than not performing a backup and migration validation


![[XLS]vox.veritas.com · Web viewYour license file is invalid ... Report Type: %1 Report: ... Vault Administration Console Internal Reference: ...](https://static.fdocuments.net/doc/165x107/5ae7d8137f8b9a08778ee43d/xlsvox-viewyour-license-file-is-invalid-report-type-1-report-vault.jpg)


