Picaxe Manual2 Es
118
Section 2 BASIC COMMANDS (ES) revolution (c) Revolution Education Ltd. Email: [email protected] Web: www.rev-ed.co.uk Version ES1.0 01/2007 1 1 www.picaxe.co.uk Contents (ES) Introduction. ................................................................................................... 3 PICAXE Programming Editor Software .................................................................. 3 Las etiquetas ................................................................................................... 4 Comentarios .................................................................................................... 4 Constantes ...................................................................................................... 5 Variable Mathematics ........................................................................................ 5 Simbolos (symbol) ........................................................................................... 5 Directives ....................................................................................................... 6 Variables ......................................................................................................... 8 backward (reversa) ......................................................................................... 11 branch (bifurcación) ....................................................................................... 12 button (botón) .............................................................................................. 13 calibfreq ....................................................................................................... 15 count (contar) ............................................................................................... 16 debug (depurar) ............................................................................................. 17 dec ............................................................................................................. 18 do...loop ...................................................................................................... 19 eeprom (eeprom) ........................................................................................... 20 data ............................................................................................................. 20 disablebod .................................................................................................... 21 enablebod ..................................................................................................... 21 end (fin) ....................................................................................................... 22 exit ............................................................................................................. 23 for...next (para...siguiente) ............................................................................. 24 forward (en marcha) ....................................................................................... 25 gosub (ir a sub) ............................................................................................. 26 goto (ir a) .................................................................................................... 27 halt ............................................................................................................. 28 high (alta) .................................................................................................... 29 high portc ..................................................................................................... 30 i2cslave (esclavoi2c) ...................................................................................... 31 if...then \ elseif...then \ else \ endif ................................................................ 33 if...then (si...entonces) .................................................................................. 35 if...and/or..then ............................................................................................ 35 if...then exit ................................................................................................. 36 if...and/or...then exit ..................................................................................... 36 if...then gosub .............................................................................................. 37 if...and/or...then gosub .................................................................................. 37 inc ............................................................................................................. 39 infrain (infraen) ............................................................................................. 40 infrain2 (infraen2) ......................................................................................... 42 infraout ........................................................................................................ 43 input (entrada) .............................................................................................. 48 keyin (entecla) .............................................................................................. 49 keyled .......................................................................................................... 51 let (sea) ....................................................................................................... 52 let dirs = ...................................................................................................... 54 let dirsc = ..................................................................................................... 54 let pins = ...................................................................................................... 55 let pinsc = .................................................................................................... 55 lookdown (igualar) ......................................................................................... 56 lookup (buscar) ............................................................................................. 57 low (baja) ..................................................................................................... 58 low portc ...................................................................................................... 59 nap (siesta) ................................................................................................... 60 on...goto ...................................................................................................... 61 on...gosub .................................................................................................... 62 output (salida) .............................................................................................. 63
Transcript of Picaxe Manual2 Es

Section 2
BASIC COMMANDS (ES)
revolution (c) Revolution Education Ltd. Email: [email protected] Web: www.rev-ed.co.ukVersion ES1.0 01/2007
1
1
www.picaxe.co.uk
Contents (ES)Introduction. ................................................................................................... 3PICAXE Programming Editor Software .................................................................. 3Las etiquetas ................................................................................................... 4Comentarios .................................................................................................... 4Constantes ...................................................................................................... 5Variable Mathematics ........................................................................................ 5Simbolos (symbol) ........................................................................................... 5Directives ....................................................................................................... 6Variables ......................................................................................................... 8backward (reversa) ......................................................................................... 11branch (bifurcación) ....................................................................................... 12button (botón) .............................................................................................. 13calibfreq ....................................................................................................... 15count (contar) ............................................................................................... 16debug (depurar) ............................................................................................. 17dec ............................................................................................................. 18do...loop ...................................................................................................... 19eeprom (eeprom) ........................................................................................... 20data ............................................................................................................. 20disablebod .................................................................................................... 21enablebod ..................................................................................................... 21end (fin) ....................................................................................................... 22exit ............................................................................................................. 23for...next (para...siguiente) ............................................................................. 24forward (en marcha) ....................................................................................... 25gosub (ir a sub) ............................................................................................. 26goto (ir a) .................................................................................................... 27halt ............................................................................................................. 28high (alta) .................................................................................................... 29high portc ..................................................................................................... 30i2cslave (esclavoi2c) ...................................................................................... 31if...then \ elseif...then \ else \ endif ................................................................ 33if...then (si...entonces) .................................................................................. 35if...and/or..then ............................................................................................ 35if...then exit ................................................................................................. 36if...and/or...then exit ..................................................................................... 36if...then gosub .............................................................................................. 37if...and/or...then gosub .................................................................................. 37inc ............................................................................................................. 39infrain (infraen) ............................................................................................. 40infrain2 (infraen2) ......................................................................................... 42infraout ........................................................................................................ 43input (entrada) .............................................................................................. 48keyin (entecla) .............................................................................................. 49keyled .......................................................................................................... 51let (sea) ....................................................................................................... 52let dirs = ...................................................................................................... 54let dirsc = ..................................................................................................... 54let pins = ...................................................................................................... 55let pinsc = .................................................................................................... 55lookdown (igualar) ......................................................................................... 56lookup (buscar) ............................................................................................. 57low (baja) ..................................................................................................... 58low portc ...................................................................................................... 59nap (siesta) ................................................................................................... 60on...goto ...................................................................................................... 61on...gosub .................................................................................................... 62output (salida) .............................................................................................. 63

Section 2
BASIC COMMANDS (ES)
revolution (c) Revolution Education Ltd. Email: [email protected] Web: www.rev-ed.co.ukVersion ES1.0 01/2007
2
2
www.picaxe.co.uk
pause (pausa) ................................................................................................ 64peek (poner) ................................................................................................. 65play ............................................................................................................. 66poke (asigna) ................................................................................................ 67pulsin (impent) ............................................................................................. 68pulsout (impsal) ............................................................................................ 69pwm (pwm) ................................................................................................... 70pwmout ........................................................................................................ 71random (aleatorio) ......................................................................................... 73readadc (leeradc) ........................................................................................... 74readadc10 (leeradc10) .................................................................................... 76readi2c (leeri2c) ............................................................................................ 77read (leer) ..................................................................................................... 78readmem (leermem) ........................................................................................ 79readoutputs .................................................................................................. 80readtemp (leertemp) ....................................................................................... 81readtemp12 (leertemp12) ................................................................................ 82readowclk (leereloj) ........................................................................................ 83resetowclk (reinreloj) ..................................................................................... 84readowsn ...................................................................................................... 85return (retorna) ............................................................................................. 87reverse (invertir) ............................................................................................ 88select case \ case \ else \ endselect ................................................................. 89serin (serent) ................................................................................................ 90serout (sersal) ............................................................................................... 92sertxd (sertxd) ............................................................................................... 93servo (servo) ................................................................................................. 94setint (setint) ............................................................................................... 95setfreq .......................................................................................................... 97shiftin .......................................................................................................... 98shiftout ...................................................................................................... 100sleep (dormir) ............................................................................................. 101sound (sonido) ............................................................................................ 102stop ........................................................................................................... 103switch on/off (encender/anagar) ................................................................... 104symbol (simbolo) ......................................................................................... 105toggle (bascular) ......................................................................................... 106tune ........................................................................................................... 107wait (esperar) .............................................................................................. 114write (escribir) ............................................................................................ 115writemem (escribirmem) ............................................................................... 116writei2c (escribiri2c) .................................................................................... 117Additional Reserved Keywords ........................................................................ 118Manufacturer Website: .................................................................................. 118Trademark: .................................................................................................. 118Acknowledgements: ...................................................................................... 118

Section 2
BASIC COMMANDS (ES)
revolution (c) Revolution Education Ltd. Email: [email protected] Web: www.rev-ed.co.ukVersion ES1.0 01/2007
3
3
www.picaxe.co.uk
BASIC COMMANDS
Introduction.
The PICAXE manual is divided into three sections:
Section 1 - Getting Started
Section 2 - BASIC Commands
Section 3 - Microcontroller interfacing circuits
This second section provides the syntax (with detailed examples) for all the BASIC
commands supported by the PICAXE system. It is intended as a lookup reference guide
for each BASIC command supported by the PICAXE system. As some commands only
apply to certain size PICAXE chips, a diagram beside each command indicates the sizes
of PICAXE that the command applies to.
When using the flowchart method of programming, only a small sub-set of the available
commands are supported by the on-screen simulation. These commands are indicated
by the corresponding flowchart icon by the description.
For more general information about how to use the PICAXE system, please see section 1
‘Getting Started’.
PICAXE Programming Editor Software
The software used for programming the PICAXE chips is called the ‘Programming Editor’.
This software is free to download from www.picaxe.co.uk. Please see section 1 of the
manual (‘Getting Started’) for installation details and tutorials.
This manual was prepared using the ‘enhanced compiler’ in version 5.0.4 of the
Programming Editor software.
The latest version of the software is available on the PICAXE website at
www.picaxe.co.uk
If you have a question about any command please post a question on the very active
support forum at this website.

Section 2
BASIC COMMANDS (ES)
revolution (c) Revolution Education Ltd. Email: [email protected] Web: www.rev-ed.co.ukVersion ES1.0 01/2007
4
4
www.picaxe.co.uk
Las etiquetas
Las etiquetas ( “main:” en el programa de arriba) pueden ser cualquier palabra
(con la excepción de palabras claves como por ejemplo “switch” ) pero DEBEN
empezar con una letra. Cuando la etiqueta es definida por primera vez debe
llevar al final el símbolo de dos puntos (:). Esto indica al ordenador que la
palabra es una nueva etiqueta.
Example:
main:
high 1 ‘ switch on output 1
pause 5000 ‘ wait 5 seconds
low 1 ‘ switch off output 1
pause 5000 ‘ wait 5 seconds
goto main ‘ loop back to start
Whitespace
Es una buena técnica de programación usar tabulaciones ( o espacios) al inicio de
líneas sin etiquetas de manera que los comandos estén alineados. El término
“espacios en blanco” es utilizado por programadores para definir tabulaciones,
espacios y líneas en blanco. Dichos “”espacios en blanco”, utilizados
correctamente, hacen al programa mucho más fácil de leer y entender
Comentarios
Los comentarios dentro de los programas deben iniciar con un apóstrofe (‘) o un
punto y coma (;) y continúan hasta el final de la línea. La palabra “REM”
también puede utilizarse para hacer comentarios.
Examples:
high 0 ‘ make output 0 high
pause 1000 ; pause 1 second
low 0 REM make output 0 low
#REM
high 0
pause 1000
low 0
#ENDREM
�������
���������������
�������
���������������

Section 2
BASIC COMMANDS (ES)
revolution (c) Revolution Education Ltd. Email: [email protected] Web: www.rev-ed.co.ukVersion ES1.0 01/2007
5
5
www.picaxe.co.uk
Constantes
Las constantes pueden definirse en cuatro modos: decimal, hexadecimal, binario
y ASCII.
Los números decimales deben escribirse directamente sin ningún prefijo.
Los números hexadecimales deben estar precedidos de un símbolo de dólar ($).
Los números binarios deben estar precedidos de un símbolo de porcentaje (%).
Los valores ASCII deben encerrarse entre comillas (“”).
Examples:
100 ‘ 100 decimal
$64 ‘ 64 hex
%01100100 ‘ 01100100 binary
“A” ‘ “A” ascii (65)
“Hello” ‘ “Hello” = “H”,”e”,”l”,”l”,”o”
B1 = B0 ^ $AA ‘ variable OR exclusiva B0 con valor AA hex
Variable Mathematics
Please see the ‘let’ command later in this manual.
Simbolos (symbol)
A los símbolos se les pueden asignar valores de constantes, nombres para
variables y direcciones de programas. Los valores de constantes y nombres para
variables se asignan introduciendo a continuación del nombre del símbolo un
signo de igual (=), seguido por la variable o constante según sea el caso.
El nombre del símbolo puede ser cualquier nombre que no sea un comando y
puede contener números (Por ejemplo: flash1, flash2, etc) siempre y cuando el
primer carácter no sea un número (Por ejemplo: 1flash).
Las direcciones de programas se asignan introduciendo dos puntos (:) después
del nombre del símbolo.
Examples:
symbol RED_LED = 7 ‘ definir un símbolo de constante
symbol COUNTER = B0 ‘ definir un símbolo de variable
let COUNTER = 200 ‘ precargar variable con el valor de 200
main: ‘ definir dirección de programa
‘ la dirección del programa debe finalizar con dos puntos (:)
high RED_LED ‘ encender salida 7
pause COUNTER ‘ esperar 0.2 segundos
low RED_LED ‘ apagar salida 7
pause COUNTER ‘ esperar 0.2 segundos
goto main ‘ regresar a inicio (main)
�������
���������������
�������
���������������

Section 2
BASIC COMMANDS (ES)
revolution (c) Revolution Education Ltd. Email: [email protected] Web: www.rev-ed.co.ukVersion ES1.0 01/2007
6
6
www.picaxe.co.uk
Directives
Directives are used by the software to set the current picaxe type and to determine
which sections of the program listing are to be compiled. Directives are therefore
not part of the PICAXE program, they are instructions to the software compiler.
All directives start with a # and must be used on a single line. Any other non-
relevant line content after the directive is ignored.
#picaxe 08/08m/18/18a/18x/28/28a/28x/28x2/40x/40x2Set the compiler mode. This directive also automatically defines a label of the
PICAXE type e.g. #picaxe 08m is also the equivalent of #define 08m. If no
#picaxe directive is used the system defaults to the currently selected PICAXE
mode (View>Options>Mode menu).
Example: #picaxe 08m
#freq m4/m8/m16/m40Set the clock frequency on parts that can be varied.
Example: #freq m8
#gosubs 16/255Set the gosubs mode (16/255) on X parts.
Example: #gosubs 16
#define labelDefines a label to us in an ifdef or ifndef statements.
Example: #define clock8
Do not confuse the use of #define and symbol =
#define is a directive and, when used with #ifdef, determines which sections of code are
going to be compiled.
‘symbol = ’is a command used within actual programs to re-label variables and pins
#undefine labelRemoves a label from the current defines list
Example: #undefine clock8
#ifdef / #ifndef label#else#endifConditionally compile code depending on whether a label is defined (#ifdef) or
not defined (#ifndef)
Example: #define clock8#ifdef clock8
let b1 = 8#else
let b1 = 4#endif

Section 2
BASIC COMMANDS (ES)
revolution (c) Revolution Education Ltd. Email: [email protected] Web: www.rev-ed.co.ukVersion ES1.0 01/2007
7
7
www.picaxe.co.uk
#error commentForce a compiler error at the current position
Example: #error Code not finished!
#rem / #endremComment out multiple lines of text.
Example:#remhigh 0pause 1000low 0#endrem
#sim axe101/axe102/axe103/axe105/axe107/axe092Use a ‘real life project’ on screen whist simulating
Example: #sim axe105
#simspeed valueSet the simulation delay (in milliseconds)
Example: #simspeed 200
#include filenameInclude code from a separately saved file within this program.
Example: #include c:\test.basNOTE: Reserved for future use. Not currently implemented.

Section 2
BASIC COMMANDS (ES)
revolution (c) Revolution Education Ltd. Email: [email protected] Web: www.rev-ed.co.ukVersion ES1.0 01/2007
8
8
www.picaxe.co.uk
Variables
The RAM memory is used to store temporary data in variables as the program
runs. It looses all data when the power is removed or reset. There are three types
of variable - general purpose, storage, and special function.
See the ‘let’ command for details about variable mathematics.
General Purpose Variables.
There are 14 general purpose byte variables. These byte variables are labelled b0
to b13. Byte variables can store integer numbers between 0 and 255. Byte
variables cannot use negative numbers or fractions, and will ‘overflow’ without
warning if you exceed the 0 or 255 boundary values (e.g. 254 + 3 = 1) (2 - 3 =
255)
However for larger numbers two byte variables can be combined to create a word
variable, which is capable of storing integer numbers between 0 and 65335.
These word variables are labelled w0 to w6, and are constructed as follows:
w0 = b1 : b0
w1 = b3 : b2
w2 = b5 : b4
w3 = b7 : b6
w4 = b9 : b8
w5 = b11 : b10
w6 = b13 : b12
Therefore the most significant byte of w0 is b1, and the least significant byte of
w0 is b0.
In addition bytes b0 and b1 (w0) are broken down into individual bit variables.
These bit variables can be used where you just require a single bit (0 or 1) storage
capability.
b0 = bit7: bit6: bit5: bit4: bit3: bit2: bit1: bit0
b1 = bit15: bit14: bit13: bit12: bit11: bit10: bit9: bit8
You can use any word, byte or bit variable within any mathematical assignment
or command that supports variables. However take care that you do not
accidentally repeatedly use the same ‘byte’ or ‘bit’ variable that is being used as
part of a ‘word’ variable elsewhere.
All general purpose variables are reset to 0 upon a program reset.
�������
���������������

Section 2
BASIC COMMANDS (ES)
revolution (c) Revolution Education Ltd. Email: [email protected] Web: www.rev-ed.co.ukVersion ES1.0 01/2007
9
9
www.picaxe.co.uk
Storage Variables.
Storage variables are additional memory locations allocated for temporary storage
of byte data. They cannot be used in mathematical calculations, but can be used
to temporarily store byte values by use of the peek and poke commands.
The number of available storage locations varies depending on PICAXE type. The
following table gives the number of available byte variables with their addresses.
These addresses vary according to technical specifications of the microcontroller.
See the poke and peek command descriptions for more information.
PICAXE-08 none
PICAXE-08M 48 80 to 127 ($50 to $7F)
PICAXE-18 48 80 to 127 ($50 to $7F)
PICAXE-18A 48 80 to 127 ($50 to $7F)
PICAXE-18X 96 80 to 127 ($50 to $7F), 192 to 239 ($C0 to $EF)
PICAXE-28A 48 80 to 127 ($50 to $7F)
PICAXE-28X 112 80 to 127 ($50 to $7F), 192 to 239 ($C0 to $FF)
PICAXE-40X 112 80 to 127 ($50 to $7F), 192 to 239 ($C0 to $FF)
Special Function Variables
The special function variables available for use depend on the PICAXE type.
PICAXE-08 / 08M Special Function Registers
pins = the input / output port
dirs = the data direction register (sets whether pins are inputs or outputs)
infra = another term for variable b13, used within the 08M infrain2 command
The variable pins is broken down into individual bit variables for reading from
individual inputs with an if...then command. Only valid input pins are
implemented.
pins = x : x : x : pin4 : pin3 : pin2 : pin1 : x
The variable dirs is also broken down into individual bits.
Only valid bi-directional pin configuration bits are implemented.
dirs = x : x : x : dir4 : x : dir2 : dir1 : x
�����
�����
���������������

Section 2
BASIC COMMANDS (ES)
revolution (c) Revolution Education Ltd. Email: [email protected] Web: www.rev-ed.co.ukVersion ES1.0 01/2007
10
10
www.picaxe.co.uk
PICAXE-18 / 18A / 18X Special Function Registers
pins = the input port when reading from the port
pins = the output port when writing to the port
infra = a separate variable used within the infrain command
keyvalue = another name for infra, used within the keyin command
Note that pins is a ‘pseudo’ variable that can apply to both the input and output
port.
When used on the left of an assignment pins applies to the ‘output’ port e.g.
let pins = %11000011
will switch outputs 7,6,1,0 high and the others low.
When used on the right of an assignment pins applies to the input port e.g.
let b1 = pins
will load b1 with the current state of the input port.
Additionally, note that
let pins = pins
means ‘let the output port equal the input port’
The variable pins is broken down into individual bit variables for reading from
individual inputs with an if...then command. Only valid input pins are
implemented.
pins = pin7 : pin6 : x : x : x : pin2 : pin1 : pin0
PICAXE-28A / 28X / 40X Special Function Registers
pins = the input port when reading from the port
pins = the output port when writing to the port
infra = a separate variable used within the infrain command
keyvalue = another name for infra, used within the keyin command
Note that pins is a ‘pseudo’ variable that can apply to both the input and output
port.
When used on the left of an assignment pins applies to the ‘output’ port e.g.
let pins = %11000011
will switch outputs 7,6,1,0 high and the others low.
When used on the right of an assignment pins applies to the input port e.g.
let b1 = pins
will load b1 with the current state of the input port.
Additionally, note that
let pins = pins
means ‘let the output port equal the input port’
The variable pins is broken down into individual bit variables for reading from
individual inputs with an if...then command.
pins = pin7 : pin6 : pin5 : pin4 : pin3 : pin2 : pin1 : pin0
���������
��
������

Section 2
BASIC COMMANDS (ES)
revolution (c) Revolution Education Ltd. Email: [email protected] Web: www.rev-ed.co.ukVersion ES1.0 01/2007
11
11
www.picaxe.co.uk
backward (reversa)
Syntax:
BACKWARD motor- Motor es el nombre del respectivo motor, A ó B.
Function:
Hace girar en reversa al motor especificado
Information:
This is a ‘pseudo’ command designed for use by younger students with pre-
assembled classroom models. It is actually equivalent to ‘low 4 : low 5’ (motor A)
or ‘low 6: low 7’ (motor B). This command is not normally used outside the
classroom.
Example:
main: forward A ‘ motor A girando hacia adelante
wait 5 ‘ esperar 5 segundos
backward A ‘ motor A girando en reversa
wait 5 ‘ esperar 5 segundos
halt A ‘ detener motor A
wait 5 ‘ esperar 5 segundos
goto main ‘ regresar a inicio
��
���������������

Section 2
BASIC COMMANDS (ES)
revolution (c) Revolution Education Ltd. Email: [email protected] Web: www.rev-ed.co.ukVersion ES1.0 01/2007
12
12
www.picaxe.co.uk
branch (bifurcación)
Syntax:
BRANCH offset,(address0,address1...addressN)-Offset es una variable/constante que especifica que número de dirección utilizar
(0-N).
-Las direcciones (address0, address1... addressN ) son etiquetas que especifican
hacia adonde ir.
Function:
Ir a la dirección indicada por offset (si está dentro del rango).
Information:
This command allows a jump to different program positions depending on the
value of the variable ‘offset’. If offset is value 0, the program flow will jump to
address0, if offset is value 1 program flow will jump to adddress1 etc.
If offset is larger than the number of addresses the whole command is ignored
and the program continues at the next line.
This command is identical in operation to on...goto
Example:
reset: let b1 = 0
low 0
low 1
low 2
low 3
main: let b1 = b1 + 1
if b1 > 3 then reset
branch b1,(btn0,btn1, btn2, btn3)
btn0: high 0
goto main
btn1: high 1
goto main
btn2: high 2
goto main
btn3: high 3
goto main
�������
���������������

Section 2
BASIC COMMANDS (ES)
revolution (c) Revolution Education Ltd. Email: [email protected] Web: www.rev-ed.co.ukVersion ES1.0 01/2007
13
13
www.picaxe.co.uk
button (botón)
Syntax:
BUTTON pin,downstate,delay,rate,bytevariable,targetstate,address- Pin es una variable/constante (0-7) que especifica cual pin de salida/entrada
utilizar.
- Downstate es una variable/constante (0 ó 1) que especifica que estado lógico
leer cuando el botón es presionado.
- Delay es una variable/constante (0-255) que especifica el tiempo muerto antes
de auto-repetir el ciclo del comando BUTTON.
- Rate es una variable/constante (0-255) que especifica la velocidad de auto-
repetición de los ciclos de BUTTON.
- Bytevariable es el espacio de trabajo. Debe ser reiniciada a 0 antes de utilizarla
por primera vez con el comando BUTTON .
- Targetstate es una variable/constante (0 ó 1) que especifica en que estado (0 =
no presionado, 1 = presionado) debe estar el botón para que ocurra una
bifurcación.
Address es una etiqueta que especifica adonde ir si el botón está en el targetstate.
Function:
Ignorar “rebotes del interruptor” (proceso de asegurarse que cuando el
interruptor es presionado sólo se registre una vez el contacto realizado, ya que
los interruptores mecánicos algunas veces “rebotan” al presionarlos y pueden
producir que se registre más de un contacto), auto-repetir, y bifurcar si el botón
está en el estado especificado por targetstate
Infomation:
When mechanical switches are activated the metal ‘contacts’ do not actually close
in one smooth action, but ‘bounce’ against each other a number of times before
settling. This can cause microcontrollers to register multiple ‘hits’ with a single
physical action, as the microcontroller can register each bounce as a new hit.
One simple way of overcoming this is to simply put a small pause (e.g. pause 10)
within the program, this gives time for the switch to settle.
Alternately the button command can be used to overcome these issues. When the
button command is executed, the microcontroller looks to see if the ‘downstate’
is matched. If this is true the switch is debounced, and then program flow jumps
to ‘address’ if ‘targetstate’ = 1. If targetstate = ‘0’ the program continues.
If the button command is within a loop, the next time the command is executed
‘downstate’ is once again checked. If the condition is still true, the variable
‘bytevariable’ is incremented. This can happen a number of times until
‘bytevariable’ value is equal to ‘delay’. At this point a jump to ‘address’ is made if
‘targetstate’ = 1. Bytevariable is then reset to 0 and the whole process then repeats,
but this time the jump to ‘address’ is made when the ‘bytevariable’ value is equal
�������
���������������

Section 2
BASIC COMMANDS (ES)
revolution (c) Revolution Education Ltd. Email: [email protected] Web: www.rev-ed.co.ukVersion ES1.0 01/2007
14
14
www.picaxe.co.uk
to ‘rate’.
This gives action like a compter keyboard key press - send one press, wait for
‘delay’, then send multiple presses at time interval ‘rate’.
Note that button should be used within a loop. It does not pause program flow
and so only checks the input switch condition as program flow passes through
the command.
Example:
main: button 0,0,200,100,b2,0,cont
‘saltar a “cont” a menos que pin0 = 0
toggle 1 ‘sino bascular entrada
goto main
cont: etc.

Section 2
BASIC COMMANDS (ES)
revolution (c) Revolution Education Ltd. Email: [email protected] Web: www.rev-ed.co.ukVersion ES1.0 01/2007
15
15
www.picaxe.co.uk
calibfreq
Syntax:
CALIBFREQ {-} factor- factor is a constant/variable containing the value -31 to 31
Function:
Calibrate the microcontrollers internal resonator. 0 is the default factory setting.
Information:
Some PICAXE chips have an internal resonator that can be set to 4 or 8Mhz
operation via the setfreq command.
On these chips it is also possible to ‘calibrate’ this frequency. This is an advanced
feature not normally required by most users, as all chips are factory calibrated to
the most accurate setting. Generally the only use for calibfreq is to slightly adjust
the frequency for serial transactions with third party devices. A larger positive
value increases speed, a larger negative value decreases speed. Try the values -4 to
+ 4 first, before going to a higher or lower value.
Use this command with extreme care. It can alter the frequency of the PICAXE
chip beyond the serial download tolerance - in this case you will need to perform
a ‘hard-reset’ in order to carry out a new download.
The calibfreq is actually a pseudo command that performs a ‘poke’ command on
the microcontrollers OSCTUNE register (address $90).
When the value is 0 to 31 the equivalent BASIC code is
poke $90, factor
pause 2
When the factor is -31 to -1 the equivalent BASIC code is
let b12 = 64 - factor
poke $90, factor
pause 2
Note that in this case variable b12 is used, and hence corrupted, by the
command. This is necessary to poke the OSCTUNE register with the correct value.
���
������

Section 2
BASIC COMMANDS (ES)
revolution (c) Revolution Education Ltd. Email: [email protected] Web: www.rev-ed.co.ukVersion ES1.0 01/2007
16
16
www.picaxe.co.uk
count (contar)
Syntax:
COUNT pin, period, wordvariable- Pin es una variable o constante que especifica cual pin de entrada/salida
utilizar.
- Period es un período de tiempo (1-65535 ms)
- variable recibe el resultado (normalmente una variable de palabra)(1-65535)
Function:
Contar los impulsos en la entrada
Information:
Count verifica el estado del pin de entrada y cuenta el número de transiciones
entre encendido (high) y apagado (low). A 4MHz el pin de entrada se verifica
cada 20 us; por lo tanto, la mayor frecuencia de impulsos posible es 25Khz,
asumiendo un ciclo de carga del 50% (igual tiempo apagado y encendido).
Take care with mechanical switches, which may cause multiple ‘hits’ for each
switch push as the metal contacts ‘bounce’ upon closure.
Affect of increased clock speed:
The period value is 0.5ms at 8MHz and 0.25ms at 16MHz.
At 8MHz the input pin is checked every 10us, so the highest frequency of pulses
that can be counted is 50kHz, presuming a 50% duty cycle (ie equal on-off time).
At 16MHz the input pin is checked every 5us, so the highest frequency of pulses
that can be counted is 100kHz, presuming a 50% duty cycle (ie equal on-off
time).
Example:
main:
count 1, 5000, w1 ‘ contar impulsos ocurridos en 5 segundos
debug w1 ‘ mostrar el valor
goto main ‘ sino volver al inicio
���
���
������

Section 2
BASIC COMMANDS (ES)
revolution (c) Revolution Education Ltd. Email: [email protected] Web: www.rev-ed.co.ukVersion ES1.0 01/2007
17
17
www.picaxe.co.uk
debug (depurar)
Syntax:
DEBUG {var}- Las variables pueden mostrarse con sus valores actuales simplemente
nombrándolas.
Function:
Durante la ejecución, visualizar en la ventana de depuración la información una
vez encontrada la misma.
Information:
The debug command uploads the current variable values for *all* the variables
via the download cable to the computer screen. This enables the computer screen
to display all the variable values in the microcontroller for debugging purposes.
Note that the debug command uploads a large amount of data and so
significantly slows down any program loop.
To display user defined debugging messages use the ‘sertxd’ command instead.
Affect of increased clock speed:
When using an 8 or 16Mhz clock speed ensure the software has been set with the
correct speed setting to enable successful communication between
microcontroller and PC.
Example:
main:
let b1 = b1 + 1 ‘ incrementar el valor de b1
readadc 2,b2 ‘ readadc
debug b1 ‘ visualizar valor
pause 500 ‘ esperar 0.5 segundos
goto main ‘ regresar al inicio
�������
���������������

Section 2
BASIC COMMANDS (ES)
revolution (c) Revolution Education Ltd. Email: [email protected] Web: www.rev-ed.co.ukVersion ES1.0 01/2007
18
18
www.picaxe.co.uk
dec
Syntax:
DEC var- var is the variable to decrement
Function:
Decrement (subtract 1 from) the variable value.
Information:
This command is shorthand for ‘let var = var - 1’
Example:
for b1 = 1 to 5
dec b2
next b1
�������
���������������

Section 2
BASIC COMMANDS (ES)
revolution (c) Revolution Education Ltd. Email: [email protected] Web: www.rev-ed.co.ukVersion ES1.0 01/2007
19
19
www.picaxe.co.uk
�������
���������������
do...loop
Syntax:
DO{code}LOOP UNTIL/WHILE VAR ?? COND
DO{code}LOOP UNTIL/WHILE VAR ?? COND AND/OR VAR ?? COND...
DO UNTIL/WHILE VAR ?? COND{code}LOOP
DO UNTIL/WHILE VAR ?? COND AND/OR VAR ?? COND...{code}LOOP
- var is the variable to test
- cond is the condition
?? can be any of the following conditions
= equal to
is equal to
<> not equal to
!= not equal to
> greater than
< less than
Function:
Loop whilst a condition is true (while) or false (until)
Information:
This structure creates a loop that allows code to be repeated whilst, or until, a
certain condition is met. The condition may be in the ‘do’ line (condition is
tested before code is executed) or in the ‘loop’ line (condition is tested after the
code is executed).
The exit command can be used to prematurely exit out of the do...loop.
Example:
do
high 1
pause 1000
low 1
pause 1000
inc b1
if pin1 = 1 then exit
loop while b1 < 5

Section 2
BASIC COMMANDS (ES)
revolution (c) Revolution Education Ltd. Email: [email protected] Web: www.rev-ed.co.ukVersion ES1.0 01/2007
20
20
www.picaxe.co.uk
eeprom (eeprom)
Syntax:
DATA {location},(data,data...)EEPROM {location},(data,data...)- Location es una constante opcional (0-255) que especifica donde comenzar a
almacenar los datos en el eeprom. Si no se especifica un registro (location), el
almacenamiento comienza en donde había quedado anteriormente. Si
inicialmente no se había especificado ningún registro, el almacenamiento
comienza en 0.
- Data son constantes (0-255) las cuales serán almacenadas en el eeprom.
Function:
Pre-cargar los registros de los datos EEPROM.
Information:
Esto no es una instrucción sino mas bien un medio para pre-cargar registros
EEPROM que de otro modo serían borrados.
With the PICAXE-08, 08M and 18 the data memory is shared with program
memory. Therefore only unused bytes may be used within a program. To
establish the length of the program use ‘Check Syntax’ from the PICAXE menu.
This will report the length of program. Available data addresses can then be used
as follows:
x
PICAXE-08 0 to (127 - number of used bytes)
PICAXE-08M 0 to (255 - number of used bytes)
PICAXE-18 0 to (127 - number of used bytes)
With the following microcontrollers the data memory is completely separate
from the program and so no conflicts arise. The number of bytes available varies
depending on microcontroller type as follows.
PICAXE-28, 28A 0 to 63
PICAXE-28X, 40X 0 to 127
PICAXE-18A, 18X 0 to 255
Example:
EEPROM 0,(“Hello World”) ‘ salvar valores en EEPROM
main: for b0 = 0 to 10 ‘ iniciar un bucle
read b0,b1 ‘ leer valor desde EEPROM
serout 7,T2400,(b1) ‘ transmitir a módulo LCD serie
next b0 ‘ siguiente carácter
�������
���������������

Section 2
BASIC COMMANDS (ES)
revolution (c) Revolution Education Ltd. Email: [email protected] Web: www.rev-ed.co.ukVersion ES1.0 01/2007
21
21
www.picaxe.co.uk
disablebod
enablebod
Syntax:
DISABLEBODENABLEBOD
Function:
Disable or enable the on-chip brown out detect function.
Information:
Some PICAXE chips have a programmable internal brown out detect function, to
automatically cleanly reset the chip on a power brown out. The brown out detect
is always enabled by default when a program runs. However it is sometimes
beneficial to disable this function to reduce current drain in battery powered
applications whilst the chip is ‘sleeping’.
Use of this command diablebod command prior to a sleep will considerably
reduce the current drawn during the actual sleep command.
Example:
main: diablebod ‘ disable brown out
sleep 10 ‘ sleep for 23 seconds
enablebod ‘ enable brown out
goto main ‘ loop back to start
���

Section 2
BASIC COMMANDS (ES)
revolution (c) Revolution Education Ltd. Email: [email protected] Web: www.rev-ed.co.ukVersion ES1.0 01/2007
22
22
www.picaxe.co.uk
end (fin)
Syntax:
END
Function:
“Dormir” hasta que el programa sea reiniciado o el ordenador conectado. La
alimentación eléctrica es reducida a un mínimo (asumiendo que no se están
controlando salidas)
Nota: El compilador siempre incluye la instrucción END después de la ultima
línea de un programa.
Information:
The end command places the microcontroller into low power mode after a
program has finished. Note that as the compiler always places an END instruction
after the last line of a program, this command is rarely required.
The end command switches off internal timers, and so commands such as servo
and pwmout that require these timers will not function after an end command
has been completed.
If you do not wish the end command to be carried out, place a ‘stop’ command at
the bottom of the program. The stop command does not enter low power mode.
The main use of the end command is to separate the main program loop from
sub-procedures as in the example below. This ensures that programs do not
accidentally ‘fall into’ the sub-procedure.
Example:
main:
let b2 = 15 ‘ configurar el valor de b2
pause 2000 ‘ esperar por dos segundos
gosub flsh ‘ ir a un sub-procedimientp
let b2 = 5 ‘ configurar el valor de b2
pause 2000 ‘ esperar por dos segundos
gosub flsh ‘ ir a un sub-procedimientp
end
‘ evita ir a un sub-procedimiento accidentalmente
flsh: for b0 = 1 to b2
‘ define el número de repeticiones del bucle en b2 veces
high 1 ‘ encender salida 1
pause 500 ‘ esperar 0.5 segundos
low 1 ‘ apagar salida 1
pause 500 ‘ esperar 0.5 segundos
next b0 ‘ fin del bucle
return ‘ retornar del sub-procedimiento
�������
���������������

Section 2
BASIC COMMANDS (ES)
revolution (c) Revolution Education Ltd. Email: [email protected] Web: www.rev-ed.co.ukVersion ES1.0 01/2007
23
23
www.picaxe.co.uk
�������
���������������
exit
Syntax:
EXIT
Function:
Exit is used to immediately terminate a do...loop or for...next program loop.
Information:
The exit command immediately terminates a do...loop or for...next program loop.
It is equivalent to ‘goto line after end of loop’.
Example:
main:
do ‘ start loop
if b1 = 1 then
exit
end if
loop ‘ loop

Section 2
BASIC COMMANDS (ES)
revolution (c) Revolution Education Ltd. Email: [email protected] Web: www.rev-ed.co.ukVersion ES1.0 01/2007
24
24
www.picaxe.co.uk
for...next (para...siguiente)
Syntax:
FOR variable = start TO end {STEP {-}increment} (other program lines)NEXT {variable}- La palabra variable será utilizada como un contador.
- Start es el valor inicial de variable (del contador).
- End es el valor final de variable (del contador).
- Increment es un valor opcional que permite cambiar el valor del contador, el
cual por defecto es un incremento de +1 . Si Increment es precedido de un “-”, se
asumirá que el valor de Start es mayor que el de End y, por lo tanto, el valor de
Increment será restado en vez de sumado en cada ciclo .
Function:
Iniciar un bucle FOR-NEXT
Information:
For...next loops are used to repeat a section of code a number of times. When a
byte variable is used, the loop can be repeated up to 255 times. Every time the
‘next’ line is reached the value of variable is incremented (or decremented) by the
step value (+1 by default). When the end value is exceeded the looping stops and
program flow continues from the line after the next command.
For...next loops can be nested 8 deep (remember to use a different variable for
each loop).
The for...next loop can be prematurely ended by use of the exit command.
Example:
main:
for b0 = 1 to 20 ‘ crear un bucle de 20 ciclos
high 1 ‘ encender salida 1
pause 500 ‘ esperar 0.5 segundos
low 1 ‘ apagar salida 1
pause 500 ‘ esperar 0.5 segundos
next b0 ‘ fin del bucle, siguiente b0
pause 2000 ‘ esperar 2 segundos
goto main ‘ regresar a inicio
�������
���������������

Section 2
BASIC COMMANDS (ES)
revolution (c) Revolution Education Ltd. Email: [email protected] Web: www.rev-ed.co.ukVersion ES1.0 01/2007
25
25
www.picaxe.co.uk
forward (en marcha)
Syntax:
FORWARD motor- Motor es el nombre del respectivo motor, A ó B.
Function:
Hace girar el motor especificado
Information:
This is a ‘pseudo’ command designed for use by younger students with pre-
assembled classroom models. It is actually equivalent to ‘high 4 : low 5’ (motor
A) or ‘high 6: low 7’ (motor B). This command is not normally used outside the
classroom.
Example:
main: forward A ‘ motor A girando hacia adelante
wait 5 ‘ esperar 5 segundos
backward A ‘ motor A girando en reversa
wait 5 ‘ esperar 5 segundos
halt A ‘ detener motor A
wait 5 ‘ esperar 5 segundos
goto main ‘ regresar a inicio
��
���������������

Section 2
BASIC COMMANDS (ES)
revolution (c) Revolution Education Ltd. Email: [email protected] Web: www.rev-ed.co.ukVersion ES1.0 01/2007
26
26
www.picaxe.co.uk
gosub (ir a sub)
Syntax:
GOSUB address- address es una etiqueta la cual especifica hacia adonde ir.
Function:
Ir a la sub-rutina especificada. Se permiten hasta 16 GOSUBS por programa y
hasta cuatro niveles de profundidad
Information:
The gosub (‘goto subprocedure’)
command is a ‘temporary’ jump to a
separate section of code, from which
you will later return (via the return
command). Every gosub command
MUST be matched by a corresponding
return command.
Do not confuse with the ‘goto’
command which is a permanent jump
to a new program location.
The table shows the maximum
number of gosubs available in each
microcontroller . Gosubs can be
nested 4 deep (ie there is a four level
stack available in the microcontroller).
Sub procedures are commonly used to reduce program space usage by putting
repeated sections of code in a single sub-procedure. By passing values to the sub-
procedure within variables, you can repeat a section of code from multiple places
within the program. See the sample below for more information.
Example:
main:
let b2 = 15 ‘ asignar un valor a b2
pause 2000 ‘ esperar 2 segundos
gosub flsh ‘ ir a un sub-procedimiento
let b2 = 5 ‘ asignar un valor a b2
pause 2000 ‘ esperar 2 segundos
gosub flsh ‘ ir a un sub-procedimiento
end
‘ evita caer accidentalmente en un sub-procedimiento
flsh:
for b0 = 1 to b2 ‘ crear un bucle de b2 ciclos
high 1 ‘ encender salida 1
pause 500 ‘ esperar 0.5 segundos
low 1 ‘ apagar salida 1
pause 500 ‘ esperar 0.5 segundos
next b0 ‘ fin del bucle
return ‘ retornar del sub-procedimiento
StandardGosub
InterruptGosub
Stack
PICAXE-08 16 0 4
PICAXE-08M 15 1 4
PICAXE-18 16 0 4
PICAXE-18A 15 1 4
PICAXE-18X 15 or 255 1 4
PICAXE-28A 15 1 4
PICAXE-28X 15 or 255 1 4
PICAXE-40X 15 or 255 1 4
�������
���������������

Section 2
BASIC COMMANDS (ES)
revolution (c) Revolution Education Ltd. Email: [email protected] Web: www.rev-ed.co.ukVersion ES1.0 01/2007
27
27
www.picaxe.co.uk
goto (ir a)
Syntax:
GOTO address- address es una etiqueta la cual especifica hacia adonde ir.
Function:
Ir a la dirección especificada
Information:
The goto command is a permanent ‘jump’ to a new section of the program. The
jump is made to a label.
Example:
main:
high 1 ‘ encender salida 1
pause 5000 ‘ esperar 5 segundos
low 1 ‘ apagar salida 1
pause 5000 ‘ esperar 5 segundos
goto main ‘ regresar al inicio
�������
���������������

Section 2
BASIC COMMANDS (ES)
revolution (c) Revolution Education Ltd. Email: [email protected] Web: www.rev-ed.co.ukVersion ES1.0 01/2007
28
28
www.picaxe.co.uk
halt
Syntax:
HALT motor- Motor es el nombre del respectivo motor, A ó B.
Function:
Detener el motor especificado
Information:
This is a ‘pseudo’ command designed for use by younger students with pre-
assembled classroom models. It is actually equivalent to ‘low 4 : low 5’ (motor A)
or ‘low 6: low 7’ (motor B). This command is not normally used outside the
classroom.
Example:
main: forward A ‘ motor A girando hacia adelante
wait 5 ‘ esperar 5 segundos
backward A ‘ motor A girando en reversa
wait 5 ‘ esperar 5 segundos
halt A ‘ detener motor A
wait 5 ‘ esperar 5 segundos
goto main ‘ regresar a inicio
��
���������������

Section 2
BASIC COMMANDS (ES)
revolution (c) Revolution Education Ltd. Email: [email protected] Web: www.rev-ed.co.ukVersion ES1.0 01/2007
29
29
www.picaxe.co.uk
high (alta)
Syntax:
HIGH pin,pin,pin...- pin es una variable/constante (0-7) que especifica cual pin de entrada/salida
utilizar.
Function:
Poner en “high” (encendido) al pin de salida especificado.
Information:
The high command switches an output on (high).
On microcontrollers with configurable input/output pins (e.g. PICAXE-08) this
command also automatically configures the pin as an output.
Example:
main: high 1 ‘ encender salida 1
pause 5000 ‘ esperar 5 segundos
low 1 ‘ apagar salida 1
pause 5000 ‘ esperar 5 segundos
goto main ‘ regresar a inicio
�������
���������������

Section 2
BASIC COMMANDS (ES)
revolution (c) Revolution Education Ltd. Email: [email protected] Web: www.rev-ed.co.ukVersion ES1.0 01/2007
30
30
www.picaxe.co.uk
high portc
Syntax:
HIGH PORTC pin,pin,pin...- Pin is a variable/constant (0-7) which specifies the i/o pin to use.
Function:
Make pin on portc output high.
Information:
The high command switches a portc output on (high).
Example:
main: high portc 1 ‘ switch on output 1
pause 5000 ‘ wait 5 seconds
low portc 1 ‘ switch off output 1
pause 5000 ‘ wait 5 seconds
goto main ‘ loop back to start
������

Section 2
BASIC COMMANDS (ES)
revolution (c) Revolution Education Ltd. Email: [email protected] Web: www.rev-ed.co.ukVersion ES1.0 01/2007
31
31
www.picaxe.co.uk
i2cslave (esclavoi2c)
Syntax:
I2CSLAVE slave, speed, address- slave es la dirección del esclavo i2c
- speed es la palabra clave i2cfast (400KHz) o i2cslow (100KHz)
- address es la palabra clave i2cbyte o i2cword
Function:
El comando i2cslave se utiliza para configurar los pines del PICAXE de manera
que puedan utilizarse con el sistema i2c, y para definir el tipo de dispositivo i2c
con el que se deben comunicar. Si usted está utilizando únicamente un
dispositivo i2c, sólo necesitará un comando i2cslave dentro de su programa.
Después que el comando i2cslave se ha ejecutado, se pueden utilizar los
comandos readi2c y writei2c para acceder al dispositivo i2c.
Description:
Dirección del Esclavo
La dirección del esclavo (slave) varía para los distintos dispositivos i2c (vea la
tabla abajo). Para los EEPROMs seriales de la popular serie 24LCxx la dirección
es comúnmente %1010xxxx.
Note que algunos dispositivos (por ejemplo el 24LC16B) incorporan la dirección
de bloque (por ejemplo la página de memoria) dentro de los bits 1-3 de la
dirección del esclavo. Otros dispositivos incluyen los pines de selección del
dispositivo externo dentro de esos bits. En este caso se debe tener cuidado en
asegurar que el hardware esté correctamente configurado para la dirección del
esclavo utilizada.
El bit 0 de la dirección del esclavo es siempre el bit de read/write. Sin embargo,
el valor introducido utilizando el comando i2cslave es ignorado por el PICAXE,
ya que el mismo se sobrescribe apropiadamente cuando la dirección del esclavo
se usa dentro de los comandos readi2c y writei2c.
Velocidad
La velocidad del bus i2c se selecciona utilizando alguna de las dos palabras
claves: i2cfast o i2cslow (400KHz o 100KHz). El control interno de limitación de
velocidad (slew rate) del microcontrolador se ajusta automáticamente a la
velocidad de 400KHz.
Tamaño de la dirección
Los dispositivos i2c usualmente tienen una dirección de un solo byte (i2cbyte)
o de doble byte (i2cword). Esto debe definirse correctamente para el tipo de
dispositivo i2c utilizado. Si utiliza la dirección incorrecta obtendrá un
comportamiento errático.
Affect of Increased Clock Speed:
Ensure you modify the speed keyword (i2cfast8, i2cslow8) at 8MHz or
(i2cfast16, i2cslow16) at 16MHz for correct operation.
���
������

Section 2
BASIC COMMANDS (ES)
revolution (c) Revolution Education Ltd. Email: [email protected] Web: www.rev-ed.co.ukVersion ES1.0 01/2007
32
32
www.picaxe.co.uk
Settings for some common parts:
Device Type Slave Speed Address24LC01B EE 128 %1010xxxx i2cfast i2cbyte
24LC02B EE 256 %1010xxxx i2cfast i2cbyte
24LC04B EE 512 %1010xxbx i2cfast i2cbyte
24LC08B EE 1kb %1010xbbx i2cfast i2cbyte
24LC16B EE 2kb %1010bbbx i2cfast i2cbyte
24LC64 EE 8kb %1010dddx i2cfast i2cword
24LC256 EE 64kb %1010dddx i2cfast i2cword
DS1307 RTC %1101000x i2cslow i2cbyte
MAX6953 5x7 LED %101ddddx i2cfast i2cbyte
AD5245 Digital Pot %010110dx i2cfast i2cbyte
SRF08 Sonar %1110000x i2cfast i2cbyte
AXE033 I2C LCD $C6 i2cslow i2cbyte
CMPS03 Compass %1100000x i2cfast i2cbyte
SPE030 Speech %1100010x i2cfast i2cbyte
x = don’t care (ignored)
b = block select (selects internal memory page within device)
d = device select (selects device via external address pin polarity)
See readi2c or writei2c for example program for DS1307 real time clock.
��
��
��������
��
�
��
�����������
�����������
������������� ���!���"#�� ��� �$%�� "�&%�'��(���"�&��� #%#���#�����' �%��(��%�#)�*' # ��(#��! � ��+ "����(# ��' ����" +%� ��%� ��'%#)
��
�
��
���
���
,���-��� ��' �����" +%�
����'�+ ��'%�� ��!� .&�%� ����� �����"/���""� ##��%�#��'���&%����#��� 0(%� ����� ��%������������ ��#�������%�� )
Tome en cuenta que el dispositivo i2c puede que tenga pines de habilitación de
chip, protección contra escritura y direcciones, que también requieran conexión a
0V o +V según sea apropiado
NOTA: Muchos tableros de proyectos incluyen resistencias removibles en los
pines de entrada. Estas deben retirarse para utilizar el dispositivo i2c de esta
manera.

Section 2
BASIC COMMANDS (ES)
revolution (c) Revolution Education Ltd. Email: [email protected] Web: www.rev-ed.co.ukVersion ES1.0 01/2007
33
33
www.picaxe.co.uk
�������
���������������
if...then \ elseif...then \ else \ endif
Syntax:
IF variable ?? value {AND/OR variable ?? value ...} THEN{code}ELSEIF variable ?? value {AND/OR variable ?? value ...} THEN{code}ELSE{code}ENDIF
- Variable(s) will be compared to value(s).
- Value is a variable/constant.
?? can be any of the following conditions
= equal to
is equal to
<> not equal to
!= not equal to
> greater than
>= greater than or equal to
< less than
<= less than or equal to
Function:
Compare and conditionally execute sections of code.
Information:
The multiple line if...then\ elseif \ else \ endif command is used to test input pin
variables (or general variables) for certain conditions. If these conditions are met
that section of the program code is executed, and then program flow jumps to the
endif position. If the condition is not met program flows jumps directly to the
next elseif or else command.
The ‘else’ section of code is only executed if none of the if or elseif conditions
have been true.
When using inputs the input variable (pin1, pin2 etc) must be used (not the
actual pin name 1, 2 etc.) i.e. the line must read ‘if pin1 = 1 then...’, not ‘if 1 = 1
then...’

Section 2
BASIC COMMANDS (ES)
revolution (c) Revolution Education Ltd. Email: [email protected] Web: www.rev-ed.co.ukVersion ES1.0 01/2007
34
34
www.picaxe.co.uk
Note that
if b0 > 1 then (goto) label ‘(single line structure)
if b0 > 1 then gosub label ‘(single line structure)
if b0 > 1 then…else…endif ‘(multi line structure)
are 3 completely separate structures which cannot be combined. Therefore the following
line is invalid as it tries to combine both a single and multi-line structure
if b0 > 1 then goto label else goto label2
This is invalid as the compiler does not know which structure you are trying to use
ie:
if b0 > 1 then goto label : else : goto label2
or
if b0 > 1 then : goto label : else : goto label2
To achieve this structure the line must be re-written as
if b0 > 1 then
goto label
else
goto label2
endif
or
if b0 > 1 then : goto label : else : goto label2 : endif
The : character separates the sections into correct syntax for the compiler.

Section 2
BASIC COMMANDS (ES)
revolution (c) Revolution Education Ltd. Email: [email protected] Web: www.rev-ed.co.ukVersion ES1.0 01/2007
35
35
www.picaxe.co.uk
if...then (si...entonces)
if...and/or..then
Syntax:
IF variable ?? value {AND/OR variable ?? value ...} THEN address- El valor de variable se comparará con el de value.
- Value es una variable/constante.
- Address es una etiqueta que especifica hacia adonde ir si la condición se cumple.
??puede ser cualquiera de los siguientes símbolos
= equal to
is equal to
<> not equal to
!= not equal to
> greater than
>= greater than or equal to
< less than
<= less than or equal to
Function:
Verificar si se cumple la condición enunciada e ir a la dirección indicada en caso
afirmativo.
Information:
The if...then command is used to test input pin variables (or general variables) for
certain conditions. If these conditions are met program flow jumps to the new
label. If the condition is not met the command is ignored and program flow
continues on the next line.
When using inputs the input variable (pin1, pin2 etc) must be used (not the
actual pin name 1, 2 etc.) i.e. the line must read ‘if pin1 = 1 then...’, not ‘if 1 = 1
then...’
The if...then command only checks an input at the time the command is
processed. Therefore it is normal to put the if...then command within a program
loop that regularly scans the input. For details on how to permanently scan for an
input condition using interrupts see the ‘setint’ command.
Examples:
Checking an input within a loop.
main:
if pin0 = 1 then flsh ‘ ir a “flsh” si el pin0 está en high
goto main ‘ sino regresar al inicio
flsh: high 1 ‘ encender salida 1
pause 5000 ‘ esperar 5 segundos
low 1 ‘ apagar salida 1
goto main ‘ regresar a inicio
�������
���������������

Section 2
BASIC COMMANDS (ES)
revolution (c) Revolution Education Ltd. Email: [email protected] Web: www.rev-ed.co.ukVersion ES1.0 01/2007
36
36
www.picaxe.co.uk
if...then exit
if...and/or...then exit
Syntax:
IF variable ?? value {AND/OR variable ?? value ...} THEN EXIT- Variable(s) will be compared to value(s).
- Value is a variable/constant.
?? can be any of the following conditions
= equal to
is equal to
<> not equal to
!= not equal to
> greater than
>= greater than or equal to
< less than
<= less than or equal to
Function:
Compare and conditionally exit a do...loop or for...next loop
Information:
The if...then exit command is used to test input pin variables (or general
variables) for certain conditions. If these conditions are met the current loop
(do...loop or for...next) is prematurely ended.
Multiple compares can be combined with the AND and OR keywords. For
examples on how to use AND and OR see the if...then goto command.
Example:
Checking an input within a do loop.
do
if pin0 = 1 then exit ‘ sub to flsh if pin0 is high
loop
�������
���������������

Section 2
BASIC COMMANDS (ES)
revolution (c) Revolution Education Ltd. Email: [email protected] Web: www.rev-ed.co.ukVersion ES1.0 01/2007
37
37
www.picaxe.co.uk
if...then gosub
if...and/or...then gosub
Syntax:
IF variable ?? value {AND/OR variable ?? value ...} THEN GOSUB address- Variable(s) will be compared to value(s).
- Value is a variable/constant.
- Address is a label which specifies where to gosub if condition is true.
?? can be any of the following conditions
= equal to
is equal to
<> not equal to
!= not equal to
> greater than
>= greater than or equal to
< less than
<= less than or equal to
Function:
Compare and conditionally execute a gosub command.
Information:
The if...then gosub command is used to test input pin variables (or general
variables) for certain conditions. If these conditions are met a sub procedure is
executed. If the condition is not met the command is ignored and program flow
continues on the next line. Any executed sub procedure retuns to the next line.
When using inputs the input variable (pin1, pin2 etc) must be used (not the
actual pin name 1, 2 etc.) i.e. the line must read ‘if pin1 = 1 then gosub...’, not ‘if
1 = 1 then gosub...’
The if...then gousb command only checks an input at the time the command is
processed. Therefore it is normal to put the if...then command within a program
loop that regularly scans the input.
Multiple compares can be combined with the AND and OR keywords. For
examples on how to use AND and OR see the if...then goto command.
Example:
Checking an input within a loop.
main:
if pin0 = 1 then gosub flsh ‘ sub to flsh if pin0 is high
goto main ‘ else loop back to start
flsh: high 1 ‘ switch on output 1
pause 5000 ‘ wait 5 seconds
low 1 ‘ switch off output
return
�������
���������������

Section 2
BASIC COMMANDS (ES)
revolution (c) Revolution Education Ltd. Email: [email protected] Web: www.rev-ed.co.ukVersion ES1.0 01/2007
38
38
www.picaxe.co.uk
2 input AND gate
if pin1 = 1 and pin2 = 1 then gosub label
3 input AND gate
if pin0 =1 and pin1 =1 and pin2 = 1 then gosub label
2 input OR gate
if pin1 =1 or pin2 =1 then gosub label
analogue value between certain values
readadc 1,b1
if b1 >= 100 and b1 <= 200 then gosub label
To read the whole input port at once the variable ‘pins’ can be used
if pins = %10101010 then gosub label
To read the whole input port and mask individual inputs (e.g. 6 and 7)
let b1 = pins & %11000000
if b1 = %11000000 then gosub label
The words is (=), on (1) and off (0) can also be used with younger students.
loop1:
if pin0 is on then gosub flsh ‘ flsh if pin0 is high
goto loop1 ‘ else loop back to start
flsh: high 1 ‘ switch on output 1
pause 5000 ‘ wait 5 seconds
low 1 ‘ switch off output 1
return ‘ return

Section 2
BASIC COMMANDS (ES)
revolution (c) Revolution Education Ltd. Email: [email protected] Web: www.rev-ed.co.ukVersion ES1.0 01/2007
39
39
www.picaxe.co.uk
�������
���������������
inc
Syntax:
INC var- var is the variable to increment
Function:
Increment (add 1 to) the variable value.
Information:
This command is shorthand for ‘let var = var + 1’
Example:
for b1 = 1 to 5
inc b2
next b1

Section 2
BASIC COMMANDS (ES)
revolution (c) Revolution Education Ltd. Email: [email protected] Web: www.rev-ed.co.ukVersion ES1.0 01/2007
40
40
www.picaxe.co.uk
���
��
��
��
��
�
�
�
��
�
��
��
infrain (infraen)
Syntax:
INFRAIN
Function:
Esperar hasta recibir un nuevo comando infrarrojo.
LED020
Description:
This command is primarily used to wait for
a new infrared signal from the infrared TV
style transmitter. It can also be used with
an infraout signal from a separate PICAXE-
08M chip. All processing stops until the
new command is received. The value of the
command received is placed in the
predefined variable ‘infra’.
The infra-red input is input 0 on all parts
that support this command.
The variable ‘infra’ is separate from the
other byte variables.
After using this command you may have to
perform a ‘hard reset’ to download a new
program to the microcontroller. See the
Serial Download section for more details.
Affect of Increased Clock Speed:
This command will only function at 4MHz
Use of TVR010 Infrared Remote Control:
The table shows the value that will be
placed into the variable ‘infra’ depending
on which key is pressed on the transmitter.
Before use (or after changing batteries) the
TVR010 transmitter must be programmed
with ‘Sony’ codes as follows:
1. Insert 3 AAA size batteries, preferably
alkaline.
2. Press ‘C’. The LED should light.
3. Press ‘2’. The LED should flash.
4. Press ‘1’. The LED should flash.
5. Press ‘2’. The LED should flash and
then go out.
Key Value
1 1
2 2
3 3
4 4
5 5
6 6
7 7
8 8
9 9
P+ 10
0 11
V+ 12
P- 13
10+ 14
V- 15
Mute 16
Power 17
��
��
��
11�2
)�(3
4�1
����
%��(��������
4�1
���������������

Section 2
BASIC COMMANDS (ES)
revolution (c) Revolution Education Ltd. Email: [email protected] Web: www.rev-ed.co.ukVersion ES1.0 01/2007
41
41
www.picaxe.co.uk
Example:
main:
infrain 'esperar la nueva señal
if infra = 1 then swon1 'encender 1
if infra = 2 then swon2 'encender 2
if infra = 3 then swon3 'encender 3
if infra = 4 then swoff1 'apagar 1
if infra = 5 then swoff2 'apagar 2
if infra = 6 then swoff3 'apagar 3
goto main
swon1: high 1
goto main
swon2: high 2
goto main
swon3: high 3
goto main
swoff1: low 1
goto main
swoff2: low 2
goto main
swoff3: low 3
goto main
���
� � �
� � �
� �
� �
� ����
� ����

Section 2
BASIC COMMANDS (ES)
revolution (c) Revolution Education Ltd. Email: [email protected] Web: www.rev-ed.co.ukVersion ES1.0 01/2007
42
42
www.picaxe.co.uk
infrain2 (infraen2)
Syntax:
INFRAIN2
Function:
Esperar hasta recibir un nuevo comando infrarrojo.
Description:
This command is used to wait for an
infraout signal from a separate PICAXE-
08M chip. It can also be used with an
infrared signal from the infrared TV style
transmitter. All processing stops until the
new command is received. The value of the
command received is placed in the
predefined variable ‘infra’. This will be a
number between 0 and 127. See the
infraout command description for more
details about the values that will be received
from the TVR010 remote control.
On the PICAXE-08M ‘infra’ is another name for ‘b13’ - it is the same variable.
The infra-red input is fixed to input 3 on the PICAXE-08M.
After using this command you may have to perform a ‘hard reset’ to download a
new program to the microcontroller. See the Serial Download section for more
details.
Affect of Increased Clock Speed:
This command will only function at 4MHz. Use a setfreq m4 command before
this command if using 8MHz speed,
Example:
main:
infrain2 ‘esperar la nueva señal
if infra = 1 then swon1 'encender 1
if infra = 2 then swon2 'encender 2
if infra = 4 then swoff1 'apagar 1
if infra = 5 then swoff2 'apagar 2
goto main
swon1: high 1
goto main
swon2: high 2
goto main
swoff1: low 1
goto main
swoff2: low 2
goto main
���
������
������
��
��
��
11�2
)�(3
4�1
����
%��(��1�����
4�1

Section 2
BASIC COMMANDS (ES)
revolution (c) Revolution Education Ltd. Email: [email protected] Web: www.rev-ed.co.ukVersion ES1.0 01/2007
43
43
www.picaxe.co.uk
infraout
Syntax:
INFRAOUT device,data- device is a constant/variable (valid device ID 1-31)
- data is a constant/variable (valid data 0-127)
Function:
Transmit an infra-red signal, modulated at 38kHz.
Description:
This command is used to transmit the infra-red data to Sony ™ device (can also be
used to transmit data to another PICAXE that is using the infrain or infrain2
command). Data is transmitted via an infra-red LED (connected on output 0)
using the SIRC (Sony Infra Red Control) protocol.
device - 5 bit device ID (0-31)
data - 7 bit data (0-127)
When using this command to transmit data to another PICAXE the device ID
used must be value 1 (TV). The infraout command can be used to transmit any of
the valid TV command 0-127. Note that the Sony protocol only uses 7 bits for
data, and so data of value 128 to 255 is not valid.
Therefore the valid infraout command for use with infrain2 is
infraout 1,x ‘ (where x = 0 to 127)
Sony SIRC protocol:
The SIRC protocol uses a 38KHz modulated infra-red signal consisting of a start
bit (2.4ms) followed by 12 data bits (7 data bits and 5 device ID bits). Logic level
1 is transmitted as a 1.2 ms pulse, logic 0 as a 0.6ms pulse. Each bit is separated
by a 0.6ms silence period.
Example:
All commercial remote controls repeat the signal every 45ms whilst the button is
held down. Therefore when using the PICAXE system higher reliability may be
gained by repeating the transmission (e.g. 10 times) within a for..next loop.
for b1 = 1 to 10 infraout 1,5 pause 45next b1
Start Data0 Data1 Data2 Data3 Data4 Data5 Data6 ID0 ID1 ID2 ID3 ID4
2.4ms1.2 or0.6ms
1.2 or0.6ms
1.2 or0.6ms
1.2 or0.6ms
1.2 or0.6ms
1.2 or0.6ms
1.2 or0.6ms
1.2 or0.6ms
1.2 or0.6ms
1.2 or0.6ms
1.2 or0.6ms
1.2 or0.6ms
���

Section 2
BASIC COMMANDS (ES)
revolution (c) Revolution Education Ltd. Email: [email protected] Web: www.rev-ed.co.ukVersion ES1.0 01/2007
44
44
www.picaxe.co.uk
Interaction between infrain, infrain2 and infraout command.
Infrain and Infraout
The original infrain command
was designed to react to signals
from the TV style remote control
TVR010. Therefore it only
acknowledges the data sent from
the 17 buttons on this remote
(1-9, 0. 10+, P+, P-, V+, V-,
MUTE, PWR) with a value
between 1 and 17.
The infraout command can be
used to ‘emulate’ the TVR010
remote to transit signals that will
be acceptable for the infrain
command. The values to be used
for each TV remote button are
shown in the table.
Infrain2 and Infraout
The infrain2 command will react
to any of the valid TV data
commands (0 to 127).
The infraout command can be
used to transmit any of the valid
TV command 0-127. Note that
the Sony protocol only uses 7
bits for data, and so data of 128
to 255 is not valid.
Therefore the valid infraout
command for use with infrain2
is (where x = 0 to 127)
infraout 1,x
Affect of Increased Clock Speed:
This command will only function at 4MHz.
Common Sony Device IDs.:
TV 1 VTR3 11
VTR1 2 Surround Sound 12
Text 3 Audio 16
Widescreen 4 CD Player 17
MDP / Laserdisk 6 Pro-Logic 18
VTR2 7 DVD 26
TVR010 TVRemoteControl
infraout equivalentcommand
infrainvariable data
value
infrain2variable data
value
1 infraout 1,0 1 0
2 infraout 1,1 2 1
3 infraout 1,2 3 2
4 infraout 1,3 4 3
5 infraout 1,4 5 4
6 infraout 1,5 6 5
7 infraout 1,6 7 6
8 infraout 1,7 8 7
9 infraout 1,8 9 8
P+ infraout 1,16 10 16
0 infraout 1,9 11 9
V+ infraout 1,18 12 18
P- infraout 1,17 13 17
10+ infraout 1,12 14 12
V- infraout 1,19 15 19
MUTE infraout 1,20 16 20
PWR infraout 1,21 17 21
���
��
��
��
��
�
�
�
��
�
��
��

Section 2
BASIC COMMANDS (ES)
revolution (c) Revolution Education Ltd. Email: [email protected] Web: www.rev-ed.co.ukVersion ES1.0 01/2007
45
45
www.picaxe.co.uk
Button infraout data for a typical Sony TV (device ID 1)
000 1 button
001 2 button
002 3 button
003 4 button
004 5 button
005 6 button
006 7 button
007 8 button
008 9 button
009 10 button/0 button
011 Enter
016 channel up
017 channel down
018 volume up
019 volume down
020 Mute
021 Power
022 Reset TV
023 Audio Mode:Mono/SAP/Stereo
024 Picture up
025 Picture down
026 Color up
027 Color down
030 Brightness up
031 Brightness down
032 Hue up
033 Hue down
034 Sharpness up
035 Sharpness down
036 Select TV tuner
038 Balance Left
039 Balance Right
041 Surround on/off
042 Aux/Ant
047 Power off
048 Time display
054 Sleep Timer
058 Channel Display
059 Channel jump
064 Select Input Video1
065 Select Input Video2
066 Select Input Video3

Section 2
BASIC COMMANDS (ES)
revolution (c) Revolution Education Ltd. Email: [email protected] Web: www.rev-ed.co.ukVersion ES1.0 01/2007
46
46
www.picaxe.co.uk
Button infraout data for a typical Sony TV (continued...)
074 Noise Reduction on/off
078 Cable/Broadcast
079 Notch Filter on/off
088 PIP channel up
089 PIP channel down
091 PIP on
092 Freeze screen
094 PIP position
095 PIP swap
096 Guide
097 Video setup
098 Audio setup
099 Exit setup
107 Auto Program
112 Treble up
113 Treble down
114 Bass up
115 Bass down
116 + key
117 - key
120 Add channel
121 Delete channel
125 Trinitone on/off
127 Displays a red RtestS on the screen

Section 2
BASIC COMMANDS (ES)
revolution (c) Revolution Education Ltd. Email: [email protected] Web: www.rev-ed.co.ukVersion ES1.0 01/2007
47
47
www.picaxe.co.uk
Button infraout data for a typical Sony VCR (device ID 2 or 7)
000 1 button
001 2 button
002 3 button
003 4 button
004 5 button
005 6 button
006 7 button
007 8 button
008 9 button
009 10 button/0 button
010 11 button
011 12 button
012 13 button
013 14 button
020 X 2 play w/sound
021 power
022 eject
023 L-CH/R-CH/Stereo
024 stop
025 pause
026 play
027 rewind
028 FF
029 record
032 pause engage
035 X 1/5 play
040 reverse visual scan
041 forward visual scan
042 TV/VTR
045 VTR from TV
047 power off
048 single frame reverse/slow reverse play
049 single frame advance/slow forward play
060 aux
070 counter reset
078 TV/VTR
083 index (scan)
106 edit play
107 mark

Section 2
BASIC COMMANDS (ES)
revolution (c) Revolution Education Ltd. Email: [email protected] Web: www.rev-ed.co.ukVersion ES1.0 01/2007
48
48
www.picaxe.co.uk
input (entrada)
Syntax:
INPUT pin,pin,pin...pin es una variable/constante (0-7) que especifica cual pin de entrada/salida
utilizar.
Function:
Convertir en pin de entrada el pin especificado
Information:
This command is only required on microcontrollers with programmable input/
output pins (e.g. PICAXE-08M). This command can be used to change a pin that
has been configured as an output back to an input.
All pins are configured as inputs on first power-up (apart from out0 on the
PICAXE-08, which is always an output).
Example:
main:
input 1 ‘ convertir al pin en una entrada
reverse 1 ‘ convertir al pin en una salida
reverse 1 ‘ convertir al pin en una entrada
output 1 ‘ convertir al pin en una salida
�����

Section 2
BASIC COMMANDS (ES)
revolution (c) Revolution Education Ltd. Email: [email protected] Web: www.rev-ed.co.ukVersion ES1.0 01/2007
49
49
www.picaxe.co.uk
keyin (entecla)
Syntax:
KEYIN
Function:
Esperar hasta que se presione una nueva tecla del teclado.
Information:
Este comando ordena al microcontrolador a esperar hasta que se presione una
nueva tecla en el teclado del ordenador (conectado directamente al PICAXE – no
el teclado utilizado durante la programación). Todos los procesos se detienen
hasta que se presione una nueva tecla. El valor de la tecla presionada es
colocado en una variable predefinida llamada “keyvalue”.
Tome en cuenta que debido al diseño de los teclados, el valor de cada tecla no
tiene un orden lógico; el valor de cada tecla debe identificarse en la tabla incluida
en la siguiente página. Algunas teclas utilizan dos números, en estas el primer
número ($E0) es ignorado por el PICAXE y por lo tanto “keyvalue” retornará el
segundo número únicamente. Note que todos los valores aparecen como
números hexadecimales y por lo tanto deben estar precedidos del símbolo “$”
al programar. Las teclas “PAUSA” e “IMPR PANT” no deben utilizarse ya que
contienen un largo código especial multidígito.
Affect of Increased Clock Speed:
This command will only function at 4MHz.
Example:
main:
keyin ‘esperar una nueva señal
if keyvalue = $45 then swon1 ‘encender salida 1
if keyvalue = $16 then swon2 ‘encender salida 2
if keyvalue = $26 then swon3 ‘encender salida 3
if keyvalue = $25 then swon1 ‘apagar salida 1
if keyvalue = $2E then swon1 ‘apagar salida 2
if keyvalue = $36 then swon1 ‘apagar salida 3
goto main
swon1: high 1
goto main
swon2: high 2
goto main
swoff1: low 1
goto main
swoff2: low 2
goto main
������
������

Section 2
BASIC COMMANDS (ES)
revolution (c) Revolution Education Ltd. Email: [email protected] Web: www.rev-ed.co.ukVersion ES1.0 01/2007
50
50
www.picaxe.co.uk
��� ���� ��� ���� ��� ����
� �� � �� � ��
� � � �� ��� ����
� � � � ��� ����
� � � �� ���� ����
� � �� � � ����
! ��" �� �� ����
� �� ���� � ���� ����
� �� �� �� #����� ����
� �� ���� $� #���� ���
% � �!��� � #����� ���
" � ��� �� #����� ����
� ��� !��� ��� ��
� �� � � �� &�" ����
� �� �!��� �� '�" ��
� �� ���� ���� ��" �
� �� ���� ��� (�" ��
) �� � �� ���� � �" ����
� � ���� !�� *�" ��
� � � �� �� ��" ��
� � �� �� ��" ��
� �� �! �� �" �
+ � ! �� ��" ��
# �� �! �� ��" �
, �! �� ��" ��
- �� �! �� ��" ��
. �� �! � ��" ��
� �� �! �$ $�" ��
� �� $! �� ��" ��
� �! �� / �
� � ��! �� 0 ��
� � ��! $� 1 �
� �! �� � ��
� �� ������� 22 * ��
� �� ���� � & ��
$ � ���� 22

Section 2
BASIC COMMANDS (ES)
revolution (c) Revolution Education Ltd. Email: [email protected] Web: www.rev-ed.co.ukVersion ES1.0 01/2007
51
51
www.picaxe.co.uk
keyled
Syntax:
keyled mask- Mask is a variable/constant which specifies the LEDs to use.
Function:
Set/clear the keyboard LEDs
Information:
This command is used to control the LEDs on a computer keyboard (connected
directly to the PICAXE - not the keyboard used whilst programming). The mask
value sets the operation of the LEDs.
Mask is used as follows:
Bit 0 - Scroll Lock (1=on, 0=off)
Bit 1 - Num Lock (1=on, 0=off)
Bit 2 - Caps Lock (1=on, 0=off)
Bit 3-6 - Not Used
Bit 7 - Disable Flash (1=no flash, 0=flash)
On reset mask is set to 0, and so all three LEDs will flash when the ‘keyin’
command detects a new key hit. This provides the user with feedback that the key
press has been detected by the PICAXE. This flashing can be disabled by setting
bit 7 of mask high. In this case the condition of the three LEDs can be manually
controlled by setting/clearing bits 2-0.
Affect of Increased Clock Speed:
This command will only function at 4MHz.
Example:
main:
keyled %10000111 ‘ all LEDs on
pause 500 ‘ pause 0.5s
keyled %10000000 ‘ all LEDs off
pause 500 ‘ pause 0.5s
goto main ‘ loop
��
��
56�7�2�
��
�
��
�����
����
������#������ ���!���"#�� ��� �$%�� "�&%�'��(���"�&��� #%#���#�����' �%��(��%�#)�*' # ��(#��! � ��+ "����(# ��' � �!���"��%� ��'%#)
��
�
��
%��(�8
%��(��
,���-
1
�
4
������������������4��������9���,���-�%��(��:��������(# "1������;��(�"��� ����(��������������9���,���-�%��(�8:8�������(# "
���� ��9�����!:
,�(<�9�����!� :
� �
� �
� �
� �
� �
� �
������
������

Section 2
BASIC COMMANDS (ES)
revolution (c) Revolution Education Ltd. Email: [email protected] Web: www.rev-ed.co.ukVersion ES1.0 01/2007
52
52
www.picaxe.co.uk
let (sea)
Syntax:
{LET} variable = {-} value ?? value ...- Variable es la variable sobre la que se va a operar.
- Value son las variables/constantes que operan sobre variable.
Function:
Realizar manipulación de variables. Las matemáticas se realizan de izquierda a
derecha exclusivamente.
Information:
The microcontroller supports word (16 bit) mathematics. Valid integers are 0 to
65335. All mathematics can also be performed on byte (8 bit) variables (0-255).
The microcontroller does not support fractions or negative numbers.
However it is sometimes possible to rewrite equations to use integers instead of
fractions, e.g.
let w1 = w2 / 5.7is not valid, but
let w1 = w2 * 10 / 57is mathematically equal and valid.
The mathematical functions supported are:
+ ; add
- ; subtract
* ; multiply (returns low word of result)
** ; multiply (returns high word of result)
/ ; divide (returns quotient)
// (or %) ; modulus divide (returns remainder)
MAX ; limit value to a maximum value
MIN ; limit value to a minimum value
AND & ; bitwise AND
OR | ; bitwise OR (typed as SHIFT + \ on UK keyboard)
XOR ^ ; bitwise XOR (typed as SHIFT + 6 on UK keyboard)
NAND ; bitwise NAND
NOR ; bitwise NOR
ANDNOT &/ ; bitwise AND NOT (NB this is not the same as NAND)
ORNOT |/ ; bitwise OR NOT (NB this is not the same as NOR)
XNOR ^/ ; bitwise XOR NOT (same as XNOR)
There is no shift left (<<) or shift right (>>) function. However the same function
can be achieved by multiplying by 2 (shift left) or dividing by 2 (shift right).
All mathematics is performed strictly from left to right. It is not possible to
enclose part equations in brackets e.g.
let w1 = w2 / ( 2 + b3)is not valid. This would be entered as
let b3 = 2 + b3let w1 = w2 / b3
�������
���������������

Section 2
BASIC COMMANDS (ES)
revolution (c) Revolution Education Ltd. Email: [email protected] Web: www.rev-ed.co.ukVersion ES1.0 01/2007
53
53
www.picaxe.co.uk
The addition (+) and subtraction (-) commands work as expected. Note that the
variables will overflow without warning if the maximum or minimum value is
exceeded (0-255 for bytes variables, 0-65335 for word variables).
When multiplying two 16 bit word numbers the result is a 32 bit (double word)
number. The multiplication (*) command returns the low word of a word*word
calculation. The ** command returns the high word of the calculation.
The division (/) command returns the quotient (whole number) word of a
word*word division. The modulus (// or %) command returns the remainder of
the calculation.
The MAX command is a limiting factor, which ensures that a value never exceeds
a preset value. In this example the value never exceeds 50. When the result of the
multiplication exceeds 50 the max command limits the value to 50.
let b1 = b2 * 10 MAX 50if b2 = 3 then b1 = 30
if b2 = 4 then b1 = 40
if b2 = 5 then b1 = 50
if b2 = 6 then b1 = 50 ‘ limited to 50
The MIN command is a similar limiting factor, which ensures that a value is never
less than a preset value. In this example the value is never less than 50. When the
result of the divison is less than 50 the min command limits the value to 50.
let b1 = 100 / b2 MIN 50if b2 = 1 then b1 = 100
if b2 = 2 then b1 = 50
if b2 = 3 then b1 = 50 ‘ limited to 50
The AND, OR, XOR, NAND, NOR, XNOR commands function bitwise on each
bit in the variables. ANDNOT and ORNOT mean, for example ‘A AND the NOT
of B’ etc. This is not the same as NOT (A AND B), as with the traditional NAND
command.
A common use of the AND (&) command is to mask individual bits:
let b1 = pins & %00000110This masks inputs 1 and 2, so the variable only contains the data of these two
inputs.
Example:
main:
let b0 = b0 + 1 ‘ increment b0
sound 7,(b0,50) ‘ make a sound
if b0 > 50 then rest ‘ after 50 reset
goto main ‘ loop back to start
rest:
let b0 = b0 max 10 ‘ limit b0 back to 10
‘ as 10 is the maximum value
goto main ‘ loop back to start

Section 2
BASIC COMMANDS (ES)
revolution (c) Revolution Education Ltd. Email: [email protected] Web: www.rev-ed.co.ukVersion ES1.0 01/2007
54
54
www.picaxe.co.uk
let dirs =
let dirsc =
Syntax:
{LET} dirs = value{LET} dirsc = value- Value(s) are variables/constants which operate on the data direction register.
Function:
Configue pins as inputs or outputs (let dirs =) (PICAXE-08/08M)
Configue pins as inputs or outputs on portc (let dirsc =) (PICAXE-28X/40X)
Information:
Some microcontrollers allow inputs to be configured as inputs or outputs. In
these cases it is necessary to tell the microcontroller which pins to use as inputs
and/or outputs (all are configured as inputs on first power up). There are a
number of ways of doing this:
1) Use the input/output/reverse commands.
2) Use an output command (high, pulsout etc) that automatically configures the
pin as an output.
3) Use the let dirs = statement.
When working with this statement it is conventional to use binary notation. With
binary notation pin 7 is on the left and pin 0 is on the right. If the bit is set to 0
the pin wil be an input, if the bit is set to 1 the pin will be an output.
Note that the 8 pin PICAXE have some pre-configured pins (e.g. pin 0 is always
an output and pin 3 is always an input). Adjusting the bits for these pins will
have no affect on the microcontroller.
Example:
let dirs = %00000011 ‘ switch pins 0 and 1 to outputs
let pins = %00000011 ‘ switch on outputs 0 and 1
�����
������

Section 2
BASIC COMMANDS (ES)
revolution (c) Revolution Education Ltd. Email: [email protected] Web: www.rev-ed.co.ukVersion ES1.0 01/2007
55
55
www.picaxe.co.uk
let pins =
let pinsc =
Syntax:
{LET} pins = value{LET} pinsc = value- Value(s) are variables/constants which operate on the output port.
Function:
Set/clear all outputs on the main output port (let pins = ).
Set/clear all outputs on portc (let pinsc =) (PICAXE-28X/40X only)
Information:
High and low commands can be used to switch individual outputs high and low.
However when working with multiple outputs it is often convenient to change all
outputs simultaneously. When working with this statement it is conventional to
use binary notation. With binary notation output7 is on the left and output0 is
on the right. If the bit is set to 0 the output will be off (low), if the bit is set to 1
the output will be on (high).
Do not confuse the input port with the output port. These are separate ports on
all except the 8 pin PICAXE. The command
let pins = pinsmeans ‘make the output port the same as the input port’.
Note that on devices that have input/output bi-directional pins (08/08M), this
command will only function on output pins. In this case it is necessary to
configure the pins as outputs (using a let dirs = command) before use of this
command.
Example:
let pins = %11000011 ‘ switch outputs 7,6,0,1 on
pause 1000 ‘ wait 1 second
let pins = %00000000 ‘ switch all outputs off
�������
���������������

Section 2
BASIC COMMANDS (ES)
revolution (c) Revolution Education Ltd. Email: [email protected] Web: www.rev-ed.co.ukVersion ES1.0 01/2007
56
56
www.picaxe.co.uk
lookdown (igualar)
Syntax:
LOOKDOWN target,(value0,value1...valueN),variable
- variable recibe el resultado (si se encuentra alguno).
- target es el objetivo y es una variable/constante la cual será comparada con los
valores de la tabla (values)
- values son variables/constantes.
Function:
Busca dentro de una tabla de valores un número que coincida con el objetivo
(target) y lo introduce en la variable (si lo encuentra).
Information:
The lookdown command should be used when you have a specific value to
compare with a pre-known list of options. The target variable is compared to the
values in the bracket. If it matches the 5th item (value4) the number ‘4’ is
returned in variable. Note the values are numbered from 0 upwards (not 1
upwards). If there is no match the value of variable is left unchanged.
In this example the variable b2 will contain the value 3 if b1 contains “d” and the
value 4 if b1 contains “e”
Example:
lookdown b1,(“abcde”),b2
�������
���������������

Section 2
BASIC COMMANDS (ES)
revolution (c) Revolution Education Ltd. Email: [email protected] Web: www.rev-ed.co.ukVersion ES1.0 01/2007
57
57
www.picaxe.co.uk
lookup (buscar)
Syntax:
LOOKUP offset,(data0,data1...dataN),variable- variable recibe el resultado (si se encuentra alguno).
- offset es una variable/constante que especifíca que datos (data#) (0-N) poner
dentro de la variable.
- values son variables/constantes.
Function:
Buscar en una tabla de valores los datos especificados por el “offset” y
almacenarlos en la variable (si están dentro del rango).
Description:
The lookup command is used to load varaiable with different values. The value to
be loaded in the position in the klookup table defined by offset. In this example
if b0 = 0 then b1 will equal “a”, if b0 =1 then b1 will equal “b” etc. If offset
exceeds the number of entries in the lookup table the value of variable is
unchanged.
Example:
main:
let b0 = b0 + 1 ‘ incrementar b0
lookup b0,(“abcd”),b1 ‘ introducir carácter ascii en b1
if b0 < 4 then main ‘ ir a main si b0 < 4
end
�������
���������������

Section 2
BASIC COMMANDS (ES)
revolution (c) Revolution Education Ltd. Email: [email protected] Web: www.rev-ed.co.ukVersion ES1.0 01/2007
58
58
www.picaxe.co.uk
low (baja)
Syntax:
LOW pin,pin,pin...- pin es una variable/constante (0-4) que especifica cual pin de entrada/salida
utilizar.
Function:
Poner en “low” (apagado) al pin de salida especificado
Information:
The low command switches an output off (low).
On microcontrollers with configurable input/output pins (e.g. PICAXE-08) this
command also automatically configures the pin as an output.
Example:
main: high 1 ‘ encender salida 1
pause 5000 ‘ esperar 5 segundos
low 1 ‘ apagar salida 1
pause 5000 ‘ esperar 5 segundos
goto main ‘ regresar a inicio
�������
���������������

Section 2
BASIC COMMANDS (ES)
revolution (c) Revolution Education Ltd. Email: [email protected] Web: www.rev-ed.co.ukVersion ES1.0 01/2007
59
59
www.picaxe.co.uk
low portc
Syntax:
LOW PORTC pin,pin,pin...- Pin is a variable/constant (0-7) which specifies the i/o pin to use.
Function:
Make pin on portc output low.
Information:
The high command switches a portc output off (low).
Example:
main: high portc 1 ‘ switch on output 1
pause 5000 ‘ wait 5 seconds
low portc 1 ‘ switch off output 1
pause 5000 ‘ wait 5 seconds
goto main ‘ loop back to start
������

Section 2
BASIC COMMANDS (ES)
revolution (c) Revolution Education Ltd. Email: [email protected] Web: www.rev-ed.co.ukVersion ES1.0 01/2007
60
60
www.picaxe.co.uk
nap (siesta)
Syntax:
NAP periodperiod es una constante/variable que determina la duración de la siesta. La
duración del período de siesta está dada por: 2^period * 18 ms; en donde period
puede ser un número del 1 al 7.
Function:
Tomar una siesta por un período de tiempo determinado . El consumo de
energía eléctrica se reduce en un porcentaje dependiente de la longitud del
período de la siesta.
Information:
The nap command puts the
microcontroller into low power mode
for a short period of time. When in
low power mode all timers are
switched off and so the pwmout and
servo commands will cease to
function. The nominal period of time
is given by this table. Due to
tolerances in the microcontrollers
internal timers, this time is subject to
-50 to +100% tolerance. The external
temperature affects these tolerances
and so no design that requires an
accurate time base should use this command.
Affect of increased clock speed:
The nap command uses the internal watchdog timer which is not affected by
changes in resonator clock speed.
Example:
main: high 1 ‘ encender salida 1
nap 4 ‘ tomar una siesta por 2^4 x 18ms
low 1 ‘ apagar salida 1
nap 7 ‘ tomar una siesta por 2^7 x 18ms
goto main ‘ regresar a inicio
Period Time Delay
0 18ms
1 32ms
2 72ms
3 144ms
4 288ms
5 576ms
6 1.152 s
7 2.304 s
�������
���������������

Section 2
BASIC COMMANDS (ES)
revolution (c) Revolution Education Ltd. Email: [email protected] Web: www.rev-ed.co.ukVersion ES1.0 01/2007
61
61
www.picaxe.co.uk
on...goto
Syntax:
ON offset GOTO address0,address1...addressN- Offset is a variable/constant which specifies which Address# to use (0-N).
- Addresses are labels which specify where to go.
Function:
Branch to address specified by offset (if in range).
Information:
This command allows a jump to different program positions depending on the
value of the variable ‘offset’. If offset is value 0, the program flow will jump to
address0, if offset is value 1 program flow will jump to adddress1 etc.
If offset is larger than the number of addresses the whole command is ignored
and the program continues at the next line.
This command is identical in operation to branch
Example:
reset: let b1 = 0
low 0
low 1
low 2
low 3
main: let b1 = b1 + 1
if b1 > 3 then reset
on b1 goto btn0,btn1, btn2, btn3
goto main
btn0: high 0
goto main
btn1: high 1
goto main
btn2: high 2
goto main
btn3: high 3
goto main
�������
���������������
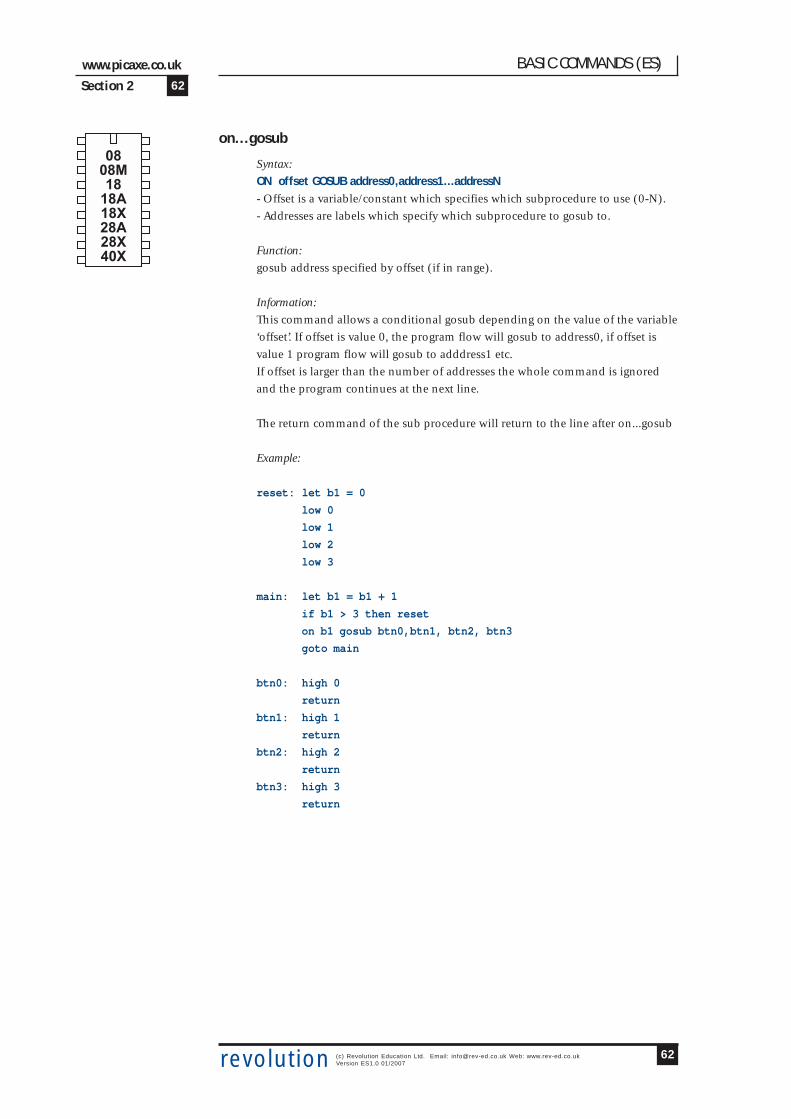
Section 2
BASIC COMMANDS (ES)
revolution (c) Revolution Education Ltd. Email: [email protected] Web: www.rev-ed.co.ukVersion ES1.0 01/2007
62
62
www.picaxe.co.uk
on...gosub
Syntax:
ON offset GOSUB address0,address1...addressN- Offset is a variable/constant which specifies which subprocedure to use (0-N).
- Addresses are labels which specify which subprocedure to gosub to.
Function:
gosub address specified by offset (if in range).
Information:
This command allows a conditional gosub depending on the value of the variable
‘offset’. If offset is value 0, the program flow will gosub to address0, if offset is
value 1 program flow will gosub to adddress1 etc.
If offset is larger than the number of addresses the whole command is ignored
and the program continues at the next line.
The return command of the sub procedure will return to the line after on...gosub
Example:
reset: let b1 = 0
low 0
low 1
low 2
low 3
main: let b1 = b1 + 1
if b1 > 3 then reset
on b1 gosub btn0,btn1, btn2, btn3
goto main
btn0: high 0
return
btn1: high 1
return
btn2: high 2
return
btn3: high 3
return
�������
���������������

Section 2
BASIC COMMANDS (ES)
revolution (c) Revolution Education Ltd. Email: [email protected] Web: www.rev-ed.co.ukVersion ES1.0 01/2007
63
63
www.picaxe.co.uk
output (salida)
Syntax:
OUTPUT pin,pin, pin...- pin es una variable/constante (0-7) que especifica cual pin de salida/entrada
utilizar.
Function:
Convertir en pin de salida el pin especificado.
Information:
This command is only required on microcontrollers with programmable input/
output pins (e.g. PICAXE-08M). This command can be used to change a pin that
has been configured as an input to an output.
All pins are connfigured as inputs on first power-up (apart from out0 on the
PICAXE-08, which is always an output).
Example:
main:
input 1 ‘ convertir al pin en una entrada
reverse 1 ‘ convertir al pin en una salida
reverse 1 ‘ convertir al pin en una entrada
output 1 ‘ convertir al pin en una salida
�����

Section 2
BASIC COMMANDS (ES)
revolution (c) Revolution Education Ltd. Email: [email protected] Web: www.rev-ed.co.ukVersion ES1.0 01/2007
64
64
www.picaxe.co.uk
pause (pausa)
Syntax:
PAUSE milliseconds- milliseconds es una variable/constante (0-65535) que específica cuantos
milisegundos debe durar la pausa.
Function:
Hacer una pausa por período de tiempo determinado. La precisión de la
duración de la pausa depende de la velocidad del resonador, y se presume la
utilización de un resonador de 4MHz.
Information:
The pause command creates a time delay (in milliseconds at 4MHz). The longest
time delay possible is just over 65 seconds. To create a longer time delay (e.g. 5
minutes) use a for...next loop
for b1 = 1 to 5 ‘ 5 loops
pause 60000 ‘ wait 60 seconds
next b1
During a pause the only way to react to inputs is via an interrupt (see the setint
command for more information). Do not put long pauses within loops that are
scanning for changing input conditions.
When using time delays longer than 5 seconds it may be necessary to perform a
‘hard reset’ to download a new program to the microcontroller. See the Serial
Download section for more details.
Affect of increased clock speed:
The timebase is reduced to 0.5ms at 8MHz and 0.25ms at 16MHz.
Example:
main: high 1 ‘ encender salida 1
pause 5000 ‘ esperar 5 segundos
low 1 ‘ apagar salida 1
pause 5000 ‘ esperar 5 segundos
goto main ‘ regresar a inicio
�������
���������������

Section 2
BASIC COMMANDS (ES)
revolution (c) Revolution Education Ltd. Email: [email protected] Web: www.rev-ed.co.ukVersion ES1.0 01/2007
65
65
www.picaxe.co.uk
peek (poner)
Syntax:
PEEK location,variable,variable,WORD wordvariable...- Location es una variable/constante que especifica una dirección de registro. Los
valores de registro validos van de 0 a 127.
- variable recibe el byte de datos leído.
Function:
Leer el contenido del registro FSR (location) dentro de la variable especificada.
Esto permite utilizar registros no definidos por las variables b0 a b13.
Information:
The function of the poke/peek commands is two fold.
The most commonly used function is to store temporary byte data in the
microcontrollers spare ‘storage variable’ memory. This allows the general purpose
variables (b0 to b13) to be re-used in calculations. Remember that to save a word
variable two separate poke/peek commands will be required - one for each of the
two bytes that form the word.
Addresses $50 to $7F are general purpose registers that can be used freely.
Addresses $C0 to $EF can also be used by PICAXE-18X.
Addresses $C0 to $FF can also be used by PICAXE-28X, 40X.
The second function of the peek command is for experinced users to study the
internal microcontroller SFR (special function regsisters).
Addresses $00 to $1F and $80 to $9F are special function registers (e.g. PORTB)
which determine how the microcontroller operates. Avoid using these addresses
unless you know what you are doing! The command uses the microcontroller
FSR register which can address register banks 0 and 1 only.
Addresses $20 to $4F and $A0 to $BF are general purpose registers reserved for
use with the PICAXE bootstrap interpreter. Poking these registers will produce
unexpected results and could cause the interpreter to crash.
When word variables are used (with the keyword WORD) the two byte sof the
word are saved/retrieved in a little endian manner (ie low byte at addrees, high
byte at address + 1)
Example:
peek 80,b1
‘ poner el valor del registro 80 dentro de la variable b1
peek 80, word w1
�����
���������������

Section 2
BASIC COMMANDS (ES)
revolution (c) Revolution Education Ltd. Email: [email protected] Web: www.rev-ed.co.ukVersion ES1.0 01/2007
66
66
www.picaxe.co.uk
play
Syntax:
PLAY tune,LED- Tune is a variable/constant (0 - 3) which specifies which tune to play
0 - Happy Birthday
1 - Jingle Bells
2 - Silent Night
3 - Rudolf the Red Nosed Reindeer
- LED is a variable/constant (0 -3) which specifies if other outputs flash at the
same time as the tune is being played.
0 - No outputs
1 - Output 0 flashes on and off
2 - Output 4 flashes on and off
3 - Output 0 and 4 flash alternately
Function:
Play an internal tune on the PICAXE-08M (i/o pin2).
Description:
The PICAXE-08M can play musical tones. The PICAXE-08M is supplied with 4
pre-programmed internal tunes, which can be output via the play command. As
these tunes are included within the PICAXE-08M bootstrap code, they use very
little program memory. To generate your own tunes use the ‘tune’ command,
although this requires a much greater amount of program mmeory.
See the Tune command for suitable piezo / speaker circuits.
Affect of increased clock speed:
The tempo (speed) of the tune is doubled at 8MHz!
Example:
play 3,1 ‘ rudolf red nosed reindeer with output 0 flashingpoke
���

Section 2
BASIC COMMANDS (ES)
revolution (c) Revolution Education Ltd. Email: [email protected] Web: www.rev-ed.co.ukVersion ES1.0 01/2007
67
67
www.picaxe.co.uk
poke (asigna)
Syntax:
POKE location,data,data,WORD wordvariable...- Location es una variable/constante que especifica una dirección de registro. Los
valores de registro validos van de 0 a 127.
- Data es una variable/constante que provee los datos que deben escribirse en el
registro.
Function:
Escribir datos especificados en el registro FSR (location). Esto permite utilizar
registros no definidos por las variables b0 a b13.
Information:
The function of the poke/peek commands is two fold.
The most commonly used function is to store temporary byte data in the
microcontrollers spare ‘storage variable’ memory. This allows the general purpose
variables (b0 to b13) to be re-used in calculations. Remember that to save a word
variable two separate poke/peek commands will be required - one for each of the
two bytes that form the word.
Addresses $50 to $7F are general purpose registers that can be used freely.
Addresses $C0 to $EF can also be used by PICAXE-18X.
Addresses $C0 to $FF can also be used by PICAXE-28X, 40X.
The second function of the poke command is for experinced users to write values
to the internal microcontroller SFR (special function regsisters).
Addresses $00 to $1F and $80 to $9F are special function registers (e.g. PORTB)
which determine how the microcontroller operates. Avoid using these addresses
unless you know what you are doing! The command uses the microcontroller
FSR register which can address register banks 0 and 1 only.
Addresses $20 to $4F and $A0 to $BF are general purpose registers reserved for
use with the PICAXE bootstrap interpreter. Poking these registers will produce
unexpected results and could cause the interpreter to crash.
When word variables are used (with the keyword WORD) the two byte sof the
word are saved/retrieved in a little endian manner (ie low byte at address, high
byte at address + 1)
Example:
poke 80,b1
‘ salvar el valor de b1 en el registro 80
poke 80, word w1
�����
���������������

Section 2
BASIC COMMANDS (ES)
revolution (c) Revolution Education Ltd. Email: [email protected] Web: www.rev-ed.co.ukVersion ES1.0 01/2007
68
68
www.picaxe.co.uk
pulsin (impent)
Syntax:
PULSIN pin,state,variable- pin es una variable/constante (0-7) que especifica cual pin de entrada/salida
utilizar.
- State es una variable/constante (0 ó 1) que especifica en que estado (0 ó 1)
debe estar el pin para que comience la medición del impulso, el cual es medido
en 10us.
- Variable recibe y almacena el resultado (1-65536). Si no se recibe un impulso
en menos de 0.65536 seg. el resultado será 0.
Function:
Medir un impulso de entrada
Information:
The pulsin command measures the length of a pulse. In no pulse occurs in the
timeout period, the result will be 0. If state = 1 then a low to high transistion
starts the timing, if state = 0 a high to low transistion starts the timing.
Use the count command to count the number of pulses with a specified time
period.
It is normal to use a word variable with this command.
Affect of Increased Clock Speed:
4MHz 10us unit 0.65536s timeout
8MHz 5us unit 0.32768s timeout
16MHz 2.5us unit 0.16384s timeout
Example:
pulsin 3,1,w1
‘medir y almacenar la longitud de un impulso en el pin 3,
‘dentro de b1.
�������
���������������

Section 2
BASIC COMMANDS (ES)
revolution (c) Revolution Education Ltd. Email: [email protected] Web: www.rev-ed.co.ukVersion ES1.0 01/2007
69
69
www.picaxe.co.uk
pulsout (impsal)
Syntax:
PULSOUT pin,time- pin es una variable/constante (0-7) que especifica cual pin de entrada/salida
utilizar.
- Time es una variable/constante que especifica el período del impulso (0-65535)
en 10us.
Function:
Enviar un impulso de longitud especificada.
Information:
The pulsout command generates a pulse of length time. If the output is initially
low, the pulse will be high, and vice versa. This command automatically
configures the pin as an output, but for reliable operation on 8 pin PICAXe you
should ensure this pin is an output before using the command.
Affect of Increased Clock Speed:
4MHz 10us unit
8MHz 5us unit
16MHz 2.5us unit
Example:
main:
pulsout 4,150 ‘ enviar un impulso de 1.5 ms por el pin 4
pause 20 ‘ pausa de 20 ms
goto main ‘ loop back to start
�������
���������������

Section 2
BASIC COMMANDS (ES)
revolution (c) Revolution Education Ltd. Email: [email protected] Web: www.rev-ed.co.ukVersion ES1.0 01/2007
70
70
www.picaxe.co.uk
pwm (pwm)
Syntax:
PWM pin,duty,cycles- pin es una variable/constante (0-7) que especifica cual pin de entrada/salida
utilizar.
- Duty es una variable/constante (0-255) que especifica el nivel analógico.
- Cycles es una variable/constante (0-255) que especifica el número de ciclos.
Cada ciclo toma aproximadamente 5 ms.
Function:
Enviar una señal PWM (modulación de la anchura de impulso) y luego convertir en
entrada al pin utilizado. Este comando se utiliza para enviar voltajes analógicos (0-5V)
mediante un pin conectado a una resistencia que a su vez está conectada a un
condensador conectado a tierra; en donde la unión resistencia-condensador constituye
la salida analógica. La PWM debe enviarse periódicamente para actualizar al voltaje
analógico.
Information:
This command is rarely used. For pwm control of motors etc. the pwmout
command is recommended instead.
This pwm command is used to provide ‘bursts’ of PWM output to generate a
pseudo analogue output on the PICAXE-08/08M (pins 1, 2, 4). This is achieved
with a resistor connected to a capacitor connected to ground; the resistor-
capacitor junction being the analog output. PWM should be executed periodically
to update/refresh the analog voltage.
Example:
main:
pwm 4,150,20 ‘ enviar 20 señales pwm por el pin 4
pause 20 ‘ pausa de 20 ms
goto main ‘ regresar a inicio
�����

Section 2
BASIC COMMANDS (ES)
revolution (c) Revolution Education Ltd. Email: [email protected] Web: www.rev-ed.co.ukVersion ES1.0 01/2007
71
71
www.picaxe.co.uk
pwmout
Syntax:
PWMOUT pin,period,duty cycles- Pin es una variable o constante que especifica cual pin de entrada/salida
utilizar (Sólo el pin 3 está disponible en el chip 18X, el 1 o el 2 en el 28X)
- Period es una variable o constante (0-255) la cual indica el período de la PWM.
- Duty es una variable o constante (valor de 10 bit) que indica el ciclo de carga.
Function:
Genera una salida pwm (modulación de la anchura de impulso) contínua
utilizando el módulo interno pwm del microcontrolador.
Information:
This command is different to most other BASIC commands in that the pwmout
runs continuously (in the background) until another pwmout command is sent.
Therefore it can be used, for instance, to continuously drive a motor at varying
speeds. To stop pwmout send a pwmout command with period = 0.
The PWM period = (period + 1) x 4 x resonator speed
(resonator speed for 4MHz = 1/4000000)
The PWM duty cycle = (duty) x resonator speed
Note that the period and duty values are linked by the above equations. If you wish to
maintain a 50:50 mark-space ratio whilst increasing the period, you must also increase
the duty cycle value appropriately. A change in resonator will change the formula.
NB: If you wish to know the frequency, PWM frequency = 1 / (the PWM period)
In many cases you may want to use these equations to setup a duty cycle at a
known frequency = e.g. 50% at 10 kHz. The Programming Editor software
contains a wizard to automatically calculate the period and duty cycle values for
you in this situation.
Select the PICAXE>Wizards>pwmout menu to use this wizard.
���
���
������

Section 2
BASIC COMMANDS (ES)
revolution (c) Revolution Education Ltd. Email: [email protected] Web: www.rev-ed.co.ukVersion ES1.0 01/2007
72
72
www.picaxe.co.uk
As the pwmout command uses the internal pwm module of the microcontroller
there are certain restrictions to its use:
1) The command only works on certain pins (28X/40X -1&2, 18X - 3, 08M -2).
2) Duty cycle is a 10 bit value (0 to 1023). The maximum duty cycle value must
not be set greater than 4x the period, as the mark ‘on time’ would then be
longer than the total PWM period (see equations above)! Setting above this
value will cause erratic behaviour.
3) The pwmout module uses a single timer for both pins on 28X/40X. Therefore
when using PWMOUT on both pins the period will be the same for both pins.
4) The servo command cannot be used at the same time as the pwmout
command as they both use the same timer.
5) pwmout stops during nap, sleep, or after an end command
To stop pwmout on a pin it is necessary to isssue a pwmout pin,0,0 command.
Example:
main:
pwmout 2,150,100 ‘ configurar la pwm
pause 1000 ‘ pausa 1 segundo
goto main ‘ regresar al inicio del bucle

Section 2
BASIC COMMANDS (ES)
revolution (c) Revolution Education Ltd. Email: [email protected] Web: www.rev-ed.co.ukVersion ES1.0 01/2007
73
73
www.picaxe.co.uk
random (aleatorio)
Syntax:
RANDOM wordvariable- Variable es tanto el espacio de trabajo como el resultado. Debido a que el
comando random genera una secuencia seudo-aleatoria, se recomienda invocarlo
repetidas veces dentro de un bucle.
Function:
Generar un número seudo-aleatorio dentro de la variable especificada.
Description:
The random command generates a pseudo-random sequence of numbers
between 0 and 65535. All microcontrollers must perform mathematics to
generate random numbers, and so the sequence can never be truly random. On
computers a changing quantity (such as the date/time) is used as the start of the
calculation, so that each random command is different. The PICAXE does not
contain such date functionality, and so the sequence it generates will always be
identical unless the value of the word variable is set to a different value before the
random command is used.
The most common way to overcome this issue is to repeadedly call the random
command within a loop, e.g. whilst waiting for a switch push. As the number of
loops will vary between switch pushes, the output is much more random.
If you only require a byte variable (0-255), still use the word variable (e.g. w0) in
the command. As w0 is made up of b0 and b1, you can use either of these two
bytes as your desired byte variable.
Example:
main:
random w0 ‘ generar un número aleatorio dentro de w0 (b0:b1)
let pins = b1 ‘ poner números aleatorios en los pines de salida
pause 100 ‘ esperar 0.1 segundos
goto main ‘ regresar a inicio
�������
���������������

Section 2
BASIC COMMANDS (ES)
revolution (c) Revolution Education Ltd. Email: [email protected] Web: www.rev-ed.co.ukVersion ES1.0 01/2007
74
74
www.picaxe.co.uk
readadc (leeradc)
Syntax:
READADC channel,variable- channel es una variable/constante que especifica una dirección byte (0-3).
- variable recibe el byte de datos leído.
Function:
Leer el contenido de un canal ADC (8 bit) dentro de una variable.
Information:
The readadc command is used to read the analogue value from the
microcontroller input pins. Note that not all inputs have internal ADC
functionality - check the table below for the PICAXE chip you are using.
On microcontrollers with ‘shared’ inputs the ADC pin is also a digital input pin.
On microcontrollers with ‘separate’ inputs the ADC pins are separate pins.
The resolution of ADC is also shown in the table. The readadc command is used
to read all types. However with 10 bit ADC types the reading will be rounded to a
byte value 8 bits. Use the readadc10 command to read the full 10 bit value.
Low-resolution ADC inputs are based upon the microcontrollers internal 16 step
comparator rather than the conventional internal ADC module.
An8-bit resolution analogue input will provide 256 different analogue readings (0 to
255) over the full voltage range (e.g. 0 to 5V). A low-resolution analogue input will
provide 16 readings over the lower two-thirds of the voltage range (e.g. 0 to 3.3V). No
readings are available in the upper third of the voltage range.
Quantity Type Pin Numbers
PICAXE-08 1 - low shared 1
PICAXE-08M 3 - 10 bit shared 1,2,4
PICAXE-18 3 - low shared 0,1,2
PICAXE-18A 3 - 8 bit shared 0,1,2
PICAXE-18X 3 - 10 bit shared 0,1,2
PICAXE-28A 4 - 8 bit separate 0,1,2,3
PICAXE-28X 4 - 10 bit separate 0,1,2,3
PICAXE-40X 7 - 10 bit separate 0,1,2,3,5,6,7
�������
���������������

Section 2
BASIC COMMANDS (ES)
revolution (c) Revolution Education Ltd. Email: [email protected] Web: www.rev-ed.co.ukVersion ES1.0 01/2007
75
75
www.picaxe.co.uk
To ensure consistency between standard and low-resolution analogue input readings, the
low-resolution reading on PICAXE-08 and 18 will ‘jump’ in 16 discrete steps between
the nearest standard 8-bit readings, according to the table below.
Standard 8 Bit Reading Low Resolution Reading0-10 011-20 1121-31 2132-42 3243-52 4353-63 5364-74 6475-84 7585-95 8596-106 96107-116 107117-127 117128-138 128139-148 139149-159 149160-170 160
Values greater than 170 (170-255) 160
Example:
main: readadc 1,b1
‘ leer la señal del canal 1 dentro de la variable b1
if b1 > 50 then flsh ‘ ir a flsh si b1>50
goto main ‘ sino regresar a inicio
flsh:
high 1 ‘ encender salida 1
pause 5000 ‘ esperar 5 segundos
low 1 ‘ apagar salida 1
goto main ‘ regresar a inicio

Section 2
BASIC COMMANDS (ES)
revolution (c) Revolution Education Ltd. Email: [email protected] Web: www.rev-ed.co.ukVersion ES1.0 01/2007
76
76
www.picaxe.co.uk
readadc10 (leeradc10)
Syntax:
READADC10 channel,wordvariable- channel es una variable/constante que especifica una dirección byte (0-3).
- wordvariable recibe el byte de datos leído.
Function:
Leer el contenido de un canal ADC (10 bit) dentro de una wordvariable.
Information:
The readadc10 command is used to read the analogue value from
microcontrollers with 10-bit capability. Note that not all inputs have internal
ADC functionality - check the table under ‘readadc’ command for the PICAXE
chip you are using.
As the result is 10 bit a word variable must be used - for a byte value use the
readadc command instead.
When using the debug command to output 10 bit numbers, the electrical
connection to the computer via the download cable may slightly affect the ADC
values. In this case it is recommened that the ‘enhanced’ interface circuit is used
on a serial connection (cable AXE026, not required with USB cable AXE027). The
Schottky diode within this circuit reduces this affect.
Example:
main: readadc 1,b1
‘ leer la señal del canal 1 dentro de la variable b1
if b1 > 50 then flsh ‘ ir a flsh si b1>50
goto main ‘ sino regresar a inicio
flsh:
high 1 ‘ encender salida 1
pause 5000 ‘ esperar 5 segundos
low 1 ‘ apagar salida 1
goto main ‘ regresar a inicio
1 � 4
==
==
= ,���-
# �%����(�# �%���%������
4��
�!�+ �+% &
4>�
��*>�
���
���
������

Section 2
BASIC COMMANDS (ES)
revolution (c) Revolution Education Ltd. Email: [email protected] Web: www.rev-ed.co.ukVersion ES1.0 01/2007
77
77
www.picaxe.co.uk
readi2c (leeri2c)
Syntax:
READI2C (variable,...)READI2C location,(variable,...)- location es una variable o constante que especifica una dirección de byte o de
palabra.
- variable (pueden ser varias) recibe el/los bytes de datos leídos.
Function:
Leer el registro i2c dentro de la variable especificada.
Information:
Use of i2c parts is covered in more detail in the separate ‘i2c Tutorial’ datasheet.
Este comando se utiliza para leer bytes de datos de un dispositivo i2c. Location
define la dirección de inicio desde donde se debe empezar a leer, aunque es
posible leer más de un byte secuencialmente (si el dispositivo i2c tolera lectura
secuencial).
Location debe ser un byte o una palabra según sea definido dentro del comando
i2cslave. Antes de utilizar este comando se debe ejecutar el comando i2cslave.
Si el hardware i2c está configurado incorrectamente o si se han utilizado datos
incorrectos en el comando i2cslave, se cargará dentro de cada variable el valor de
255 ($FF).
Example:
; Ejemplo de cómo utilizar el Reloj DS1307
; Note que los datos son enviados y recibidos en formato BCD
‘ fijar la dirección del esclavo del DS1307
i2cslave %11010000, i2cslow, i2cbyte
‘leer hora y fecha y depurar pantalla
main:
readi2c 0, (seconds, mins, hour, day, date, month, year)
debug b1
pause 2000
goto main
���
������

Section 2
BASIC COMMANDS (ES)
revolution (c) Revolution Education Ltd. Email: [email protected] Web: www.rev-ed.co.ukVersion ES1.0 01/2007
78
78
www.picaxe.co.uk
read (leer)
Syntax:
READ location,variable,variable, WORD wordvariable- location es una variable/constante que especifica una dirección byte (0-255).
- variable recibe el byte de datos leído.
Function:
Leer el contenido de la ubicación de memoria eeprom especificada dentro de la
variable
Information:
The read command allows byte data to be read from the microcontrollers data
memory. The contents of this memory is not lost when the power is removed.
However the data is updated (with the EEPROM command specified data) upon
a new download. To save the data during a program use the write command.
The read command is byte wide, so to read a word variable two separate byte read
commands will be required, one for each of the two bytes that makes the word
(e.g. for w0, read both b0 and b1).
With the PICAXE-08, 08M and 18 the data memory is shared with program
memory. Therefore only unused bytes may be used within a program. To
establish the length of the program use ‘Check Syntax’ from the PICAXE menu.
This will report the length of program. Available data addresses can then be used
as follows:
PICAXE-08 0 to (127 - number of used bytes)
PICAXE-08M 0 to (255 - number of used bytes)
PICAXE-18 0 to (127 - number of used bytes)
With the following microcontrollers the data memory is completely separate
from the program and so no conflicts arise. The number of bytes available varies
depending on microcontroller type as follows.
PICAXE-28, 28A 0 to 63
PICAXE-28X, 40X 0 to 127
PICAXE-18A, 18X 0 to 255
When word variables are used (with the keyword WORD) the two byte sof the
word are saved/retrieved in a little endian manner (ie low byte at addrees, high
byte at address + 1)
Example:
main: for b0 = 0 to 63 ‘ iniciar un bucle
read b0,b1 ‘ leer valor dentro de b1
serout 7,T2400,(b1) ‘ transmitir valor a LCD serie
next b0 ‘ siguiente b0
�������
���������������

Section 2
BASIC COMMANDS (ES)
revolution (c) Revolution Education Ltd. Email: [email protected] Web: www.rev-ed.co.ukVersion ES1.0 01/2007
79
79
www.picaxe.co.uk
readmem (leermem)
Syntax:
READMEM location,data- location es una variable/constante que especifica una dirección byte (0-255).
- variable recibe el byte de datos leído.
Function:
Leer registro especificado de la memoria eeprom dentro de la variable. Provee
256 bytes de espacio de almacenaje adicionales al comando “ read”
Information:
The data memory on the PICAXE-28A is limited to only 64 bytes. Therefore the
readmem command provides an additional 256 bytes storage in a second data
memory area. This second data area is not reset during a download.
This command is not available on the PICAXE-28X as a larger i2c external
EEPROM can be used.
The readmem command is byte wide, so to read a word variable two separate
byte read commands will be required, one for each of the two bytes that makes
the word (e.g. for w0, read both b0 and b1).
Example:
main: for b0 = 0 to 63 ‘ iniciar un bucle
readmem b0,b1 ‘ leer valor dentro de b1
serout 7,T2400,(b1) ‘ transmitir valor a LCD serie
next b0 ‘ siguiente b0
���

Section 2
BASIC COMMANDS (ES)
revolution (c) Revolution Education Ltd. Email: [email protected] Web: www.rev-ed.co.ukVersion ES1.0 01/2007
80
80
www.picaxe.co.uk
�����
���������������
readoutputs
Syntax:
READOUTPUTS var- var is a variable to receive the output pins values
Function:
Read the output pins value into variable.
Information:
The current state of the output pins can be read into a variable using the
readoutputs command. Note that this is not the same as ‘let var = pins’, as this let
command reads the status of the input (not output) pins.
Example:
main:
readoutputs b1 ‘ read outputs value into b1

Section 2
BASIC COMMANDS (ES)
revolution (c) Revolution Education Ltd. Email: [email protected] Web: www.rev-ed.co.ukVersion ES1.0 01/2007
81
81
www.picaxe.co.uk
readtemp (leertemp)
Syntax:
READTEMP pin,variable- pin es el pin de entrada.
- variable recibe el byte de datos leído.
Function:
La temperatura se lee en pasos de 1 grado, y el rango de operación del sensor va
de –55 a + 125 grados Celsius. Tome en cuenta que el bit 7 es 0 para
temperaturas positivas y 1 para temperaturas negativas. (Por ende, los valores
negativos aparecerán como 128 + el valor numérico).
Information:
El comando readtemp no funciona con las versiones anteriores del sensor
(DS1820 o DS1820S) ya que estas tienen una resolución interna diferente.
This command cannot be used on pin0 or pin3 of the PICAXE-08M.
Affect of increased clock speed:
This command only functions at 4MHz.
Example:
main:
readtemp 1,b1 ‘ leer el valor dentro de b1
if b1 > 127 then neg ‘ verificar si el valor es negativo
serout 7,T2400,(#b1) ‘ transmitir el valor al LCD serial
goto loop
neg:
let b1 = b1 – 128 ‘ ajustar el valor negativo
serout 7,2400,(“-”) ‘ transmitir el símbolo negativo
serout 7,2400,(#b1) ‘ transmitir el valor al LCD serial
goto main
��4>���
��
��
,���-
� �� ���(� # �#��
��
�
��
%��(��%�
� "�����
������#������ ���!���"#�� ��� �$%�� "�&%�'����(���"�&��� #%#��������' �%��(��%�)�*'%#��(#��! �� ��+ "���(# ��' �� ��)�# �#��)
���
���������������

Section 2
BASIC COMMANDS (ES)
revolution (c) Revolution Education Ltd. Email: [email protected] Web: www.rev-ed.co.ukVersion ES1.0 01/2007
82
82
www.picaxe.co.uk
readtemp12 (leertemp12)
Syntax:
READTEMP12 pin,wordvariable- pin es el pin de entrada.
- wordvariable recibe el byte de datos leído.
Function:
La temperatura se lee y almacena en la variable de palabra especificada
(resolución de 0.125 grados) como un dato de 12 bit. El usuario debe
interpretar loas datos mediante manipulación matemática. Para mayor
información acerca de la relación Temperatura/Datos, vea la ficha técnica
DS18B20 (www.dalsemi.com).
Information:
This command is for advanced users only. For standard ‘whole degree’ data use
the readtemp command.
The temperature is read back as the raw 12 bit data into a word variable (0.125
degree resolution). The user must interpret the data through mathematical
manipulation. See the DS18B20 datasheet (www.dalsemi.com) for more
information on the 12 bit Temperature/Data relationship.
See the readtemp command for a suitable circuit.
Note the readtemp12 command does not work with the older DS1820 or
DS18S20 as they have a different internal resolution.
Affect of increased clock speed:
This command only functions at 4MHz.
Example:
main:
readtemp12 1,w1 ‘ read value into b1
debug w1 ‘ transmit to computer screen
goto main
���
������
������

Section 2
BASIC COMMANDS (ES)
revolution (c) Revolution Education Ltd. Email: [email protected] Web: www.rev-ed.co.ukVersion ES1.0 01/2007
83
83
www.picaxe.co.uk
readowclk (leereloj)
Syntax:
readowclk pin- pin es una variable o constante (0-7) que especifica cual pin de entrada/salida
utilizar.
Function:
Lee los segundos transcurridos en un chip de reloj DS2415.
Information:
A continuación se muestra un ejemplo de cómo leer los segundos transcurridos
con el reloj monocable DS2415. Este comando no está disponible para el
PICAXE-28X a menos que se utilice un dispositivo más poderoso tal como el i2c
DS1307.
El DS2415 es un “contador de segundos” de alta precisión. Por cada segundo el
contador de 32 bits (4 bytes) incrementa en 1. Este dispositivo no es
propiamente un reloj, es un contador que, desde que se activa va contando
permanentemente los segundos transcurridos. La medida del tiempo
transcurrido es muy precisa debido a la utilización de un cristal de reloj. Al
tomar dos lecturas de los segundos totales transcurridos, se pueden calcular los
segundos transcurridos en ese lapso de tiempo. El registro de 32 bits tiene
capacidad para almacenar hasta 136 años en segundos. Opcionalmente, el
DS2415 puede alimentarse independientemente con una batería de 3V de
manera que continúe operando al cortar la alimentación del chip PICAXE.
Después de conectar la fuente de alimentación al DS2415 se debe ejecutar el
comando resetowclk para activar el cristal del reloj y reiniciar el contador.
El comando readowclk lee el contador de 32 bits y luego coloca dicho valor de 32
bits, de una manera compuesta, en las variables b10 a b13 (variables w6 y w7 en
el caso que se utilicen variables de palabras).
Utilización de variables de byte:
El número almacenado en b10 es el número de segundos “sobrantes” (<256
segundos)
El número almacenado en b11 es ese número x 256 segundos
El número almacenado en b12 es ese número x 65536 segundos
El número almacenado en b13 es ese número x 16777216 segundos
Utilización de variables de palabras:
El número almacenado en w6 es el número de segundos “sobrantes” (<65536
segundos)
El número almacenado en w7 es ese número x 65536 segundos
Affect of Increased Clock Speed:
This command will only function at 4MHz.
Example:
main:
resetowclk 2 ‘ reiniciar el reloj del pin 2
loop1:
readowclk 2 ‘ leer el valor del reloj en la entrada 2
debug b1 ‘ mostrar el tiempo transcurrido
pause 10000 ‘ esperar 10 segundos
goto loop1
���

Section 2
BASIC COMMANDS (ES)
revolution (c) Revolution Education Ltd. Email: [email protected] Web: www.rev-ed.co.ukVersion ES1.0 01/2007
84
84
www.picaxe.co.uk
resetowclk (reinreloj)
Syntax:
resetowclk pin- pin es una variable o constante (0-7) que especifica cual pin de entrada/salida
utilizar.
Function:
Reinicia a 0 los segundos en el chip de reloj DS2415
Information:
Este comando reinicia el tiempo en el chip del reloj monocable DS2415.
También enciende el cristal del reloj, y por lo tanto debe utilizarse cuando el
chip es encendido por primera vez para permitir el conteo del tiempo.
Affect of Increased Clock Speed:
This command will only function at 4MHz.
(Ver ejemplo arriba)
��
��
������4�
��
4�&%�
-4
-�
������#������ ���!���"#�� ��� �$%�� "�&%�'��(���"�&��� #%#���#�����' �%��(��%�)�*'%#��(#��! �� ��+ "���(# ��' ��� �&%� �" +%� �%� ��'%#)
��
�
��
%��(�,���-
,%���9�!��:�����! ���� �� "�����' �������,���-�#(���������# ����� �1��!���(��� ��9�%� ���%���%� "�&' �,���-���& ��� ��+ ":
�!��
�""
���#�����(#��! 1�)�8>�?@�&���'0(���@����#����&%�'8�3�9����4�:����"�����%���� )
1
4
�
�
8
4���3
���

Section 2
BASIC COMMANDS (ES)
revolution (c) Revolution Education Ltd. Email: [email protected] Web: www.rev-ed.co.ukVersion ES1.0 01/2007
85
85
www.picaxe.co.uk
readowsn
Syntax:
readowsn pin- Pin is a variable/constant (0-7) which specifies the i/o pin to use.
Function:
Read serial number from any Dallas 1-wire device.
Information:
This command (read-one-wire-serial-number) reads the unique serial number
from any Dallas 1-wire device (e.g DS18B20 digital temp sensor, DS2415 clock,
or DS1990A iButton).
If using an iButton device (e.g. DS1990A) this serial number is laser engraved on
the casing of the iButton.
The readowsn command reads the serial number and then puts the family code
in b6, the serial number in b7 to b12, and the checksum in b13
Note that you should not use variables b6 to b13 for other purposes in your
program during a readowsn command.
����< � ���&<� �
!�(
��
���
4�&%� ��
��
��
%�(����5 � ������#������ ���!���"#
�� ��� �$%�� "�&%�'��(���"�&��� #%#���#�����' �%��(��%�)�*'%#��(#��! �� ��+ "���(# ��' ��� �&%� �" +%� �%� ��'%#)
��
�
��
%��(�
,���-
*' �� �"�&#��9� �"��� &%� �# �%����(�! �:������"�&%���� �"��' # �%����(�! ��$������������#�4�&%� �" +%� ��%� ����4AA���%�(������ �)
���
���������������
Part RSA002 - iButton Contact probe
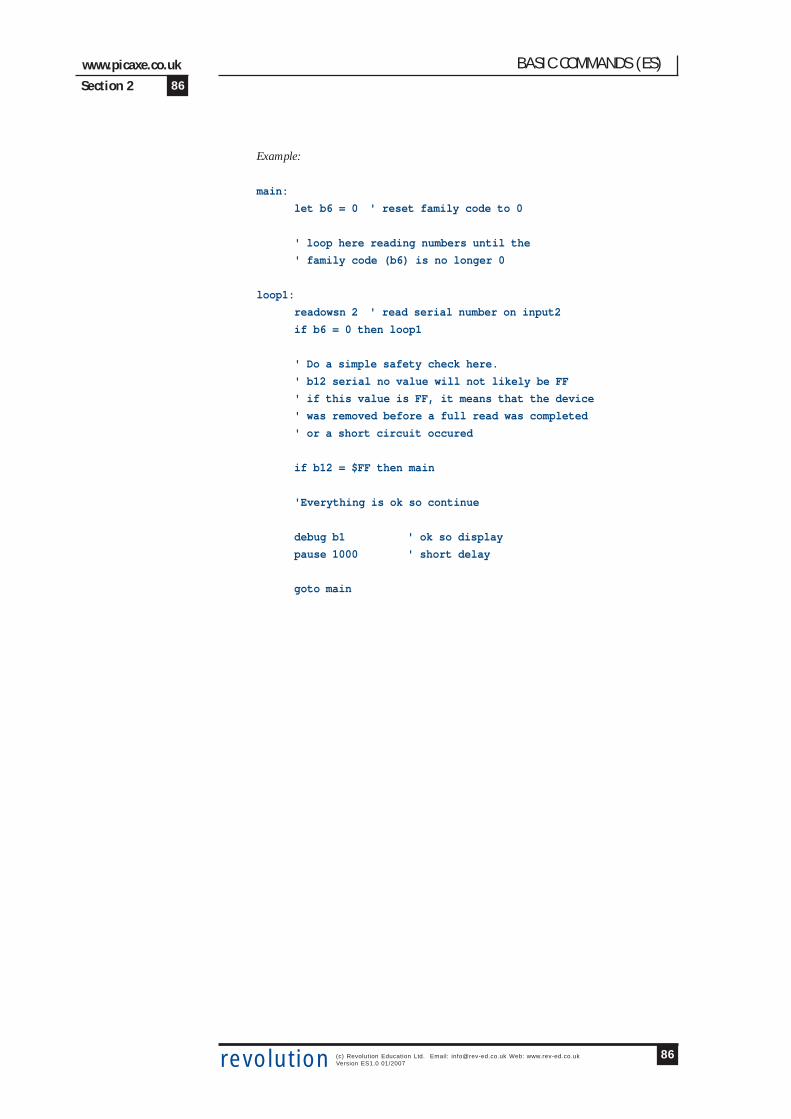
Section 2
BASIC COMMANDS (ES)
revolution (c) Revolution Education Ltd. Email: [email protected] Web: www.rev-ed.co.ukVersion ES1.0 01/2007
86
86
www.picaxe.co.uk
Example:
main:
let b6 = 0 ' reset family code to 0
' loop here reading numbers until the
' family code (b6) is no longer 0
loop1:
readowsn 2 ' read serial number on input2
if b6 = 0 then loop1
' Do a simple safety check here.
' b12 serial no value will not likely be FF
' if this value is FF, it means that the device
' was removed before a full read was completed
' or a short circuit occured
if b12 = $FF then main
'Everything is ok so continue
debug b1 ' ok so display
pause 1000 ' short delay
goto main

Section 2
BASIC COMMANDS (ES)
revolution (c) Revolution Education Ltd. Email: [email protected] Web: www.rev-ed.co.ukVersion ES1.0 01/2007
87
87
www.picaxe.co.uk
return (retorna)
Syntax:
RETURN
Function:
Retornar de una subrutina.
Information:
The return command is only used with a matching ‘gosub’ command, to return
program flow back to the main program at the end of the sub procedure. If a
return command is used without a matching ‘gosub’ beforehand, the program
flow will crash.
Example:
main:
let b2 = 15 ‘ configurar el valor de b2
pause 2000 ‘ esperar 2 segundos
gosub flsh ‘ ir al sub-procedimiento flsh
let b2 = 5 ‘ configurar el valor de b2
pause 2000 ‘ esperar 2 segundos
gosub flsh ‘ ir al sub-procedimiento flsh
end ‘ evita ir a un sub-procedimiento
‘ accidentalmente
flsh: for b0 = 1 to b2 ‘ crear un bucle de b2 ciclos
high 1 ‘ encender salida 1
pause 500 ‘ esperar 0.5 segundos
low 1 ‘ apagar salida 1
pause 500 ‘ esperar 0.5 segundos
next b0 ‘ siguiente b0
return ‘ retornar del sub-procedimiento
�������
���������������

Section 2
BASIC COMMANDS (ES)
revolution (c) Revolution Education Ltd. Email: [email protected] Web: www.rev-ed.co.ukVersion ES1.0 01/2007
88
88
www.picaxe.co.uk
reverse (invertir)
Syntax:
REVERSE pin,pin,pin...- pin es una variable/constante (0-7) que especifica cual pin de entrada/salida
utilizar.
Function:
Invierte la configuración del pin especificado (entrada a salida o viceversa)
Information:
This command is only required on microcontrollers with programmable input/
output pins (e.g. PICAXE-08M). This command can be used to change a pin that
has been configured as an input to an output.
All pins are connfigured as inputs on first power-up (apart from out0 on the
PICAXE-08, which is always an output). Note that pin3 is always an input.
Example:
main:
input 1 ‘ convertir al pin en entrada
reverse 1 ‘ convertir al pin en salida
reverse 1 ‘ convertir al pin en entrada
output 1 ‘ convertir al pin en salida
�����

Section 2
BASIC COMMANDS (ES)
revolution (c) Revolution Education Ltd. Email: [email protected] Web: www.rev-ed.co.ukVersion ES1.0 01/2007
89
89
www.picaxe.co.uk
select case \ case \ else \ endselect
Syntax:
SELECT VARCASE VALUE{code}CASE VALUE, VALUE...{code}CASE VALUE TO VALUE{code}CASE ?? value{code}ELSE{code}ENDSELECT
- Var is the value to test.
- Value is a variable/constant.
?? can be any of the following conditions
= equal to
is equal to
<> not equal to
!= not equal to
> greater than
>= greater than or equal to
< less than
<= less than or equal to
Function:
Compare a variable value and conditionally execute sections of code.
Information:
The multiple select \ case \ else \endselect command is used to test a variable for
certain conditions. If these conditions are met that section of the program code is
executed, and then program flow jumps to the endselect position. If the
condition is not met program flows jumps directly to the next case or else
command.
The ‘else’ section of code is only executed if none of the case conditions have
been true.
Example:
select case b1
case 1
high 1
case 2,3
low 1
case 4 to 6
high 2
else
low 2
endselect
�������
���������������

Section 2
BASIC COMMANDS (ES)
revolution (c) Revolution Education Ltd. Email: [email protected] Web: www.rev-ed.co.ukVersion ES1.0 01/2007
90
90
www.picaxe.co.uk
serin (serent)
Syntax:
SERIN pin,baudmode,(qualifier,qualifier...)SERIN pin,baudmode,(qualifier,qualifier...),{#}variable,{#}variable...SERIN pin,baudmode,{#}variable,{#}variable...- pin es una variable/constante (0-7) que especifica cual pin de entrada/salida
utilizar.
- Baudmode es una variable/constante (0-7) que especifica el modo:
T2400 entrada real
T1200 entrada real
T600 entrada real
T300/T4800 entrada real
N2400 entrada invertida
N1200 entrada invertida
N600 entrada invertida
N300/N4800 entrada invertida
- Qualifiers son variables/constantes opcionales (0-255) que deben recibirse en un
orden exacto para que los bytes subsiguientes puedan recibirse y almacenarse
dentro de las variables.
- variables reciben los resultados (0-255). Los signos # opcionales se utilizan para
introducir números decimales ascii dentro de las variables.
Function:
Entradas en serie con “calificadores”(qualifiers) opcionales (8 datos, sin paridad,
1 parada).
Information:
The serin command is used to receive serial data into an input pin of the
microcontroller. It cannot be used with the serial download input pin, which is
reserved for program downloads only.
Pin specifies the input pin to be used. Baud mode specifies the baud rate and
polarity of the signal. When using simple resistor interface, use N (inverted)
signals. When using a MAX232 type interface use T (true) signals. The protocol is
fixed at N,8,1 (no parity, 8 data bits, 1 stop bit).
Note that the 4800 baud rate is only available on the X parts. Note that the
microcontroller may not be able to keep up with complicated datagrams at this
speed - a maximum of 2400 is recommended when a 4 MHz resonator is used.
Qualifiers are used to specify a ‘marker’ byte or sequence. The command
serin 1,N2400,(“ABC”),b1
requires to receive the string “ABC” before the next byte read is put into byte b1
Without qualifiers
serin 1,N2400,b1
the first byte received will be put into b1 regardless.
�������
���������������

Section 2
BASIC COMMANDS (ES)
revolution (c) Revolution Education Ltd. Email: [email protected] Web: www.rev-ed.co.ukVersion ES1.0 01/2007
91
91
www.picaxe.co.uk
All processing stops until the new serial data byte is received. This command
cannot be interrupted by the setint command. The following example simply
waits until the sequence “go” is received.
serin 1,N2400,(“go”)
After using this command you may have to perform a ‘hard reset’ to download a
new program to the microcontroller. See the Serial Download scetion for more
details.
Affect of Increased Clock Speed:
Increasing the clock speed increases the serial baud rate as shown below. However
due to the sensitive nature of serial communications it is recommened that only a
4MHz resonator is used.
Baudmode 4MHz 8MHz 16MHz300 300 600 1200
600 600 1200 2400
1200 1200 2400 4800
2400 2400 4800 9600
4800 4800 9600 19200
A maximum of 4800 is recommended for complicated serial transactions.
Internal resonators are not as accurate as external resonators, so in high accuracy
applications an external resonator device is recommended. However
microcontrollers with an internal resonator may be used successfully in most
applications, and may also be calibrated using the calibfreq command if required.
Example Computer Interface Circuit:
PICAXE-08/08M ONLY - Due to the internal structure of input3 (leg 4) of the
PICAXE-08, a 1N4148 diode is required betwen the pin and V+ for serin to work
on this particular pin (‘bar’ end of diode to V+) with this circuit. All other pins
have an internal diode.
Example:
main: for b0 = 0 to 63 ‘ iniciar un bucle
serin 6,T2400,b1 ‘ recibir un valor en serie
write b0,b1 ‘ escribir valor dentro de b1
next b0 ‘ siguiente b0
��
4��
������(��,%�
4>�27(��(��,%�
����(� �����9�%���:
����(� ��*-�9�%��1:
����(� ��2-�9�%���:
*�����(� � *��,���-

Section 2
BASIC COMMANDS (ES)
revolution (c) Revolution Education Ltd. Email: [email protected] Web: www.rev-ed.co.ukVersion ES1.0 01/2007
92
92
www.picaxe.co.uk
serout (sersal)
Syntax:
SEROUT pin,baudmode,({#}data,{#}data...)- pin es una variable/constante (0-7) que especifica cual pin de entrada/salida
utilizar.
- Baudmode es una variable/constante (0-7) que especifica el modo:
T2400 salida real
T1200 salida real
T600 salida real
T300/T4800 salida real
N2400 salida invertida
N1200 salida invertida
N600 salida invertida
N300/N4800 salida invertida
- Data son variables/constantes (0-255) con los datos que se desean enviar como
salidas.
- Los signos # opcionales se utilizan para introducir números decimales ascii
dentro de las variables.
Function:
Transmit serial data output (8 data bits, no parity, 1 stop bit).
Information:
The serout command is used to transmit serial data from an output pin of the
microcontroller. It cannot be used with the serial download output pin - use the
sertxd command in this case.
Pin specifies the output pin to be used. Baud mode specifies the baud rate and
polarity of the signal. When using simple resistor interface, use N (inverted)
signals. When using a MAX232 type interface use T (true) signals. The protocol is
fixed at N,8,1 (no parity, 8 data bits, 1 stop bit).
Note that the 4800 baud rate is only available on the X parts. Note that the
microcontroller may not be able to keep up with complicated datagrams at this
speed - a maximum of 2400 is recommended when a 4 MHz resonator is used.
The # symbol allows ascii output. Therefore #b1, when b1 contains the data 126,
will output the ascii characters “1” ”2” ”6” rather than the raw data 126.
Please also see the interfacing circuits , affect of resonator clock speed, and
explanation notes of the ‘serin’ command, as all of these notes also apply to the
serout command.
Example:
main:
for b0 = 0 to 63 ‘ iniciar un bucle
read b0,b1 ‘ leer valor de b0 dentro de b1
serout 7,T2400,(b1) ‘ transmitir el valor al LCD serie
next b0 ‘ siguiente b0
�������
���������������

Section 2
BASIC COMMANDS (ES)
revolution (c) Revolution Education Ltd. Email: [email protected] Web: www.rev-ed.co.ukVersion ES1.0 01/2007
93
93
www.picaxe.co.uk
sertxd (sertxd)
Syntax:
SERTXD ({#}data,{#}data...)- data son las variables o constantes (0-255) que suministran los datos que
constituirán la salida. Los símbolos “#” son opcionales y se utilizan para
transmitir datos con números decimales ascii en vez de simples caracteres. Al
escribir textos, estos se pueden encerrar entre comillas (“Hello”).
Function:
Salida en serie mediante el pin de programación serout (4800 baudios, 8 datos,
sin paridad, 1 parada)
Information:
The sertxd command is similar to the serout command, but acts via the serial
output pin rather than a general output pin. This allows data to be sent back to
the computer via the programming cable. This can be useful whilst debugging
data - view the uploaded data in the PICAXE>Terminal window. There is an
option within View>Options>Options to automatically open the Terminal
windows after a download.
The baud rate is fixed at 4800,n,8,1
Affect of Increased Clock Speed:
Increasing the clock speed increases the serial baud rate as shown below.
4MHz 8MHz 16MHz4800 9600 19200
Example:
main:
for b0 = 0 to 63 ‘ iniciar un bucle
read b0,b1 ‘ leer el valor de b0 dentro de b1
sertxd(b1) ‘ transmitir el valor al LCD serial
next b0 ‘ siguiente b0
���
������
������

Section 2
BASIC COMMANDS (ES)
revolution (c) Revolution Education Ltd. Email: [email protected] Web: www.rev-ed.co.ukVersion ES1.0 01/2007
94
94
www.picaxe.co.uk
servo (servo)
Syntax:
SERVO pin,pulse- pin es una variable/constante (0-7) que especifica cual
pin de entrada/salida utilizar.
- pulse es una variable/constante (75-255) que especifica l
a posición adonde se desea mover el servo.
Function:
Enviar impulsos por un pin de salida para controlar un servo de control por radio
Information:
Este comando envía impulsos high a través de un pin por periodos de tiempo
dados por la ecuación pulse x (0.01 ms). Los impulsos se repiten cada 20 ms.
Usualmente los servos de control por radio requieren impulsos de 0.75 a 2.25 ms
cada 20 ms. Por lo tanto, el comando servo 1,75 moverá al servo a un extremo
(0º), el comando servo 1,225 moverá al servo al otro extremo (180º) y servo
1,150 moverá al servo a su posición central.
Este comando es diferente a todos los otros comandos BASIC en el sentido que
los impulsos continúan hasta que se envíe otro comando servo, high ó low. Los
comandos high y low detienen los impulsos inmediatamente. El comando servo
funciona de la siguiente manera: cuando se envía un nuevo comando con
un pulse distinto, la longitud del impulso
se ajusta al nuevo valor y por consiguiente
el servo se mueve a su nueva posición.
No se deben utilizar pulses menores de
75 ni mayores de 225 ya que esto puede
provocar un mal funcionamiento del
servo. Debido a las tolerancias de
fabricación de los servos, todos los
valores (pulse) que indican las posiciones donde se desea mover a los
mismos son aproximados y se requiere siempre realizar ajustes y afinamiento
mediante experimentación.
Note que el tiempo de procesamiento requerido para procesar los comandos
servo cada 20 ms provoca un retraso en la ejecución de otros comandos. Por
ejemplo, un comando de pausa tomará un tiempo ligeramente mayor que lo
esperado. Por esta misma razón, los impulsos del comando servo son
temporalmente deshabilitados al ejecutar comandos serin y serout muy sensibles.
Affect of increased clock speed:
The servo command will only function correctly at 4MHz.
Example:
main: servo 4,75 ‘ mover el servo a un extremo
pause 2000 ‘ esperar 2 segundos
servo 4,150 ‘ mover el servo a su posición central
pause 2000 ‘ esperar 2 segundos
servo 4,225 ‘ mover el servo al otro extremo
pause 2000 ‘ esperar 2 segundos
goto main ‘ regresar a inicio
���
���������������
,%�11�2
B
2
�
�2�7
8���C,,�6
��
8� ��

Section 2
BASIC COMMANDS (ES)
revolution (c) Revolution Education Ltd. Email: [email protected] Web: www.rev-ed.co.ukVersion ES1.0 01/2007
95
95
www.picaxe.co.uk
setint (setint)
Syntax:
SETINT input,mask- input es una variable o constante (0-7) que especifica una condición en la
entrada.
- Mask es una constante o variable (75-255) que especifica la “máscara”.
Function:
Interrumpir el programa si se da la condición específica para la entrada.
Information:
Este comando causa una interrupción “encuesta” (Polled interrupt) al darse
cierta condición en un pin de entrada.
La interrupción encuesta es la manera más rápida de reaccionar a una situación
particular en las entradas. Es el único tipo de interrupción disponible en los
sistemas PICAXE. El puerto de entrada se verifica entre la ejecución de una
línea de comandos y otra en el programa, y continuamente durante la ejecución
de cualquier comando de pausa. Si se cumple con la condición especificada
para la entrada, el programa salta a un sub-procedimiento (gosub). Una vez que
el sub-procedimiento se ejecuta, el programa retorna y continúa ejecutando el
programa principal.
La condición de interrupción puede ser cualquier patrón de ceros (0) y unos (1)
en el puerto de entrada , “enmascarado” por el byte “mask”. Por lo tanto,
cualquier bit “enmascarado” por un “0” en un byte “mask” será ignorado.
Ejemplo:
Para interrumpir el programa cuando únicamente la entrada1 está encendida
(high):
Setint %00000010,%00000010
Para interrumpir el programa cuando únicamente la entrada1 está apagada
(low):
Setint %00000000,%00000010
Para interrumpir el programa cuando la entrada0 esta encendida (high), la
entrada1 encendida (high) y la entrada2 apagada (low):
Setint %00000011,%00000111
etcétera...
Sólo se permite un patrón de entrada a la vez. Para deshabilitar la interrupción
debe ejecutar el comando SETINT con el valor de “0” como byte “mask”.
Notas:
1) Cada programa que utilice el comando SETINT debe tener su interrupción
correspondiente: un sub-procedimiento (que termine con el comando “return”)
al final del programa.
2) Después que ocurre la interrupción, la función es deshabilitada. Por lo
tanto, si desea re-habilitar la interrupción, debe utilizar nuevamente el comando
SETINT dentro del mismo sub-procedimiento. La interrupción no se habilitará
nuevamente hasta que se ejecute el comando “return” del sub-procedimiento.
3) Si la condición de interrupción no termina durante la ejecución del sub-
���
���������������

Section 2
BASIC COMMANDS (ES)
revolution (c) Revolution Education Ltd. Email: [email protected] Web: www.rev-ed.co.ukVersion ES1.0 01/2007
96
96
www.picaxe.co.uk
procedimiento, puede ocurrir una segunda interrupción inmediatamente.
4) Luego de que el código de interrupción se ha ejecutado, el programa
continúa ejecutándose en la siguiente línea del programa principal. En caso de
que la interrupción se dé durante la ejecución de un comando de pausa, el
tiempo faltante para terminar dicha pausa será ignorado y el programa
continuará en la siguiente línea.
Ejemplo:
setint %10000000,%10000000
‘ activar la interrupción cuando el pin7 se enciende (high)
main:
low 1 ‘ apagar la salida1
pause 2000 ‘ esperar 2 segundos
goto main ‘ regresar al inicio
interrupt:
high 1 ‘ encender la salida1
if pin7 = 1 then interrupt
‘ continuar en el sub-bucle hasta que cambie la condición de
interrupción en la entrada
pause 2000 ‘ esperar 2 segundos
setint %10000000,%10000000
‘ reactivar la interrupción
return ‘ retornar del sub-procedimiento
En este ejemplo el LED de la salida 1 se encenderá inmediatamente después que
se encienda el interruptor de la entrada. Si se utilizara el comando “if pin7 = 1
then...”, el programa tardaría hasta dos segundos en encender el LED ya que el
comando “if” no se procesa durante el tiempo de retardo del comando “pause
2000” del bucle del programa principal (para comparar, abajo se muestra el
programa estándar).
main:
low 1 ‘ apagar salida 1
pause 2000 ‘ esperar 2 segundos
if pin7 = 1 then sw_on
goto main ‘ regresar al inicio
sw_on:
high 1 ‘ encender salida 1
if pin7 = 1 then sw_on
‘ continuar en el sub-bucle hasta que cambie la condición
pause 2000 ‘ esperar 2 segundos
goto main ‘ regresar al bucle principal

Section 2
BASIC COMMANDS (ES)
revolution (c) Revolution Education Ltd. Email: [email protected] Web: www.rev-ed.co.ukVersion ES1.0 01/2007
97
97
www.picaxe.co.uk
setfreq
Syntax:
setfreq freq- freq is the keyword m4 or m8.
Function:
Set the internal clock frequency for microcontrollers with internal resonator to
4MHz (default) or 8MHz.
Information:
The setfreq command can be used to double the speed of operation of the
microcontroller from 4MHz to 8MHz. However note that this speed increase
affects many commands, by, for instance, changing their properties (e.g. all pause
commands are half the length at 8MHz).
On devices with an external resonator this command cannot be used - the value
of the external resonator must be changed to alter the clock frequency.
The change occurs immediately. All programs default to m4 (4MHz) if a setfreq
command is not used. Note that you may have to perform a ’hard reset’ at 4MHz
if a new download fails after using this command.
The 8 and 4MHz frequencies are factory preset to the most accurate settings.
However advanced users may use the calibfreq command to adjust these factory
preset settings.
Some commands such as readtemp will only work at 4MHz. In these cases
change back to 4MHz temporarily to operate these commands.
Example:
setfreq m4 ‘ setfreq to 4MHz
readtemp 1,b1 ‘ do command at 4MHz
setfreq m8 ‘ set freq back to 8MHz
���
������

Section 2
BASIC COMMANDS (ES)
revolution (c) Revolution Education Ltd. Email: [email protected] Web: www.rev-ed.co.ukVersion ES1.0 01/2007
98
98
www.picaxe.co.uk
shiftin
Information:
The PICAXE microcontrollers do not have a shiftin command. However the same
functionality found in other products can be achieved by using the sub
procedures provided below. These sub-procedures are also saved in the file called
shiftin_out.bas in the \samples folder of the Programming Editor software.
To use, simply copy the symbol definitions to the top of your program and copy
the appropriate shiftin sub procedures to the bottom of your program.
Do not copy all options as this will waste memory space.
It is presumed that the data and clock outputs (sdata and sclk) are in the low
condition before the gosub is used.
BASIC line
“shiftin serdata, sclk, mode, (var_in(\bits)) “
becomes
gosub shiftin_LSB_Pre (for mode LSBPre)
gosub shiftin_MSB_Pre (for mode MSBPre)
gosub shiftin_LSB_Post (for mode LSBPost)
gosub shiftin_MSB_Post (for mode MSBPost) ‘
‘ ~~~~~ SYMBOL DEFINITIONS ~~~~~
‘ Required for all routines. Change pin numbers/bits as required.
‘ Uses variables b7-b13 (i.e. b7,w4,w5,w6). If only using 8 bits
‘ all the word variables can be safely changed to byte variables.
‘
‘***** Sample symbol definitions *****
symbol sclk = 5 ‘ clock (output pin)
symbol sdata = 7 ‘ data (output pin for shiftout)
symbol serdata = input7 ‘ data (input pin for shiftin, note input7
symbol counter = b7 ‘ variable used during loop
symbol mask = w4 ‘ bit masking variable
symbol var_in = w5 ‘ data variable used durig shiftin
symbol var_out = w6 ‘ data variable used during shiftout
symbol bits = 8 ‘ number of bits
symbol MSBvalue = 128 ‘ MSBvalue
‘(=128 for 8 bits, 512 for 10 bits, 2048 for 12 bits)
�������
���������������

Section 2
BASIC COMMANDS (ES)
revolution (c) Revolution Education Ltd. Email: [email protected] Web: www.rev-ed.co.ukVersion ES1.0 01/2007
99
99
www.picaxe.co.uk
‘========================================================================
‘ ~~~~~ SHIFTIN ROUTINES ~~~~~
‘ Only one of these 4 is required - see your IC requirements
‘ It is recommended you delete the others to save space
‘========================================================================
‘ ***** Shiftin LSB first, Data Pre-Clock *****
shiftin_LSB_Pre:
let var_in = 0
for counter = 1 to bits ‘ number of bits
var_in = var_in / 2 ‘ shift right as LSB first
if serdata = 0 then skipLSBPre
var_in = var_in + MSBValue ‘ set MSB if serdata = 1
skipLSBPre: pulsout sclk,1 ‘ pulse clock to get next data bit
next counter
return
‘========================================================================
‘ ***** Shiftin MSB first, Data Pre-Clock *****
shiftin_MSB_Pre:
let var_in = 0
for counter = 1 to bits ‘ number of bits
var_in = var_in * 2 ‘ shift left as MSB first
if serdata = 0 then skipMSBPre
var_in = var_in + 1 ‘ set LSB if serdata = 1
skipMSBPre: pulsout sclk,1 ‘ pulse clock to get next data bit
next counter
return
‘========================================================================
‘ ***** Shiftin LSB first, Data Post-Clock ***** ‘
shiftin_LSB_Post: let var_in = 0
for counter = 1 to bits ‘ number of bits
var_in = var_in / 2 ‘ shift right as LSB first
pulsout sclk,1 ‘ pulse clock to get next data bit
if serdata = 0 then skipLSBPost
var_in = var_in + MSBValue ‘ set MSB if serdata = 1
skipLSBPost: next counter
return
‘========================================================================
‘ ***** Shiftin MSB first, Data Post-Clock *****
shiftin_MSB_Post: let var_in = 0
for counter = 1 to bits ‘ number of bits
var_in = var_in * 2 ‘ shift left as MSB first
pulsout sclk,1 ‘ pulse clock to get next data bit
if serdata = 0 then skipMSBPost
var_in = var_in + 1 ‘ set LSB if serdata = 1
skipMSBPost: next counter
return
‘========================================================================

Section 2
BASIC COMMANDS (ES)
revolution (c) Revolution Education Ltd. Email: [email protected] Web: www.rev-ed.co.ukVersion ES1.0 01/2007
100
100
www.picaxe.co.uk
�������
���������������
shiftout
Information:
The PICAXE microcontrollers do not have a shiftout command. However the
same functionality found in other products can be achieved by using the sub
procedures provided below. These sub-procedures are also saved in the file called
shiftin_out.bas in the \samples folder of the Programming Editor software.
To use, simply copy the symbol definitions (listed within the shiftin command)
to the top of your program and copy the appropriate shiftout sub procedures
below to the bottom of your program.
Do not copy both options as this will waste memory space.
It is presumed that the data and clock outputs (sdata and sclk) are in the low
condition before the gosub is used.
BASIC line
“shiftout sdata, sclk, mode, (var_out(\bits))”
becomes
gosub shiftout_LSBFirst (for mode LSBFirst)
gosub shiftout_MSBFirst (for mode MSBFirst)
Note the symbol definitions listed in the ‘shiftin’ command must also be used.
‘========================================================================
‘ ***** Shiftout LSB first *****
shiftout_LSBFirst:
for counter = 1 to bits ‘ number of bits
mask = var_out & 1 ‘ mask LSB
low sdata ‘ data low
if mask = 0 then skipLSB
high sdata ‘ data high
skipLSB: pulsout sclk,1 ‘ pulse clock for 10us
var_out = var_out / 2 ‘ shift variable right for LSB
next counter
return
‘========================================================================
‘ ***** Shiftout MSB first *****
shiftout_MSBFirst:
for counter = 1 to bits ‘ number of bits
mask = var_out & MSBValue ‘ mask MSB
low sdata ‘ data low
if mask = 0 then skipMSB
high sdata ‘ data high
skipMSB: pulsout sclk,1 ‘ pulse clock for 10us
var_out = var_out * 2 ‘ shift variable left for MSB
next counter
return
‘========================================================================

Section 2
BASIC COMMANDS (ES)
revolution (c) Revolution Education Ltd. Email: [email protected] Web: www.rev-ed.co.ukVersion ES1.0 01/2007
101
101
www.picaxe.co.uk
sleep (dormir)
Syntax:
SLEEP period-period es una variable/constante que especifica la duración del comando sleep en
segundos (0-65535).
Function:
“Dormir” por algunos segundos (resolución ~ 2.3s, precisión 99.9%). Cuando el
microcontrolador está “durmiendo” el consumo de energía eléctrica se reduce a
1/100 del consumo regular (si no se está controlando nada).
Information:
The sleep command puts the microcontroller into low power mode for a period
of time. When in low power mode all timers are switched off and so the pwmout
and servo commands will cease to function. The nominal period is 2.3s, so sleep
10 will be approximately 23 seconds. The sleep command is not regulated and so
due to tolerances in the microcontrollers internal timers, this time is subject to -
50 to +100% tolerance. The external temperature affects these tolerances and so
no design that requires an accurate time base should use this command.
Shorter ‘sleeps’ are possible with the ‘nap’ command.
Some PICAXE chips (e.g. 08M) support the disablebod (enablebod) command to
disable the brown-out detect function. Use of this command prior to a sleep will
considerably reduce the current drawn during the sleep command.
Affect of increased clock speed:
The sleep command uses the internal watchdog timer which is not affected by
changes in resonator clock speed.
Example:
main: high 1 ‘ encender salida 1
sleep 10 ‘ dormir por 9.2 segundos
low 1 ‘ apagar salida 1
sleep 100 ‘ dormir por 98.9 segundos
goto main ‘ loop back to start
�������
���������������

Section 2
BASIC COMMANDS (ES)
revolution (c) Revolution Education Ltd. Email: [email protected] Web: www.rev-ed.co.ukVersion ES1.0 01/2007
102
102
www.picaxe.co.uk
sound (sonido)
Syntax:
SOUND pin,(note,duration,note,duration...)- pin es una variable/constante (0-7) que especifica cual pin de entrada/salida
utilizar.
- notes son variables/constantes (0-255) que especifican el tipo de nota y su
frecuencia. La nota 0 es muda. Las notas 1-127 son notas con tonos ascendientes.
Las notas 128-255 son ruido blanco ascendente.
- Duration es una variable/constante (0-255) que especifica la duración de la
nota.
Function:
Emitir sonidos con las notas y duraciones especificadas. El pin de salida debe
tener conectados un zumbador ó un altavoz, y un condensador electrolítico de
10uf. El zumbador se debe conectar entre el pin y la conexión a tierra.
Information:
This command is designed to make audible ‘beeps’ for games and keypads etc. To
play music use the play or tune command instead. Note and duration must be
used in ‘pairs’ within the command.
See the tune command for suitable piezo / speaker circuits.
Affect of Increased Clock Speed:
This length of the note is halved at 8MHz and quartered at 16MHz.
Example:
main: let b0 = b0 + 1 ‘ incrementar b0
sound 7,(b0,50) ‘ emitir un sonido
goto main ‘ regresar al inicio
�������
���������������

Section 2
BASIC COMMANDS (ES)
revolution (c) Revolution Education Ltd. Email: [email protected] Web: www.rev-ed.co.ukVersion ES1.0 01/2007
103
103
www.picaxe.co.uk
stop
Syntax:
STOP
Function:
Enter a permanent stop loop until the power cycles (program re-runs) or the PC
connects for a new download.
Information:
The stop command places the microcontroller into a permament loop at the end
of a program. Unlike the end command the stop command does not put the the
microcontroller into low power mode after a program has finished.
The stop command does not switch off internal timers, and so commands such as
servo and pwmout that require these timers will continue to function.
Example:
main:
pwmout 1,120,400
stop
�������
���������������

Section 2
BASIC COMMANDS (ES)
revolution (c) Revolution Education Ltd. Email: [email protected] Web: www.rev-ed.co.ukVersion ES1.0 01/2007
104
104
www.picaxe.co.uk
switch on/off (encender/anagar)
Syntax:
SWITCH ON pin, pin, pin...SWITCHON pin, pin, pin...SWITCH OFF pin, pin, pin...SWITCHOFF pin, pin, pin...- pin es una variable/constante (0-7) que especifica cual pin de entrada/salida
utilizar.
Function:
Poner al pin de salida especificado en high / low
Information:
This is a ‘pseudo’ command designed for use by younger students It is actually
equivalent to ‘high’ or ‘low’, ie the software outputs a high or low command as
appropriate.
Example:
main: switch on 7 ‘ encender salida 7
wait 5 ‘ esperar 5 segundos
switch off 7 ‘ apagar salida 7
wait 5 ‘ esperar 5 segundos
goto main ‘ regresar a inicio
�������
���������������

Section 2
BASIC COMMANDS (ES)
revolution (c) Revolution Education Ltd. Email: [email protected] Web: www.rev-ed.co.ukVersion ES1.0 01/2007
105
105
www.picaxe.co.uk
�������
���������������
symbol (simbolo)
Syntax:
SYMBOL symbolname = valueSYMBOL symbolname = value ?? constant- symbolname es un texto el cual debe comenzar con una letra o con un “_”.
Después del primer carácter, también puede contener números (“0”-”9").
- value es una variable o constante a la cual se le esta dando el nombre
especificado por symbolname.
Function:
Asignar un valor a un nuevo nombre de símbolo.
Information:
Symbols are used to rename constants or variables to make them easier to
remember during a program. Symbols have no affect on program length as they
are converted back into ‘numbers’ before the download.
Symbols can contain numeric characters, but must not start with a numeric
character. Naturally symbol names cannot be command names or reserved words
such as input, step, etc. See the list of reserved words at the end of this section.
When using input and output pin definitions take care to use the term ‘pin0’ not
‘0’ when describing input variables to be used within if...then statements.
Example:
symbol RED_LED = 7 ‘ define un nombre de símbolo para una constante
symbol COUNTER = B0 ‘ define un nombre de símbolo para una variable
let COUNTER = 200 ‘ pre-cargar símbolo counter con 200
main: high RED_LED ‘ encender salida 7
pause COUNTER ‘ esperar 0.2 segundos
low RED_LED ‘ apagar salida 7
pause COUNTER ‘ esperar 0.2 segundos
goto main ‘ regresar a inicio

Section 2
BASIC COMMANDS (ES)
revolution (c) Revolution Education Ltd. Email: [email protected] Web: www.rev-ed.co.ukVersion ES1.0 01/2007
106
106
www.picaxe.co.uk
toggle (bascular)
Syntax:
TOGGLE pin,pin,pin...- pin es una variable/constante (0-7) que especifica cual pin de entrada/salida
utilizar.
Function:
Convertir en salida al pin especificado y bascular su estado.
Information:
The high command inverts an output (high if currently low and vice versa)
On microcontrollers with configurable input/output pins (e.g. PICAXE-08) this
command also automatically configures the pin as an output.
Example:
main:
toggle 7 ‘ bascular salida 7
pause 1000 ‘ esperar 1 segundo
goto loop ‘ regresar a inicio
�������
���������������

Section 2
BASIC COMMANDS (ES)
revolution (c) Revolution Education Ltd. Email: [email protected] Web: www.rev-ed.co.ukVersion ES1.0 01/2007
107
107
www.picaxe.co.uk
tune
Syntax:
TUNE LED, speed, (note, note, note...)- LED is a variable/constant (0 -3) which specifies if other outputs flash at the
same time as the tune is being played.
0 - No outputs
1 - Output 0 flashes on and off
2 - Output 4 flashes on and off
3 - Output 0 and 4 flash alternately
- speed is a variable/constant (1-15) which specifies the tempo of the tune.
- notes are the actual tune data generated by the Tune Wizard.
Function:
Plays a user defined musical tune on the PICAXE-08M.
Information:
The tune command allows musical ‘tunes’ to be played on the PICAXE-08M.
Playing music on a microcontroller with limited memory will never have the
quality of commercial playback devices, but the tune command performs
remarkably well. Music can be played on economical piezo sounders (as found in
musical birthday cards) or on better quality speakers.
The following information gives technical details of the note encoding process.
However most users will use the ‘Tune Wizard’ to automatically generate the tune
command, by either manually sequentially entering notes or by importing a
mobile phone ring tone. Therefore the technical details are only provided for
information only – they are not required to use the Tune Wizard.
Note that the tune command compresses the data, but the longer the tune the
more memory that will be used. The ‘play’ command does not use up memory in
the same way, but is limited to the 4 internal preset tunes.
All tunes play on a piezo sounder or speaker, connected to output 2 (leg 5) of the
PICAXE-08M. Some sample circuits are shown later in this section.
���

Section 2
BASIC COMMANDS (ES)
revolution (c) Revolution Education Ltd. Email: [email protected] Web: www.rev-ed.co.ukVersion ES1.0 01/2007
108
108
www.picaxe.co.uk
Speed:
The speed of music is normally called ‘tempo’ and is
the number of ‘quarter beats per minute’ (BPM).
This is defined within the PICAXE system by
allocating a value of 1-15 to the speed setting.
The sound duration of a quarter beat within the
PICAXE is as follows:
sound duration = speed x 65.64 ms
Each quarter beat is also followed by a silence
duration as follows,
silence duration = speed x 8.20 ms
Therefore the total duration of a quarter beat is:
total duration = (speed x 65.64)
+ (speed x 8.20)
= speed x 73.84 ms
Therefore the approximate number of beats per
minute (bpm) are:
bpm = 60 000 / (speed x 73.84)
A table of different speed values are shown here.
This gives a good range for most popular tunes.
Note that within electronic music a note normally plays for 7/8 of the total note
time, with silence for 1/8. With the PICAXE the ratio is slightly different (8/9)
due to memory and mathematical limitations of the microcontroller.
Speed BPM
1 812
2 406
3 270
4 203
5 162
6 135
7 116
8 101
9 90
10 81
11 73
12 67
13 62
14 58
15 54

Section 2
BASIC COMMANDS (ES)
revolution (c) Revolution Education Ltd. Email: [email protected] Web: www.rev-ed.co.ukVersion ES1.0 01/2007
109
109
www.picaxe.co.uk
.
Musical note Byte.017 6 5 4 3 2
Note (0 - 12)
Octave (0 - 2)
Duration (0 - 3)
Note Bytes:
Each note byte is encoded into 8 bits as shown. The encoding is optimised to
ensure the most common values (1/4 beat and octave 6) both have a value of 00.
Note that as the PICAXE also performs further optimisation on the whole tune,
the length of the tune will not be exactly the same length as the number of note
bytes. 1/16, 1/32 and ‘dotted’ notes are not supported.
76 = Duration 54 = Octave 3210 = Note
00 = 1/4 00 = Middle Octave (6) 0000 = C
01 = 1/8 01 = High Octave (7) 0001 = C#
10 = 1 10 = Low Octave (5) 0010 = D
11 = 1/2 11 = not used 0011 = D#
0100 = E
0101 = F
0110 = F#
0111 = G
1000 = G#
1001 = A
1010 = A#
1011 = B
11xx = Pause
C5 D5 E5 F5 G5 A5 B5
C5# D5# F5# G5# A5#
C6 D6 E6 F6 G6 A6 B6
C6# D6# F6# G6# A6#
C7 D7 E7 F7 G7 A7 B7
C7# D7# F7# G7# A7#
Piano Representation of Note Frequency
C5 = 262 Hz
C5# = 277 Hz
D5 = 294 Hz
D5# = 311 Hz
E5 = 330 Hz
F5 = 349 Hz
F5# = 370 Hz
G5 = 392 Hz
G5# = 415 Hz
A5 = 440 Hz
A5# = 466 Hz
B5 = 494 Hz
C6 = 523 Hz ("Middle C")
C6# = 554 Hz
D6 = 587 Hz
D6# = 622 Hz
E6 = 659 Hz
F6 = 698 Hz
F6# = 740 Hz
G6 = 784 Hz
G6# = 831 Hz
A6 = 880 Hz
A6# = 932 Hz
B6 = 988 Hz
C7 = 1047 Hz
C7# = 1109 Hz
D7 = 1175 Hz
D7# = 1245 Hz
E7 = 1318 Hz
F7 = 1396 Hz
F7# = 1480 Hz
G7 = 1568 Hz
G7# = 1661 Hz
A7 = 1760 Hz
A7# = 1865 Hz
B7 = 1975 Hz
Octave 5 Octave 6 Octave 7

Section 2
BASIC COMMANDS (ES)
revolution (c) Revolution Education Ltd. Email: [email protected] Web: www.rev-ed.co.ukVersion ES1.0 01/2007
110
110
www.picaxe.co.uk
PICAXE-08M Tune Wizard
The Tune Wizard allows musical
tunes to be created for the
PICAXE-08M. Tunes can be
entered manually using the drop-
down boxes if desired, but most
users will prefer to automatically
import a mobile phone
monophonic ringtone. These
ringtones are widely available on
the internet in RTTTL format (used
on most Nokia phones). Note the
PICAXE can only play one note at
a time (monophonic), and so
cannot use multiple note
(polyphonic) ringtones.
There are approximately 1000 tunes for free download on the software page of
the www.picaxe.co.uk website. Some other possible sources for free ringtones are:
http://www.ringtonerfest.com/
http://www.free-ringtones.eu.com/
http://www.tones4free.com/
To start the Tune Wizard click the PICAXE>Wizard>Tune Wizard menu.
The easiest way to import a ringtone from the internet is to find the tune on a
web page. Highlight the RTTTL version of the ringtone in the web browser and
then click Edit>Copy. Move back to the Tune Wizard and then click Edit>Paste
Ringtone.
To import a ringtone from a saved text file, click File>Import Ringtone.
Once the tune has been generated, select whether you want outputs 0 and 4 to
flash as the tune plays (from the options within the ‘Outputs’ section).
The tune can then be tested on the computer by clicking the ‘Play’ menu (if your
computer is fitted with soundcard and speakers). The tune played will give a
rough idea of how the tune will sound on the PICAXE, but will differ slightly due
to the different ways that the computer and PICAXE generate and playback
sounds. On older computers the tune generation may take a couple of seconds as
generating the tune is very memory intensive.
Once your tune is complete click the ’Copy’ button to copy the tune command to
the Windows clipboard. The tune can then be pasted into your main program.
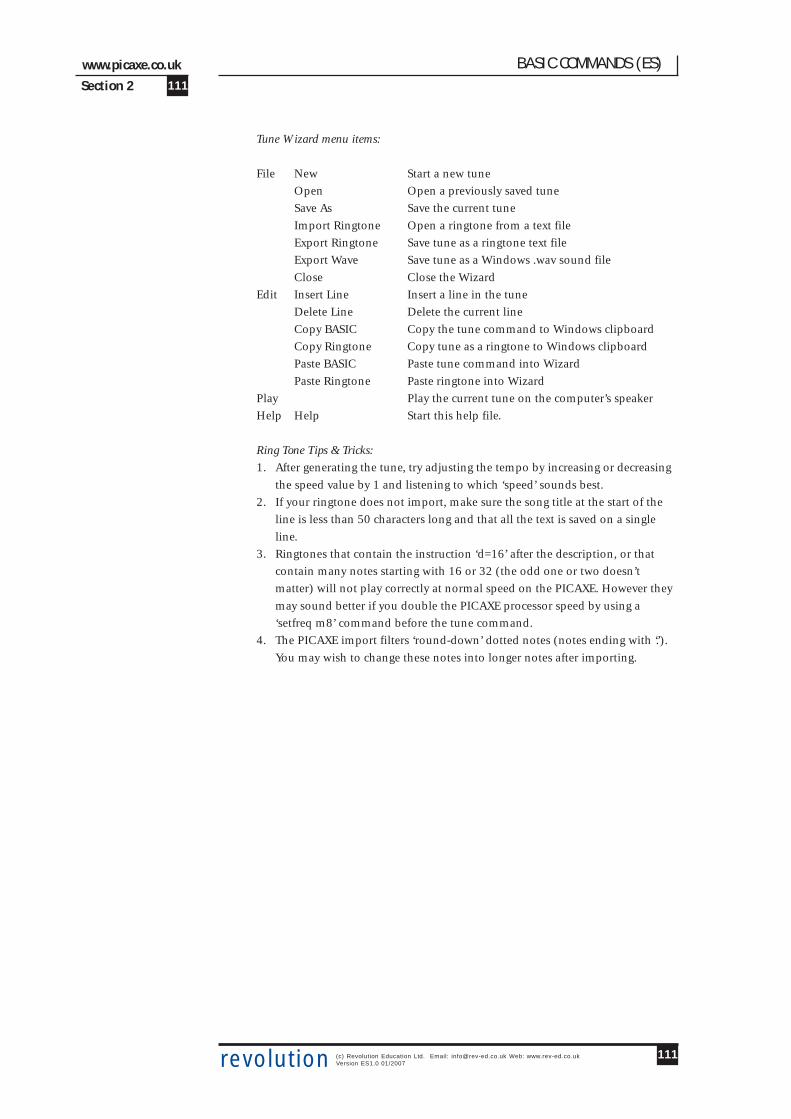
Section 2
BASIC COMMANDS (ES)
revolution (c) Revolution Education Ltd. Email: [email protected] Web: www.rev-ed.co.ukVersion ES1.0 01/2007
111
111
www.picaxe.co.uk
Tune Wizard menu items:
File New Start a new tune
Open Open a previously saved tune
Save As Save the current tune
Import Ringtone Open a ringtone from a text file
Export Ringtone Save tune as a ringtone text file
Export Wave Save tune as a Windows .wav sound file
Close Close the Wizard
Edit Insert Line Insert a line in the tune
Delete Line Delete the current line
Copy BASIC Copy the tune command to Windows clipboard
Copy Ringtone Copy tune as a ringtone to Windows clipboard
Paste BASIC Paste tune command into Wizard
Paste Ringtone Paste ringtone into Wizard
Play Play the current tune on the computer’s speaker
Help Help Start this help file.
Ring Tone Tips & Tricks:
1. After generating the tune, try adjusting the tempo by increasing or decreasing
the speed value by 1 and listening to which ‘speed’ sounds best.
2. If your ringtone does not import, make sure the song title at the start of the
line is less than 50 characters long and that all the text is saved on a single
line.
3. Ringtones that contain the instruction ‘d=16’ after the description, or that
contain many notes starting with 16 or 32 (the odd one or two doesn’t
matter) will not play correctly at normal speed on the PICAXE. However they
may sound better if you double the PICAXE processor speed by using a
‘setfreq m8’ command before the tune command.
4. The PICAXE import filters ‘round-down’ dotted notes (notes ending with ‘.’).
You may wish to change these notes into longer notes after importing.

Section 2
BASIC COMMANDS (ES)
revolution (c) Revolution Education Ltd. Email: [email protected] Web: www.rev-ed.co.ukVersion ES1.0 01/2007
112
112
www.picaxe.co.uk
Sound Circuits for use with the play or tune command.
The simplest, most economical, way to play the tunes is to use a piezo
sounder. These are simply connected between the output pin 2 (leg 5)
of the PICAXE-08M and 0V (see circuits below).
The best piezo sound comes from the ’plastic cased’ variants. Uncased
piezos are also often used in schools due to their low cost, but the
‘copper’ side will need fixing to a suitable sound-board (piece of card,
polystyrene cup or even the PCB itself) with double sided tape to
amplify the sound.
For richer sounds a speaker should be used. Once again the quality of
the sound-box the speaker is placed in is the most significant factor for
quality of sound. Speakers can be driven directly (using a series
capacitor) or via a simply push-pull transistor amplifier.
A 40 or 80 ohm speaker can be connected with two capacitors as shown. For an 8
ohm speaker use a combination of the speaker and a 33R resistor in series (to
generate a total resistance of 39R).
The output can also be connected (via a simple RC filter) to an audio amplifier
such as the TBA820M.
The sample .wav sound files in the \music sub-folder of the Programming Editor
software are real-life recordings of tunes played (via a speaker) from the
microcontroller chip.
,%���
��
,%���
��
�����>��'��#� �� �
4�(3
4�(3
,%���
��
*���("%�����%$% �4���3 4��3
4� 4�
,% @�

Section 2
BASIC COMMANDS (ES)
revolution (c) Revolution Education Ltd. Email: [email protected] Web: www.rev-ed.co.ukVersion ES1.0 01/2007
113
113
www.picaxe.co.uk
Ringing Tones Text Transfer Language (RTTTL) file format specification
<name> <sep> [<defaults>] <sep> <note-command>+
<name> := <char>+ ; max length 10 characters PICAXE accepts up to 50
<sep> := “:”
<defaults> :=
<def-note-duration> |<def-note-scale> |<def-beats>
<def-note-duration> := “d=” <duration>
<def-note-octave> := “o=” <octave>
<def-beats> := “b=” <beats-per-minute>
; If not specified, defaults are
; duration = 4 (quarter note)
; octave = 6
; beats-per-minute = 63 (decimal value) PICAXE defaults to 62
<note-command> :=
[<duration>] <note> [<octave>] [<special-duration>] <delimiter>
<duration> :=
”1" | ; Full 1/1 note
”2" | ; 1/2 note
”4" | ; 1/4 note
”8" | ; 1/8 note
”16" | ; 1/16 note Not used – PICAXE changes to 8
”32" | ; 1/32 note Not used – PICAXE changes to 8
<note> :=
”C” |
”C#” |
”D” |
”D#” |
”E” |
”F” |
”F#” |
”G” |
”G#” |
”A” |
”A#” |
”B” | ; “H” can also be used PICAXE exports using B
“P” ; pause
<octave> :=
”5" | ; Note A is 440Hz
”6" | ; Note A is 880Hz
”7" | ; Note A is 1.76 kHz
”8" ; Note A is 3.52 kHz Not used - PICAXE uses octave 7
<special-duration> :=
”.” ; Dotted note Not used - PICAXE rounds down
<delimiter> := “,”

Section 2
BASIC COMMANDS (ES)
revolution (c) Revolution Education Ltd. Email: [email protected] Web: www.rev-ed.co.ukVersion ES1.0 01/2007
114
114
www.picaxe.co.uk
wait (esperar)
Syntax:
WAIT seconds- seconds es una constante (0-65) que especifica la duración de la pausa.
Function:
Hacer una pausa por el tiempo especificado.
Information:
This is a ‘pseudo’ command designed for use by younger students It is actually
equivalent to ‘pause * 1000’, ie the software outputs a pause command with a
value 1000 greater than the wait value. Therefore this command cannot be used
with variables. This command is not normally used outside the classroom.
Example:
main: switch on 7 ‘ encender salida 7
wait 5 ‘ esperar 5 segundos
switch off 7 ‘ apagar salida 7
wait 5 ‘ esperar 5 segundos
goto main ‘ regresar a inicio
�������
���������������

Section 2
BASIC COMMANDS (ES)
revolution (c) Revolution Education Ltd. Email: [email protected] Web: www.rev-ed.co.ukVersion ES1.0 01/2007
115
115
www.picaxe.co.uk
write (escribir)
Syntax:
WRITE location,data ,data, WORD wordvariable...- location es una variable/constante que especifica una dirección de byte (0-255).
- Data es una variable/constante que provee los bytes de datos a escribir.
Function:
Escribir datos en un registro (location) de la memoria eeprom.
Information:
The write command allows byte data to be written into the microcontrollers data
memory. The contents of this memory is not lost when the power is removed.
However the data is updated (with the EEPROM command specified data) upon
a new download. To read the data during a program use the read command.
The write command is byte wide, so to write a word variable two separate byte
write commands will be required, one for each of the two bytes that makes the
word (e.g. for w0, write/read both b0 and b1).
With the PICAXE-08, 08M and 18 the data memory is shared with program
memory. Therefore only unused bytes may be used within a program. To
establish the length of the program use ‘Check Syntax’ from the PICAXE menu.
This will report the length of program. Available data addresses can then be used
as follows:
PICAXE-08 0 to (127 - number of used bytes)
PICAXE-08M 0 to (255 - number of used bytes)
PICAXE-18 0 to (127 - number of used bytes)
With the following microcontrollers the data memory is completely separate
from the program and so no conflicts arise. The number of bytes available varies
depending on microcontroller type as follows.
PICAXE-28, 28A 0 to 63
PICAXE-28X, 40X 0 to 127
PICAXE-18A, 18X 0 to 255
When word variables are used (with the keyword WORD) the two byte sof the
word are saved/retrieved in a little endian manner (ie low byte at addrees, high
byte at address + 1)
Example:
main: for b0 = 0 to 63 ‘ iniciar un bucle
serin 6,T2400,b1 ‘ recibir valor en serie
write b0,b1 ‘ escribir el valor dentro de b1
next b0 ‘ siguiente b0
�������
���������������

Section 2
BASIC COMMANDS (ES)
revolution (c) Revolution Education Ltd. Email: [email protected] Web: www.rev-ed.co.ukVersion ES1.0 01/2007
116
116
www.picaxe.co.uk
writemem (escribirmem)
Syntax:
WRITEMEM location,data- location es una variable/constante que especifica una dirección byte (0-255).
- Data es una variable/constante que provee los byte de datos a escribir.
Function:
Escribir datos de memoria FLASH en el registro indicado. Este comando provee
256 bytes adicionales de espacio de almacenamiento al comando “write”
Information:
The data memory on the PICAXE-28A is limited to only 64 bytes. Therefore the
writemem command provides an additional 256 bytes storage in a second data
memory area. This second data area is not reset during a download.
This command is not available on the PICAXE-28X as a larger i2c external
EEPROM can be used.
The writemem command is byte wide, so to write a word variable two separate
byte write commands will be required, one for each of the two bytes that makes
the word (e.g. for w0, read both b0 and b1).
Example:
main: for b0 = 0 to 63 ‘ iniciar un bucle
serin 6,T2400,b1 ‘ recibir valor en serie
writemem b0,b1 ‘ escribir el valor dentro de b1
next b0 ‘ siguiente b0
���

Section 2
BASIC COMMANDS (ES)
revolution (c) Revolution Education Ltd. Email: [email protected] Web: www.rev-ed.co.ukVersion ES1.0 01/2007
117
117
www.picaxe.co.uk
writei2c (escribiri2c)
Syntax:
WRITEI2C location,(variable,...)WRITEI2C (variable,...)- location es una variable o constante que especifica una dirección de byte o de
palabra.
- Variable contiene el/los bytes de datos a escribir.
Function:
Escribir bytes de datos dentro de un registro i2c.
Information:
Este comando se utiliza para escribir datos al dispositivo i2c. Location define la
dirección de inicio desde donde se debe empezar a escribir, aunque es posible
escribir más de un byte secuencialmente (si el dispositivo i2c tolera lectura
secuencial – tenga cuidado al utilizar EEPROMs ya que a menudo hay
limitaciones de escritura en bloque).
Tome en cuenta que la mayor parte de los EEPROMs requieren de una pausa de
10ms después del comando writei2c. Si usted no incluye esta pausa (mediante
el comando pause 10) puede que los datos se corrompan.
Location debe ser un byte o palabra (word) tal y como se define dentro del
comando i2cslave. Dentro de un programa, se debe utilizar el comando i2cslave
antes de utilizar este comando.
Si el dispositivo i2c está configurado incorrectamente o se han utilizado los
datos i2cslave incorrectos, no se generará ningún error. Por lo tanto, si lo desea,
puede verificar que los datos se hayan salvado correctamente mediante el
comando readi2c.
Example:
; Ejemplo de cómo utilizar el reloj DS1307
; Tome en cuenta que los datos se envían y reciben en formato BCD.
‘ especificar la dirección del esclavo del DS1307
i2cslave %11010000, i2cslow, i2cbyte
‘ escribir la hora y la fecha. Ejemplo: 11:59:00 del Jueves 25/
12/03
start_clock:
let seconds = $00 ‘ 00 todo en formato BCD
let seconds = seconds + 128
‘ Habilitar el bit CH de segundos
let mins = $59 ‘ 50 todo en formato BCD
let hour = $11 ‘ 11 todo en formato BCD
let day = $03 ‘ 03 todo en formato BCD
let date = $25 ‘ 25 todo en formato BCD
let month = $12 ‘ 12 todo en formato BCD
let year = $03 ‘ 03 todo en formato BCD
let control = %00010000 ‘ Habilitar salida a 1Hz
write i2c 0, (seconds, mins, hour, day, date, month, year,
control)
end
���
������

Section 2
BASIC COMMANDS (ES)
revolution (c) Revolution Education Ltd. Email: [email protected] Web: www.rev-ed.co.ukVersion ES1.0 01/2007
118
118
www.picaxe.co.uk
Additional Reserved Keywords
In addition to the command names (see index on page 1-2), the following are
also reserved keywords within the compiler. These words may not be used as
lables or symbols within a program.
a, and, andnot
b, b0 -b13, bit0 - bit15, byte
c, cls, cr
d, dirs, dir0 - dir7
i2cfast, i2cfast8, i2cfast16, i2cslow, i2cslow8, i2cslow16
inputa, infra, input0-input7, is
lf, keyvalue
m, m4, m8
n300, n600, n1200, n2400, n4800
on, off, or, ornot, outpin0 - outpin7, output0-output7
pin0 - pin7, port, pot
step
to, then, t300, t600, t1200, t2400, t4800
until
w0, w1, w2, w3, w4, w5, w6, w7, while, word
x, x2, xnor, xor, xornot
Manufacturer Website:
PICAXE products are developed and distributed by
Revolution Education Ltdhttp://www.rev-ed.co.uk/
Trademark:
PICAXE® is a registered trademark licensed by Microchip Technology Inc.
Revolution Education is not an agent or representative of Microchip
and has no authority to bind Microchip in any way.
Acknowledgements:
Revolution Education would like to thank the following:
Clive Seager
John Bown
LTScotland
Higher Still Development Unit
UKOOA