Photoplus Magazine Sampler
11
NEW PHOTOSHOP VIDEO LESSONS September 2012 Issue 65 £4.99 NEW TECHNIQUES! Canon D-SLR photo projects Learn to improve your camera skills with 14 new indoor and outdoor assignments! CANON D-SLR VIDEO GUIDES 12 FREE VIDEOS! D-SLR MASTERCLASS Take great high-flying airplane shots today! Learn to take your D-SLR and Photoshop skills to new heights! CANON PRO TIPS How to shoot wildlife on safari! Photograph all creatures great and small from lions to lizards BUDGET LIGHTS! Flashguns for under £200 Brighten up your shots as we test eight flashguns SEPTEMBER 2012 £4.99 HANDS-ON PREVIEW! CANON EOS M Canon’s new Compact System Camera! 100% CANON SIX GREAT LENSES FOR LANDSCAPE PHOTOS
-
Upload
future-plc -
Category
Documents
-
view
232 -
download
5
description
Photoplus Magazine Sampler
Transcript of Photoplus Magazine Sampler

NEWPHOTOSHOPVIDEO LESSONS
September 2012Issue 65£4.99
NEWTECHNIQUES!
Canon D-SLRphoto projectsLearn to improve your camera skills with14 new indoor and outdoor assignments!
CANOND-SLRVIDEOGUIDES12FREEVIDEOS!
D-SLRMASTERCLASS
Take great high-flyingairplane shots today!Learn to take your D-SLR andPhotoshop skills to newheights!
CANONPROTIPS
How to shootwildlife on safari!Photograph all creatures greatand small from lions to lizards
BUDGETLIGHTS!Flashguns forunder £200Brighten up your shotsas we test eight flashguns
Flashguns for
ashguns as we test eight flSEPTEMBER2012£4.99
HANDS-ONPREVIEW!
CANONEOSMCanon’snewCompactSystemCamera!
100%CANON
SIXGREAT
LENSESFORLANDSCAPEPHOTOS

Stunning imagery from theworld of Canonphotography
22 | PhotoPlus September 2012
PhotoPlus InspirationsPhotoPlus Inspirations
Singapore Skyline by David Clapp“Singapore is without a doubt one of the most wonderful cities on earth, and boasts someabsolutely stunning architecture. This was one of many night-time cityscapes I shot duringa trip last Christmas – it’s the view looking across Marina Bay towards the Central BusinessDistrict. For much of the trip it was a rather cruel 32°C and 90 per cent humidity, which leftme feeling like I needed a shower every hour. The most important piece of kit for these shootswas a small towel to wipe my brow – it was much too hot to be lugging around a 9kg camerabag and tripod! But it was worth it: the photography was particularly compelling.”Location: SingaporeCamera: Canon EOS 5DMk IILens: Canon TS-E 24mm f/3.5L IIExposure: 13 secs at f/11; ISO100

PhotoPlus September 2012 |23
Great Canonphotographers in action
In associationwith…

PhotoPlus Inspirations

Great Canonphotographers in action
In associationwith…
LEFT
Enys Dodnan by David Clapp“This shot is of the Enys Dodnan natural rock arch atLand’s End in Cornwall, with the Longships Lighthousein the distance. A rather bland daytime hadme feelingsomewhat lacklustre about a sunset shoot, but thecoastline of Cornwall is very unpredictable, so muchso that the clouds will often break out to sea and createbeautiful sunset conditions. Large waves were rollingin from the Atlantic, but this composition owes itselfto timing in particular. The trough of the breaking wavecreates a wonderful S-shape though the picture, leadingthe eye to the sea stacks, then the lighthouse beyond.”Location: Land’s End, CornwallCamera: Canon EOS 5DLens: Canon EF 24-105mm f/4L IS USMExposure: 1 sec at f/22; ISO50
ABOVE
The Parliament II by David Clapp“This is the formidable stone circle near the village of Callanishon the Isle of Lewis. This day was classic Scottish weather – ahuge anvil of cumulus nimbus cloud came in off the Atlantic,drenching the Outer Hebrides in rain and hail. The circle itselfwas the perfect setting for this meteorological fun, so I stayedthere all day and captured the changing conditions in infrared,colour and black-and-white. This huge cloud hadme running forcover, so I hid behind the centre stone as it lashed down, thengot the camera out again to capture it disappearing towards thecoast. I shot this infrared image with my old 5D, which I hadconverted. The camera still records images in RGB, but on theback screen everything looks red. It’s then a case of convertingthe image to mono, which I’ve been doing in Lightroom.”Location: Isle of Lewis, Outer Hebrides, ScotlandCamera: Canon EOS 5D – converted for IRLens: Canon EF 24mm f/1.4L II USMExposure: 1/30 sec at f/11; ISO50
PhotoPlus September 2012 |25
David ClappDavid Clapp has been aprofessional landscape,travel and architecturalphotographer for thepast five years and isbased in Devon. A regularcontributor to PhotoPlus,he also runs photographyworkshops in the UK andoverseas in associationwith Light and Land,Bangwallop and the YHA.www.davidclapp.co.uk

PhotoPlus Inspirations
26 | PhotoPlus September 2012
Clikpic provides websites for photographers for only £40 p.a. Its easy-to-use onlineadmin system combines with stylish templates and a vast array of customisation optionsto allow photographers to build their ownwebsite with theminimum amount of hassle,technical expertise and cost. Visitwww.clikpic.com for a free 14-day trial.
About Clikpic…
ABOVE
Mynydd Drws-y-Coed by David Clapp“I took this shot on a trip to the Snowdonia National Park in Wales last November.It wasn’t a particularly eventful trip, as it was brief and the weather was prettyfoul, but I did manage to capture some good reflections, and also this wonderfulcloud inversion engulfing the peak of Mynydd Drws-y-Coed and the surroundingmountains, which I photographed from the summit of Mount Snowdon. Thetemperature was dropping fast and cloud was spiralling from the summit andengulfing us. I managed this composition, sitting on a flattened tripod, with myhands so cold they turned into flippers! Walking down in the dark was far fromfunny though, especially with no water, no food and worse still, no torch! Aphotograph I will never forget!”Location: Snowdonia National Park, WalesCamera: Canon EOS-1DsMk IIILens: Canon EF 70-300mm f/4-5.6L IS USMExposure: 1/80 sec at f/11; ISO100
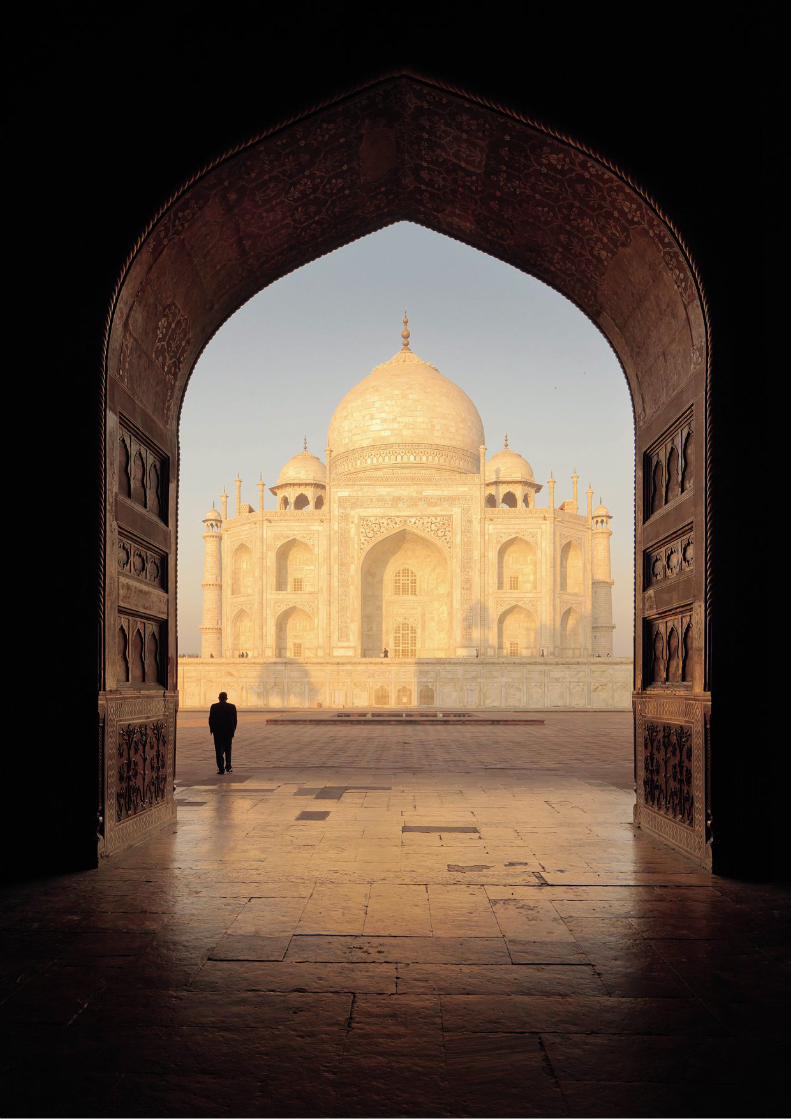
RIGHT
Taj Mahal by David Clapp“This shot was taken while I was leading a workshop toSikkim in India. We got to the Taj Mahal at 7am to take fulladvantage of the morning light that bathes the wonderfulbuilding in soft yellows. After a few symmetrical shots, I movedto a more secluded part of the park to captured this image ofa security guard heading off to start his working day. As usual,there’s more going on behind the scenes than it appears. I amarguing with an American lady who wants to take the sameshot, and who insists I am ‘in her way’, after standing behindme. There is a tripod ban inside the Taj, so I used a handheld24mm TS-E lens to keep those doors straight, and pushed theISO to keep the shutter speed high. Remember the ‘one-over’rule in these situations: 1/24 sec is the slowest shutter speedat which you can safely hand-hold when using a 24mm lens.”Location: Taj Mahal, IndiaCamera: Canon EOS-1DsMk IIILens: Canon TS-E 24mm f/3.5L IIExposure: 1/60 sec at f/8; ISO400
40 | PhotoPlus September 2012
SkillsCamera TechniquesClaireGillo
NEW PROJECT!
PhotoPlus September 2012 | 41
ONYOUR
VIDEODISC
Photoshop ElementsElements Photoshop
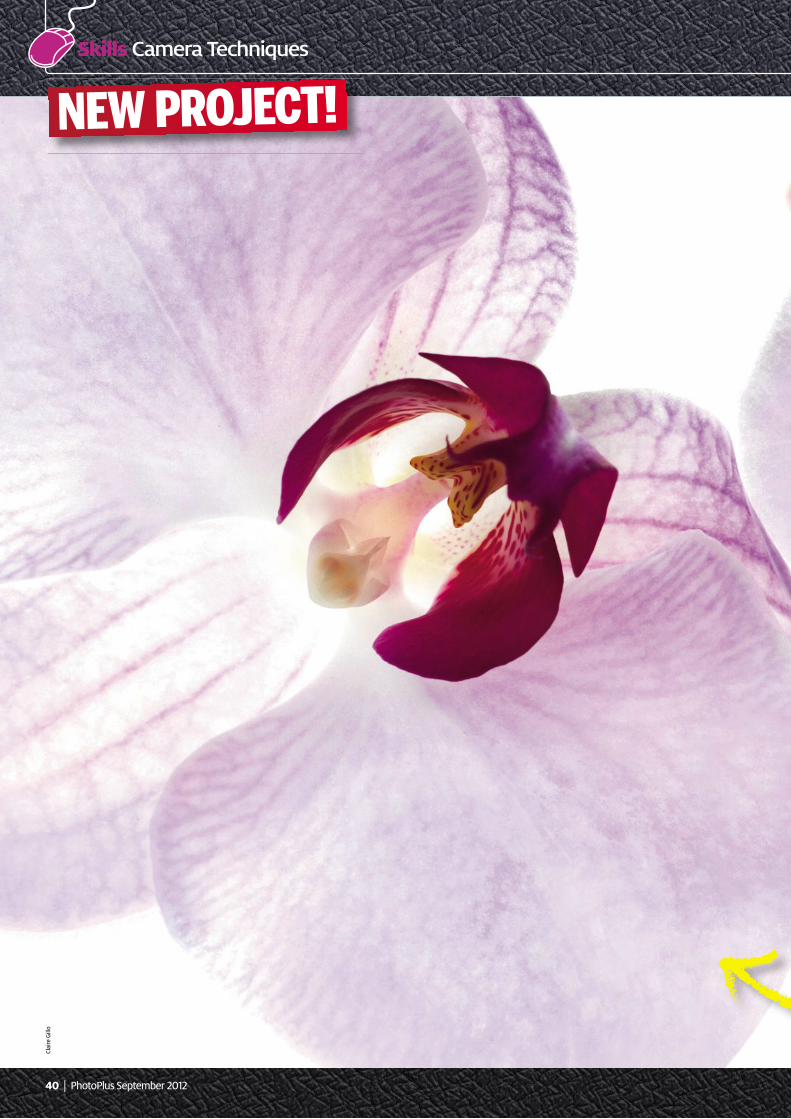
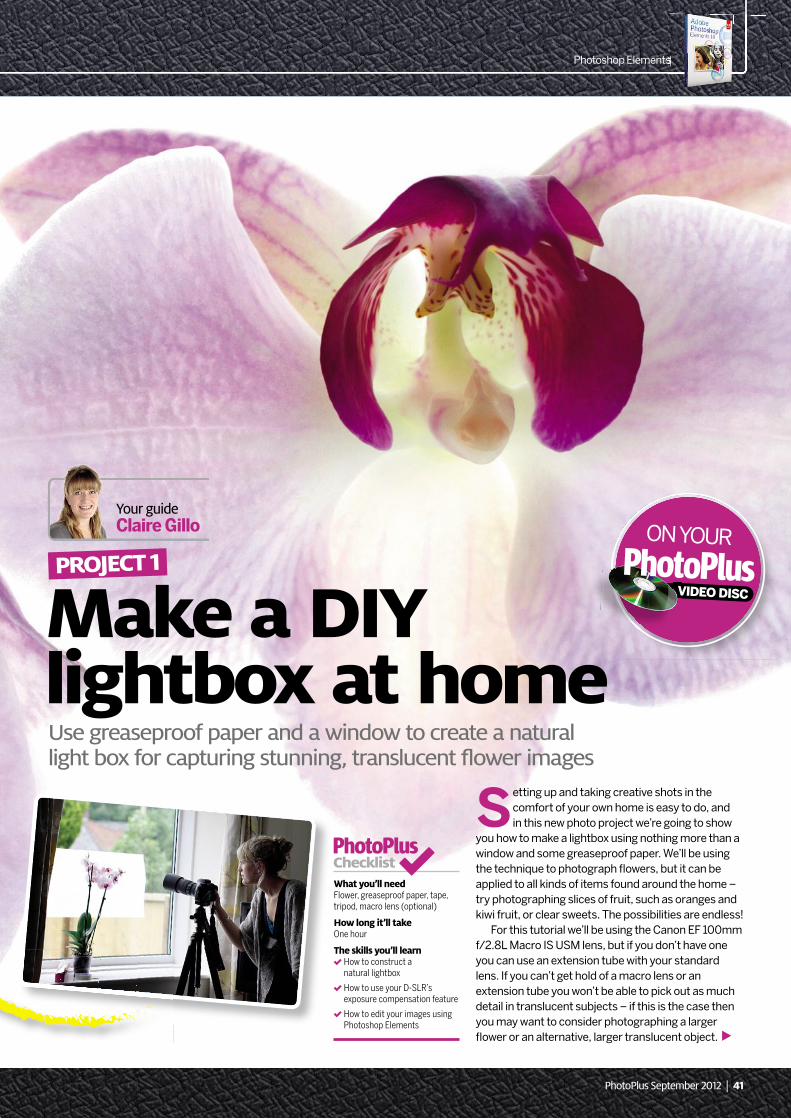
Use greaseproof paper and awindow to create a naturallight box for capturing stunning, translucent flower images
Make a DIYlightbox at home
What you’ll needFlower, greaseproof paper, tape,tripod,macro lens (optional)
How long it’ll takeOne hour
The skills you’ll learnHow to construct anatural lightbox
How to use your D-SLR’sexposure compensation feature
How to edit your images usingPhotoshop Elements
Checklist
PROJECT1
Setting up and taking creative shots in thecomfort of your own home is easy to do, andin this new photo project we’re going to show
you how to make a lightbox using nothing more than awindow and some greaseproof paper. We’ll be usingthe technique to photograph flowers, but it can beapplied to all kinds of items found around the home –try photographing slices of fruit, such as oranges andkiwi fruit, or clear sweets. The possibilities are endless!
For this tutorial we’ll be using the Canon EF 100mmf/2.8L Macro IS USM lens, but if you don’t have oneyou can use an extension tube with your standardlens. If you can’t get hold of a macro lens or anextension tube you won’t be able to pick out as muchdetail in translucent subjects – if this is the case thenyou may want to consider photographing a largerflower or an alternative, larger translucent object.
Your guideClaireGillo

42 | PhotoPlus September 2012
SkillsCamera Techniques
Set up the light boxTape a sheet of greaseproof paper to a window.You can either shoot the flowers on their stems,
or cut them off as we have and tape them to the paper;if you do this make sure you use clear tape, and spreadthe petals over the paper so you can see through them.
Switch toAvmodeSet your camera to Aperture Priority mode soyou can control the aperture. Set the aperture
to f/8 to keep your images sharp from front to back,and set the ISO to 100 for detailed, noise-free shots.
Brighten the exposureYour camera will underexpose shots in anattempt to render bright backlight as a midtone,
so go to the Exposure Compensation setting and dial in+1 stop of exposure compensation. Check your shots,and increase this as high as +2, if necessary.
Set the focusSet the focus to the centre AF point, and makesure the centre of the flower is precisely in focus.
If you’re photographing two or more flowers, set thefocal point for the largest flower in the shot.
Usea tripodTo ensure that your images are perfectly sharp,mount your camera on a tripod. Even pressing
the button can cause slight camera shake, so for thebest results use the self-timer or a remote release. Youshould start by composing your shot from a low angle,pointing upwards.
Start shootingNow you can get shooting. Experiment by takingphotos of one flower by itself or a bunch together.
You can overlay different flowers on top of each otheror just stick to one type as we have. It’s entirely up toyou which composition you prefer!
Althoughyou’re taking
shots indoors you’restill using natural lightto control the results.Think about whichwindow in your homewill work best for yourlightbox, and considerthe time of day; theweather will also makea difference. Avoiddirect sunlight, unlessyou want your objectto be brightly litfrom behind.
Super Tip!
Super Tip!
Macro photographyMacro photographydescribes shootingsubjects for display atlarger-than-life size,revealing a hugeamount of detail that isnormally invisible tothe naked eye. A ‘true’macro lens is capableof projecting thesubject onto the imagesensor at a 1:1 ratio(actual size), but manystandard lenses offer a‘macro’ setting thatallows close-upphotography atsomething like a 1:4ratio (quarter size).This still reveals anamazing amount ofdetail because theimages are viewed at amuch larger size thanthey are recorded onthe sensor – the 22.3 x14.9mm image froma 600D can easily beblown up to a posterprint, for example.
Phrase Book
Download start image at:http://downloads.photoplusmag.com/65_1.zip

PhotoPlus September 2012 | 43
Photoshop ElementsElements Photoshop
Pull back thehighlightsOpen the macro_start.dng Raw image in ACR inPhotoshop Elements. If you’re editing your own
images you’ll need to use slightly different settings, butyou’ll be making similar edits as we are here. Start bymoving the Recovery slider right to 23 pull back somehighlight detail. Select the Crop tool, and crop into theimage to get rid of some of the white space. Click OpenImage to open the image in the Elements workspace.
Cloneout distractionsDuplicate the ‘Background’ layer and name thenew layer ‘Flower’. Select the Clone Stamp tool,
and set the brush size to 125 pixels. Use the tool toclean up any marks and breaks on the petals, Alt-clicking to sample suitable ‘clean’ areas. Next use theQuick Selection tool to select the stem of the flower,and clone it out with white background pixels.
Cleanup thebackgroundPress Ctrl+D to deselect the stem, then zoominto the image, reduce the brush size and
carefully clone out any bits of the stem that remain.Next, tidy up the background by removing any tapemarks and blemishes such as sensor spots.
Boost the contrastNext add a Levels adjustment layer, and toboost the contrast set the Shadows slider to 63,
the Midtones slider to 0.70 and the Highlights sliderto 240. This leaves the darker central parts of theflowers looking too dark, so take the Brush tool, setthe foreground colour to black, target the layer maskand mask out (paint) the adjustment in that area.
Tweak the coloursTo enhance the paler tones of the petals add aHue/Saturation adjustment layer and set Hue
to -14, Saturation to -18 and Lightness to +12. Againremove this adjustment from the more colourfulcentral areas by painting with the Brush tool (set toblack as before) on the layer mask.
Touchup the coloursTo finish off select the ‘Flower’ layer. With theBrush tool selected, hold down Alt and click on
one of the lighter purple tones in the flowers to makethat colour the foreground colour. Reduce the Opacityof the Brush tool to 10%, and carefully brush over anydiscoloured area of the petals – particularly green-tinged areas – to improve their colour. ■
The Recoveryslider in ACR
(Adobe Camera Rawwithin Photoshop)enables you to pullback some detail inhighlights that areclipped in one or twocolour channels, butnot in areas that areclipped in all threechannels, as thosepixels will be purewhite with no detailat all. It’s a useful tool,but take care not topush the slider too farfor images such as ourtranslucent flower,or you’ll destroy thesubtle gradations incolour that createdetail in thelightest areas.
Share yourshotswithus!Why don’t you giveour photo projects ago, and then shareyour imageswithus online? Uploadyour images to ourFacebook page atwww.facebook.com/PhotoPlusMag, orour Flickr page atwww.flickr.com/groups/photoplusmagazine
Super Tip!
To enhance the paler tones of the petals add a
Next add a Levels adjustment layer, and to