duckma.com PHONOTTO · duckma.com Keyboard Tapping this button will open the screen with the...
24
Version: 1 User Manual PHONOTTO duckma.com SIMPLE PHONE FOR SENIORS
-
Upload
phungkhanh -
Category
Documents
-
view
225 -
download
0
Transcript of duckma.com PHONOTTO · duckma.com Keyboard Tapping this button will open the screen with the...

Version: 1
User ManualPHONOTTO
duckma.com
SIMPLE PHONE FOR SENIORS

2© PHONOTTO - USER MANUAL - v 1
PHONOTTO - USER MANUAL
duckma.com
Setup WizardLaunching the app will start the Setup Wizard, configuring it to suit your preferences and needs. The first screen allows you to immediately select the desired language.
Running forward with arrows will appear the next steps of the tutorial.The second step shows the settings for the appearance of buttons and allows you to adjust the screen brightness.
The third step shows the settings related to security, checking the options that you want.
Tutorial > SecurityTutorial > Start Tutorial > Appearance

3© PHONOTTO - USER MANUAL - v 1
PHONOTTO - USER MANUAL
duckma.com
Setup WizardThe fourth step shows the settings related to sound and vibration.
The fifth step allows you to set three speed dialing numbers.
After finishing the setup wizard, you will see the activation screen, in which you will need to enter your coupon code in order to use Phonotto. After activation, you will see the Home screen of Phonotto.
Tutorial > ActivationTutorial > Sound and Vibration Tutorial > Speed dials

4© PHONOTTO - USER MANUAL - v 1
PHONOTTO - USER MANUAL
duckma.com
Home Setting
Keyboard
Applications List
Contacts
Photo / Video
Call
Speed dials
NotificationsMessages
Date and Time
Network indicator
Battery Indicator
Bluetooth and wifi indicator
Hold on this icon will display the settings screen and set the functionality of Phonotto according to your preferences.
Tapping this button will display the keyboard through which you can make a call
This button displays the list of all installed applications on your device and added in Phonotto
Tapping on this button will show the phonebook
Tapping this button will show the screen containing all the media
This button shows the call log
This button displays the set numbers for quick dialing
This red dot indicates the number of notifications on your device
Tapping this button will show the messages screen
This area shows the current time and date
This icon indicates the network signal
This icon indicates the battery charge
These icons show the bluetooth and wifi signal
1
2
7
3
8
10
12
9
45
6
11
13
3
92
8
5
114
10
6
12
13
1
7

5© PHONOTTO - USER MANUAL - v 1
PHONOTTO - USER MANUAL
duckma.com
NotificationsThis screenshot shows the lock screen of the Phonotto interface, which you can set from the settings panel.
The red dot, below the settings button, indicates the number of notifications on the device. It will appear only in the presence of notifications.
Touching the red dot, you will open the screen containing the list of notifications.
Notifications ListLock Screen Home > Notifications

6© PHONOTTO - USER MANUAL - v 1
PHONOTTO - USER MANUAL
duckma.com
Speed DialsThis button displays the set numbers for quick dialing. You can add three, directly from the settings.
If you have not set any speed dial number, by tapping the button you will get this popup.
However, if the setting has been set to a speed dial number to make a call simply press and hold the button.
Speed dials > SetHome > Speed dials Speed dials > Not set
7© PHONOTTO - USER MANUAL - v 1
PHONOTTO - USER MANUAL
duckma.com
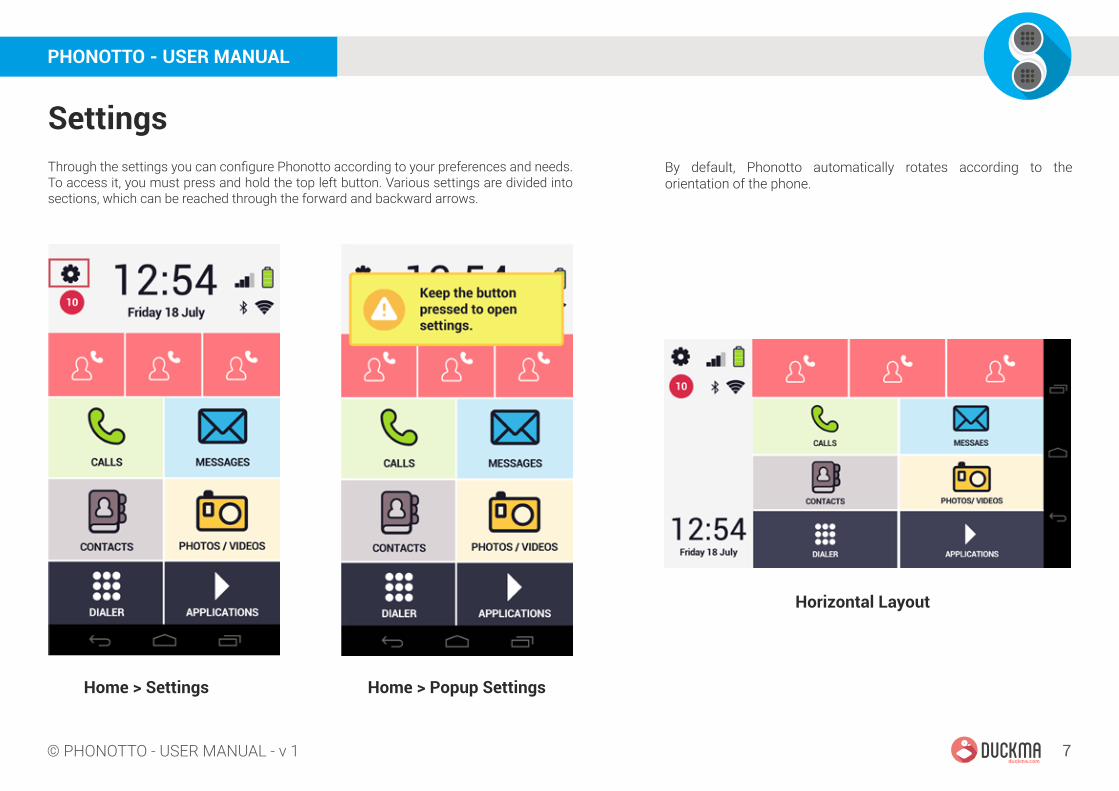
SettingsThrough the settings you can configure Phonotto according to your preferences and needs. To access it, you must press and hold the top left button. Various settings are divided into sections, which can be reached through the forward and backward arrows.
By default, Phonotto automatically rotates according to the orientation of the phone.
Home > Settings Home > Popup Settings
Horizontal Layout

8© PHONOTTO - USER MANUAL - v 1
PHONOTTO - USER MANUAL
duckma.com
SettingsIn this screen will show the general settings, which can be customized according to your preference. If you scroll down will be shown the contents of the entire section. Through the side arrows you can scroll through all the sections.
In this screen you can customize the connection settings, checking the ones you want.
This screen will show the settings related to the appearance of Phonotto. From here you can adjust the brightness of the screen and choose the style of the buttons.
Settings > AppearanceSettings > General Settings > Connection
9© PHONOTTO - USER MANUAL - v 1
PHONOTTO - USER MANUAL
duckma.com
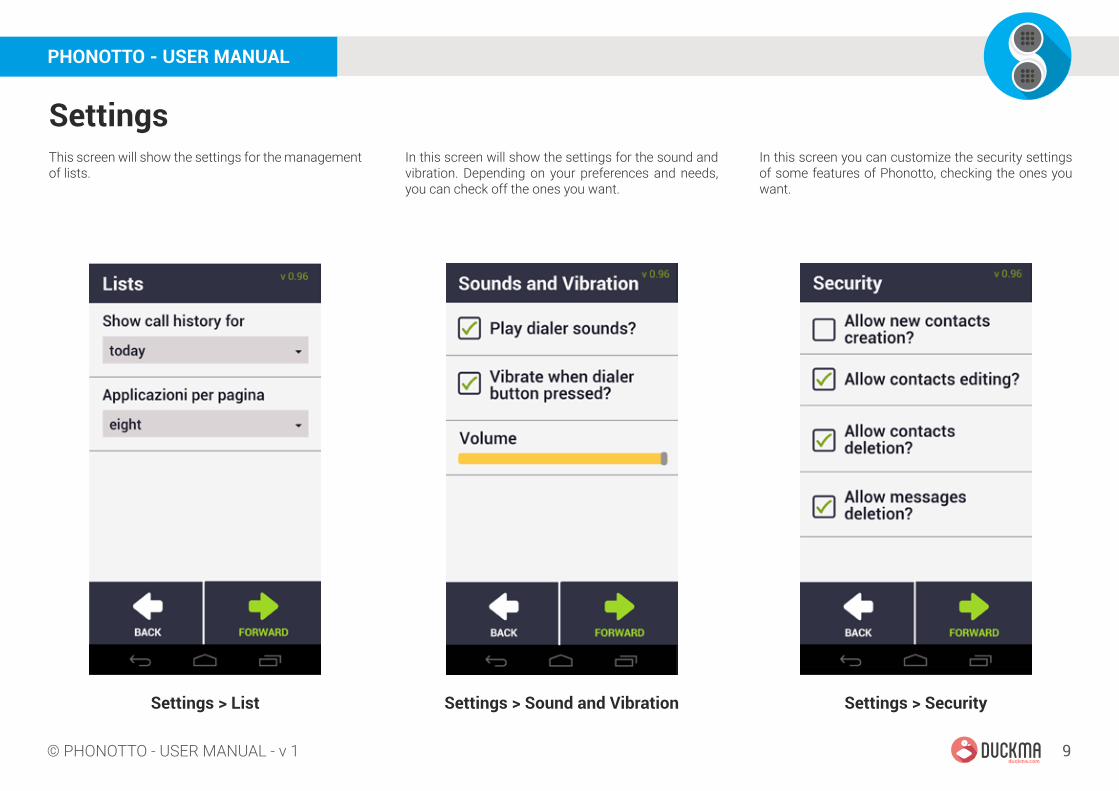
SettingsThis screen will show the settings for the management of lists.
In this screen will show the settings for the sound and vibration. Depending on your preferences and needs, you can check off the ones you want.
In this screen you can customize the security settings of some features of Phonotto, checking the ones you want.
Settings > SecuritySettings > List Settings > Sound and Vibration

10© PHONOTTO - USER MANUAL - v 1
PHONOTTO - USER MANUAL
duckma.com
SettingsIn this screen you can customize the settings for the different interfaces, checking the ones you want.
In this screen will show the settings for speed dialing. From here you can set three numbers always have on hand in the home of Phonotto.
From this screen you can ask for support, look at the online manual and evaluate Phonotto.
Settings > HelpSettings > Interfaces Settings > Speed Dials

11© PHONOTTO - USER MANUAL - v 1
PHONOTTO - USER MANUAL
duckma.com
SettingsIn the last settings screen will present the items “Redeem Coupon“, “System Setup“ and “Exit Phonotto“. Pressing the button in the lower right corner you will return to the Home screen of Phonotto.
Settings > System

12© PHONOTTO - USER MANUAL - v 1
PHONOTTO - USER MANUAL
duckma.com
Different layoutsFrom the settings screen you can customize the layout of the buttons to your preference and needs.
Phonotto allows to choose between three options: buttons with an icon more text, only text or only icon.
Icon + Text Only Text Only Icon

13© PHONOTTO - USER MANUAL - v 1
PHONOTTO - USER MANUAL
duckma.com
CallTouching this button opens the screen that contains the call log.
The calls are classified by different icons: Touching each element will open the call screen detail.
Outgoing Call
Missed Call
Incoming Call
Call List Call DetailHome > Call
14© PHONOTTO - USER MANUAL - v 1
PHONOTTO - USER MANUAL
duckma.com
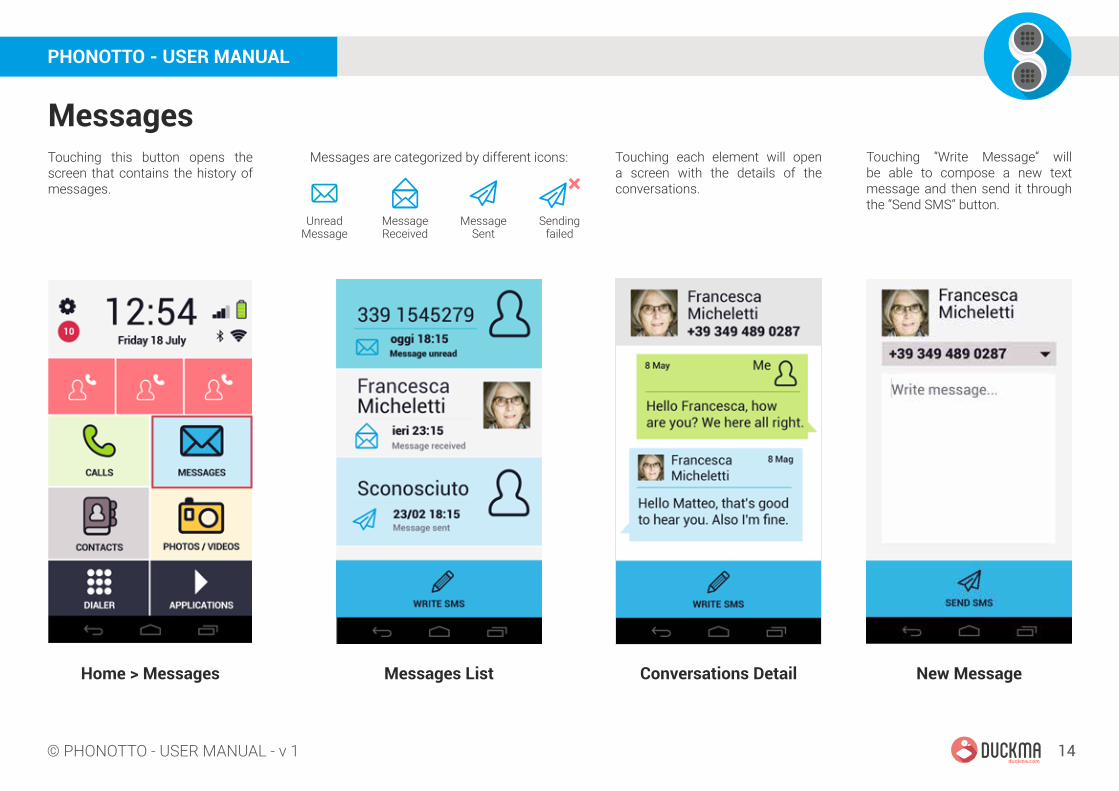
MessagesTouching this button opens the screen that contains the history of messages.
Messages are categorized by different icons: Touching each element will open a screen with the details of the conversations.
Touching “Write Message“ will be able to compose a new text message and then send it through the “Send SMS“ button.
Unread Message
Message Received
Message Sent
Sending failed
Messages List Conversations Detail New MessageHome > Messages

15© PHONOTTO - USER MANUAL - v 1
PHONOTTO - USER MANUAL
duckma.com
ContactsTouching this button opens a screen containing a list of all the numbers on your phone.
In the address book will present all the contacts stored on your device. By pressing the “Search“ button you you will be able to quickly make a search.
Touching each element will open the screen that shows the details of the selected contact. From the phonebook you can search or add a new contact.
Contacts List Contacts List (selected)Home > Contacts

16© PHONOTTO - USER MANUAL - v 1
PHONOTTO - USER MANUAL
duckma.com
ContactsIn this screen you can view the information of the selected contact and make a call, or write a new SMS.
Touching the “Edit Contact“ you can make changes to the contact, and then confirm or cancel. From the editing screen you can also delete the contact.
Touching “Delete Contact“ pop-up will appear allowing you to confirm or cancel the operation of removing the contact.
Delete contactAttention
Edit contact
Detail contact Edit contact Delete Contact

17© PHONOTTO - USER MANUAL - v 1
PHONOTTO - USER MANUAL
duckma.com
Photo/VideoTouching this button will open a screen containing pictures and videos and you will have the opportunity to take a new picture or shoot a video.
In this screen you'll see the photos and videos you take with Phonotto. In a few simple steps you can shoot a video or take a picture.
Pressing “New Photo“ will start the camera. Through the button at the top right, at any time you can switch to the videocamera, and shoot a new video.
Home > Camera Image Gallery Take
18© PHONOTTO - USER MANUAL - v 1
PHONOTTO - USER MANUAL
duckma.com
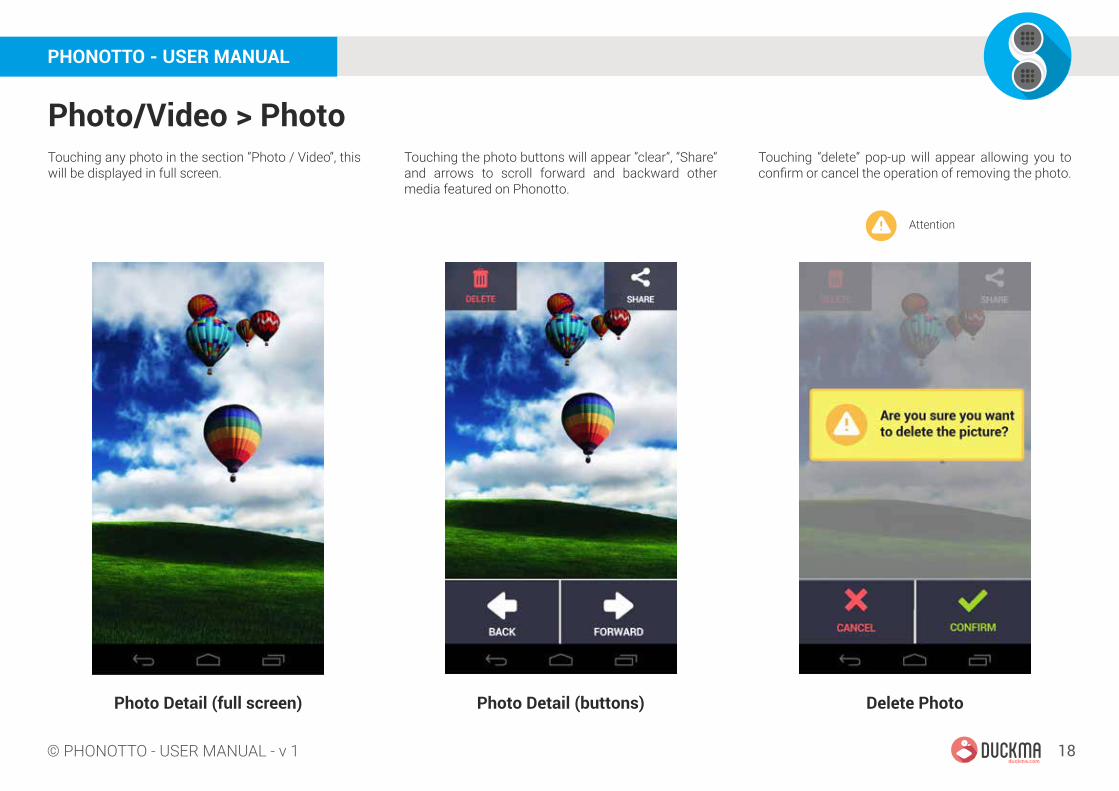
Photo/Video > PhotoTouching any photo in the section “Photo / Video“, this will be displayed in full screen.
Touching the photo buttons will appear “clear“, “Share“ and arrows to scroll forward and backward other media featured on Phonotto.
Touching “delete“ pop-up will appear allowing you to confirm or cancel the operation of removing the photo.
Photo Detail (full screen) Photo Detail (buttons) Delete Photo
Attention
19© PHONOTTO - USER MANUAL - v 1
PHONOTTO - USER MANUAL
duckma.com
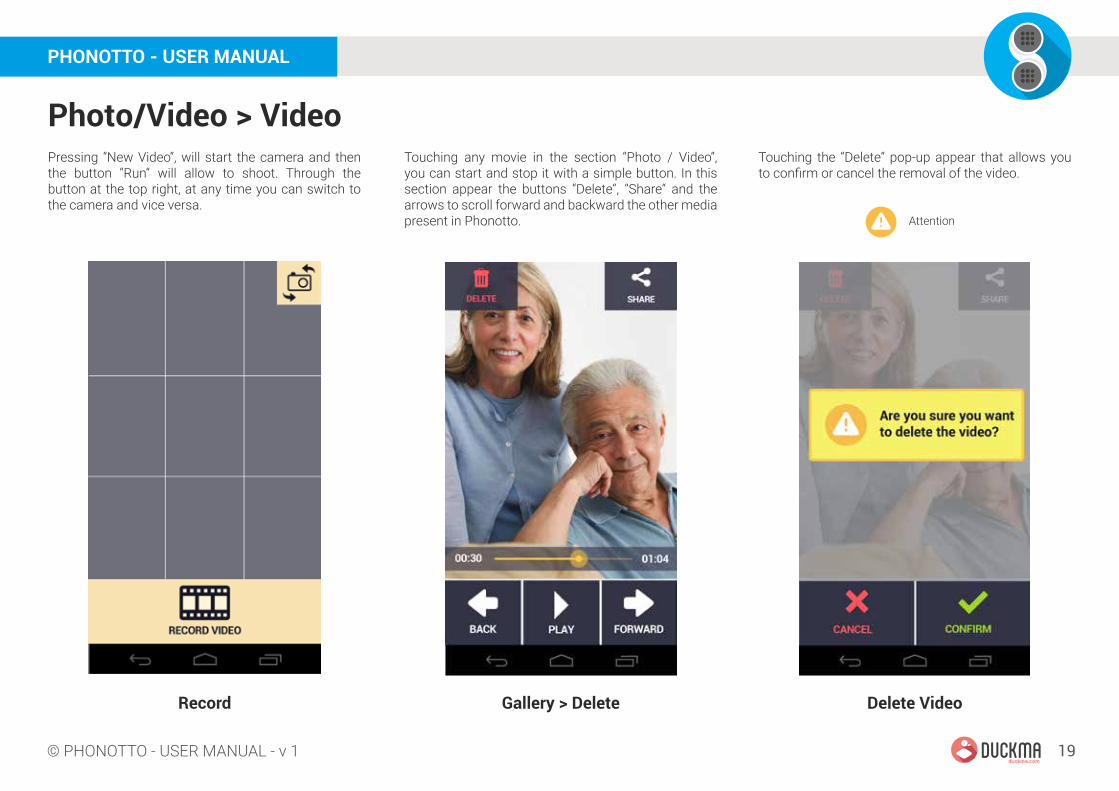
Photo/Video > VideoPressing “New Video“, will start the camera and then the button “Run“ will allow to shoot. Through the button at the top right, at any time you can switch to the camera and vice versa.
Touching any movie in the section “Photo / Video“, you can start and stop it with a simple button. In this section appear the buttons “Delete“, “Share“ and the arrows to scroll forward and backward the other media present in Phonotto.
Touching the “Delete“ pop-up appear that allows you to confirm or cancel the removal of the video.
Record Gallery > Delete Delete Video
Attention

20© PHONOTTO - USER MANUAL - v 1
PHONOTTO - USER MANUAL
duckma.com
KeyboardTapping this button will open the screen with the keyboard, from which you can make a call.
The keyboard Phonotto is simple and intuitive. By pressing the buttons with the numbers, the number will be displayed on the top row. To initiate the call, just press the button with the Green handset.
When a call is incoming, Phonotto allows you to respond by simply touching a button.
Home > Keyboard Keyboard Incoming Call
21© PHONOTTO - USER MANUAL - v 1
PHONOTTO - USER MANUAL
duckma.com
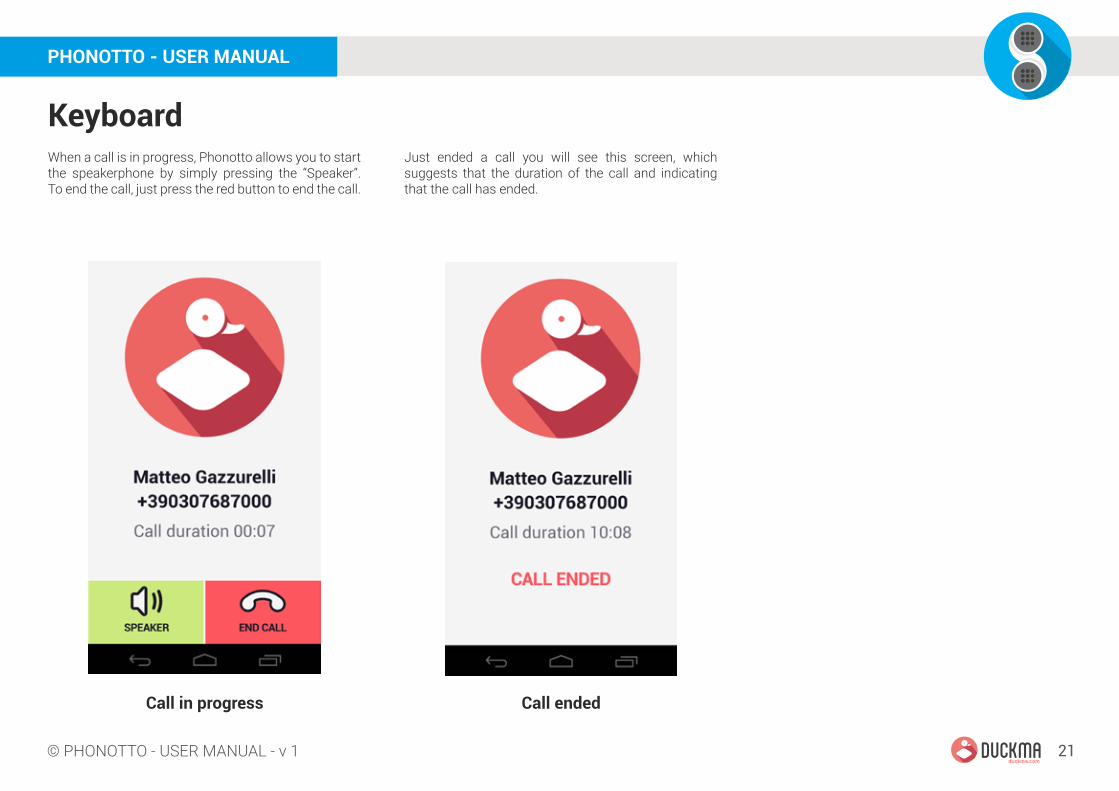
KeyboardWhen a call is in progress, Phonotto allows you to start the speakerphone by simply pressing the “Speaker“. To end the call, just press the red button to end the call.
Just ended a call you will see this screen, which suggests that the duration of the call and indicating that the call has ended.
Call in progress Call ended

22© PHONOTTO - USER MANUAL - v 1
PHONOTTO - USER MANUAL
duckma.com
ApplicationsTouching this button will open a screen containing the list of installed applications on your phone and that have been added in the “Applications“ section of Phonotto.
Through the “Add“ button you can enter all the applications on your phone, so that you always have them on hand in Phonotto.
Uploaded applications will stay in individual boxes. Once occupied the last box, you will see the button "Add" and you will be forwarded to the next screen.
Applications List (empty) Applications List (full)Home > Applications

23© PHONOTTO - USER MANUAL - v 1
PHONOTTO - USER MANUAL
duckma.com
ApplicationsThrough the two arrow button “Next“ and “Back“ will be able to scroll through all the applications loaded in Phonotto.
From the screen containing the latest application added, there will be buttons “Back“ and “Add“.
Applications ListApplications List (arrows)

PHONOTTO.COM
Made induckma.com
SIMPLE PHONE FOR SENIORS