
PHILIPPINE NATIONAL POLICE MANUAL PNPM DIDM DS 9...
102
PHILIPPINE NATIONAL POLICE MANUAL PNPM – DIDM – DS – 9 – 2 FIELD MANUAL ON INVESTIGATION OF CRIMES OF VIOLENCE AND OTHER CRIMES (2011)
Transcript of PHILIPPINE NATIONAL POLICE MANUAL PNPM DIDM DS 9...
1
PHILIPPINE NATIONAL POLICE MANUAL
PNPM – DIDM – DS – 9 – 2
FIELD MANUAL ON
INVESTIGATION OF CRIMES OF VIOLENCE AND
OTHER CRIMES (2011)
2
COPYRIGHT PAGE
PNP Field Manual on Investigation of Crimes of Violence and Other Crimes (2011) Copyright 2011.
Printed by: PNP Directorate for Investigation and Detective Management
2011 All rights reserved. This publication may not be reproduced, in whole or in part, in any
form or by any means electronic or mechanical or by any information storage and retrieval system now known or hereafter invented, without prior written permission of The Director, PNP Directorate for Investigation and Detective Management with postal
address at DIDM Office, 2nd Floor., NHQ Bldg., Camp Crame, Quezon City. Telephone Nos. (632) 724-8773; (632) 724-8767.
Infringement of the copyright protection law and the provisions expressed here under Intellectual Property Rights Law of the Philippines.
“To teach is to touch lives forever.” (Anonymous)
3
Republic of the Philippines
DEPARTMENT OF THE INTERIOR AND LOCAL GOVERNMENT
(Kagawaran ng Interyor at Pamahalaang Lokal) Kamuning, Quezon City
Message
The commitment of the national government to boost the capability of the
Philippine National Police in securing the streets and maintaining peace and order is
manifest in the publication of the Field Manual on Investigation of Crimes of Violence and Other Crimes.
The work of defining proper accountabilities and setting standards for the many aspects of the investigation process is a definite step in the right direction by the Directorate for Investigation and Detective Management.
Armed with the knowledge in this Manual, our field investigators and first
responders will be in a better position to process crime scenes and contribute to a
higher crime solution efficiency. Congratulations to the professional team of the PNP Directorate for Investigation
and Detective Management! Let this be the beginning of even more timely and productive tools that will help every police officer fulfil his pledge to serve and protect.
Mabuhay!!!
ORIGINAL SIGNED
JESSE M ROBREDO DILG Secretary
4
HEADQUARTERS Philippine National Police
OFFICE OF THE CHIEF PNP NHQ PNP Building, Camp Crame, Quezon City
Manila, Philippines
Message of Chief, PNP As the Philippine National Police marks twenty years of service, it is taking on the
challenge of transformation by upgrading its capabilities, particularly in the area of investigation and detective management.
Given the various situations involving the investigation of crimes that police officers have faced, the publication of the Field Investigation Manual on Crimes of Violence and Other crimes is a much-needed tool that will certainly enable better case work and
crime solution efficiency. Following the guidelines defined in the Eight Foundation Initiatives, this Manual is a
fitting contribution to the overall effort of improving our capabilities in the basics, especially investigation. The substance of this Manual will be solid support for our investigators and first responders, giving them the necessary guidance to conduct
proper operations when handling crime scenes and physical evidence. The work of capability-building is not easy, but the Philippine National Police has been
given very supportive partners like the European-Philippines Justice Support (EPJUST) who have provided counterpart resources to complete this project. For their enthusiastic support, the Philippine National Police is deeply grateful.
The leadership and staff of the Directorate for Investigation and Detective Management have worked hard to craft the Field Investigation Manual on Crimes of Violence and Other Crimes. The finished product deserves our heartiest praise for a job well done.
Congratulations! And Mabuhay tayong lahat!
ATTY RAUL M BACALZO, Ph.D Police Director General
Chief, PNP
5
HEADQUARTERS Philippine National Police
DIRECTORATE FOR INVESTIGATION AND DETECTIVE MANAGEMENT
NHQ PNP Building, Camp Crame, Quezon City
Manila, Philippines
Message It is indeed an honor on my part being The Director for Investigation and Detective Management (TDIDM) to have the opportunity to publish this first-ever PNP Field Manual for Investigation of Crimes of Violence and Other Crimes. I would like to congratulate the DIDM Technical Working Group particularly POLICE CHIEF SUPERINTENDENT ALEX PAUL I MONTEAGUDO, Deputy Director, DIDM for providing the much needed direction and guidance in the consolidation of all the necessary materials and the final crafting of this Manual. Crimes of violence such as murder, homicide, kidnapping/abduction, bombings, sexual assault and other major criminal incidents that endanger the lives of innocent victims serve as significant challenge to the PNP‟s investigation capabilities. In the past, it has been commonly observed that several lapses in crime scene investigation procedures have been committed such that despite the strong case filed by our police officers, some cases were eventually dismissed. This Field Manual, therefore, attempts to plug the most common oversights in Crime Scene Investigation and Case Management by providing checklists to help ensure that all the basic investigative procedures are undertaken. It is imperative to state, however, that the checklists are meant as a guide only and not a substitute for critical thinking. In the end it is the aptitude of the individual investigator and case manager that will make the difference. Nevertheless, this manual should provide a handy and indispensable field reference and guide for the First Responders, Investigators, SOCO Teams and Case Managers, members of criminal investigation machinery of the Philippine National Police who must all endeavor to bring the guilty to justice. Maraming Salamat po.
PDIR ARTURO G CACDAC JR, CEO VI The Director for Investigation and Detective Management
6
ACKNOWLEDGEMENT
The publication of this first-ever PNP Field Manual on Investigation of
Crimes of Violence and Other Crimes required a lot of patience, research and
collective efforts since the manual must be responsive to the needs of not only
the Field Investigators but also the First Responders, SOCO Teams and the
Case Managers/SITG Commanders who are all part of the investigation
machinery of the PNP which must face the demands of the ever-changing
nature of the crime situation in the country.
The publication of this Field Manual would never have been made
possible without the leadership of the members of the DIDM Command Group
headed by the Deputy Director, PCSUPT ALEX PAUL I. MONTEAGUDO, who
almost singlehandedly took it upon himself to provide the much needed
direction and guidance in the consolidation of all the needed materials and
personally supervised and edited the final crafting of this Field Manual. It is
also noteworthy to recognize the assistance and support extended by the
members of the Technical Working Group composed of PNP Officers and their
respective staff.
Acknowledgement must also be given to our foreign partners for their
invaluable support in providing their personal expertise as well as most of the
references used for this manual: the Australian Federal Police (AFP) thru
Federal Agent Michael Kilfoyle; and the European Union-Philippine Justice
Support Program (EPJUST) thru Mr. Detlev Mehlis, Team Leader and Mr. Bo
Astrom, Senior Police Key Expert, which also extended funding assistance for
the printing of this manual.
“I can do all things through Christ who gives me strength….” ( Philippians 4:13)
7
FIELD MANUAL ON INVESTIGATION OF
CRIMES OF VIOLENCE AND OTHER CRIMES
INTRODUCTION
For the purpose of this Field Manual, Crimes of Violence shall refer to crimes such as murder, homicide, kidnapping/abduction, bombings, sexual assault and other criminal incidents that put lives in danger all of which pose a major challenge to
the PNP‟s investigative capability. Murder, however, whether committed by a single individual or by a syndicated crime group or by a terrorist group, is the most serious of all “violent crimes”- the reduction and detection of which is a major concern to both
the police and the public. The procedures in this field manual are therefore geared towards the investigation of murder cases, but it is imperative to state that most, if not all the checklists enumerated herein, are the same as in the investigation of cases such
as abduction and any other major crimes.
Once a suspicious death is identified as a potential murder case, the actions by
the “First Responders” attending the scene are critical to the investigation. Studies show that the initial action at the crime scene is the most commonly cited weakness within the investigative response. In many instances this simply entails police personnel
failing to adhere to procedures to minimize contamination such as controlling access to the scene thru a specific route.
On the other hand, the opening stages of an investigation are often the most important in terms of collecting vital forensic evidence and information, but they are also often the most chaotic and therefore prone to errors.
There is also the issue of record-keeping, information management, staffing and
resources, and communications, all of which must be attended to by the investigator
and also by the Commander of the Special Investigation Task Group (SITG)/case manager if they are to successfully solve a murder case and ensure the prosecution of suspect/s. This requires planning and coordination which are most often overlooked.
It is against this backdrop that this field manual was prepared by the PNP
Directorate for Investigation and Detective Management (DIDM) to provide the PNP
Initial Responders, Investigators, the SOCO Teams and Case Managers with a checklist that will serve as a guide to help them ensure that they undertake all the basic procedures in the conduct of the investigation and, thereby, minimize lapses and
errors.
In this light, this Field Manual is divided into four parts.
8
Part I: Initial Response to the Crime Scene (“The Golden Hour”)
Part 1 deals with the initial response to a crime scene and the initial investigation undertaken, including the conduct of interviews and profiling. For the First Responder/s, this handbook provides a guide and checklist of the actions to be taken
to ensure that the crime scene is not contaminated and that records of all activities and information gathered are maintained.
PART II: Initial Investigation (“The Golden Hour”) The initial phase or the first 72 hours (“Golden Hour”) of a murder or
kidnapping/abduction investigation (crimes of violence investigation) is crucial. For the PNP field investigator/investigator-on-case/investigative units, this field manual provides a guide and checklist of the questions that must be answered in the conduct of the
inquiries/investigation. This also includes a guide on post mortem changes, investigative interviewing and profiling.
Part II also provides a checklist for the investigation of other crimes such as fatal road accidents, robberies, suicide, sexual offenses, fires, explosions and drug-related crimes.
Part III: Evidence Collection
The importance of physical evidence in any case cannot be underestimated. The credibility and integrity of the evidence are directly predicated upon the proper handling of the evidence from its initial observance until its presentation in court. This Field
Manual, therefore, provides the standard procedures for crime scene processing such as collecting, handling and preserving evidence. This also includes procedures for the submission by the field forensic investigator of physical evidence for examination by the
PNP Crime Laboratory if the PNP Crime Laboratory was unable to conduct Scene of Crime Operation (SOCO).
Part III of this field manual therefore deals with the procedures in the conduct of evidence collection, handling and transportation, and in submitting evidence to the crime laboratory. While it is presumed that the Scene of Crime Operations
(SOCO) team is competent in the collection of physical evidence, the checklist should still serve as their guide. But for the Investigator-on-case, this manual gives him an overview of the evidence-gathering procedures that the SOCO team is supposed to
undertake. Thus, it provides the investigator-on-case a handy reference in reminding or overseeing the SOCO team and ensures that the team does not overlook the collection of vital evidence that he would need as the investigator. But more importantly,
this field manual will allow the investigators themselves or a police station crime scene investigator, if necessary in the absence of a SOCO team, to conduct the evidence-gathering by themselves.
9
Part IV: Managing the Investigation
Finally, Part IV deals with Case Management. As mandated, whenever a crime of violence or a major case occurs, a Special Investigation Task Group (SITG) shall immediately be organized to conduct an aggressive, concerted and substantial program
of action. The SITG allows for the strengthening of the coordination system among members of the PNP, DOJ and other law enforcement agencies in order to properly investigate major cases or crimes of violence. Part IV, therefore, includes the
organizational structure and functions of the SITG and a list of investigation management tools including investigation planning, coordination mechanism, crime matrix analysis, surveillance and finally, case review.
Part IV also provides a guide and list of management procedures for the SITG
Commander/Case Manager, including the preparation of the evidence matrix and
resource matrix, to help him effectively and efficiently organize and manage the investigation. Also, using the checklists provided, the SITG Commander/Case Manager can, among others, audit the first responders, the investigators and even the SOCO
teams within the “Golden Hour” (72 hours) of the investigation and ensure adherence to procedures as well as guarantee that the minutest detail (to include all material and testimonial evidence) pertinent to a case are documented and thoroughly investigated.
“Whoever loves instructions loves knowledge, but he who hates corrections is stupid.” (Proverbs 12:1)
10
FIELD MANUAL ON INVESTIGATION OF
CRIMES OF VIOLENCE AND OTHER CRIMES
TABLE OF CONTENTS
PART I - INITIAL RESPONSE TO THE CRIME SCENE (“THE GOLDEN HOUR”) 1. First Responder
1.1 First Officer on the Scene 1.2 Crime Scene Security and Preservation 1.3Checklists for Initial Action of First Responders
PART II - INITIAL INVESTIGATION (“THE GOLDEN HOUR”)
2. Initial Investigation Guide 2.1 Initial Phase of Investigation 2.2 Investigator‟s Checklist
3. Investigation Checklist
3.1 Investigation of Crimes of Violence in General
3.2 Checklist for Conduct of Investigation 3.3 Signs of Death: Post-Mortem Changes
4. Investigative Interviewing and Profiling 4.1 Checklist for the Conduct of Interview
-Victims/Witnesses
-Suspects 4.2 Checklist in the Conduct of Profiling
-Victim
-Suspect 5. Investigation Checklist for Other Crimes
5.1 Road Accidents 5.2 Robberies 5.3 Suicide
5.4 Sexual Offenses 5.5 Drug-related Crimes 5.6 Fires
5.7 Explosions of Bombs and Other Explosive or Gaseous Materials 5.8 Poisoning 5.9 Fraud (Forged or Counterfeit Documents, Banknotes, etc.)
PART III - EVIDENCE COLLECTION
11
6. Evidence Collection, Handling and Transportation 6.1 General Rules for the Collection and Preservation of
Biological Materials 6.2 Collection and Preservation of Blood 6.3 Collection and Preservation of Semen and Saliva
6.4 Collection and Preservation of Urine 6.5 Collection and Preservation of Body Fluids 6.6 Collection and Preservation of Fibers
6.7 Collection and Preservation of Hairs 6.8 Collection and Preservation of Fingerprint 6.9 Collection and Preservation of Articles in Clothing
6.10 Collection and Preservation of Latent Footwear and Print 6.11 Collection and Preservation of Visible Gloves Print 6.12 Collection and Preservation of Soil
6.13 Collection and Preservation of Tool Marks 6.14 Collection and Preservation of Glass 6.15 Collection and Preservation of Paint
6.16 Collection and Preservation of Materials from Fire Scenes 6.17 Collection and Preservation of Materials from Explosions 6.18 Collection and Preservation of Firearms
6.19 Collection and Preservation of Documents and ICT Materials 6.20 Collection and Preservation of Computers and Peripheral Devices
7. Procedure for Submitting Evidence to the Crime Laboratory 7.1 General Information 7.2 Paperwork
7.3 Evidence Packaging, Marking and Sealing PART IV - MANAGING THE INVESTIGATION
8. Special Investigation Task Group (SITG)
8.1 Organizational Structure
8.2 Organizational Chart 8.3 Organizational Operation 8.4 General Operational Procedures
8.5 Duties and Responsibilities of SITG Investigators 8.6 Coordination with the Prosecutors and Other Agencies
9. Investigation Planning and Management 9.1 Investigation Plan and Management System (IPMS)
9.2 Evidence Matrix
9.3 Resource Spreadsheet 9.4 Standard Tactical Plan 9.5 Major Investigation Plan
10. Crime Matrix Template
10.1 Checklist in the Conduct of Crime Analysis
12
11. Surveillance
11.1 General Procedure in the Conduct of Surveillance 11.2 Checklist in the Conduct of Surveillance Operations
12. Coordination Mechanism 12.1 Crime Scene Investigation 12.2 Case Build-Up Investigation
12.3 Case Conferences 12.4 Case Presentation 12.5 Case Tracking
13. Case Review 13.1 Principal Aim of Case Review
13.2 Benefits of Case Review 13.3 Types of Case Review 13.4 Three Main Types of Weaknesses in Investigation
13.5 Six Major Themes on Investigative Weakness 13.6 Case Review Team/Committee
“Curiosity is one of the most permanent and certain characteristics of a vigorous mind.” (Samuel Johnson)
13
PART I- INITIAL RESPONSE TO THE CRIME SCENE
(“THE GOLDEN HOUR”)
CHAPTER 1
FIRST RESPONDER The four main tasks of the first officer on the scene are:
To give first aid;
To apprehend the suspected offender;
To protect and if necessary collect and preserve evidence; and
To cordon off and protect the area.
1.1 First Officer on The Scene
a. Give first aid. Immediately request for assistance from medical experts.
b. Decide whether a crime has been committed.
c. Apprehend the suspected offender. Take into account possible entry points, route of escape or hiding place of perpetrator.
d. Write down the names of all the persons at the crime scene and where they can be contacted in the next few hours. Remove them from the scene.
e. Do not let anyone enter the crime scene area. This applies to police officers too unless they have some special reason for being there. Exception: First aid measures.
f. Inform the police officer responsible for deciding (COP/PD) on who is to
carry out the investigation and call in reinforcements to the scene.
g. If shots have been fired, secure any evidence of primer particles (gunpowder
residue) on the hands.
h. If any person has been taken to hospital, see to it that a police officer is sent to
the hospital to take the necessary measures.
i. Cordon off a sufficiently large area around the crime scene while waiting for
reinforcements.
j. Protect the crime scene from alteration.
14
k. Make a note of the measures that are taken and the persons who enter the crime scene. Also make a note of the times of important events and observations.
l. Photograph and if appropriate video record the crime scene and the adjacent
area, including people hanging around the scene.
m. The First Responder shall be responsible for the control of the crime scene
until the arrival of the designated investigator-on-case who shall thereafter
assume responsibility of the crime scene.
The checklists are only meant as a guide and not as a substitute for critical thinking.
In some cases certain items can probably be left out, while others must be added.
Life-saving measures
Life-saving measures must be taken immediately if there are any signs of life on any of the victims and/or suspects. This must be done even if a crime is suspected and the measures lead to loss of evidence.
Apprehend the suspected perpetrator
In the case of a recent incident, measures must be taken to apprehend the perpetrator if possible. All the people at the crime scene should initially be asked for any information that may be of help.
If information is forthcoming in the form of description, escape route etc. action
should be taken accordingly and the information passed on to the local or regional
operation centers. It should always be borne in mind that persons at the crime scene who claim to be witnesses may in fact be involved in the incident itself.
1.2 Crime Scene Security and Preservation
Protect and collect evidence
The main duty of the first responder is, after giving first aid if necessary, to
protect the scene. Protecting and collecting trace evidence involves a number of
different measures that will vary from one scene to another. The first responder should primarily protect the crime scene and preserve evidence and, secondly, collect evidence that might otherwise be destroyed. One important measure when it comes
to ensuring that evidence is not lost is to avoid contamination.
15
Avoid contamination
When two objects come into contact there is always a risk of contamination, i.e. exchange of materials between them. The objects do not even have to be in contact, since materials such as fibers and hair may be suspended in the air.
The best way of avoiding contamination at the initial stage is to leave the crime
scene untouched. The persons involved, for example victim and suspect, must on
no account be allowed to enter the crime scene and must always be kept apart. Such persons should be dealt with by different police officers and transported in different vehicles. If it is necessary to recover something at the crime scene, this must
always be done by an officer who has not been in contact with the persons involved.
Contamination must be avoided throughout the material handling chain,
from collection at the crime scene to the examination in the laboratory . The following rules should be followed to avoid contamination:
Never let suspects and victims be in the same room or be transported in the same car (not even at different times).
Use protective clothing (overalls, caps, gloves and disposable shoe coverings) when entering a crime scene and collecting trace evidence (hair,
fibers, blood, secretions, small particles etc.).
Plan out the gathering of on-scene evidence such that each specific source
is handled separately, if possible. As such, one person should carry out the crime scene investigation; another should examine the suspect‟s clothes, car
etc., a third- the suspect himself, a fourth- the victim, etc.
Cars should preferably be examined on site.
If a car must be moved, it should be towed. Avoid using the seats. If that is
unavoidable, use protective clothing. If the car must be driven, the only person in it should be the driver, who should wear protective clothing. A list of the clothes worn by the driver should be given to the investigating officer.
Cordons
The purpose of cordons is to make sure that unauthorized persons do not enter the crime scene. Guarded cordons are always the best. The area should be cordoned off with tape or rope and warning signs should be put up. Make sure that the
cordoned off area is sufficiently large. (It is better if the area is sufficiently large).
Witnesses
Do not allow witnesses or suspects to return to or enter the crime scene.
Persons at the scene who are to be questioned should be taken to separate premises in
16
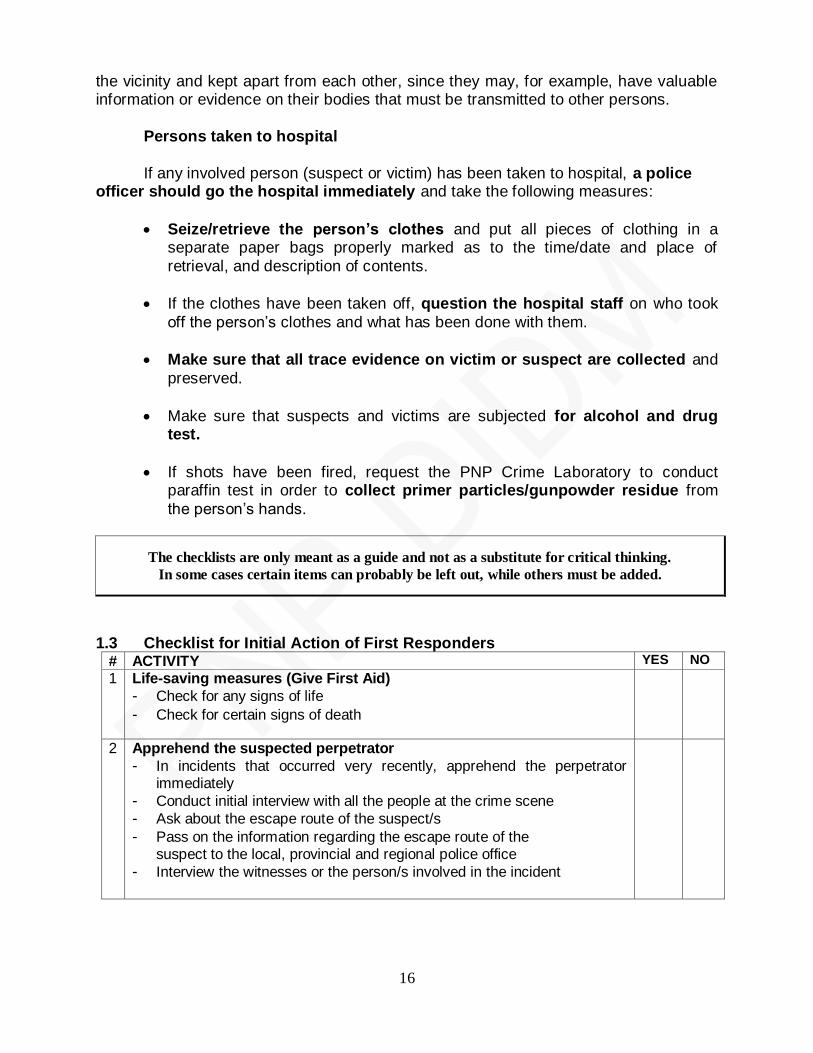
the vicinity and kept apart from each other, since they may, for example, have valuable information or evidence on their bodies that must be transmitted to other persons.
Persons taken to hospital
If any involved person (suspect or victim) has been taken to hospital, a police officer should go the hospital immediately and take the following measures:
Seize/retrieve the person‟s clothes and put all pieces of clothing in a separate paper bags properly marked as to the time/date and place of
retrieval, and description of contents.
If the clothes have been taken off, question the hospital staff on who took
off the person‟s clothes and what has been done with them.
Make sure that all trace evidence on victim or suspect are collected and
preserved.
Make sure that suspects and victims are subjected for alcohol and drug test.
If shots have been fired, request the PNP Crime Laboratory to conduct paraffin test in order to collect primer particles/gunpowder residue from
the person‟s hands.
The checklists are only meant as a guide and not as a substitute for critical thinking.
In some cases certain items can probably be left out, while others must be added.
1.3 Checklist for Initial Action of First Responders
# ACTIVITY YES NO
1 Life-saving measures (Give First Aid) - Check for any signs of life
- Check for certain signs of death
2 Apprehend the suspected perpetrator - In incidents that occurred very recently, apprehend the perpetrator
immediately - Conduct initial interview with all the people at the crime scene - Ask about the escape route of the suspect/s - Pass on the information regarding the escape route of the
suspect to the local, provincial and regional police office - Interview the witnesses or the person/s involved in the incident
17
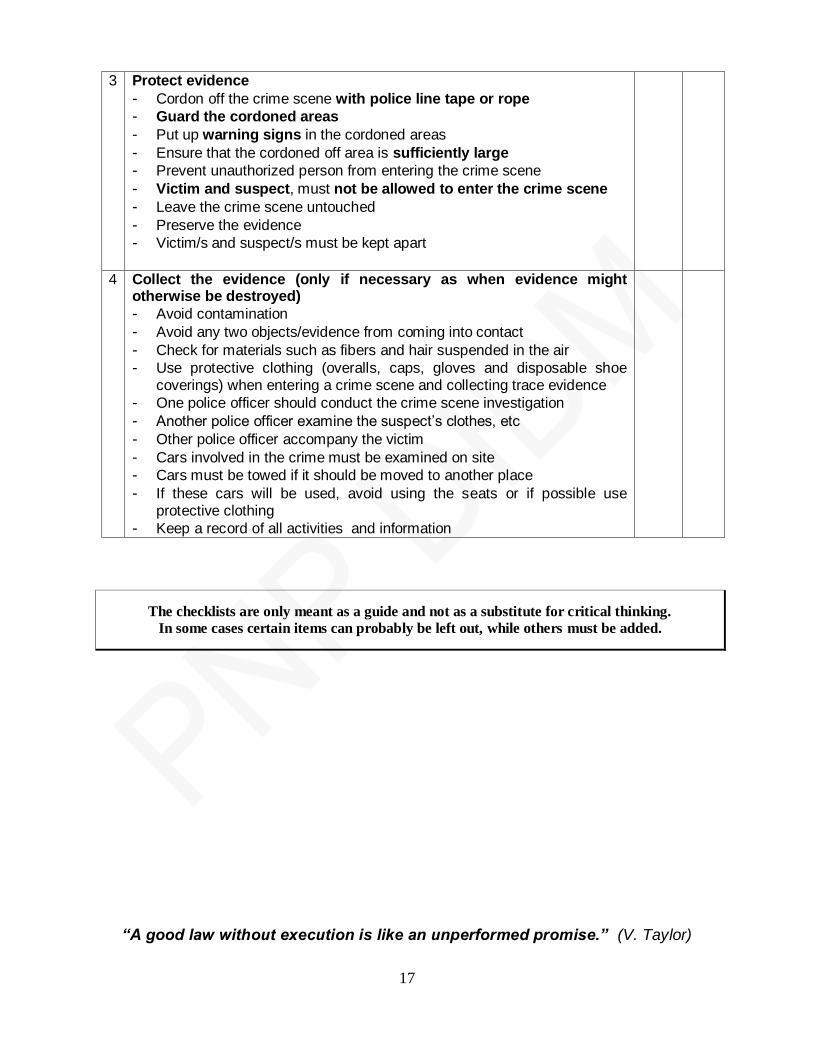
3 Protect evidence - Cordon off the crime scene with police line tape or rope - Guard the cordoned areas - Put up warning signs in the cordoned areas - Ensure that the cordoned off area is sufficiently large - Prevent unauthorized person from entering the crime scene - Victim and suspect, must not be allowed to enter the crime scene - Leave the crime scene untouched - Preserve the evidence - Victim/s and suspect/s must be kept apart
4 Collect the evidence (only if necessary as when evidence might otherwise be destroyed) - Avoid contamination - Avoid any two objects/evidence from coming into contact - Check for materials such as fibers and hair suspended in the air - Use protective clothing (overalls, caps, gloves and disposable shoe
coverings) when entering a crime scene and collecting trace evidence - One police officer should conduct the crime scene investigation - Another police officer examine the suspect‟s clothes, etc - Other police officer accompany the victim - Cars involved in the crime must be examined on site - Cars must be towed if it should be moved to another place - If these cars will be used, avoid using the seats or if possible use
protective clothing - Keep a record of all activities and information
The checklists are only meant as a guide and not as a substitute for critical thinking.
In some cases certain items can probably be left out, while others must be added.
“A good law without execution is like an unperformed promise.” (V. Taylor)
18
PART II- INITIAL INVESTIGATION (“THE GOLDEN HOUR”)
CHAPTER 2
INITIAL INVESTIGATION GUIDE 2.1 Initial Phase of Investigation
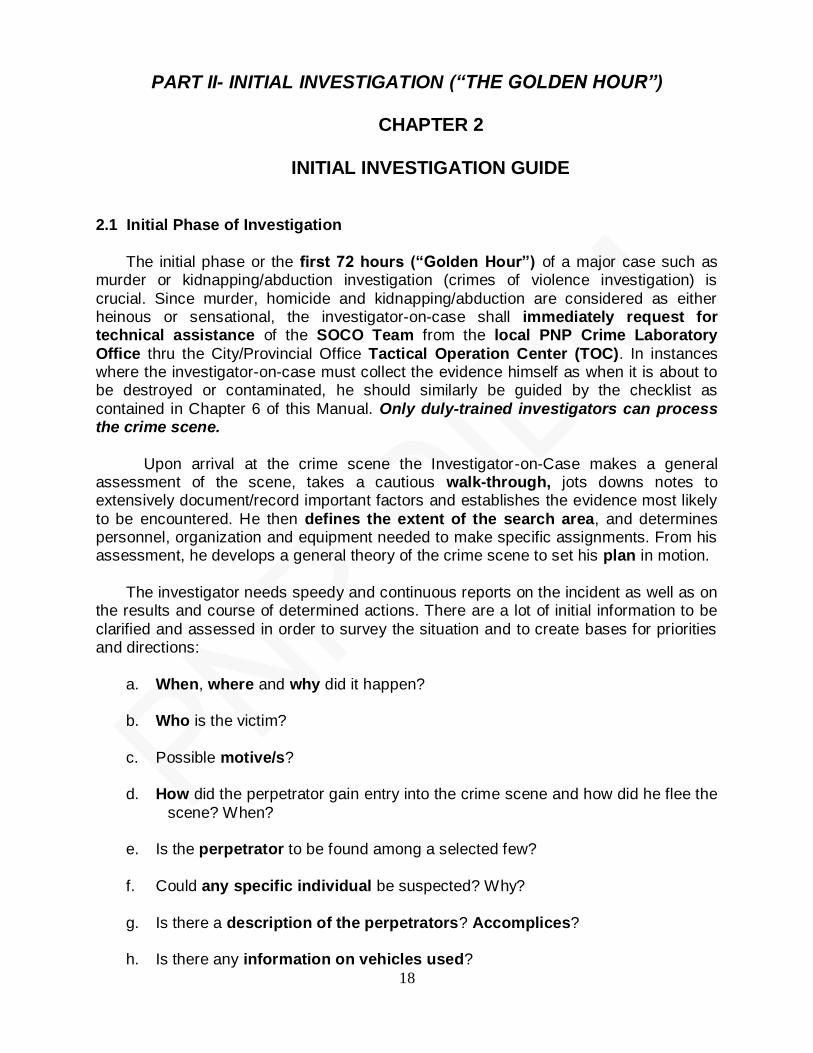
The initial phase or the first 72 hours (“Golden Hour”) of a major case such as
murder or kidnapping/abduction investigation (crimes of violence investigation) is
crucial. Since murder, homicide and kidnapping/abduction are considered as either heinous or sensational, the investigator-on-case shall immediately request for technical assistance of the SOCO Team from the local PNP Crime Laboratory
Office thru the City/Provincial Office Tactical Operation Center (TOC). In instances where the investigator-on-case must collect the evidence himself as when it is about to be destroyed or contaminated, he should similarly be guided by the checklist as
contained in Chapter 6 of this Manual. Only duly-trained investigators can process the crime scene.
Upon arrival at the crime scene the Investigator-on-Case makes a general assessment of the scene, takes a cautious walk-through, jots downs notes to extensively document/record important factors and establishes the evidence most likely
to be encountered. He then defines the extent of the search area, and determines personnel, organization and equipment needed to make specific assignments. From his assessment, he develops a general theory of the crime scene to set his plan in motion.
The investigator needs speedy and continuous reports on the incident as well as on
the results and course of determined actions. There are a lot of initial information to be
clarified and assessed in order to survey the situation and to create bases for priorities and directions:
a. When, where and why did it happen? b. Who is the victim?
c. Possible motive/s? d. How did the perpetrator gain entry into the crime scene and how did he flee the
scene? When? e. Is the perpetrator to be found among a selected few?
f. Could any specific individual be suspected? Why?
g. Is there a description of the perpetrators? Accomplices? h. Is there any information on vehicles used?
19
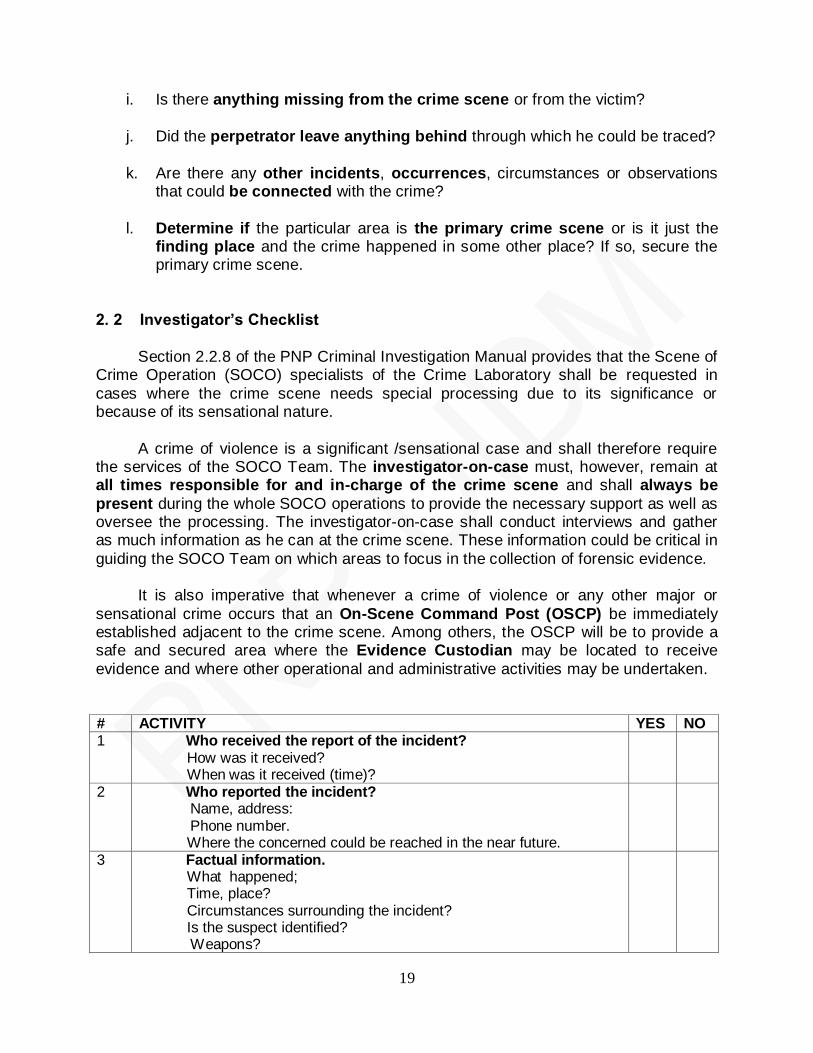
i. Is there anything missing from the crime scene or from the victim?
j. Did the perpetrator leave anything behind through which he could be traced?
k. Are there any other incidents, occurrences, circumstances or observations that could be connected with the crime?
l. Determine if the particular area is the primary crime scene or is it just the finding place and the crime happened in some other place? If so, secure the primary crime scene.
2. 2 Investigator‟s Checklist
Section 2.2.8 of the PNP Criminal Investigation Manual provides that the Scene of
Crime Operation (SOCO) specialists of the Crime Laboratory shall be requested in
cases where the crime scene needs special processing due to its significance or because of its sensational nature.
A crime of violence is a significant /sensational case and shall therefore require the services of the SOCO Team. The investigator-on-case must, however, remain at all times responsible for and in-charge of the crime scene and shall always be
present during the whole SOCO operations to provide the necessary support as well as oversee the processing. The investigator-on-case shall conduct interviews and gather as much information as he can at the crime scene. These information could be critical in
guiding the SOCO Team on which areas to focus in the collection of forensic evidence. It is also imperative that whenever a crime of violence or any other major or
sensational crime occurs that an On-Scene Command Post (OSCP) be immediately established adjacent to the crime scene. Among others, the OSCP will be to provide a safe and secured area where the Evidence Custodian may be located to receive
evidence and where other operational and administrative activities may be undertaken.
# ACTIVITY YES NO 1 Who received the report of the incident?
How was it received? When was it received (time)?
2 Who reported the incident? Name, address: Phone number. Where the concerned could be reached in the near future.
3 Factual information. What happened; Time, place? Circumstances surrounding the incident? Is the suspect identified? Weapons?
20
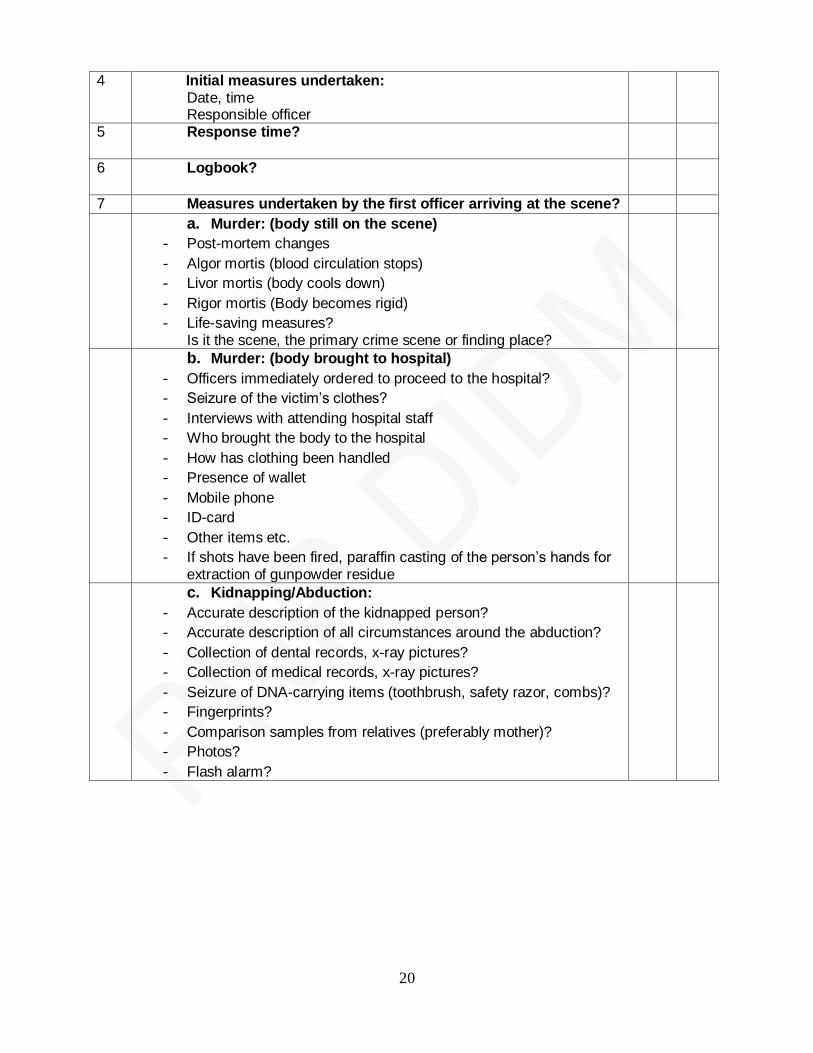
4 Initial measures undertaken: Date, time Responsible officer
5 Response time?
6 Logbook?
7 Measures undertaken by the first officer arriving at the scene?
a. Murder: (body still on the scene)
- Post-mortem changes
- Algor mortis (blood circulation stops)
- Livor mortis (body cools down)
- Rigor mortis (Body becomes rigid)
- Life-saving measures? Is it the scene, the primary crime scene or finding place?
b. Murder: (body brought to hospital)
- Officers immediately ordered to proceed to the hospital?
- Seizure of the victim‟s clothes?
- Interviews with attending hospital staff
- Who brought the body to the hospital
- How has clothing been handled
- Presence of wallet
- Mobile phone
- ID-card
- Other items etc.
- If shots have been fired, paraffin casting of the person‟s hands for extraction of gunpowder residue
c. Kidnapping/Abduction:
- Accurate description of the kidnapped person?
- Accurate description of all circumstances around the abduction?
- Collection of dental records, x-ray pictures?
- Collection of medical records, x-ray pictures?
- Seizure of DNA-carrying items (toothbrush, safety razor, combs)?
- Fingerprints?
- Comparison samples from relatives (preferably mother)?
- Photos?
- Flash alarm?

21
d. In all cases:
- Cordon off a sufficiently large area around the crime scene, taking into account perpetrator‟s potential hide-out, ports of entry and departure?
- Ensure protection of the cordoned off crime scene and secure evidence that could be destroyed by external factors?
- Record or take note of everyone who enters the crime scene.
- Notes of bystanders?
- Make a documentation of the crime scene (photo or sketch)?
- Make a description of the surrounding area of the scene (dwellings, shops, bus stops, restaurants etc., security guards, pulis “OYSTERS”, etc.).
- Take note of license numbers of parked cars in the vicinity/area (potential witnesses)?
- Check for Presence of CCTV
- Mobile phone?
8 Crime scene examination:
- Outcome of proceedings (protocol)?
- Documentation (photos, videos, sketches)?
- Collected samples?
- Further forensic investigations?
- Results?
- Prudence of early decision to lift cordons?
9 Organizational set-up:
- Structure? SITG?
- Allocation of resources (reinforcements)?
- Officer-in-charge?
- Priorities and directions?
- Tasking?
- Documentation?
- Daily briefings?
- Contingency plans? Media relations (monitoring and collection of articles, and other media coverage of the incident)?
10 Alert other police stations and units in the adjacent areas?
- Routines?
11 Immediate measures to track down and apprehend the perpetrator?
- Check-points etc.?
- Employment of canine?
- Flash alarms?
12. Canvassing operation (house- to- house) around the crime scene and the route of escape?
- Prepared templates with battery of questions?
- Comparison materials (cars, colors, etc.).
- Interviews?
22
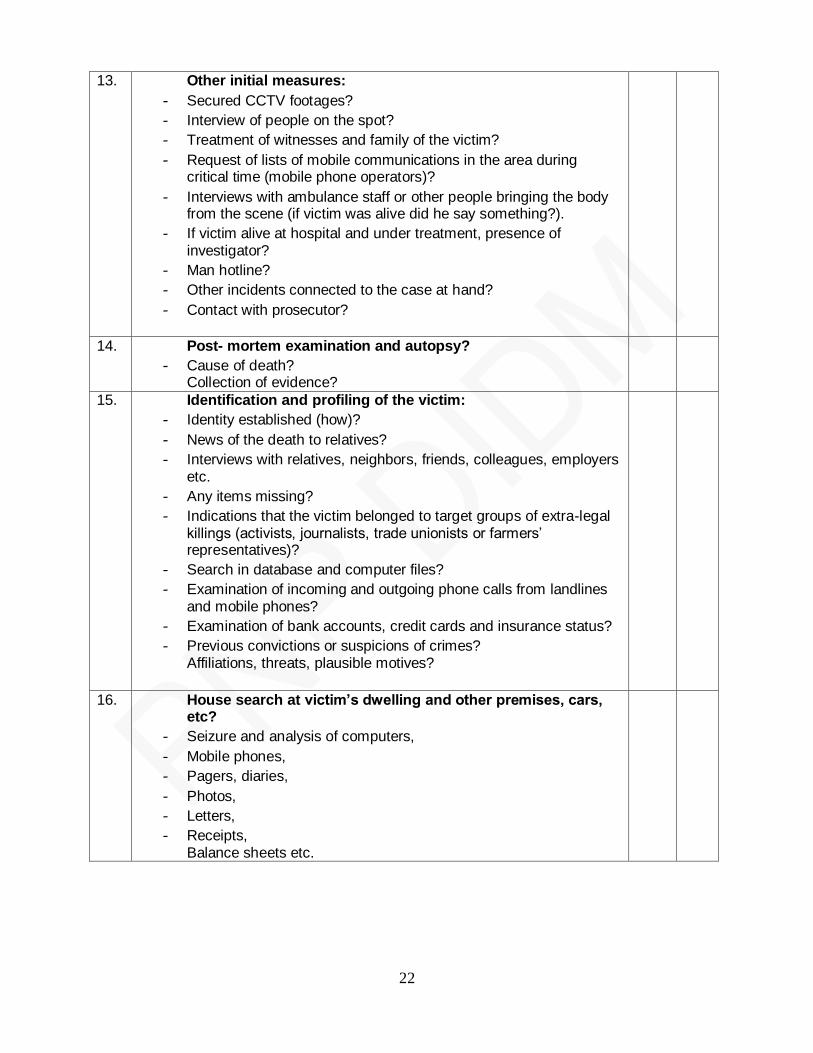
13. Other initial measures:
- Secured CCTV footages?
- Interview of people on the spot?
- Treatment of witnesses and family of the victim?
- Request of lists of mobile communications in the area during critical time (mobile phone operators)?
- Interviews with ambulance staff or other people bringing the body from the scene (if victim was alive did he say something?).
- If victim alive at hospital and under treatment, presence of investigator?
- Man hotline?
- Other incidents connected to the case at hand?
- Contact with prosecutor?
14. Post- mortem examination and autopsy?
- Cause of death? Collection of evidence?
15. Identification and profiling of the victim:
- Identity established (how)?
- News of the death to relatives?
- Interviews with relatives, neighbors, friends, colleagues, employers etc.
- Any items missing?
- Indications that the victim belonged to target groups of extra-legal killings (activists, journalists, trade unionists or farmers‟ representatives)?
- Search in database and computer files?
- Examination of incoming and outgoing phone calls from landlines and mobile phones?
- Examination of bank accounts, credit cards and insurance status?
- Previous convictions or suspicions of crimes? Affiliations, threats, plausible motives?
16. House search at victim‟s dwelling and other premises, cars, etc?
- Seizure and analysis of computers,
- Mobile phones,
- Pagers, diaries,
- Photos,
- Letters,
- Receipts, Balance sheets etc.
23
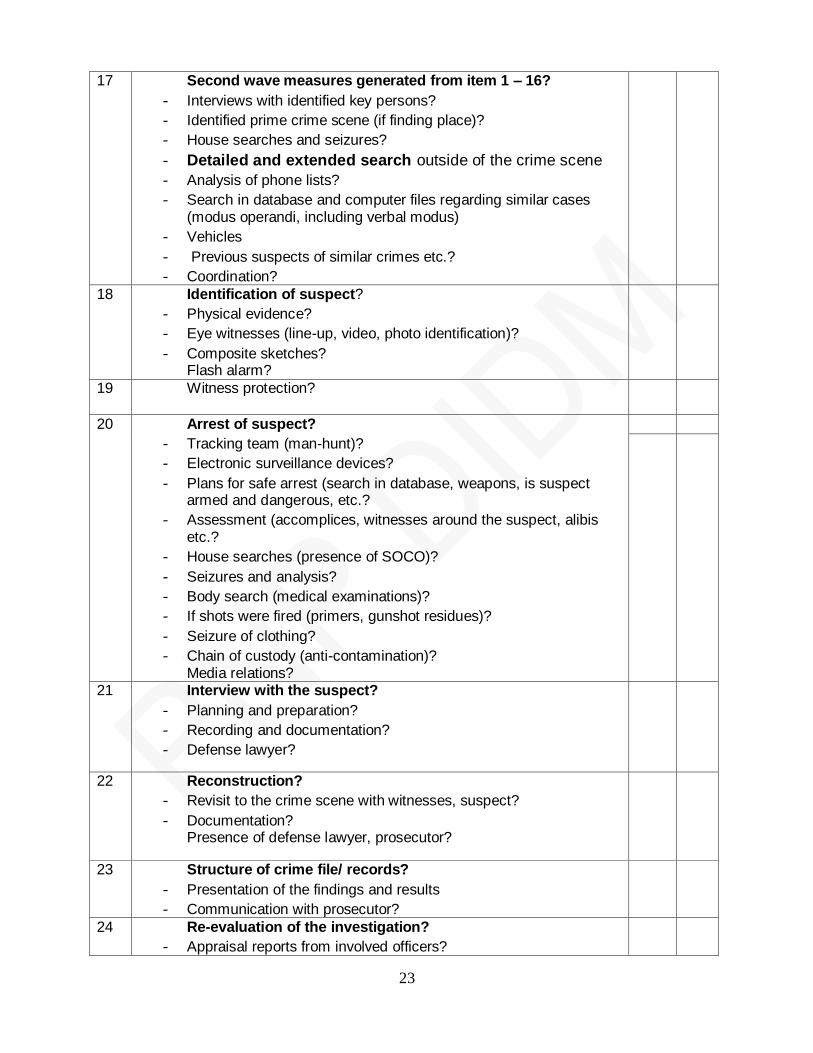
17 Second wave measures generated from item 1 – 16?
- Interviews with identified key persons?
- Identified prime crime scene (if finding place)?
- House searches and seizures?
- Detailed and extended search outside of the crime scene
- Analysis of phone lists?
- Search in database and computer files regarding similar cases (modus operandi, including verbal modus)
- Vehicles
- Previous suspects of similar crimes etc.?
- Coordination?
18 Identification of suspect?
- Physical evidence?
- Eye witnesses (line-up, video, photo identification)?
- Composite sketches? Flash alarm?
19 Witness protection?
20 Arrest of suspect?
- Tracking team (man-hunt)?
- Electronic surveillance devices?
- Plans for safe arrest (search in database, weapons, is suspect armed and dangerous, etc.?
- Assessment (accomplices, witnesses around the suspect, alibis etc.?
- House searches (presence of SOCO)?
- Seizures and analysis?
- Body search (medical examinations)?
- If shots were fired (primers, gunshot residues)?
- Seizure of clothing?
- Chain of custody (anti-contamination)? Media relations?
21 Interview with the suspect?
- Planning and preparation?
- Recording and documentation?
- Defense lawyer?
22 Reconstruction?
- Revisit to the crime scene with witnesses, suspect?
- Documentation? Presence of defense lawyer, prosecutor?
23 Structure of crime file/ records?
- Presentation of the findings and results
- Communication with prosecutor?
24 Re-evaluation of the investigation?
- Appraisal reports from involved officers?
24
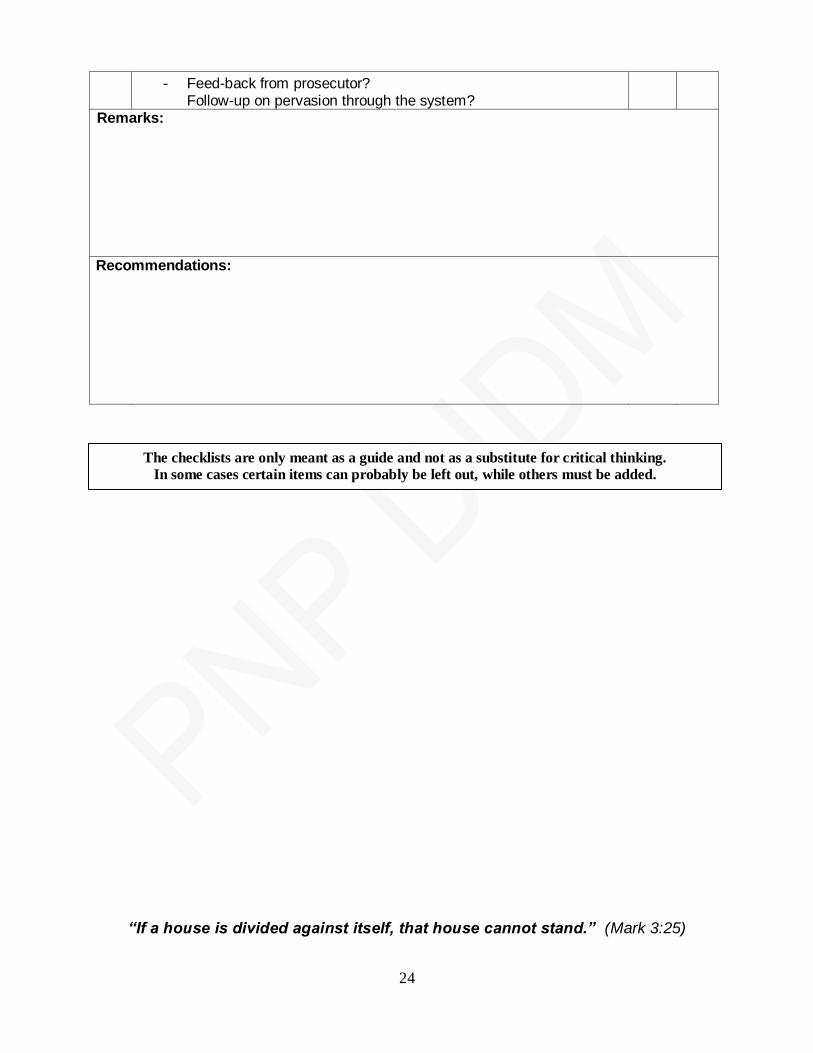
- Feed-back from prosecutor? Follow-up on pervasion through the system?
Remarks:
Recommendations:
“If a house is divided against itself, that house cannot stand.” (Mark 3:25)
The checklists are only meant as a guide and not as a substitute for critical thinking.
In some cases certain items can probably be left out, while others must be added.
25
----------
----------
----------
----------
26
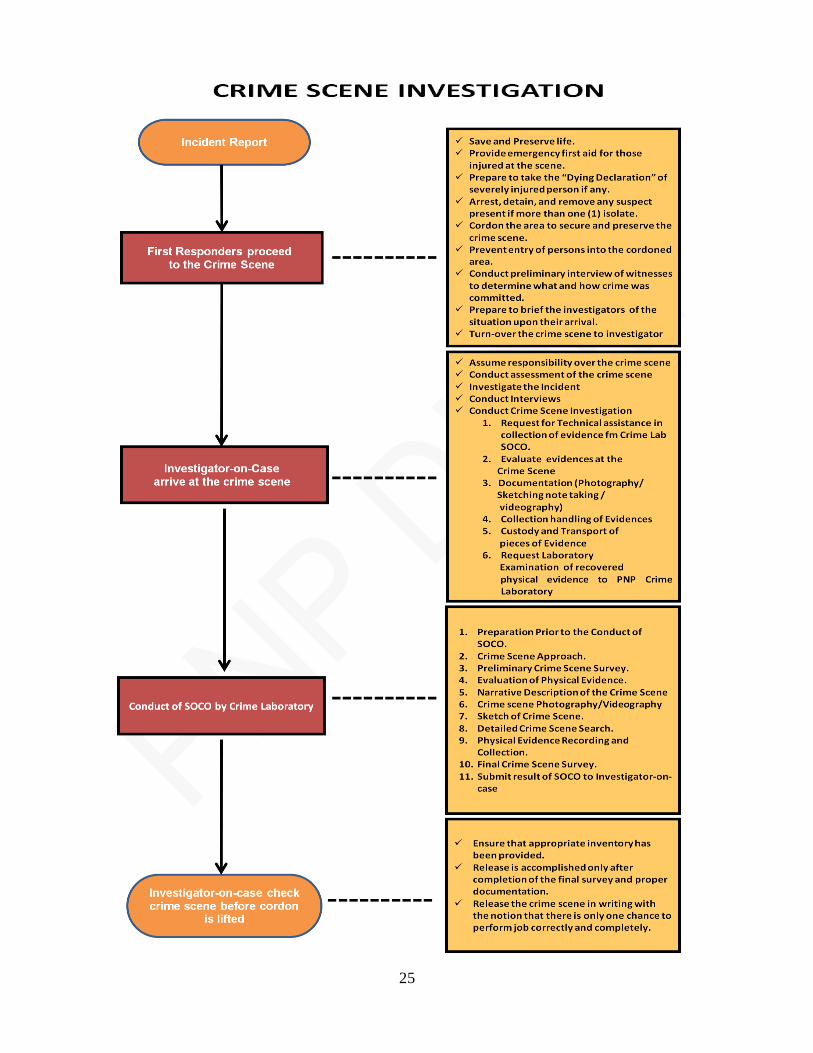
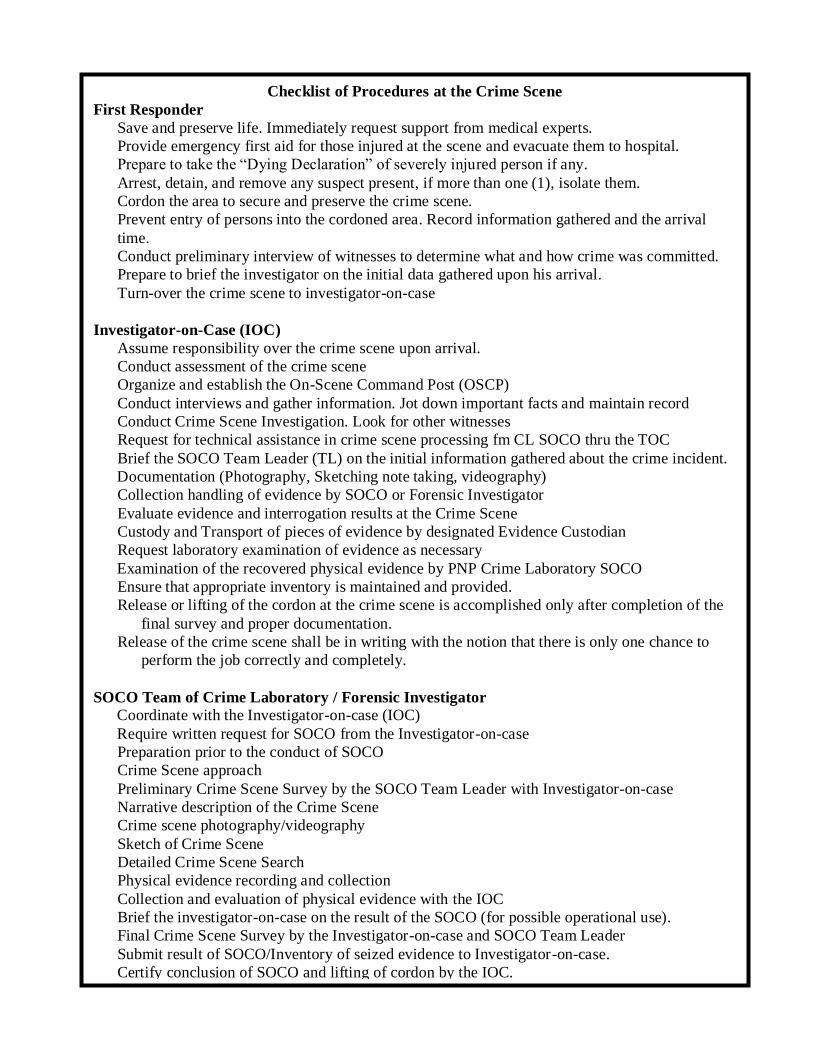
Checklist of Procedures at the Crime Scene
First Responder
Save and preserve life. Immediately request support from medical experts.
Provide emergency first aid for those injured at the scene and evacuate them to hospital.
Prepare to take the “Dying Declaration” of severely injured person if any.
Arrest, detain, and remove any suspect present, if more than one (1), isolate them.
Cordon the area to secure and preserve the crime scene.
Prevent entry of persons into the cordoned area. Record information gathered and the arrival
time.
Conduct preliminary interview of witnesses to determine what and how crime was committed.
Prepare to brief the investigator on the initial data gathered upon his arrival.
Turn-over the crime scene to investigator-on-case
Investigator-on-Case (IOC)
Assume responsibility over the crime scene upon arrival.
Conduct assessment of the crime scene
Organize and establish the On-Scene Command Post (OSCP)
Conduct interviews and gather information. Jot down important facts and maintain record
Conduct Crime Scene Investigation. Look for other witnesses
Request for technical assistance in crime scene processing fm CL SOCO thru the TOC
Brief the SOCO Team Leader (TL) on the initial information gathered about the crime incident.
Documentation (Photography, Sketching note taking, videography)
Collection handling of evidence by SOCO or Forensic Investigator
Evaluate evidence and interrogation results at the Crime Scene
Custody and Transport of pieces of evidence by designated Evidence Custodian
Request laboratory examination of evidence as necessary
Examination of the recovered physical evidence by PNP Crime Laboratory SOCO
Ensure that appropriate inventory is maintained and provided.
Release or lifting of the cordon at the crime scene is accomplished only after completion of the
final survey and proper documentation.
Release of the crime scene shall be in writing with the notion that there is only one chance to
perform the job correctly and completely.
SOCO Team of Crime Laboratory / Forensic Investigator
Coordinate with the Investigator-on-case (IOC)
Require written request for SOCO from the Investigator-on-case
Preparation prior to the conduct of SOCO
Crime Scene approach
Preliminary Crime Scene Survey by the SOCO Team Leader with Investigator-on-case
Narrative description of the Crime Scene
Crime scene photography/videography
Sketch of Crime Scene
Detailed Crime Scene Search
Physical evidence recording and collection
Collection and evaluation of physical evidence with the IOC
Brief the investigator-on-case on the result of the SOCO (for possible operational use).
Final Crime Scene Survey by the Investigator-on-case and SOCO Team Leader
Submit result of SOCO/Inventory of seized evidence to Investigator-on-case.
Certify conclusion of SOCO and lifting of cordon by the IOC.
Certify conclusion of SOCO and lifting of cordon by the Investigator-on-case.
27
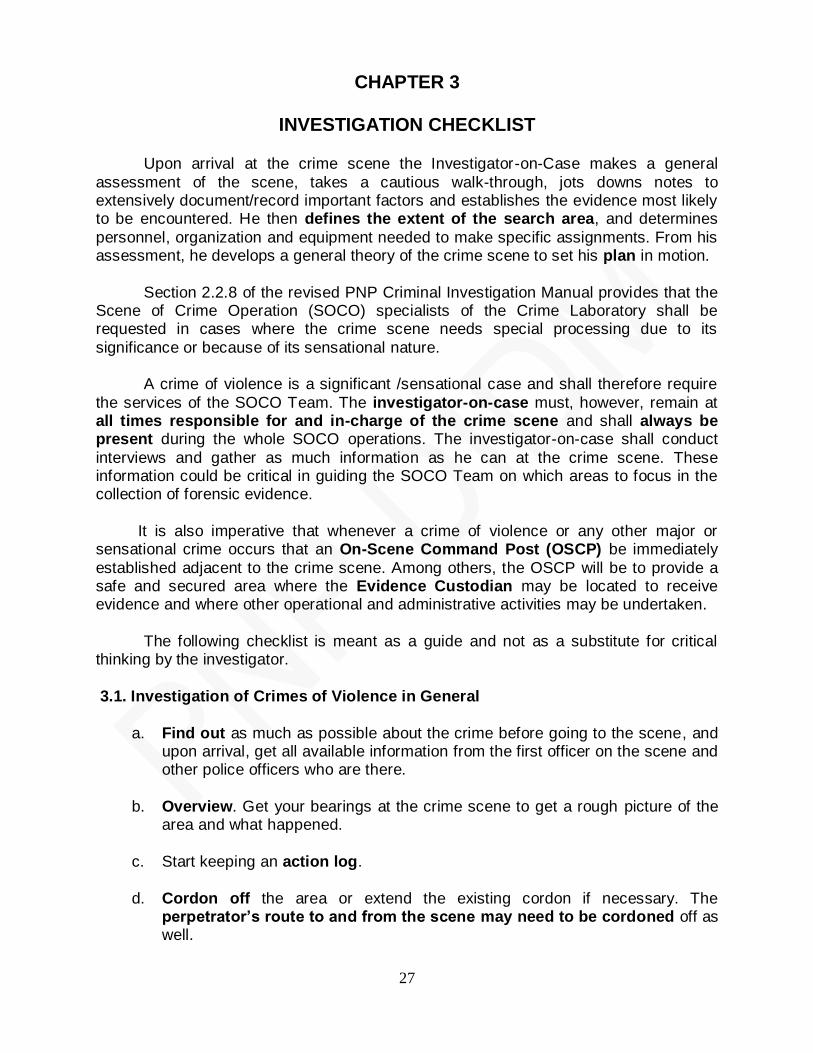
CHAPTER 3
INVESTIGATION CHECKLIST
Upon arrival at the crime scene the Investigator-on-Case makes a general
assessment of the scene, takes a cautious walk-through, jots downs notes to extensively document/record important factors and establishes the evidence most likely to be encountered. He then defines the extent of the search area, and determines
personnel, organization and equipment needed to make specific assignments. From his assessment, he develops a general theory of the crime scene to set his plan in motion.
Section 2.2.8 of the revised PNP Criminal Investigation Manual provides that the Scene of Crime Operation (SOCO) specialists of the Crime Laboratory shall be requested in cases where the crime scene needs special processing due to its
significance or because of its sensational nature. A crime of violence is a significant /sensational case and shall therefore require
the services of the SOCO Team. The investigator-on-case must, however, remain at all times responsible for and in-charge of the crime scene and shall always be present during the whole SOCO operations. The investigator-on-case shall conduct
interviews and gather as much information as he can at the crime scene. These information could be critical in guiding the SOCO Team on which areas to focus in the collection of forensic evidence.
It is also imperative that whenever a crime of violence or any other major or
sensational crime occurs that an On-Scene Command Post (OSCP) be immediately
established adjacent to the crime scene. Among others, the OSCP will be to provide a safe and secured area where the Evidence Custodian may be located to receive evidence and where other operational and administrative activities may be undertaken.
The following checklist is meant as a guide and not as a substitute for critical
thinking by the investigator.
3.1. Investigation of Crimes of Violence in General
a. Find out as much as possible about the crime before going to the scene, and upon arrival, get all available information from the first officer on the scene and other police officers who are there.
b. Overview. Get your bearings at the crime scene to get a rough picture of the
area and what happened.
c. Start keeping an action log.
d. Cordon off the area or extend the existing cordon if necessary. The perpetrator‟s route to and from the scene may need to be cordoned off as well.

28
e. Make sure that the responsible police officer posts the necessary guards for the cordoned off area.
f. Make sure that a list is made of the people who enter the crime scene.
g. If shots have been fired, find out whether gunpowder residue/primer particles have been collected from the hands of persons involved. If not, request PNP crime Laboratory to do so at once.
h. Take a general photograph of the crime scene. Film the scene with a video
camera.
i. Pause and take stock of the situation then start planning. This is where the
crime scene analysis starts.
j. Note down your observations continuously. It is a good idea to use a tape
recorder.
k. Decide whether you need help from an expert such as a forensic
pathologist, biologist etc.
l. Take photographs continuously. Photograph all the evidences before they
are collected. If possible, engage a photographer for specialized trace
evidence photography. m. Search for and collect evidence, objects and reference samples etc. that
are relevant to the crime investigation. Examine victims and suspects too. Pay attention to the risk of contamination.
n. Consider conducting a detailed and extended search outside of the crime scene.
o. Write a (continuous) seizure report. p. Check the crime scene before the cordon is lifted. Make sure that you have
not forgotten anything important, such as interrogation reports. A suspect may enter the crime scene area after the cordon has been lifted, and this must not be allowed to destroy the value of the evidence collected.
The checklists are only meant as a guide and not as a substitute for critical thinking.
In some cases certain items can probably be left out, while others must be added.
29
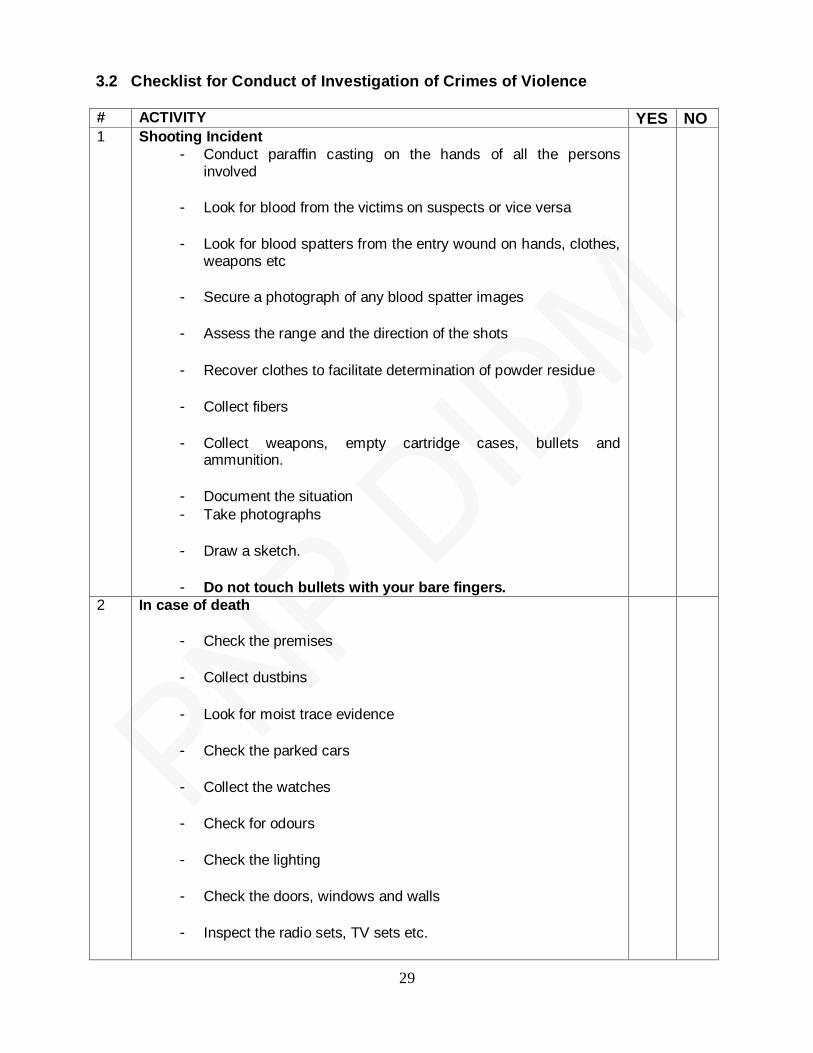
3.2 Checklist for Conduct of Investigation of Crimes of Violence # ACTIVITY YES NO 1 Shooting Incident
- Conduct paraffin casting on the hands of all the persons involved
- Look for blood from the victims on suspects or vice versa
- Look for blood spatters from the entry wound on hands, clothes,
weapons etc
- Secure a photograph of any blood spatter images
- Assess the range and the direction of the shots
- Recover clothes to facilitate determination of powder residue
- Collect fibers
- Collect weapons, empty cartridge cases, bullets and
ammunition.
- Document the situation - Take photographs
- Draw a sketch.
- Do not touch bullets with your bare fingers.
2 In case of death
- Check the premises
- Collect dustbins
- Look for moist trace evidence
- Check the parked cars
- Collect the watches
- Check for odours
- Check the lighting
- Check the doors, windows and walls
- Inspect the radio sets, TV sets etc.
30
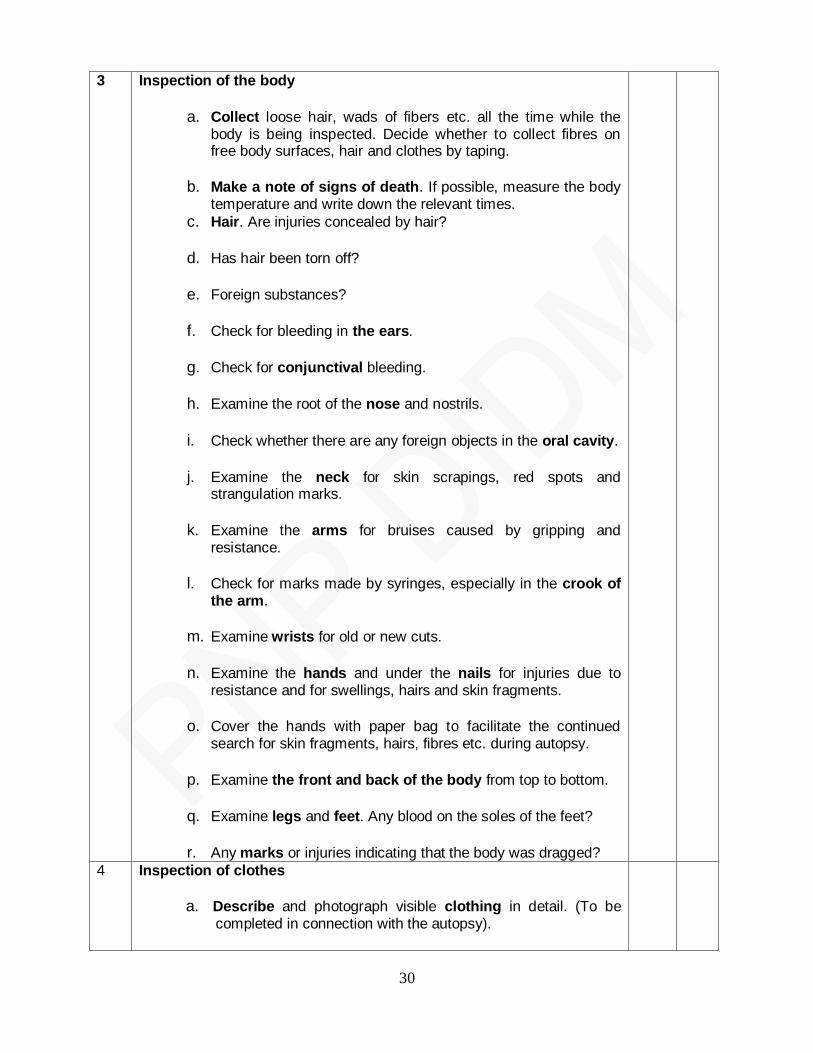
3 Inspection of the body
a. Collect loose hair, wads of fibers etc. all the time while the
body is being inspected. Decide whether to collect fibres on free body surfaces, hair and clothes by taping.
b. Make a note of signs of death. If possible, measure the body temperature and write down the relevant times.
c. Hair. Are injuries concealed by hair?
d. Has hair been torn off?
e. Foreign substances?
f. Check for bleeding in the ears.
g. Check for conjunctival bleeding.
h. Examine the root of the nose and nostrils.
i. Check whether there are any foreign objects in the oral cavity.
j. Examine the neck for skin scrapings, red spots and
strangulation marks.
k. Examine the arms for bruises caused by gripping and resistance.
l. Check for marks made by syringes, especially in the crook of the arm.
m. Examine wrists for old or new cuts.
n. Examine the hands and under the nails for injuries due to
resistance and for swellings, hairs and skin fragments.
o. Cover the hands with paper bag to facilitate the continued search for skin fragments, hairs, fibres etc. during autopsy.
p. Examine the front and back of the body from top to bottom.
q. Examine legs and feet. Any blood on the soles of the feet? r. Any marks or injuries indicating that the body was dragged?
4 Inspection of clothes
a. Describe and photograph visible clothing in detail. (To be
completed in connection with the autopsy).
31
b. Pay attention to creases, damage, bullet-holes, blood spatter, dirt, position on the body etc.
c. Examine the pockets. Make a list of the contents. d. Describe the presence of blood and any other stains on the
clothing.
e. The clothes should be taken charge of in connection with the
autopsy. 5 Weapons
a. Recovered weapons call for especially careful handling for safety reasons b. Hold the weapon by a part with a rough surface or by the strap
so as not to destroy any evidence.
c. Always check whether there are any cartridges left in the chamber before doing anything else.
d. Never insert any object, such as a pencil, in the bore or the
trigger-guard.
e. Never point the weapon in a way that might injure someone with an accidental shot.
f. Check the safety catch, (If you are not sure of how to operate the safety, do not handle the weapon.)
3.4 Signs of Death: Post-Mortem Changes
Once the heart stops beating, the blood collects in the most dependent parts of
the body (livor mortis) or the body stiffens (rigor mortis) or the body begins to cool (algor
mortis).
a. Livor mortis
1) The blood begins to settle in the parts of the body that are the closest to
the ground, usually the buttocks and back when a corpse is supine.
2) The skin, normally pink-colored because of the oxygen-laden blood in the
capillaries, becomes pale as the blood drains into larger veins.
3) Within minutes to hours after death, the skin is discolored by livor mortis,
or what embalmers call “post-mortem stain”, the purple-red discoloration
from blood accumulating in the lowermost (dependent) blood vessels.
32
4) Immediately after death, the blood is unfixed and will move to other body parts if the body‟s position is changed.
5) After a few hours, the pooled blood becomes fixed and will not move.
Pressing on an area of discoloration can determine this; if it blanches
(turns white) easily, then the blood remains unfixed.
6) Livor mortis is usually most pronounced eight to twelve hours after death.
7) The skin, no longer under muscular control, succumbs to gravity, forming
new shapes and accentuating prominent bones still further. The body then
begins to cool.
b. Rigor mortis
1) At the moment of death the muscles relax completely, a condition called
“primary flaccidity”.
2) The muscles then stiffen, due to coagulation of muscle proteins or a shift
in the muscles‟ energy containers, into a condition known as rigor mortis.
3) All of the body muscles are affected.
4) Rigor mortis begins within two to six hours of death, starting with the eyelids, neck and jaw.
5) This sequence may be due to the difference in lactic acid levels among different muscles, which corresponds to the difference in glycogen levels and to the different types of muscle fibers.
6) Over the next four to six hours, rigor mortis spreads to the other muscles,
including those in the internal organs such as the heart.
7) The onset of rigor mortis is more rapid if the environment is cold and if the
deceased had performed hard physical exertions just before death.
8) Its onset also varies with the individual‟s sex, physical condition and
muscular build.
9) After being in this rigid condition for twenty-four to eighty-four hours, the
muscles relax and secondary laxity (flaccidity) develops, usually in the
same order as it began.
10) The length of time rigor mortis lasts depends on multiple factors,
particularly the ambient temperature. The degree of rigor mortis can be determined by checking both the finger joints and the larger joints and ranking their degree of stiffness on a one to three or four-point scale.
33
c. Algor mortis
During the period of rigor mortis, the body gradually cools in a process called algor mortis.
d. Putrefaction
1) In the absence of embalming or relatively rapid cremation, the body
putrefies.
2) The first sign of putrefaction is a greenish skin discoloration appearing on
the right lower abdomen about the second or third day after death.
3) This coloration then spreads over the abdomen, chest and upper thighs
and is usually accompanied by a putrid odor.
4) Sulphur-containing intestinal gas and a breakdown product of red blood
cells produce both the color and the smell.
5) Seven days after death, most of the body is discolored and giant blood-
tinged blisters begin to appear.
6) The skin loosens and any pressure causes the top layer to come off in
large sheets (skin slip). 7) As the internal organs and the fatty tissues decay, they produce large
quantities of foul-smelling gas. 8) By the second week after death, the abdomen, scrotum, breasts and
tongue swell; the eyes bulge out. 9) A bloody fluid seeps out of the mouth and the nose.
10) After three to four weeks, the hair, nails and teeth loosen and grossly
swollen internal organs begin to rupture and eventually liquefy.
11) The internal organs decompose at different rates, with the resistant uterus
and prostate often intact after twelve months, giving pathologists one way
to determine an unidentified corpse‟s sex.
12) Aside from the action of microbes, the breakdown of cells (autolysis)
helps destroy the body unless the corpse is kept at temperatures at or below 0 degrees Celsius (32 degrees Fahrenheit).
13) Cells die (necrosis) through the progressive destruction of their various parts.
34
14) First, the cellular fluid (cytoplasm) and the energy-releasing mechanism (mitochondria) swell.
15) Various products, including calcium, begin to coalesce in the
mitochondria as other mechanisms within the cell dissolve.
16) Next, loss of energy causes the cell to lose its connections with
neighboring cells (tissue destruction) and to further lose control over the
fluid within its outer barrier, much like an over-filled water balloon.
17) The cell controller (nucleus) fails, and the packs of destructive acids
(enzymes) within the cell break loose. These enzymes complete the work of destroying the cell.
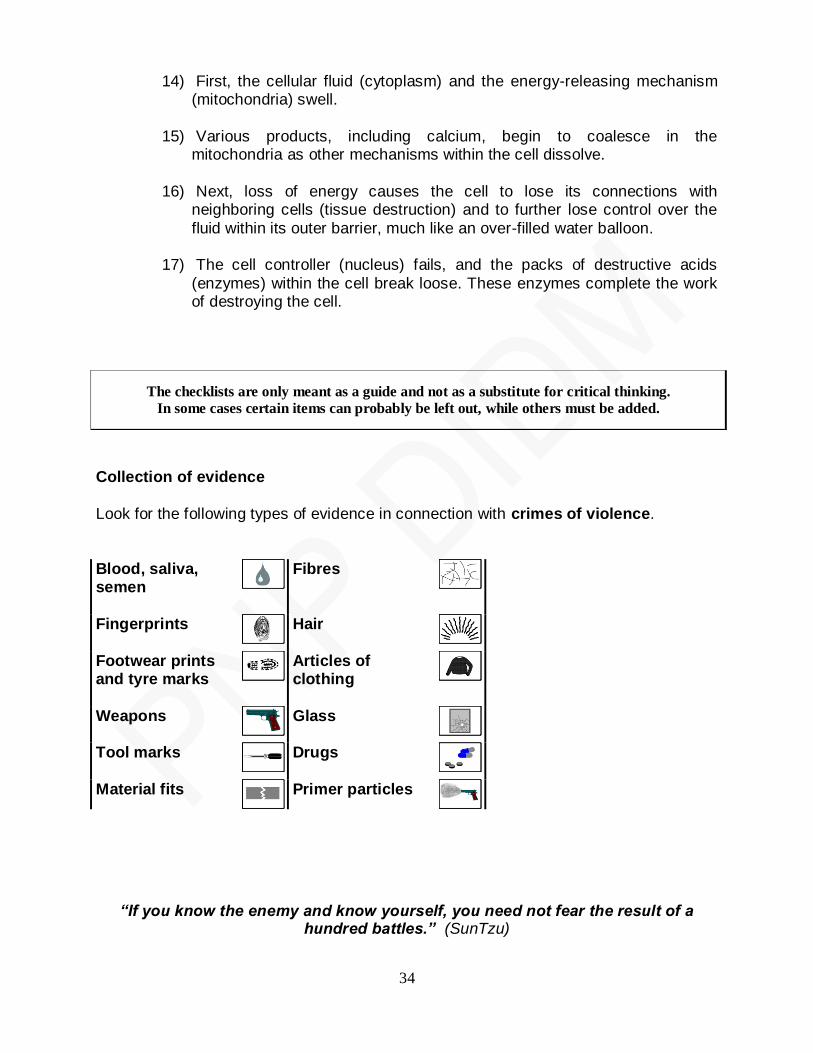
Collection of evidence
Look for the following types of evidence in connection with crimes of violence.
Blood, saliva, semen
Fibres
Fingerprints
Hair
Footwear prints and tyre marks
Articles of clothing
Weapons
Glass
Tool marks
Drugs
Material fits Primer particles
“If you know the enemy and know yourself, you need not fear the result of a hundred battles.” (SunTzu)
The checklists are only meant as a guide and not as a substitute for critical thinking.
In some cases certain items can probably be left out, while others must be added.
35
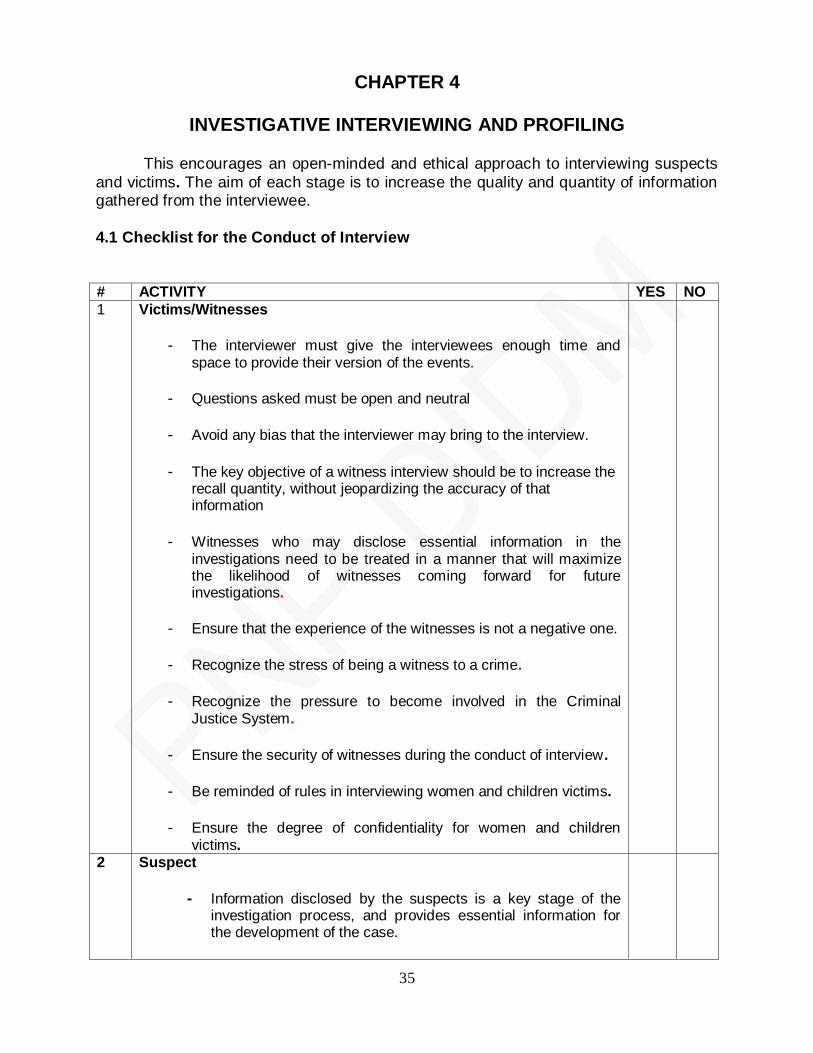
CHAPTER 4
INVESTIGATIVE INTERVIEWING AND PROFILING This encourages an open-minded and ethical approach to interviewing suspects
and victims. The aim of each stage is to increase the quality and quantity of information gathered from the interviewee.
4.1 Checklist for the Conduct of Interview
# ACTIVITY YES NO 1 Victims/Witnesses
- The interviewer must give the interviewees enough time and
space to provide their version of the events.
- Questions asked must be open and neutral
- Avoid any bias that the interviewer may bring to the interview.
- The key objective of a witness interview should be to increase the
recall quantity, without jeopardizing the accuracy of that information
- Witnesses who may disclose essential information in the
investigations need to be treated in a manner that will maximize the likelihood of witnesses coming forward for future investigations.
- Ensure that the experience of the witnesses is not a negative one.
- Recognize the stress of being a witness to a crime.
- Recognize the pressure to become involved in the Criminal
Justice System.
- Ensure the security of witnesses during the conduct of interview.
- Be reminded of rules in interviewing women and children victims.
- Ensure the degree of confidentiality for women and children
victims.
2 Suspect
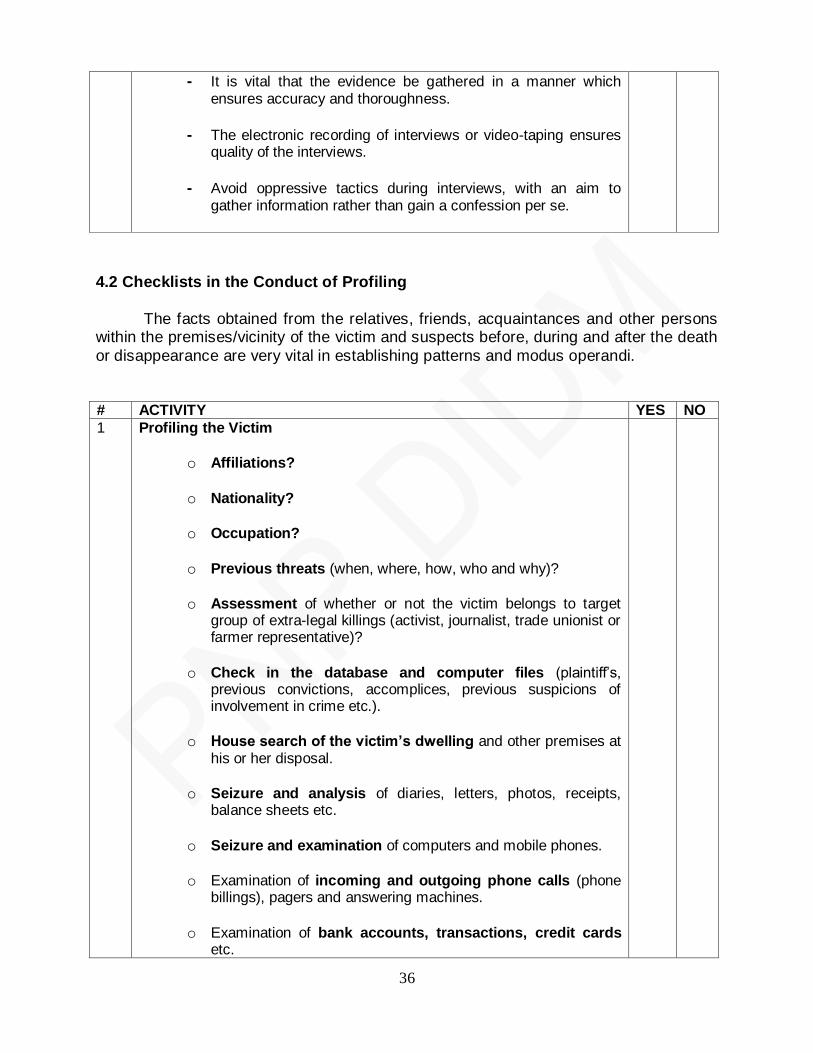
- Information disclosed by the suspects is a key stage of the investigation process, and provides essential information for the development of the case.
36
- It is vital that the evidence be gathered in a manner which ensures accuracy and thoroughness.
- The electronic recording of interviews or video-taping ensures
quality of the interviews.
- Avoid oppressive tactics during interviews, with an aim to gather information rather than gain a confession per se.
4.2 Checklists in the Conduct of Profiling
The facts obtained from the relatives, friends, acquaintances and other persons
within the premises/vicinity of the victim and suspects before, during and after the death
or disappearance are very vital in establishing patterns and modus operandi.
# ACTIVITY YES NO 1 Profiling the Victim
o Affiliations?
o Nationality?
o Occupation?
o Previous threats (when, where, how, who and why)?
o Assessment of whether or not the victim belongs to target
group of extra-legal killings (activist, journalist, trade unionist or farmer representative)?
o Check in the database and computer files (plaintiff‟s, previous convictions, accomplices, previous suspicions of involvement in crime etc.).
o House search of the victim‟s dwelling and other premises at his or her disposal.
o Seizure and analysis of diaries, letters, photos, receipts, balance sheets etc.
o Seizure and examination of computers and mobile phones.
o Examination of incoming and outgoing phone calls (phone billings), pagers and answering machines.
o Examination of bank accounts, transactions, credit cards etc.
37
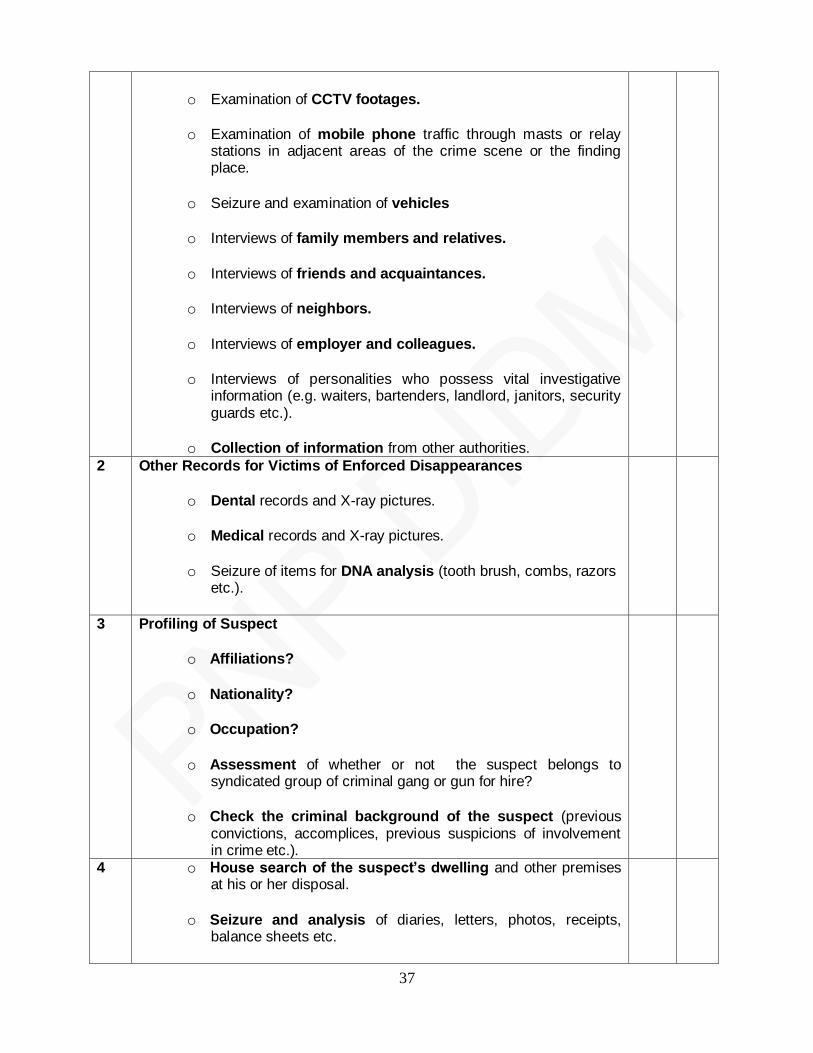
o Examination of CCTV footages.
o Examination of mobile phone traffic through masts or relay
stations in adjacent areas of the crime scene or the finding place.
o Seizure and examination of vehicles
o Interviews of family members and relatives.
o Interviews of friends and acquaintances.
o Interviews of neighbors.
o Interviews of employer and colleagues.
o Interviews of personalities who possess vital investigative
information (e.g. waiters, bartenders, landlord, janitors, security guards etc.).
o Collection of information from other authorities. 2 Other Records for Victims of Enforced Disappearances
o Dental records and X-ray pictures.
o Medical records and X-ray pictures.
o Seizure of items for DNA analysis (tooth brush, combs, razors
etc.).
3 Profiling of Suspect
o Affiliations?
o Nationality?
o Occupation?
o Assessment of whether or not the suspect belongs to
syndicated group of criminal gang or gun for hire?
o Check the criminal background of the suspect (previous convictions, accomplices, previous suspicions of involvement in crime etc.).
4 o House search of the suspect‟s dwelling and other premises at his or her disposal.
o Seizure and analysis of diaries, letters, photos, receipts, balance sheets etc.
38
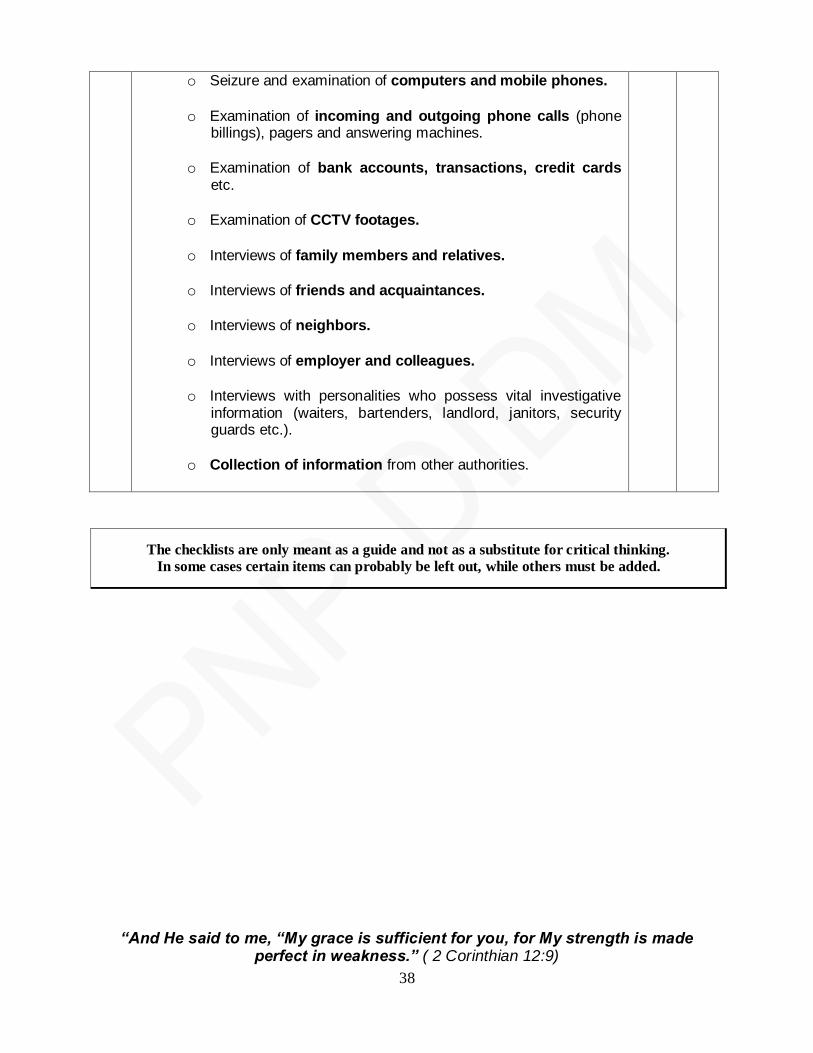
o Seizure and examination of computers and mobile phones.
o Examination of incoming and outgoing phone calls (phone
billings), pagers and answering machines.
o Examination of bank accounts, transactions, credit cards etc.
o Examination of CCTV footages.
o Interviews of family members and relatives.
o Interviews of friends and acquaintances.
o Interviews of neighbors.
o Interviews of employer and colleagues.
o Interviews with personalities who possess vital investigative
information (waiters, bartenders, landlord, janitors, security guards etc.).
o Collection of information from other authorities.
“And He said to me, “My grace is sufficient for you, for My strength is made perfect in weakness.” ( 2 Corinthian 12:9)
The checklists are only meant as a guide and not as a substitute for critical thinking.
In some cases certain items can probably be left out, while others must be added.

39
CHAPTER 5
INVESTIGATION OF OTHER CRIMES
This Chapter enumerates several incidents which the PNP investigator may have
to investigate particularly when it involves serious injuries or the loss of lives. It is imperative to note that, as much as possible, the assistance of the SOCO team must be requested to ensure that the evidence in the crime scene are properly obtained even
as the Investigator-on-case remains in-charge of the crime scene investigation.
5.1 Traffic or Road Accidents
The local police traffic investigator shall investigate all road or traffic accidents. However, in case of Major Traffic Accidents such as those that attract national media
attention or those that involve numerous victims, the local traffic investigator shall immediately inform the nearest PNP Highway Patrol Group Office which shall then take the lead in the investigation under the Special Investigation Task Group (SITG)
which shall be activated to manage the case. While road or traffic accidents may seem ordinary, yet some accidents such as
hit-and-run cases are usually fatal or cause serious injuries to the victims. It is therefore imperative that evidence is collected to help identify and prosecute the suspect.
a. Find out as much as possible about the accident both before going to the scene and upon arrival.
b. Start keeping an action log. c. Cordon off the area or extend the existing cordon if necessary.
d. Take a general photograph of the accident scene. Film the scene with a video
camera.
e. Pause for thought and start planning.
f. Note down your observations continuously. It is a good idea to use a tape recorder.
g. Establish the directions in which the different parties were travelling before the collision. Take photographs in the relevant directions at the same height as the parties were prior to the collision.
h. Draw a sketch. Measure and mark the places where evidence and reference
samples are collected.
i. Photograph and, if appropriate, video continuously. Photograph all damage,
injuries and other evidence.
40
j. Search for and collect trace evidence, objects, reference samples etc. that may be relevant to the accident investigation.
k. Write a continuous seizure report.
Collection of evidence (Refer to Chapter 6 for Collection Procedure)
Look for the following types of evidence in connection with road accidents.
Tyre marks
Glass and paint
Blood
Fibres, pieces of
cloth
Hair
Material fits
Fingerprints
5.2 Robberies (of banks, houses, etc.)
a. Find out as much as possible about the crime before going to the scene and upon arrival.
b. Overview. Take your bearings at the crime scene so that you get a rough picture of the area and what has happened.
c. Start keeping an action log. d. Cordon off the area or extend the existing cordon if necessary. The perpetrator‟s
route to and from the scene may need to be cordoned off as well. e. Make sure that a list is made of the people who enter the crime scene.
f. Pause for thought and start planning. This is where the crime scene analysis
starts.
g. Note down your observations continuously. It is a good idea to use a tape
recorder.
h. Take a general photograph of the crime scene. Film the scene with a video
camera.
i. Search for and collect evidence, objects and reference samples etc. outdoors.
41
j. Search for and collect evidence, objects and reference samples etc. indoors.
k. Take photographs continuously. Photograph all the evidence before it is collected. If possible, engage a photographer for specialized trace evidence photography.
l. If the robbery was video/filmed (CCTV), view the video to see where evidence
might be found.
m. Seize any video recordings and films in still cameras.
n. Draw a sketch. Mark the places where trace evidence and reference samples are collected.
o. Write a continuous seizure report.
p. Find out whether the proceeds of the robbery included bait money.
q. Check the crime scene before you leave it. Make sure that you have not
forgotten anything important, such as interrogation reports, memos, equipment
etc.
Entry route
After a robbery, it is important to investigate how the offender got in. It is important
to find the entry route, which is not necessarily a door. Look at the building from the outside and try to find traces of a break-in or other damage to doors or windows. Check the function of the lock and check whether there are any pick marks.
Ask the victim
Find out from the victim what has been stolen and where there are traces of objects being moved by the perpetrator. That is the place to look for trace evidence.
Latent footwear prints Paper on the floor is always of interest since there may be latent footwear prints on
it. Collect all paper and then look for footwear prints on the paper at your unit or send the papers to the Crime Laboratory for examination. There may also be latent footwear prints on desk pads, chair seats, etc.
The checklists are only meant as a guide and not as a substitute for critical thinking.
In some cases certain items can probably be left out, while others must be added.

42
Collection of evidence (Refer to Chapter 6 for Collection Procedure)
Look for the following types of evidence in connection with robberies.
Hair e.g. robber‟s
hood, near entry point
Video film, still film
Tool marks near point of
entry, on cupboards that
have been broken open
Footwear and glove prints, tyre marks indoors and outdoors
Blood and saliva e.g. bloodstains,
saliva in
robber‟s hood, cigarette-ends
Weapons, bullets and cases
Fingerprints near point of
entry etc.
Glass and paint windows, safes,
near point of
entry
Fibres
Explosives in connection
with safe-breaking
Fibres e.g. near point of
entry
Material fits
Clothes
5.3 Suicide Checklist
a. Find out as much as possible about the crime before going to the scene and upon arrival from the first officer on the scene and any other police officers who
are there.
b. Overview. Take your bearings at the scene so that you get a rough picture of the
area and what has happened. Always bear in mind that a murder may have been committed.
c. Take a general photograph of the scene. Film the scene with a video camera. d. Note down your observations continuously. It is a good idea to use a tape
recorder. e. Decide whether you need help from an expert such as a forensic pathologist,
biologist etc. f. Make a note of signs of death. If possible, measure the body temperature; write
down the relevant times.
The checklists are only meant as a guide and not as a substitute for critical thinking.
In some cases certain items can probably be left out, while others must be added.
43
g. In the case of hanging: cut down the rope so that the knot remains intact for further examination.
h. Hair. Are injuries concealed by hair? Has hair been torn off? Foreign
substances?
i. Check for bleeding in the ears.
j. Check for conjunctival bleeding. k. Examine the root of the nose and nostrils.
l. Check whether there are any foreign objects in the oral cavity.
m. Examine the neck for skin scrapings, red spots and strangulation marks. n. Examine the arms for bruises caused by gripping and resistance.
o. Check for marks made by syringes, especially in the crook of the arm.
p. Examine wrists for old or new cuts. q. Examine the hands and under the nails for injuries due to resistance and for
swellings, hairs and skin fragments. If shots have been fired, collect primer particles from the hands.
r. Cover the hands with paper bags to facilitate the continued search for skin fragments, hairs, fibres etc. during autopsy.
s. Examine the front and back of the body from top to bottom. t. Examine legs and feet. Any blood on the soles of the feet? Any marks or injuries
indicating that the body was dragged? u. Describe and photograph clothes in detail. (To be completed in connection with
the autopsy). Pay attention to creases, damage, bullet-holes, blood spatter, dirt, position on the body etc.
v. Examine the pockets. Make a list of the contents. w. Describe the presence of blood and any other stains on the clothing.
x. The clothes should be taken in charge in connection with the autopsy.
The checklists are only meant as a guide and not as a substitute for critical thinking.
In some cases certain items can probably be left out, while others must be added.
44
Primer particles
If the dead person was shot, it is a good idea to collect primer particles from the hands. This may provide an indication whether or not it is a case of manslaughter/murder.
Photographic documentation
Photographic documentation is an important part of the investigation, as in all
crime-scene investigations. Use plenty of film. Combine still photography and video filming.
The chain of events
It is important in connection with a suicide to be able to exclude the possibility of
murder or homicide. It is therefore important to be able to reconstruct the chain of events. Apart from the collection and preservation of evidence it is therefore very important to „read‟ the crime scene carefully so as to lay a solid foundation for the final
analysis of the crime, with a hypothetical and preferably proven chain of events. Weapons
Recovering weapons calls for especially careful handling for safety reasons. Hold the weapon by a part with a rough surface or by the strap so as not to destroy
any evidence. Always check whether there are any cartridges left in the chamber before doing anything else. Never insert any object, such as a pencil, in the bore or the trigger-guard. Never point the weapon in such a way that someone night be injured by
an accidental shot. Check the safety catch, the signal pin, the slide position and whether or not the magazine is completely pushed in.
Signs of death
When an apparently dead person is found, the signs of death must be documented
with an indication of the time when the observation was made. It is up to a physician to establish death. If there is no doubt that death has occurred, for example if putrefaction has set in or there are obviously fatal injuries, the dead person may be
taken directly to a forensic facility. A physician will issue a death certificate. Signs of death are divided into early and late signs. A physician must establish the early signs of death.
The checklists are only meant as a guide and not as a substitute for critical thinking.
In some cases certain items can probably be left out, while others must be added.

45
Collection of evidence (Refer to Chapter 6 for Collection Procedure)
Look for the following types of evidence and materials in connection with suicide.
Blood, saliva, semen
Articles of clothing
Fingerprints
Drugs
Weapons
Material fits
Primer particles
Written
messages, computer files, e-mail etc.
5.4 Sexual Offenses
In the case of sexual offences the most important trace evidence is often to be
found on the persons involved. It is therefore important to treat these persons in the
same way as crime scenes as regards the collection and preservation of evidence. This is extremely important to avoid contamination. (Refer to 5.10 to 5.14 of the PNP Criminal Investigation Manual 2010).
Checklist
a. Find out as much as possible about the crime before going to the scene and upon arrival from the first responder and any other police officers who are there.
b. Overview. Take your bearings at the crime scene so that you get a rough picture of the area and what has happened.
c. If the victim is a woman or child, immediately refer the matter to the WCPD (Women and Children Protection Desk) of your unit for assistance in the handling of the victim and to ensure that proper procedures are observed. Start
keeping an action log. d. Cordon off the area or extend the existing cordon if necessary
e. Take a general photograph of the crime scene. Film the scene with a video camera.
f. Pause for thought and start planning. This is where the crime scene analysis starts.
g. Note down your observations continuously. It is a good idea to use a tape recorder.
46
h. Decide whether you need help from an expert such as a forensic pathologist,
biologist etc. i. Take photographs continuously. Photograph all the evidence before it is
collected. If possible, engage a photographer for specialized trace evidence photography.
j. Search for and collect evidence, objects and reference samples etc. that are relevant to the crime investigation. Pay attention to the risk of contamination.
k. Write a continuous seizure report. l. Check the crime scene before the cordon is lifted. Make sure that you have not
forgotten anything important, such as interrogation reports. A suspect may enter the crime scene area after the cordon has been lifted, and this must not be allowed to destroy the value of the evidence collected.
Avoid contamination
Crime-scene investigations related to sexual offences may call for a great deal of work and many types of evidence may occur. Be very careful to avoid the risk of cross-contamination. Make sure that different people collect and preserve evidence and
materials in different places. Package materials well and make sure that materials from different scenes are kept separate, or stored in different rooms and handled by different people.
Photographic documentation
Photographic documentation is an important part of the investigation, as in all crime-scene investigations. Use plenty of film. Combine still photography and video filming.
Persons involved
Make sure that both the victim(s) and suspect(s) are taken to a doctor as soon as possible, inter alia to secure forensic evidence. Give the doctor a rape kit, which contains an action logbook and equipment for preservation of evidence. After the
examination, help the doctor to take charge of the persons‟ clothes and preserve the evidence generated by the examination. Also help the doctor by providing information that will make it easier to evaluate what evidence should be preserved. Make sure that
injuries are documented and contamination avoided.
The checklists are only meant as a guide and not as a substitute for critical thinking.
In some cases certain items can probably be left out, while others must be added.
47
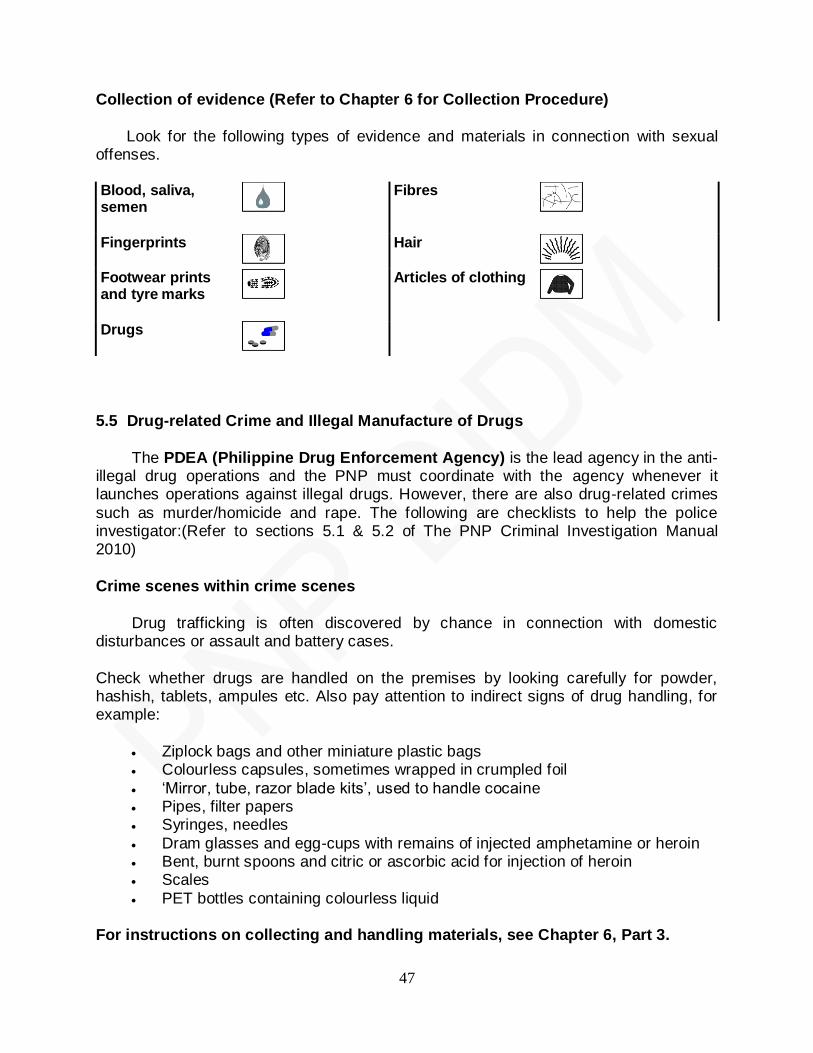
Collection of evidence (Refer to Chapter 6 for Collection Procedure)
Look for the following types of evidence and materials in connection with sexual offenses.
Blood, saliva, semen
Fibres
Fingerprints
Hair
Footwear prints and tyre marks
Articles of clothing
Drugs
5.5 Drug-related Crime and Illegal Manufacture of Drugs
The PDEA (Philippine Drug Enforcement Agency) is the lead agency in the anti-illegal drug operations and the PNP must coordinate with the agency whenever it launches operations against illegal drugs. However, there are also drug-related crimes
such as murder/homicide and rape. The following are checklists to help the police investigator:(Refer to sections 5.1 & 5.2 of The PNP Criminal Investigation Manual 2010)
Crime scenes within crime scenes
Drug trafficking is often discovered by chance in connection with domestic disturbances or assault and battery cases.
Check whether drugs are handled on the premises by looking carefully for powder, hashish, tablets, ampules etc. Also pay attention to indirect signs of drug handling, for example:
Ziplock bags and other miniature plastic bags Colourless capsules, sometimes wrapped in crumpled foil
„Mirror, tube, razor blade kits‟, used to handle cocaine Pipes, filter papers Syringes, needles
Dram glasses and egg-cups with remains of injected amphetamine or heroin Bent, burnt spoons and citric or ascorbic acid for injection of heroin Scales
PET bottles containing colourless liquid For instructions on collecting and handling materials, see Chapter 6, Part 3.

48
There are instant drug test kits for tests of suspected amphetamine, heroin, cocaine and cannabis. These tests can be performed on site and provide a preliminary
answer within a few minutes. Do not use test kits in the following cases:
If the powder is not soluble in water. The material may consist of explosives,
which may explode when they come into contact with the liquid in the test kit.
If there is a very small quantity of material, i.e. trace quantities. If the suspected drugs are in liquid form
Drug laboratories
Extreme caution must be taken in connection with operations against illegal drug
laboratories, since the following may be present: Booby traps Persons who are armed
Persons who use chemicals as weapons Corrosive, flammable, hazardous (toxic) and explosive substances Air that is polluted by solvents and chemicals
Hydrogen gas, which forms explosive mixtures with air – do not switch on the lights.
The chemicals that are handled in illegal drug laboratories occur in various mixtures, in ongoing processes, in open vessels or in any form other than in closed original packages. As a result, such substances/chemicals may be or become
explosive, flammable, corrosive or hazardous. In the event of any uncertainty, seek assistance of experts.
Checklist for investigations in connection with production of illegal drugs
a. Find out as much as possible about the accident both before going to the scene
and upon arrival. b. Decide whether you need help, for example from a chemist from the SNLFS, or
a bomb technician. Always contact the PDEA before action is taken against a drug laboratory.
c. Start keeping an action log. d. Cordon off the area or extend the existing cordon if necessary.
e. Carry out a security check. Wearing appropriate protective clothing, scene-of-
crime officers are to check for traps, after which the chemist assesses the risks
associated with the handling of chemicals. f. Turn off the heat for the still, hot plate etc. NB: Do not turn off the water or
cooling and ventilation fans.
49
g. Make sure that a list is made of the people who enter the crime scene.
h. Take a general photograph of the crime scene. Film the scene with a video
camera.
i. Pause for thought and start planning.
j. Note down your observations continuously. Take photographs continuously. Photograph all the evidence before it is collected and all places where there is laboratory equipment. If possible, engage a photographer, in particular for
specialized trace evidence photography. k. Make a sketch. Mark the places where evidence and reference samples are
collected. l. Search for and collect evidence, objects and reference samples etc. that are
relevant to the crime investigation. m. Write a continuous seizure report.
n. Check the crime scene before the cordon is lifted. Make sure that you have not
forgotten anything important, such as interrogation reports. A suspect may enter
the crime scene area after the cordon has been lifted, and this must not be allowed to destroy the value of the evidence collected.
Search and secure
Seize any documents that indicate the extent of production, perpetrators or
buyers. Look for receipts, bills, delivery notes etc.
Where drug production is suspected, take samples from the various stages of
the production process. Samples of ventilation ducts, fans and water seals may be useful. Wipe any waste chemicals/drugs with a cotton compress soaked in an alcohol mixture (about 80%).
Seize packaging material, e.g. bags, rolls of plastic bags and tape. These can
then be used to compare with corresponding materials from other seizures and used as
a basis for calculation of the amounts produced. 5.6 Fires
While fire incidents are the primary responsibility of the Bureau of fire, some fire incidents may be fatal resulting to the loss of lives and as such it may turn out to be a
homicide or even a murder investigation. Arson investigation is highly technical and as much as possible arson investigators as well as SOCO team must be employed. (Refer to Section 3.10.22 and 23 of the PNP Criminal Investigation Manual 2010).

50
Checklist for investigations of fire causes
1. Find out as much as possible about the fire before going to the scene and upon arrival. Obtain information from the rescue services, from the owners of the building, from people who were in it and from neighbours and eyewitnesses.
2. If the fire is still burning or was recently extinguished:
Make notes of any observations on the way to the scene of the fire. Examples
of interesting observations are oncoming vehicles and persons near the fire scene.
3. If the fire is still burning when you arrive: Take photographs, video film and make a note of the times when different things happen.
4. Cordon off the area or extend the existing cordon if necessary.
5. Make sure that a list is made of the people who enter the fire scene. 6. Preliminary orientation. Start immediately after extinction of the fire. Study fire
damage and fire behaviour. Decide whether to call in personnel from the SNLFS or other experts.
7. Preliminary determination of the origin of the fire. Get help from the incident commander and the firemen who arrived on the scene first.
8. Initial debris removal. Before debris is removed, the whole building must be photographed and video filmed both inside and outside.
9. Final debris removal and cleanup. Start from the outside and work towards the point(s) of origin. Photograph all objects found before they are moved. Photograph and document rooms less affected by fire damage and undamaged
rooms too. 10. Carry out a reconstruction. Put all objects back in their original places.
Photograph and video film the uncovered area both with and without the objects. 11. Establish the origin of the fire.
12. Investigate any potential fire sources.
13. Establish the possible cause of the fire. Information
It is important to make a written record of interrogations at an early stage. Often, it is very important to get answers to a large number of questions before debris removal
starts. The information received may give contradictory indications as to the primary fire
51
area. Particular caution may therefore be called for when debris is removed from certain areas.
Preliminary orientation
Study the fire damage and fire development without disturbing the remnants of the fire. Try to obtain a preliminary idea of where the fire might have started. In the case of fatal fires, find out whether the dead person was alive when the fire started. Bear in
mind that the fire may have been started in order to conceal another crime. Come to an agreement with the Salvage Officer so that he/she can go about his/her business without interfering with the investigation.
Preliminary determination of the origin of the fire
The origin of the fire is determined on the basis of the information obtained during the extinction phase together with the results of the preliminary orientation. It must be borne in mind that this is only a preliminary assessment, which is to be used to decide
where debris is to be removed first. Compare your theory with the information received. Guideline: Where did most of the burning take place and where is the lowest area
affected by fire damage? That is the place to start looking for the origin of the fire. If this assessment leads to the conclusion that there may be more than one point of
ignition, the removal of debris will have to be carried out with extra caution. Initial debris removal
Start by photographing and video filming outdoors and indoors. Debris should first be removed from the room or rooms that are considered to be where the point(s) of
ignition is/are. Other rooms where fire behaviour appears unusual should also be examined. Bulky material that has fallen down in the area should be removed at this stage.
Final debris removal and cleanup
Work from the outside towards the assumed point of ignition, layer by layer from top to bottom. Make notes and take photographs while removal is in progress. Save objects that are found as it may be used for the subsequent reconstruction. Make a note of any
electrical devices and related wiring in the primary area. Other material of particular interest includes candle remnants, wicks, matches etc. Pay attention to odours. If you suspect that the fire was incendiary with flammable liquid, recover suitable material and
package it in fire bags.
When all debris has been removed, the floor in the origin area should be uncovered
and it should be possible to sweep it so that it can be studied with regard to fire damage and spread.
52
Reconstruction
Return all the objects that have been found to their original places. Study the objects in relation to the burn patterns on the floor and walls. Photograph and video film the uncovered area both with and without the associated objects. Draw a sketch of the
rooms showing the furniture and interesting objects that were found. Establish the primary fire area
The origin of the fire is established on the basis of the findings described above, including examination of electrical installations.
Check potential fire sources
Note down all the potential fire sources in the origin area. Recover such fire sources and have them examined by experts where appropriate. Examine fireplaces, chimneys, chemical products etc.
Collection of evidence (Refer to Chapter 6 for Collection Procedure)
Look for the following types of evidence and materials, among others, in connection with investigations of fire causes. Material from fire scenes
Footwear and glove prints, tyre marks
Fingerprints
Tool marks near point of entry
Glass and paint
Blood and saliva e.g. cigarette-ends
The checklists are only meant as a guide and not as a substitute for critical thinking.
In some cases certain items can probably be left out, while others must be added.
5.7 Explosions of Bombs and Other Explosive or Gaseous Materials
Explosions are one of the most serious incidents which may cause loss of lives and damage to property. The First Responder and the Investigator-on-case must, as soon as possible, assess whether the explosion may have been caused by a bomb or a terrorist attack. If there are any indications that it is so, the matter must immediately
be elevated to higher headquarters of the PNP to decide on how to handle the situation. (Refer to Section 5.5 of the PNP Criminal Investigation Manual 2010)
53
The following checklists apply to explosions: Checklist for suspected bombs
Checklist for post-explosion investigations Checklist for house searches in connection with suspected illegal production of
bombs and/or explosives
Checklist for Suspected Bombs
Bomb technicians must defuse bombs.
Turn off your radio and mobile phone. Do not switch on any lights on the premises.
Do not go any closer than absolutely necessary!
a. Before entering the area, ask the person who reported the bomb the following
questions in a protected place: What is the object? Where is it exactly?
When was it discovered? Who discovered it? Does anyone know why the object is there?
Have any threats been made? Has anyone touched the object? Does the object emit any sound or smell?
What does the surrounding area look like? (Any signs of splinters?) b. Contact the duty decision-maker as soon as possible in order to reach a
decision, on the basis of the information you have obtained, whether or not to cordon off the area, evacuate it and call in bomb technicians.
c. Evacuate and cordon off a sufficiently large area. d. Guard the cordoned off area and wait for the bomb technicians who are to
defuse the bomb. Checklist for Post-Explosion Investigations
a. Find out as much as possible about the explosion both before going to the scene and upon arrival. Find out what the area looked like before the explosion. Obtain drawings, pictures etc.
b. Assess the risk of further explosions.
c. Start keeping an action log. d. Cordon off the area or extend the existing cordon if necessary.
54
e. Make sure that a list is made of the people who enter the explosion site.
f. Preliminary orientation. Study the explosion damage. Decide whether to call in other experts.
g. Preliminary assessment. Determine the type of explosion, the explosion centre, effects of the blast etc.
h. Photograph and video film the area before debris is removed. i. Take steps to ensure that there are no undetonated explosives on the primary
detonation site. j. Remove all debris from the primary detonation site. Photograph all objects found
before they are removed. Take samples of all relevant materials found in the area for examination in the laboratory. Look for parts of the bomb. To facilitate reconstruction of the original location of objects, a grid of squares can be made
and materials found in each square can be collected in a special container. k. Photograph and document even rooms that have not suffered much damage
and undamaged rooms. l. Document craters, if any. Measure and make a note of the slope, diameter,
depth and type of soil/substratum. m. Draw a sketch. Mark the places where trace evidence and reference samples
are collected. n. Search for and collect evidence, objects and reference samples etc. Look
carefully for explosion residues and bomb parts. o. Take photographs continuously. Photograph all the evidence before it is
collected. If possible, engage a photographer for specialized trace evidence photography.
p. Write a continuous seizure report. Checklist for House Searches In Connection With Suspected Illegal Production
of Bombs and/or Explosives Warning! This kind of house search calls for caution. Call in experts in order to minimize the risk of accidents.
a. Find out as much as possible about the accident both before going to the scene
and upon arrival.
b. Decide whether you need help from bomb technicians, chemists from the SNLFS
or other experts.
55
c. Start keeping an action log.
d. Take a general photograph of the site. Film the scene with a video camera.
e. Pause for thought and start planning. f. Note down your observations continuously. Take photographs continuously.
Photograph all the evidence before it is collected. g. Draw a sketch. Measure and mark the places where objects, evidence and
reference samples are collected. h. Search for and collect evidence, objects and reference samples etc. that are
relevant to the crime investigation. i. Write a continuous seizure report.
Information
It is important to keep track of information obtained during interrogations at an early stage. Often, it is very important to obtain a great deal of information before an explosion site is cleared up.
Assess the risk of further explosions
Are there any more explosive devices? Is there any risk of gas emissions? Take no risks. Make sure that a sufficiently large area is cordoned off and guarded. Wait until it is possible to make more reliable assessments. It may be necessary to call in experts
before you make the final assessment. Preliminary orientation
Study the damage caused by the explosion without displacing the explosion residues. Try to obtain a preliminary picture of where the explosion centre is. If there are
any fatal casualties, the bodies should be examined in accordance with the instructions in the chapter on crimes of violence. If there are any explosion remnants on the victim(s), collect and preserve them.
Initial assessment
The initial assessment of the type of explosion, explosion centre etc. will be used as the point of departure for where and how debris removal is to take place.
Initial debris removal
Start by photographing and video filming the damaged area and the immediate
surroundings. Debris should first be removed from the room or rooms that are

56
considered to be the explosion centre. Bulky material that has fallen down in the area should be removed at this stage.
Final debris removal and cleanup
Work from the outside towards the assumed explosion centre, layer by layer from top to bottom. Make notes and take photographs while removal is in progress. Save objects that are found for subsequent reconstruction. Look for and secure remains of
explosives and bombs (pieces of tape, timer components etc.). If bomb sniffers or explosive spray are available, they can be used to determine where material should be collected.
The explosion centre should be uncovered as a result of the removal of debris at
this stage, making it possible to study the crater, if there is one. If so, document the
crater by measuring and noting down the slope, diameter, depth, type of soil etc. Take photographs.
Collection of evidence (Refer to Chapter 6 for Collection Procedure)
Look for the following types of evidence, among others, in connection with explosions.
Material from explosions
Footwear and glove prints, tyre marks indoors and outdoors
Fingerprints
Tool marks near point of entry
Glass and paint
Blood and saliva e.g. cigarette-ends
Material fits
5.8 Poisoning
Where poisoning is suspected, the scene must be searched for remains of the
substances that may have been used for the poisoning or information (receipts, prescriptions etc.) about the poison that was used. If a material (wine, beer etc.) is to be sent to the Crime Lab for a toxicity test, it is a great advantage if corresponding
reference material (e.g. an unopened bottle of the same sort) can be sent with it. An accurate description of the incident should be enclosed so that the laboratory is informed, if possible, of the type of poison that may have been used.
Blood and urine samples from the victim are to be sent to the Crime laboratory
for analysis.
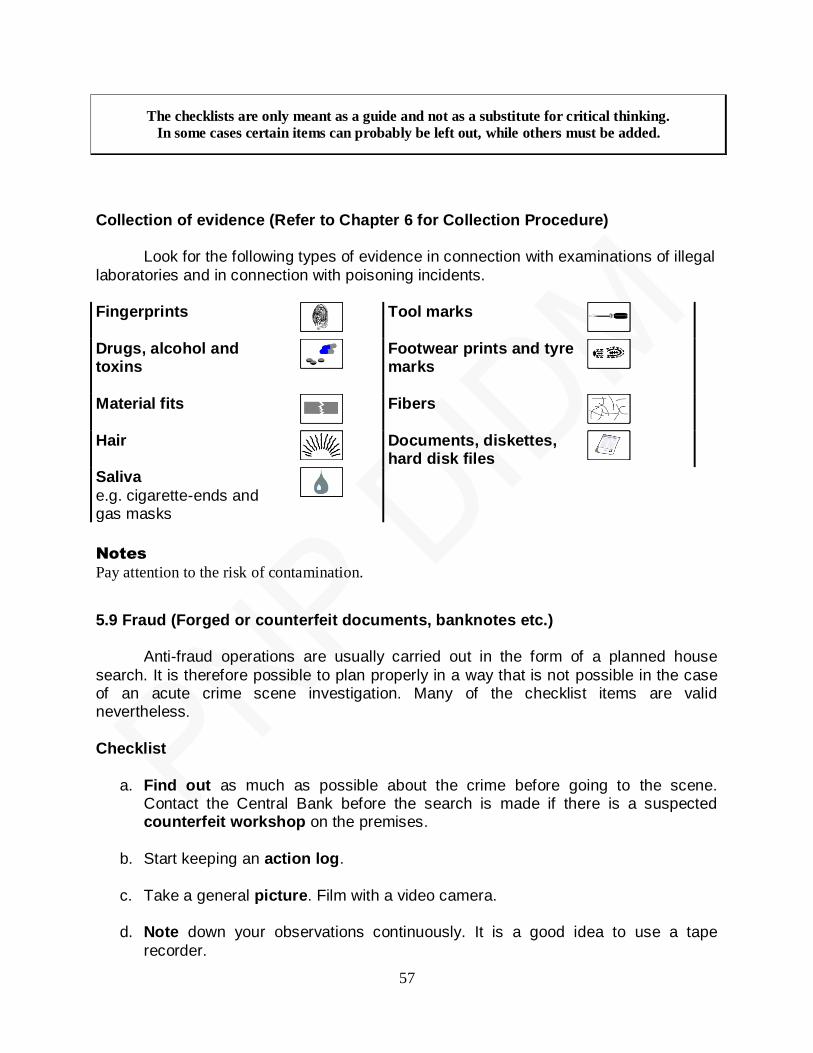
57
Collection of evidence (Refer to Chapter 6 for Collection Procedure)
Look for the following types of evidence in connection with examinations of illegal
laboratories and in connection with poisoning incidents. Fingerprints
Tool marks
Drugs, alcohol and toxins
Footwear prints and tyre marks
Material fits
Fibers
Hair
Documents, diskettes, hard disk files
Saliva
e.g. cigarette-ends and gas masks
Notes
Pay attention to the risk of contamination.
5.9 Fraud (Forged or counterfeit documents, banknotes etc.)
Anti-fraud operations are usually carried out in the form of a planned house
search. It is therefore possible to plan properly in a way that is not possible in the case of an acute crime scene investigation. Many of the checklist items are valid nevertheless.
Checklist
a. Find out as much as possible about the crime before going to the scene. Contact the Central Bank before the search is made if there is a suspected counterfeit workshop on the premises.
b. Start keeping an action log.
c. Take a general picture. Film with a video camera. d. Note down your observations continuously. It is a good idea to use a tape
recorder.
The checklists are only meant as a guide and not as a substitute for critical thinking.
In some cases certain items can probably be left out, while others must be added.
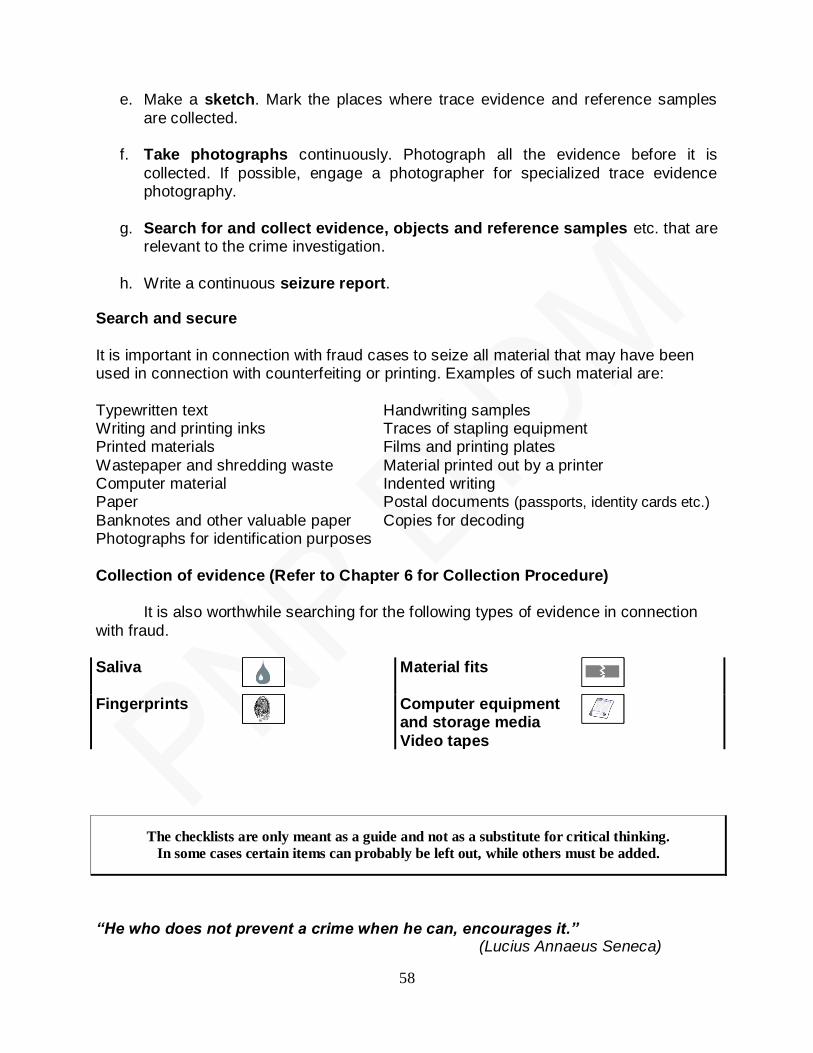
58
e. Make a sketch. Mark the places where trace evidence and reference samples
are collected. f. Take photographs continuously. Photograph all the evidence before it is
collected. If possible, engage a photographer for specialized trace evidence photography.
g. Search for and collect evidence, objects and reference samples etc. that are relevant to the crime investigation.
h. Write a continuous seizure report.
Search and secure
It is important in connection with fraud cases to seize all material that may have been used in connection with counterfeiting or printing. Examples of such material are:
Typewritten text Handwriting samples Writing and printing inks Traces of stapling equipment Printed materials Films and printing plates
Wastepaper and shredding waste Material printed out by a printer Computer material Indented writing Paper Postal documents (passports, identity cards etc.)
Banknotes and other valuable paper Copies for decoding Photographs for identification purposes
Collection of evidence (Refer to Chapter 6 for Collection Procedure)
It is also worthwhile searching for the following types of evidence in connection
with fraud. Saliva
Material fits
Fingerprints
Computer equipment and storage media
Video tapes
“He who does not prevent a crime when he can, encourages it.” (Lucius Annaeus Seneca)
The checklists are only meant as a guide and not as a substitute for critical thinking.
In some cases certain items can probably be left out, while others must be added.
59
PART III – EVIDENCE COLLECTION
CHAPTER 6
EVIDENCE COLLECTION, HANDLING AND TRANSPORTATION
In the conduct of crime scene investigation for crimes of violence and other crimes, the crime scene processing or the evidence collection, handling and
transportation shall primarily be conducted by the SOCO specialists of Crime Laboratory. However, in some instances the First Responder or the Investigator-on-case may have to collect evidence that might otherwise be destroyed or
contaminated if uncollected. In such cases, the collection should be properly handled and documented. The following procedures are set as guide not only for the SOCO team but may also apply to any crime scene investigator in the collection and handling
of evidence. The collection and submission of standard samples for comparison, however, must be done by the Crime Laboratory.
6.1 General Rules for the Collection and Preservation of Biological Materials
a. Use protective gloves.
1) If possible, avoid touching individual smears/traces. Remember that
gloves can entail a risk of contamination.
2) Change gloves after handling each kind of material and otherwise as
necessary.
3) Use disposable equipment for preliminary tests and collection of trace
evidence.
4) Cover surfaces where materials are to be placed with protective paper.
Keep victims‟ and suspects‟ clothes separate.
b. Avoid coughing or sneezing on evidence/materials.
c. Packaging of biological materials.
1) Use paper packaging for all biological materials or materials that are
soiled with biological matter. Although plastic bags are useful in many
cases, they cannot be recommended for routine use on account of residual moisture.
2) Separate outer packages are to be used for trace evidence and for clothes from persons involved.
3) Do not mix materials/samples from different people, for example clothes, in the same parcel.
60
4) Fold the opening of the bag twice and seal with tape. Envelopes should also be sealed with tape.
d. Special precautions
1) Make an explicit note if a person from whom material has been collected is suspected of having an infectious disease.
2) Prevent contamination by avoiding all contact between collected evidence and clothes seized from people.
3) Packages containing collected materials must not be opened until the examination in the laboratory is to commence. The only exception is when moist or wet material must be dried out under normal room conditions.
6.2 The Collection and Preservation of Blood Type of evidence/samples
Procedure Packing/storage
Blood on removable materials
Remove the whole object Put each piece of material in a paper packaging and seal with tape. If the material is wet or moist, pack each piece of material in a plastic bag sealed with tape. Open and allow to dry on arrival at the police station. Send to the PNP CL in wrapping paper or an envelope.
Pools of blood
Collect blood on some swabs. In the case of larger accumulations of blood, take several samples from various places.
Put the swabs in the swab wrapper or a folded piece of paper. Package in an envelope, store dry and cool.
Blood in Water
Collect on several swabs. Put the swabs in the swab wrapper or a folded piece of paper. Package in an envelope, store dry and cool.
Collect water with a clean pipette or syringe.
Pour the water into a clean, dry test tube with a cork or a vacuum tube with a purple cork.
The checklists are only meant as a guide and not as a substitute for critical thinking.
In some cases certain items can probably be left out, while others must be added.
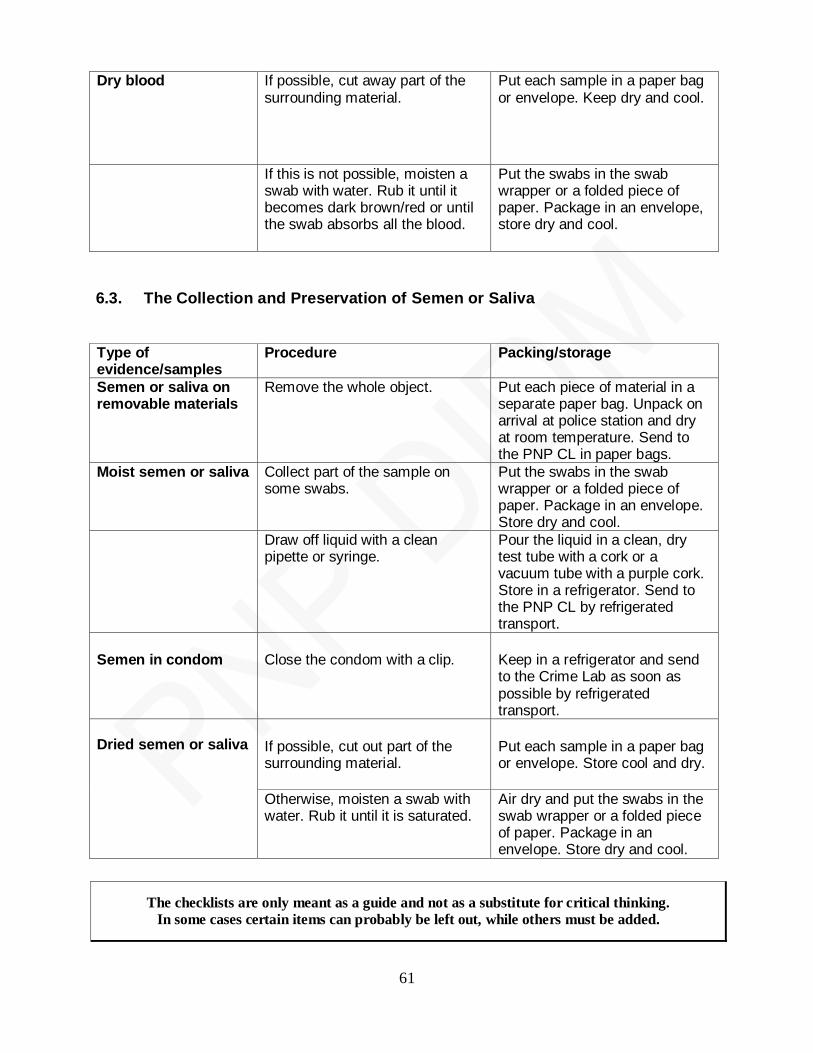
61
Dry blood If possible, cut away part of the surrounding material.
Put each sample in a paper bag or envelope. Keep dry and cool.
If this is not possible, moisten a swab with water. Rub it until it becomes dark brown/red or until the swab absorbs all the blood.
Put the swabs in the swab wrapper or a folded piece of paper. Package in an envelope, store dry and cool.
6.3. The Collection and Preservation of Semen or Saliva Type of evidence/samples
Procedure Packing/storage
Semen or saliva on removable materials
Remove the whole object. Put each piece of material in a separate paper bag. Unpack on arrival at police station and dry at room temperature. Send to the PNP CL in paper bags.
Moist semen or saliva Collect part of the sample on some swabs.
Put the swabs in the swab wrapper or a folded piece of paper. Package in an envelope. Store dry and cool.
Draw off liquid with a clean pipette or syringe.
Pour the liquid in a clean, dry test tube with a cork or a vacuum tube with a purple cork. Store in a refrigerator. Send to the PNP CL by refrigerated transport.
Semen in condom
Close the condom with a clip.
Keep in a refrigerator and send to the Crime Lab as soon as possible by refrigerated transport.
Dried semen or saliva
If possible, cut out part of the surrounding material.
Put each sample in a paper bag or envelope. Store cool and dry.
Otherwise, moisten a swab with water. Rub it until it is saturated.
Air dry and put the swabs in the swab wrapper or a folded piece of paper. Package in an envelope. Store dry and cool.
The checklists are only meant as a guide and not as a substitute for critical thinking.
In some cases certain items can probably be left out, while others must be added.
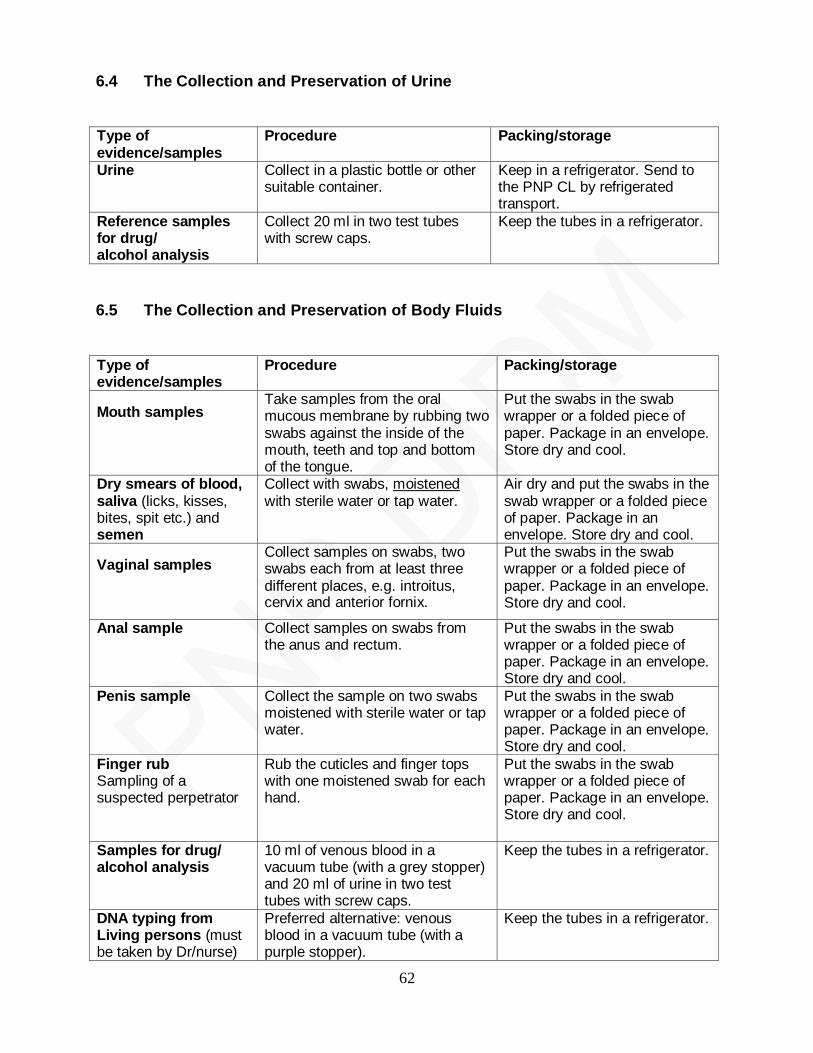
62
6.4 The Collection and Preservation of Urine
Type of evidence/samples
Procedure Packing/storage
Urine Collect in a plastic bottle or other suitable container.
Keep in a refrigerator. Send to the PNP CL by refrigerated transport.
Reference samples for drug/ alcohol analysis
Collect 20 ml in two test tubes with screw caps.
Keep the tubes in a refrigerator.
6.5 The Collection and Preservation of Body Fluids
Type of evidence/samples
Procedure Packing/storage
Mouth samples Take samples from the oral mucous membrane by rubbing two swabs against the inside of the mouth, teeth and top and bottom of the tongue.
Put the swabs in the swab wrapper or a folded piece of paper. Package in an envelope. Store dry and cool.
Dry smears of blood, saliva (licks, kisses, bites, spit etc.) and semen
Collect with swabs, moistened with sterile water or tap water.
Air dry and put the swabs in the swab wrapper or a folded piece of paper. Package in an envelope. Store dry and cool.
Vaginal samples Collect samples on swabs, two swabs each from at least three different places, e.g. introitus, cervix and anterior fornix.
Put the swabs in the swab wrapper or a folded piece of paper. Package in an envelope. Store dry and cool.
Anal sample Collect samples on swabs from the anus and rectum.
Put the swabs in the swab wrapper or a folded piece of paper. Package in an envelope. Store dry and cool.
Penis sample Collect the sample on two swabs moistened with sterile water or tap water.
Put the swabs in the swab wrapper or a folded piece of paper. Package in an envelope. Store dry and cool.
Finger rub Sampling of a suspected perpetrator
Rub the cuticles and finger tops with one moistened swab for each hand.
Put the swabs in the swab wrapper or a folded piece of paper. Package in an envelope. Store dry and cool.
Samples for drug/ alcohol analysis
10 ml of venous blood in a vacuum tube (with a grey stopper) and 20 ml of urine in two test tubes with screw caps.
Keep the tubes in a refrigerator.
DNA typing from Living persons (must be taken by Dr/nurse)
Preferred alternative: venous blood in a vacuum tube (with a purple stopper).
Keep the tubes in a refrigerator.
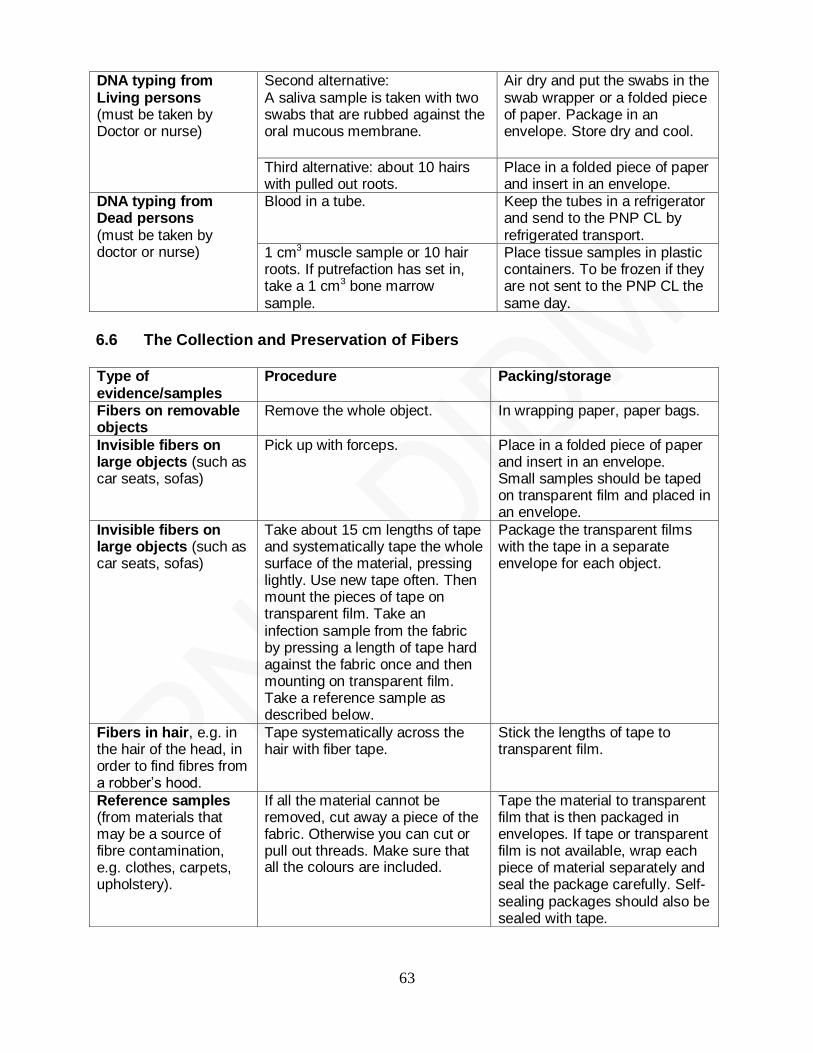
63
DNA typing from Living persons (must be taken by Doctor or nurse)
Second alternative: A saliva sample is taken with two swabs that are rubbed against the oral mucous membrane.
Air dry and put the swabs in the swab wrapper or a folded piece of paper. Package in an envelope. Store dry and cool.
Third alternative: about 10 hairs with pulled out roots.
Place in a folded piece of paper and insert in an envelope.
DNA typing from Dead persons (must be taken by doctor or nurse)
Blood in a tube. Keep the tubes in a refrigerator and send to the PNP CL by refrigerated transport.
1 cm3 muscle sample or 10 hair roots. If putrefaction has set in, take a 1 cm3 bone marrow sample.
Place tissue samples in plastic containers. To be frozen if they are not sent to the PNP CL the same day.
6.6 The Collection and Preservation of Fibers
Type of evidence/samples
Procedure Packing/storage
Fibers on removable objects
Remove the whole object. In wrapping paper, paper bags.
Invisible fibers on large objects (such as car seats, sofas)
Pick up with forceps. Place in a folded piece of paper and insert in an envelope. Small samples should be taped on transparent film and placed in an envelope.
Invisible fibers on large objects (such as car seats, sofas)
Take about 15 cm lengths of tape and systematically tape the whole surface of the material, pressing lightly. Use new tape often. Then mount the pieces of tape on transparent film. Take an infection sample from the fabric by pressing a length of tape hard against the fabric once and then mounting on transparent film. Take a reference sample as described below.
Package the transparent films with the tape in a separate envelope for each object.
Fibers in hair, e.g. in the hair of the head, in order to find fibres from a robber‟s hood.
Tape systematically across the hair with fiber tape.
Stick the lengths of tape to transparent film.
Reference samples (from materials that may be a source of fibre contamination, e.g. clothes, carpets, upholstery).
If all the material cannot be removed, cut away a piece of the fabric. Otherwise you can cut or pull out threads. Make sure that all the colours are included.
Tape the material to transparent film that is then packaged in envelopes. If tape or transparent film is not available, wrap each piece of material separately and seal the package carefully. Self-sealing packages should also be sealed with tape.
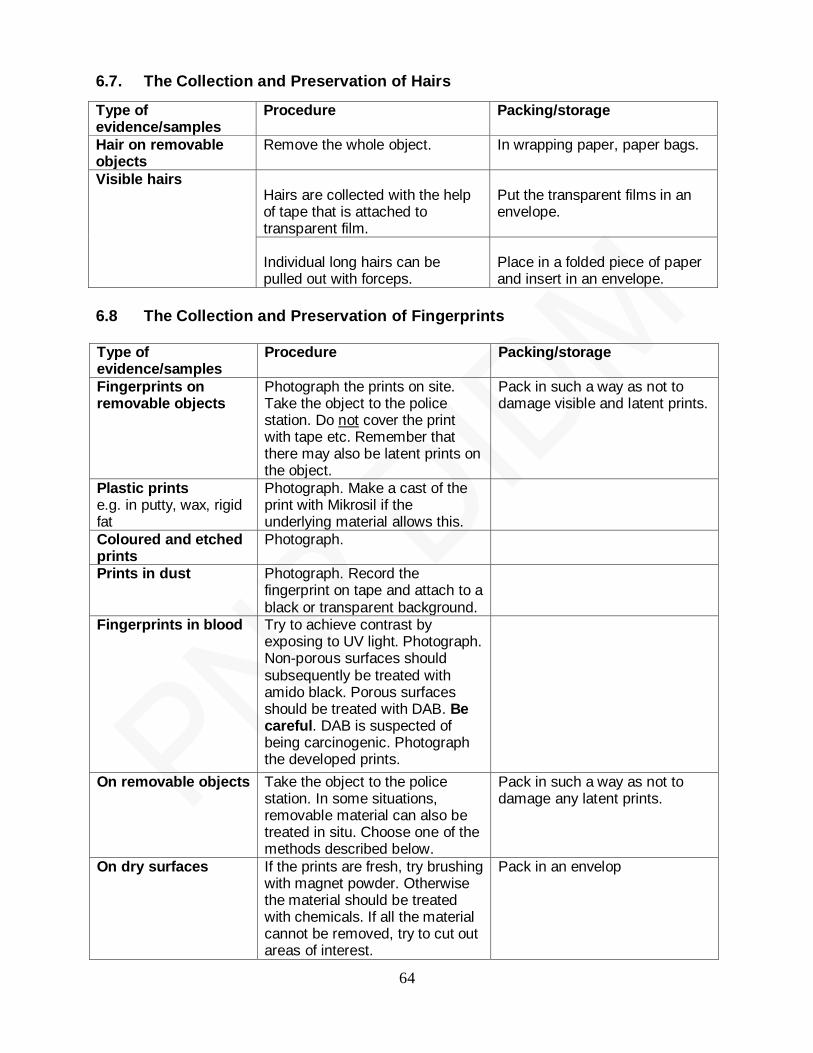
64
6.7. The Collection and Preservation of Hairs
6.8 The Collection and Preservation of Fingerprints Type of evidence/samples
Procedure Packing/storage
Fingerprints on removable objects
Photograph the prints on site. Take the object to the police station. Do not cover the print with tape etc. Remember that there may also be latent prints on the object.
Pack in such a way as not to damage visible and latent prints.
Plastic prints e.g. in putty, wax, rigid fat
Photograph. Make a cast of the print with Mikrosil if the underlying material allows this.
Coloured and etched prints
Photograph.
Prints in dust Photograph. Record the fingerprint on tape and attach to a black or transparent background.
Fingerprints in blood Try to achieve contrast by exposing to UV light. Photograph. Non-porous surfaces should subsequently be treated with amido black. Porous surfaces should be treated with DAB. Be careful. DAB is suspected of being carcinogenic. Photograph the developed prints.
On removable objects Take the object to the police station. In some situations, removable material can also be treated in situ. Choose one of the methods described below.
Pack in such a way as not to damage any latent prints.
On dry surfaces
If the prints are fresh, try brushing with magnet powder. Otherwise the material should be treated with chemicals. If all the material cannot be removed, try to cut out areas of interest.
Pack in an envelop
Type of evidence/samples
Procedure Packing/storage
Hair on removable objects
Remove the whole object. In wrapping paper, paper bags.
Visible hairs Hairs are collected with the help of tape that is attached to transparent film.
Put the transparent films in an envelope.
Individual long hairs can be pulled out with forceps.
Place in a folded piece of paper and insert in an envelope.
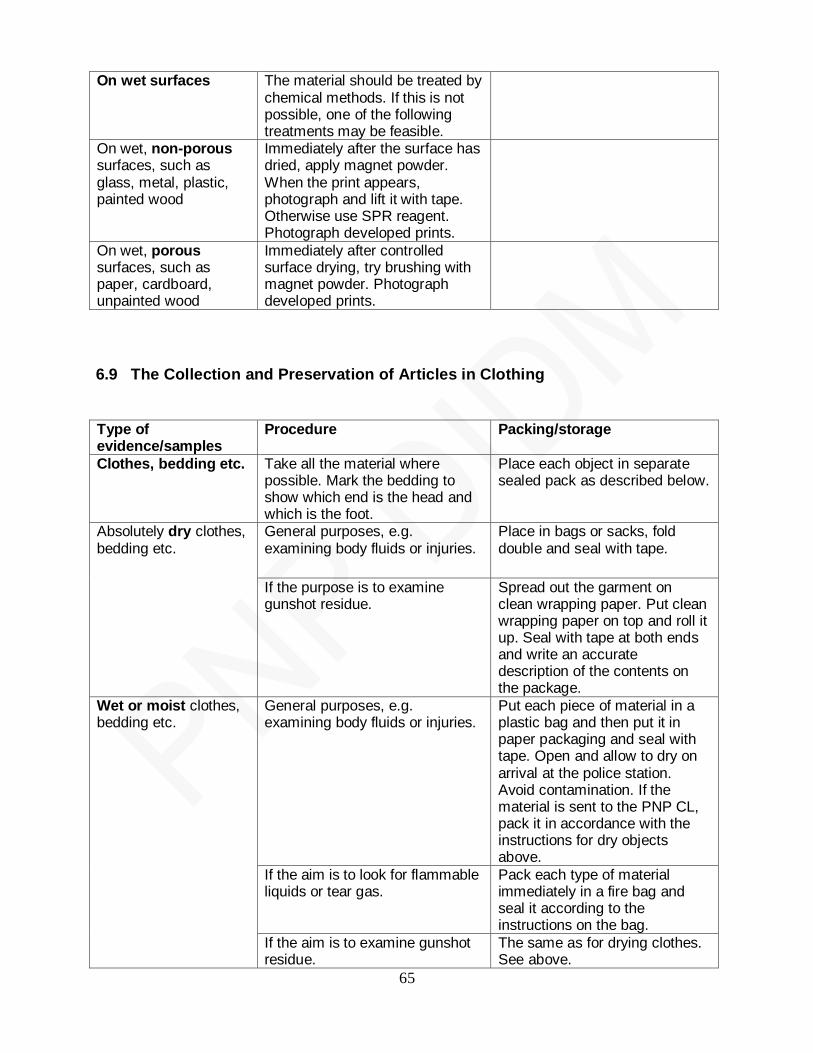
65
On wet surfaces The material should be treated by chemical methods. If this is not possible, one of the following treatments may be feasible.
On wet, non-porous surfaces, such as glass, metal, plastic, painted wood
Immediately after the surface has dried, apply magnet powder. When the print appears, photograph and lift it with tape. Otherwise use SPR reagent. Photograph developed prints.
On wet, porous surfaces, such as paper, cardboard, unpainted wood
Immediately after controlled surface drying, try brushing with magnet powder. Photograph developed prints.
6.9 The Collection and Preservation of Articles in Clothing
Type of evidence/samples
Procedure Packing/storage
Clothes, bedding etc. Take all the material where possible. Mark the bedding to show which end is the head and which is the foot.
Place each object in separate sealed pack as described below.
Absolutely dry clothes, bedding etc.
General purposes, e.g. examining body fluids or injuries.
Place in bags or sacks, fold double and seal with tape.
If the purpose is to examine gunshot residue.
Spread out the garment on clean wrapping paper. Put clean wrapping paper on top and roll it up. Seal with tape at both ends and write an accurate description of the contents on the package.
Wet or moist clothes, bedding etc.
General purposes, e.g. examining body fluids or injuries.
Put each piece of material in a plastic bag and then put it in paper packaging and seal with tape. Open and allow to dry on arrival at the police station. Avoid contamination. If the material is sent to the PNP CL, pack it in accordance with the instructions for dry objects above.
If the aim is to look for flammable liquids or tear gas.
Pack each type of material immediately in a fire bag and seal it according to the instructions on the bag.
If the aim is to examine gunshot residue.
The same as for drying clothes. See above.
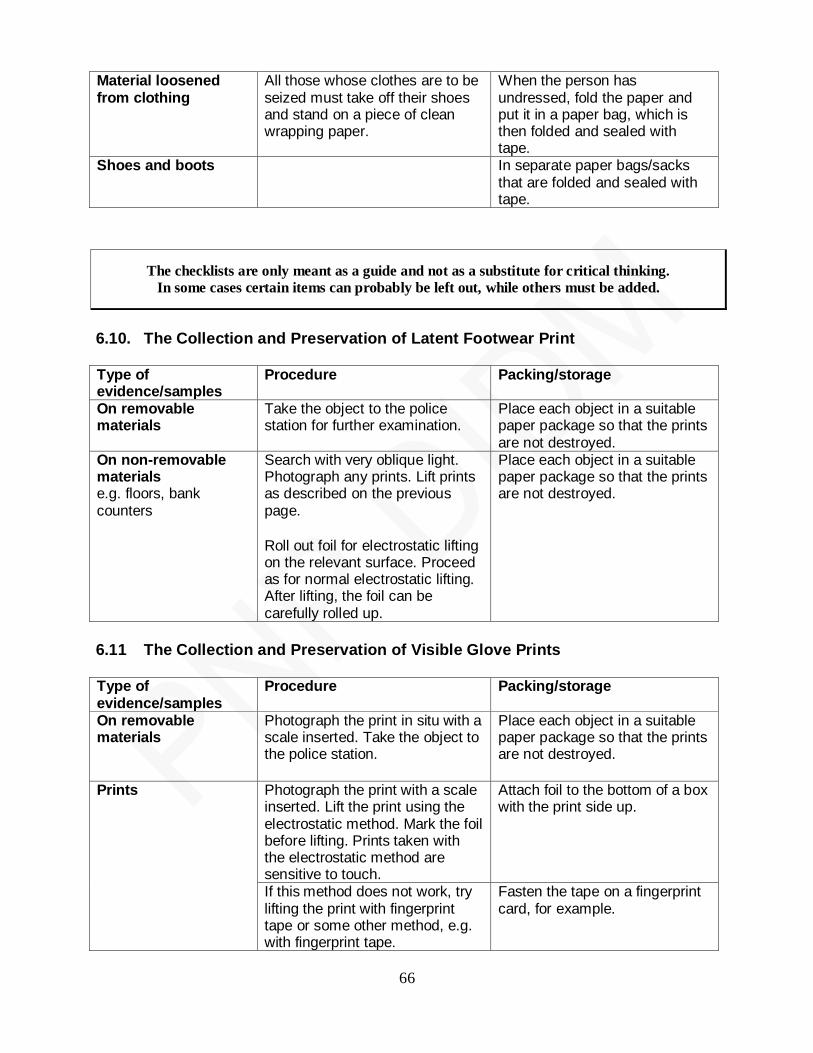
66
Material loosened from clothing
All those whose clothes are to be seized must take off their shoes and stand on a piece of clean wrapping paper.
When the person has undressed, fold the paper and put it in a paper bag, which is then folded and sealed with tape.
Shoes and boots In separate paper bags/sacks that are folded and sealed with tape.
6.10. The Collection and Preservation of Latent Footwear Print Type of evidence/samples
Procedure Packing/storage
On removable materials
Take the object to the police station for further examination.
Place each object in a suitable paper package so that the prints are not destroyed.
On non-removable materials e.g. floors, bank counters
Search with very oblique light. Photograph any prints. Lift prints as described on the previous page. Roll out foil for electrostatic lifting on the relevant surface. Proceed as for normal electrostatic lifting. After lifting, the foil can be carefully rolled up.
Place each object in a suitable paper package so that the prints are not destroyed.
6.11 The Collection and Preservation of Visible Glove Prints
Type of evidence/samples
Procedure Packing/storage
On removable materials
Photograph the print in situ with a scale inserted. Take the object to the police station.
Place each object in a suitable paper package so that the prints are not destroyed.
Prints Photograph the print with a scale inserted. Lift the print using the electrostatic method. Mark the foil before lifting. Prints taken with the electrostatic method are sensitive to touch.
Attach foil to the bottom of a box with the print side up.
If this method does not work, try lifting the print with fingerprint tape or some other method, e.g. with fingerprint tape.
Fasten the tape on a fingerprint card, for example.
The checklists are only meant as a guide and not as a substitute for critical thinking.
In some cases certain items can probably be left out, while others must be added.

67
6.12. The Collection and Preservation of Soil, Plants, Construction Materials Type of evidence/samples
Procedure Packing/storage
Soil from the crime scene
Take about 10 samples: at least 2 from the questioned site and 8 from the surroundings within a radius of about 3-4 metres. Take samples at various depths where appropriate. Each sample should consist of about 0.5 dl. It is a good idea to photograph the site.
Pack each sample in a plastic or glass container with a tightly fitting cap, e.g. a film canister. Dry the samples unless they are to be sent to the PNP CL immediately.
Soil under a footwear print
When footwear prints are secured, let any soil sticking to the cast remain. Take 8 more soil samples in the surroundings as described above.
Shoes, clothing etc. from suspect(s) and/or victim(s)
Remove the whole object if possible. Do not touch any material deposited on the object.
Package in paper bags or sacks, fold double and seal with tape.
Plant material from the crime scene
Take away the whole plant if possible. If there are any flowers or parts that tend to stick to clothes etc., make sure they are included. It is a good idea to photograph the site.
Package the plant in folded newspaper and put in a paper sack. Transport to the PNP CL as soon as possible. If it cannot be transported immediately, let the plant material dry in the air and then put it in a fire bag
Construction materials
Take representative samples of bricks, light concrete etc. Many such materials raise a great deal of dust; bear in mind the risk of contamination.
Package in suitable containers. Material with the consistency of powder should be packaged in plastic tubes or small boxes.
Safe insulation If a safe has been broken, take a sample of the insulation. 1 or 2 cm3 is enough.
Package in containers with tightly fitting caps.
6.13 The Collection and Preservation of Tool Marks
Type of evidence/samples
Procedure Packing/storage
In removable material Take away the material. Insert in a suitable package depending on the size of the material.
In non-removable material
Preferably, cut or saw away the part of the material where the mark is.
Insert in a suitable package depending on the size of the material.
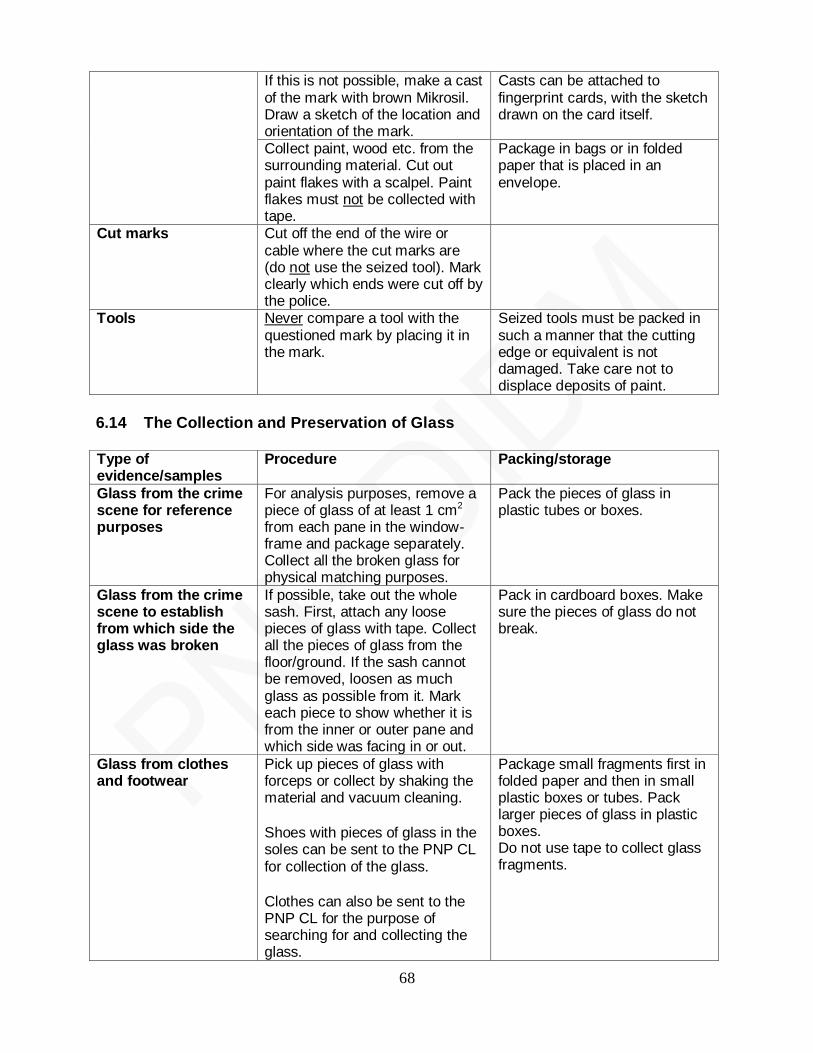
68
If this is not possible, make a cast of the mark with brown Mikrosil. Draw a sketch of the location and orientation of the mark.
Casts can be attached to fingerprint cards, with the sketch drawn on the card itself.
Collect paint, wood etc. from the surrounding material. Cut out paint flakes with a scalpel. Paint flakes must not be collected with tape.
Package in bags or in folded paper that is placed in an envelope.
Cut marks Cut off the end of the wire or cable where the cut marks are (do not use the seized tool). Mark clearly which ends were cut off by the police.
Tools Never compare a tool with the questioned mark by placing it in the mark.
Seized tools must be packed in such a manner that the cutting edge or equivalent is not damaged. Take care not to displace deposits of paint.
6.14 The Collection and Preservation of Glass Type of evidence/samples
Procedure Packing/storage
Glass from the crime scene for reference purposes
For analysis purposes, remove a piece of glass of at least 1 cm2 from each pane in the window-frame and package separately. Collect all the broken glass for physical matching purposes.
Pack the pieces of glass in plastic tubes or boxes.
Glass from the crime scene to establish from which side the glass was broken
If possible, take out the whole sash. First, attach any loose pieces of glass with tape. Collect all the pieces of glass from the floor/ground. If the sash cannot be removed, loosen as much glass as possible from it. Mark each piece to show whether it is from the inner or outer pane and which side was facing in or out.
Pack in cardboard boxes. Make sure the pieces of glass do not break.
Glass from clothes and footwear
Pick up pieces of glass with forceps or collect by shaking the material and vacuum cleaning. Shoes with pieces of glass in the soles can be sent to the PNP CL for collection of the glass. Clothes can also be sent to the PNP CL for the purpose of searching for and collecting the glass.
Package small fragments first in folded paper and then in small plastic boxes or tubes. Pack larger pieces of glass in plastic boxes. Do not use tape to collect glass fragments.

69
6.15 The Collection and Preservation of Paint
Type of evidence/samples
Procedure Packing/storage
Paint from crime and accident scenes
Collect paint flakes with a scalpel. Include some of the material underneath if possible. Paint flakes must not be collected with tape. Reference paint samples from all the layers of paint are taken from the objects involved. Take reference samples from material next to any damaged material. Check for any cross transfers of paint. In the vent of such transfers, collect reference samples from both objects.
Pack in bags or in folded paper that is placed in an envelope.
Collect any intact paint flakes that it may be possible to physically match with the paint on the damaged object. Protect the edges of these flakes.
Pack in a small plastic boxes.
6.16 The Collection and Preservation of Materials from Fire Scenes
Type of evidence/samples
Procedure Packing/storage
Residual liquids from the fire scene
Close the original package/bottle if it is undamaged and does not leak. Otherwise, pour the liquid into glass bottles of the type used in sampling kits for diesel fuel.
Place empty original packages/bottles in fire bags and seal in accordance with the accompanying instructions. Package liquid that is poured into a glass bottle in a transport container together with vermiculite. Place the transport container in an outer cardboard box; the package now meets postal distribution requirements. Place an original package containing liquid in a fire bag, seal it and place it in a cardboard box together with vermiculite.
The checklists are only meant as a guide and not as a substitute for critical thinking.
In some cases certain items can probably be left out, while others must be added.
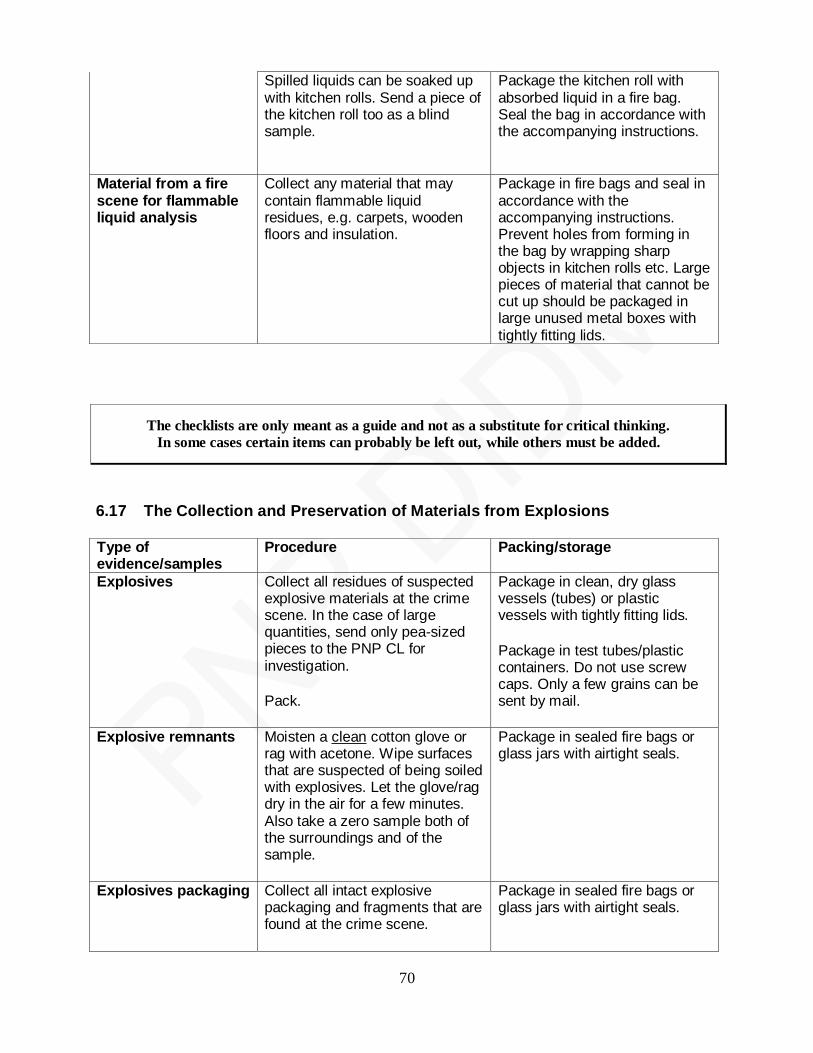
70
Spilled liquids can be soaked up with kitchen rolls. Send a piece of the kitchen roll too as a blind sample.
Package the kitchen roll with absorbed liquid in a fire bag. Seal the bag in accordance with the accompanying instructions.
Material from a fire scene for flammable liquid analysis
Collect any material that may contain flammable liquid residues, e.g. carpets, wooden floors and insulation.
Package in fire bags and seal in accordance with the accompanying instructions. Prevent holes from forming in the bag by wrapping sharp objects in kitchen rolls etc. Large pieces of material that cannot be cut up should be packaged in large unused metal boxes with tightly fitting lids.
6.17 The Collection and Preservation of Materials from Explosions Type of evidence/samples
Procedure Packing/storage
Explosives
Collect all residues of suspected explosive materials at the crime scene. In the case of large quantities, send only pea-sized pieces to the PNP CL for investigation. Pack.
Package in clean, dry glass vessels (tubes) or plastic vessels with tightly fitting lids. Package in test tubes/plastic containers. Do not use screw caps. Only a few grains can be sent by mail.
Explosive remnants
Moisten a clean cotton glove or rag with acetone. Wipe surfaces that are suspected of being soiled with explosives. Let the glove/rag dry in the air for a few minutes. Also take a zero sample both of the surroundings and of the sample.
Package in sealed fire bags or glass jars with airtight seals.
Explosives packaging Collect all intact explosive packaging and fragments that are found at the crime scene.
Package in sealed fire bags or glass jars with airtight seals.
The checklists are only meant as a guide and not as a substitute for critical thinking.
In some cases certain items can probably be left out, while others must be added.
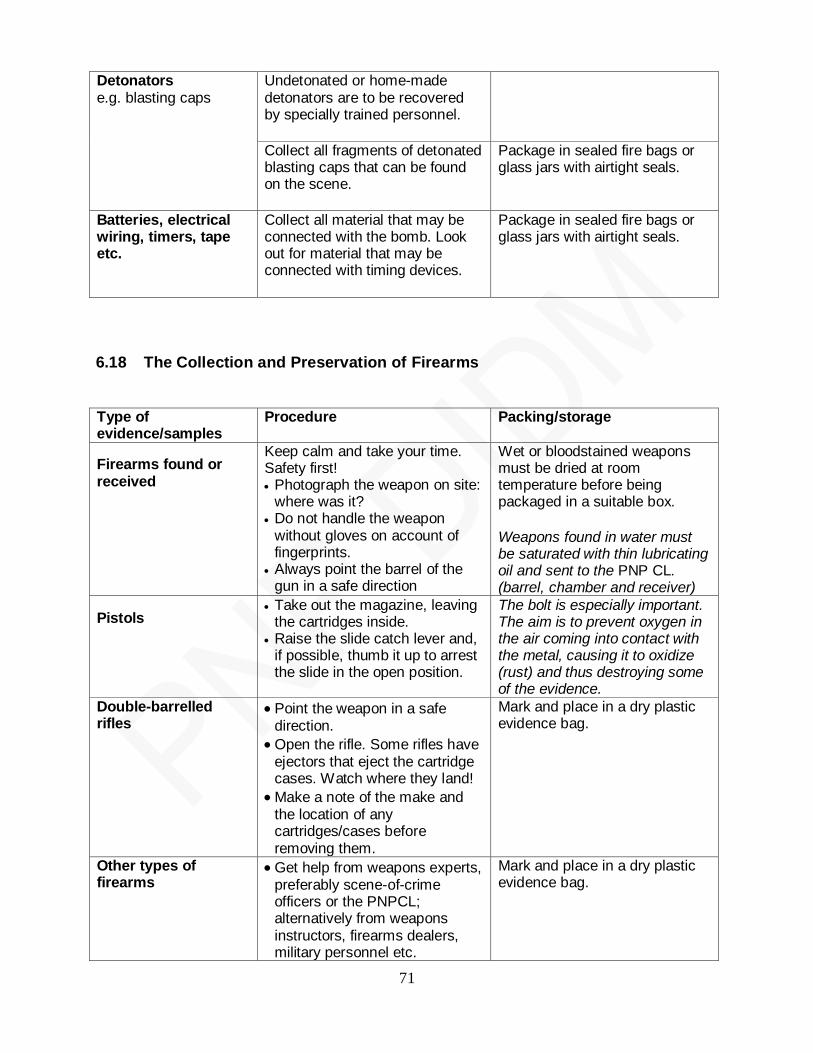
71
Detonators e.g. blasting caps
Undetonated or home-made detonators are to be recovered by specially trained personnel.
Collect all fragments of detonated blasting caps that can be found on the scene.
Package in sealed fire bags or glass jars with airtight seals.
Batteries, electrical wiring, timers, tape etc.
Collect all material that may be connected with the bomb. Look out for material that may be connected with timing devices.
Package in sealed fire bags or glass jars with airtight seals.
6.18 The Collection and Preservation of Firearms
Type of evidence/samples
Procedure Packing/storage
Firearms found or received
Keep calm and take your time. Safety first! Photograph the weapon on site:
where was it? Do not handle the weapon
without gloves on account of fingerprints.
Always point the barrel of the gun in a safe direction
Wet or bloodstained weapons must be dried at room temperature before being packaged in a suitable box. Weapons found in water must be saturated with thin lubricating oil and sent to the PNP CL. (barrel, chamber and receiver)
Pistols Take out the magazine, leaving
the cartridges inside. Raise the slide catch lever and,
if possible, thumb it up to arrest the slide in the open position.
The bolt is especially important. The aim is to prevent oxygen in the air coming into contact with the metal, causing it to oxidize (rust) and thus destroying some of the evidence.
Double-barrelled rifles
Point the weapon in a safe direction.
Open the rifle. Some rifles have ejectors that eject the cartridge cases. Watch where they land!
Make a note of the make and the location of any cartridges/cases before removing them.
Mark and place in a dry plastic evidence bag.
Other types of firearms
Get help from weapons experts, preferably scene-of-crime officers or the PNPCL; alternatively from weapons instructors, firearms dealers, military personnel etc.
Mark and place in a dry plastic evidence bag.
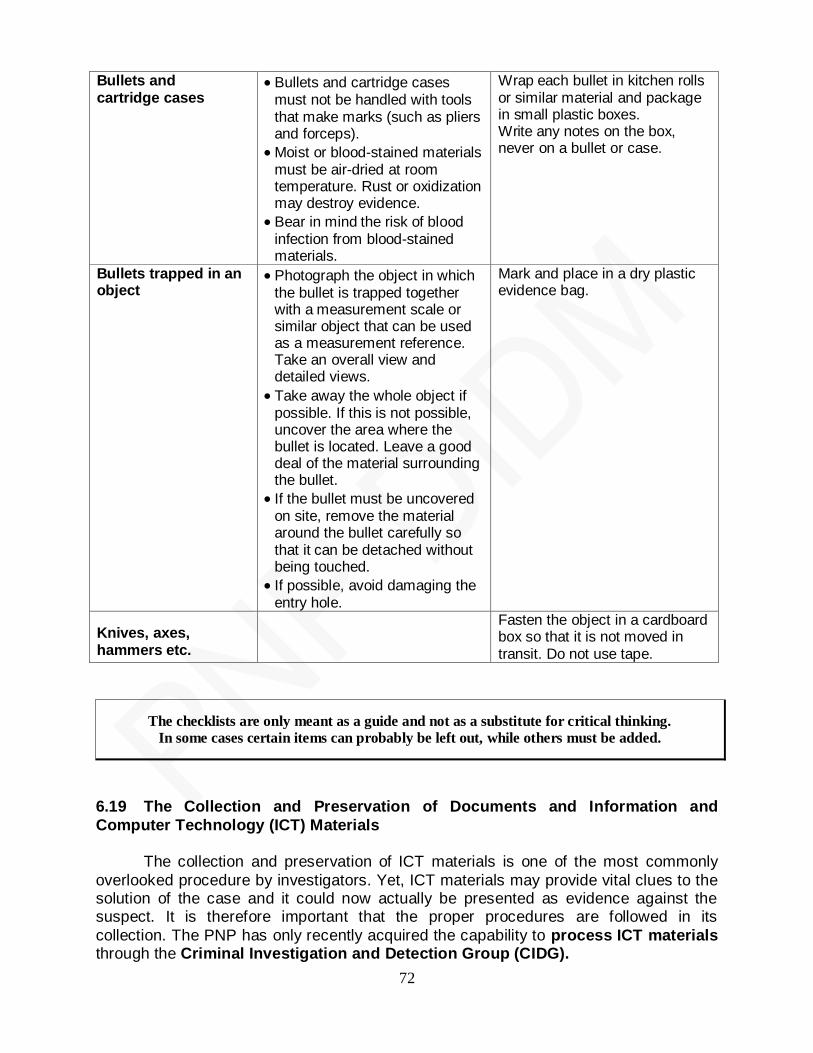
72
Bullets and cartridge cases
Bullets and cartridge cases must not be handled with tools that make marks (such as pliers and forceps).
Moist or blood-stained materials must be air-dried at room temperature. Rust or oxidization may destroy evidence.
Bear in mind the risk of blood infection from blood-stained materials.
Wrap each bullet in kitchen rolls or similar material and package in small plastic boxes. Write any notes on the box, never on a bullet or case.
Bullets trapped in an object
Photograph the object in which the bullet is trapped together with a measurement scale or similar object that can be used as a measurement reference. Take an overall view and detailed views.
Take away the whole object if possible. If this is not possible, uncover the area where the bullet is located. Leave a good deal of the material surrounding the bullet.
If the bullet must be uncovered on site, remove the material around the bullet carefully so that it can be detached without being touched.
If possible, avoid damaging the entry hole.
Mark and place in a dry plastic evidence bag.
Knives, axes, hammers etc.
Fasten the object in a cardboard box so that it is not moved in transit. Do not use tape.
The checklists are only meant as a guide and not as a substitute for critical thinking.
In some cases certain items can probably be left out, while others must be added.
6.19 The Collection and Preservation of Documents and Information and
Computer Technology (ICT) Materials
The collection and preservation of ICT materials is one of the most commonly
overlooked procedure by investigators. Yet, ICT materials may provide vital clues to the solution of the case and it could now actually be presented as evidence against the suspect. It is therefore important that the proper procedures are followed in its
collection. The PNP has only recently acquired the capability to process ICT materials through the Criminal Investigation and Detection Group (CIDG).
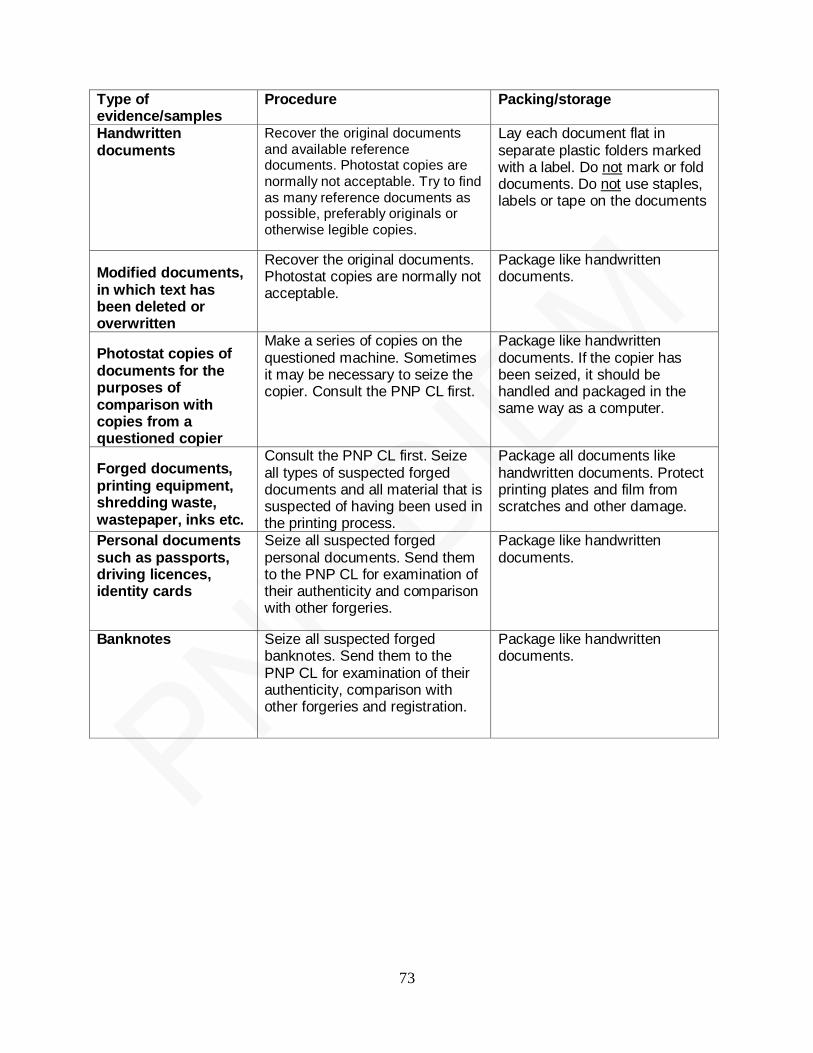
73
Type of evidence/samples
Procedure Packing/storage
Handwritten documents
Recover the original documents and available reference documents. Photostat copies are
normally not acceptable. Try to find as many reference documents as possible, preferably originals or otherwise legible copies.
Lay each document flat in separate plastic folders marked with a label. Do not mark or fold documents. Do not use staples, labels or tape on the documents
Modified documents, in which text has been deleted or overwritten
Recover the original documents. Photostat copies are normally not acceptable.
Package like handwritten documents.
Photostat copies of documents for the purposes of comparison with copies from a questioned copier
Make a series of copies on the questioned machine. Sometimes it may be necessary to seize the copier. Consult the PNP CL first.
Package like handwritten documents. If the copier has been seized, it should be handled and packaged in the same way as a computer.
Forged documents, printing equipment, shredding waste, wastepaper, inks etc.
Consult the PNP CL first. Seize all types of suspected forged documents and all material that is suspected of having been used in the printing process.
Package all documents like handwritten documents. Protect printing plates and film from scratches and other damage.
Personal documents such as passports, driving licences, identity cards
Seize all suspected forged personal documents. Send them to the PNP CL for examination of their authenticity and comparison with other forgeries.
Package like handwritten documents.
Banknotes
Seize all suspected forged banknotes. Send them to the PNP CL for examination of their authenticity, comparison with other forgeries and registration.
Package like handwritten documents.
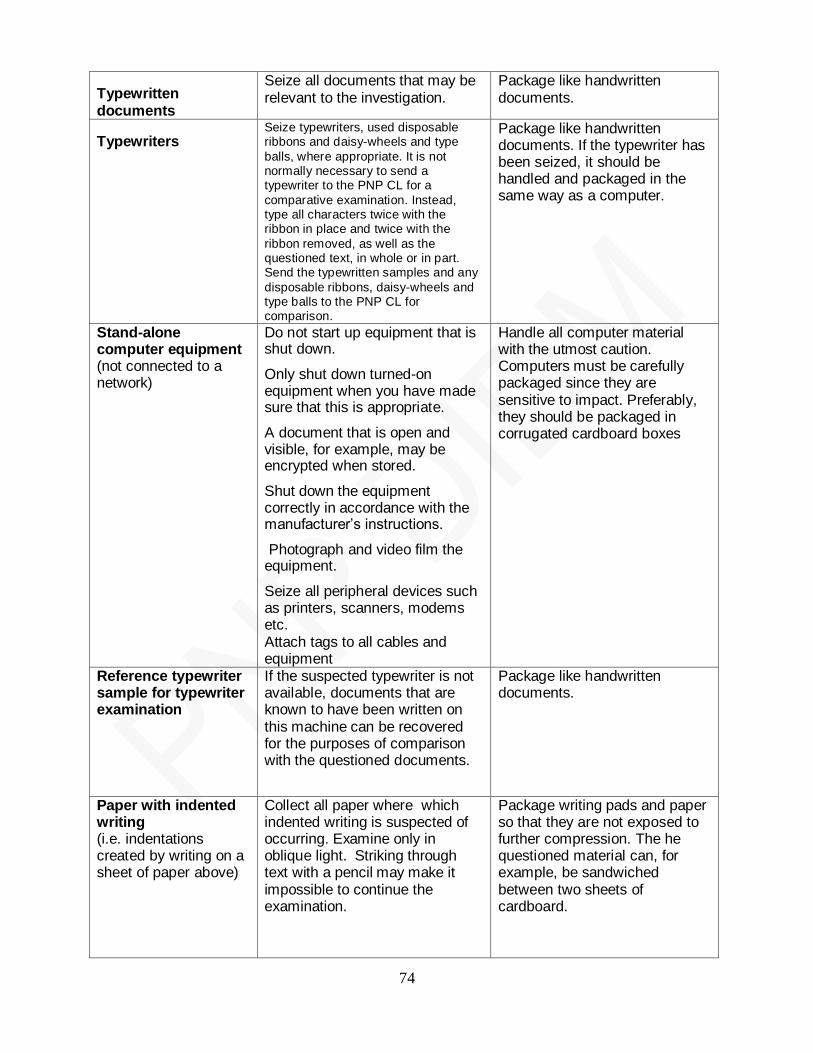
74
Typewritten documents
Seize all documents that may be relevant to the investigation.
Package like handwritten documents.
Typewriters Seize typewriters, used disposable ribbons and daisy-wheels and type
balls, where appropriate. It is not normally necessary to send a typewriter to the PNP CL for a
comparative examination. Instead, type all characters twice with the ribbon in place and twice with the
ribbon removed, as well as the questioned text, in whole or in part. Send the typewritten samples and any
disposable ribbons, daisy-wheels and type balls to the PNP CL for comparison.
Package like handwritten documents. If the typewriter has been seized, it should be handled and packaged in the same way as a computer.
Stand-alone computer equipment (not connected to a network)
Do not start up equipment that is shut down.
Only shut down turned-on equipment when you have made sure that this is appropriate.
A document that is open and visible, for example, may be encrypted when stored.
Shut down the equipment correctly in accordance with the manufacturer‟s instructions.
Photograph and video film the equipment.
Seize all peripheral devices such as printers, scanners, modems etc. Attach tags to all cables and equipment
Handle all computer material with the utmost caution. Computers must be carefully packaged since they are sensitive to impact. Preferably, they should be packaged in corrugated cardboard boxes
Reference typewriter sample for typewriter examination
If the suspected typewriter is not available, documents that are known to have been written on this machine can be recovered for the purposes of comparison with the questioned documents.
Package like handwritten documents.
Paper with indented writing (i.e. indentations created by writing on a sheet of paper above)
Collect all paper where which indented writing is suspected of occurring. Examine only in oblique light. Striking through text with a pencil may make it impossible to continue the examination.
Package writing pads and paper so that they are not exposed to further compression. The he questioned material can, for example, be sandwiched between two sheets of cardboard.
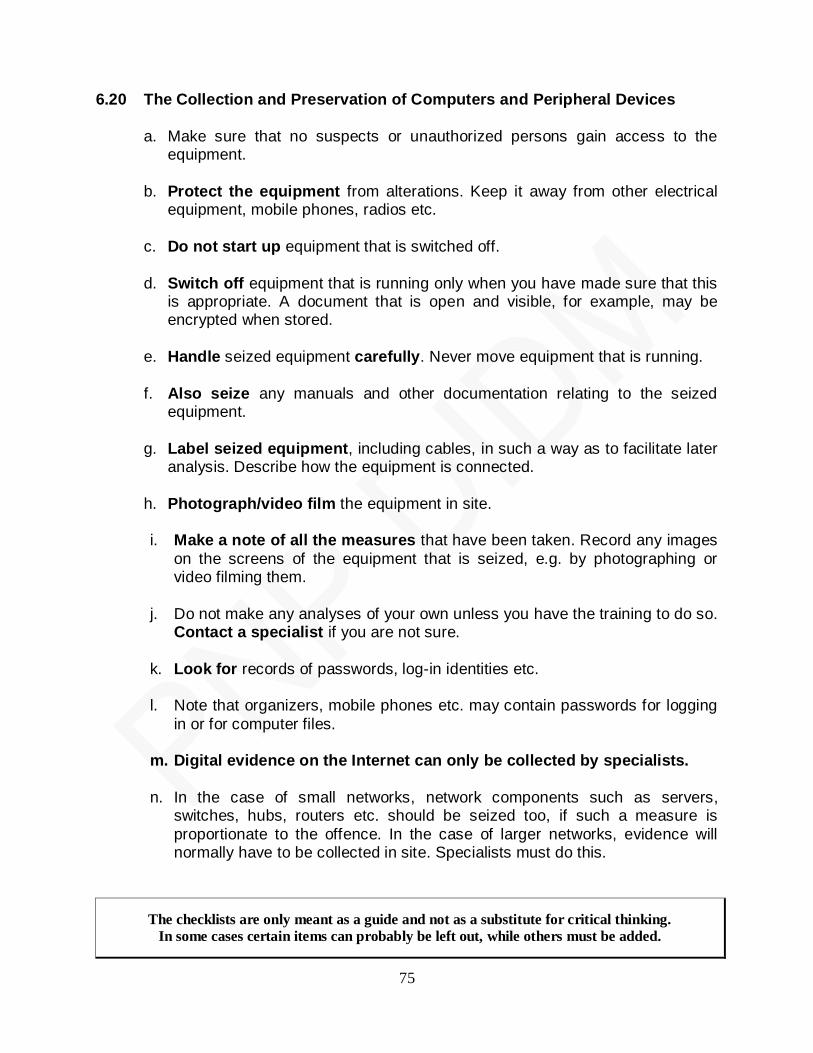
75
6.20 The Collection and Preservation of Computers and Peripheral Devices
a. Make sure that no suspects or unauthorized persons gain access to the
equipment.
b. Protect the equipment from alterations. Keep it away from other electrical
equipment, mobile phones, radios etc.
c. Do not start up equipment that is switched off.
d. Switch off equipment that is running only when you have made sure that this is appropriate. A document that is open and visible, for example, may be encrypted when stored.
e. Handle seized equipment carefully. Never move equipment that is running.
f. Also seize any manuals and other documentation relating to the seized equipment.
g. Label seized equipment, including cables, in such a way as to facilitate later analysis. Describe how the equipment is connected.
h. Photograph/video film the equipment in site.
i. Make a note of all the measures that have been taken. Record any images
on the screens of the equipment that is seized, e.g. by photographing or video filming them.
j. Do not make any analyses of your own unless you have the training to do so. Contact a specialist if you are not sure.
k. Look for records of passwords, log-in identities etc. l. Note that organizers, mobile phones etc. may contain passwords for logging
in or for computer files. m. Digital evidence on the Internet can only be collected by specialists.
n. In the case of small networks, network components such as servers,
switches, hubs, routers etc. should be seized too, if such a measure is
proportionate to the offence. In the case of larger networks, evidence will normally have to be collected in site. Specialists must do this.
The checklists are only meant as a guide and not as a substitute for critical thinking.
In some cases certain items can probably be left out, while others must be added.
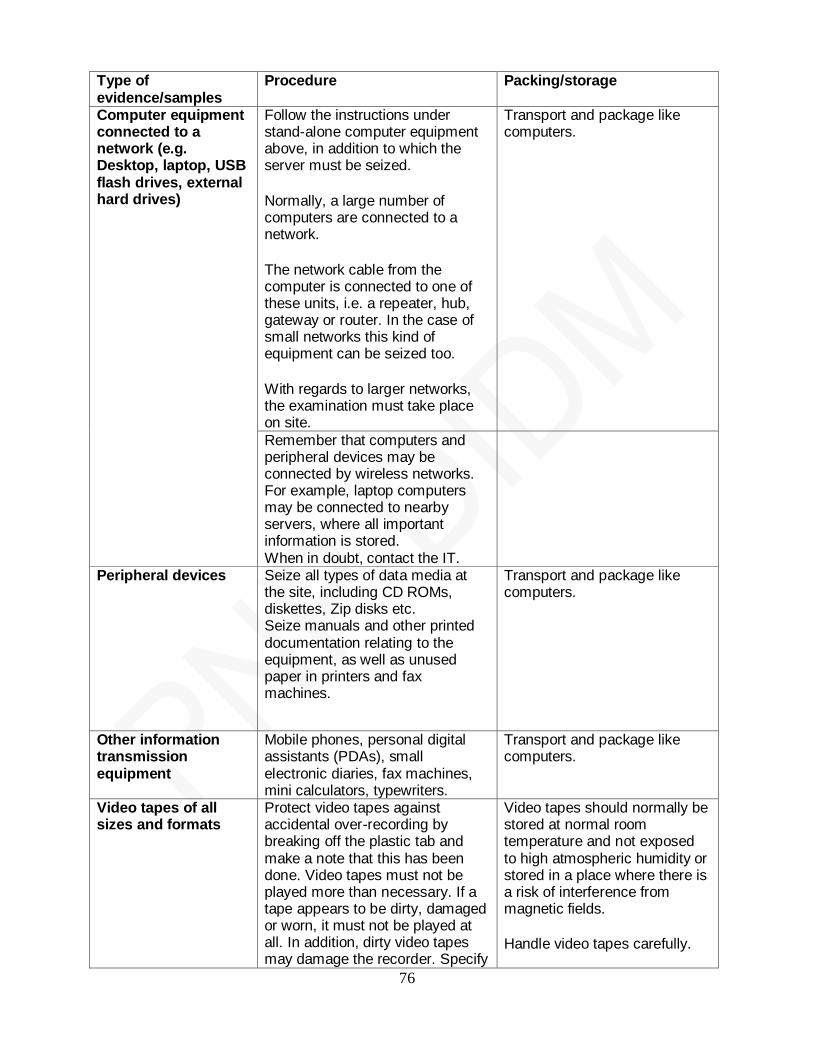
76
Type of evidence/samples
Procedure Packing/storage
Computer equipment connected to a network (e.g. Desktop, laptop, USB flash drives, external hard drives)
Follow the instructions under stand-alone computer equipment above, in addition to which the server must be seized.
Normally, a large number of computers are connected to a network. The network cable from the computer is connected to one of these units, i.e. a repeater, hub, gateway or router. In the case of small networks this kind of equipment can be seized too. With regards to larger networks, the examination must take place on site.
Transport and package like computers.
Remember that computers and peripheral devices may be connected by wireless networks. For example, laptop computers may be connected to nearby servers, where all important information is stored. When in doubt, contact the IT.
Peripheral devices
Seize all types of data media at the site, including CD ROMs, diskettes, Zip disks etc. Seize manuals and other printed documentation relating to the equipment, as well as unused paper in printers and fax machines.
Transport and package like computers.
Other information transmission equipment
Mobile phones, personal digital assistants (PDAs), small electronic diaries, fax machines, mini calculators, typewriters.
Transport and package like computers.
Video tapes of all sizes and formats
Protect video tapes against accidental over-recording by breaking off the plastic tab and make a note that this has been done. Video tapes must not be played more than necessary. If a tape appears to be dirty, damaged or worn, it must not be played at all. In addition, dirty video tapes may damage the recorder. Specify
Video tapes should normally be stored at normal room temperature and not exposed to high atmospheric humidity or stored in a place where there is a risk of interference from magnetic fields. Handle video tapes carefully.
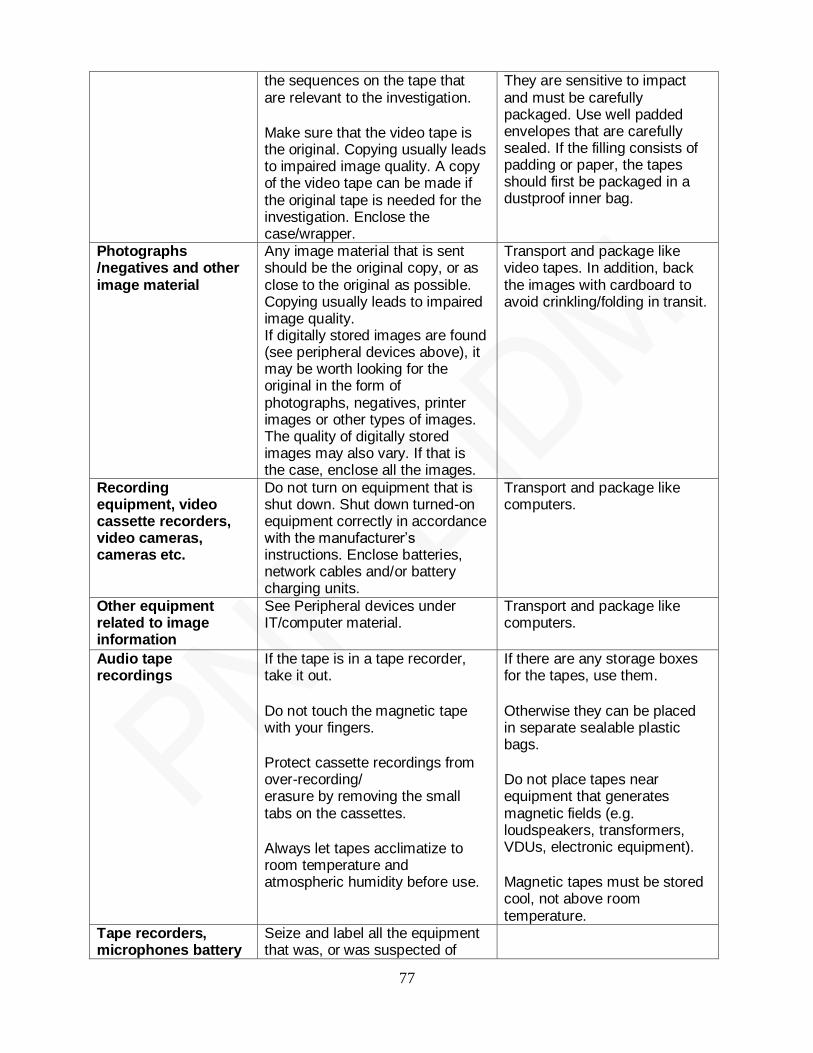
77
the sequences on the tape that are relevant to the investigation. Make sure that the video tape is the original. Copying usually leads to impaired image quality. A copy of the video tape can be made if the original tape is needed for the investigation. Enclose the case/wrapper.
They are sensitive to impact and must be carefully packaged. Use well padded envelopes that are carefully sealed. If the filling consists of padding or paper, the tapes should first be packaged in a dustproof inner bag.
Photographs /negatives and other image material
Any image material that is sent should be the original copy, or as close to the original as possible. Copying usually leads to impaired image quality. If digitally stored images are found (see peripheral devices above), it may be worth looking for the original in the form of photographs, negatives, printer images or other types of images. The quality of digitally stored images may also vary. If that is the case, enclose all the images.
Transport and package like video tapes. In addition, back the images with cardboard to avoid crinkling/folding in transit.
Recording equipment, video cassette recorders, video cameras, cameras etc.
Do not turn on equipment that is shut down. Shut down turned-on equipment correctly in accordance with the manufacturer‟s instructions. Enclose batteries, network cables and/or battery charging units.
Transport and package like computers.
Other equipment related to image information
See Peripheral devices under IT/computer material.
Transport and package like computers.
Audio tape recordings
If the tape is in a tape recorder, take it out. Do not touch the magnetic tape with your fingers. Protect cassette recordings from over-recording/ erasure by removing the small tabs on the cassettes. Always let tapes acclimatize to room temperature and atmospheric humidity before use.
If there are any storage boxes for the tapes, use them. Otherwise they can be placed in separate sealable plastic bags. Do not place tapes near equipment that generates magnetic fields (e.g. loudspeakers, transformers, VDUs, electronic equipment). Magnetic tapes must be stored cool, not above room temperature.
Tape recorders, microphones battery
Seize and label all the equipment that was, or was suspected of
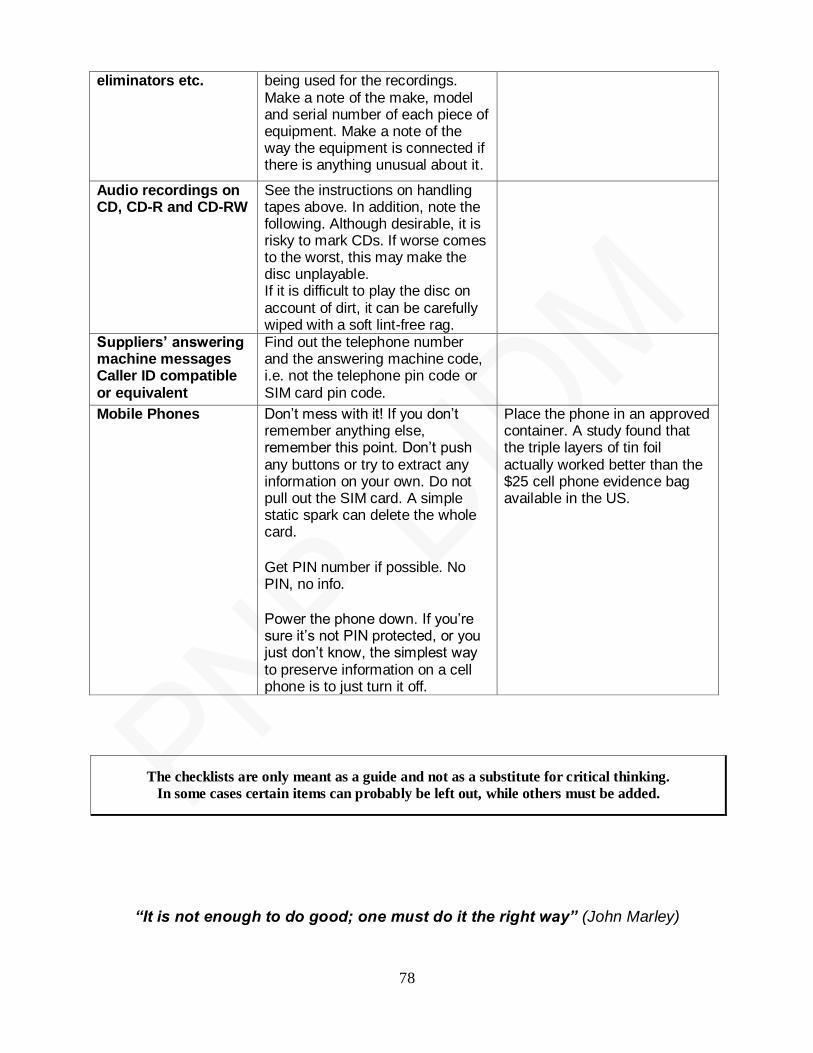
78
eliminators etc.
being used for the recordings. Make a note of the make, model and serial number of each piece of equipment. Make a note of the way the equipment is connected if there is anything unusual about it.
Audio recordings on CD, CD-R and CD-RW
See the instructions on handling tapes above. In addition, note the following. Although desirable, it is risky to mark CDs. If worse comes to the worst, this may make the disc unplayable. If it is difficult to play the disc on account of dirt, it can be carefully wiped with a soft lint-free rag.
Suppliers‟ answering machine messages Caller ID compatible or equivalent
Find out the telephone number and the answering machine code, i.e. not the telephone pin code or SIM card pin code.
Mobile Phones Don‟t mess with it! If you don‟t remember anything else, remember this point. Don‟t push any buttons or try to extract any information on your own. Do not pull out the SIM card. A simple static spark can delete the whole card. Get PIN number if possible. No PIN, no info. Power the phone down. If you‟re sure it‟s not PIN protected, or you just don‟t know, the simplest way to preserve information on a cell phone is to just turn it off.
Place the phone in an approved container. A study found that the triple layers of tin foil actually worked better than the $25 cell phone evidence bag available in the US.
“It is not enough to do good; one must do it the right way” (John Marley)
The checklists are only meant as a guide and not as a substitute for critical thinking.
In some cases certain items can probably be left out, while others must be added.
79
CHAPTER 7
PROCEDURE FOR SUBMITTING EVIDENCE TO THE CRIME LABORATORY
There are situations where the Investigator-on-Case or even the First Responder
may have to collect evidence such as under tactical situations or those which otherwise would be contaminated or destroyed if it remains uncollected. In such cases, all evidence collected under similar circumstances shall be turned-over to the investigator-
on-case with the proper documentation and description on how it was collected. The investigator-on-case shall then determine which evidence will need further laboratory examination. The Investigator shall observe the following procedures for the proper submission of evidence to the Crime Laboratory. (A standard sample shall be collected by the Crime Laboratory as necessary for comparison.)
7.1 General Information
a. Should there be any query pertaining to the laboratory services in your area, prior coordination with Crime Laboratory Office shall be made before submission of your
evidence. This can often be cumbersome but can expedite the evidence reception process.
b. Submit only items that need analysis. c. Be cognizant of the cross contamination with regard to your packaging.
Placing multiple unsealed items in one bag may lead to the eventual elimination of that evidence.
d. All potential Bio-Hazard items must be plainly marked with Bio Hazard stickers which are available from supply companies. If evidence is suspected of being contaminated with Hepatitis B, HIV, or other contagious viruses, it must be noted on the
„Request for Examination of Evidence‟. e. The laboratory will not re-analyze evidence previously analyzed by an outside
laboratory for the same type of examination.
7.2 Paperwork
a. Evidence submitted must be accompanied by three “Request for Examination
of Evidence” forms consisting of one original and two photocopies. Another copy will
be presented by the police. b. In addition, all Bio/Chem or DNA evidence requires a completed “Bio-Chem”
form. Relative to this, refer to the DNA submission section for information relating specifically to the submission of DNA cases.
80
c. Ballistics Cases must be accompanied by an additional “Request for Examination of Evidence” form when submitted in conjunction with other
examinations. d. The original and all copies of the „ Request for Examination of Evidence‟ forms
will be individually signed by the person delivering the evidence.
7.3 Evidence Packaging/Marking and Sealing
a. Acceptable packaging containers (depending on the type of evidence) include:
1) Paper bags
2) Plastic bags (clear plastic is preferred for drug cases) 3) Boxes - sturdy cardboard 4) Manila envelopes
5) Small glass vials (typically arson and liquid drugs) 6) Metal cans (typically arson)
b. Acceptable seals 1) Tamper-proof evidence tape 2) Reinforced packaging tape
3) Heat seal
A package is considered as sealed if the contents are properly secured in
place and the seal/container is not tampered. Manila Envelope Clasps, Ziplock Bags And Staples Do Not Constitute An Acceptable
Seal. The person sealing the evidence shall place his initial or individual identifier
across the seal or tape on the package.
c. Information on each package should minimally include:
1) Name of the Agency 2) Agency case number 3) Item number
4) Date 5) The investigator‟s identifier
d. Additionally, packaging of evidence should include: 1) Where the item was found 2) By whom
3) Date & time found 4) Description of item
“Never stop learning; knowledge doubles every fourteen months.”
81
PART IV – MANAGING THE INVESTIGATION
CHAPTER 8
SPECIAL INVESTIGATION TASK GROUP (SITG)
Murder and other crimes of violence almost always attract media attention and public scrutiny. Yet, it has been noted by the Chief, PNP himself that there is a lack of
focus on the conduct of investigation. It is for this reason that the concept of activat ing Special Investigation Task Groups was established. The SITG will ensure that there will be full-time investigators to handle the case and that a record/case management
system is in place.
As mandated, a SITG shall be organized whenever a major case or crime of
violence occurs. The SITG shall conduct aggressive, concerted and sustainable programs of action through strengthening the coordinating system among the members of PNP, DOJ and other law enforcement agencies in order to properly investigate major cases or crimes of violence.
8.1 Organizational Structure
a. Except when otherwise directed, the SITG shall be composed of the PNP
Provincial/City Director of the province/city where the incident happened who shall be
the Task Group (TG) Commander of the SITG while the Provincial Officer (PO) or Chief of the local CIDU, CIDG shall be the Deputy TG Commander.
b. The SITG shall be composed of the Investigation Team, Technical/Legal Support Team from Legal Service and Prosecutors, Admin/Logistic Team and a Case Record Officer.
c. The Investigation Team shall be headed by the Provincial Officer or
Chief of the local CIDU of CIDG who shall be the concurrent Deputy TGC and the team
shall be composed of full-time personnel from the CIDU, Investigators the from local Police Station, SOCO operatives from the local Crime Laboratory Office (CLO), intelligence operatives from the Regional Intelligence Office (RIO) of PNP Intelligence
Group and the Chief of the Provincial/City Investigation and Detective Management Section/Br/Div (PIDMD) of the concerned PPO/CPO.
d. The SITG shall have its own Public Information Officer (PIO) who shall be responsible for the daily press releases on the developments of the case. However, this does not prevent the Regional Director from making press statements on the
developments of the investigation.
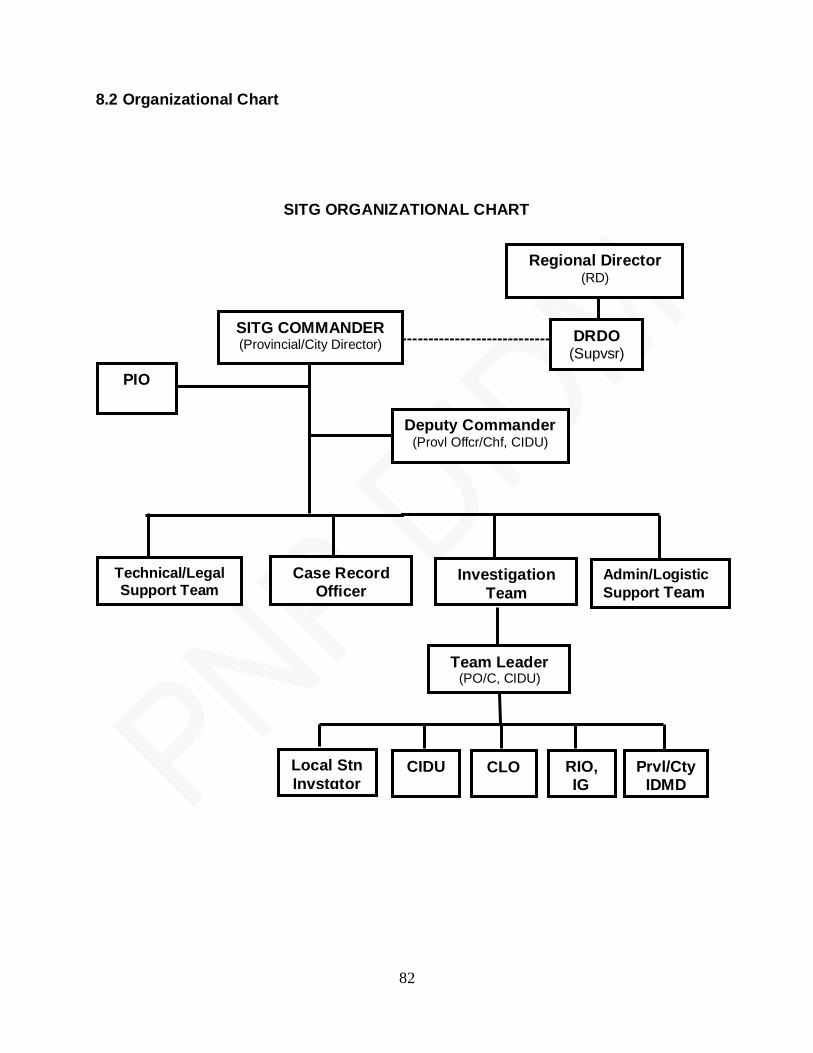
82
8.2 Organizational Chart
SITG ORGANIZATIONAL CHART
10 - - - - - - - - - - -- -------------------------------
Regional Director (RD)
DRDO (Supvsr)
SITG COMMANDER (Provincial/City Director)
PIO
Deputy Commander (Provl Offcr/Chf, CIDU)
Admin/Logistic
Support Team
Technical/Legal Support Team
Case Record Officer
Investigation
Team
Team Leader (PO/C, CIDU)
Prvl/Cty IDMD
RIO, IG
CIDU
Local Stn
Invstgtor
CLO
83
8.3 Organizational Operation
a. The Regional Director shall immediately issue order organizing a SITG.
The PNP Provincial/City Director of the Province/City where the incident happened shall
be the Task Group (TG) Commander and the Provincial Officer (PO) of the CIDU,CIDG shall be the Deputy TG Commander. The orders shall indicate specifically the ranks and names of the personnel who will compose the SITG;
b. The Deputy Regional Director for Operation(DRDO) shall supervise the
SITGs within the Police Regional Office;
c. The SITG Commander or the PNP Provincial/City Director of the area where
the incident happened shall ensure the successful investigation of crimes of violence
and prosecute the offender; d. Other members of SITG:
Provincial Officer (PO) or Chief of the local CIDU,CIDG who shall be
the Deputy TG Commander, SITG and the Investigation Team Leader;
Personnel from the local CIDU;
Investigators from the local Police Station;
SOCO teams from Crime Laboratory Office (CLO),
Intelligence Operatives from Regional Intelligence Office (RIO), IG;
The Chief or Action PCO from the Invest and Det Mngmt Br of the
concerned PPO/CPO;
Technical/Legal Support Team from Legal Service and local
Prosecutors;
Admin/Logistic Team;
Case Record Officer; and,
Public Information Officer (PIO), shall support and provide assistance
to the SITG Commander on media matters; e. The members of the SITG Investigation Team shall be detailed on full-time
status and the orders shall indicate that they shall be relieved of all their other duties; f. The SITG shall have its own Public Information Officer (PIO) who shall be
responsible for the daily press releases on the development of the case. However, this does not prevent the Regional Director from making press statement on the developments of the investigation.
8.4 General Operational Procedures
a. Initial Actions
1) Aside from the usual investigative procedures, SITG shall immediately
validate and confirm the affiliations of the victims, issue press releases on a regular basis and establish an On-Scene Command Post (OSCP) by putting up a tent or
84
similar structures or deploying a Mobile Investigation Van (if available) at/or near the crime scene and shall ensure the presence/availability of the SITG Commander all the
time; 2) The OSCP shall be utilized by the SITG to conduct on-scene or on-the-
ground investigation. The tent or van shall be marked appropriately as “PNP On-Scene Command Post” and shall also be posted with the mobile phone or contact numbers of the SITG Commander, Deputy/TGC/Investigator-on-case;
3) The OSCP shall be maintained for as long as necessary and shall only
be deactivated or transferred with the clearance and approval of the Regional Director;
and,
4) The Police Station which has jurisdictions over the area shall be utilized
as alternate on-scene command post of the SITG;
b. Follow-up Actions
1) Follow-up efforts must give special focus to ascertaining/establishing
motive.
2) During follow-up operations, SITG shall conduct profiling of victims,
suspects and witnesses;
3) Conduct link/matrix analysis and exploit evidence and information;
4) The SITG shall, as much as possible, hold paramount the convenience of witnesses when requesting for their testimonial evidence;
8.5 Duties and Responsibilities of the SITG Members
a. Members of Investigation Team shall strictly observe the chain of custody of evidence and flow of communications;
b. Members of SITG shall conduct case conferences with the DOJ representatives in the area and other concerned agencies to resolve issues reative to the investigation in order to strengthen the case;
c. Investigator-on-case shall initiate case build-up and follow-up investigation;
d. Investigator on-case shall consolidate all the forensic results, testimonial documents and investigation report as well as the compliances of the members of SITG;
e. Investigator on-case shall initiate the crime matrix analysis in coordination with all members of SITG;
85
f. Investigator-on–case shall initiate the preparation of case folder with the assistance of the other members of SITG;
g. Investigator on-case shall file the case before the court of proper jurisdiction;
h. The Task Group Commander shall conduct case review as necessary; i. All the case folders including pertinent documents must be kept by the case
record officers, with copies furnished the evidence custodian of the local police station; j. In case the investigator in-charge is dismissed or retired or separated from
the service, all remaining members of investigation team shall be responsible for the court presentation of the case; and
k. Investigator on-case and other members of investigation team shall conduct case tracking until the final disposition of the case.
8.6 Coordination with the Prosecutor and Other Agencies The need to coordinate with other agencies in the conduct of an investigation
cannot be over-emphasized and it is the very reason for creating a SITG. Thus, it is important to remember that the Department of Justice (DOJ) had issued a memorandum requiring their prosecutors to assist the PNP in the conduct of
investigation of major cases such as crimes of violence. The SITG must therefore closely coordinate with their respective local Prosecutors office and ensure that a Prosecutor is made a member of the Technical/Legal Support Team.
Representatives from other agencies must also be invited to the SITG as needed.
“He who exercises no forethought but makes light of his opponents is sure to be captured by them.” (Sun Tzu)
86
CHAPTER 9
INVESTIGATION PLAN AND MANAGEMENT
9.1 Investigation Plan and Management System (IPMS)
Objectives:
a. To enhance the ability of senior investigative managers to apply „best
practice‟ to the management of major crime investigations, especially those that are
multi-jurisdictional and multi-agency orientated.
b. To provide a forum for the establishment of effective and meaningful
relationships, at an operational level, amongst Law Enforcement agencies.
The Investigation Management System consists of:
a. The Evidence Matrix; b. The Resource Spreadsheet;
c. The Standard Tactical Plan; and d. The Major Investigation Plan
9.2 Evidence Matrix (See Figure 9.1)
• Facilitates Planning • Sets the direction and focus of an investigation • Useful as an adjudication tool for the sufficiency of evidence
• Useful as a briefing tool • Useful in the review process
9.3 Resource Spreadsheet (See Figure 9.2)
• Enables an assessment of resource needs • Presents a graphic display of relationship between avenues of inquiry, resources
and time
• Useful briefing tool • Useful in the review process
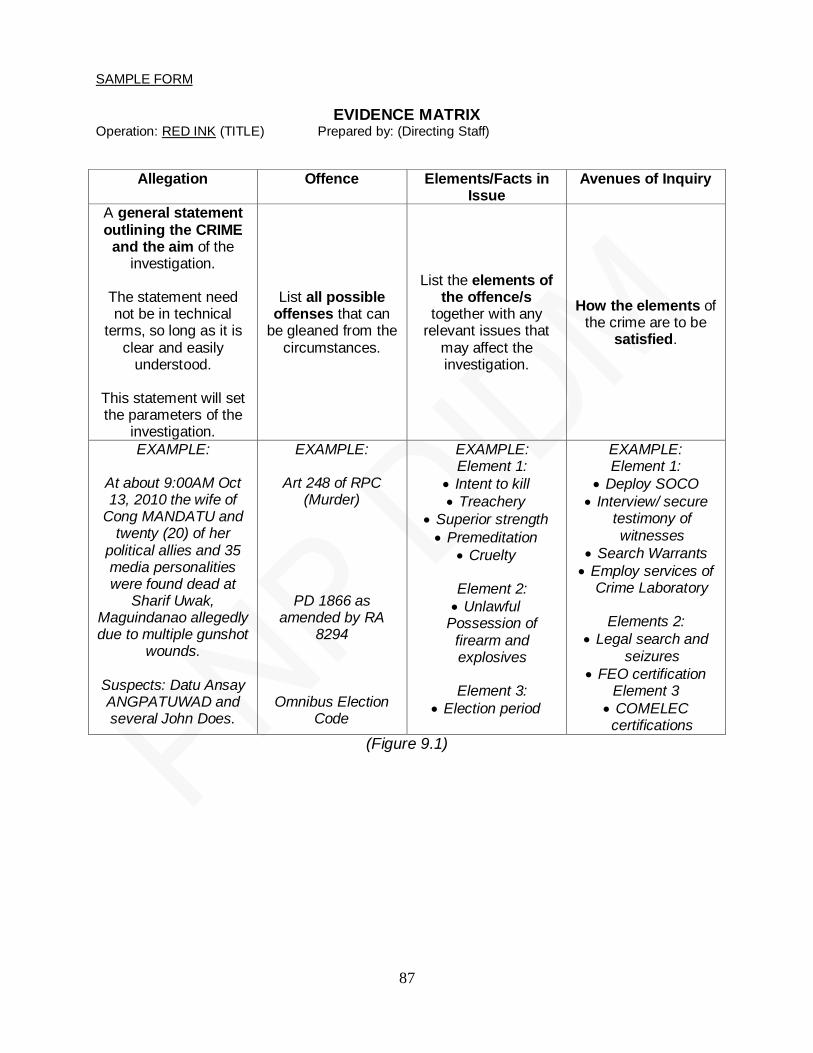
87
SAMPLE FORM
EVIDENCE MATRIX
Operation: RED INK (TITLE) Prepared by: (Directing Staff)
Allegation Offence Elements/Facts in Issue
Avenues of Inquiry
A general statement outlining the CRIME
and the aim of the investigation.
The statement need not be in technical
terms, so long as it is clear and easily
understood.
This statement will set the parameters of the
investigation.
List all possible offenses that can
be gleaned from the circumstances.
List the elements of the offence/s
together with any relevant issues that
may affect the investigation.
How the elements of the crime are to be
satisfied.
EXAMPLE:
At about 9:00AM Oct 13, 2010 the wife of
Cong MANDATU and twenty (20) of her
political allies and 35 media personalities were found dead at
Sharif Uwak, Maguindanao allegedly due to multiple gunshot
wounds.
Suspects: Datu Ansay ANGPATUWAD and several John Does.
EXAMPLE:
Art 248 of RPC (Murder)
PD 1866 as amended by RA
8294
Omnibus Election Code
EXAMPLE: Element 1:
Intent to kill
Treachery
Superior strength
Premeditation
Cruelty
Element 2:
Unlawful Possession of
firearm and explosives
Element 3:
Election period
EXAMPLE: Element 1:
Deploy SOCO
Interview/ secure testimony of witnesses
Search Warrants
Employ services of Crime Laboratory
Elements 2:
Legal search and seizures
FEO certification Element 3
COMELEC certifications
(Figure 9.1)
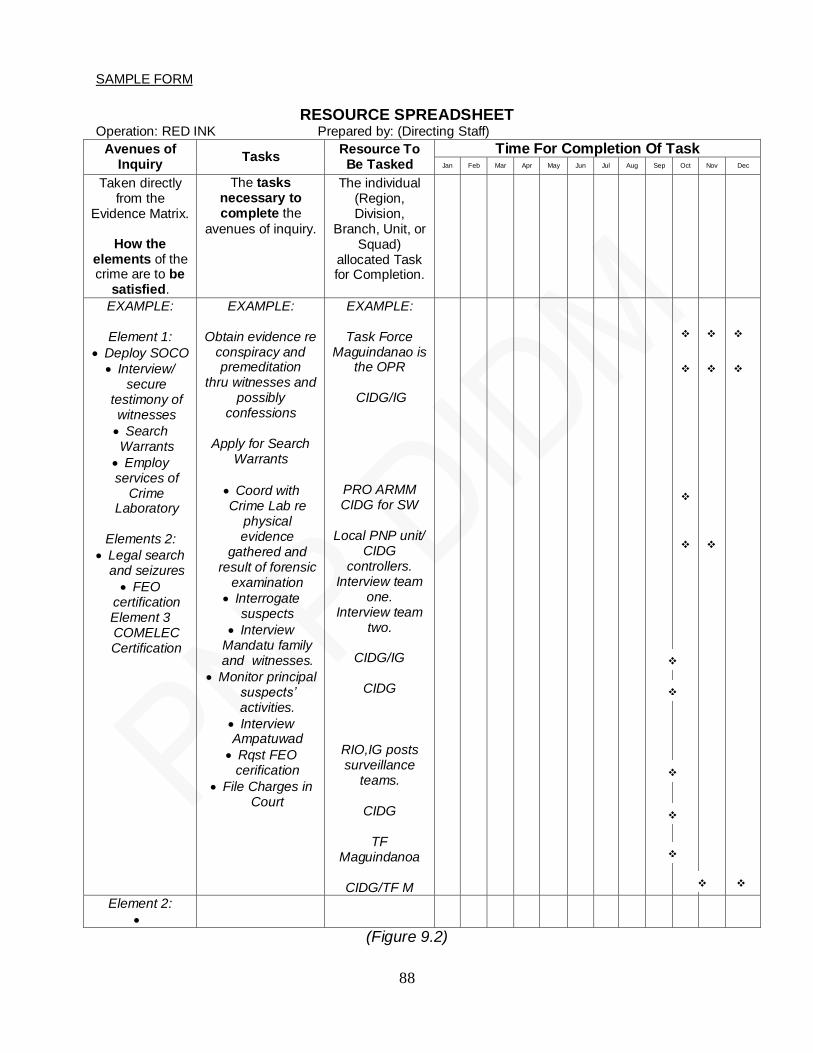
88
SAMPLE FORM
RESOURCE SPREADSHEET
Operation: RED INK Prepared by: (Directing Staff)
(Figure 9.2)
Avenues of Inquiry
Tasks Resource To Be Tasked
Time For Completion Of Task Jan Feb Mar Apr May Jun Jul Aug Sep Oct Nov Dec
Taken directly from the
Evidence Matrix.
How the elements of the crime are to be
satisfied.
The tasks necessary to complete the
avenues of inquiry.
The individual (Region, Division,
Branch, Unit, or Squad)
allocated Task for Completion.
EXAMPLE:
Element 1:
Deploy SOCO
Interview/ secure
testimony of witnesses
Search Warrants
Employ services of
Crime Laboratory
Elements 2:
Legal search and seizures
FEO certification Element 3 COMELEC Certification
EXAMPLE:
Obtain evidence re conspiracy and premeditation
thru witnesses and possibly
confessions
Apply for Search Warrants
Coord with Crime Lab re
physical evidence
gathered and result of forensic
examination
Interrogate suspects
Interview Mandatu family and witnesses.
Monitor principal suspects’ activities.
Interview Ampatuwad
Rqst FEO cerification
File Charges in Court
EXAMPLE:
Task Force Maguindanao is
the OPR
CIDG/IG
PRO ARMM CIDG for SW
Local PNP unit/
CIDG controllers.
Interview team one.
Interview team two.
CIDG/IG
CIDG
RIO,IG posts surveillance
teams.
CIDG
TF Maguindanoa
CIDG/TF M
Element 2:
89
9.4 Standard Tactical Plan
• Six Point Plan (SMECAC) • Situation
• Mission • Execution • Contingencies
• Administration • Command and Communication
• Assignment Sheet (Figure 9.3)
The Six Point Plan
a. Situation: General description of what has occurred. Description could include: • outline of offence under investigation • details of the offender
• resources available • other agencies involved
b. Mission: A concise statement (no more than thirty words) about the task you want to accomplish
c. Execution: How you intend to carry out the mission • Information common to all • Specific tasks on Assignment Sheet
d. Contingency
• What variables may be encountered
• Consideration of alternatives • Recommendation for course of action based on appropriate consideration of
alternatives and risk
e. Administration and Logistics
• Support arrangements common to all
• cost codes • personnel requirements • special equipment.
• (Specific tasks on Assignment Sheet)
f. Command and Communications
• Controlling arrangements common to all • command structure • reporting channels
• command post location • interview rooms • (Specific details on Assignment Sheet)
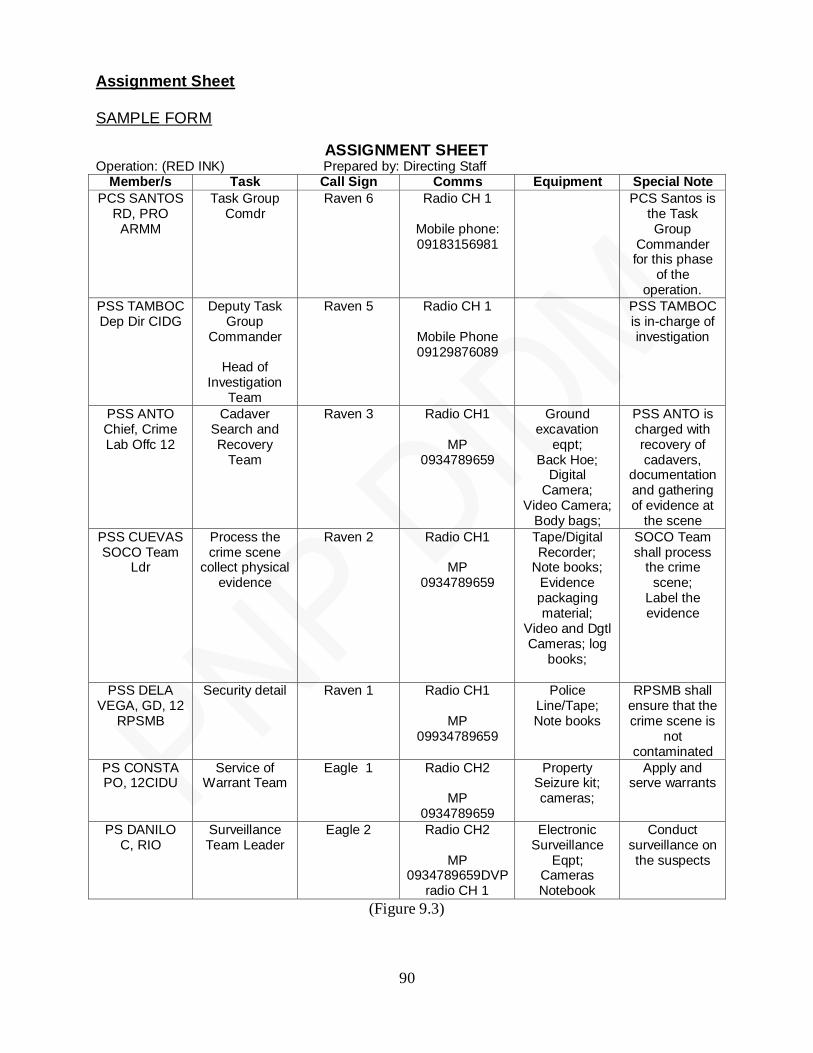
90
Assignment Sheet
SAMPLE FORM
ASSIGNMENT SHEET Operation: (RED INK) Prepared by: Directing Staff
Member/s Task Call Sign Comms Equipment Special Note
PCS SANTOS RD, PRO
ARMM
Task Group Comdr
Raven 6 Radio CH 1
Mobile phone: 09183156981
PCS Santos is the Task Group
Commander for this phase
of the operation.
PSS TAMBOC Dep Dir CIDG
Deputy Task Group
Commander
Head of Investigation
Team
Raven 5 Radio CH 1
Mobile Phone 09129876089
PSS TAMBOC is in-charge of investigation
PSS ANTO Chief, Crime Lab Offc 12
Cadaver Search and Recovery
Team
Raven 3 Radio CH1
MP 0934789659
Ground excavation
eqpt; Back Hoe;
Digital Camera;
Video Camera; Body bags;
PSS ANTO is charged with recovery of cadavers,
documentation and gathering of evidence at
the scene
PSS CUEVAS SOCO Team
Ldr
Process the crime scene
collect physical evidence
Raven 2 Radio CH1
MP 0934789659
Tape/Digital Recorder;
Note books; Evidence packaging material;
Video and Dgtl Cameras; log
books;
SOCO Team shall process
the crime scene;
Label the evidence
PSS DELA VEGA, GD, 12
RPSMB
Security detail Raven 1 Radio CH1
MP 09934789659
Police Line/Tape; Note books
RPSMB shall ensure that the crime scene is
not contaminated
PS CONSTA PO, 12CIDU
Service of Warrant Team
Eagle 1 Radio CH2
MP 0934789659
Property Seizure kit; cameras;
Apply and serve warrants
PS DANILO C, RIO
Surveillance Team Leader
Eagle 2 Radio CH2
MP 0934789659DVP
radio CH 1
Electronic Surveillance
Eqpt; Cameras Notebook
Conduct surveillance on the suspects
(Figure 9.3)
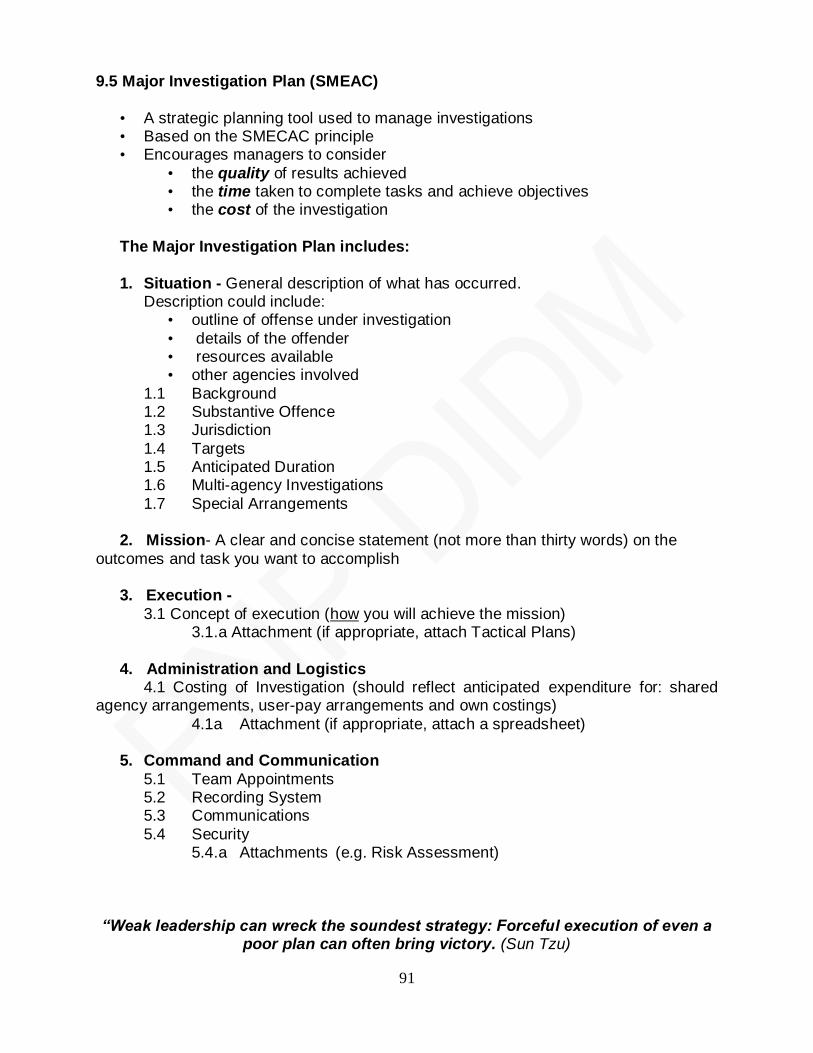
91
9.5 Major Investigation Plan (SMEAC)
• A strategic planning tool used to manage investigations • Based on the SMECAC principle • Encourages managers to consider
• the quality of results achieved • the time taken to complete tasks and achieve objectives • the cost of the investigation
The Major Investigation Plan includes:
1. Situation - General description of what has occurred. Description could include:
• outline of offense under investigation
• details of the offender • resources available • other agencies involved
1.1 Background 1.2 Substantive Offence 1.3 Jurisdiction
1.4 Targets 1.5 Anticipated Duration 1.6 Multi-agency Investigations
1.7 Special Arrangements
2. Mission- A clear and concise statement (not more than thirty words) on the
outcomes and task you want to accomplish
3. Execution -
3.1 Concept of execution (how you will achieve the mission) 3.1.a Attachment (if appropriate, attach Tactical Plans)
4. Administration and Logistics 4.1 Costing of Investigation (should reflect anticipated expenditure for: shared agency arrangements, user-pay arrangements and own costings)
4.1a Attachment (if appropriate, attach a spreadsheet)
5. Command and Communication
5.1 Team Appointments 5.2 Recording System 5.3 Communications
5.4 Security 5.4.a Attachments (e.g. Risk Assessment)
“Weak leadership can wreck the soundest strategy: Forceful execution of even a poor plan can often bring victory. (Sun Tzu)
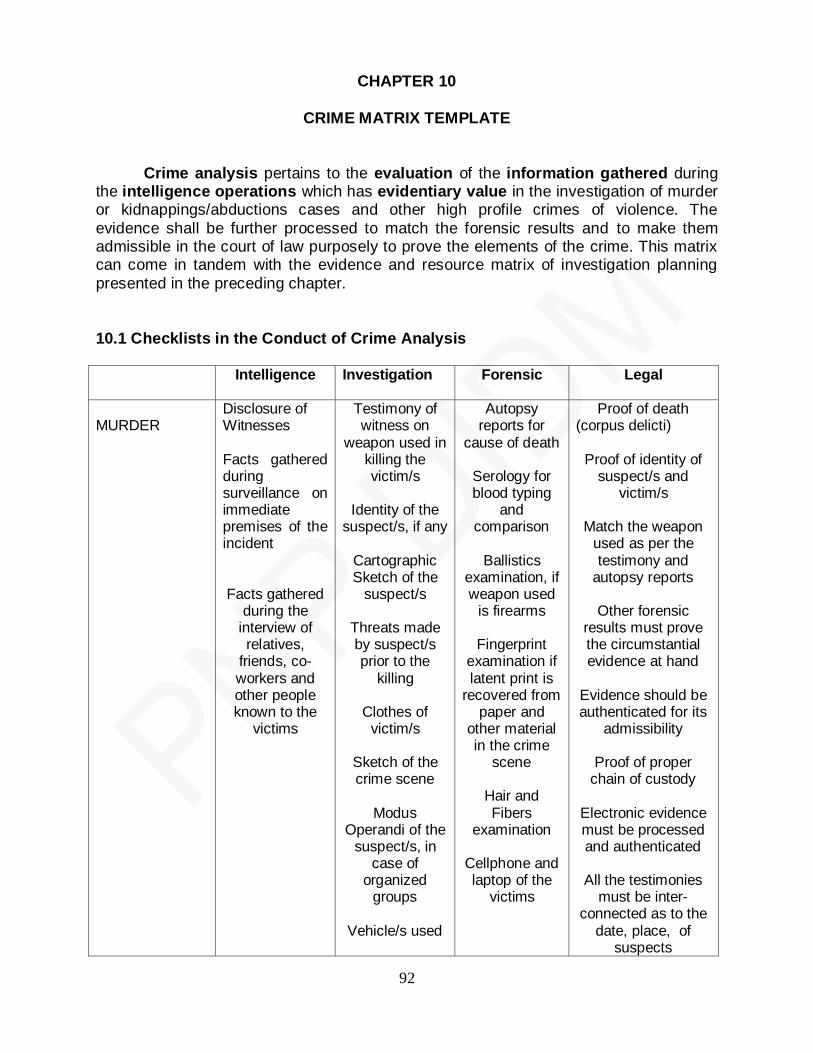
92
CHAPTER 10
CRIME MATRIX TEMPLATE
Crime analysis pertains to the evaluation of the information gathered during the intelligence operations which has evidentiary value in the investigation of murder or kidnappings/abductions cases and other high profile crimes of violence. The
evidence shall be further processed to match the forensic results and to make them admissible in the court of law purposely to prove the elements of the crime. This matrix can come in tandem with the evidence and resource matrix of investigation planning
presented in the preceding chapter.
10.1 Checklists in the Conduct of Crime Analysis
Intelligence Investigation Forensic Legal
MURDER
Disclosure of Witnesses Facts gathered during surveillance on immediate premises of the incident Facts gathered
during the interview of relatives,
friends, co-workers and other people known to the
victims
Testimony of witness on
weapon used in killing the victim/s
Identity of the
suspect/s, if any
Cartographic Sketch of the
suspect/s
Threats made by suspect/s prior to the
killing
Clothes of victim/s
Sketch of the crime scene
Modus
Operandi of the suspect/s, in
case of organized
groups
Vehicle/s used
Autopsy reports for
cause of death
Serology for blood typing
and comparison
Ballistics
examination, if weapon used
is firearms
Fingerprint examination if latent print is
recovered from paper and
other material in the crime
scene
Hair and Fibers
examination
Cellphone and laptop of the
victims
Proof of death (corpus delicti)
Proof of identity of
suspect/s and victim/s
Match the weapon
used as per the testimony and
autopsy reports
Other forensic results must prove the circumstantial evidence at hand
Evidence should be authenticated for its
admissibility
Proof of proper chain of custody
Electronic evidence must be processed and authenticated
All the testimonies
must be inter-connected as to the
date, place, of suspects
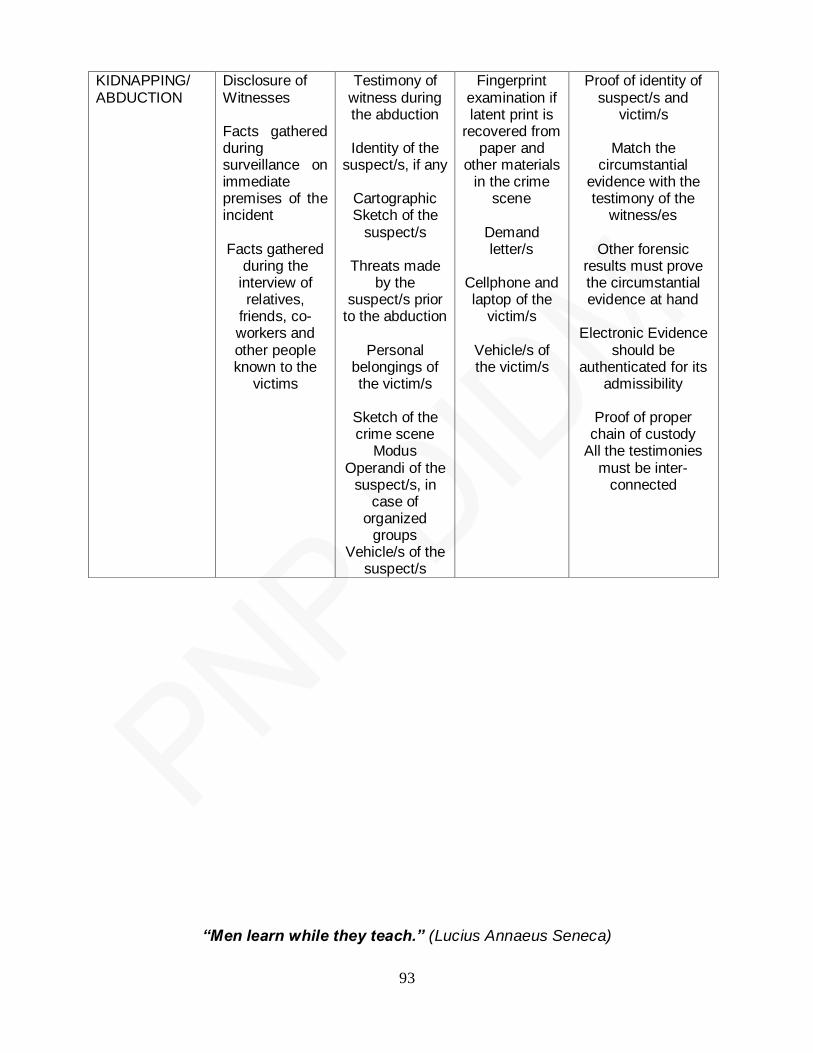
93
KIDNAPPING/ ABDUCTION
Disclosure of Witnesses Facts gathered during surveillance on immediate premises of the incident Facts gathered
during the interview of relatives,
friends, co-workers and other people known to the
victims
Testimony of witness during the abduction
Identity of the
suspect/s, if any
Cartographic Sketch of the
suspect/s
Threats made by the
suspect/s prior to the abduction
Personal
belongings of the victim/s
Sketch of the crime scene
Modus Operandi of the
suspect/s, in case of
organized groups
Vehicle/s of the suspect/s
Fingerprint examination if latent print is
recovered from paper and
other materials in the crime
scene
Demand letter/s
Cellphone and laptop of the
victim/s
Vehicle/s of the victim/s
Proof of identity of suspect/s and
victim/s
Match the circumstantial
evidence with the testimony of the
witness/es
Other forensic results must prove the circumstantial evidence at hand
Electronic Evidence
should be authenticated for its
admissibility
Proof of proper chain of custody
All the testimonies must be inter-
connected
“Men learn while they teach.” (Lucius Annaeus Seneca)
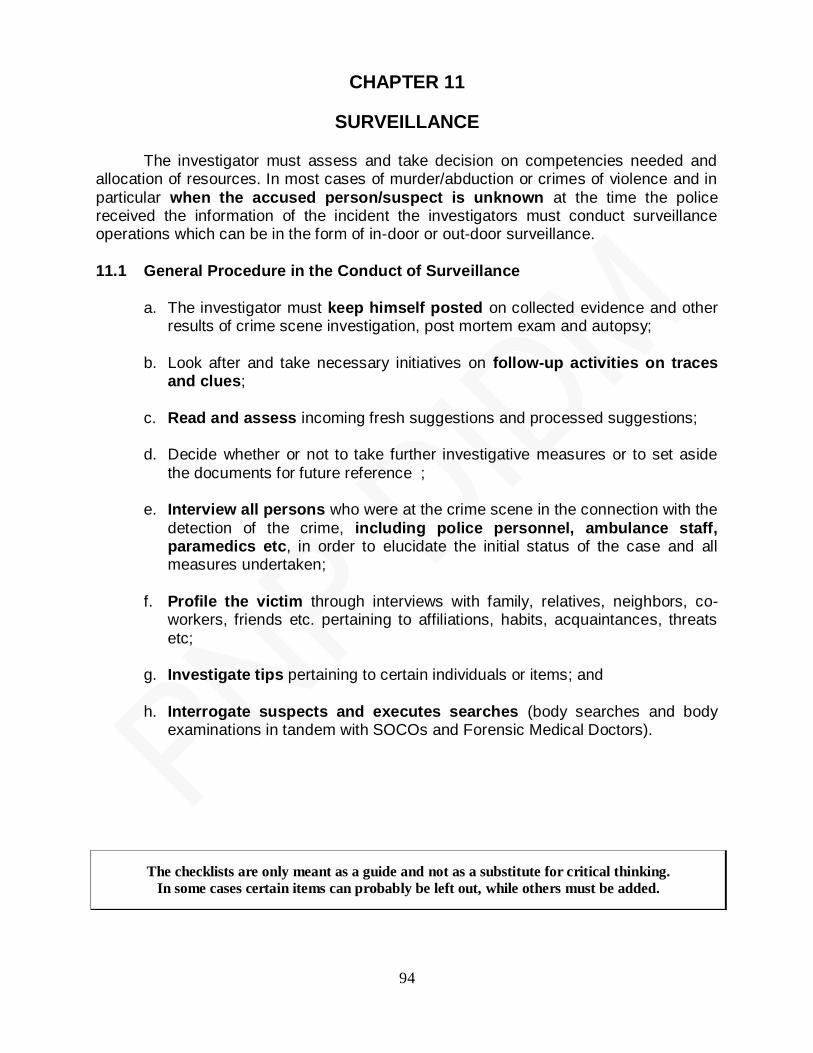
94
CHAPTER 11
SURVEILLANCE
The investigator must assess and take decision on competencies needed and allocation of resources. In most cases of murder/abduction or crimes of violence and in
particular when the accused person/suspect is unknown at the time the police received the information of the incident the investigators must conduct surveillance operations which can be in the form of in-door or out-door surveillance.
11.1 General Procedure in the Conduct of Surveillance
a. The investigator must keep himself posted on collected evidence and other results of crime scene investigation, post mortem exam and autopsy;
b. Look after and take necessary initiatives on follow-up activities on traces and clues;
c. Read and assess incoming fresh suggestions and processed suggestions;
d. Decide whether or not to take further investigative measures or to set aside
the documents for future reference ;
e. Interview all persons who were at the crime scene in the connection with the
detection of the crime, including police personnel, ambulance staff, paramedics etc, in order to elucidate the initial status of the case and all measures undertaken;
f. Profile the victim through interviews with family, relatives, neighbors, co-
workers, friends etc. pertaining to affiliations, habits, acquaintances, threats
etc;
g. Investigate tips pertaining to certain individuals or items; and
h. Interrogate suspects and executes searches (body searches and body
examinations in tandem with SOCOs and Forensic Medical Doctors).
The checklists are only meant as a guide and not as a substitute for critical thinking.
In some cases certain items can probably be left out, while others must be added.
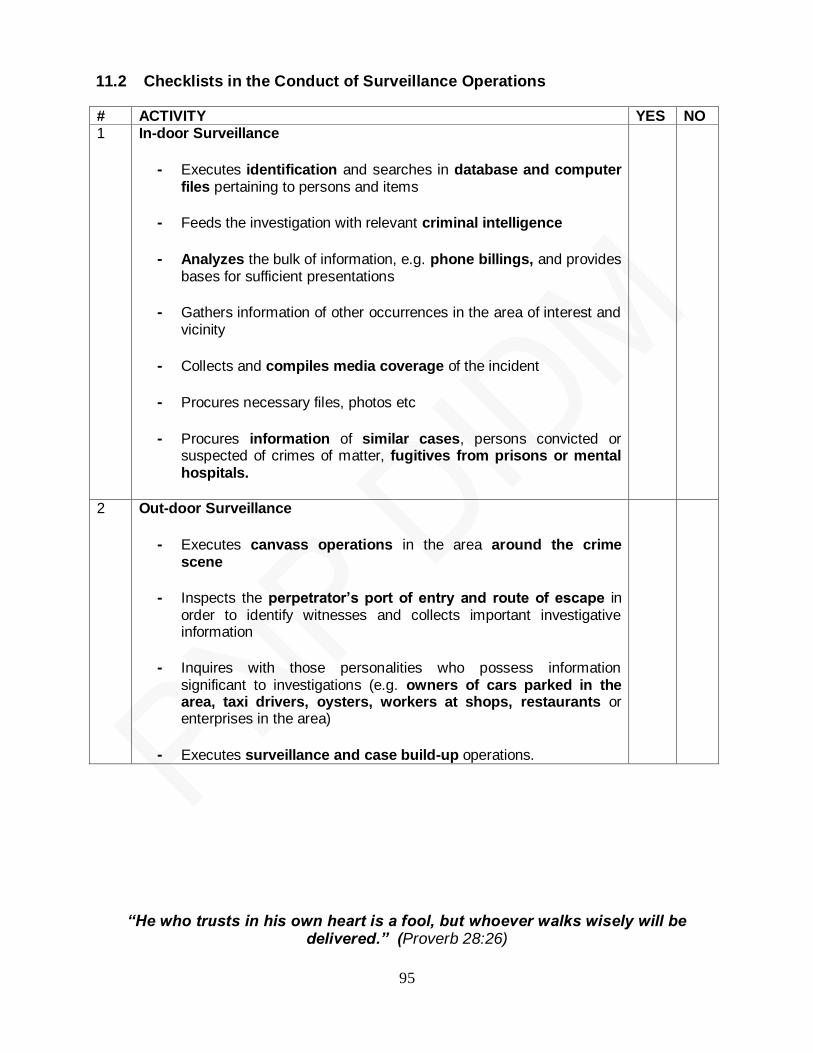
95
11.2 Checklists in the Conduct of Surveillance Operations
# ACTIVITY YES NO 1 In-door Surveillance
- Executes identification and searches in database and computer
files pertaining to persons and items
- Feeds the investigation with relevant criminal intelligence
- Analyzes the bulk of information, e.g. phone billings, and provides
bases for sufficient presentations
- Gathers information of other occurrences in the area of interest and vicinity
- Collects and compiles media coverage of the incident
- Procures necessary files, photos etc
- Procures information of similar cases, persons convicted or suspected of crimes of matter, fugitives from prisons or mental hospitals.
2 Out-door Surveillance
- Executes canvass operations in the area around the crime
scene
- Inspects the perpetrator‟s port of entry and route of escape in order to identify witnesses and collects important investigative information
- Inquires with those personalities who possess information significant to investigations (e.g. owners of cars parked in the area, taxi drivers, oysters, workers at shops, restaurants or enterprises in the area)
- Executes surveillance and case build-up operations.
“He who trusts in his own heart is a fool, but whoever walks wisely will be delivered.” (Proverb 28:26)
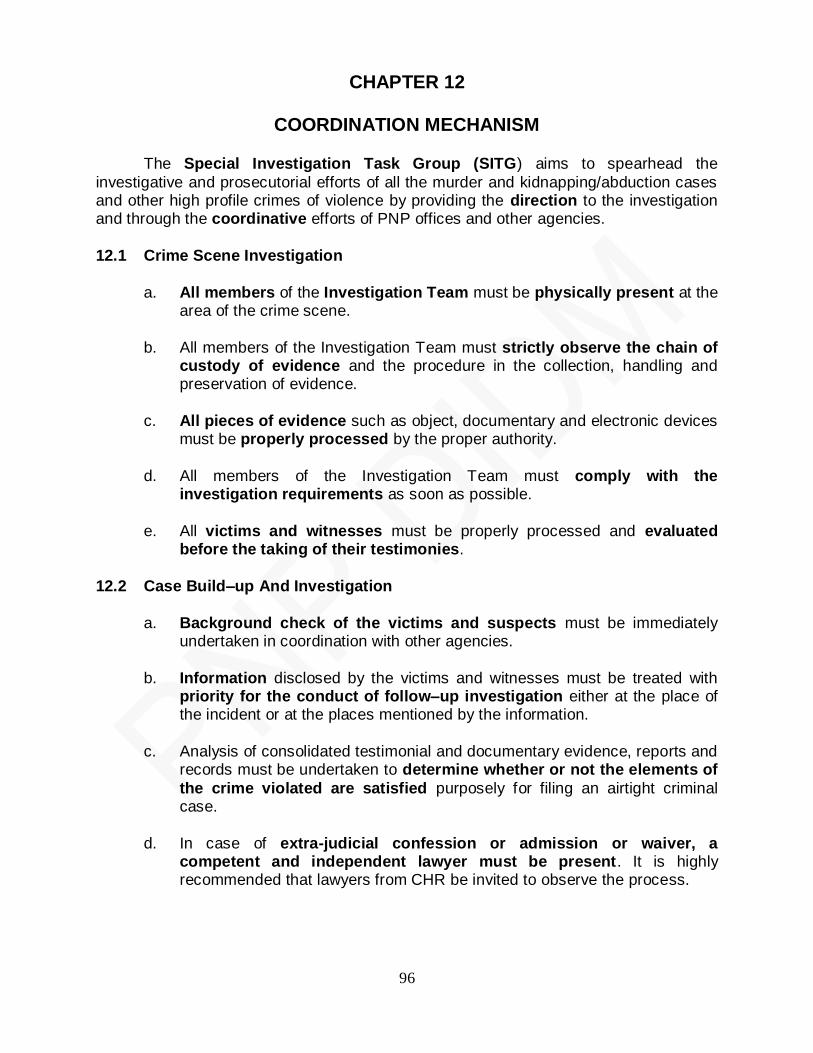
96
CHAPTER 12
COORDINATION MECHANISM The Special Investigation Task Group (SITG) aims to spearhead the
investigative and prosecutorial efforts of all the murder and kidnapping/abduction cases and other high profile crimes of violence by providing the direction to the investigation and through the coordinative efforts of PNP offices and other agencies.
12.1 Crime Scene Investigation
a. All members of the Investigation Team must be physically present at the area of the crime scene.
b. All members of the Investigation Team must strictly observe the chain of custody of evidence and the procedure in the collection, handling and preservation of evidence.
c. All pieces of evidence such as object, documentary and electronic devices
must be properly processed by the proper authority.
d. All members of the Investigation Team must comply with the
investigation requirements as soon as possible.
e. All victims and witnesses must be properly processed and evaluated
before the taking of their testimonies.
12.2 Case Build–up And Investigation
a. Background check of the victims and suspects must be immediately undertaken in coordination with other agencies.
b. Information disclosed by the victims and witnesses must be treated with priority for the conduct of follow–up investigation either at the place of the incident or at the places mentioned by the information.
c. Analysis of consolidated testimonial and documentary evidence, reports and
records must be undertaken to determine whether or not the elements of
the crime violated are satisfied purposely for filing an airtight criminal case.
d. In case of extra-judicial confession or admission or waiver, a competent and independent lawyer must be present. It is highly recommended that lawyers from CHR be invited to observe the process.
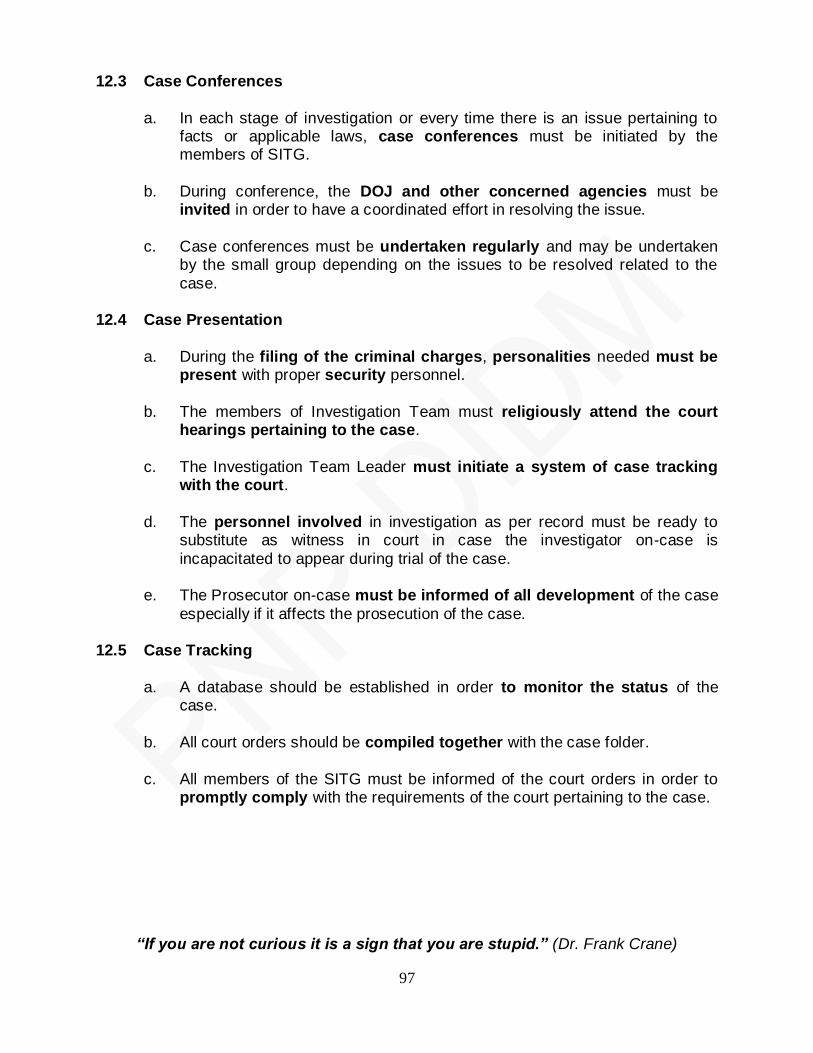
97
12.3 Case Conferences
a. In each stage of investigation or every time there is an issue pertaining to facts or applicable laws, case conferences must be initiated by the members of SITG.
b. During conference, the DOJ and other concerned agencies must be
invited in order to have a coordinated effort in resolving the issue.
c. Case conferences must be undertaken regularly and may be undertaken
by the small group depending on the issues to be resolved related to the
case.
12.4 Case Presentation
a. During the filing of the criminal charges, personalities needed must be
present with proper security personnel.
b. The members of Investigation Team must religiously attend the court
hearings pertaining to the case.
c. The Investigation Team Leader must initiate a system of case tracking
with the court.
d. The personnel involved in investigation as per record must be ready to
substitute as witness in court in case the investigator on-case is
incapacitated to appear during trial of the case. e. The Prosecutor on-case must be informed of all development of the case
especially if it affects the prosecution of the case.
12.5 Case Tracking
a. A database should be established in order to monitor the status of the
case.
b. All court orders should be compiled together with the case folder.
c. All members of the SITG must be informed of the court orders in order to promptly comply with the requirements of the court pertaining to the case.
“If you are not curious it is a sign that you are stupid.” (Dr. Frank Crane)
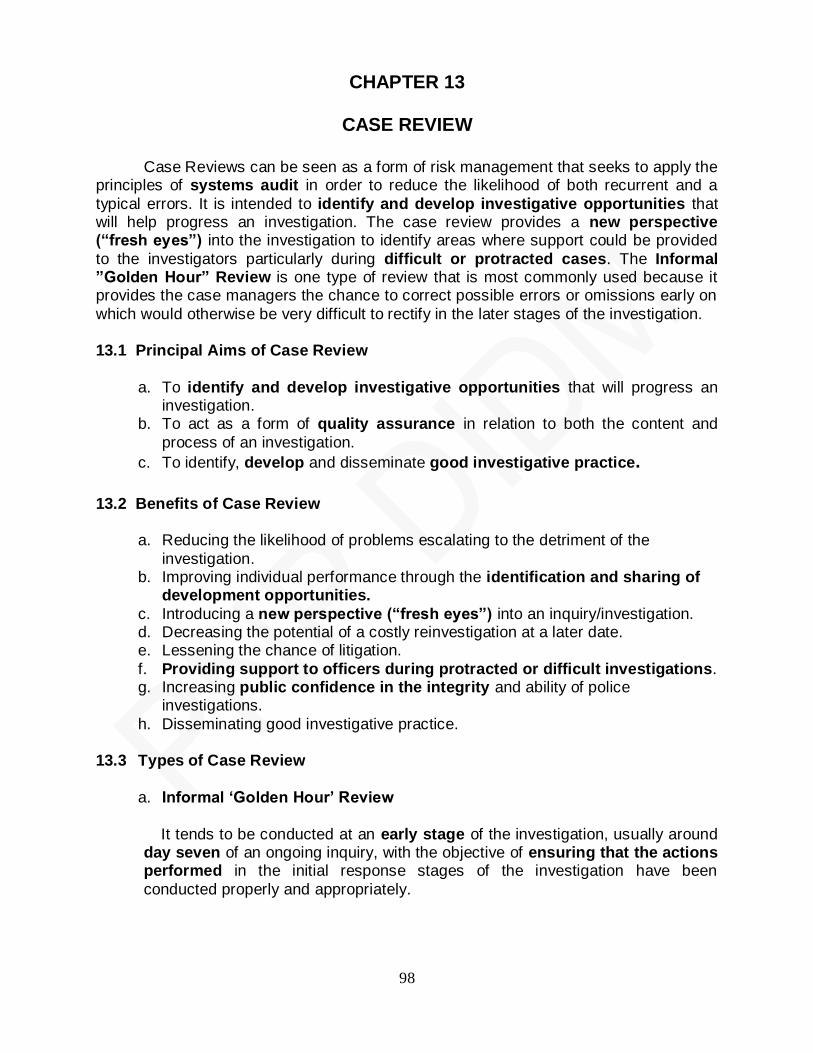
98
CHAPTER 13
CASE REVIEW
Case Reviews can be seen as a form of risk management that seeks to apply the principles of systems audit in order to reduce the likelihood of both recurrent and a
typical errors. It is intended to identify and develop investigative opportunities that will help progress an investigation. The case review provides a new perspective (“fresh eyes”) into the investigation to identify areas where support could be provided
to the investigators particularly during difficult or protracted cases. The Informal ”Golden Hour” Review is one type of review that is most commonly used because it provides the case managers the chance to correct possible errors or omissions early on
which would otherwise be very difficult to rectify in the later stages of the investigation.
13.1 Principal Aims of Case Review
a. To identify and develop investigative opportunities that will progress an
investigation. b. To act as a form of quality assurance in relation to both the content and
process of an investigation.
c. To identify, develop and disseminate good investigative practice.
13.2 Benefits of Case Review
a. Reducing the likelihood of problems escalating to the detriment of the
investigation. b. Improving individual performance through the identification and sharing of
development opportunities.
c. Introducing a new perspective (“fresh eyes”) into an inquiry/investigation. d. Decreasing the potential of a costly reinvestigation at a later date. e. Lessening the chance of litigation.
f. Providing support to officers during protracted or difficult investigations. g. Increasing public confidence in the integrity and ability of police
investigations.
h. Disseminating good investigative practice. 13.3 Types of Case Review
a. Informal „Golden Hour‟ Review
It tends to be conducted at an early stage of the investigation, usually around day seven of an ongoing inquiry, with the objective of ensuring that the actions performed in the initial response stages of the investigation have been
conducted properly and appropriately.
99
• The opening stages of an investigation are often the most important in terms of collecting vital forensic evidence, but they are also often the most
chaotic and therefore most prone to errors. • Some expressed the opinion that if such errors are made it is often
quite difficult to rectify them through a 28-day review.
b. Self-inspection
• Self-inspection is based around the self-completion of a short pro forma, which can provide a helpful prompt for actions, as well as a mechanism to
highlight emerging problems.
• This is a mechanism that allows an investigator to ensure, in the early stages of an investigation, when they are often subject to intense pressure, that they have completed all the basic procedural and investigative requirements.
• The particular strength of this approach is that it is cost-efficient and does not disrupt the ongoing investigation.
c. The 28-Day Progress Review
The main aim is to quality assure the ongoing investigation and to assist the
investigator in identifying „investigative opportunities‟ to help advance the inquiry.
d. Concluding Reviews
These are used to provide an overview of a long-term investigation in order to
aid decision-making in respect of whether all operational resources should be removed
from the investigation. e. Case Development Reviews (Cold Case Review)
• These are being conducted on long-term unsolved cases with the
intention of evaluating whether there are grounds for conducting new lines of
inquiry. • In particular there tends to be a focus upon whether advances in
forensic technologies allow for a re-analysis of previously collected physical
materials in order to provide new leads. • Alternatively, they can be used to judge whether, over the course of time,
potential witnesses who were previously unwilling to assist the police have,
as a result of changing loyalties, any further contributions to make to the investigation.
f. Detected Case Reviews
A review on a sample of their solved cases in an effort to identify good
practices and thereby learn from their past successes.
100
g. Thematic Reviews
• These reviews can be conducted at any stage of an inquiry and focus upon a specific issue (such as forensic evidence or house to house inquiries), in an effort to ensure that all of the investigative actions and decisions taken in
respect of that particular issue have been conducted appropriately. • This is particularly relevant in cases where there is an issue that may have
been significantly detrimental to the investigation.
13.4 Three Main Types of Weaknesses in Investigation:
a. Actions, tasks or lines of inquiry that were not undertaken (but were identified by the reviewing team as being required because it was a policy, good practice, or would have added value to that specific investigation);
b. Actions, tasks or lines of inquiry which were undertaken but were
considered to have been detrimental in some way to the inquiry (or likewise
in contravention or in violation of procedures and guidelines); and, c. Actions, tasks or lines of inquiry which were undertaken and were appropriate
to the investigation, but some aspect of the quality, or the way in which the task was undertaken, was considered to be inadequate.
13.5 The Six Major Themes on Investigative Weakness:
a. Investigative Response (initial actions at the scene; information gathering;
witness and suspect management); b. Forensics (exhibit management and submission); c. Record Keeping (recording of Investigators‟ decisions, procedure and
content; acquirement and storage of documentation); d. Information Management (document management and action
administration);
e. Staffing and Resources (staffing levels and the availability of a suitably trained and experienced team); and
f. Communication (internal, external and with the victim‟s family).
Possible Causes of Investigative Weakness:
1) Poor judgment; 2) Lack of knowledge; 3) Non-compliance with agreed processes/procedures;
4) Lack of resources; and, 5) Management style.
101
13.6 Case Review Team/Committee
Case reviews may be undertaken internally, but whether it is an internal or external case review, these should be conducted by senior investigators (detectives) who have considerable investigative experience at a specified period of the investigation process.
While there are advantages to a self-administered/internal review process, there
may be some benefit to an external case reviews such as one that would be conducted
by the Police Regional Office of cases being handled by Provincial/City Police Office SITGs. The conduct of case review may vary but the checklists provided in this Field Manual should provide the review team a guide in the auditing process. The checklists
should come in handy and useful in the meantime that a nationally agreed audit process is yet to be issued.
It is important to remember that a case review is not intended to embarrass the investigators but rather to help them identify and develop investigative opportunities.
didm/apim2010/field manual
“Maneuvering with an army is advantageous; with an undisciplined multitude, most dangerous.” (Sun Tzu)
102
TECHNICAL WORKING GROUP
POLICE DIRECTOR ARTUROG G. CACDAC, JR - Director, DIDM POL CHIEF SUPT ALEX PAUL I. MONTEAGUDO - Deputy Director, DIDM
POL SR SUPT RICARDO C. MARQUEZ - Executive Officer, DIDM PSSUPT LORLIE N. ARROYO - Acting Dir, Crime Lab Grp PSSUPT LIZA M. SABONG - DDA,Crime Lab Grp
PSSUPT NAPOLEON C. TAAS - C, RAD, DIDM PSSUPT RICARDO DC ZAPATA JR - C, CMD, DIDM PSSUPT KEITH ERNALD L. SINGIAN - C, SIDD, DIDM
PSUPT MARLON M. GANZON - C, BFO, DIDM PCINSP HENRY Q. LIBAY - HS, TF USIG, DIDM MS Patricia Cantero - OCPNP
NUP Myla B Dy - DIDM
“Apply thine heart unto instruction , and thine ears to words of knowledge.” (Proverbs 23:12)