Pharma Creatio. User guide
26
Pharma User guide
Transcript of Pharma Creatio. User guide

Pharma
User guide

1
Pharma Creatio
Contents1. About Pharma Creatio .................................................................................................................................. 22. How to set up rules of a med rep visit ..................................................................................................... 4
2.1. How to set up a med rep visit rule ..................................................................................................... 42.2. How to manage med rep visit actions .............................................................................................. 52.3. How to add a presentation to a visit ................................................................................................. 72.4. How to set up a list of promoted products for med rep visits ................................................... 7
3. How to schedule med rep visits................................................................................................................. 93.1. How to schedule med rep visits .......................................................................................................... 93.2. How to build a route for a med rep ................................................................................................. 11
4. How to conduct visits ..................................................................................................................................124.1. How to work with the list of med rep visits .....................................................................................124.2. How to perform visit actions ..............................................................................................................13
5. Check-in performance monitoring...........................................................................................................176. Categorization of physicians......................................................................................................................197. Cyclic tasks......................................................................................................................................................21
7.1. How to create a cyclic task ..................................................................................................................217.2. How to schedule med rep visits automatically..............................................................................227.3. How to connect a manually created visit to a cyclic task ...........................................................247.4. How to configure a personal calendar for a contact ..................................................................24
Pharma Creatio
About Pharma CreatioPharma Creatio functionality is designed to efficiently schedule the med reps' visits to doctors andpharmacies, build routes on the map, manage the visit activities and assist med reps during the visits.
ATTENTIONThis function is unavailable for the Oracle DBMS.
How pharma functionality can be used by a med rep
Use a mobile device with the Creatio application installed during your visits. After selecting therequired visit in the calendar, you will be transferred to the visit page, which will display the visit actionlist and switches for each action.During a visit, Creatio will prompt the required steps. For example, when performing the [Presentation]action, the screen will automatically display a presentation of new products, etc.During a visit, you can add orders based on visit results, create a list of products and their number andwrite down stock keeping unit (SKU) monitoring results and product facing check results. Visits arecovered in a separate article.How to access the pharma functionality
To access the pharma functionality, install Creatio pharma application from the marketplace. Moreinformation about installation of the marketplace applications is available in the separate article.
ATTENTION!Pharma functionality requires at least 1 Pharma Creatio package license. To access the pharma functionality, all med rep users must be licensed separately.
What elements will appear in Creatio after the “Pharma” package installation
When the pharma package is installed, several new elements will appear in CreatioFor example, the [Contacts] section will now display the “Doctor” and “Pharmacist” contact types. Thecontact page will display the [Specialty], [Category], [Potential], [Loyalty] fields and the [Categorizationhistory] detail. Additionally, the [Products] tab with a detail that contains a list of drugs that arepromoted via this contact.The [Accounts] section will display new account types — “Pharmacy”, “Pharmacy network”, “” and the[Products] tab with a detail containing a list of products promoted via an account.The product page [General information] tab will display the [Contacts] and [Accounts] details. Thedetails contain a list of contacts and accounts that promote the product. The product page[Categorization] detail will display a new [Nosology] field. This field is used to specify the disease themedicine is subscribed for.The [Accounts] and [Contacts] tabs will become available in the [Visit scheduling] view of the[Activities] section. The [Contacts] tab shows the list of physicians. The [Accounts] tab shows the list ofpharmacies, pharmacy networks and hospitals.The “Pharma” folder in the [Lookups] section will contain the following lookups: [Doctor potentialsetup], [Doctor loyalty setup], [Nosology], [Doctor specialties]. New activity categories will be added:“Doctor visit” and “Pharmacy visit”. Two new rules will be added in the field sales lookup: “Doctor visitrule” and “Pharmacy visit rule”.CONTENTS
• How to set up rules of a med rep visit• How to schedule med rep visits
2

Pharma Creatio
• How to conduct visits• Check-in performance monitoring• Categorization of physicians• Cyclic tasks
3
Pharma Creatio
How to set up rules of a med rep visitVisit rules determine the different types of visits and med rep’s “to-do” list for each visit type.Thisenables you to plan med rep visits with a few clicks, as Creatio will populate the properties of each visitautomatically, according to applicable visit rule.One of the primary components of a visit rule is the med rep “to-do” list – the activities that med repsare required to complete during a visit. For example, the first step of any visit is the “Check-in“ action,which confirms that the med rep has actually arrived at the visit site. Completing this action willautomatically save the information about the employee's location. Other visit activities may includepresentation of new products, order placement and “Check-out“.CONTENTS• How to set up a med rep visit rule• How to manage med rep visit actions• How to add a presentation to a visit• How to set up a list of promoted products for med rep visits
How to set up a med rep visit rule
1. Open the system designer by clicking the button in the top right corner of the applicationwindow.
2. Click the [Lookups] link in the [System setup] block.3. Click the [Field sales rules] lookup.4. On the lookup content page, click the [New rule] button.5. Populate the required fields:
a. Populate the rule name, for example, “Visit to a doctor rule — I quarter”.b. In the [Start] and [Due] fields, specify the time limit of rule validity.c. Specify visit duration (including travel time) in the corresponding field. The specified
duration will be used by the system when creating visit activities.d. In the [Number of visits] field, enter the approximate number of visits of this type that a
med rep can perform during one day.e. In the [Visit category] field, select the “Visit to the doctor” or “Visit to the pharmacy”
value.6. Save the changes.7. Similarly, specify the other rules. Normally, different visit rules apply to different periods and
locations.As a result, these rules will be taken into account when building a schedule for the med reps.If several rules can be applied to a visit, Creatio will let you choose which rule to use.
SEE ALSO• How to manage med rep visit actions• How to add a presentation to a visit• How to set up a list of promoted products for med rep visits
4
Pharma Creatio
How to manage med rep visit actionsAdd med rep activities that must be completed during the visit on the [Actions during visit] detail of the[Field sales rules] lookup.To add an action:
1. Open the [Field sales rules] lookup.
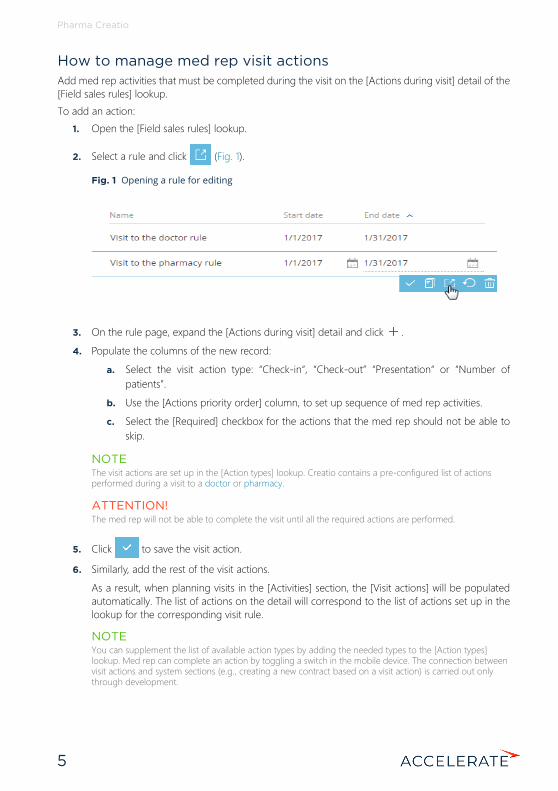
2. Select a rule and click (Fig. 1).
Fig. 1 Opening a rule for editing
3. On the rule page, expand the [Actions during visit] detail and click .4. Populate the columns of the new record:
a. Select the visit action type: “Check-in“, “Check-out” “Presentation“ or “Number ofpatients”.
b. Use the [Actions priority order] column, to set up sequence of med rep activities. c. Select the [Required] checkbox for the actions that the med rep should not be able to
skip.
NOTEThe visit actions are set up in the [Action types] lookup. Creatio contains a pre-configured list of actions performed during a visit to a doctor or pharmacy.
ATTENTION!The med rep will not be able to complete the visit until all the required actions are performed.
5. Click to save the visit action.6. Similarly, add the rest of the visit actions.
As a result, when planning visits in the [Activities] section, the [Visit actions] will be populatedautomatically. The list of actions on the detail will correspond to the list of actions set up in thelookup for the corresponding visit rule.NOTEYou can supplement the list of available action types by adding the needed types to the [Action types] lookup. Med rep can complete an action by toggling a switch in the mobile device. The connection between visit actions and system sections (e.g., creating a new contract based on a visit action) is carried out only through development.
5

Pharma Creatio
The [Action types] lookup contains a pre-configured list of actions performed during a visit to a doctoror pharmacy. These actions are available by default when setting up actions for physician or pharmacyvisits on the [Actions during visit] detail of the [Field sales rules] rules.Pre-configured rules for “Visit to the doctor”
Pre-configured rules for “Visit to the pharmacy”
SEE ALSO• How to set up a med rep visit rule• How to add a presentation to a visit• How to set up a list of promoted products for med rep visits
Check-in Creatio receives GPS coordinates of the med rep's location and the visit status is changed to “In progress“.
Presentation Opens a PowerPoint or PDF presentation on the mobile device (the presentation must be added to the [Attachments and notes] detail of the visit record in the [Activities] section).
Number of patients A pharmaceutical rep, based on the information from a physician specifies the number of patients that the physician treats regularly and whose diagnoses requires treatment by the promoted product. Based on this value, the doctor is categorized.
Promoted products When performing this action during visits, a pharmaceutical rep, based on the information from a physician specifies how many units of promoted products has the physician prescribed since the last visit.. Based on this value, the doctor is categorized.
Check-out When the action is performed, the system receives the GPS coordinates of the med rep's location and the visit is assigned the “Completed“ status.
Check-in When the action is performed, the system receives the GPS coordinates of the med rep's location and the visit is assigned the “In progress“ status.
Presentation When the action is performed, a PowerPoint or PDF presentation will open on the med rep's mobile device if it has been added to the [Attachments and notes] detail of the visit.
SKU Monitoring Opens the SKU monitoring window for the med rep to enter changes in SKUs and specify whether the products are on display in a pharmacy.
Check-out Creatio receives the GPS coordinates of the med rep's location and the visit status is changed to “Completed“.
6

Pharma Creatio
How to add a presentation to a visitSet up the [Presentation] action to enable the pharmaceutical reps show presentation from a mobiledevice during visits.In the system, create a knowledge base article and add a PowerPoint presentation (*.pptx) or PDF fileon its [Attachments] detail. Then, connect the article to the action. As a result, during a visit thepresentation will open automatically on the mobile device.
NOTEYou can add not only PowerPoint presentations or PDF files but also any other document to the knowledge base article. When performing the “Presentation“ action, this document will be opened using the standard applications of the mobile device.
To add a presentation to a med rep visit action:
1. Open the system designer by clicking in the top right corner of the application window.2. Click the [Lookups] link in the [System setup] block.3. Open the [Field sales rules] lookup.
4. Select the required rule, for example, “Visit to the doctor” and expand by clicking the button.
5. Open the [Actions during visit] detail.
6. Select the “Presentation” record and click .
7. On the displayed page, expand the [Presentation] detail and click .
8. In the displayed string, click in the field.9. In the displayed lookup, select a knowledge base article with an attached presentation.10. If necessary, add another knowledge base articles.
As a result, the med rep’s mobile device will display the presentation and the med rep will haveaccess to other added knowledge base articles on the [Attachments] detail.
SEE ALSO• How to complete the “Presentation” action• How to set up a med rep visit rule• How to manage med rep visit actions• How to set up a list of promoted products for med rep visits
How to set up a list of promoted products for med rep visitsWhen monitoring SKUs, a med rep should be able to view only products promoted for the currentdoctor or pharmacy. This is done by setting up individual lists of promoted products for each customercontact or account. There are two ways to do this.To set up the list of products promoted via accounts:• Go to the [Accounts] detail of the product page and add the list of all accounts that promote
the product. The information about the product will be automatically added to the [Products]detail of an account page.
7

Pharma Creatio
• Alternatively, add the promoted products to the [Products] detail of the account page of theaccount where the products must be promoted. The information about accounts will be addedto the [Accounts] detail of the product page.
To set up the list of products promoted via contacts:• Go to the [Contacts] detail of the product page and add the list of all contacts that promote the
product. The information about the product will be automatically added to the [Products] detailof a contact page.
• Alternatively, add the promoted products to the [Products] detail of the contact page of thecontact who promotes the product. The information about the product will be automaticallyadded to the [Products] detail of a contact page.
As a result, the connection between promoted products and accounts/contacts will be set. During avisit to a pharmacy, when performing the [SKU monitoring] action, a med rep will see only theproducts promoted via this account. During a visit to a doctor, when performing the [Promotedproducts] action, a med rep will see only the products promoted via this contact.
NOTEIf an account has more than one subsidiary companies, when adding products to the [Products] tab of the parent company, added products will appear on the corresponding tabs of the subsidiary companies. However, when adding new products to subsidiary company pages, the products will not be added to the parent company page. When deleting products from the [Products] tab of the parent company, the products will not be removed from the subsidiary companies’ pages.
SEE ALSO• How to complete the “SKU Monitoring” action• How to set up a med rep visit rule• How to manage med rep visit actions• How to add a presentation to a visit
8

Pharma Creatio
How to schedule med rep visitsSchedule visits of your pharmaceutical reps to physicians and pharmacies and build routes on the mapusing the [Visit scheduling] view of the [Activities] section.The [Visit scheduling] view has the following functional areas:
1. Contacts list The area displays the list of doctors with scheduled visits. To display a list ofcontacts with a certain system user as owner, specify the owner’s full name in the schedulequick filter. The records in the list of contacts can be filtered via the [Apply filter] command ofthe menu.
2. Accounts list. The list displays pharmacies and hospitals where you can schedule visits. Todisplay a list of accounts with a certain system user as owner, specify the owner’s full name inthe schedule quick filter. You can filter the records in the accounts list by selecting the [Applyfilter] option from the button menu.
3. Med rep's calendar. The calendar in the [Visit scheduling] view is similar to the standard usercalendar. The titles of days in the calendar contain additional buttons that allow the user tobuild the pharmaceutical rep's daily route.
4. Route map. The map that displays the pharmaceutical rep's daily route.
CONTENTS• How to schedule med rep visits• How to build a route for a med rep
SEE ALSO• How to set up rules of a med rep visit• How to conduct visits• Check-in performance monitoring• Categorization of physicians• Cyclic tasks
How to schedule med rep visitsBefore scheduling visits, make sure that the rule that applies to the visit corresponds to the neededtime period and visit category.
NOTESetting up visit rules is performed in the [Field sales rules] lookup.
To plan a visit:1. In the [Activities] section, select the [Visit scheduling] view (Fig. 2).
Fig. 2 Selecting the [Visit scheduling] view
2. Use the filters in the calendar area to select the time period and a med rep employee.
9

Pharma Creatio
3. If you plan a physician visit, select that physician’s contact and drag it to the calendar area(Fig. 3).Fig. 3 Adding a visit to the calendar
If more than one rule is set up for the period, a rule selection window will open (Fig. 4).Fig. 4 Selecting a visit rule
NOTEVisit rules are set up in the [Field sales rules] lookup.
As a result, the calendar will contain a new activity with the “Visit“ type. The contact that youdragged on the schedule area will be specified in the corresponding visit. The list of actions setup in the [Field sales rules] lookup will be added to the visit. The duration of the visit willcorrespond to the value from the corresponding visit rule. If necessary, you can change thevisit duration manually.
4. Pharmacy visits are scheduled in a similar way, by dragging an account to the schedule.
10

Pharma Creatio
NOTEAfter adding all visit activities of a med rep on the calendar, use the map to view the changes in med rep’s route for each day. Canceled visits are not taken into account when building a route.
SEE ALSO• How to build a route for a med rep
How to build a route for a med repCreatio uses the timing of visits and the locations of the medical outlets to automatically chart routesthat the med reps should take.Med outlet is displayed on the map in accordance with the GPS coordinates specified on the accountpage. By default, when building routes, Creatio used the last added address of the pharmacy account. In case of a physician visit, last added address of the corresponding hospital account is used. The detaildisplays the [Addresses] detail value of the [Contact info] tab of the contact page.
NOTEYou can view the address of the sales outlet on the map and the title of the selected visit by clicking the marker of the visit.
When all the visits are added to the map, build a route.To view routes for one day, tap the button located in the day title of the calendar (Fig. 5).
Fig. 5 Building a route for a med rep
As a result, the map will display the route between the visit locations for the selected day. The order ofvisits on the map will correspond to their order in the schedule. The button in the day title willchange its color. The button color will correspond to the color of the route on the map for that day.You can view routes for several days by clicking for multiple dates.
NOTEOn the map, the point that the route starts from is your current location (your browser will need permission to share your current location). If your browser privacy settings do not permit sharing location, the first point of the route is the value specified in the “Default city for employees“ system setting.
SEE ALSO• How to schedule med rep visits
11

Pharma Creatio
How to conduct visitsPharma Creatio manages med rep’s “to-do” list during the visits and records results of each activity.While in the field, med reps use mobile devices to perform visit actions (presentation, SKU monitoring,order placement, etc.) and report on their results.
ATTENTION!Only the users that are included to the “Sales representatives“ role can use the pharma features in the mobile app.
NOTEWe recommend that med reps use tablets for best experience when working in the field. Visit pages are most informative when viewed in the horizontal layout.
Medical rep action results are recorded in Creatio on the [Actions - Visit] detail of the visit activity page. NOTEUse the [Field sales rules] lookup to customize the list of visit actions.
Performing visit actions offline
All actions during a visit can be performed in both online and offline modes of the mobile app. Theoffline mode, does not require constant Internet connection. It is required to periodically synchronizethe mobile application with the main application to save the changes made in the mobile device withthe Creatio database.
NOTEYou can select the preferable mode in the “Mobile application operation mode” system setting.
To synchronize the mobile app with the primary Creatio application:1. Make sure that the mobile device has established Internet connection.2. Open the [Settings] section of the mobile application.3. Click the [Synchronization] button.
As a result, the updated data from the primary application will be displayed in the mobile appand the primary application will display the records that were created using the mobile app.NOTEOnline mode does not require regular manual synchronization.
CONTENTS• How to work with the list of med rep visits• How to perform visit actions
SEE ALSO
• User and role management• How to set up rules of a med rep visit• Check-in performance monitoring
How to work with the list of med rep visitsVisits are displayed in the [Activities] section of the mobile app. You can view visits as a list or as aschedule. By default, the section opens in the “calendar” view. To view the list of visits:
12
Pharma Creatio
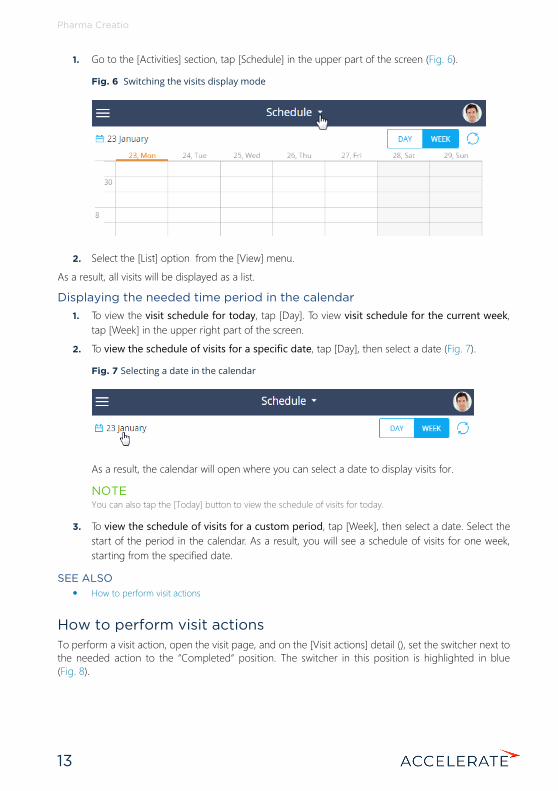
1. Go to the [Activities] section, tap [Schedule] in the upper part of the screen (Fig. 6).Fig. 6 Switching the visits display mode
2. Select the [List] option from the [View] menu.As a result, all visits will be displayed as a list.Displaying the needed time period in the calendar
1. To view the visit schedule for today, tap [Day]. To view visit schedule for the current week,tap [Week] in the upper right part of the screen.
2. To view the schedule of visits for a specific date, tap [Day], then select a date (Fig. 7).Fig. 7 Selecting a date in the calendar
As a result, the calendar will open where you can select a date to display visits for.NOTEYou can also tap the [Today] button to view the schedule of visits for today.
3. To view the schedule of visits for a custom period, tap [Week], then select a date. Select thestart of the period in the calendar. As a result, you will see a schedule of visits for one week,starting from the specified date.
SEE ALSO• How to perform visit actions
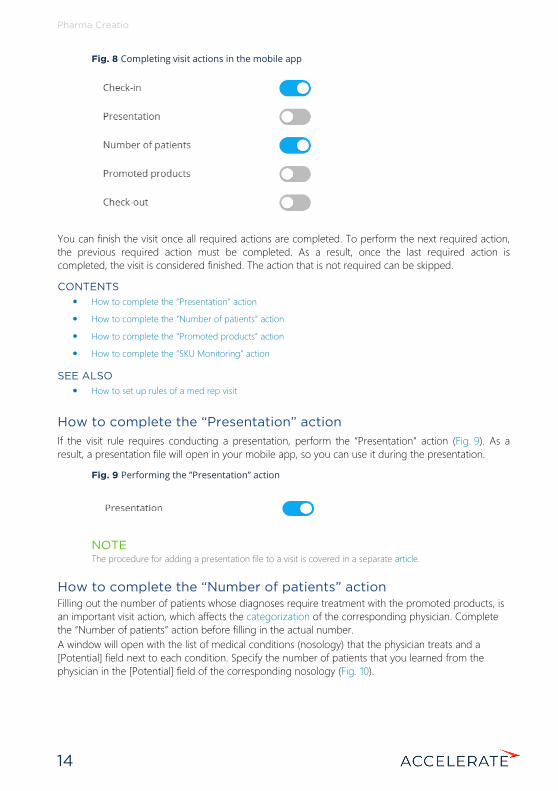
How to perform visit actionsTo perform a visit action, open the visit page, and on the [Visit actions] detail (), set the switcher next tothe needed action to the “Completed“ position. The switcher in this position is highlighted in blue(Fig. 8).
13
Pharma Creatio
Fig. 8 Completing visit actions in the mobile app
You can finish the visit once all required actions are completed. To perform the next required action,the previous required action must be completed. As a result, once the last required action iscompleted, the visit is considered finished. The action that is not required can be skipped.CONTENTS• How to complete the “Presentation” action• How to complete the “Number of patients” action• How to complete the “Promoted products” action• How to complete the “SKU Monitoring” action
SEE ALSO• How to set up rules of a med rep visit
How to complete the “Presentation” actionIf the visit rule requires conducting a presentation, perform the “Presentation“ action (Fig. 9). As aresult, a presentation file will open in your mobile app, so you can use it during the presentation.
Fig. 9 Performing the ”Presentation” action
NOTEThe procedure for adding a presentation file to a visit is covered in a separate article.
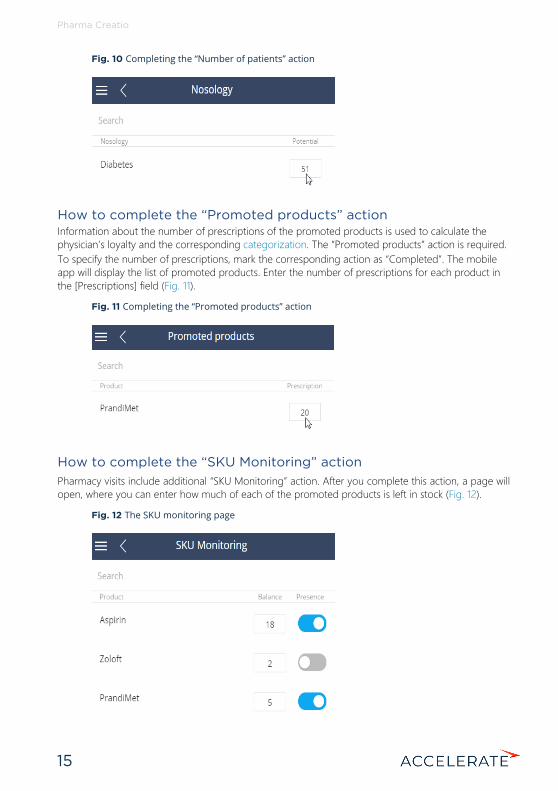
How to complete the “Number of patients” actionFilling out the number of patients whose diagnoses require treatment with the promoted products, is an important visit action, which affects the categorization of the corresponding physician. Complete the “Number of patients” action before filling in the actual number.A window will open with the list of medical conditions (nosology) that the physician treats and a [Potential] field next to each condition. Specify the number of patients that you learned from the physician in the [Potential] field of the corresponding nosology (Fig. 10).
14
Pharma Creatio
Fig. 10 Completing the “Number of patients” action
How to complete the “Promoted products” actionInformation about the number of prescriptions of the promoted products is used to calculate the physician’s loyalty and the corresponding categorization. The “Promoted products” action is required.To specify the number of prescriptions, mark the corresponding action as “Completed”. The mobile app will display the list of promoted products. Enter the number of prescriptions for each product in the [Prescriptions] field (Fig. 11).
Fig. 11 Completing the “Promoted products” action
How to complete the “SKU Monitoring” actionPharmacy visits include additional “SKU Monitoring” action. After you complete this action, a page willopen, where you can enter how much of each of the promoted products is left in stock (Fig. 12).
Fig. 12 The SKU monitoring page
15

Pharma Creatio
You can use your mobile device’s camera to take a photo of the product facings and attach it to thevisit. To do this:
1. On the section page, click the [Edit] button (Fig. 13).Fig. 13 Opening a visit for editing
2. Select the [Files] detail (Fig. 14).Fig. 14 The [Files] detail
3. Click the button.4. Select the photo you made earlier and attach it to the activity. You can also use the [Take
picture] action. The mobile device will switch to its camera mode. The picture taken will beautomatically added to the [Files] detail.
SEE ALSO
• How to set up a med rep visit rule• How to manage med rep visit actions• How to add a presentation to a visit• How to set up a list of promoted products for med rep visits• How to schedule med rep visits
16
Pharma Creatio
Check-in performance monitoringYou can keep track of med rep’s wok by setting up the check-in performance and verificationparameters during visits. Use custom details, dynamic folders or dashboards to display check-in results.Creatio stores detailed check-in information including the source of received coordinates and the timeof receiving the coordinates from GPS. Current time is indicated for the coordinates received in realtime while the time of caching is used for the cached coordinates.
Check-in verification setupUse the following system settings to set up check-in verification:• “Use last known location of user” – This system setting enables a mobile device to use the
latest cached med rep’s location and save it as the check-in location if the actual check-incoordinates are unknown. This usually occurs when med reps check in inside buildings, whereGPS signal may be unavailable.NOTEWorking with cached coordinates is available for devices on Android OS.
• “Check-in verification range” – This system setting enables you to monitor the med repcheck-in performance. It helps to identify the acceptable discrepancy (in meters) between themed rep’s coordinates and the actual coordinates of the check-in. Specified distance will beused for check-in verification.ATTENTIONIf the range value is not specified, check-in verification will not be performed.
How the check-in is verifiedAt check-in Creatio captures the current or cached coordinates of the latest med rep’s location andcompares them to the account’s address coordinates in case of a visit to pharmacy or to the contact’saddress in case of a visit to physician. The allowable discrepancy between these coordinates isspecified in meters in the “Check-in verification range” system setting.The last added address marked as [Primary] is used for verification. The check-in is not verified if it wasnot possible to obtain the coordinates and if the value of the [Check-in verification range] systemsetting is not specified.You can add the [Check-in and check-out performance result] detail based on the [Check-in andcheck-out performance result] object to display the check-in results and show the columns in the detaillist on Creatio primary application page.
NOTEMore information about adding a detail to the record page is available in a separate article. Read more >>>
• If the GPS coordinates of the med rep and the visited account or contact are in the verificationrange, the check-in will be verified and the status of the visit will be changed to “In progress”.The “Check-in coordinates are within range” status will be displayed on the [Check-in andcheck-out results] detail.
• In case distance between the med rep GPS coordinates and the factual check-in are out of thecheck-in verification range, the med rep will receive the following message: “Check-incoordinates are out of range. Would you like to save check-in results?”. If this result is saved, thecheck-in will have the “Check-in coordinates are out of range” status.
17

Pharma Creatio
• If the check-in verification is not possible (the address of an account is not specified or a medrep had no Internet connection during the verification process), the med rep will receive thefollowing message: “Unable to verify check-in coordinates. Would you like to save check-inresults?”. If this result is saved, the check-in will have the “Unable to verify check-in coordinates”status.
How to get the results of the check-in verification.To track the check-in results, you can configure a dynamic folder in the [Activities] section, or adashboard in the dashboards view of this section. An example of configuring the filtration conditionsfor all visits with unverified check-in (Fig. 15)
Fig. 15 Filtration conditions of all visits with unverified check-in
NOTEMore information about work with folders and dashboards is available in the separate articles.
SEE ALSO• How to work with the list of med rep visits• How to perform visit actions• How to schedule med rep visits• How to set up a med rep visit rule• How to manage med rep visit actions• How to add a presentation to a visit• How to set up a list of promoted products for med rep visits• How to build a route for a med rep
18

Pharma Creatio
Categorization of physiciansInformation about a doctor’s potential significance in terms of pharmacy product promotion is criticalfor choosing a proper communication strategy with the doctors. In Creatio, this information is availableon the doctor’s contact page, in the [Potential], [Loyalty] and [Category] fields.The [Potential] field contains doctor’s estimated potential, which is an indicator of doctor’s capability topromote pharmacy products. The doctor’s potential is based on the number of patients with specificdiagnoses (“nosology” or “ICDs”) that a medical rep recorded during last visit to that doctor. Thenumber of patients is compared with the values in the [Doctor’s potential setup] lookup. The [Loyalty] field contains a general estimation of doctor’s loyalty towards your brand. Loyalty is anindicator of how actively the doctor promotes your products. By default, the loyalty can range from “1”(highest) to “3” (lowest). The loyalty value is calculated based on the actual prescriptions of yourproducts by the doctor. The number of prescriptions is compared to the values in the [Doctor’s loyaltysetup] lookup. The values in the [Potential] and [Loyalty] fields are calculated automatically during doctorcategorization.The regional manager analyzes the “potential” and “loyalty” indicators and assigns doctor’s category.Information about previously assigned categories is automatically saved on the [Categorization history]detail on the contact’s page.
How to set up calculation of a doctor’s potential and loyalty indicatorsA doctor’s potential indicator depends on the number of patients with various diagnoses who visitedthe doctor. To set up calculation of the doctor’s potential:
1. Open system designer by clicking the button.2. Go to the [Lookups] section and open the [Doctor’s potential setup] lookup. 3. Add new lookup records and specify the values of doctor’s potential in the desired format. By
default, there are three levels of potential (from highest to lowest): “A”, “B” and “C”.4. Select the doctor specialty, for which the potential value is relevant.
NOTESet up separate rules of calculating potential for different doctor specialties.
5. Assign the value range for the number of patients that visit a doctor of the selected specialtybetween the measurements (usually taken by a medical rep during visits).
NOTETo let medical reps enter data for calculation of potential, set up a connection between the doctor specialties and diagnoses (nosology) of the patients that visit each type of doctor. To do this, edit the records in the [Nosology] lookup.
The doctor’s loyalty indicator depends on the number of prescriptions for the promoted products thedoctor makes between the medical rep’s visits. To set up calculation of the doctor’s loyalty:
1. Open system designer by clicking the button.2. Go to the [Lookups] section and open the [Doctor’s loyalty setup] lookup.
19

Pharma Creatio
3. Add new lookup records and specify the values of doctor’s loyalty in the desired format. Bydefault, the loyalty can range from “1” (highest) to “3” (lowest).
4. Select the doctor specialty, for which the potential value is relevant.
NOTESet up separate rules for calculating loyalty for different doctor specialties.
5. Assign the value range for the number of prescriptions that a doctor of the selected specialtyissues between measurements (usually taken by a medical rep during visits).
NOTETo let pharmaceutical reps enter data for calculation of doctor’s loyalty, enter the list of the promoted products in Creatio. You can do this by adding the products to the [Promoted products] detail on the [Products] tab of the doctor’s contact page, or by adding doctors to the [Contacts] detail of the product page.
How to perform doctor categorizationDoctor’s category is assigned by a regional manager and is based on analysis of the doctor’s potentialand loyalty indicators. The doctor’s potential and loyalty are calculated based on the information aboutthe number of doctor’s patients and the number of prescriptions of the promoted products issued bythe doctor. The information is gathered by medial reps during visits. Creatio automatically assigns thedoctor’s potential value if the number of patients is within the range specified for this value in the[Doctor’s potential setup] lookup. Creatio automatically assigns the doctor’s loyalty value if the numberof prescriptions is within the range specified for this loyalty value in the [Doctor’s loyalty setup] lookup.To perform doctor categorization:
1. Select one or more doctor records in the [Contacts] section. If no records are selected thecategorization will be performed for all records in the [Contacts] section.
NOTEYou can also run the categorization action from the contact page, if a contact with the “Doctor” type is opened.
2. Click the [Actions] button and select [Categorize].As a result, doctor’s potential and loyalty indicators will be calculated. The categorization willrun on the background, and you will be notified when it completes.
3. Select doctor’s category based on the calculated potential and loyalty indicators. Informationabout previously assigned categories is automatically saved on the [Categorization historydetail] on the contact’s page.
NOTEYou can set up the list of categories in the [Contact category] lookup.
SEE ALSO• Contact page• The actions in the [Contacts] section• Percentage of profile completion
20

Pharma Creatio
Cyclic tasksUse the [Cyclic tasks] section in Sales Creatio to automatically plan medical rep visits to pharmacies andphysicians. One cyclic task may include multiple visits planned for a certain period of time.VIEWSThe following views are available:
• – a list of cyclic tasks. Displays all cyclic tasks as a list of records.
• – cyclic task dashboards. Enables you to analyze the effectiveness of cyclic tasks (the“Planned visits”, “Completed visits” and “Remaining visits” metrics) and plan the amount of visitsahead of time (the “Available visits” metric).
CONTENTS
• How to create a cyclic task• How to schedule med rep visits automatically• How to connect a manually created visit to a cyclic task• How to configure a personal calendar for a contact
SEE ALSO• How to schedule med rep visits• How to set up rules of a med rep visit• How to schedule med rep visits• How to build a route for a med rep• Categorization of physicians
How to create a cyclic taskThe system takes location and calendars of physicians and medical reps into account while creatingautomatic cyclic tasks.To add a cyclic task:
1. Go to the [Cyclic tasks] section.2. Click the [New task] button.3. On the displayed page, fill in the required fields: Specify the name of the cyclic task, the start
and the end dates, and the owner. The owner must be a contact for which the system user iscreated.
4. On the [General information] tab:a. Use the [Visit categories] detail to add a new visit category. Specify the name of the
category in the [Name] field.b. In the [Quantity] field, specify the total number of visits you want to schedule for the
selected time frame. The [Days between visits] and the [Visits frequency per month]field values are populated automatically.
21

Pharma Creatio
NOTEIf you change the values in either one of the [Quantity], [Days between visits] and the [Visits frequency per month] fields, the values in the other two columns will be automatically recalculated based on the total task execution period.
c. Select the lookup value in the [Visit rule] field to specify the rule according to which thevisit will be performed. The field is populated from the [Field sales rules] lookup.
d. Select the contacts and accounts in the [Doctors] and [Pharmacies] details.5. In the [Products] tab, specify a list of products, which the medical rep will promote for
physicians and pharmacies.
NOTEDuring automatic visit planning, the products specified on the [Promoted products] detail will be promoted instead of those specified on the [Products] tab of a contact (doctor), or an account (pharmacy) page.
6. Save the cyclic task (Fig. 16).Fig. 16 Filling out a cyclic task page
NOTEWe recommend planning your visits quarterly to analyze product promotion results correctly.
SEE ALSO• How to schedule med rep visits automatically• How to connect a manually created visit to a cyclic task• How to configure a personal calendar for a contact
How to schedule med rep visits automaticallyPrior to planning a visit, it is necessary to calculate how many additional visits the medical rep canperform during the planned period, taking into account all configured parameters (e.g., the duration ofthe visit, the interval between visits, the working hours of physicians / pharmacies, etc.).
22
Pharma Creatio
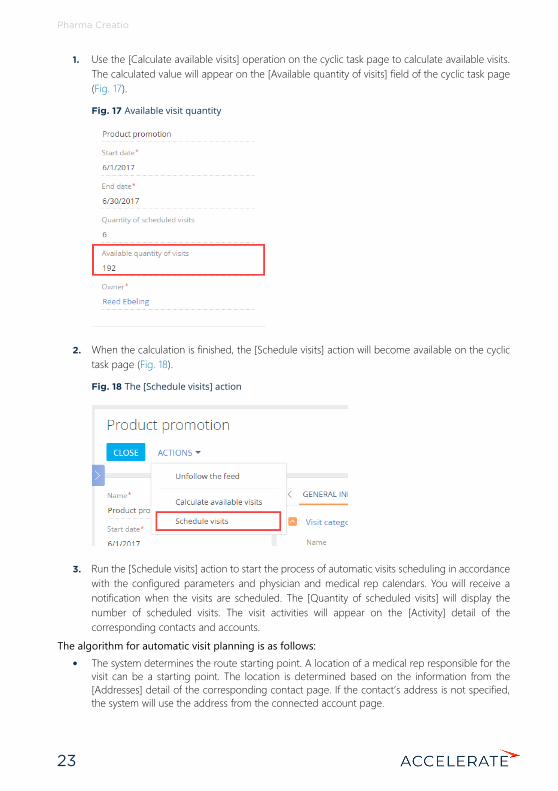
1. Use the [Calculate available visits] operation on the cyclic task page to calculate available visits.The calculated value will appear on the [Available quantity of visits] field of the cyclic task page(Fig. 17).Fig. 17 Available visit quantity
2. When the calculation is finished, the [Schedule visits] action will become available on the cyclictask page (Fig. 18).Fig. 18 The [Schedule visits] action
3. Run the [Schedule visits] action to start the process of automatic visits scheduling in accordancewith the configured parameters and physician and medical rep calendars. You will receive anotification when the visits are scheduled. The [Quantity of scheduled visits] will display thenumber of scheduled visits. The visit activities will appear on the [Activity] detail of thecorresponding contacts and accounts.
The algorithm for automatic visit planning is as follows:• The system determines the route starting point. A location of a medical rep responsible for the
visit can be a starting point. The location is determined based on the information from the[Addresses] detail of the corresponding contact page. If the contact’s address is not specified,the system will use the address from the connected account page.
23
Pharma Creatio
• The system determines the closest location to a visit. The optimal car route is determinedwithin the 200 km radius. Learn more about route planning here.
• The system checks the working hours of both the physician (pharmacy) and the medical rep.NOTEWhen checking the working hours of visit participants, the system analyzes the calendars of the medical rep and the doctor. More information about the personal calendars is available in a separate article.
• The system will create the first visit if the schedules of the medical rep and the physician(pharmacy) coincide.
• If the visit time is outside of the working hours of both parties, the system will look for the nextclosest location. Further planning and creation of visits is carried out in the same way.
SEE ALSO
• How to create a cyclic task• How to connect a manually created visit to a cyclic task• How to configure a personal calendar for a contact
How to connect a manually created visit to a cyclic taskTo automatically connect a manually created visit to a cyclic task, the following parameters mustcoincide:• time frame• promoted product• physician and/or pharmacy
If the above parameters are the same in the [Cyclic task] field of the [Connected to] detail of the [BasicInformation] tab of the manually scheduled visit, the name of the associated cyclic task is displayed.SEE ALSO• How to create a cyclic task• How to schedule med rep visits automatically• How to configure a personal calendar for a contact
How to configure a personal calendar for a contactWhen planning visits, weekends and business hours are taken into account. Therefore, it is required toconfigure calendars prior to planning visit dates. By default, a single basic calendar with the followingcharacteristics is set up in the system:• Time zone GMT 0, without daylight saving time.• 5-day workweek (from Monday till Friday).• 8-hour workday (from 9:00 AM to 6:00 PM), without lunch break.• Workdays with irregular business hours and holidays are not included.
This calendar is specified as default in the [Base calendar] system setting. You can modify the standardcalendar according to the working schedule of your company, or create a new one and add it to thesystem setting as the default one. Additionally, you can create personal calendars for pharmacies anddoctors who your medical representatives are going to visit.
24

Pharma Creatio
NOTEThe [Base calendar] system setting must be filled in for correct work of calendars. The system will refer to the [Base calendar] system setting if a contact’s calendar is not configured.
A process of setting up a contact’s personal calendar with a six-day workweek and a shorter day onSaturday is described below. The lunch break is fixed, its duration is 1 hour. To create a new calendar:
1. Select “Calendar” in the [Actions] menu on the contact page. 2. The system will prompt you to confirm adding a new personal calendar (Fig. 19).
Fig. 19 Confirming the need to create a personal calendar
The page for setting up the personal calendar of the contact will open. The [Name] and [Timezone] fields are populated automatically he [Name] field is read-only, but you can change thetime zone if necessary.
3. In the [User] field, specify the company rep who will perform visits to the contact. Their workinghours will be taken into consideration when planning visits.
4. Edit the workweek settings. The default week parameters match the parameters of the basecalendar. Set the day type as “Work” for all days from Monday to Friday, “Reduced” for Saturdayand “Day off” for Sunday.
5. Set up work time. Set the technical break by separating the work time into two intervals, beforeand after the break: 9:00 AM – 1:00 PM and 2:00 PM – 6:00 PM.
6. Specify all holidays on the [Days off ] tab.
NOTEThe [Calendars] lookup may also be used to configure personal calendars of contacts. The setup sequence is the same. Open the system designer by clicking the button at the top right corner of the application window.
SEE ALSO• How to create a cyclic task• How to schedule med rep visits automatically• How to connect a manually created visit to a cyclic task
25