
PH FM - Tehran University of Medical...
62
PH FM Pamela Evans-Smith, tvtsn, rnp Clinical Nursing Instructor University of Missouri Columbia Missouri LI pplNcorr Vl u-l,ttvts I M LKINS A Wolters Kluwer ComPanY Philadelphia . Baltimore . NewYork . London Buenos Aires . Hong Kong . Sydney . Tokyo
Transcript of PH FM - Tehran University of Medical...
PHFM
Pamela Evans-Smith, tvtsn, rnpClinical Nursing Instructor
University of Missouri
Columbia Missouri
LI pplNcorr Vl u-l,ttvts I M LKINSA Wolters Kluwer ComPanY
Philadelphia . Baltimore . NewYork . LondonBuenos Aires . Hong Kong . Sydney . Tokyo

&ffiL ipp inco t t ' s Phoro At las o f Med ica t ion Admin is r ra r ion , 2e
MgdiCatiOn adm in istratiOl'l i5 a uasic nursing function that involves skill-ful technique and consideration of the patient's development and safety. The nurse adminis-tering medications needs a knowledge base about drugs, including drug names, preparations,classifications, adverse effects, and physiologic factors that affect drug action.
The nursing process can be applied to the fundamental nursing skill of medication admin-istration. Assessment includes a comprehensive medication history as well as ongoing assess-ments of the patient's response during and after drug therapy. Nursing diagnoses are developedfrom the assessment data. Patient-centered outcomes are evaluated after implementation of theplan ofcare, tailored to the patient's needs.
This chapter will cover skills that the nurse needs to safely administer medications via sev-eral routes. Please look over the summary boxes in the beginning of this chapter for a quickreview of critical knowledge to assist you in understanding the skills related to medicationadministration.
t - - -
a - - -
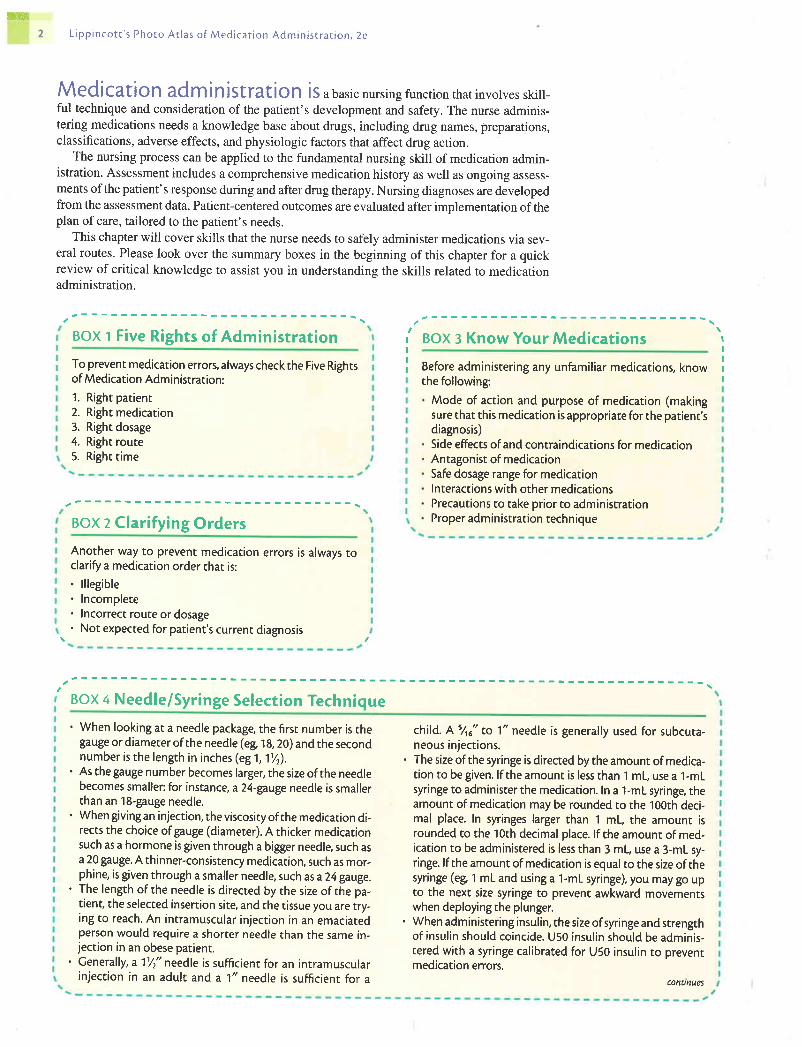
BoX 1 Five Rights of Administration
To prevent medication error5 always check the Five Rightsof Medication Administrarion:
Right patientRight medicationRight dosageRight routeRight t ime
IIIII Before administering any unfamiliar medications, know
the following:
Mode of action and purpose of medication (makingsure that this medication is appropriate for rhe patient'sdiagnosis)Side effects of and contraindications for medicationAntagonist of medicationSafe dosage range for medicationInteractions with other medicationsPrecautions to take prior ro administrationProper administration technique
child. A 7r" Eo 1" needle is generally used for subcuta-neous injections.
. The size of the syringe is directed by the amount of medica-tion to be given. lf rhe amount is less than 1 ml use a 1-mLsyringe to administer the medicadon. In a 1-mL syringe theamount of medication may be rounded to the 100th deci-mal place. In syringes larger than 1 mL, rhe amount isrounded to the 1Oth decimal place. lf rhe amount of med-ication to be administered is less than 3 mL, use a 3-mL sy,ringe. lf the amount of medication is equal to the size of thesyringe (eg 1 mL and using a 1-mL syringe), you may go upto the next size syringe to prevent awkward movementswhen deploying the plunger.
. When administering insulin, the size of syringe and strengthof insulin should coincide. U50 insulin should be adminis-tered with a syringe calibrated for U50 insulin to prevenrmedication errors.
BOX 3 Know Your Medications IIIII
1 .2.3.4.5.
BoX 2 Clarifying Orders
Another way to prevent medication errors is always toclariff a medication order rhat is:. l l legible. Incomplete. Incorrect route or dosage
. . Not expected for patient's current diagnosis
r t - '
i aox + Needle/Syringe Selection Technique. When looking ar a needle package the first number is the
gauge or diamerer of the needle (eg 1 8, 20) and rhe secondnumber is the length in inches (eg1,l1/r).
. As the gauge number becomes larger, the size of the needlebecomes smaller: for instance, a24-gauge needle is smallerthan an 18-gauge needle.
. When giving an injection, the viscosiry of the medication di-rects the choice of gauge (diameter). A thicker medicarionsuch as a hormone is given through a bigger needle, such asa 20 gauge. A thinner-consistency medication, such as mor-phine, is given rhrough a smaller needle, such as a24 gauge.
. The length of the needle is directed by the size of the pa-tient, the selected insertion site, and the tissue you are rry-ing to reach. An inrramuscular injection in an emaciatedperson would require a shorter needle than the same in-jection in an obese patient.
. Generally, all/r" needle is sufficient for an intramuscurarinjection in an adult and a 1" needle is sufficient for a

L ipp inco t t ' s Photo At las o f Med ica t ion Admin is t ra t ion , 2e
i aox + Needle/Syringe Selection Technique (continued)
Needle package showingfirst number (gauge ordiameter ofneedle)and second number (length ofthe needle in inches).
Different needle sizes: a24-gauge needle and an 1 8-gauge needle.
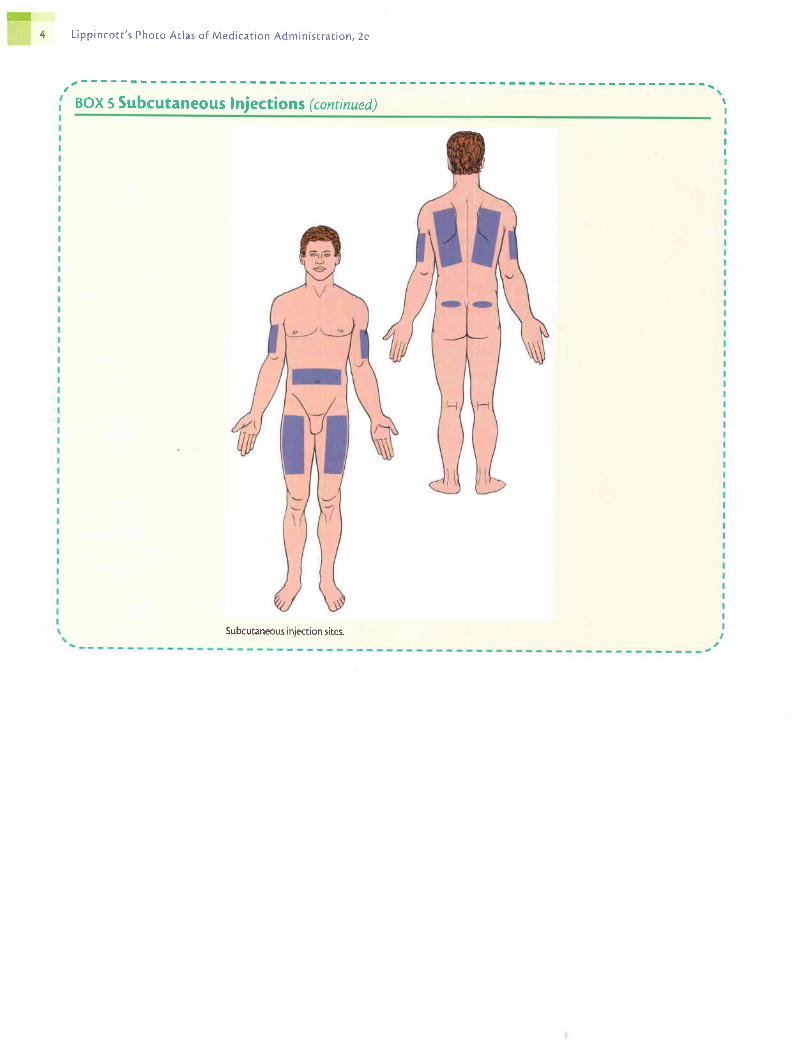
BOX 5 Subcutaneous Injections
I .III
Subcutaneous injections should contain no more than1 mL of ffuid in one insertion site.The normal angle for insertion for a subcutaneous injectionis 45 to 90 degrees. This angle depends on the length oftheneedle and the amount of adipose tissue the patient has.An emaciated patient would probably require a 45-degreeangle of insertion, while an obese patient may require a90-degree angle.
. Subcutaneous injection sites include:. Outer aspect of upper arm. Abdomen. Anterior aspects of thigh. Upper back. Upper ventral or dorsogluteal area
. Insertion site selection depends on patient's preference,nurse's preference, and type of medication to be admin-istered.
Subcutaneous tissue Skin
Comparison of the angles of insertion for intnmuscular, subcutaneous, andintradermal injections.
conunues
ill4 L ipp inco t t ' s Photo At las o f Med ica t ion Admin is t ra t ion , 2e
a r r - \
BOX 5 Subcutaneous lnjections (continued)
Subcutaneous injection sites.
IIIIII
L i p p i n c o t t ' s P h o t o A t l a s o f M e d i c a t i o n A d m i n i s t r a t i o n , 2 e
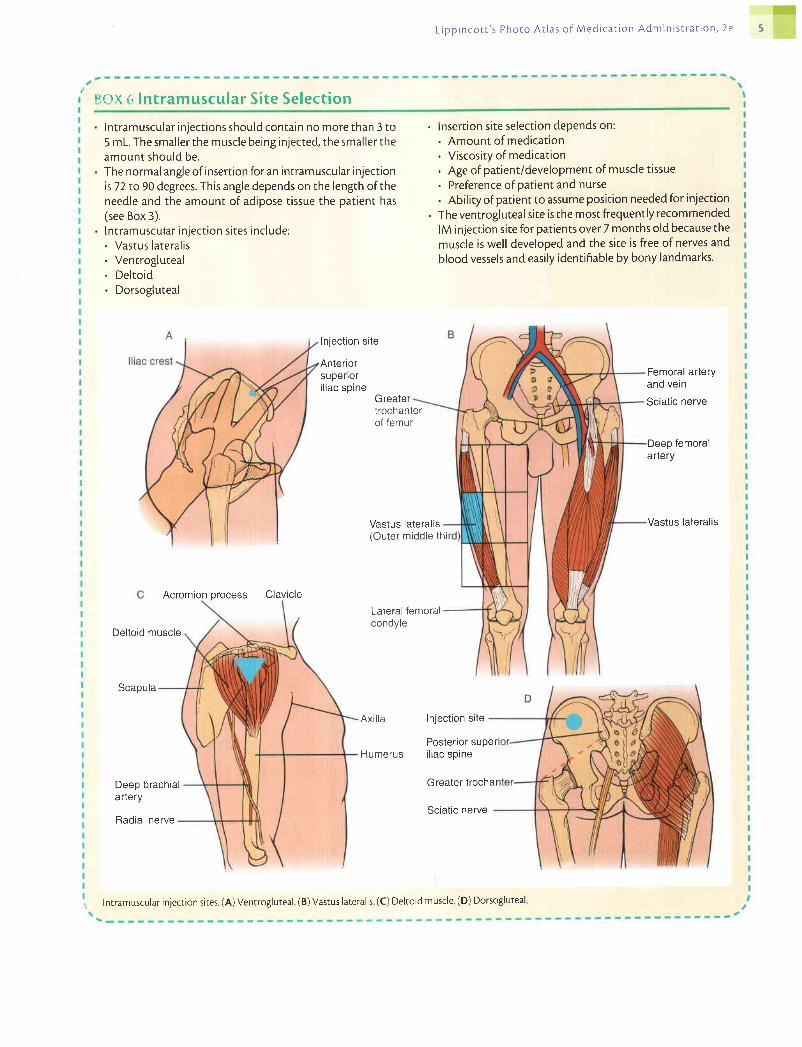
' nc)x ( ; lntramuscular Si te Select ion
Intramuscular injections should contain no more than 3 to5 mL. The smaller the muscle being injected, the smaller theamount should be.The normal angle of insertion for an intramuscular injectionis72 to 90 degrees. This angle depends on the length of theneedle and the amount of adipose tissue the patient has(see Box 3).lntramuscular injection sites include:. Vastus lateralis. Ventrogluteal. Deltoid. Dorsogluteal
Inject ion site
Anteriorsupeflori l iac spine
Greater
. lnsertion site selection depends on:. Amount of medication. Viscosity of medication. Age of patient/development of muscle tissue. Preference ofpatient and nurse. Abil ity of patient to assume position neededfor injection
. The ventrogluteal site is the most frequently recommendedlM injection site for patients over 7 months old because themuscle is well developed and the site is free of nerves andblood vessels and easily identif iable by bony landmarks.
Femoral arteryand vein
Sciatic nerve
Deep femoralartery
Vastus Iateralis
process Clavicle
trochanterof femur
Vastus lateralis(Outer middle thi
Lateral femoralcondyle
Acromion
Deltoid muscle
Scapula
Axil la
Humerus
Inject ion site
Deep brachialartery
Posterior superi l iac sp ine
Greater trochal
Sciat ic nerveRadial nerve
I Inrramuscular injection sites (A) Ventrogluteal (B) Vastus lateralis (C) Deltoid muscle (D) Dorsogluteal
ffi
L i p p i n c o t r ' s P h o t o A t l a s o f M e d i c a r i o n A d m i n i s t r a t i o n . 2 e
S K I L L
1
E q u i p m e n t
A S S E S S M E N T
N U R S I N GD I A G N O S I S
O U T C O M EI D E N T I F I C A T I O NA N D P L A N N I N G
I M P L E M E N T A T I O NA C T I O N
l. Gather equipment. Check each medication orderagainst the original physician's order according toagency policy. Clarify any inconsistencies. Check thepatient's chart for allergies.
2. Know the actions, special nursing considerations, safedose ranges, purpose ofadministration, and adverseeffects of the medications to be administered.
5. Unlock the medication cart or drawer.
6. Prepare medications for one patient at a time.7. Select the proper medication from the drawer or stock
and compare with the Kardex or order. Check expira-tion dates and perform calculations if necessary.
The oral route is the most commonly used route. Drugs given orally are intended forabsorption in the stomach and small intestine.
. Medication in disposable cup or oral syringe
. Liquid with straw if not contraindicated
. Medication cart or tray
. Medication Kardex or computer-generated MAR
Assess the patient's ability to swallow medications. If the patient cannot swallow, is NPO, oris experiencing nausea or vomiting, the medication should be withheld, the physician noti-fied, and proper documentation completed. Assess the patient's knowledge of the medica-tion. If the patient has a knowledge deficit about the medication, this may be the appropriatetime to begin education about the medication. If the medication may affect the patient's vitalsigns, assess them before administration. If the medication is for pain relief, assess the pa-tient's pain level before and after administration.
Determine related factors for the nursing diagnoses based on the patient's current status.Appropriate nursing diagnoses may include:. Impaired Swallowing. Risk for Aspiration. Anxiety. Deficient Knowledge. Noncompliance
The expected outcome to achieve when administering an oral medication is that the patientwill swallow the medication. Other outcomes that may be appropriate include the following:the patient will not aspirate; the patient has decreased anxiety; and the patient understandsand complies with the medication regimen.
R A T I O N A T E
This comparison helps to identify errors that may haveoccurred when orders were transcribed. The physician'sorder is the legal record ofmedication orders for eachagency.
This knowledge aids the nurse in evaluating the therapeuticeffect of the medication in relation to the patient's dis-order and can also be used to educate the patient aboutthe medication.
3' Perform hand hygiene. Hand hygiene prevents the spread of microorganisms.4' Move the medication cart to the outside of the patient's Organization facilitates error-free adminisffation and saves
room or prepare for administration in the medication trme.area.
Locking of the cart or drawer safeguards each patient'smedication supply. Hospital accrediting organizationsrequire medication carts to be locked when not in use.
This prevents errors in medication administration.
Comparison of medication to physician's order reduceserrors in medication administration. This is the first safetycheck. Verify calculations with another nurse if necessary.

L i p p i n c o t t ' s P h o t o A t l a s o f M e d i c a t i o n A d m i n i s t r a t i o n , 2 e
A C T I O N
a. Place unit dose-packaged medications in a dispos-able cup. Do not open wrapper until at the bedside.Keep narcotics and medications that require specialnursing assessments in a separate container.
b. When removing tablets or capsules from a bottle,pour the necessary number into the bottle cap andthen place the tablets in a medication cup. Breakonly scored tablets, if necessary, to obtain theproper dosage. Do not touch tablets with hands.
c. Hold liquid medication bottles with the label againstthe palm. Use the appropriate measuring devicewhen pouring liquids, and read the amount of med-ication at the bottom of the meniscus at eye level.Wipe the lip of the bottle with a paper towel.
Recheck each medication package or preparation withthe order as it is poured.
When all medications for one patient have been pre-pared recheck once again with the medication orderbefore taking them to the patient.
Transport medications to the patient's bedside care-fully, and keep the medications in sight at all times.
See that the patient receives the medications at the cor-rect time,
ldentify the patient carefully. There are three correctways to do this:
a. Check the name on the patient's identification band.
b. Ask the patient to state his or her name.
R A T I O N A L E
a. The label is needed for an additional safety check. Pre-requisites to giving certain medications may include as-sessing vital signs and checking laboratory test results.
b. Pouring medication into the cap allows for easy return ofexcess medication to bottle. Pouring tablets or capsulesinto the nurse's hand is unsanitarv.
c. Liquid that may drip onto the label makes the label diffi-cult to read. Accuracy is possible when the appropriatemeasuring device is used and then read accurately.
This is a second check to guard against a medication error.
This is athirdcheckto ensure accuracy and to prevent errors.
Careful handling and close observation prevent accidentalor deliberate disarrangement of medications.
Check agency policy, which may allow for administrationwithin a period of 30 minutes before or 30 minutes afterdesignated time.
Identifying the patient is the nurse's responsibility to guardagainst error.
a. This is the most reliable method. Replace the identifica-tion band if it is missing or inaccurate in any way.
b. This requires a response from the patient, but illness andstrange surroundings often cause patients to be confused.
8.
9.
10.
1 1 .
Action 7: Comparing medication with Kardex or order. Action 7c: Measuring at eye level.
12.
continues

L i p p i n c o t t ' s P h o t o A t l a s o f M e d i c a r i o n A d m i n i s t r a t j o n . 2 e
A C T I O N
c. Verify the patient's identification with a staffmember who knows the patient.
13. Complete necessary assessments before administeringmedications. Check allergy bracelet or ask patient aboutallergies. Explain the purpose and action of each medica,tion to the patient.
14. Assist the patient to an upright or lateral position.
I 5. Administer medications:
a. Offer water or other permitted fluids with pills, cap-sules, tablets, and some liquid medications.
b. Ask whether the patient prefers to take the medicationsby hand or in a cup and one at a time or all at once.
c. If the capsule or tablet falls to the floor, it must bediscarded and a new one administered.
d. Record any fluid intake if intake and output mea-surement is ordered.
16. Remain with the patient unti l each medication is swal-lowed. Never leave medication at the patient's bedside.
17. Perform hand hygiene.
18. Record each medication given on the medication chartor record using the required format.
a. If the drug was refused or omitted, record this in theappropriate area on the medication record and notifythe physician.
b. Recording of administration of a narcotic may requireadditional documentation on a narcotic record, statingdrug count and other specific information.
R A T I O N A T E
c. This is another way to double-check identity. Do not usethe name on the door or over the bed, because these maybe inaccurate.
Assessment is a prerequisite to administration ofmedications.
Swallowing is facilitated by proper positioning. An uprightor side-lying position protects the patient from aspiration.
a. Liquids facilitate swallowing of solid drugs. Some liquiddrugs are intended to adhere to the pharyngeal area, inwhich case liquid is not offered with the medication.
b. This encourages the patient's participation in taking themedications.
c. This prevents contamination.
d. This provides for accurate documentation.
Unless the nurse has seen the patient swallow the drug, thedrug cannot be recorded as administered. The patient'schart is a legal record. Only with a physician's order canmedications be left at the bedside.
Hand hygiene prevents the spread of microorganisms.
Prompt recording avoids the possibility of accidentallyrepeating the administration of the drug.
a. This verifies the reason medication was omitted and en-sures that the physician is aware of the patient's condition.
b. Controlled substance laws necessitate careful recordingof narcotic use. If a computerized medication station isbeing used, the machine may document needed informa-tion upon withdrawal of the medication. conttnues
Action 12a: Checking patient identity. Action 16: Observing patient swallowing medication.

ffi
L i p p i n c o t t ' s P h o t o A t l a s o f M e d i c a t i o n A d m i n i s t r a t i o n , 2 e
A C T I O N
19. Check on the patient within 30 minutes to verifyresponse to medication.
E V A L U A T I O N
R A T I O N A L E
8/6/06 0835 Mr. Jomes connplalnLng oJ LegpnLns. Rntes patn as nn 8/10. 2 PercocetndnxLnlstered -K. sand.ers, RN
8/6/06 0905 Mr.Jones resttng con+Jort-abLg. Ra.tes Leg paLn ns n 1/10.-K. Sanders, RN
8/6/06 1300 Mr. Jones reJnslng to twkepniw rnedlcatiow. States, "lt n+ad.e vneJeeLwoozu Last tin+e". FeeLLngs d.Lscwssed' wlthpatLewt. Pilt lent aLgrees to tnke'l Percocet etth.Ls tLn+e.-K. Sand.ers, RN
8/6/06 1320 Percocet, 1 tabLet qlven P.O.-K. Sand.ers, RN
Action 19: Documentation.
This provides the opportunity for further documentationand additional assessment of effectiveness of pain reliefand adverse effects of medications.
The expected outcomes are met when the patient swallowed the medication, did not aspirate,
has decreased anxiety, and understood and complied with the medication
administration.
Action 18: Documenting medication administration on CMAR.
Unexpected S i tua t ionsand AssociatedI n te rvent ions
Patient feels that medication is lodged in throat: Offer patient more fluids to drink. If
allowed, offer the patient bread or crackers to help move the medication to stomach.
It is unclear whether patient swallowed medication: Check in the patient's mouth, undertongue, and between cheek and gum. Patients may "cheek" medications to avoid taking themedication or to save it for later use. This has been established with many medications, es-pecially antidepressants and pain medication. Patients requiring suicide precautions should
be watched closely to ensure that they are not "cheeking" the medication or hiding it in the
mouth; they may be trying to accumulate a large amount of medication to take all at oncein a suicide attempt. Substance abusers may cheek medication in order to accumulate alarge amount to take all at once so that they may feel a high from medication.Patient vomits immediately or shortly after receiving oral medicafion.' Assess vomit, look-ing for pills or fragments. Do not readminister medication without notifying physician. If awhole pill is seen and can be identified, physician may ask that medication be administeredagain. If a pill is not seen or medications cannot be identified, medication should not bereadministered so that patient does not receive too large of a dose.Child refuses to take oral medications.' Some medications may be hidden in a smallamount of food, such as pudding or ice cream. Do not add to liquid, because medicationmay alter the taste of liquids; if child then refuses to drink the rest of the liquid, you willnot know how much of the medication was ingested. Creativity may be needed whendevising ways to administer medications to a child. See below for suggestions.
continues
aeffifrffiiL i p p i n c o t t ' s P h o t o A r l a s o f M e d i c a r i o n A d m i n i s r r a t i o n , 2 e
In fan t and Ch i ldCons idera t ions
Older Adu l tCons idera t ions
Home CareCons idera t ions
Spec ia l Cons idera t ions
' Special devices, such as oral syringes and calibrated nipples, are available in apharmacyto ensure accurate dose calculations for young children and infants.
' Some creative ways to administer medications to children include: have a "tea party" withmedicine cups; place syringe (without needle) or dropper in the space between the cheekand gum and slowly administer the medication; save a special treat for after the medicationadministration (eg, movie, playroom time, or a special food if allowed).
' The FDA has received reports of infants choking on the plastic caps that fit on the end ofsyringes when used to administer oral medications. They recommend the following:remove and dispose of caps before giving syringes to patients or families, caution familycaregivers to dispose of caps on syringes they buy over the counter, and report any prob-lems with syringe caps to the FDA. Companies have begun to manufacture syringeslabeled "oral use" without the caps on them.
' Elderly patients with arthdtis may have difficulty opening childproof caps. On request, thepharmacist can substitute a cap that is easier to open. A rubber band twisted around the capmay provide a more secure grip for older patients.
. Encourage the patient to discard outdated prescription medications.' Discuss safe storage of medications when there are children and pets in the environment.' Discuss with parents the difference in over-the-counter medications made for infants and
medications made for children. Many times parents do not realize that there are differentstrengths to the actual medications, leading to under- or over-dosing.
' Encourage patients to carry a card listing all medications, dosage, and frequency in case ofan emergency.
. If the patient questions a medication order or states the medication is different from theusual dose, always recheck and clarify with the original order or physician before givingmedication.
' If the patient's level of consciousness is altered or his or her swallowing is impaired, checkwith the physician to clarify the route of administration or alternative forms of medication.This may also be a solution for a pediatric or a confused patient who is refusing to take amedication.
. Patients with poor vision can request large-type labels on medication containers. A magni-fying lens also may be helpful.

ffi'ffi
S K I t L
2
E q u i p m e n t
A S S E S S M E N T
N U R S I N GD I A G N O S I S
4. Wrap a small gauze pad or dry antimicrobial swab
around the neck of the ampule.
7. Withdraw medication in the amount ordered plus asmall amount more (approximately 30Vo). Do not injectair into solutions. Use either of the followins methods:
a. Insert the tip of the needle into the ampule, which isupright on a flat surface, and withdraw fluid into thesyringe. Touch plunger at knob only.
L i o o i n c o r t ' s P h o t o A t l a s o f M e d i c a t i o n A d m i n i s t r a t i o n , 2 e 1 1
By withdrawing a small amount more of medication, anyair bubbles in the syringe can be displaced once thesyringe is removed and there will still be ample medicationin the syringe.
a. The contents of the ampule are not under pressure; there-fore, air is unnecessary and will cause the contents tooverflow. Handling plunger at knob only will keep shaftof plunger sterile.
O U T C O M EI D E N T I F I C A T I O NA N D P L A N N I N G
I M P L E M E N T A T I O NA C T I O N R A T I O N A L E
L Gather equipment. Check the medication order against This comparison helps to identify errors that may have
the original physician's order according to agency occurred when orders were transcribed.
policy.
2. Perform hand hygiene. Hand hygiene deters the spread of microorganisms.
3. Tap the stem of the ampule or twist your wrist quickly This facilitates movement of medication in the stem to the
while holding the ampule vertically. body of the ampule.
An ampule is a glass flask that contains a single dose of medication for parenteral adminis-tration. Because there is no way to prevent airborne contamination of any unused portion ofmedication after the ampule is opened, if not all the medication is used, the remainder mustbe discarded. Medication is removed from an ampule after its thin neck is broken.
. Sterile syringe and filter needle
. Ampule of medication
. Needle (optional; for medications that are to be given IM, size depends on medicationbeing administered and patient)
. Antimicrobial swab or gauze pad
. Medication Kardex or computer-generated MAR
Assess the medication in the ampule for any particles or discoloration. Assess the ampule forany cracks or chips. Check expiration date before administering the medication.
Determine related factors for the nursing diagnoses based on the patient's curent status.Appropriate nursing diagnoses may include:. Risk for Infection. Risk for Injury
The expected outcome to achieve when removing medication from an ampule is that themedication will be removed in a sterile manner and free from glass shards.
This protects the nurse's fingers from the glass as theampule is broken.
5. Use a snapping motion to break off the top of the This protects the nurse's face and fingers from any shat-
ampule along the scored line at its neck. Always break tered glass fragments.
away from your body.
6. Remove the cap from the filter needle by pulling it The rim of the ampule is considered contaminated. Use of a
straight off Insert the filter needle into the ampule, being filter needle prevents the accidental withdrawing of small
careful not to touch the rim. glass particles with the medication.

m1 2 L i p p i n c o t t ' s P h o t o A t l a s o f M e d i c a t i o n A d m i n i s t r a r i o n . 2 e
A C T I O N R A T I O N A T E
Action 3: Twisting motion of wrist while holdingampure.
Action 3: Tapping stem of ampule. Action 4: Snappingofftop of ampule.
Action 7a: Withdrawing medication from up-right ampule.
Action 7b: Withdrawing medication frominvened amoule.
L ipp inco t t ' s Photo At las o f Med ica t ion Admin is t ra t ion , 2e 1 3
A C T I O N
b. Insert the tip of the needle into the ampule and in-
vert the ampule. Keep the needle centered and not
touching the sides of the ampule. Withdraw fluid
into syringe. Touch plungerat knobonly.
8. Wait until the needle has been withdrawn to taP the sy-
ringe and expel the air carefully. Do not expel any air
bubbles that may form in the solution. Check the amount
of medication in the syringe and discard any surplus.
9. Discard the ampule in a suitable container after com-
paring with the medication Kardex.
10. Discard the filter needle in a suitable container. lf med'
ication is to be given lM or if agency requires the use of a
needle to administer medication, attach selected needle
to syringe.
1 1. Perform hand hygiene.
E V A L U A T I O N
R A T I O N A L E
b. Surface tension holds the fluids in the ampule when in-
verted. If the needle touches the sides or is removed
and then reinserted into the ampule, surface tension is
broken, and fluid runs out. Handling plunger at knob
only will keep shaft of plunger sterile.
Ejecting air into the solution increases pressure in the
ampule and can force the medication to spill out over the
ampule. Ampules may have overfill. Careful measure-
ment ensures that conect dose is withdrawn'
Any medication that has not been removed from the ampule
must be discarded because there is no way to maintain
sterility of contents in an unopened ampule.
Filter needle used to draw up medication should not be used
to administer the medication, to prevent any glass shards
from entering the patient' If agency has a needleless IV
system, medication is ready to be given.
Hand hygiene deters the spread of microorganisms'
The expected outcome is met when the medication is removed from the ampule in a sterile
manner and free from glass shards.
Unexpected S i tua t ionsand Associatedln te rvent ions
, Nurse cuts self while trying to open ampule: Discard ampule in case contamination has
occurred. Bandage wound and retrieve new ampule. Report according to agency policy'
, Alt of medication was not removed from the stem and there is not enough medication lefi
in body of ampule fordose: Retrieve another ampule for the remainder of the dose'
Medication should be considered contaminated once neck of ampule has been placed on
a nonsterile surface.. Nurse injects air into inverted ampule, spraying medication: Wash hands to remove any
medication. If any medication has gotten into eyes, pelform an eye irrigation' Retrieve
new ampule for medication dose. Report according to agency policy'
. Medication is drawn up without using a filter need.le: Replace needle with a filter needle'
If medication is to be given Itrrt or agency uses a needleless IV system, medication can be
injected into a new syringe and then administered to patient'
. plunger becomes contaminated before inserted into ampule.' Discard needle and syringe
and siart over. If plunger is contaminated after medication is drawn into the syringe, it is
not necessary to discard and start over. The contaminated plunger will enter the barrel of
the syringe when pushing the medication out and will not contaminate the medication'
1 4 L i p p i n c o r t ' s P h o t o A t l a s o f M e d i c a t i o n A d m i n i s t r a r r o n . 2 e
E q u i p m e n t
A S S E S S M E N T
N U R S I N GD I A G N O S I S
O U T C O M EI D E N T I F I C A T I O NA N D P L A N N I N G
I M P L E M E N T A T I O NA C T I O N
1 .
2.3.
8. Draw up the prescribed amount of medication whileholding the syringe at eye level and vertically. Be carefulto touch the plunger at knob only.
A vial is a glass bottle with a self-sealing stopper through which medication is removed. Forsafety in transporting and storing, the single-dose rubber-capped vial is usually covered witha soft metal cap that can be removed easily. The rubber stopper that is then exposed is tlemeans of entrance into the vial.
' Sterile syringe and needle (size depends on medication being administered and patient). Vial of medication. Antimicrobial swab. Second needle (optional). Filter needle (optional). Medication Kardex or computer-generated MAR
Assess the medication in vial for any discoloration or particles. Check expiration date beforeadministering medication.
Determine related factors for the nursing diagnoses based on the patient's current status. Anappropriate nursing diagnosis is Risk for Infection.
The expected outcome to achieve when removing medication from a vial is withdrawal ofthe medication into a syringe in a sterile manner.
R A T I O N A T E
Gather equipment. Check medication order against the This comparison helps to identify errors that may haveoriginal physician's order according to agency policy. o."urr"i when orders were transcribed.Perform hand hygiene' Hand hygiene deters the spread of microorganisms.Remove the metal or plastic cap on the vial that pro- The metal or plastic cap prevents contamination of thetects the rubber stopper. rubber top.
4' swab the rubber top with the antimicrobial swab. Antimicrobial swab removes surface bacteria coniamination.5' Remove the cap from the needle by pulling it straight Before fluid is removed, injection of an equal amount of air
off' (Some agencies recommend use of a filter needle is required to prevent the formation of a partial vacuum,when withdrawing premixed medication from multi- because a vial is a sealed container. If not enough air isdose vials') Draw back an amount of air into the injected, the negative pressure makes it difficult to with-syringe that is equal to the specific dose of medication draw the medication. (Use of a filter needle prevents anyto be withdrawn' solid material from being withdrawn througl the needle.)
6' Pierce the rubber stopper in the center with the needle Ah bubbled through the solution could result in withdrawaltip and inject the measured air into the space above the of an inaccurate amount of medication.solution. (Do not inject air into the solution.) The vialmay be positioned upright on a flat surface or inverted.
7' lnvert the vial and withdraw the needle tip slightly so This prevents air from being aspirated into the syringe.that it is below the fluid level.
Holding the syringe at eye level facilitates accurate reading,and the vertical position makes removal of air bubblesfrom the syringe easy. Handling plunger at knob onlywill keep shaft of plunger sterile.
L i p p i n c o t t ' s P h o t o A t l a s o f M e d i c a t i o n A d m i n i s t r a t i o n ' 2 e 1 5
A C T I O N R A T I O N A T E
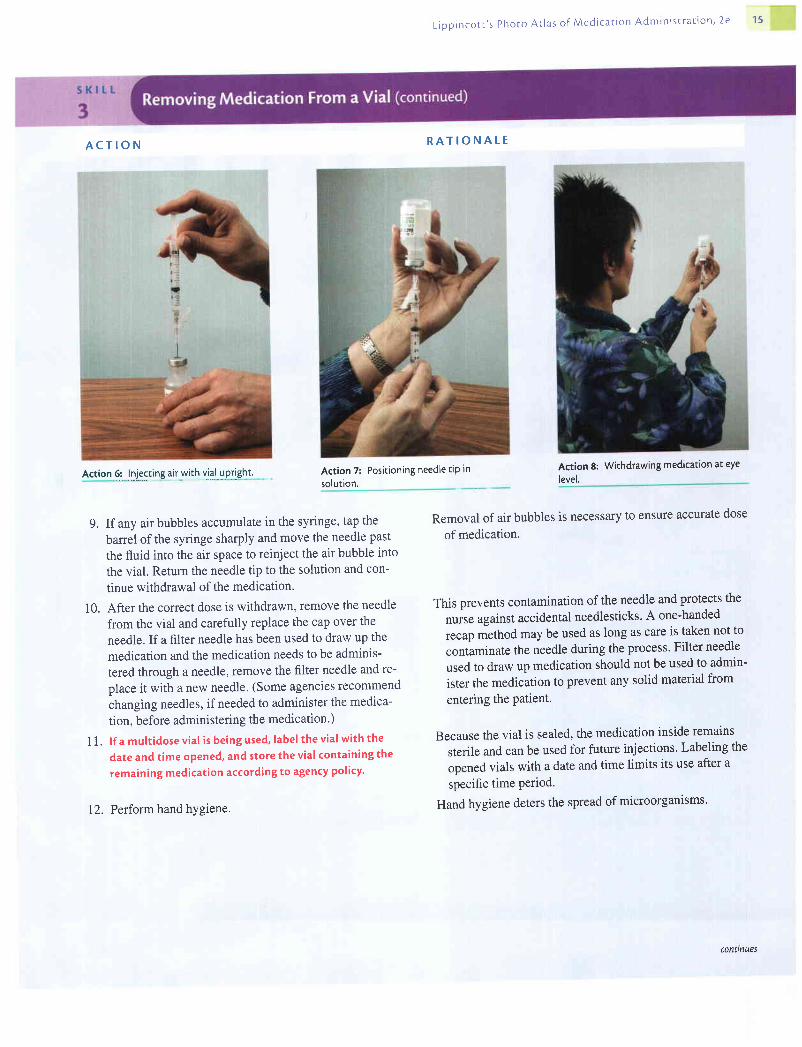
Act ion 7: Posi t ioning needle t iP in
soluUon.
9. If any air bubbles accumulate in the syringe, tap the
barrel of the syringe sharply and move the needle past
the fluid into the air space to reinject the air bubble into
the vial. Return the needle tip to the solution and con-
tinue withdrawal of the medication.
10. After the correct dose is withdrawn, remove the needle
from the vial and carefully replace the cap over the
needle. If a filter needle has been used to draw up the
medication and the medication needs to be adminis-
tered through a needle, remove the filter needle and re-
place it with a new needle' (Some agencies recommend
changing needles, if needed to administer the medica-
tion, before administering the medication')
1 1. lf a multidose vial is being used, label the vial with the
date and time opene4 and store the vial containing the
remaining medication according to agency policy'
12. Perform hand hygiene.
level.
Removal of air bubbles is necessary to ensure accurate dose
of medication.
This prevents contamination of the needle and protects the
nuise against accidental needlesticks' A one-handed
recap method may be used as long as care is taken not to
contaminate the needle during the process' Filter needle
used to draw up medication should not be used to admin-
ister the medication to prevent any solid material from
entering the Patient'
Because the vial is sealed, the medication inside remains
sterile and can be used for future injections' Labeling the
opened vials with a date and time limits its use after a
specific time Period.
Hand hygiene deters the spread of microorganisms'
Action 8: Withdrawing medication at eyeAction 6: lliSSUA1f *lqfill yptlshlt
conttnues

f f i tU L ippincot t ,s phoro At las of Medicat ion Adminisrrat ion, 2e
A C T I O N
E V A L U A T I O N
R A T I O N A L E
The expected outcome is met when the medication is withdrawn into the syringe in a sterilemanner and is ready for administration.
move air bubbles. Action 11: Vial wirh label attached
Unexpected Situat ionsand AssociatedIntervent ions
' A piece of rubber stopper is noticedfloating in medication in syringe: Apply a filter needletothe syringe and inject medication into a new syringe. Filter needie should remove anysolid material from the medication.
' As needle attached to syringe fitled with air is insened into vial, the plunger is immediatelypulled down: If possible to withdraw medication, continue steps as explained above. If sucha vacuum has formed that this is impossible, remove syringe and injeci more air into thevial. This is caused by withdrawal of medication without the addition of air into the vial.' Plunger is contaminated before injecting air into vial: Discardneedle and syringe and startover' If plunger is contaminated after medication is drawn into syringe, it is not-necessaryto discard and start over. The contaminated plunger will enter tfre Uanef of the syringewhen pushing the medication out and will not contaminate the medication.

S K I L T
4
Equipment
A S S E S S M E N T
N U R S I N GD I A G N O S I S
O U T C O M EI D E N T I F I C A T I O NA N D P L A N N I N G
I M P L E M E N T A T I O NA C T I O N
1. Gather equipment. Check medication order against the
original physician's order according to agency policy'
2. Perform hand hygiene.
3. If necessary, remove the cap that protects the rubber
stopper on each vial.
4. lf insulin is a suspension (NPH, Lente), roll and agitate
the vial to mix it well.
5. Cleanse the rubber tops with antimicrobial swabs.
6. Remove cap from needle. Inject air into the modified
insulin preparation (eg, NPH insulin)' Touch plunger at
knob only. Use an amount of air equal to the amount of
medication to be withdrawn. Do not allow needle to
touch medication in vial. Remove needle.
Insulin, a naturally occurring hormone produced by the islets of Langerhans in the pancreas,
enables cells to use carbohylrates. Patiints with diabetes mellitus type I produce no insulin
or produce insulin in insufiicient amounts. Several types of insulin are available for use by
patients with diabetes mellitus. Insulins vary in their onset and duration of action and are
classified as short acting, intermediate acting, and long acting. Many cases of diabetes melli-
tus are regulated with a combination of two insulins (eg, regular and NPH insulins)' Review
the duration and peak times of each type of insulin'
. Two vials of insulin
. Sterile insulin syringe with 25- to 31-gauge needle
. Antimicrobial swabs
. Medication Kardex or computer-generated MAR
Assess the clarity of each vial of insulin. In the past, clear insulins have been short acting
and cloudy insulins have been long acting, but this is no longer the case: there is a new long-
acting insulin on the market that is clear. Therefore, it is important to be familiar with each
particular insulin's peak and half-life before removing it from the vial.
Determine related factors for the nursing diagnoses based on the patient's current status' An
appropriate nursing diagnosis is Risk for Infection'
The expected outcome to achieve when mixing two different types of insulin in one syringe
is that the insulin is appropriately mixed in the syringe in a sterile manner and is ready for
administration.
L ipp inco t t ' s Photo At las o f Med ica t ion Admin is t ra t ion ' 2e 1 7
R A T I O N A L E
This comparison helps to identify errors that may have
occurred when orders were transcribed'
Hand hygiene deters the spread of microorganisms'
The cap Protects the rubber toP.
need to be mixed before withdrawal.
Antimicrobial swab removes surface contamination' It is
questionable whether cleaning with alcohol actually dis-
infects or instead transfers resident bacteria from the
hands to another surface. Because it is difficult in a
healthcare facility to keep an insulin vial in its original
box as recommended, the practice of cleansing with alco-
hol will most likelY continue.
Regular insulin should never be contaminated with NPH or
any insulin modified with added protein' Placing air in
the NPH insulin first without allowing the needle to con-
tact the insulin ensures that regular insulin is not contami-
nated with the additional protein in the NPH' Handling
plunger by knob only ensures sterility of shaft ofplunger'conilnues
1 8 L i p p i n c o r r ' s P h o t o A r l a s o f M e d i c a t i o n A d m i n i s t r a r r o n , 2 e
s K t r - t
4
7.
8 .
A C T I O N
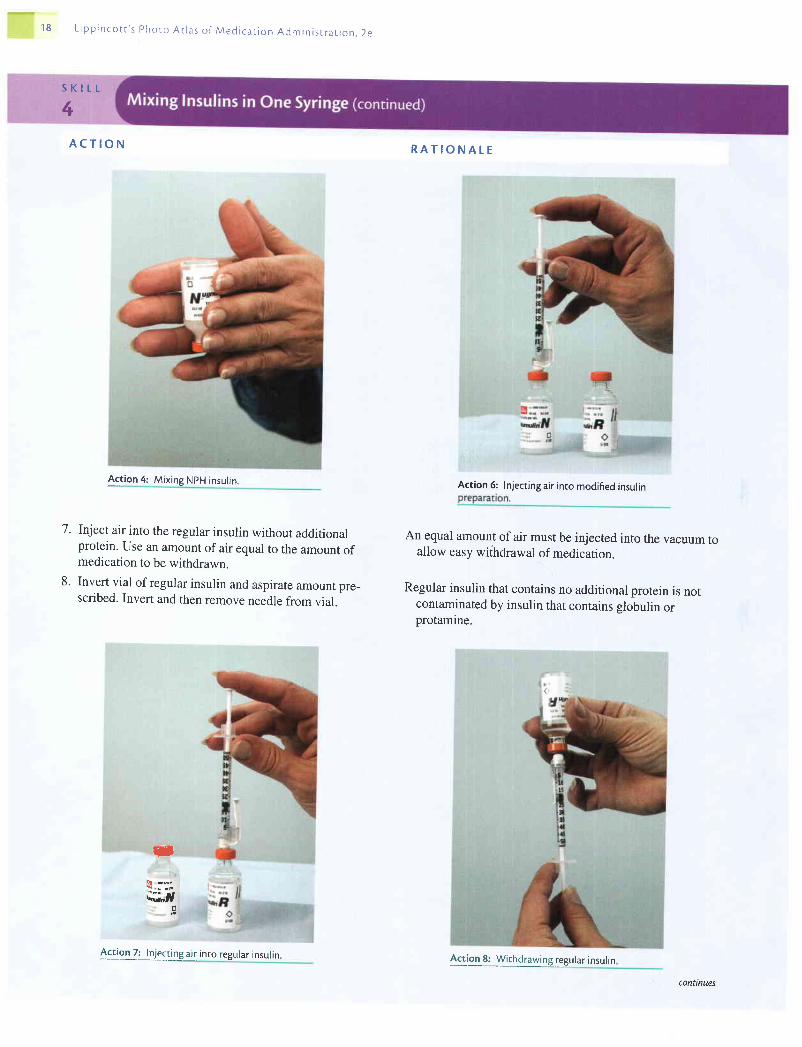
Act ion 4: Mix ing NpH insul in.
Inject air into the regular insulin without additionalprotein. Use an amount of air equal to the amount ofmedication to be withdrawn.
Invert vial of regular insulin and aspirate amount pre_scribed. Invert and then remove needle from vial.
R A T I O N A L E
Action 6:
An equal amount of air must be injected into the vacuum toallow easy withdrawal of medication.
Regular insulin that contains no additional protein is notcontaminated by insulin that contains slobulin orprotamine.
3
d;r,d
Inject ing air into modif ied insul in
Action 8: Wirhdrawing regular insulin4:golZi_.!t":Ug air into regular insulin.
conttnues

L ipp inco t t ' s Photo At las o f Med ica t ion Admin is t ra t ion ' 2e 1 9
A C T I O N
9. Cleanse the rubber top of the modified insulin vial' In-
sert the needle into this vial, invert it, and withdraw the
medication. Carefully replace the cap over the needle.
10. Store the vials according to agency recommendations.
1 1. Perform hand hygiene.
E V A L U A T I O N
R A T I O N A L E
Previous addition of air eliminates need to create positive
pressure. Capping the needle prevents contamination and
protects the nurse against accidental needlesticks' A one-
handed recap method may be used as long as care is
taken to ensure that the needle remains sterile'
Insulin need not be refrigerated but must be protected from
temperature exffemes.
Hand hygiene deters the spread of microorganisms'
: , . i : r i l ! : r r i .
The expected outcome is met when the insulin is mixed appropriately (in a sterile manner) in
the syrilnge following the steps above and is ready for administration'
Unexpected S i tua t ionsand Assoc ia tedln te rvent ions
, Nurse contaminates plunger before injecting air into insulin vial: Discard needle and
syringe and start over. If ilunger is contaminated after medication is drawn into the
syringe, it is not n.."rrury to discard and start over. The contaminated plunger will enter
the banel of the syringe when pushing the medication out and will not contaminate the
medication.. Nurse allows NpH insulin to come in contact with syringe before entering the regular
insulin vial: Discard needle and syringe and start over'
. Nurse notices that the combined amount is not the ordered anxount (eg, nurse has less or
more units in combined syringe than ordered): Discard syringe and start over' There is no
way to know for sure which dosage is wrong'. Nurse injects regular insulin into NPH vial; Discard vial and syringe and start over'
continues
20 L i p p i n c o t t ' s P h o t o A r l a s o f M e d i c a t i o n A d m i n i s t r a t i o n . 2 e
Cons idera t ions
S K I L T
5
E q u i p m e n t
A S S E S S M E N T
N U R S I N GD I A G N O S I S
O U T C O M EI D E N T I F I C A T I O NA N D P T A N N I N G
I M P T E M E N T A T I O NA C T I O N
' An insulin-cartridge pen (the Novolin Pen) is available that allows the patient to dial thecolrect dose ofinsulin and press a button to release the dose quickly through a short, fine,27-gatge needle.
' A type I diabetic patient who is visually impaired may find it helpful to use a magnifyingapparatus that fits around the syringe.
' Before attempting to explain or demonstrate devices that help low-vision diabetic patientsto prepare their medication, attempt to use the device yourself under similar circum-stances. To detect any difficulties the patient may experience, practice using the aid withyour eyes closed or in a poorly lit room.
The intradermal route has the longest absorption time of all parenteral routes. For this reason,intradermal injections are used for diagnostic pu{poses, such as the tuberculin test and tests todetermine sensitivity to various substances. The advantage of the intradermal route for thesetests is that the body's reaction to substances is easily visible, and degrees of reaction are dis-cernible by comparative study. Intradermal injections are placed just below the epidermis.
. Medication
. Sterile syringe and needle (25 to 27 gauge, y4,, to %,, long)
. Antimicrobial swab
. Disposable gloves
. Acetone and2x 2 sterile gauze square (optional)
. Medication Kardex or computer-generated MAR
Assess the patient for any allergies. Assess the site on the patient where the injection is to begiven; it should not be given in broken or open skin. Avoid areas that are highly pigmentedand hairy. Assess the patient's knowledge of reason for injection. This may provide anopportune time for patient education.
Determine related factors for the nursing diagnoses based on the patient's current status.Appropriate nursing diagnoses may include:. Deficient Knowledge. Risk for Allergy Response. Anxiety
The expected outcome to achieve when administering an intradermal injection is appearance ofa wheal or blister at the site of injection. Other outcomes that may be appropriate inilude thefollowing: the patient understands the rationale for the injection;ih" puii"nt experiences no al-lergy response; the patient refrains from rubbing the site; and the patLnt's anxiety is decreased.
R A T I O N A T E
This ensures that the patient receives the right medicationat the right time by the proper route. Many intradermaldrugs are potent allergens and may cause a significantreaction if given in an incorrect dose.
l. Assemble equipment and check the physician,s order.

L ipp inco t t ' s Photo At las o f Med ica t ion Admin is t ra t ion , 2e 2 1
A C T I O N
2. Explain the procedure to the patient.
3. Perform hand hygiene. Don disposable gloves.
4. If necessary, withdraw medication from an ampule or
vial as described in Skills 2 and3.
5. Select an area on the inner aspect of the forearm that is
not heavily pigmented or covered with hair. The upper
chest and upper back beneath the scapulae also are sites
for intradermal injections.
6. Cleanse the area with an antimicrobial swab while wiping
with a firm, circular motion and moving outward from
the injection site. Allow the skin to dry. If the skin is oily'
clean the area with a pledget moistened with acetone.
7. Remove the needle cap with the nondominant hand by
pulling it straight off.
8. Use the nondominant hand to spread the skin taut over
the injection site.
9. Place the needle almost flat against the Patient's skin,
bevel side up, and insert the needle into the skin so that
the point ofthe needle can be seen through the skin. Insert
the needle only about '/"" with entire bevel under the skin.
10. Slowly inject the agent while watching for a small
wheal or blister to appear. If none appears, withdraw
the needle to ensure bevel is in interdermal tissue.
I L Once the agent has been injected, withdraw the needle
quickly at the same angle that it was inserted-
R A T I O N A T E
Explanation encourages cooperation and reduces
apprehension.
Hand hygiene deters the spread of microorganisms' Gloves
act as a barrier and protect the nurse's hands from acci-
dental exposure to blood during the injection procedure'
The forearm is a convenient and easy location for introduc-
ing an agent intradermally. Hair or lesions at the injection
site may interfere with assessments of skin changes at
the site.
Pathogens on the skin can be forced into the tissues by the
needle. Introducing alcohol into tissues irritates the tis-
sues and is uncomfortable for the patient. Acetone is
effective for removing oily substances from the skin'
Taut skin provides an easy entrance into intradermal tissue'
The cap protects the needle from contact with micro-
organisms. This technique lessens the risk of an acciden-
tal needlestick.
Intradermal tissue is entered when the needle is held as
nearly parallel to the skin as possible and is inserted
about/g".
If a small wheal or blister appears, the agent is in the intra-
dermal tissue.
Withdrawing the needle quickly and at the angle at which it
entered the skin minimizes tissue damage and discomfort
for the patient.
Action E: Holdingforearm skin taut.conunues
22 L ipp inco t r ' s Photo At las o f Med ica t ion Admin is t ra t ron , 2e
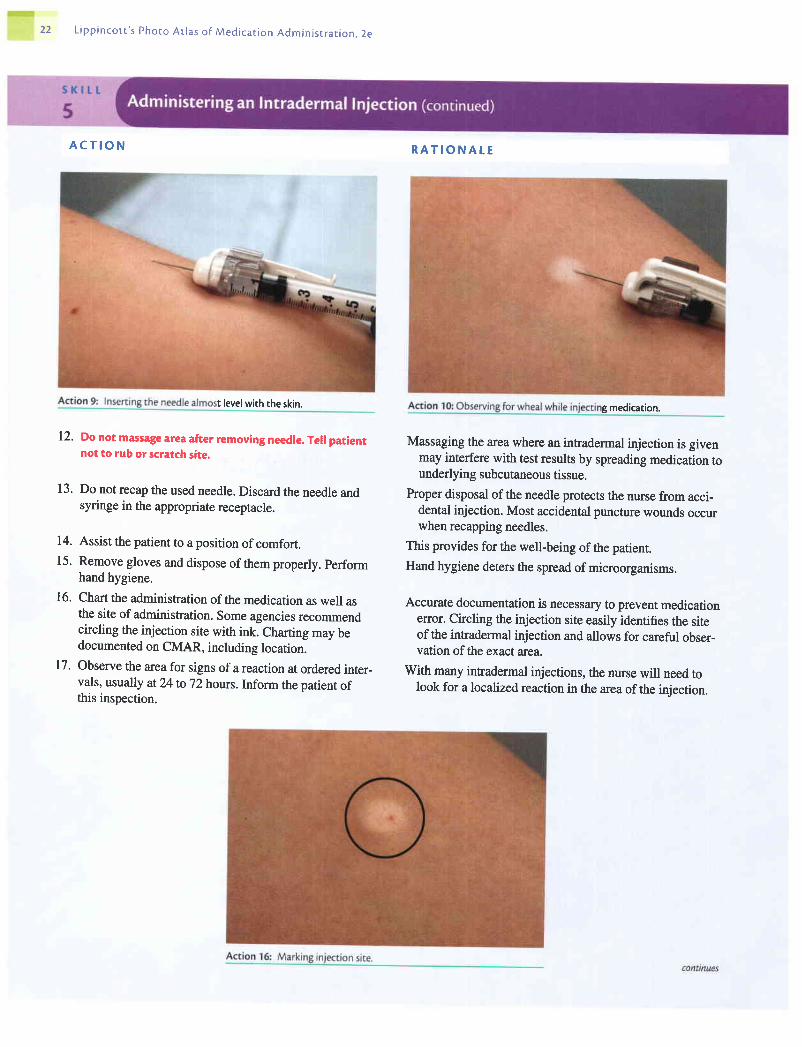
A C T I O N
t level with the skin.
12. Do not massage area after removing needle. Tell patientnot to rub or scratch site.
13. Do not recap the used needle. Discard the needle andsyringe in the appropriate receptacle.
14. Assist the patient to a position of comfort.15. Remove gloves and dispose of them properly. perform
hand hygiene.
16. Chart the administration of the medication as well asthe site of administration. Some agencies recommendcircling the injection site with ink. Charting may bedocumented on CMAR, including location.
17. Observe the area for signs of a reaction at ordered inter_vals, usually at24 to 72 hours. Inform the patient ofthis inspection.
R A T I O N A t E
g medication.
Massaging tle area where an intradermal injection is givenmay interfere with test results by spreading medication tounderlying subcutaneous tissue.
Proper disposal of the needle protects the nurse from acci-dental injection. Most accidental puncture wounds occurwhen recapping needles.
This provides for the well-being of the patient.Hand hygiene deiers the spread of microorganisms.
Accurate documentation is necessary to prevent medicationerror. Circling the injection site easily identifies the siteof the intradermal injection and allows for careful obser-vation of the exact area.
With many infradermal injections, the nurse will need tolook for a localized reaction in the area ofthe injection.

L i p p i n c o t t ' s P h o t o A t l a s o f M e d i c a t i o n A d m i n i s t r a t i o n , 2 e
E V A T U A T I O N The expected outcomes ilre met when the nurse notes a wheal or blister at site of injection;
patient understood the rationale for the injection; the patient experienced no allergy
,"rponr"; the patient does not rub or scratch the site; and the patient's anxiety is decreased.
Unexpected S i tua t ionsand Assoc ia tedln te rvent ions
Spec ia l Cons idera t ions
S K l L L
6
Equ ipmen t
A S S E S S M E N T
N U R S I N GD I A G N O S I S
. Nurse does not note wheal or blister at site of injection: Medication has been injected sub-
cutaneously. Nurse may need to obtain order to repeat procedure.. Medication leaks out of injection site before needle is withdrawn: Needle was inserted less
than t/s". Nurse may need to obtain order to repeat procedure'. Nurse sticks self with needle before injection.' Discard needle and syringe appropriately'
Follow agency policy regarding needlestick injury. Prepare new syringe with medication
and administer to patient. Complete appropriate paperwork and follow agency's policy re-
garding needlesticks.. Nurse sticks self with needle after injectior.' Follow agency's policy regarding needlestick
injuries. Discard needle and syringe appropriately. Complete the appropriate paperwork'
Do not document needlestick in patient's notes.. Afier or during injection, the patient pulls away from the needle before medication is
deliveredfutly; Remove and appropriately discard needle. Attach a new needle to the
syringe and administer the remaining medicatton.
. Since the needle is entering only the dermal portion of tissue, where there are no large blood ves-
sels, aspiration (pulling back on the plunger) is not recommended for an inffadermal injection.
. Some agencies recommend administering intradermal injections with the bevel down in-
stead of the bevel up.
Subcutaneous tissue lies between the epidermis and the muscle. Because there is subcuta-
neous tissue all over the body, various sites are used for subcutaneous injections. These sites
are the outer aspect of the upper arm, the abdomen (from below the costal margin to the iliac
crests), the anteiior aspects bithe thigh, the upper back, and the upper ventral or dorsogluteal
area (see Box 5). This route is used to administer insulin, heparin, and certain immuniza-
tions. If needed, review the specif,cs of the particular medication before administrating.
. Medication
. Sterile syringe and needle (size depends on medication being administered and patient)
. Antimicrobial swabs
. Disposable gloves
. Medication Kardex or computer-generated MAR
. Cotton balls or dry sponge (optional)
Assess the patient for any allergies. Assess the patient's knowledge of the medication. If the
patient has a knowledge deficit about the medication, this may be an appropriate time to
tegin education abouithe medication. Assess the area where injection is to be given' Sub-
"utun"ou, injections should not be given into areas of skin that are broken or open.
Determine related factors for the nursing diagnoses based on the patient's current status'
Appropriate nursing diagnoses may include:
. Deficient Knowledge
. Acute Pain
. Anxiety
. Risk for Allergy Responseconnnues
I
24 L i p p i n c o t t ' s P h o t o A t l a s o f M e d i c a t i o n A d m i n i s t r a t i o n , 2 e
O U T C O M EI D E N T ! F I C A T I O NA N D P T A N N I N G
I M P T E M E N T A T I O NA C T I O N
l. Assemble equipment and check the physician's order.
2. Explain the procedure to the patient.
3. Perform hand hygiene.
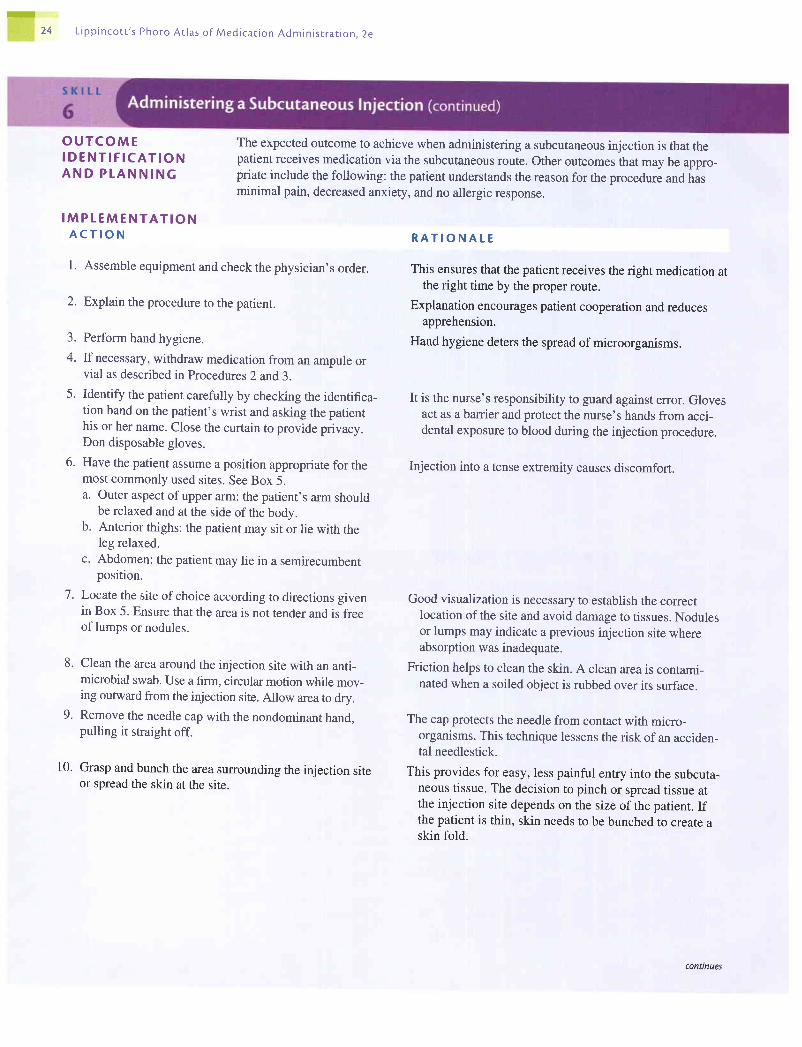
The expected outcome to achieve when administering a subcutaneous injection is that thepatient receives medication via the subcutaneous route. Other outcomes that may be appro-priate include the following: the patient understands the reason for the procedure and hasminimal pain, decreased anxiety, and no allergic response.
R A T I O N A L E
This ensures that the patient receives the right medication atthe right time by the proper route.
Explanation encourages patient cooperation and reducesapprehension.
Hand hygiene deters the spread of microorganisms.
Good visualization is necessary to establish the correctlocation of the site and avoid damage to tissues. Nodulesor lumps may indicate a previous injection site whereabsorption was inadequate.
Friction helps to clean the skin. A clean area is contami-nated when a soiled object is rubbed over its surface.
The cap protects the needle from contact with micro-organisms. This technique lessens the risk of an acciden-tal needlestick.
4. If necessary, withdraw medication from an ampule orvial as described in Procedures 2 and 3.
5' Identify the patient carefully by checking the identifica- It is the nurse's responsibility to guard against error. Glovestion band on the patient's wrist and asking the patient act as a barrier and proteci the nurse's hands from acci-his or her name. Close the curtain to provide privacy. dental exposure to blood during the injection procedure.Don disposable gloves.
6. Have the patient assume a position appropriate for themost commonly used sites. See Box 5.a. Outer aspect of upper arm: the patient's arm should
be relaxed and at the side of the body.b. Anterior thighs: the patient may sit or lie with the
leg relaxed.c. Abdomen: the patient may lie in a semirecumbent
position.
7. Locate the site of choice according to directions givenin Box 5. Ensure that the area is not tender and is freeof lumps or nodules.
8. Clean the area around the injection site with an anti-microbial swab. Use a firm, circular motion while mov-ing outward from the injection site. Allow area to dry.
9. Remove the needle cap with the nondominant hand,pulling it straight off.
Injection into a tense extremity causes discomfort.
l0' Grasp and bunch the area surrounding the injection site This provides for easy, less painful entry into the subcuta-or spread the skin at the site. neous tissue. The decision to pinch or spread tissue at
the injection site depends on the size ofthe patient. Ifthe patient is thin, skin needs to be bunched to create askin fold.
conttnues

L ipp inco t t ' s Photo At las o f Med ica t ion Admin is t ra t ion , 2e 75
1 1 .
A C T I O N
t t,fi
' * $
t
Hold the syringe in the dominant hand between thethumb and forefinger. Inject the needle quickly at an
angle at 45 to 90 degrees, depending on the amount
and turgor of the tissue and the length of the needle,as shown.
After the needle is in place, release the tissue. If you
have a large skin fold pinched up, ensure that the nee-
dle stays in place as the skin is released. Immediatelymove your nondominant hand to steady the lower end
of the syringe. Slide your dominant hand to the tip of
the barrel.
Aspirate, if recommended, by pulling back gently on theplunger of the syringe to determine whether the needle is
in a blood vessel. lf blood appears, the needle should be
withdrawn, the medication syringe and needle discarde4
and a new syringe with new medication prepared. Do not
aspirate when givinginsulin or anyJorm oJ heparin.
R A T I O N A L E
Action 10: Bunchingtissue around injection site'
Inserting the needle quickly causes less pain to the patient.
Subcutaneous tissue is abundant in well-nourished, well-
hydrated people and spare in emaciated, dehydrated, or
very thin persons. For a thin person, it is best to insert the
needle at a 45-degree angle.
Injecting the solution into compressed tissues results in
pressure against nerve fibers and creates discomfort. If
there is alarge skin fold, the skin may retract away from
the needle. The nondominant hand secures the syringe
and allows for smooth asPiration.
Discomfort and possibly a serious reaction may occur if a
drug intended for subcutaneous use is injected into a
vein. Heparin is an anticoagulant and may cause bruising
if aspirated. Because the insulin needle is so small, aspi-
ration after insulin has proved unreliable in predicting
needle placement.
* I ri:,
f i i #
12.
13.
Action 8: Cleaning in.jection site.
: : S - ,
t l 6 r ^
: ;i]*
Action 11: Inserting needle conilnues

26 L r p p r n c o t t ' s P h o t o A t l a s o f M e d i c a t i o n A d m i n i s r r a t i o n . 2 e
14.
1 5 .
A C T I O N
If no blood appears, inject the solution slowly.
Withdraw the needle quickly at the same angle atwhich it was inserted.
. f { r *
#!'
R A T I O N A L E
Rapid injection ofthe solution creates pressure in the tis-sues, resulting in discomfort.
Slow withdrawal of the needle pulls the tissues and causesdiscomfort. Applying countertraction around the injectionsite helps to prevent pulling on the tissue as the needle iswithdrawn. Removing the needle at the same angle atwhich it was inserted minimizes tissue damage and dis-comfort for the patient.
Massaging helps to distribute the solution and hastens itsabsorption. Massaging the site of a heparin injectioncauses additional bruising. Massaging after an insulin in-jection may contribute to unpredictable absorption of themedication.
s l h
Massage the area gently with cotton ball or dry swab.Do not massage a subcutaneous heparin or insulin injec-tion site. Apply a small bandage if needed.
16.
a r.:
I' *
a
conilnues

L i p p i n c o t c ' s P h o t o A t l a s o f M e d i c a t i o n A d m i n i s t r a t i o n , 2 e
A C T I O N
17. Do not recap the used needle. Discard the needle andsyringe in the appropriate receptacle.
18. Assist the patient to a position of comfort.
19. Remove gloves and dispose of them properly. Performhand hygiene.
20. Chart the administration of the medication, includingthe site of adminisffation. This charting can be done onCMAR.
21. Evaluate the response of the patient to the medicationwithin an appropriate time frame.
E V A T U A T I O N
R A T I O N A L E
Proper disposal of the needle protects the nurse from acci-
dental injection. Most accidental puncture wounds occur
when recapping needles.
This provides for the well-being of the patient.
Hand hygiene deters the spread of microorganisms'
Accurate documentation is necessary to prevent medication
erTor.
Reaction to medication given by the parenteral route may
occur within 15 to 30 minutes after injection.
The expected outcomes are met when the patient has received the medication via the subcu-
taneous route; understands the reason for the procedure; experienced minimal pain; has de-
creased anxiety; and has had no allergic response'
Unexpected S i tua t ionsand Associatedln te rvent ions
ln fan t and Ch i ldCons idera t ions
Older Adu l tCons idera t ions
Home CareCons idera t ions
. When skinfold is released, needle pulls out of skin: Remove and appropriately discard
needle. Attach new needle to syringe and administer injection.. Patient refuses to let nurse administer medication in another location: Explain the ratio-
nale behind rotating injection sites. Discuss other available injection sites with patient' If
patient will still not allow injection in another area, administer medication to patient, docu-
ment patient's refusal and discussion, and notify physician.. Nurse sticks self with needle before injectiorz.' Discard needle and syringe appropriately.
Follow the agency's policy regarding needlesticks. Prepare a new syringe with medication
and administer to patient. Complete appropriate paperwork.. Nurse sticks self with needle after injectionr Discard needle and syringe appropriately.
Follow agency's policy regarding needlesticks. Complete appropriate paperwork' Do not
document needlestick in patient's notes.. After or during injection, patient pulls away from needle before medication is delivered
fully: Remove and appropriately discard needle. Attach a new needle to syringe and
administer remaining medication.
. Do not tell a child that an injection will not hurt. Describe the feel of the injection as a
pinch or a sting. A child who believes you have been dishonest with him or her is less
likely to cooperate with future procedures.
. Many elderly patients have less adipose tissue. Adjust the angle of the needle accordingly.
You do not want to inadvertently give a subcutaneous medication intramuscularly.
. According to the American Diabetes Association, reuse of insulin syringes in the home
setting appears safe. Once the needle is dull, it should be discarded (usually after2to
10 uses).
2 8 L i p p i n c o t t ' s P h o r o A t l a s o f M e d r c a t i o n A d m i n i s t r a r i o n , 2 e
s K t t t _
7
E q u i p m e n t
A S S E S S M E N T
N U R S I N GD I A G N O S I S
O U T C O M EI D E N T I F I C A T I O NA N D P T A N N I N G
The intramuscular route is often used for drugs that are irritating because there are few nerveendings in deep muscle tissue. If a sore or inflamed muscle is entered, however, the musclemay act as a trigger area, and severe referred pain often results. It is best to palpate a musclebefore injection. Select a site that does not feel tender to the patient and where the tissue doesnot contract and become firm and tense. Avoid nodules, lumps, and scars.Absorption occurs as in subcutaneous administration but more rapidly because of the greatervascularity of muscle tissue. The amount of 5 mL is considered the maximum to be given inone site for an adult with well-developed muscles, although the patient's size and the siteused (eg, deltoid muscle) may necessitate smaller injection (Nicoll & Hesby, 2002).An important point in the administration of an intramuscular injection is the selection of asafe site away from large nerves, bones, and blood vessels (see Box 6). When care is nottaken, common complications include abscesses, necrosis and skin slough, nerve injuries,lingering pain, and periostitis (inflammation of the membrane covering a bone).The sites for injecting intramuscular medications should be rotated when therapy requiresrepeated injections. The sites described in this skill may all be used on a rotating basis.Whatever pattern of rotating sites is used, a description of it should appear in the patient'splan of nursing care.
. Disposable gloves
. Medication' Sterile syringe and needle (size depends on medication being administered and patient). Antimicrobial swab. Dry sponge. Medication Kardex or computer-generated MAR
Assess the patient for any allergies. Assess the patient's knowledge of the medication. If thepatient has a knowledge deficit about the medication, this may be an appropriate time tobegin education about the medication. Assess tle area where the injection is to be given.Intramuscular injections should not be given into areas of skin that are broken or open. If themedication is for pain, assess the patient's level of pain. If the medication may affect thepatient's vital signs or laboratory test results, check them before administering the medication.
Determine related factors for the nursing diagnoses based on the patient's current status.Appropriate diagnoses may include:. Deficient Knowledge. Acute Pain. Risk for Allergy Response. Anxiety. Risk for Injury. Risk for Impaired Skin Integrity
The expected outcome to achieve when administering an intramuscular injection is that thepatient receives the medication via the intramuscular route. Other outcomes that may beappropriate include the following: the patient understands the reasons for the injection; hasminimal pain; has no allergy response; has decreased anxiety; and experiences no injury; andpatient's skin remains intact.
conunues
L i p p i n c o t t ' s P h o t o A t l a s o f M e d i c a t i o n A d m i n i s t r a t i o n , 2 e 29
I M P L E M E N T A T I O NA C T I O N
1. Assemble equipment and check the physician's order.
2. Explain procedure to patient.
3. Perform hand hygiene.
4. If necessary, withdraw medication from an ampule orvial as described in Procedures 2 and 3.
5. Do not add air to the syringe.
6. Identify the patient carefully. There are three correctways to do this:a. Check the name on the patient's identification
badge.b. Ask the patient his or her name.
c. Verify the patient's identification with a staff mem-ber who knows the patient.
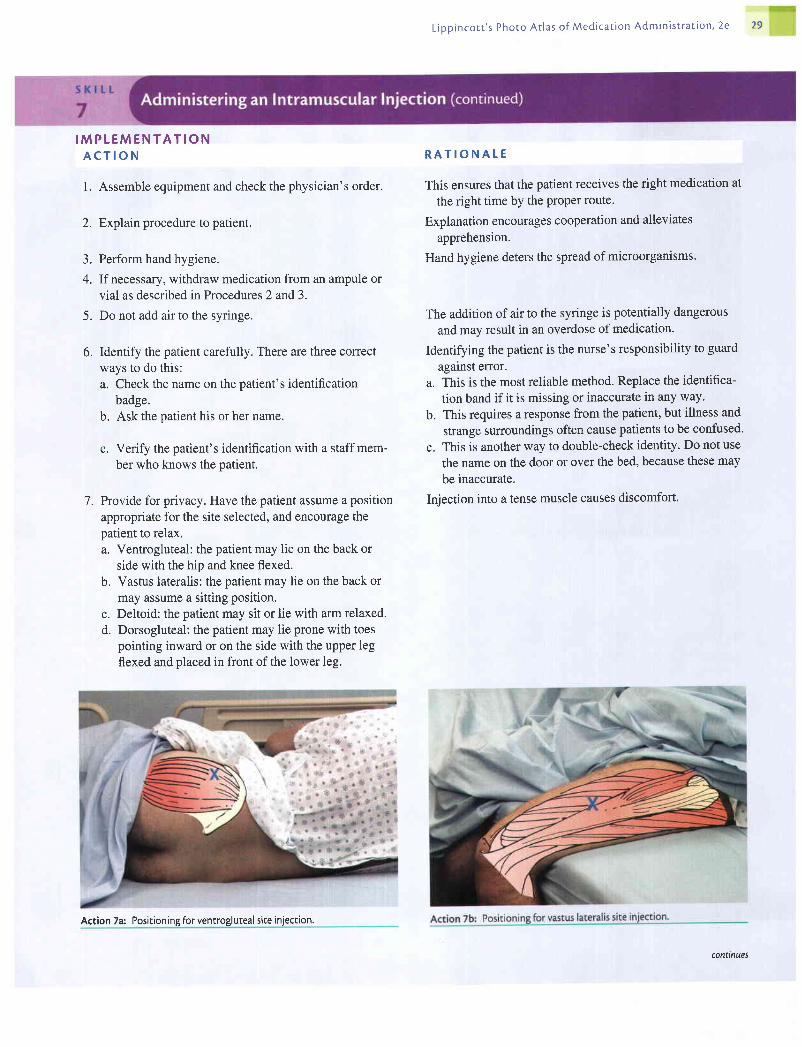
7. Provide for privacy. Have the patient assume a position
appropriate for the site selected, and encourage thepatient to relax.a. Ventrogluteal: the patient may lie on the back or
side with the hip and knee flexed.b. Vastus lateralis: the patient may lie on the back or
may assume a sitting position.c. Deltoid: the patient may sit or lie with arm relaxed.d. Dorsogluteal: the patient may lie prone with toes
pointing inward or on the side with the upper legflexed and placed in front of the lower leg.
R A T I O N A T E
This ensures that the patient receives the right medication at
the right time by the Proper route.
Explanation encourages cooperation and alleviates
apprehension.
Hand hygiene deters the spread of microorganisms.
The addition of air to the syringe is potentially dangerous
and may result in an overdose of medication.
Identifying the patient is the nurse's responsibility to guard
against error.a. This is the most reliable method' Replace the identifica-
tion band if it is missing or inaccurate in any way.
b. This requires a response from the patient, but illness and
strange surroundings often cause patients to be confused.
c. This is another way to double-check identity' Do not use
the name on the door or over the bed, because these may
be inaccurate.
Injection into a tense muscle causes discomfort.
Action 7a: Positioning for ventrogluteal site injection.
contmues

30 L i p p i n c o t t ' s P h o t o A t l a s o f M e d i c a t i o n A d m i n i s t r a t i o n , 2 e
A C T I O N
8. Locate the site ofchoice according to directions givenin Box 6. Ensure that the area is nontender and free oflumps or nodules. Don disposable gloves.
Clean the area thoroughly with an antimicrobial swab,using friction. Allow to dry.Remove the needle cap by pulling it straight off.
Displace the skin in aZ-trackmanner by pulling toone side or spread the skin at the site using your non-dominant hand.
Hold the syringe in your dominant hand between thethumb and forefinger. Quickly dart the needle into thetissue at a 90-degree angle.
As soon as the needle is in place, use your nondomi-nant hand to hold the lower end of the syringe. Slideyour dominant hand to the tip of the barrel.
Aspirate by slowly (for at least 5 seconds) pulling back onthe plunger to determine whether the needle is in ablood vessel. lf blood is aspirated discard the needle,syringe, and medication, prepare a new sterile setup, andinject another site.
R A T I O N A T E
Action 7d: Positioning for dorsogluteal site injection.
Good visualization is necessary to establish the correctlocation of the site and avoid damage to tissues. Nodulesor lumps may indicate a previous injection site whereabsorption was inadequate. Gloves act as a barrier andprotect the nurse's hands from accidental exposure toblood during the injection procedure.
Pathogens present on the skin and antimicrobial agent canbe forced into the tissues by the needle,
The cap protects the needle from contact with microorgan-isms, This technique lessens the risk of an accidentalneedlestick and also prevents inadvertently unscrewingthe needle from the barrel of the syringe.
This makes the tissue taut and minimizes discomfort. Usingthe Z-track method prevents seepage of the medicationinto the needle track and is less painful.
A quick injection is less painful. Insening the needle at a90-degree angle facilitates entry into muscle tissue.
This acts to steady the syringe and allows for smoothaspiration.
Discomfort and possibly a serious reaction may occur if adrug intended for intramuscular use is injected into avein. Allowing slow aspiration facilitates backflow ofblood even if needle is in a small, low-flow blood vessel.
9.
10.
n.
12.
13 .
14.
Action 7c: Positioning for deltoid muscle site injection.
conunues

ffi#ffiL i p p i n c o t t ' s P h o t o A t l a s o f M e d i c a t i o n A d m i n i s t r a t i o n , 2 e 31
A C T I O N
If no blood is aspirated, inject the solution slowly(10 seconds per mL of medication).
Remove needle slowly and steadily. Release displacedtissue if Z-track technique was used.
Apply gentle pressure at the site with a small, drysponge.
Do not recap used needle. Discard needle and syringein appropriate receptacle.
Assist patient to position of comfort. Encourage patientto exercise exffemity used for injection if possible.
Remove gloves and dispose of them properly. Performhand hygiene.
R A T I O N A L E
Injecting slowly helps to reduce discomfort by allowing
time for solution to disperse in the tissues.
Slow withdrawal allows the medication to begin to diffuse
through the muscle. Releasing displaced skin seals med-
ication in the tissues.
Light pressure causes less trauma and irritation to the tissues.
Massaging can force medication into subcutaneous tissues.
Proper disposal of needle protects nurse from accidental
injection. Most accidental puncture wounds occur when
recapping needles.
Exercise promotes absorption of medication.
Hand hygiene deters the spread of microorganisms.
1 5 .
16 .
t7 .
1 8 .
19.
Action 1 1: Spreading the skin at ventrogluteal site.
Action 12: Inserting needle in the ventrogluteal site. Action 14: Aspirating.
20.

ffiL i p p i n c o t t ' s P h o t o A t l a s o f M e d i c a t i o n A d m i n i s t r a t i o n , 2 e
A C T I O N
Chart the administration of the medication, includingthe site of administration. This may be documented onthe CMAR.
Evaluate patient's response to medication within anappropriate time frame. Assess site, if possible, within2 to 4 hours after adminisffation.
E V A L U A T I O N
R A T I O N A T E
21.
22.
Accurate documentation is necessary to prevent medicationetTor.
Reaction to medication given by the parenteral route isa possibility. Visualization of the site also allows forassessment of anv untoward effects.
The expected outcomes are met when the patient has received the medication via the intra-muscular route; understood the reasons for injection; had minimal pain; experienced noallergy response; has decreased anxiety; and experienced no injury; and patient's skinremained intact.
Action 15: Injecting medication.
-*-:Action 17: Applying pressure at the injection site.
Unexpected S i tua t ionsand Assoc ia tedIn te rvent ions
In fan t and Ch i ldCons idera t ions
. Nurse sticlcs self with needle before injectiorz.' Discard needle and syringe appropriately.Follow the agency's policy regarding needlesticks. Prepare a new syringe with medicationand administer to the patient. Complete appropriate paperwork.
' Nurse sticks selfwith needle after injectiou Discard needle and syringe appropriately.Follow the agency's policy regarding needlesticks. Complete appropriate paperwork.Do not document needlestick in the patient's notes.
' After or during injection, patient pulls away from needle before medication is deliveredfully: Remove and discard needle appropriately. Attach a new needle to syringe andadminister remaining medication in a new site.
' While injecting needle into patient, nurse hits patient's bone: Withdraw and discard theneedle. Apply new needle to syringe and administer in alternate site. Document incidentin patient's notes. Notify physician. May need to complete incident report.
' Safe adminishation of an intramuscular injection into an infant's vastus lateralis musclemay require use of a 1" needle rather than the commonly used5/s" needle. A 1" needle con-sistently allows penetration into the muscle and safe administration of the medication.

ffiL ipp inco t t ' s Photo At las o f Med ica t ion Admin is t ra t ion , 2e
E q u i p m e n t
A S S E S S M E N T
N U R S I N GD I A G N O S I S
O U T C O M EI D E N T I F I C A T I O NA N D P L A N N I N G
I M P L E M E N T A T I O NA C T I O N
1. Gather all equipment. Check the medication order withthe physician's order and that medication is compatiblewith IV fluid. Take equipment to patient's bedside.
Perform hand hygiene.
Identify patient by checking identification band on pa-tient's wrist and asking patient his or her name. Checkfor any allergies patient may have.
Explain procedure to patient.
Medications may be added to the patient's infusion solution. The recommended procedure is
for the pharmacist to add the prescribed drug to a large volume of IV solution, but sometimes
the drug is added in the nursing unit, in which case sterile technique must be maintained.
When medication is administered by continuous infusion, the patient receives it slowly and
over a long period. Although sometimes this can be an advantage when it is desirable to give
the medication slowly, it is a disadvantage when the patient needs to receive the drug morequickly. Also, if for some reason all of the solution cannot be infused, the patient will not
receive the prescribed amount of the medication. The patient receiving medication by a con-
tinuous IV infusion should be checked for possible adverse effects at least every hour.
. Medication prepared in a syringe with a 19- to 21-gauge needle, blunt needle or needleless
device (follow agency policy). IV fluid container (bag or bottle). Antimicrobial swab. Label to be attached to the IV container. Medication Kardex or computer-generated MAR
Assess the patient for allergies. Assess the patient's knowledge of the medication. If patient
has a knowledge deficit, this may be an appropriate time to begin education about the
medication.
Determine related factors for the nursing diagnoses based on the patient's current status.
Appropriate nursing diagnoses may include:
. Risk for Injury
. Risk for Allergy Response
. Risk for Infection
. Deficient Knowledge
. Anxiety
The expected outcome to achieve when adding medications to an IV solution container is
that the medication is added to an adequate amount of IV solution and mixed appropriately.
Other outcomes that may be appropriate include the following: medication is delivered to the
patient in a safe and effective way; patient experiences no allergy response; patient remains
infection free; and patient understands and experiences decreased anxiety regarding medica-
tion infusion.
2.
3 .
R A T I O N A T E
Checking the order ensures that the patient receives the cor-
rect medication at the correct time and in the right man-
ner. Compatibility of medication and solution prevents
complications. Having equipment available saves time
and facilitates performance of the task.
Hand hygiene deters the spread of microorganisms.
This ensures that the medication is given to the right person'
Explanation allays patient anxiety.A-.
continues
34 L ipp inco t t ' s Photo Ar las o f Med ica t ion Admin is t ra t ion , 2e
A C T I O N
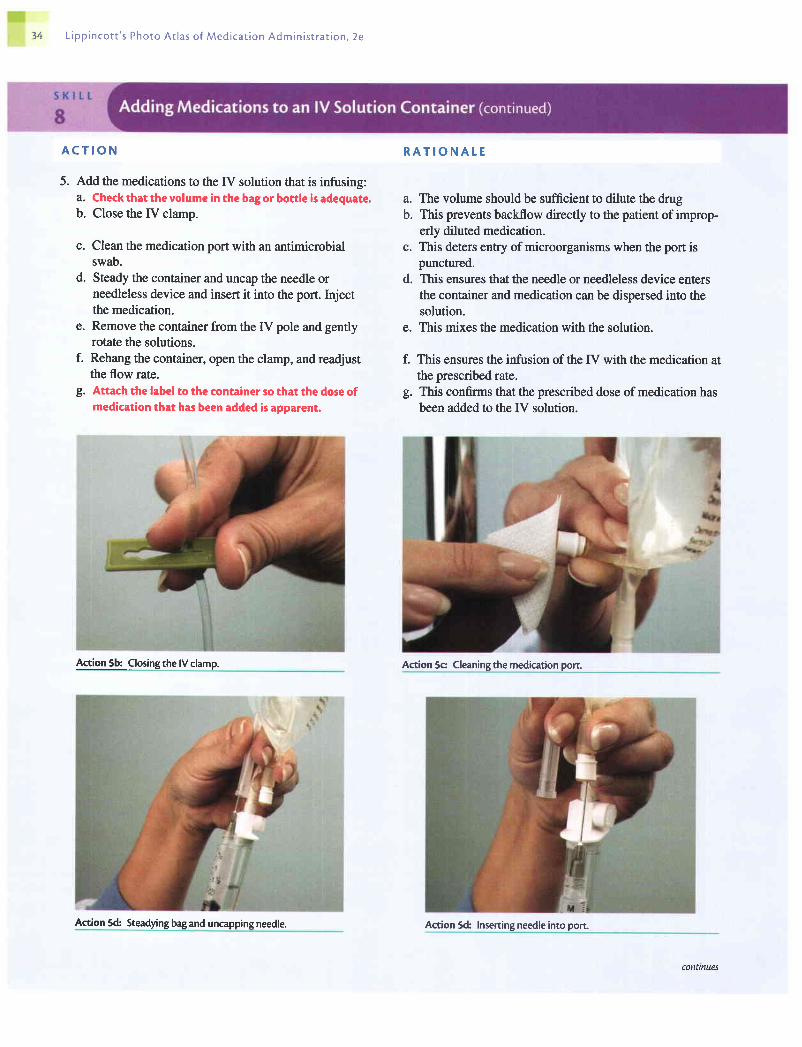
5. Add the medications to the fV solution that is infusing:a. Check that the volume in the bag or bottle is adequate.b. Close the [V clamp.
c. Clean the medication port with an antimicrobialswab.
d. Steady the container and uncap the needle orneedleless device and insert it into the port. Injectthe medication.
e. Remove the container from the IV pole and gentlyrotate the solutions.
f. Rehang the container, open the clamp, and readjustthe flow rate.
g. Attach the label to the container so that the dose ofmedication that has been added is apparent.
R A T I O N A T E
The volume should be sufficient to dilute the drugThis prevents backflow directly to the patient of improp-erly diluted medication.This deters entry of microorganisms when the port ispunctured.This ensures that the needle or needleless device entersthe container and medication can be dispersed into thesolution.
e. This mixes the medication with the solution.
f. This ensures the infirsion of the fV with the medication atthe prescribed rate.
g. This confirms that the prescribed dose of medication hasbeen added to the IV solution.
Action 5c Cleaning the medication porc
a.b.
c.
d.
Action 5b: Closing the lV clamp.
Action 5d: Steadying bag and uncapping needle. Action 5d: Insening needle into port
connnues

L i p p i n c o t t ' s P h o t o A t l a s o f M e d i c a t i o n A d m i n i s t r a t i o n , 2 e 35
A C T I O N
Add ttre medication to the IV solution before the infusion:a. Carefully remove any protective cover and locate
the injection port. Clean with an antimicrobial swab.b. Uncap the needle or needleless device and insert
into the port. Inject the medication.c. Withdraw and insert the spike into the proper entry
site on the bag or bottle.d. With tubing clamped, gently rotate the IV solution
in the bag or bottle. Hang the IV.e. Attach the label to the container so that the dose of
medication that has been added is apparent.
Dispose of equipment according to agency policy.
Perform hand hygiene.
Chart the addition of medication to the IV solution.This may be done on the CMAR.
Evaluate the patient's response to medication withinthe appropriate time frame.
R A T I O N A L E
a. This deters entry of microorganisms when the needle
punctures the port.b. This ensures that the needle enters the container and that
medication can be dispersed into the solution.
c. This punctures the seal in the IV bag or bottle.
d. This mixes the medication with the solution.
e. This confirms that the prescribed dose of medication has
been added to the IV solution.
This prevents inadvertent injury from the equipment.
Hand hygiene deters the spread of microorganisms.
Accurate documentation is necessary to prevent medication
e1Tors.
Patients require careful observation because medicationsgiven by the IV route may have a rapid effect.
6.
l .
8 .
9.
10 .
Action 5e: Rotating solution to distribute medication. Action 5ft Readiusting ffow rate.
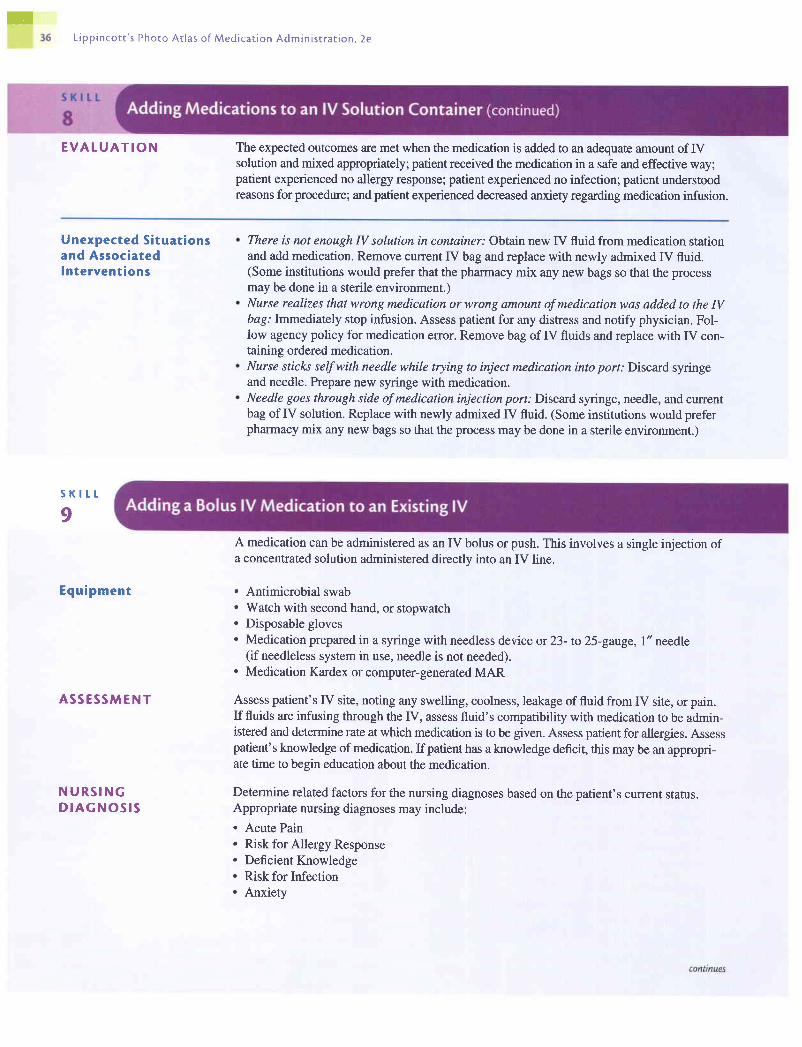
TL ipp inco t t ' s Photo At las o f Med icar ion Admin is r ra t ion , 2e
E V A L U A T I O N The expected outcomes are met when the medication is added to an adequate amount of fVsolution and mixed appropriately; patient received the medication in a safe and effective way;patient experienced no allergy response; patient experienced no infection; patient understoodreasons for procedure; and patient experienced decreased anxiety regarding medication infusion.
Unexpected Situat ionsand Associatedlntervent ions
s K l t t
I
Equipment
A S S E S S M E N T
N U R S I N GD I A G N O S I S
There is not enough N solution in container: Obtain new IV fluid from medication stationand add medication. Remove current IV bag and replace with newly admixed IV fluid.(Some institutions would prefer that the pharmacy mix any new bags so that the processmay be done in a sterile environment.)Nurse realizes that wrong medication or wrong amount of medication was added to the IVbag: Immediately stop infusion. Assess patient for any distress and notify physician. Fol-low agency policy for medication error. Remove bag of IV fluids and replace with IV con-taining ordered medication.Nurse sticks self with needle while trying to inject medication into port: Discard syringeand needle. Prepare new syringe with medicatron.Needle goes through side ofmedication injection port: Discard syringe, needle, and currentbag of IV solution. Replace with newly admixed IV fluid. (Some institutions would preferpharmacy mix any new bags so that the process may be done in a sterile environment.)
A medication can be administered as an IV bolus or push. This involves a single injection ofa concentrated solution administered directlv into an IV line.
. Antimicrobial swab
. Watch with second hand, or stopwatch
. Disposable gloves
. Medication prepared in a syringe with needless device or 23- to 25-gauge, 1" needle(if needleless system in use, needle is not needed).
. Medication Kardex or computer-generated MAR
Assess patient's IV site, noting any swelling, coolness, leakage of fluid from IV site, or pain.If fluids are infusing through the IV, assess fluid's compatibility with medication to be admin-istered and determine rate at which medication is to be given. Assess patient for allergies. Assesspatient's knowledge of medication. If patient has a knowledge deficit, this may be an appropri-ate time to begin education about the medication.
Determine related factors for the nursing diagnoses based on the patient's current status.Appropriate nursing diagnoses may include:. Acute Pain. Risk for Allergy Response. Deficient Knowledge. Risk for Infection. Anxiety
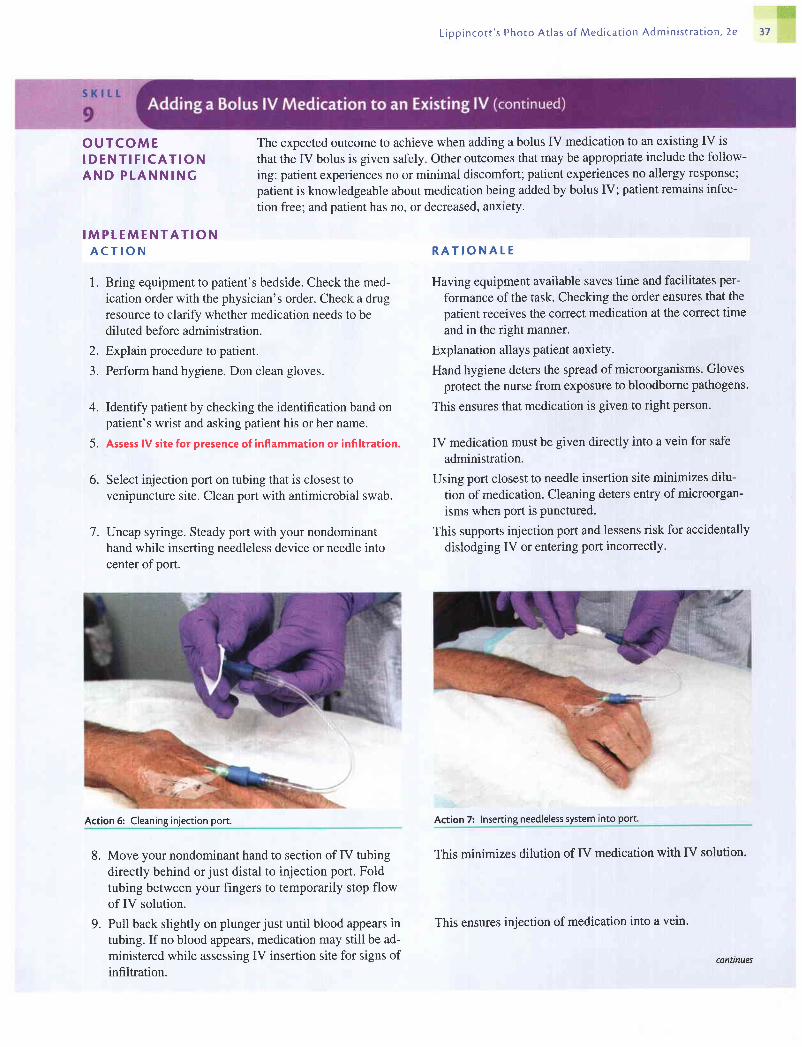
llii#$L ipp inco t t ' s Photo At las o f Med ica t ion Admin is t ra t ion , 2e t7
O U T C O M EI D E N T I F I C A T I O NA N D P L A N N I N G
I M P L E M E N T A T I O NA C T I O N
1 . Bring equipment to patient's bedside. Check the med-ication order with the physician's order. Check a drugresource to clarify whether medication needs to bediluted before administration.
2. Explain procedure to patient.
3. Perform hand hygiene. Don clean gloves.
4. Identify patient by checking the identification band onpatient's wrist and asking patient his or her name.
5. Assess lV site for presence of inflammation or infiltration.
6. Select injection port on tubing that is closest tovenipuncture site. Clean port with antimicrobial swab.
7. Uncap syringe. Steady port with your nondominanthand while inserting needleless device or needle intocenter of port.
Move your nondominant hand to section of IV tubingdirectly behind orjust distal to injection port. Foldtubing between your fingers to temporarily stop flowof IV solution.
Pull back slightly on plungerjust until blood appears intubing. If no blood appears, medication may still be ad-ministered while assessing IV insertion site for signs ofinfiltration.
The expected outcome to achieve when adding a bolus IV medication to an existing IV is
that the IV bolus is given safely. Other outcomes that may be appropriate include the follow-
ing: patient experiences no or minimal discomfort; patient experiences no allergy response;
patient is knowledgeable about medication being added by bolus IV; patient remains infec-
tion free; and patient has no, or decreased, anxlety.
8.
9 .
R A T I O N A T E
Having equipment available saves time and facilitates per-
formance of the task. Checking the order ensures that the
patient receives the correct medication at the correct time
and in the right manner.
Explanation allays patient anxiety.
Hand hygiene deters the spread of microorganisms. Glovesprotect the nurse from exposure to bloodborne pathogens.
This ensures that medication is given to right person.
IV medication must be given directly into a vein for safe
administration.
Using port closest to needle insertion site minimizes dilu-
tion of medication. Cleaning deters entry of microorgan-
isms when port is punctured.
This suppons injection port and lessens risk for accidentally
dislodging IV or entering port incorrectly.
Action 7: lnserting needleless system into port.
This minimizes dilution of IV medication with IV solution.
Action 6: Cleaning injection port.
This ensures injection of medication into a vein,
conlnues

ffi€L i p p i n c o t t ' s P h o t o A r l a s o f M e d i c a t i o n A d m i n i s r r a t i o n , 2 e
A C T I O N
10. Inject medication at recommended rate (see SpecialConsiderations below).
11. Remove needle. Do not cap it. Release tubing andallow IV to flow at proper rate.
12. Dispose of syringe in proper receptacle.
13. Remove gloves and perform hand hygiene.
14. Chart administration of the medication. This mav bedone on the CMAR.
15. Evaluate patient's response to medication within appro-priate time frame.
E V A T U A T I O N
R A T I O N A T E
This delivers correct amount of medication at proper inter-val accordins to manufacturer's directions.
This prevents accidental needlestick.
Proper disposal prevents accidental injury and spread ofmicroorganisms.
Hand hygiene deters spread of microorganisms.
Accurate documentation is necessary to prevent medicationeITOrS.
Patient requires careful observation because medicationsgiven by IV bolus injection may have a rapid effect.
The expected outcomes are met when the patient receives the medication via an IV bolus;had no, or minimal, discomfort; experienced no allergy response; understood rationale formedication added by bolus IV; experienced no infection; and experienced decreased anxiety.
Action 8: Interrupting lV ffow.
Unexpected S i tua t ionsand Assoc ia tedIn te rvent ions
Upon assessing patient's N site before administering medication, nurse notes that N hasinfiltrated: Stop IV fluid and remove IV from extremity. Restart IV in a different location,Continue to monitor new IV site as medication is administered.While administering medication, nurse notes a cloudy, white substanceforming in N tubing:Stop IV from flowing and stop administering medication. Clamp IV at site nearest topatient. Tubing will need to be flushed thoroughly to get rid of any remaining precipitate.Check literature regarding incompatibilities of medications.while nurse is administering medication, patient begins to complain of pain at IV site:Stop medication. Assess IV site for any signs of infiltration or phlebitis. You may want toflush the IV with normal saline to check for patency. If the IV site appears within normallimits, resume medication administration at a slower rate.
conanues

itififrff
L i p p i n c o t t ' s P h o t o A t l a s o f M e d i c a t i o n A d m i n i s t r a t i o n , 2 e
Spec ia l Cons idera t ions
S K I L L
10
Agency policy may recommend the following variations when injecting a bolus IV
medication:. Release folded tubing after each increment of the drug has been administered at pre-
scribed rate to facilitate delivery of medication.. Use a syringe with I mL normal saline to flush tubing after an IV bolus is delivered to
ensure that residual medication in tubing is not delivered too rapidly'
Consider how fast IV fluid is flowing to determine whether a flush of normal saline is in
order after administering medication. If IV fluid is flowing less than 50 mL per hour, it
may take medication up to 30 minutes to reach patient. This depends on what type of
tubing is being used in the agency.If the IV is a small gauge (22 to 24 gaxge) placed in a small vein, a blood return may not
occur even if IV is intact. Also, patient may complain of stinging and pain at site while
medication is being administered due to irritation of vein. Placing a warm pack over vein
or slowing the rate may relieve discomfort.
Medications can be administered by intermittent IV infusion. The drug is mixed with a small
amount of the IV solution (50 to 100 mL) and administered over a short period at the pre-
scribed interval (eg, every 4 hours). Needleless devices (recommended by the Centers for
Disease Control and Prevention and the Occupational Safety and Health Administration)
prevent needlesticks and provide access to the primary venous line. Either blunt-ended
cannulas or recessed connection ports may be used.
A patient with an IV line in place can receive the solution containing the medication by way of
a piggyback setup, a mini-infusion pump, or a volume-control administration set (eg, Pediatrol
oiVotottot). TheIV piggyback delivery system requires the intermittent or additive solution to
be placed higher than the primary solution container. An extension hook provided by the man-
ufacturer provides for easy lowering of the main fV container. The port on the primary IV line
has a back-check valve that automatically stops the flow of the primary solution, allowing the
secondary or piggyback solution to flow when connected. Because manufacturers' designs
vary, cnett ttre directions carefully for the systems used in your agency. The nurse is responsi-
ble for calculating and manually adjusting the flow rate of the IV intermittent infusion or regu-
lating the infusion with an infusion pump or controller.
The mini-syringe pump for intermittent infusion is battery operated and allows medication
mixed in a syringe to be connected to the primary line and delivered by mechanical pressure
applied to the syringe plunger.
Medications can also be placed in a controlled-volume administration set for intermittent IV
infusion. The medication is diluted with a small amount of solution and administered
through the patient's IV line. This type of equipment is also used for infusing solutions into
childien and older patients when the volume of fluid infused must be monitored carefully.
ffiL i p p i n c o t t ' s P h o t o A c l a s o f M e d i c a t i o n A d m i n i s t r a t i o n . 2 e
E q u i p m e n t
A S S E S S M E N T
N U R S I N GD I A G N O S I S
O U T C O M EI D E N T I F I C A T I O NA N D P T A N N I N G
. Medication Kardex or computer-generated MAR
For Piggyback or Mini-infusion Pump:. Gloves (optional). Medication prepared in labeled piggyback set or syringe (5 to 100 mL). Secondary infusion tubing (microdrip or macrodrip). Needleless device, stopcock, or sterile needle (2I- to 23-gatge). Antimicrobial swab. Tape. Metal or plastic hook. Miniinfusion pump. Date label for tubing
For Volume-Control Set:. Gloves (optional). Volume-control set (eg, Volutrol, Buretrol, Burette). Medication (in vial or ampule). Syringe with needleless device attached or a20- or 2l-gauge needle. Antimicrobial swab. Medication label
Assess patient for allergies. Assess patient's knowledge of the medication. If patient has aknowledge deficit, this may be an appropriate time to begin education about the medication.Assess patient's IV site, noting any swelling, coolness, leaking of fluid from IV site, or pain.If fluids are infusing through the IV, assess the fluid's compatibility with the medication tobe administered.
Determine related factors for the nursing diagnoses based on the patient's current status.Appropriate nursing diagnoses include:. Acute Pain. Risk for Allergy Response. Risk for Infection. Deficient Knowledge
The expected outcome to achieve when administering IV medications by piggyback, volume-control administration set, or mini-infusion pump is that the medication is delivered via theparenteral route. Other outcomes that may be appropriate include the following: patientexperiences no or minimal discomfort; patient experiences no allergy response; patientremains infection free; and patient understands the rationale for medication administration.
I M P L E M E N T A T I O NA C T I O N R A T I O N A T E
1. Gather equipment and bring to patient's bedside. Check Having equipment available saves time and facilitates per-the medication order against the original physician's formance of the task. Checking the order ensures ttrai ttreorder according to agency policy. patient receives the correct medication at the correct time
and in the risht manner.

ffi
L ipp inco t t ' s Phoro At las o f Med ica t ion Admin is t ra t ion , 2e 41
A C T I O N
2. Identify patient by checking identification band onpatient's wrist and asking patient his or her name.
3. Explain procedure to patient.
4. Perform hand hygiene and don gloves.
5. Assess lV site for presence of inflammation or infiltration.
Using Piggyback Infusion
6. Attach infusion tubing to piggyback set containingdiluted medication. Place label on tubing with appro-priate date and attach needle or needleless device to
end of tubing according to manufacturer's directions.Open clamp and prime tubing. Close clamp.
7. Hang piggyback container on lV pole, positioning ithigherthan primary lV accordingto manufacturer'srecommendations. Use metal or plastic hook to lowerprimary IV.
8. Use antimicrobial swab to clean appropriate port.
9. Connectpiggyback setup to:a. Needleless portb. Stopcock: turn stopcockto "open" position
c. Primary IV line: uncap needle and insert into sec-
ondary IV port closest to top of primary tubing. Use
strip of tape to secure secondary set tubing to pri-
mary infusion tubing. Primary line is left unclampedif port has a backflow valve.
10. Open clamp on piggyback set and regulate flow at pre-
scribed delivery rate or set for secondary infusion on
infusion pump. Monitor medication infusion at periodic
intervals.
11. Clamp tubing on piggyback set when solution is
infused. Follow agency policy regarding disposal of
equipment.
12. Readjust flow rate of primary IV.
R A T I O N A L E
This ensures that the medication is given to the right person.
Explanation allays patient anxiety.
Hand hygiene deters the spread of microorganisms. Gloves
protect the nurse when connecting setup to an existing IV'
Medication must be administered directly into a vein that is
not inflamed to avoid injuring surrounding tissue.
This removes air from tubing and preserves sterility of
setup. Tubing for piggyback setup may be used for 48 to
72 hours, depending on agency policy.
Position of container influences flow of IV fluid into
primary setuP.
This deters entry of microorganisms when piggyback setup
is connected to Port.
a&b. Needleless systems and stopcock setup eliminate the
need for a needle and are recommended by the
Centers for Disease Control and Prevention.
c. Tape stabilizes needle in infusion port and prevents it
from slipping out. Backflow valve in primary line sec-
ondary port stops flow of primary infusion while piggy-
back solution is infusing. Once completed, backflow
valves opens and flow of primary solution resumes.
Delivery over a 30- to 60-minute interval is usually a safe
method of administering IV medication. It is important to
verify the safe administration rate for each drug to pre-
vent adverse effects.
This reduces risk for contaminating primary IV setup'
Piggyback medication administration may intemrpt normal
flow rate of primary IV' Rate readjustment may be
necessary.
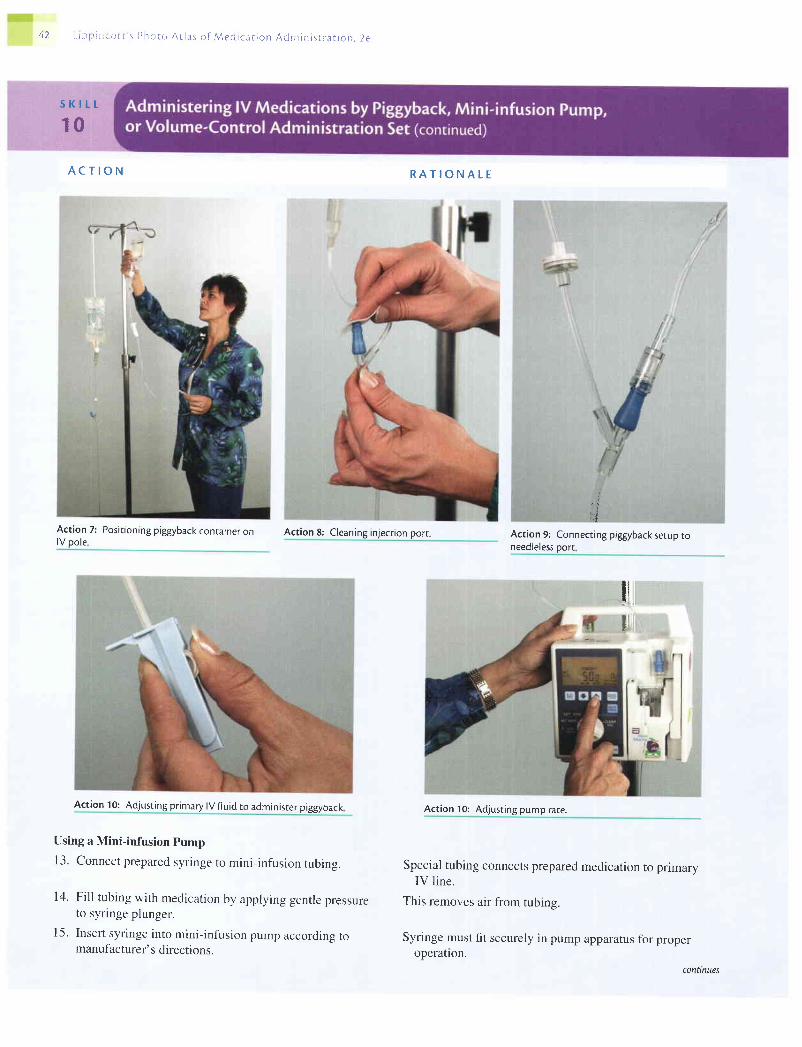
4 2 L r p ; r p . e i s s 1 ) h o r o A r l a s o f , \ l e d i c a r i o n A d m i n i s r r a t i o n , 2 e
s K t t t
10
A C T I O N
Act ion 7: Posi t ioning prggyback container onlV oole
Action 8: Cleaning in.lecrion port.
Action 10: Adjusting primary lV ffuid to administer piggyback
Using a Mini-infusion Pump
13. Connect prepared syringe to mini-infusion tubing.
14. Fill tubing with medication by applying gentle pressureto syringe plunger.
15. Insert syringe into mini-infusion pump according tomanufacturer' s directions.
R A T I O N A T E
Action 9: Connecting piggyback serup toneedleless oorr
l ' ll l
Act ion 10: Adjust ing pump rate.
Special tubing connects prepared medication to primaryIV l ine.
This removes air from tubing.
Syringe must fit securely in pump apparatus for properoperatlon.
i| - !
11l
conttnues

L ipp inco t t ' s Photo At las o f Med ica t ion Admin is t ra t ion , 2e 43
A C T I O N
16. Use antimicrobial swab to cleanse appropriate connec-tor. Connect mini-infusion tubing to appropriate con-nector, as in Action 9.
17. Program pump to begin infusion. Set alarm if recom-mended by manufacturer.
18. Recheck flow rate of primary IV once pump has com-pleted delivery of medication.
Using a Volume-Control Administration Set
19. Withdraw medication from vial or ampule into pre-pared syringe. See Skill 2 or 3.
20. Open clamp between IV solution and volume-controladministration set or secondary setup. Follow manufac-turer's instructions and fill with desired amount ofIV solution. Close clamp.
Action 20: Bag with volume control set
Use antimicrobial swab to clean injection port on sec-
ondary setup.
Remove clamp and insert needle or blunt needleless
device into port while holding syringe steady. Inject
medication. Mix gently with IV solution.
R A T I O N A L E
This deters entry of microorganisms when piggyback setup
is connected to port. Proper connection allows IV med-
ication to flow into PrimarY line'
Pump delivers medication at controlled rate' Alarm is rec-
ommended for use with IV lock apparanrs.
Normal flow rate of primary IV may have been altered by
mini-infusion pumP.
The correct dose is prepared for dilution in the IV solution'
This dilutes the medication in the minimal amount of solu-
tion. Reclamping prevents the continued addition of ffuid
to the volume to be mixed with medication.
Action 20: Adjusting clamp between bagand volume control set.
This deters entry of microorganisms when needle punctures
port.
This ensures that medication is evenly mixed with solution'
21.
22.
connnues

44 L i p p i n c o c t ' s P h o t o A r l a s o f M e d i c a t i o n A d m i n i s t r a t i o n , 2 e
24.25.
A C T I O N
23. Open clamp below secondary setup and regulate at pre-scribed delivery rate. Monitor medication infusion atperiodic intervals.
Attach the medication label to the volume-control device.Place syringe with uncapped needle in designatedcontainer.
ction poft.
R A T I O N A T E
Delivery over a 30- to 60-minute interval is a safe methodof administering IV medication.
This prevents medication error.
Proper disposal ofneedle protects the nurse against acci-dental injection. Most accidental puncture wounds occurwhen recapping needles.
Action 22: Holding syringe steady while inserting blunt needleless device inro port and injectingmedication.
26. Perform hand hygiene.
27. Chaft administration of medication after it has beeninfused. This can be done on the CMAR.
28. Evaluate patient's response to medication within appro-priate time frame.
Hand hygiene deters the spread of microorganisms.
Accurate documentation is necessary to prevent medicationEITOTS.
Patient requires careful observation because medicationsgiven by the parenteral route may have a rapid effect.
conttnues
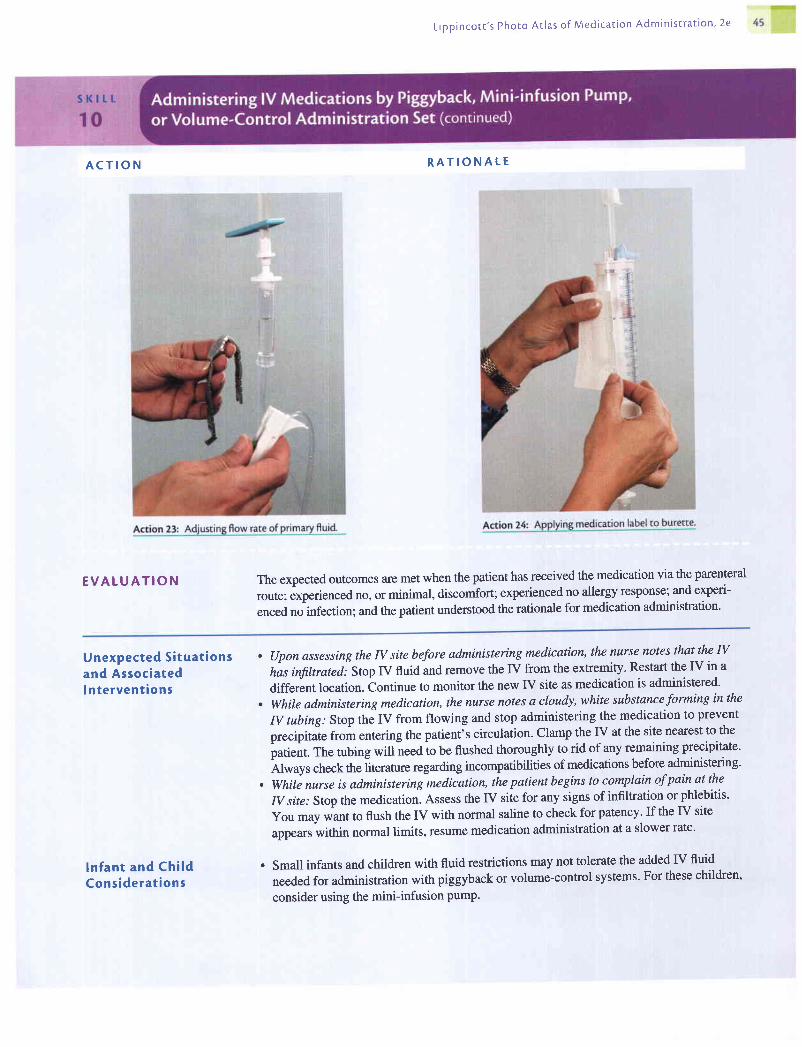
L ipp inco t t ' s Photo At las o f Med ica t ion Admin is t ra t ion , 2e
A C T I O N
E V A L U A T I O N
R A T I O N A L E
The expected outcomes are met when the patient has received the medication via the parenteral
route; experienced no, or minimal, discomfort; experienced no allergy response; and experi-
enced no infection; and the patient understood the rationale for medication administration'
Unexpected S i tua t ionsand AssociatedI n te rvent ions
ln fan t and Ch i ldCons idera t ions
. (Jpon assessing the N site before administering medication, the nurse notes that the N
his infiltrated.- Stop IV fluid and remove the IV from the extremity. Restart the IV in a
different location. Continue to monitor the new IV site as medication is administered'
. While administering medication, the nurse notes a cloudy, white substance forming in the
IV tubing: Stop the IV from flowing and stop administering the medication to prevent
precipitate from entering the patient's circulation. Clamp the IV at the site nearest to the
puti"nt. The tubing will-need io be flushed thoroughly to rid of any remaining precipitate'
Alruy, check the literature regarding incompatibilities of medications before administering'
. While nurse is administering-medication, the patient begins to complain of pain at the
IV site: Stop the medication. Assess the IV site for any signs of infiltration or phlebitis'
You may *unt to flush the IV with normal saline to check for patency. If the IV site
appears within normal limits, resume medication administration at a slower rate'
. Small infants and children with fluid restrictions may not tolerate the added IV fluid
needed for administration with piggyback or volume-control systems' For these children'
consider using the mini-infusion pump.
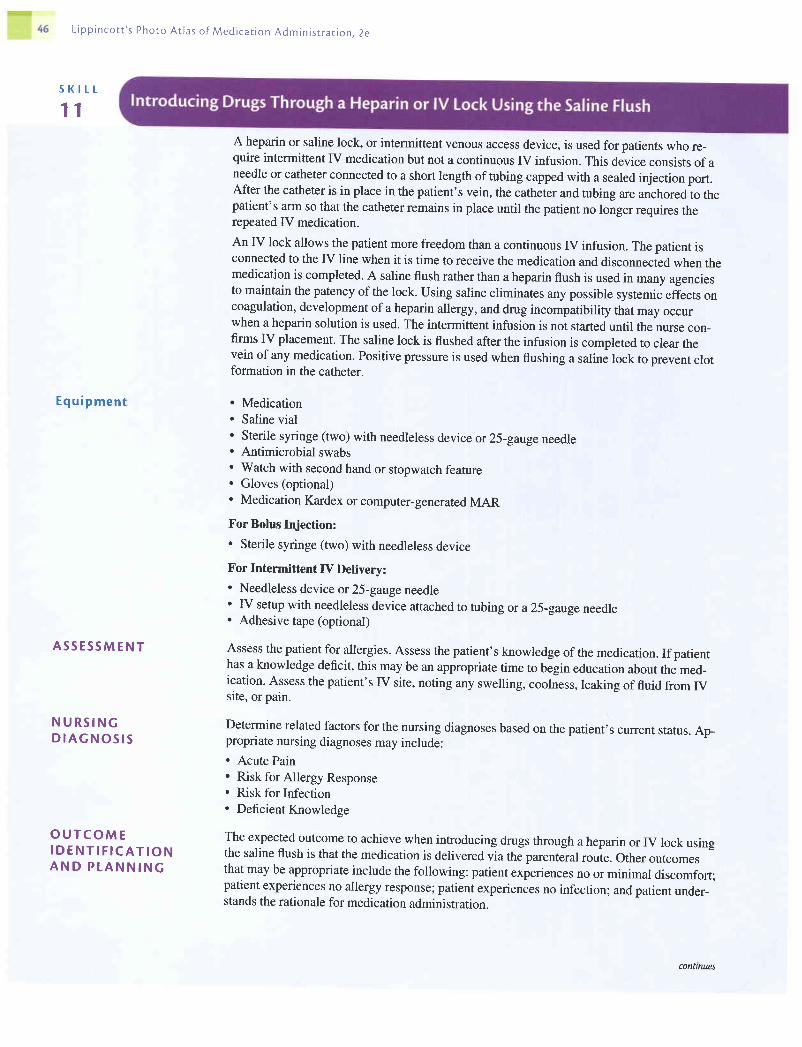
L i p p i n c o t t ' s P h o t o A t l a s o f M e d i c a c i o n A d m i n i s t r a t i o n . 2 e
s K t L r .
11
E q u i p m e n t
A S S E S S M E N T
N U R S I N GD I A G N O S I S
O U T C O M EI D E N T I F I C A T I O NA N D P L A N N I N G
A heparin or saline lock, or intermittent venous access device, is used for patients who re-quire intermittent IV medication but not a continuous IV infusion. This device consists of aneedle or catheter connected to a short length oftubing capped with a sealed injection port.After the catheter is in place in the patient's vein, the catheter and tubing are anchoredio thepatient's arm so that the catheter remains in place until the patient no longer requires therepeated IV medication.
An IV lock allows the patient more freedom than a continuous IV infusion. The patient isconnected to the IV line when it is time to receive the medication and disconnected when themedication is completed. A saline flush rather than a heparin flush is used in many agenciesto maintain the patency of the lock. Using saline eliminates any possible systemic effects oncoagulation, development of a heparin allergy, and drug incompatibility that may occurwhen a heparin solution is used. The intermittent infusion is not started until the nurse con-firms IV placement. The saline lock is flushed after the infusion is completed to clear thevein of any medication. Positive pressure is used when flushing a saline lock to prevent clotformation in the catheter.
. Medication
. Saline vial
. Sterile syringe (two) with needleless device or 2l-gaugeneedle
. Antimicrobial swabs
. Watch with second hand or stopwatch feature
. Gloves (optional)
. Medication Kardex or computer-generated MAR
For Bolus Injection:. Sterile syringe (two) with needleless device
For Intermittent IV Delivery:. Needleless device or25-gauge needle' IV setup with needleless device attached to tubing or a 25-gauge needle. Adhesive tape (optional)
Assess the patient for allergies. Assess the patient's knowledge of the medication. If patienthas a knowledge deficit, this may be an appropriate time to begin education about the med-ication. Assess the patient's IV site, noting any swelling, coolness, leaking of fluid from IVsite, or pain.
Determine related factors for the nursing diagnoses based on the patient's current status. Ap-propriate nursing diagnoses may include:. Acute Pain. Risk for Allergy Response. Risk for Infection. Deficient Knowledge
The expected outcome to achieve when introducing drugs through a heparin or IV lock usingthe saline flush is that the medication is delivered via the parent;ral route. Other outcomesthat may be appropriate include the following: patient experiences no or minimal discomfort;patient experiences no allergy response; patient experiences no infection; and patient under-stands the rationale for medication administration.
conUnues

L ipp inco t t ' s Photo At las o f Med ica t ion Admin is t ra t ion , 2e 47
I M P L E M E N T A T I O NA C T I O N
1. Assemble equipment and check physician's order.
2. Identify patient by checking identification band on
patient's wrist and asking patient his or her name.
Explain procedure to patient.
3. Perform hand hygiene.
4. Withdraw 1 to 2 mL of sterile saline from the vial into
the syringe as described in Skill 3.
5. Don clean gloves and prepare to administer medication'
6. For Bolus fV Injection:
a. Check drug package for correct injection rate for lVpush route.
b. Clean port of lock with antimicrobial swab.
c. Stabilize port with your nondominant hand and insert
needleless device or needle of syringe of normal
saline into port.
d. Aspirate gently and check for blood return (blood retum
does not always occur even though lock is patent).
e. Gently flush with 1 mL of normal saline. Removesyringe.
f. Insert needleless device or needle of syringe withmedication into port and gently inject medication,using a watch to verify correct injection rate. Do notforce the injection if resistance is felt. If the lock is
clogged, it must be changed. Remove medicationsyringe and needle when administration is complete.
R A T I O N A L E
This ensures that the patient receives the right medication at
the right time by the ProPer route'
This ensures that the right patient is receiving the medica-
tion. Explanation alleviates the patient's apprehension
about IV drug administration.
Hand hygiene deters the spread of microorganisms.
Using saline eliminates concerns about drug incompatibili-
ties and the effect on systemic circulation that exists with
heparin.
Gloves protect the nurse's hands from contact with the
patient's blood.
a. Using the correct injection rate prevents speed shock
from occurring.b. Cleaning removes surface bacteria at the lock entry site.
c. This allows for careful insertion into the center circle of
the lock.
Action 6c: Inserting syringe with blunt needle into port.
t.
Blood return usually indicates that the catheter is in the
vein.Saline flush ensures that the IV line is patent. A patient's
complaint of pain or resistance to the flush detected by
the nurse may indicate that the IV line is not patent.
Easy installation of medication usually indicates that the
lock is still patent and in the vein. If force is used against
resistance, a clot may break away and cause a blockage
elsewhere in the body.
d.
e.
Action 6b: Cleaning pon with antimicrobial swab.

48 L i p p i n c o t t ' s P h o t o A r l a s o f M e d i c a t i o n A d m i n i s t r a t i o n , 2 e
A C T I O N
g. Remove syringe with medication from port. Stabi_lize port with your nondominant hand and insertneedleless device or needle of syringe of normalsaline into port. Slowly flush reservoir with 1 to 2 mLof sterile saline using positive pressure. To gain posi_tive pressure, you can either clamp the IV tubing asyou are still flushing the last of the saline into the IVor remove the syringe as you are still flushing the re_mainder of the saline into the IV. Remove syringeand discard uncapped needles and syringes in theappropriate receptacle. Remove gloves and discardappropriately.
7. For Drug Administration viaan Intermittent Delivery System:
a. Use a drug resource book to check for the correct flowrate of the medication (the usual is 30 to 60 minutes).
b. Connect infusion tubing to medication setup accord-ing to manufacturer's directions using sterile tech-nique. Hang IV setup on pole. Open clamp and allowsolution to clear IV tubing of air. Reclamp tubing.
c. Attach needleless connector or sterile 25-gaugeneedle to end of infusion tubing.
d. Clean port of lock with antimicrobial swab.e. Stabilize port with your nondominant hand and insert
needleless device or needle of syringe of normalsaline into port.
R A T I O N A T E
g. Positive pressure prevents blood from backing into IVcatheter and causing the IV to clot off.
Action 69: Clamping lV.
a. Using the correct injection rate prevents speed shockfrom occurring.
b. This removes air from the tubing and preserves thesterility of the setup.
c. A small-gauge needle prevents damage to the lock.
d. Cleaning removes surface bacteria at the lock entry site.e. This allows for careful insertion into the por1.
Action 6e: Flushing saline lock.
continues

L ipp inco t t ' s Photo At las o f Med ica t ion Admin is t ra t ion ' 2e 49
A C T I O N
f. Aspirate gently and check for blood return (blood return
does not always occur even though lock is patent)'
g. Gently flush with 1 mL of normal saline. Remove
synnge.h. Insert blunt needleless device or needle attached to
tubing into port. Ifnecessary, secure with tape'
i. Open clamp and regulate flow rate or attach to IV
pump or controller according to manufacturer's direc-
tions. Close clamp when infusion is complete'j. Remove needleless connector or needle from lock'
Carefully replace uncapped, used needle or needleless
device with a new sterile one' Allow medication setup
to hang on pole for future use according to agency
policy. Stabilize port with your nondominant hand
and insert needleless device or needle of syringe of
normal saline into the port' Slowly flush the reservoir
with 1 to 2 mL of sterile saline using positive pressure'
R A T I O N A L E
f. Blood return usually indicates that the catheter is in
the vein.g. Saline flush ensures that the IV line is patent'
h. Tape secures the needle in the lock port'
i. This ensures that the patient receives the medication
at the correct rate.
j. This prevents possible needlestick with contaminated
needle. Agency policy specifies length of time for safe
use of IV infusion tubing. Saline clears the line of med-
ication with less of the systemic effects of the heparin
flush. Positive pressure prevents blood from backing
into IV catheter and causing the IV to clot off'

L r p p r n c o t r ' s P h o r o A t l a s o f M e d i c a t i o n A d m i n i s r r a r i o n , 2 e
A C T I O N
To gain positive pressure, you can either clamp the IVtubing as you are still flushing the last ofthe saline into
8. Perform hand hygiene.
9. Check injection site and IV lock at least every g hoursand administer a small amount of saline (2 to 3 mL) ifmedication is not given at least every g to 12 hours.
10. Change heparin lock at least every 72to 96 hours or
11. Chart administration of medication or saline flush.
R A T I O N A L E
Hand hygiene deters the spread of microorganisms.This ensures patency of system for continuing injections.
Changing a heparin lock regularly and having it free of clot_ted blood reduces dangers of infection and emboli in thecirculating blood.
Accurate documentation is necessary to prevent medicationerTor.
Action 7h: Attaching tubing to saline lock.
conilnues
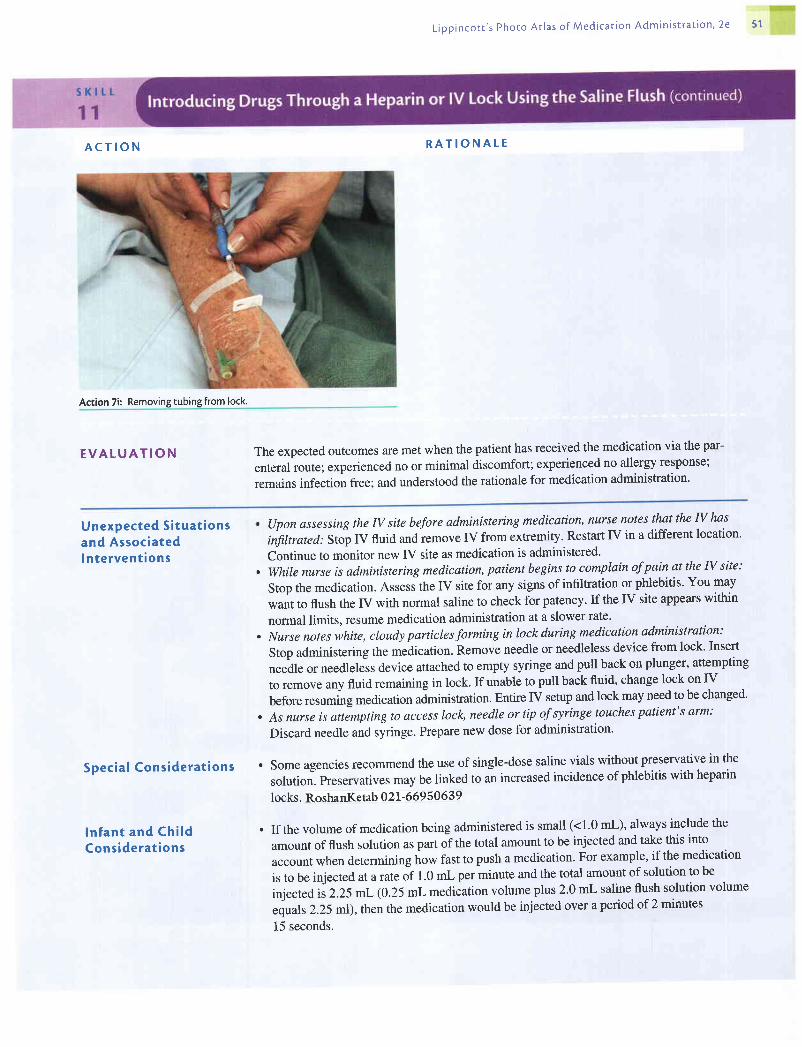
L i p p i n c o r t ' s P h o t o A t l a s o f M e d i c a t i o n A d m i n i s t r a c i o n ' 2 e 5 1
A C T I O N
Action 7i: Removing tubing from lock.
R A T I O N A T E
E V A L U A T I O N The expected outcomes are met when the patient has received the medication via the par-
enteral route; experienced no or minimal discomfort; experienced no allergy response;
remains infection free; and understood the rationale for medication administration'
Unexpected S i tua t ionsand Associatedln te rvent ions
Spec ia l Cons idera t ions
ln fan t and Ch i ldCons idera t ions
, (Jpon assessing the IV site before administering medication, nurse notes that the N has
iifiltrated: Stop IV fluid and iemove IV from extremity. Restart IV in a different location'
Continue to monitor new IV site as medication is administered'. While nurse is administering medication, patient begins to complain of pain at the N site:
Stop the medication. Assess the IV site for any signs of infiltration or phlebitis' You may
want to flush the IV with normal saline to check for patency. If the IV site appears within
normal limits, resume medication administration at a slower rate.
. Nurse notes white, cloudy particles forming in lock during medication administration:
Stop administering the medication. Remove needle or needleless device from lock' Insert
needle or needleless device attached to empty syringe and pull back on plunger, attempting
to remove any fluid remaining in lock. If unable to pull back fluid, change lock on IV
before resuming medication aJministration. Entire IV setup and lock may need to be changed'
. As nurse is attempting to access lock, needle or tip of syringe touches patient's arm:
Discard needle and syringe. Prepare new dose for administration'
. Some agencies recommend the use of single-dose saline vials without preservative in the
solution. Preservatives may be linked to an increased incidence of phlebitis with heparin
locks. RoshanKetab 02I-669 50 639
. If the volume of medication being administered is small (<1.0 mL), always include the
amount of flush solution as part of the total amount to be injected and take this into
account when determining how fast to push a medication' For example, if the medication
is to be injected at a ftteor t.o -l per minute and the total amount of solution to be
injected iiZ.ZSmL (0.25 mL medication volume plus 2.0 mL saline flush solution volume
equals 2.25 m1), then the medication would be injected over a period of 2 minutes
15 seconds.
L ipp inco t r ' s Phoro At las o f Med ica t ion Admin is t ra t ion . 2e
S K I L L
12
E q u i p m e n t
A S S E S S M E N T
N U R S I N GD I A G N O S I S
2. Identify patienr by checking identification band onpatient's wrist and asking patient his or her name.Ask patient about any allergies.
3. Explain procedure to patient.
4. Perform hand hygiene and don gloves.
5. Offer tissue to patient.
6. Cleanse the eyetids and eyelashes ofany drainage with awashcloth moistened with normal saline solutio n, pro-ceeding from the inner canthus to the outer canthus. Useeach area ofthe washcloth only once.
Eyedrops are instilled for their local effects, such as for pupil dilation or constriction whenexamining the eye, for treating an infection, or to help control intraocular pressure (for patientswith glaucoma). The type and amount of solution depend on the purpose of the instillation.
. Gloves
. Medication
. Tissue, washcloth
. Medication Kardex or computer-generated MAR
Assess the patient for allergies. Assess the affected eye for any drainage, erythema, orswelling. Assess the patient's knowledge of medication. If patient has a knowledge deficit,this may be an appropriate time to begin education about the medication.
Determine related factors for the nursing diagnoses based on the patient's current status.Appropriate nursing diagnoses may include:. Risk for Allergy Response. Risk for Injury. Deficient Knowledge
The expected outcome to achieve when administering eyedrops is that the medication isdelivered successfully into the eye. Other outcomes that may te appropriate include thefollowing: patient experiences no allergy response; patient's
"y".onuin, free from injury;
and patient understands the rationale for medication administratron.
O U T C O M EI D E N T I F I C A T I O NA N D P L A N N I N G
I M P T E M E N T A T I O NA C T I O N R A T I O N A T E
1' Bring equipment to patient's bedside. Check medication Having equipment available saves time and facilitates per-order against original physician's order according to formance oftask. Checking the order ensures that theagency policy' patient receives the correct medication at the correct time
and in the right manner.
This ensures that the medication is given to the right person.
Explanation allays patient anxrety.
Hand hygiene deters the spread of microorganisms. Glovesprotect the nurse when coming in contact with drainagefrom eyes (solution or tears).
Solution and tears may spill from the eye during theprocedure.
Debris can be carried into the eye when the conjunctival sacis exposed. By using each area ofwashcloth once andgoing from the inner canthus to the outer canthus, debrisis kept away from the lacrimal duct.
7' Tilt patient's head back stightly. The head may be turned Tilting patient's head back slightly makes it easier to reachslightly to the affected side' the conjunctival sac. This should be avoided ifthe patienthas a cervical spine injury. Turning the head to the af_fected side helps to prevent solution or tears from flowinstoward the opposite eye.

L ipp inco t t ' s Photo At las o f Med ica t ion Admin is t ra t ion ' 2e 53
A C T I O N
Action 6: Cleaning lids and lashes fr
8. Remove cap from medication bottle, being careful to
not touch the inner side of the caP.
9. Invert the monodrip plastic container that is commonly
used to instill eyedrops. Have patient look up and focus
on something on the ceiling.
10. Place thumb or two fingers near margin of lower eyelid
immediately below eyelashes, and exert pressure
downward over bony prominence of cheek. Lower con-junctival sac is exposed as lower lid is pulled down.
1 1. Hold dropper close to eye, but avoid touching eyelids or
lashes. Squeeze container and allow prescribed number
ofdrops to fall in lower coniunctival sac.
R A T I O N A L E
Touching the inner side of the cap may contaminate the
bottle of medication.
By having the patient look up and focus on something else,
the procedure is less traumatic.
The eyedrop should be placed in the conjunctival sac, not
directly on the eYeball.
Touching the eye, eyelids, or lashes can contaminate the
medication in the bottle; startle the patient, causing blink-
ing; or injure the eye. Do not allow medication to fall
onto cornea. This may injure the cornea or cause the
patient to have an unpleasant sensation.
Action 7: Positionin
Action 10: Holding eye in Position.
conilnues
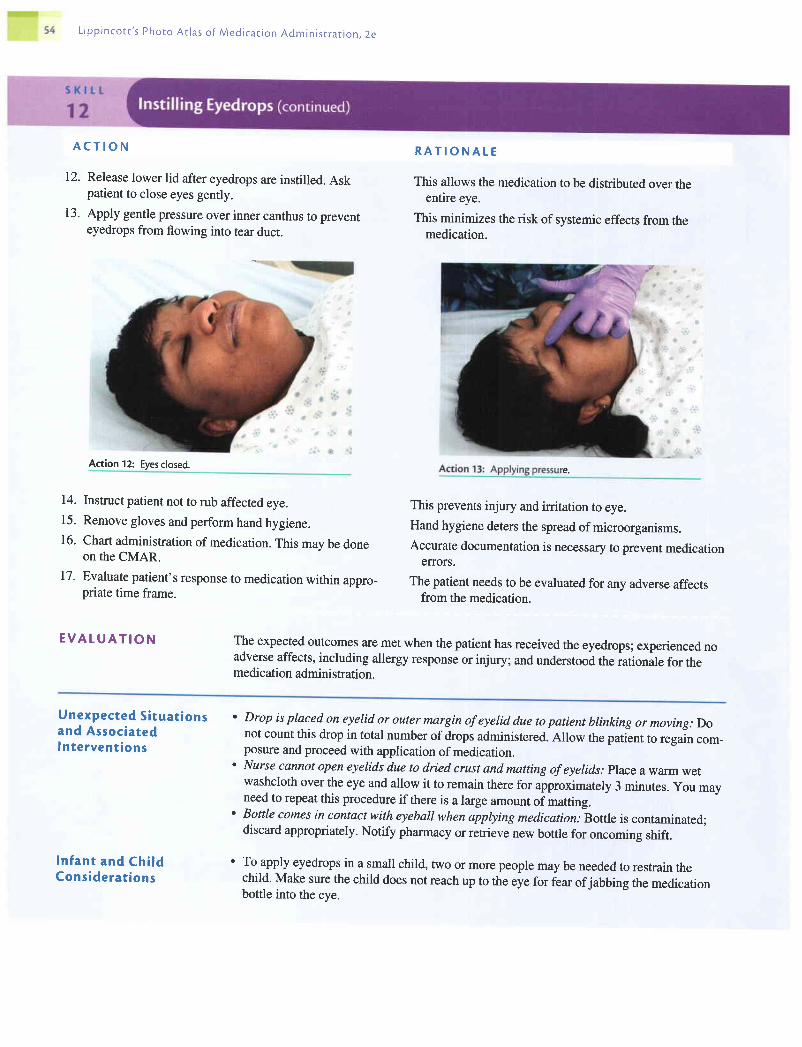
L i p p i n c o t r ' s P h o t o A t l a s o f M e d i c a t i o n A d m i n i s t r a t r o n . 2 e
A C T I O N
12. Release lower lid after eyedrops are instilled. Askpatient to close eyes gently.
13. Apply gentle pressure over inner canthus to prevenreyedrops from flowing into tear duct.
14. Instruct patient not to rub affected eye.15. Remove gloves and perform hand hygiene.16. Chart administration of medication. This may be done
on the CMAR.
17. Evaluate patient's response to medication within appro_priate time frame.
E V A T U A T I O N
R A T I O N A L E
This allows the medication to be distributed over theentire eye.
This minimizes the risk of systemic effects from themedication.
This prevents injury and irritation to eye.Hand hygiene deters the spread of microorganisms.Accurate documentation is necessary to prevent medication
EITOTS.
The patient needs to be evaluated for any adverse affectsfrom the medication.
The expected outcomes are met when the patient has received the eyedrops; experienced noadverse affects, including allergy response or injury; and understood the rationale for themedication admini stration.
Action 12: Eyesclosed.e.
Unexpected S i tua t ionsand AssociatedIn te rvent ions
In fan t and Ch i ldCons idera t ions
' Drop is placed on eyelid or outer margin of eyelid due to patient blinking or moving: Donot count this drop in total number of drops administered. Allow the patient to regain com-posure and proceed with application of medication.
' Nurse cannot open eyelids due to dried crust and matting of eyelids.. Place a warm wetwashcloth over the eye and allow it to remain there for approximately 3 minutes. you mayneed to repeat this procedure if there is a large amount of matting.
' Bottle comes in contact with eyeball when applying medicatiow -Bottle
is contaminated;discard appropriately. Notify pharmacy or retrieve new bottle for oncoming shift.
' To apply eyedrops in a small child, two or more people may be needed to restrain thechild. Make sure the child does not reach up to the eye for fear ofjabbing the medicationbottle into the eye.
L i p p i n c o t t ' s P h o t o A t l a s o f M e d i c a t i o n A d m i n i s t r a t i o n , 2 e
S K I L L
13
E q u i p m e n t
A S S E S S M E N T
N U R S I N GD I A G N O S I S
O U T C O M EI D E N T I F I C A T I O NA N D P L A N N I N G
I M P L E M E N T A T I O NA C T I O N
2. Identify patient by checking identification band on
patient's wrist and asking patient his or her name' Ask
patient regarding any medication allergies.
3. Explain procedure to patient.
4. Perform hand hygiene and don gloves (gloves are to be
worn if drainage is present).
Drugs are instilled into the auditory canal for their local effect. They are used to soften wax,
relieve pain, apply local anesthesia, destroy organisms, or destroy an insect lodged in the
canal, which can cause almost intolerable discomfort. If the ear canal has swollen to the
point that medication cannot pass, a long piece of cotton material called a wick is inserted so
that one end is near the middle ear and the other end is external. This cotton acts as a wick to
help medication get to the inner ear.
The tympanic membrane separates the external ear from the middle ear. Normally, it is intact
and closes the entrance to the middle ear completely. If it is ruptured or has been opened by
surgical intervention, the middle ear and the inner ear have a direct passage to the external
ear. When this occurs, instillations should be performed with the greatest of care to prevent
forcing materials from the outer ear into the middle ear and the inner ear. Sterile technique is
used to prevent infection.
. Medication (warmed to3'7oC [98.6'F])
. Tissue
. Cotton ball (optional)
. Gloves (optional)
. Washcloth (optional)
. Medication Kardex or computer-generated MAR
Assess the affected ear for any drainage or tenderness. Assess the patient for allergies'
Assess the patient's knowledge of medication. If the patient has a knowledge deficit about
the medication, this may be an appropriate time to begin education'
Determine related factors for the nursing diagnoses based on the patient's current status.
Appropriate nursing diagnoses may include:
. Deficient Knowledge
. Anxiety
. Acute Pain
. Risk for Allergy Response
The expected outcome to achieve when administering eardrops is that drops are administered
successfully. Other outcomes that may be appropriate include the following: patient under-
stands the rationale for the ear drop instillation and has decreased anxiety; patient remains
free from pain; and patient experiences no allergy response.
This ensures that the medication is given to the right person'
Explanation allays patient anxiety.
Hand hygiene deters the spread of microorganisms. Gloves
protect the nurse when coming in contact with drainage
from ear.
R A T I O N A T E
l. Bring equipment to patient's bedside. Check physician's Having equipment available saves time and facilitates per-
order. formance of task. Checking the order ensures that the
patient receives the correct medication at the correct time
and in the right manner.
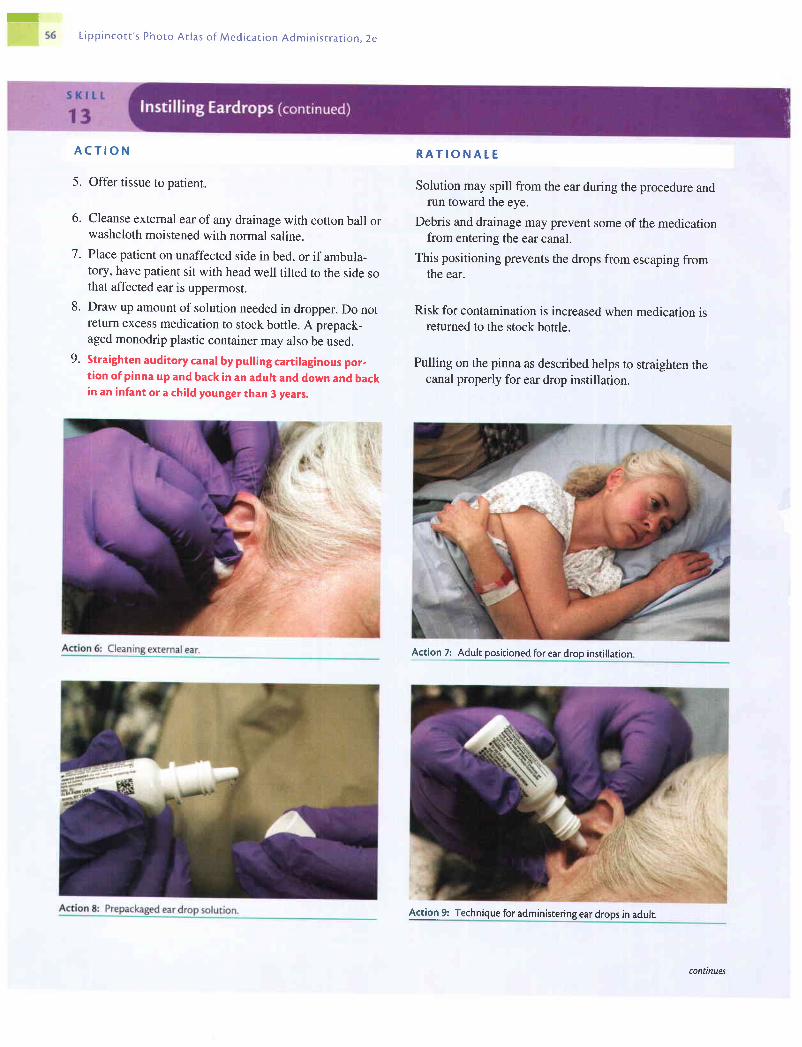
rL ipp inco t t ' s Phoro At las o f Med ica t ion Admin is t ra t ion . 2e
A C T I O N
5. Offer tissue to patient.
6. Cleanse external ear of any drainage with cotton ball orwashcloth moistened with normal saline.
7 . Place patient on unaffected side in bed, or if ambula-tory, have patient sit with head well tilted to the side sothat affected ear is uppermost.
8. Draw up amount of solution needed in dropper. Do notreturn excess medication to stock bottle. A prepack-aged monodrip plastic container may also be used.
9. Straighten auditory canal by pulling cartilaginous por,tion of pinna up and back in an adult and down and backin an infant or a child younger than 3 years,
R A T I O N A T E
Solution may spill from the ear during the procedure andrun toward the eye.
Debris and drainage may prevent some of the medicationfrom entering the ear canal.
This positioning prevents the drops from escaping fromthe ear.
Risk for contamination is increased when medication isreturned to the stock bottle.
Pulling on the pinna as described helps to straighten thecanal properly for ear drop instillation.
Action 7: Adult positioned for ear drop instillarion
Action 9: Technique for administering ear drops in adult.
continues

L ipp inco t t ' s Photo At las o f Med ica t ion Admin is t ra t ion , 2e 5 7
A C T I O N
10. Hold dropper in ear with its tip above auditory canal.For an infant or an irrational or confused patient, pro-
tect dropper with a piece of soft tubing to help prevent
injury to ear.
11. Allow drops to fall on side of canal.
12. Release pinna after instilling drops, and have patient
maintain the position to prevent escape of medication.
13. Gently press on tragus a few times.
14. If ordered, loosely insert a cotton ball into ear canal.
15. Remove gloves and perform hand hygiene.
16. Document medication administration and any drainage
from ear noted. Documentation mav be done on CMAR.
R A T I O N A T E
By holding the dropper in the ear, the majority of medica-
tion will enter the ear canal. The hard tip of the dropper
can damage the tympanic membrane if it is jabbed into
the ear.
It is uncomfortable for the patient if drops fall directly onto
the tympanic membrane.
Medication should remain in ear canal for at least 5 minutes'
Pressing on tragus causes medication from canal to move
toward tympanic membrane.
Cotton ball can help prevent medication from leaking out of
ear canal.
Hand hygiene deters the spread of microorganisms.
This provides accurate documentation and helps to prevent
medication errors.
Action 13: Applying pressure to tragus. Action 14: Cotton ball inserted in ear.
continues
EVATUATION The expected outcomes are met when the patient has received the eardrops successfully;understood the rationale for ear drop instillation and exhibited no or decreased anxiety;experienced no or minimal pain; and experienced no allergy response.
Unexpected S i tua t ionsand AssociatedIn te rvent ions
In fan t and Ch i ldCons idera t ions
s K l t t
14
Equipment
A S S E S S M E N T
N U R S I N GD I A G N O S I S
2. Identify patient by checking identification band onpatient's wrist and asking patient his or her name. Alsoask patient regarding any medication allergies.
3. Explain procedure to patient.
Medication runs from ear into eye: Notify physician and check with the pharmacy. Eyeirrigation may need to be performed.Patient complains of extreme pain when nurse presses on tregus: Allow patient to press ontragus. If pain is too much, this part may be deferred.
Distraction techniques, such as TV or a quiet toy, may be helpful when attempting to keepa child quiet for 5 minutes. Reading to the child may not be appropriate because the child'shearing may be compromised during medication administration.
Nasal instillations are used to treat allergies, sinus infections, and nasal congestion. Medica-tions with a systemic effect, such as vasopressin, may also be prepared as a nasal instillation.The nose is normally not a sterile cavity, but because of its connection with the sinuses.medical asepsis should be observed carefully when using nasal instillations.
. Medication
. Gloves
. Tissue
. Medication Kardex or computer-generated MAR
Assess the patient for allergies. Assess the patient's knowledge of medication. If the patienthas a knowledge deficit about the medication, this may be an appropriate time to begineducation. Assess the nares for any drainage or broken skin.
Determine related factors for the nursing diagnoses based on the patient's current status.Appropriate nursing diagnoses may include:. Deficient Knowledge. Risk for Allergy Response. Risk for Impaired Skin. Acute Pain
The expected outcome to achieve when instilling nose drops is that the medication is admin-istered successfully. Other outcomes that may be appropriate include the following: patientunderstands the rationale for the nose drop instillation; patient experiences no allergyresponse; patient's skin remains intact; patient experiences no, or minimal, pain.
O U T C O M EI D E N T I F I C A T I O NA N D P T A N N I N G
I M P T E M E N T A T I O NA C T I O N R A T I O N A T E
l' Bring equipment to patient's bedside. Check physician's Having equipment available saves time and facilitates per-order' formance oftatk. Checking the order ensures that the
patient receives the correct medication at the correct timeand in the right manner.
This ensures that the medication is given to the right person.
Explanation allays patient anxiety.
58

ffi
L i p p i n c o t t ' s P h o t o A t l a s o f M e d i c a t i o n A d m i n i s t r a t i o n , 2 e
6.
n
A C T I O N
4. Perform hand hygiene and don gloves (gloves are to beworn if drainage is present).
5 , Provide patient with paper tissues and ask patient toblow his or her nose.
Have patient sit up with head tilted well back. If patientis lying down, tilt head back over a pillow.
Draw sufficient solution into dropper for both nares.Do not return excess solution to a stock bottle.
Action 6: Patient positioned for nose drops.
Hold tip of nose up and place dropperjust inside naris,about one third of an inch. Instill prescribed number ofdrops in one naris and then into the other. Protect drop-per with a piece of soft tubing if patient is an infant oryoung child. Avoid touching naris with dropper.
R A T I O N A T E
Hand hygiene deters the spread of microorganisms. Glovesprotect the nurse when coming in contact with drainagefrom nose.
Blowing the nose clears the nasal mucosa prior to medica-tion administration.
These positions allow the solution to flow well back into thenares. Do not tilt head if patient has a cervical spine injury.
Returning solution to a stock bottle increases the risk forcontamination of the stock bottle.
The soft tubing will protect the patient's nares from injuryduring administration of medication. Touching the narismay cause the patient to sneeze and will contaminate thedropper.
8.
Action 7: Drawing up nose drops.
Action 8: Administering nose drops.
continues
tffim60 L i p p i n c o t t ' s P h o t o A t l a s o f M e d i c a t i o n A d m i n i s t r a t i o n , 2 e
9. Have patient remain in position with head tilted backfor a few minutes.
10. Document medication administration and any drainagefrom nose noted. Documentation may be done on theCMAR.
E V A T U A T I O N
Tilting the head back prevents the escape of the medication.
This provides accurate documentation and helps to preventmedication errors.
The expected outcomes are met when the patient has received the nose drops successfully;understood the rationale for nose drop instillation; and experienced no allergy response;patient's skin remained intact; and patient experienced no, or minimal, pain or discomfort.
Unexpected S i tua t ionsand AssociatedIn te rvent ions
. Patient sneezes immediately after receiving nose drops: Do not repeat the dosage, becauseyou cannot determine how much medication was actually absorbed.
BibJiogrwphgAbrams, A. (2001). Clinical drug therapy (6th ed.). Philadelphia: Lippincott Williams & Wilkins.Ahmed, D., & Fecik, S. (2000). MAOIs: Still here, still dangerous. American Journal of Nursing,
100(2),29-30.Carroll, P. (2003). Medication errors: The bigger picrure. RN, 66(l),52-58.Eisenhauer, L., Nichols, L., Spencer, R., & Bergan, F. (1998). Clinical pharmacology and nursing
management (5th ed.). Philadelphia: Lippincott Williams & Wilkins.Fain, J. (2002). Delivering insulin round the clock. Nursing, 32(8),54-56.Fleming, D. (1999). Challenging traditional insulin injection practices. Am erican Journal of Nursing,
99(2),72-74.Haddad, A. (2001). Ethics in action. RN, 64(9),25-28.Jech, A. (2001). The next step in preventing med errors. RN, 64(4),4649.Johanson, L. (2001). Complacency can kill. RN,64(8),49-50.Karch, A., & Karch, F. (2001). Let the user bewarc. American Journal of Nursing, 101(2),25.Karch, A., & Karch, F. (2001). Take part in the solution: How to report medication errors. American
Journal of Nursing, 101(10),25.Katsma, D., & Katsma, R. (2000). The myth of the 90o-angle intramuscular injection. Nurse Educa-
tor, 25(l),34-37.Koschel, M. (2001). Question of practice: Filter needles. American Journal of Nursing, 101(l),'75.Kuhn, M. (1998). Pharmacotherapeutics: a nursing process approach (4th ed.). Philadelphia: F. A.
Davis.McConnell, E. (2001). Clinical do's & don'ts: Instilling eyedrops. Nursing, 31(9),17.McKenry, L., & Salemo, E. (2002). Pharmacology in nursing (21st ed.). St. Louis: C. V. Mosby.Morris, M. (2002). When a phone order differs from the written one. RN, 65(l),'71.Nicoll, L., & Hesby, A. (2002).Intramuscular injection: An integrative research review and guideline
for evidence-based practice. Applied N ursing Research, l 6(2), 149-162.North American Nursing Diagnosis Association. (2002). Nursing diagnoses: definitions and classifi-
cation 2002-2003. Philadelphia: Author.Pope, B. (2002). How to administer subcutaneous and intramuscular. Nursing, 32(l),5C-51.Trooskin, S. (2002). Low-technology, cost-efficient strategies for reducing medication enors. Amer-
ican Joumal of Infection Control, 30(6),351-354.Wentz, J., Karch, A., & Karch, F. (2000). You've caught the error, now how do youfixit? American
Journal of Nursing, I 00(9), 24.Winland-Brown, J., & Valiante, f. (2000). Effectiveness of different medication management ap-
proaches on elders' medication adherence. Outcomes Management for Nursing Practice, 4(4),172-176.
Wolf, 2., Serembus, J., & Beitz, J. (2001). Clinical inference of nursing students concerning harmfuloutcomes after medication enors. N ur s e E duc ato r, 2 6(6), 268-2'7 0.


![[Thao Doan,Roger Melvold] Lippincott's Illustrated Reviews_ Immunology](https://static.fdocuments.net/doc/165x107/55cf947b550346f57ba251ff/thao-doanroger-melvold-lippincotts-illustrated-reviews-immunology.jpg)


