PFMS User Manual...PFMS User Manual – Role of Administrator Ver 1.1 11 | P a g e Figure 22 2.4...
32
PFMS User Manual Role of Administrator Version 1.1 August, 2017 Public Financial Management System Controller General of Accounts Department of Expenditure Ministry of Finance
Transcript of PFMS User Manual...PFMS User Manual – Role of Administrator Ver 1.1 11 | P a g e Figure 22 2.4...
PFMS User Manual
Role of Administrator
Version 1.1
August, 2017
Public Financial Management System
Controller General of Accounts
Department of Expenditure
Ministry of Finance

PFMS User Manual – Role of Administrator Ver 1.1
1 | P a g e
1. INTRODUCTION ..................................................................................... 2
2. ROLE OF ADMINISTRATOR ................................................................... 2
2.1 CREATION OF USERS (MAKER AND CHECKER) ............................................................ 2
2.2 EDITING THE EXISTING USERS...................................................................................... 4
2.3 EDITING ADMIN USER PROFILE AND PIA PROFILE ...................................................... 9
2.3.1 Editing PIA Admin User Profile ......................................................................... 9
2.3.2 Editing PIA Profile ................................................................................................ 10
2.4 REGISTERING NEW SCHEME ........................................................................................ 11
2.5 MANAGE OTHER PIAS ................................................................................................. 17
2.6 ADD NEW SCHEME TO CHILD PIA ............................................................................... 19
2.7 ADDING MORE BANK ACCOUNT(S) ............................................................................... 24
2.8 DE-ACTIVATION OF SCHEME/BANK ACCOUNT .......................................................... 25
2.9 BANK ACCOUNT ACTIVATION FOR E PAYMENT ........................................................... 28
Version control
Version Date Designation/Office Summary of Changes
1.1 25 September 2017
O/o CGA Original Document

PFMS User Manual – Role of Administrator Ver 1.1
2 | P a g e
1. Introduction
A Program Implementing Agency (PIA) gets registered onto Public Financial
Management System (PFMS) post approval by the competent authorities (Program
Division and the Principal Accounts office of the Ministry running the scheme in case
of first level PIA and Funding PIA in case of other PIAs are the identified competent
authorities for approving PIAs). Subsequent to the approval of the PIA by competent
authority, user credentials are sent to the PIA’s email id and Mobile Number provided
at the time of registration of the PIA on the PFMS portal. The user credentials are
provided to the Administrator, generally the Head of Department of the concerned
PIA.
Figure 1
2. Role of Administrator
The Administrator performs the functions set out below:
2.1 Creation of Users (Maker and Checker)
The Public Financial Management System (PFMS) has been designed with Maker
Checker concept where the Data Operator (Maker) will enter all transaction entries
and submit it to the Data Approver (Checker) for verification and approval/rejection
of transactions. For this purpose two separate users have to be created as Data
Operator and Data Approver by the Admin user. The detailed steps for creating these
users are set out below:
Step1: Go to Masters > Users>Add New

PFMS User Manual – Role of Administrator Ver 1.1
3 | P a g e
Figure 2
Step2: Select the Type of User from the drop down list
Step3: Enter the First Name
Step4: Enter the Last Name
Step5: Enter Email (This should be correct and active e-mail as the password and
other communication will be sent to this e-mail only)
Step6: Enter Phone Number
Step7: Enter Mobile Number, if any.
Step8: Enter a Login ID for the user (Login ID should be minimum of four different
characters).
Step9: After entering all the above details, click on “Submit” button
Figure 3
Step10: The message “Record saved successfully, your password has been sent
on your email address” will be displayed.

PFMS User Manual – Role of Administrator Ver 1.1
4 | P a g e
Figure 4
Note: The same procedure should be followed for creating ‘Data Approver’ user by
selecting the user type as ‘Data Approver’. After obtaining the password, the
operator and approver can login through their respective login credentials. The
Admin user can create another Admin user using the procedure described above, if
the incumbent is changed. The new Admin user can login and disable the earlier
Admin user.
2.2 Editing the Existing Users
Step1: Navigate to Masters > Users > Manage
Figure 5
Step2: On the ‘Manage Agency Users’ page, enter data against the search criteria
in the relevant boxes and click on Search Button.

PFMS User Manual – Role of Administrator Ver 1.1
5 | P a g e
Figure 6
Step3: When the user are displayed in a grid, Click on the User Name hyper link.
Figure 7
Step4: ‘Agency Users Mapping’ page will be displayed on which the details of the
existing users can be changed e.g. Change Scheme(s), Change Location(s), Edit
user, Disable user or Reset Password. The detailed steps are set out below:
Figure 8
a) Change Schemes
When a user is created by the Administrator, all the schemes mapped with the PIA
get assigned to this user by default. Change scheme(s) option can be used for
assigning specific scheme or adding a new scheme to a particular user. The detailed
steps for the same are set out below:

PFMS User Manual – Role of Administrator Ver 1.1
6 | P a g e
i. On Clicking Change Scheme(s) Hyperlink, the following page will appear on
screen:
Figure 9
ii. Click on Specific Scheme check box (‘All’ option is selected by default).
Then, click on Select Scheme hyperlink. A pop up window will open.
Figure 10
iii. On clicking ‘Select Scheme’ hyperlink, a pop up window will be displayed.
Enter scheme name or code in Scheme Name box provided and click on
Search button to search scheme. Click on the scheme name displayed to
select that scheme and click on Add button to assign specific scheme(s) to
the user.
Figure 11
b) Change Location
The detailed steps for changing location of a PIA is set out below:
i. Click on Change Location hyperlink.
PFMS User Manual – Role of Administrator Ver 1.1
7 | P a g e
Figure 12
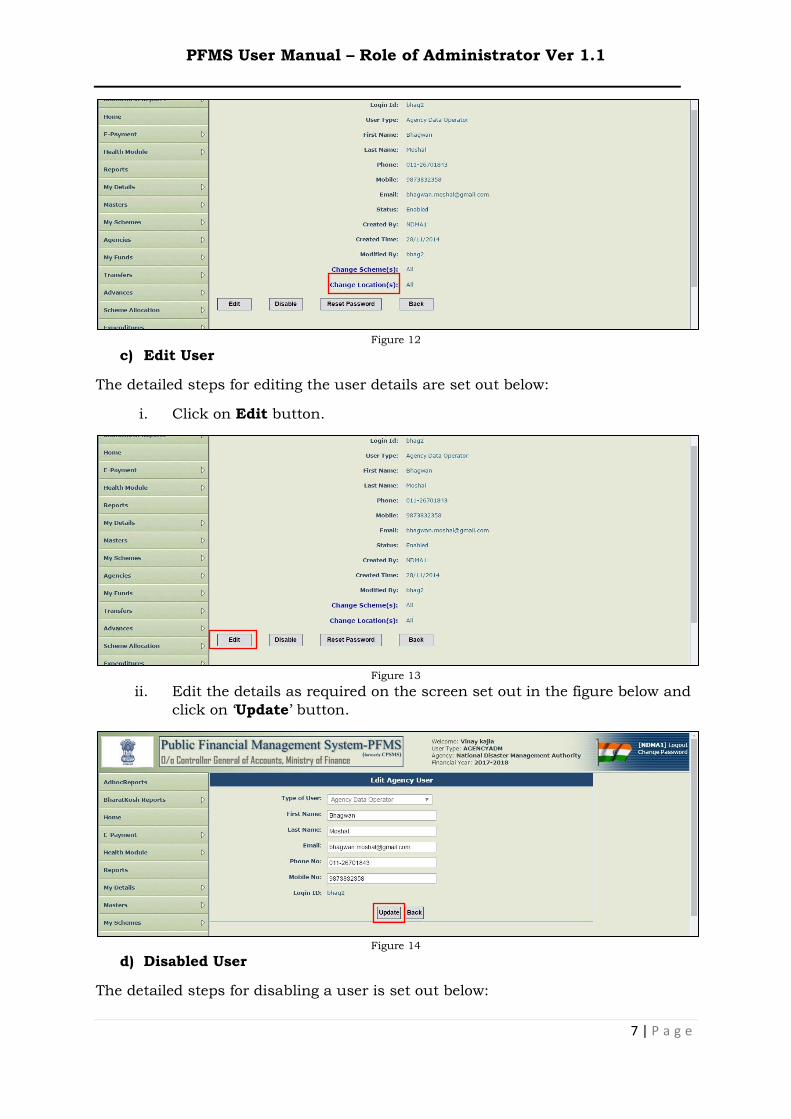
c) Edit User
The detailed steps for editing the user details are set out below:
i. Click on Edit button.
Figure 13
ii. Edit the details as required on the screen set out in the figure below and
click on ‘Update’ button.
Figure 14
d) Disabled User
The detailed steps for disabling a user is set out below:

PFMS User Manual – Role of Administrator Ver 1.1
8 | P a g e
i. Click on ‘Disable’ button.
Figure 15
Note: This option should be used whenever the user ceases to function in the PIA.
Also, a new user should always be created separately without using the edit option
to ensure that the audit trail is maintained.
e) Reset Password
The detailed steps for resetting the password is set out below:
i. Click on Reset Password button.
Figure 16
ii. On clicking the Reset Password button an email will be sent to the
registered email address and the message “Password reset successfully
and system generated password has been sent to given email ID”, will be
displayed on the screen.

PFMS User Manual – Role of Administrator Ver 1.1
9 | P a g e
Figure 17
2.3 Editing Admin User Profile and PIA Profile
2.3.1 Editing PIA Admin User Profile
A PIA administrator can edit the admin user details. The detailed steps are set out
below:
Step1: Go to My Details > My Profile
Figure 18
Step2: Edit the fields as required on the following screen and click on Update
button.
Figure 19

PFMS User Manual – Role of Administrator Ver 1.1
10 | P a g e
2.3.2 Editing PIA Profile
An agency administrator can edit the PIA profile details. The detailed steps are set
out below:
Step1: Go to My Details>Agency Profile
Figure 20
Step2: The PIA Details page will be displayed on the screen.
Figure 21
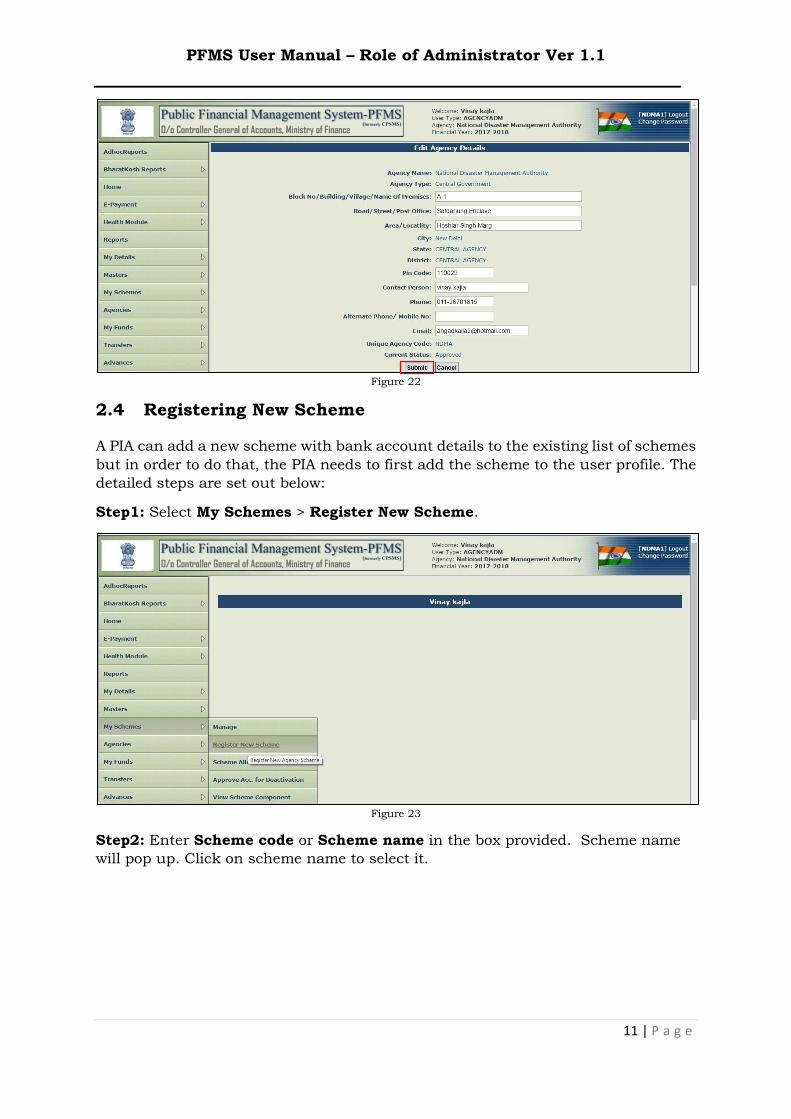
Step3: Click on Edit button in order to change/update details of enabled fields and
click on Submit button. To edit disabled fields except Agency Type and Unique
code, funding agency is to be contacted (Agency Type and Unique code are non-
editable)
PFMS User Manual – Role of Administrator Ver 1.1
11 | P a g e
Figure 22
2.4 Registering New Scheme
A PIA can add a new scheme with bank account details to the existing list of schemes
but in order to do that, the PIA needs to first add the scheme to the user profile. The
detailed steps are set out below:
Step1: Select My Schemes > Register New Scheme.
Figure 23
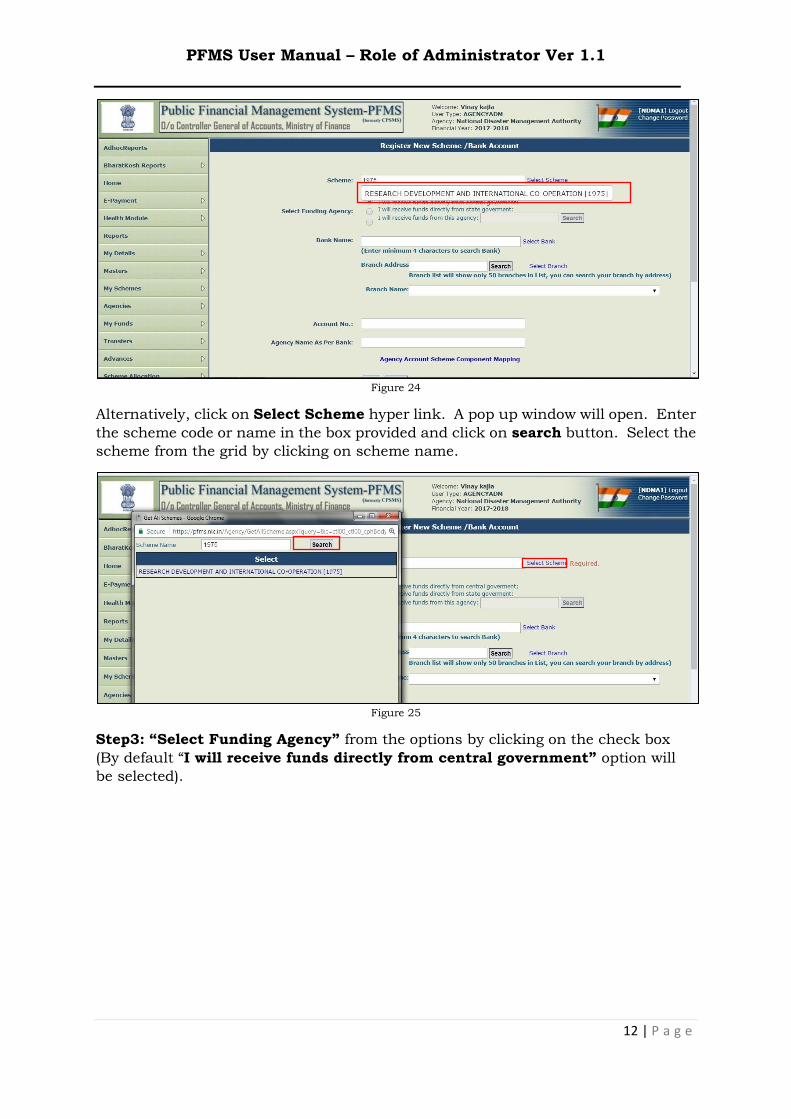
Step2: Enter Scheme code or Scheme name in the box provided. Scheme name
will pop up. Click on scheme name to select it.
PFMS User Manual – Role of Administrator Ver 1.1
12 | P a g e
Figure 24
Alternatively, click on Select Scheme hyper link. A pop up window will open. Enter
the scheme code or name in the box provided and click on search button. Select the
scheme from the grid by clicking on scheme name.
Figure 25
Step3: “Select Funding Agency” from the options by clicking on the check box
(By default “I will receive funds directly from central government” option will
be selected).

PFMS User Manual – Role of Administrator Ver 1.1
13 | P a g e
Figure 26
Step4: Once the option is selected, the Search button will be enabled. Click on
Search button to select the funding PIA
Figure 27
Step5: A pop-up window will open showing a list of funding PIA, that can be
searched by Agency Name, Agency Unique code, State and District.

PFMS User Manual – Role of Administrator Ver 1.1
14 | P a g e
Figure 28
Step6: Click on PIA name to select the funding PIA that gets displayed on the
screen.
Figure 29
Step7: Enter first four letters of bank name in the box provided (All banks starting
with similar name will be populated). Select the appropriate bank from the list.
Figure 30
Step8: Alternatively, click on Select Bank hyperlink. A pop up window showing all
banks will appear on screen. Type bank name in the box provided and click on
Search button. Click on Bank Name to select the bank.

PFMS User Manual – Role of Administrator Ver 1.1
15 | P a g e
Figure 31
Step9: Enter Branch name in the Branch Address box and click on Search
button. Branches with similar name will populated in the Branch Name dropdown.
Select the appropriate branch from the list.
Figure 32
Alternatively, click on the Select Branch Hyperlink. A pop up window showing all
branches of the bank selected. Select the branch by Address, City, Pin No., IFSC or
MICR and click on Search button.

PFMS User Manual – Role of Administrator Ver 1.1
16 | P a g e
Figure 33
Step10: Once the branch is selected, Account Rule column will display the bank
accounting rule of the selected bank (highlighted in red). Read the rule carefully
and enter the Account No. as per the account rule in the box provided.
Figure 34
Step11: Enter ‘Agency Name as per Bank’ as given in the pass book in the box
appearing on the screen. Then, click on Agency Account Scheme Component
Mapping hyperlink to map the components with the newly registered account.
Figure 35
Step12: A pop up window displaying all the components of the scheme selected will
open. Select all or desired components from the list by clicking on Bulk check box
or individual check boxes respectively to map components and click on Save button
in the pop up window.

PFMS User Manual – Role of Administrator Ver 1.1
17 | P a g e
Figure 36
Step13: Click on ‘Save’ button to submit the details. Once the funding PIA
approves the registration, the scheme will be mapped to PIA.
Figure 37
2.5 Manage Other PIAs
Manage Other Agency option is used for editing, adding a new account or adding a
new scheme to a child PIA created by the PIA performing this function. The parent
PIA can edit most of the fields of its child PIA except the Type of Agency and the
Unique Code.
Step1: Go to Agencies>Manage Other Agencies.

PFMS User Manual – Role of Administrator Ver 1.1
18 | P a g e
Figure 38
Step2: Child PIA created by the parent PIA will be displayed in a grid on the Manage
Agency page. Alternatively, the PIA to be edited can also be selected by entering
search criteria(s). Click on the Agency Name hyperlink to open the PIA to be edited.
Figure 39
Step3: Click on Edit button for editing PIA details.

PFMS User Manual – Role of Administrator Ver 1.1
19 | P a g e
Figure 40
Step4: Update the required fields and click on Update button.
Figure 41
2.6 Add New Scheme to child PIA
Parent PIA can add a New Scheme with bank account details to the child PIA. The
detailed steps are set out below:
Step1: Select Agencies>Manage Agencies
Step2: Click on Add New Scheme button to open Agency Scheme Details page.
Figure 42
Step3: Select Scheme from the Scheme drop down list to be added.
Step4: Select the Institution Type from the drop down list.
Step5: Select Implementation Level from the drop down list.

PFMS User Manual – Role of Administrator Ver 1.1
20 | P a g e
Figure 43
Step6: Under Funding Institution/Agencies from where Agency received funds,
select Implementation Level from the drop down list. Agencies registered at
selected level for the scheme will be displayed in the drop down list on the right side.
Step7: Select Funding Agency from the drop down list on the right side.
Step8: Click Add Funding Agency button to add funding PIA. Multiple funding PIAs
can be added if the PIA is receiving funds from more than one PIA. Funding PIAs
added will be displayed in the grid at the bottom of the screen.
Figure 44
Step9: Click on Save & Continue button to add Bank details.
Figure 45
PFMS User Manual – Role of Administrator Ver 1.1
21 | P a g e
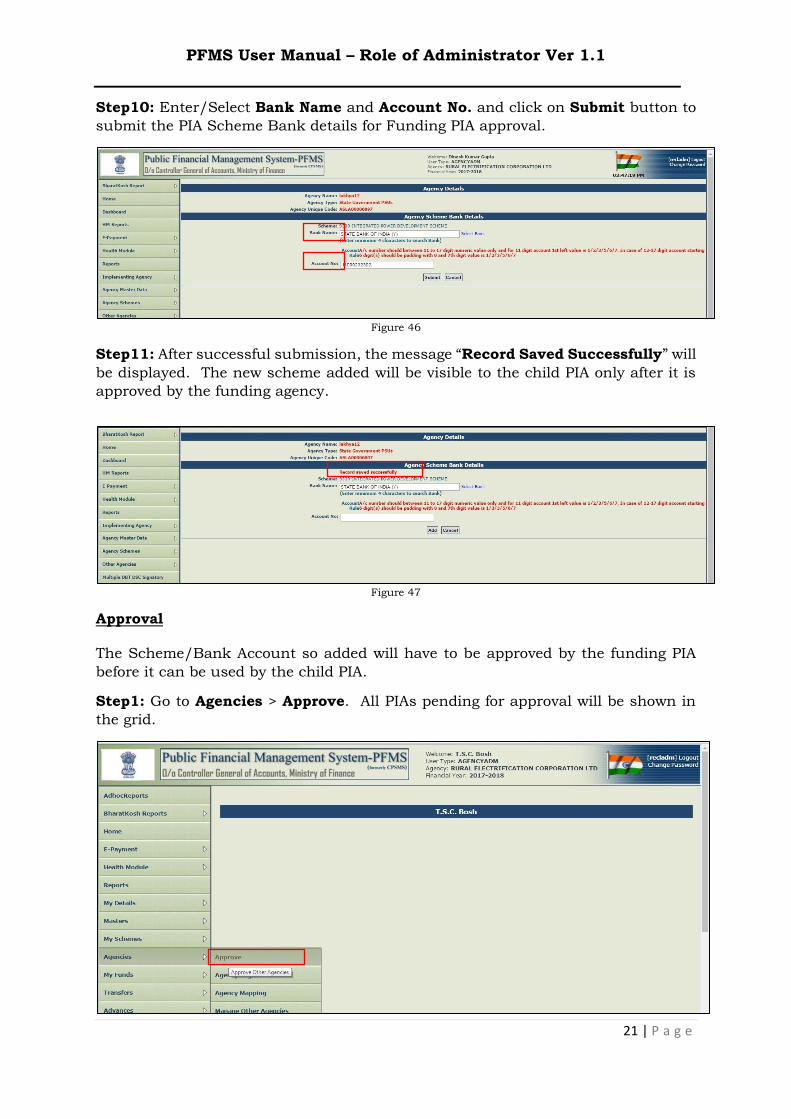
Step10: Enter/Select Bank Name and Account No. and click on Submit button to
submit the PIA Scheme Bank details for Funding PIA approval.
Figure 46
Step11: After successful submission, the message “Record Saved Successfully” will
be displayed. The new scheme added will be visible to the child PIA only after it is
approved by the funding agency.
Figure 47
Approval
The Scheme/Bank Account so added will have to be approved by the funding PIA
before it can be used by the child PIA.
Step1: Go to Agencies > Approve. All PIAs pending for approval will be shown in
the grid.
PFMS User Manual – Role of Administrator Ver 1.1
22 | P a g e
Figure 48
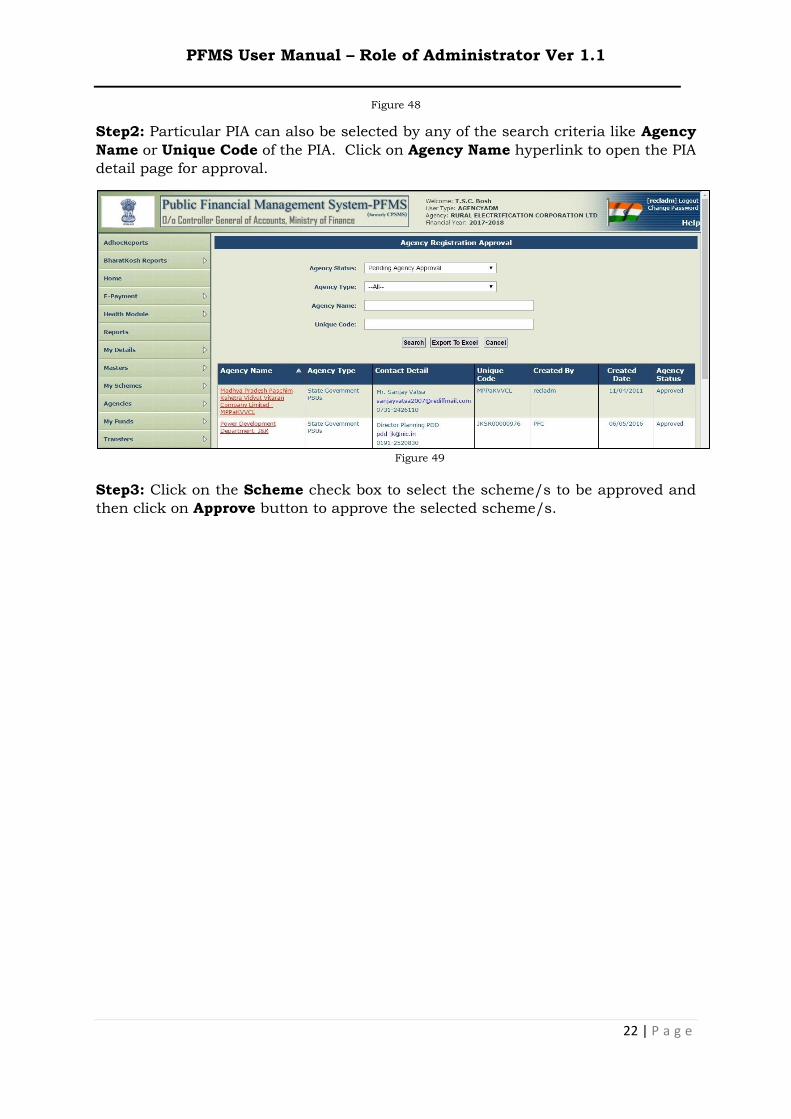
Step2: Particular PIA can also be selected by any of the search criteria like Agency
Name or Unique Code of the PIA. Click on Agency Name hyperlink to open the PIA
detail page for approval.
Figure 49
Step3: Click on the Scheme check box to select the scheme/s to be approved and
then click on Approve button to approve the selected scheme/s.

PFMS User Manual – Role of Administrator Ver 1.1
23 | P a g e
Figure 50
Step4: The message “Agency approved successfully and login details for this
agency has been approved” will be displayed on screen upon successful approval
of PIA.
Figure 51

PFMS User Manual – Role of Administrator Ver 1.1
24 | P a g e
2.7 Adding more Bank Account(s)
Funding PIA can add more bank accounts for an already existing scheme of its child
PIA.
Step1: Go to Agencies>Manage Other Agencies. Click on the Agency Name
hyperlink for adding a new bank account for an existing scheme.
Figure 52
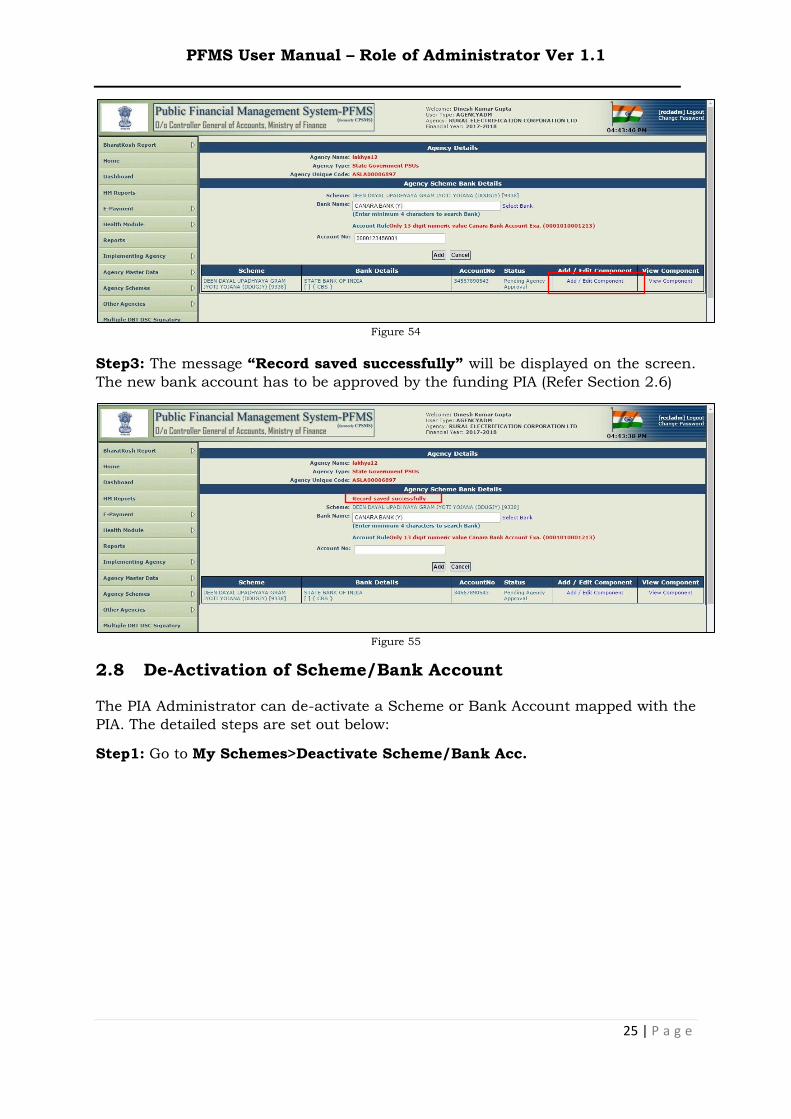
Step2: Click on Add button in More Account Column against the scheme for which
the account is to be added.
Figure 53
a) Enter/Select Bank name in the Bank Name box.
b) Enter the Bank Account Number in the Account No. box as per the accounting
rule.
c) Map Component with Bank Account by clicking Add/Edit Component
hyperlink.
d) Click Add button to submit for approval of the Funding PIA.
PFMS User Manual – Role of Administrator Ver 1.1
25 | P a g e
Figure 54
Step3: The message “Record saved successfully” will be displayed on the screen.
The new bank account has to be approved by the funding PIA (Refer Section 2.6)
Figure 55
2.8 De-Activation of Scheme/Bank Account
The PIA Administrator can de-activate a Scheme or Bank Account mapped with the
PIA. The detailed steps are set out below:
Step1: Go to My Schemes>Deactivate Scheme/Bank Acc.

PFMS User Manual – Role of Administrator Ver 1.1
26 | P a g e
Figure 56
Step2: The scheme can be searched by any of the search criteria(s) such as Scheme,
Account Number, Status, Agency Unique Code and Agency Name on the page
displayed. (In case the scheme is searched by status, the options available in the
drop down will be – All, Pending PD Approval, Approved, Pending at approver, De
activated Account).
Figure 57
Step3: In case the scheme is searched by “status”, ‘All’ will be the default option
and will display all the Schemes/Bank accounts (Agency wise) which are pending
at approver’s end for approval for de-activation and all active schemes/bank
accounts which can be selected for deactivation.
It will include all the records with the status approved, pending as well as
deactivated.

PFMS User Manual – Role of Administrator Ver 1.1
27 | P a g e
Figure 58
Step4: ‘Approved’ status will display all the Scheme/bank accounts which are
approved by the ministry and can be selected for the deactivation i.e., which can be
deactivated if they are no longer needed.
Bank Accounts/schemes which are already approved will be shown by the filter, for
which the request can be sent to the approver for Deactivation.
Figure 59
After selecting the status as Approved, all the approved schemes/Bank accounts of
that PIA will be displayed on the screen. Then the user will select the corresponding
checkbox and with valid remarks he can request the deactivation of that particular
scheme/bank account.
Step5: Schemes which will be displayed on the selection of ‘Pending at Approver’
are those schemes which have been already selected by the requester for deactivation
and are pending at approver’s end for the approval i.e., once the entry is received by
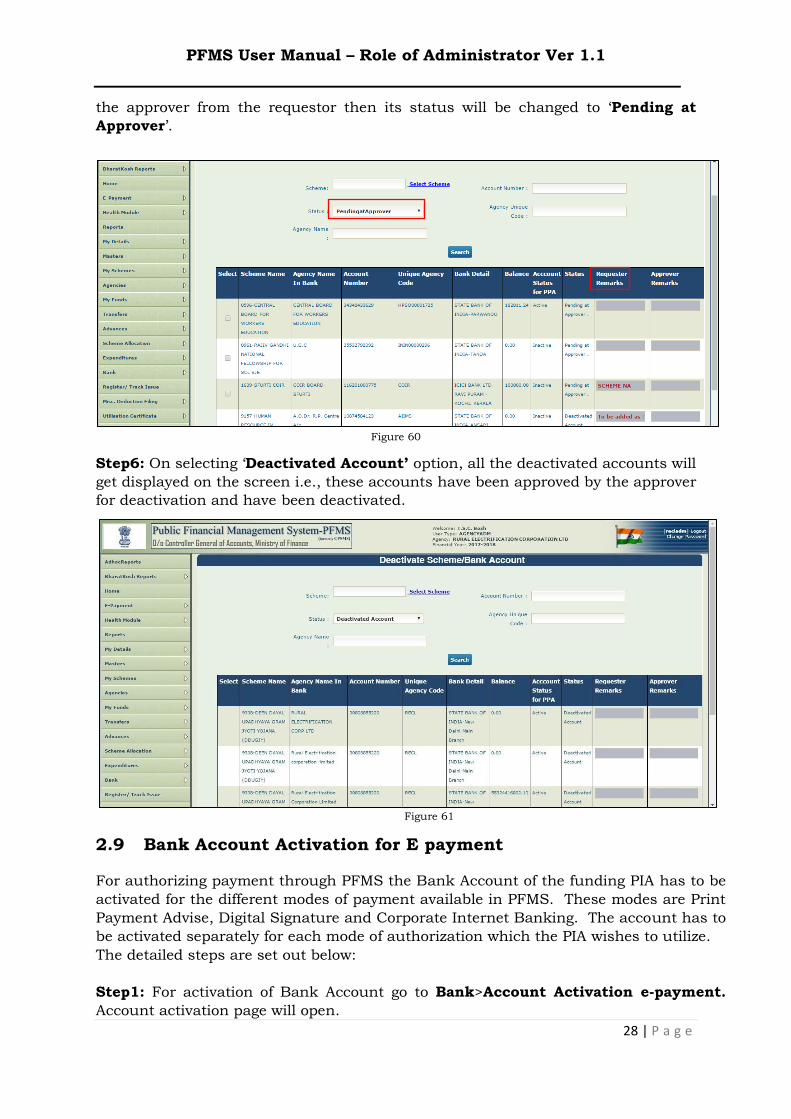
PFMS User Manual – Role of Administrator Ver 1.1
28 | P a g e
the approver from the requestor then its status will be changed to ‘Pending at
Approver’.
Figure 60
Step6: On selecting ‘Deactivated Account’ option, all the deactivated accounts will
get displayed on the screen i.e., these accounts have been approved by the approver
for deactivation and have been deactivated.
Figure 61
2.9 Bank Account Activation for E payment
For authorizing payment through PFMS the Bank Account of the funding PIA has to be
activated for the different modes of payment available in PFMS. These modes are Print
Payment Advise, Digital Signature and Corporate Internet Banking. The account has to
be activated separately for each mode of authorization which the PIA wishes to utilize.
The detailed steps are set out below:
Step1: For activation of Bank Account go to Bank>Account Activation e-payment.
Account activation page will open.

PFMS User Manual – Role of Administrator Ver 1.1
29 | P a g e
Figure 62
Step2: Enter the Scheme Name or Scheme code in the box provided or select scheme
from the Select Scheme hyperlink.
Figure 63
Step3: Enter the Bank Account Number in the Account Number box and click Search
button. The searched account number will be displayed in a grid.

PFMS User Manual – Role of Administrator Ver 1.1
30 | P a g e
Figure 64
Step4: Select the Account by clicking on the check box.
Step5: From Account Activation dropdown select the desired mode of authorization.
Figure 65
Step6: Click on Submit button to submit activation request.
Figure 66
Step7: “Record saved successfully” message will be displayed. Account status for
activation approval will be shown Pending for Activation Approval. The account will be
auto activated in a few minutes.

PFMS User Manual – Role of Administrator Ver 1.1
31 | P a g e
For any assistance, please contact PFMS support staff: Email: [email protected] Helpdesk: 1800118111
Figure 67


![Welcome [jakfinance.nic.in]jakfinance.nic.in/pfms-presentation2612final.pdf · About PFMS Public Financial Management System (PFMS) PFMS a web based application is an online management](https://static.fdocuments.net/doc/165x107/5aafd8d87f8b9a6b308dd4bc/welcome-pfms-public-financial-management-system-pfms-pfms-a-web-based-application.jpg)