Brochure: Personalization - Price & Product Recommendation - Happiest Minds

Personalization Product Guide Version 10.1

Environment Manager 10.1 Personalization Product Guide
Table of ContentsPersonalization Product Guide 1Table of Contents 2About Environment Manager 4
What's New in Environment Manager 10.1? 4Licensing 5Architecture 7Console 9Environment Manager Administrative Tools 16Service Packs 16Best Practices for Configuration 18Wildcards and Regular Expressions 22Performance Monitor Counters 23
About User Personalization 27Designing and Implementing Environment Manager Personalization 28User Personalization Architecture 29Configure Personalization Servers 34
Personalization Servers Policy 43Configure a Personalization Servers List 43
Personalization Groups 45Add a Personalization Group 45Create Group Personalization Membership Rules 45Personalization Group Arrangement 47Personalization Group Settings 47Personalization Group Membership Rules 52Application Personalization for Personalization Groups 56Windows Personalization and Personalization Groups 63Profile Migration 63Excluded Users 70Endpoint Self-Service Tool 71
Application Personalization 75Application Processing Rules 75Application Groups 75Applications 82Inclusions and Exclusions 87
Application Data Collection 97Add New Applications 97Add Inclusions 97
Windows Personalization 98Windows Settings Groups 98Custom Windows Settings 102Default Windows Settings Groups 104
Sites 108Add a Personalization Site 108
Copyright © 2017 , Ivanti. All Rights Reserved. Terms of Use.
Page 2 of 145

Environment Manager 10.1 Personalization Product Guide
Environment Manager Sites Hierarchy 108Environment Manager Site Membership Rules 109Environment Manager Site Conditions 111Servers and Virtual Hosts 111
Personalization Tools 114Synchronize Site Databases 114Import and Export Personalization Configurations 114
Global Options 119Access Rights 119Advanced Settings 121Application Exclusions 128Data Collection Settings 128
Personalization Analysis 131Generate a Personalization Analysis Report 131Personalization Analysis and Windows Settings 132Size and Usage Reports 132Archive Reports 137
Environment Manager Support Console 140Support Console Functionality 140
SQL AlwaysOn 141Streamed Applications 142
Citrix XenApp 142Symantec Virtualization 144
Support for Citrix Offline Plug-in 6.0 145
Copyright © 2017 , Ivanti. All Rights Reserved. Terms of Use.
Page 3 of 145

Environment Manager 10.1 Personalization Product Guide
About Environment ManagerEnvironment Manager provides on-demand personalization of user desktops on-demand and helpsprotect endpoints with fine-grained contextual policy control.
Environment Manager Personalization provides:
l Fast logon timesl A fully personalized desktop experience, regardless of location or devicel A secure desktop environment that adapts based on user context
Use Environment Manager Policy to:
l Enforce policy real-time throughout the user session, not just at loginl Help meet corporate and industry-based compliance mandates such as HIPAA, FINRA, and PCIl Run multiple policies in parallel for the best possible user experience.
What's New in Environment Manager 10.1?
What's New in Personalization?
Support for Windows Server 2016
Environment Manager 10.1 Personalization Server, Console, and Agent Components are all compatiblewith Windows Server 2016 (Server with Desktop Experience installation). You can installPersonalization Server 10.1 on a Windows Server 2016 machine and require no additionalconfiguration than for a Server 2012 install, and out-of-the-box Windows Setting Groups are availablefor Windows Server 2016. For example, the Windows 10 personalization settings on a user's laptop willbe available to that user on a Server 2016 RDP session.
For more information on supported software see the maintained platforms matrix. See ComputerConditions for information on operating system conditions.
Enhanced shortcut management
When users are roaming between different environments, Personalization now manages and preventsany personalized shortcut links that are not resolvable from appearing in the user’s session.
For more information, see Shortcut Management for Roaming Users.
Personalization Operations Console localization
The Personalization Console is now available in three new UI languages - French, Dutch, and German.
For more information on Personalization Operations, see Personalization Operations Help.
Copyright © 2017 , Ivanti. All Rights Reserved. Terms of Use.
Page 4 of 145
Environment Manager 10.1 Personalization Product Guide
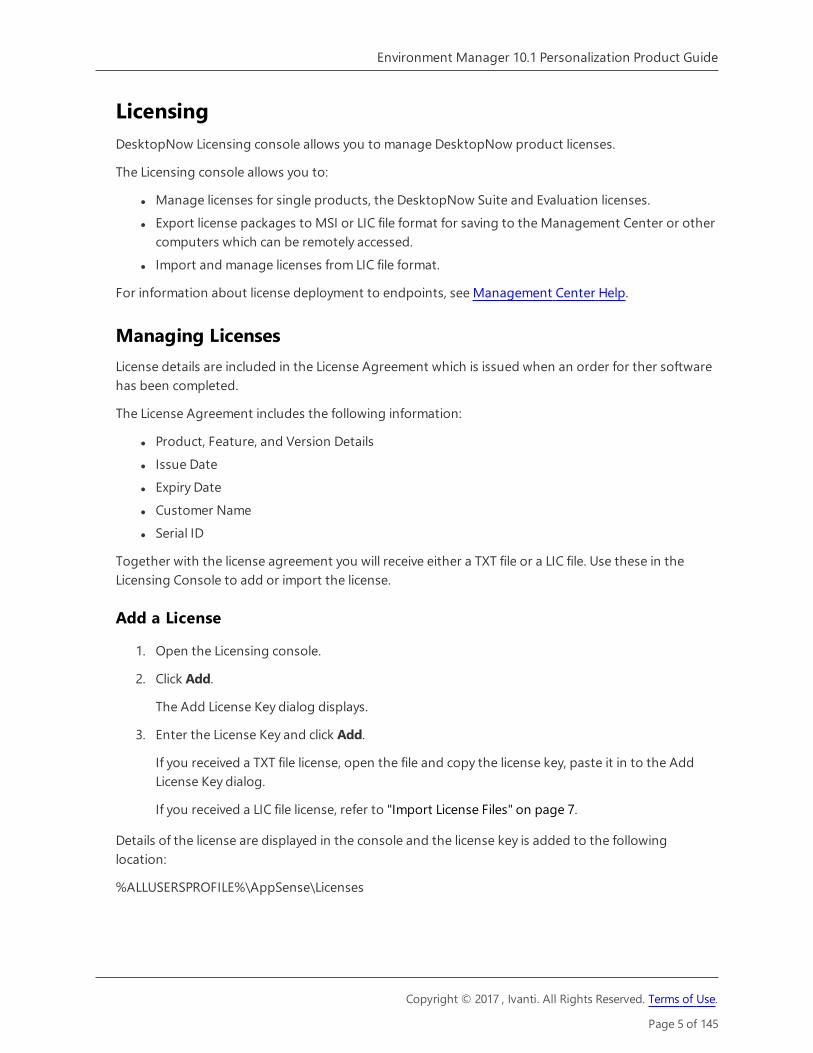
LicensingDesktopNow Licensing console allows you to manage DesktopNow product licenses.
The Licensing console allows you to:
l Manage licenses for single products, the DesktopNow Suite and Evaluation licenses.l Export license packages to MSI or LIC file format for saving to the Management Center or other
computers which can be remotely accessed.l Import and manage licenses from LIC file format.
For information about license deployment to endpoints, see Management Center Help.
Managing LicensesLicense details are included in the License Agreement which is issued when an order for ther softwarehas been completed.
The License Agreement includes the following information:
l Product, Feature, and Version Detailsl Issue Datel Expiry Datel Customer Namel Serial ID
Together with the license agreement you will receive either a TXT file or a LIC file. Use these in theLicensing Console to add or import the license.
Add a License
1. Open the Licensing console.
2. Click Add.
The Add License Key dialog displays.
3. Enter the License Key and click Add.
If you received a TXT file license, open the file and copy the license key, paste it in to the AddLicense Key dialog.
If you received a LIC file license, refer to "Import License Files" on page 7.
Details of the license are displayed in the console and the license key is added to the followinglocation:
%ALLUSERSPROFILE%\AppSense\Licenses
Copyright © 2017 , Ivanti. All Rights Reserved. Terms of Use.
Page 5 of 145

Environment Manager 10.1 Personalization Product Guide
Activate a License
Once added, some licenses require activating.
1. Select a license or add one to the licensing console.2. Click Activate.3. Type or copy and paste the activation code.4. Press Enter to accept the code.
The license console saves the license key to the MS Windows registry on the local machine. The LicenseStatus field updates to show the status of the license and the license details display in the lower partof the console.
To check that the license is active on your endpoint, search the registry for the license code. Ifthe search finds the code, then the license is active.
Remove a License
1. Highlight the required license and click Remove.
A confirmation dialog displays.
2. Click Yes to confirm.
The selected license is deleted and removed from the console and the MS Windows registry or%ALLUSERSPROFILE%\AppSense\Licenses location, whichever is applicable to the license type.
Export License FilesExport licenses to an MSI or LIC file to create a backup and enable distribution to other endpointsusing the Licensing console or the Management Center.
1. Highlight the license you want to export.2. Click Export to display Windows Save As dialog.3. Browse to the required location to save the license file.4. Enter a name for the file.5. Select the file type: MSI or LIC.6. Click Save.
A file is created and saved in the selected location. This file can be copied to any network location andloaded via the DesktopNow Suite Licensing console or in the Management Center console.
Copyright © 2017 , Ivanti. All Rights Reserved. Terms of Use.
Page 6 of 145

Environment Manager 10.1 Personalization Product Guide
Import License FilesImport a previously exported license to an endpoint using the Licensing console.
1. Open the Licensing console.2. Click Import to display the Windows Open dialog.3. Navigate to the required LIC file.4. Click Open.
Details of the license are displayed in the console and the license key is added to the followinglocation:
%ALLUSERSPROFILE%\AppSense\Licenses
TroubleshootingI received a license, what do I do?
If you have received a product license you can load the license by launching the DesktopNow SuiteLicensing Console on your client computer and entering the license code.
I have entered a license, but it says it is not activated, why?
Some licenses require activation before they can be used. Activation codes are provided by Ivanti.Activate a license by entering the License and Activation codes into the console.
ArchitectureThe Environment Manager system consists of the Environment Manager Console, EnvironmentManager Agent, Personalization Server and Database.
The console is an administrative tool to create and manage configurations. The agent resides on thecontrolled computers and can receive configurations from the Management Center or third partydeployment system to manage the machine and user environment. The console also provides a liveconnection to the Personalization Database.
The Personalization Server runs as a website, using IIS on either Windows Server 2003 or 2008. Clientmachines (Tier 1) connect through HTTP(s) handlers, and the Console uses WCF Services.
The Personalization Server acts as a broker between the Client and Database, providing a securechannel to read and write the Personalization data. It is designed to support thousands of userssimultaneously and multiple Personalization Servers can be configured in parallel to use a singleDatabase.
Environment Manager can operate either in Standalone or Enterprise mode. In Standalone mode, theconsole saves its settings directly to the local system. In Enterprise mode, different configurations canbe deployed to the controlled computers depending on your system requirements. This helpdescribes the use of Environment Manager in Standalone mode.
Copyright © 2017 , Ivanti. All Rights Reserved. Terms of Use.
Page 7 of 145

Environment Manager 10.1 Personalization Product Guide
For details on centralized management mode please refer to the Management Center Help system.
Policy Configuration and User Personalization work together to provide complementary control of theentire user environment. Inevitably there are some areas of overlap. The profile settings are applied inthe following stages:
l Default Settings - Policy Configurationl Usually occur through the use of mandatory profiles, although Policy Configuration is free to
set anything at this stage.l Virtual Settings - User Personalizationl User specific changes to their own personality settings that are being managed by User
Personalization. These are applied on top of the defaults.l Enforced Settings - Policy Configuration
Any policies that the administrator wants to set regardless of how the user has changed theirapplication previously, so these are applied last. The user may be free to change these whilst theapplication is running, but they will be reapplied the next time the application runs.
Copyright © 2017 , Ivanti. All Rights Reserved. Terms of Use.
Page 8 of 145

Environment Manager 10.1 Personalization Product Guide
ConsoleThe Environment Manager Console launches from the start menu:
Start > All Programs > AppSense > Environment Manager> Environment Manager Console.
When accessed in this way the console opens with an empty and untitled configuration. The consolealso starts when a saved configuration is opened.
There are three variants of the Environment Manager console:
l Personalization - Installs only the personalization element of Environment Managerl Policy - Installs only the policy element of Environment Managerl Both consoles - Installs the combined console; both personalization and policy are installed.
The choice of which console to install is made during installation.
Elements
ResolutionRecommended screen resolution for the console is 1024 x 768 pixels.
Copyright © 2017 , Ivanti. All Rights Reserved. Terms of Use.
Page 9 of 145

Environment Manager 10.1 Personalization Product Guide
Installing the ConsolesThe traditional Environment Manager installation, using Setup.exe, automatically installs thecombined console. Some administrators may not require access to both. For example, they may onlybe responsible for configuring personalization and have no need for the policy side of the console.Installing the Personalization or Policy consoles can only be done using theEnvironmentManagerConsole MSIs.
See the DesktopNow Install and Configure Guide.
RibbonsRibbons include buttons for performing actions, arranged in groups, according to the area of theconsole to which the actions relate. For example, the Edit ribbon page includes all common tasks, suchas Cut, Copy and Paste.
Split ribbon buttons contain multiple options and are indicated by an arrow just below the button.Click the arrow to display and select the list of options, or simply click the button for the default action.
HelpTheHelp button on the Help ribbon launches the Help for the product and displays the topic relatingto the current area of the console in view. A smaller icon for launching the Help displays at the far rightof the console, level with the ribbon page tabs.
Navigation PaneThe Navigationpane consists of the navigation tree and navigation buttons. The navigation tree is thearea for managing nodes of the configuration. The navigation buttons allow you to view the differentareas of the console, i.e. the Policy Configuration and User Personalization.
Work AreaTheWork Area provides the main area for managing the settings of the configuration and product.The contents of the work area vary according to the selected nodes in the navigation tree and theselected navigation buttons. Sometimes the work area is split into two panes. For example, one panecan provide a summary of the settings in the other pane.
Additional Console Features
l Shortcut Menu— right-click shortcuts are available in the navigation tree and some areas ofthe console.
l Drag and Drop— this feature is available in some nodes of the navigation tree.l Cut/Copy/Paste— these actions can be performed using the buttons in the Edit ribbon,
shortcut menu options and also using keyboard shortcuts.
Copyright © 2017 , Ivanti. All Rights Reserved. Terms of Use.
Page 10 of 145
Environment Manager 10.1 Personalization Product Guide
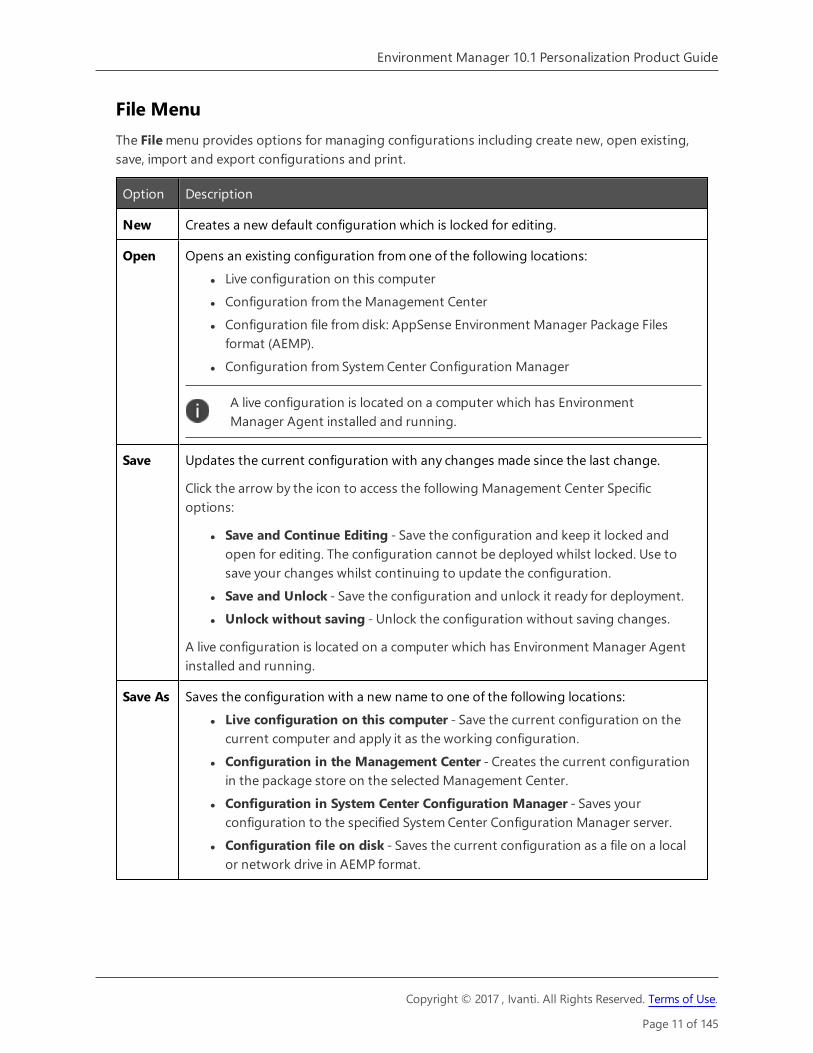
File MenuThe Filemenu provides options for managing configurations including create new, open existing,save, import and export configurations and print.
Option Description
New Creates a new default configuration which is locked for editing.
Open Opens an existing configuration from one of the following locations:l Live configuration on this computerl Configuration from the Management Centerl Configuration file from disk: AppSense Environment Manager Package Files
format (AEMP).l Configuration from System Center Configuration Manager
A live configuration is located on a computer which has EnvironmentManager Agent installed and running.
Save Updates the current configuration with any changes made since the last change.
Click the arrow by the icon to access the following Management Center Specificoptions:
l Save and Continue Editing - Save the configuration and keep it locked andopen for editing. The configuration cannot be deployed whilst locked. Use tosave your changes whilst continuing to update the configuration.
l Save and Unlock - Save the configuration and unlock it ready for deployment.l Unlock without saving - Unlock the configuration without saving changes.
A live configuration is located on a computer which has Environment Manager Agentinstalled and running.
Save As Saves the configuration with a new name to one of the following locations:l Live configuration on this computer - Save the current configuration on the
current computer and apply it as the working configuration.l Configuration in the Management Center - Creates the current configuration
in the package store on the selected Management Center.l Configuration in System Center Configuration Manager - Saves your
configuration to the specified System Center Configuration Manager server.l Configuration file on disk - Saves the current configuration as a file on a local
or network drive in AEMP format.
Copyright © 2017 , Ivanti. All Rights Reserved. Terms of Use.
Page 11 of 145
Environment Manager 10.1 Personalization Product Guide
Option Description
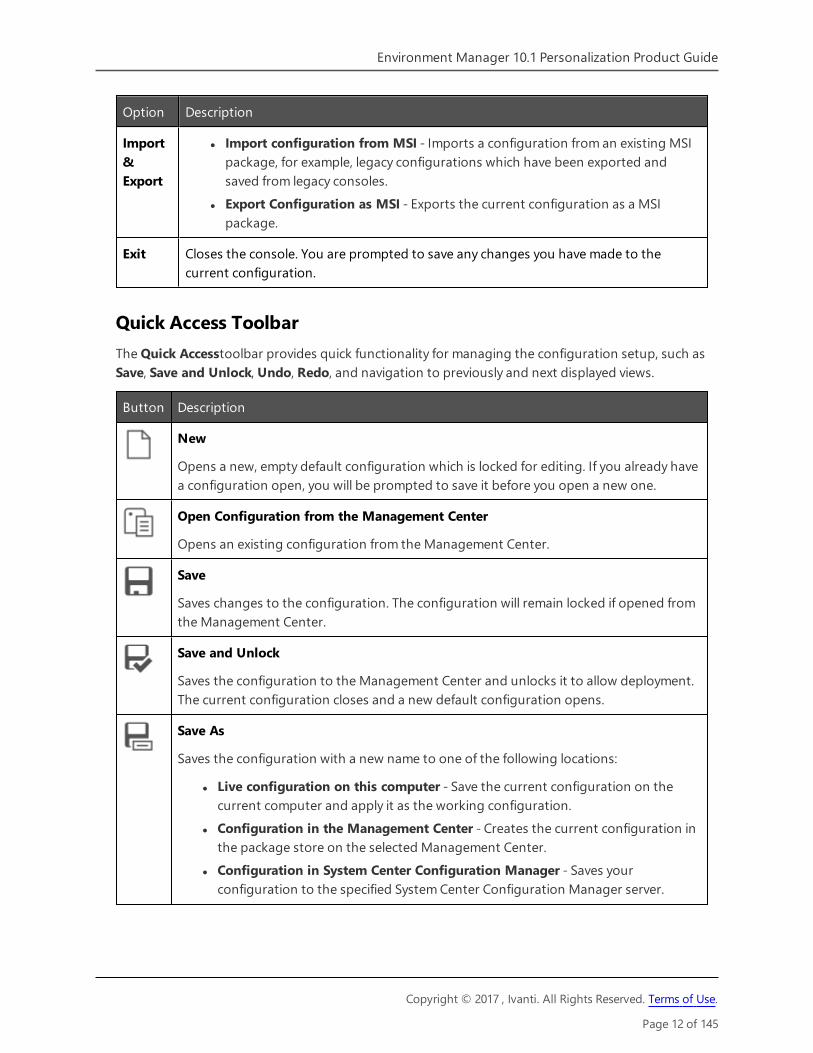
Import&Export
l Import configuration from MSI - Imports a configuration from an existing MSIpackage, for example, legacy configurations which have been exported andsaved from legacy consoles.
l Export Configuration as MSI - Exports the current configuration as a MSIpackage.
Exit Closes the console. You are prompted to save any changes you have made to thecurrent configuration.
Quick Access ToolbarThe Quick Accesstoolbar provides quick functionality for managing the configuration setup, such asSave, Save and Unlock, Undo, Redo, and navigation to previously and next displayed views.
Button Description
New
Opens a new, empty default configuration which is locked for editing. If you already havea configuration open, you will be prompted to save it before you open a new one.
Open Configuration from the Management Center
Opens an existing configuration from the Management Center.
Save
Saves changes to the configuration. The configuration will remain locked if opened fromthe Management Center.
Save and Unlock
Saves the configuration to the Management Center and unlocks it to allow deployment.The current configuration closes and a new default configuration opens.
Save As
Saves the configuration with a new name to one of the following locations:
l Live configuration on this computer - Save the current configuration on thecurrent computer and apply it as the working configuration.
l Configuration in the Management Center - Creates the current configuration inthe package store on the selected Management Center.
l Configuration in System Center Configuration Manager - Saves yourconfiguration to the specified System Center Configuration Manager server.
Copyright © 2017 , Ivanti. All Rights Reserved. Terms of Use.
Page 12 of 145

Environment Manager 10.1 Personalization Product Guide
Button Description
l Configuration file on disk - Saves the current configuration as a file on a local ornetwork drive in AEMP format.
Back and Forward
Cycle through the views you have visited in a session. For example, if you select theComputer trigger and then the User trigger, the Back button takes you to the Computertrigger and a subsequent click of the forward button, takes you to the User trigger.These are navigation tools only and do not affect the action you have performed in theconsole.
Undo
Clears the action history. Up to 20 previous actions are listed. Select the point at whichyou want to clear the actions. The action selected and all preceding actions are undone.
Redo
Re-applies the cleared action history. Up to 20 cleared actions are listed. Select the pointat which you want to redo the actions. The action selected and all preceding actions areredone.
Expand All
Expand all nodes, actions and conditions in a selected area of the console. Contextsensitive to the selected item and works in the navigation tree or the work area. Forexample, if used when the Computer trigger is highlighted, all triggers and nodes withinthe Computer trigger are fully expanded. To expand all triggers and nodes in aconfiguration, select the Environment Manager item at the top of the pane and selectExpand All. In the work area, if a condition is highlighted, all sub conditions and actionsare fully expanded.
Collapse All
Collapses all nodes, actions and conditions - works as Expand All but in reverse.
Managing the Quick Access Toolbar
The Quick Access Toolbar can be configured to add and remove functions and change its positionwithin the console:
l Right-click on a ribbon button or file menu option and select Add to Quick Access Toolbar toadd it to the Quick Access Toolbar.
l Right-click on a toolbar item and select Remove From Quick Access Toolbar to remove it.l Right click on a ribbon or the toolbar and select Show Quick Access Toolbar Below theRibbon to display the toolbar below the ribbon.
Copyright © 2017 , Ivanti. All Rights Reserved. Terms of Use.
Page 13 of 145

Environment Manager 10.1 Personalization Product Guide
Find and ReplaceEnvironment Manager configurations can be searched using text strings and regular expressions. Thewhole of the navigation tree can be searched or individual areas, such as a node or a trigger, can betargeted. Searches include all nodes, child nodes, conditions and actions in a configuration or withinthe selected area.
Find and Replace could be used, for example, to change the name of a server throughout theconfiguration, to amend the IP address of a particular endpoint or just to find where in aconfiguration a particular registry key is referenced.
Perform a Find and Replace
1. In the Edit ribbon, select Find and Replace.
The Find and Replace dialog displays. If you want to target the search, select the required areaof the configuration prior to opening the dialog. In the example below, the Computer\ProcessStarted trigger was selected. This can be changed in the dialog as explained in step 4.
2. In the Find field, enter the text to search for or the regular expression you want to use for thesearch.
3. In the In field, define which elements of the configuration you want to search -Actions,Conditions,Nodes and/or Reusable Nodes.
4. Check that theWhere field shows the path to the area of the configuration you want to search.If the path is incorrect:
o Amend the path manuallyo Delete the path to search the whole configurationo Select a previously searched path from the drop-down
5. In the Replace with field, enter the replacement text. If you are performing a search, this fieldcan be left blank.
6. Configure the find options by selecting any combination of the check boxes:o Match Case - Search for only those items which match the capitalization of the text in
the Find texto Match Whole Word - Search for only those items which match the whole word in the
Find field.o Use Regular Expressions - Return any items which match the regular expression
entered in the Find field.7. Click Find to display all items that match your search criteria.
Search Results
The search results list any item which matches the query and show where the item is found in theconfiguration.
Copyright © 2017 , Ivanti. All Rights Reserved. Terms of Use.
Page 14 of 145

Environment Manager 10.1 Personalization Product Guide
In the example below, the user has searched for "CurrentVersion". The search results include theregistry key "Software\Microsoft\Windows\CurrentVersion\Explorer". This registry key is referenced inactions found in two different triggers in the configuration. The path to each of the actions isdisplayed beneath the match.
Select a path to automatically navigate to that area of the configuration. To move to the next match,click Find Next.
If you want to replace text, select the required match and click Replace - to replace all matches clickReplace All.
Copyright © 2017 , Ivanti. All Rights Reserved. Terms of Use.
Page 15 of 145

Environment Manager 10.1 Personalization Product Guide
You can redefine a search at any time by updating the criteria and clicking Find to update the results.For example, you restrict your search to Conditions or focus the search on another area of theconfiguration.
To view or edit an action or condition in the search results, select the item and click View/Edit. Theitem opens in the relevant dialog.
Environment Manager Administrative ToolsEnvironment Manager is packaged with standalone utilities that help administrators createconfigurations and manage the Personalization Database. The tools are run independently fromEnvironment Manager and all our other products.
The Administrative Tools installer is included with the Environment Manager installation media in both32 and 64-bit versions:
l EnvironmentManagerTools32l EnvironmentManagerTools64
Once installed to the default location, the following tools are available:
l Environment Manager Monitor (EmMon)l Personalization Server Log Viewerl Environment Manager File Conversionl EMP File Utilityl EMP Migrate Utilityl EMP Migrate Command Line Utilityl EMP Registry Utilityl File Based Registry Explorer
Service PacksService Packs are self-contained packages or patches that are used to update specific files within aDesktopNow application without reinstalling the full application. Service packs can be applied moreoften and reduce the need for system restarts on your endpoints. Service packs are delivered as aWindows Installer patch (MSP) file and are often referred to as patch files.
Install a Service PackService Packs can be installed or deployed using the same technology and techniques used wheninstalling MSIs. Both Microsoft System Center and the Management Center 8 FR4 can deploy MSPs. Ifneither of these products are available, service packs can be installed using the command lineinterface.
For example, the command:msiexec.exe /p EnvironmentManagerAgent64.msp
Copyright © 2017 , Ivanti. All Rights Reserved. Terms of Use.
Page 16 of 145

Environment Manager 10.1 Personalization Product Guide
installs any files that have been amended as part of the patch for just Environment Manager 64 bitagent.
The following command installs the base version of the Environment Manager Agent (MSI) and theEnvironment Manager patch file (MSP) simultaneously:msiexec.exe /i EnvironmentManagerAgent64.msi PATCH=c:\fullpath\EnvironmentManagerAgent64.msp
A base version must be installed before the patch file can be applied.
If the patch file contains driver or hook files that are currently in use on the machine the patch is beingapplied to, you are informed that a reboot is required. If you chose to continue, the system is restartedwhen the patch has been applied.
For information on installing and upgrading service packs using Management Center, see theDesktopNow Install and Configure Guide.
Installation Order and Dependencies
It is recommended that all components of a service pack are installed and that thePersonalizationServerXX.MSP is installed first. All other components have no required install order.
Roll back a Service PackYou can roll back or install service packs using either the Management Center (8 FR4 onwards) or theWindows Control Panel.
When you uninstall a service pack, the product reverts to the previous latest build - whether a servicepack or base version.
With the exception of the Personalization Server component patch file (PersonalizationServerXX.msp)All agent and console service pack components can be uninstalled.
Roll Back a Service Pack Using the Management Center
1. In the Management Center console, select Overview > Deployment Groups tab >Deployment Groups.
2. Highlight the Deployment Group and select Settings > Assigned Packages.
The Assigned Packages work area displays a list of all the products and their associatedpackages.
3. Highlight the required Environment Manager service pack and click Unassign from the Actionsmenu.
4. Click Review and Submit.
The Submit Changes dialog displays.
5. Check the details are correct and click Submit.
Copyright © 2017 , Ivanti. All Rights Reserved. Terms of Use.
Page 17 of 145

Environment Manager 10.1 Personalization Product Guide
The patch is unassigned based on the deployment group Installation Schedule.
Roll Back a Service Pack Using the Windows Control Panel
From the Control Panel select Programs and Features and uninstall the required patch.
Best Practices for ConfigurationThis section outlines the key points for consideration when setting up your Environment Managerconfiguration.
Mandatory vs Local ProfilesDuring design and implementation stages, consideration should be given to the type of profile whichneeds to be used as the base to be loaded for the user before Environment Manager Personalizationoverlays the user’s actual settings.
Typically, Mandatory profiles are used which are very light weight and contribute to faster logon timesfor users. This profile is ideal for environments where all users are accessing devices which arepermanently online.
If users also use laptops to work offline, then you need to look at how their account is managed whenthe laptop is offline; do they:
l Use an Active Directory account?
l Use a Local Profile and provide Active Directory credentials when accessing company resources?
In these instances, it may be easier to leave the user profile path within Active Directory blank andallow users to load a local profile as a base. The cached copy of the local profile must be deleted usingthe Microsoft utility, DELPROF.
Another solution is to create theMAN file for the Mandatory profile, placed within the location of%SYSTEMDRIVE%\Default User.
This allows two benefits:
l You do not have to specify a path within the User properties of Active Directory
l As it is a Mandatory profile, the Windows operating system will flush this automatically.
This will require some time to copy to each managed device.
Applications that use INI FilesSome applications that are used within an environment require the use of INI files or files of this typeto keep certain settings for the user.
Copyright © 2017 , Ivanti. All Rights Reserved. Terms of Use.
Page 18 of 145

Environment Manager 10.1 Personalization Product Guide
If the INI file is kept within the user’s profile this is typically not a problem for Environment ManagerPersonalization.
When the INI file is not kept within the user’s profile, but in another location, for example,C:\Windows, then you may not want Environment Manager Personalization to capture informationfrom this location, due to the nature and the amount of files in that location.
At this point, you can use Environment Manager Policy actions to copy down the file or folder to thelocation during either a Logon or a Process Start trigger for the application and then copy the file orfolder back up to the user’s home directory during a Logoff or Process Stop trigger.
Personalization Membership PerformanceEach condition evaluates matches and queries at different speeds providing different response times.These differences could be due to some conditions evaluating against local data and thereforeproviding rapid response times. Other conditions may require connection to the network therebyincreasing response times and relying on connection speeds.
The conditions in the tables below have been rated by performance speed for carrying out matchesand queries. By creating configurations with these response times in mind, performance can beoptimized. For example, if a configuration contains OR conditions, place them in order of responsetime with the quickest evaluating first. If the first condition matches, the configuration is not held upby the slower response time of the second condition.
Directory Services Expressions
Condition Match Query
Site Membership Fast N/A
Computer OU Membership Slow Slow
User OU Membership Slow Slow
User Expressions
Condition Match Query
Is Administrator Fast N/A
User Name Fast Fast
User Group Name Fast Medium
Copyright © 2017 , Ivanti. All Rights Reserved. Terms of Use.
Page 19 of 145

Environment Manager 10.1 Personalization Product Guide
Computer Expressions
Condition Match Query
Computer IP Address Fast Fast
Computer DomainMembership
Fast Fast
Computer NETBios Name Fast Fast
Computer Group Fast Medium
Computer Name Slow Slow
Enabling Reverse DNS Lookup on the server increases the performance of the ComputerName condition.
Printer Settings for PersonalizationIf printer settings are required to be kept by the user, then the following keys need to be added toWindows Settings within the Personalization Server:
HKEY_CURRENT_USER\Printers
HKEY_CURRENT_USER\Software\Microsoft\Windows NT\CurrentVersion\Devices
HKEY_CURRENT_USER\Software\Microsoft\Windows NT\CurrentVersion\Windows
Masquerading ApplicationsTo enable managed applications to share user Personalization settings, it is necessary to create anapplication group. For example, this could be a Microsoft Office group containing Word, Excel,Outlook and PowerPoint.
It may, however, be useful to use a Masquerading Application to allow an application access toanother application’s personalization data without having to create an application group. Forexample, running mlcfg32.cpl against Outlook’s personalization data to view its registry settings onthe client.
To do this, create an entry in the Advanced Settings dialog:
l Name:MasqueradingApps
l Value: rundll32.exe;office12\mlcfg32.cpl;outlook.exe;12.0.0.0:
This value equates to:
<RealExe>;<RealExe Commandline>;<TargetExe>;<TargetExeVersion>:
For this example, mlcfg32.cpl is grouped with Outlook to share its personalization data.
Copyright © 2017 , Ivanti. All Rights Reserved. Terms of Use.
Page 20 of 145

Environment Manager 10.1 Personalization Product Guide
<TargetExeVersion> matches the version configured in the database for Outlook. If it is set toa wildcard (.*), any version can be supplied here.These entries can be chained together to provide multiple settings.
Client Specific MasqueradingThe MasqueradingApps setting is global and as such, applies on all managed end-point devices.However, to achieve the same behavior, applications can be launched on individual client machineswith a special command-line argument: /APPSENSESPECIAL.
The syntax on the client is:
<RealExe> /appsensespecial:<TargetExe>:<TargetExeVersion>
Some applications such as regedit.exe, do not work correctly with extra command-line arguments.These applications should be launched using a command shell which has been run with theAPPSENSESPECIAL switch.
For example, cmd.exe /appsensespecial:notepad.exe:1.0.0.0 would launch with the command shellsharing the personalization settings of Notepad. Regedit.exe can now be launched from within thecommand shell and will have access to Notepad’s settings.
In the above scenario, ensure that regedit.exe is not already defined as a managedapplication or blacklisted.There should be no other instances of cmd.exe or regedit.exe running.
Create Personalization Caches Based on Environment VariablesThe Advanced setting,MasqueradeAppByEnvVar allows the Personalization cache used by EnvironmentManager to be changed based on the existence of an environment variable on the end point.
This allows greater flexibility where Personalization is required for the same version of an application,across multiple machines where one instance of the application is using different plug-ins.
For example, if Microsoft Excel 2007 is run on three Windows 7 devices, by design it would sharePersonalization settings between all three. If one of those devices was running different plug-ins tothe others, it could be useful for this version of Excel to use separate Personalization settings.
Configure Personalization Caches Based on Environment Variables
The following steps show how to configure the user interface using the Excel scenario.
1. Create the following entry in the Advanced Settings dialog:
o Name:MasqueradeAppByEnvVaro Value: TargetExe>%ENV_VAR%
Copyright © 2017 , Ivanti. All Rights Reserved. Terms of Use.
Page 21 of 145

Environment Manager 10.1 Personalization Product Guide
For the Excel scenario, the value would be Excel.exe>%MASQ%.
MASQ is an environment variable set on the client.
2. Create the following managed applications:
Name Executable OS RegEx Version RegEx
Excel Excel.exe .* .*
Excel MASQ Excel.exe.masq .* .*
The Excel.exe.masq executable entry provides an alternative to excel.exe using a different cache toallow separate Personalization to be used for the same application.
Client Configuration
Add the environment variable calledMASQ with a value ofmasq.
When Excel is run, its Personalization settings go into a cache called ExcelMASQ.
If the MASQ variable is removed, Excel settings will go into a cache called Excel.
Wildcards and Regular ExpressionsThis section contains examples of wildcards and regular expressions and how they can be used inEnvironment Manager.
Environment Manager uses CAtIRegExp Class regular expressions.
For further information on CAtIRegExp Class regular expressions, refer to www.msdn.microsoft.com.
Expression Matches
^[a-f]+ "alice" matches because her name starts with a letter between a and f
"john" does not match because his name starts with a letter greater than f
"Alice" does not match because her name does not start with a lowercaseletter
^[a-fA-F]+ "Alice" matches because with this expression uppercase letters are allowed
[a-zA-Z]+\d\d\d$
"UserWithThreeNumbers123" matches because the user name is made upof alpha numerics followed by 3 numbers
"UserWithFourNumbers1234" does not match because the user name hasfour numbers in it
The domain name can also be specified in regular expressions. For example, appsense\\^[a-f]+matches all user names which have a first letter a to h. Without a domain name in the regularexpression, the query matches any user names which have a first letter from a to h in any domain.
Copyright © 2017 , Ivanti. All Rights Reserved. Terms of Use.
Page 22 of 145
Environment Manager 10.1 Personalization Product Guide
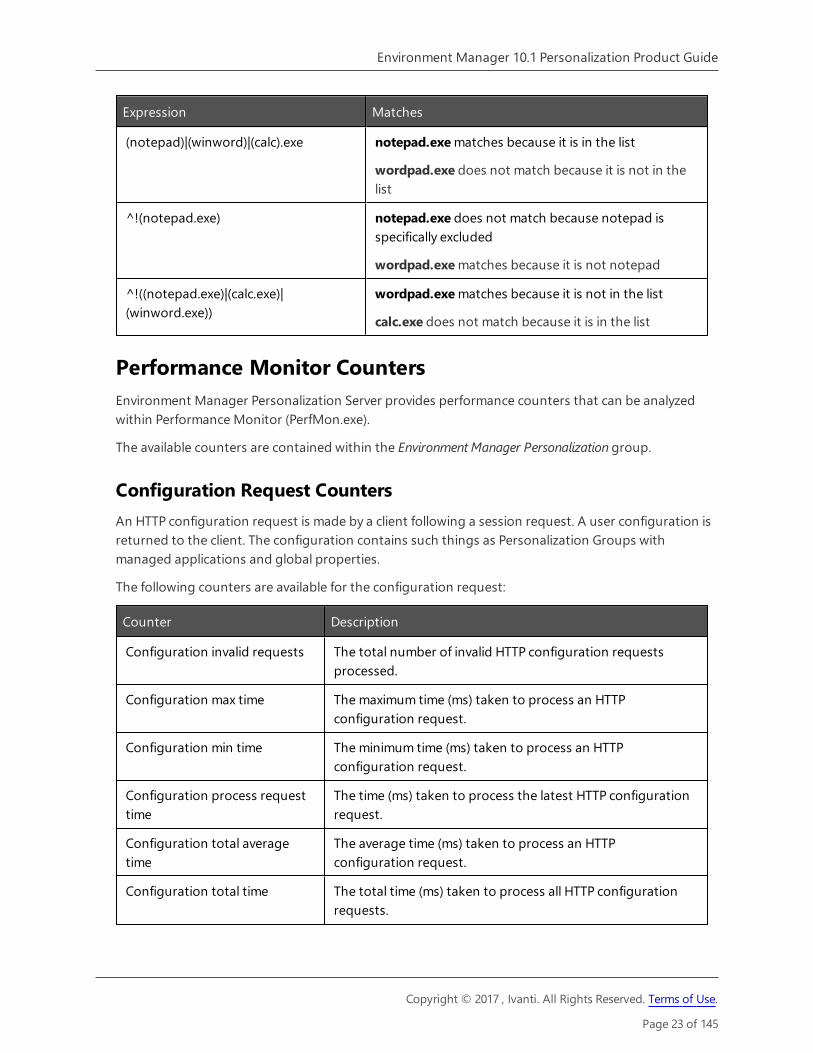
Expression Matches
(notepad)|(winword)|(calc).exe notepad.exematches because it is in the list
wordpad.exe does not match because it is not in thelist
^!(notepad.exe) notepad.exe does not match because notepad isspecifically excluded
wordpad.exematches because it is not notepad
^!((notepad.exe)|(calc.exe)|(winword.exe))
wordpad.exematches because it is not in the list
calc.exe does not match because it is in the list
Performance Monitor CountersEnvironment Manager Personalization Server provides performance counters that can be analyzedwithin Performance Monitor (PerfMon.exe).
The available counters are contained within the Environment Manager Personalization group.
Configuration Request CountersAn HTTP configuration request is made by a client following a session request. A user configuration isreturned to the client. The configuration contains such things as Personalization Groups withmanaged applications and global properties.
The following counters are available for the configuration request:
Counter Description
Configuration invalid requests The total number of invalid HTTP configuration requestsprocessed.
Configuration max time The maximum time (ms) taken to process an HTTPconfiguration request.
Configuration min time The minimum time (ms) taken to process an HTTPconfiguration request.
Configuration process requesttime
The time (ms) taken to process the latest HTTP configurationrequest.
Configuration total averagetime
The average time (ms) taken to process an HTTPconfiguration request.
Configuration total time The total time (ms) taken to process all HTTP configurationrequests.
Copyright © 2017 , Ivanti. All Rights Reserved. Terms of Use.
Page 23 of 145

Environment Manager 10.1 Personalization Product Guide
Counter Description
Configurations per second The number of HTTP configuration requests processed persecond.
Configurations total failed The total number of failed HTTP configuration requestsprocessed.
Configuration total succeeded The total number of successful HTTP configuration requestsprocessed.
Session Request CountersAn HTTP session request is made by a client following user logon. The server determines the user sitemembership and returns a list of server URLs to use for subsequent configuration andsynchronization requests.
The following counters are available for the session request:
Counter Description
Session invalid requests The total number of invalid HTTP session requests processed.
Session max time The maximum time (ms) taken to process an HTTP sessionrequest.
Session min time The minimum time (ms) taken to process an HTTP sessionrequest.
Session process request time The time (ms) taken to process the latest HTTP sessionrequest.
Session total average time The average time (ms) taken to process an HTTP sessionrequest.
Session total time The total time (ms) taken to process all HTTP session requests.
Session per second The number of HTTP session requests processed per second.
Session total failed The total number of failed HTTP session requests processed.
Session total succeeded The total number of successful HTTP session requestsprocessed.
Synchronization Request CountersAn HTTP synchronization request is made by a client following an application start or stop and is usedto synchronize personalization data to or from the server. Windows settings and otherpersonalization data may also be synchronized using this request at logon/logoff.
Copyright © 2017 , Ivanti. All Rights Reserved. Terms of Use.
Page 24 of 145
Environment Manager 10.1 Personalization Product Guide
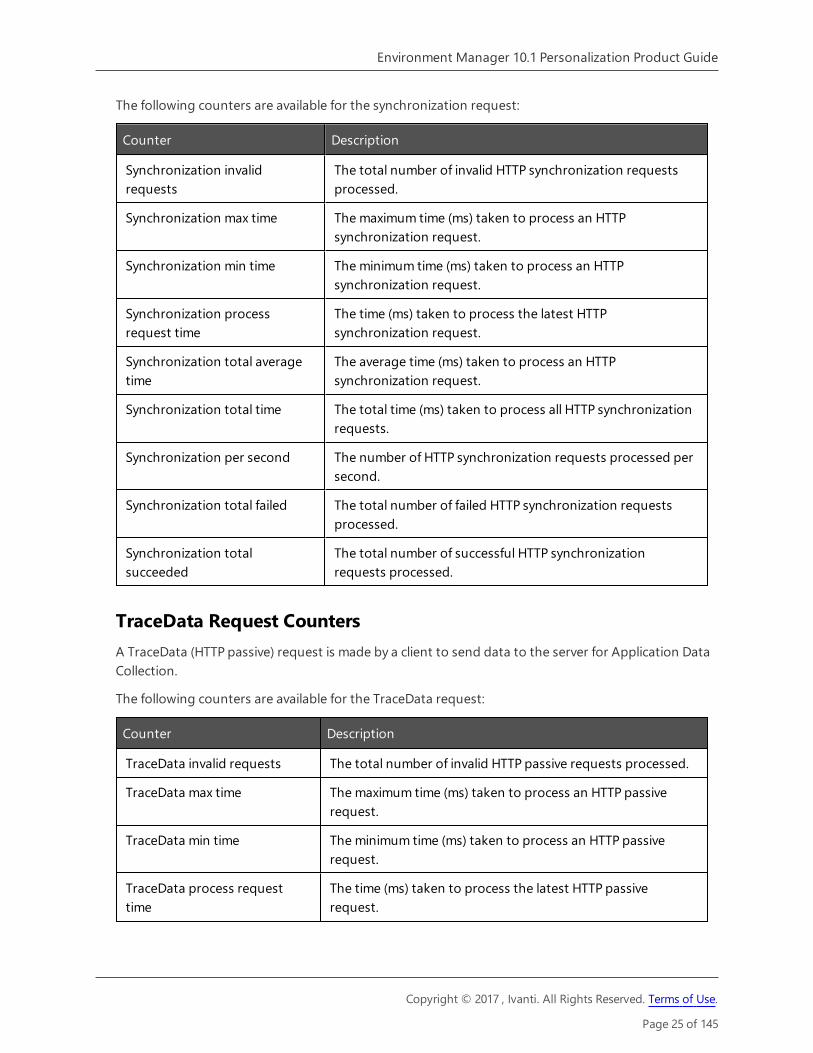
The following counters are available for the synchronization request:
Counter Description
Synchronization invalidrequests
The total number of invalid HTTP synchronization requestsprocessed.
Synchronization max time The maximum time (ms) taken to process an HTTPsynchronization request.
Synchronization min time The minimum time (ms) taken to process an HTTPsynchronization request.
Synchronization processrequest time
The time (ms) taken to process the latest HTTPsynchronization request.
Synchronization total averagetime
The average time (ms) taken to process an HTTPsynchronization request.
Synchronization total time The total time (ms) taken to process all HTTP synchronizationrequests.
Synchronization per second The number of HTTP synchronization requests processed persecond.
Synchronization total failed The total number of failed HTTP synchronization requestsprocessed.
Synchronization totalsucceeded
The total number of successful HTTP synchronizationrequests processed.
TraceData Request CountersA TraceData (HTTP passive) request is made by a client to send data to the server for Application DataCollection.
The following counters are available for the TraceData request:
Counter Description
TraceData invalid requests The total number of invalid HTTP passive requests processed.
TraceData max time The maximum time (ms) taken to process an HTTP passiverequest.
TraceData min time The minimum time (ms) taken to process an HTTP passiverequest.
TraceData process requesttime
The time (ms) taken to process the latest HTTP passiverequest.
Copyright © 2017 , Ivanti. All Rights Reserved. Terms of Use.
Page 25 of 145

Environment Manager 10.1 Personalization Product Guide
Counter Description
TraceData total average time The average time (ms) taken to process an HTTP passiverequest.
TraceData total time The total time (ms) taken to process all HTTP passive requests.
TraceData per second The number of HTTP passive requests processed per second.
TraceData total failed The total number of failed HTTP passive requests processed.
TraceData total succeeded The total number of successful HTTP passive requestsprocessed.
Copyright © 2017 , Ivanti. All Rights Reserved. Terms of Use.
Page 26 of 145

Environment Manager 10.1 Personalization Product Guide
About User PersonalizationUser Personalization captures application and desktop changes to a central database and reappliesthem for the user upon logon or application start, regardless of operating system or deliverymechanism.
Changes made to an application are synchronized when the application starts or stops. This enableschanges to be shared between multiple sessions simultaneously, without the need to log off.
Windows Settings, such as wallpaper, keyboard and mouse preferences are managed when the userlogs on and off.
User Personalization enables applications to be discovered and settings managed with minimumconfiguration.
When a log on request is received from a client endpoint, the Personalization Server uses rulesconfigured in the database to determine who the user is in order to provide the correct configurationbased on that user’s personalization group.
The configuration retrieved by the client session from the database at logon determines whichapplications are managed and the data that is to be virtualized. If a user who is not matched bypersonalization group membership rules logs on to the system, they are assigned to the defaultgroup and managed according to this group’s settings.
An Excluded Users personalization group can be created for users who do not requirepersonalization. By creating a personalization group in which no applications or settings aremanaged, users matching the membership rules are removed from all user personalizationmanagement.
If a known user logs on without any applications configured, no applications are managed.
User Personalization does not work with the Run as command. Personalization relies on auser’s logon credentials to determine which applications are managed. Therefore, if a userruns an application as Administrator or other user, that application is not personalized.
User Personalization requires a live connection to the SQL database which means that changes to theconfiguration in the Environment Manager console, are immediately committed to the database -unless working offline. The changes are reflected on endpoints when the local configuration isupdated; at logon, configuration poll (default time of 10 minutes) or when the EM User VirtualizationService is started.
By default, User Personalization data is archived on a daily basis enabling application and WindowsSettings to be rolled back to previous states, in the event of profile inconsistencies.
The Personalization Analysis tool is also provided which enables the administrator to monitor whichapplications are being controlled by Environment Manager, including how much data is being storedfor each user and application.
Copyright © 2017 , Ivanti. All Rights Reserved. Terms of Use.
Page 27 of 145

Environment Manager 10.1 Personalization Product Guide
Designing and Implementing Environment ManagerPersonalizationThe following points are recommendations for the design and implementation of EnvironmentManager User Personalization.
l Install the Personalization Database and Personalization Server on separate devices (physical orvirtual).
l Where possible, install the Personalization Database with High Availability in mind. Typically forthis, clustering of the Microsoft SQL Server is recommended.
l When required, Personalization Servers will support Network Load Balancing being placed infront of the servers.
l For multiple Environment Manager sites or data centers, it is recommended thatPersonalization Servers and Databases are installed on these sites and local clients pointed totheir local Personalization Server and Databases. This reduces performance issues across WANlinks.
Setting Up a Personalization ConfigurationThe following steps outline how to create a basic configuration to manage and migrate existing userdata into the Personalization database.
Step 1 Add Personalization Groups
Create the Personalization Groups required for your organization and add membership rules torepresent your users.
See Personalization Groups.
Step 2 Configure Application Data Collection
Enable Application Data Collection to passively gather registry and folder usage data for theapplications your users have run.
It is recommended that Application Data Collection is disabled when no longer required.
See Application Data Collection.
Step 3 Add Application Groups and Windows Settings Groups
Use the collected data to create managed Application Groups to manage the applications within yourorganization.
Add Windows Settings Groups to manage the settings users apply to their endpoints.
See Application Personalization and Windows Personalization.
Copyright © 2017 , Ivanti. All Rights Reserved. Terms of Use.
Page 28 of 145

Environment Manager 10.1 Personalization Product Guide
Step 4 Enable Profile Migration
Use Profile Migration to import data from existing user profiles.
See Profile Migration.
User Personalization ArchitectureEnvironment Manager User Personalization utilizes a three tier architecture.
IntroductionCollectively, the components of the standard architecture are known as a site. Sites provide a logicalgrouping of users; for example, by area of business or geographical location. For organizations withmore than one site, the same architecture is used for each site, linked via their SQL servers throughreplication.
It is not a requirement that each branch site has a dedicated SQL server. However,performance is improved as traffic is contained within the Local Area Network (LAN) and doesnot have to travel across the Wide Area Network (WAN).
In the diagram below, the system consists of two sites; the default site and an optional branch site.
The client endpoints on a site communicate with their Personalization Server every time one of thefollowing events occurs:
Copyright © 2017 , Ivanti. All Rights Reserved. Terms of Use.
Page 29 of 145

Environment Manager 10.1 Personalization Product Guide
l Logon - When a user logs onto a managed endpoint, the Environment Manager Package(AEMP) file is loaded. If user personalization is enabled, the user is connected to thePersonalization Server detailed in the configuration. User, endpoint and software versiondetails are passed from the endpoint to the server which determines the site andpersonalization group that the user belongs to. A personalization configuration is passed backto the client on the managed endpoint by the Personalization Server. This configuration filedescribes the personalization settings for the user and includes details of managedapplications and certificates for the user.
Windows Settings are synchronized and applied to the endpoint to complete the userpersonalization logon.
l Application Start - When a user launches an application on the endpoint, it is paused briefly toallow Environment Manager to perform the required virtualization actions.
Details of the application are analyzed and Environment Manager checks to see if UserPersonalization is enabled and that the application should be managed. For non-managedapplications, any policy configuration actions are applied and the application continueswithout User Personalization settings being managed.
For those applications which are managed, a configuration file specific to the application iscreated which details the file and registry inclusions, exclusions and a subset of the GlobalProperties as configured in the User Personalization database.
Environment Manager Policy Configuration is notified of the start of the process and anyrelevant Policy actions are replicated on the virtual cache.Whilst the application is running and the user continues to change user personalizationsettings within it, any changes are virtualized and written to the personalization cache on theendpoint, rather than into the physical registry or file system.
For application groups configured in Environment Manager, the Personalization database isonly synchronized when the first application in the group is started. Synchronization is notperformed when the other applications in the group are launched.
l Application Stop - When an application is closed, the Personalization Server is notified and acopy of any modified personalization settings is stored in the SQL database. If the process is thelast within a group to exit, or the last instance of a managed process of similar applications,synchronization of the cache occurs back to the server.
If an application is closed when other applications in the same application group are still open,synchronization to the database is not performed. Only when the last application in the groupis closed is the database synchronized.
For more information see Application Groups.
Copyright © 2017 , Ivanti. All Rights Reserved. Terms of Use.
Page 30 of 145

Environment Manager 10.1 Personalization Product Guide
l Logoff - When a user logs off any managed applications still running are stopped by Windowsand the logoff completes as normal before the Environment Manager logoff screen displays.The application, desktop and certificate settings are synchronized with the database and thelocal virtual cache is cleared. Once this is complete the Environment Manager logoff screen isremoved from display and the Windows logoff is completed as normal.
If Local Cache is enabled, the local virtual cache is not cleared to enable the user to maintaintheir settings once disconnected from the corporate network.
l Configuration Poll - Changes can be made to user personalization configurations byadministrators whilst users are logged on. A configuration poll is performed at a predefinedinterval which picks up any configuration changes and applies them to the managedendpoints. The polling interval is set in the console using the Advanced Settings.
The virtual cache on the endpoint is the root folder for all User Personalization data where virtualizedfiles and registry settings are stored prior to synchronization with the Personalization database. Thedata for each setting and managed application is stored here and kept up to date by synchronizationwith the Personalization database.
The virtual cache is a hidden folder located at C:\AppSenseVirtual on every managed endpoint.
Each of the above events creates a synchronize request where the client ensures that the local virtualcache is up to date with the SQL database. Every time an application starts or stops, the softwareensures that the SQL database and local virtual cache are synchronized.
Copyright © 2017 , Ivanti. All Rights Reserved. Terms of Use.
Page 31 of 145

Environment Manager 10.1 Personalization Product Guide
Tier 1 - Client EndpointThe client endpoint hosts the user’s logon session. Within the session is the Environment Managersoftware containing the User Personalization modules which monitor changes that the user makes tomanaged applications and communicates these back to the Personalization Server.
The client endpoints can be any combination of hardware and software that is capable of running awindows session:
l Standalone desktops, laptops and tablet PCsl Terminal Serversl Microsoft Hyper-V
Tier 2 - Personalization ServerThe Personalization Server is implemented as an Internet Information Services (IIS) Website and actsas the broker between the endpoints and the Personalization database. It enables access to thedatabase from multiple clients to be controlled from one place. The Personalization Server can verifythe identity of the clients before processing requests so clients do not need to be added as users tothe database.
Status Request
To test whether a Personalization Server is installed, running and to test the database connection,enter the following URL in your internet browser, replacing <SERVER> with the name of the requiredserver.
http://<SERVER>/PersonalizationServer/
The status.aspx file for a server shows whether the server connection was successful and furtherdetails about the connection, database and server.
Copyright © 2017 , Ivanti. All Rights Reserved. Terms of Use.
Page 32 of 145

Environment Manager 10.1 Personalization Product Guide
Load Balancing Status Request
If using a load balancer monitor to check the server status page (status.aspx) where the server is setto Windows Authentication, the monitor must provide Windows credentials in the HTTP headers orthe server will respond with an "unauthorized" reply. As an alternative, use one of the followingmethods, appropriate to your setup should be used.
To check the health of load balanced servers use the following methods, appropriate to your setup.
IIS7 - Windows Server 2008 and R2
Use the following URLs in an internet browser, replacing <SERVER> with the name of the requiredserver:
l http://<SERVER>/PersonalizationServer/dbmonitor.aspx - Checks the connection with thedatabase. Returns "OK" if the database can be contacted and "FAIL" if it cannot.
l http://<SERVER>/PersonalizationServer/pingmonitor.aspx - Checks whether thepersonalization server address is reachable returning "OK" if successful. No response indicatesan error.
Copyright © 2017 , Ivanti. All Rights Reserved. Terms of Use.
Page 33 of 145

Environment Manager 10.1 Personalization Product Guide
IIS6 - Windows Server 2003
For IIS6, the SetMonitorAnonymousIIS6.vbs script must be used to set up dbmonitor.aspx andpingmonitor.aspx for anonymous access. For further details, contact Support.
Tier 3 - SQL ServerHolds information related to personalization sites and servers, users and groups, applications,endpoint configuration data and user personalization data.
Personalization Server data is organized and stored in tables on the SQL server in the following logicalgroupings:
l Personalization Data - Contains data relating to the user, including group membership detailsand controls the data for managed applications. Application data is updated here each time amanaged application is opened or closed.
l Site Membership - Houses the Site Membership information which communicates details ofwhich Personalization Server the user should be connected to. Once connected, configurationinformation is retrieved including details of includes and excludes for registry items and folders.
l User Group Assignment - Defines the group to which a user belongs which in turn controlswhich applications are managed for the user in addition to their Windows Settings.
l Authorized Users - Contains tables which control who is authorized to connect to thePersonalization Server and what they are able to do when connected.
l Archiving - Stores the archive data from the Daily and Demand archiving SQL Agent jobs in twotables relating to Application Profile and Application Data archives.
l Auditing - Used to setup and configure the auditing events that are raised internally andcontrol what and to where, events are raised. From this, the required alerts and reports aregenerated by the Management Center.
See the Management Center Product help for further information.
l Managed Application Settings - Contains details of all registry and folder include and excludepaths for each application and application group.
l General Settings - Contains system and user defined global properties for key and valuepairing including console version, timeouts and archiving information. Installation informationincluding an upgrade history and is maintained by the AppSense System Configuration Utility,is also stored here.
Configure Personalization ServersTo configure a personalization server, you must first establish a connection. Once connected you cancreate a configuration to control personalization for you enterprise. A list of servers can then becreated to manage which servers your managed users connect to.
Copyright © 2017 , Ivanti. All Rights Reserved. Terms of Use.
Page 34 of 145

Environment Manager 10.1 Personalization Product Guide
For details about configuring Personalization Servers, see the Server Configuration Portal help.
ConnectionIn order to configure personalization for your users, you must first establish a connection to aPersonalization Server. The Connect button allows you to list one or more Personalization Servers andconnect to the required one.
To configure Personalization, localhost is automatically added to the Select Personalization Serverdialog if the following conditions are true:
l A Personalization Server is installed and configured on the same machine as the console.l A Personalization Server has not previously been configured in the Select Personalization Server
dialog
Connect to a Personalization Server
1. Select the User Personalization navigation button.
2. From the Server ribbon, click Connect.
The Select Personalization Server dialog displays.
Copyright © 2017 , Ivanti. All Rights Reserved. Terms of Use.
Page 35 of 145

Environment Manager 10.1 Personalization Product Guide
3. Click the new server button .
The Add Server dialog displays.
4. Enter a Friendly Name for the server. This can be any text but should be something which willenable you to identify the server. If no text is entered, the server name is used.
5. Select the required protocol - http or https.6. Enter the server name or browse for the required server by specifying locations and searching
for server names.
7. Enter the port number. The port range for Personalization servers is 7771 to 7790 and thedefault port is 7771.
Once the server details have been added, the URL for the server is displayed.
8. Click Add.
The server is listed in the Select Personalization Server dialog.
9. Repeat steps 2 to 6 to add more servers.
Servers in the list can have their details edited or be deleted from the list using the buttons atthe top of the dialog.
10. Select the server you want to connect to and click Connect.
When you return to this dialog, any servers you have listed are available for selection.
Copyright © 2017 , Ivanti. All Rights Reserved. Terms of Use.
Page 36 of 145

Environment Manager 10.1 Personalization Product Guide
Personalization Servers in the Combined Console
This feature is only available in the combined console. In the Personalization console, theserver list is configured using the Endpoint Server List.
When creating an AEMP configuration in the combined console, a list of personalization servers canbe configured. When the configuration is pushed out to endpoints it determines whether endpointsare personalized and if they are, to which server they will connect. It is recommended that multiplepersonalization servers are listed so alternative servers can be automatically selected for failoverpurposes.
The first time a user logs on to a managed endpoint, the Environment Manager agent contacts thefirst Personalization Server to request the actual list of servers the endpoint should use (based on thesites configured in the database). The client then contacts the correct server to pull down the UserPersonalization configuration, containing the list of the applications which should be personalized forthe user.
If all attempts to connect to a Personalization Server fail, then the configuration is not downloadedand Personalization does not take place.
If no servers are configured, endpoints managed by this configuration are not personalized.
To cater for such a scenario it is recommended that the 9661 - Timeout Communicating withPersonalization Server auditing event is enabled.
Configure a Personalization Server List
1. Select the Policy Configuration navigation button.
2. From the Manage tab select Personalization Servers.
The Configure Personalization Servers dialog displays.
3. Click the add server button .
The Add Server dialog displays.
4. Enter the server name or click the ellipsis to search for the required server by specifyinglocations and searching for server names.
Do not select or enter Localhost as the server name. If Localhost is entered as theserver name it is added to the configuration.aemp file as the location of thePersonalization Server. The client tries connecting to http://localhost/Personalizationwhich is incorrect and User Personalization is disabled.
5. Enter a Friendly Name for the server. This can be any text but should be something which willenable you to identify the server. If no text is entered, the server name is used.
6. Select the required protocol - http or https.
Copyright © 2017 , Ivanti. All Rights Reserved. Terms of Use.
Page 37 of 145

Environment Manager 10.1 Personalization Product Guide
7. Enter the server name or browse for the required server by specifying locations and searchingfor server names.
8. Enter a port number. The port range for Personalization servers is 7771 to 7790 and the defaultport is 7771.
Once the server details have been added, the URL for the server is displayed.
9. Click OK.
The server is listed in the Select Personalization Server dialog.
10. Repeat steps 3 to 9 to add more servers.
Servers in the list can have their details edited or be deleted from the list using the buttons atthe top of the dialog.
11. If you have added more than one server, use the arrow buttons to reorder the list. When theconfiguration is deployed, endpoints attempt to connect to each server in turn. If a connectioncannot be made with any server in the list, Personalization does not occur.
12. Click OK to save the server list.
When the configuration is deployed to endpoints, this list is used to determine which serversmanaged users connect to.
Personalization Servers in the Personalization ConsoleThis feature is only available in the Personalization console. In the combined console, the server list isconfigured in the Policy side of the console using the Personalization Servers option from the Manageribbon.
The Endpoint Server List allows you to create an AEMP configuration file containing thePersonalization Servers to which endpoints can connect.
It is recommended that, where possible, multiple servers are added to the Select PersonalizationServer dialog so alternative servers can be connected to for failover purposes.
Environment Manager supports SQL 2012 Always-On functionality.
Copyright © 2017 , Ivanti. All Rights Reserved. Terms of Use.
Page 38 of 145

Environment Manager 10.1 Personalization Product Guide
When a user logs on to a managed endpoint, an attempt is made to connect to the first server on thelist. If a connection cannot be made to that server, connection with the next server in the list isattempted and so on until a connection is established.
If all attempts to connect to a server fail, personalization does not take place.An AEMP configuration created from the Endpoint Server List in the Personalization console can beopened and edited in the combined console.
Likewise, an AEMP configuration with configured servers, created in the combined console, can beopened and edited in the Endpoint Server List in the Personalization console.
You cannot upgrade policy configurations in the Personalization only console. policy configurationscan only be upgraded in the combined Policy only consoles.
Configure and Save a Personalization Server List
1. Open the Environment Manager Personalization console.
2. From the Server ribbon, click Endpoint ServerList.
The Personalization configuration dialog displays.
3. Click the new server button . The Add Server dialog displays.
4. Enter the server name or click the ellipsis to search for the required server by specifyinglocations and searching for server names.
Do not select or enter Localhost as the server name. If Localhost is entered as theserver name it is added to the configuration file as the location of the PersonalizationServer. The client tries connecting to http://localhost/Personalization which is incorrectand User Personalization is disabled.
5. Enter a Friendly Name for the server. This can be any text but should be something which willenable you to identify the server. If no text is entered, the server name is used.
6. Select the required protocol - http or https.7. Enter the server name or browse for the required server by specifying locations and searching
for server names.
8. Enter the port number. The port range for Personalization servers is 7771 to 7790 and thedefault port is 7771.
Once the server details have been added, the URL for the server is displayed.
9. Click OK.
The server is listed in the Select Personalization Server dialog.
Copyright © 2017 , Ivanti. All Rights Reserved. Terms of Use.
Page 39 of 145

Environment Manager 10.1 Personalization Product Guide
10. Repeat steps 2 to 6 to add more servers.
Servers can have their details edited or can be deleted from the list using the buttons at the topof the dialog.
11. If you have added more than one server, use the arrow buttons to reorder the list. When theconfiguration is deployed, endpoints attempt to connect to each server in turn. If a connectioncannot be made with any server in the list, Personalization does not occur.
12. Click OK to save the server list.
When the configuration is deployed to endpoints, this list is used to determine which serversmanaged users connect to.
13. Click File and select the required save option.
Personalization Server Selection Using Group PolicyEnvironment Manager 8.3 client software allows the personalization server to be selected using grouppolicy. As detailed in the sections above, a list of personalization servers is normally specified in theconfiguration. However, this can be overridden by the group policy list.
Using group policy templates, a list of servers can be created that will be used by endpoints as a fail-over list. There is also an option to bypass the site processing on the server and use the specifiedserver directly. This provides new configuration options and offers better performance for largenumbers of users.
Group policy selection of personalization servers works even if no configuration file isdeployed to the client.
The following group policy administrative template files are supplied with the Environment ManagerPersonalization and combined consoles:
l AppSensePersonalizationServers.admxl AppSensePersonalizationServers.admll AppSensePersonalizationServers.adm
Upgrades for Endpoints with Personalization Applied by Group PolicyIf an endpoint with an 8.2 configuration file without personalization servers, is upgraded tosoftware version 8.3 or later, the configuration file should be upgraded by loading it into theconsole and saving it out again. Errors are not generated if the configuration file is notupdated but policy actions will not be applied to managed processes.
Copyright © 2017 , Ivanti. All Rights Reserved. Terms of Use.
Page 40 of 145

Environment Manager 10.1 Personalization Product Guide
Configure a Personalization Server List with Group Policy
1. Navigate to the Group Policy folder:
C:\Program Files\AppSense\Environment Manager\Console\Templates\Group Policy
This is the default installation file path. If you have installed to an alternative location, find theGroup Policy folder in you install location.
2. Complete the setup action for your operating system:
o Copy the AppSensePersonalizationServers.admx file to:
C:\Windows\PolicyDefinitions (where C:\Windows is the system root).
o Copy the AppSensePersonalizationServers.adml file to:
C:\Windows\PolicyDefinitions\en-US (where C:\Windows is the system root).
3. Open Group Policy Editor. Policy templates are available for user and computer policies. Userpolicies can be tailored to individual users and computer policies apply to the endpoint.
4. Select Administrative Templates > AppSense > Environment Manager for either the user orcomputer policy.
5. Select the required option:
o Specify list of personalization servers - Specify a list of personalization servers forendpoints to connect to and use as a failover list. The AEMP configuration server list isoverridden by the list created.
Select Enabled and enter the required server name(s). Each server must be preceded byhttp:// and where more than one server is required, separated by a comma. For example,http://server1,https://server2,http://server3:3000.
o Bypass server site processing - Normally, initial contact is made with the server listed inthe AEMP file. Once contact is made, the database rules are evaluated to determinewhich server the client should connect to. Enabling this option means clients ignore thedatabase site rules and connect directly to the server determined by Group Policy.
Select Enabled to bypass server site processing.
6. Click OK to save your settings and update personalization server selection to use group policy.
Evaluation Order
When deciding which server to connect to, the following evaluation order is used:
1. User Policy2. Computer Policy3. AEMP File
Copyright © 2017 , Ivanti. All Rights Reserved. Terms of Use.
Page 41 of 145

Environment Manager 10.1 Personalization Product Guide
Each source is evaluated in order until a server list is found; if a server is not found, evaluation movesto the next source. If no servers are found, the user is not personalized.
If a server is listed in User Policy, for example, but is unavailable, processing ends and the user is notpersonalized.
Copyright © 2017 , Ivanti. All Rights Reserved. Terms of Use.
Page 42 of 145

Environment Manager 10.1 Personalization Product Guide
Personalization Servers PolicyEnabling User Personalization is a policy decision and the setting is configured within the PolicyConfiguration side of the console. It is the deployed configuration which determines whethermanaged endpoints are subject to User Personalization and to which server endpoints connect.
It is recommended that multiple servers and/or virtual hosts are added to the Select PersonalizationServer dialog so alternative servers can be easily selected for failover purposes.
Deploy the policy configuration that contains a list of Personalization Servers to the endpointssending the configuration.aemp to managed computers. The first time a user logs on to a managedendpoint, the Environment Manager agent contacts the first personalization server to request theactual list of servers the endpoint should use (based on the sites configured in the database). Theclient then contacts the correct server to pull down the User Personalization configuration, containingthe list of the applications which should be personalized for the user.
If all attempts to connect to a Personalization Server fail, then the User Personalization configurationis not downloaded and User Personalization does not take place.
For details about configuring Personalization Servers, see the Server Configuration Portal help.
To cater for such a scenario it is recommended that the 9661 - Timeout Communicating withPersonalization Server auditing event is enabled.
Configure a Personalization Servers List1. Select the Policy Configuration navigation button.
2. From the Manage tab select Personalization Servers.
The Configure Personalization Servers dialog displays.
3. Click the add server button .
The Add Server dialog displays.
4. Enter the server name or click the ellipsis to search for the required server by specifyinglocations and searching for server names.
Do not select or enter Localhost as the server name. If Localhost is entered as theserver name it is added to the configuration.aemp file as the location of thePersonalization Server. The client tries connecting to http://localhost/Personalizationwhich is incorrect and User Personalization is disabled.
5. Enter a Friendly Name for the server. This can be any text but should be something which willenable you to identify the server. If no text is entered, the server name is used.
6. Select the required protocol - http or https.
Copyright © 2017 , Ivanti. All Rights Reserved. Terms of Use.
Page 43 of 145

Environment Manager 10.1 Personalization Product Guide
7. Enter the server name or browse for the required server by specifying locations and searchingfor server names.
8. Enter a port number. The port range for Personalization servers is 7771 to 7790 and the defaultport is 7771.
Once the server details have been added, the URL for the server is displayed.
9. Click OK.
The server is listed in the Select Personalization Server dialog.
10. Repeat steps 3 to 9 to add more servers.
Servers in the list can have their details edited or be deleted from the list using the buttons atthe top of the dialog.
11. If you have added more than one server, use the arrow buttons to reorder the list. When theconfiguration is deployed, endpoints attempt to connect to each server in turn. If a connectioncannot be made with any server in the list, Personalization does not occur.
12. Click OK to save the server list.
When the configuration is deployed to endpoints, this list is used to determine which serversmanaged users connect to.
Copyright © 2017 , Ivanti. All Rights Reserved. Terms of Use.
Page 44 of 145
Environment Manager 10.1 Personalization Product Guide
Personalization GroupsPersonalization groups enable Environment Manager User Personalization to be configured formultiple users based on common requirements. Membership Rules, based on Environment Managerconditions, define which users are managed by the group. applications, application groups andWindows Settings groups can then be added to determine what is personalized for users in thegroup.
Settings for application discovery, syncing and caching can also be applied to further control howpersonalization is managed for the group.
Add a Personalization Group1. In the User Personalization navigation pane select Personalization Groups.
The work area displays the name and description of all existing personalization groups whichcan be accessed by double-clicking.
2. Click Add Personalization Group from the Personalization ribbon.
A new personalization group is created at the bottom of the list of personalization groups,immediately above the Default Users group.
3. Add a name for the new group and press Enter.
To rename a personalization group, highlight and click Rename Group from thePersonalization ribbon.
If changes are made to personalization group assignment, the affected users should log offand back on to pick up the changes.
Create Group Personalization Membership Rules1. In the User Personalization navigation pane select Personalization Groups.2. Select a personalization group.3. Right-click in the Membership Rules work area and select Add Condition Group from the
shortcut menu.
Copyright © 2017 , Ivanti. All Rights Reserved. Terms of Use.
Page 45 of 145
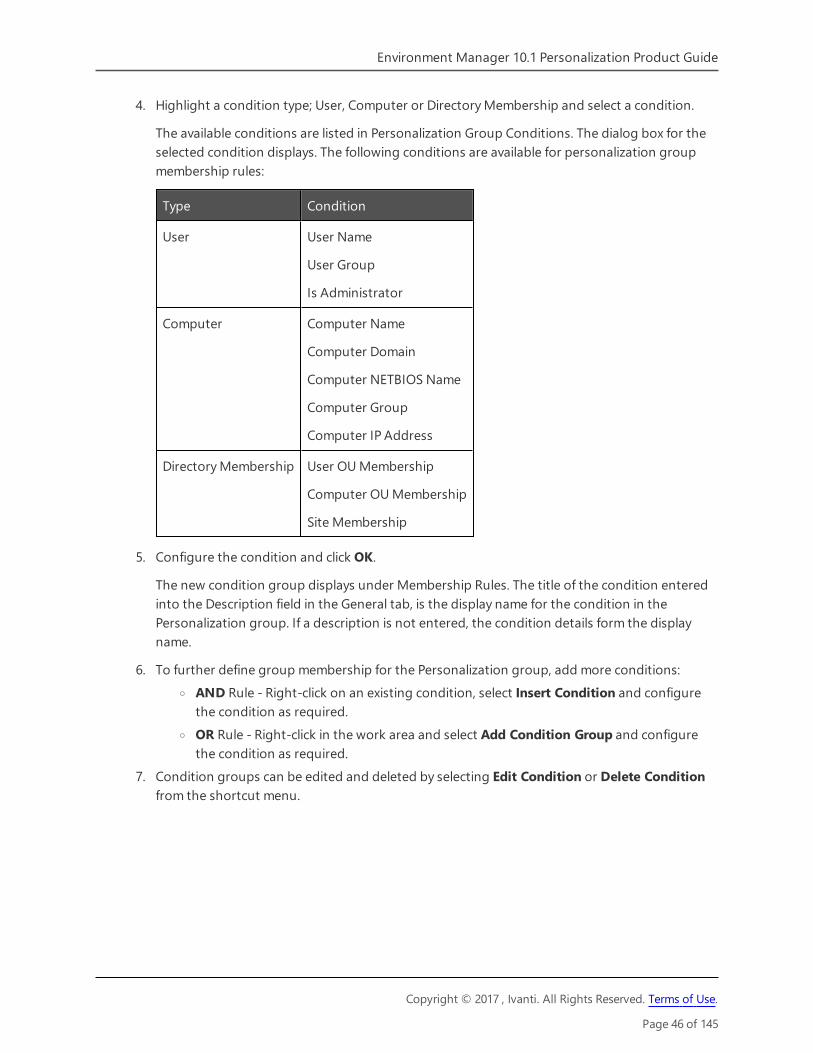
Environment Manager 10.1 Personalization Product Guide
4. Highlight a condition type; User, Computer or Directory Membership and select a condition.
The available conditions are listed in Personalization Group Conditions. The dialog box for theselected condition displays. The following conditions are available for personalization groupmembership rules:
Type Condition
User User Name
User Group
Is Administrator
Computer Computer Name
Computer Domain
Computer NETBIOS Name
Computer Group
Computer IP Address
Directory Membership User OU Membership
Computer OU Membership
Site Membership
5. Configure the condition and click OK.
The new condition group displays under Membership Rules. The title of the condition enteredinto the Description field in the General tab, is the display name for the condition in thePersonalization group. If a description is not entered, the condition details form the displayname.
6. To further define group membership for the Personalization group, add more conditions:o AND Rule - Right-click on an existing condition, select Insert Condition and configure
the condition as required.o OR Rule - Right-click in the work area and select Add Condition Group and configure
the condition as required.7. Condition groups can be edited and deleted by selecting Edit Condition or Delete Condition
from the shortcut menu.
Copyright © 2017 , Ivanti. All Rights Reserved. Terms of Use.
Page 46 of 145

Environment Manager 10.1 Personalization Product Guide
Personalization Group ArrangementPersonalization groups can be created based on roles within an organization. For example,Administrators would be managed by a different group to that of a Sales or Marketing department.They have different responsibilities and requirements and therefore require different access rules andsettings.
The Personalization Server assigns users to the first personalization group in the PersonalizationGroups node with matching membership rules. It is therefore important that personalization groupsare listed in order of priority with the most relevant group at the top. This ensures users are assignedto the correct group.
Users may match the membership rules of multiple groups at different times and might even bemanaged by different groups depending on their circumstances at logon. For example, a user workingat a different site could have different requirements and can be assigned to a different group for eachsite.
The Default Users personalization group is automatically included in all Environment ManagerPersonalization configurations and is always at the bottom of the list of groups. If a user, on anendpoint with the Personalization Agent installed, does not match the membership rules of any othergroup, that user would be managed by the Default Users group. Membership rules are therefore notrequired and cannot be defined.
Only applications and Windows Settings that are relevant to a typical user within your organizationshould be personalized in the default group.
Order a List of Personalization Groups1. In the User Personalization navigation pane select Personalization Groups.2. Select a personalization group.
3. From the Edit ribbon, click Move Up andMove Down to change the order of thepersonalization groups.
Default Users is always be the last personalization group and cannot be moved.
Personalization Group SettingsEach personalization group includes settings to define behavior regarding ApplicationPersonalization, Windows Personalization and Local Cache settings for users in the personalizationgroup.
In the User Personalization navigation tree, select Personalization Groups, choose a PersonalizationGroup and select the Settings tab.
Copyright © 2017 , Ivanti. All Rights Reserved. Terms of Use.
Page 47 of 145

Environment Manager 10.1 Personalization Product Guide
Application Personalization SettingsSettings for discovering applications and application data.
Auto-discover user applications
This option enables monitoring of managed endpoints to detect the applications which are beingused within an organization. The executable name, version and operating system are captured forevery applications launched.
The collected data can be viewed through Personalization Analysis reports where applications can beadded to the list of managed applications available to Personalization Groups.
Enable Application Data Collection
This option enables registry and folder usage data to be passively collected from endpoints as usersrun applications.
Caution: Enabling this option causes a significant increase in system utilization on managedendpoints. It is recommended that Application Data Collection is disabled when no longerrequired.
This data can be used when adding new applications to the Personalization configuration.
Copyright © 2017 , Ivanti. All Rights Reserved. Terms of Use.
Page 48 of 145

Environment Manager 10.1 Personalization Product Guide
Windows Personalization Sync OptionsSelect when you want Windows Personalization settings to be saved to the database:
l On Log Offl On Session Lockl On Session Disconnect
Any combination of the above settings can be applied.
Scriptable Sync
Windows Personalization settings can be synchronized on demand using a PowerShell cmdlet,installed with the Environment Manager Agent.
Before using the command, import the EmCmdlet.dll - open Windows PowerShell and enter thefollowing:
import-module 'C:\Program Files\AppSense\EnvironmentManager\Agent\EmCmdlet.dll'
If you have changed the default install location, amend the file path accordingly.
Enter Test-EmUserOperations to verify that the cmdlet is able to communicate with the server.The response should be True.
To synchronize Windows Personalization settings, enter: Sync-DesktopSettings
The Windows Settings for that endpoint are synchronized with the database.
The default timeout for the cmdlet is 30 seconds. However, this can be changed using the -Timeoutargument. For example, Sync-DesktopSettings -Timeout 60
Other standard PowerShell arguments can be used in conjunction with the cmdlet. For example, -verbose.
Local CacheThe Local Cache settings manage personalization behavior for users when they are not connected tothe corporate network. When Local Cache is enabled, a copy of a user’s virtual cache, containing theirpersonalization settings, is retained on the managed endpoint when they log off. When the usersubsequently logs on whilst disconnected from the network, their personalization settings areavailable. The next time the user logs on to the corporate network, any changes to managedapplications made offline are synchronized with the database.
Copyright © 2017 , Ivanti. All Rights Reserved. Terms of Use.
Page 49 of 145

Environment Manager 10.1 Personalization Product Guide
For the virtual cache to exist for an application offline, that application must have been opened andclosed on the specific endpoint, prior to going offline. If a virtual cache does not exist for anapplication on the endpoint, personalization settings are not applied and the application opens withits default settings. Not having cache at application start means any changes made are notsynchronized to the database and are lost.
It is only necessary to enable local caching for physical devices which may have intermittentconnectivity to the corporate network, for example, laptops which are taken home. This ensures thatPersonalization settings are still available on the endpoint when there is no connection to thePersonalization Server. It is generally not required for virtual machines.
There are three Local Cache settings:
l Disabled - The virtual cache is deleted when users log off from the corporate network. Anychanges a user makes to managed applications whilst offline are lost when they next connectto the network.
l Always enabled - Each time a user logs off, a copy of their virtual cache is saved on theirendpoint. Whilst working offline, their personalization data is updated locally as changes tomanaged applications are made and synchronized to the database when online.
l Enabled if the following conditions are true - A set of conditions govern the circumstancesunder which the virtual cache is saved at logoff.
Two further Local Cache options can be selected in addition to the settings above:
l Enable Pre-cache - All application personalization data is downloaded to the local cache atlogon rather than when each application is run. This option is only available when Local Cacheis enabled.
The availability of the Pre-Cache option is dependent on local cache being enabled andany specified conditions being met. If the conditions are not met, pre-caching on theclient will not take place.
l Save caches on failed logoff sync - If communication between a managed endpoint and thedatabase is interrupted or lost, synchronization of personalization data from the endpoint tothe database is retried at regular intervals until communication is re-established. When theconnection is restored, personalization data is synchronized to the database.
If communication is not restored and the user logs off, personalization data for that session orapplication is lost. However, if Local Cache is enabled the personalization data is saved on theendpoint and is synchronized following successful connection with the database.
Configure Local Cache Conditions
1. Select a personalization group In the User Personalization navigation tree.2. Select the Settings tab.
Copyright © 2017 , Ivanti. All Rights Reserved. Terms of Use.
Page 50 of 145

Environment Manager 10.1 Personalization Product Guide
3. In the Local Cache section of the work area, select, Enabled if the following conditions aretrue. The Conditions ribbon is displayed.
For a user to be subject to Local Cache rules they must first be a member of the selectedpersonalization group; offline rules are only considered once group membership has beenestablished.
4. Select a condition from the Conditions ribbon.
The dialog for the selected condition displays.
5. Configure the condition and click OK.
The new condition displays under the Membership Rules tab.
6. To further define group membership for the personalization group, add more conditions. Morecomplex conditions can be configured using AND and OR statements:
o AND Rule - Right-click on an existing condition, select Insert Condition and configurethe condition as required.
o OR Rule - Right-click in the work area and select Add Condition Group and configurethe condition as required.
Condition groups can be edited and deleted by selecting Edit Condition or Delete Conditionfrom the shortcut menu.
Local Cache Conditions
The table below lists the conditions available for the Enabled if the following conditions are trueoption is selected for a Personalization Group.
Type Condition
User User Name
User Group
Is Administrator
Computer Is Laptop
Computer Name
Computer Domain
Computer NETBIOS Name
Computer Group
Computer IP Address
Operating System
Copyright © 2017 , Ivanti. All Rights Reserved. Terms of Use.
Page 51 of 145

Environment Manager 10.1 Personalization Product Guide
Type Condition
Is VDI
Directory Membership User OU Membership
Computer OU Membership
Site Membership
Session and Client Client Connection Protocol
Personalization Group Membership RulesThe Membership Rules for a Personalization group are governed by conditions which must besatisfied for a user to be managed by that personalization group. The conditions are based on userattributes, computer specifications and directory membership. Membership can be based on a singlecondition or a user may have to fulfill a number of conditions to be managed by a Personalizationgroup.
Rule TypesMembership to a Personalization group can be based on two rule types:
l AND - Multiple conditions must be satisfied for membership of the Personalization group.
This is called a condition group.A condition group has been created containing two conditions:
Users must fulfill both conditions to be managed by the Personalization group.
Copyright © 2017 , Ivanti. All Rights Reserved. Terms of Use.
Page 52 of 145

Environment Manager 10.1 Personalization Product Guide
l OR - By satisfying the conditions for one of a number of conditions or condition groups, usersare managed by the Personalization group.
A second condition group has been added.
To be managed by this personalization group, a user must fulfill all the conditions in the firstcondition group or all the conditions in the second condition group.
Membership ConditionsPersonalization Group Membership conditions are a subset of the conditions used in the EnvironmentManager Policy console. Most of the membership rules conditions use the same fields to set thevalidation.
The image below shows the User Group condition dialog.
Copyright © 2017 , Ivanti. All Rights Reserved. Terms of Use.
Page 53 of 145

Environment Manager 10.1 Personalization Product Guide
Most conditions use the same fields to create a condition. Select an option from the Condition drop-down. The following options are available:
l Equal - A comparison is made against the contents of the Match field to target the users orcomputers which fulfill those criteria
l Not Equal - Targets all users or computers which do not fulfill the criteria in the Match field.l Query - Targets all users or computers which match the criteria specified in the Query field.
Using wildcards in the query allows a wide range of matches, for example:l *Windows - matches text ending in Windows.l Windows* - matches text starting with Windows.l *Windows* - matches text containing Windows.
Copyright © 2017 , Ivanti. All Rights Reserved. Terms of Use.
Page 54 of 145

Environment Manager 10.1 Personalization Product Guide
Create Group Personalization Membership Rules1. In the User Personalization navigation pane select Personalization Groups.2. Select a personalization group.3. Right-click in theMembership Rules work area and select Add Condition Group from the
shortcut menu.
4. Highlight a condition type; User, Computer or Directory Membership and select a condition.The available conditions are listed in Personalization Group Conditions. The dialog box for theselected condition displays.
The following conditions are available for personalization group membership rules:
Type Condition
User User Name
User Group
Is Administrator
Computer Computer Name
Computer Domain
Computer NETBIOS Name
Computer Group
Computer IP Address
Directory Membership User OU Membership
Computer OU Membership
Site Membership
5. Configure the condition and click OK. The new condition group displays under MembershipRules.
The title of the condition entered into the Description field in the General tab, is the displayname for the condition in the Personalization group. If a description is not entered, thecondition details form the display name.
Copyright © 2017 , Ivanti. All Rights Reserved. Terms of Use.
Page 55 of 145

Environment Manager 10.1 Personalization Product Guide
6. To further define group membership for the Personalization group, add more conditions:o AND Rule - Right-click on an existing condition, select Insert Condition and configure
the condition as required.
o OR Rule - Right-click in the work area and select Add Condition Group and configurethe condition as required.
Condition groups can be edited and deleted by selecting Edit Condition or Delete Conditionfrom the shortcut menu.
Application Personalization for Personalization GroupsApplication Groups enable applications which interact together, using common registry keys andfolders, to be managed as a single group for personalization.
Applications must be in an Application Group before they can be personalized. When creating anapplication, options are available to add it to a new or existing Application Group. This makes it easierto add new applications that share common settings with existing applications.
Application Groups can be added to a Personalization Group using one of the following methods:
l Add Existing Application Groupsl Add Existing Ungrouped Applicationsl Add a New Application to a Personalization Group by Namel Add a New Application to a Personalization Group from Application Data Collectionl Add a New Application Group to a Personalization Group from Template
Add Existing Application GroupsAdd existing Application Groups to be personalized for users who match the membership rules of thePersonalization Group.
1. In the User Personalization navigation pane select Personalization Groups.2. Select a personalization group.3. Select the Application Personalization tab.
4. Click Add Existing.
The Select Application Groups dialog displays.
5. Select one or more Application Groups. Multiple Application Groups can be selected using theCtrl or Shift keys.
6. Click OK.
The selected Application Group is added to the Personalization Group.
Copyright © 2017 , Ivanti. All Rights Reserved. Terms of Use.
Page 56 of 145

Environment Manager 10.1 Personalization Product Guide
Add Existing Ungrouped ApplicationsAdd existing ungrouped applications, that are not part of an Application Group, to be personalizedfor users who match the membership rules of the Personalization Group.
1. In the User Personalization navigation pane select Personalization Groups.2. Select a personalization group.3. Select the Application Personalization tab.
4. Click Add Existing.
The Select Application Groups dialog displays.
5. Select Select Ungrouped Applications.
The Select Ungrouped Applications option displays only when applications that are not part ofan Application Group are available to add.
Ungrouped applications that are not part of an Application Group display at the bottom of thedialog.
6. Select one or more applications. Multiple applications can be selected using the Ctrl or Shiftkeys.
7. Click OK.
The selected application is added to the Personalization Group.
Add a New Application to a Personalization Group by Name1. Add a new application, either to a new or existing Application Group, to be personalized for
users who match the membership rules of the Personalization Group.2. In the User Personalization navigation pane select Personalization Groups.3. Select a personalization group.4. Select the Application Personalization tab.
5. Click New By Name.
The Add an Application dialog displays.
6. In the Executable field, enter an application executable name or click the ellipsis (...) to select anapplication from the file system.
7. Optionally, in the Folder field, enter a folder path or click the ellipsis to select a folder from thefile system. The application is managed only if it is located in the specified folder.
If the field is left blank, all applications matching the entered criteria are managed, regardless oflocation.
Copyright © 2017 , Ivanti. All Rights Reserved. Terms of Use.
Page 57 of 145

Environment Manager 10.1 Personalization Product Guide
8. In the Name field, enter a name to uniquely identify the application within the EnvironmentManager console. Applications must not have the same name as existing applications orApplication Groups.
9. Optionally, tick Advanced Details and, in the Operating System and Application Version fields,enter regular expressions to target a specific operating system and/or application version.Alternatively, use the .* default regular expression to include all operating systems andapplication versions.
The specified combination of executable name, operating system and application version mustnot match existing applications.
Applications must be added to a new or existing Application Group:
10. New Application Group - Specify the Application Group name in the Create New ApplicationGroup field. The Application Group name is automatically populated from the application name,however it can be changed as required. Application Groups must not have the same name asexisting applications or Application Groups.
11. Existing Application Group - Select an existing Application Group in the Add to ExistingApplication Group field.
12. Click OK.
The Application Group is added to the Personalization Group.
Add a New Application to a Personalization Group from ApplicationData CollectionApplication Data Collection passively collects data from managed endpoints as users run applications.
Registry key and folder paths that are written to and read from are recorded for each application. Onapplication close, the data is stored in the Environment Manager Personalization database.
The collected data can be used to create new applications and add to registry and folder inclusions toexisting Application Groups.
Application Data Collection can be used in the following modes:
l Add a New Application to a Personalization Group from Automatic Configurationl Add a New Application to a Personalization Group from Manual Configuration
Add a New Application to a Personalization Group from AutomaticConfiguration
Environment Manager analyzes the collected data and uses it to create an automatic configuration.
In the automatic configuration, paths are grouped to common parents and paths which are notrecommended for inclusion are filtered out.
Copyright © 2017 , Ivanti. All Rights Reserved. Terms of Use.
Page 58 of 145

Environment Manager 10.1 Personalization Product Guide
1. In the User Personalization navigation pane select Personalization Groups.2. Select a personalization group.3. Select the Application Personalization tab.
4. Click New from Data Collection.
The Add Application - Data Collection dialog displays. The dialog lists applications that havebeen collected by Application Data Collection.
5. Select one of the following radio buttons to target specific application versions:o Use Major Application Version - Applications are grouped by their major version
number. For example, 5.0 and 5.1 are grouped together, but 6.0 is separate.o Use All Application Versions - Applications are grouped, regardless of their version
number. For example, 5.0, 5.1 and 6.0 are grouped together.6. Select an application from the list.
7. Click View automatic configuration details.
A read-only copy of the configuration displays. From the snapshot taken at each applicationclose, the following statistics are calculated and displayed alongside each registry key or folderpath for all users that have run the application:
o Occurrences - The total number of times that the registry path or folder path has beenaccessed by the application.
o Average Size - The average size of the data in the registry key or folder from eachapplication close. For example, a size of 100 bytes at the first application close and a sizeof 200 bytes at the second application close displays as an average size of 150 bytes.
o Peak Size - The largest recorded size of the data in the registry key or folder from eachapplication close. For example, a size of 100 bytes at the first application close and a sizeof 200 bytes at the second application close displays as a peak size of 200 bytes.
The cumulative sizes of the Average Size and Peak Size displays at the bottom of the dialog. Thisinformation shows the potential profile size per user if the application is personalized.
8. Click Done to close the automatic configuration view.
The automatic configuration closes.
9. Click OK.The Enter Details dialog displays.
10. In the Name field, enter a name to uniquely identify the application within the EnvironmentManager console. Applications must not have the same name as existing applications orApplication Groups.
Copyright © 2017 , Ivanti. All Rights Reserved. Terms of Use.
Page 59 of 145

Environment Manager 10.1 Personalization Product Guide
11. Applications must be added to a new or existing Application Group:o New Application Group - Specify the Application Group name in the Create New
Application Group field. The Application Group name is automatically populated fromthe application name, however it can be changed as required. Application Groups mustnot have the same name as existing applications or Application Groups.
o Existing Application Group - Select an existing Application Group in the Add to ExistingApplication Group field.
12. Click OK.
The Application Group is added to the Personalization Group.
Add a New Application to a Personalization Group from ManualConfiguration
1. Using manual configuration, registry and folder inclusions can be configured from the collecteddata to create an application configuration to suit your requirements.
2. In the User Personalization navigation pane select Personalization Groups.3. Select a personalization group.4. Select the Application Personalization tab.
5. Click New from Data Collection.
The Add Application - Data Collection dialog displays. The dialog lists applications that havebeen collected by Application Data Collection.
6. Select one of the following radio buttons to target specific application versions:o Use Major Application Version - Applications are grouped by their major version
number. For example, 5.0 and 5.1 are together, but 6.0 is separate.o Use All Application Versions - Applications are grouped, regardless of their version
number. For example, 5.0, 5.1 and 6.0 are grouped together.7. Tick No, I want to configure this application manually (advanced).
Copyright © 2017 , Ivanti. All Rights Reserved. Terms of Use.
Page 60 of 145

Environment Manager 10.1 Personalization Product Guide
8. Click Configure.
The dialog lists all registry keys and folder paths which have been collected by Application DataCollection for the selected application.
From the snapshot taken at each application close, the following statistics are calculated anddisplayed alongside each registry key or folder path for all users that have run the application:
o Occurrences - The total number of times that the registry path or folder path has beenaccessed by the application.
o Average Size - The average size of the data in the registry key or folder from eachapplication close. For example, a size of 100 bytes at the first application close and a sizeof 200 bytes at the second application close displays as an average size of 150 bytes.
o Peak Size - The largest recorded size of the data in the registry key or folder from eachapplication close. For example, a size of 100 bytes at the first application close and a sizeof 200 bytes at the second application close displays as a peak size of 200 bytes.
If required, tick Hide paths which are rarely personalized to filter out paths which are notrecommended for inclusion.
9. Tick the registry and folder paths to be added as inclusions for the Application Group.
As paths are selected and deselected, the Application Profile Size updates with the cumulativesizes of the Average Size and Peak Size for the selected paths. This information shows thepotential profile size per user if the application is personalized.
10. Click OK.
The Enter Details dialog displays.
11. In the Name field, enter a name to uniquely identify the application within the EnvironmentManager console. Applications must not have the same name as existing applications orApplication Groups.
Applications must be added to a new or existing Application Group:
o New Application Group - Specify the Application Group name in the Create NewApplication Group field. The Application Group name is automatically populated fromthe application name, however it can be changed as required. Application Groups mustnot have the same name as existing applications or Application Groups.
o Existing Application Group - Select an existing Application Group in the Add to ExistingApplication Group field.
12. Click OK.
The Application Group is added to the Personalization Group.
Copyright © 2017 , Ivanti. All Rights Reserved. Terms of Use.
Page 61 of 145

Environment Manager 10.1 Personalization Product Guide
Add a New Application Group to a Personalization Group fromTemplateImport one or more Application Groups from the built-in templates or from a template file.
If a template is available, it is recommended that the template is used rather than adding theApplication Group either manually or from Application Data Collection.
Templates for commonly used applications are available on Support.
1. In the User Personalization navigation pane select Personalization Groups.2. Select a personalization group.3. Select the Application Personalization tab.
4. Click Import Template.
The Import Application Groups dialog displays.
5. Select one of the following radio buttons:o Import from AppSense templates - Import from the built-in Application Group
templates. Templates are available for commonly personalized applications, such asMicrosoft Internet Explorer and Microsoft Office. These templates contain recommendedinclusions and exclusions for personalization.
o Import from exported configuration - Import from an exported Application Grouptemplate. When selected, a file browser displays for an Environment ManagerPersonalization configuration to be selected.
6. Select the Application Groups to import. To select all groups, select Application Groups at thetop of the list.
7. Click OK.
The selected Application Groups are imported into the configuration and added to the currentPersonalization Group.
Personalization Group Application ClashesClashes occur when an application exists multiple times in a single personalization group.Environment Manager automatically detects clashes between applications within a personalizationgroup and will notify you of a clash when:
l An application is added to a personalization group which already exists in an application group,assigned to the personalization group
l An application group is added to a personalization group which contains an application whichalready exists in the applications list for that group
Clashing applications are managed based on the following processing order:
Copyright © 2017 , Ivanti. All Rights Reserved. Terms of Use.
Page 62 of 145

Environment Manager 10.1 Personalization Product Guide
l Application groupsl Applicationsl Global application exclusions
Clashing applications can cause unexpected behavior and should be resolved. Resolveapplication clashes by removing the application from the application group, applications listor Application Exclusions.
Windows Personalization and Personalization GroupsFor each personalization group, a list of Windows Settings Groups can be configured to tailorpersonalization to the requirements of the users managed by that group.
Configure Windows Personalization for a Personalization Group1. In the User Personalization navigation pane select Personalization Groups.2. Select a personalization group.3. Select theWindows Personalization tab.
4. Click Add.
The available Windows Settings Groups are listed.
5. Select a Windows Settings Group and click OK.6. Select multiple groups using the Ctrl or Shift keys.
The Windows Settings Groups are added to the Personalization Group.
For information on inclusion logic when adding a Windows Settings Group to a PersonalizationGroup, see Windows Personalization.
Profile MigrationFor each Personalization Group, Profile Migration can be configured to either import user profile datainto the database from a local profile or network profile or export user profile data from the databaseback into the local file system.
Importing Profiles
Import Restrictions
During profile Import, files may fail to synchronize in the following scenarios:
l The number of files within a specific profile sync exceeds the IIS MaxHttpCollectionKeys setting -the default value is 1000
Copyright © 2017 , Ivanti. All Rights Reserved. Terms of Use.
Page 63 of 145

Environment Manager 10.1 Personalization Product Guide
l The size of any single file exceeds the IIS maxAllowedContentLength setting - the default valueis 30mb
In both scenarios, the profile import for Windows Settings or Application Groups fails and is reportedas "failed to copy data to target" for the migration state. Profile Import continues to attempt to syncthe remaining Profile settings.
If the issues above are addressed, the import automatically retries at the next logon if the user has notsubsequently captured personalization for Windows Settings groups or that specific applicationgroup.
If personalization data has been captured subsequently by the user, after fixing the profile source, thecaptured data for the failed application group or Windows Settings Group must be deleted for it to beimported on next logon.
Files that cannot be read, such as those locked by another application, are not be imported.
Configure Profile Migration to Import Data from a Local Profile
User profile data is copied at logon from the logged on user’s local profile to the EnvironmentManager virtual cache. This data consists of included registry, folder and file paths for managedApplication Groups and Windows Settings Groups.
1. In the User Personalization navigation pane select Personalization Groups.2. Select a personalization group.3. Select the Profile Migration tab.
4. Click Edit.
The User Profile Migration Settings dialog displays.
5. Select Import existing user settings to Personalization.6. Select Local from the Source drop-down.
7. Click OK.
If settings from a previous import operation exist for the Personalization Group, a dialogdisplays. The following options are available:
o Resume the previous import - Existing settings are not replaced, but registry, folder orfile inclusions which do not have data are imported.
o Start a new import - Existing settings are overwritten with imported user profile data.
Profile Migration Import is enabled for users within the Personalization Group.
At logon, data from included registry, folder and file paths for managed Application Groups andWindows Settings Groups within the user profile is copied into the database.
Copyright © 2017 , Ivanti. All Rights Reserved. Terms of Use.
Page 64 of 145

Environment Manager 10.1 Personalization Product Guide
Configure Profile Migration to Import Data from a Network Profile
User profile data is copied at logon from the profile at the specified network path to the EnvironmentManager virtual cache. This data consists of all included registry, folder and file paths for managedApplication Groups and Windows Settings Groups. AppData can be imported from a separatenetwork path if required.
Advanced Certificates, General Folder Options and Icons Windows Settings, cannot be imported froma network location.
1. In the User Personalization navigation pane select Personalization Groups.2. Select a personalization group.3. Select the Profile Migration tab.
4. Click Edit.
The User Profile Migration Settings dialog displays.
5. Select Import existing user settings to Personalization.6. Select Network from the Source drop-down.
7. Enter a UNC path in the Network Path field. Environment Variables within the specified networkpath are expanded.
The profile version number is appended to the specified network path where required. Thefollowing table shows the profile paths for each operating system if\\server\share\profiles\%USERNAME% is specified:
Operating system Profileversion
Example profile path
Windows 7 Windows Server2008 R2
V2 \\server\share\profiles\%USERNAME%.V2
Windows 8 Windows Server2012
V3 \\server\share\profiles\%USERNAME%.V3
Windows 8.1 Windows Server2012 R2
V4 \\server\share\profiles\%USERNAME%.V4
Windows 10 V5 \\server\share\profiles\%USERNAME%.V5
8. If AppData is stored in a separate location, tick Enable AppData to be imported from anetwork location and specify a UNC path in the AppData Path field.
Copyright © 2017 , Ivanti. All Rights Reserved. Terms of Use.
Page 65 of 145

Environment Manager 10.1 Personalization Product Guide
9. Click OK.
If settings from a previous import operation exist for the Personalization Group, a dialogdisplays. The following options are available:
o Resume the previous import - Existing settings will not be replaced, but registry, folderor file inclusions which do not have data will be imported.
o Start a new import - Existing settings will be overwritten with imported user profiledata.
Profile Migration Import is enabled for users within the Personalization Group.
At logon, data from included registry, folder and file paths for managed Application Groups andWindows Settings Groups within the user profile is copied into the database.
Import Activity for Configuration Updates
After configuring Profile Migration in Import mode, a prompt displays if either:
l Application Groups or Windows Settings Groups are added to the Personalization Groupl Included registry, folder or file paths are added to a managed Application Group or Windows
Settings Group.
Select from one of the options below.
Option Description
Commit thechange andrestart theImport forthe affectedgroups
The Application Group or Windows Settings Group is added to thePersonalization Group or the included registry, folder or file path is added to themanaged Application Group or Windows Settings Group. The import isrestarted for all users within the Personalization Group, regardless of whetherdata has already been imported for the user.
Commit thechange butonly for newusers
The Application Group or Windows Settings Group is added to thePersonalization Group or the included registry, folder or file path is added to themanaged Application Group or Windows Settings Group. The import is startedfor users in the Personalization Group who do not have existing data.
Exporting ProfilesExport existing data from the Environment Manager Personalization database into user profiles.
Configure Profile Migration to Export Profiles
User profile data is copied at logon from the database to the logged on user’s local profile.
Copyright © 2017 , Ivanti. All Rights Reserved. Terms of Use.
Page 66 of 145

Environment Manager 10.1 Personalization Product Guide
1. In the User Personalization navigation pane select Personalization Groups.2. Select a personalization group.3. Select the Profile Migration tab.
4. Click Edit.
The User Profile Migration Settings dialog displays.
5. Select Export user settings back to their User Profile.6. Click OK.
Profile Migration Export is enabled for users within the Personalization Group.
At logon, data from the database is copied into the user profile.
Changing ModesThe table below shows the behavior when changing Profile Migration modes.
Operatingsystem
Profileversion
Example profile path
Disabled Import If settings from a previous import operation exist for the PersonalizationGroup, a dialog displays. The following options are available:
l Resume the previous import - Existing settings will not bereplaced, but registry, folder or file inclusions which do not havedata will be imported.
l Start a new import - Existing settings will be overwritten withimported user profile data.
At logon, settings from the logged on user’s profile are copied into thedatabase.
Disabled Export At logon, settings from the database are copied into the logged onuser’s profile.
Import Disabled The import operation is stopped. It can be resumed, however users whohave not been migrated will have their user profile settings overwritten.
Import Export The import operation is stopped and cannot be resumed. At logon,settings from the database are copied into the logged on user’s profile.
Export Disabled The export operation is stopped and cannot be resumed.
Export Import The export operation is stopped and cannot be resumed. At logon,settings from the logged on user’s profile are copied into the database.
Copyright © 2017 , Ivanti. All Rights Reserved. Terms of Use.
Page 67 of 145

Environment Manager 10.1 Personalization Product Guide
Profile Migration PowerShell InterfaceProfile Migration can be scripted to import or export application or Application Group data betweenthe database and the Windows profile on the client.
It is recommended that Profile Migration is configured through the Environment ManagerPersonalization console. The cmdlet should be used only where granular control is required to migrateindividual applications or Application Groups, such as moving data from ungrouped applications toApplication Groups. The cmdlet can assist with the careful migration of profile data, such as wheremultiple versions of Microsoft Office are used concurrently within the environment.
To migrate data from ungrouped applications to Application Groups, export the application to thelocal profile and then import it into an Application Group.
The PowerShell cmdlet has the following behavior:
l It is supported only when Profile Migration is not enabled on the Personalization Server.l Migration occurs as many times as the cmdlet is executed. The state is not recorded and it is the
responsibility of the administrator to ensure it is used only as required.l To ensure data integrity, the migration occurs only if there is no instance of an application
running for the specified application or Application Group.l Errors are presented through the raising of an exception after execution.
Help
Further help is available by entering the following command:
get-help <cmdlet name>
Load the Profile Migration PowerShell Module
The module is installed in the Environment Manager Agent directory. Use the following command toload the PowerShell module:Import-Module "C:\Program Files\AppSense\Environment Manager\Agent\EmCmdlet.dll"
If you have changed the default install location, amend the file path accordingly.
Alternatively, use the following command to load the PowerShell module from the current installationdirectory:Import-Module ((Get-ItemProperty 'HKLM:\SOFTWARE\AppSense\Environment Manager').ClientPath +'EmCmdlet.dll'
Import Profiles Using the Profile Migration PowerShell Interface
The Import-EMPManagedAppData cmdlet performs a migration of profile data from the WindowsProfile into a Managed Application profile.
The Managed Application’s configured registry, folder and file inclusions and exclusions are used asthe locations to import data from.
Copyright © 2017 , Ivanti. All Rights Reserved. Terms of Use.
Page 68 of 145

Environment Manager 10.1 Personalization Product Guide
The Windows profile can be either the local profile or a roaming profile stored on a network location.
The following parameters are available:
Parameter Description
-App (Mandatory) The name of the managed application or managed ApplicationGroup against which to perform the import. This is the DisplayName as seen in the Personalization Console.
-ProfilePath (Optional) The path to the Windows Profile to use as the source of the data asan alternative to importing from the local profile. This path must bea Windows Profile Version agnostic path and so should not includeany version suffix such. For example, a profile path of\\server\share\user1.V2 should be entered as \\server\share\user1.Only profile versions that match the current operating system orearlier are supported. For example, it is not possible to import froma Windows 10 profile when running on a Windows 7 machine. Anappropriate profile is selected at the configured location by lookingfor a version that matches the current operating system. If amatching profile is not found, then an earlier profile version is used.The use of Environment Variables specific to the current usersession is supported.
-ProfileAppDataPath(Optional if ProfilePath issupplied)
When importing from a network profile, this parameter can be usedto specify the path to Roaming AppData folder when it is not partof the user’s profile location. The use of Environment Variablesspecific to the current user session is supported.
-Merge (Optional switch) If specified, the action merges the personalized data with the datafrom the Windows Profile. The personalized data takes precedenceand is not replaced. If not specified, the action clears the existingprofile data before the import takes place.
-Verbose (Optionalswitch)
Provides verbose output of the PowerShell command for diagnosticpurposes.
Examples
The following shows an example of importing data from the local Windows Profile for the ManagedApplication Notepad:Import-Module ((Get-ItemProperty 'HKLM:\SOFTWARE\AppSense\Environment Manager').ClientPath +'EmCmdlet.dll')Import-EMPManagedAppData -App Notepad
The following shows an example that could be used inside an Environment Manager Policy CustomCondition where the exit code of the script is used to determine if the condition result:try
Copyright © 2017 , Ivanti. All Rights Reserved. Terms of Use.
Page 69 of 145

Environment Manager 10.1 Personalization Product Guide
{ Import-Module ((Get-ItemProperty 'HKLM:\SOFTWARE\AppSense\Environment Manager').ClientPath +'EmCmdlet.dll') Import-EMPManagedAppData -App Notepad}catch{ # Exit with an error
[System.Environment]::Exit(1)}
Export Profiles Using the Profile Migration PowerShell Interface
The Export-EMPManagedAppData cmdlet performs a migration of profile data from a managedapplication or Application Group back to the Windows Profile.
The following parameters are available
Parameter Description
-App
(Mandatory)
The name of the managed application or managed Application Group againstwhich to perform the export. This is the Display Name as seen in the PersonalizationConsole.
-Verbose
(Optionalswitch)
Provides verbose output of the PowerShell command for diagnostic purposes.
Excluded UsersIf personalization is enabled, all users are assigned to a Personalization Group. Users with anEnvironment Manager agent installed and configuration deployed who do not fulfill the membershiprules for any other group, are managed by the Default Users group.
However, personalization may not be required for all users. For example, you may not wish to save thepersonalization settings for system administrators who routinely log onto multiple users’ machines. Itis unlikely they would require their own desktop settings to roam with them onto each machine theylog onto.
In order to exclude a specific user or computer from personalization create a Personalization Groupwith each option on the Settings tab disabled and with no managed applications, Application Groupsor Windows Settings Groups configured. This effectively removes group members from userpersonalization.
By creating an appropriate membership rules, the users and computers which do not requirepersonalization, can be excluded.
Copyright © 2017 , Ivanti. All Rights Reserved. Terms of Use.
Page 70 of 145

Environment Manager 10.1 Personalization Product Guide
Endpoint Self-Service ToolThe Endpoint Self-Service tool provides monitoring and management of certain Environment Managersettings and data. It is available to users and managed endpoints for Personalization Groups whichhave it enabled.
The Endpoint Self-Service tool is available from the Environment Manager Information icon in theWindows System Tray. Right-click on the icon to access the functionality.
The Endpoint Self-Service Tool requires .NET4 to run. If this is unavailable, local audit event 9680 iscreated.
The options available from the Endpoint Self-Service tool vary depending on whether the user is astandard or administrative user. To accommodate these user types, the Endpoint Self-Service Tool hastwo operational modes:
l Basic - For standard users.l Advanced - For users that are assigned an administrative role in the Personalization Database.
Enable the Endpoint Self-Service ToolThis process explains how to enable the Endpoint Self-Service tool for Personalization Groups.
1. In the User Personalization navigation pane select Personalization Groups.2. Select a personalization group.3. Select the Endpoint Self-Service tab.4. Select one of the following options:
o Disabled - The Endpoint Self-Service tool is not available for users in the selectedPersonalization Group.
o Enabled for all users in group - The Endpoint Self-Service tool is available for membersof the selected Personalization Group.
o Enabled if the following conditions are true - The Endpoint Self-Service tool is onlyavailable for members of the selected Personalization Group, if certain conditions aremet.
Any users or computers that have been specified in the Membership Rules for a Personalization Grouphave access to the tool when they log on.
Endpoint Self-Service Functionality for Standard UsersAny endpoints where the Endpoint Self-Service Tool is enabled for a Personalization Group canperform the following basic tasks:
l Rollback or delete Personalization data archivesl Show policy action progress
Copyright © 2017 , Ivanti. All Rights Reserved. Terms of Use.
Page 71 of 145
Environment Manager 10.1 Personalization Product Guide
Archiving
The Archive Management dialog displays when a user selects the Archiving option from theEnvironment Manager Information System Tray icon. The dialog displays a list of all associatedApplications, Application Groups and Windows Settings Group archives for that user.
Rollback
Select an Application or Windows Settings Group archive and click Rollback. All Personalizationsettings are returned to the state they were when the previous archive was created. Users areprompted to confirm that the rollback action is to be performed and are informed when the rollback iscomplete.
Delete
Select an Application or Windows Settings Group archive and click Delete. Any user settings containedwithin the selected archive are deleted.
Policy Action Progress
The Show Policy Action Progress option displays the percentage progress of any triggered copy folderactions.
Endpoint Self-Service Functionality for Administrative UsersUsers that have the Environment Manager User role of Master Administrator or Administrator canaccess the tool locally on a managed endpoint or remotely.
For information on User Roles and how they are assigned, see User Roles.
Administrative users have access to both the basic and the advanced functionality of the EndpointSelf-Service tool. Administrators have access to Session Information, can use archive functionality,update settings and alerts and refresh the local cache.
Session Information
Select the Session Information option from the Environment Manager Information Windows SystemTray icon from where you can view details of the managed endpoint and user.
The dialog has four information categories:
l General Information - Displays the User name, Personalization Server, the PersonalizationGroup associated with the currently logged on user and the build version of the currentEnvironment Manager agent. The status of the license and whether Offline cache mode isenabled is also displayed.
l Application Personalization - Displays details of any Application Groups and associatedApplications that are assigned to the managed endpoint.
Copyright © 2017 , Ivanti. All Rights Reserved. Terms of Use.
Page 72 of 145

Environment Manager 10.1 Personalization Product Guide
l Windows Personalization - Displays details of the Windows Settings Groups that arepersonalized on the managed endpoint and the date that Windows Personalization settingswere last archived.
l Global Includes and Excludes - Displays the registry, folder and file includes and excludes thatare applied on the managed endpoint.
Archiving
Select the Archiving option from the Environment Manager Information Windows System Tray icon toaccess the Archive Manager dialog. Use this dialog to perform the following tasks:
l Create Archive - Click Create to archive any current Application, Custom or Windows SettingsGroups. To prevent the archive from being automatically deleted, select the Protected checkbox before you click OK.
Only one archive can be protected, if another is already set to be protected the mostrecent one is automatically set and any previous protection removed.
l Edit Archives - Select an archive and click Edit to amend the description of an ApplicationGroup archive. To prevent the archive from being automatically deleted, select the Protectedcheck box before you click OK.
l Rollback Archive - Select an Application or Windows Settings Group archive and click Rollback.All Personalization settings are returned to the state they were when the selected archive wascreated. You will be prompted to confirm that the rollback action is to be performed and will beinformed when the rollback is complete.
l Delete Archives - Select an Application, Custom or Windows Settings Group archive and clickDelete. Any settings contained within the selected archive are deleted. To delete a protectedarchive, protection must first be removed.
Settings and Alerts
Use the Settings option from the Environment Manager Information Windows System Tray icon toselect which action balloon notifications are displayed on managed endpoints. The Settings dialog canalso be used to select a border color to surround the window frame of any managed application whenin use.
Alerts
Alert notifications are displayed as standard balloon type notifications when actions are triggered.Select the required notification types:
l Server link state - Displays the status of the connection to the Personalization Server and thePersonalization Server URL.
l Sync to server - Displays when the Application Settings or Application Groups Settings, on themanaged endpoint have synchronized with those on the Personalization Server.
Copyright © 2017 , Ivanti. All Rights Reserved. Terms of Use.
Page 73 of 145

Environment Manager 10.1 Personalization Product Guide
l Sync from server - Displays the Applications or Application Groups Settings on thePersonalization Server have updated those on the endpoint.
l Sync failure - Displays when an attempted synchronization fails.l Managed Process start/stop - Displays when a managed process starts and stops.l Virtualization service starts/stop - Displays when the virtualization service is started or the
service has stopped. If the service has stopped, the icon in the Windows System Tray displays ayellow warning icon. Any Applications or Application Group Settings previously handled are nolonger being managed.
l Virtualization service not running - This alert notification displays if the virtualization servicehas not been started or is not running. If the service has stopped, the icon in the WindowsSystem Tray displays a yellow warning icon. Any Applications or Application Group Settingspreviously handled are no longer being managed.
l New configuration applied - This information notification displays when a new configurationis applied to the managed endpoint.
l Pre-cache complete - This information notification displays when pre-caching is complete forall Applications and Applications Groups assigned to the managed endpoint. Pre-Caching isthe process by which you download existing Application data from the Personalization Serverto the local cache.
l Folder copy/mirror/sync complete - This information notification displays when folder copyactions are complete.
Windows Frame
To clearly identify a managed application on the endpoint, a colored border can be placed around theapplication window. Select Show managed application frame and chose the color from the BorderColor drop-down list. When a managed application is in use the application has a colored border.
Refresh Local Cache
Use the Refresh Local Cache option to help speed up network access to data files by taking a copy ofthe data stored on the Personalization Server and refreshing the cached data on the managedendpoint. This will ensure the local Personalization cache is in sync with the Personalization Database
Using the Endpoint Self-Service Tool RemotelyUsers assigned the Master Administrator or Administrator role can use this tool remotely fortroubleshooting purposes. When remotely logged onto a machine, authorized users can run theEndpointSelfService.exe from the Environment Manger installed location, input their credentials andaccess all the administrator functionality from the Environment Manager Information dialog.
Copyright © 2017 , Ivanti. All Rights Reserved. Terms of Use.
Page 74 of 145

Environment Manager 10.1 Personalization Product Guide
Application PersonalizationThe Application Personalization area of the console is used to configure a list of applications andApplication Groups which can be included for personalization.
Application Processing RulesWhen an application is opened on a managed endpoint, processing rules determine if it is managedand how it is managed. Applications can be marked as follows:
l Managed - The application or process is managed, either individually or as part of anApplication Group.
l Discovered - The application is not managed or excluded but the Personalization Groupsettings has Auto-discover user applications applied.
l Excluded - The application has been added to the Application Exclusions list or is the childprocess of an excluded application. It will not be discovered or managed when run on amanaged endpoint.
l Passive - The application is not managed but usage data is collected for analysis by theApplication Data Collection.
Unless virtualization is disabled for the process, a Personalization Virtualization Component (PVC)configuration is created to redirect registry reads and writes and file and folder access to the virtualcache so that the process is virtualized.
Application GroupsApplication Groups enable applications which interact together, using common registry keys andfolders, to be managed as a single group for personalization.
Applications must be in an Application Group before they can be personalized. When creating anapplication, options are available to add it to a new or existing Application Group. This makes it easierto add new applications that share common settings with existing applications.
Inclusions and exclusions must be set at Application Group level. This ensures consistency across allapplications within a group.
Applications in an Application Group share the same virtual cache. Personalization settings are onlysynchronized with the Personalization Server when:
l The initial application in the group is openedl The last, open application in the group is closed
For example, if all Microsoft Office applications are managed within one group and Outlook, Word andExcel are opened in that sequence, synchronization occurs only when Outlook is opened. If Word,Outlook and Excel are closed in that sequence, synchronization occurs only when Excel is closed.
Copyright © 2017 , Ivanti. All Rights Reserved. Terms of Use.
Page 75 of 145

Environment Manager 10.1 Personalization Product Guide
Add an Application Group1. In the User Personalization navigation tree, select Personalization Settings > Application
Personalization > Application Group.
2. In the Personalization ribbon, click Add Application Group.
The Add Application dialog displays.
3. Enter a name for the Application Group. Application Groups must not have the same name asexisting applications or Application Groups.
4. Click OK.5. The Application Group is created in the navigation pane.
Add Existing Applications to an Application Group1. In the User Personalization navigation tree, select Personalization Settings > Application
Personalization > Application Group.2. Select an application group.
3. From the Personalization ribbon, click Add Application > Select Application.
The Select Applications dialog displays.
4. Select the required applications. Multiple applications can be selected using the Ctrl or Shiftkeys.
5. Click OK.
The selected applications are added to the Application Group.
Add a New Application to an Application Group from ApplicationData Collection (Automatic)
1. In the User Personalization navigation tree, select Personalization Settings > ApplicationPersonalization > Application Groups.
2. Select an application group.
3. From the Personalization ribbon, click Add Application > Select Application.
The Select Applications dialog displays.
4. Click New > From Application Data Collection.
The Add Application - Data Collection dialog displays. The dialog lists applications that havebeen collected by Application Data Collection.
Copyright © 2017 , Ivanti. All Rights Reserved. Terms of Use.
Page 76 of 145

Environment Manager 10.1 Personalization Product Guide
5. Select one of the following radio buttons to target specific application versions:o Use Major Application Version - Applications are grouped by their major version
number. For example, 5.0 and 5.1 are grouped together, but 6.0 is separate.o Use All Application Versions - Applications are grouped, regardless of their version
number. For example, 5.0, 5.1 and 6.0 are grouped together.6. Select an application from the list.
7. Click View automatic configuration details.
A read-only copy of the configuration displays.
8. From the snapshot taken at each application close, the following statistics are calculated anddisplayed alongside each registry key or folder path for all users that have run the application:
o Occurrences - The total number of times that the registry path or folder path has beenaccessed by the application.
o Average Size - The average size of the data in the registry key or folder from eachapplication close. For example, a size of 100 bytes at the first application close and a sizeof 200 bytes at the second application close displays as an average size of 150 bytes.
o Peak Size - The largest recorded size of the data in the registry key or folder from eachapplication close. For example, a size of 100 bytes at the first application close and a sizeof 200 bytes at the second application close displays as a peak size of 200 bytes.
The cumulative sizes of the Average Size and Peak Size displays at the bottom of the dialog. Thisinformation shows the potential profile size per user if the application is personalized.
9. Click Done to close the automatic configuration view.
The automatic configuration closes.
10. Click OK.
The Enter Details dialog displays.
11. In the Name field, enter a name to uniquely identify the application within the EnvironmentManager console. Applications must not have the same name as existing applications orApplication Groups.
12. Click OK.13. Select the new application in the list and click OK.
The application is created and added to the Application Group.
Add a New Application to an Application Group from ApplicationData Collection (Manual)
1. In the User Personalization navigation tree, select Personalization Settings > ApplicationPersonalization > Application Group.
Copyright © 2017 , Ivanti. All Rights Reserved. Terms of Use.
Page 77 of 145

Environment Manager 10.1 Personalization Product Guide
2. Select an application group.3. From the Personalization ribbon, click Add Application > Select Application from the
Personalization ribbon.
The Select Applications dialog displays.
4. Click New > From Application Data Collection.
The Add Application - Data Collection dialog displays. The dialog lists applications that havebeen collected by Application Data Collection.
5. Select one of the following radio buttons to target specific application versions:6. Use Major Application Version - Applications are grouped by their major version number. For
example, 5.0 and 5.1 are grouped together, but 6.0 is separate.7. Use All Application Versions - Applications are grouped, regardless of their version number.
For example, 5.0, 5.1 and 6.0 are grouped together.8. Tick No, I want to configure this application manually (advanced).9. Click Configure.
The dialog lists all registry keys and folder paths which have been collected by ApplicationData Collection for the selected application.
10. From the snapshot taken at each application close, the following statistics are calculated anddisplayed alongside each registry key or folder path for all users that have run the application:
o Occurrences - The total number of times that the registry path or folder path has beenaccessed by the application.
o Average Size - The average size of the data in the registry key or folder from eachapplication close. For example, a size of 100 bytes at the first application close and a sizeof 200 bytes at the second application close displays as an average size of 150 bytes.
o Peak Size - The largest recorded size of the data in the registry key or folder from eachapplication close. For example, a size of 100 bytes at the first application close and a sizeof 200 bytes at the second application close displays as a peak size of 200 bytes.
11. If required, tick Hide paths which are rarely personalized to filter out paths which are notrecommended for inclusion.
12. Tick the registry and folder paths to be added as inclusions for the Application Group.13. As paths are selected and deselected, the Application Profile Size updates with the cumulative
sizes of the Average Size and Peak Size for the selected paths. This information shows thepotential profile size per user if the application is personalized.
14. Click OK.
The Enter Details dialog displays.
Copyright © 2017 , Ivanti. All Rights Reserved. Terms of Use.
Page 78 of 145

Environment Manager 10.1 Personalization Product Guide
15. In the Name field, enter a name to uniquely identify the application within the EnvironmentManager console. Applications must not have the same name as existing applications orApplication Groups.
16. Click OK.
The application is created and is listed in the Select Applications dialog.
17. Select the new application in the list and click OK.
The application is added to the Application Group.
Add a New Application by Name to an Application Group1. In the User Personalization navigation tree, select Personalization Settings > Application
Personalization > Application Groups.2. Select an application group.
3. From the Personalization ribbon, click Add Application > Select Application from thePersonalization ribbon.
The Select Applications displays.
4. Click New > By Name.
5. In the Application field, enter an application executable name or click the ellipsis (...) to select anapplication from the file system.
6. Optionally, in the Folder field, enter a folder path or click the ellipsis to select a folder from thefile system. The application is managed only if it is located in the specified folder.
If the field is left blank, all applications matching the entered criteria are managed, regardless oflocation.
7. In the Name field, enter a name to uniquely identify the application within the EnvironmentManager console. Applications must not have the same name as existing applications orApplication Groups.
8. Optionally, in the Operating System and Application Version fields, specify regular expressionsto target a specific operating system or application version. Alternatively, use the .* defaultregular expression to include all operating systems and application versions.
The specified combination of executable name, operating system and application version mustnot match existing applications.
9. Click OK.
The application is created and is listed in the Select Applications dialog.
10. Select the new application in the list and click OK.
The application is added to the Application Group.
Copyright © 2017 , Ivanti. All Rights Reserved. Terms of Use.
Page 79 of 145

Environment Manager 10.1 Personalization Product Guide
Path Based Configuration of Application GroupsWhen configuring an application group, a file path to a folder can be specified so that any applicationrun from that location is managed. This means that applications do not need to be individually addedto a group if those applications are in the managed folder.
For example, rather than adding each individual Microsoft Office application to a group, you candefine the path to the Microsoft Office folder. When Word, Excel and Outlook are opened from thislocation, they are managed by the Microsoft Office application group.
Configure an Application Group Using Managed Folders
1. In the User Personalization navigation tree, select Personalization Settings > ApplicationPersonalization > Application Groups.
2. Select an application group.
3. From the Personalization ribbon, click Add Managed Folder.
The Add Managed Folder dialog displays.
4. Enter a valid path or browse to the required folder.
Paths must adhere to the following rules:
o Local and mapped drives are supportedo UNC paths are not supportedo For the applications to be personalized, the path must exist on the managed endpointo CSIDL paths are supported and are expanded to suit the target operating systemo All paths act as wildcards; an asterisk (*) is not requiredo Standard application group rules apply regarding synchronization with the
Personalization Server.5. Enter an Operating System. Alternatively, to include all operating systems, use the default
regular expression (.*)
6. Select theManage all subfolders checkbox as required.
If unchecked, only applications in the top level folder will be managed.
7. Click OK to add the folder to the Managed Folders for the personalization group.
Application Group TemplatesApplication Group templates contain configuration details about the Application Groups andapplications within the group.
Copyright © 2017 , Ivanti. All Rights Reserved. Terms of Use.
Page 80 of 145

Environment Manager 10.1 Personalization Product Guide
Export an Application Group
1. In the User Personalization navigation tree, select Personalization Settings > ApplicationPersonalization > Application Group.
2. Right-click an application group and select Export Application Group Template.
The Save As dialog displays.
3. Select a location to save the template and click OK.
An XML file containing the configuration details about the Application Group and applications withinthe group is created in the specified location.
Export multiple Application Groups
1. In the User Personalization navigation tree, select Personalization Settings > ApplicationPersonalization > Application Group.
2. Right-click an application group and select Export Application Group Template from thecontext menu.
The Export Application Groups dialog displays.
3. Select one or more Application Groups to export.
4. Click OK.
The Save As dialog displays.
5. Select a location to save the template and click OK.
An XML file containing the configuration details about the selected Application Groups andapplications within the groups is created in the specified location.
Import Application Groups
1. In the User Personalization navigation tree, select Personalization Settings > ApplicationPersonalization > Application Group.
2. Right-click an application group and select Import Application Group Template from thecontext menu.
3. The Import Application Groups dialog displays.
Copyright © 2017 , Ivanti. All Rights Reserved. Terms of Use.
Page 81 of 145
Environment Manager 10.1 Personalization Product Guide
4. Select one of the following radio buttons:
o Import from AppSense templates - In built Application Group templates are availablefor commonly personalized applications, such as Microsoft Internet Explorer andMicrosoft Office. These templates contain recommended inclusions and exclusions forpersonalization.
o Import from exported configuration - Application Groups can be imported where aninbuilt Application Group template does not exist. When selected, a file browser displaysfor an Environment Manager Personalization configuration to be selected.
5. Select the Applications Groups to import. To select all Application Groups, select ApplicationGroups at the top of the list.
6. Click OK.
The selected Application Groups are imported into the configuration.
ApplicationsThe applications list allows a library of applications to be configured which can be quickly added toApplication Group and Personalization Groups for personalization.
Applications can be specified by version and operating system allowing different instances of the sameapplication to be personalized independently, even when the executable has the same name.
Add a New Application from Application Data Collection (Automatic)1. In the User Personalization navigation tree, select Personalization Settings > Application
Personalization > Applications.
2. In the Personalization ribbon, click Add Application > From Application Data Collection.
The Add Application - Data Collection dialog displays. The dialog lists applications that havebeen collected by Application Data Collection.
3. Select one of the following radio buttons to target specific application versions:o Use Major Application Version - Applications are grouped by their major version
number. For example, 5.0 and 5.1 are grouped together, but 6.0 is separate.o Use All Application Versions - Applications are grouped, regardless of their version
number. For example, 5.0, 5.1 and 6.0 are grouped together.4. Select an application from the list.
Copyright © 2017 , Ivanti. All Rights Reserved. Terms of Use.
Page 82 of 145

Environment Manager 10.1 Personalization Product Guide
5. Click View automatic configuration details.
A read-only copy of the configuration displays.
From the snapshot taken at each application close, the following statistics are calculated anddisplayed alongside each registry key or folder path for all users that have run the application:
o Occurrences - The total number of times that the registry path or folder path has beenaccessed by the application.
o Average Size - The average size of the data in the registry key or folder from eachapplication close. For example, a size of 100 bytes at the first application close and a sizeof 200 bytes at the second application close displays as an average size of 150 bytes.
o Peak Size - The largest recorded size of the data in the registry key or folder from eachapplication close. For example, a size of 100 bytes at the first application close and a sizeof 200 bytes at the second application close displays as a peak size of 200 bytes.
The cumulative sizes of the Average Size and Peak Size displays at the bottom of the dialog. Thisinformation shows the potential profile size per user if the application is personalized.
6. Click Done to close the automatic configuration view.
The automatic configuration closes.
7. Click OK.
The Enter Details dialog displays.
8. In the Name field, enter a name to uniquely identify the application within the EnvironmentManager console. Applications must not have the same name as existing applications orApplication Groups.
Applications must be added to a new or existing Application Group:
o New Application Group - Specify the Application Group name in the Create NewApplication Group field. Application Groups must not have the same name as existingapplications or Application Groups.
o Existing Application Group - Select an existing Application Group in the Add to ExistingApplication Group field.
9. Click OK.
The application is created and is visible within the Applications work area.
The registry and folder paths from the Application Data Collection automatic configuration are addedas inclusions for the application. The global registry, folder and file path inclusions are added asexclusions for the application to ensure that unexpected data is not captured for the application.
Copyright © 2017 , Ivanti. All Rights Reserved. Terms of Use.
Page 83 of 145

Environment Manager 10.1 Personalization Product Guide
Add a New Application from Application Data Collection (Manual)1. In the User Personalization navigation tree, select Personalization Settings > Application
Personalization > Applications.
2. In the Personalization ribbon, click Add Application > From Application Data Collection.
The Add Application - Data Collection dialog displays. The dialog lists applications that havebeen collected by Application Data Collection.
3. Select one of the following radio buttons to target specific application versions:o Use Major Application Version - Applications are grouped by their major version
number. For example, 5.0 and 5.1 are together, but 6.0 is separate.o Use All Application Versions - Applications are grouped, regardless of their version
number. For example, 5.0, 5.1 and 6.0 are grouped together.4. Tick No, I want to configure this application manually (advanced).
5. Click Configure.
The dialog lists all registry keys and folder paths which have been collected by Application DataCollection for the selected application.
From the snapshot taken at each application close, the following statistics are calculated anddisplayed alongside each registry key or folder path for all users that have run the application:
o Occurrences - The total number of times that the registry path or folder path has beenaccessed by the application.
o Average Size - The average size of the data in the registry key or folder from eachapplication close. For example, a size of 100 bytes at the first application close and a sizeof 200 bytes at the second application close displays as an average size of 150 bytes.
o Peak Size - The largest recorded size of the data in the registry key or folder from eachapplication close. For example, a size of 100 bytes at the first application close and a sizeof 200 bytes at the second application close displays as a peak size of 200 bytes.
6. If required, tick Hide paths which are rarely personalized to filter out paths which are notrecommended for inclusion.
7. Tick the registry and folder paths to be added as inclusions for the Application Group.
As paths are selected and deselected, the Application Profile Size updates with the cumulativesizes of the Average Size and Peak Size for the selected paths. This information shows thepotential profile size per user if the application is personalized.
8. Click OK.
The Enter Details dialog displays.
Copyright © 2017 , Ivanti. All Rights Reserved. Terms of Use.
Page 84 of 145

Environment Manager 10.1 Personalization Product Guide
9. In the Name field, enter a name to uniquely identify the application within the EnvironmentManager console. Applications must not have the same name as existing applications orApplication Groups.
Applications must be added to a new or existing Application Group:
o New Application Group - Specify the Application Group name in the Create NewApplication Group field. Application Groups must not have the same name as existingapplications or Application Groups.
o Existing Application Group - Select an existing Application Group in the Add to ExistingApplication Group field.
The application is created and is visible within the Applications work area.
10. Click OK.
The registry and folder paths from the Application Data Collection manual configuration are added asinclusions for the application. The global registry, folder and file path inclusions are added asexclusions for the application to ensure that unexpected data is not captured for the application.
Add a New Application by Name1. In the User Personalization navigation tree, select Personalization Settings > Application
Personalization > Application Group.2. Select an application group.
3. From the Personalization ribbon, click Add Application > Select Application.
The Select Applications displays.
4. Click New > By Name.
The Add an Application dialog displays.
5. In the Application field, enter an application executable name or click the ellipsis (...) to select anapplication from the file system.
6. Optionally, in the Folder field, enter a folder path or click the ellipsis to select a folder from thefile system. The application is managed only if it is located in the specified folder. If the field isleft blank, all applications matching the entered criteria are managed, regardless of location.
7. In the Name field, enter a name to uniquely identify the application within the EnvironmentManager console. Applications must not have the same name as existing applications orApplication Groups.
8. Optionally, in the Operating System and Application Version fields, specify regular expressionsto target a specific operating system or application version. Alternatively, use the .* defaultregular expression to include all operating systems and application versions.
Copyright © 2017 , Ivanti. All Rights Reserved. Terms of Use.
Page 85 of 145
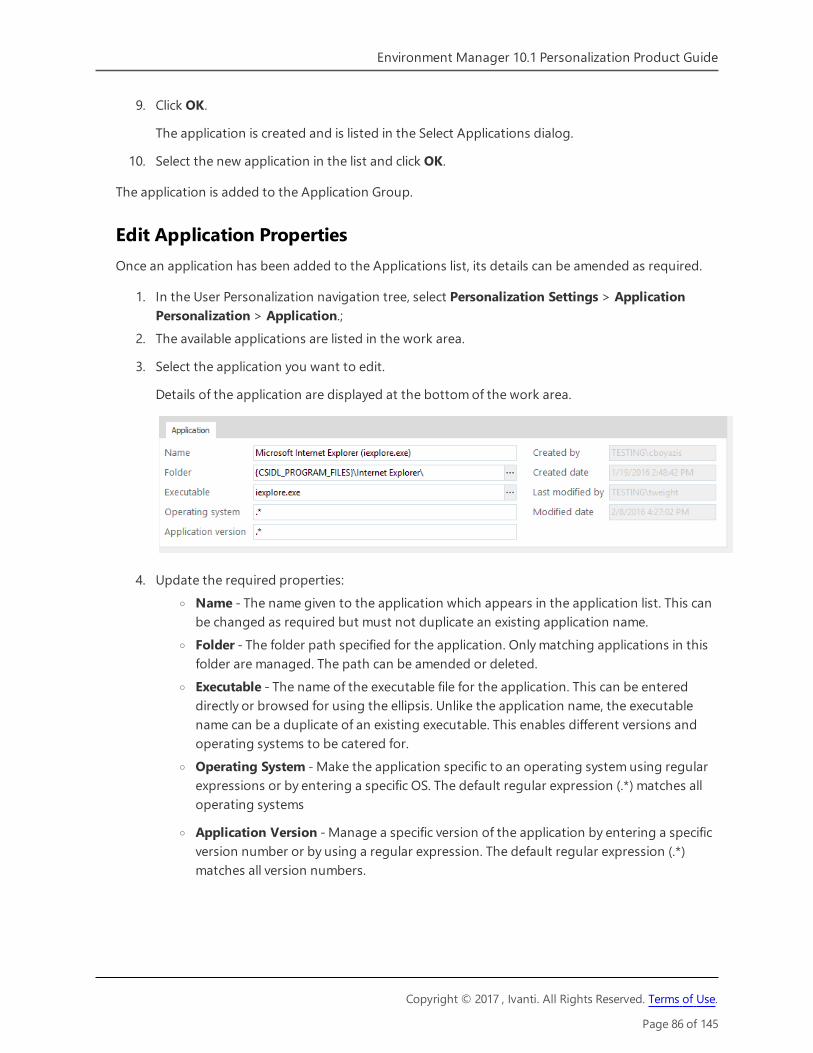
Environment Manager 10.1 Personalization Product Guide
9. Click OK.
The application is created and is listed in the Select Applications dialog.
10. Select the new application in the list and click OK.
The application is added to the Application Group.
Edit Application PropertiesOnce an application has been added to the Applications list, its details can be amended as required.
1. In the User Personalization navigation tree, select Personalization Settings > ApplicationPersonalization > Application.;
2. The available applications are listed in the work area.
3. Select the application you want to edit.
Details of the application are displayed at the bottom of the work area.
4. Update the required properties:o Name - The name given to the application which appears in the application list. This can
be changed as required but must not duplicate an existing application name.o Folder - The folder path specified for the application. Only matching applications in this
folder are managed. The path can be amended or deleted.o Executable - The name of the executable file for the application. This can be entered
directly or browsed for using the ellipsis. Unlike the application name, the executablename can be a duplicate of an existing executable. This enables different versions andoperating systems to be catered for.
o Operating System - Make the application specific to an operating system using regularexpressions or by entering a specific OS. The default regular expression (.*) matches alloperating systems
o Application Version - Manage a specific version of the application by entering a specificversion number or by using a regular expression. The default regular expression (.*)matches all version numbers.
Copyright © 2017 , Ivanti. All Rights Reserved. Terms of Use.
Page 86 of 145

Environment Manager 10.1 Personalization Product Guide
The combination of Application executable name, Operating System and Application Versionmust be unique.
Adding a regular expression such as 11.* matches anywhere in the version string, for example,in 11.1.2.3 and 4.5.11.2.
To match only the start of the string, prefix the regular expression with a caret (^). For example,^11.* matches 11.1.2.3 but does not match 4.5.11.2.
The Application tab also includes creation and modification dates and details of the user whoperformed the actions.
The regular expressions used in Environment Manager conform to MicrosoftCAtIRegExp Class framework.
5. Click away from the fields, such as within the work area, to automatically update the editeddetails in the Application - User list.
Delete an Application from the Applications ListTo delete an application, select it from the applications list, right-click and select Delete.
Environment Manager checks where the application is referenced in the configuration and displaysany dependencies the application has, such as belonging to an application or personalization group.Use this information to amend your personalization configuration if required.
Deleting an application removes every instance of that application; it will be removed from allapplication and Personalization groups
Inclusions and ExclusionsSpecific registry keys, registry values, folders and files can be included in or excluded fromPersonalization at the following levels:
l Application Group - Inclusions and exclusions that apply to all applications in an ApplicationGroup. It is recommended that inclusions and exclusions are added at Application Group level.
l Global - Inclusions and exclusions that apply to all managed applications, unless contradictedat Application Group or application level.
l Application - Inclusions and exclusions that apply to individual applications. Application levelinclusions and exclusions can be viewed or edited only when ungrouped applications exist thatare not part of any Application Group.
Application Group inclusions and exclusions take precedence over those set at global and applicationlevels. This ensures consistency across all applications within a group.
Copyright © 2017 , Ivanti. All Rights Reserved. Terms of Use.
Page 87 of 145

Environment Manager 10.1 Personalization Product Guide
Files with .tmp extensions are excluded by default. This can cause issues with some managedapplications if the virtual cache is on a different drive than the user's profile. If you want to usethe virtual cache on a different drive, remove .tmp from the global file exclusion list.
Files and folders, registry keys and values can be excluded using Personalization Analysis reports.
Inclusion and Exclusion RulesThe following rules apply to inclusions and exclusions:
l Everything is excluded by default - to personalize something, it must be explicitly included.l Exclusions take priority over inclusions, except where the include path is deeper.l Inclusions and exclusions apply to the path and all sub-folders, subject to the rules.l A filename added to exclusions will exclude that file from all locations. For inclusions, the full file
path must be specified. For example, File.tmp is a valid exclusion but an invalid inclusion.l Wildcards can be used anywhere in a registry path inclusion and exclusion. However, for files,
wildcards can be only be used for the filename - the path cannot include wildcards.
Using wildcards in includes and excludes can affect performance by increasing processingtimes.
Inclusion and Exclusion ExamplesThe two tables below show examples of inclusions and exclusions and the behavior displayed incertain situations for files, folders and registry keys.
Registry
Include Path Exclude Path Behavior
Exclude everythingNothing ispersonalized as to personalizesomething, it must be explicitly included.
HKCU\Software\Key HKCU\Software\Key Exclude HKCU\Software\Key Theregistry exclusion is applied as exclusionstake priority over inclusions.
HKCU\Software\Key HKCU\Software Exclude HKCU\SoftwareIncludeHKCU\Software\Key Although theinclusion is within the exclusion path,the registry inclusion is applied as itspath is deeper.
Copyright © 2017 , Ivanti. All Rights Reserved. Terms of Use.
Page 88 of 145

Environment Manager 10.1 Personalization Product Guide
Include Path Exclude Path Behavior
HKCU\Software HKCU\Software\Key Include HKCU\SoftwareExcludeHKCU\Software\Key Although theexclusion is within the inclusion path,the registry exclusion is applied as itspath is deeper.
HKCU\Software\Key\Value HKCU\Software\Key\Value Exclude HKCU\Software\Key\ValueThe registry exclusion is applied asexclusions take priority over inclusions.
HKCU\Software\Key\Value HKCU\Software\Key IncludeHKCU\Software\Key\ValueExcludeHKCU\Software\Key Although theinclusion is within the exclusion path,the registry inclusion is applied as itspath is deeper.
HKCU\Software\Key HKCU\Software\Key\Value Include HKCU\Software\KeyExcludeHKCU\Software\Key\Value Althoughthe exclusion is within the inclusionpath, the registry exclusion is applied asits path is deeper.
File and Folder
Include Path Exclude Path Behavior
Exclude everythingNothing ispersonalized as to personalize something,it must be explicitly included.
C:\Folder C:\Folder Exclude C:\Folder The folder exclusion isapplied as exclusions take priority overinclusions.
C:\Folder\AppSense C:\Folder Exclude C:\FolderIncludeC:\Folder\AppSense Although theinclusion is within the exclusion path, thefolder inclusion is applied as its path isdeeper.
C:\Folder C:\Folder\AppSense Include C:\FolderExcludeC:\Folder\AppSense Although the
Copyright © 2017 , Ivanti. All Rights Reserved. Terms of Use.
Page 89 of 145

Environment Manager 10.1 Personalization Product Guide
Include Path Exclude Path Behavior
exclusion is within the inclusion path, thefolder exclusion is applied as its path isdeeper.
C:\File.tmp C:\File.tmp Exclude C:\File.tmp The file exclusion isapplied as exclusions take priority overinclusions.
C:\Folder\File.tmp File.tmp Exclude C:\File.tmp The file exclusion isapplied as full paths are not required forexclusions and they take priority overinclusions
C:\Folder\File.tmp C:\Folder Include C:\Folder\File.tmp The fileinclusion is applied as the path is deeper.
As everything is excluded bydefault, it is not recommendedthat whole folders are excluded asthis requires unnecessaryprocessing which has a negativeeffect on performance.
C:\Folder C:\Folder\File.tmp Exclude C:\Folder\File.tmp The fileexclusion is applied as the path is deeper.
Application Group Inclusions and ExclusionsInclusions and exclusions for registry, folder and file paths can be added that apply to all applicationswithin an Application Group.
It is recommended that inclusions and exclusions are added at Application Group level.
Add Application Group Inclusions using Application Data Collection
Application Data Collection passively collects data from managed endpoints as users run applications.
Registry key and folder paths that are written to and read from are recorded for each application. Onapplication close, the data is stored in the Environment Manager Personalization database.
1. In the User Personalization navigation tree, select Personalization Settings > ApplicationPersonalization > Application Group.
2. Select an application group.
Copyright © 2017 , Ivanti. All Rights Reserved. Terms of Use.
Page 90 of 145

Environment Manager 10.1 Personalization Product Guide
3. From the Personalization ribbon, click Add Application > Select Application.
The Select Applications dialog displays.
4. Click New > From Application Data Collection.
The Add Application - Data Collection dialog displays. The dialog lists applications that havebeen collected by Application Data Collection.
5. Select the application from which to add the folder or registry inclusions.6. Tick No, I want to configure this application manually (advanced).
7. Click Configure.
The dialog lists all registry keys and folder paths which have been collected by Application DataCollection for the selected application. Existing inclusions are selected.
8. Tick the registry and folder paths to be added as inclusions for the Application Group. Unlessexplicitly excluded, child paths are included with their parent path. When a parent path isselected, the child paths are automatically deselected and disabled.
9. Click OK.
The Enter Details dialog displays. The Application name is read-only.
10. Click OK.
The selected registry and folder paths are added as inclusions to the Application Group.
Add Application Group Registry Inclusions or Exclusions Manually
1. In the User Personalization navigation tree, select Personalization Settings > ApplicationPersonalization > Application Groups.
2. Select an application group.3. Select the Registry tab.4. In either the Include or Exclude area and select Add Registry Key.
The Select Registry Key dialog displays.
5. In the Key field, select the ellipsis (...) to browse for the registry key or manually enter the pathand key name into the field.
Wildcards can be used anywhere in a registry path to represent one or more characters. Forexample, adding *.0 to the path for Microsoft Outlook means all versions of Outlook can beincluded or excluded with one entry.HKCU\Software\Microsoft\Office\*.0\Outlook
The Browse Registry dialog displays. You can select from your local computer, current user orclick Connect to display the Active Directory Select Computer dialog to select anothercomputer to browse.
Copyright © 2017 , Ivanti. All Rights Reserved. Terms of Use.
Page 91 of 145

Environment Manager 10.1 Personalization Product Guide
6. Locate the required Registry Key and click OK.
The selected registry key is entered in the Select Registry Key dialog.
7. Click OK.
The registry key is added as an inclusion or exclusion for the Application Group.
Add Application Group Folder Inclusions or Exclusions Manually
1. In the User Personalization navigation tree, select Personalization Settings > ApplicationPersonalization > Application Group.
2. Select an application group.3. Select the Folder tab.
4. In either the Include or Exclude area and select Add Folder.
The Select Folder dialog displays.
5. In the Path field, select the ellipsis (...) to browse for the folder. The path can also be enteredmanually into the field.
The Browse for Folder dialog displays. You can select an existing folder from your localcomputer or click theMake New Folder button to create a new folder for inclusion orexclusion.
6. Locate the required folder and click OK.7. The selected folder path is entered in the Select Folder dialog.8. Click OK.
The folder path is added as an inclusion or exclusion for the Application Group.
Add Application Group File Inclusions or Exclusions Manually
1. In the User Personalization navigation tree, select Personalization Settings > ApplicationPersonalization > Application Group.
2. Select an application group.3. Select the File tab.
4. In either the Include or Exclude area and select Add File.
The Select File dialog displays.
5. In the Path field, select the ellipsis (...) to browse for the file. The path can also be enteredmanually into the field.
6. Locate the required file and click OK.
Copyright © 2017 , Ivanti. All Rights Reserved. Terms of Use.
Page 92 of 145

Environment Manager 10.1 Personalization Product Guide
The selected file path is entered in the Select File dialog.
7. Click OK.
The file path is added as an inclusion or exclusion for the Application Group.
Global Inclusions and ExclusionsInclusions and exclusions for registry, folder and file paths can be added that apply to all managedapplications, unless contradicted at Application Group or application level.
It is recommended that inclusions and exclusions are added at Application Group level.
Add Global Registry Inclusions or Exclusions
1. Select the User Personalization navigation button.2. From the Manage ribbon, click Global Application Settings.3. Select the Registry tab.
4. Right-click in either the Include or Exclude area and select Add Registry Key.
The Select Registry Key dialog displays.
5. In the Key field, select the ellipsis (...) to browse for the registry key or manually enter the pathand key name into the field.
Wildcards can be used anywhere in a registry path to represent one or morecharacters.For example, adding *.0 to the path for Microsoft Outlook means all versions ofOutlook can be included or excluded with one entry.HKCU\Software\Microsoft\Office\*.0\Outlook
The Browse Registry dialog displays. You can select from your local computer, current user orclick Connect to display the Active Directory Select Computer dialog to select another computerto browse.
6. Locate the required Registry Key and click OK.
The selected registry key is entered in the Select Registry Key dialog.
7. Click OK.8. The registry key is added as a global inclusion or exclusion.
Add Global Folder Inclusions or Exclusions
1. Select the User Personalization navigation button.2. From the Manage ribbon, click Global Application Settings.
Copyright © 2017 , Ivanti. All Rights Reserved. Terms of Use.
Page 93 of 145
Environment Manager 10.1 Personalization Product Guide
3. Select the Folder tab.
4. Right-click in either the Include or Exclude area and select Add Folder.
The Select Folder dialog displays.
5. In the Path field, select the ellipsis (...) to browse for the folder. The path can also be enteredmanually into the field.
The Browse for Folder dialog displays. You can select an existing folder from your localcomputer or click theMake New Folder button to create a new folder for inclusion orexclusion.
6. Locate the required folder and click OK.
The selected folder path is entered in the Select Folder dialog.
7. Click OK.
The folder path is added as a global inclusion or exclusion.
Add Global File Inclusions or Exclusions
1. Select the User Personalization navigation button.2. From the Manage ribbon, click Global Application Settings.3. Select the File tab.
4. Right-click in the Include or Exclude areas and select Add File.
The Select File dialog displays.
5. In the Path field, select the ellipsis (...) to browse for the file. The path can also be enteredmanually into the field.
6. Locate the required file and click OK.
The selected file path is entered in the Select File dialog.
7. Click OK.
The file path is added as a global inclusion or exclusion.
Application Inclusions and ExclusionsWhere ungrouped applications exist that are not part of any Application Group, inclusions andexclusions for registry, folder and file paths can be added to an individual application.
It is recommended that inclusions and exclusions are added at Application Group level.
Copyright © 2017 , Ivanti. All Rights Reserved. Terms of Use.
Page 94 of 145

Environment Manager 10.1 Personalization Product Guide
Add Application Registry Inclusions or Exclusions
1. In the User Personalization navigation tree, select Personalization Settings > ApplicationPersonalization > Applications.
2. Select an application in the work area.3. Select the Registry tab.
4. Right-click in either the Include or Exclude area and select Add Registry Key.
The Select Registry Key dialog displays.
5. In the Key field, select the ellipsis (...) to browse for the registry key or manually enter the pathand key name into the field.
Wildcards can be used anywhere in a registry path to represent one or morecharacters.For example, adding *.0 to the path for Microsoft Outlook means all versions ofOutlook can be included or excluded with one entry.HKCU\Software\Microsoft\Office\*.0\Outlook
The Browse Registry dialog displays. You can select from your local computer, current user orclick Connect to display the Active Directory Select Computer dialog to select another computerto browse.
6. Locate the required Registry Key and click OK.
The selected registry key is entered in the Select Registry Key dialog.
7. Click OK.
The registry key is added as an inclusion or exclusion for the application.
Add Application Folder Inclusions or Exclusions
1. In the User Personalization navigation tree, select Personalization Settings > ApplicationPersonalization > Applications.
2. Select an application in the work area.3. Select the Folder tab.
4. Right-click in either the Include or Exclude area and select Add Folder.
The Select Folder dialog displays.
Copyright © 2017 , Ivanti. All Rights Reserved. Terms of Use.
Page 95 of 145

Environment Manager 10.1 Personalization Product Guide
5. In the Path field, select the ellipsis (...) to browse for the folder. The path can also be enteredmanually into the field.
The Browse for Folder dialog displays. You can select an existing folder from your localcomputer or click theMake New Folder button to create a new folder for inclusion orexclusion.
6. Locate the required folder and click OK.
The selected folder path is entered in the Select Folder dialog.
7. Click OK.
The folder path is added as an inclusion or exclusion for the application.
Add Application File Inclusions or Exclusions
1. In the User Personalization navigation tree, select Personalization Settings > ApplicationPersonalization > Applications.
2. Select an application in the work area.3. Select the File tab.
4. Right-click in the Include or Exclude areas and select Add File.
The Select File dialog displays.
5. In the Path field, select the ellipsis (...) to browse for the file. The path can also be enteredmanually into the field.
6. Locate the required file and click OK.
The selected file path is entered in the Select File dialog.
7. Click OK.
The file path is added as an inclusion or exclusion for the application.
Copyright © 2017 , Ivanti. All Rights Reserved. Terms of Use.
Page 96 of 145

Environment Manager 10.1 Personalization Product Guide
Application Data CollectionApplication Data Collection passively collects data from managed endpoints as users run applications.The collected data can be used to create new applications and add to registry and folder inclusions toexisting Application Groups.
Registry key and folder paths that are written to and read from are recorded for each application. Onapplication close, the data is stored in the Environment Manager Personalization database.
The registry and folder paths from the Application Data Collection configuration are added asinclusions. The global registry, folder and file path inclusions are added as exclusions for theApplication Group to ensure that unexpected data is not captured.
Caution: Enabling Application Data Collection causes an increase in system utilization onmanaged endpoints.It is recommended that Application Data Collection is disabled when no longer required.
Add New ApplicationsNew applications can be added to the below locations using Application Data Collection.
Location Process
PersonalizationGroups
Add a New Application to a Personalization Group from Application DataCollection
ApplicationGroups
Add a New Application to an Application Group from Application DataCollection (Automatic)Add a New Application to an Application Group fromApplication Data Collection (Manual)
Applications Add a New Application from Application Data Collection (Automatic)Add a NewApplication from Application Data Collection (Manual)
Add InclusionsRegistry and folder inclusions can be added to existing Application Groups using Application DataCollection.
See Add Application Group Inclusions using Application Data Collection
Copyright © 2017 , Ivanti. All Rights Reserved. Terms of Use.
Page 97 of 145

Environment Manager 10.1 Personalization Product Guide
Windows PersonalizationWindows Settings, such as wallpaper selection, mouse options and accessibility features, can bepersonalized for managed users through Environment Manager Windows Personalization. This isachieved by personalizing the appropriate registry keys and values, files and folders. The settings auser applies to their desktop are saved to the personalization database when a user logs off andrestored when the user logs onto any managed endpoint.
Windows Settings GroupsWindows Settings can be grouped together in Windows Settings Groups and added toPersonalization Groups in order to personalize the appropriate settings for groups of users. Thisallows a higher level of granularity, enabling settings to be personalized and rolled back in individualgroups. Further control can be achieved by adding conditions that specify how groups of WindowsSettings are applied.
Environment Manager contains default Windows Settings Groups that personalize the most commonWindows Settings. When you expand Windows Personalization, the pre-configured Windows SettingsGroups are displayed with any groups you have added yourself.
All groups can be used as they are, edited to your requirements or new groups, containing existing orCustom Windows Settings, can be created. Groups can also be cloned to create a new group based onthe settings of an existing one.
Windows Settings Groups and Inclusion LogicWhen you assign a Windows Settings Group containing registry or file inclusions to a PersonalizationGroup, this automatically excludes those included locations from application virtualization for thatPersonalization Group. When a condition has been configured for a Windows Settings Group, thefollowing logic applies on the endpoint:
l If the condition evaluates as True, the Windows Settings Group data is applied to the user'ssession and the inclusion paths are excluded globally from application virtualization.
l If the condition evaluates as False, the Windows Settings Group data is preserved in thedatabase but is not applied to the user's session. The inclusion paths in the Windows SettingsGroup are still excluded from the app bubble. When the user roams back to the machine with apassing condition, the data is applied.
Create a Windows Settings Group1. In the User Personalization navigation tree, select Windows Personalization.2. From the Personalization ribbon, click Add Windows Settings Group.
Copyright © 2017 , Ivanti. All Rights Reserved. Terms of Use.
Page 98 of 145

Environment Manager 10.1 Personalization Product Guide
3. Enter a name and an optional description and click OK. The Windows Settings Group namemust not be a duplicate of an existing group or a reserved name, for example, W7 and W8.
The Windows Settings Group displays in the work area.
4. Click Add/Remove.
The Add/Remove Items dialog displays.
5. Select the required settings from the left pane and click the right arrow to add them to theWindows Settings Group.
Copyright © 2017 , Ivanti. All Rights Reserved. Terms of Use.
Page 99 of 145

Environment Manager 10.1 Personalization Product Guide
6. Multiple settings can be selected using the Ctrl or Shift keys.
An emboldened setting means that the setting is used in another Windows Settings Group. Tosee which groups it is used in, highlight the setting and select the In Groups tab at the bottomof the dialog.
Copyright © 2017 , Ivanti. All Rights Reserved. Terms of Use.
Page 100 of 145

Environment Manager 10.1 Personalization Product Guide
To see which registry keys and values, files and folders are personalized, highlight a WindowsSetting on either side of the dialog and select the appropriate tab.
If the setting you want to personalize is not available, click the Create WindowsSetting link to configure a Custom Windows Setting.
7. Once you have added all the required settings, click OK to save the Windows Settings Group.
The settings you have added for the group are displayed in the work area.
Settings can be deleted from the group or you can click the Add/Remove button to fully edit thegroup.
Add Conditions to a Windows Setting Group1. Create conditions to determine when Windows Settings are applied, for example, when a
particular registry key or folder exists.2. Select a Windows Settings Group.3. Click AddCondition.
Copyright © 2017 , Ivanti. All Rights Reserved. Terms of Use.
Page 101 of 145

Environment Manager 10.1 Personalization Product Guide
4. Enter a name for the Windows Settings Group Condition. If you want to use the condition inanother Windows Settings Group, you must enter a name. If you are adding conditions for thisgroup only, a name is not required.
5. Select theMake available for reuse checkbox if you want the condition to be available forother Windows Settings Groups.
To apply an existing Windows Settings Group Condition, select the Use existing conditionradio button and choose the required condition from the drop-down. The list includesconditions you have already configured and built-in conditions for Windows 7 and Windows 8.Conditions for Windows 10 operating systems are only available as custom conditions.
6. Click the Conditions drop-down and select a condition.7. You can add multiple conditions and utilize AND/OR statements to create a configuration of
conditions to apply to the Windows Settings Group as required. Move, remove and editconditions using the toolbar.
8. Click OK to save the Windows Settings Group Condition. The condition is applied to theWindows Settings Group and displayed in the work area.
9. Edit a Windows Settings Group10. Select a Windows Settings Group to edit the settings managed by that group and to manage
its conditions. The following options are available:11. Add/Remove - Open the Add/Remove Items dialog to configure the Windows Settings for the
group.12. Delete - Delete the selected Windows Setting.13. Delete All - Delete all Windows Settings for the group.14. Edit Condition - Open the Windows Settings Group Condition dialog to configure conditions
for the group. If there are no current conditions for the group, the click the Add Conditionbutton.
15. Remove Condition - Remove the condition that applies to the Windows Settings.
Clone a Windows Settings GroupSelect a Windows Settings group and click Personalization > Clone Windows Settings Group.
A copy is made of the selected group and can be edited as required.
Custom Windows SettingsUsing the Custom Windows Settings Editor, you can create your own Windows Settings by selectingregistry keys, values, folders and individual files to personalize or exclude from personalization. Oncecreated, the setting can be added to Windows Settings Groups.
From the Personalization ribbon, select Custom Windows Settings Editor. The Custom WindowsSettings dialog is displayed. Any existing custom settings are listed.
The following options are available:
Copyright © 2017 , Ivanti. All Rights Reserved. Terms of Use.
Page 102 of 145

Environment Manager 10.1 Personalization Product Guide
l Add - Configure a setting which can then be added to Windows Settings Groups andpersonalized.
l Edit - Update the selected custom setting.l Remove - Delete the selected setting from the list. If you attempt to remove a setting which is
referenced in a Windows Setting Group, you will be asked to confirm the delete. Each group inwhich the setting is referenced is listed. This helps to ensure that a setting is not removed inerror.
l Clone - The clone function makes a copy of an existing Windows setting and allows theconfigured registry keys and folders to be updated as required.
Certificate, Credentials and Start Menu Windows Settings cannot be cloned.
Windows Settings are configured using the following properties:
Property Description
Name The name that appears in the Windows Personalization list.
Description An optional description used to tell users more about the setting and what it does.
OS The operating system to which the setting applies. Separate tabs are created foreach selected operating system so specific folders and keys can be configured foreach. This allows differences between operating systems can be taken into accountwhen the setting is applied. If you want to configure one setting, managing thesame folders and keys across all operating systems, select All. If you change asetting from individual operating systems to All, select whether to inherit thesettings applied to one of the operating systems or configure new settings. The Alltab and individual operating system tabs cannot be displayed simultaneously.However, when you clone some Windows Settings, multiple OS tabs, including theAll tab, may initially be shown. Before you save the setting either keep the All taband remove the individual operating systems tabs or remove the All tab. If you donot remove any of the tabs, the OS tabs are automatically removed leaving only theAll tab.
Folder The folder to personalize or to exclude from personalization. Enter a folder path orselect the ellipsis (...) and browse to the folder. Folder paths must start with aCSIDL, a system variable, or a letter. Wildcards are not supported.
If an item is required for more than one operating system, highlight the requireditem select an operating system from the drop-down and click Copy To. If you donot want to personalize an item and it is included in personalization because aparent item it its folder or registry path is included, select the Exclude checkbox forthat item.
File Name The file to personalize or to exclude from personalization. Click the ellipsis in the
Copyright © 2017 , Ivanti. All Rights Reserved. Terms of Use.
Page 103 of 145

Environment Manager 10.1 Personalization Product Guide
Property Description
File Name field to browse to a file or enter the folder path and file name manually.You can use the following wildcards in the file name: *, ?, and [ ].
When using wildcards to include or exclude items, be aware that the more specificfolder or registry path takes priority. If paths are of equal length, the exclusiontakes priority. For more information see, Inclusions and Exclusions.
Key The registry key to personalize or to exclude from personalization. Click the ellipsisin the Key field to open a registry browser and select the key. Or enter the registrykey path manually. You can use the following wildcards: *, ?, and [ ].
Value Enter the registry key value to personalize or to exclude from personalization. Youcan use the following wildcards: *, ?, and [ ].
It is not possible to enter the backslash character \ in the registry keyValue text.
Default Windows Settings GroupsThe following Windows Settings Groups are available by default. Click on a group to view whichWindows Settings are managed by that group.
Accessibilityl Accessibility Keyboardl Audio and Soundsl Tabletsl Visual Settings
Action Centerl Action Center Settings
Active Setupl ActiveSetup
Explorer Settingsl General Folder Optionsl Librariesl Linksl Mapped Network Drivesl Mapped Network Printers
Copyright © 2017 , Ivanti. All Rights Reserved. Terms of Use.
Page 104 of 145

Environment Manager 10.1 Personalization Product Guide
l Network Location Shortcutsl Search Folder Optionsl View Folder Options
IE10+ Cookies and History (W7, WS 2K8 R2)l IE Passwordsl IE Zonesl IE10+ Settings
IE10+ Cookies and History (W8.x, WS 2012, WS 2012 R2)l IE Passwordsl IE Zonesl IE10+ Settings
IE11 Cookies and History (W10, WS 2016)l IE Passwordsl IE Zonesl IE10+ Settings
IE8-9 Cookies and History (W7, WS 2008 R2)l IE Passwordsl IE Zonesl IE8-9 Settings
Input Devicesl Input Keyboardl Mouse
Mail Profile and Signaturesl Mail Signaturesl MAPI Profile
Region and Languagel Input Languagel Language Barl Localel MUI
Securityl Certificates
Copyright © 2017 , Ivanti. All Rights Reserved. Terms of Use.
Page 105 of 145

Environment Manager 10.1 Personalization Product Guide
l Credentials
Start Menu (W10, WS 2016)l Start Menu
Taskbar (W10, WS 2016)l Notification Areal Taskbarl Toolbars
Taskbar and Start Menu (W7, W8, WS 2008 R2, WS 2012, WS 2012 R2)l Notification Areal Start Menul Start Menu - Recently Launched Applicationsl Taskbarl Toolbars
Windows Appearance (W10, WS 2016)l Iconsl Themesl Window Color and Appearance
Windows Appearance (W7, WS 2008 R2)l Iconsl Themesl Window Color and Appearance
Windows Appearance (W8.x, WS 2012, WS 2012 R2)l Iconsl Themesl Window Color and Appearance
Windows Desktopl Account Picturel ClearTypel Icon Positions and Viewsl Screen Saverl Visual Effectsl Wallpaper
Copyright © 2017 , Ivanti. All Rights Reserved. Terms of Use.
Page 106 of 145

Environment Manager 10.1 Personalization Product Guide
As a user moves between managed endpoints with different operation systems and applications,some configured shortcuts are not valid for all environments. If users are managing folders usingWindows Settings Groups, Environment Manager manages the following temporarily invalidshortcuts:
Shortcut or Link Supported Operating System
Standard shortcuts in the Windows file system that point to atarget does not exist
All supported operatingsystems
Items pinned to the Taskbar that point to nonexistent paths All supported operatingsystems
Items pinned to the Start menu that point to nonexistent paths Windows 7, Windows Server2008 R2
Copyright © 2017 , Ivanti. All Rights Reserved. Terms of Use.
Page 107 of 145

Environment Manager 10.1 Personalization Product Guide
SitesLarger organizations typically utilize multiple sites to manage the User Personalization requirements oftheir users. Sites can be based on areas of the organization such as different departments,geographical location or any other logical division.
An Environment Manager site is made up of the following components:
l Client Endpointsl Personalization Server(s)l SQL Server
Each site uses this standard three-tier architecture and can be linked via their SQL servers throughreplication.
Within the Environment Manager console, sites are configured in the Sites node in the UserPersonalization navigation tree. All personalization configurations include a Default Site whichcontains the Personalization Server and database on which the software was installed and configured.This is typically set up as the main site for an organization, adding additional branch sites as required.If no further sites are configured, the Default Site is used.
Once a site has been created in the console, membership rules are used to define which endpointshave their personalization managed by that site. Personalization Servers and virtual hosts can then beadded to the site as required.
When a user logs on to an endpoint, they connect to the Personalization Server listed in the AEMPconfiguration file. Once connected, the Personalization Server gathers details of the user, theendpoint and software to determine which site and personalization group the user belongs.
Add a Personalization Site1. In the User Personalization tree, select Personalization Settings > Sites.2. Select Add Site on the Server ribbon.
A New Site node is created and highlighted ready to be renamed in the navigation tree and the Sitework area displays.
Environment Manager Sites HierarchyEnvironment Manager Sites are created in the User Personalization navigation tree. Users areassigned to the first site in the list where membership rules match. It is therefore important that sitesare listed in order of priority to ensure users are assigned to the most relevant site.
Copyright © 2017 , Ivanti. All Rights Reserved. Terms of Use.
Page 108 of 145
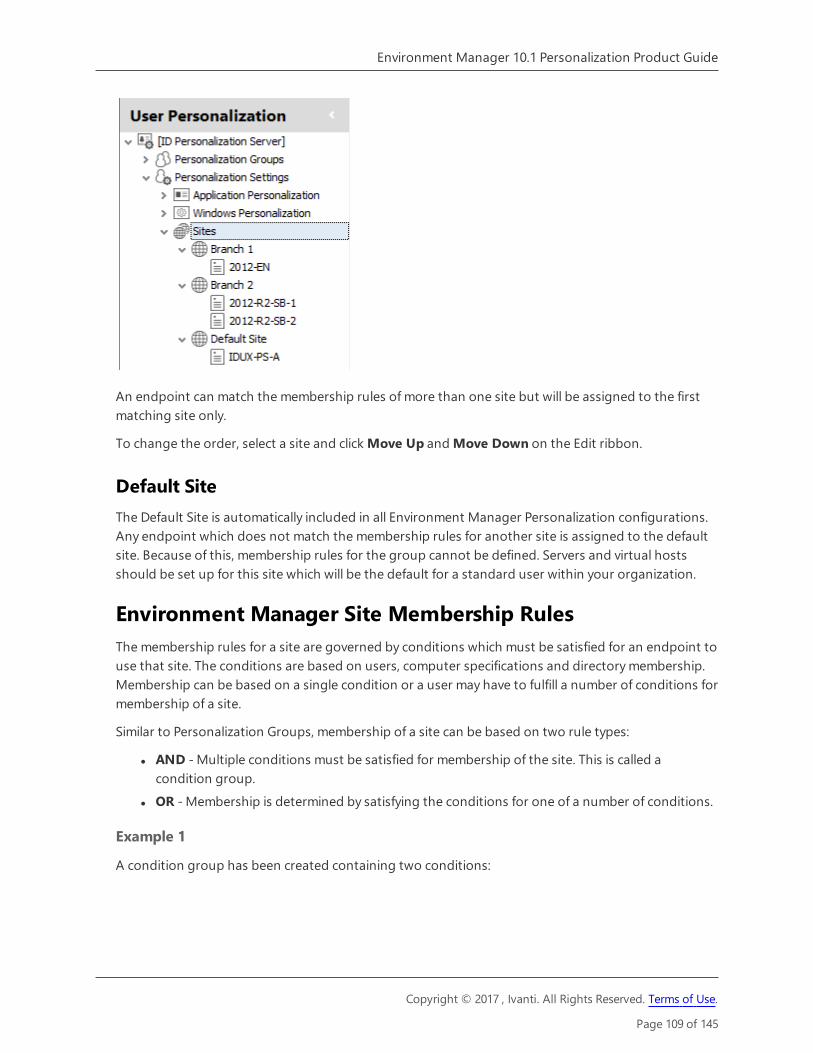
Environment Manager 10.1 Personalization Product Guide
An endpoint can match the membership rules of more than one site but will be assigned to the firstmatching site only.
To change the order, select a site and click Move Up andMove Down on the Edit ribbon.
Default SiteThe Default Site is automatically included in all Environment Manager Personalization configurations.Any endpoint which does not match the membership rules for another site is assigned to the defaultsite. Because of this, membership rules for the group cannot be defined. Servers and virtual hostsshould be set up for this site which will be the default for a standard user within your organization.
Environment Manager Site Membership RulesThe membership rules for a site are governed by conditions which must be satisfied for an endpoint touse that site. The conditions are based on users, computer specifications and directory membership.Membership can be based on a single condition or a user may have to fulfill a number of conditions formembership of a site.
Similar to Personalization Groups, membership of a site can be based on two rule types:
l AND - Multiple conditions must be satisfied for membership of the site. This is called acondition group.
l OR - Membership is determined by satisfying the conditions for one of a number of conditions.
Example 1
A condition group has been created containing two conditions:
Copyright © 2017 , Ivanti. All Rights Reserved. Terms of Use.
Page 109 of 145
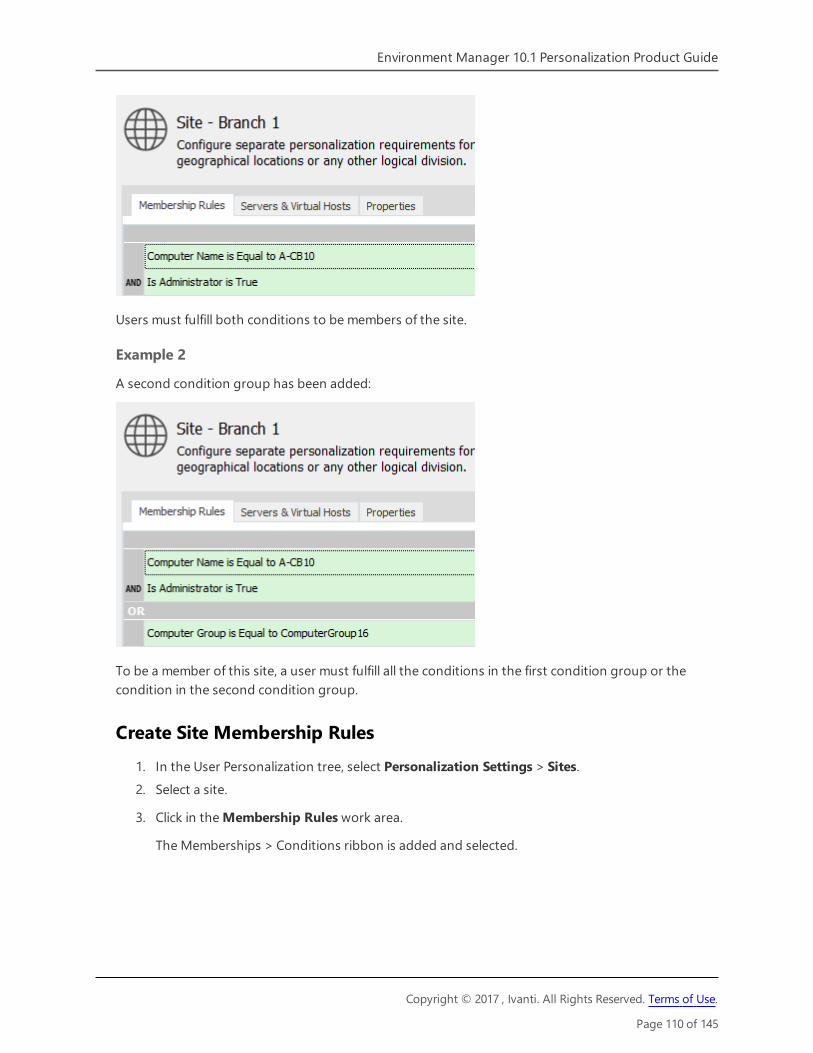
Environment Manager 10.1 Personalization Product Guide
Users must fulfill both conditions to be members of the site.
Example 2
A second condition group has been added:
To be a member of this site, a user must fulfill all the conditions in the first condition group or thecondition in the second condition group.
Create Site Membership Rules1. In the User Personalization tree, select Personalization Settings > Sites.2. Select a site.
3. Click in theMembership Rules work area.
The Memberships > Conditions ribbon is added and selected.
Copyright © 2017 , Ivanti. All Rights Reserved. Terms of Use.
Page 110 of 145

Environment Manager 10.1 Personalization Product Guide
4. In the Conditions ribbon, select the required condition. User, Computer, and DirectoryMembership are available.
See Environment Manager Site Conditions for details.
The dialog box for the selected condition displays.
5. Configure the condition and click OK. The new condition group displays under MembershipRules.
6. To further define group membership for the site, add more conditions:o AND Rule - Right-click on an existing condition, select Insert Condition and configure
the condition as required.
o OR Rule - Right-click in the work area and select Add Condition Group and configurethe condition as required.
Condition groups can be edited and deleted by selecting Edit Condition or Delete Conditionfrom the shortcut menu.
Environment Manager Site ConditionsUsing membership rules for sites enables you configure the conditions which govern who connects towhich site in your organization. For example, if you set a User condition for a site you can ensure thatwhen a user logs on, they are connected to the same site regardless of where they are and whatcomputer they are logging onto.
If site membership rules are not configured, all managed users are assigned to the Default Site.
The table below list the available conditions for sites.
Type Condition
User User Name User Group Is Administrator
Computer Computer Name Computer Domain Computer NETBIOS Name ComputerGroup Computer IP Address
DirectoryMembership
User OU Membership Computer OU Membership Site Membership
Servers and Virtual HostsSites can be made up of multiple Personalization Servers and virtual hosts as defined by theirindividual requirements.
The servers and virtual hosts which have been set up for a site can be viewed by selecting the requiredsite in the navigation tree and the Servers & Virtual Hosts tab.
Copyright © 2017 , Ivanti. All Rights Reserved. Terms of Use.
Page 111 of 145

Environment Manager 10.1 Personalization Product Guide
Servers and virtual host can be deleted by selecting and clicking the appropriate button from the Editribbon.
Virtual Hosts should be added to a site to support network load balancing.
View and Edit Server and Virtual Host Properties
Select a server or virtual host from the navigation tree to display details in the work area. The display isthe same for both virtual hosts and servers.
From the work area, the following properties can be edited for virtual hosts and servers:
l Name - A name what can easily identify the server or virtual host. This displays in the list ofServers & Virtual Hosts when a site is selected in the navigational tree.
Copyright © 2017 , Ivanti. All Rights Reserved. Terms of Use.
Page 112 of 145

Environment Manager 10.1 Personalization Product Guide
l Description - A description for the server or virtual host.l URL - The location of the server or virtual host. A valid URL must start with HTTP or HTTPS.l Port - The connection method to the server or virtual host. The port range for is 7771 to 7790
and the default port is 7771.
Add Personalization Servers to a Site1. In the User Personalization tree, select Personalization Settings > Sites.2. Select a site.
3. Click Add Server from the Personalization ribbon. The Select Computers dialog box displays.
The Select Computers dialog box enables criteria to be used to search for servers by name ordescription and in specified directories, if required. The Advanced search button expands thedialog enabling the search to be further defined.
4. Locate the server and click OK. The server is added as a new node under the site in thenavigation tree.
Add Virtual Hosts to a Site1. In the User Personalization tree, select Personalization Settings > Sites.2. Select a site.3. Click Add Virtual Host from the Server ribbon. The Add Virtual Host dialog box displays.4. Enter the FQDN (Fully Qualified Domain Name) for the virtual host.5. Click OK. The virtual host is added as a new node under the site in the navigation tree.
Copyright © 2017 , Ivanti. All Rights Reserved. Terms of Use.
Page 113 of 145

Environment Manager 10.1 Personalization Product Guide
Personalization ToolsSynchronize Site DatabasesPersonalization databases which use SQL replication synchronize with each other once a day at apredefined time; normally midnight. The Synchronize Site Databases option, on the Tools & Wizardsribbon, can be used at any time to replicate personalization data between master and slave databasesat any time between scheduled synchronization.
Import and Export Personalization ConfigurationsIn the Personalization console, you can export a configuration as an XML template. Wholeconfigurations, individual items, or groups of items from a configuration can be exported to an XMLfile. You can copy the full and partial configurations from one personalization database to another.
To create a new configuration or to update an existing one, you can import the exported XMLconfiguration into a personalization database.
Caution: Importing configurations makes changes to your database which cannot beundone. It is recommended that you back up your database prior to using the Import feature.
Personalization imports and exports are performed for the following groupings, represented by nodesin the import and export dialogs:
l Application Groupsl Applicationsl Windows Settings Groupsl Custom Windows Settingsl Windows Settings Conditionsl Personalization Groupsl Sitesl Global Application Exclusionsl Settings
You can further define the import and export by selecting individual items from any group.
Two cmdlets within the EMPImportExport Powershell module can also be used to import andexport configuration data from personalization server databases.
Import and Export RulesWhen importing or exporting personalization configurations the following rules apply:
Copyright © 2017 , Ivanti. All Rights Reserved. Terms of Use.
Page 114 of 145

Environment Manager 10.1 Personalization Product Guide
l Any configuration item that has a dependency with another item is automatically included inthe import or export and cannot be deselected. For example, when you select an ApplicationGroup, all the associated User Applications are automatically selected. The same is true of anyWindows Settings Conditions that are required for the Windows Settings being imported orexported.
l The Default Site and Default Users personalization group are the last elements in theirrespective nodes and always maintain this position on import.
l Imported User Applications and Application Groups are placed in alphabetical order in theconfiguration. For example, if Application Groups A, C and E already exist in a configuration andgroups B and D are imported, the order following import is A, B, C, D, E.
l Order numbers are not exported for Personalization Groups. This means that importedPersonalization Groups are placed after any existing groups in the configuration but before theDefault User group. For example, if groups A, C, E and Default User already exist in aconfiguration and groups B and D are imported, the order following import is A, C, E, B, D,Default User. The same behavior applies for Sites.
l Environment Manager XML configuration files that were not generated by the Export feature -such as some of the templates supplied by Ivanti Professional Services, or XML files that havebeen edited outside of Environment Manager - can be imported. However, because these fileshave been created or edited outside of the Environment Manager console, any errors are notvalidated and could impact the configuration on the database.
l The following settings can be merged on import:l Global registry inclusions & exclusionsl Global file path inclusions & exclusionsl User Applications added to an existing Application Groupl Application Group registry inclusions and exclusionsl Application Group file path inclusions and exclusionsl Servers added to an existing site
l The following settings cannot be merged on import and result in an overwrite:l User Applications that already existl Personalization groups that already existl Servers added to a site which already exist in that sitel Windows Personalization Servers
l When merging sites, the Membership Rules, Servers & Virtual Hosts, and Properties are alwaysupdated with the settings from the imported site.
l When importing Windows Settings Groups, the following apply:
l Windows Settings Groups are always merged (or can be skipped)
l Windows Settings Conditions are always replaced (or can be skipped)
l Individual (customized) Windows Settings are always replaced (or can be skipped)
Copyright © 2017 , Ivanti. All Rights Reserved. Terms of Use.
Page 115 of 145

Environment Manager 10.1 Personalization Product Guide
Export a Personalization XML Template1. In the Personalization console of Environment Manager, connect to the database that contains
the configuration you want to export.
2. From the Tools ribbon, click Export.
The Export Configuration dialog displays.
The left-hand column of the dialog displays the nodes under which the configuration elementsare grouped. Highlighting a node displays all associated elements for that node in the right-hand pane. By default, all nodes and elements are selected.
Clearing the User Applications checkbox excludes all managed applications from the export.However, if an application is a member of a selected Application Group, it cannot be deselectedunless the group has first been deselected.
3. Select the checkboxes for elements of the configuration that you want to export.
In the example below, all Application Groups, Personalization Groups, User Applications havebeen selected for export.
4. Click OK to open a Save As Windows browser dialog.5. Navigate to where you want to save the configuration file. Enter a file name, accept the default
file type setting (Configuration Files *.xml), and click OK.
Copyright © 2017 , Ivanti. All Rights Reserved. Terms of Use.
Page 116 of 145

Environment Manager 10.1 Personalization Product Guide
An XML file containing the selected elements is created. For whole configurations or large portionsthereof, this may take a few seconds. When complete a confirmation dialog displays.
Import a Personalization XML Template
Caution: Importing User Personalization configurations makes changes to your databasethat cannot be undone. It is recommended that you back up your database prior to using theImport feature
1. In the Personalization console of Environment Manager, connect to the database into whichyou want to import configuration items. This could be a new configuration or an existing onethat you want to overwrite or add to.
2. From the Tools ribbon, click Import.
A Windows browser dialog displays.
3. Navigate to the configuration file that you want to import.
4. Select the file and click Open.
The Configuration Import dialog displays. This dialog contains the configuration elements inthe file for import. Only those nodes that were exported are included.
The left-hand column of the dialog box displays the categories under which the configurationelements are grouped. Highlighting a category displays all associated elements for that node inthe right-hand pane. By default, all nodes and elements are selected.
5. Use the checkboxes or buttons to select the elements that you want to import into theconfiguration and click OK.
Deselecting the User Applications checkbox excludes all managed applications fromthe import. However, if an application is a member of a selected Application Group, itcannot be deselected unless the group has first been deselected.
6. When an existing item is encountered that has the same name as that in the file beingimported, a conflict occurs. Conflicts are displayed in the Resolve Conflicts dialog, which enablesyou to select an action to resolve each conflict.
If there are no conflicts, go to step 8.
Copyright © 2017 , Ivanti. All Rights Reserved. Terms of Use.
Page 117 of 145

Environment Manager 10.1 Personalization Product Guide
7. From the Resolve Conflicts dialog select the action required for each element:o Replace - The element in the current configuration is deleted and the one from the new
configuration added.o Skip - The new element is not imported and the existing one remains unchanged.
o Merge - Combines the contents of the two elements to include the contents of both. Forexample, when importing an application group that already exists in the database butcontains different applications, those applications are added to the existingconfiguration to expand that application to include all the applications from bothapplication groups.
If you are importing default (out-of-the-box) Windows Settings Groups, you canonlyMerge or Skip a group. If you are importing customized Windows SettingsGroups, you can onlyReplace or Skip. Conditions always import in Replacemode, or you can Skip them.
Multiple conflicts can also be resolved at category level by selecting Replace All, Skip All orMerge All, where available.
8. Click OK.9. A warning states that you are making irreversible changes. Click OK to proceed.
All selected elements are added to the personalization configuration on the connected database. Allelements are subject to normal behavior and can be edited as required.
Copyright © 2017 , Ivanti. All Rights Reserved. Terms of Use.
Page 118 of 145

Environment Manager 10.1 Personalization Product Guide
Global OptionsAccess RightsControl the authorized users for administration of the Personalization Server and define who canaccess and change Environment Manager console settings.
The user that configures the Personalization Server Configuration Portal is automatically added to thedatabase as a Master Administrator. Initially this is the only user that can connect to the databasethrough the console. This user can then add users to the database.
Any user can be added and deleted but at least one Master Administrator must always be defined.Users who are not defined here cannot connect their console to the Personalization Server. This onlyapplies to the console and not managed users logging onto endpoints.
l User Rolesl Permissionsl Configure Console Access Rights
User Roles
Administrator
The Administrator role provides access to the functionality in the Environment Manager Console.Administrators also have access to the Advanced Mode of the Endpoint Self-Service Tool when thetool is enabled for a Personalization Group. Administrators cannot manage or assign other user roles.
Master Administrator
The Master Administrator role allows the user to manage roles assignment and provides full access tothe Environment Manager Console and Browser Interface functionality. Master Administrators alsohave access to the Advanced Mode of the Endpoint Self-Service Tool when the tool is enabled for aPersonalization Group. At least one Master Administrator must always be defined.
Support Console
The Support Console provides read-only access to Environment Manager Personalizationconfigurations and allows users to view Personalization Analysis reports. Support Console users canalso use the associated analysis functionality, such as rolling back application settings. Using this role,support teams can safely carry out routine maintenance for end users in a restricted environment,without full access to modify the configuration.
When a user with a Support Console role connects, functionality to modify the personalizationconfiguration is automatically disabled and the console changes to a blue color scheme.
Copyright © 2017 , Ivanti. All Rights Reserved. Terms of Use.
Page 119 of 145

Environment Manager 10.1 Personalization Product Guide
Application Team
The Application Team console offers limited access to Environment Manager Personalizationconfigurations and allows users to add, modify and delete applications and Application Groups andview Personalization Analysis reports. Application Team users can also use Personalization Analysisfunctionality, such as rolling back application settings and converting discovered applications.
When a user with the Application Team role connects, functionality to modify some of thepersonalization configuration is automatically disabled and the console changes to a blue colorscheme.
Permissions
Environment Manager Console
Action Admin MasterAdmin
SupportConsole
ApplicationTeam
Create New Personalization Groups
Configure Personalization Group Settings
Configure Personalization Group MembershipRules
Configure Personalization Group Applications
Configure Personalization Group WindowsPersonalization
Configure Application and Application Groups
Configure Windows Personalization
Configure Sites
Configure User Roles
Configure Advanced Settings
Access Personalization Analysis
Read Access to Console
Copyright © 2017 , Ivanti. All Rights Reserved. Terms of Use.
Page 120 of 145

Environment Manager 10.1 Personalization Product Guide
Endpoint Self-Service Tool
Action Admin MasterAdmin
SupportConsole
ApplicationTeam
Run in Basic Mode
Run in Advanced Mode
Configure Console Access Rights1. Select the User Personalization navigation button.2. Click Access Rights from the Manage ribbon.3. The Access Rights dialog displays.4. Click Add. The Select User or Group dialog box displays which searches the Active Directory for
users and groups which match entered criteria. The Advanced search button expands thedialog enabling the search to be further defined.
5. Select the required user or group and click OK. The user or group will be assigned the User roleby default.
6. Click the Role column for the user or group to change the role to one of the following:o Master Administratoro Administratoro Web Usero Web Administratoro Web Usero Self-Serviceo Support Consoleo Application Team
7. The list can be updated as follows:o Click Remove to remove a user or group from the listo Click the ellipsis in the name column of any group or user to change the group or usero Click the role column for a user or group to change the role
8. When all users and groups are configured as required, click Close.
Advanced SettingsAdvanced Settings enable an administrator to make changes to specific database andcommunications settings. Changes made to any setting within here will affect the operation of userpersonalization for all managed endpoints. Advanced Settings should only be added as advised bySupport.
Copyright © 2017 , Ivanti. All Rights Reserved. Terms of Use.
Page 121 of 145
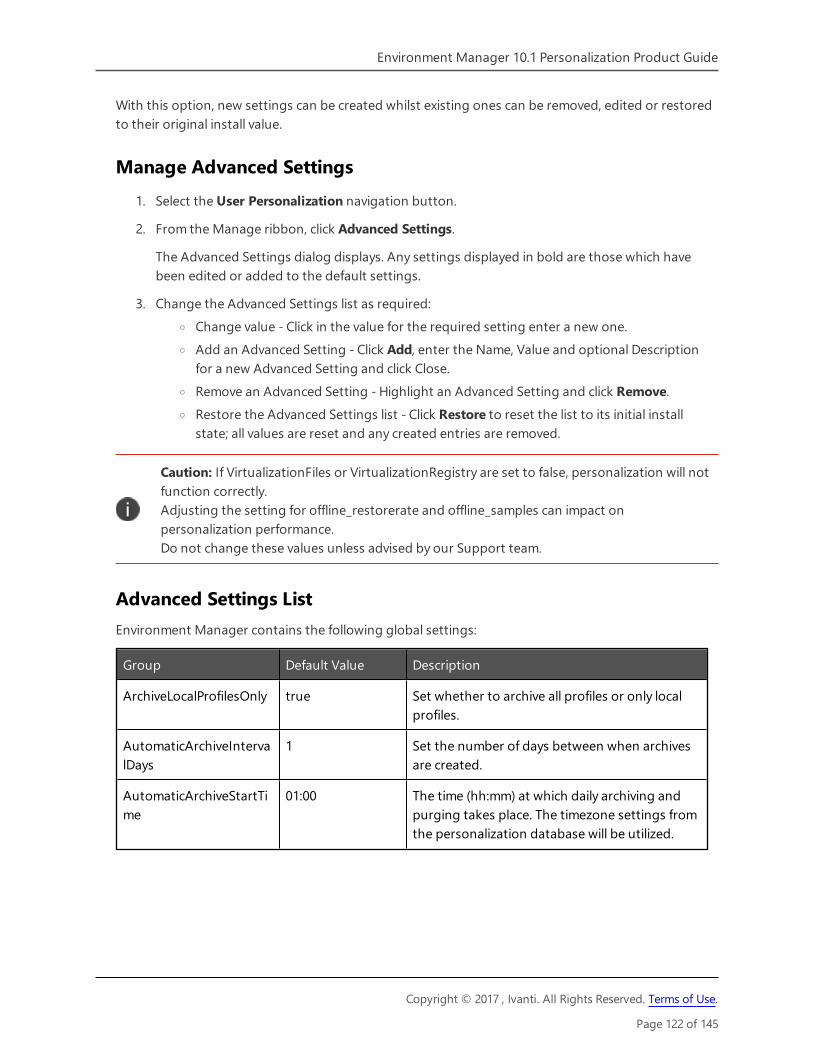
Environment Manager 10.1 Personalization Product Guide
With this option, new settings can be created whilst existing ones can be removed, edited or restoredto their original install value.
Manage Advanced Settings1. Select the User Personalization navigation button.
2. From the Manage ribbon, click Advanced Settings.
The Advanced Settings dialog displays. Any settings displayed in bold are those which havebeen edited or added to the default settings.
3. Change the Advanced Settings list as required:o Change value - Click in the value for the required setting enter a new one.o Add an Advanced Setting - Click Add, enter the Name, Value and optional Description
for a new Advanced Setting and click Close.o Remove an Advanced Setting - Highlight an Advanced Setting and click Remove.o Restore the Advanced Settings list - Click Restore to reset the list to its initial install
state; all values are reset and any created entries are removed.
Caution: If VirtualizationFiles or VirtualizationRegistry are set to false, personalization will notfunction correctly.Adjusting the setting for offline_restorerate and offline_samples can impact onpersonalization performance.Do not change these values unless advised by our Support team.
Advanced Settings ListEnvironment Manager contains the following global settings:
Group Default Value Description
ArchiveLocalProfilesOnly true Set whether to archive all profiles or only localprofiles.
AutomaticArchiveIntervalDays
1 Set the number of days between when archivesare created.
AutomaticArchiveStartTime
01:00 The time (hh:mm) at which daily archiving andpurging takes place. The timezone settings fromthe personalization database will be utilized.
Copyright © 2017 , Ivanti. All Rights Reserved. Terms of Use.
Page 122 of 145

Environment Manager 10.1 Personalization Product Guide
Group Default Value Description
If the time is not in the correct format, archivingwill not work and an error message will appear inthe Windows Application log on thePersonalization Server. If there are multiplePersonalization Servers error messages willappear on all servers.
The time zone of this time is the time zone of theSQL Server machine - not the PersonalizationServer machines. This is to match the 8.0behavior (when archiving was done by SQLServer Agent).
commsloggingenabled false Enables or disables communications logging onthe managed endpoints. True or false.
When set to true, all clients produce logs ofcommunications with the personalization server.These logs show all personalization activity togive confidence that personalization is workingcorrectly. The logs are by default written to theuser’s local application data folder, for example,C:\Users\username\AppData\Local\AppSense\Environment Manager\CommsLogs, but ifdiagnostic logging is enabled the logs arewritten instead tologdirectory\user’ssid\CommsLogs.
Comms logging may be enabled for an individualendpoint by defining the registry DWORD valueHKEY_LOCAL_MACHINE\Software\Appsense\EnvironmentManager\CommsLoggingEnabled on theendpoint and setting it to 1. To enable for asingle user defineHKEY_CURRENT_USER\Software\Appsense\EnvironmentManager\CommsLoggingEnabled instead.
When diagnostic logging is enabled on anendpoint, all the information that appears in thecomms logs will also appear in the diagnosticlogs too - the comms logs merely provide a shortsummary of personalization activity.
Copyright © 2017 , Ivanti. All Rights Reserved. Terms of Use.
Page 123 of 145

Environment Manager 10.1 Personalization Product Guide
Group Default Value Description
configpoll 600 The interval (in seconds) in which the managedendpoints poll the personalization server forconfiguration changes
Setting this value to 60 seconds or less leads to alarge increase in memory from the WinHTTPcode.
daysofcommslogtokeep 3 When communications logging is enabled (usingthe commsloggingenabled option), this settingspecifies the number of days logs to retain.
debug false Enables logging of synchronizer activity for eachapplication on all endpoints. These logs arewritten to the profile cache for each applicationin the logs subdirectory directory. For example,C:\appsensevirtual\S-1-5-21-3975584332-491336430-3592548699-1104\{58A6B7A8-C2F6-43E1-88AC-07531B5D53A8}\notepad\logs.
desktopinclusions jpg;jpeg;bmp;ico;cur;ani
File types to be included for personalization ofdesktop settings for a user.
DNS_Resolve_Timeout 5 The timeout (in seconds) for the managedendpoint to resolve the personalization servername when attempting synchronization of data.
HTTP_Connect_Timeout 5 The managed endpoint to personalization serverreconnect timeout (in seconds). This setting isonly valid once the managed endpoint hasreceived and loaded the personalizationconfiguration for the first time.
HTTP_Receive_Timeout 30 The managed endpoint to personalization serverreceive timeout (in seconds). This setting is onlyvalid once the managed endpoint has receivedand loaded the personalization configuration forthe first time.
HTTP_Send_Timeout 30 The managed endpoint to personalization serversend timeout (in seconds). This setting is onlyvalid once the managed endpoint has receivedand loaded the personalization configuration forthe first time.
Copyright © 2017 , Ivanti. All Rights Reserved. Terms of Use.
Page 124 of 145

Environment Manager 10.1 Personalization Product Guide
Group Default Value Description
InactiveProfileExpiryMonths
0 The expiry time (in months) for inactive profiles,after which time they are deleted. Set to 0 todisable this option.
InactiveUserExpiryADCheck
true If set to true, users are only deleted if they nolonger exist in active directory. This setting isonly applicable if the InactiveUserExpiryDays isnon-zero.
InactiveUserExpiryDays 180 The expiry time for inactive users. If a user doesnot log in within the specified time, their profileis deleted. Set to 0 to disable this option.
InactiveUserExpiryMonths
0 The expiry time (in months) for inactive users. If auser does not log in between the specified time,their profile is deleted. Set to 0 to disable thisoption.
jpgquality 50 The amount of compression to apply (as apercentage) used when converting a desktopwallpaper from BMP to JPG for personalizationdatabase storage. 100 = best quality, nocompression. 0 = worst quality, maximumcompression.
LegacyFbrDeleteDelayDays
30 The number of days after which legacy FBR filesare deleted from a profile where a hive file hasbeen created by a later client. To disable thissetting, apply a 0 value.
This setting is only applied if the UpgradeFbrHiveproperty is enabled following an upgrade.
linkfailretrypolltimescales 90 The configuration poll period (in seconds) usedby the managed endpoint when communicationwith the personalization server is lost.
ManagePersistentDat false Enable management of the persistent.dat file onthe client. If set to false, persistent.dat is notsaved to the database.
maxlinkfailbackoffsecs 1800 Used with minlinkfailbackoffsecs to create arandom offline config polling time for clients.This ensures that when clients go offline, they do
Copyright © 2017 , Ivanti. All Rights Reserved. Terms of Use.
Page 125 of 145

Environment Manager 10.1 Personalization Product Guide
Group Default Value Description
not poll the server simultaneously, which couldresult in spike in the server load.
minlinkfailbackoffsecs 300 Used with maxlinkfailbackoffsecs to create arandom offline config polling time for clients.This ensures that when clients go offline, they donot poll the server simultaneously, which couldresult in spike in the server load.
MonthsOfUsageDataToKeep
6 The number (in months) of usage data to keepfor user applications. Usage data older than thisvalue are deleted by the daily archiving job.
Network_Path_Support False Enables or disables the personalization ofapplication settings stored on network pathsand mapped drives. These must also have beenconfigured as inclusions within personalization.
When set to False network drives are notpersonalized and application settings are notwritten to the virtual cache.
Change the setting to True to personalize anyapplication settings written to included networkfolders.
NumberOfArchivesToKeep
5 Used by the daily archive job, this defines thenumber of daily archives to retain.
offline_restorerate 100 The communication rate (in kb/second) abovewhich the managed endpoint considerscommunication with the personalization serverto be restored and hence online. This value mustbe higher than the offline_failrate value.
Adjusting the Global Settings can impact onPersonalization performance.
This value is provided for support purposes andshould not be modified by the end user.
offline_samples 4 The number of samples, in a moving average,used by the managed endpoint to measure thelink transfer rate and detect an offline condition.
Copyright © 2017 , Ivanti. All Rights Reserved. Terms of Use.
Page 126 of 145

Environment Manager 10.1 Personalization Product Guide
Group Default Value Description
Adjusting the Global Settings can impact onPersonalization performance.
This value is provided for support purposes andshould not be modified by the end user.
PingWebServerTimeOfDayLocal
01:05 Local time that background services pingcorresponding servers. It should be set to a timeafter the personalization server’s daily recycletime.
ProfileCleanupDelayDays 30 The delay before endpoints clean extraneousdata from profiles after a change to inclusions orexclusions. Set to 0 for no delay or -1 to disablethe cleanup function.
pvcdebug 0 The Personalization Virtualization Component(PVC) debug level for all managed endpoints. 0 isdisabled. 10 is verbose.Setting this value will enable PVC debugging onall endpoints and will have a detrimental effecton performance as well as heavy use of diskspace. It is recommended instead to enabledebugging on a per-endpoint basis usingregistry settings.
ReplicationType none Used in replicated SQL environments to identifymaster / slave / none for archiving purposes. Thisvalue is set by the archiving script and is notrecommended to be changed by the user.
syncpoll 900 The interval (in seconds) between managedendpoint retries of failed synchronizations whenoffline resiliency is enabled.
transport http Transport Type. Only required for backwardscompatibility with older versions of theEnvironment Manager Agent.
This value is provided for support purposes andshould not be modified by the end user.
version 3.0 This value is no longer used and will be removedin future versions of Environment Manager.
Copyright © 2017 , Ivanti. All Rights Reserved. Terms of Use.
Page 127 of 145

Environment Manager 10.1 Personalization Product Guide
Group Default Value Description
virtualzationfiles true Enable or disable User Personalization of files forall managed endpoints. True or false.
This value is provided for support purposes andshould not be modified by the end user.
virtualizationregistry true Enable or disable User Personalization of registrysettings for all managed endpoints. True or false.
This value is provided for support purposes andshould not be modified by the end user.
Application ExclusionsApplications in the Application Exclusions list are not managed if they are started as child process of amanaged application. However, exclusions can be overridden by adding an excluded application to themanaged applications list for a personalization group.
Child processes of a managed application are personalized by default. Some child processes may notbe suitable for personalization. It could be that a child process continues to run when the managedparent application is closed; preventing the parent application from synchronizing with the database.By adding the child process to the Application Exclusions, the parent application will synchronizecorrectly when closed.
The Applications Exclusions list is pre-populated with applications recommended for exclusion frompersonalization. The list includes common applications which are not necessarily suitable forpersonalization, such as registry editing tools and system administration utilities.
The Application Exclusion list can be updated by adding new applications and removing existing ones.From the Manage ribbon, select Application Exclusions to display the currently excluded applications.Amend the list of applications using the Add and Remove buttons.
Data Collection SettingsGlobal settings for Application Data Collection are available to specify registry and folder inclusionsand exclusions and to clear all collected data.
Application Data Collection Inclusions and ExclusionsRegistry and folder inclusions and exclusions determine which registry keys and folders are passivelymonitored by Application Data Collection.
Copyright © 2017 , Ivanti. All Rights Reserved. Terms of Use.
Page 128 of 145

Environment Manager 10.1 Personalization Product Guide
Add Registry Inclusion or Exclusion for Application Data Collection
1. Select the User Personalization navigation button.
2. From the Manage ribbon, click Data Collection Settings.
The Application Data Collection Settings dialog displays.
3. Select the Registry tab.
4. Right-click in either the Include or Exclude area and select Add Registry Key.
The Add Registry Key dialog displays.
5. In the Key field, select the ellipsis (...) to browse for the registry key or manually enter the pathand key name.
Wildcards can be used anywhere in a registry path to represent one or more characters. Forexample, adding *.0 to the path for Microsoft Outlook means all versions of Outlook can beincluded or excluded with one entry: HKCU\Software\Microsoft\Office\*.0\Outlook
The Browse Registry dialog displays. You can select from your local computer, current user orclick Connect to display the Active Directory Select Computer dialog to select another computerto browse.
6. Locate the required Registry Key and click OK.
The selected registry key is entered in the Add Registry Key dialog.
7. Click OK.
The selected Registry Key is added to the Include or Exclude list in the work area.
8. Click Close.
Add Folder Inclusion or Exclusion for Application Data Collection
1. Select the User Personalization navigation button.
2. From the Manage ribbon, click Data Collection Settings.
The Application Data Collection Settings dialog displays.
3. Select the Folder tab.
4. Right-click in either the Include or Exclude area and select Add Folder.
The Select Folder dialog displays.
Copyright © 2017 , Ivanti. All Rights Reserved. Terms of Use.
Page 129 of 145

Environment Manager 10.1 Personalization Product Guide
5. In the Path field, select the ellipsis (...) to browse for the folder. The path can also be enteredmanually.
The Browse for Folder dialog displays. You can select an existing folder from your localcomputer or click theMake New Folder button to create a new folder for inclusion orexclusion.
6. Locate the required folder and click OK.
The selected folder path is entered in the Select Folder dialog.
7. Click OK.
The folder path is added to the Include or Exclude list in the work area.
8. Click Close.
Remove Collected Data from Application Data CollectionRemove all data collected for Personalization Groups which have, or have had, Application DataCollection enabled. This removes all registry and folder data for collected applications.
Caution: Clearing collected data is permanent. Data cannot be recovered.
1. Select the User Personalization navigation button.
2. From the Manage ribbon, click Data Collection Settings.
The Application Data Collection Settings dialog displays.
3. Click Clear all Data Collection.
A confirmatory prompt is displayed.
4. Click Yes.
The collected data is cleared.
Copyright © 2017 , Ivanti. All Rights Reserved. Terms of Use.
Page 130 of 145
Environment Manager 10.1 Personalization Product Guide
Personalization AnalysisPersonalization Analysis allows you to view data collected on a Personalization Server about users,applications and Windows Personalization. Reports can be run for Personalization Groups to displaycurrent and historical personalization data.
Once a report has been generated, the information can be used to directly manipulate data on thePersonalization Server. This functionality has a real-time effect on application and user settings on thelive database allowing administrators to:
l Manually create and delete archives for application settingsl Restore application settings from a previous, archived statel Delete a user’s application settings, reverting to the application’s default settingsl View and edit an application’s stored registry and file datal Convert discovered applications to managed applicationsl Move application settings between personalization groups
Multiple Personalization Analysis report windows can be opened at the same time allowing data to beeasily compared between different users, applications and Windows Settings.
The Environment Manager Support Console allows users to use Personalization Analysisfunctionality without full configuration access to the database.
Generate a Personalization Analysis Report1. Select the User Personalization navigation button.2. Select Personalization Groups and select a personalization group to analyze.3. Click Personalization Analysis from the Tools & Wizards ribbon. The Personalization Analysis
report window displays for the selected personalization group.4. Use the tabs to select the required report type:
o Sizeo Application Usageo Discovered Application Usageo Archive Reports
5. Select the required criteria for the report. Each report has different criteria which can be set tomanipulate the results:
o Size and Usage reports can be generated for applications or users.o Archive reports can only be generated a specified user.o Usage reports can produce results for a specified time period. The default period is the
week prior to and including the current date.
Copyright © 2017 , Ivanti. All Rights Reserved. Terms of Use.
Page 131 of 145
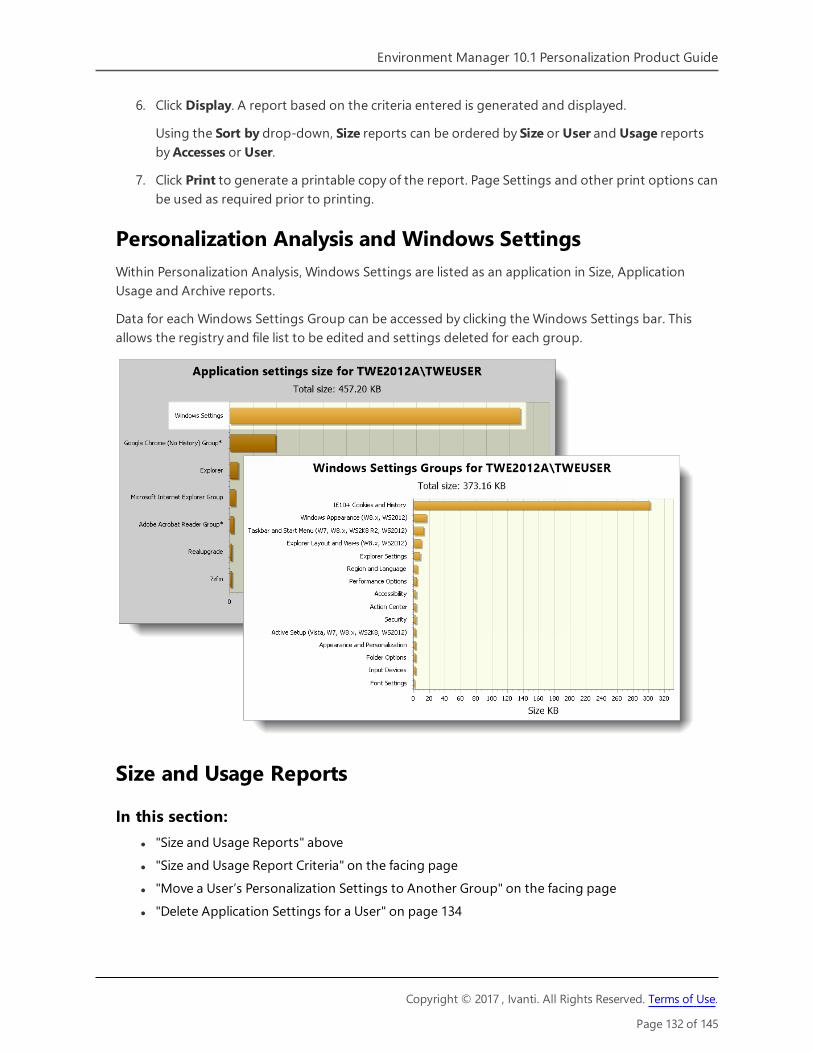
Environment Manager 10.1 Personalization Product Guide
6. Click Display. A report based on the criteria entered is generated and displayed.
Using the Sort by drop-down, Size reports can be ordered by Size or User and Usage reportsbyAccesses or User.
7. Click Print to generate a printable copy of the report. Page Settings and other print options canbe used as required prior to printing.
Personalization Analysis and Windows SettingsWithin Personalization Analysis, Windows Settings are listed as an application in Size, ApplicationUsage and Archive reports.
Data for each Windows Settings Group can be accessed by clicking the Windows Settings bar. Thisallows the registry and file list to be edited and settings deleted for each group.
Size and Usage Reports
In this section:l "Size and Usage Reports" abovel "Size and Usage Report Criteria" on the facing pagel "Move a User’s Personalization Settings to Another Group" on the facing pagel "Delete Application Settings for a User" on page 134
Copyright © 2017 , Ivanti. All Rights Reserved. Terms of Use.
Page 132 of 145

Environment Manager 10.1 Personalization Product Guide
l "Clear All Usage Counts for a User" on the next pagel "Delete All User Data for a User" on page 135l "Edit Virtual Registry for an Application" on page 135l "Edit the Application File List" on page 136
These reports show the amount of application and user personalization data used together with theapplications that managed users are accessing. Three separate reports are available:
l Size - Generates a report to show how much personalization data is stored on the databaseper application and user. This information can identify bottlenecks and resource problems forapplications and used to eliminate unnecessary registry keys and folders from personalizationto reduce the amount of data being transferred between endpoints and the server.
l Usage - Generates a report which displays the number of times a managed application hasbeen accessed by users over a specified time period.
Each report has a combination of functions, accessible from generated analysis reports. Right-click ona bar in one of the graphs to access the shortcut menu.
Size and Usage Report CriteriaThe size and usage reports can be generated using the following criteria:
l Report by User and <All Users> - Reports are generated per user for all users in the database,in size or usage order. Double-click on a user to see data on their individual applications. Forthe application size report, each bar represents the total amount of personalization data forthe user. For usage reports, each bar represents the total usage count for applications run byusers.
l Report by User for a specific user - Reports show all applications for that user, with the datadisplayed per application.
l Report by Application and <All Applications> - Reports are displayed per applicationshowing the data for all users in the Personalization Group. The size graph for this reportshows the total size of settings stored for all users in the group for each application. Double-click on an application to show data for each user.
l Report by Application for a specific application - Shows the report data for each user’s usageof that application. For example, the application size graph shows the amount ofpersonalization data for each user for that application only.
To report on all users or all applications, delete any existing contents of the Report By field.
Move a User’s Personalization Settings to Another GroupWhen a user is added to a specific personalization group, their personalization settings are onlyrelevant for that group. Personalization Analysis enables the administrator to move the settings toanother group.
Copyright © 2017 , Ivanti. All Rights Reserved. Terms of Use.
Page 133 of 145

Environment Manager 10.1 Personalization Product Guide
This option is only available for User data and can only be performed if more than one personalizationgroup exists.
This task only moves the user data from one personalization group to another. Anadministrator must move the actual user from one group to another using groupmembership rules. See Personalization Group Membership Rules.
1. Select the User Personalization navigation button.2. Select Personalization Groups and select a personalization group.3. Click Personalization Analysis from the Tools & Wizards ribbon. The Personalization Analysis
report window displays for the selected personalization group.4. Select a compatible report; Size or Application Usage.5. Ensure the Report By settings are configured to User and <All Users>.6. Click Display. The report for all users displays.7. Right-click the user you wish to move and select Move the settings for [user] to another
group... This prompts you to choose an available group to move the chosen user’spersonalization settings to.
8. Select the Personalization group to receive the user settings.9. Click Continue to proceed and OK to confirm. The graph is refreshed with the user removed
from the report.
Delete All User Data For a Selected User
In a size or usage report, select this option from a user bar shortcut menu to delete all personalizationdata and archives for that user. The next time the user starts any application, the default settings willbe reinstated.
Delete Application Settings for a UserIn a size or usage report, select this option from an application bar shortcut menu to delete the cacheof an application for the selected user. Next time the user starts the application, it will revert to thedefault settings.
If you delete the application cache for a user who is logged on, the deletion may take longer to deleteon the client as it is linked to the configuration poll, which runs every 10 minutes by default.
Clear All Usage Counts for a UserThis action can be performed for usage reports on both application and user bars. Select this optionfrom the shortcut menu to reset the application accesses count to zero for all of the user’s managedapplications.
Copyright © 2017 , Ivanti. All Rights Reserved. Terms of Use.
Page 134 of 145

Environment Manager 10.1 Personalization Product Guide
Delete All User Data for a UserIn a size or usage report, select this option from the shortcut menu of a user or application bar todelete all settings and archives for all applications for the specified user.
Edit Virtual Registry for an ApplicationOnce generated the size and usage reports allow administrator's access to a registry editor whichenables stored registry data for an application to be examined and edited. Files can be imported andexported and registry keys can be added, deleted, edited and excluded.
Caution: Editing registry settings can cause application failure and serious system problemswhich may require re-installation of your operating system. Before making any changes,create an archive for this application. See Archive Reports.
1. Create a size or usage report for a user.2. Locate the application you want to view, right-click on the bar for that application and select
Edit application registry...
3. A warning dialog displays. Disable the dialog for the session if required using the checkbox andclick OK.
The Edit Registry Settings dialog box displays showing the virtual registry structure for theapplication.
Copyright © 2017 , Ivanti. All Rights Reserved. Terms of Use.
Page 135 of 145

Environment Manager 10.1 Personalization Product Guide
4. Select the required option:o Import - Click Import from the File menu to import a registry key from the local disk for
the selected application. Imported files have the REG extension, as used by the WindowsRegedit utility.
o Export - Highlight a registry key and click Export from the File menu to export and save itto the local disk. The key can then be imported into other application’s registries asrequired. Exported files have the REG extension, as used by the Windows Regedit utility.
o Print - Click from the File menu to generate a printable Registry Settings Report for theapplication.
o New - Click New from the Edit menu to create a new key and set the required values.o Rename Key - Highlight a registry key and select Rename Key from the Edit menu.o Delete Key - Highlight a registry key and select Delete Key from the Edit menu.o Exclude - Highlight a registry key and select Exclude from the Edit menu. The selected
key is added to the Exclude list for the application. For further information, seeInclusions and Exclusions.
o Hide R.I.P. Entries - Keys with an RIP extension represent residual keys, for example,keys that have been renamed or deleted. These keys are still virtualized to ensure correctbehavior. However, when examining the registry, it may give a clearer view if these keysare hidden.
5. Select this checkbox to hide these entries from the registry editor.6. When all required actions have been made, click OK to commit them to the database.
Edit the Application File ListOnce generated the Size and Usage reports enable administrators to view the folder structure for anapplication or application group. This structure allows files and folders to be imported, excluded anddeleted directly from Personalization Analysis reports.
1. Create a Size or Usage report for a user.2. Locate the application you want to view, right-click on the bar for that application and select
Edit application file list...3. From the Folder Display drop-down, select the file structure you want to view:
o Vista and Windows 7 and aboveo XPo Raw
4. Select a View Type; Tree File View or Flat File View.5. Navigate to the required folder.
Copyright © 2017 , Ivanti. All Rights Reserved. Terms of Use.
Page 136 of 145

Environment Manager 10.1 Personalization Product Guide
6. The following options are available:o Import - Right-click in the details pane and select Import to add files from the local disk
to the selected folder.o Export - Right-click on a file and select Export to save the selected file to the local disk.o Open - Right-click on a file and select Open. This extracts the file to a temporary location
and attempts to open the associated application. If the application modifies the file themodifications are written back to the profile in the database.
o Delete - Right-click on a file and select Delete to remove the selected file from thedatabase. Multiple files can be selected using CTRL and shift when selecting files. You canalso select a file and delete its contents.
o Print - Click Print to generate a printable Application File Report for the selected file.7. Click OK to save any changes or to quit the file list.
Related topics:"Archive Reports" below"Personalization Analysis" on page 131
Archive ReportsAll managed application’s stored user personalization settings are archived daily, recording the user’ssettings for each application and creating a restore point per application. The default daily archive isset at 1.00 am. This can be amended to any convenient time using the DailyArchiveStartTime GlobalSetting.
For details of how to change the DailyArchiveStartTime setting, see Advanced Settings.
Manual archives can also be created when required. Each archive can be used to return anapplication’s settings to the position they were in at the time of the archive.
Environment Manager detects duplicate files within new application, Application Group and WindowsSettings Group archives. Within the database, only one copy is stored regardless of how many archivesthe file exists in. This provides a large reduction in database size compared to previous versions ofEnvironment Manager.
Archive reports list all archive points created for the managed applications of a selected user.
Copyright © 2017 , Ivanti. All Rights Reserved. Terms of Use.
Page 137 of 145

Environment Manager 10.1 Personalization Product Guide
Manually Archive Application Data1. Generate an Archive report for the required user.
2. Click Display.
The report is created and a list of managed applications displays for the selected user. Eachapplication entry in the report shows the EXE name, application version and operating system.The existing archive(s) for each application are listed beneath the application, accessed byexpanding the tree.
3. Select the application for which you want to create an archive.4. Right-click and select Archive [application] now...
An archive is created which stores the personalization settings defined by the user for thatapplication, at the time the archive is created. The date and time at which the archive was created isused as the archive name.
If the user has the application open at the time the archive is created, these settings are not takeninto account. The settings as they were the last time the application was closed and synchronized withthe database are archived.
Roll Back an ApplicationThis option returns a user’s application settings to a previous state as recorded at an archive point. Ifa user’s settings for a particular application become corrupted or are not as expected by that user,they may want to return them to a state when the application was successfully operating.
Select the required application in the Archive report and expand the tree beneath to display therelated archives. Select the required archive, right-click and select Roll back to this archive.
The rollback replaces the current settings in the database for that application with the settings at thetime of the archive. The next time the user accesses that application, their settings are reset.
Modify ArchivesThis option allows you to change the protection settings for an archive - protection can be added orremoved for an archive.
1. Select the required application in the Archive report and expand the tree beneath to displaythe related archives.
2. Highlight the required archive, right-click and select Modify archive.
The Modify Archive dialog displays.
3. Select the Protect archive checkbox as required. Only one archive can be protected perapplication.
Copyright © 2017 , Ivanti. All Rights Reserved. Terms of Use.
Page 138 of 145

Environment Manager 10.1 Personalization Product Guide
4. Add or update the archive description if required.5. Click OK to commit the changes.
Delete ArchivesUnprotected archives can be deleted as required using one of the options from the shortcut menu:
l Delete an archive - Select the required archive, right-click and select Delete this archive.l Delete all archives for an application - Select an application, right-click and select Delete allarchives for [application]
Protected archives cannot be deleted. Use the Modify Archive option to remove protection from anarchive before deleting.
Copyright © 2017 , Ivanti. All Rights Reserved. Terms of Use.
Page 139 of 145

Environment Manager 10.1 Personalization Product Guide
Environment Manager Support ConsoleThe Support Console offers read-only access to Environment Manager Personalization configurationsand allows users to view Personalization Analysis reports. Support Console users can also use theassociated analysis functionality, such as roll back application settings and convert discoveredapplications. Using this role, support teams can safely carry out routine maintenance for end users in afocused environment, without full configuration access to the database to perform these tasks.
When a user with a Support Console role connects, functionality to change the personalizationconfiguration is automatically disabled and the console changes to a blue color scheme.
Support Console FunctionalityThe table below lists the functionality available to users with a Support Console role.
Function Availability Link
Connect/Disconnect Support Console users can configure the list ofPersonalization Servers and connect and disconnectto/from them as required.
Connection
Advanced Settings Read only access to view the list of database andcommunications settings.
AdvancedSettings
ApplicationExclusions
Read-only access to the list of applications which areglobally excluded from personalization.
ApplicationExclusions
Options Ribbon Includes the following display options:l Show AND and OR labelsl Disable Splash Screenl Reset View Customizations
OptionsRibbon
Help Ribbon Access to the online help, the Ivanti website, informationabout the console and a means of contacting Support.
Help Ribbon
PersonalizationAnalysis
Full access to Personalization Analysis functionality toenable reports to be run and archives to be managed.Application data can be managed for users anddiscovered applications can be converted to managedapplications.
PersonalizationAnalysis
Copyright © 2017 , Ivanti. All Rights Reserved. Terms of Use.
Page 140 of 145

Environment Manager 10.1 Personalization Product Guide
SQL AlwaysOnDatabase mirroring in version 10.0 must be set up using SQL AlwaysOn or AlwaysOn AvailabilityGroups. SQL Server AlwaysOn is the preferred SQL Server technology to support High Availabilityscenarios and the DesktopNow 10.0 servers have been optimized to support this technology.
SQL mirroring is supported for versions 8.x. For more information, see the DesktopNow Installand Configure Guide for the relevant version.
Guidance on configuring SQL Server AlwaysOn Availability Groups can be found here:
l Overview of AlwaysOn Availability Groupsl Prerequisites, Restrictions, and Recommendations for AlwaysOn Availability Groupsl Configuration of a Server Instance for AlwaysOn Availability Groupsl Creation and Configuration of Availability Groups
The whitepaper on SQL Server High Availability and Disaster Recovery can be found here:
High Availability and Disaster Recovery for DesktopNow SQL Server Databases
If you have configured SQL AlwaysOn with multi-subnet failover availability groups, you must handlethe MultiSubnetFailover value in the database connection string for the Personalization Server. Thiscan only be done using Server Configuration Platform Powershell cmdlets.
For more information on configuring the database connection string, see Setting Up a NewServer and Database in the Server Configuration Portal Scripting Guide.
Copyright © 2017 , Ivanti. All Rights Reserved. Terms of Use.
Page 141 of 145

Environment Manager 10.1 Personalization Product Guide
Streamed ApplicationsOnce an application is under the control of User Personalization users receive their managedpersonalization data regardless of how they access the application. This includes virtualizedapplications which are streamed from a server rather than run locally. Commonly, streaming involvespackaging an application in such a way that it is self-contained. For User Personalization streamedapplications are managed in the same way as local applications.
To see which streamed applications are supported, access the Maintained Platforms Matrix availableon www.support.appsense.com.
Citrix XenAppTo set up Citrix XenApp streaming applications to work with certain elements of EnvironmentManager, such as Lockdown, Process Started and Stopped triggers and User Personalization, youneed to specify certain exclusions, as follows:
1. Navigate to Citrix Streaming Profiler for Windows.2. Open the Application Profile.3. Highlight the relevant Target and select the Editmenu.
4. Select Target Properties.
The Target Properties screen displays.
5. Select Rules.
The Rules work area displays on the right hand side.
6. Click Add in the Rules work area.
The New Rule Select Action and Objects dialog box displays.
7. In the Action section leave the default setting as Ignore.
8. In the Object section select Named Objects and click Next.
The New Rule Select Objects dialog box displays.
9. Select Some Named Objects and click Add.
The Choose Named Object dialog box displays.
10. Add the following entries and click OK:o Appsense*
o \??\pipe\Appsense*
These display in Named Objects on the New Rule Select Objects dialog box.
11. Click Next to display the New Rule Name Rule dialog box.
Copyright © 2017 , Ivanti. All Rights Reserved. Terms of Use.
Page 142 of 145

Environment Manager 10.1 Personalization Product Guide
12. Enter a name for the rule or accept the default and click Finish.
13. Click OK.
The Target Properties screen re-displays and the Ignore all named objects rule is now listed inthe work area on the right hand side.
14. Save the profile.15. Repeat for each Application Profile as required.
User PersonalizationIf using Environment Manager User Personalization you need to complete the following task inaddition:
1. Navigate to Citrix Streaming Profiler for Windows.2. Open the Application Profile.3. Highlight the relevant Target and select the Editmenu.
4. Select Target Properties.
The Target Properties screen displays.
5. Select Rules.
The Rules work area displays on the right hand side.
6. Click Add in the Rules work area.
The New Rule Select Action and Objects dialog box displays.
7. In the Action section leave the default setting as Ignore.
8. In the Object section select Files and Folders and click Next.
The Select Objects dialog box displays.
9. Click Add.
The Choose Path dialog box displays.
10. In Path enter C:\AppSenseVirtual and click OK.
The New Rule Name Rule dialog box re-displays.
11. Click Next.12. Enter a name for the rule or accept the default and click Finish.13. Click OK to apply the rule.14. Save the Profile.15. Repeat for each Application Profile as required.
Copyright © 2017 , Ivanti. All Rights Reserved. Terms of Use.
Page 143 of 145

Environment Manager 10.1 Personalization Product Guide
Symantec VirtualizationThis section provides steps for setting up exclusions when using Environment Manager and SymantecWorkspace Virtualization (6.1) and Symantec Software Virtualization Solution (2.1)
SymantecIt is recommended that you exclude the folder C:\AppSenseVirtual from the Symantec solution. Do thiseither as a global exclusion on the Symantec solution client or, alternatively, as an exclusion withineach Symantec solution layer that is to be personalized by Environment Manager.
To add a global exclusion for the Symantec solution client:
1. Open the Symantec solution console.2. Select File>Global Excludes.3. Right-click within the console and select New Exclude Entry.4. Select Directory and enter C:\AppSenseVirtual.5. Select Exclude Subdirectories and click OK.6. In the Symantec solution, exclude anything where user data is written (AppData and
subdirectories, LocalAppData and subdirectories). Ensure there is no user data captured in thelayer.
Environment ManagerIt is recommended that you exclude the folder C:\Fslrdr from Environment Manager. Do this either as aglobal exclusion at the Personalization Group level, or for a particular application.
To add a global exclusion for Environment Manager:
1. Open Environment Manager.2. Select the User Personalization bar in the left navigation pane.3. Select Personalization Applications and globally exclude%SYSTEMDRIVE%\fslrdr.4. Expand Application Categories and ensure that applications are matched by file name only and
not the full path.
Copyright © 2017 , Ivanti. All Rights Reserved. Terms of Use.
Page 144 of 145

Environment Manager 10.1 Personalization Product Guide
Support for Citrix Offline Plug-in 6.0In order to provide support for Citrix Offline Plug-in 6.0, a driver is included in the EM UserVirtualization Service software. The driver, called AsVfxLdr.sys, replaces the existing Windows AppInit_DLLs registry value for loading the personalization modules into managed processes. The driverenables better control over what is hooked and when.
For Citrix Offline Plug-in 6.0t all hooking is performed via a kernel based API and the driver enablesEnvironment Manager’s hook DLLs to be loaded after the Citrix hooks, as part of the processinitialization.
With the driver it is possible to exclude certain processes from having the personalization modulesloaded by setting the following registry value on the client:
l Key - HKLM\Software\AppSense Technologies\AsVfxLdr\l Name - Exceptionsl Type - REG_MULTI_SZl Data - List of processes that should be ignored by the driver. The list should only contain the
filename of the process including the file extension, e.g. calc.exe; full paths are ignored and willnot be matched. The list is stored in multi-string format with each filename as a separate string.The driver will not attempt to load any DLLs into these processes.
It is also possible to disable the driver and revert to the existing AppInit_DLLs mechanism by settingthe following registry value on the client:
l Key - HKLM\Software\AppSense Technologies\Environment Manager\l Name - LegacyAppInitl Type - REG_DWORDl Data - Controls whether the EMLoader.dll should be loaded using the legacy AppInit_DLLs
value instead of the driver. If this value is set to a non-zero value, the Environment Managerservice will modify the AppInit_DLLs entry on start-up to include AsVfxLdrAppInit.dll; on stop itwill also remove the entry. The AsVfxLdrAppInit.dll uses the same registry keys as the driver andloads the EMLoader.dll in a similar way to the driver.
This means that AsVfxLdrAppInit.dll appears in the AppInit_DLLs entry rather than EMLoader.dll as inprevious releases.
The Applnit_DLLs must not be manually edited.
Copyright © 2017 , Ivanti. All Rights Reserved. Terms of Use.
Page 145 of 145