Performing an ArcPad Demo on the MobileMapper 6
24
1 Performing an ArcPad Demo on the MobileMapper 6 Technical Support Presentation
-
Upload
hilda-downs -
Category
Documents
-
view
40 -
download
4
description
Performing an ArcPad Demo on the MobileMapper 6. Technical Support Presentation. PROCESS OUTLINE. MOBILEMAPPER 6 PREPARATION PRE-COLLECTION COLLECTION DEMO. PREPARATION. OS Port Management. Programs tab: NONE 3. Hardware tab: COM 1 4. Baud rate: 9600 5. Access tab: Box checked 6. - PowerPoint PPT Presentation
Transcript of Performing an ArcPad Demo on the MobileMapper 6

1
Performing an ArcPad Demo on the MobileMapper 6
Technical Support Presentation

2
2008
Arp
ad D
emo
Rev
. A
PROCESS OUTLINE
•MOBILEMAPPER 6 PREPARATION
•PRE-COLLECTION
•COLLECTION DEMO
•MOBILEMAPPER 6 PREPARATION
•PRE-COLLECTION
•COLLECTION DEMO

3
2008
Arp
ad D
emo
Rev
. A
PREPARATION
Programs tab: NONE3.
Hardware tab: COM 14.
Baud rate: 96005.
Access tab: Box checked6.
Tap 'ok'
OS Port ManagementOS Port Management Tap Start/Settings/SystemTab1.,
Double-tap External GPS2.

4
2008
Arp
ad D
emo
Rev
. A
PREPARATION
• Open VisualGPSce
Position Information Position Information•Colored dot changes from red (no fix), to green (fix), to blue (fix with SBAS Corrections)
•Wait for a Blue Dot Solution
•Tap File/Exit

5
2008
Arp
ad D
emo
Rev
. A
PRE-COLLECTION
Create a New JobCreate a New Job
Open ArcPad
Create a New Map1.
Save Map2.
Name map3.
Store on SD Card4.

6
2008
Arp
ad D
emo
Rev
. A
PRE-COLLECTION
Choose Geometry of each Shapefile1.
Add at least one Attribute2.
Tap 'ok'
Create Point, Polyline, and Polygon Shapefiles
Create New ShapefilesCreate New Shapefiles

7
2008
Arp
ad D
emo
Rev
. A
PRE-COLLECTION
Enter name1. and storage location2.
Tap Save
Tap NO in create QuickForm dialogue box
Follow steps to create Shapefiles for Point, Polyline, and Polygon features
Create New ShapefilesCreate New Shapefiles

8
2008
Arp
ad D
emo
Rev
. A
PRE-COLLECTION
Tap Satellite Icon2
Tap GPS Preferences3.
New Shapefiles are active in Edit Menu1.
GPS PreferencesGPS PreferencesCreate New ShapefilesCreate New Shapefiles

9
2008
Arp
ad D
emo
Rev
. A
PRE-COLLECTION
Protocol: NMEA 0183
Port: COM 1
Baud: 9600
Tap Capture tab1.
Check Enable Averaging box2.
Tap 'ok'
GPS PreferencesGPS Preferences

10
2008
Arp
ad D
emo
Rev
. A
PRE-COLLECTION
Set Data PathsSet Data Paths Tap Toolbar icon 1.
Tap Options 2.
Tap Paths Tab 3.
Change Data Path from My Documents to Storage Card using the Browse icon 4.
All other paths are correct by default 5.
Tap ‘ok’6.

11
2008
Arp
ad D
emo
Rev
. A
PRE-COLLECTION
Tap Satellite Icon1.
Tap GPS Active2.
MobileMapper 6 and ArcPad are ready for Collection
Point CollectionPoint Collection

12
2008
Arp
ad D
emo
Rev
. A
COLLECTION DEMO
• Adjust zoom1. using magnifying glass2.
Point CollectionPoint Collection
Tap Select Shapefile menu3.
Tap Point4.

13
2008
Arp
ad D
emo
Rev
. A
COLLECTION DEMO
• Tap Point from GPS icon1.
• Attribute window displays incremented progress of Point Averaging2.
Point CollectionPoint Collection

14
2008
Arp
ad D
emo
Rev
. A
COLLECTION DEMO
• Tabs along bottom of Attribute window give data entry options for Point
Point CollectionPoint Collection
• On Attributes tab, tap NULL field to enter text

15
2008
Arp
ad D
emo
Rev
. A
COLLECTION DEMO
• On Picture tab, take a new picture with built in camera1.
• Tap folder icon to browse for pictures saved on MobileMapper 6 or inserted SD card2.
Point CollectionPoint Collection
• Symbology tab gives point display options. (To access these options, double-tap on the symbol icon4. )

16
2008
Arp
ad D
emo
Rev
. A
COLLECTION DEMO
• When progress reaches 100% and all attribute information has been entered tap 'ok'
• Point will be represented by selected icon
Point CollectionPoint Collection

17
2008
Arp
ad D
emo
Rev
. A
COLLECTION DEMO
Line/Area CollectionLine/Area Collection
Tap Polyline in Shapefile Select menu

18
2008
Arp
ad D
emo
Rev
. A
COLLECTION DEMO
• Collect points (vertices) on line one by one1.
or
Collect points continuously at a time/distance interval2.
Polyline/Vertex CollectionPolyline/Vertex Collection
• Walk to the beginning of Line
• Tap Create Vertex from GPS icon1.
• Averaging Progress window will appear3.
Polyine CollectionPolyine Collection

19
2008
Arp
ad D
emo
Rev
. A
COLLECTION DEMO
• When averaging completes the first Vertex of the line is displayed
Polyline/Vertex CollectionPolyline/Vertex Collection
• Walk to next spot on line
• Tap vertex icon
• Averaging will take place
• Second vertex will be connected to first

20
2008
Arp
ad D
emo
Rev
. A
COLLECTION DEMO
• Collect all vertices
• Tap green arrow1. when completed
Polyline/Vertex CollectionPolyline/Vertex Collection
• Attribute window will open
• Enter data
• Tap 'ok‘
• Polyline will be displayed

21
2008
Arp
ad D
emo
Rev
. A
COLLECTION DEMO
• Instead of collecting vertices1., use Continuous Colection2.
Polyline/Continuous CollectionPolyline/Continuous Collection
• Start at beginning of line
• Tap Continuous icon2.
• Start walking
• When first vertex is collected green arrow is selectable
22
2008
Arp
ad D
emo
Rev
. A
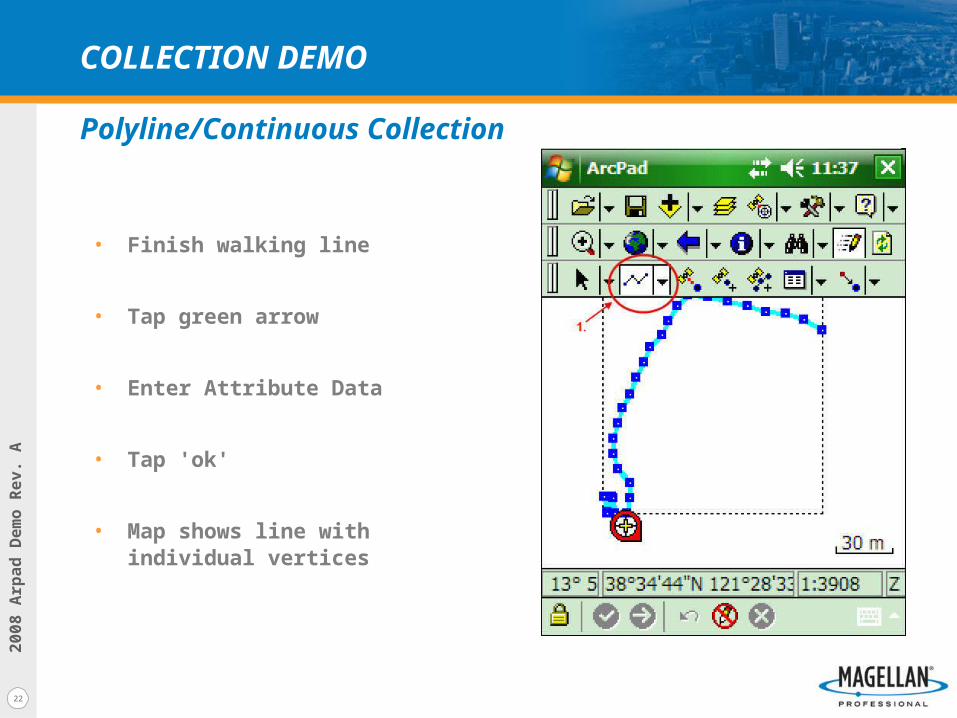
COLLECTION DEMO
• Finish walking line
• Tap green arrow
• Enter Attribute Data
• Tap 'ok'
• Map shows line with individual vertices
Polyline/Continuous CollectionPolyline/Continuous Collection

23
2008
Arp
ad D
emo
Rev
. A
COLLECTION DEMO
Polygon Collection WorkflowPolygon Collection Workflow
• Select Polygon from Shapefile Selection menu
• Choose Vertex or Continuous collection
• Collect vertices or walk path of the desired line
• Tap green arrow
• Enter Attribute data
• Tap 'ok'

24
2008
Arp
ad D
emo
Rev
. A
EXAMPLE
Polygon/Vertex CollectionPolygon/Vertex Collection
• Collected Vertex at three corners of a city block, tapped green arrow, entered attribute information
• Tapped 'ok‘ on Attribute Window, new Polygon displayed on map with first and last position connected