pepperi Plugin For Sap Business One · Transaction A customer transaction of any type (Sales Order,...
48
Pepperi Plugin for SAP Business One April. 2015 Ver 1.1
Transcript of pepperi Plugin For Sap Business One · Transaction A customer transaction of any type (Sales Order,...

Pepperi Plugin for SAP Business One
April. 2015
Ver 1.1

Contents
1 Introduction .........................................................................................................4
1.1 System Requirements ........................................................................................... 4
1.2 Glossary .................................................................................................................. 4
2 System Architecture ............................................................................................5
3 Overview ...............................................................................................................6
3.1 Installation and Setup ........................................................................................... 6
3.2 Day-to-Day Operations ........................................................................................ 7
3.3 Advanced Configuration ...................................................................................... 7
4 Installation and Setup ........................................................................................9
4.1 Creating a Pepperi User ....................................................................................... 9
4.2 Installing the Pepperi Plugin for SAP B1 ......................................................... 12
4.3 Configuring the Pepperi Plugin for SAP B1 .................................................... 13
4.3.1 Pepperi Image Uploader ................................................................... 21
4.4 Configuring Items in the Pepperi Web Admin ............................................... 23
4.5 Testing the Installation ....................................................................................... 24
4.5.1 Verifying the Pepperi Scheduler Monitor Installation .................. 24
4.5.2 Synchronizing the Pepperi App ....................................................... 24
4.5.3 Working with Business Partner Accounts in Pepperi ................... 26
4.5.4 Creating a New Transaction ............................................................. 29
5 Day-to-Day Operations ....................................................................................32
5.1 Sales Rep Operations (Import) .......................................................................... 32
5.2 SAP Operations (Export) .................................................................................... 32
5.3 Import and Export Indicators ............................................................................ 33
5.4 Running Pepperi Utilities ................................................................................... 34
5.5 Pepperi Log Manager ......................................................................................... 35
6 Advanced Configuration .................................................................................37
6.1 Changing the Import/Export Schedule............................................................. 37
6.2 Running an Immediate Import/Export ............................................................. 38
6.3 Changing the Transaction Type ........................................................................ 39

7 Appendix: Pepperi<->SAP Field Mapping ...................................................40
7.1 Importer and Exporter Advanced Configuration Tools ................................ 41
7.2 Fields Exported from SAP to Pepperi ............................................................... 42
7.2.1 Fields Mapped by Default ................................................................. 42
7.2.2 Optional Fields Requiring Advanced Configuration .................... 44
7.2.2.1 Advanced Configuration of Exported Fields in
the Pepperi Web Admin ................................................ 44
7.3 Fields Imported from Pepperi to SAP .............................................................. 45
7.3.1 Fields Imported by Default ............................................................... 45
7.3.2 Optional Fields Requiring Advanced Configuration .................... 47
7.4 Exporting SAP Fields by SQL Query ................................................................ 48

1 Introduction
The Pepperi tablet application allows sales representatives in the field to
communicate easily and automatically with a back-office sales platform. The
Pepperi server, running in a cloud, seamlessly synchronizes your sales database
with your representatives' Pepperi tablet applications. Updates to the database's
inventory items, stock status, pricing and customer information are exported
periodically to Pepperi, and new client and transaction information is imported
periodically from Pepperi to the database.
The Pepperi plugin for SAP B1 is easily installed and enables instant integration
between Pepperi and a SAP database.
1.1 System Requirements
The Pepperi plugin for SAP B1 supports SAP versions 8.8 and upward (on
the Windows OS only).
Before installing the Pepperi plugin for SAP B1, you must log in as a user
with Administrator privileges.
1.2 Glossary
Term Description
Export Export of sales-related data from SAP to Pepperi
Import Import of sales-related data from Pepperi to SAP
Scheduler A service that runs on the SAP server machine, which
performs automatic import and export processes
Pepperi app Pepperi tablet application used by sales reps
Pepperi Web
Admin
A web application that allows you to upload photos for
your inventory items and configure field labels that will be
displayed in the Pepperi app
Pepperi server Pepperi server running on a cloud, which synchronizes
between the Pepperi app instances and the backoffice sales
database
Transaction A customer transaction of any type (Sales Order, Invoice,
Quotation , Return or Delivery Note)

System Architecture
Confidential Pepperi Plugin for QuickBooks Page 5
2 System Architecture
The following diagram illustrates the system architecture of Pepperi when
integrated with SAP.
NOTE: See Configuring Items in the Pepperi to learn about optional configuration
you can perform using the Pepperi Web Admin application.

Overview
Confidential Pepperi Plugin for QuickBooks Page 6
3 Overview
This section provides a high-level overview of the Pepperi plugin installation, and
how day-to-day sales operations are implemented as Pepperi workflows, and
advanced configuration options. Detailed descriptions follow in sections 45 and 6.
3.1 Installation and Setup
To install the Pepperi plugin, configure it, and verify that it's functioning
correctly, you'll need to:
Create a Pepperi user on the Pepperi Sales Apps web site.
Install the Pepperi Plugin for SAP B1 on a machine which can access the SAP
database
Optionally perform additional configuration using the Pepperi Web Admin
application. This allows you to upload images of your inventory items and
configure the field labels that will be displayed in the Pepperi tablet app.
Test the installation by updating a test customer account and creating a test
transaction through the Pepperi app, and verifying that this data is imported
automatically into SAP.

Overview
Confidential Pepperi Plugin for QuickBooks Page 7
3.2 Day-to-Day Operations
There are two directions of data flow in the day-to-day sales operations:
Export from SAP to the Pepperi app: When SAP is updated with inventory
items, stock status, pricing and customer information, this is exported
periodically to all Pepperi app instances, usually every few hours.
Import from the Pepperi app to SAP: When a sales rep enters new client and
transaction information, this is imported periodically from Pepperi to SAP,
usually every few minutes.
You can monitor import and export operations by noting the Pepperi process
icons that appear on the taskbar.
3.3 Advanced Configuration
In most cases, you will not need to change the Pepperi default configuration, but
it is possible to perform the following configuration and synchronization actions
at any time after Pepperi has been deployed:
Change the scheduling of the periodic import and export operations
Overview
Confidential Pepperi Plugin for QuickBooks Page 8
Trigger an import or export operation to run immediately
Change the Pepperi transaction type (to one of these values: Sales Order,
Invoice, Quotation , Return or Delivery Note)
Advanced option: create an SQL statement to add custom fields from SAP to
Pepperi

Installation and Setup
Confidential Pepperi Plugin for QuickBooks Page 9
4 Installation and Setup
4.1 Creating a Pepperi User
To create a Pepperi user:
1. Go to the Pepperi for SAP B1 page.
Installation and Setup
Confidential Pepperi Plugin for QuickBooks Page 10
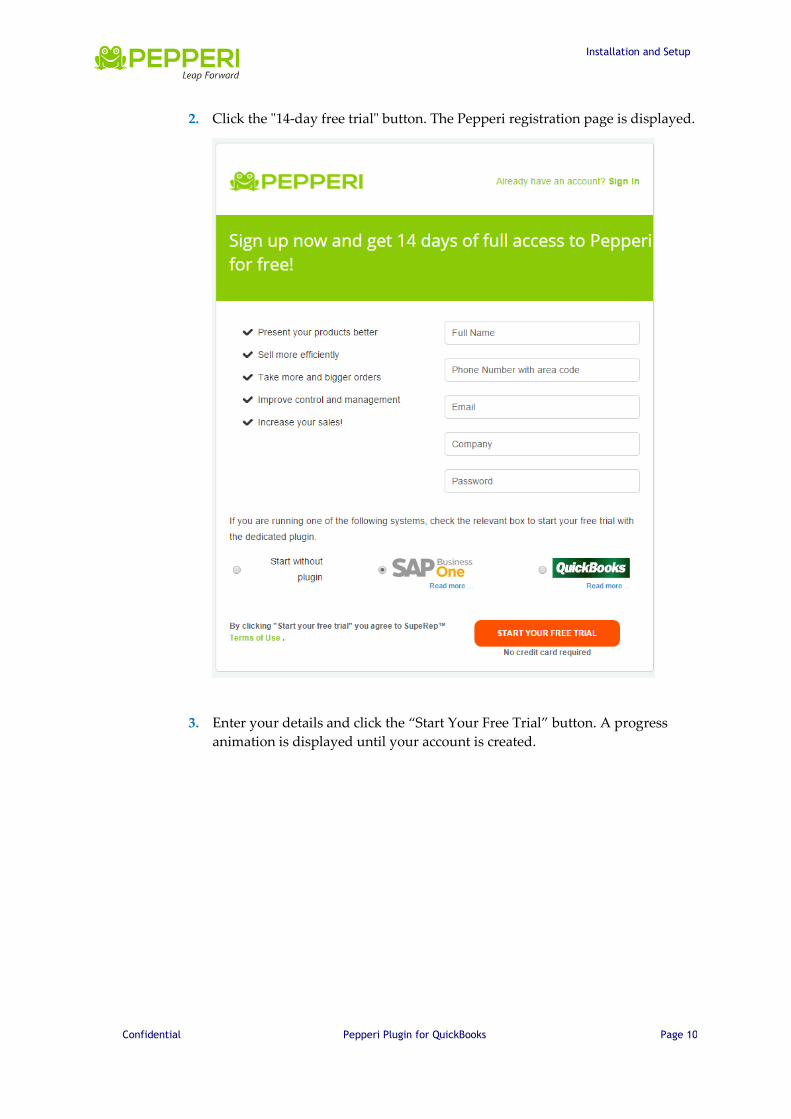
2. Click the "14-day free trial" button. The Pepperi registration page is displayed.
3. Enter your details and click the “Start Your Free Trial” button. A progress
animation is displayed until your account is created.

Installation and Setup
Confidential Pepperi Plugin for QuickBooks Page 11
4. Once an account is created, you will be instructed to download and install the
SAP B1 plug-in.

Installation and Setup
Confidential Pepperi Plugin for QuickBooks Page 12
4.2 Installing the Pepperi Plugin for SAP B1
To install the Pepperi plugin for SAP B1:
1. Press the ‘Run’ button from the download link to start the wizard, or run the
setup executable from the download location you chose.
2. Click Next in each step of the wizard to complete the installation.

Installation and Setup
Confidential Pepperi Plugin for QuickBooks Page 13
4.3 Configuring the Pepperi Plugin for SAP B1
1. Once the installation is complete, the Pepperi plugin setup wizard opens.
Enter your email and password.
2. Click Next. The SQL Server Connection page opens.
3. In the Server name field, enter the name or IP address of your SQL server.
4. In the Authentication field:
Choose Windows Authentication, and enter the user name and password of
the Windows Administrator.
Installation and Setup
Confidential Pepperi Plugin for QuickBooks Page 14
– OR –
Choose SQL Server Authentication and enter the SQL administrator name
(e.g. "sa") and password.
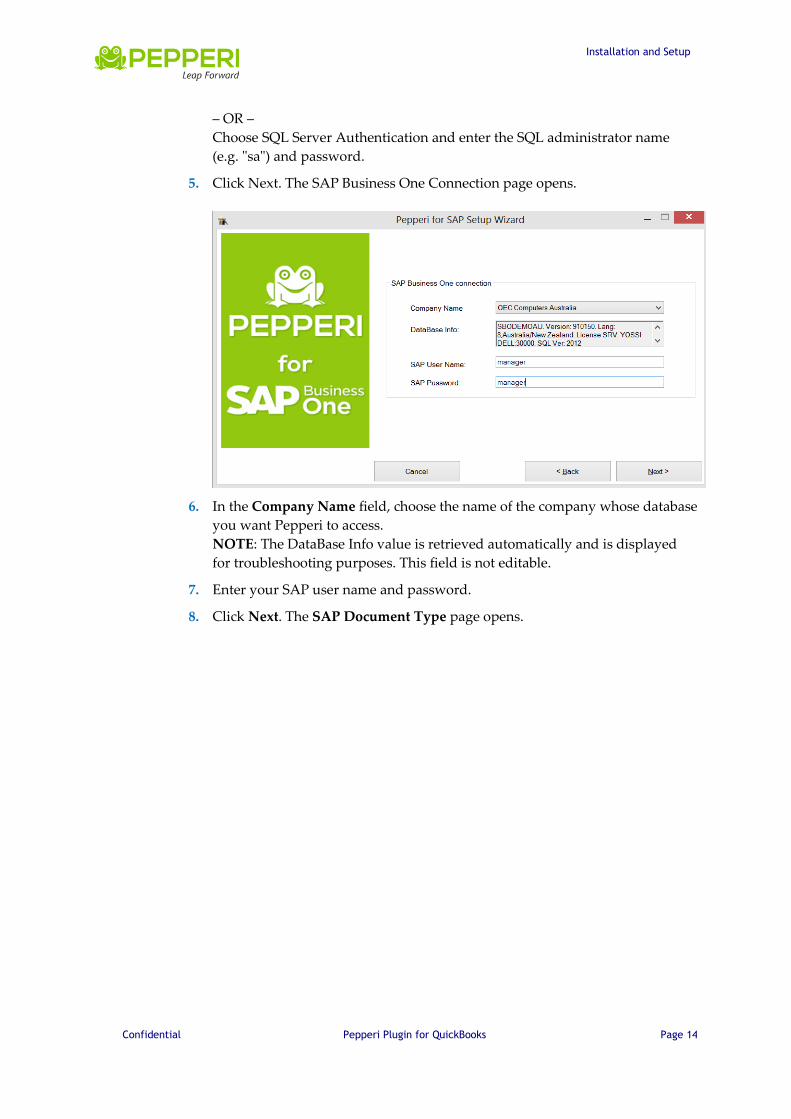
5. Click Next. The SAP Business One Connection page opens.
6. In the Company Name field, choose the name of the company whose database
you want Pepperi to access.
NOTE: The DataBase Info value is retrieved automatically and is displayed
for troubleshooting purposes. This field is not editable.
7. Enter your SAP user name and password.
8. Click Next. The SAP Document Type page opens.

Installation and Setup
Confidential Pepperi Plugin for QuickBooks Page 15
9.
10. In the Document type field, choose one of the following values: Sales Order,
Invoice, Quotation , Return or Delivery Note. Each transaction created
through Pepperi will have one of these types.
11.

Installation and Setup
Confidential Pepperi Plugin for QuickBooks Page 16
12. In the Document status field, choose Regular or Draft. This value determines
whether transactions created through Pepperi are final ("regular") or have a
"draft" status and must be approved by a supervisor.
To learn more about document drafts, go to the SAP wiki page about
Authorizations, Approval Procedures, and Document Drafts.
13. Click Next. The Design your catalog page opens.
14. OPTIONAL: Select a Base Selling Price value. This is an identifier of one of
the price lists in the SAP database. This price list will be displayed in the
Pepperi Web Admin catalog. Using the Web Admin application, you can
configure the Pepperi tablet app to display only the Base Price, only the
Business Partner's Linked Price, or both. In any case, the price list used in the
transaction calculation is the Business Partner's Linked Price List.

Installation and Setup
Confidential Pepperi Plugin for QuickBooks Page 17
15. Select a Main warehouse value. This is an identifier of the stock quantity in
the main warehouse that will be accessed when checking whether an item is in
stock. Regardless of the Main warehouse value, stock in all warehouses can
be displayed. If an item is in stock in the main warehouse, this is indicated by
a blue dot (see image below). If the quantity of items in the order exceeds the
quantity of items in stock, the order quantity is displayed in red.
16. OPTIONAL: To pool several warehouses' stock together when checking for
stock, click the button. The Multiple Warehouse Selection window opens.

Installation and Setup
Confidential Pepperi Plugin for QuickBooks Page 18
Select a warehouse identifier and click to add it to the formula, or to
delete it from the formula.
17. The Main sales category and Sub sales category values determine how stock
items will be grouped and displayed in the Pepperi app. The Main sales
category appears on the upper left-hand side of the display, and the various
Sub sales categories appear as different tabs above the item display.

Installation and Setup
Confidential Pepperi Plugin for QuickBooks Page 19
18. The possible values for sales category fields are Manufacturer (the product
manufacturer), Item Group (usually the type of product, e.g. shirts, hats,
sunglasses) and a User Defined Field of your choice.
Choose one of these values in the Main sales category field.
19. OPTIONAL: Choose one of these values in the Sub sales category field. If
you do not select a Sub sales category value, all items in the Main sales
category will be grouped together on one page.

Installation and Setup
Confidential Pepperi Plugin for QuickBooks Page 20
20. OPTIONAL: If you choose – Select UDF – as one of the category values, the
Select User Defined Field window opens.
21. Select the User Defined Field to be used as a sales cagtegory and click OK.
22. OPTIONAL: The Export only if this property is checked field can be used to
display only items with a certain property as part of the sales offering. This
feature can be used to filter out items that should not be sold in a standard
transaction, such as off-season items or auxiliary items that are only sold as
add-ons to other items. To display all items, leave this field value as – None –.
To display only items with a certain property checked, select the relevant
property name.
23. Click Next. Pepperi will start synchronizing data with the SAP database.
24.

Installation and Setup
Confidential Pepperi Plugin for QuickBooks Page 21
25. When the synchronization process is complete, the final page of the wizard
opens.
26. If you want to launch the Pepperi Web Admin application in order to
configure the Pepperi app display, leave the Launch Pepperi back office
option checked. Click Finish.
4.3.1 Pepperi Image Uploader
The Pepperi plugin installation triggers a process called the Image Uploader. This
process uploads catalog images from SAP to Pepperi. The upload process may not
be complete when the installation finishes, and therefore you may see catalog
images still being added when you launch the Pepperi Web Admin application.
After the initial load of all images, the Image Uploader runs periodically (every 6
hours by default) and updates newly modified images.

Installation and Setup
Confidential Pepperi Plugin for QuickBooks Page 22
Pepperi

Installation and Setup
Confidential Pepperi Plugin for QuickBooks Page 23
4.4 Configuring Items in the Pepperi Web Admin
The Pepperi Web Admin application enables these optional configuration actions:
Upload images of your inventory items
Configure the field labels that will be displayed in the Pepperi tablet app
For full documentation of the Pepperi Web Admin application, please refer to the
Pepperi Web Admin help page.
To upload an image for a single inventory item:
1. In the inventory catalog, locate the item and click the Upload images button.
2. Browse to the item's image file and select it for upload.
3. The image appears in the item pane instead of the image icon placeholder.
To perform a bulk upload of several item images:
1. Click the Upload images icon (marked in red in the picture above).
2. For more details, refer to the Pepperi Web Admin help page for image upload.

Installation and Setup
Confidential Pepperi Plugin for QuickBooks Page 24
To configure a field label:
Please refer to the Pepperi Web Admin help page for modifying a field label.
4.5 Testing the Installation
We recommend testing the correct installation of the Pepperi plugin by creating a
new test transaction using the Pepperi app, and verifying that the transaction is
imported into SAP within a few minutes. Before performing these operations,
you'll need to open the Pepperi app on your tablet device and synchronize its data
with the Pepperi server.
NOTE: To download the Pepperi tablet app, go to the Pepperi page on the App
Store.
4.5.1 Verifying the Pepperi Scheduler Monitor Installation
The Pepperi Scheduler Monitor is a Windows service that manages the periodic
synchronization of data between SAP and Pepperi.
To verify correct installation of the Pepperi Scheduler Monitor:
1. Open the Windows Computer Managements window and under Services and
Applications, click Services.
2. Verify that Pepperi Scheduler service appears in the list of services, with a
Status of "Started", and a Startup Type of "Automatic".
4.5.2 Synchronizing the Pepperi App
To synchronize the Pepperi tablet app with your SAP data:

Installation and Setup
Confidential Pepperi Plugin for QuickBooks Page 25
1. Open the Pepperi app. Enter your email and password, and Log In. The app dashboard
opens and automatic data synchronization begins.
After synchronization is complete, go to the Accounts tab and verify that you can see the
business partner accounts imported from SAP. Go to the Catalog tab and verify that you can see
the stock and pricing data imported from SAP.

Installation and Setup
Confidential Pepperi Plugin for QuickBooks Page 26
4.5.3 Working with Business Partner Accounts in Pepperi
Although it is possible to create new SAP business partner accounts using the
Pepperi app, the recommended work method is to create several blank
"placeholder" accounts in SAP, and then edit them using the Pepperi app each
time a new account must be created. This is because the Pepperi app can't
generate a SAP business partner ID for the account.
If you do create a new SAP business partner account using the Pepperi app, the
next time SAP is synchronized with Pepperi, a duplicate account will be created in
SAP with a SAP business partner ID. In this case, it's recommended to delete the
original account so that only the one with the SAP-generated ID remains.
Installation and Setup
Confidential Pepperi Plugin for QuickBooks Page 27
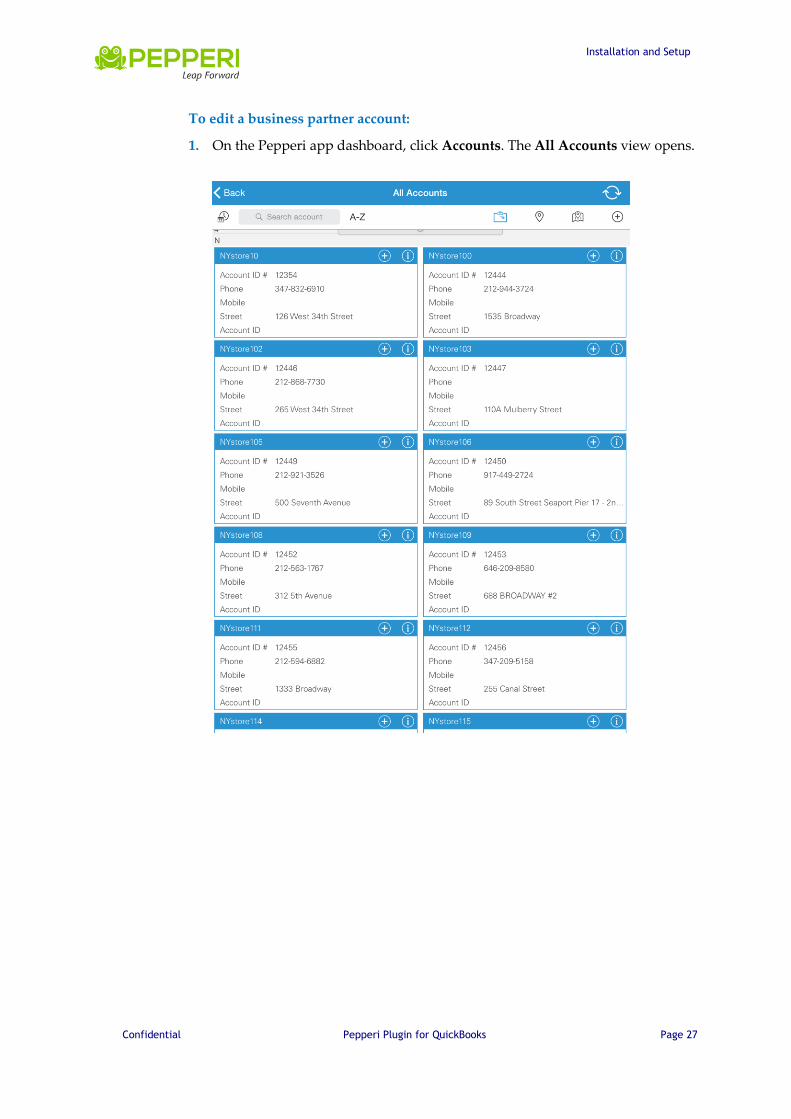
To edit a business partner account:
1. On the Pepperi app dashboard, click Accounts. The All Accounts view opens.

Installation and Setup
Confidential Pepperi Plugin for QuickBooks Page 28
2. Click the button on the account you wish to edit.
The Account Information window opens. Tap Edit:
3. Edit the account details and click Done.

Installation and Setup
Confidential Pepperi Plugin for QuickBooks Page 29
4.5.4 Creating a New Transaction
To create a new test transaction:
1. From the All Accounts window, tap on the test account you just created. The
Account Dashboard opens.

Installation and Setup
Confidential Pepperi Plugin for QuickBooks Page 30
2. Tap Sales Order at the top-right. The Order Center window opens.
3. Click the + icon for the items you want to order in the test transaction.
4. Click the shopping cart icon at the bottom-right. The Cart opens.
5. Click the Submit button on the bottom-right. You will see the message: "Sales
Order submitted successfully".

Installation and Setup
Confidential Pepperi Plugin for QuickBooks Page 31
6. Open SAP, go to the test customer's orders and search for your test
transaction. Depending on the configured frequency of data import, it may
take a few minutes for the new transaction to appear in SAP.

Day-to-Day Operations
Confidential Pepperi Plugin for QuickBooks Page 32
5 Day-to-Day Operations
This section describes the day-to-day operations that occur when using Pepperi,
and how to monitor them on the Pepperi server.
For instructions on how to use the Pepperi tablet app, please refer to the Pepperi
App help page.
NOTE: This document does not describe how to perform SAP operations.
5.1 Sales Rep Operations (Import)
These are the operations a sales rep performs, which produce data that is
imported into SAP:
Creating a new transaction (Sales Order, Invoice, Quotation , Return or
Delivery Note)
Creating a new customer account
Modifying the details (name, address, etc.) of an existing customer account
When a sales rep performs one of these operations within the Pepperi app, the
next time the app is online the new data is uploaded to the Pepperi server. It will
then be imported into SAP the next time the automatic import process runs (once
every minute by default).
5.2 SAP Operations (Export)
These are the operations performed in SAP, which produce data that is exported
to Pepperi:
Adding a new item to the inventory
Updating an item's price
Updating an item's image
Updating the number of available items in stock
Creating a new customer account
When one of these operations is performed in SAP, the resulting data will be
exported to Pepperi according to the scheduled frequency of export processes. By
default, this is once every 12 hours for new customer data, once every 6 hours for
image data, and once every hour for inventory and price data.

Day-to-Day Operations
Confidential Pepperi Plugin for QuickBooks Page 33
5.3 Import and Export Indicators
Once the Pepperi plugin for SAP is installed on the machine hosting SAP, the
Pepperi Scheduler Monitor runs automatically as a Windows service. The
following icon indicating the active Pepperi Scheduler Monitor service will
always appear on the task bar.
You will know when import and export processes are running by observing the
additional icons that appear periodically in the taskbar:
Import inventory and account data from Pepperi to SAP:
Export inventory and account data from SAP to Pepperi:
Export image data from SAP to Pepperi

Day-to-Day Operations
Confidential Pepperi Plugin for QuickBooks Page 34
5.4 Running Pepperi Utilities
At any stage, you can run Pepperi utilities from the Windows program menu,
under Pepperi\Pepperi for SAP Business One.
These are the available utilities:
Export to Pepperi Now – trigger an immediate export of data from SAP to
Pepperi
Exporter Advanced Configuration Tool - configure the way data fields are
exported from SAP to Pepperi
Import from Pepperi Now - trigger an immediate import of data from
Pepperi to SAP
Import Log Manager – run the Pepperi Import Log Manager in order to
monitor and handle import errors
Importer Advanced Configuration Tool - configure the way data fields are
imported from Pepperi to SAP
Run Setup Wizard – rerun the Pepperi setup wizard, e.g. in order to
reconfigure the transaction type

Day-to-Day Operations
Confidential Pepperi Plugin for QuickBooks Page 35
5.5 Pepperi Log Manager
The Pepperi Import Log Manager allows you to monitor all data import
operations from Pepperi to SAP, to investigate import failures and to retry the
import operations.
When import failures occur, the Import Log Manager window will pop up
automatically on the Pepperi server. In addition, an error notification email will
be sent to the email address entered for the Pepperi account.
To view all import operations:
1. From the Windows program menu run Pepperi\Pepperi for SAP Business
One\Import Log Manager. The Log Manager window opens.
2. Click the Imports Log tab.
3. Click Run to display import logs. You can edit the number in the Show Last
edit box to change the number of logs displayed.
4. In the top pane, click on an order in the Orders tab, or click on an account in
the Accounts tab, to see the details of the corresponding import operation in
the bottom pane.

Day-to-Day Operations
Confidential Pepperi Plugin for QuickBooks Page 36
To view and handle import failures:
1. From the Windows program menu run Pepperi\Pepperi for SAP Business
One\Import Log Manager. The Log Manager window opens.
2. Click the Failed Imports tab.
3. Click Ignore All to ignore all displayed errors.
4. Click a specific error in the Orders or Accounts table and click Ignore
Selected Row to ignore a single error.
5. Click Try Again All to retry all of the import operations.
Advanced Configuration
Confidential Pepperi Plugin for QuickBooks Page 37
6 Advanced Configuration
The default configuration for the SAP B1 plugin is usually suitable for most users,
but in some cases you may want to modify it. This section describes how to make
these changes:
Change the import/export schedule
Run an immediate import/export operation
Change the transaction type
6.1 Changing the Import/Export Schedule
You may want to increase the frequency of the automatic import and export
operations, if you need tighter synchronization between the sales data that
appears in SAP and the data your sales reps are using.
You may want to decrease the frequency of the automatic import and export
operations, if you think they are impacting performance on the SAP machine.
In the Pepperi Scheduler Monitor window, you can see the following processes:
1. DownloaderPlus – this process imports new customer and transaction data
from Pepperi into SAP.
2. Exporter with an "items" argument – this process exports new inventory data
from SAP to Pepperi.
3. Exporter with a "customers" argument – this process exports new customer
data from SAP to Pepperi.
4. Exporter with an "images" argument (Image Uploader) – this process exports
new stock item images from SAP to Pepperi.
NOTE: The frequency of the DownloaderPlus process should not be set to less
than 1 minute, and the frequency of the Exporter processes should not be set to
less than 1 hour.

Advanced Configuration
Confidential Pepperi Plugin for QuickBooks Page 38
To change the scheduled frequency of import and export operations:
1. Click the scheduler icon on the taskbar. The Scheduler Monitor window
opens.
2. In the row of the process whose scheduling frequency you wish to change,
type a new value in the hours or minutes field.
3. Click Save and Reset All to save all changes and reset the scheduling counter
of all processes.
4. Click Exit Scheduler.
6.2 Running an Immediate Import/Export
Sometimes you may want to run an import or export operation ad-hoc, without
waiting for the scheduled periodic run, for instance if you want changes that you
made in SAP to reach the sales reps in the field immediately.
To run an import or export operation:
1. Click the scheduler icon on the taskbar. The Scheduler Monitor window
opens.
2. Select the process that you wish to run immediately and click Run EXE.
3. Click Exit Scheduler.

Advanced Configuration
Confidential Pepperi Plugin for QuickBooks Page 39
6.3 Changing the Transaction Type
When you install the SAP B1 plugin, you select one of the transaction type values
(Sales Order, Invoice, Quotation, Return or Delivery Note). This determines the
type of record that will be created and imported to SAP for every new transaction.
You can change this value even after the plugin is installed.
To change the transaction type:
Rerun the plugin installation wizard (see Installing the Pepperi Plugin for SAP B1)
and select the new transaction type.

Appendix: Pepperi<->SAP Field Mapping
Confidential Pepperi Plugin for QuickBooks Page 40
7 Appendix: Pepperi<->SAP Field Mapping
This section describes the mapping between SAP fields and Pepperi fields. It also
shows which fields are updated by default in the import/export operations, and
which additional fields can be configured for update using advanced
configuration methods.
The most commonly used fields appear in the Pepperi Web Admin application.
For these fields, using the Web Admin, you can configure field mapping,
determine which fields will be displayed in the Pepperi tablet app, and configure
the labels with which they'll be displayed.
For detailed instructions see: Customize the Catalog Views

Appendix: Pepperi<->SAP Field Mapping
Confidential Pepperi Plugin for QuickBooks Page 41
7.1 Importer and Exporter Advanced Configuration Tools
If you want to configure additional fields to be mapped as well as those already
mapped by default, you can use the Pepperi Importer and Exporter Advanced
Configuration Tools, which can be run from the Windows program menu (see
Running Pepperi Utilities). If you wish to perform advanced configuration, please
contact the Pepperi support team through our support portal for assistance.
Exporter Advanced Configuration Tool
Importer Advanced Configuration Tool

Appendix: Pepperi<->SAP Field Mapping
Confidential Pepperi Plugin for QuickBooks Page 42
7.2 Fields Exported from SAP to Pepperi
7.2.1 Fields Mapped by Default
Type SAP Field Pepperi Field Display in App by Default
Item Item Number Item Code √
Item Description Item Name √
Item Item Group Group Name √
Item Manufacturer Firm Name √
Item Item Image Primary Image √
Item Committed Committed Qty
Item On Order On Order
Item Bar Code Bar Code
Item Preferred Vendor Vendor Name
Item Sales UoM Qty Qty Per Unit
Item Package Qty Qty Per Box
Item Purchase UoM Qty Buy Unit Msr
Business Partner Code Account Code √
Business Partner Customer Name Name √
Business Partner Agent Sales Rep √
Business Partner Address Address √

Appendix: Pepperi<->SAP Field Mapping
Confidential Pepperi Plugin for QuickBooks Page 43
Type SAP Field Pepperi Field Display in App by Default
Business Partner City City √
Business Partner Tel1 Phone 1 √
Business Partner Tel2 Phone 2
Business Partner Mobile Phone Mobile √
Business Partner Email Email √
Business Partner Fax Fax √
Business Partner Notes Notes √
Business Partner Balance Balance
Business Partner Trade Number Trade Number
Business Partner Contact Person Contact Person

Appendix: Pepperi<->SAP Field Mapping
Confidential Pepperi Plugin for QuickBooks Page 44
7.2.2 Optional Fields Requiring Advanced Configuration
The following fields and field types require advanced configuration:
Item property fields and all other fields (not mentioned in the previous
section) related to items and business partners.
NOTE: all of these fields are uploaded to Pepperi by default. You can
configure them using the Pepperi Web Admin (see next section).
All custom fields related to items and business partners.
NOTE: Custom fields can only be mapped to Pepperi fields using an SQL
statement, which you can edit in the Pepperi Export Editor.
7.2.2.1 Advanced Configuration of Exported Fields in the Pepperi Web Admin
To configure mapping of optional exported fields in the Pepperi Web Admin:
1. Open the Pepperi Web Admin, click Settings -> ERP Integration -> Upload
Data
2. The ERP Log is displayed.
3. Click on a row whose File Name starts with A-I for Item fields, or E-S for
Business Partner fields, click Actions -> Export Error Log.
4. Refer to Configuring optional exported Item fields or Configuring optional
exported Account fields, according to the type of field you wish to map.

Appendix: Pepperi<->SAP Field Mapping
Confidential Pepperi Plugin for QuickBooks Page 45
7.3 Fields Imported from Pepperi to SAP
7.3.1 Fields Imported by Default
Type Pepperi Field
SAP Field
Order - Header (Sales Order/Invoice/Quotation/Return)
ERP # Customer Ref. Num
Order - Header (Sales Order/Invoice/Quotation/Return)
Submit Date Document Date
Order - Header (Sales Order/Invoice/Quotation/Return)
Rep ERP # Sales Employee
Order - Header (Sales Order/Invoice/Quotation/Return)
Remark Remarks
Order - Header (Sales Order/Invoice/Quotation/Return)
Order Discount
% Discount
Order - Header (Sales Order/Invoice/Quotation/Return)
Rep ERP # Sales Employee
Order - Items (Sales Order/Invoice/Quotation/Return)
Item Code Item No.
Order - Items (Sales Order/Invoice/Quotation/Return)
Unit Quantity Quantity
Order - Items (Sales Order/Invoice/Quotation/Return)
Unit Price Unit Price
Order - Items (Sales Order/Invoice/Quotation/Return)
Unit Price Discount
Unit Price % Discount
Order - Items (Sales Order/Invoice/Quotation/Return)
Item Remark Text Row (Free-Text)
Business Partner Name Name

Appendix: Pepperi<->SAP Field Mapping
Confidential Pepperi Plugin for QuickBooks Page 46
Type Pepperi Field
SAP Field
Business Partner Street Address
Business Partner City City
Business Partner State Mobile
Business Partner Phone Phone
Business Partner Mobile Alt Phone
Business Partner Email Email
Business Partner Fax Fax
Business Partner Remark Note
Business Partner VAT # Company Registration Number
Business Partner - Contact Person
First Name Name
Business Partner - Contact Person
First Name First Name
Business Partner - Contact Person
Middle Name Middle Name
Business Partner - Contact Person
Last Name Last Name
Business Partner - Contact Person
Email Email
Business Partner - Contact Person
Fax Fax

Appendix: Pepperi<->SAP Field Mapping
Confidential Pepperi Plugin for QuickBooks Page 47
Type Pepperi Field
SAP Field
Business Partner - Contact Person
Mobile Mobile Phone
Business Partner - Contact Person
Home Phone Phone1
Business Partner - Contact Person
Role Position
7.3.2 Optional Fields Requiring Advanced Configuration
Type Pepperi Field SAP Field
Order - Header (Sales Order/Invoice/Quotation/Return)
Series Series
Order - Items (Sales Order/Invoice/Quotation/Return)
Attribute (Custom) Ware House
Order - Items (Sales Order/Invoice/Quotation/Return)
Unit Price Price After VAT
Order - Items (Sales Order/Invoice/Quotation/Return)
Attribute (Custom) Serial Number

Appendix: Pepperi<->SAP Field Mapping
Confidential Pepperi Plugin for QuickBooks Page 48
7.4 Exporting SAP Fields by SQL Query
In addition to exporting SAP fields to Pepperi using a simple field-to-field
mapping logic, you can also populate Pepperi fields with the results of an SQL
query that you define in the Pepperi Exporter Editor.
Please contact the Pepperi support team through our support portal for assistance
with this feature.