
PeopleSoft End-User Training Super User... · PeopleSoft End-User Training PURCHASING TRAINING DAY...
235
PeopleSoft End-User Training PURCHASING TRAINING DAY 1 PARTICIPANT GUIDE JUNE, 2011
Transcript of PeopleSoft End-User Training Super User... · PeopleSoft End-User Training PURCHASING TRAINING DAY...

PeopleSoft End-User Training
PURCHASING TRAINING
DAY 1 PARTICIPANT GUIDE
JUNE, 2011

COPYRIGHT & TRADEMARKS
Copyright © 1998, 2009, Oracle and/or its affiliates. All rights reserved.
Oracle is a registered trademark of Oracle Corporation and/or its affiliates. Other names
may be trademarks of their respective owners.
This software and related documentation are provided under a license agreement
containing restrictions on use and disclosure and are protected by intellectual property
laws. Except as expressly permitted in your license agreement or allowed by law, you
may not use, copy, reproduce, translate, broadcast, modify, license, transmit, distribute,
exhibit, perform, publish or display any part, in any form, or by any means. Reverse
engineering, disassembly, or decompilation of this software, unless required by law for
interoperability, is prohibited.
The information contained herein is subject to change without notice and is not warranted
to be error-free. If you find any errors, please report them to us in writing.
If this software or related documentation is delivered to the U.S. Government or anyone
licensing it on behalf of the U.S. Government, the following notice is applicable:
U.S. GOVERNMENT RIGHTS
Programs, software, databases, and related documentation and technical data delivered to
U.S. Government customers are “commercial computer software” or “commercial
technical data” pursuant to the applicable Federal Acquisition Regulation and agency-
specific supplemental regulations. As such, the use, duplication, disclosure, modification,
and adaptation shall be subject to the restrictions and license terms set forth in the
applicable Government contract, and, to the extent applicable by the terms of the
Government contract, the additional rights set forth in FAR 52.227-19, Commercial
Computer Software License (December 2007). Oracle USA, Inc., 500 Oracle Parkway,
Redwood City, CA 94065.
This software is developed for general use in a variety of information management
applications. It is not developed or intended for use in any inherently dangerous
applications, including applications which may create a risk of personal injury. If you use
this software in dangerous applications, then you shall be responsible to take all
appropriate fail-safe, backup, redundancy and other measures to ensure the safe use of
this software. Oracle Corporation and its affiliates disclaim any liability for any damages
caused by use of this software in dangerous applications.
This software and documentation may provide access to or information on content,
products and services from third parties. Oracle Corporation and its affiliates are not
responsible for and expressly disclaim all warranties of any kind with respect to third
party content, products and services. Oracle Corporation and its affiliates will not be
responsible for any loss, costs, or damages incurred due to your access to or use of third
party content, products or services.

Training Guide
Page iii
Table of Contents Purchasing Day 1 .............................................................................................................. 1
Logon to PeopleSoft 9.0 via Citrix Web and the PS9 Launcher ............................................ 1 Log On to PeopleSoft 9.0 via Citrix Web ............................................................................................... 1
Viewing Item Information ......................................................................................................... 5 View Purchasing Attributes and Item Vendor Information .................................................................... 9 View Units of Measure for an Item ...................................................................................................... 17
Entering Vendors ..................................................................................................................... 21 Add a Vendor ........................................................................................................................................ 23 Add a Withholding Vendor ................................................................................................................... 37 Update Vendor Information .................................................................................................................. 49 Review Vendor Information ................................................................................................................. 55
Managing Requisitions ............................................................................................................ 57 Enter a Requisition ............................................................................................................................... 57 Add, Change and Delete Comments ..................................................................................................... 97 Enter a Contract Requisition ............................................................................................................... 117 View the Requisition Activity Log ..................................................................................................... 123 Access the Process Monitor ................................................................................................................ 127 Print a Requisition .............................................................................................................................. 131 Copy a Requisition ............................................................................................................................. 147 Inquire on a Requisition ...................................................................................................................... 161 Inquire on Document Status ............................................................................................................... 173 Budget Check a Requisition ............................................................................................................... 185 Create a Change Order for a Requisition ............................................................................................ 191 Change a ChartString on a Requisition ............................................................................................... 197 Cancel a Requisition ........................................................................................................................... 203 Delete a Requisition ............................................................................................................................ 207
Appendix ................................................................................................................................. 211 Delete Temporary Internet Cookies and Files .................................................................................... 211 Print PeopleSoft 9.0 Pages .................................................................................................................. 213
Session Time Out ................................................................................................................................ 217
Understanding Budget Control Exceptions......................................................................................... 223 Understanding Exception Handling and Notification ..................................................................................... 223 Errors and Warnings ....................................................................................................................................... 223 Errors .............................................................................................................................................................. 223 Warnings ......................................................................................................................................................... 229


Training Guide
Page 1
Purchasing Day 1
Logon to PeopleSoft 9.0 via Citrix Web and the PS9 Launcher
Log On to PeopleSoft 9.0 via Citrix Web
Procedure
In this topic you will learn how to Logon to PeopleSoft 9.0 via Citrix Web.
Step Action
1. Double-click the LSU Health Sciences Center - Logon icon.

Training Guide
Page 2
Step Action
2. The User name field is not case sensitive.
Enter the desired information into the User name: field. Enter "koconn".
3. The Password field is case sensitive. The Password must be entered the way the
user created it.
Enter your password into the Password: field.
4. Click the Log On button.

Training Guide
Page 3
Step Action
5. Click the PS Desktop screen.
6. Double-click the PeopleSoft 9 icon.
7. From the LSUHSC PeopleSoft 9 Launcher, you will select the PeopleSoft System,
Database and Application you wish to work in.
The System will be Financials. If Financials does not default, click the drop-down
arrow to the right of the System field to select it.
8. Click the button to the right of the Database field.
9. There are several Databases from which to choose. The following will be the three
options you will use most for day-to-day operations:
• Enter data – PS 9 Financials Production (PS9FSPRD)
• View data and run reports – PS 9 Financials Reports (PS9FSRPT); and
• Practice using the system – PS 9 Financials Sandbox (PS9FSSND).
NOTE: Nothing entered into the Reporting or Sandbox databases is transferrable
to another database. Make sure you enter data into the Production database.
Training Guide
Page 4
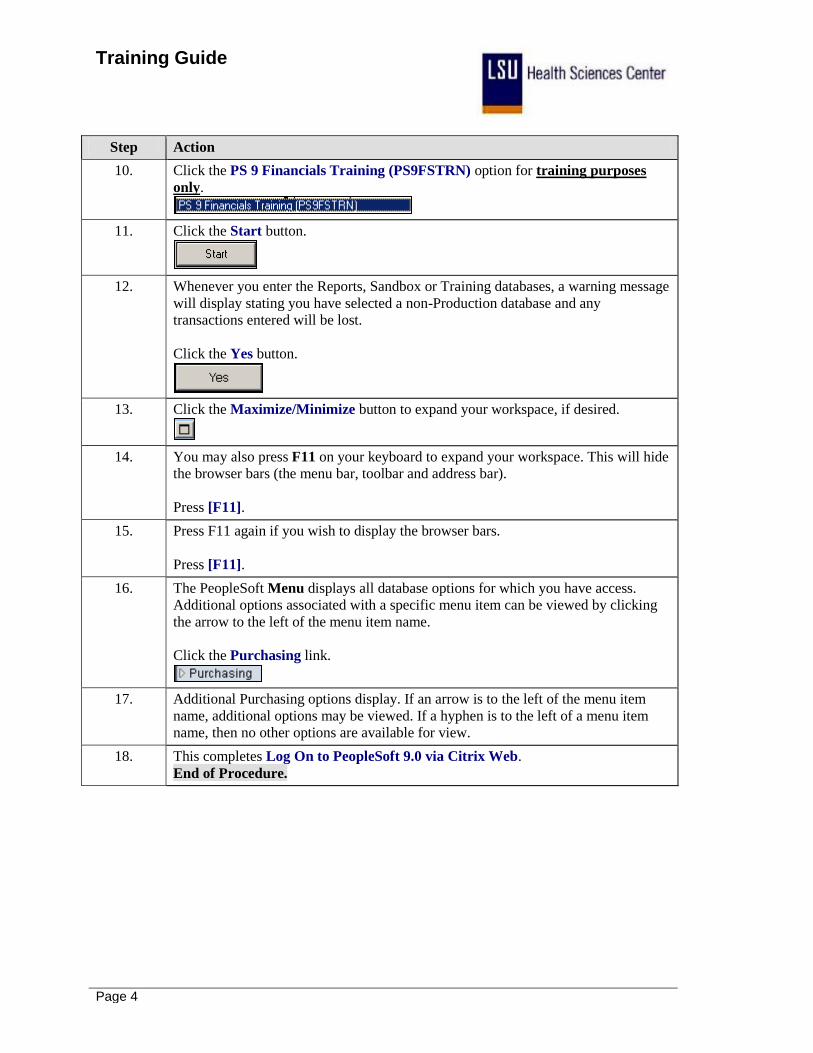
Step Action
10. Click the PS 9 Financials Training (PS9FSTRN) option for training purposes
only.
11. Click the Start button.
12. Whenever you enter the Reports, Sandbox or Training databases, a warning message
will display stating you have selected a non-Production database and any
transactions entered will be lost.
Click the Yes button.
13. Click the Maximize/Minimize button to expand your workspace, if desired.
14. You may also press F11 on your keyboard to expand your workspace. This will hide
the browser bars (the menu bar, toolbar and address bar).
Press [F11].
15. Press F11 again if you wish to display the browser bars.
Press [F11].
16. The PeopleSoft Menu displays all database options for which you have access.
Additional options associated with a specific menu item can be viewed by clicking
the arrow to the left of the menu item name.
Click the Purchasing link.
17. Additional Purchasing options display. If an arrow is to the left of the menu item
name, additional options may be viewed. If a hyphen is to the left of a menu item
name, then no other options are available for view.
18. This completes Log On to PeopleSoft 9.0 via Citrix Web.
End of Procedure.

Training Guide
Page 5
Viewing Item Information Overview of PeopleSoft Inventory
PeopleSoft SCM Inventory is a flexible, comprehensive inventory management system that
enables you to increase your inventory accuracy and customer service levels and, at the same
time, reduce your carrying costs, labor costs, and inventory write-offs. PeopleSoft SCM Inventory
helps you make faster, more accurate decisions, which is critical in today's complex global
inventory environments.
PeopleSoft SCM Inventory business processes include Putaway, Order Fulfillment, Replenish
Stock, Returned Material Authorization, Par Inventory, Consigned Inventory, Storage and
Shipping Containers, Vendor Managed Inventory, Material Usage and Reconciliation, Inventory
Counts, and Adjustments and Transfers.
PeopleSoft Inventory Integrations
PeopleSoft Inventory integrates with these applications:
Purchasing
You can send a requisition created in PeopleSoft Purchasing to PeopleSoft Inventory as a
material stock request if stock is available.
If stock is unavailable, you can add the requisition to a purchase order and dispatch it to
a vendor using PeopleSoft Purchasing.
When items on a purchase order are received from the vendor in PeopleSoft Purchasing,
the items can be put away in a PeopleSoft Inventory business unit using the putaway
processes.
Using PeopleSoft Purchasing online pages, you can call the directed putaway feature in
PeopleSoft Inventory.
PeopleSoft Inventory passes replenishment requests to PeopleSoft Purchasing, including
ad-hoc replenishment requests from the Reserve Materials process, stockless or non-stock
replenishment requests from the Create Par Replenishment Requests process, or reorder
point replenishment requests from the Replenishment Options process.
To return items that have been stocked in inventory, the data on the Return to Vendor
(RTV) pages is entered in PeopleSoft Purchasing and passed to PeopleSoft Inventory
where the items are shipped or adjusted.
Using the Pegging Workbench, a material stock request can be pegged to a requisition or
purchase order.
PeopleSoft Cost Management
PeopleSoft Cost Management calculates the cost and creates the accounting entries to
record putaways, shipments, adjustments, and other material movements in PeopleSoft
Inventory.
PeopleSoft Cost Management receives costing information from PeopleSoft Purchasing,

Training Guide
Page 6
PeopleSoft Payables, and PeopleSoft Manufacturing to record and update the cost of
stock in each PeopleSoft Inventory business unit.
The accounting entries are then passed to the general ledger to record the accounting
impact of PeopleSoft Inventory transactions.
The Landed Cost Extraction process in PeopleSoft Payables can pass cost adjustments
to PeopleSoft Cost Management for the stock putaway in PeopleSoft Inventory.
PeopleSoft General Ledger
Accounting entries recording the activity in PeopleSoft Inventory are retrieved from
PeopleSoft Cost Management and are used as input to create journal entries that are posted in
the PeopleSoft General Ledger business unit tied to the PeopleSoft Inventory business unit.
PeopleSoft Commitment Control
A requisition or purchase order is entered in PeopleSoft Purchasing using commitment
control and a pre-encumbrance or encumbrance is established.
If the purchase order is sourced from PeopleSoft Inventory, then the encumbrance is
relieved and replaced with a expenditure against the budget when the Accounting Line
Creation process in PeopleSoft Cost Management is run with the Budget Check
Accounting Lines check box selected to run the Commitment Control Budget Processor.
An expenditure is recorded in the budget when a material stock request is created, and
stock is issued from PeopleSoft Inventory using a ChartField combination set up as a
budgetary account for commitment control.
The deduction to the budget occurs when you run the Accounting Line Creation process
in PeopleSoft Cost Management with the Budget Check Accounting Lines check box
selected. No pre-encumbrance or encumbrance is created or relieved.
PeopleSoft Payables
When a consigned item is consumed using any one of various transactions in PeopleSoft
Inventory or PeopleSoft Manufacturing, ownership of the item is transferred from the
vendor to the business.
The Transaction Costing and Accounting Line Creation processes in PeopleSoft Cost
Management make consignment information available to PeopleSoft Payables for
voucher creation.
For intercompany transfers, the destination PeopleSoft Inventory business units are
defined as customers in the PeopleSoft customer tables, enabling the system to create an
invoice in PeopleSoft Billing for each intercompany transfer and to load the invoice as a
voucher into the PeopleSoft Payables business unit linked to the destination
PeopleSoft Inventory business unit. The Landed Cost Extraction process in PeopleSoft
Payables can pass cost adjustments to PeopleSoft Cost Management for the stock
putaway in PeopleSoft Inventory.

Training Guide
Page 7
Training Guide
Page 8

Training Guide
Page 9
View Purchasing Attributes and Item Vendor Information
Procedure
In this topic you will learn how to View Purchasing Attributes and Item Vendor Information.
Step Action
1. Click the Items link.
2. Click the Define Items and Attributes link.
3. Click the Purchasing Attributes link.

Training Guide
Page 10
Step Action
4. Enter the desired information into the Item ID field. Enter "100001".
5. Click the Search button.
6. View item information (category, model no, standard price, long description, file
name, account).

Training Guide
Page 11
Step Action
7. Click the Purchasing Controls link.

Training Guide
Page 12
Step Action
8. Click the Expand All link.
9. View the Matching Controls, Receiving Controls, Sourcing Controls, and
Miscellaneous Controls and Options sections.
Click the Item Vendor link.

Training Guide
Page 13
Step Action
10. View Item Vendor Information.
Click the Down button of the scrollbar.
Training Guide
Page 14
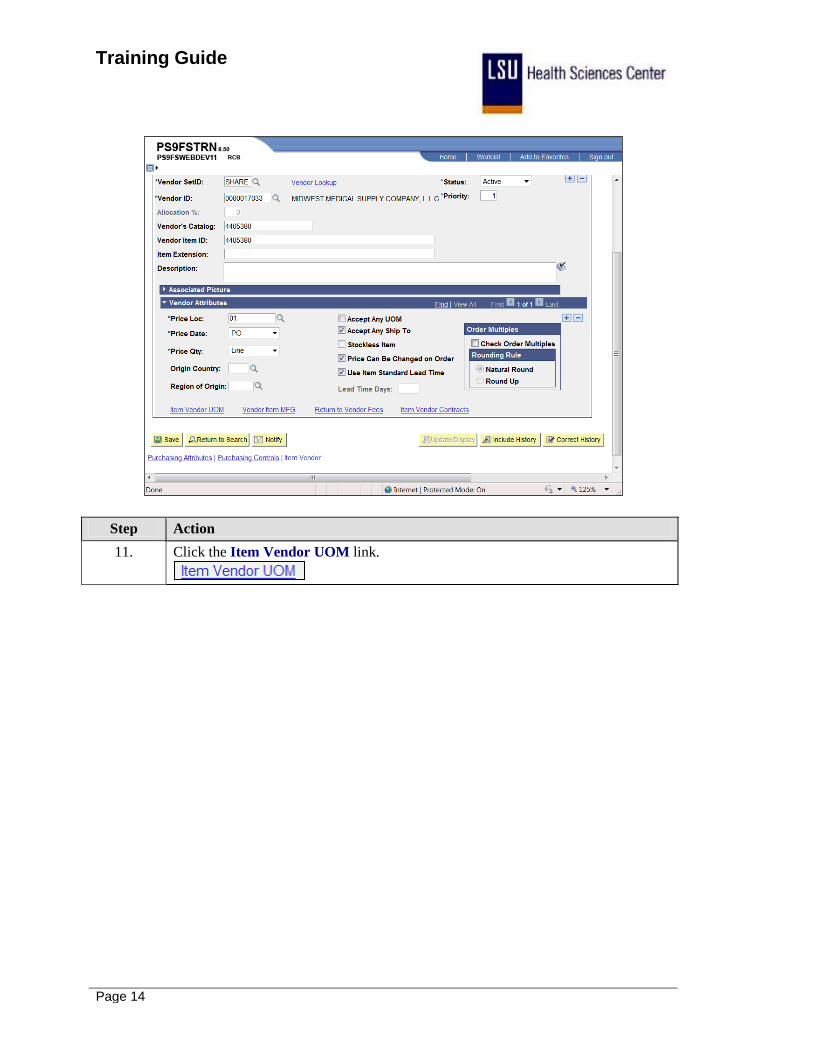
Step Action
11. Click the Item Vendor UOM link.

Training Guide
Page 15
Step Action
12. View the Unit of Measure, Conversion to Item Base UOM, and UOM Price
Attributes sections.
Click the OK button.

Training Guide
Page 16
Step Action
13. Click the Home link.
14. This completes View purchasing Attributed and Item Vendor Information.
End of Procedure.

Training Guide
Page 17
View Units of Measure for an Item
Procedure
In this topic you will learn how to View Units of Measure for an Item.
Step Action
1. Click the Items link.
2. Click the Define Items and Attributes link.

Training Guide
Page 18
Step Action
3. Click the Units of Measure link.
Training Guide
Page 19
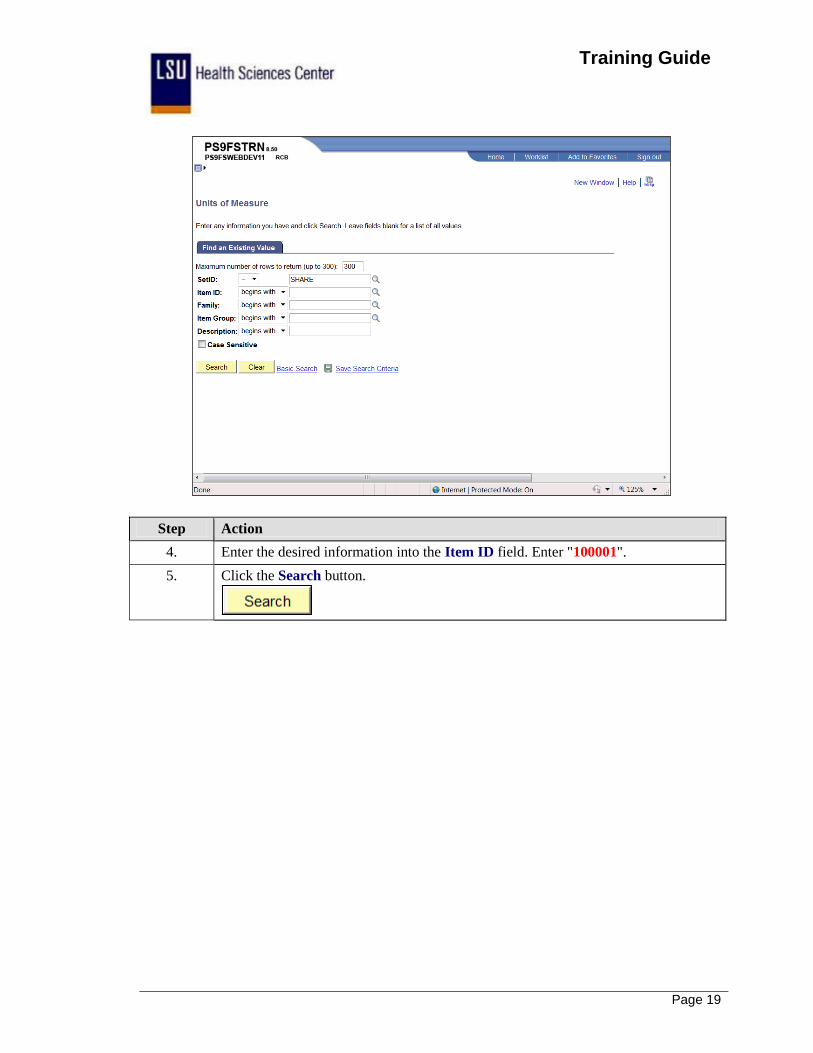
Step Action
4. Enter the desired information into the Item ID field. Enter "100001".
5. Click the Search button.

Training Guide
Page 20
Step Action
6. View Unit of Measure and Conversion Rate.
Click the Show next row button.
7. Click the Home link.
8. This completes View Units of Measure for an Item.
End of Procedure.

Training Guide
Page 21
Entering Vendors Entering Vendors
Most vendor information is initially added to the system as part of the Procurement process. The
vendor has to be set up in the data tables in order for Purchasing to issue a purchase order to the
vendor. Purchasing must set up at least one address as part of the initial vendor setup – usually
this is the address that the purchase order is sent to.
In order to add a vendor to PeopleSoft, the following information is required:
1. A completed Vendor Add/Update form;
2. An IRS W-9 form completed by the vendor that shows the vendor’s legal name and tax payer
identification number OR an ISIS vendor screen print that shows the same information (ISIS
requires an IRS W-9 form); and
3. An “official” document from the vendor that shows the address that is being added to
Peoplesoft.
Accurate vendor information is essential in any business enterprise. Purchasing needs to have
accurate vendor information to make sure that the purchase order is issued to the correct vendor
and sent to the correct vendor address. Accounts Payable needs accurate vendor information to
ensure the correct vendor is being paid for goods or services delivered, and the payment is sent to
the correct vendor address for application to the right invoices and accounts. If purchase orders
are sent to the wrong vendor or vendor address, significant delays in delivery of needed materials
may result. If payments are sent to the wrong vendor address, this may delay application of the
payment to the outstanding invoice, resulting in our units being placed on credit hold. This could
prevent further purchase orders from being accepted, result in duplicate invoices being received,
calls from the vendor and/or a collection company about the invoice payment, etc.
Accurate vendor information is also essential in preparing various procurement activity reports
and vendor payments reports. An example is the annual preparation of IRS 1099-M Payments to
Withholding Vendors forms that is done every January to report, for income tax purposes, the
payments made to certain vendors. Failure to properly report accurate withholding information
can result in extra work to correct the reported information, and in fines being charged to the
agency by the IRS.
The costs of having inaccurate vendor information in the procurement system are:
a. Time lost in tracking and correcting purchase orders and payments that were sent to the wrong
vendor or vendor address;
b. Possible delays in obtaining necessary materials or services; and
c. Poor relations between the vendor and the business unit.
When entering postal codes, the correct format for the USA is 99999 or 99999-9999. If the postal
code is not entered in this format you will receive a warning message.

Training Guide
Page 22

Training Guide
Page 23
Add a Vendor
Procedure
In this topic you will learn how to Add a Vendor.
NOTE: Prior to adding a vendor to PeopleSoft, the user should obtain a completed W-9 from
the vendor. If the vendor exists in ISIS, a screen print of the VENC screen can be substituted
for the W-9.
Step Action
1. Click the Vendors link.
2. Click the Vendor Information link.
3. Click the Add/Update link.
4. Click the Vendor link.

Training Guide
Page 24
Step Action
5. Click the Add a New Value link.
6. The SetID, Vendor ID and Persistence will default as follows:
Set ID = SHARE
Vendor ID = NEXT
Persistence = Regular.
Click the Add button.

Training Guide
Page 25
Step Action
7. NOTE: All information must be entered in ALL CAPS.
Enter the desired information into the Vendor Short Name field. Enter "JOE'S
CRAB".

Training Guide
Page 26
Step Action
8. Enter the desired information into the Vendor Name 1 field. Enter "JOE'S CRAB
SHACK".
9. The Status, Persistence, and Classification will default as follows:
Status = Approved
Persistence = Regular
Classification = Supplier
If the Status, Persistence and Classification do not default correctly, click the drop-
down to the right of the field to select the correct option.
10. NOTE: Make sure the Open for Ordering box is checked.
Click the Expand All button and scroll down to the Additional ID Numbers
section.
11. Enter the desired information into the Type field. Enter "TIN".
12. Enter the desired information into the ID Number field. Enter "999888766".
Scroll down to the Government Classifications section for small and emerging
businesses.

Training Guide
Page 27
Step Action
13. Click the Look up Source button.
14. For small and emerging businesses, select the SEB option.
For small entrepreneurship's, select the SEH option.
Click the SEH link.
15. Click the ADDRESS tab.
16. Enter the desired information into the Description field. Enter "GENERAL".
17. NOTE: The Effective Date will always be the 1st day of the current month and
year.
Enter the desired information into the Effective Date field. Enter "05/01/2011".
18. Enter the desired information into the Address 1 field. Enter "111
HUMMINGBIRD LANE".
19. Enter the desired information into the City field. Enter "NEW ORLEANS".
20. Enter the desired information into the Parish field. Enter "ORLEANS".
NOTE: For vendors located in another state enter "OUT OF STATE" as the
Parish.
21. Enter the desired information into the Zip field. Enter "71101".
22. Enter the desired information into the State field. Enter "LA".
Scroll down the page to view the Payment/Withholding Alt Names section.
23. Click the button to the right of the Type field.
24. Click the FAX list item.
25. NOTE: We now have the ability to fax purchase orders to vendors. When faxing
purchase orders, the vendor's telephone information is pulled from this page.
It is important that you enter the telephone number in the exact format: 000/000-
0000. DO NOT enter the area code in the Prefix field.
You will have the option of changing the fax number at the PO level when you
change the dispatch method to FAX.

Training Guide
Page 28
Step Action
26. Enter the desired information into the Telephone field. Enter "800/555-5555".
27. Rows may be added if addition telephone information is available.
Click the Add a new row at row 1 button.
28. Blank rows cannot be saved.
Click the Delete row 2 button.
29. Click the Vendors pane.
30. Click the Contacts tab.
31. Enter the desired information into the Description field. Enter "GENERAL".
32. Click the button to the right of the Type field.
33. Click the Billing Contact list item.

Training Guide
Page 29
Step Action
34. Enter the desired information into the Name field. Enter "JOE CRAB".
35. Enter the desired information into the Title field. Enter "OWNER".

Training Guide
Page 30
Step Action
36. Click the Location tab.
37. Enter the desired information into the Location field. Enter "01".
38. The following Location Descriptions can be used in the Description field:
• BIDS
• BILLING
• GENERAL
• MAILING
• ORDER
• REMIT
Enter the desired information into the Description field. Enter "GENERAL".
39. NOTE: The Effective Date will always be the 1st day of the current month and
year.
Enter the desired information into the Effective Date field. Enter "05/01/2011".
40. Click the cell.

Training Guide
Page 31
Step Action
41. View the Freight Terms, Ship Method, etc., if applicable.
Click the Expand All button.
Scroll Down the page to view additional fields.

Training Guide
Page 32
Step Action
42. Click the OK button.

Training Guide
Page 33
Step Action
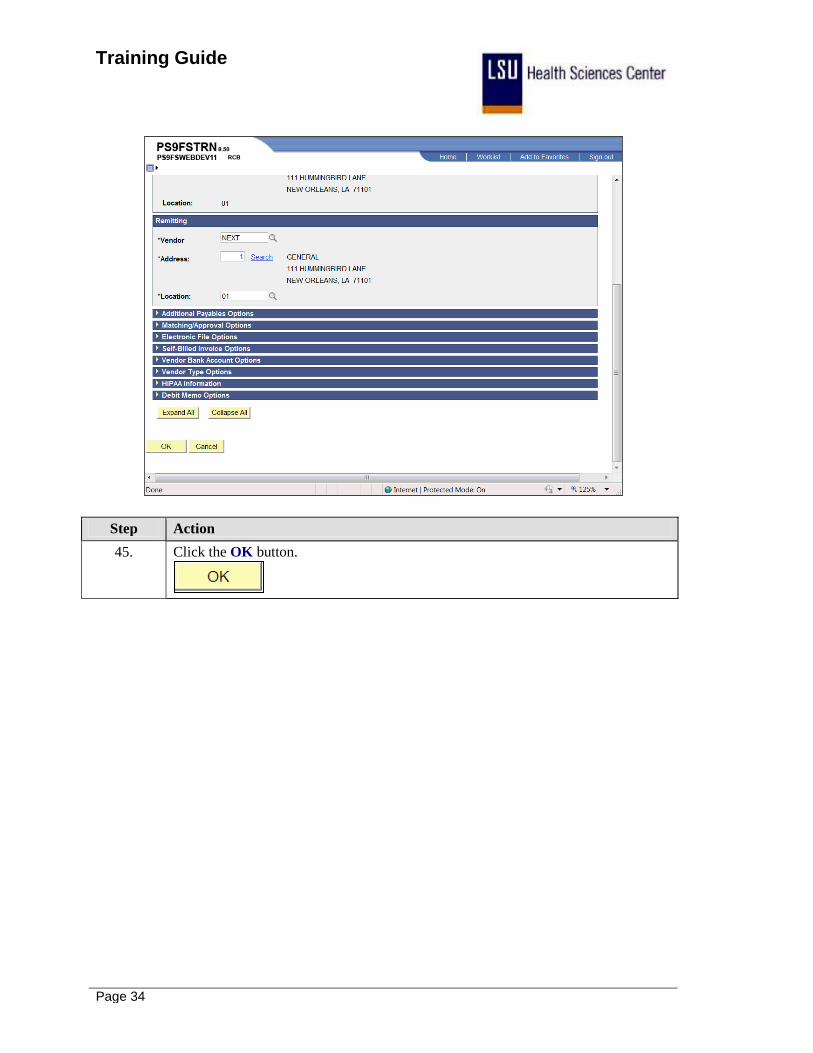
43. Click the Payables link.
44. View Payable page.
Training Guide
Page 34
Step Action
45. Click the OK button.

Training Guide
Page 35
Step Action
46. Click the Save button.
NOTE: The Vendor will change from NEXT to a ten-digit number.
47. The Summary tab displays after saving the vendor information. The Summary
page provides a history of who entered or modified the vendor.
Click the Summary link.

Training Guide
Page 36
Step Action
48. Click the Home link.
49. This completes Add a Vendor.
End of Procedure.

Training Guide
Page 37
Add a Withholding Vendor
Procedure
In this topic you will learn how to Add a Withholding Vendor.
NOTE: Prior to entering a vendor you should search for the vendor by Tax ID number or
name.
Step Action
1. Click the Vendors link.
2. Click the Vendor Information link.
3. Click the Add/Update link.
4. Click the Vendor link.

Training Guide
Page 38
Step Action
5. Click the Add a New Value link.
6. Click the Add button.

Training Guide
Page 39
Step Action
7. Enter the desired information into the Vendor Short Name field. Enter
"WITHHOLD".

Training Guide
Page 40
Step Action
8. Enter the desired information into the Vendor Name 1 field. Enter
"WITHHOLDING VENDOR".

Training Guide
Page 41
Step Action
9. Click the Expand button for the Additional ID Numbers section.
10. Click the Look up Type button.
11. Click the TIN - Tax Identification Number link.
12. Enter the desired information into the ID Number field. Enter "456456456".
NOTE: Record the Tax ID number for use later in this exercise.
13. Click the Address link.

Training Guide
Page 42
Step Action
14. Enter the desired information into the Description field. Enter "1099 ADDRESS".
15. Enter the desired information into the Effective Date field. Enter "05/01/2011".
16. Enter the desired information into the Country field. Enter "1099 ADDRESS".
17. Enter the desired information into the City field. Enter "BATON ROUGE".
18. Enter the desired information into the Parish field. Enter "EAST BATON
ROUGE".
19. Enter the desired information into the Zip Code field. Enter "70804".
20. Enter the desired information into the State field. Enter "LA".
21. DO NOT enter the vendor's e-mail address on this page.
22. Click the Location link.

Training Guide
Page 43
Step Action
23. Enter the desired information into the Location field. Enter "01".
24. Enter the desired information into the Description field. Enter "1099".
25. NOTE: The Effective Date will always be the 1st day of the current month and
year.
Enter the desired information into the Effective Date field. Enter "05/01/2011".
26. Click the Save button.
27. Click the Identifying Information link.

Training Guide
Page 44
Step Action
28. Click the Withholding option.
29. Click the Location link.

Training Guide
Page 45
Step Action
30. Click the 1099 link.

Training Guide
Page 46
Step Action
31. Enter the desired information into the Entity field. Enter "IRS".
32. Enter the desired information into the Type field. Enter "1099".
33. Enter the desired information into the Jurisdiction field. Enter "FED".
34. Click the Default Jurisdiction option.
35. Enter the desired information into the Default Class field. Enter "07".
36. The 1099 Status defaults as RPT and will remain as defaulted. If the 1099 Status
does not default correctly, enter it or select it using the Look up 1099 Status button.
37. Enter the desired information into the Entity field. Enter "IRS".
38. Enter the desired information into the Address field. Enter "01".
39. Enter the desired information into the TIN Type field. Enter "F".

Training Guide
Page 47
Step Action
40. Enter the desired information into the Taxpayer Identification Number field. Enter
"456456456".
41. Click the Additional Information tab.
42. The Withholding Control Name will be entered using the first 4 letters of the
company name, or the first 4 letters of the last name.
Below are examples of exceptions and how to enter the Withholding Control Name
for an exception:
Vendor Name Withholding Control Name
The Houma Courier THEH
Sally Authement, RN AUTH
Estate of Sally Authement ESTA
Hong Lo LO
Sarah Jessica-Parker JESS
43. Enter the desired information into the Withholding Control Name field. Enter
"WITH".
44. Click the OK button.

Training Guide
Page 48
Step Action
45. Click the Save button.
46. Click the Summary tab.
47. NOTE: If a vendor is setup as a withholding vendor, you should never change the
setup of the vendor to non-withholding. Although the vendor may not be a
withholding vendor for your Business Unit, he may be a withholding vendor for
another Business Unit.
If a vendor is setup as a non-withholding vendor, you can change him to a
withholding vendor.
48. Click the Home link.
49. This completes Add a Withholding Vendor.
End of Procedure.

Training Guide
Page 49
Update Vendor Information
Procedure
In this topic you will learn how to Update Vendor Information.
Step Action
1. Scenario
You have received a notice from a vendor that he is moving to a new address
effective the first of next month. You will add a new address with the an effective
date of the first of next month.

Training Guide
Page 50
Step Action
2. Click the Vendors link.
3. Click the Vendor Information link.
4. Click the Add/Update link.
5. Click the Vendor link.

Training Guide
Page 51
Step Action
6. Enter the desired information into the Vendor ID field. Enter "0000034911".
7. Click the Search button.
Training Guide
Page 52
Step Action
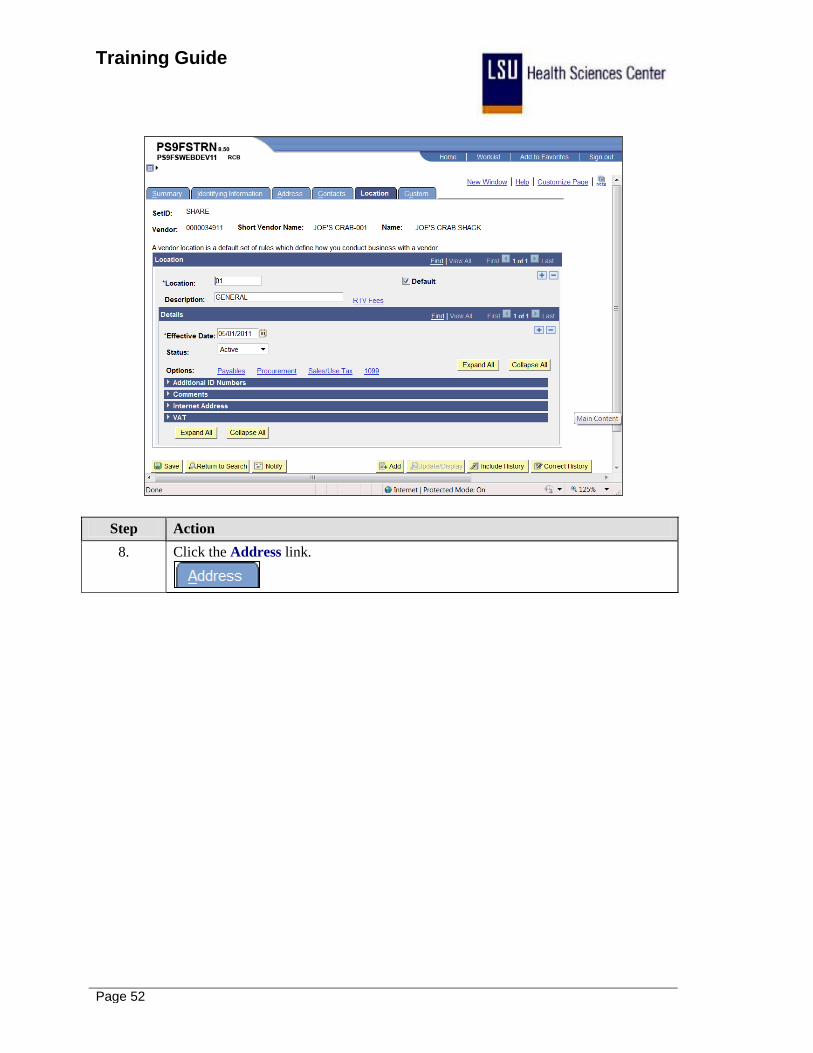
8. Click the Address link.

Training Guide
Page 53
Step Action
9. Click the Add a new row at row 1 button in the Details section.

Training Guide
Page 54
Step Action
10. The Effective Date is the 1st day of the next month in the current year.
Enter the desired information into the Vendors field. Enter "06/01/2011".
11. Enter the desired information into the Address 1 field. Enter "3760 AIRLINE
HWY".
12. Enter the desired information into the City field. Enter "BATON ROUGE".
13. Enter the desired information into the Parish field. Enter "EAST BATON
ROUGE".
14. Enter the desired information into the Zip code field. Enter "70805".
15. Click the Save button.
16. Click the Home link.
17. This completes Update Vendor Information.
End of Procedure.
Training Guide
Page 55
Review Vendor Information
Procedure
In this topic you will learn how to Review Vendor Information.
Step Action
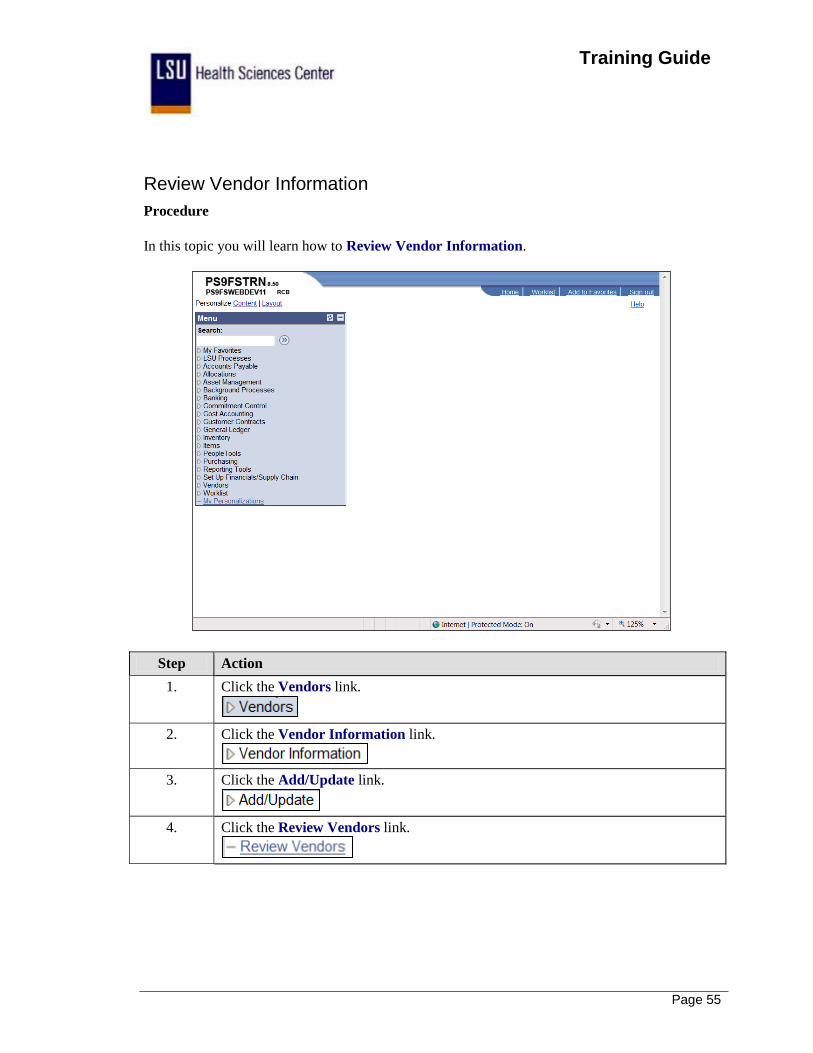
1. Click the Vendors link.
2. Click the Vendor Information link.
3. Click the Add/Update link.
4. Click the Review Vendors link.

Training Guide
Page 56
Step Action
5. Enter the desired information into the SetID field. Enter "0000034911".
6. Click the Search button.
7. View the vendor Name, Short Name, Address, City, State, and Status.
Click the Additional Vendor Info link.
8. View the withholding information.
Click the Audit Information link.
9. View audit information.
Click the Home link.
10. This completes Review Vendor Information.
End of Procedure.

Training Guide
Page 57
Managing Requisitions
Enter a Requisition
Procedure
In this topic you will learn how to Enter a Requisition.
Step Action
1. Scenario
In this exercise you will create a requisition to order from Office Depot. The
total cost of the requisition will be less than $1,000, so the requisition will not have
to go out for bid.
Step Action
2. Click the Purchasing link.
3. Click the Requisitions link.
Training Guide
Page 58
Step Action
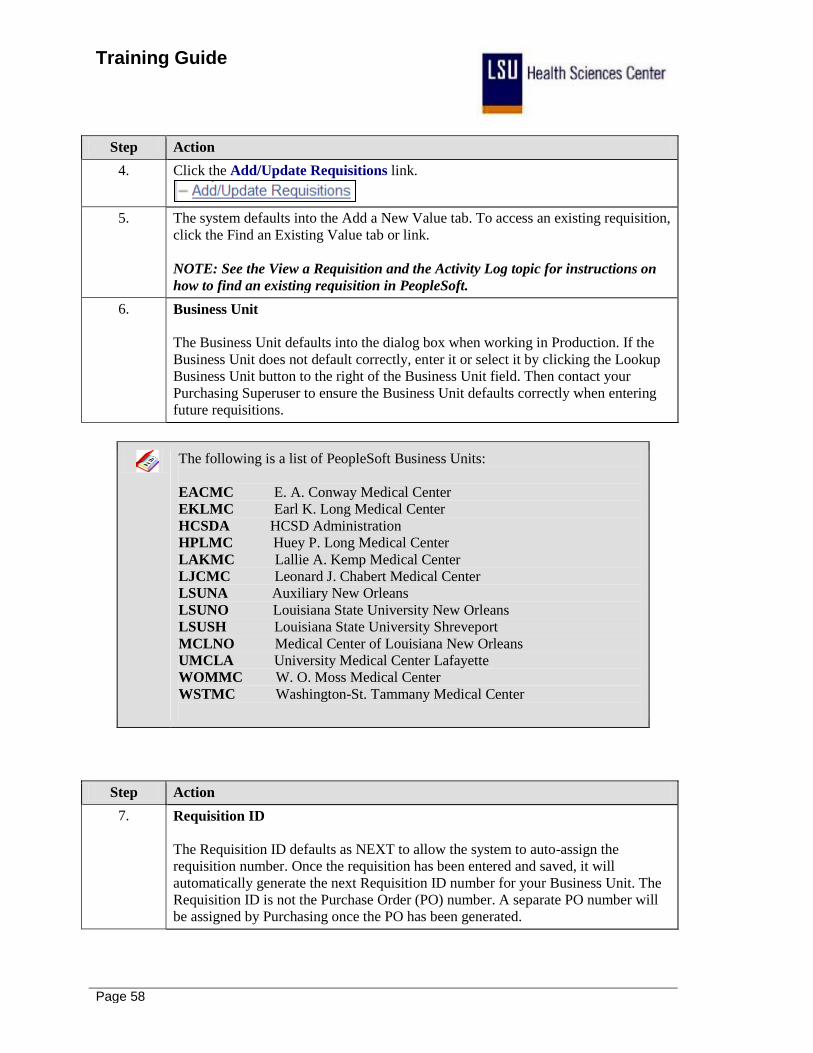
4. Click the Add/Update Requisitions link.
5. The system defaults into the Add a New Value tab. To access an existing requisition,
click the Find an Existing Value tab or link.
NOTE: See the View a Requisition and the Activity Log topic for instructions on
how to find an existing requisition in PeopleSoft.
6. Business Unit
The Business Unit defaults into the dialog box when working in Production. If the
Business Unit does not default correctly, enter it or select it by clicking the Lookup
Business Unit button to the right of the Business Unit field. Then contact your
Purchasing Superuser to ensure the Business Unit defaults correctly when entering
future requisitions.
The following is a list of PeopleSoft Business Units:
EACMC E. A. Conway Medical Center
EKLMC Earl K. Long Medical Center
HCSDA HCSD Administration
HPLMC Huey P. Long Medical Center
LAKMC Lallie A. Kemp Medical Center
LJCMC Leonard J. Chabert Medical Center
LSUNA Auxiliary New Orleans
LSUNO Louisiana State University New Orleans
LSUSH Louisiana State University Shreveport
MCLNO Medical Center of Louisiana New Orleans
UMCLA University Medical Center Lafayette
WOMMC W. O. Moss Medical Center
WSTMC Washington-St. Tammany Medical Center
Step Action
7. Requisition ID
The Requisition ID defaults as NEXT to allow the system to auto-assign the
requisition number. Once the requisition has been entered and saved, it will
automatically generate the next Requisition ID number for your Business Unit. The
Requisition ID is not the Purchase Order (PO) number. A separate PO number will
be assigned by Purchasing once the PO has been generated.

Training Guide
Page 59
Step Action
8. Requisition ID (continued)
LSUSH and LSUNA ONLY: Enter the assigned requisition number in the
Requisition ID field. The Requisition ID NEXT must be replaced with a
Confirmation Purchase Order Number before proceeding to the next step in the
process if the requisition is assigned as a Confirmation PO.
Confirmation numbers for LSUSH are 8-digit numbers beginning with 065 followed
by 5 digits (065xxxxx). Confirmation numbers for LSUNA begin with a C followed
by 5 digits (Cxxxxx). Confirmation PO numbers are obtained from the Purchasing
Department.
NOTE: The Confirmation PO Number will be both the Requisition ID number
and the PO number. A separate PO will not be assigned.

Training Guide
Page 60
Step Action
9. Click the Add button.
10. The requisition Status defaults as Pending. The requisition must saved with a Status
of Pending the first time or it will not move forward in the purchasing process
sequence.
If the Status does not default correctly, contact your Purchasing Superuser so that
appropriate defaults can be set for entering future requisitions.
HPLMC ONLY: Workflow is not currently being used by this facility. The Status
of the requisition will save as Open and is dependent on the Requester setup. The
requisition will be approved and the Status changed to Approved by Purchasing.
11. The Budget Status indicates if the budget check process has been run. The Budget
Status will default as Not Chk'd.
The budget check process must be run prior to Purchasing sourcing (i.e. generating)
the requisition to a PO or RFQ (Request for Quote). The requisition must be
approved before it can be budget checked.
LSUNO and LSUSH ONLY: The Budget Check must be done by the department.
See the "Budget Check a Requisition" topic for additional information.

Training Guide
Page 61
Step Action
12. It is important to check the Hold From Further Processing box when the Maintain
Requisitions page first displays. Checking the Hold From Further Processing box
will prevent the requisition from being routed prematurely to the Approver's
Worklist. Checking the box allows you to close and reopen the requisition so items
can be added, changed or deleted.
You must uncheck the Hold From Further Processing box once the requisition is
completed, so that it can proceed through the ordering process.

Training Guide
Page 62
Step Action
13. Click the Hold From Further Processing option.
14. The requester's User ID will default into the Requester field. If the User ID does not
default, enter it or select it by clicking the Lookup Requester button. Contact your
Purchasing Superuser so that the appropriate default can be set for entering future
requisitions.
15. The Requisition Date defaults as the current date and may remain as defaulted.
16. The Accounting Date also defaults as the current date. However, the Accounting
Date must be adjusted when entering a requisition for the next fiscal year. The
Accounting Date must be changed prior to entering information on the Requisition
Defaults page so the Accounting Date and Budget Period will match. If the
Accounting Date is not changed prior to entering Requisition Default information,
the Budget Date will be incorrect and an error will be received when attempting to
save the requisition. The Due Date must be changed on the Requisition Defaults
page.
The dates must be changed when entering a requisition for the next fiscal year as
follows:
Accounting Date - 07/01/XXXX (the next fiscal year)
Due Date - 07/01/XXXX (the Due Date may be a date later in the fiscal year)
Training Guide
Page 63
Step Action
17. Maintain Requisitions Links
The Copy From link is used to copy a new requisition from an existing requisition.
See the "Copy a Requisition" topic for additional information.
The Requester Info link is not used.
18. Maintain Requisitions Links (continued)
The Requisition Defaults link is used to enter default information for the
requisition. Default information should apply to most or all of the line items on the
requisition, as the system will copy the information to all line items thus preventing
you from having to re-enter the information for multiple line item requisitions.
Default values can be changed for any line item as needed.
The Add Comments link is where Header comments can be added. See the Add,
Change and Delete Comments" topic for additional information.
The Requisition Activities link is not used by most end-users. The link may be used
to enter notes however, the notes will not display/print on the requisition.
19. The links located in the Add Items From section are not used.
20. Click the Requisition Defaults link.
21. Step 1: Enter Defaults
Default information must first be entered on the Requisitions Defaults page for two
reasons:
1. In order to properly save the requisition. If defaults are not entered correctly, save
errors may occur resulting in requester re-entering the information for the
requisition.
2. In order for the chartstring to default to all line items. By entering chartstring
information on the Requisition Defaults page, you will not have to re-enter it for
each line item on a multi-line requisition. The chartstring values can be changed
however, for any line item.
22. Default Options
The Override option in the Defaults Options section defaults as selected and will
remain as such.

Training Guide
Page 64
Step Action
23. Certain fields on the requisition are PeopleSoft required fields. Generally, these
fields have an asterisk next to the field name, such as the Distribute by field. If a
PeopleSoft required field is left blank, you will not be able to save the requisition.
There are some fields that are not PeopleSoft required fields, but are Company or
facility required fields (Buyer, Vendor, Ship To, Due Date, etc.). If you are unsure
whether a field is required, contact your Purchasing department.

Training Guide
Page 65
Step Action
24. Line
The Buyer field is not a required field, but may be entered. If you know your buyer's
User ID, you can enter it in the Buyer field. The buyer's User ID must be entered in
ALL CAPS. If you do not know your buyer's User ID, you may select it by clicking
the Lookup Buyer button and searching for it.
Click the Look up Buyer button.
25. Enter all or part of the buyer's last name into the Name field. A buyer's full name
should not be entered unless it is in proper PeopleSoft format (i.e. last name,first
name).
If you enter part of the buyer's last name into the Name field, you may use the % as
a wildcard symbol to focus your search. The wildcard symbol takes the place of
unknown letters or characters.
Enter the desired information into the Name field. Enter "auth%".
26. Click the Look Up button.

Training Guide
Page 66
Step Action
27. Click the buyer's name in the Search Results list to select it.
Click the SAUTH2 link for this example.
28. Use the Tab key to move from field to field within PeopleSoft. The Enter key cannot
be used to move from field to field.
If multiple fields display in a section, the tab key will move down first and then to
the right.
29. Line (continued)
Although the Vendor field is not a required field, the requester must provide
information about the vendor to Purchasing. This field may be left blank if the
vendor cannot be found in the PS database or if the requisitions will go out for bid.
The Vendor ID is always a 10-digit number. If you know the Vendor ID, you may
enter it or select it by clicking the Look up Vendor button.

Training Guide
Page 67
Requisitions Not Requiring a Request for Quote (RFQ)
If the total amount of a requisition does not exceed $1,000 (inlcuding freight,
handling and other charges), the requisition doe not need to go out for bid. The
vendor ID may be entered into the Vendor field if it is known. If the vendor ID
is not known, the requester should attempt to locate the vendor ID in the PS
database.
If the vendor is not in the PS database, the vendor information must be entered
in the Header section, Add Comments link on the Maintain Requisitions page.
The requester will include as much as is possible, if not all, of the following
information: Vendor Name, Contact Name, Street Address, City, State, Zip
Code, Telephone Number, Fax Number and Tax ID Number. The vendor will
be added to the PS database by Purchasing for use when entering furture
requisitions.
NOTE: Entering information in the Header section, Add Comments link is
shown in the Add, Change and Delete Comments topic.
Requisitions Requiring a Request for Quote (RFQ)
Requisitions that exceed the small purchase limit will go out for bid. Any
suggested vendors must be enterin the HEader section, Add Comments link on
the Maintain Requisitions page. The requester will include the Vendor Name,
Contact Name, Telephone Number and Fax Number. Only if the vendor is
awarded the bid will it be added to the PS database by Purchasing.
Contact your buyer for information regarding the bid process (i.e. the price
thresholds, required quotes from vendors and itmes require or do not require
bids, etc.). Or you may view the Executive Order for Small Purchases on the
Louisiana Office of State Purchasing website for additional information.
Step Action
30. In this example, the total amount of the requisition is less than $1,000 therefore, the
requisition does not have to go out for bid. You must enter or search for the Vendor
ID, or enter the vendor information into Add Comments if the vendor is not in the
PS database.
In this example, the Vendor ID is unknown, but the vendor is listed in the PS
database.
Click the Look up Vendor button.

Training Guide
Page 68
Step Action
31. A list of vendors displays. If the list contains more results than can be displayed, the
following message displays below Search Results:
Only the first 300 results of a possible 27869 can be displayed. Enter more search
key information and search again to reduce the number of search results.
32. The wildcard (%) symbol can be used to help narrow the search results. The
wildcard replaces letters and/or numbers in the vendor name.
Enter the desired information into the Short Vendor Name field. Enter
"OFFICE%".
33. Click the Look Up button.
34. Use the vertical scroll bar if needed to find and highlight the desired vendor.
NOTE: If the vendor name does not appear in the list, the vendor information
must be entered into the Header section, Add Comments link on the Maintain
Requisitions page.
Click the OFFICE DEPOT link.
35. When the Vendor field is populated the vendor name and Vendor Location field
will default.
The Vendor Location generally will default to 0000000001 and will remain as
defaulted. However, if the vendor has multiple locations, you must identify the
location where Purchasing will send the PO. The mailing address for the location
should be entered into Header section, Add Comments link on the Maintain
Requisitions page.
36. A second option is available for searching for the Vendor and Vendor Location. The
Vendor Lookup link may be used to search for the Vendor Location. The Vendor
Lookup allows you to search for the vendor using more criteria such as Name, Short
Vendor Name, City, State, Country, Postal Code and/or Vendor TIN (Tax
Identification Number).
Click the Vendor Lookup link.

Training Guide
Page 69
Step Action
37. Any of the fields may be used for your search using all or part of the required field
information.
Enter the desired information into the Name field. Enter "OFFICE%".
38. Enter the desired information into the City field. Enter "LA".
39. Enter the desired information into the Max Rows field. Enter "100".
40. Click the Search button.
41. The search results will list at the bottom of the page. In this example, the first 5 out
of 39 results have been retrieved. View additional results by using the arrows and
links displayed on the blue Search Results bar.
Click the arrows to view the next or previous page. Click the Last and First links to
view the last page and first page. Click the View All to view all results at one time.
42. Click the Show next row button.
43. Click the Sel option.

Training Guide
Page 70
Step Action
44. Once the Sel box is checked, the Vendor Detail and Address options below your
search results display as blue links. The Address link will be used to verify the
correct location is selected.
Click the Address link.

Training Guide
Page 71
Step Action
45. Click the OK button.
46. If selected option is the correct vendor and vendor location, you will click the OK
button to return to the Requisition Defaults page. The Vendor and Vendor Location
will default onto the page.
If the selected option is not the correct Vendor or Vendor Location, but it is the
only option available, click the OK button so the vendor name and location defaults
into the Requisition Defaults page. You must then enter the correct location
information in the Header section, Add Comments link on the Maintain Requisitions
page.
If the selected option is not the correct Vendor or Vendor Location and there are
multiple options listed for the Vendor, click the next Sel box to view the address
associated with the next option.
If the correct Vendor or Vendor Location does not appear in the list, select the first
location listed for the vendor. Click the OK button and the vendor name and location
will default into the Requisition Defaults page. You must then enter the correct
vendor information into the Header section, Add Comments link on the Maintain
Requisition page.

Training Guide
Page 72
Step Action
47. Click the OK button.
48. Schedule
The Ship To location must be identified. The Ship To location varies based on
company and Business Unit and the available options are as follows:
LSUSH Receiving
HCSDA Where items are received at the facility
LSUNO Usually the department requesting the item
LSUNA Usually the department requesting the item
Specific shipping and delivery instructions can be entered in the Header section,
Add Comments link on the Maintain Requisitions page. If multiple items are being
requested and the shipping and delivery instructions apply to only one line item,
enter the shipping and delivery instructions in the Line Comments for the particular
line item.

Training Guide
Page 73
Step Action
49. Click the Look up Ship To button.
50. Click the RECEIVING link.
51. Schedule (continued)
The Due Date will be 30 days from the current date.
Enter the desired information into the Due Date field. Enter "063011".

Training Guide
Page 74
The Due Date is not a required field for PeopleSoft. However, in order to save
the requisitions and generate a requisition number, the Due Date must be
entered. The Due Date is the last date you expect to receive the item(s).
One Time Orders - The Due Date is the expected delivery date.
Blanket or Standing Orders - The Due Date is the last day of the last
month you expect to receive the item(s).
Two examples are provided below:
1. If you have a Standing Order for the delivery of 10 cases per month for 3
months beginning September and ending November, the Due Date will be the
last day of November.
2. If you have a Blanket PO for rental or supplies where the contract period
is through the end of the fiscal year, the Due Date will be the last day of June.
Enter a T in the Due Date field and click Refresh to display the current date.
Or you may enter the Due Date using one of the following:
1. Click the calendar icon to the right of the Due Date field to select the
month, year and day.
2. Enter the date using mmddyy. PeopleSoft requires 6 digits be entered, but
you do not have to enter the slashes. The slashes will populate automatically
when you navigate away from the field or page.
NOTE to LJCMC: You must enter the Due Date. Contact your Purchasing
department for a copu of the "Purchasing Information Guide" for
instructions on entering the Due Date.
When a requisition is entered for the next fiscal year, the Due Date must be
changed to reflect the new fiscal year. A warning message will display
advising the date entered is out of range (i.e. more than 30 days from the
current date). Click the OK button to continue.
Step Action
52. Schedule (continued)
Funds may be distributed by Quantity or Amount. Most blanket purchase order are
distributed by Amount, while one-time and standing purchase orders are generally
distributed by Quantity. See your Buyer for additional information regarding
distributing funds by Quantity or Amount.

Training Guide
Page 75
Step Action
53. You can designate how funds are distributed on either the Requisitions Defaults
page or the Distribution page. If designated on the Requisition Defaults page, the
distribution will default to all line items for the requisition. However, when entering
multiple line item requisitions, you can change the distribution method on the
Distribution page for a specific line item.
Click the button to the right of the Distribute by field.
Training Guide
Page 76
Step Action
54. Click the Amount list item.
55. Schedule (continued)
The Ultimate Use Code and One Time Address Link are not used.
56. Distribution
The SpeedChart is a value associated with a specific chartstring. If a SpeedChart
value is entered, the system will automatically populate Account, Dept, Fund,
Program and Class.
Training Guide
Page 77
Step Action
57. Distributions
You will enter ChartString codes to which the item(s) is being charged. If multiple
items are being ordered, each line item can have a different ChartString value and
will require entering the ChartString information for each line item.
Tip: Enter the ChartString to which the first item is charged, or the ChartString that
applies to most of the line items, on the Requisition Defaults page so that
ChartString information defaults to all line items. These values can be changed on
the Distribution page for a specific line item as needed.
HCSD - Contact your Purchasing department for ChartString Information.
LSUNA - Contact Purchasing and/or your Accounting Specialist for ChartString
information.
Training Guide
Page 78
Step Action
58. Account Code
The Account Code is a transaction code for the item being ordered. Lines items may
have different Account Codes. If this occurs, the Account Code will be left blank on
the Requisition Defaults page. The correct Account Code must be entered for each
line item on the Distribution page.
If most of the line items have the same Account Code, you may opt to enter the
Account Code on the Requisitions Defaults page. You will then make changes to
only the few line items to which the Account Code does not apply on the
Distribution page.
Enter the desired information into the Account field. Enter "546700".
59. Dept
The Dept is the cost center paying for the item(s).
Enter the desired information into the Dept field. Enter "1053000".

Training Guide
Page 79
Step Action
60. Location
The Location will vary by company as follows:
LSUSH: The Location code consists of 8-10 alphanumeric characters. Each
department has an assigned location code (e.g. Surgery Dept - MB010303 translates
as: MB - Medical B building, 01 - 1st floor, 0303 - room 303; Hospital
Anesthesiology - HH03H0015A translates as: HH - Hospital H-wing, 03 - 3rd floor,
H0015A - room H315A.
HCSDA: The cost center requesting the item.
LSUNO: It is recommended LSUNO be used for all requisition locations.
LSUNA: Usually the department receiving the item(s).
61. Enter the desired information into the Location field. Enter "MB010303".
62. Fund
The general Fund code is 111. However, if the item(s) requested is being charged to
a Project or Grant, the general Fund Code will not be used, but rather one of the
following: 113, 115, 116, etc.
Enter the desired information into the Fund field. Enter "111".
63. Program
The Program will vary based on company as follows:
HCSDA: 95001
Enter the desired information into the Program field. Enter "00001".
64. Class
The Class will vary based on company as follows:
HCSDA: 61010
Enter the desired information into the Class field. Enter "10105".

Training Guide
Page 80
Step Action
65. Project
If the item(s) being requested is associated with a Project or Grant, you will enter the
Project/Grant number in the Project field. Otherwise, the Project field will remain
blank. You can search for the Project/Grant number using the Look up Project
button.
Click the Look up Project button.
66. You would enter all or part of the Project number or Description to narrow the
search.
For training purposes only, click the Cancel button.

Training Guide
Page 81
Step Action
67. Multiple ChartStrings
If the cost of the item(s) is being charged to more than one department, account,
fund, etc., additional ChartString information is required and may be entered on the
Requisition Defaults page or the Distribution page.
If multiple items are being ordered, each line item can have a different chartstring
value. The correct chartstring value must be entered on each line.
Tip: If you are distributing the funds to more than one chartstring on the
Requisition Defaults page, enter the chartstring for the first item being charged or
the chartstring being used for the majority of the items. These values can be changed
on the Distribution page as needed.
Entering more than one chartstring and changing values on the Distribution page are
shown later in this topic.
68. Insert a New Row
New rows can be added to the page by clicking the Add a new row at row 1 (+)
button on the far right hand side of the page. Another option is to click on any field
on Line 1 and press Alt + 7 on your computer keyboard.
Delete a Row
Rows can be deleted by clicking the Delete row (-) button. Clicking the Delete row
button can also clear all fields on the row if there is only one chartstring row.
Another option is to click on any field in the row you wish to delete and press Alt +
8.
69. Click the OK button when all default information has been entered.
70. Step 2: Enter Item(s) to be Ordered
Item information such as description, quantity, price, etc will be entered on the
Maintain Requisitions page in the Line section.
71. NOTE to LSUNA: AE can only enter one line item requisitions since it must
interface with Integrasoft (or GAP).
Freight: The freight charges must be estimated and included in the total (Price
field) on the Maintain Requisition page. Many change orders will be required if
the freight is not added to the requisition. Even if the freight is overestimated,
Accounting can short pay it. Since Auxiliary cannot insert another line for
freight, freight charges will be noted in the Transaction Item Description field or
on the Line Comments page.

Training Guide
Page 82
Step Action
72. Click the Details... button.
73. Transaction Item Description
The Transaction Item Description field is a free-text field. This is where you will
enter the item description. The description will be entered in ALL CAPS.
The field holds 254 characters, although only 20 characters at a time can be seen in
the Description field on the Maintain Requisitions page. PeopleSoft will let you
enter more than 254 characters, but will not save more than 254. An error message
will be received if you exceed the 254 character limit. Additional item information
can be added as line comments.
You can copy and paste item description information from another application such
as Word. PeopleSoft also provides a spell check feature (the blue book with a
checkmark) for this field.
74. NOTE to LSUNO and LSUNA: If an item is being ordered on State Contract, you
must provide the following information to Purchasing by entering it in the
Transaction item Description field: Master State Contract Number and Line
Number.

Training Guide
Page 83
Step Action
75. Enter the desired information into the Transaction Item Description field. Enter
"D-RING BINDER, 5" RINGS, RED".
76. Click the Expand All link to view the Vendor Information, Item Information,
Attributes, Contract and Sourcing Controls sections.
NOTE: You may expand or collapse one section at a time by clicking the arrow to
the left of each section title.
77. Most end-users will not enter information into these fields. Information may be
entered into the Vendor's Catalog, Vendor Item ID, etc. if pertinent.
If you know the requisition will go out for bid, click the checkbox to the left of the
RFQ Required field for each line item. If you are unsure whether the requisition will
be sent out for bid, leave the RFQ Required box blank.
NOTE: See your buyer for information about the bid process (i.e. price thresholds,
required quotes from vendors, and items that require, or not require, bids). You
may also view the Executive Order for Small Purchases on the Louisiana Office
of State Purchasing website.

Training Guide
Page 84
Step Action
78. Click the Collapse All link.
79. Click the OK button.
80. Item
The Item field will be left blank.
81. The Quantity can only be entered in whole numbers (i.e. 10 rather than 10.5). Delete
all zeros and the decimal point before entering the quantity to prevent input errors.
When the page is Refreshed, the system will automatically populate the decimal and
trailing zeros.
Enter the desired information into the Quantity field. Enter "10".
82. You may search for the UOM (Unit of Measure) by clicking the Look up UOM
button, or you can enter it directly into the field. DO NOT use a UOM that includes
alpha and numeric values (e.g. C24).
Enter the desired information into the UOM field. Enter "EA".

Training Guide
Page 85
Step Action
83. Category
The Category is taken from the State Commodity Code Inventory Tables. The
Category will vary based on company as follows:
LSUSH - Enter 00000, which is the Generic Item Category code, and Purchasing
will change it at the PO level.
HCSDA - DO NOT use 00000. Contact your Purchasing department for a copy of
the Commodity Code Reference Guide.
LSUNO & LSUNA – Search for the Category first using the Look up Category
button. If the Category cannot be determined contact Purchasing for assistance.
Click the Look up Category button.
Training Guide
Page 86
Step Action
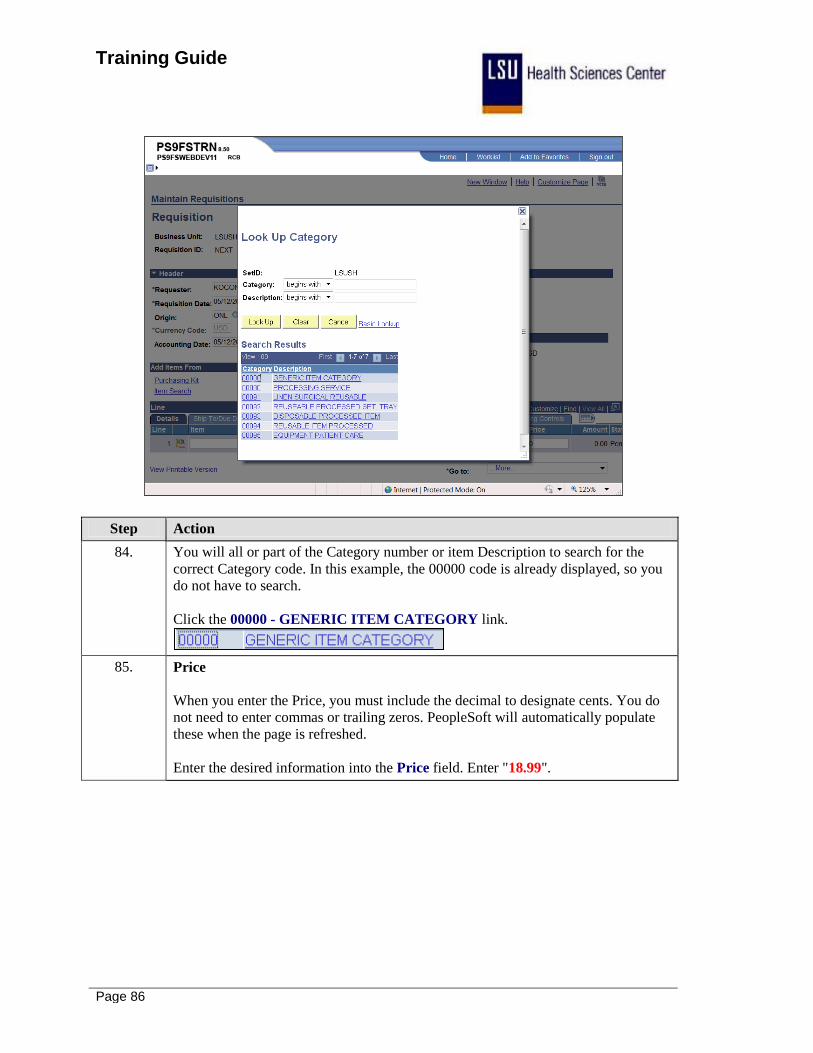
84. You will all or part of the Category number or item Description to search for the
correct Category code. In this example, the 00000 code is already displayed, so you
do not have to search.
Click the 00000 - GENERIC ITEM CATEGORY link.
85. Price
When you enter the Price, you must include the decimal to designate cents. You do
not need to enter commas or trailing zeros. PeopleSoft will automatically populate
these when the page is refreshed.
Enter the desired information into the Price field. Enter "18.99".

Training Guide
Page 87
Step Action
86. Click the Refresh button.
87. The Amount displays and the decimal and trailing zeros have populated.
88. Line Icons
The Line Comments button (white bubble) is used to enter comments specific to a
line item (e.g. special delivery or shipping instructions, item description information,
etc.).
The Line Defaults button (open book) is not used.
The Schedule button (page with red lines and clock face) is used to access the
Distribution page.
Add row and Delete row buttons (the + and - signs) are used to insert and remove
rows from the requisition.
89. The Go to: field is used to view the Activity Log. The Activity Log provides
information on where the requisition is in the process.
90. The tabs above line 1 (Ship To/Due Date, Status, Vendor Information, etc.) are a
compilation of the information entered on the requisition. DO NOT make any
changes to the requisition on these tabs.

Training Guide
Page 88
Step Action
91. Step 3: Adjust ChartString
You can adjust the distribution of funds on the Distribution page. The Distribution
page is accessed from the Schedule page.
Click the Schedule button.
92. You may add special shipping or delivery instructions using the Add Ship To
Comments link.
93. Click the Distribution button.
94. Distribute by:
You may distribute funds by Quantity or Amount. Most blanket purchase orders are
distributed by Amount. One-time orders and standing orders are generally
distributed by Quantity.
The distribution method can be changed either on the Requisition Defaults page or
on the Distribution page. If designated on the Requisition Defaults page the
distribution method will default to all line items and will copy over to the
Distribution page. Changes made to the distribution method on the Distribution page
will apply to only the specific line item.
95. Verify that the entries on the Distrib Line 1 are valid. Changes may be made to any
portion of the chartstring.
If there are multiple line items, each line item can have a different chartstring value.
The correct chartstring values must be entered on each line item. For example, the
Account code is a transaction code for the item being ordered. Line items may have
different Account codes and the correct Account code must be entered on each line
item.
If the Account code was left blank on the Requisition Defaults page, you must enter
the appropriate Account code on the Distribution page. If an Account code was
entered on the Requisition Defaults page but does not apply to a specific line item,
you must change the Account on the Distribution page.
96. If the line item is to be charged to more than one chartstring, you can enter the
additional chartstring on the Distribution if it was not added on the Requisition
Defaults page. Multiple chartstring values will only default to line items if entered
on the Requisition Defaults page. Chartstring entered on the Distribution page will
only apply to the specific line item.

Training Guide
Page 89
Step Action
97. In this example, you will charge 40% of the cost of the binders to department
1053000 and 60% of the costs to department 1050100.
Enter the desired information into the Percent field. Enter "40".
98. Click the Add a new row at row 1 button.
NOTE: To add a line you may also click on any field on line 1 and press Alt + 7
on your keyboard.
99. You will enter the number of rows you wish to add in the prompt box. Blank lines
cannot be saved, so you should only add the number of rows you think you will
need.
Click the OK button.
100. The Percent for line 2 defaults based on the Percent indicated in line 1. All other
fields default to the same values as displayed in line 1.
Enter the desired information into the Dept field. Enter "1050100".
101. If the item is being charged to a Project/Grant, you will enter the Project/Grant
number in the Project field. If the Project/Grant number was added on the
Requisition Defaults page, it will default onto the Distribution page.
102. Normally you would click the OK button once all changes have been made to the
chartstring.
For training purposes only, click the Cancel button.
103. Click the Distribution button.
104. In this example you will change the distribution method to Quantity. Four (4)
binders will be charged to department 1053000. Six (6) binders will be charged to
department 1050100.
Click the button to the right of the Distribute by: field.
105. Click the Quantity list item.

Training Guide
Page 90
Step Action
106. Click on any field on line 1 and press the [Alt+7] key to insert a row.
107. Enter the number of rows you wish to add in the prompt box.
Click the OK button.
108. Enter the desired information into the Requisitions field. Enter "4".
109. Enter the desired information into the Quantity field. Enter "6".
110. Enter the desired information into the Dept field. Enter "1050100".
111. If the item is being charged to a Project/Grant, you will enter the Project/Grant
number in the Project field. If the Project/Grant number was added on the
Requisition Defaults page, it will default onto the Distribution page.
112. Click the OK button.
Training Guide
Page 91
Step Action
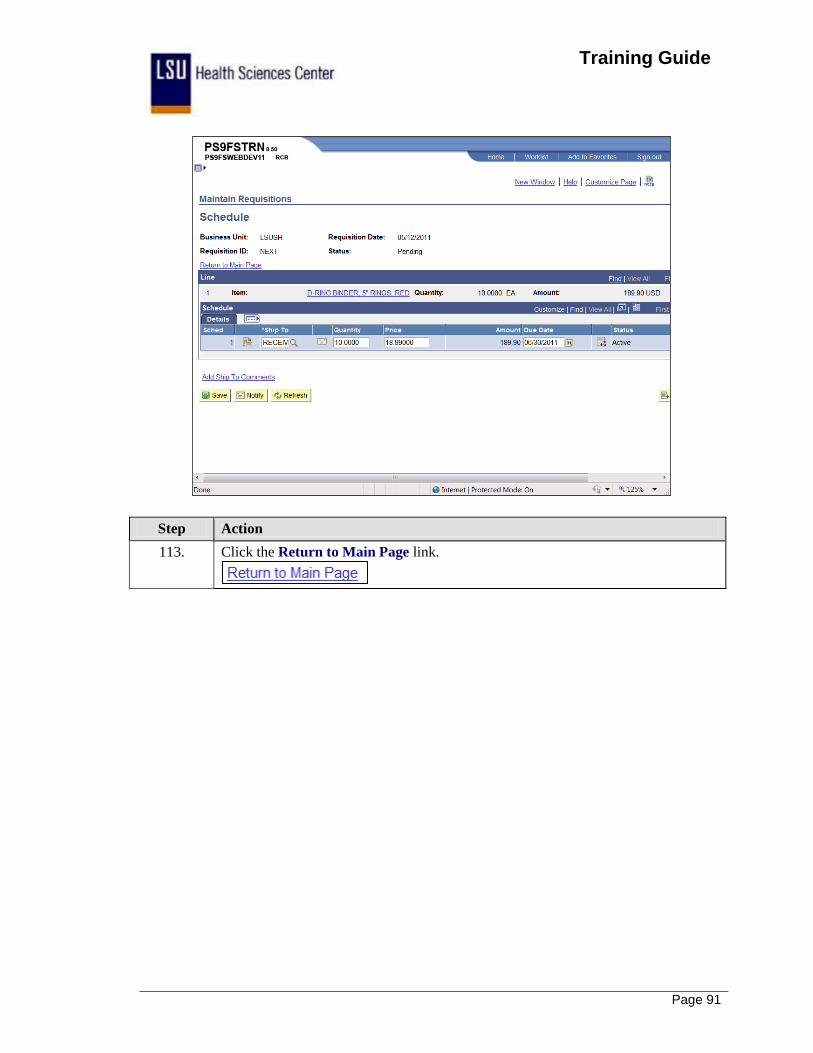
113. Click the Return to Main Page link.

Training Guide
Page 92
Step Action
114. Click the Save button.
115. Once saved, the Requisition ID changes from NEXT to a 7-digit number. The
Requisition ID is not the PO number. A separate PO number will be assigned when
the PO is generated.
NOTE to LSUSH and LSUNA only: When a Confirmation PO number is entered,
The Requisition ID number will be both the Requisition ID and the PO number. A
separate PO number will not be assigned.
116. If you intend to add more items to the requisition, you will begin at Step 2: Enter
Items to be Ordered. It is not necessary to return to the Requisition Defaults page.
Click the Add a new row at row 1 button.

Training Guide
Page 93
Step Action
117. Enter the number of rows you wish to add in the prompt box. It is strongly
recommended you save after each line item is entered, so if a Save Error Message is
received it is easy to identify the error.
Blank lines cannot be saved, so you should only add the number of rows you think
you will need.
Click the OK button.
118. Add the item information (Description, Quantity, UOM, Category and Price), to the
new line.
NOTE to LSUNO: The Account code for Freight must be changed on the
Distribution page. The Account code for Freight is 535802.
119. For this example, no additional item will be added so the line will be deleted.
Click the Delete row 2 button.
120. Click the OK button.
121. If the requisition is complete, you will uncheck the Hold From Further Processing
box and save the requisition. By unchecking the Hold From Further Processing, the
requisition will move to the Approver's worklist.
If the requisition is not complete, save and exit the requisition. Leaving the Hold
From Further Processing box checked will prevent the requisition from moving
forward in the purchasing process.
122. NOTE to LSUNO only: In order for Accounts Payable to adjust the freight on the
Vendor Invoice, a separate freight line must be added to the requisition.
NOTE to LSUNA only: Freight must be included in the Price field, as only single
line requisitions can be created.
All Other Business Units: Do Not add freight to the requisition.

Training Guide
Page 94
Step Action
123. Click the Hold From Further Processing option.
124. The following is the minimal data required in order to enter and save a requisition
and generate a Requisition ID:
Requester, Requisition Date, Accounting Date, Ship To, Due Date, Account, Dept,
Location, Fund, Program, Class, Item, Description, Quantity, UOM, Category and
Price
If any of these fields are left blank, you will receive a red box or a save error
message. If this occurs, you will not be able to save the requisition until the correct
data is entered into the identified field.
If the user enters a multiple line item requisition and receives a red box or save error
message, the line item containing the blank field will not be identified. Therefore, it
is strongly recommended you save the requisition after entering each line item.
125. Click the Save button. Record the Requisition ID for use in additional exercises.

Training Guide
Page 95
Step Action
126. NOTE to HPLMC: Workflow is not currently being used by your facility. The
Status of the requisition will save as Open and is dependent upon the requester's
setup. The requisition will be approved by Purchasing by changing the status to
Approved on the Maintain Requisitions page as opposed to the Approver's
worklist.
NOTE to All Other Business Units: The requisition must be saved in Pending
status. Once the database agent runs (i.e. every 15 minutes on the quarter hour
from 6:00 am - 6:00 pm, Monday - Friday), the requisition will automatically
move to the Approver's worklist. If an Approver approves his/her own requisition,
it will not move to their worklist.
127. Approving You Own Requisition
An Approver will not approve his/her own requisition from the worklist. He/she will
navigate to the Approve ChartFields page immediately after saving the requisition
to approve the requisition. If the Approver does not immediately approved his/her
requisition, the system will pick u the requisition and route it through Workflow.
This will result in the system showing someone has approved the requisition which
can cause audit issues. Audit issue are considered undesirable by administration.
128. The following display after unchecking the Hold From Further Processing and
saving the requisition:
• Cancel Requisition button (big red X) in the top right corner of the page;
• Delete Requisition button on the bottom left side of the page; and
• View Printable Version link which allows you to print the requisition.
NOTE: Most end-users will not Cancel or Delete a requisition. Canceling and
deleting requisition is mainly done by Purchasing. If you have questions
regarding canceling or deleting a requisition, contact your buyer or Purchasing.
129. NOTE to LSUSH, LSUNO and LSUNA only: Requisitions must be Budget
Checked by the Department prior to Purchasing sourcing the PO or RFQ. Any
requisition that does not have a Valid budget check status will be returned to the
Department to run the budget check process.
The Budget Check process must be run after approval of the requisition. The budget
process will "freeze" the chartstring in the requisition.
130. This completes Enter a Requisition.
End of Procedure.

Training Guide
Page 96

Training Guide
Page 97
Add, Change and Delete Comments
Procedure
In this topic you will learn how to Add, Change and Delete Comments.
Step Action
1. Header Comments
Comments that apply to all line items can be added in the Header section to the Add
Comments link. If you need to add new vendor information, vendors suggested for a
RFQ, an alternate mailing address, etc., you will add this information to the
requisition using the Add Comments link. Any specific shipping or delivery
instructions may be added there as well.
For this example, comments will be added for a specific line item. Comments are
added using the same method at both the Header and Line level.
2. Line Comments
Comments can also be added at the line level using Line Comments. When entered
as Line Comments, the information will relate to the specific line item only and will
display and print with the corresponding line item.
The end-user will enter information that applies to a particular line item on the Line
Comments page. Some examples of comments that may be added are: if additional
space is needed for long descriptions; if there are multiple items being ordered and
the shipping or delivery instruction applies to a particular line item, the user may
choose to enter the specific shipping or delivery instructions in the Line Comments
page for that particular line; etc.).
3. NOTE: Shipping and/or delivery instructions for a specific line item should never
be added to the Add Ship TO Comments on the Schedule page. Vendor and
address information for mailing the PO should never be added at the line level.
Vendor and address information for mailing the PO must be entered in the
Header section using the Add Comments link.

Training Guide
Page 98
Step Action
4. The process for adding comments, whether at the Header or Line level, is the same,
so the process demonstrated here is used for both.
Click the Line Comments button.
5. The Comments box on the Line Comments page is a free-text box. You can use the
Enter key on your keyboard in the comment box to move to the next line.
The Comment box is limited to 2,000 characters. It is recommended the end-user
limit comments to 2 or 3 pages in a comment box. If additional space is needed, a
new comment box will be added. You can copy and paste information from another
application such as Word or the Web.
If you need to enter lengthy comments, you can also elect to send the information
via e-mail or deliver a hard copy to Purchasing. The Requisition ID must be noted
on the document if either of these options is used.
6. Enter the desired information into the field. Enter "DELIVER TO SALLIE
JONES IN ROOM 204 BETWEEN THE HOURS OF 8AM-2:30PM.".

Training Guide
Page 99
Step Action
7. A spell check option is available on the Line Comments page. The same method as
used in Word to spell check is used in PeopleSoft.
Click the Spell Check Comments (Alt+5) graphic.
8. Misspelled words are highlighted and can be ignored, Changed or Added.
Click the Ignore button.
9. Click the OK button.

Training Guide
Page 100
Step Action
10. Standard Comments
You can insert pre-defined comments using the Copy Standard Comments link.
If more comment space is needed, you can add comment boxes. There is no limit on
the number of comment that can be added.
Click the Add a new row at row 1 button.
11. Added rows are independent of each other, so documents added to one row will not
display on another. Use the arrows to move from row to row. The View All link can
also be used to view all rows at one time.
12. Click the Copy Standard Comments link.
NOTE: The Copy Item Specs option is not used.

Training Guide
Page 101
Step Action
13. Click the Comment Type button.
14. Click the DEL link.
15. Click the Comment ID button.
16. Click the DEL link.
17. Click the OK button.
18. You can edit the comments by clicking in the comment box and making the
necessary changes.

Training Guide
Page 102
Step Action
19. Delete Comments
Comments boxes are never really deleted from the system. You can prevent a
comment box from displaying and printing by clicking the Inactivate button. This
will cause the comment box to be grayed out. The inactive comment box will
continue to be seen on the page until you navigate away from it.
Click the Inactivate button.
20. A comment can be reactivated by clicking the Undo button. However, if you
navigate away from the page prior to reactivating the comment, you will have to re-
enter the comment information.
Click the Undo button.
21. The Send to Vendor, Shown at Receipt and Shown at Voucher check boxes will
remain blank. Purchasing will check these boxes if needed.
22. Documents can be attached to the requisition as well. Currently no documents are
attached to the requisition, which is indicated by the word Attachment being grayed
out.
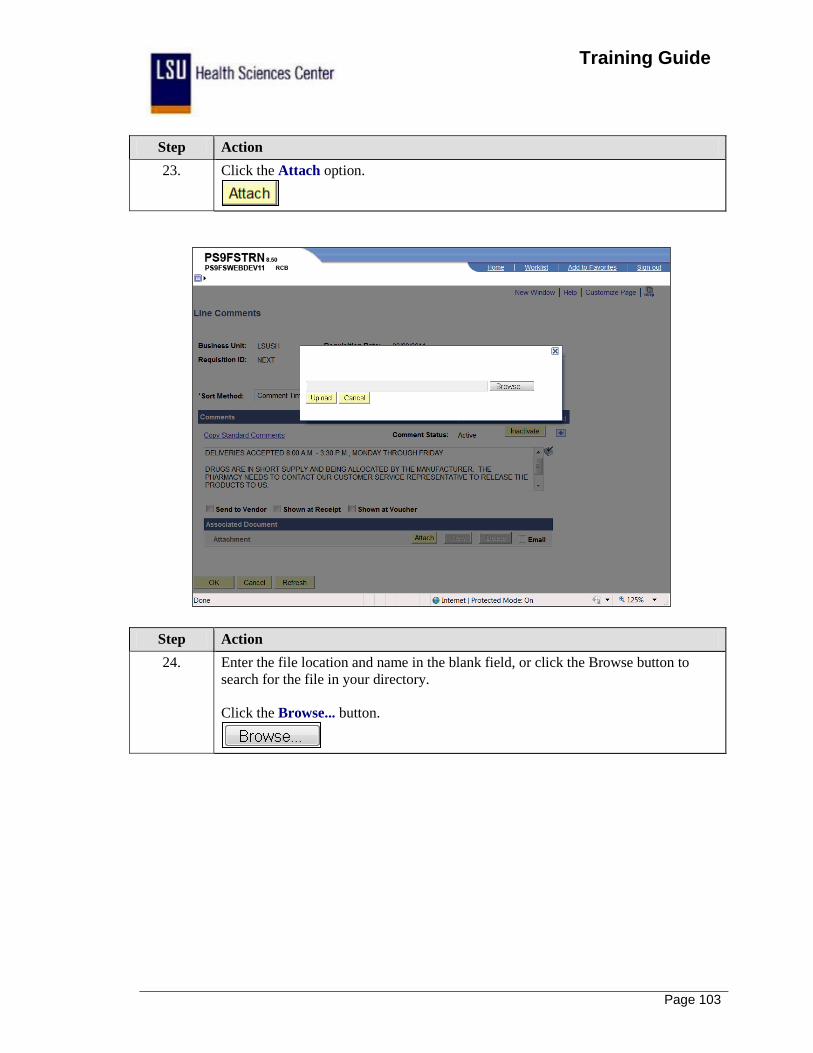
Training Guide
Page 103
Step Action
23. Click the Attach option.
Step Action
24. Enter the file location and name in the blank field, or click the Browse button to
search for the file in your directory.
Click the Browse... button.

Training Guide
Page 104
Step Action
25. Click the Documents button.
26. Click the Binders list item.
27. Click the Open button.
or Press [Alt+O].

Training Guide
Page 105
Step Action
28. Click the Upload button.
29. The name of the attached document displays to the right of the word Attachment.
The Attach button is grayed out and the View and Delete button are now active.
NOTE: Once the attachment is added, the requisition must be saved. For
training purposes only, you will not save the requisition until later in the exercise.

Training Guide
Page 106
Step Action
30. Click the View button to view the document. This will open a new window.
31. Click the To help protect your security, Internet Explorer blocked this site from
downloading files to your computer. Click here for options....
32. Click the Download File... menu.

Training Guide
Page 107
Step Action
33. Click the Open button.

Training Guide
Page 108
Step Action
34. No changes can be made to the document once it is attached to the requisition. If
changes to the document are required, delete the attachment, make the changes to
the original document and then attach the revised document to the requisition.
Click the Close button.

Training Guide
Page 109
Step Action
35. Click the Close button.
36. If the wrong attachment is added, the document can be removed by clicking the
Delete button. You must then exit the Line Comments page and Save the requisition
for the document to be deleted.

Training Guide
Page 110
Step Action
37. Click the OK button.
38. Changes made on the Line Comments page must be saved to the requisition.
Click the Save button.

Training Guide
Page 111
Step Action
39. Click the Schedule... button.

Training Guide
Page 112
Step Action
40. Click the Add Ship To Comments link.

Training Guide
Page 113
Step Action
41. The only difference between the Add Ship To Comments and the Line Comments
page is the Copy Item Specs link is missing. In place of this link is the Ship To:
field.
Enter the desired information into the Comments field. Enter "TEST".

Training Guide
Page 114
Step Action
42. Click the RECEIVING list item.

Training Guide
Page 115
Step Action
43. Normally, you would click the OK button to return to the Schedule page.
For training purposes only, click the Cancel button.

Training Guide
Page 116
Step Action
44. Click the Return to Main Page link.
45. This completes Add, Change and Delete Comments.
End of Procedure.
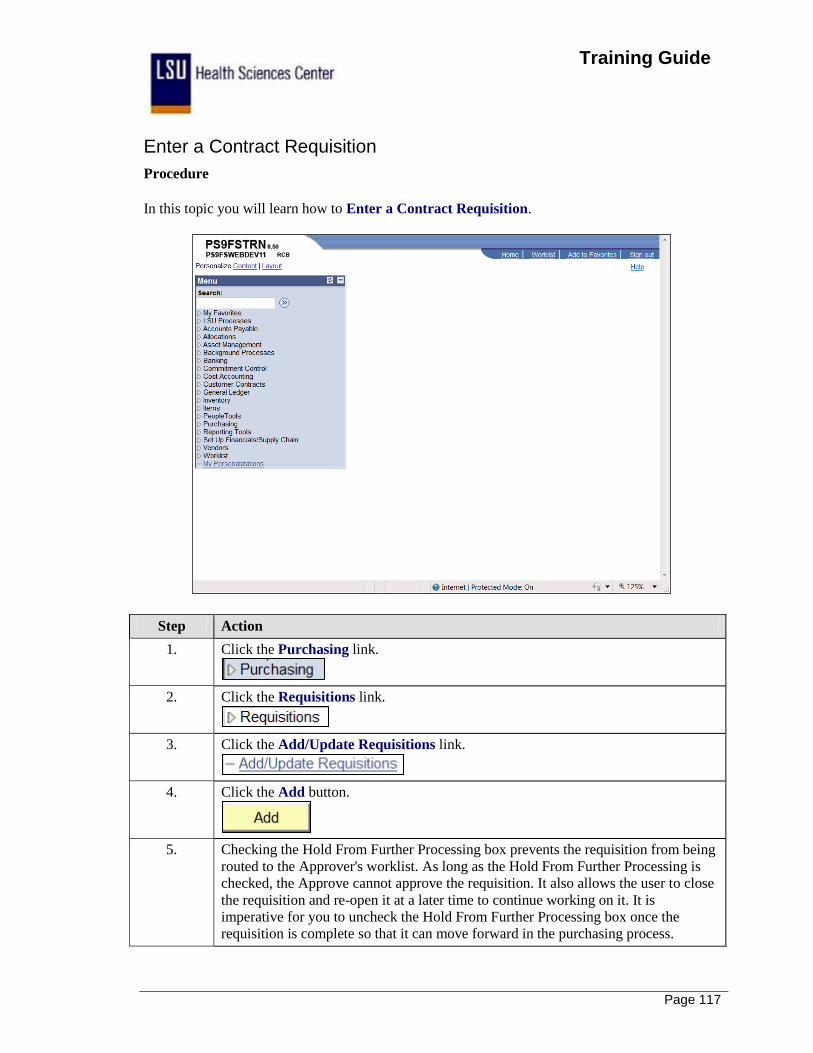
Training Guide
Page 117
Enter a Contract Requisition
Procedure
In this topic you will learn how to Enter a Contract Requisition.
Step Action
1. Click the Purchasing link.
2. Click the Requisitions link.
3. Click the Add/Update Requisitions link.
4. Click the Add button.
5. Checking the Hold From Further Processing box prevents the requisition from being
routed to the Approver's worklist. As long as the Hold From Further Processing is
checked, the Approve cannot approve the requisition. It also allows the user to close
the requisition and re-open it at a later time to continue working on it. It is
imperative for you to uncheck the Hold From Further Processing box once the
requisition is complete so that it can move forward in the purchasing process.

Training Guide
Page 118
Step Action
6. Click the Hold From Further Processing option.
7. Click the Requisition Defaults link.
8. You can enter the Buyer's User ID or search for it using the Look up Buyer button.
The Buyer User ID must be entered in ALL CAPS.
Click the Look up Buyer button.

Training Guide
Page 119
Step Action
9. Enter the desired information into the Name field. Enter "authement".
10. Click the Look Up button.
11. Click the SAUTHE link.

Training Guide
Page 120
Step Action
12. Enter the desired information into the Vendor: field. Enter "0000017033".
13. Click the Look up Ship To button.
14. Click the ELRCV - EKLMC Receiving link.
15. The Due Date is the expected delivery date. For contract requisitions, this will be
three (3) days from the requisition date.
Enter the desired information into the Due Date: field. Enter "053111".
16. Enter the desired information into the Account field. Enter "546700".
17. Enter the desired information into the Dept field. Enter "2018710".
18. Enter the desired information into the Location field. Enter "2018710".
19. If item(s) being purchased is to be charged to a Project/Grant, enter the
Project/Grant number in the Project field.
NOTE: Entering a Project/Grant number requires the Fund code be 113, 115,
116, etc.
20. Click the OK button.

Training Guide
Page 121
Step Action
21. Click the Contract ID/Line Search button.
22. Enter the desired information into the Contract ID field. Enter "009999".
23. Enter the desired information into the Contract Line field. Enter "42535".
24. Click the Refresh button.
25. Click the Return Main Page link.
26. Enter the desired information into the Quantity field. Enter "2".
27. It is recommended the page be refreshed after each line is entered to verify the
information.
Click the Refresh button.
28. If multiple items are being ordered, you can add lines to the requisition. Blank lines
cannot be saved, so it is recommended you add only the number of lines needed.
Click the Add multiple new rows at row 1 button.
29. Click the OK button.
30. Generally you will enter items using steps 19 - 26.
For training purposes only, click the Delete row 2 button.
31. Click the OK button.
32. Click the Save button.
33. When the requisition is saved for the first time, the Requisition ID will change from
NEXT to a number. For contract requisitions, the Requisition ID is the PO number.

Training Guide
Page 122
Step Action
34. The requisition is not complete, leave the Hold From Further Processing box
checked to prevent the requisition from being routed to the Approver's worklist. If
the requisition is complete, the Hold From Further Processing box must be
unchecked to move forward in the purchasing process.
Click the Hold From Further Processing option.
35. Click the Save button.
For training purposes, record the Requisition ID number for use in other exercises.
36. This completes Enter a Contract Requisition.
End of Procedure.

Training Guide
Page 123
View the Requisition Activity Log
Procedure
In this topic you will learn how to View the Requisition Activity Log.
Step Action
1. The Activity Log provides information on who entered and/or modified the
requisition and who approved the requisition. It also provides the date and time each
action was completed.

Training Guide
Page 124
Step Action
2. Click the Purchasing link.
3. Click the Requisitions link.
4. Click the Add/Update Requisitions link.
5. Click the Find an Existing Value tab.
6. Enter the desired information into the Requester: field. Enter "koconn".
7. Click the Search button.
NOTE: The search results will display at the bottom of the page.
8. Select the requisition you wish to view the list displayed.
Click the 0048968 link.

Training Guide
Page 125
Step Action
9. Click the button to the right of the *Go to: field.
10. Click the 02-Activity Log list item.
11. Click the Return button.
12. This completes View the Requisition Activity Log.
End of Procedure.

Training Guide
Page 126

Training Guide
Page 127
Access the Process Monitor
Procedure
In this topic you will learn how to Access the Process Monitor.
Step Action
1. The speed with which a process runs will vary and depend on circumstances such as
the type of process run, amount of network traffic, etc. The process may be delayed
as a result of several end-users running processes and/or printing at the same time.
End-users should monitor the status of their processes in the Process Monitor.
2. Requisitions must be requested and printed one at a time by each end-user to
prevent blocking of the database. End-users must confirm whether he/she has a
requisition print process running, and monitor the status of the request in the Process
Monitor. The Process Monitor can be accessed using the View Printable Version
link on the Maintain Requisitions page as well as from the main menu.

Training Guide
Page 128
Step Action
3. Click the PeopleTools link.
4. Click the Process Scheduler link.
5. Click the Process Monitor link.
6. The Process List displays all of the processes the end-user has requested with the
most current request listed first.
7. The end-user may select the number of days, hours, minutes, etc. activity to display
in the Process List. If the number of days is changed, the user should click the
Refresh button to update the page.
8. The Run Status indicates the where the print request is in the process. The following
Run Statuses are used:
Queued - the process is waiting in line to process;
Initiated - the process is begun;
Processing - the system is running the request;
Success - the process has ran successfully;
No Success - the process did not run successfully;
Cancel - the process has been canceled; and
Error - the request encountered a error when processing.

Training Guide
Page 129
Step Action
9. A completed process will have a Run Status of Success and a Distribution Status of
Posted. Click the Refresh button every 10 - 15 seconds to refresh the page to
complete the process.
Click the Refresh button.
10. If a print request has a Run Status of Initiated or Processing for more than ten
minutes, the process may be stalled. Contact the Help Desk for assistance. The user
should first view the process details and note the Instance Number for the print
request.
Click the Details link.
11. Update Process Options
You should not Cancel a process until you have spoken with the Help Desk.
Canceling the process will prevent the Help Desk from determining the cause of the
delay.
End-users will never Delete a request. Deleting a process will cause problems in the
database.
12. In this example, neither the Cancel Request nor Delete Request option is available.
The radio button to the left of the process option will be bold rather than grayed out.
13. The Message Log will be reviewed first before any other actions are taken.
Click the Message Log link.
14. Note the Instance number and any error messages that display.
Click the Return button.
15. Click the OK button.
16. If the process is canceled, you must save the changes before attempting to re-print
the requisition.
Click the Save button.

Training Guide
Page 130
Step Action
17. This completes Access the Process Monitor.
End of Procedure.

Training Guide
Page 131
Print a Requisition
Procedure
In this topic you will learn how to Print a Requisition.
Step Action
1. Requisition must be requested and printed one at a time by each end-user to prevent
blocking of the database. The speed with which a requisition will print will vary
depending on network traffic, the type of process run, etc.
An end-user must confirm whether he/she has a Requisition Print Process running
before initiating a new print request. The Process Monitor can be used to view and
monitor a print request. You can access the Process Monitor using one of the
following methods:
1. Navigate directly to the Process Monitor from the main menu; or
2. Click the Process Monitor link on the Requisition Print page.

Training Guide
Page 132
Step Action
2. Click the Purchasing link.
3. Click the Requisitions link.
4. Click the Reports link.
5. Click the Print Requisition link.
6. The first time you print a requisition, you must create a Run Control ID. A Run
Control ID is:
1. Specific to the end-user's User ID;
2. Must be one continuous string of words;
3. Can connect multiple words using an underscore;
4. Cannot have any blank spaces; and
5. Cannot use any special characters.
When printing future requests, you can select the Run Control ID previously
established.

Training Guide
Page 133
Step Action
7. Click the Add a New Value link to add a Run Control ID.
8. Enter the desired information into the Run Control ID field. Enter "REQ_PRINT".
9. Click the Add button.
10. You will select Report Request Parameters and save them to the Requisition Print
page. When printing future requisitions, it will only be necessary to change the
Requisition ID. All other fields will remain as previously selected.
11. Default parameters will be selected for the following field only:
1. Business Unit;
2. Requisition ID; and
3. Statuses to Include.
The From Date, Through Date and Requester fields will remain blank.
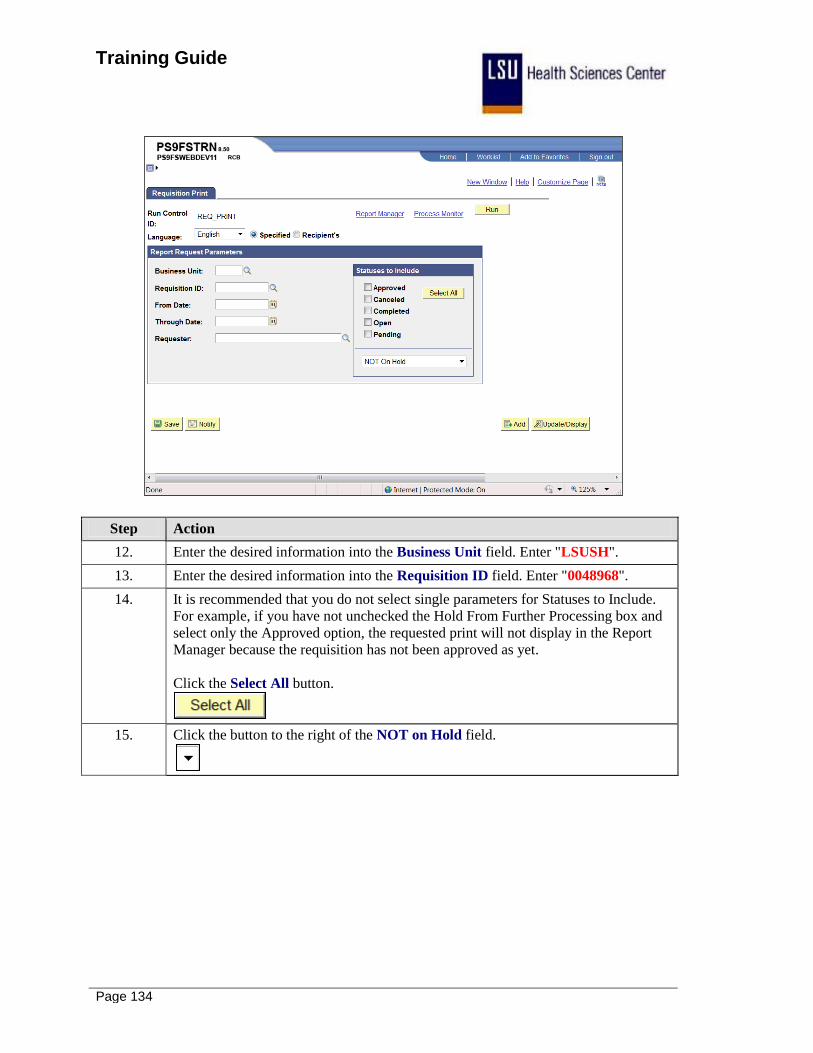
Training Guide
Page 134
Step Action
12. Enter the desired information into the Business Unit field. Enter "LSUSH".
13. Enter the desired information into the Requisition ID field. Enter "0048968".
14. It is recommended that you do not select single parameters for Statuses to Include.
For example, if you have not unchecked the Hold From Further Processing box and
select only the Approved option, the requested print will not display in the Report
Manager because the requisition has not been approved as yet.
Click the Select All button.
15. Click the button to the right of the NOT on Hold field.

Training Guide
Page 135
Step Action
16. Click the On Hold AND Not On Hold list item.

Training Guide
Page 136
Step Action
17. Click the Run button.

Training Guide
Page 137
Step Action
18. Click the button to the right of the Server Name field.

Training Guide
Page 138
Step Action
19. Click the PSNT list item.

Training Guide
Page 139
Step Action
20. Click the OK button.

Training Guide
Page 140
Step Action
21. Click the Process Monitor link.
22. The Run Status must be Success and the Distribution Status must be Posted to have
a completed process. Click the Refresh button every 10 - 15 seconds to update the
page and statuses.

Training Guide
Page 141
Step Action
23. Click the Refresh button.
24. Click the Go back to Requisition Print link.

Training Guide
Page 142
Step Action
25. Click the Report Manager link.
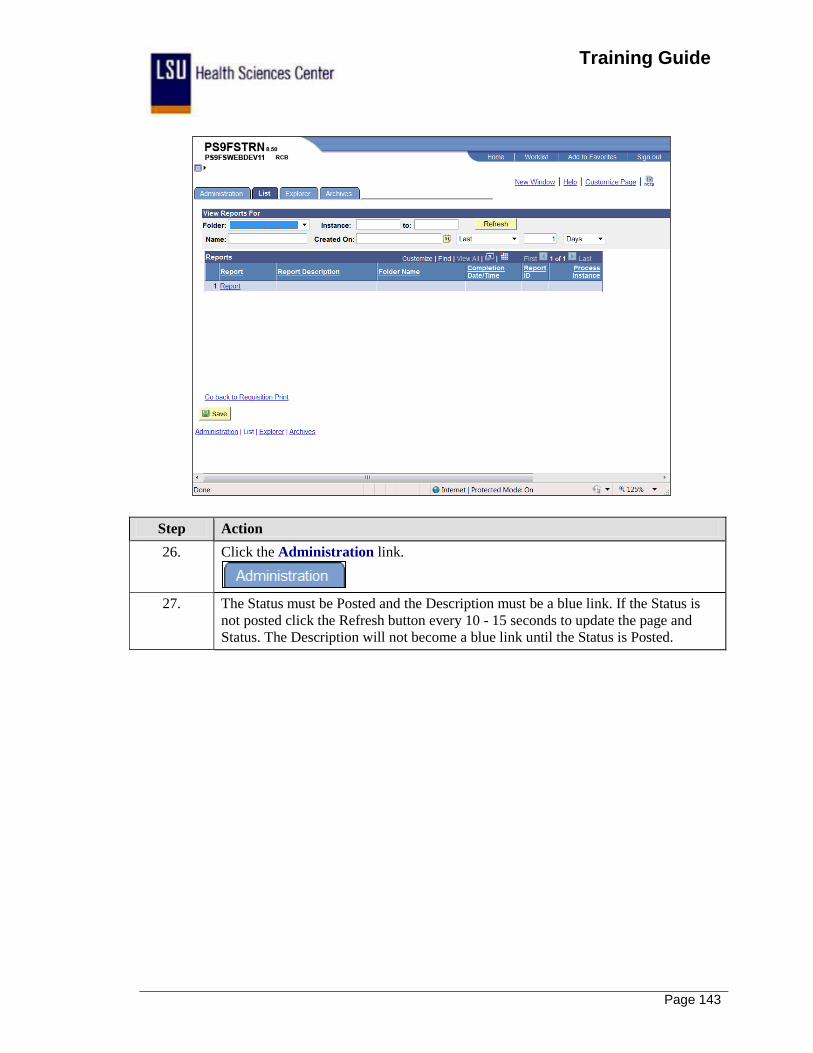
Training Guide
Page 143
Step Action
26. Click the Administration link.
27. The Status must be Posted and the Description must be a blue link. If the Status is
not posted click the Refresh button every 10 - 15 seconds to update the page and
Status. The Description will not become a blue link until the Status is Posted.

Training Guide
Page 144
Step Action
28. Click the Requisition Print SQR link. This will open a new window.
NOTE: If you receive a pop-up blocker message, right click on the pop-up menu
bar and select "Always Allow Pop-ups from this site".

Training Guide
Page 145
Step Action
29. Click the File button to print the requisition or click the printer icon.
30. Click the Print list item.
31. Normally you will click the OK button to print the requisition.
For training purposes only, click the Cancel button.
32. Click the Close button.
33. This completes Print a Requisition.
End of Procedure.

Training Guide
Page 146
Training Guide
Page 147
Copy a Requisition
Procedure
In this topic you will learn how to Copy a Requisition.
Step Action
1. You can copy a requisition previously created by yourself or by another user. Only
non-contract requisitions can be copied. Copying a requisition will not affect the
original requisition. You can only copy an old requisition onto a new requisition so
that a new Requisition ID number can be assigned by the system.
NOTE: Contract requisitions cannot be copied. Contract information changes
regularly without notice.

Training Guide
Page 148
Step Action
2. Click the Purchasing link.
3. Click the Requisitions link.
4. Click the Add/Update Requisitions link.

Training Guide
Page 149
Step Action
5. When adding a requisition, do not change the Requisition ID from NEXT to a
number. A new requisition must have a Requisition ID of NEXT when it is first
saved.
Click the Add button.

Training Guide
Page 150
Step Action
6. Click the Hold From Further Processing option to prevent the requisition from
prematurely being routed to the approver's worklist.
7. The Status will default as Pending. The requisition must be saved the first time with
a Status of Pending. The Requester field will default with the User ID.
If the Status or Requester does not default correctly, contact Purchasing for
assistance.
8. When copying your own requisition, you will not begin creating the requisition by
clicking on the Requisition Defaults link. All defaults, line items and schedule
information will copy onto the new requisition from the old requisition.
NOTE: The Due Date, found on the Requisition Defaults page, must be added when
copying a requisition. The Quantity and Price must also be verified and changed as
needed.
NOTE: When copying a requisition from another user, you may have to change
default information as well as line item information. Once changes have been
made, you should check the Schedule page to ensure the Due Date has defaulted
over.
9. Click the Copy From link.
Training Guide
Page 151
Step Action
10. You can enter the Requisition ID for the requisition you wish to copy directly into
the Requisition ID field. You can also search for the Requisition ID using the Look
up Requisition ID button. The Requester field may also be used to search for
available requisitions.
NOTE: The other fields on the page are recommended for use when searching for
a requisition.

Training Guide
Page 152
Step Action
11. Click the Look up Requisition ID button.
12. In this example, we are using the Requester option to search by. You can also use
the Requisition ID field.
Enter the desired information into the Requester field. Enter "Your UserID".
13. Click the Look Up button.
14. Select the requisition you wish to copy.
For this example, click the 0048966 link.

Training Guide
Page 153
Step Action
15. Click the Search button.
NOTE: When copying a requisition from another user, you will receive a warning
message stating the source requester is different from the target requester. Click
the Yes button.
This message advises that the defaults being copied over will remain the same, so
changes other than Due Date may need to be changed on the Requisition Defaults
page.
16. If you had copied a requisition from another user, the Requester ID would have
changed. You must change the Requester back to your User ID before entering
information on the Schedule or Distribution pages.

Training Guide
Page 154
Step Action
17. When copying a requisition you must go to the Schedule page to enter the Due Date,
or make changes to the Ship To, Quantity and/or Price.
Click the Schedule... button.

Training Guide
Page 155
Step Action
18. No changes need to be made to the Ship To or Price. However, changes must be
made to the Quantity.
Enter the desired information into the Quantity field. Enter "5".
19. If a Due Date was entered on the copied requisition, that date will default onto the
Schedule page. A new requisition cannot contain a stale date, so a new Due Date
must be entered.
Enter the desired information into the Due Date field. Enter "060811".
20. Changes made to a line item that defaulted from the copied requisition such as
Quantity, Account, Dept, Location, etc, must be made on the Distribution page.
When adding new line items to the requisition, you will need to enter default
information for those lines on the Requisition Defaults page.
Click the Distribution button.
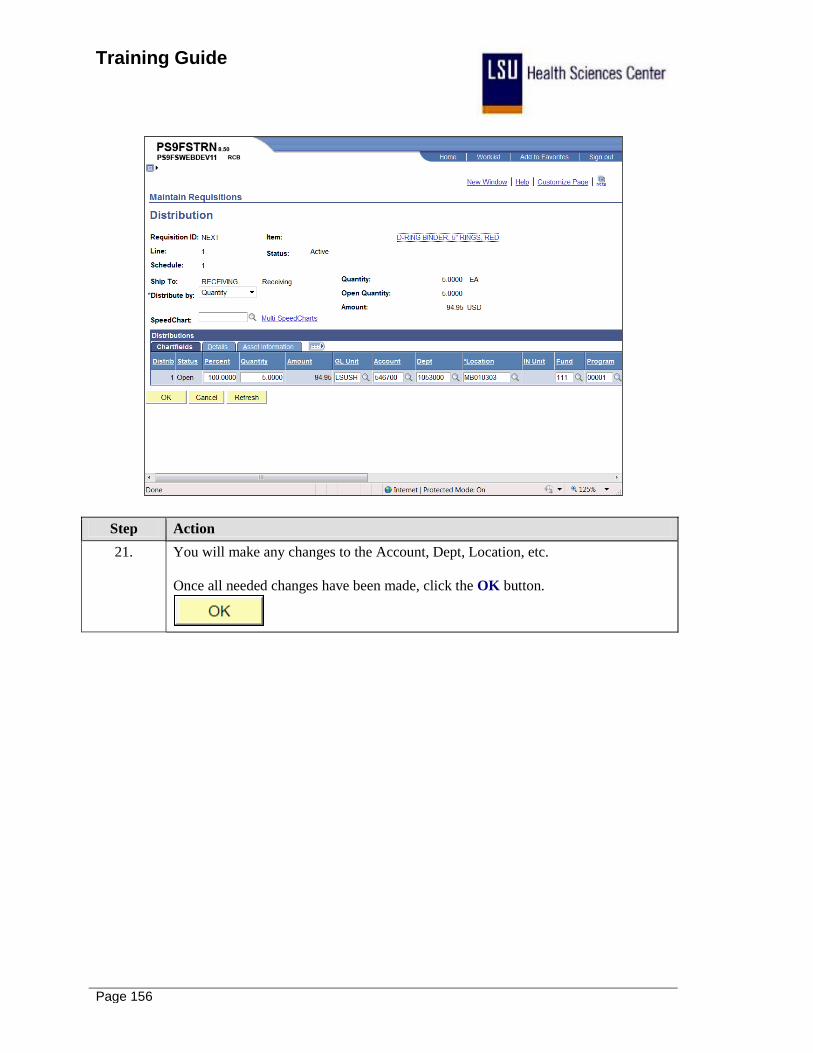
Training Guide
Page 156
Step Action
21. You will make any changes to the Account, Dept, Location, etc.
Once all needed changes have been made, click the OK button.

Training Guide
Page 157
Step Action
22. When you save the requisition for the first time, the system will assign a Requisition
ID number to the requisition.
Click the Save button.
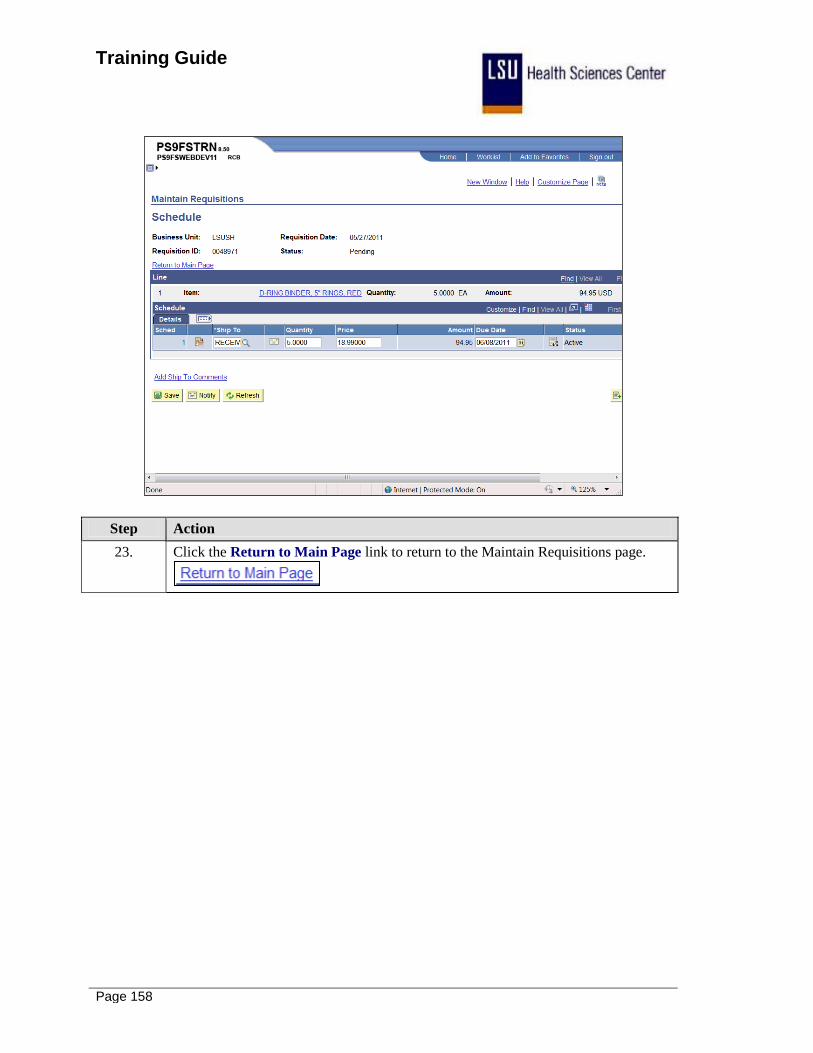
Training Guide
Page 158
Step Action
23. Click the Return to Main Page link to return to the Maintain Requisitions page.

Training Guide
Page 159
Step Action
24. Once all changes and additions have been made, you must uncheck the Hold From
Further Processing box and save the requisition, so the requisition can move forward
in the Purchasing process.
Click the Hold From Further Processing option.
25. Click the Save button.
26. This completes Copy a Requisition.
End of Procedure.

Training Guide
Page 160

Training Guide
Page 161
Inquire on a Requisition
Procedure
In this topic you will learn how to Inquire on a Requisition.
Step Action
1. From the Requisition Inquiry page you can view the following:
• Line Details, Header and Line Comments and Schedule Details for the requisition;
• Inquiry pages for Purchasing and Accounts Payable documents associated with the
requisition;
• The Approval History page; and
• The Document Status page. The Document Status page allows you to access
associated documents such as the PO, Receipts, Voucher, and/or Payments.

Training Guide
Page 162
Step Action
2. Click the Purchasing link.
3. Click the Requisitions link.
4. Click the Review Requisition Information link.
5. Click the Requisitions link.

Training Guide
Page 163
Step Action
6. You must enter all or part of either the Requisition ID field or the Requester field to
search for a requisition. It is not recommended that other fields on the page be used
for search purposes.
Enter the desired information into the Requisition ID field. Enter "5977387".
7. Click the OK button.
8. From the Req Inquiry page you can access the following:
• Line Detail page;
• Line Comments page;
• Schedule page;
• PO Details page;
• Receiving Details page;
• Voucher page;
• Document Status page;
• Approval History; and
• Comments page.
NOTE: You must have the correct security to access the PO Inquiry page,
Receiving Details page, and Voucher page.

Training Guide
Page 164
Step Action
9. Click the Requisition link to access the Line Details information.
10. From the Line Details page you can access the following:
• Description;
• Comments; •and
• Schedule pages.
NOTE: Click the More tab to view Buyer information.
Click the Return button.

Training Guide
Page 165
Step Action
11. Click the Show all columns button.

Training Guide
Page 166
Step Action
12. Click the On PO - Y link to view the PO Details page.
13. You can view the Purchase Order by clicking on the Purchase Order link.
Click the Return button.
14. The Document Status allows you to view the documents associated with the
requisition during the purchasing process.
Click the Document Status button. This action will open a new window.

Training Guide
Page 167
Step Action
15. Click on the DOC ID to view the Payment, PO and Receipt pages.
Click the Close button.

Training Guide
Page 168
Step Action
16. You can view the date and the approver on the Approval History page.
Click the Approval History button.

Training Guide
Page 169
Step Action
17. Click the OK button.

Training Guide
Page 170
Step Action
18. Click the Comments button.

Training Guide
Page 171
Step Action
19. Click the OK button.
20. This completes Inquire on a Requisition.
End of Procedure.

Training Guide
Page 172

Training Guide
Page 173
Inquire on Document Status
Procedure
In this topic you will learn how to Inquire on Document Status.
Step Action
1. Click the Purchasing link.
2. Click the Requisitions link.
3. Click the Review Requisition Information link.
4. Click the Document Status link.
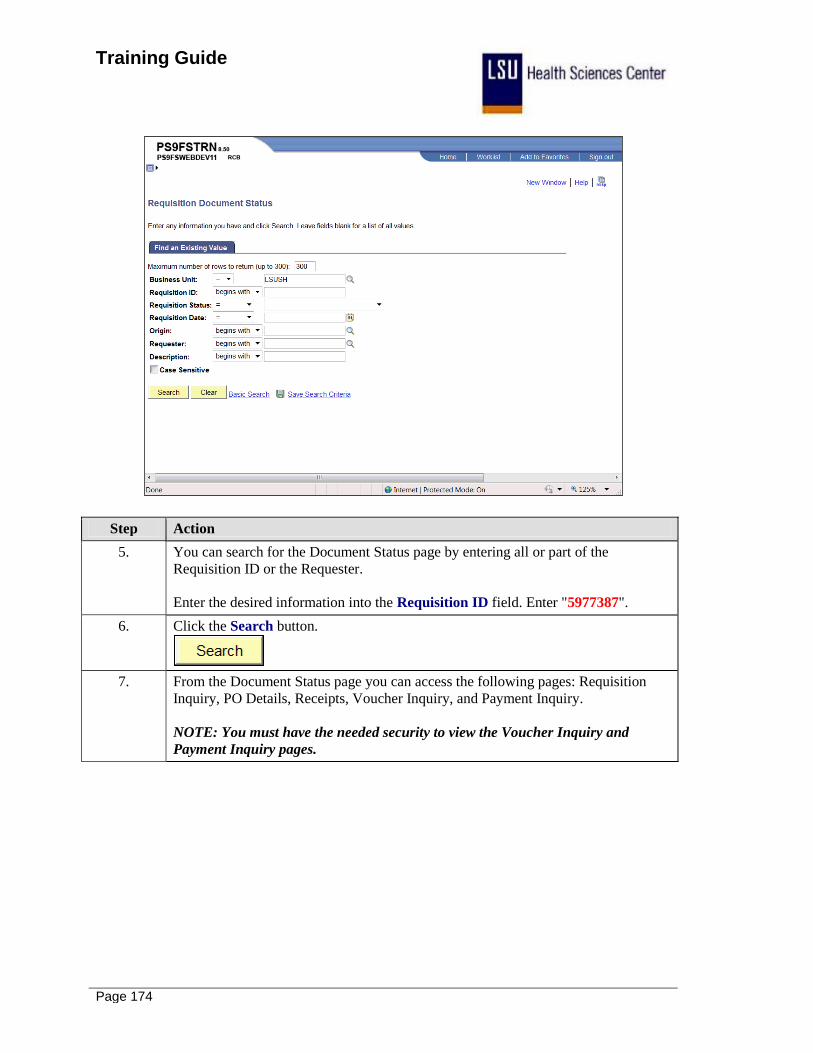
Training Guide
Page 174
Step Action
5. You can search for the Document Status page by entering all or part of the
Requisition ID or the Requester.
Enter the desired information into the Requisition ID field. Enter "5977387".
6. Click the Search button.
7. From the Document Status page you can access the following pages: Requisition
Inquiry, PO Details, Receipts, Voucher Inquiry, and Payment Inquiry.
NOTE: You must have the needed security to view the Voucher Inquiry and
Payment Inquiry pages.

Training Guide
Page 175
Step Action
8. Click the Req ID - 5977387 link. This will open a new window.

Training Guide
Page 176
Step Action
9. Click the Close button.

Training Guide
Page 177
Step Action
10. Click the Receipt ID - 182886 link. This will open a new window.

Training Guide
Page 178
Step Action
11. Click the Close button.
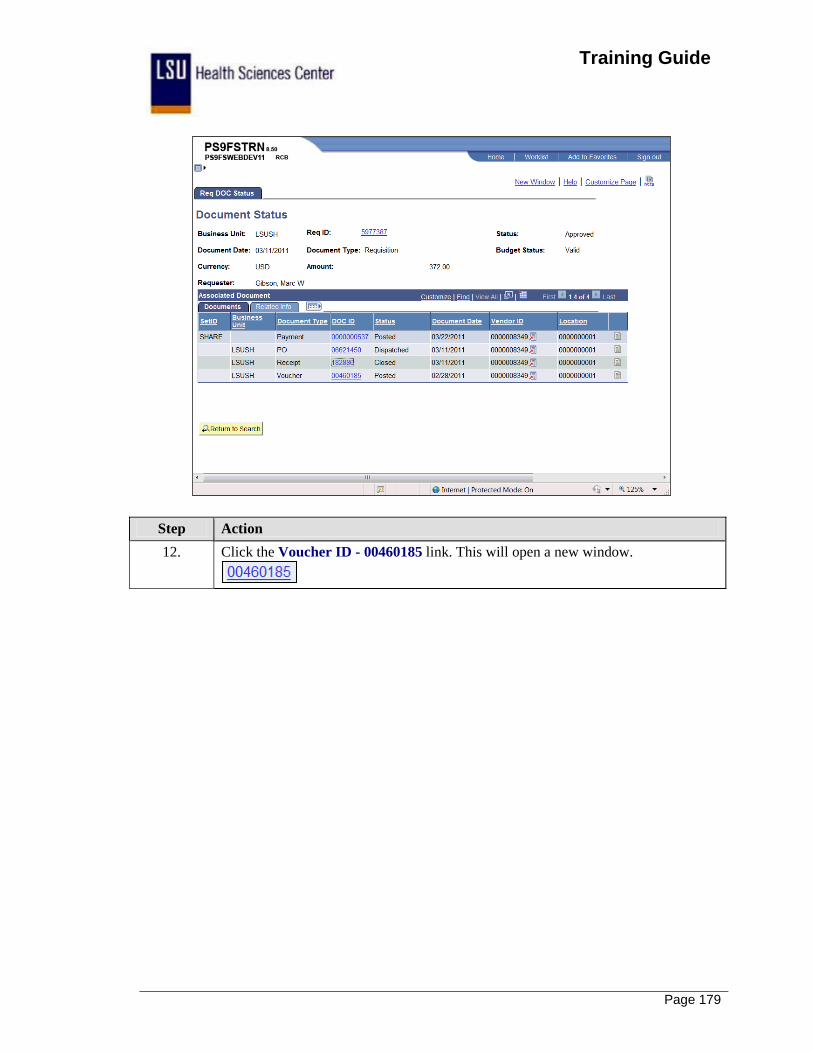
Training Guide
Page 179
Step Action
12. Click the Voucher ID - 00460185 link. This will open a new window.

Training Guide
Page 180
Step Action
13. Click the Down button of the scrollbar.

Training Guide
Page 181
Step Action
14. Click the Close button.

Training Guide
Page 182
Step Action
15. Click the Payment ID - 0000000537 link. This will open a new window.

Training Guide
Page 183
Step Action
16. Click the Down button of the scrollbar.
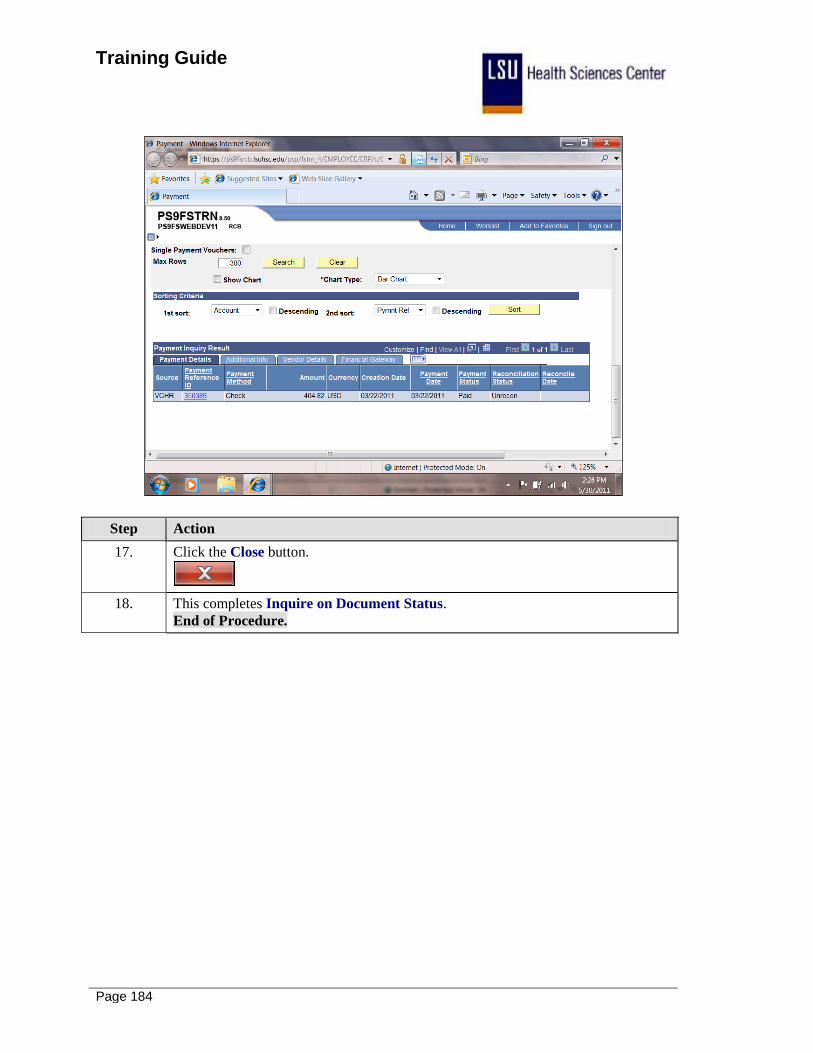
Training Guide
Page 184
Step Action
17. Click the Close button.
18. This completes Inquire on Document Status.
End of Procedure.
Training Guide
Page 185
Budget Check a Requisition Throughout the procurement process, Budget Checking ensures financial obligations and
expenditures do not exceed budget limitations. Controls are created to permit only transactions
applied to correct calendar periods, account types, and chartfield combinations. Budget Checking
a requisition also verifies the allocated funds are available before a liability is created.
The Budget Check process "freezes" the chartstring. It is highly recommended the Budget Check
process be run after the requisition has been approved. If the process is performed prior to the
approval of the requisition, neither the department nor Purchasing will be able to change any
values associated with the chartstring.
All non-contract requisitions must be budget checked by the department prior to the Purchase
Order or Request For Quote being generated. Any requisition that does not have a "Valid" budget
check status will be returned to the department to have the budget check process run. The
department will decide who will assume responsibility for the Budget Check process. Anytime
there are changes made to the requisition such as price, quantity, chartstring values, etc., the
Budget Check process must be performed again.
Users can monitor the process using the Process Monitor. The speed with which the process runs
will vary depending on the process run, amount of network traffic, etc.

Training Guide
Page 186
Procedure
In this topic you will learn how to Budget Check a Requisition.
Step Action
1. Click the Purchasing link.
2. Click the Requisitions link.
3. Click the Add/Update Requisitions link.

Training Guide
Page 187
Step Action
4. Click the Find an Existing Value link.
5. You can search for the requisition you wish to Budget Check for entering all or part
of the Requisition ID or Requester.
Enter the desired information into the Requester field. Enter "koconn".
6. Click the Search button.

Training Guide
Page 188
Step Action
7. Click the Requisition ID - 0048968 link.
8. Click the Budget Check button.
9. The Run Status must be Success and the Distribution Status must be Posted. Click
the Refresh button every 10 - 15 seconds to update the page and statuses.
Click the Refresh button.
10. Click the Go back to Requisitions link.
11. If the Budget Check process is successful, the Budget Status will be Valid. If the
Budget Check is unsuccessful, the Budget Status will be an Error link.
12. Error information can be viewed on the Requisitions Exceptions page. Navigation to
the Requisition Exceptions page is:
Commitment Control > Review Budget Check Exceptions > Purchasing and Cost
Management > Requisition

Training Guide
Page 189
Step Action
13. If an Error is received, it must be resolved and the budget check process run again.
The steps to take to resolve a budget check error are:
1. Verify the accuracy of the chartstring information. if no data entry errors are
found, see the Budget Control Exceptions Table in the Appendix;
2. Notify table contacts for assistance; and
3. Run the Budget Check process for the requisition again.
A list of general budget check errors, the Budget Control Exceptions Table,
can be found in the Appendix. his not a comprehensive list, but it does cover
the failures that have been found to occur. Ultimate resolution of the error
must be made in coordination with the Budget Office, Accounting Services or
Sponsored Projects.
If an error code is received that does not appear on the list, find a similar code
on the list and apply that action and contact information to the new code. If a
similar code cannot be found, contact the department to which the code
applies (i.e. Budget Office, Accounting Services, or Sponsored Projects) for
assistance.
NOTE: The error code and description can be found in the bottom, right
corner of the Budget Exceptions page.
Step Action
14. This completes Budget Check a Requisition.
End of Procedure.

Training Guide
Page 190

Training Guide
Page 191
Create a Change Order for a Requisition
Procedure
In this topic you will learn how to Create a Change Order for a Requisition.
Step Action
1. Click the Purchasing link.
2. Click the Requisitions link.
3. Click the Add/Update Requisitions link.

Training Guide
Page 192
Step Action
4. Click the Find an Existing Value link.
5. Enter the desired information into the Requisition ID field. Enter "0048968".
6. Click the Search button.

Training Guide
Page 193
Step Action
7. Click the Details... button.

Training Guide
Page 194
Step Action
8. Click the Create Line Changes button.
9. Click the OK button.
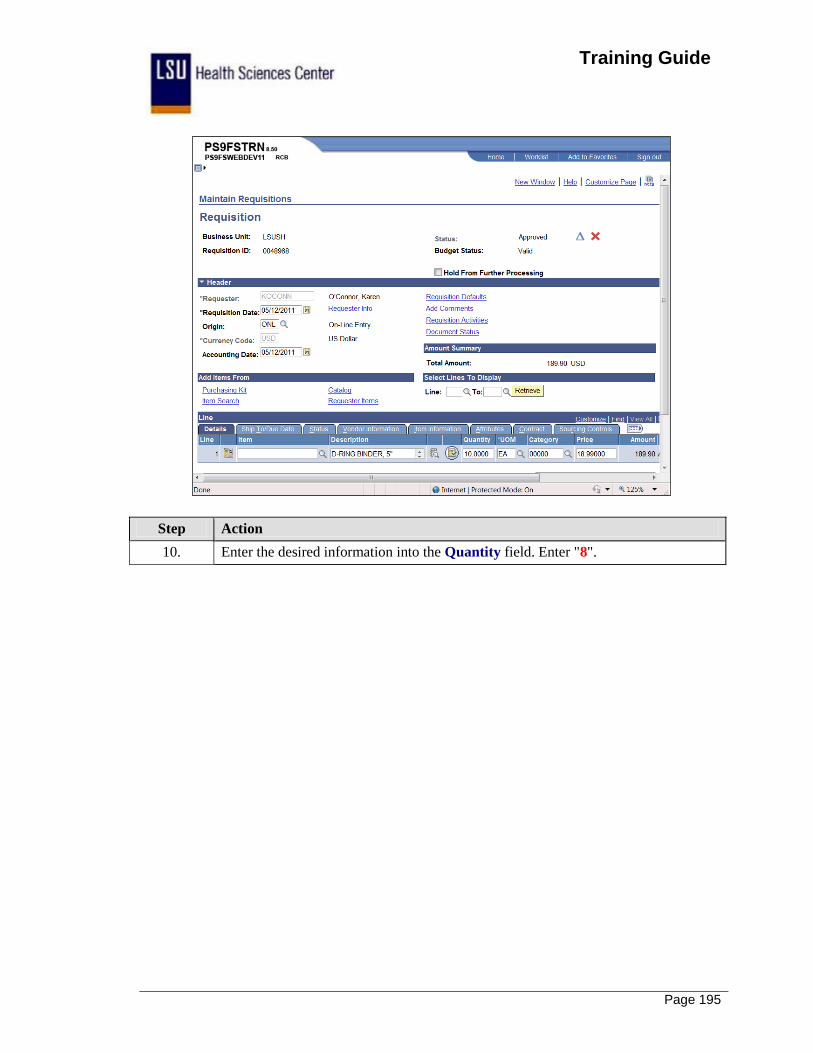
Training Guide
Page 195
Step Action
10. Enter the desired information into the Quantity field. Enter "8".

Training Guide
Page 196
Step Action
11. Click the Save button.
12. NOTE: The Budget Status reverts to Not Chk'd once the changes are saved. You
must budget check the requisition again before Purchasing can source the
requisition to a RFQ or PO.
13. This completes Create a Change Order for a Requisition.
End of Procedure.
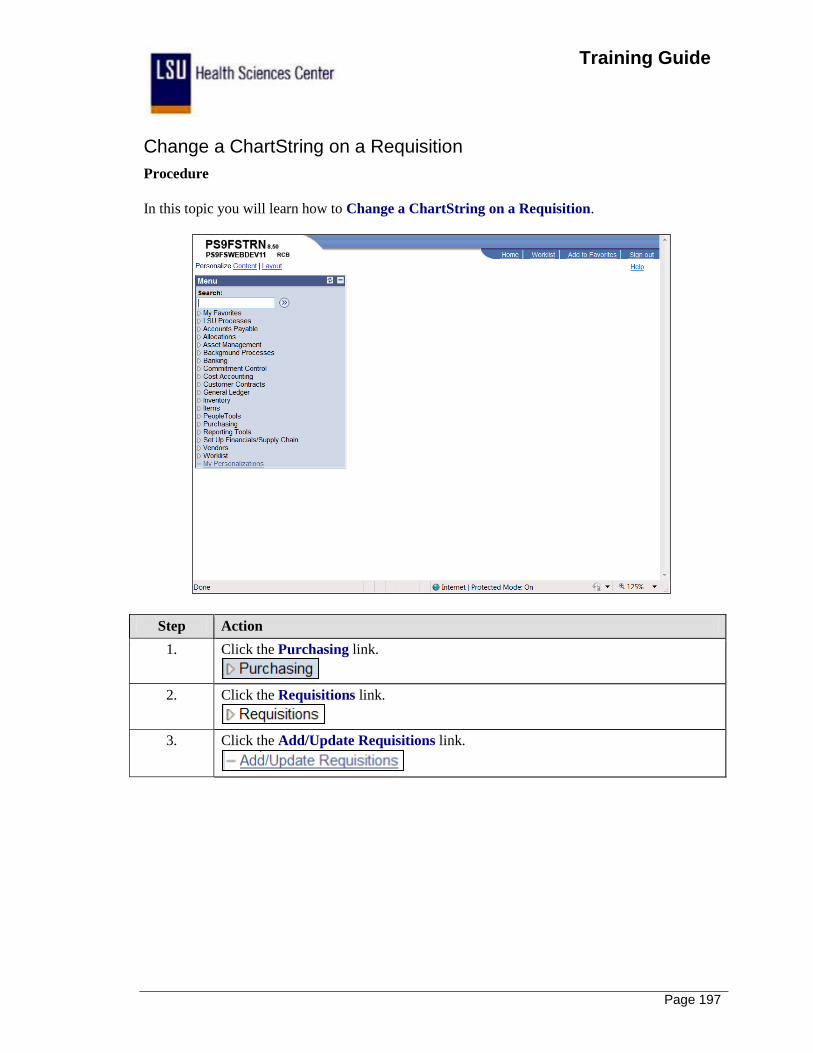
Training Guide
Page 197
Change a ChartString on a Requisition
Procedure
In this topic you will learn how to Change a ChartString on a Requisition.
Step Action
1. Click the Purchasing link.
2. Click the Requisitions link.
3. Click the Add/Update Requisitions link.

Training Guide
Page 198
Step Action
4. Click the Find an Existing Value link.
5. Enter the desired information into the Requisition ID field. Enter "0048968".
6. Click the Search button.
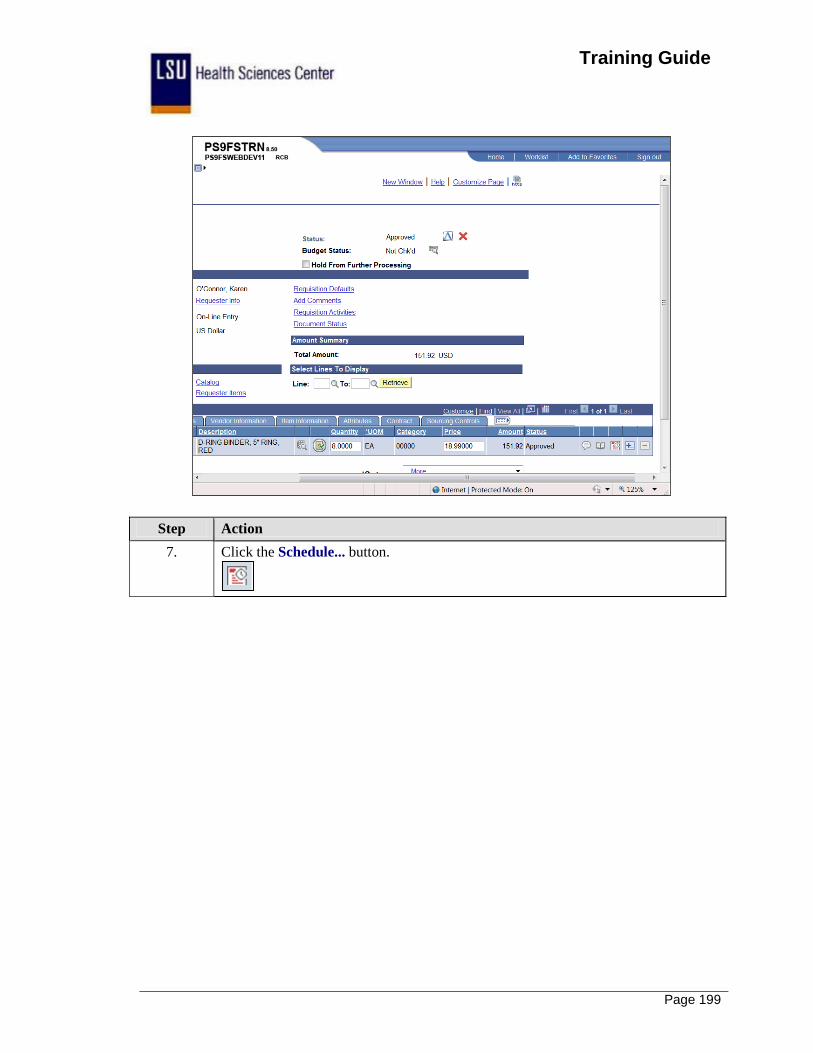
Training Guide
Page 199
Step Action
7. Click the Schedule... button.

Training Guide
Page 200
Step Action
8. Click the Distribution button.

Training Guide
Page 201
Step Action
9. The Distribution page is where you will make chartstring changes on the requisition.
In this example you will change the Account number from 546700 to 547299.
Enter the desired information into the Account field. Enter "547200".
10. Click the OK button.

Training Guide
Page 202
Step Action
11. Click the Save button. This action will take you back to the Requisition page.
12. NOTE: Once changes are saved, the Status will be changed to Pending and the
Budget Status will change to Not Chk'd. If your business unit uses workflow, the
requisition will have to be re-approved and then the budget check performed.
If your Business Unit does not use workflow, the Status will remain Approved.
However, the Budget Check will have to run again.
13. This completes Change a ChartString on a Requisition.
End of Procedure.

Training Guide
Page 203
Cancel a Requisition
Procedure
In this topic you will learn how to Cancel a Requisition.
Step Action
1. You can cancel an entire requisition if:
1. The requisition is not on hold;
2. You are authorized to cancel Requisitions on the User Preferences;
3. You are authorized to cancel Requisitions for the requester on User Preferences;
4. No requisition lines have been sourced to a PO or RFQ; and
5. No requisition schedule has been staged.

Training Guide
Page 204
Step Action
2. Click the Purchasing link.
3. Click the Requisitions link.
4. Click the Add/Update Requisitions link.

Training Guide
Page 205
Step Action
5. Click the Find an Existing Value link.
6. Enter the desired information into the Requisition ID field. Enter "0048970".
7. Click the Search button.

Training Guide
Page 206
Step Action
8. Click the Cancel button.
9. Click the Yes button.
NOTE: The pre-encumbrance will not be reserved for the requisition. A nightly
process will be scheduled to budget check and close cancelled requisitions. If you
need the requisition budget checked before the nightly process runs, contact your
Purchasing department.
10. The Status has changed from Pending to Cancelled.
11. This completes Cancel a Requisition.
End of Procedure.

Training Guide
Page 207
Delete a Requisition You can delete a requisition line, schedule, or distribution by clicking the Delete Requisition
button on their respective pages. You can delete an entire requisition by clicking the Delete
Requisition button on the Requisition page.
The following criteria must be met in order to Delete a Requisition:
1. The requisition is not on hold;
2. The requisition has never been successfully budget checked;
3. The Allow Requisition Deletion check box is selected on the Purchasing Business Unit
Operations page;
4. You are authorized to delete entire requisitions on the User Preferences, Requisition
Authorization page;
5. There are no change orders for the requisition;
6. The deletion will cause no change in order processing;
7. No requisition lines have been sourced to a PO or RFQ;
8. No requisition schedule has been staged; and
9. No lines have been processed by PeopleSoft Projects.
NOTE: Once a requisition is deleted, there will be no history of the requisition. If you want to
retain history information, you should cancel the requisition instead of deleting it.

Training Guide
Page 208
Procedure
In this topic you will learn how to Delete a Requisition.
Step Action
1. Click the Purchasing link.
2. Click the Requisitions link.
3. Click the Add/Update Requisitions link.

Training Guide
Page 209
Step Action
4. Click the Find an Existing Value link.
5. Enter the desired information into the Requisition ID field. Enter "0048969".

Training Guide
Page 210
Step Action
6. Click the Search button.
7. Click the Delete Requisition button.
8. Click the Yes button.
9. This completes Delete a Requisition.
End of Procedure.

Training Guide
Page 211
Appendix
Delete Temporary Internet Cookies and Files
Procedure
In this topic you will learn how to Delete Temporary Internet Cookies and Files.
Step Action
1. Temporary Internet Cookies and Files should be cleared when problems arise (e.g.
computer slowdowns, inability to load pages, inability to refresh the page when an
error message is received, etc.).
Click the button to the right of the Tools field.
2. Click the Internet Options list item.

Training Guide
Page 212
Step Action
3. Click the Delete... button.
4. Click the Delete button.
5. Click the OK button.
6. This completes Delete Temporary Internet Cookies and Files.
End of Procedure.
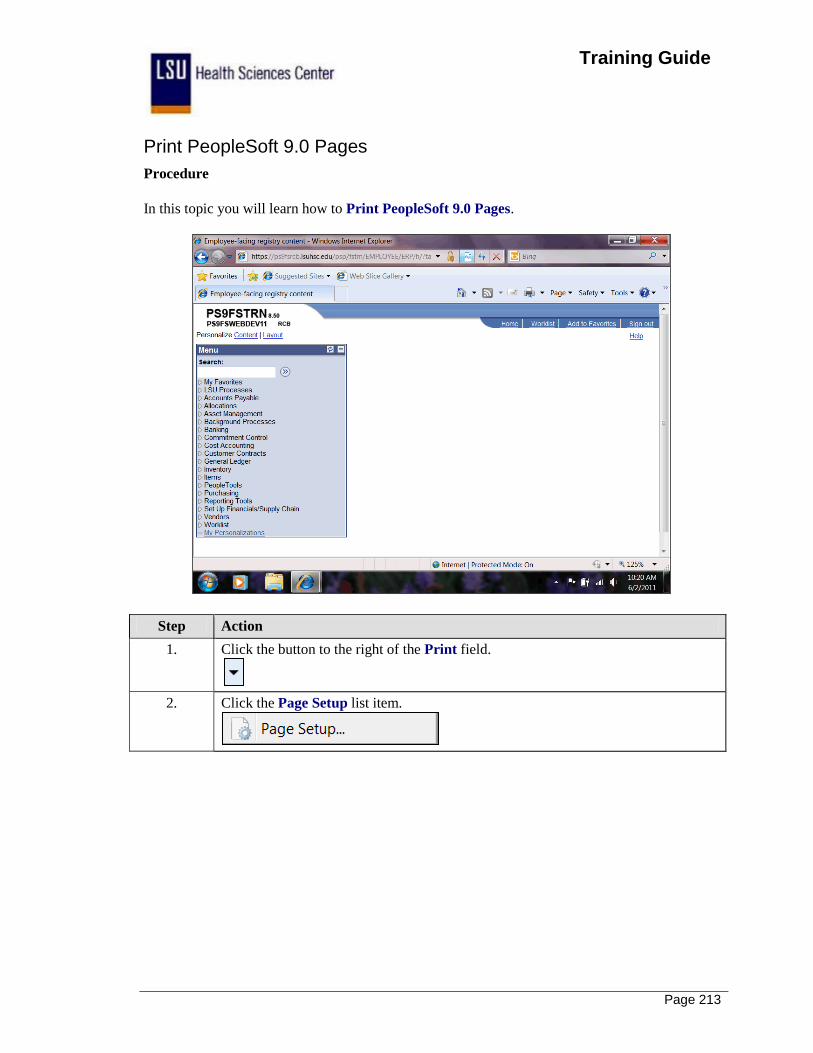
Training Guide
Page 213
Print PeopleSoft 9.0 Pages
Procedure
In this topic you will learn how to Print PeopleSoft 9.0 Pages.
Step Action
1. Click the button to the right of the Print field.
2. Click the Page Setup list item.

Training Guide
Page 214
Step Action
3. Click the OK button.

Training Guide
Page 215
Step Action
4. Click the Print button.
5. This completes Print PeopleSoft 9.0 Pages.
End of Procedure.

Training Guide
Page 216

Training Guide
Page 217
Session Time Out
Procedure
In this topic you will learn how to access PeopleSoft9.0 when a session times out.
For increased security on the site, when you are logged on to PeopleSoft9.0 and the system
detects that there has been no activity for 2 hours your connection will expire.
Step Action
1. Click the Sign in to PeopleSoft link.

Training Guide
Page 218
Step Action
2. Enter your User ID (must be entered in CAPS).
This should be the same User name that you enter when you log on to your
computer or access e-mail.
To practice, please Enter the following sample User ID:"AVANDE".

Training Guide
Page 219
Step Action
3. Enter your Password (must enter in lower case).
This should be the same Password that you enter when you log on to your
computer or access e-mail.
To practice, please Enter the following sample Password: "*******"

Training Guide
Page 220
Step Action
4. Click the Sign In button.

Training Guide
Page 221
The following is an optional method to access PeopleSoft9.0 when your
session expires. This method does not require the end-user to sign in:
Close the Internet browser by choosing one of the following methods:
• Select File, Close on the Internet browser menu bar;
• Click the “X” in the upper right corner of the Internet browser
Do not click the “X” on the PS Desktop - Citrix ICA Client
title bar.
Once the browser is closed, restart the PS9 Launcher. The PeopleSoft9.0
Home page will display.
Step Action
5. This completes Session Time Out.
End of Procedure.
Training Guide
Page 222

Training Guide
Page 223
Understanding Budget Control Exceptions This chapter provides an overview of exception handling in PeopleSoft Commitment Control and
discusses how to:
Set up and run exception notification.
View and handle budget exceptions.
Understanding Exception Handling and Notification
Inevitably, some transactions fail the budget checking process or cause the Budget Processor to
issue a warning. Such transactions are marked by the Budget Processor as exceptions. PeopleSoft
Commitment Control provides processes and pages to notify appropriate users of these
exceptions. Depending on the nature of the exception and the security authority granted to the
user, a user can handle budget exceptions by changing transactions, adjusting budgets, overriding
the budget checking process, or by simply viewing and noting them.
Errors and Warnings
Exceptions fall into two categories: errors and warnings.
Errors
Errors are exceptions that have failed budget checking because they do not conform to the rules
established for that control budget. Transactions with errors are not allowed by the system to
update the Commitment Control budget ledgers. Most errors occur when a transaction has at least
one line that exceeds at least one budget and is over tolerance. Depending on the configuration of
your control budgets, the exact reason that a budget has insufficient funds will vary from budget
to budget. The budget may be on hold, closed, or simply lacking a sufficient available budget
amount.
Transactions with errors stop at the budget check stage and do not proceed until they are
corrected or overridden and are budget checked again.

Training Guide
Page 224
These are errors that you might encounter:
Error Code
Overridable? Description Notes
E1 Y Exceeds budget and is over tolerance.
N/A
E2 N No budget exists. N/A
E3 N Budget is closed. N/A
E4 Y Budget is on hold. N/A
E5 Y Transaction has offset account.
The transaction line contains an account value that is reserved as an offset account.
E6 Y Budget date is out of bounds.
N/A
E7 Y Spending authority over budget.
Credit transaction caused spending authority (available budget balance) to exceed original budgeted amount.
This error does not occur if you selected Allow Increased Spending Authority for the control budget definition on the Ledgers for a Unit - Commitment Control Options page.
See Adding Commitment Control Ledger Groups to a Business Unit.
E8 N CF (ChartField) funding source error.
A funding source allocation row for a project budget exists without a corresponding budget amount having been entered in the Commitment Control ledger data table (LEDGER_KK).
See Project Budgets With Funding Source Control.
E9 N Cumulative calendar data not found.
Budget is defined for cumulative budgeting with a cumulative calendar, but the calendar is not found.
See Budget Period Calendars and Cumulative Budgeting.
E10 N Cumulative date range not found.
Budget is defined for cumulative budgeting with a cumulative date range, but the date range is not found.
E11 Y Exceeds budget and is over tolerance for referenced row.
When a transaction (such as a voucher) and its referenced documents (such as purchase orders) impact different budgets, the Budget Processor budget-checks the liquidation rows for the referenced documents separately from the transaction itself. Errors E11 through E20, E23 through E25, and E30 occur for the referenced (liquidation) row.
See Budget Processor.
E12 N No budget exists See E11.

Training Guide
Page 225
Error Code
Overridable? Description Notes
for referenced row.
E13 N Budget is closed for referenced row.
See E11.
E14 Y Budget is on hold for referenced row.
See E11.
E15 Y Transaction has offset account for referenced row.
See E11.
E16 Y Budget date is out of bounds for referenced row.
See E11.
E17 Y Spending authority over budget for referenced row.
See E7, E11.
E18 N CF (ChartField) funding source error for referenced row.
See E8, E11.
E19 N Cumulative calendar data not found for referenced row.
See E9, E11.
E20 N Cumulative date range not found for referenced row.
See E10, E11.
E21 Y Exceeds statistical budget and is over tolerance.
Occurs for budgets with statistical budgeting enabled.
See Statistical Budgeting.
E22 N Statistical budget does not exist.
See E21.
E23 Y Exceeds statistical budget and is over tolerance for referenced row.
See E21.

Training Guide
Page 226
Error Code
Overridable? Description Notes
E24 N Statistical budget does not exist for referenced row.
See E11, E21.
E25 Y Spending authority over statistical budget for referenced row.
See E7, E11, E21.
E27 Y Spending authority over statistical budget.
See E7, E21.
E28 N Referenced document balance is zero.
The transaction (such as a voucher) has a referenced document (such as a purchase order) that has already been fully liquidated.
E29 N Funding source allocation not found.
There are no funding source allocations for the project budget related to the transaction. This only applies if funding source tracking is enabled for the control budget definition and the Project ID in the transaction is flagged as Funding Source Controlled.
See Project Budgets With Funding Source Control.
E30 N Funding source allocation not found for referenced row.
See E11, E29.
E31 N Current budget period not in cumulative range.
Cumulative budgeting has been set up incorrectly for the budget, such that a budget period defined as part of the cumulative range does not, in fact, fall within the cumulative range.
For example, asume that you set up cumulative budgeting for the date range of 01/01/2002 through 02/28/2002 and include monthly budget periods 2002M1 (covering January), 2002M2 (covering February), and 2002M3 (covering March). The budget period 2002M3 does not fall within the cumulative date rage, and an error results when you budget-check a transaction whose budget date falls within budget period 2002M3.
See Budget Period Calendars and Cumulative Budgeting.
E32 N Current budget period not in cumulative range for referenced row.
See E11, E31.
E33 Y Funding is expired. The budget date on the transaction line is beyond the expiration date specified on the Expiration CF (ChartField) page within the budget definition and the transaction line is attempting to reduce the

Training Guide
Page 227
Error Code
Overridable? Description Notes
budget's remaining spending authority.
E34 Y Budget date outside specified dates.
The budget date on the transaction line is outside either the begin or end date specified on the Expiration CF (ChartField) page within the budget definition.

Training Guide
Page 228

Training Guide
Page 229
Warnings
Warnings are exceptions that do not conform to the rules of the control budget, but have been
passed along and update the Commitment Control ledgers nonetheless. Warnings function as
exceptions that are automatically overridden, as well as alerts to certain situations that could
adversely impact the budget and budgetary processing.
The Budget Processor issues warnings, rather than errors, in the following situations:
1. The system inherently defines the transaction exception as a warning.
This is the case, for example, with the warning that the budget date does not equal the
accounting date and the warning that the transaction exceeds the remaining available
budget but is within tolerance.
2. The control option for the control budget definition is Track with Budget, or Control
Initial Document.
If you selected one of these options when you defined your budgets, you determined that
transactions that would otherwise generate an error exception merely require an audit trail and
examination and do not need to be stopped.
If the control option is Track with Budget, you receive warning exceptions, except when there is
no budget for a transaction, which results in an error exception. If the control option is Control
Initial Document, you receive error exceptions for the initial document and warning exceptions
for subsequent transactions.
Note. Whether the option is Track without Budget or Track with Budget, you receive
warnings for any error that can be overridden; however, errors that cannot be overridden
might be logged.

Training Guide
Page 230
These are the warnings:
Warning Code
Description Notes
W1 Exceeds budget but is within tolerance.
Transaction exceeds available budget balance, but is within the tolerance allowed.
See Hierarchy of Control Budget Attributes.
W2 Exceeds budget, but is a track or non-initial transaction.
Transaction exceeds budget, but the control option for the control budget definition is Tracking without Budget, or Control Initial Document.
See Hierarchy of Control Budget Attributes.
W3 Budget date and accounting (transaction) date are not equal.
N/A
W4 Override of the error of Exceeds budget and is over tolerance.
Overrides always generate warnings.
W5 SA (spending authority) exceeds non-control budget amount.
Credit transaction caused spending authority (available budget balance) to exceed original budgeted amount for a budget whose control option is Tracking with Budget, or Tracking without Budget, or Control Initial Document.
This warning does not occur if you selected Allow Increased Spending Authority for the control budget definition on the Ledgers for a Unit - Commitment Control Options page.
See W2.
See Adding Commitment Control Ledger Groups to a Business Unit.
W6 Override of the error of SA (spending authority) exceeds budgeted amount.
See W4.
W7 Override of the error of Budget is on hold.
See W4.
W8 Override of the error Date is out of bounds.
See W4.
W9 Closed budget periods exist in cumulative set.
One or more budget periods within a cumulative budgeting set has been closed.
See Budget Period Calendars and Cumulative Budgeting.
W21 Exceeds statistical budget but is within tolerance.
See W1.
See Statistical Budgeting.

Training Guide
Page 231
Warning Code
Description Notes
W22 Exceeds non-control statistical budget.
See W2, W21.
W24 Override of the error of exceeds statistical budget.
See W4.
W25 SA (spending authority) exceeds non-control statistical budget amount.
See W5, W21.
W26 Override of the error of SA (spending authority) exceeds statistical budget amount.
See W4.
W33 Funding is expired. Warning is issued if you override the E33 exception
W34 Budget date outside dates specified on the Expiration CF (ChartField) page.
Warning is issued if you override the E34 exception.
Note. Early warnings, or notifications that a predefined percentage of a budget has been
committed for spending or spent, are not exceptions. You set them up on the Notify Preferences
page.