PeopleAdmin 7 - University of Dayton
8
1 PeopleAdmin 7 General Navigation Training Login Page Go to https://jobs.udayton.edu/hr This will take you to the login page. Login with your UD Novell username and password. Home Page When you log in, you will come to the Applicant Tracking home page. Depending on the user group you are logged into, you will see the menu options that correspond to your user permissions.
Transcript of PeopleAdmin 7 - University of Dayton
1
PeopleAdmin 7 General Navigation
Training
Login Page
Go to https://jobs.udayton.edu/hr This will take you to the login page. Login with your UD Novell username and password.
Home Page
When you log in, you will come to the Applicant Tracking home page. Depending on the user group you are logged into, you will see the menu options that correspond to your user permissions.
2
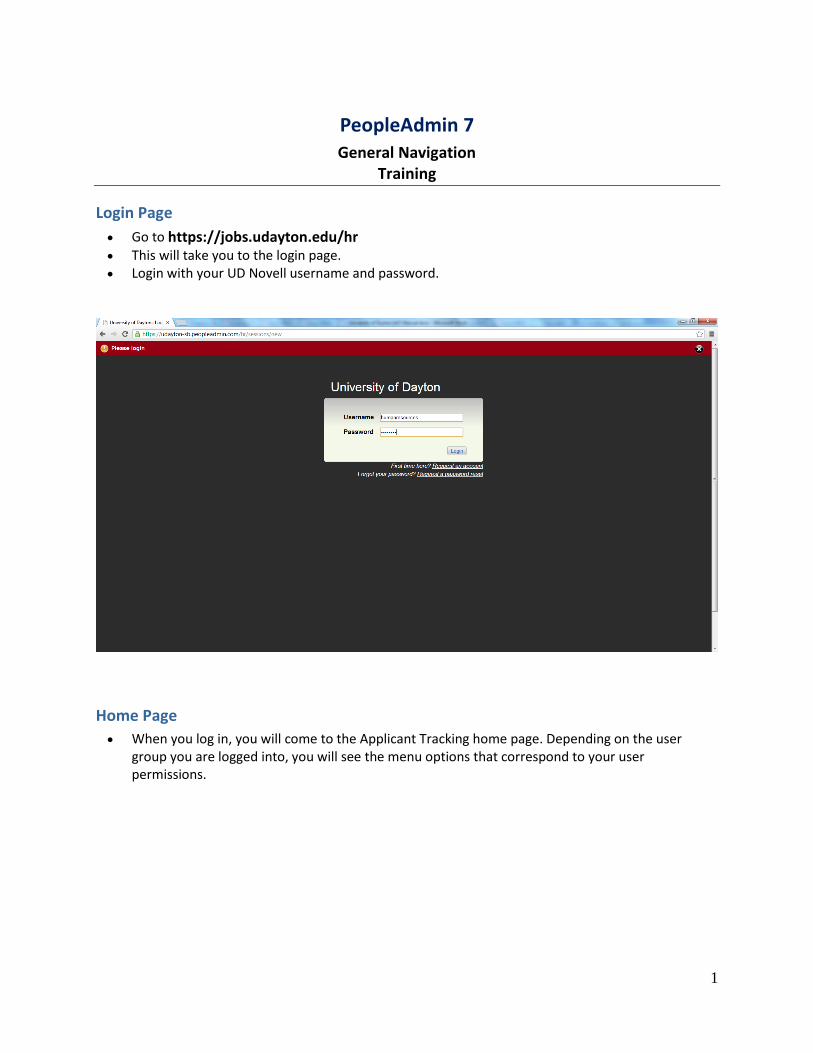
At the top right hand side of the screen, you will see the following…
[Module Selection] – indicated by the following
Hover your mouse over Applicant Tracking and you will see the standard module options such as “position management’” or “applicant tracking” appear. The modules “position management and “applicant tracking” will take you to two different sections or modules in the system.
[User Drop Down] – indicated by the following
This drop-down menu will only be available if you are assigned multiple User Groups, such as employee, hiring manager/supervisor, Department Head/Chair, etc…
[Inbox] – indicated by the following
The inbox is a notification area where the system will display any items that need you to take action upon such as approving a position description or hiring proposal.
[Watch List] – indicated by the following
The watch list displays any item that you have flagged to be put on your watch list such as a job posting or position description.
[My links] – indicated by the following
The “My Links” section will display links to training materials and quick access to the applicant portal.
[Help] – indicated by the following
The Help tab will provide quick system help from PeopleAdmin
3
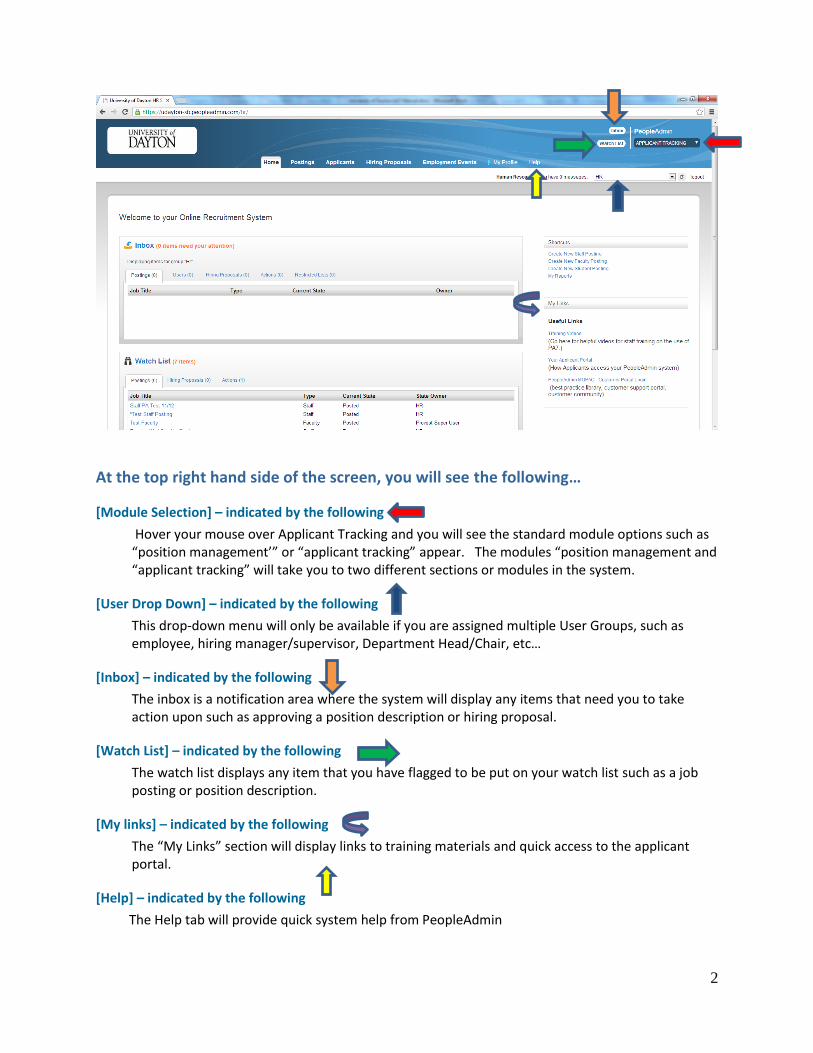
Position Management
If hover over the module selection drop-down menu and select Position Management. This is the module where you will create and modify position descriptions.
1. Under the “Position description” tab you can select Staff, Faculty or Student depending on your access. This is the area where you can review current position descriptions in your department and/or division.
2. Notice the orange tab that says “Create new position description” at the top right hand side of the screen. This is where you will create a new position description.
3. Notice the “search bar”. Click on the link, “more search options.”
4. When the “Add column” link appears, you can select a column from the drop down. Once
selected, it will appear as a column in the search results below.
5. You can click on the “working title” for a position description from the list at the bottom of the page or on the “actions” button under the “actions” column.
6. You can click on the back button on the web browser or the “bread crumbs” at the top left of
the page to navigate back.
4
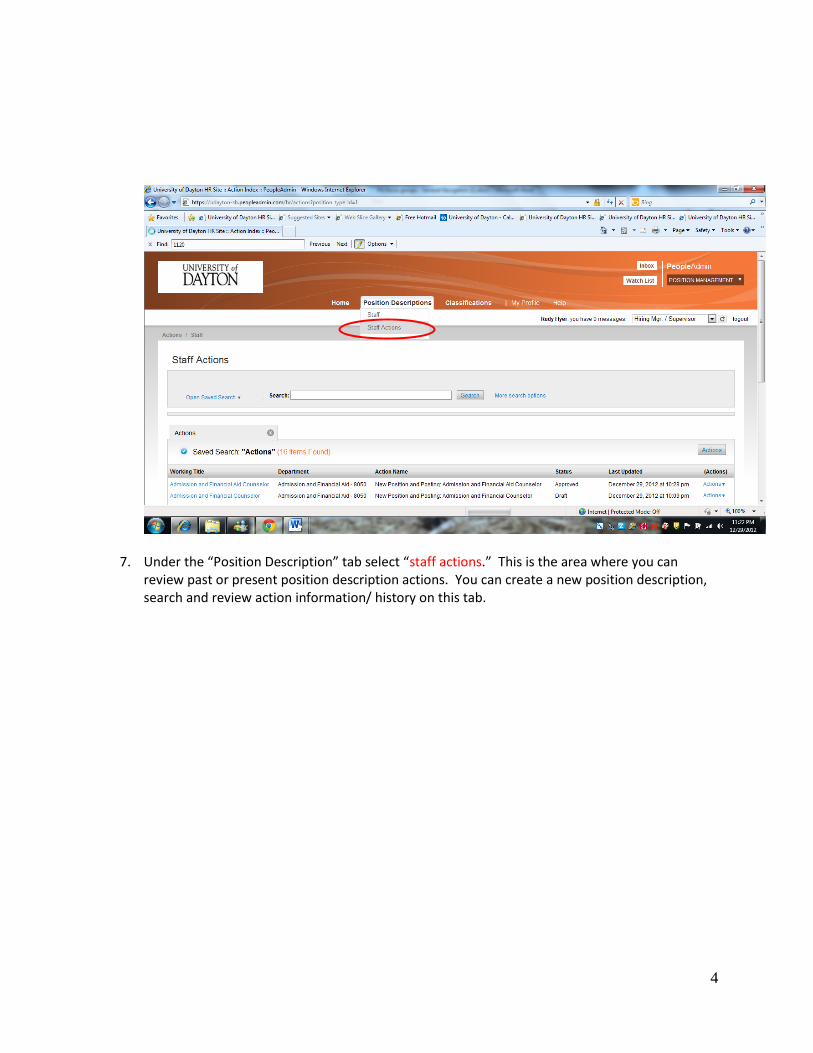
7. Under the “Position Description” tab select “staff actions.” This is the area where you can review past or present position description actions. You can create a new position description, search and review action information/ history on this tab.
5
Applicant Tracking
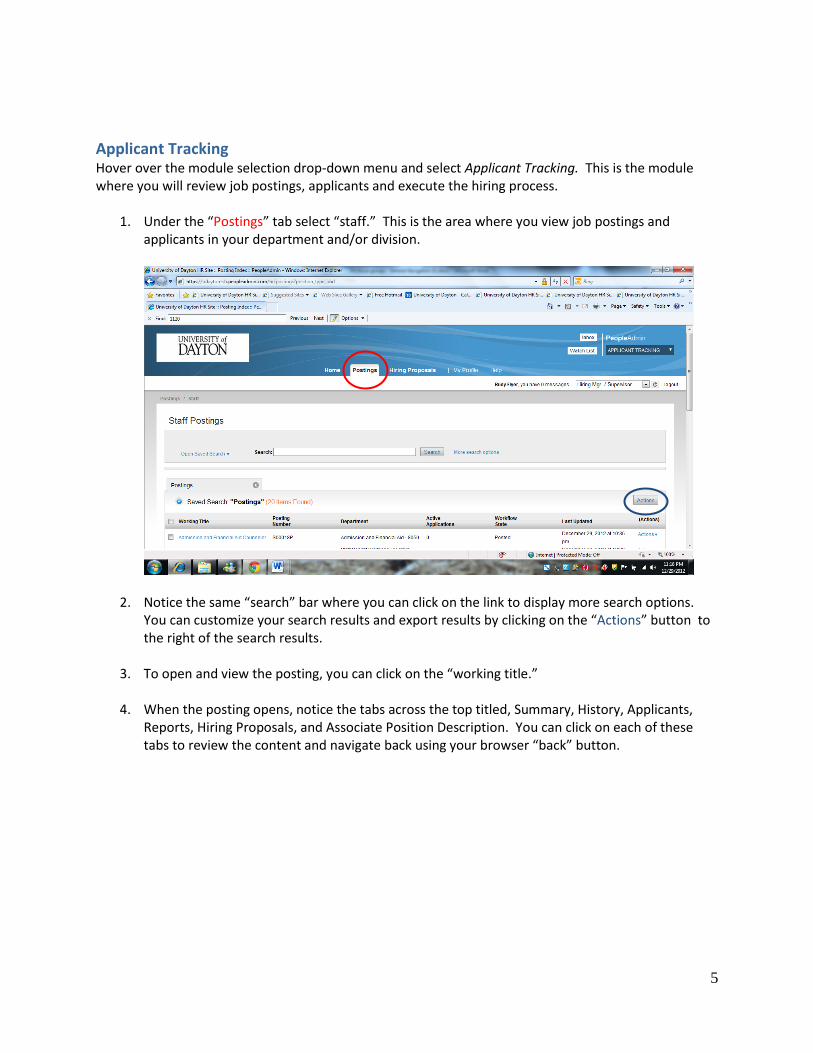
Hover over the module selection drop-down menu and select Applicant Tracking. This is the module where you will review job postings, applicants and execute the hiring process.
1. Under the “Postings” tab select “staff.” This is the area where you view job postings and applicants in your department and/or division.
2. Notice the same “search” bar where you can click on the link to display more search options. You can customize your search results and export results by clicking on the “Actions” button to the right of the search results.
3. To open and view the posting, you can click on the “working title.”
4. When the posting opens, notice the tabs across the top titled, Summary, History, Applicants, Reports, Hiring Proposals, and Associate Position Description. You can click on each of these tabs to review the content and navigate back using your browser “back” button.
6
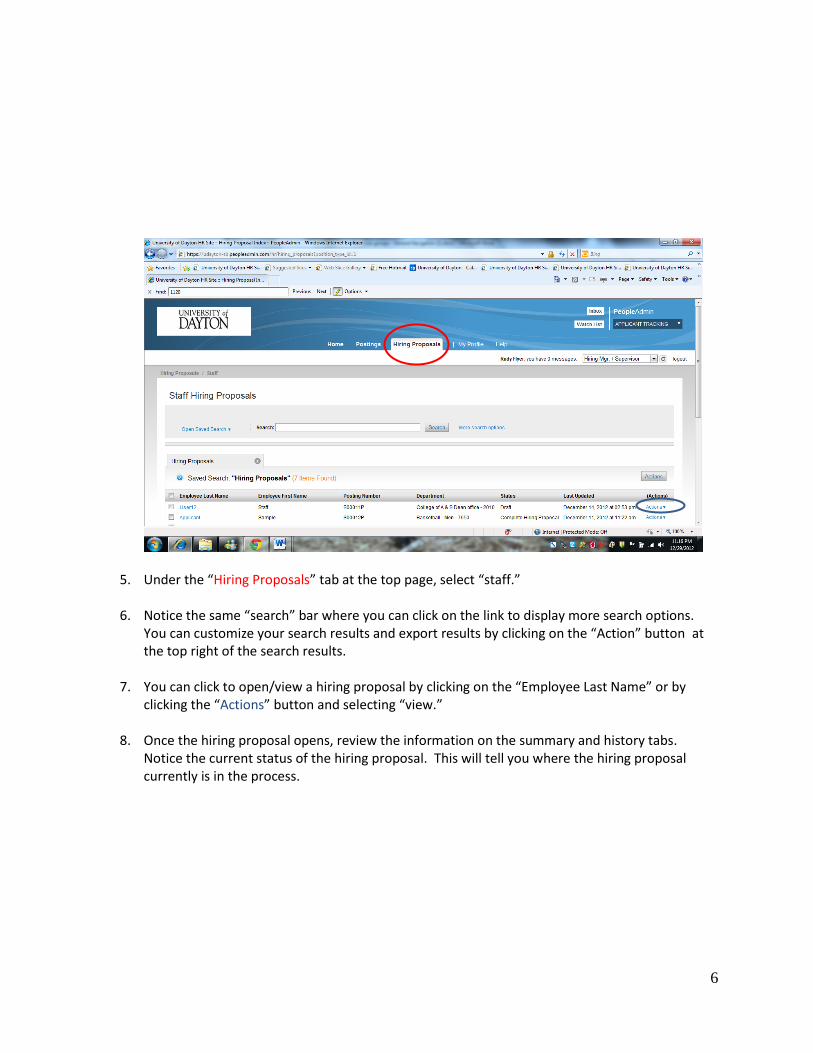
5. Under the “Hiring Proposals” tab at the top page, select “staff.”
6. Notice the same “search” bar where you can click on the link to display more search options. You can customize your search results and export results by clicking on the “Action” button at the top right of the search results.
7. You can click to open/view a hiring proposal by clicking on the “Employee Last Name” or by
clicking the “Actions” button and selecting “view.”
8. Once the hiring proposal opens, review the information on the summary and history tabs. Notice the current status of the hiring proposal. This will tell you where the hiring proposal currently is in the process.
7
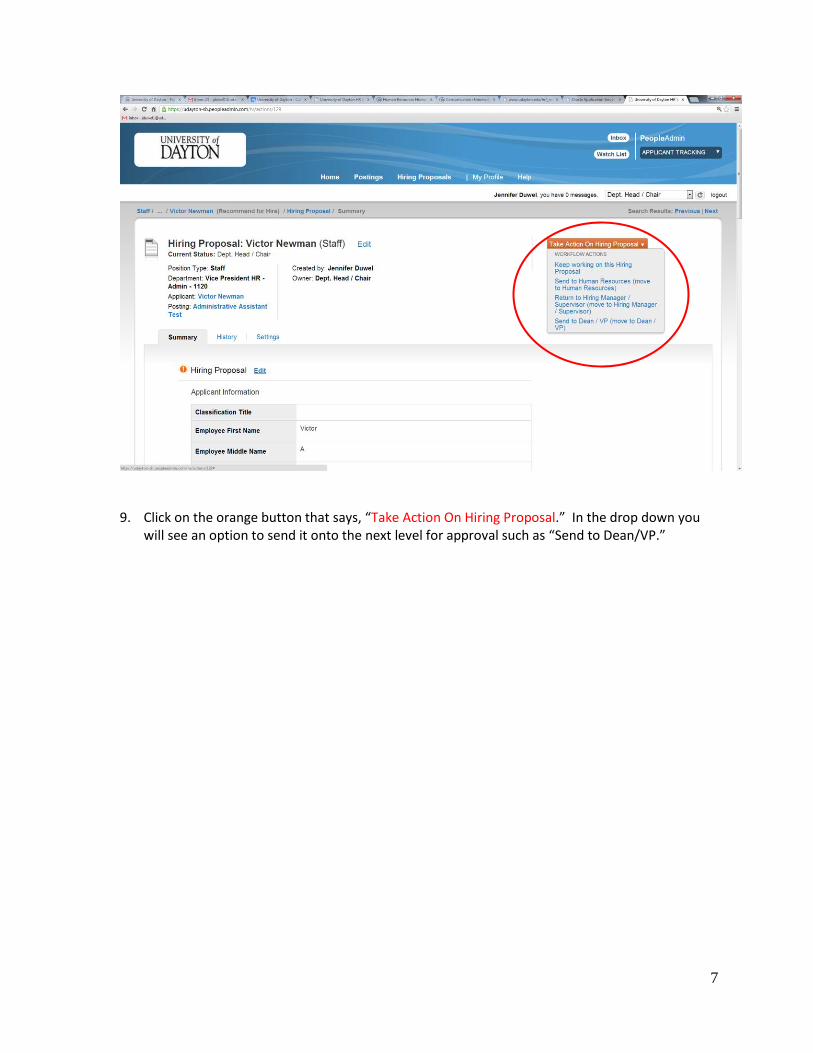
9. Click on the orange button that says, “Take Action On Hiring Proposal.” In the drop down you will see an option to send it onto the next level for approval such as “Send to Dean/VP.”
8
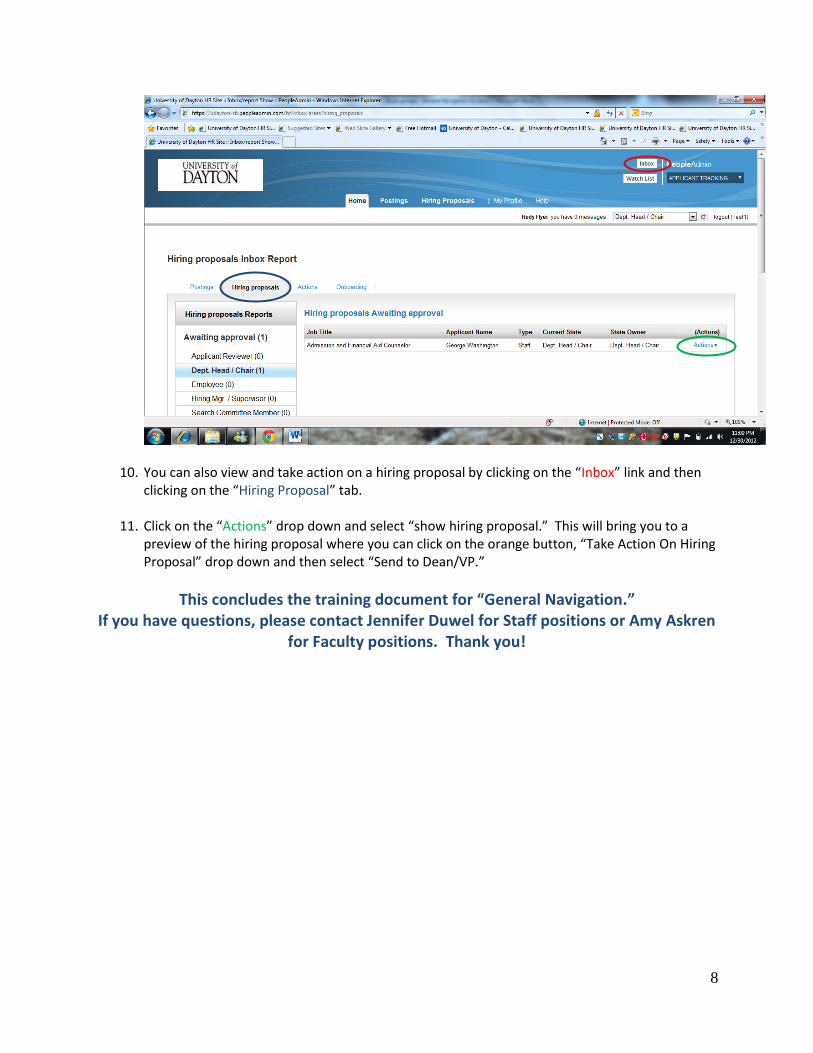
10. You can also view and take action on a hiring proposal by clicking on the “Inbox” link and then clicking on the “Hiring Proposal” tab.
11. Click on the “Actions” drop down and select “show hiring proposal.” This will bring you to a preview of the hiring proposal where you can click on the orange button, “Take Action On Hiring Proposal” drop down and then select “Send to Dean/VP.”
This concludes the training document for “General Navigation.” If you have questions, please contact Jennifer Duwel for Staff positions or Amy Askren
for Faculty positions. Thank you!