PENGEMBANGAN KEPROFESIAN BERKELANJUTAN (PKB) … · 2018-04-19 · terdiri dari Modul Diklat PKB...
114
Pusat Pengembangan dan Pemberdayaan Pendidik dan Tenaga Kependidikan Ilmu Pengetahuan Alam (PPPPTK IPA) DIREKTORAT JENDERAL GURU DAN TENAGA KEPENDIDIKAN KEMENTERIAN PENDIDIKAN DAN KEBUDAYAAN Modul Suplemen Diklat PENGEMBANGAN KEPROFESIAN BERKELANJUTAN (PKB) UNTUK GURU MODUL SUPLEMEN 8 PEMANFAATAN COREL DRAW DALAM PEMBELAJARAN IPA
Transcript of PENGEMBANGAN KEPROFESIAN BERKELANJUTAN (PKB) … · 2018-04-19 · terdiri dari Modul Diklat PKB...
Pusat Pengembangan dan Pemberdayaan Pendidik dan Tenaga Kependidikan Ilmu Pengetahuan Alam (PPPPTK IPA) DIREKTORAT JENDERAL GURU DAN TENAGA KEPENDIDIKAN KEMENTERIAN PENDIDIKAN DAN KEBUDAYAAN
Modul Suplemen Diklat
PENGEMBANGAN
KEPROFESIAN
BERKELANJUTAN (PKB)
UNTUK GURU
MODUL SUPLEMEN 8
PEMANFAATAN
COREL DRAW
DALAM PEMBELAJARAN IPA

Pusat Pengembangan dan Pemberdayaan Pendidik dan Tenaga Kependidikan Ilmu Pengetahuan Alam (PPPPTK IPA) DIREKTORAT JENDERAL GURU DAN TENAGA KEPENDIDIKAN KEMENTERIAN PENDIDIKAN DAN KEBUDAYAAN
1 1
MODUL SUPLEMEN DIKLAT
PENGEMBANGAN KEPROFESIAN
BERKELANJUTAN (PKB)
UNTUK GURU
MODUL SUPLEMEN 8
PEMANFAATAN
COREL DRAW
DALAM PEMBELAJARAN IPA
Diterbitkan oleh Pusat Pengembangan dan Pemberdayaan Pendidik dan Tenaga Kependidikan Ilmu Pengetahuan Alam (PPPPTK IPA)
Tahun Cetak 2015
Hak Cipta pada PPPPTK IPA Dilindungi Undang-Undang
MODUL SUPLEMEN DIKLAT
PENGEMBANGAN KEPROFESIAN
BERKELANJUTAN (PKB)
UNTUK GURU
MODUL SUPLEMEN 8
PEMANFAATAN
COREL DRAW
DALAM PEMBELAJARAN IPA
Penanggung Jawab Dr. Sediono Abdullah
Penyusun Agus Maulani, S.Sn. Robi Suwarga, S.Si.
Penyunting Dr. Indrawati, M.Pd.
Penyelia Dr. Muhammad Adning, S.Pd., M.Ed. (PUSTEKKOM)
Disainer Grafis / Layouter Agus Maulani, S.Sn. Aritta Megadomani, M.Pd.
KATA PENGANTAR iii
Puji dan syukur kami panjatkan ke hadirat Allah SWT atas selesainya Modul
Diklat Pengembangan Keprofesian Berkelanjutan (PKB) bagi Guru IPA yang
terdiri dari Modul Diklat PKB Guru IPA SMP, Modul Diklat PKB Guru Fisika SMA,
Modul Diklat PKB Guru Kimia SMA dan Modul Diklat PKB Guru Biologi SMA.
Modul diklat PKB Guru pada intinya merupakan model bahan belajar (Learning
Material) yang menuntut peserta pelatihan untuk belajar lebih mandiri dan aktif.
Modul Diklat PKB Guru disusun dalam rangka diklat PKB guru pasca UKG
yang telah diselenggarakan oleh Direktorat Jenderal Guru dan Tenaga
Kependidikan. Materi modul dikembangkan dari Standar Kompetensi Guru
sesuai Peraturan Menteri Pendidikan Nasional nomor 16 tahun 2007 tentang
Standar Kualifikasi Akademik dan Kompetensi Guru yang dijabarkan menjadi
Indikator Pencapaian Kompetensi Guru. Modul Diklat PKB ini masing-masing
dijabarkan dalam 10 (sepuluh) grade. Materi modul pada masing-masing grade
berisi materi kompetensi pedagogik dan kompetensi profesional guru mata
pelajaran, uraian materi tugas dan kegiatan pembelajaran serta diakhiri dengan
evaluasi dan uji diri untuk mengetahui ketuntasan belajar yang diuraikan di dalam
modul. Bahan pengayaan dan pendalaman materi dimasukkan pada beberapa
modul untuk mengakomodasi perkembangan ilmu pengetahuan dan teknologi
serta kegunaan dan aplikasinya dalam pembelajaran maupun kehidupan sehari
hari.
Modul ini telah dilakukan review dan revisi oleh tim baik internal dan eksternal,
praktisi, pakar, dan para pengguna. Namun demikian, kami masih berharap
kepada para reviu-er dan pengguna untuk selalu memberikan masukan dan
penyempurnaan sesuai kebutuhan dan perkembangan ilmu pengetahuan
teknologi terkini. Besar harapan kami kiranya kritik dan saran serta masukan
untuk lebih menyempurnakan isi dan materi serta sistematika modul dapat
KATA PENGANTAR

PPPPTK IPA Direktorat Jenderal Guru dan Tenaga Kependidikan - KEMDIKBUD
KATA PENGANTAR iv
disampaikan PPPPTK IPA dalam rangka perbaikan dan penyempurnaan untuk
edisi yang akan datang. Akhirnya kami menyampaikan penghargaan dan terima
kasih dan penghargaan kepada para pengarah dari jajaran Direktorat Jenderal
Guru dan Tenaga Kependidikan, manajemen PPPPTK IPA, staf dan
widyaisawara PPPPTK IPA, serta dosen dan guru, kepala dan pengawas
sekolah yang telah berpartisipasi dalam penyelesaian modul sebagaimana
tersebut diatas.
Semoga peran serta dan kontribusi Bapak-Bapak dan Ibu-Ibu semuanya dapat
memberikan nilai tambah serta bermanfaat dalam Pengembangan Keprofesian
Berkelanjutan bagi PTK IPA di Indonesia.
Bandung, 29 Desember 2015 Kepala PPPPTK IPA,
Dr. Sediono, M.Si. NIP. 195909021983031002
LISTRIK untuk SMP
DAFTAR ISI, DAFTAR GAMBAR, DAFTAR TABEL MODUL SUPLEMEN 8
Modul Diklat Pengembangan Keprofesian Berkelanjutan (PKB) Untuk Guru
v
Hal
KATA PENGANTAR iii
DAFTAR ISI v
DAFTAR GAMBAR vii
DAFTAR TABEL viii
PENDAHULUAN 1
A. LATAR BELAKANG 1
B. TUJUAN 3
C. PETA KOMPETENSI 3
D. RUANG LINGKUP 3
E. SARAN CARA PENGGUNAAN MODUL 3
PEMBELAJARAN 7
1. KEGIATAN PEMBELAJARAN 1
MEMAHAMI PERANGKAT LUNAK COREL DRAW 7
A. Tujuan 7
B. Indikator Ketercapaian Kompetensi 8
C. Uraian Materi 8
D. Aktivitas Pembelajaran 15
E. Latihan 20
F. Rangkuman 20
G. Umpan Balik dan Tindak Lanjut 20
DAFTAR ISI
PPPPTK IPA Direktorat Jenderal Guru dan Tenaga Kependidikan - KEMDIKBUD
DAFTAR ISI, DAFTAR GAMBAR, DAFTAR TABEL MODUL SUPLEMEN 8
vi
2. KEGIATAN PEMBELAJARAN 2
BEKERJA DENGAN COREL DRAW 25
A. Tujuan 25
B. Indikator Ketercapaian Kompetensi 25
C. Uraian Materi 26
D. Aktivitas Pembelajaran 52
E. Latihan 79
F. Rangkuman 81
G. Umpan Balik dan Tindak Lanjut 81
EVALUASI 83
GLOSARIUM 87
DAFTAR PUSTAKA 91
LISTRIK untuk SMP
DAFTAR ISI, DAFTAR GAMBAR, DAFTAR TABEL MODUL SUPLEMEN 8
Modul Diklat Pengembangan Keprofesian Berkelanjutan (PKB) Untuk Guru
vii
Hal
Gambar 2.1 Tampilan awal jendela aplikasi Corel Draw 8
Gambar 2.2 Antarmuka Corel Draw 10
Gambar 2.6 Jendela File Menu 13
Gambar 2.8 Tombol-tombol perintah pada jendela New 19
Gambar 3.1 Slide awal yang berisi dua kotak dengan garis putus-
putus untuk mengetikkan teks. 26
Gambar 3.3 Lokasi tombol New Slide 27
Gambar 3.4 Slide kedua yang berisi dua kotak dengan garis putus-
putus untuk mengetikkan teks. 28
Gambar 3.5 Slide kedua yang telah diisi dengan teks 29
Gambar 3.6 Lokasi tombol Text Box 32
Gambar 3.7 Kotak Text Box yang telah disisipkan pada Slide 33
Gambar 3.8 Gambar 3. 8 Lokasi tombol Picture dan Shapes 34
Gambar 3.9 Pilihan Shapes pada Corel Draw 34
Gambar 3.13 Lokasi tombol Shape Fill dan Shape Outline 38
Gambar 3.16 Lokasi tombol panah kecil 41
DAFTAR GAMBAR
PPPPTK IPA Direktorat Jenderal Guru dan Tenaga Kependidikan - KEMDIKBUD
DAFTAR ISI, DAFTAR GAMBAR, DAFTAR TABEL MODUL SUPLEMEN 8
viii
Hal
Tabel 2.1 Komponen dan fungsi antarmuka Corel Draw 11
Tabel 2.2 Tombol-tombol perintah di dalam jendela Menu File dan
fungsinya. 14
Tabel 3.1 Tombol-tombol perintah pada Kelompok Font dan Paragraph 30
Tabel 3.2 Pengaturan warna pada Shape 38
DAFTAR TABEL
PENDAHULUAN
MODUL SUPLEMEN 8
1
A. LATAR BELAKANG
Kegiatan Pengembangan Keprofesian Berkelanjutan (PKB) adalah kegiatan
keprofesian yang wajib dilakukan secara terus menerus oleh guru dan tenaga
kependidikan agar kompetensinya terjaga dan terus ditingkatkan.
Pengembangan Keprofesian Berkelanjutan (PKB) berdasarkan Peraturan
Menteri Negara Pendayagunaan Aparatur Negara dan Reformasi Birokrasi
Nomor 16 Tahun 2009 adalah pengembangan kompetensi guru yang
dilaksanakan sesuai dengan kebutuhan, bertahap, berkelanjutan untuk
meningkatkan profesionalitasnya.
PKB sebagai salah satu strategi pembinaan guru dan tenaga kependidikan
diharapkan dapat menjamin guru dan tenaga kependidikan mampu secara terus
menerus memelihara, meningkatkan, dan mengembangkan kompetensi sesuai
dengan standar yang telah ditetapkan. PKB merupakan salah satu komponen
pada unsur utama yang kegiatannya diberikan angka kredit,
Kegiatan Pengembangan Keprofesian Berkelanjutan dikembangkan atas dasar
profil kinerja guru sebagai perwujudan hasil penilaian kinerja guru dan didukung
dengan hasil evaluasi diri. Apabila hasil penilaian kinerja guru masih berada di
bawah standar kompetensi yang dipersyaratkan dalam penilaian kinerja guru,
maka guru diwajibkan untuk mengikuti program pengembangan keprofesian
berkelanjutan yang diorientasikan sebagai pembinaan dalam pencapaian standar
kompetensi guru.
Guru adalah bagian integral dari organisasi pendidikan di sekolah. Profesi guru
bermakna strategis karena mengemban tugas sejati bagi proses kemanusiaan,
pemanusiaan, pencerdasan, pembudayaan, pembangun karakter bangsa. Di
dalam UU No. 14 Tahun 2005 disebutkan bahwa guru adalah pendidik
PENDAHULUAN
PPPPTK IPA Direktorat Jenderal Guru dan Tenaga Kependidikan - KEMDIKBUD
PENDAHULUAN MODUL SUPLEMEN 8
2
profesional dengan tugas utama mendidik, mengajar, membimbing,
mengarahkan, melatih, menilai, dan mengevaluasi peserta didik pada pedidikan
anak usia dini jalur pendidikan formal, pendidikan dasar, dan pendidikan
menengah.
Guru dan tenaga kependidikan wajib melaksanakan Pengembangan Keprofesian
Berkelanjutan baik secara mandiri maupun kelompok. Salah satu kompetensi
profesional yang harus dimiliki guru adalah memanfaatkan teknologi informasi
dan komunikasi untuk berkomunikasi dan mengembangkan diri.
Modul Pemanfaatan Corel Draw dalam Pembelajaran IPA ini merupakan Modul
Suplemen Diklat Pengembangan Keprofesian Berkelanjutan Bagi Guru dan
Tenaga Kependidikan yang merupakan salah satu modul suplemen bagi peserta
pada kegiatan pendidikan dan pelatihan Pengembangan Keprofesian
Berkelanjutan.
Corel Draw adalah editor grafik vektor yang dikembangkan oleh Corel, sebuah
perusahaan perangkat lunak yang bermarkas di Ottawa, Kanada. Corel Draw
pada awalnya dikembangkan untuk sistem operasi Windows 2000 dan
seterusnya. Versi Corel Draw untuk Linux dan Mac OS pernah dikembangkan,
namun dihentikan karena tingkat penjualannya rendah.
Corel Draw banyak digunakan untuk membuat berbagai macam disain seperti
logo, kartu nama, kalender, poster, stiker dan lain-lain yang terkenal dalam dunia
disain grafis. Manfaat desain grafis tidak dapat dipisahkan dari kehidupan sehari-
hari. Hampir sebagain besar sektor kehidupan di dunia ini memerlukan seorang
desainer. Desain grafis merupakan proses untuk menciptakan tampilan sebuah
publikasi, presentasi, atau di situs web yang menarik dengan cara logis. Oleh
karena itu, tidak dapat kita pungkiri ketika desain selesai dikerjakan atau dibuat
maka hasilnya akan terlihat seperti menarik perhatian, menambah nilai, dan
meningkatkan minat audiens, simpel, terorganisir, memberikan penekanan
selektif, dan menciptakan kesatuan yang utuh. Begitu pun pada dunia
pendidikan, desain grafis sangat berperan besar. Contohnya, buku-buku yang
dicetak dan dipelajari, didesain sedemikian rupa oleh seorang desainer dengan
menggunakan Corel Draw agar tampil menarik, atraktif, tapi tetap komunikatif
dan tetap mencapai tujuan dari buku tersebut.
LISTRIK untuk SMP
PENDAHULUAN MODUL SUPLEMEN 8
Modul Diklat Pengembangan Keprofesian Berkelanjutan (PKB) Untuk Guru
3
Modul ini dibuat untuk mendukung guru dalam mencapai kompetensinya,
terutama dalam pemanfaatan TIK agar mampu membuat gambar yang akan
digunakan dalam pembelajaran IPA sehingga dapat meningkatkan minat belajar
peserta didik.
B. TUJUAN
Tujuan ditulisnya modul suplemen Pemanfaatan Corel Draw Dalam
Pembelajaran IPA ini sebagai salah satu bahan belajar bagi peserta pelatihan
diklat Pengembangan Keprofesian Berkelanjutan agar dapat belajar lebih mandiri
dan aktif sesuai kemampuannya.
C. PETA KOMPETENSI
Kompetensi Inti
“20. Menguasai materi, struktur, konsep, dan pola pikir keilmuan yang
mendukung mata pelajaran yang diampu”.
Kompetensi Guru Mapel
“20.7. Menggunakan alat-alat ukur, alat peraga, alat hitung, dan piranti lunak
komputer untuk meningkatkan pembelajaran IPA di kelas, laboratorium”.
Kompetensi dasar yang harus dicapai oleh peserta setelah mengikuti kegiatan
pelatihan ini adalah sebagai berikut.
1. Memahami perangkat lunak Corel Draw.
2. Mempraktekkan menggambar menggunakan perangkat lunak Corel Draw.
D. RUANG LINGKUP
Modul Pemanfaatan Corel Draw Dalam Pembelajaran IPA ini terdiri dari
pendahulian yang berisi paparan tentang latar belakang modul, tujuan belajar
dengan modul ini, kompetensi guru yang diharapkan dicapai setelah belajar
dengn modul ini, ruang lingkup dan saran penggunaan modul. Bagian kegiatan
pembelajaran 1, kegiatan pembelajaran 2, dan seterusnya sampai materi berisi
Tujuan, Indikator Pencapaian Kompetensi, Uraian Materi, Aktivitas
PPPPTK IPA Direktorat Jenderal Guru dan Tenaga Kependidikan - KEMDIKBUD
PENDAHULUAN MODUL SUPLEMEN 8
4
Pembelajaran, Latihan/Kasus/Tugas, Rangkuman, Umpan Balik dan Tindak
Lanjut dan Kunci Jawaban. Bagian evaluasi yang dilengkapi kunci jawabannya
agar guru peserta diklat melakukan self assesment sebagai tolak ukur untuk
mengetahui keberhasilan diri sendiri dan bagian penutup
E. SARAN CARA PENGGUNAAN MODUL
Peserta pelatihan sebaiknya mempelajari modul ini secara bertahap. Sebelum
mempelajari bagian kegiatan pembelajaran sebagai inti modul, peserta perlu
memahami tujuan, kompetensi dasar dan indikator ketercapaian keberhasilan
agar hasilnya sesuai dengan yang diharapkan, melalui test awal sebagai
pengukuran diri tentang seberapa besar pengetahuan awal peserta tentang
materi yang akan dipelajari.
Modul ini diharapkan menjadi model bahan belajar yang menuntut peserta
pelatihan untuk belajar lebih mandiri dan aktif. Modul ini merupakan suplemen
modul diklat PKB yang sangat penting dipelajari agar dapat mengatasi
kelemahan sistem pembelajaran konvensional dalam pelatihan, meningkatkan
motivasi belajar, meningkatkan keterampilan TIK secara bertahap, dapat
mengembangkan pembelajaran, mengolah dan menggali informasi yang
dibutuhkan, serta memanfaatkan teknologi dan media untuk meningkatkan
kualitas pembelajaran IPA.
Cara penggunaan modul pada setiap Kegiatan Pembelajaran secara umum
sesuai dengan skenario setiap penyajian mata diklat. Langkah-langkah belajar
secara umum adalah sebagai berikut.
LISTRIK untuk SMP
PENDAHULUAN MODUL SUPLEMEN 8
Modul Diklat Pengembangan Keprofesian Berkelanjutan (PKB) Untuk Guru
5
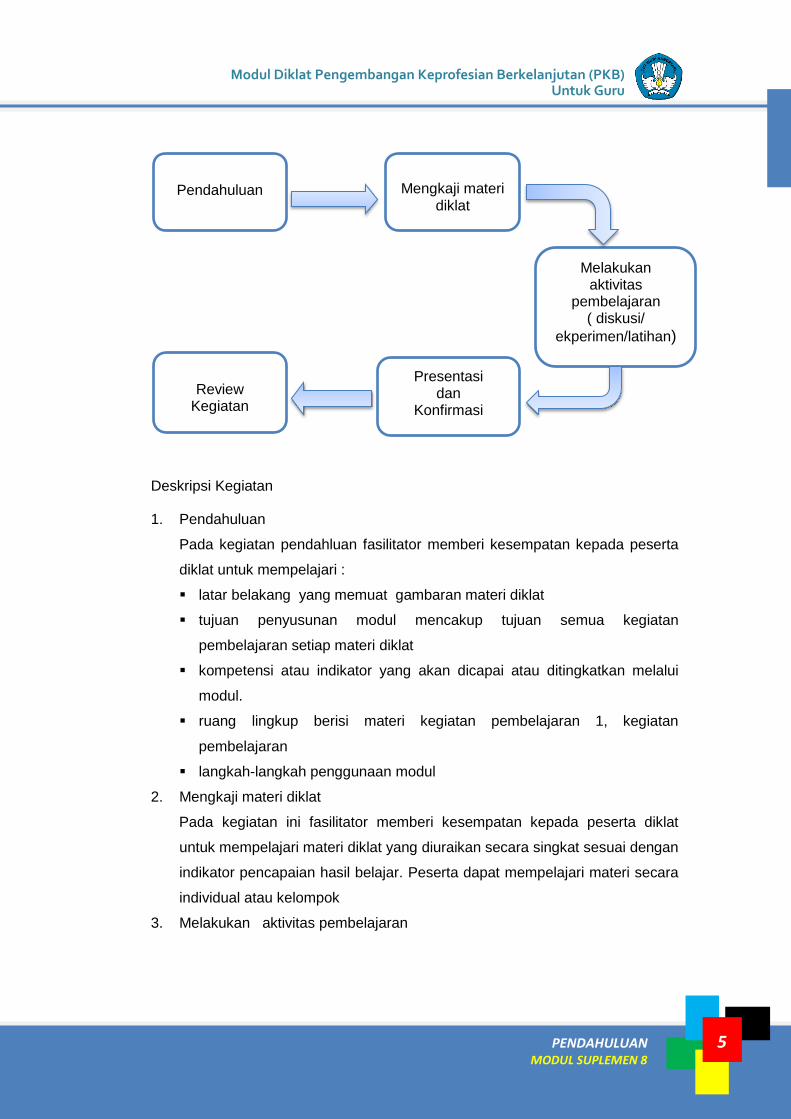
Deskripsi Kegiatan
1. Pendahuluan
Pada kegiatan pendahluan fasilitator memberi kesempatan kepada peserta
diklat untuk mempelajari :
latar belakang yang memuat gambaran materi diklat
tujuan penyusunan modul mencakup tujuan semua kegiatan
pembelajaran setiap materi diklat
kompetensi atau indikator yang akan dicapai atau ditingkatkan melalui
modul.
ruang lingkup berisi materi kegiatan pembelajaran 1, kegiatan
pembelajaran
langkah-langkah penggunaan modul
2. Mengkaji materi diklat
Pada kegiatan ini fasilitator memberi kesempatan kepada peserta diklat
untuk mempelajari materi diklat yang diuraikan secara singkat sesuai dengan
indikator pencapaian hasil belajar. Peserta dapat mempelajari materi secara
individual atau kelompok
3. Melakukan aktivitas pembelajaran
Pendahuluan
Review
Kegiatan
Mengkaji materi
diklat
Melakukan aktivitas
pembelajaran ( diskusi/
ekperimen/latihan)
Presentasi dan
Konfirmasi

PPPPTK IPA Direktorat Jenderal Guru dan Tenaga Kependidikan - KEMDIKBUD
PENDAHULUAN MODUL SUPLEMEN 8
6
Pada kegiatan ini peserta melakukan kegiatan pembelajaran sesuai dengan
rambu-rambu/intruksi yang tertera pada modul baik berupa diskusi materi,
melakukan eksperimen, latihan dsb.
Pada kegiatan ini peserta secara aktif menggali informasi, mengumpulkan
data dan mengolah data sampai membuat kesimpulan kegiatan
4. Presentasi dan Konfirmasi
Pada kegiatan ini peserta melakukan presentasi hasil kegiatan edangkan
fasilitator melakukan konfirmasi terhadap materi dibahas bersama
5. Review Kegiatan
Pada kegiatan ini peserta dan penyaji mereview materi.
7 7
KEGIATAN PEMBELAJARAN 1: MEMAHAMI PERANGKAT LUNAK COREL DRAW MODUL SUPLEMEN 8
7
Corel Draw adalah editor grafik vektor yang sangat populer di Indonesia.
Penggunaannya sangat luas. Tidak hanya di dunia disain grafis, tapi juga banyak
digunakan dalam dunia pendidikan.
Sebelum saudara mampu untuk menggunakan Corel Draw dalam pembelajaran
IPA, terlebih dahulu Saudara memahami apa dan bagaimana Corel Draw
tersebut.
A. TUJUAN
Setelah belajar dengan modul ini diharapkan Saudara dapat:
1. Menyebutkan fungsi dan kegunaan Corel Draw
2. Menyebutkan dan menunjukkan bagian-bagian antar muka Corel Draw
B. INDIKATOR PENCAPAIAN KOMPETENSI
Indikator hasil belajar yang diharapkan dicapai melalui modul ini adalah:
1. Menjelaskan perangkat lunak Corel Draw.
2. Menjabarkan bagian-bagian antarmuka perangkat lunak Corel Draw dan
fungsinya.
C. URAIAN MATERI
1. Grafis sebagai media visual
Grafis diklasifikasikan ke dalam jenis media visual, yang memberikan pesan
melalui simbol-simbol visual. Grafis juga berfungsi untuk menarik perhatian,
KEGIATAN PEMBELAJARAN 1
MEMAHAMI PERANGKAT LUNAK COREL DRAW
PPPPTK IPA Direktorat Jenderal Guru dan Tenaga Kependidikan - KEMDIKBUD
8 KEGIATAN PEMBELAJARAN 1: MEMAHAMI PERANGKAT LUNAK COREL DRAW MODUL SUPLEMEN 8
memperjelas presentasi pelajaran, dan mengilustrasikan fakta atau konsep yang
mudah dilupakan jika hanya dijelaskan oleh penjelasan lisan saja. Banyak
konsep yang lebih mudah dijelaskan melalui gambar daripada menggunakan
kata-kata secara lisan. Ingat kalimat dari "gambar berbicara seribu kata".
Semua media grafis, apakah mereka gambar, grafik sketsa, grafik atau media
visual lainnya harus dibuat dengan prinsip-prinsip umum. Sebagai salah satu
media visual, grafis harus berusaha memenuhi ketentuan untuk menghasilkan
komunikatif visual. Untuk membuatnya lebih mudah untuk diingat, ketentuan
tersebut dinyatakan dalam akronim "VISUAL" (singkatan dari Visible, Interesting,
Simple, Useful, Accurate, Legitimate and Structured).
Secara singkat prinsip umum penciptaan visual dapat dijelaskan sebagai berikut:
Visible (Terlihat), berarti mudah dilihat oleh siswa yang akan menggunakan
media yang kita buat.
Interesting (Menarik), berarti tidak monoton dan membosankan.
Simple (Sederhana), berarti singkat, tidak berlebihan.
Useful (Berguna), berarti tampilan visual harus dipilih yang benar-benar
berguna sesuai target sasaran. Tidak menunjukkan terlalu banyak tulisan
yang tidak penting.
Assurate (Akurat), berarti bahwa konten harus benar dan tepat sasaran. Jika
pesan dikemas dalam media visual yang salah, maka efek buruk akan sulit
untuk dihapus dari memori siswa.
Legitimate (Sah), berarti tampilan visual harus menjadi sesuatu yang sah dan
wajar. Logis dan bukan suatu visual yang tidak biasa yang akan dianggap
aneh oleh siswa.
Structured (Terstruktur), berarti visual yang harus terstruktur atau
terorganisasi, sistematis, dan koheren, sehingga mudah untuk memahami
pesannya.
LISTRIK untuk SMP Modul Diklat Pengembangan Keprofesian Berkelanjutan (PKB)
Untuk Guru
KEGIATAN PEMBELAJARAN 1: MEMAHAMI PERANGKAT LUNAK COREL DRAW MODUL SUPLEMEN 8
9
Desainer grafis lebih dikenal sebagai orang yang memiliki peran utama dalam
menciptakan kualitas gambar yang dapat menampilkan sampul beberapa
publikasi seperti buku atau majalah, brosur, booklet, leaflet, spanduk, katalog
dan publikasi lain yang sejenis untuk menjadi mengesankan. Dan komputer
adalah alat yang sangat diperlukan dalam mengembangkan grafis / media visual.
Dunia komputer grafis sangat luas dan kompleks karena ada beberapa aplikasi
pengolah gambar dan publikasi tata letak halaman. Munculnya berbagai aplikasi
pengolah gambar dan tata letak disebabkan kebutuhan yang berbeda mulai dari:
printing, advertising, penyiaran atau tujuan lainnya. Aplikasi ini dikelompokkan
menjadi beberapa bagian, yaitu:
a. Aplikasi Pengolah Tata Letak
Program ini sering digunakan untuk keperluan pembuatan brosur, pamflet,
booklet, poster, dan lain-lain. Program ini mampu mengatur penempatan teks
dan gambar yang diambil dari program lain (seperti Adobe Photoshop). Aplikasi
yang termasuk dalam kelompok ini adalah sebagai berikut:
Adobe FrameMaker
Adobe In Design
Adobe PageMaker
Corel Ventura
Microsoft Publisher
b. Aplikasi Pengolah Vektor/Garis
Program yang termasuk dalam kelompok ini dapat digunakan untuk membuat
gambar dalam bentuk vektor / garis sehingga sering disebut sebagai Program
Illustrator. Semua objek yang dihasilkan adalah kombinasi beberapa garis, baik
berupa garis lurus atau melengkung. Aplikasi yang termasuk dalam kelompok ini
adalah:
Adobe Illustrator
Beneba Canvas
CorelDraw
Macromedia Freehand
PPPPTK IPA Direktorat Jenderal Guru dan Tenaga Kependidikan - KEMDIKBUD
10 KEGIATAN PEMBELAJARAN 1: MEMAHAMI PERANGKAT LUNAK COREL DRAW MODUL SUPLEMEN 8
Ekspresi MetaCreations
Micrografix Designer
c. Aplikasi Pengolah Pixel / Gambar
Aplikasi yang termasuk dalam kelompok ini dapat digunakan untuk pengolahan
gambar/manipulasi foto (photo retouching). Semua objek yang diolah dalam
program dianggap sebagai kombinasi beberapa titik/pixel yang memiliki
kerapatan dan warna tertentu, misalnya foto. Gambar dalam foto terbentuk dari
beberapa kumpulan pixel yang memiliki kerapatan dan warna tertentu. Walaupun
aplikasi yang termasuk dalam kelompok ini juga dapat memproses teks dan
garis, tetapi tetap dianggap sebagai kumpulan pixel. Objek yang diimpor dari
aplikasi pengolah vektor, setelah diproses oleh program pengolah pixel/titik
secara otomatis akan dikonversikan menjadi bentuk pixel/titik. Aplikasi yang
termasuk dalam program ini adalah:
Adobe Photoshop
Corel Photo Paint
Macromedia XREs
MetaCreations Painter
MetaCreations Gambar Hidup
Micrografix Picture Publisher
Microsoft Photo Editor
Dari sini Saudara mengetahui bahwa Corel Draw adalah aplikasi komputer
pengolah vektor atau garis. Apa itu vektor dalam dunia grafis? Akan diuraikan
pada materi selanjutnya.
2. Corel Draw sebagai aplikasi pengolah vektor/garis
Corel Draw adalah aplikasi desain grafis dan pembuat gambar berbasis vektor
yang handal dan komprehensif untuk menciptakan karya grafis profesional.
Kemampuan dan fasilitas lengkapnya membuat Corel Draw menarik untuk
seniman, profesional, dan pemula yang membutuhkan sebuah program gambar
yang lengkap namun mudah digunakan.
LISTRIK untuk SMP Modul Diklat Pengembangan Keprofesian Berkelanjutan (PKB)
Untuk Guru
KEGIATAN PEMBELAJARAN 1: MEMAHAMI PERANGKAT LUNAK COREL DRAW MODUL SUPLEMEN 8
11
Gambar atau citra di komputer grafis terdiri dari dua jenis kategori, yaitu gambar
bitmap dan gambar vektor.
a. Gambar Bitmap
Adobe Photoshop adalah program editing gambar yang menggunakan jenis
gambar bitmap yang juga disebut sebagai gambar raster. Gambar-gambar dari
bitmap menggunakan grid berupa kotak kecil atau pixel yang membentuk sebuah
gambar. Setiap pixel terletak di lokasi tertentu dan memiliki satu warna tertentu,
sehingga gambar yang sebenarnya terbentuk adalah mosaik ribuan bahkan
jutaan pixel. Ketika Anda bekerja dengan gambar bitmap, Anda dapat mengedit
pixel tersebut.
Gambar bitmap sangat tergantung pada resolusi. Ini berarti sebuah gambar akan
tergantung pada jumlah pixel yang membentuk mereka. Jika Saudara
memperbesar ukuran gambar beberapa kali, maka gambar akan kehilangan detil
dan Saudara akan melihat kotak/bujursangkar yang memiliki tangga pixel. Jika
resolusi gambar sangat rendah, gambar akan terlihat kurang rinci dan memiliki
tangga. Gambar bitmap sangat baik untuk tampilan dan gradasi warna.
Contohnya adalah foto atau lukisan gambar.
b. Gambar Vektor
Aplikasi menggambar seperti Adobe Illustrator, Corel Draw dan FreeHand
menghasilkan gambar berdasarkan vektor grafis di mana gambar yang dibuat
dari garis dan kurva elemen yang disebut vektor. Dengan mode gambar yang
didasarkan pada vektor grafis, gambar tidak akan kehilangan kualitas meskipun
diperbesar ukurannya beberapa kali.
Gambar vektor tidak tergantung pada resolusi, sehingga dapat diperbesar,
diperkecil dan dapat dicetak pada semua jenis resolusi printer tanpa kehilangan
detail gambar. Gambar vektor memiliki ukuran file yang kecil dan dapat
diperbesar atau diperkecil ukuran bentuknya tanpa mengubah ukuran file.
PPPPTK IPA Direktorat Jenderal Guru dan Tenaga Kependidikan - KEMDIKBUD
12 KEGIATAN PEMBELAJARAN 1: MEMAHAMI PERANGKAT LUNAK COREL DRAW MODUL SUPLEMEN 8
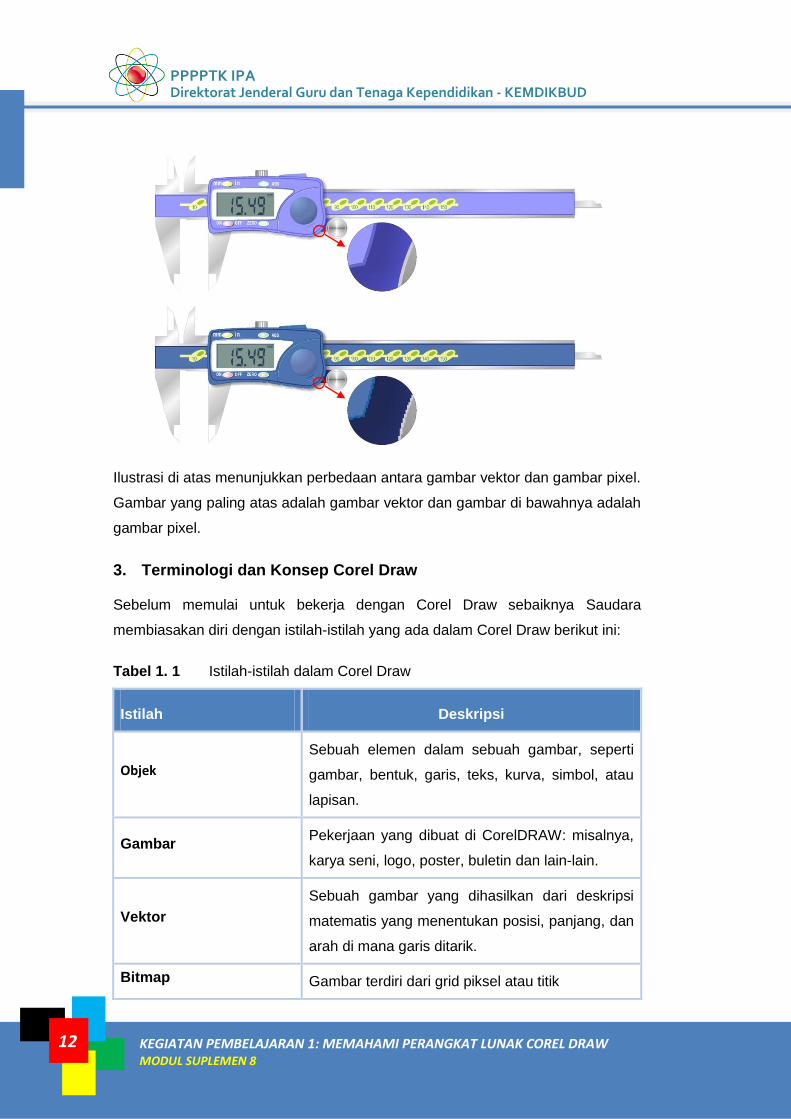
Ilustrasi di atas menunjukkan perbedaan antara gambar vektor dan gambar pixel.
Gambar yang paling atas adalah gambar vektor dan gambar di bawahnya adalah
gambar pixel.
3. Terminologi dan Konsep Corel Draw
Sebelum memulai untuk bekerja dengan Corel Draw sebaiknya Saudara
membiasakan diri dengan istilah-istilah yang ada dalam Corel Draw berikut ini:
Tabel 1. 1 Istilah-istilah dalam Corel Draw
Istilah Deskripsi
Objek
Sebuah elemen dalam sebuah gambar, seperti
gambar, bentuk, garis, teks, kurva, simbol, atau
lapisan.
Gambar Pekerjaan yang dibuat di CorelDRAW: misalnya,
karya seni, logo, poster, buletin dan lain-lain.
Vektor
Sebuah gambar yang dihasilkan dari deskripsi
matematis yang menentukan posisi, panjang, dan
arah di mana garis ditarik.
Bitmap Gambar terdiri dari grid piksel atau titik

LISTRIK untuk SMP Modul Diklat Pengembangan Keprofesian Berkelanjutan (PKB)
Untuk Guru
KEGIATAN PEMBELAJARAN 1: MEMAHAMI PERANGKAT LUNAK COREL DRAW MODUL SUPLEMEN 8
13
Istilah Deskripsi
Docker
Sebuah jendela yang berisi perintah dan
pengaturan yang relevan untuk alat atau tugas
tertentu
Fly Out Sebuah tombol yang membuka sekelompok alat
terkait
Artistic Text Jenis teks yang dapat diberi efek khusus, seperti
bayangan dan sebagainya.
Paragraph Text Jenis teks yang dapat diformat sebagai sebuah
paragraf.
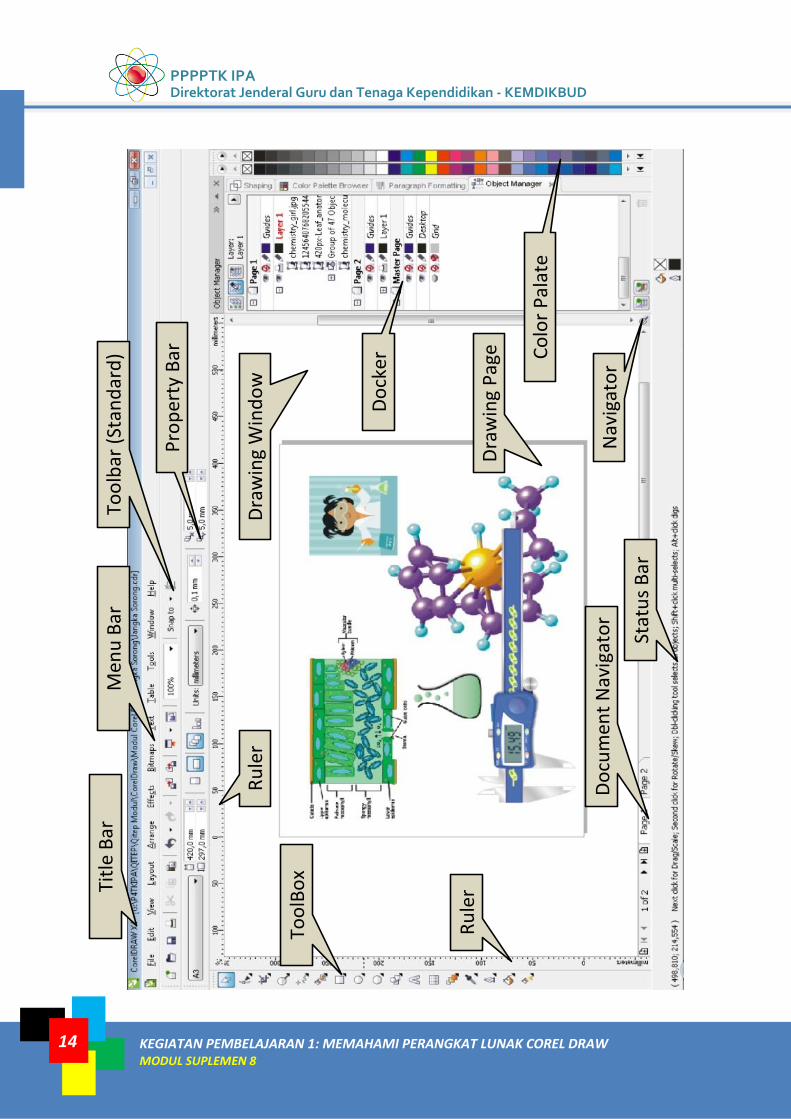
4. Antarmuka Corel Draw
Berikut gambar antarmuka Corel Draw.
PPPPTK IPA Direktorat Jenderal Guru dan Tenaga Kependidikan - KEMDIKBUD
14 KEGIATAN PEMBELAJARAN 1: MEMAHAMI PERANGKAT LUNAK COREL DRAW MODUL SUPLEMEN 8
M
enu
Bar
Ti
tle
Bar
To
olb
ar (
Stan
dar
d)
Pro
per
ty B
ar
Too
lBo
x
Dra
win
g W
ind
ow
Dra
win
g P
age
R
ule
r
Do
cum
ent
Nav
igat
or
Stat
us
Bar
Nav
igat
or
Co
lor
Pal
ate
Do
cker
Ru
ler
LISTRIK untuk SMP Modul Diklat Pengembangan Keprofesian Berkelanjutan (PKB)
Untuk Guru
KEGIATAN PEMBELAJARAN 1: MEMAHAMI PERANGKAT LUNAK COREL DRAW MODUL SUPLEMEN 8
15
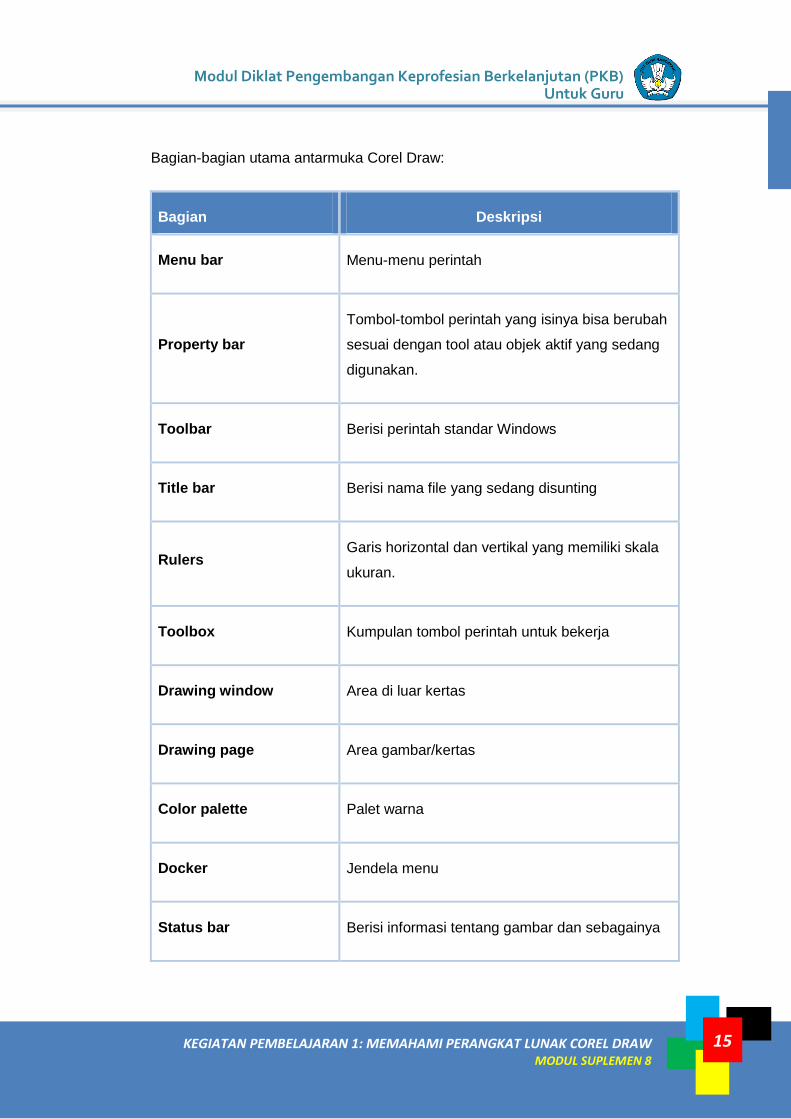
Bagian-bagian utama antarmuka Corel Draw:
Bagian Deskripsi
Menu bar Menu-menu perintah
Property bar
Tombol-tombol perintah yang isinya bisa berubah
sesuai dengan tool atau objek aktif yang sedang
digunakan.
Toolbar Berisi perintah standar Windows
Title bar Berisi nama file yang sedang disunting
Rulers Garis horizontal dan vertikal yang memiliki skala
ukuran.
Toolbox Kumpulan tombol perintah untuk bekerja
Drawing window Area di luar kertas
Drawing page Area gambar/kertas
Color palette Palet warna
Docker Jendela menu
Status bar Berisi informasi tentang gambar dan sebagainya
PPPPTK IPA Direktorat Jenderal Guru dan Tenaga Kependidikan - KEMDIKBUD
16 KEGIATAN PEMBELAJARAN 1: MEMAHAMI PERANGKAT LUNAK COREL DRAW MODUL SUPLEMEN 8
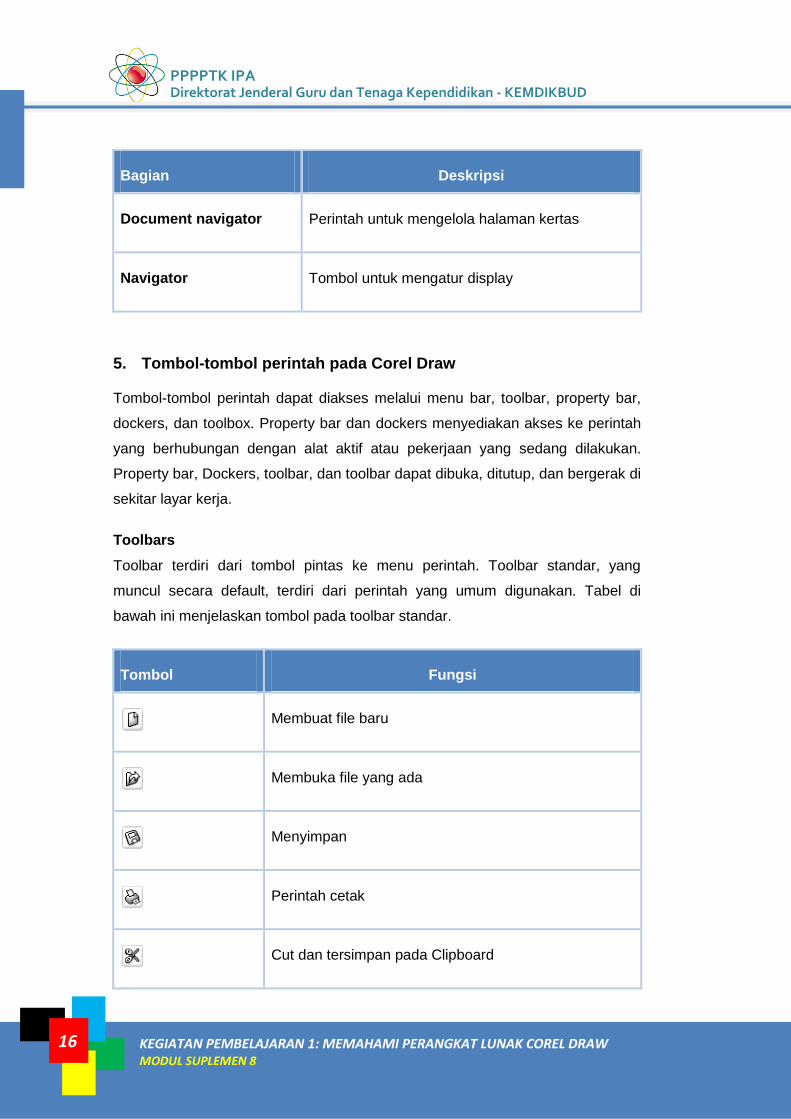
Bagian Deskripsi
Document navigator Perintah untuk mengelola halaman kertas
Navigator Tombol untuk mengatur display
5. Tombol-tombol perintah pada Corel Draw
Tombol-tombol perintah dapat diakses melalui menu bar, toolbar, property bar,
dockers, dan toolbox. Property bar dan dockers menyediakan akses ke perintah
yang berhubungan dengan alat aktif atau pekerjaan yang sedang dilakukan.
Property bar, Dockers, toolbar, dan toolbar dapat dibuka, ditutup, dan bergerak di
sekitar layar kerja.
Toolbars
Toolbar terdiri dari tombol pintas ke menu perintah. Toolbar standar, yang
muncul secara default, terdiri dari perintah yang umum digunakan. Tabel di
bawah ini menjelaskan tombol pada toolbar standar.
Tombol Fungsi
Membuat file baru
Membuka file yang ada
Menyimpan
Perintah cetak
Cut dan tersimpan pada Clipboard
LISTRIK untuk SMP Modul Diklat Pengembangan Keprofesian Berkelanjutan (PKB)
Untuk Guru
KEGIATAN PEMBELAJARAN 1: MEMAHAMI PERANGKAT LUNAK COREL DRAW MODUL SUPLEMEN 8
17
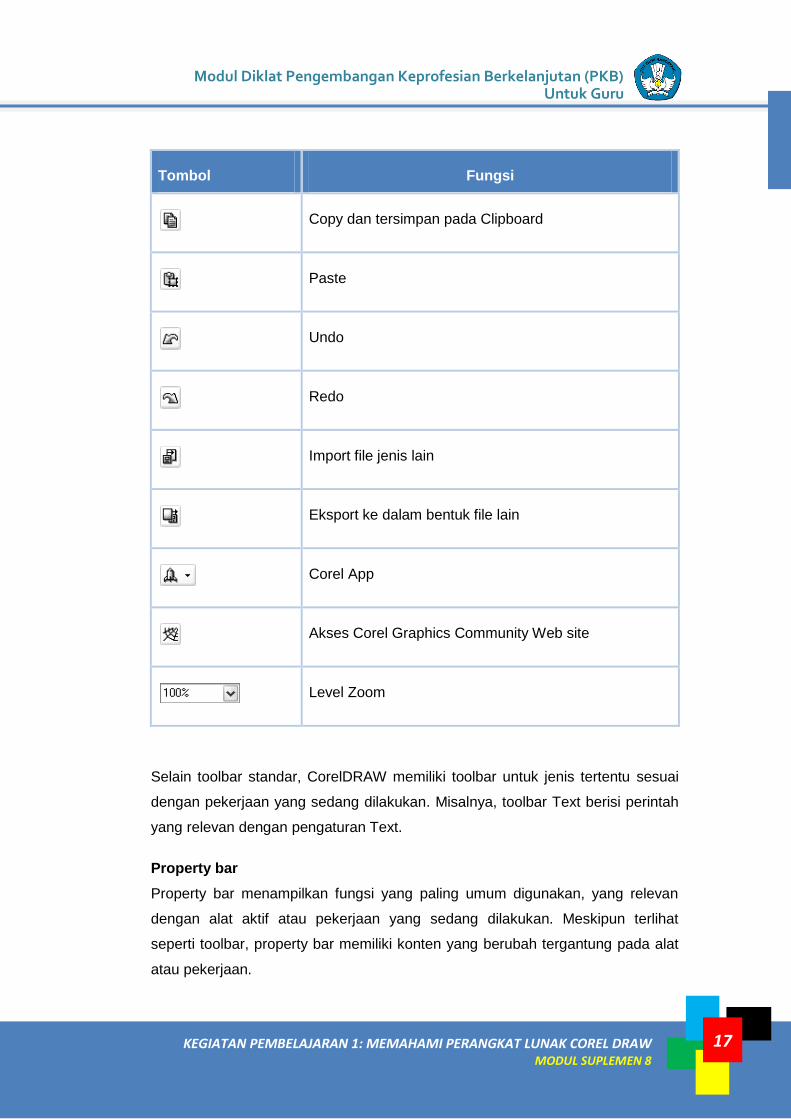
Tombol Fungsi
Copy dan tersimpan pada Clipboard
Paste
Undo
Redo
Import file jenis lain
Eksport ke dalam bentuk file lain
Corel App
Akses Corel Graphics Community Web site
Level Zoom
Selain toolbar standar, CorelDRAW memiliki toolbar untuk jenis tertentu sesuai
dengan pekerjaan yang sedang dilakukan. Misalnya, toolbar Text berisi perintah
yang relevan dengan pengaturan Text.
Property bar
Property bar menampilkan fungsi yang paling umum digunakan, yang relevan
dengan alat aktif atau pekerjaan yang sedang dilakukan. Meskipun terlihat
seperti toolbar, property bar memiliki konten yang berubah tergantung pada alat
atau pekerjaan.
PPPPTK IPA Direktorat Jenderal Guru dan Tenaga Kependidikan - KEMDIKBUD
18 KEGIATAN PEMBELAJARAN 1: MEMAHAMI PERANGKAT LUNAK COREL DRAW MODUL SUPLEMEN 8
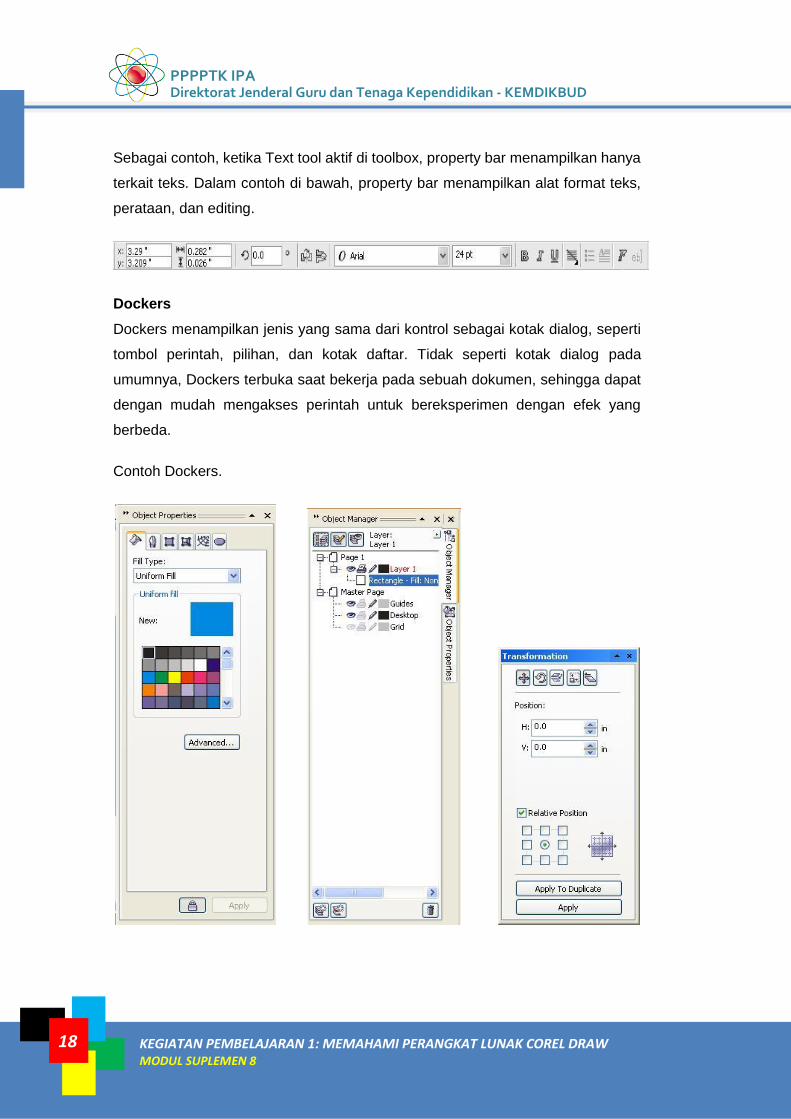
Sebagai contoh, ketika Text tool aktif di toolbox, property bar menampilkan hanya
terkait teks. Dalam contoh di bawah, property bar menampilkan alat format teks,
perataan, dan editing.
Dockers
Dockers menampilkan jenis yang sama dari kontrol sebagai kotak dialog, seperti
tombol perintah, pilihan, dan kotak daftar. Tidak seperti kotak dialog pada
umumnya, Dockers terbuka saat bekerja pada sebuah dokumen, sehingga dapat
dengan mudah mengakses perintah untuk bereksperimen dengan efek yang
berbeda.
Contoh Dockers.
LISTRIK untuk SMP Modul Diklat Pengembangan Keprofesian Berkelanjutan (PKB)
Untuk Guru
KEGIATAN PEMBELAJARAN 1: MEMAHAMI PERANGKAT LUNAK COREL DRAW MODUL SUPLEMEN 8
19
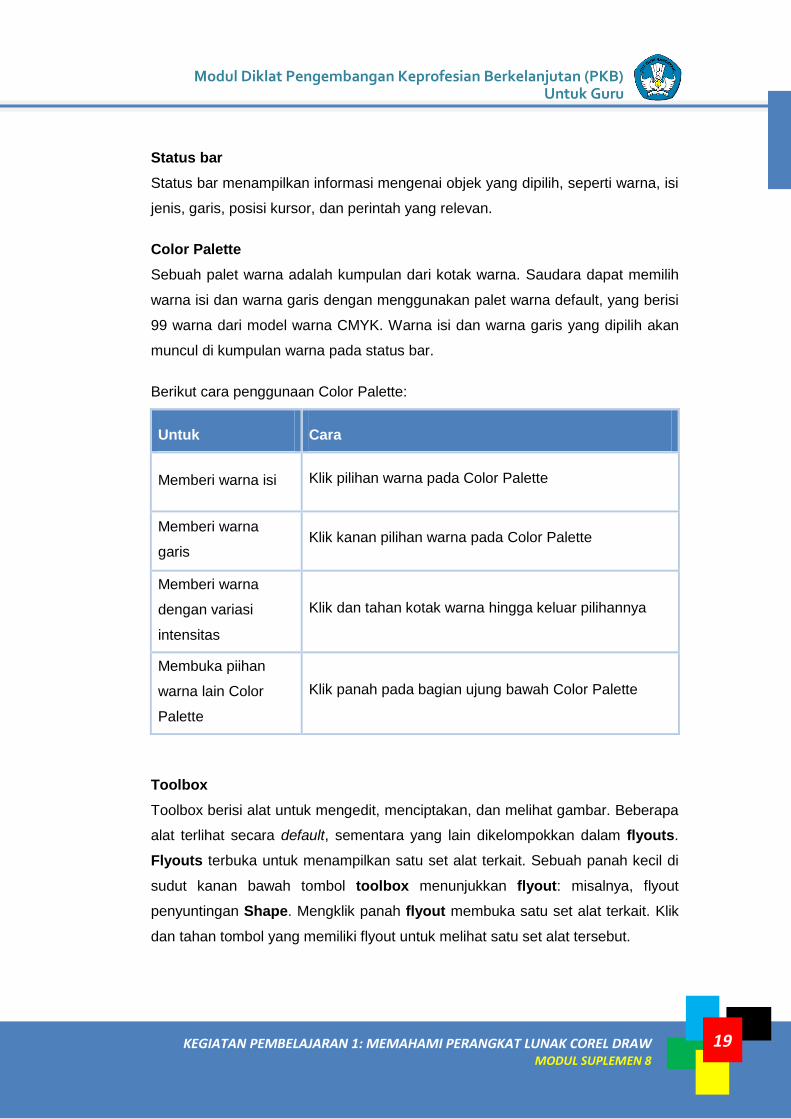
Status bar
Status bar menampilkan informasi mengenai objek yang dipilih, seperti warna, isi
jenis, garis, posisi kursor, dan perintah yang relevan.
Color Palette
Sebuah palet warna adalah kumpulan dari kotak warna. Saudara dapat memilih
warna isi dan warna garis dengan menggunakan palet warna default, yang berisi
99 warna dari model warna CMYK. Warna isi dan warna garis yang dipilih akan
muncul di kumpulan warna pada status bar.
Berikut cara penggunaan Color Palette:
Untuk Cara
Memberi warna isi Klik pilihan warna pada Color Palette
Memberi warna
garis Klik kanan pilihan warna pada Color Palette
Memberi warna
dengan variasi
intensitas
Klik dan tahan kotak warna hingga keluar pilihannya
Membuka piihan
warna lain Color
Palette
Klik panah pada bagian ujung bawah Color Palette
Toolbox
Toolbox berisi alat untuk mengedit, menciptakan, dan melihat gambar. Beberapa
alat terlihat secara default, sementara yang lain dikelompokkan dalam flyouts.
Flyouts terbuka untuk menampilkan satu set alat terkait. Sebuah panah kecil di
sudut kanan bawah tombol toolbox menunjukkan flyout: misalnya, flyout
penyuntingan Shape. Mengklik panah flyout membuka satu set alat terkait. Klik
dan tahan tombol yang memiliki flyout untuk melihat satu set alat tersebut.
PPPPTK IPA Direktorat Jenderal Guru dan Tenaga Kependidikan - KEMDIKBUD
20 KEGIATAN PEMBELAJARAN 1: MEMAHAMI PERANGKAT LUNAK COREL DRAW MODUL SUPLEMEN 8
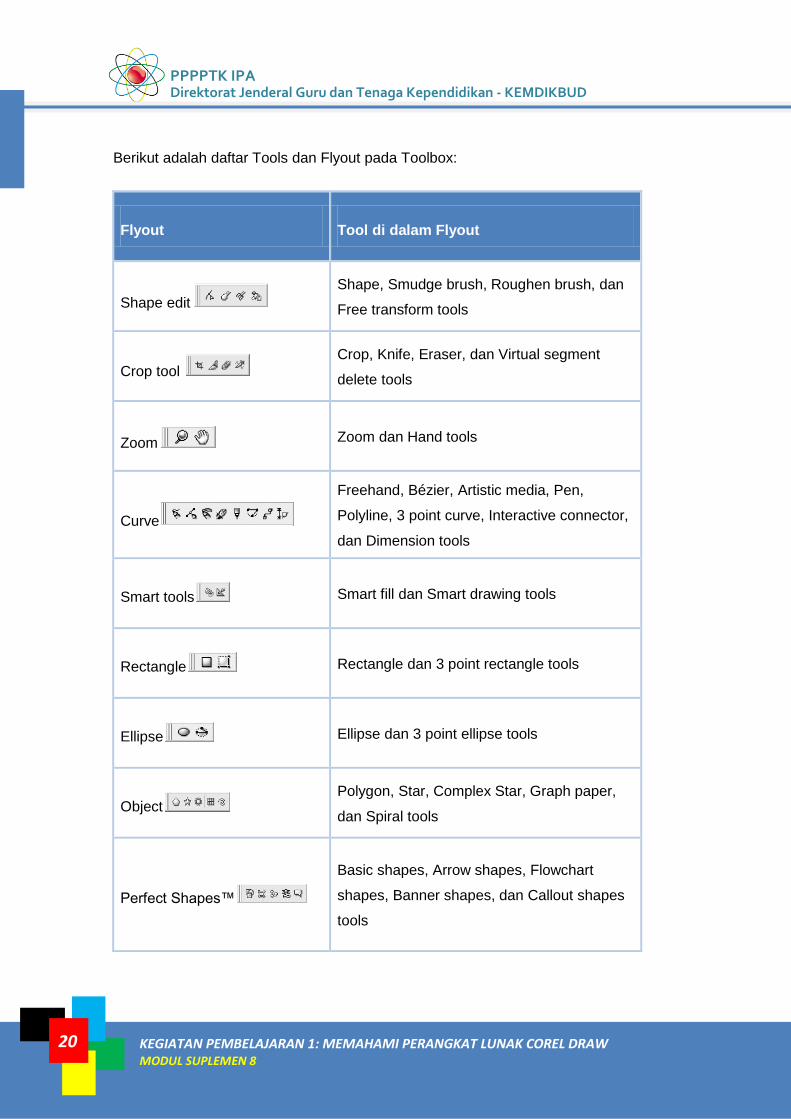
Berikut adalah daftar Tools dan Flyout pada Toolbox:
Flyout Tool di dalam Flyout
Shape edit
Shape, Smudge brush, Roughen brush, dan
Free transform tools
Crop tool Crop, Knife, Eraser, dan Virtual segment
delete tools
Zoom Zoom dan Hand tools
Curve
Freehand, Bézier, Artistic media, Pen,
Polyline, 3 point curve, Interactive connector,
dan Dimension tools
Smart tools Smart fill dan Smart drawing tools
Rectangle Rectangle dan 3 point rectangle tools
Ellipse Ellipse dan 3 point ellipse tools
Object Polygon, Star, Complex Star, Graph paper,
dan Spiral tools
Perfect Shapes™
Basic shapes, Arrow shapes, Flowchart
shapes, Banner shapes, dan Callout shapes
tools
LISTRIK untuk SMP Modul Diklat Pengembangan Keprofesian Berkelanjutan (PKB)
Untuk Guru
KEGIATAN PEMBELAJARAN 1: MEMAHAMI PERANGKAT LUNAK COREL DRAW MODUL SUPLEMEN 8
21
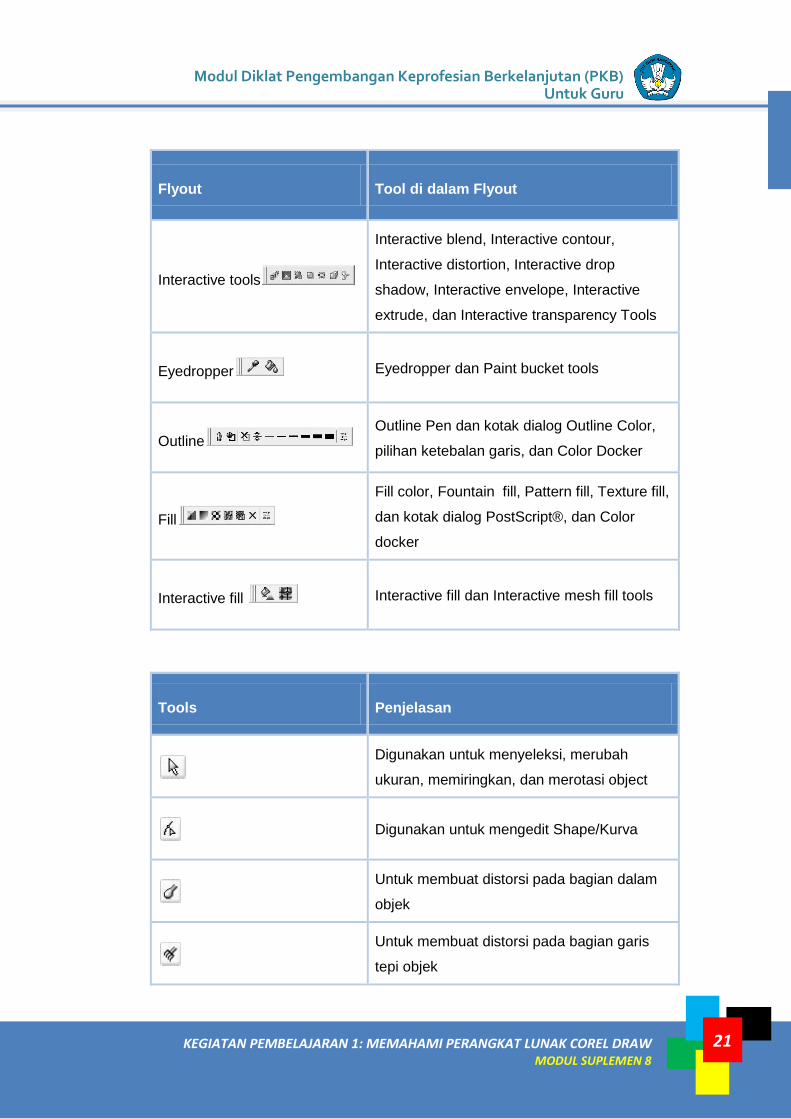
Flyout Tool di dalam Flyout
Interactive tools
Interactive blend, Interactive contour,
Interactive distortion, Interactive drop
shadow, Interactive envelope, Interactive
extrude, dan Interactive transparency Tools
Eyedropper Eyedropper dan Paint bucket tools
Outline Outline Pen dan kotak dialog Outline Color,
pilihan ketebalan garis, dan Color Docker
Fill
Fill color, Fountain fill, Pattern fill, Texture fill,
dan kotak dialog PostScript®, dan Color
docker
Interactive fill Interactive fill dan Interactive mesh fill tools
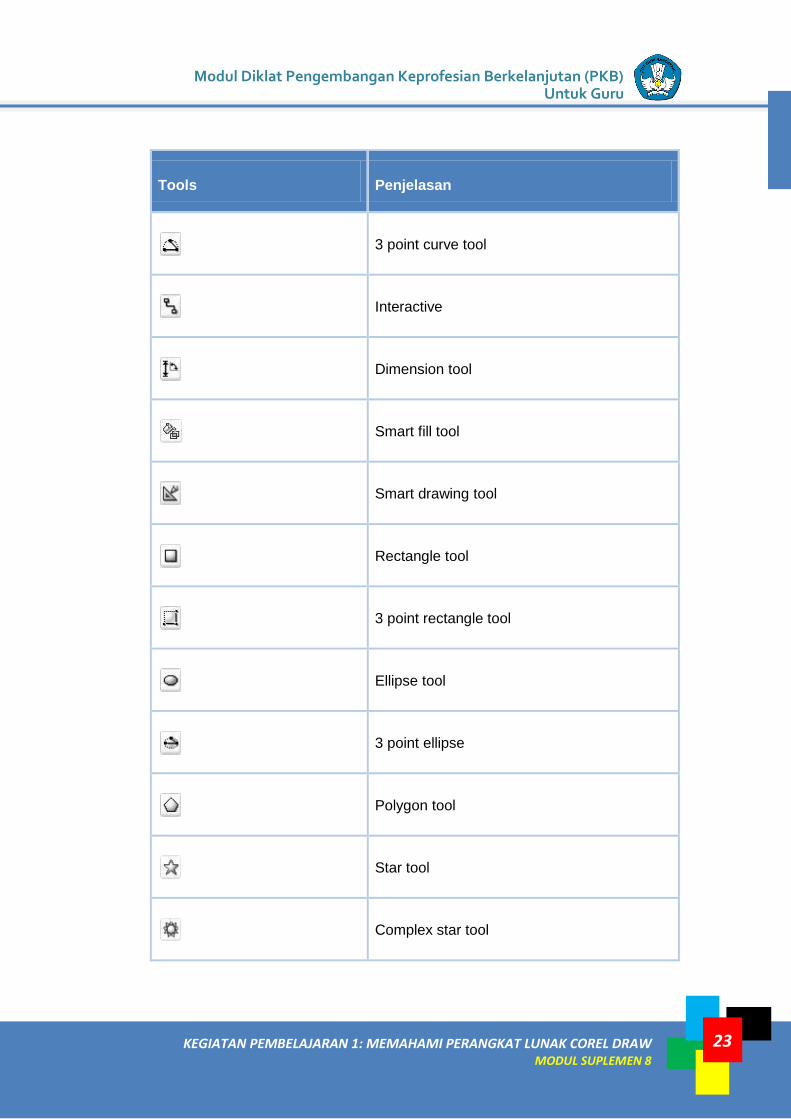
Tools Penjelasan
Digunakan untuk menyeleksi, merubah
ukuran, memiringkan, dan merotasi object
Digunakan untuk mengedit Shape/Kurva
Untuk membuat distorsi pada bagian dalam
objek
Untuk membuat distorsi pada bagian garis
tepi objek
PPPPTK IPA Direktorat Jenderal Guru dan Tenaga Kependidikan - KEMDIKBUD
22 KEGIATAN PEMBELAJARAN 1: MEMAHAMI PERANGKAT LUNAK COREL DRAW MODUL SUPLEMEN 8
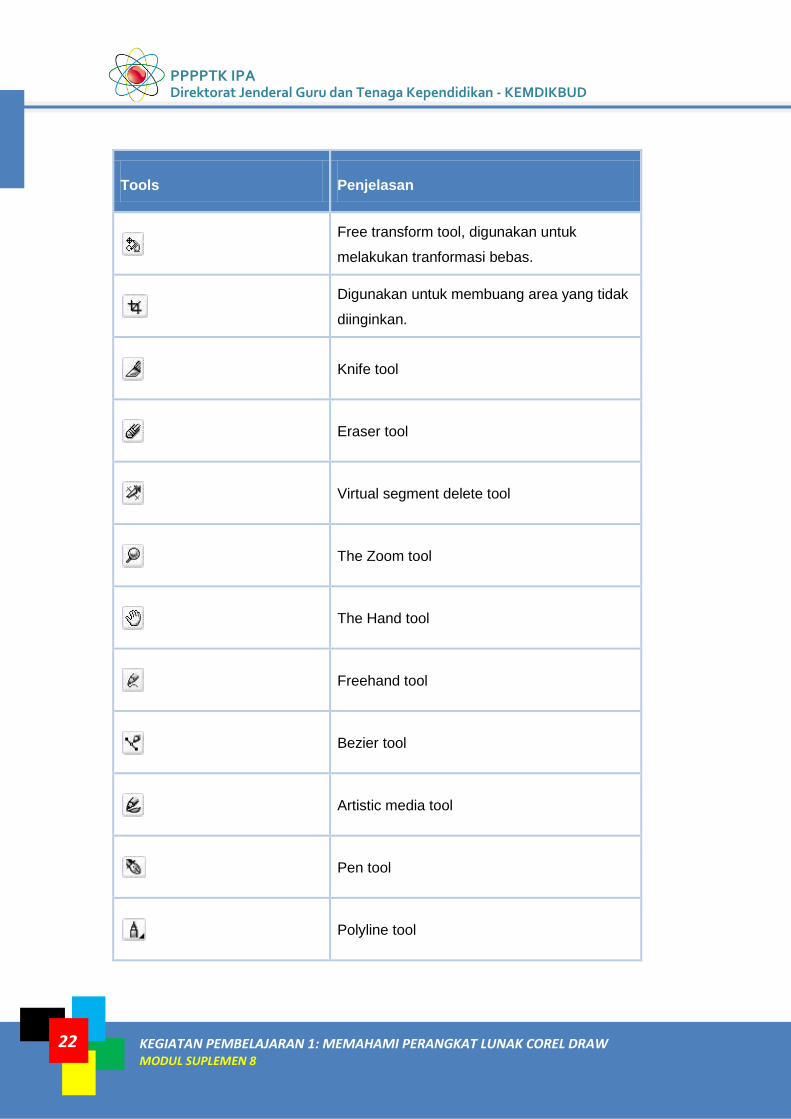
Tools Penjelasan
Free transform tool, digunakan untuk
melakukan tranformasi bebas.
Digunakan untuk membuang area yang tidak
diinginkan.
Knife tool
Eraser tool
Virtual segment delete tool
The Zoom tool
The Hand tool
Freehand tool
Bezier tool
Artistic media tool
Pen tool
Polyline tool
LISTRIK untuk SMP Modul Diklat Pengembangan Keprofesian Berkelanjutan (PKB)
Untuk Guru
KEGIATAN PEMBELAJARAN 1: MEMAHAMI PERANGKAT LUNAK COREL DRAW MODUL SUPLEMEN 8
23
Tools Penjelasan
3 point curve tool
Interactive
Dimension tool
Smart fill tool
Smart drawing tool
Rectangle tool
3 point rectangle tool
Ellipse tool
3 point ellipse
Polygon tool
Star tool
Complex star tool
PPPPTK IPA Direktorat Jenderal Guru dan Tenaga Kependidikan - KEMDIKBUD
24 KEGIATAN PEMBELAJARAN 1: MEMAHAMI PERANGKAT LUNAK COREL DRAW MODUL SUPLEMEN 8
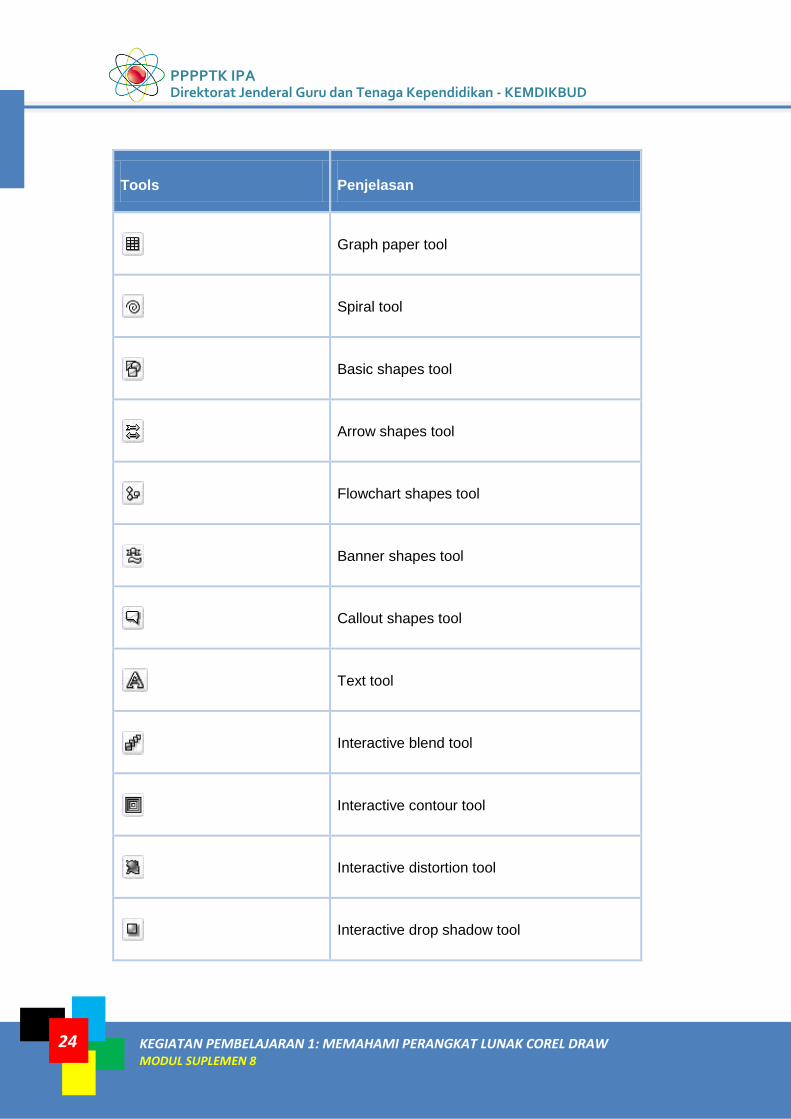
Tools Penjelasan
Graph paper tool
Spiral tool
Basic shapes tool
Arrow shapes tool
Flowchart shapes tool
Banner shapes tool
Callout shapes tool
Text tool
Interactive blend tool
Interactive contour tool
Interactive distortion tool
Interactive drop shadow tool
LISTRIK untuk SMP Modul Diklat Pengembangan Keprofesian Berkelanjutan (PKB)
Untuk Guru
KEGIATAN PEMBELAJARAN 1: MEMAHAMI PERANGKAT LUNAK COREL DRAW MODUL SUPLEMEN 8
25
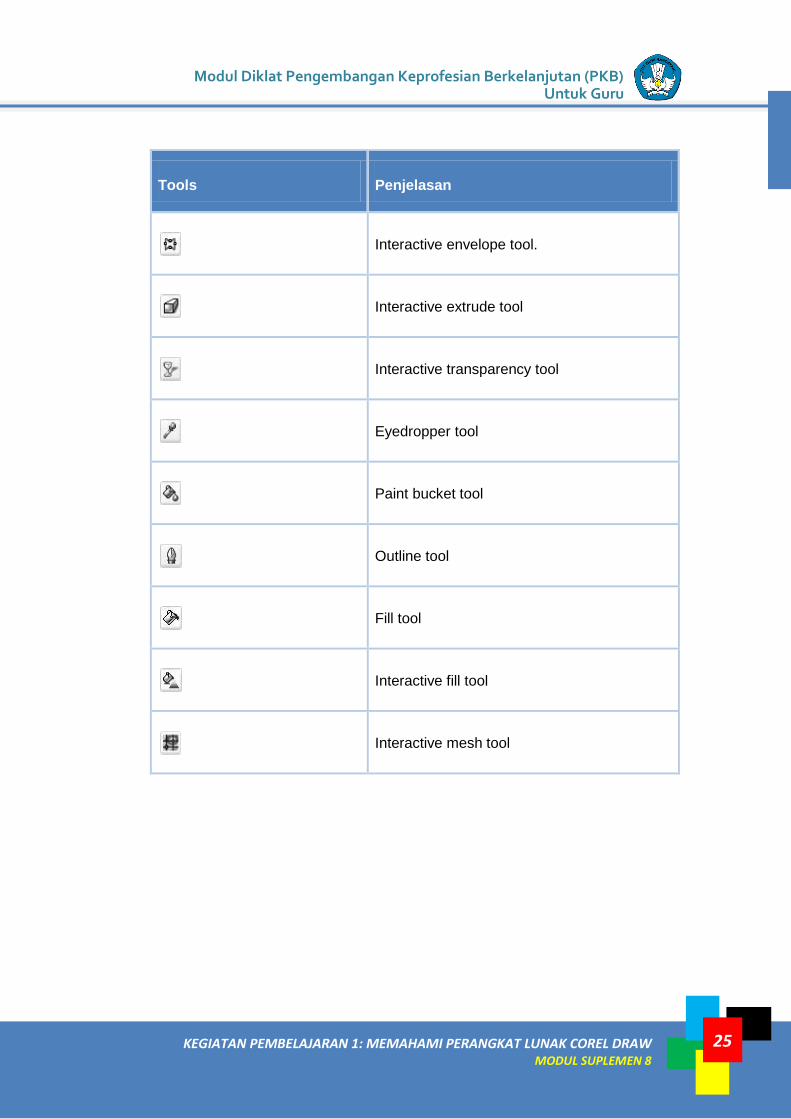
Tools Penjelasan
Interactive envelope tool.
Interactive extrude tool
Interactive transparency tool
Eyedropper tool
Paint bucket tool
Outline tool
Fill tool
Interactive fill tool
Interactive mesh tool
PPPPTK IPA Direktorat Jenderal Guru dan Tenaga Kependidikan - KEMDIKBUD
26 KEGIATAN PEMBELAJARAN 1: MEMAHAMI PERANGKAT LUNAK COREL DRAW MODUL SUPLEMEN 8
Customizing the workspace
You can customize your application by creating a custom workspace to suit your
needs. For example, you can create custom toolbars and color palettes.
Using multiple workspaces
A workspace is a configuration of settings that specifies how the various
command bars, commands, and buttons are arranged when you open the
application. You can always reset the current workspace to the default settings.
To reset the current workspace
Hold down F8 while the application is starting.
Customizing toolbars
You can customize toolbar position and display. For example, you can move or
resize a toolbar, and you can choose to hide or display a toolbar.
Toolbars can be either docked or floating. Docking a toolbar attaches it to the
edge of the application window. Undocking a toolbar pulls it away from the edge
of the application window, so it floats and can be easily moved around.
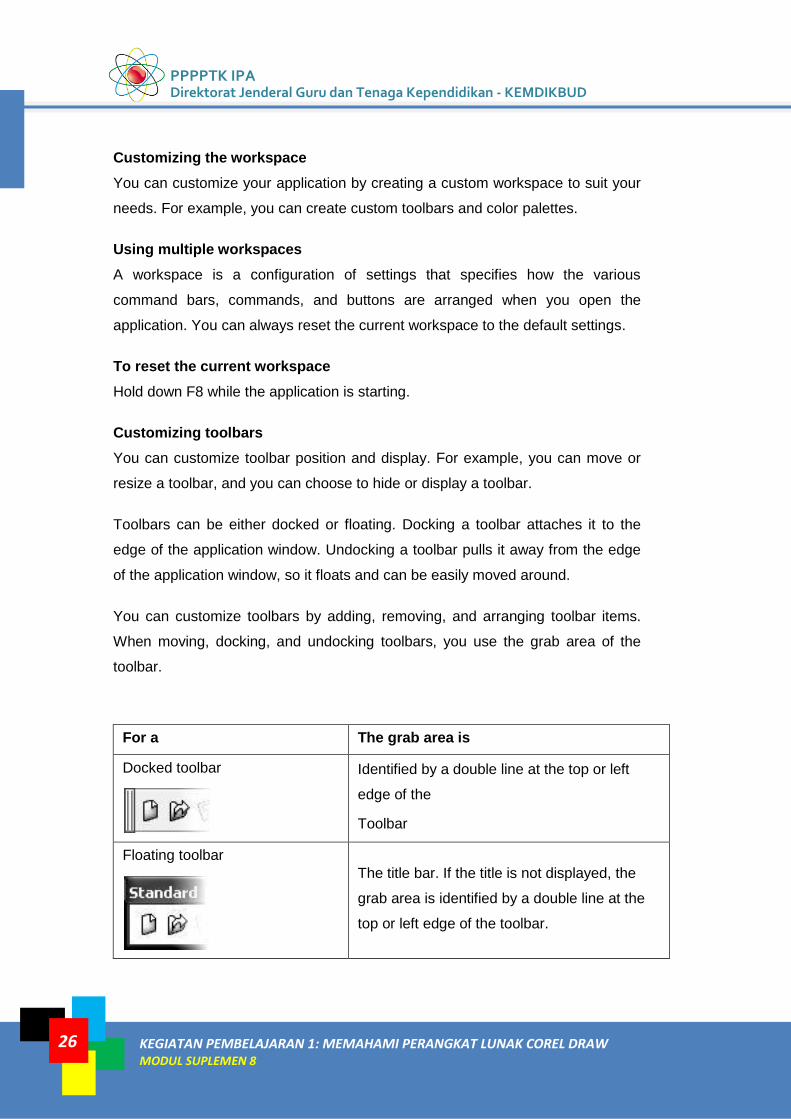
You can customize toolbars by adding, removing, and arranging toolbar items.
When moving, docking, and undocking toolbars, you use the grab area of the
toolbar.
For a The grab area is
Docked toolbar
Identified by a double line at the top or left
edge of the
Toolbar
Floating toolbar
The title bar. If the title is not displayed, the
grab area is identified by a double line at the
top or left edge of the toolbar.
LISTRIK untuk SMP Modul Diklat Pengembangan Keprofesian Berkelanjutan (PKB)
Untuk Guru
KEGIATAN PEMBELAJARAN 1: MEMAHAMI PERANGKAT LUNAK COREL DRAW MODUL SUPLEMEN 8
27
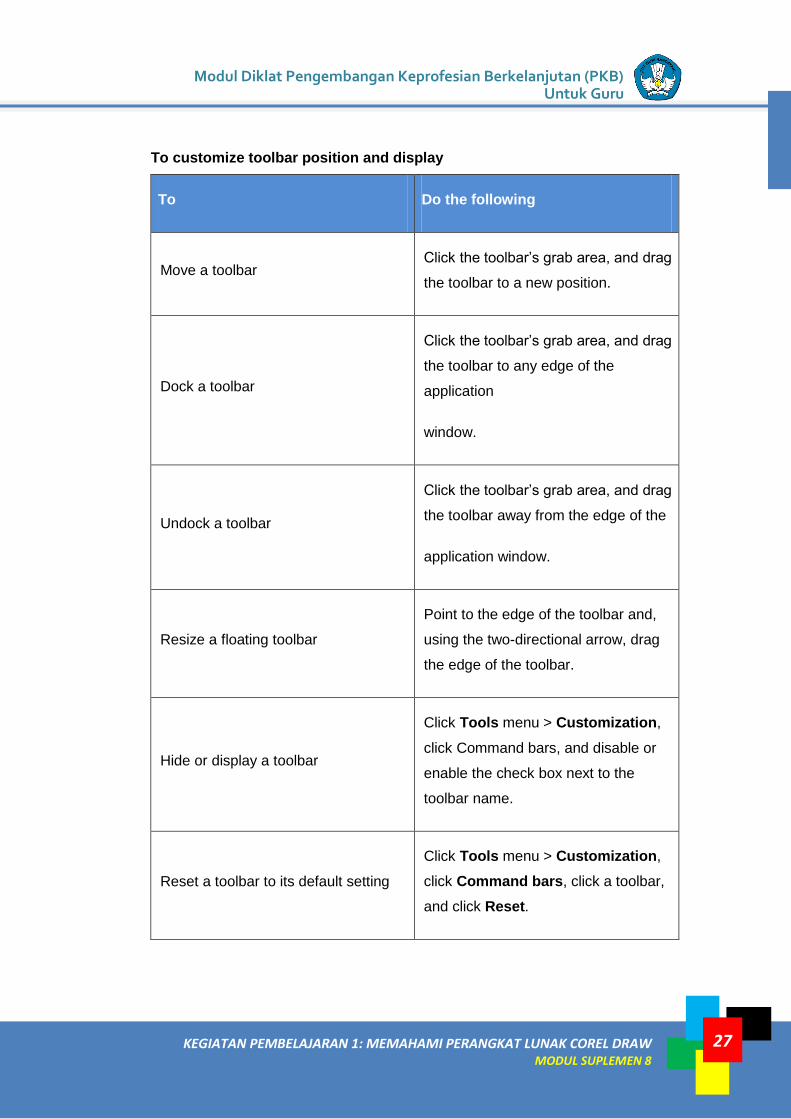
To customize toolbar position and display
To Do the following
Move a toolbar Click the toolbar’s grab area, and drag
the toolbar to a new position.
Dock a toolbar
Click the toolbar’s grab area, and drag
the toolbar to any edge of the
application
window.
Undock a toolbar
Click the toolbar’s grab area, and drag
the toolbar away from the edge of the
application window.
Resize a floating toolbar
Point to the edge of the toolbar and,
using the two-directional arrow, drag
the edge of the toolbar.
Hide or display a toolbar
Click Tools menu > Customization,
click Command bars, and disable or
enable the check box next to the
toolbar name.
Reset a toolbar to its default setting
Click Tools menu > Customization,
click Command bars, click a toolbar,
and click Reset.
PPPPTK IPA Direktorat Jenderal Guru dan Tenaga Kependidikan - KEMDIKBUD
28 KEGIATAN PEMBELAJARAN 1: MEMAHAMI PERANGKAT LUNAK COREL DRAW MODUL SUPLEMEN 8
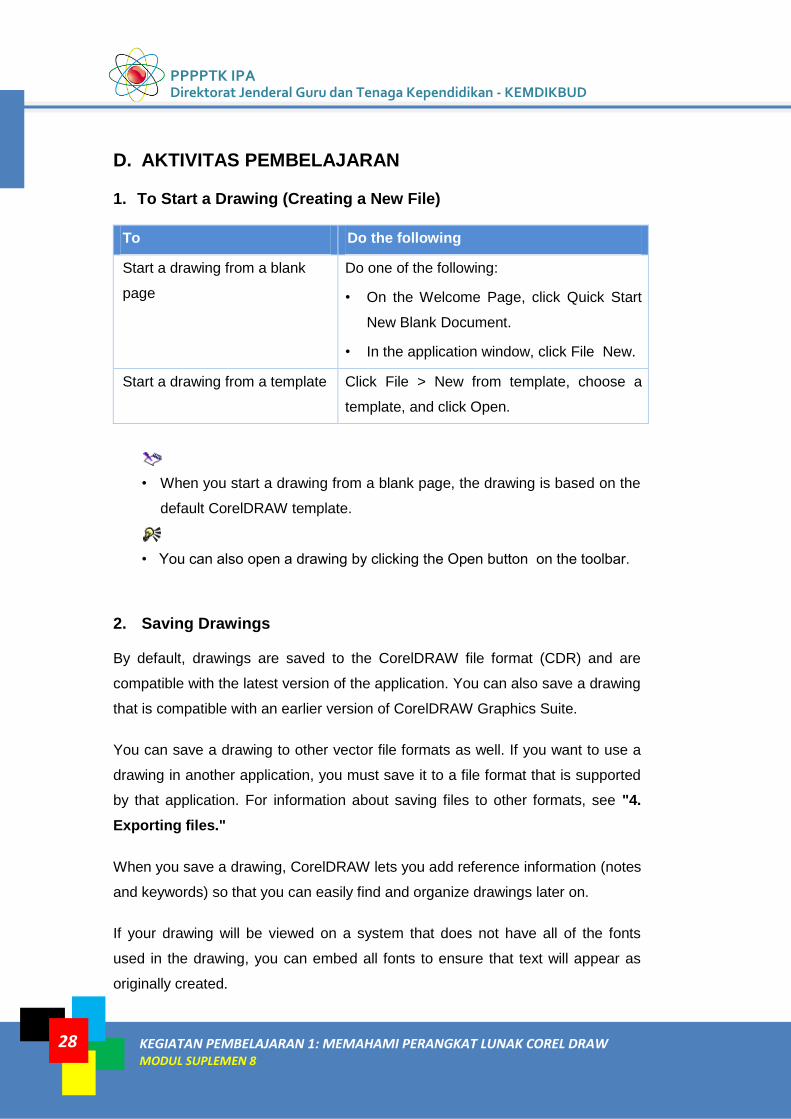
D. AKTIVITAS PEMBELAJARAN
1. To Start a Drawing (Creating a New File)
To Do the following
Start a drawing from a blank
page
Do one of the following:
• On the Welcome Page, click Quick Start
New Blank Document.
• In the application window, click File New.
Start a drawing from a template Click File > New from template, choose a
template, and click Open.
• When you start a drawing from a blank page, the drawing is based on the
default CorelDRAW template.
• You can also open a drawing by clicking the Open button on the toolbar.
2. Saving Drawings
By default, drawings are saved to the CorelDRAW file format (CDR) and are
compatible with the latest version of the application. You can also save a drawing
that is compatible with an earlier version of CorelDRAW Graphics Suite.
You can save a drawing to other vector file formats as well. If you want to use a
drawing in another application, you must save it to a file format that is supported
by that application. For information about saving files to other formats, see "4.
Exporting files."
When you save a drawing, CorelDRAW lets you add reference information (notes
and keywords) so that you can easily find and organize drawings later on.
If your drawing will be viewed on a system that does not have all of the fonts
used in the drawing, you can embed all fonts to ensure that text will appear as
originally created.
LISTRIK untuk SMP Modul Diklat Pengembangan Keprofesian Berkelanjutan (PKB)
Untuk Guru
KEGIATAN PEMBELAJARAN 1: MEMAHAMI PERANGKAT LUNAK COREL DRAW MODUL SUPLEMEN 8
29
You can also save selected objects in a drawing. For large drawings, saving only
the selected objects reduces the file size, which can decrease the time it takes to
load the drawing.
You can use advanced save options to control how bitmaps, textures, and vector
effects, such as blends and extrusions, are saved with a drawing.
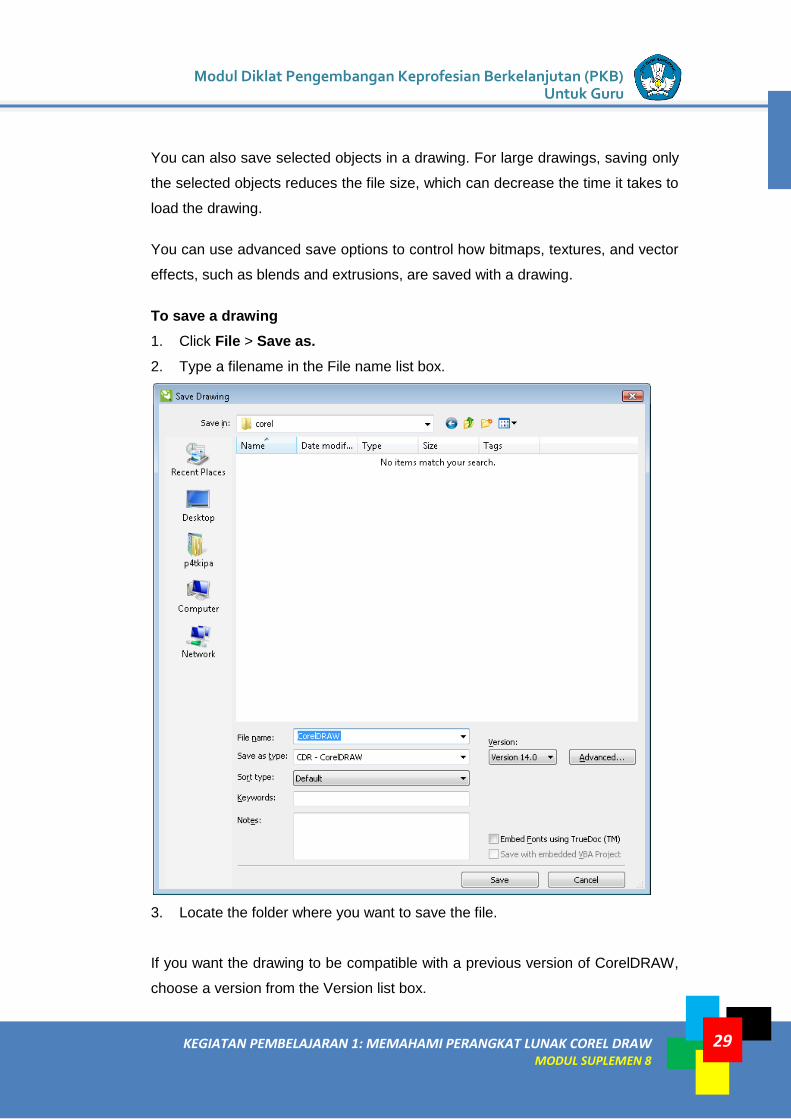
To save a drawing
1. Click File > Save as.
2. Type a filename in the File name list box.
3. Locate the folder where you want to save the file.
If you want the drawing to be compatible with a previous version of CorelDRAW,
choose a version from the Version list box.
PPPPTK IPA Direktorat Jenderal Guru dan Tenaga Kependidikan - KEMDIKBUD
30 KEGIATAN PEMBELAJARAN 1: MEMAHAMI PERANGKAT LUNAK COREL DRAW MODUL SUPLEMEN 8
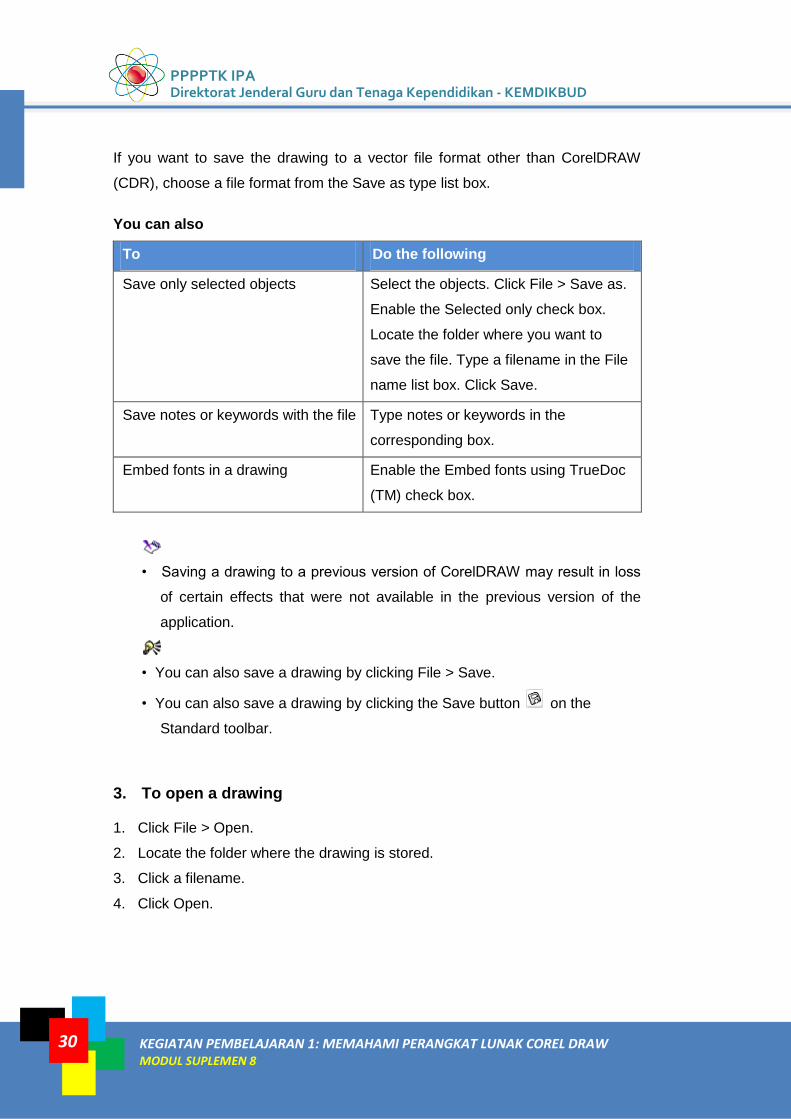
If you want to save the drawing to a vector file format other than CorelDRAW
(CDR), choose a file format from the Save as type list box.
You can also
To Do the following
Save only selected objects Select the objects. Click File > Save as.
Enable the Selected only check box.
Locate the folder where you want to
save the file. Type a filename in the File
name list box. Click Save.
Save notes or keywords with the file Type notes or keywords in the
corresponding box.
Embed fonts in a drawing Enable the Embed fonts using TrueDoc
(TM) check box.
• Saving a drawing to a previous version of CorelDRAW may result in loss
of certain effects that were not available in the previous version of the
application.
• You can also save a drawing by clicking File > Save.
• You can also save a drawing by clicking the Save button on the
Standard toolbar.
3. To open a drawing
1. Click File > Open.
2. Locate the folder where the drawing is stored.
3. Click a filename.
4. Click Open.
LISTRIK untuk SMP Modul Diklat Pengembangan Keprofesian Berkelanjutan (PKB)
Untuk Guru
KEGIATAN PEMBELAJARAN 1: MEMAHAMI PERANGKAT LUNAK COREL DRAW MODUL SUPLEMEN 8
31
4. Exporting files
You can use the File > Export command to export files to a variety of bitmap and
vector file formats that can be used in other applications. For example, you can
export a file to the Adobe Illustrator (AI) or GIF format. You can also export a file
so that it is optimized for use with a suite of office productivity applications, such
as Microsoft Word or Corel WordPerfect Office.
When you are exporting a file, the original file is left open in the drawing window
in its existing format.
You can use the File > Save as command to save files to various vector formats.
After you save a file to a different format, the saved file is displayed immediately
in the drawing window. It is recommended that you first save the file as a
CorelDRAW (CDR) file because some file formats do not support all of the
features found in a CorelDRAW file.
To export a file
1. Click File > Export.
2. Choose the folder where you want to save the file.
3. Choose a file format from the Save as type list box.
4. Type a file name in the File name list box.
5. Enable any of the following active check boxes:
• Export this page only — exports only the current page in a multipage file
• Selected only — saves only the objects selected in the active drawing
• Do not show filter dialog — suppresses dialog boxes that offer more
advanced exporting options
These options are not available for all file formats.
6. Click Export.
If a dialog box for the export format opens, specify the options you want.
5. Importing files
You can import files created in other applications. For example, you can import a
Portable Document Format (PDF), JPEG, BMP, GIF, TIFF or Adobe Illustrator
(AI) file.You can import a file and place it in the active application window as an
PPPPTK IPA Direktorat Jenderal Guru dan Tenaga Kependidikan - KEMDIKBUD
32 KEGIATAN PEMBELAJARAN 1: MEMAHAMI PERANGKAT LUNAK COREL DRAW MODUL SUPLEMEN 8
object. You can also resize and center a file as you import it. The imported file
becomes part of the active file. While importing a bitmap, you can resample it to
reduce the file size, or crop it to eliminate unused areas of the photo. You can
also crop a bitmap to select only the exact area and size of the image you want to
import.
To import a file into an active drawing
1. Click File > Import.
2. Choose the folder where the file is stored.
If necessary, you can search for an image by using the search box. You can
search for such things as file name, title, subject, author, keyword, comment,
bitmap names, object names, and so on.
3. Choose a file format from the list box next to the File name box (Windows
Vista) or the Files of type list box (Windows XP).
If you do know the file’s format, choose All file formats.
4. Click the file name.
5. Click Import, and do one of the following:
• Click the drawing page to maintain original file and position top-left corner
where you click.
• Click and drag on the drawing page to resize the file. The import cursor
displays the dimensions of the resized file as you drag on the drawing
page.
• Press Enter to center the file on the drawing page.
Active snapping options are applied to the imported file.
6. Supported file formats
A file format defines how an application stores information in a file. If you want to
use a file created in a different application than the one you are currently using,
you must import that file. Conversely, if you create a file in one application and
want to use it in another application, you must export the file to a different file
format.

LISTRIK untuk SMP Modul Diklat Pengembangan Keprofesian Berkelanjutan (PKB)
Untuk Guru
KEGIATAN PEMBELAJARAN 1: MEMAHAMI PERANGKAT LUNAK COREL DRAW MODUL SUPLEMEN 8
33
When you name a file, an application automatically appends a filename
extension, usually three characters in length (for example, .cdr, .bmp, .tif, and
.eps). This filename extension helps you and the computer differentiate between
files of different formats.
The following list includes all file formats used in this application. Note that not all
file format filters are installed by default. If you cannot export or import a file from
the list, you need to update your installation of CorelDRAW Graphics Suite X4.
• Adobe Illustrator (AI)
• Adobe Type 1 Font (PFB)
• Windows Bitmap (BMP)
• OS/2 Bitmap (BMP)
• Computer Graphics Metafile (CGM)
• CorelDRAW (CDR)
• Corel Presentation Exchange (CMX)
• Corel PHOTO-PAINT (CPT)
• Corel Symbol Library (CSL)
• Cursor Resource (CUR)
• Microsoft Word files (DOC, DOCX, or RTF)
• Microsoft Publisher (PUB)
• Corel DESIGNER (DSF or DES)
• AutoCAD Drawing Interchange Format (DXF) and AutoCAD Drawing
Database (DWG)
• Encapsulated PostScript (EPS)
• PostScript (PS or PRN)
• GIF
• HTML
• JPEG (JPG)
• JPEG 2000 (JP2)
• Kodak Photo CD Image (PCD)
• PICT (PCT)
• Adobe Portable Document Format (PDF)
• HPGL Plotter File (PLT)
PPPPTK IPA Direktorat Jenderal Guru dan Tenaga Kependidikan - KEMDIKBUD
34 KEGIATAN PEMBELAJARAN 1: MEMAHAMI PERANGKAT LUNAK COREL DRAW MODUL SUPLEMEN 8
• Portable Network Graphics (PNG)
• Adobe Photoshop (PSD)
• Corel Painter (RIF)
• Scalable Vector Graphics (SVG)
• Macromedia Flash (SWF)
• TARGA Bitmap (TGA)
• TIFF Bitmap (TIF)
• Corel Paint Shop Pro (PSP)
• TrueType Font (TTF)
• WordPerfect Document (WPD)
• WordPerfect Graphic (WPG)
• Raw camera file formats
• Wavelet Compressed Bitmap (WI)
• Windows Metafile Format (WMF)
E. LATIHAN
1. Silakan Anda buka aplikasi Corel Draw, kemudian simpan berkasnya dengan
nama Latihan 1, kemudian tutup berkas tersebut tanpa menutup aplikasi
Corel Draw
2. Buka kembali berkas Latihan 1 tadi kemudian simpan dengan nama lain
menjadi Latihan 1a dan Latihan 1b hingga nantinya akan terdapat tiga
berkas Corel Draw.
3. Tutup aplikasi Corel Draw.
F. RANGKUMAN
Corel Draw menjadi pilihan yang penting untuk dikuasai Guru IPA sebagai media
yang dapat membantu pembelajaran IPA. Sebelum mengembangkan
kemampuan operasional Corel Draw ke tahap lebih lanjut, Guru perlu
membiasakan diri dengan operasi dasarnya dan mengenal bagian-bagian utama
untuk bekerja dengan menggunakan Corel Draw seperti: membuka dan menutup
LISTRIK untuk SMP Modul Diklat Pengembangan Keprofesian Berkelanjutan (PKB)
Untuk Guru
KEGIATAN PEMBELAJARAN 1: MEMAHAMI PERANGKAT LUNAK COREL DRAW MODUL SUPLEMEN 8
35
Corel Draw dengan cara yang umum yang terdapat di semua komputer,
mengenal dengan baik antarmuka Corel Draw, mengetahui letak dan fungsi
tombol perintah-perintah utama pada Toolbar, Toolbox, Property Bar dan Docker
dan mengelola berkas melalui Menu File.
G. UMPAN BALIK DAN TINDAK LANJUT
Latihan dasar yang diberikan dapat digunakan untuk mengetahui kemampuan
dasar pada Kegiatan Pembelajaran ini. Jika dapat dilakukan sesuai dengan
instruksi, Saudara dapat melanjutkan pada Kegiatan Pembelajaran selanjutnya.
Jika belum sesuai dengan instruksi silakan ulangi Kegiatan Pembelajaran ini.

PPPPTK IPA Direktorat Jenderal Guru dan Tenaga Kependidikan - KEMDIKBUD
36 KEGIATAN PEMBELAJARAN 1: MEMAHAMI PERANGKAT LUNAK COREL DRAW MODUL SUPLEMEN 8

KEGIATAN PEMBELAJARAN 1: MEMAHAMI PERANGKAT LUNAK COREL DRAW MODUL SUPLEMEN 8
37
Setelah Saudara memahami perangkat lunak Corel Draw, pada kegiatan ini
Saudara akan mempelajari lebih lanjut bagaimana cara kerja Corel Draw
sehingga nantinya Saudara dapat membuat gambar-gambar yang dapat
Saudara gunakan dalam pembelajaran di kelas.
A. TUJUAN
Setelah belajar dengan modul ini diharapkan Saudara dapat:
1. Menggambar bentuk baru dari objek dasar
2. Menggambar dengan menggunakan kurva
3. Membuat teks pada Corel Draw
4. Menggambar objek pada Corel Draw dan digunakan pada aplikasi lain
B. INDIKATOR PENCAPAIAN KOMPETENSI
Indikator hasil belajar yang diharapkan dicapai melalui modul ini adalah Saudara
mampu:
1. Melakukan menggambar bentuk baru dari objek dasar
2. Melakukan menggambar dengan menggunakan kurva
3. Melakukan membuat teks pada Corel Draw
4. Melakukan menggambar objek pada Corel Draw dan digunakan pada
aplikasi lain
KEGIATAN PEMBELAJARAN 2
BEKERJA DENGAN COREL DRAW

PPPPTK IPA Direktorat Jenderal Guru dan Tenaga Kependidikan - KEMDIKBUD
38 KEGIATAN PEMBELAJARAN 2: BEKERJA DENGAN COREL DRAW MODUL SUPLEMEN 8
C. URAIAN MATERI
1. DRAWING SHAPES
a) Drawing rectangles and squares
CorelDRAW lets you draw rectangles and squares. You can draw a
rectangle or square by dragging diagonally with the Rectangle tool.
To draw a rectangle or square
To Do the following
Draw a rectangle In the toolbox, click the Rectangle tool
. Drag in the drawing window until
the rectangle is the size you want.
Draw a square In the toolbox, click the Rectangle tool
. Hold down Ctrl, and drag in the
drawing window until the square is the
size you want.
To resize a rectangle or square
1. Click a rectangle or square.
2. Type values in the Object(s) size or in the Scale factor areas on the
property bar. To keep the proportion of size, click the
Modul Diklat Pengembangan Keprofesian Berkelanjutan (PKB) Untuk Guru
KEGIATAN PEMBELAJARAN 1: MEMAHAMI PERANGKAT LUNAK COREL DRAW MODUL SUPLEMEN 8
39
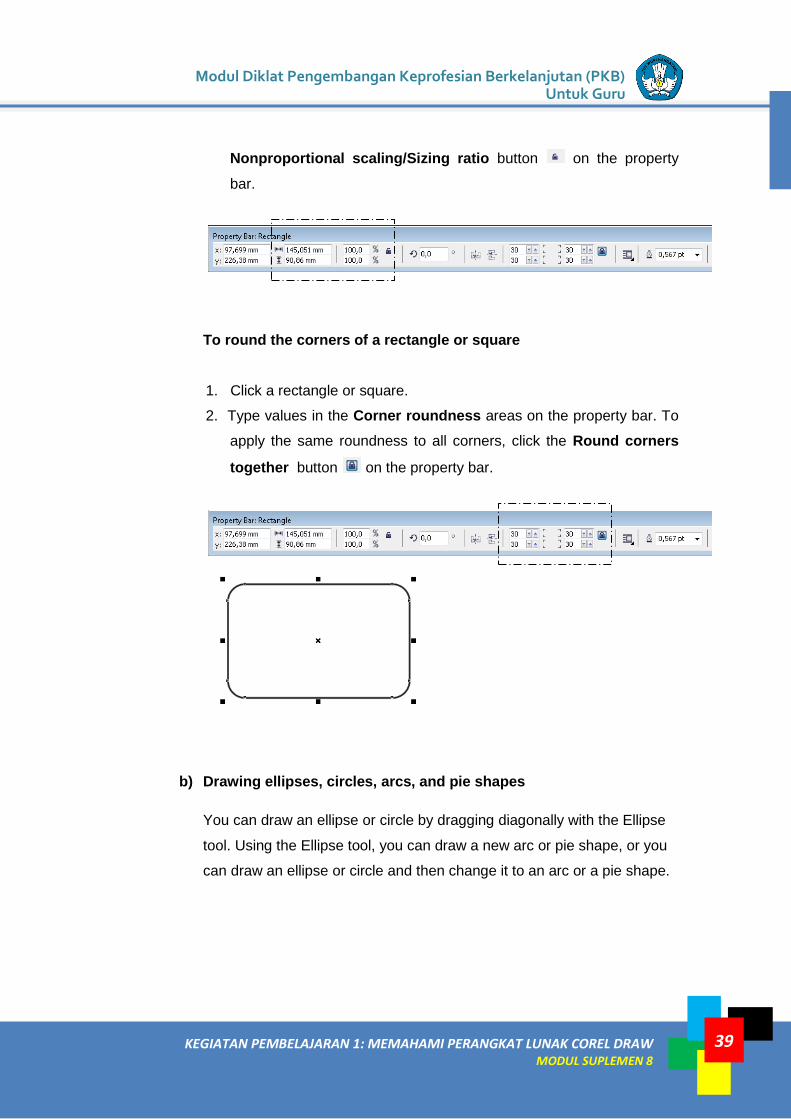
Nonproportional scaling/Sizing ratio button on the property
bar.
To round the corners of a rectangle or square
1. Click a rectangle or square.
2. Type values in the Corner roundness areas on the property bar. To
apply the same roundness to all corners, click the Round corners
together button on the property bar.
b) Drawing ellipses, circles, arcs, and pie shapes
You can draw an ellipse or circle by dragging diagonally with the Ellipse
tool. Using the Ellipse tool, you can draw a new arc or pie shape, or you
can draw an ellipse or circle and then change it to an arc or a pie shape.
PPPPTK IPA Direktorat Jenderal Guru dan Tenaga Kependidikan - KEMDIKBUD
40 KEGIATAN PEMBELAJARAN 2: BEKERJA DENGAN COREL DRAW MODUL SUPLEMEN 8
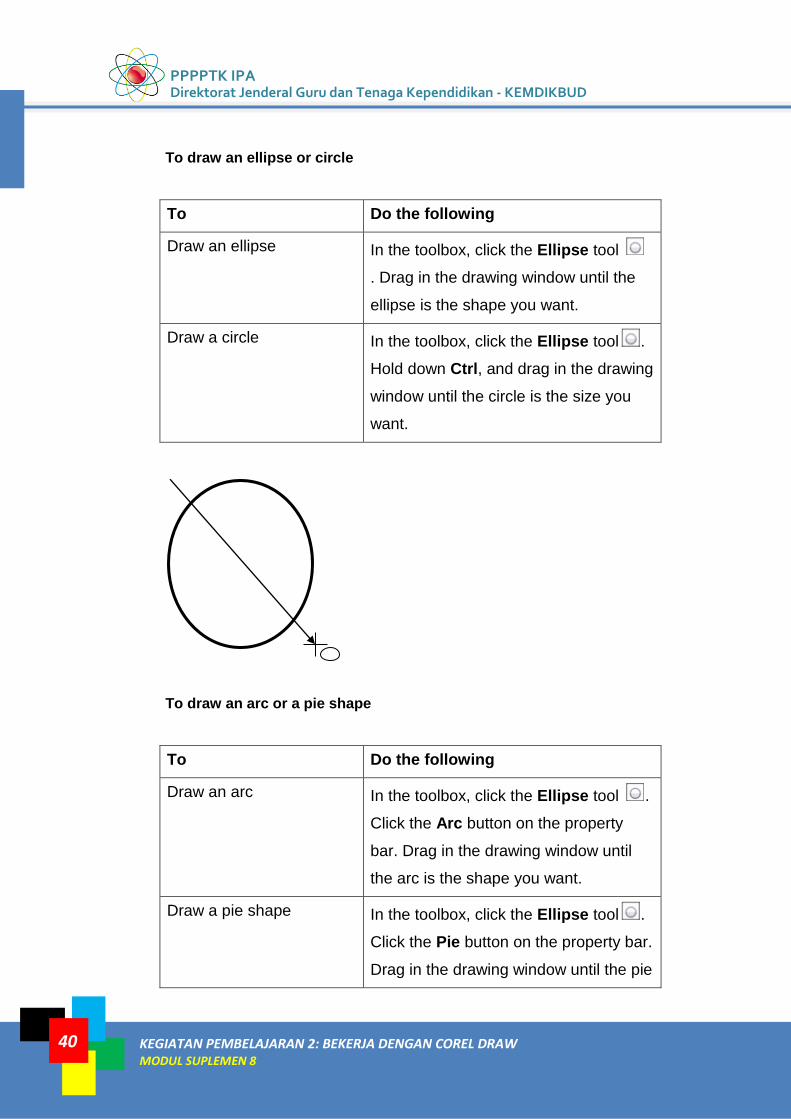
To draw an ellipse or circle
To Do the following
Draw an ellipse
In the toolbox, click the Ellipse tool
. Drag in the drawing window until the
ellipse is the shape you want.
Draw a circle In the toolbox, click the Ellipse tool .
Hold down Ctrl, and drag in the drawing
window until the circle is the size you
want.
To draw an arc or a pie shape
To Do the following
Draw an arc In the toolbox, click the Ellipse tool .
Click the Arc button on the property
bar. Drag in the drawing window until
the arc is the shape you want.
Draw a pie shape In the toolbox, click the Ellipse tool .
Click the Pie button on the property bar.
Drag in the drawing window until the pie
Modul Diklat Pengembangan Keprofesian Berkelanjutan (PKB) Untuk Guru
KEGIATAN PEMBELAJARAN 1: MEMAHAMI PERANGKAT LUNAK COREL DRAW MODUL SUPLEMEN 8
41
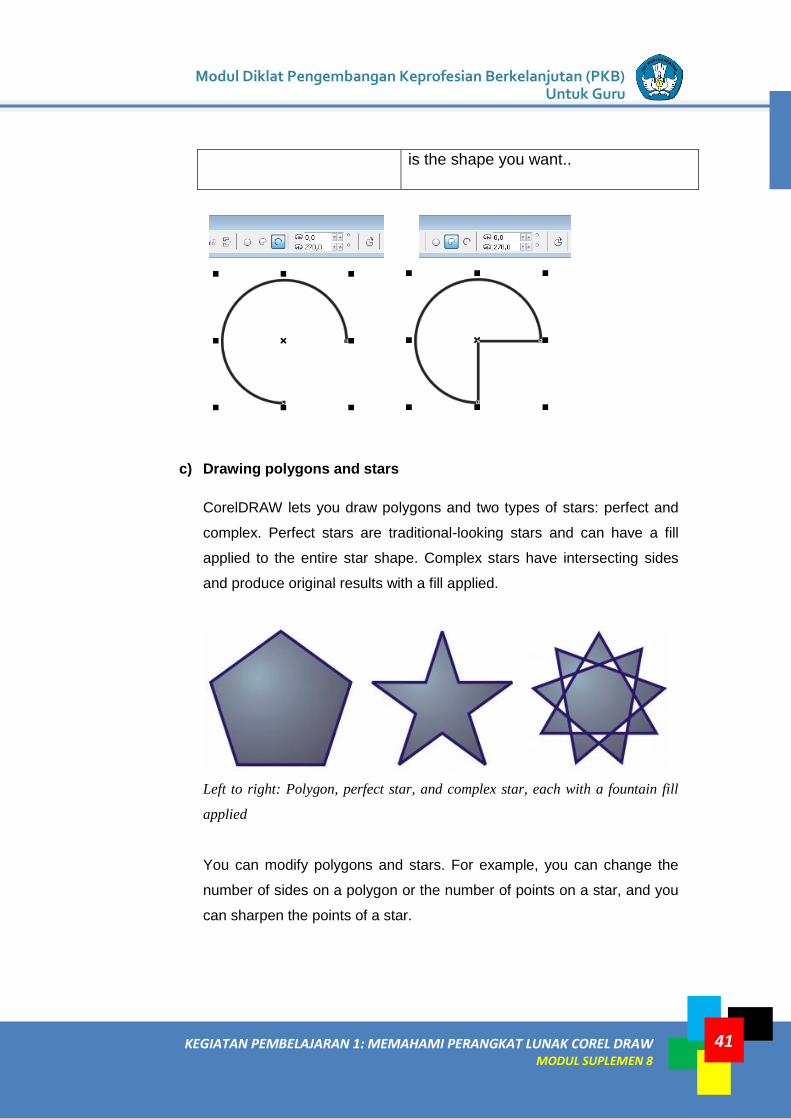
is the shape you want..
c) Drawing polygons and stars
CorelDRAW lets you draw polygons and two types of stars: perfect and
complex. Perfect stars are traditional-looking stars and can have a fill
applied to the entire star shape. Complex stars have intersecting sides
and produce original results with a fill applied.
Left to right: Polygon, perfect star, and complex star, each with a fountain fill
applied
You can modify polygons and stars. For example, you can change the
number of sides on a polygon or the number of points on a star, and you
can sharpen the points of a star.
PPPPTK IPA Direktorat Jenderal Guru dan Tenaga Kependidikan - KEMDIKBUD
42 KEGIATAN PEMBELAJARAN 2: BEKERJA DENGAN COREL DRAW MODUL SUPLEMEN 8
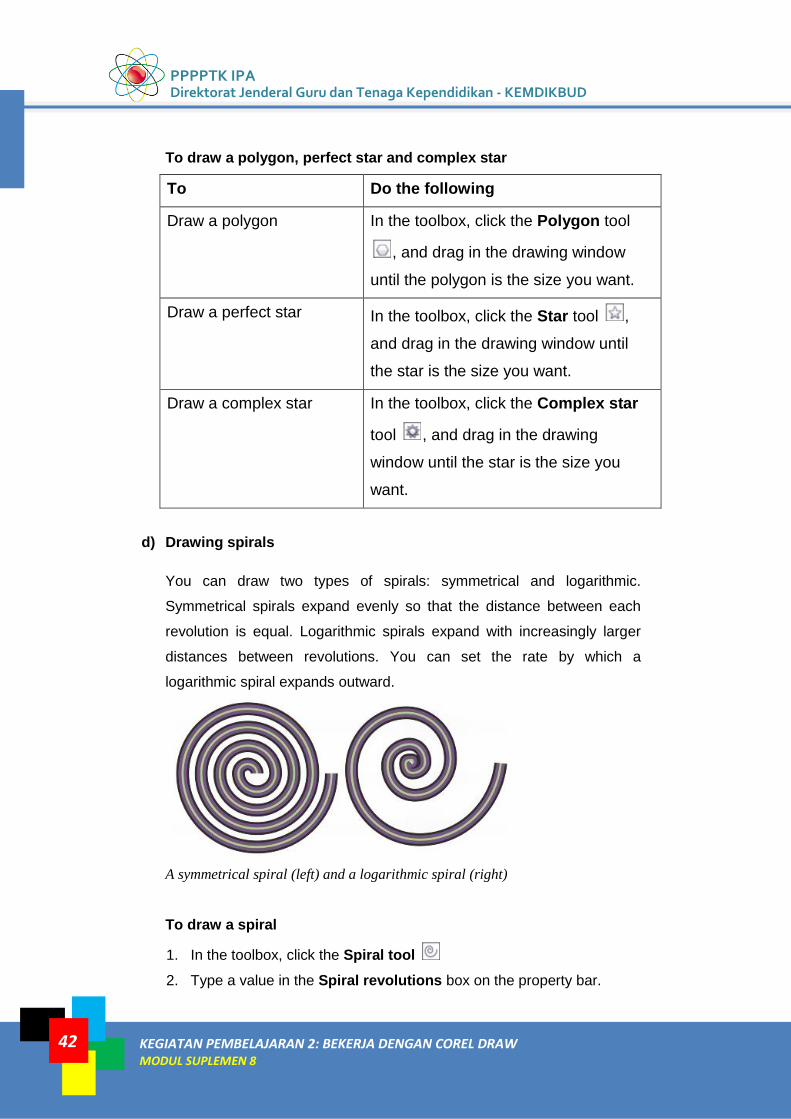
To draw a polygon, perfect star and complex star
To Do the following
Draw a polygon In the toolbox, click the Polygon tool
, and drag in the drawing window
until the polygon is the size you want.
Draw a perfect star In the toolbox, click the Star tool ,
and drag in the drawing window until
the star is the size you want.
Draw a complex star In the toolbox, click the Complex star
tool , and drag in the drawing
window until the star is the size you
want.
d) Drawing spirals
You can draw two types of spirals: symmetrical and logarithmic.
Symmetrical spirals expand evenly so that the distance between each
revolution is equal. Logarithmic spirals expand with increasingly larger
distances between revolutions. You can set the rate by which a
logarithmic spiral expands outward.
A symmetrical spiral (left) and a logarithmic spiral (right)
To draw a spiral
1. In the toolbox, click the Spiral tool
2. Type a value in the Spiral revolutions box on the property bar.
Modul Diklat Pengembangan Keprofesian Berkelanjutan (PKB) Untuk Guru
KEGIATAN PEMBELAJARAN 1: MEMAHAMI PERANGKAT LUNAK COREL DRAW MODUL SUPLEMEN 8
43
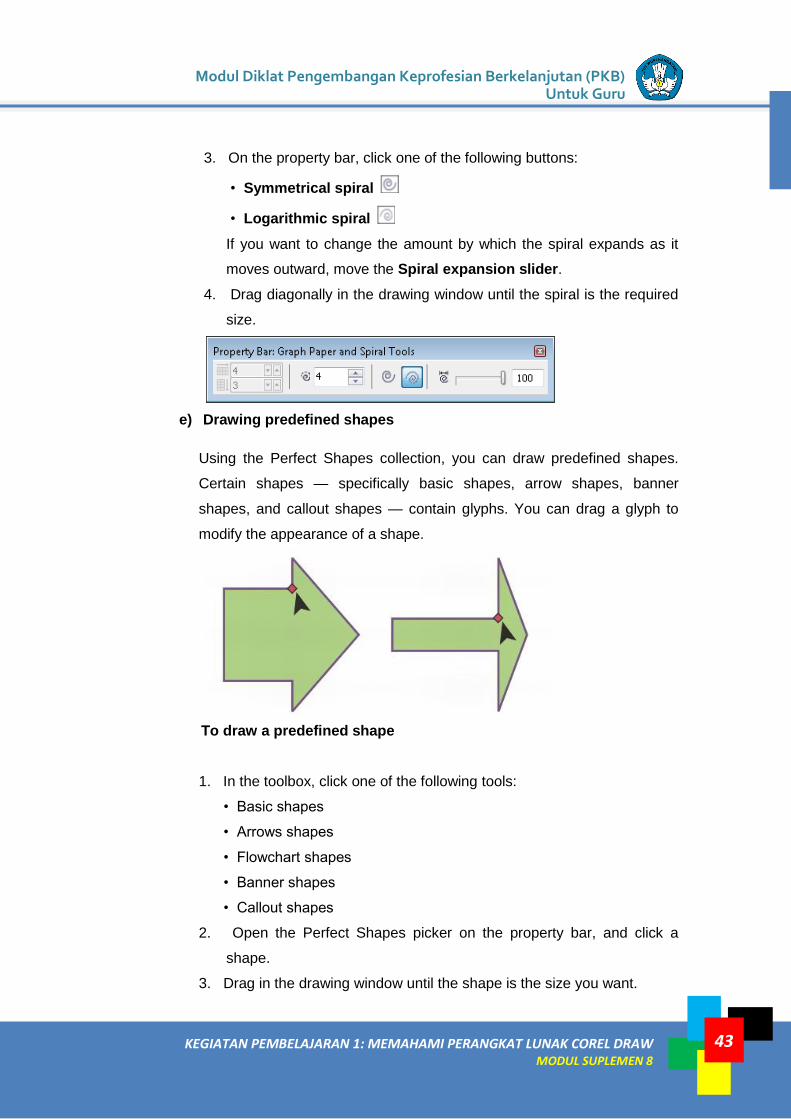
3. On the property bar, click one of the following buttons:
• Symmetrical spiral
• Logarithmic spiral
If you want to change the amount by which the spiral expands as it
moves outward, move the Spiral expansion slider.
4. Drag diagonally in the drawing window until the spiral is the required
size.
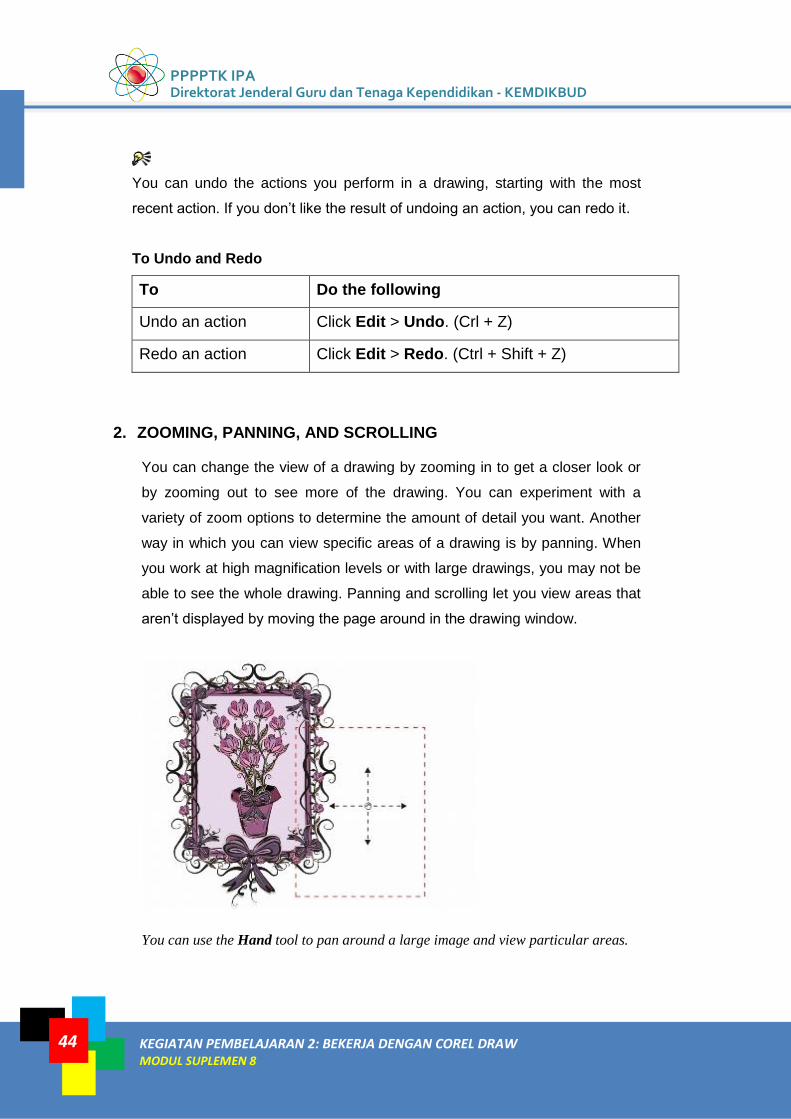
e) Drawing predefined shapes
Using the Perfect Shapes collection, you can draw predefined shapes.
Certain shapes — specifically basic shapes, arrow shapes, banner
shapes, and callout shapes — contain glyphs. You can drag a glyph to
modify the appearance of a shape.
To draw a predefined shape
1. In the toolbox, click one of the following tools:
• Basic shapes
• Arrows shapes
• Flowchart shapes
• Banner shapes
• Callout shapes
2. Open the Perfect Shapes picker on the property bar, and click a
shape.
3. Drag in the drawing window until the shape is the size you want.
PPPPTK IPA Direktorat Jenderal Guru dan Tenaga Kependidikan - KEMDIKBUD
44 KEGIATAN PEMBELAJARAN 2: BEKERJA DENGAN COREL DRAW MODUL SUPLEMEN 8
You can undo the actions you perform in a drawing, starting with the most
recent action. If you don’t like the result of undoing an action, you can redo it.
To Undo and Redo
To Do the following
Undo an action Click Edit > Undo. (Crl + Z)
Redo an action Click Edit > Redo. (Ctrl + Shift + Z)
2. ZOOMING, PANNING, AND SCROLLING
You can change the view of a drawing by zooming in to get a closer look or
by zooming out to see more of the drawing. You can experiment with a
variety of zoom options to determine the amount of detail you want. Another
way in which you can view specific areas of a drawing is by panning. When
you work at high magnification levels or with large drawings, you may not be
able to see the whole drawing. Panning and scrolling let you view areas that
aren’t displayed by moving the page around in the drawing window.
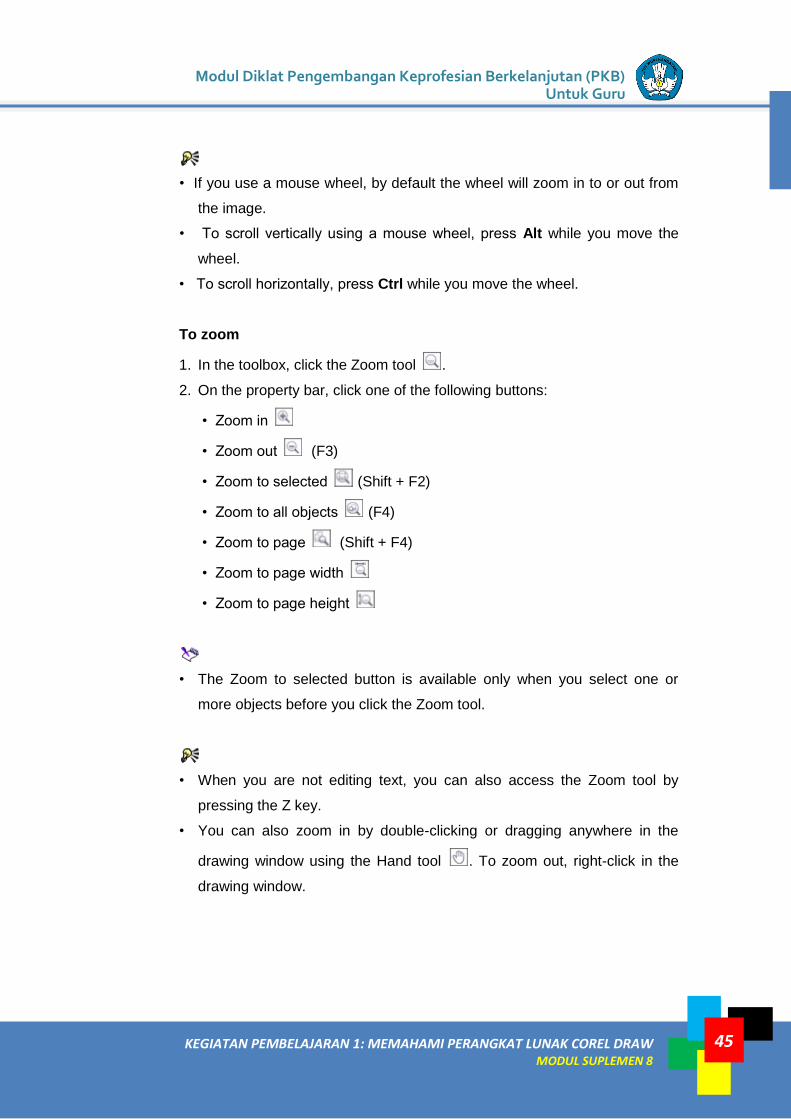
You can use the Hand tool to pan around a large image and view particular areas.
Modul Diklat Pengembangan Keprofesian Berkelanjutan (PKB) Untuk Guru
KEGIATAN PEMBELAJARAN 1: MEMAHAMI PERANGKAT LUNAK COREL DRAW MODUL SUPLEMEN 8
45
• If you use a mouse wheel, by default the wheel will zoom in to or out from
the image.
• To scroll vertically using a mouse wheel, press Alt while you move the
wheel.
• To scroll horizontally, press Ctrl while you move the wheel.
To zoom
1. In the toolbox, click the Zoom tool .
2. On the property bar, click one of the following buttons:
• Zoom in
• Zoom out (F3)
• Zoom to selected (Shift + F2)
• Zoom to all objects (F4)
• Zoom to page (Shift + F4)
• Zoom to page width
• Zoom to page height
• The Zoom to selected button is available only when you select one or
more objects before you click the Zoom tool.
• When you are not editing text, you can also access the Zoom tool by
pressing the Z key.
• You can also zoom in by double-clicking or dragging anywhere in the
drawing window using the Hand tool . To zoom out, right-click in the
drawing window.
PPPPTK IPA Direktorat Jenderal Guru dan Tenaga Kependidikan - KEMDIKBUD
46 KEGIATAN PEMBELAJARAN 2: BEKERJA DENGAN COREL DRAW MODUL SUPLEMEN 8
To pan in the drawing window
1. In the toolbox, click the Hand tool .
2. Drag in the drawing window until the area you want to view appears.
3. WORKING WITH OBJECTS
1. Selecting objects
Before you can change an object, you must select it. You can select
visible objects, objects that are hidden from view by other objects, and a
single object in a group or a nested group. In addition, you can select
objects in the order in which they were created, select all objects at once,
and deselect objects.
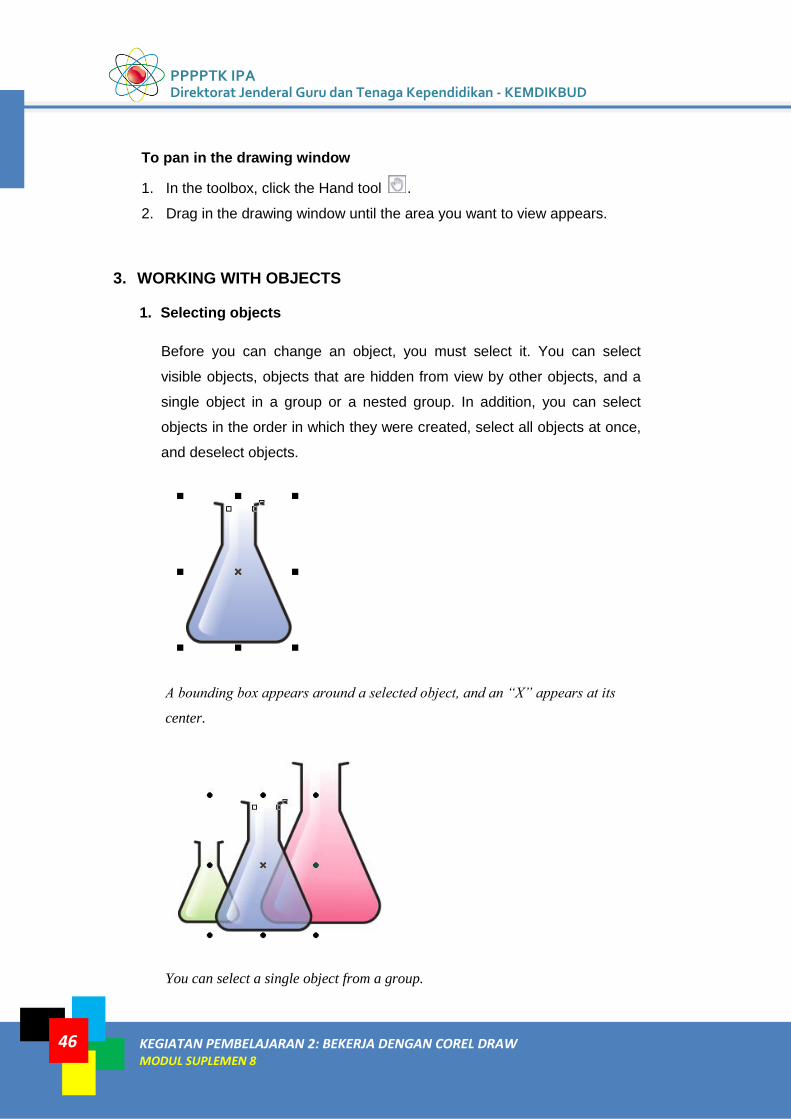
A bounding box appears around a selected object, and an “X” appears at its
center.
You can select a single object from a group.
Modul Diklat Pengembangan Keprofesian Berkelanjutan (PKB) Untuk Guru
KEGIATAN PEMBELAJARAN 1: MEMAHAMI PERANGKAT LUNAK COREL DRAW MODUL SUPLEMEN 8
47
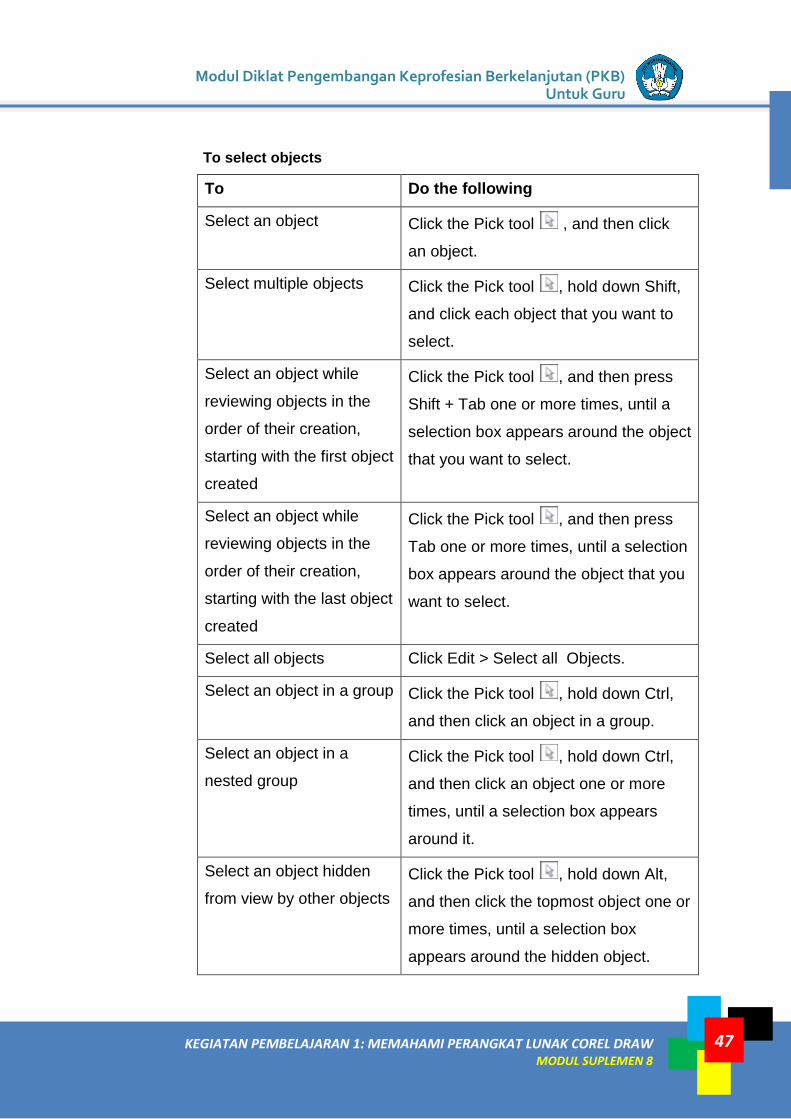
To select objects
To Do the following
Select an object Click the Pick tool , and then click
an object.
Select multiple objects Click the Pick tool , hold down Shift,
and click each object that you want to
select.
Select an object while
reviewing objects in the
order of their creation,
starting with the first object
created
Click the Pick tool , and then press
Shift + Tab one or more times, until a
selection box appears around the object
that you want to select.
Select an object while
reviewing objects in the
order of their creation,
starting with the last object
created
Click the Pick tool , and then press
Tab one or more times, until a selection
box appears around the object that you
want to select.
Select all objects Click Edit > Select all Objects.
Select an object in a group Click the Pick tool , hold down Ctrl,
and then click an object in a group.
Select an object in a
nested group
Click the Pick tool , hold down Ctrl,
and then click an object one or more
times, until a selection box appears
around it.
Select an object hidden
from view by other objects
Click the Pick tool , hold down Alt,
and then click the topmost object one or
more times, until a selection box
appears around the hidden object.
PPPPTK IPA Direktorat Jenderal Guru dan Tenaga Kependidikan - KEMDIKBUD
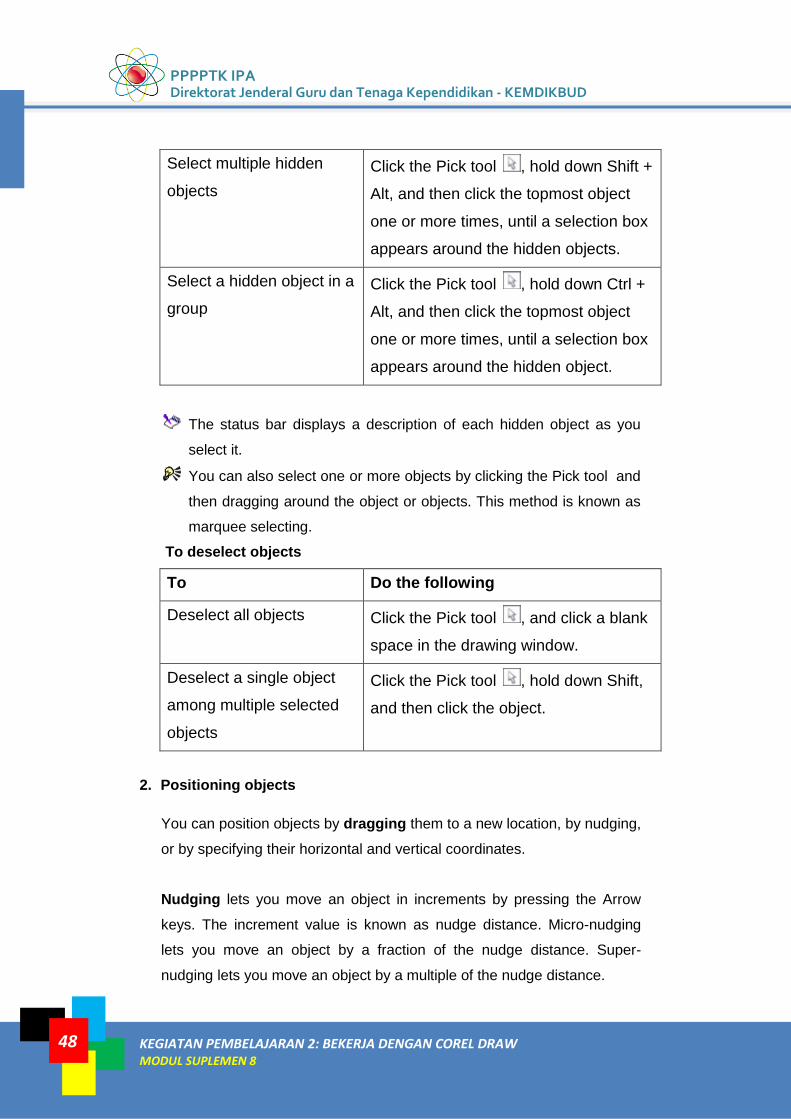
48 KEGIATAN PEMBELAJARAN 2: BEKERJA DENGAN COREL DRAW MODUL SUPLEMEN 8
Select multiple hidden
objects
Click the Pick tool , hold down Shift +
Alt, and then click the topmost object
one or more times, until a selection box
appears around the hidden objects.
Select a hidden object in a
group
Click the Pick tool , hold down Ctrl +
Alt, and then click the topmost object
one or more times, until a selection box
appears around the hidden object.
The status bar displays a description of each hidden object as you
select it.
You can also select one or more objects by clicking the Pick tool and
then dragging around the object or objects. This method is known as
marquee selecting.
To deselect objects
To Do the following
Deselect all objects Click the Pick tool , and click a blank
space in the drawing window.
Deselect a single object
among multiple selected
objects
Click the Pick tool , hold down Shift,
and then click the object.
2. Positioning objects
You can position objects by dragging them to a new location, by nudging,
or by specifying their horizontal and vertical coordinates.
Nudging lets you move an object in increments by pressing the Arrow
keys. The increment value is known as nudge distance. Micro-nudging
lets you move an object by a fraction of the nudge distance. Super-
nudging lets you move an object by a multiple of the nudge distance.
Modul Diklat Pengembangan Keprofesian Berkelanjutan (PKB) Untuk Guru
KEGIATAN PEMBELAJARAN 1: MEMAHAMI PERANGKAT LUNAK COREL DRAW MODUL SUPLEMEN 8
49
To position an object, you can set horizontal and vertical coordinates
that are relative to the center anchor point, or other anchor point, of the
object.
To move an object
1. Select an object.
2. Point to the center of the bounding box.
3. When the position cursor appears, drag the object to a new position in
the drawing.
To nudge an object
To Do the following
Nudge a selected object by the
nudge distance
Press an Arrow key.
Nudge a selected object by a
fraction of the nudge distance
(micro-nudge)
Hold down Ctrl, and press an Arrow
key.
Nudge a selected object by a
multiple of the nudge distance
(super-nudge)
Hold down Shift, and press an Arrow
key.
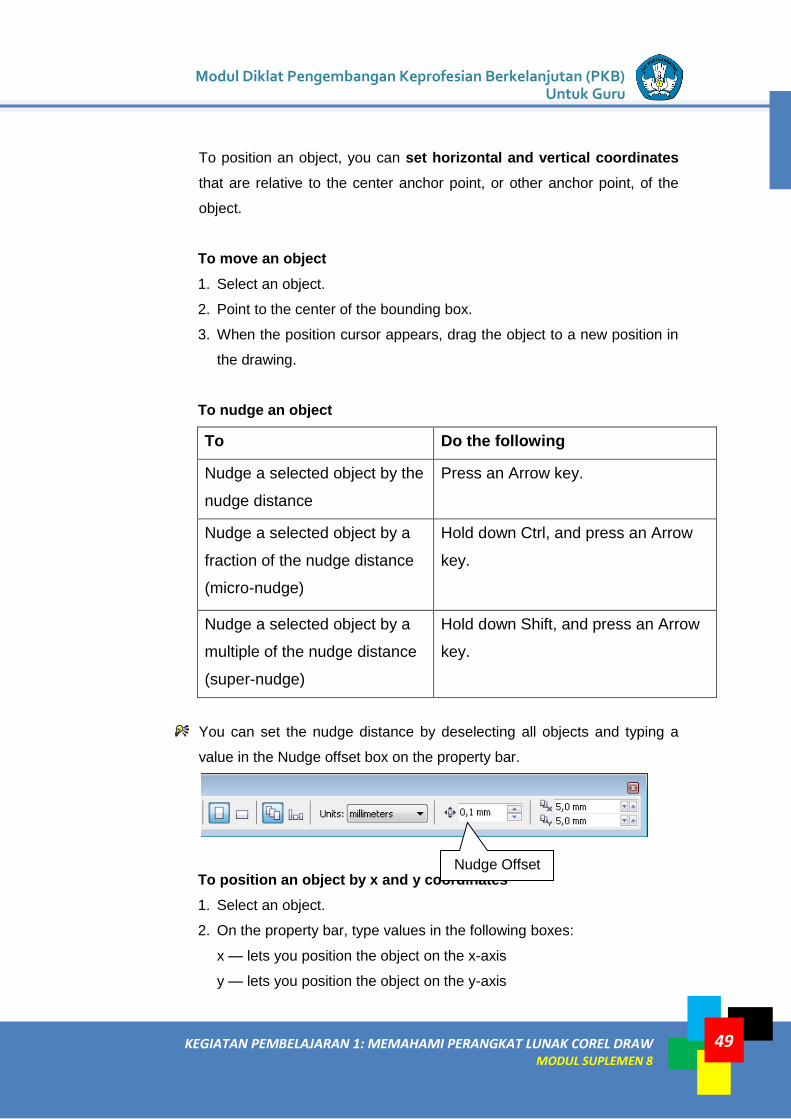
You can set the nudge distance by deselecting all objects and typing a
value in the Nudge offset box on the property bar.
To position an object by x and y coordinates
1. Select an object.
2. On the property bar, type values in the following boxes:
x — lets you position the object on the x-axis
y — lets you position the object on the y-axis
Nudge Offset
PPPPTK IPA Direktorat Jenderal Guru dan Tenaga Kependidikan - KEMDIKBUD
50 KEGIATAN PEMBELAJARAN 2: BEKERJA DENGAN COREL DRAW MODUL SUPLEMEN 8
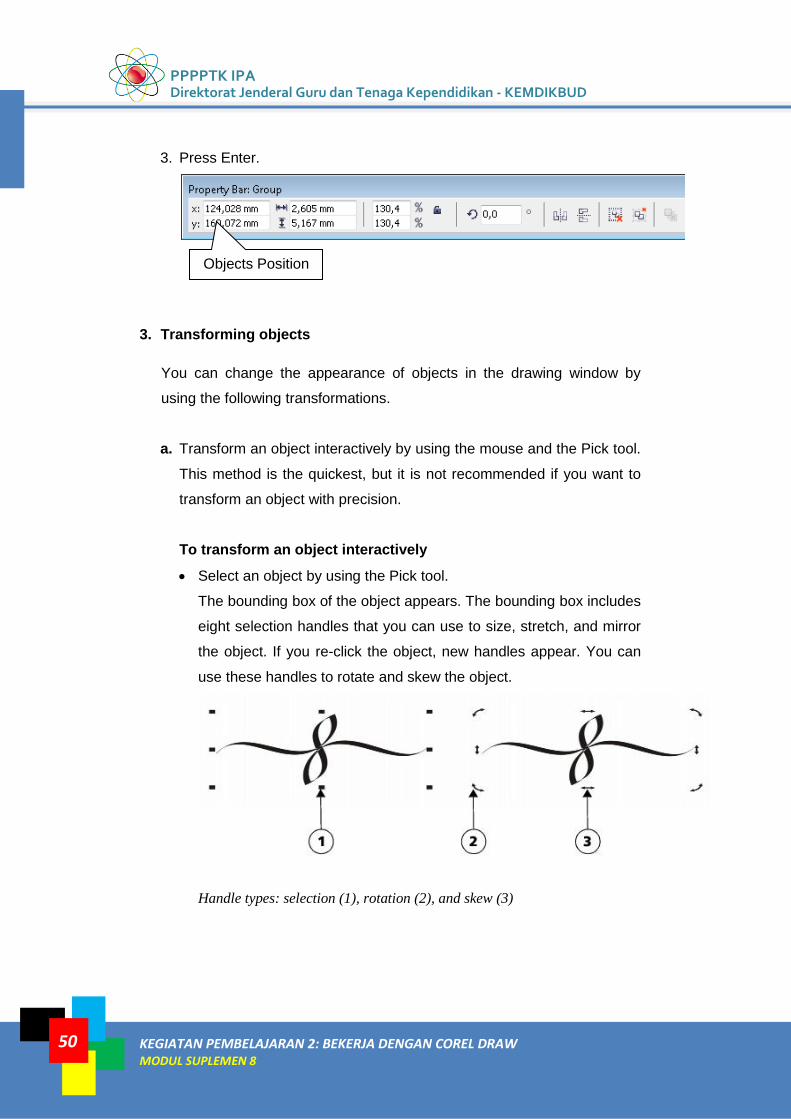
3. Press Enter.
3. Transforming objects
You can change the appearance of objects in the drawing window by
using the following transformations.
a. Transform an object interactively by using the mouse and the Pick tool.
This method is the quickest, but it is not recommended if you want to
transform an object with precision.
To transform an object interactively
Select an object by using the Pick tool.
The bounding box of the object appears. The bounding box includes
eight selection handles that you can use to size, stretch, and mirror
the object. If you re-click the object, new handles appear. You can
use these handles to rotate and skew the object.
Handle types: selection (1), rotation (2), and skew (3)
Objects Position
Modul Diklat Pengembangan Keprofesian Berkelanjutan (PKB) Untuk Guru
KEGIATAN PEMBELAJARAN 1: MEMAHAMI PERANGKAT LUNAK COREL DRAW MODUL SUPLEMEN 8
51
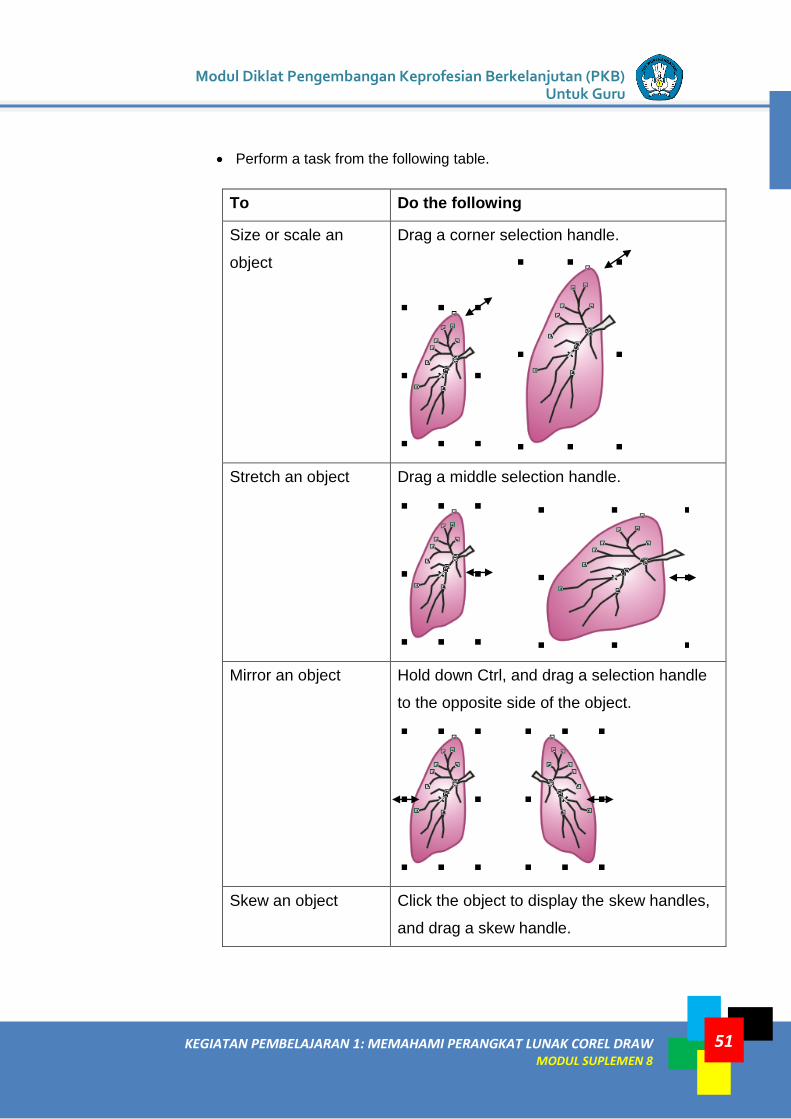
Perform a task from the following table.
To Do the following
Size or scale an
object
Drag a corner selection handle.
Stretch an object Drag a middle selection handle.
Mirror an object Hold down Ctrl, and drag a selection handle
to the opposite side of the object.
Skew an object Click the object to display the skew handles,
and drag a skew handle.
PPPPTK IPA Direktorat Jenderal Guru dan Tenaga Kependidikan - KEMDIKBUD
52 KEGIATAN PEMBELAJARAN 2: BEKERJA DENGAN COREL DRAW MODUL SUPLEMEN 8
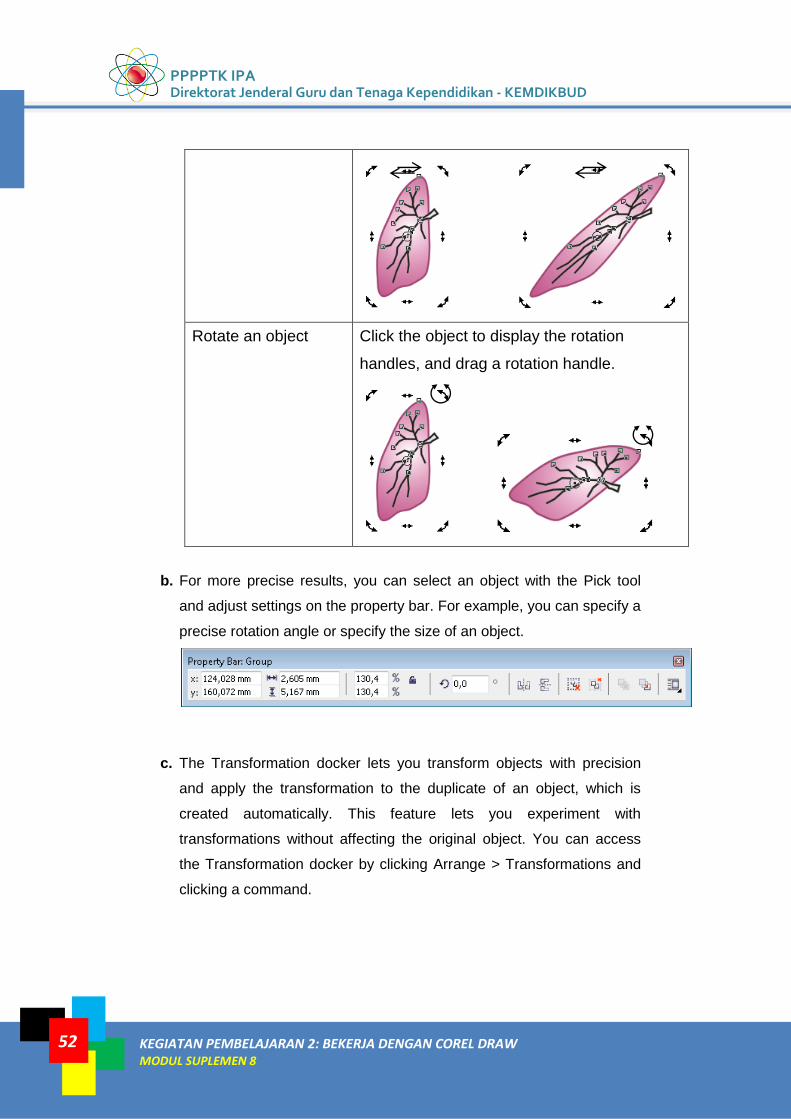
Rotate an object Click the object to display the rotation
handles, and drag a rotation handle.
b. For more precise results, you can select an object with the Pick tool
and adjust settings on the property bar. For example, you can specify a
precise rotation angle or specify the size of an object.
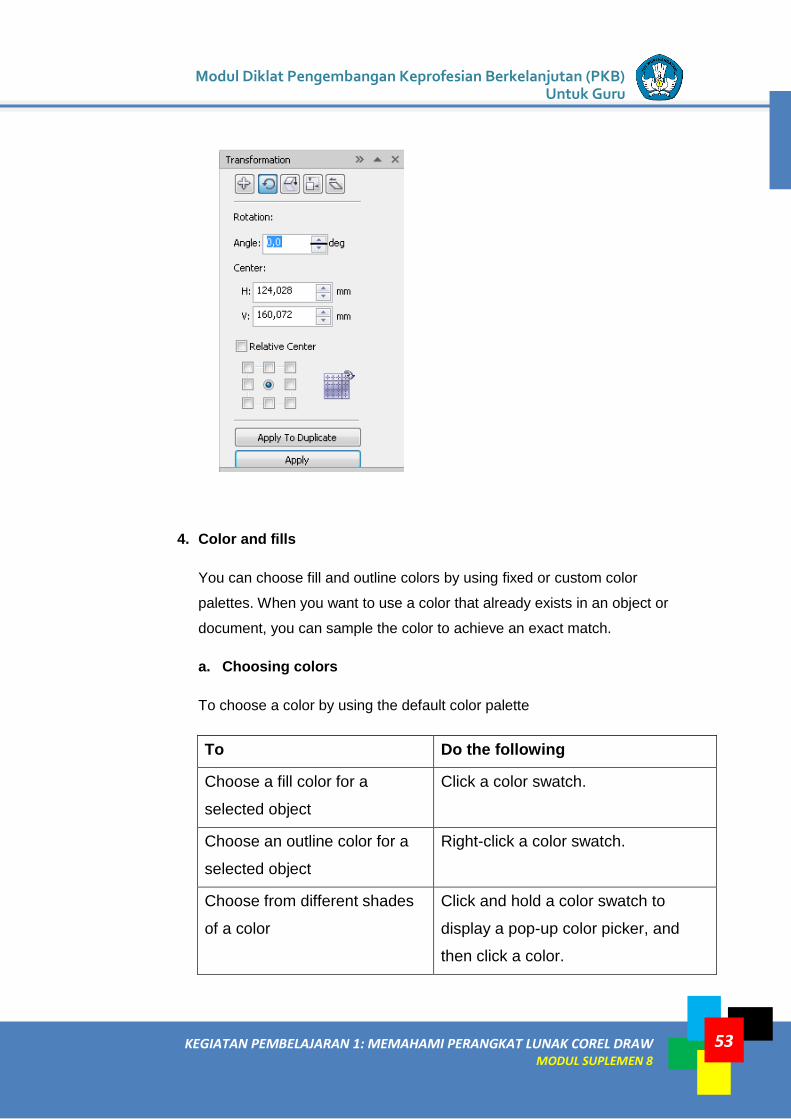
c. The Transformation docker lets you transform objects with precision
and apply the transformation to the duplicate of an object, which is
created automatically. This feature lets you experiment with
transformations without affecting the original object. You can access
the Transformation docker by clicking Arrange > Transformations and
clicking a command.
Modul Diklat Pengembangan Keprofesian Berkelanjutan (PKB) Untuk Guru
KEGIATAN PEMBELAJARAN 1: MEMAHAMI PERANGKAT LUNAK COREL DRAW MODUL SUPLEMEN 8
53
4. Color and fills
You can choose fill and outline colors by using fixed or custom color
palettes. When you want to use a color that already exists in an object or
document, you can sample the color to achieve an exact match.
a. Choosing colors
To choose a color by using the default color palette
To Do the following
Choose a fill color for a
selected object
Click a color swatch.
Choose an outline color for a
selected object
Right-click a color swatch.
Choose from different shades
of a color
Click and hold a color swatch to
display a pop-up color picker, and
then click a color.
PPPPTK IPA Direktorat Jenderal Guru dan Tenaga Kependidikan - KEMDIKBUD
54 KEGIATAN PEMBELAJARAN 2: BEKERJA DENGAN COREL DRAW MODUL SUPLEMEN 8
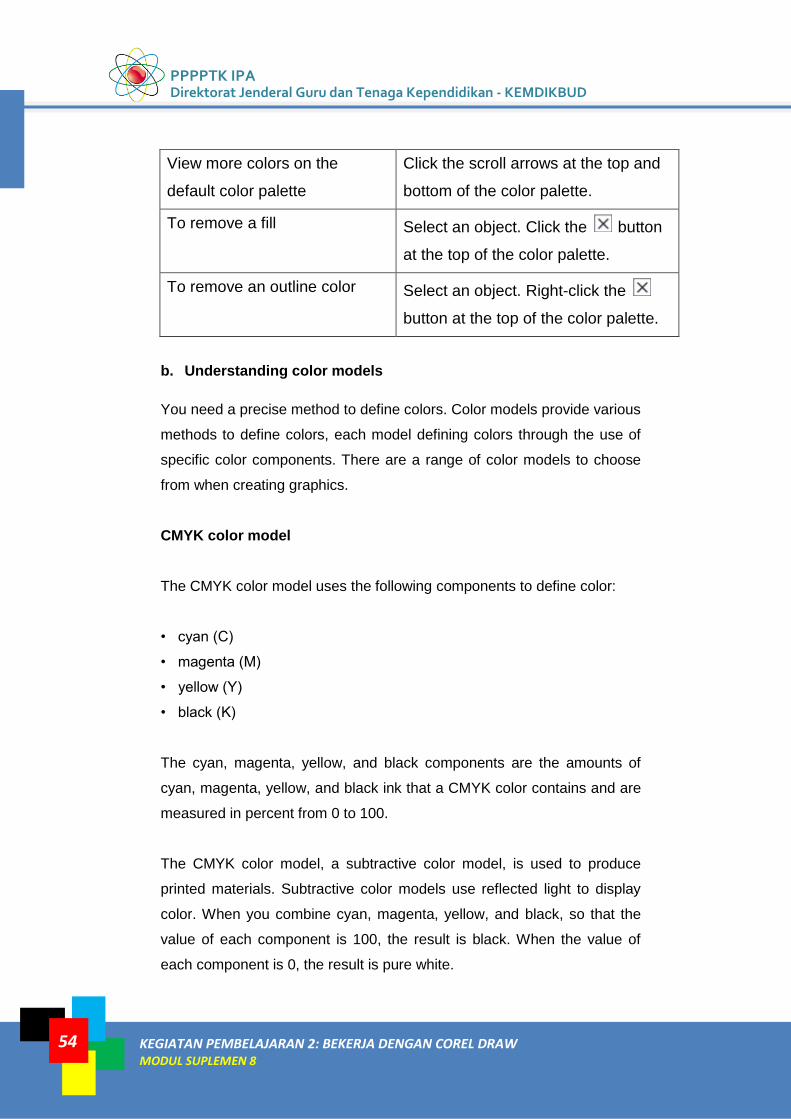
View more colors on the
default color palette
Click the scroll arrows at the top and
bottom of the color palette.
To remove a fill Select an object. Click the button
at the top of the color palette.
To remove an outline color Select an object. Right-click the
button at the top of the color palette.
b. Understanding color models
You need a precise method to define colors. Color models provide various
methods to define colors, each model defining colors through the use of
specific color components. There are a range of color models to choose
from when creating graphics.
CMYK color model
The CMYK color model uses the following components to define color:
• cyan (C)
• magenta (M)
• yellow (Y)
• black (K)
The cyan, magenta, yellow, and black components are the amounts of
cyan, magenta, yellow, and black ink that a CMYK color contains and are
measured in percent from 0 to 100.
The CMYK color model, a subtractive color model, is used to produce
printed materials. Subtractive color models use reflected light to display
color. When you combine cyan, magenta, yellow, and black, so that the
value of each component is 100, the result is black. When the value of
each component is 0, the result is pure white.
Modul Diklat Pengembangan Keprofesian Berkelanjutan (PKB) Untuk Guru
KEGIATAN PEMBELAJARAN 1: MEMAHAMI PERANGKAT LUNAK COREL DRAW MODUL SUPLEMEN 8
55
RGB color model
The RGB color model uses the following components to define color:
• red (R)
• green (G)
• blue (B)
The red, green, and blue components are the amounts of red, green, and
blue light that an RGB color contains and are measured in values ranging
from 0 to 255.
The RGB color model is an additive color model. Additive color models
use transmitted light to display color. Monitors use the RGB color model.
When you add red light, blue light, and green light together, so that the
value of each component is 255, the color white is displayed. When the
value of each component is 0, the result is pure black.
c. Understanding color depth
Color depth refers to the maximum number of colors an image can
contain. Color depth is determined by the bit depth of an image (the
number of binary bits that define the shade or color of each pixel in a
bitmap). For example, a pixel with a bit depth of 1 can have two values:
black and white. The greater the bit depth, the more colors an image can
contain, and the more accurate the color representation is. For example,
an 8-bit GIF image can contain up to 256 colors, but a 24-bit JPEG image
can contain approximately 16 million colors.
Usually, RGB, grayscale, and CMYK images contain 8 bits of data per
color channel. That is why an RGB image is often referred to as 24-bit
RGB (8 bits x 3 channels), a grayscale image is referred to as 8-bit
grayscale (8 bits x channel), and a CMYK image is referred to as 32-bit
CMYK (8 bits x 4 channels).
PPPPTK IPA Direktorat Jenderal Guru dan Tenaga Kependidikan - KEMDIKBUD
56 KEGIATAN PEMBELAJARAN 2: BEKERJA DENGAN COREL DRAW MODUL SUPLEMEN 8
Regardless of how many colors an image contains, the image display is
limited to the highest number of colors supported by the monitor on which
it is viewed. For example, an 8-bit monitor can display only up to 256
colors in a 24-bit image.
d. Filling objects
You can add colored, patterned, textured, and other fills to the inside of
objects or other enclosed areas.
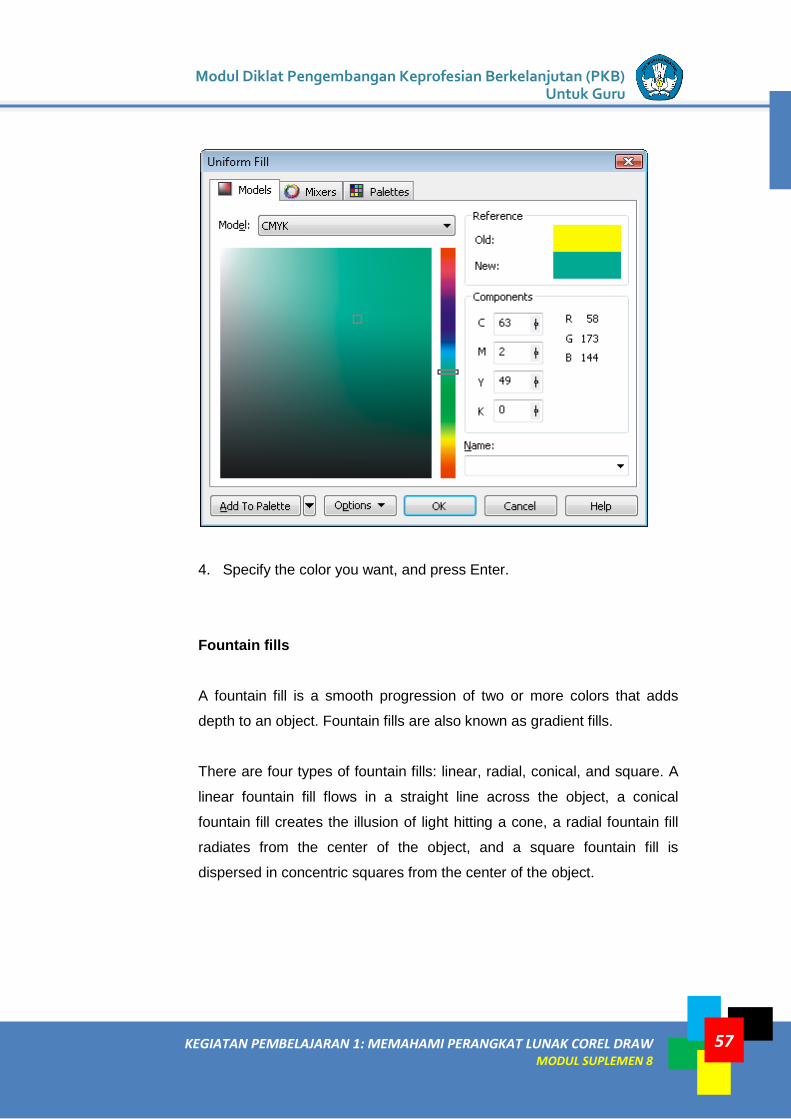
Uniform fills
Uniform fills are solid colors that you can choose or create by using color
models and color palettes
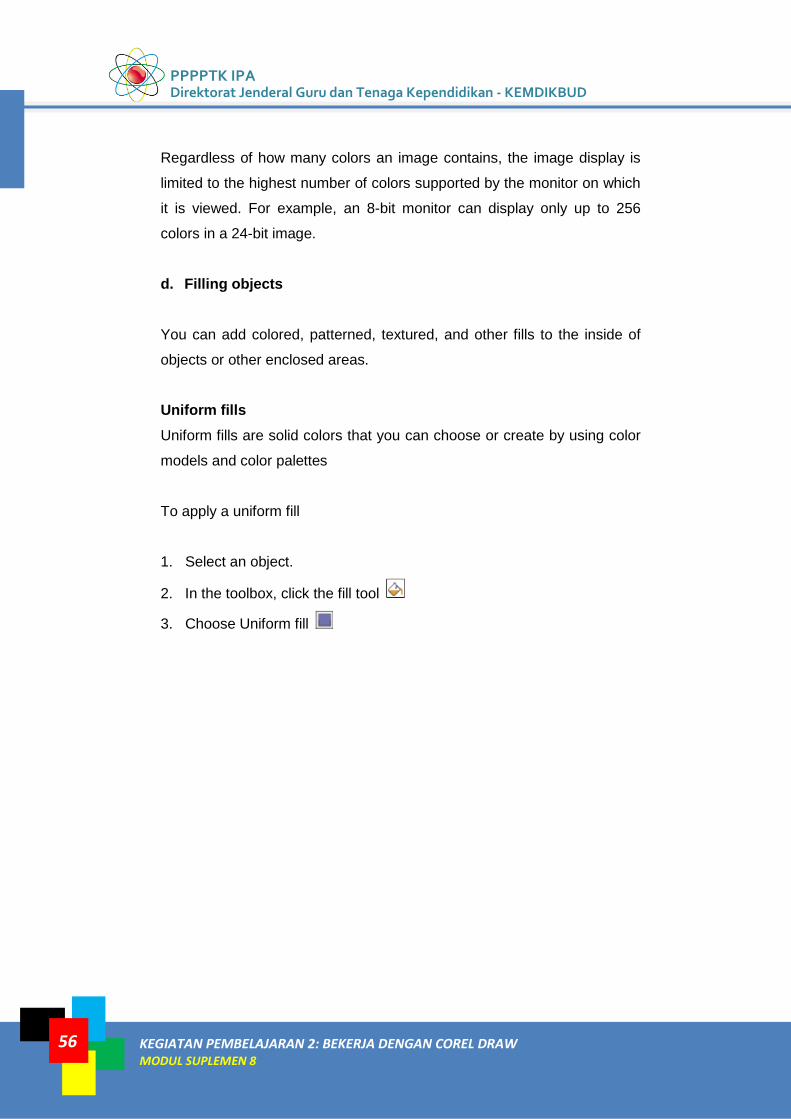
To apply a uniform fill
1. Select an object.
2. In the toolbox, click the fill tool
3. Choose Uniform fill
Modul Diklat Pengembangan Keprofesian Berkelanjutan (PKB) Untuk Guru
KEGIATAN PEMBELAJARAN 1: MEMAHAMI PERANGKAT LUNAK COREL DRAW MODUL SUPLEMEN 8
57
4. Specify the color you want, and press Enter.
Fountain fills
A fountain fill is a smooth progression of two or more colors that adds
depth to an object. Fountain fills are also known as gradient fills.
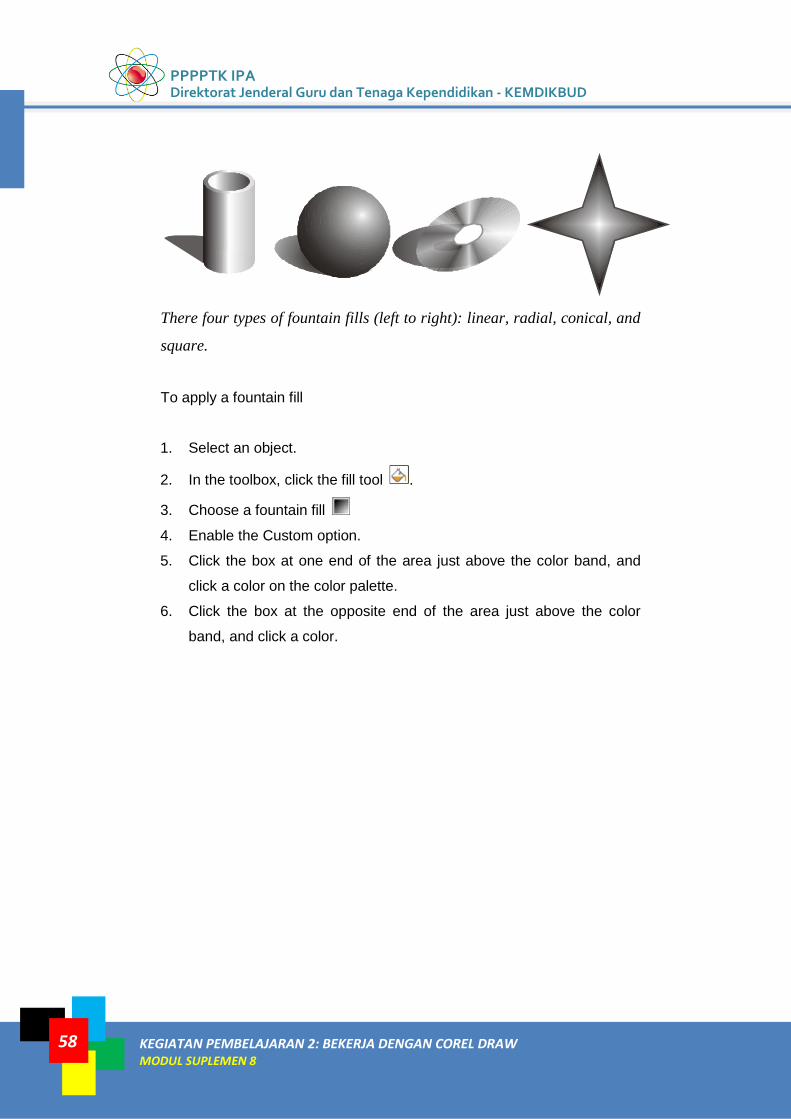
There are four types of fountain fills: linear, radial, conical, and square. A
linear fountain fill flows in a straight line across the object, a conical
fountain fill creates the illusion of light hitting a cone, a radial fountain fill
radiates from the center of the object, and a square fountain fill is
dispersed in concentric squares from the center of the object.
PPPPTK IPA Direktorat Jenderal Guru dan Tenaga Kependidikan - KEMDIKBUD
58 KEGIATAN PEMBELAJARAN 2: BEKERJA DENGAN COREL DRAW MODUL SUPLEMEN 8
There four types of fountain fills (left to right): linear, radial, conical, and
square.
To apply a fountain fill
1. Select an object.
2. In the toolbox, click the fill tool .
3. Choose a fountain fill
4. Enable the Custom option.
5. Click the box at one end of the area just above the color band, and
click a color on the color palette.
6. Click the box at the opposite end of the area just above the color
band, and click a color.
Modul Diklat Pengembangan Keprofesian Berkelanjutan (PKB) Untuk Guru
KEGIATAN PEMBELAJARAN 1: MEMAHAMI PERANGKAT LUNAK COREL DRAW MODUL SUPLEMEN 8
59
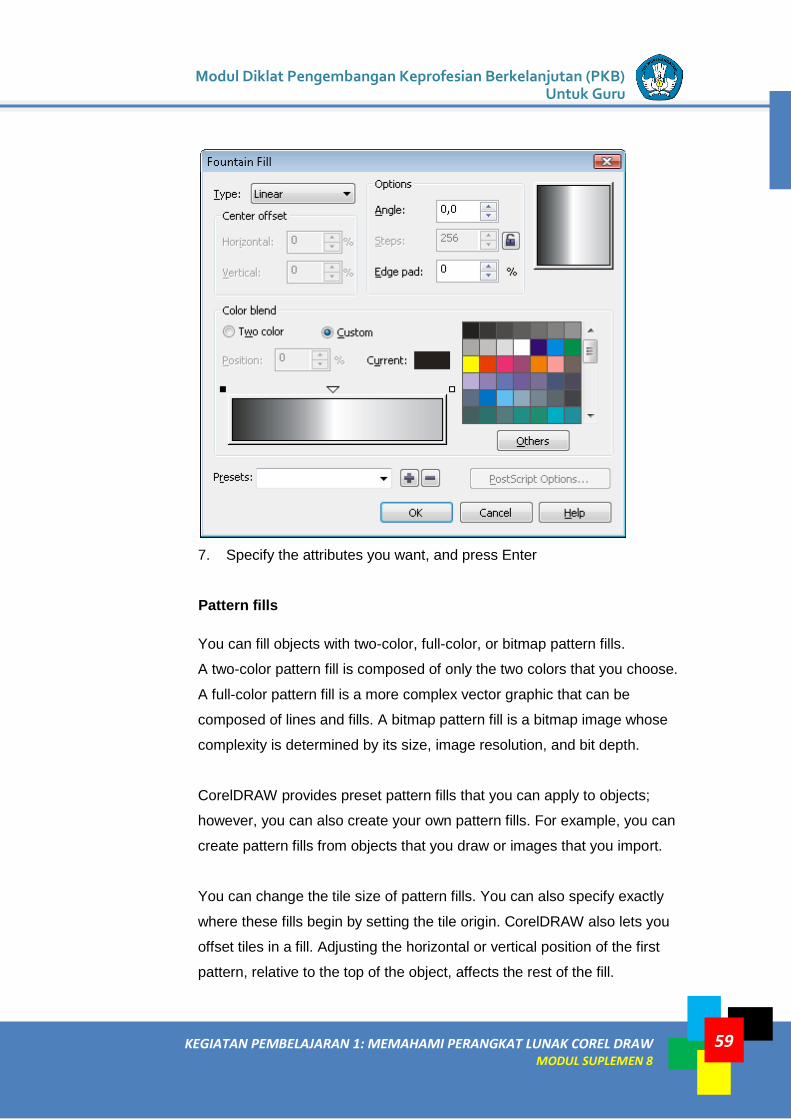
7. Specify the attributes you want, and press Enter
Pattern fills
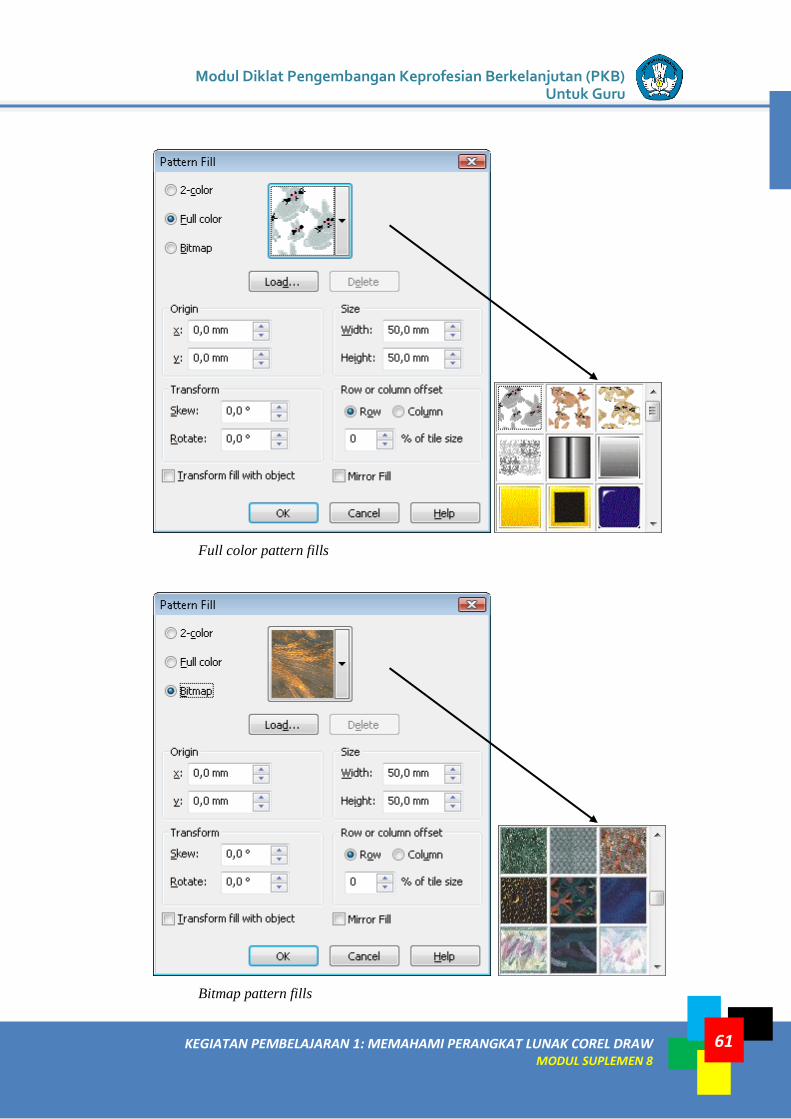
You can fill objects with two-color, full-color, or bitmap pattern fills.
A two-color pattern fill is composed of only the two colors that you choose.
A full-color pattern fill is a more complex vector graphic that can be
composed of lines and fills. A bitmap pattern fill is a bitmap image whose
complexity is determined by its size, image resolution, and bit depth.
CorelDRAW provides preset pattern fills that you can apply to objects;
however, you can also create your own pattern fills. For example, you can
create pattern fills from objects that you draw or images that you import.
You can change the tile size of pattern fills. You can also specify exactly
where these fills begin by setting the tile origin. CorelDRAW also lets you
offset tiles in a fill. Adjusting the horizontal or vertical position of the first
pattern, relative to the top of the object, affects the rest of the fill.
PPPPTK IPA Direktorat Jenderal Guru dan Tenaga Kependidikan - KEMDIKBUD
60 KEGIATAN PEMBELAJARAN 2: BEKERJA DENGAN COREL DRAW MODUL SUPLEMEN 8
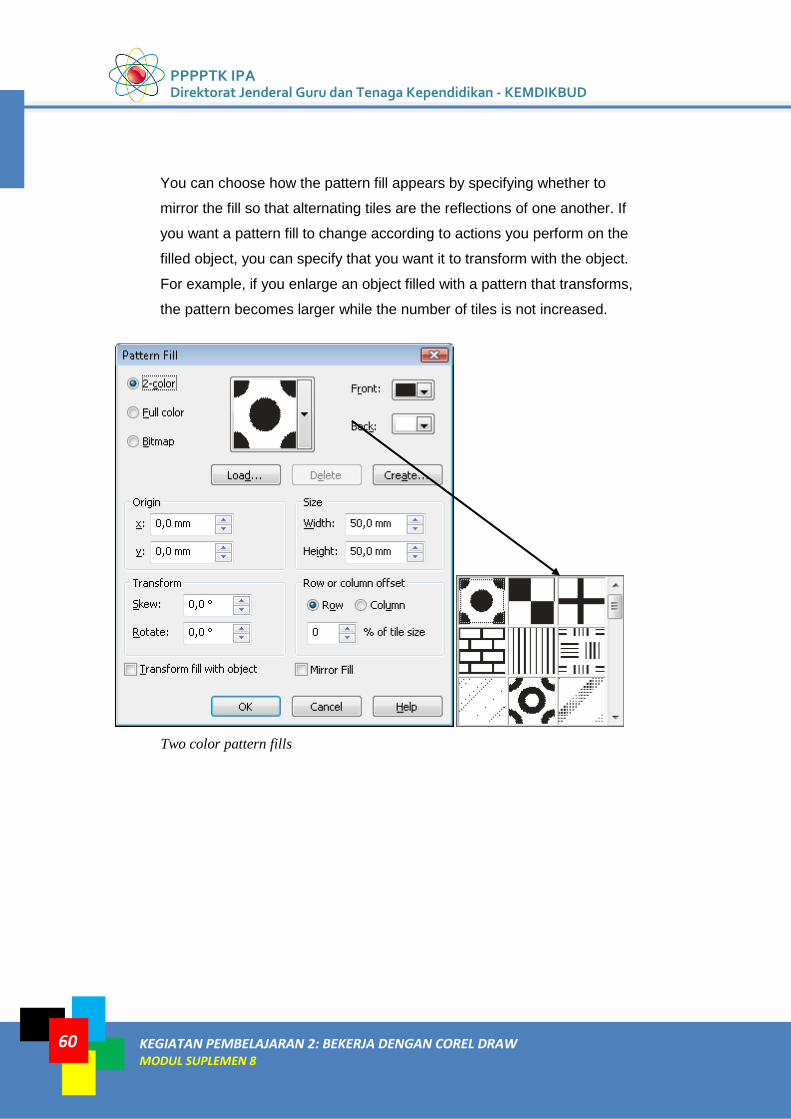
You can choose how the pattern fill appears by specifying whether to
mirror the fill so that alternating tiles are the reflections of one another. If
you want a pattern fill to change according to actions you perform on the
filled object, you can specify that you want it to transform with the object.
For example, if you enlarge an object filled with a pattern that transforms,
the pattern becomes larger while the number of tiles is not increased.
Two color pattern fills
Modul Diklat Pengembangan Keprofesian Berkelanjutan (PKB) Untuk Guru
KEGIATAN PEMBELAJARAN 1: MEMAHAMI PERANGKAT LUNAK COREL DRAW MODUL SUPLEMEN 8
61
Full color pattern fills
Bitmap pattern fills
PPPPTK IPA Direktorat Jenderal Guru dan Tenaga Kependidikan - KEMDIKBUD
62 KEGIATAN PEMBELAJARAN 2: BEKERJA DENGAN COREL DRAW MODUL SUPLEMEN 8
Texture fills
A texture fill is a randomly generated fill that you can use to give your
objects a natural appearance. CorelDRAW provides preset textures, and
each texture has a set of options that you can change. You can use colors
from any color model or palette to customize texture fills. Texture fills can
hold only RGB colors; however, other color models and palettes can be
used as a reference to select colors.
You can change the tile size of texture fills. Increasing the resolution of a
texture tile increases the accuracy of the fill. You can also specify exactly
where these fills begin by setting the tile origin. CorelDRAW also lets you
offset tiles in a fill. Adjusting the horizontal or vertical position of the first
tile, relative to the top of the object, affects the rest of the fill.
You can rotate, skew, adjust the tile size, and change the center of the
texture to create a custom fill.
If you want a texture fill to change according to the actions you perform on
the filled object, you can specify that you want the fill to transform with the
object. For example, if you enlarge an object filled with a texture that
transforms, the texture becomes larger instead of increasing the number
of tiles.
Texture fills are powerful features that can enhance a drawing. However,
they also increase the size of a file and the time it takes to print, so you
may want to use them in moderation.
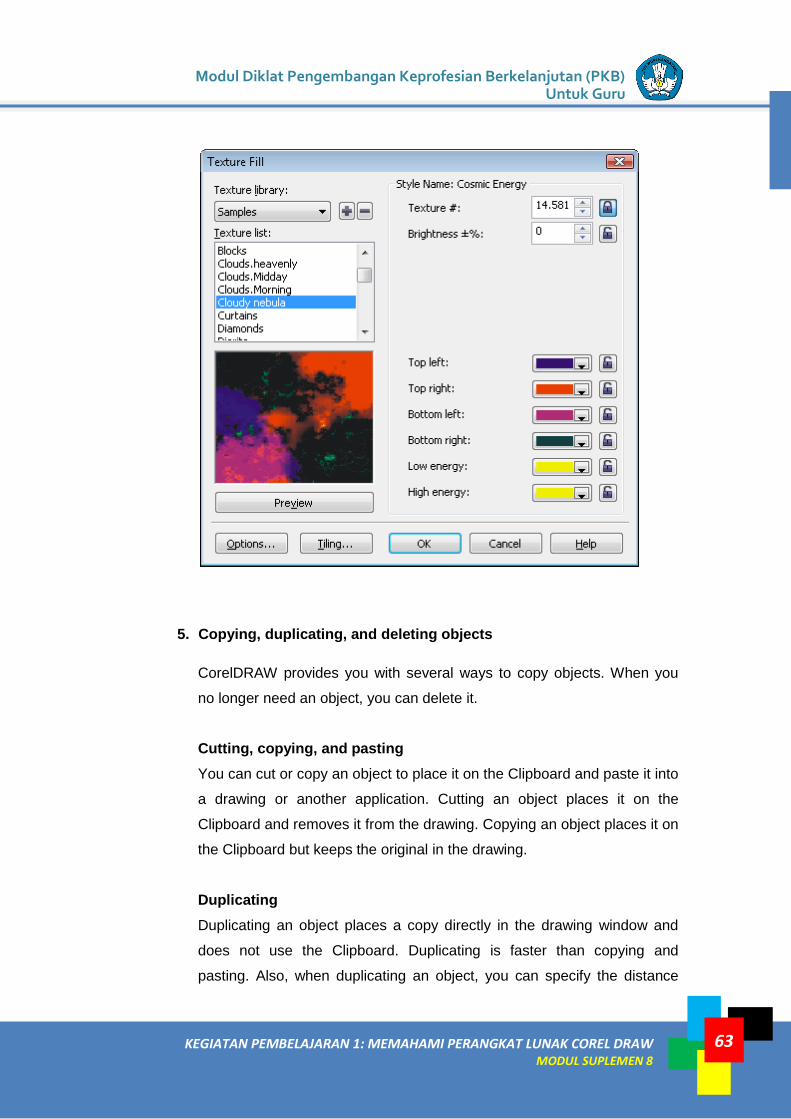
Modul Diklat Pengembangan Keprofesian Berkelanjutan (PKB) Untuk Guru
KEGIATAN PEMBELAJARAN 1: MEMAHAMI PERANGKAT LUNAK COREL DRAW MODUL SUPLEMEN 8
63
5. Copying, duplicating, and deleting objects
CorelDRAW provides you with several ways to copy objects. When you
no longer need an object, you can delete it.
Cutting, copying, and pasting
You can cut or copy an object to place it on the Clipboard and paste it into
a drawing or another application. Cutting an object places it on the
Clipboard and removes it from the drawing. Copying an object places it on
the Clipboard but keeps the original in the drawing.
Duplicating
Duplicating an object places a copy directly in the drawing window and
does not use the Clipboard. Duplicating is faster than copying and
pasting. Also, when duplicating an object, you can specify the distance
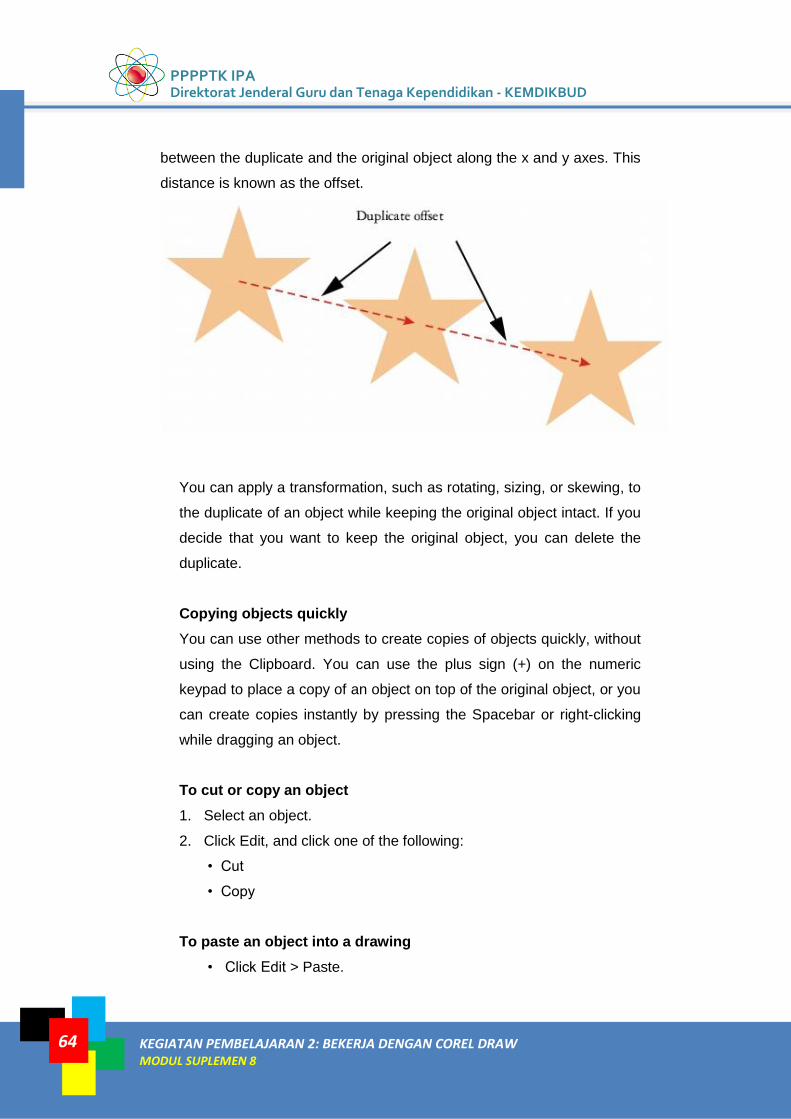
PPPPTK IPA Direktorat Jenderal Guru dan Tenaga Kependidikan - KEMDIKBUD
64 KEGIATAN PEMBELAJARAN 2: BEKERJA DENGAN COREL DRAW MODUL SUPLEMEN 8
between the duplicate and the original object along the x and y axes. This
distance is known as the offset.
You can apply a transformation, such as rotating, sizing, or skewing, to
the duplicate of an object while keeping the original object intact. If you
decide that you want to keep the original object, you can delete the
duplicate.
Copying objects quickly
You can use other methods to create copies of objects quickly, without
using the Clipboard. You can use the plus sign (+) on the numeric
keypad to place a copy of an object on top of the original object, or you
can create copies instantly by pressing the Spacebar or right-clicking
while dragging an object.
To cut or copy an object
1. Select an object.
2. Click Edit, and click one of the following:
• Cut
• Copy
To paste an object into a drawing
• Click Edit > Paste.

Modul Diklat Pengembangan Keprofesian Berkelanjutan (PKB) Untuk Guru
KEGIATAN PEMBELAJARAN 1: MEMAHAMI PERANGKAT LUNAK COREL DRAW MODUL SUPLEMEN 8
65
To duplicate an object
1. Select an object.
2. Click Edit > Duplicate. (Ctrl + D)
When you duplicate objects for the first time, the Duplicate offset
dialog box appears. To specify the distance between the duplicate and
the original object along the x and y axes, type values in the Horizontal
offset and Vertical offset boxes.
• Offset values of 0 place the duplicate on top of the original.
• Positive offset values place the duplicate up and to the right of the
original.
• Negative offset values place the duplicate down and to the left of the
original.
To create copies of objects quickly
1. Select an object by using the Pick tool .
2. Press the Spacebar while moving, rotating, or transforming the
object.
You can also
• Place a copy of an object on top of the original Press the plus sign
(+ ) on the numeric keypad.
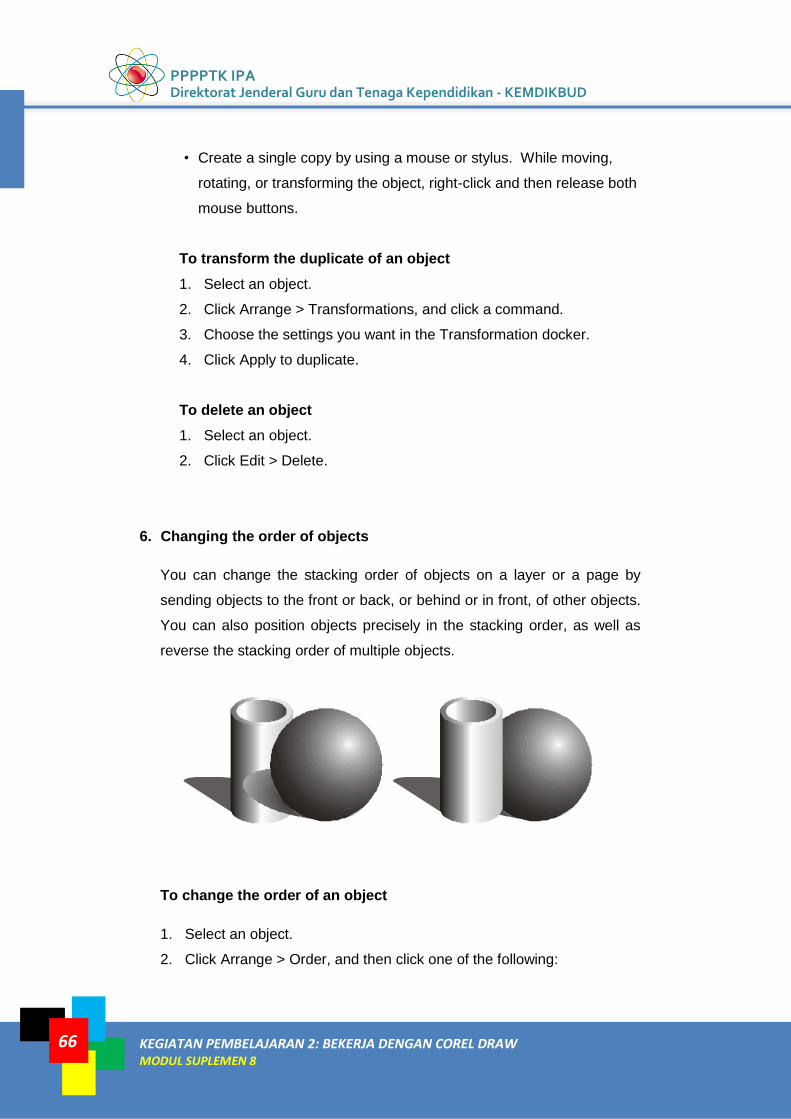
PPPPTK IPA Direktorat Jenderal Guru dan Tenaga Kependidikan - KEMDIKBUD
66 KEGIATAN PEMBELAJARAN 2: BEKERJA DENGAN COREL DRAW MODUL SUPLEMEN 8
• Create a single copy by using a mouse or stylus. While moving,
rotating, or transforming the object, right-click and then release both
mouse buttons.
To transform the duplicate of an object
1. Select an object.
2. Click Arrange > Transformations, and click a command.
3. Choose the settings you want in the Transformation docker.
4. Click Apply to duplicate.
To delete an object
1. Select an object.
2. Click Edit > Delete.
6. Changing the order of objects
You can change the stacking order of objects on a layer or a page by
sending objects to the front or back, or behind or in front, of other objects.
You can also position objects precisely in the stacking order, as well as
reverse the stacking order of multiple objects.
To change the order of an object
1. Select an object.
2. Click Arrange > Order, and then click one of the following:
Modul Diklat Pengembangan Keprofesian Berkelanjutan (PKB) Untuk Guru
KEGIATAN PEMBELAJARAN 1: MEMAHAMI PERANGKAT LUNAK COREL DRAW MODUL SUPLEMEN 8
67
• To front of page — moves the selected object in front of all other
objects on the page
• To back of page — moves the selected object behind all other
objects on the page
• To front of layer — moves the selected object in front of all other
objects on the active layer
• To back of layer — moves the selected object behind all other
objects on the active layer
• Forward one — moves the selected object forward one position. If
the selected object is in front of all other objects on the active layer,
it is moved to the layer above.
• Back one — moves the selected object behind one position. If the
selected object is behind all other objects on the selected layer, it is
moved to the layer below.
• In front of — moves the selected object in front of the object that you
click in the drawing window
• Behind — moves the selected object behind the object that you click
in the drawing window
7. Aligning and distributing objects
CorelDRAW lets you precisely align and distribute objects in a drawing.
You can align objects with each other and with parts of the drawing page,
such as the center, edges, and grid. When you align objects with objects,
you can line them up by their centers or by their edges.
You can align multiple objects horizontally or vertically with the center of
the drawing page. Single or multiple objects can also be arranged along
the edge of the page and to the nearest point on a grid.
Distributing objects automatically adds spacing between them based on
their width, height, and center points. You can distribute objects so that
their center points or selected edges (for example, top or right) appear at
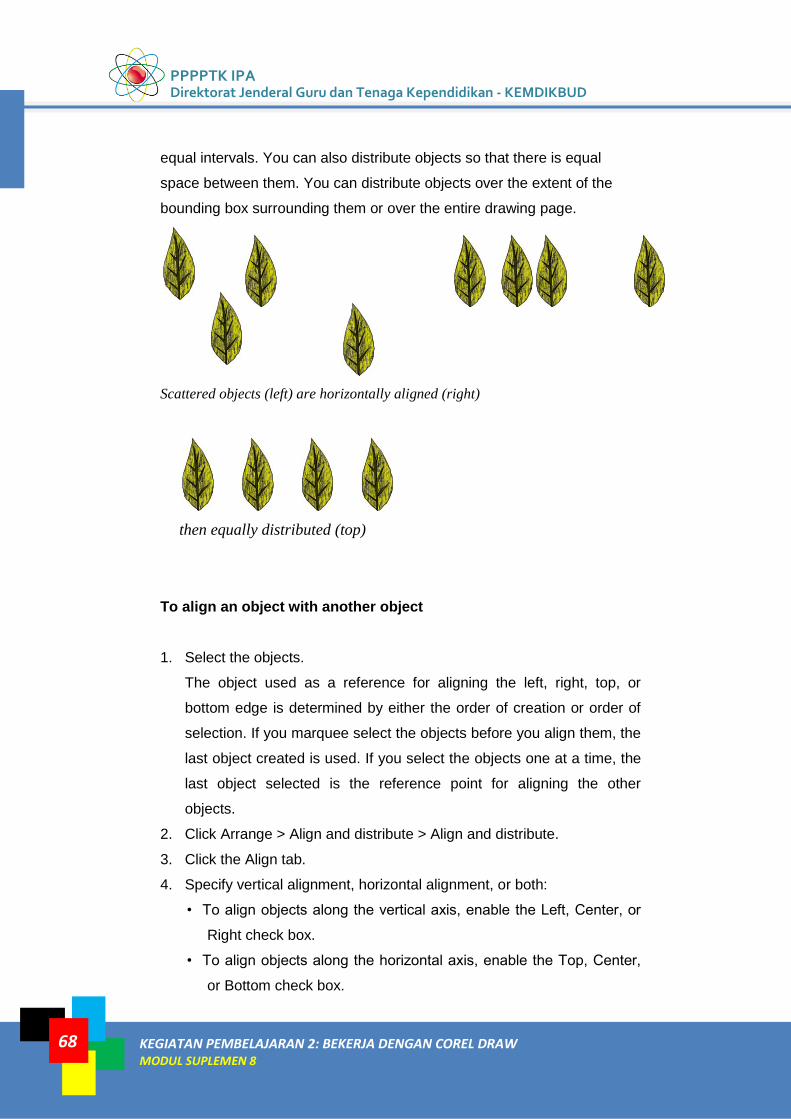
PPPPTK IPA Direktorat Jenderal Guru dan Tenaga Kependidikan - KEMDIKBUD
68 KEGIATAN PEMBELAJARAN 2: BEKERJA DENGAN COREL DRAW MODUL SUPLEMEN 8
equal intervals. You can also distribute objects so that there is equal
space between them. You can distribute objects over the extent of the
bounding box surrounding them or over the entire drawing page.
Scattered objects (left) are horizontally aligned (right)
then equally distributed (top)
To align an object with another object
1. Select the objects.
The object used as a reference for aligning the left, right, top, or
bottom edge is determined by either the order of creation or order of
selection. If you marquee select the objects before you align them, the
last object created is used. If you select the objects one at a time, the
last object selected is the reference point for aligning the other
objects.
2. Click Arrange > Align and distribute > Align and distribute.
3. Click the Align tab.
4. Specify vertical alignment, horizontal alignment, or both:
• To align objects along the vertical axis, enable the Left, Center, or
Right check box.
• To align objects along the horizontal axis, enable the Top, Center,
or Bottom check box.
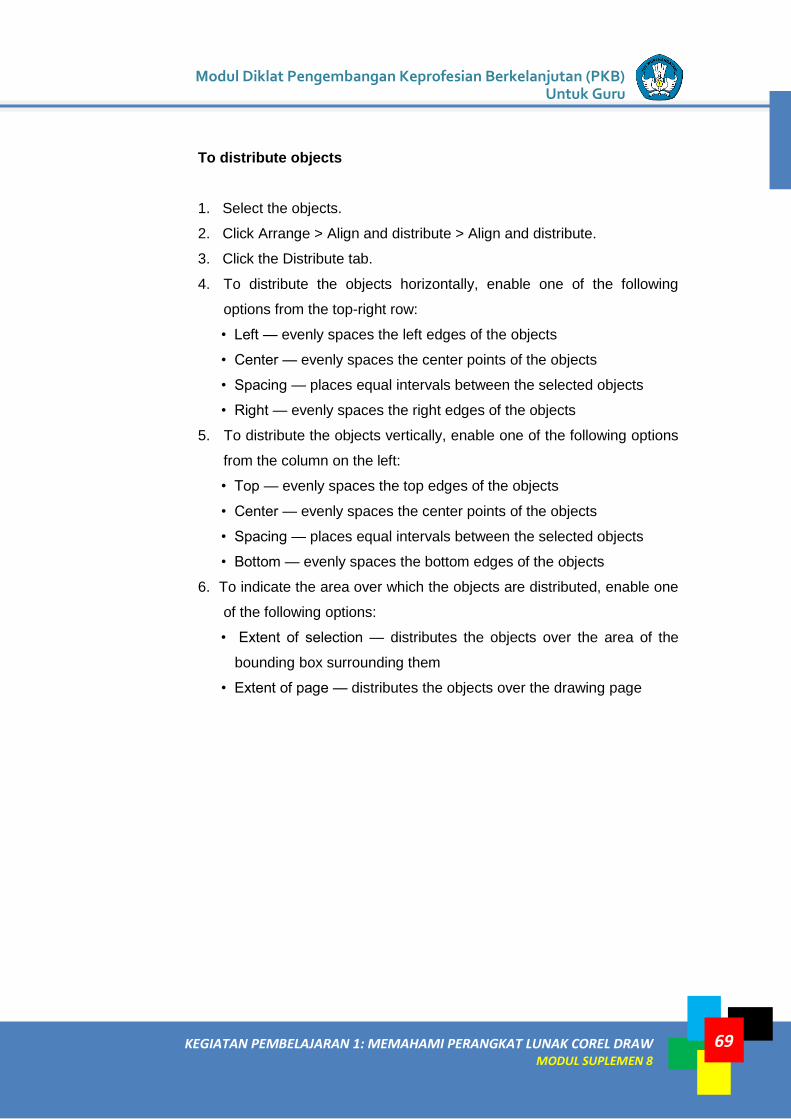
Modul Diklat Pengembangan Keprofesian Berkelanjutan (PKB) Untuk Guru
KEGIATAN PEMBELAJARAN 1: MEMAHAMI PERANGKAT LUNAK COREL DRAW MODUL SUPLEMEN 8
69
To distribute objects
1. Select the objects.
2. Click Arrange > Align and distribute > Align and distribute.
3. Click the Distribute tab.
4. To distribute the objects horizontally, enable one of the following
options from the top-right row:
• Left — evenly spaces the left edges of the objects
• Center — evenly spaces the center points of the objects
• Spacing — places equal intervals between the selected objects
• Right — evenly spaces the right edges of the objects
5. To distribute the objects vertically, enable one of the following options
from the column on the left:
• Top — evenly spaces the top edges of the objects
• Center — evenly spaces the center points of the objects
• Spacing — places equal intervals between the selected objects
• Bottom — evenly spaces the bottom edges of the objects
6. To indicate the area over which the objects are distributed, enable one
of the following options:
• Extent of selection — distributes the objects over the area of the
bounding box surrounding them
• Extent of page — distributes the objects over the drawing page
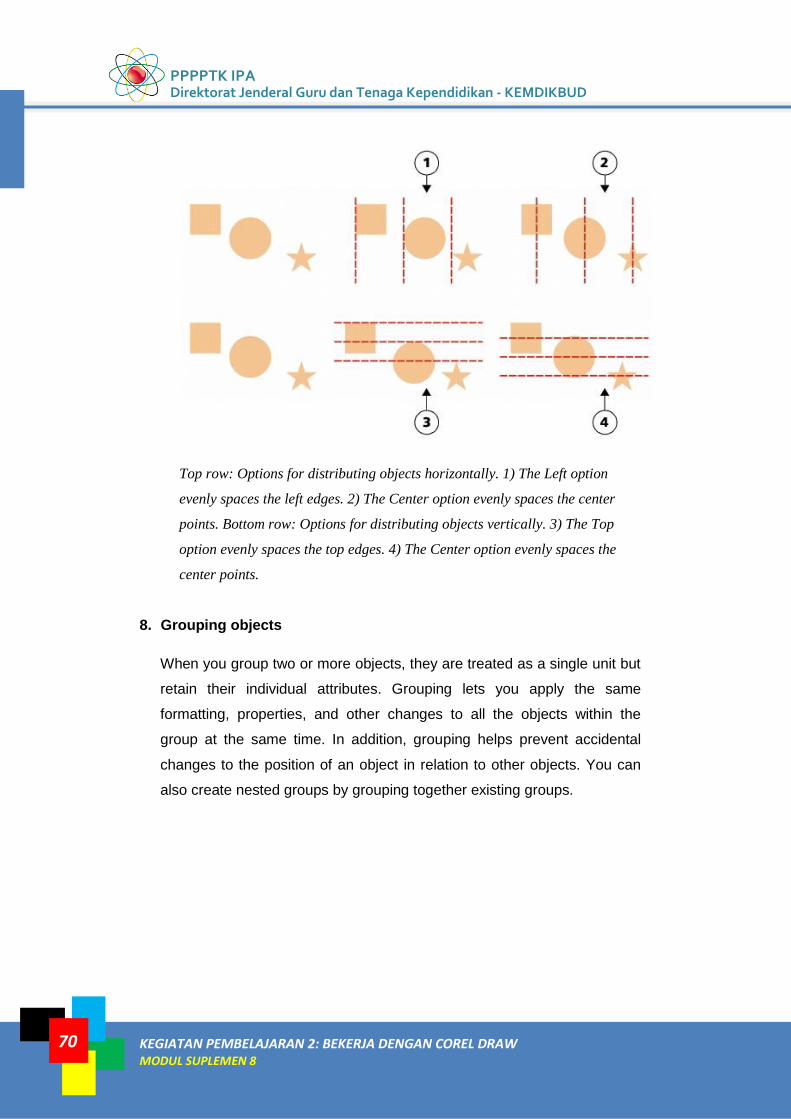
PPPPTK IPA Direktorat Jenderal Guru dan Tenaga Kependidikan - KEMDIKBUD
70 KEGIATAN PEMBELAJARAN 2: BEKERJA DENGAN COREL DRAW MODUL SUPLEMEN 8
Top row: Options for distributing objects horizontally. 1) The Left option
evenly spaces the left edges. 2) The Center option evenly spaces the center
points. Bottom row: Options for distributing objects vertically. 3) The Top
option evenly spaces the top edges. 4) The Center option evenly spaces the
center points.
8. Grouping objects
When you group two or more objects, they are treated as a single unit but
retain their individual attributes. Grouping lets you apply the same
formatting, properties, and other changes to all the objects within the
group at the same time. In addition, grouping helps prevent accidental
changes to the position of an object in relation to other objects. You can
also create nested groups by grouping together existing groups.
Modul Diklat Pengembangan Keprofesian Berkelanjutan (PKB) Untuk Guru
KEGIATAN PEMBELAJARAN 1: MEMAHAMI PERANGKAT LUNAK COREL DRAW MODUL SUPLEMEN 8
71
Single objects retain their attributes when they are grouped.
You can add objects to or remove objects from a group, and you can
delete objects that are members of a group. You can also edit a single
object in a group without ungrouping the objects. If you want to edit
multiple objects in a group at the same time, you must first ungroup the
objects. If a group contains nested groups, you can ungroup all objects in
the nested groups simultaneously.
To group objects
1. Select the objects.
2. Click Arrange > Group. (Ctrl + G)
To edit a single object in a group
1. Click the Pick tool .
2. While holding down Ctrl, click an object in a group.
3. Edit the object.
To ungroup objects
1. Select one or more groups.
2. Click Arrange, and click one of the following commands:
• Ungroup — breaks a group into individual objects, or a nested
group into multiple groups
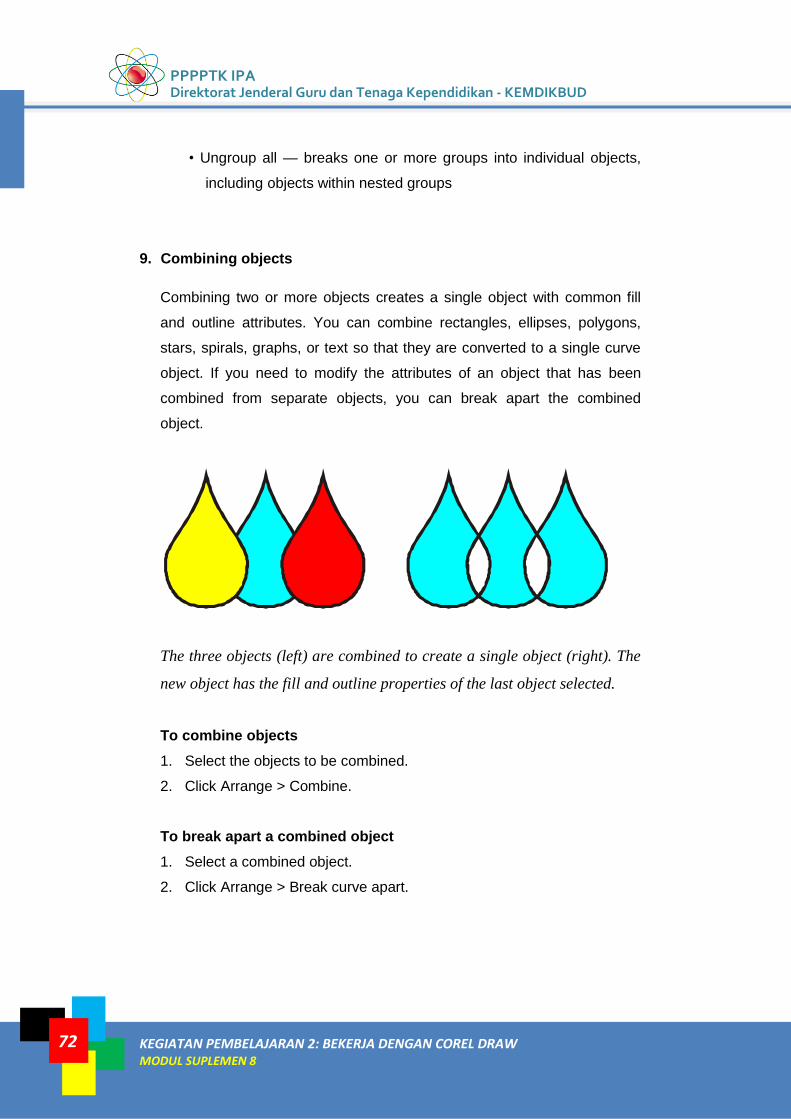
PPPPTK IPA Direktorat Jenderal Guru dan Tenaga Kependidikan - KEMDIKBUD
72 KEGIATAN PEMBELAJARAN 2: BEKERJA DENGAN COREL DRAW MODUL SUPLEMEN 8
• Ungroup all — breaks one or more groups into individual objects,
including objects within nested groups
9. Combining objects
Combining two or more objects creates a single object with common fill
and outline attributes. You can combine rectangles, ellipses, polygons,
stars, spirals, graphs, or text so that they are converted to a single curve
object. If you need to modify the attributes of an object that has been
combined from separate objects, you can break apart the combined
object.
The three objects (left) are combined to create a single object (right). The
new object has the fill and outline properties of the last object selected.
To combine objects
1. Select the objects to be combined.
2. Click Arrange > Combine.
To break apart a combined object
1. Select a combined object.
2. Click Arrange > Break curve apart.
Modul Diklat Pengembangan Keprofesian Berkelanjutan (PKB) Untuk Guru
KEGIATAN PEMBELAJARAN 1: MEMAHAMI PERANGKAT LUNAK COREL DRAW MODUL SUPLEMEN 8
73
10. Locking objects
Locking an object prevents you from accidentally moving, sizing,
transforming, filling, or otherwise changing it. You can lock single,
multiple, or grouped objects. To change a locked object, you need to
unlock it first. You can unlock one object at a time, or all locked objects at
the same time.
To lock an object
• Select an object, and click Arrange > Lock object.
• You can also lock an object by right-clicking it and then clicking Lock
object.
To unlock objects
1. Select a locked object or group of objects.
2. Click Arrange, and then click one of the following:
• Unlock object
• Unlock all objects
4. SHAPING OBJECTS
1. Filleting, scalloping, and chamfering corners
You can shape an object by filleting, scalloping, or chamfering corners.
Filleting produces a rounded corner, scalloping rounds and inverts the corner
to create a notch, and chamfering bevels a corner so that it appears flat.
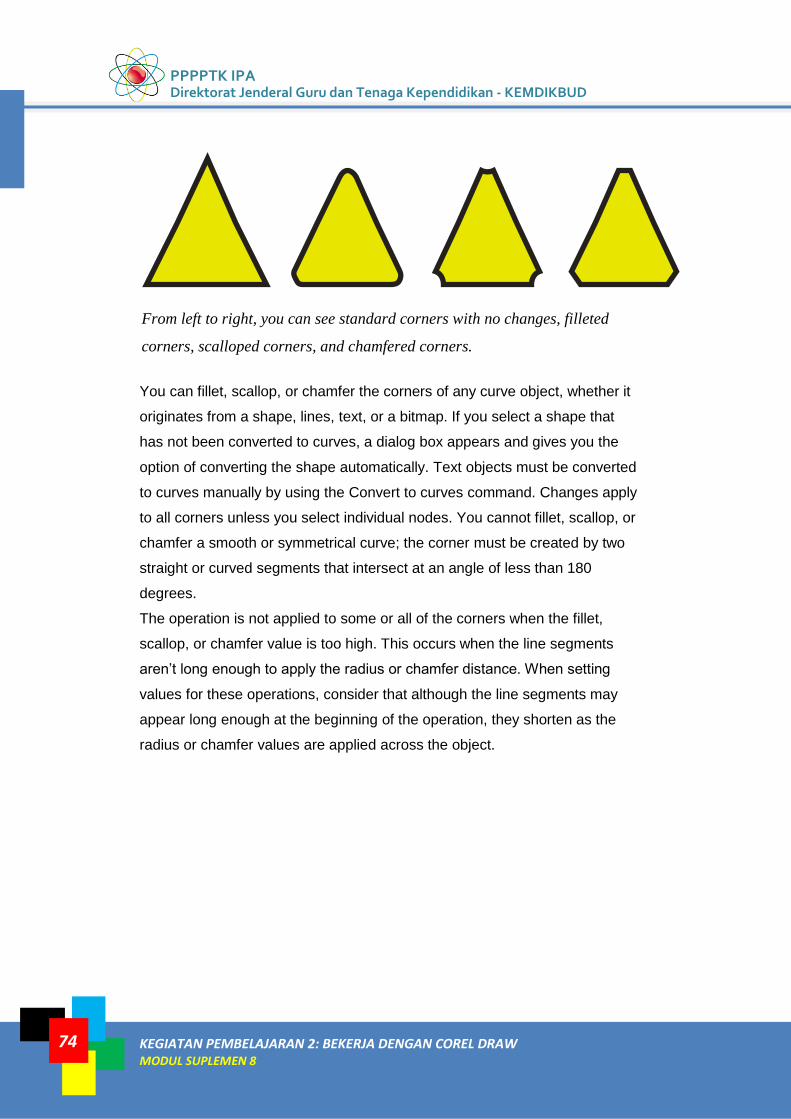
PPPPTK IPA Direktorat Jenderal Guru dan Tenaga Kependidikan - KEMDIKBUD
74 KEGIATAN PEMBELAJARAN 2: BEKERJA DENGAN COREL DRAW MODUL SUPLEMEN 8
From left to right, you can see standard corners with no changes, filleted
corners, scalloped corners, and chamfered corners.
You can fillet, scallop, or chamfer the corners of any curve object, whether it
originates from a shape, lines, text, or a bitmap. If you select a shape that
has not been converted to curves, a dialog box appears and gives you the
option of converting the shape automatically. Text objects must be converted
to curves manually by using the Convert to curves command. Changes apply
to all corners unless you select individual nodes. You cannot fillet, scallop, or
chamfer a smooth or symmetrical curve; the corner must be created by two
straight or curved segments that intersect at an angle of less than 180
degrees.
The operation is not applied to some or all of the corners when the fillet,
scallop, or chamfer value is too high. This occurs when the line segments
aren’t long enough to apply the radius or chamfer distance. When setting
values for these operations, consider that although the line segments may
appear long enough at the beginning of the operation, they shorten as the
radius or chamfer values are applied across the object.
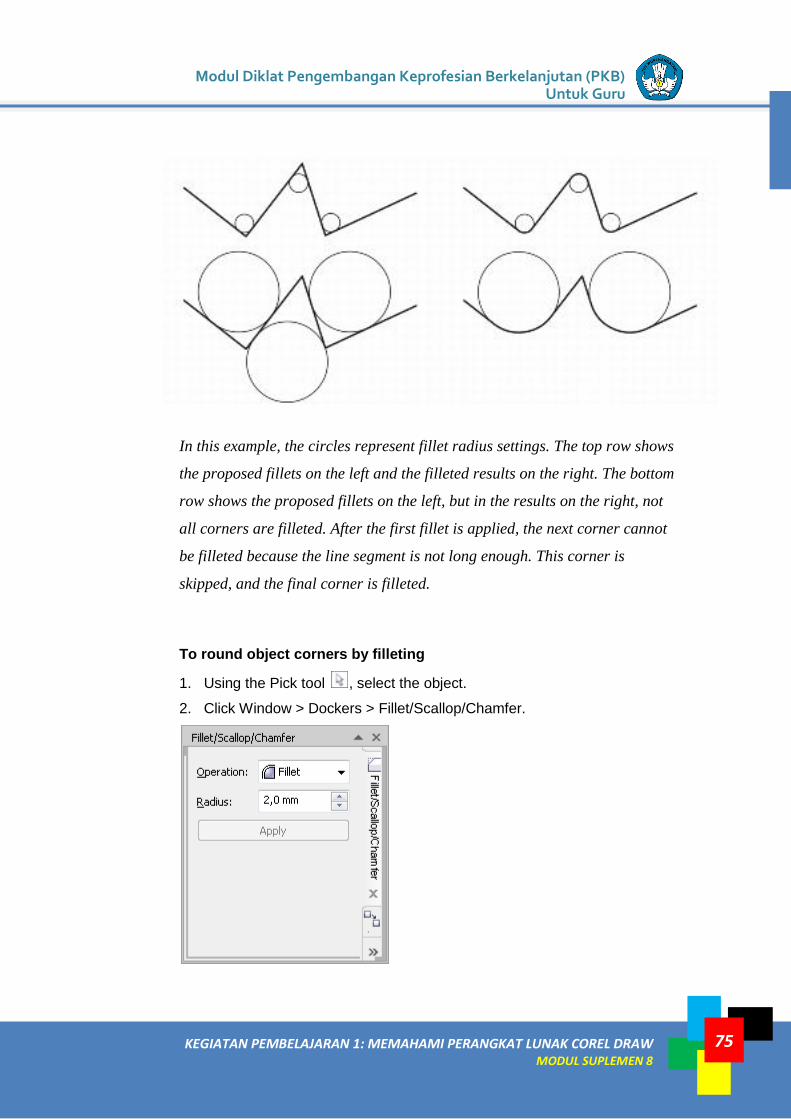
Modul Diklat Pengembangan Keprofesian Berkelanjutan (PKB) Untuk Guru
KEGIATAN PEMBELAJARAN 1: MEMAHAMI PERANGKAT LUNAK COREL DRAW MODUL SUPLEMEN 8
75
In this example, the circles represent fillet radius settings. The top row shows
the proposed fillets on the left and the filleted results on the right. The bottom
row shows the proposed fillets on the left, but in the results on the right, not
all corners are filleted. After the first fillet is applied, the next corner cannot
be filleted because the line segment is not long enough. This corner is
skipped, and the final corner is filleted.
To round object corners by filleting
1. Using the Pick tool , select the object.
2. Click Window > Dockers > Fillet/Scallop/Chamfer.
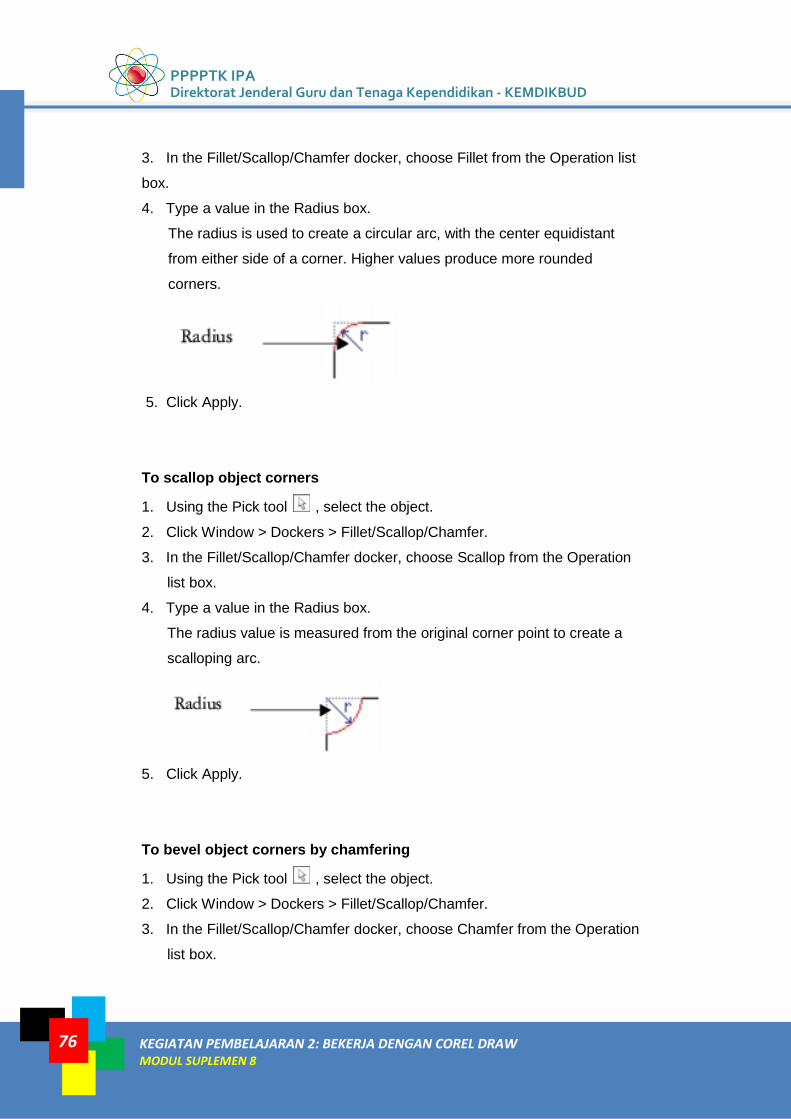
PPPPTK IPA Direktorat Jenderal Guru dan Tenaga Kependidikan - KEMDIKBUD
76 KEGIATAN PEMBELAJARAN 2: BEKERJA DENGAN COREL DRAW MODUL SUPLEMEN 8
3. In the Fillet/Scallop/Chamfer docker, choose Fillet from the Operation list
box.
4. Type a value in the Radius box.
The radius is used to create a circular arc, with the center equidistant
from either side of a corner. Higher values produce more rounded
corners.
5. Click Apply.
To scallop object corners
1. Using the Pick tool , select the object.
2. Click Window > Dockers > Fillet/Scallop/Chamfer.
3. In the Fillet/Scallop/Chamfer docker, choose Scallop from the Operation
list box.
4. Type a value in the Radius box.
The radius value is measured from the original corner point to create a
scalloping arc.
5. Click Apply.
To bevel object corners by chamfering
1. Using the Pick tool , select the object.
2. Click Window > Dockers > Fillet/Scallop/Chamfer.
3. In the Fillet/Scallop/Chamfer docker, choose Chamfer from the Operation
list box.
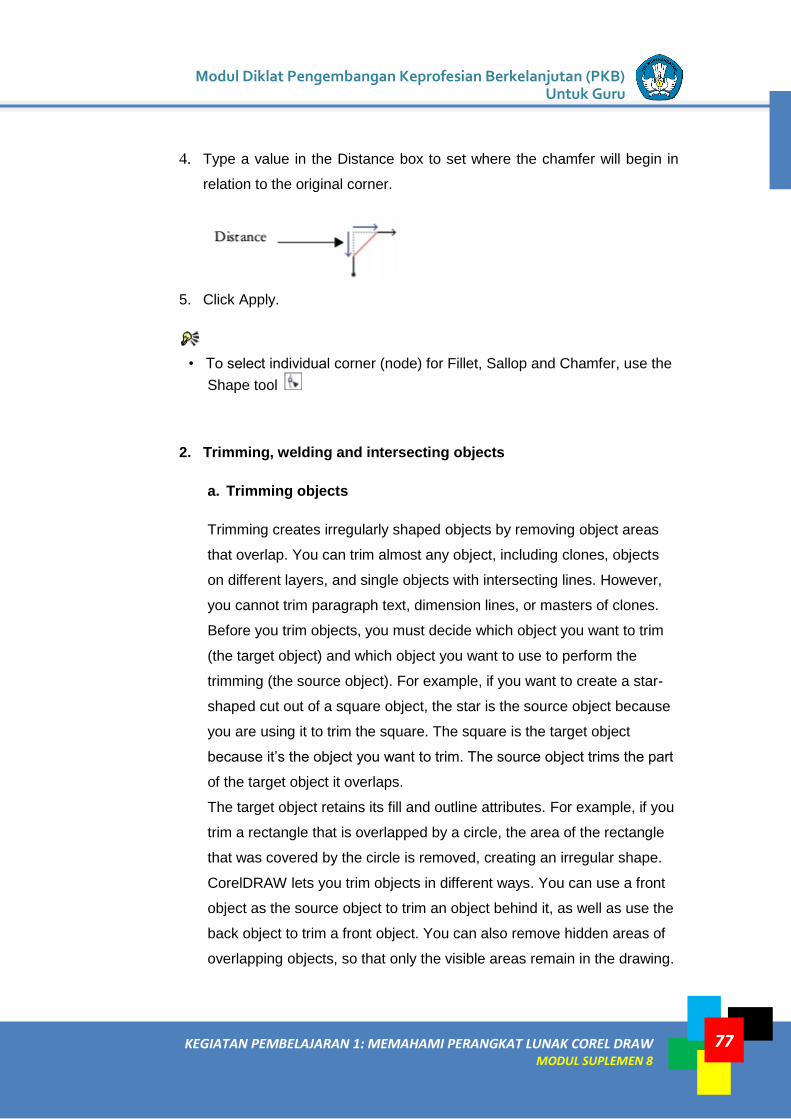
Modul Diklat Pengembangan Keprofesian Berkelanjutan (PKB) Untuk Guru
KEGIATAN PEMBELAJARAN 1: MEMAHAMI PERANGKAT LUNAK COREL DRAW MODUL SUPLEMEN 8
77
4. Type a value in the Distance box to set where the chamfer will begin in
relation to the original corner.
5. Click Apply.
• To select individual corner (node) for Fillet, Sallop and Chamfer, use the
Shape tool
2. Trimming, welding and intersecting objects
a. Trimming objects
Trimming creates irregularly shaped objects by removing object areas
that overlap. You can trim almost any object, including clones, objects
on different layers, and single objects with intersecting lines. However,
you cannot trim paragraph text, dimension lines, or masters of clones.
Before you trim objects, you must decide which object you want to trim
(the target object) and which object you want to use to perform the
trimming (the source object). For example, if you want to create a star-
shaped cut out of a square object, the star is the source object because
you are using it to trim the square. The square is the target object
because it’s the object you want to trim. The source object trims the part
of the target object it overlaps.
The target object retains its fill and outline attributes. For example, if you
trim a rectangle that is overlapped by a circle, the area of the rectangle
that was covered by the circle is removed, creating an irregular shape.
CorelDRAW lets you trim objects in different ways. You can use a front
object as the source object to trim an object behind it, as well as use the
back object to trim a front object. You can also remove hidden areas of
overlapping objects, so that only the visible areas remain in the drawing.
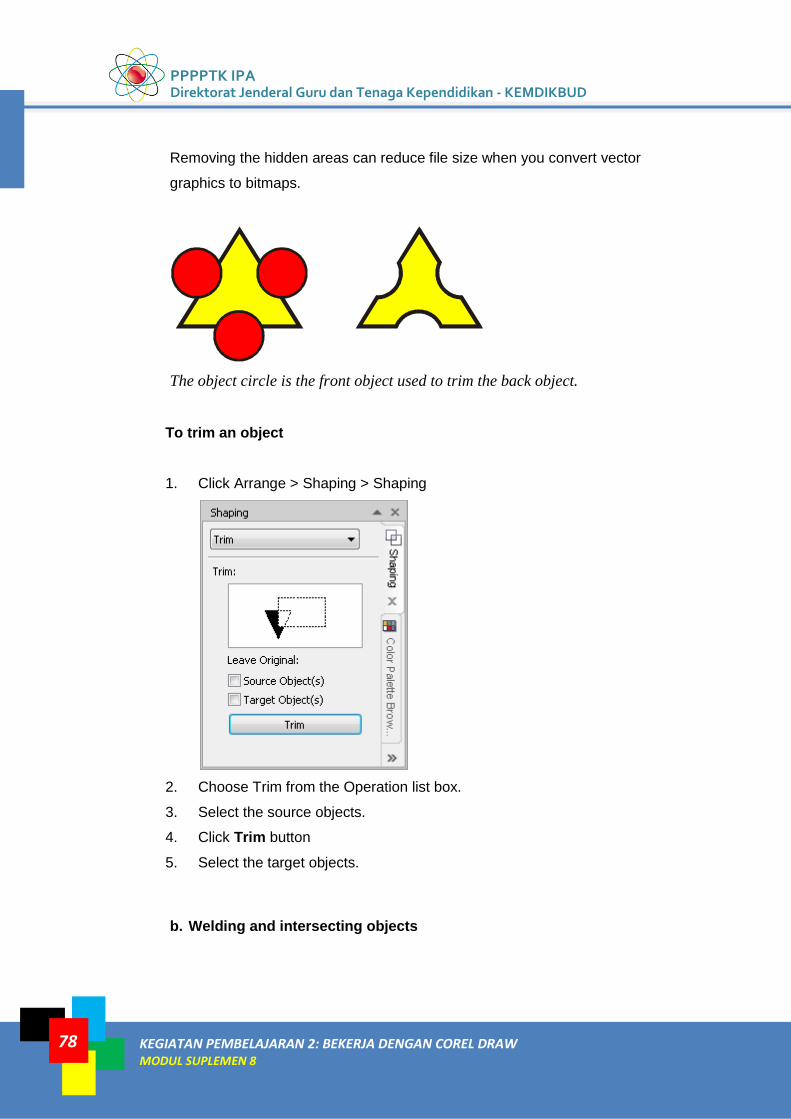
PPPPTK IPA Direktorat Jenderal Guru dan Tenaga Kependidikan - KEMDIKBUD
78 KEGIATAN PEMBELAJARAN 2: BEKERJA DENGAN COREL DRAW MODUL SUPLEMEN 8
Removing the hidden areas can reduce file size when you convert vector
graphics to bitmaps.
The object circle is the front object used to trim the back object.
To trim an object
1. Click Arrange > Shaping > Shaping
2. Choose Trim from the Operation list box.
3. Select the source objects.
4. Click Trim button
5. Select the target objects.
b. Welding and intersecting objects
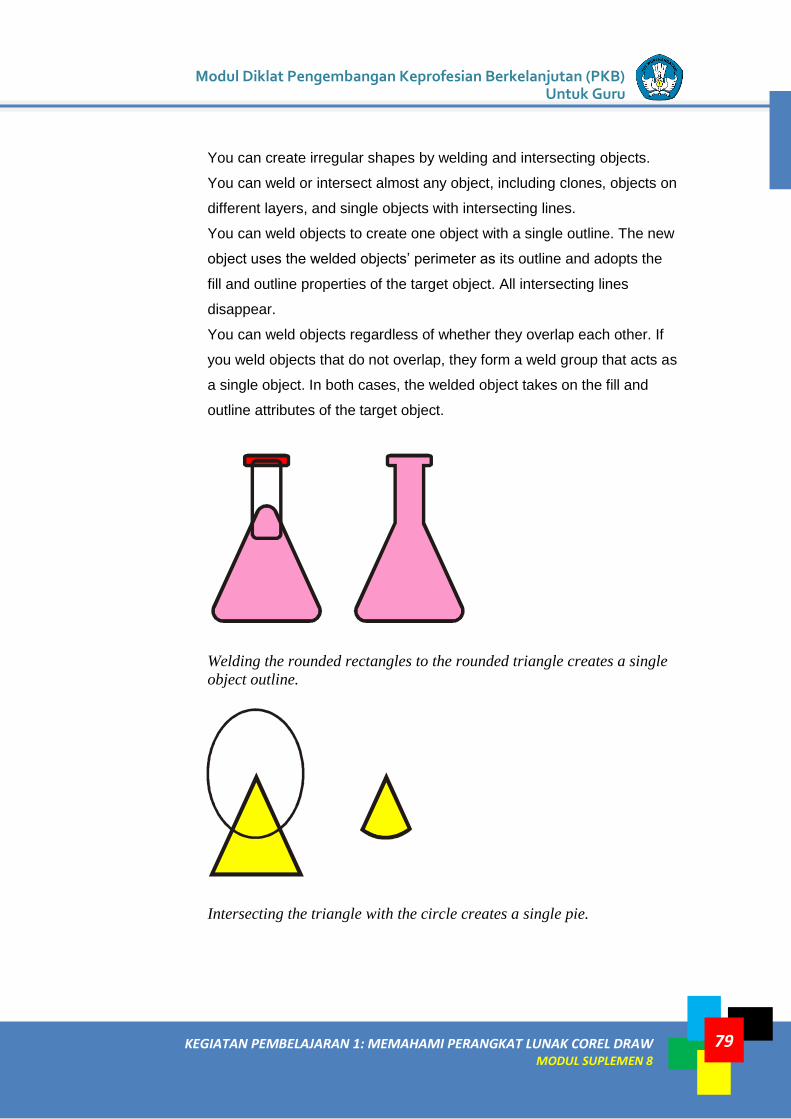
Modul Diklat Pengembangan Keprofesian Berkelanjutan (PKB) Untuk Guru
KEGIATAN PEMBELAJARAN 1: MEMAHAMI PERANGKAT LUNAK COREL DRAW MODUL SUPLEMEN 8
79
You can create irregular shapes by welding and intersecting objects.
You can weld or intersect almost any object, including clones, objects on
different layers, and single objects with intersecting lines.
You can weld objects to create one object with a single outline. The new
object uses the welded objects’ perimeter as its outline and adopts the
fill and outline properties of the target object. All intersecting lines
disappear.
You can weld objects regardless of whether they overlap each other. If
you weld objects that do not overlap, they form a weld group that acts as
a single object. In both cases, the welded object takes on the fill and
outline attributes of the target object.
Welding the rounded rectangles to the rounded triangle creates a single
object outline.
Intersecting the triangle with the circle creates a single pie.
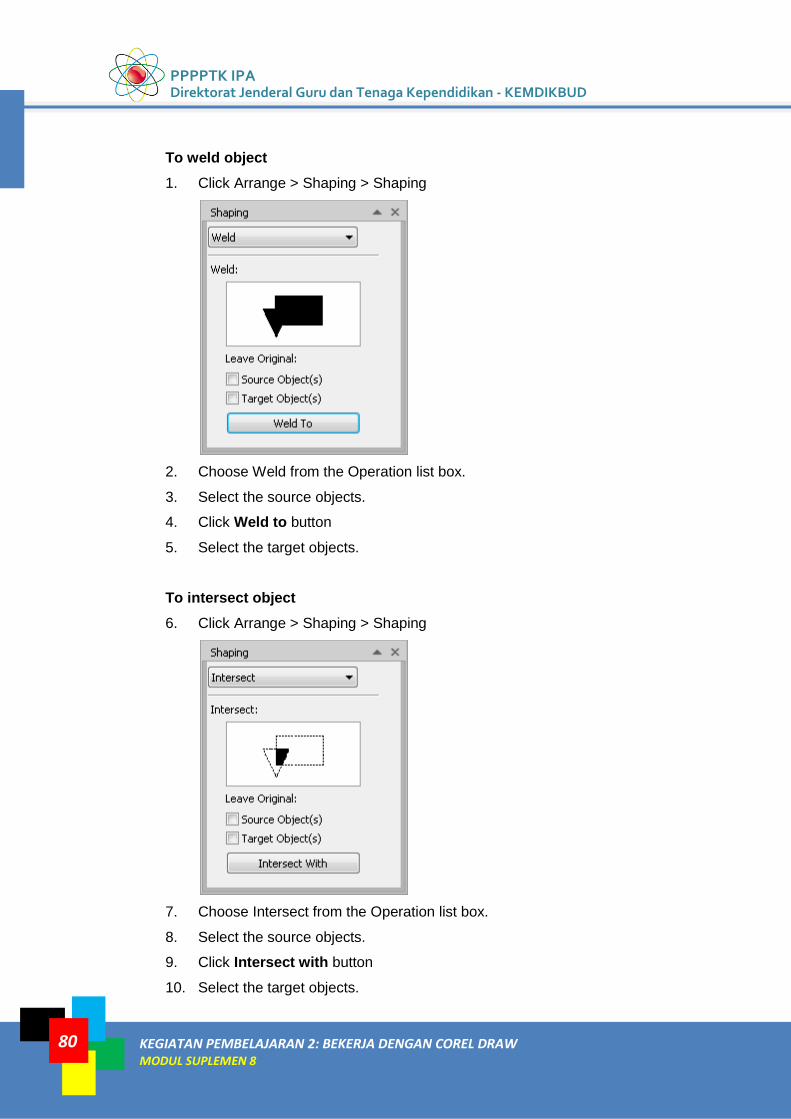
PPPPTK IPA Direktorat Jenderal Guru dan Tenaga Kependidikan - KEMDIKBUD
80 KEGIATAN PEMBELAJARAN 2: BEKERJA DENGAN COREL DRAW MODUL SUPLEMEN 8
To weld object
1. Click Arrange > Shaping > Shaping
2. Choose Weld from the Operation list box.
3. Select the source objects.
4. Click Weld to button
5. Select the target objects.
To intersect object
6. Click Arrange > Shaping > Shaping
7. Choose Intersect from the Operation list box.
8. Select the source objects.
9. Click Intersect with button
10. Select the target objects.
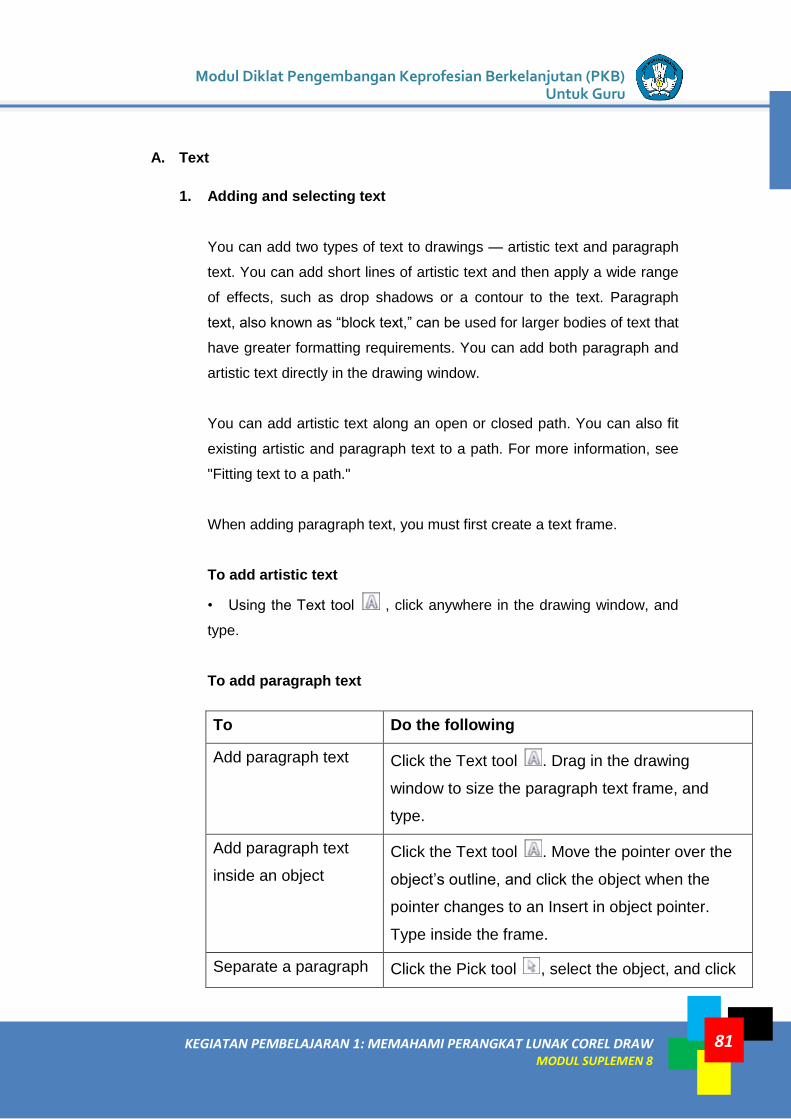
Modul Diklat Pengembangan Keprofesian Berkelanjutan (PKB) Untuk Guru
KEGIATAN PEMBELAJARAN 1: MEMAHAMI PERANGKAT LUNAK COREL DRAW MODUL SUPLEMEN 8
81
A. Text
1. Adding and selecting text
You can add two types of text to drawings — artistic text and paragraph
text. You can add short lines of artistic text and then apply a wide range
of effects, such as drop shadows or a contour to the text. Paragraph
text, also known as “block text,” can be used for larger bodies of text that
have greater formatting requirements. You can add both paragraph and
artistic text directly in the drawing window.
You can add artistic text along an open or closed path. You can also fit
existing artistic and paragraph text to a path. For more information, see
"Fitting text to a path."
When adding paragraph text, you must first create a text frame.
To add artistic text
• Using the Text tool , click anywhere in the drawing window, and
type.
To add paragraph text
To Do the following
Add paragraph text Click the Text tool . Drag in the drawing
window to size the paragraph text frame, and
type.
Add paragraph text
inside an object
Click the Text tool . Move the pointer over the
object’s outline, and click the object when the
pointer changes to an Insert in object pointer.
Type inside the frame.
Separate a paragraph Click the Pick tool , select the object, and click
PPPPTK IPA Direktorat Jenderal Guru dan Tenaga Kependidikan - KEMDIKBUD
82 KEGIATAN PEMBELAJARAN 2: BEKERJA DENGAN COREL DRAW MODUL SUPLEMEN 8
text frame from an
object
Arrange > Break paragraph text inside a path
apart.
To select text
To Do the following
Select an entire text
object
Using the Pick tool , click the text object.
Select specific
characters
Using the Text tool , drag across the text.
2. Fitting text to a path
You can add artistic text along the path of an open object (for example, a
line) or a closed object (for example, a square). You can also fit existing
text to a path. Artistic text can be fitted to an open or closed path.
Paragraph text can be fitted to open paths only.
After you fit text to a path, you can adjust the text’s position relative to
that path. For example, you can mirror the text horizontally, vertically, or
both. Using tick spacing, you can specify an exact distance between the
text and the path.
CorelDRAW treats text fitted to a path as one object; however, you can
separate the text from the object if you no longer want it to be part of the
path. When you separate text from a curved or closed path, the text
retains the shape of the object to which it was fitted.
Modul Diklat Pengembangan Keprofesian Berkelanjutan (PKB) Untuk Guru
KEGIATAN PEMBELAJARAN 1: MEMAHAMI PERANGKAT LUNAK COREL DRAW MODUL SUPLEMEN 8
83
To fit text to a path
1. Select a text object by using the Pick tool .
2. Click Text > Fit text to path.
The pointer changes to the Fit text to path pointer . By moving the
pointer over the path, you can preview where the text will be fitted.
3. Click a path.
If the text is fitted to a closed path, the text is centered along the
path. If the text is fitted to an open path, the text flows from the point
of insertion.
3. Wrapping paragraph text around objects and text
You can change the shape of text by wrapping paragraph text around an
object, artistic text, or a paragraph text frame. You can wrap text by
using contour or square wrapping styles. The contour wrapping styles
follow the curve of the object. The square wrapping styles follow the
bounding box of the object. You can also adjust the amount of space
between paragraph text and the object or text, as well as remove any
wrapping style you apply.
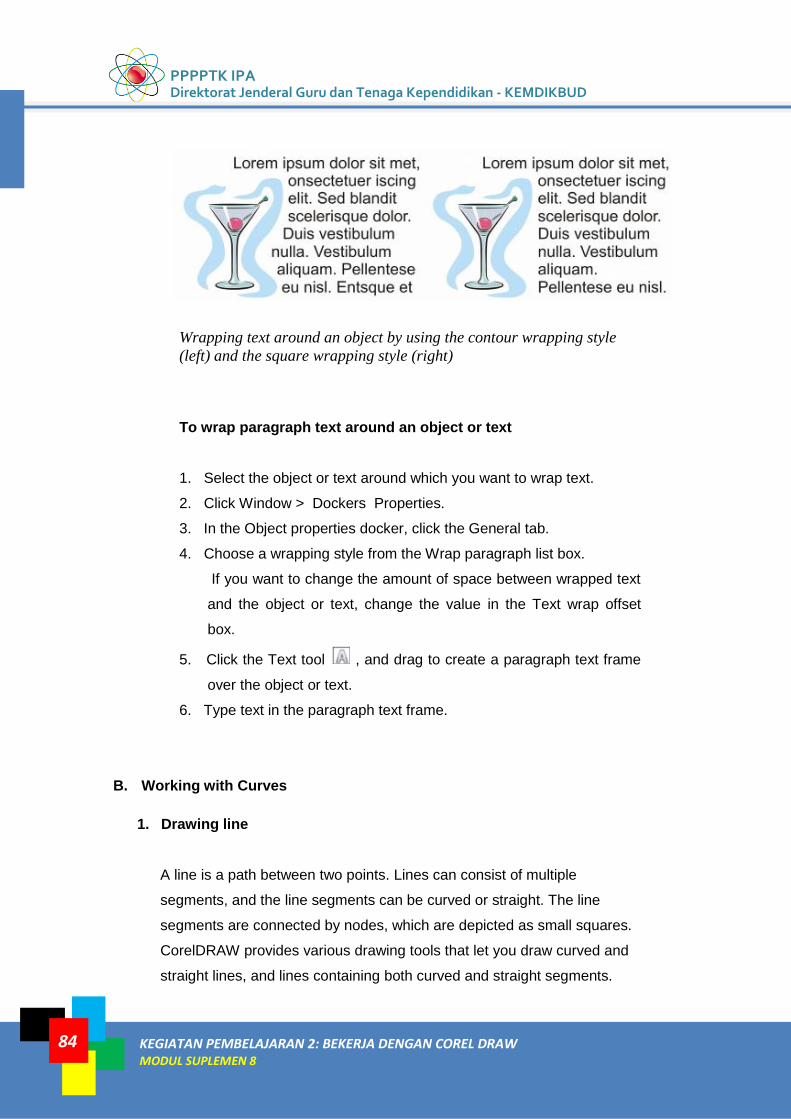
PPPPTK IPA Direktorat Jenderal Guru dan Tenaga Kependidikan - KEMDIKBUD
84 KEGIATAN PEMBELAJARAN 2: BEKERJA DENGAN COREL DRAW MODUL SUPLEMEN 8
Wrapping text around an object by using the contour wrapping style
(left) and the square wrapping style (right)
To wrap paragraph text around an object or text
1. Select the object or text around which you want to wrap text.
2. Click Window > Dockers Properties.
3. In the Object properties docker, click the General tab.
4. Choose a wrapping style from the Wrap paragraph list box.
If you want to change the amount of space between wrapped text
and the object or text, change the value in the Text wrap offset
box.
5. Click the Text tool , and drag to create a paragraph text frame
over the object or text.
6. Type text in the paragraph text frame.
B. Working with Curves
1. Drawing line
A line is a path between two points. Lines can consist of multiple
segments, and the line segments can be curved or straight. The line
segments are connected by nodes, which are depicted as small squares.
CorelDRAW provides various drawing tools that let you draw curved and
straight lines, and lines containing both curved and straight segments.
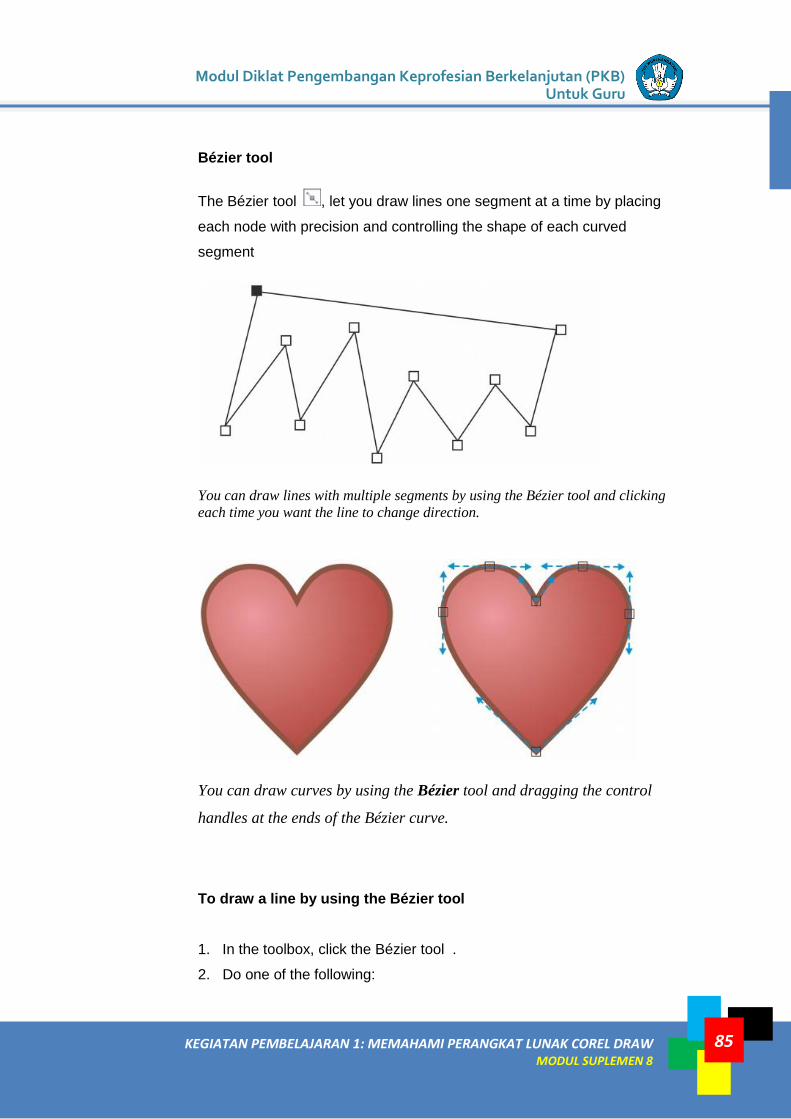
Modul Diklat Pengembangan Keprofesian Berkelanjutan (PKB) Untuk Guru
KEGIATAN PEMBELAJARAN 1: MEMAHAMI PERANGKAT LUNAK COREL DRAW MODUL SUPLEMEN 8
85
Bézier tool
The Bézier tool , let you draw lines one segment at a time by placing
each node with precision and controlling the shape of each curved
segment
You can draw lines with multiple segments by using the Bézier tool and clicking
each time you want the line to change direction.
You can draw curves by using the Bézier tool and dragging the control
handles at the ends of the Bézier curve.
To draw a line by using the Bézier tool
1. In the toolbox, click the Bézier tool .
2. Do one of the following:
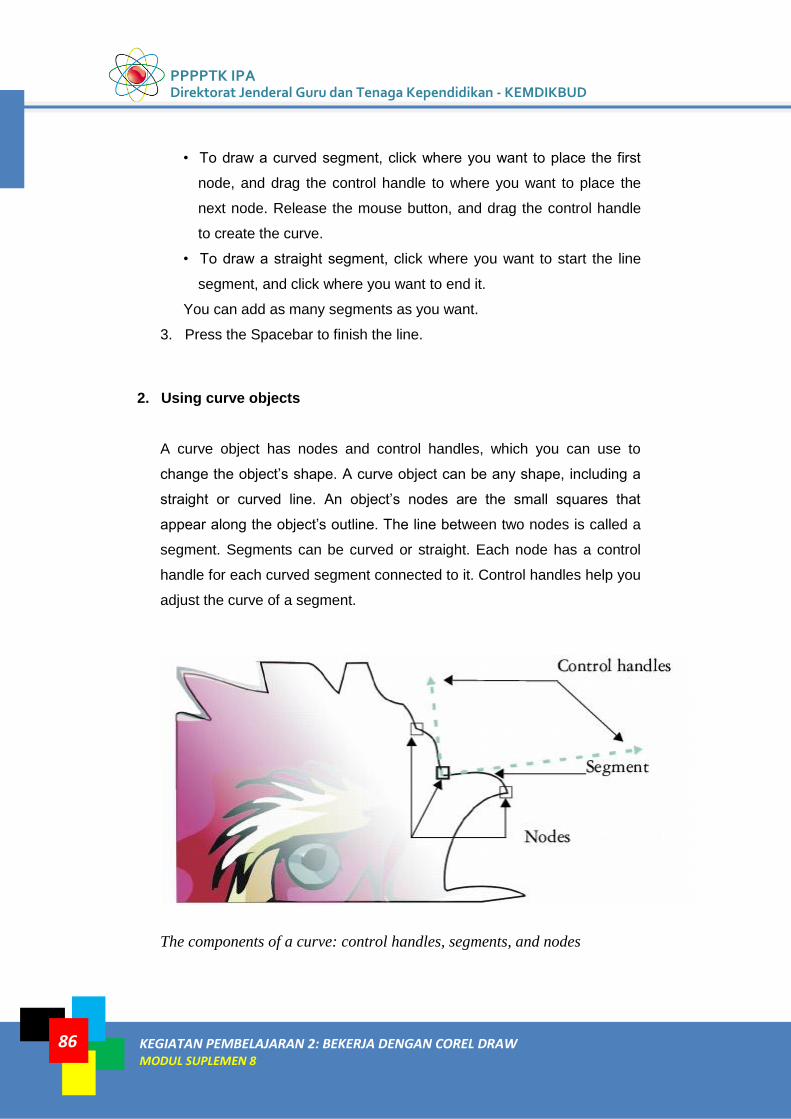
PPPPTK IPA Direktorat Jenderal Guru dan Tenaga Kependidikan - KEMDIKBUD
86 KEGIATAN PEMBELAJARAN 2: BEKERJA DENGAN COREL DRAW MODUL SUPLEMEN 8
• To draw a curved segment, click where you want to place the first
node, and drag the control handle to where you want to place the
next node. Release the mouse button, and drag the control handle
to create the curve.
• To draw a straight segment, click where you want to start the line
segment, and click where you want to end it.
You can add as many segments as you want.
3. Press the Spacebar to finish the line.
2. Using curve objects
A curve object has nodes and control handles, which you can use to
change the object’s shape. A curve object can be any shape, including a
straight or curved line. An object’s nodes are the small squares that
appear along the object’s outline. The line between two nodes is called a
segment. Segments can be curved or straight. Each node has a control
handle for each curved segment connected to it. Control handles help you
adjust the curve of a segment.
The components of a curve: control handles, segments, and nodes

Modul Diklat Pengembangan Keprofesian Berkelanjutan (PKB) Untuk Guru
KEGIATAN PEMBELAJARAN 1: MEMAHAMI PERANGKAT LUNAK COREL DRAW MODUL SUPLEMEN 8
87
Most objects that are added to a drawing are not curve objects, with the
exception of spirals, freehand lines, and Bézier lines. Therefore, if you
want to customize the shape of an object or text object, it is recommended
that you convert it to a curve object.
To convert objects to curve objects
1. Select the object.
2. Click Arrange > Convert to curves.
3. Manipulating segments
You can move curved segments to change an object’s shape. You can
also control the smoothness of curved segments.
You can change the direction of a curve object by reversing the position of
its start and end nodes. The effect is apparent only when the ends of a
curve object are different. For example, when an arrowhead is applied to
the end node of a curve object, changing the direction results in moving
the arrowhead to the start node.
Changing the direction of a curve
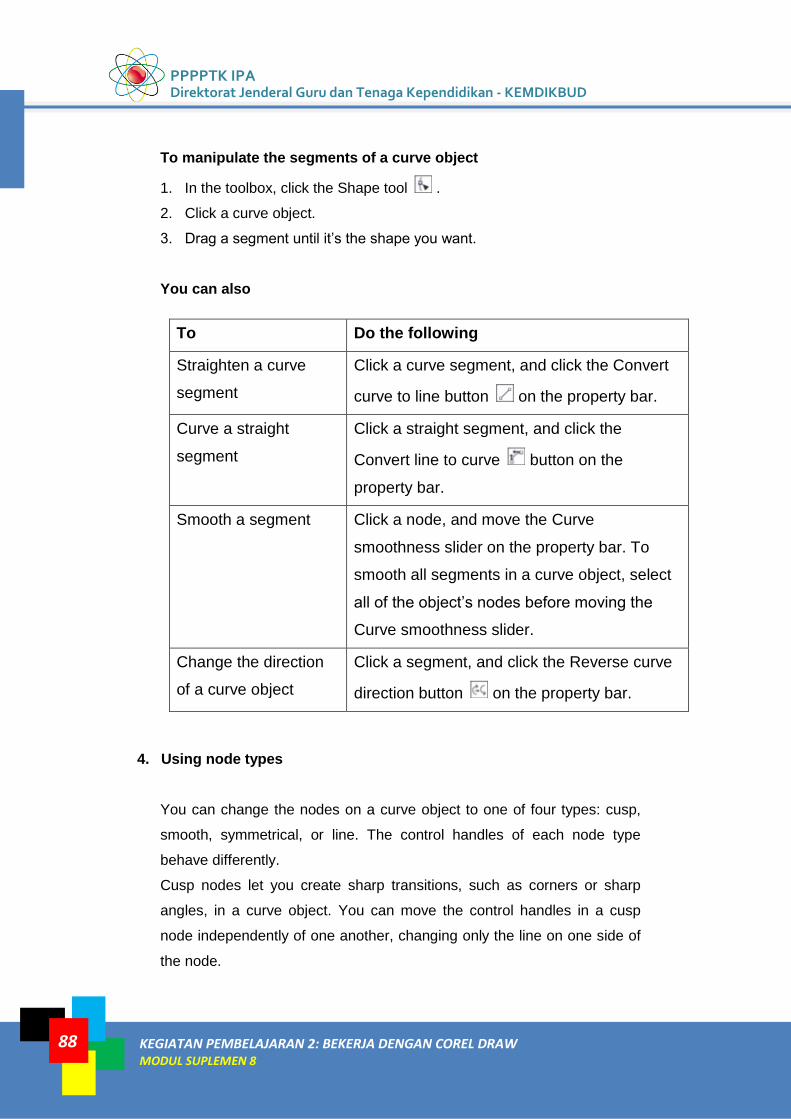
PPPPTK IPA Direktorat Jenderal Guru dan Tenaga Kependidikan - KEMDIKBUD
88 KEGIATAN PEMBELAJARAN 2: BEKERJA DENGAN COREL DRAW MODUL SUPLEMEN 8
To manipulate the segments of a curve object
1. In the toolbox, click the Shape tool .
2. Click a curve object.
3. Drag a segment until it’s the shape you want.
You can also
To Do the following
Straighten a curve
segment
Click a curve segment, and click the Convert
curve to line button on the property bar.
Curve a straight
segment
Click a straight segment, and click the
Convert line to curve button on the
property bar.
Smooth a segment Click a node, and move the Curve
smoothness slider on the property bar. To
smooth all segments in a curve object, select
all of the object’s nodes before moving the
Curve smoothness slider.
Change the direction
of a curve object
Click a segment, and click the Reverse curve
direction button on the property bar.
4. Using node types
You can change the nodes on a curve object to one of four types: cusp,
smooth, symmetrical, or line. The control handles of each node type
behave differently.
Cusp nodes let you create sharp transitions, such as corners or sharp
angles, in a curve object. You can move the control handles in a cusp
node independently of one another, changing only the line on one side of
the node.
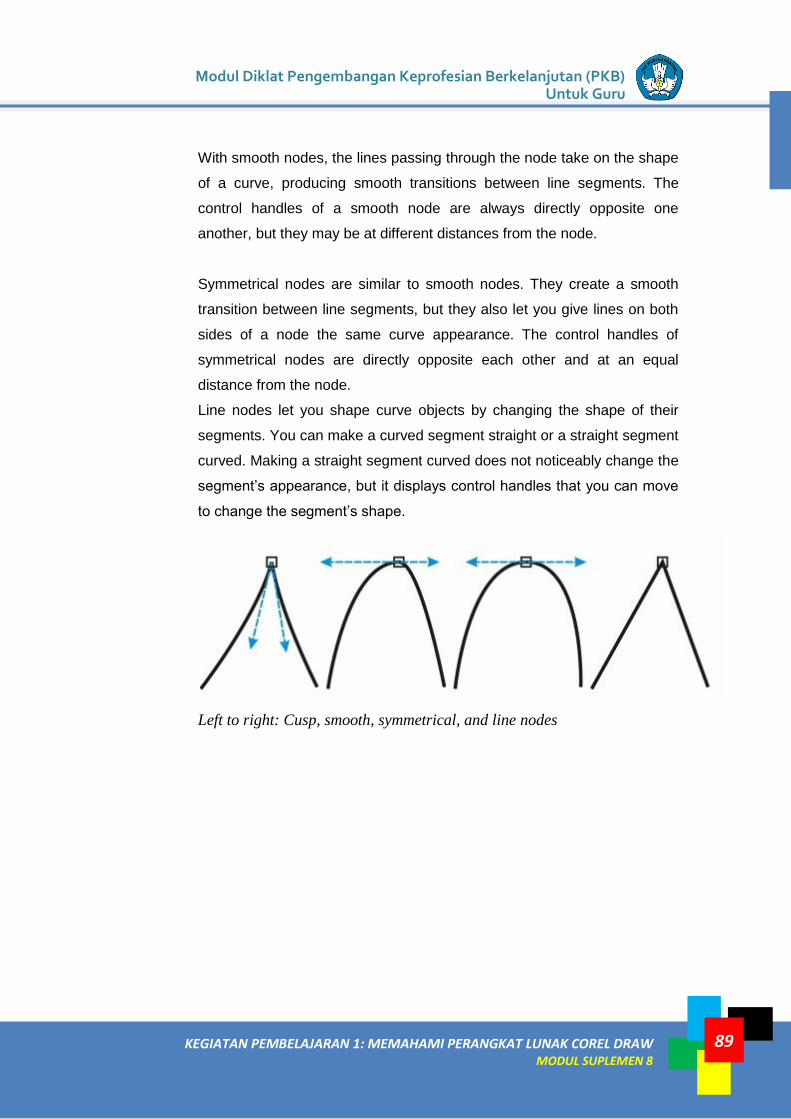
Modul Diklat Pengembangan Keprofesian Berkelanjutan (PKB) Untuk Guru
KEGIATAN PEMBELAJARAN 1: MEMAHAMI PERANGKAT LUNAK COREL DRAW MODUL SUPLEMEN 8
89
With smooth nodes, the lines passing through the node take on the shape
of a curve, producing smooth transitions between line segments. The
control handles of a smooth node are always directly opposite one
another, but they may be at different distances from the node.
Symmetrical nodes are similar to smooth nodes. They create a smooth
transition between line segments, but they also let you give lines on both
sides of a node the same curve appearance. The control handles of
symmetrical nodes are directly opposite each other and at an equal
distance from the node.
Line nodes let you shape curve objects by changing the shape of their
segments. You can make a curved segment straight or a straight segment
curved. Making a straight segment curved does not noticeably change the
segment’s appearance, but it displays control handles that you can move
to change the segment’s shape.
Left to right: Cusp, smooth, symmetrical, and line nodes
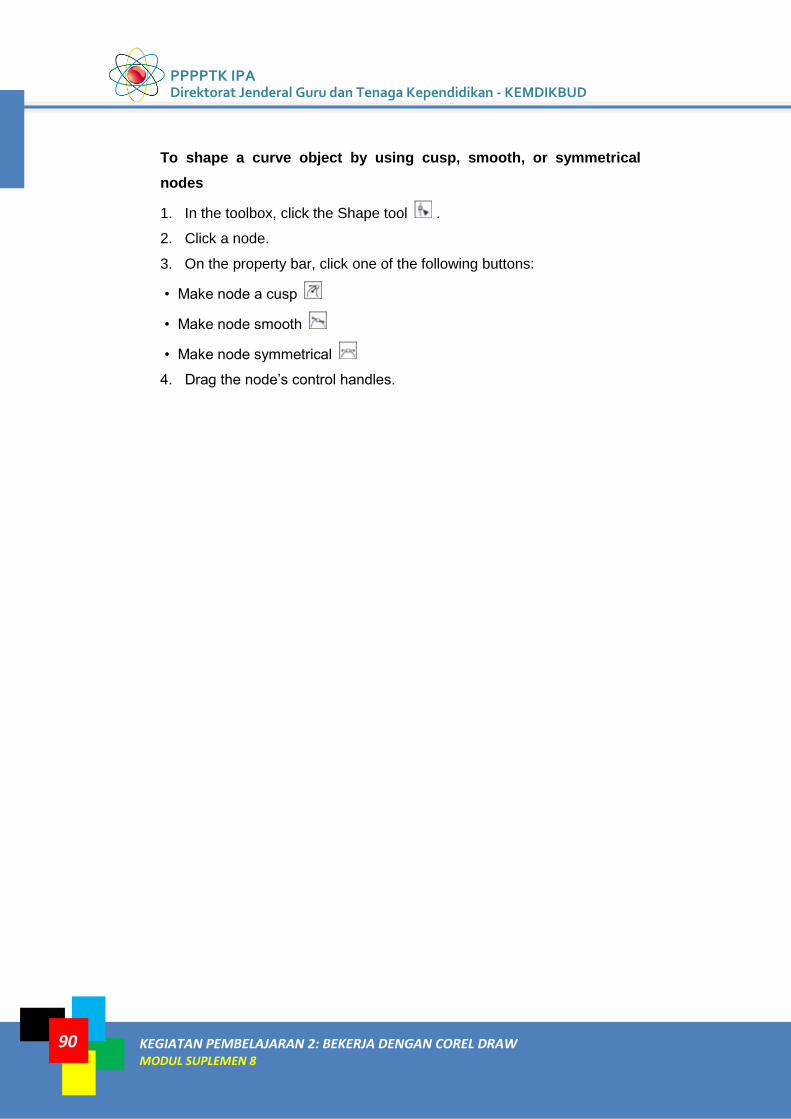
PPPPTK IPA Direktorat Jenderal Guru dan Tenaga Kependidikan - KEMDIKBUD
90 KEGIATAN PEMBELAJARAN 2: BEKERJA DENGAN COREL DRAW MODUL SUPLEMEN 8
To shape a curve object by using cusp, smooth, or symmetrical
nodes
1. In the toolbox, click the Shape tool .
2. Click a node.
3. On the property bar, click one of the following buttons:
• Make node a cusp
• Make node smooth
• Make node symmetrical
4. Drag the node’s control handles.
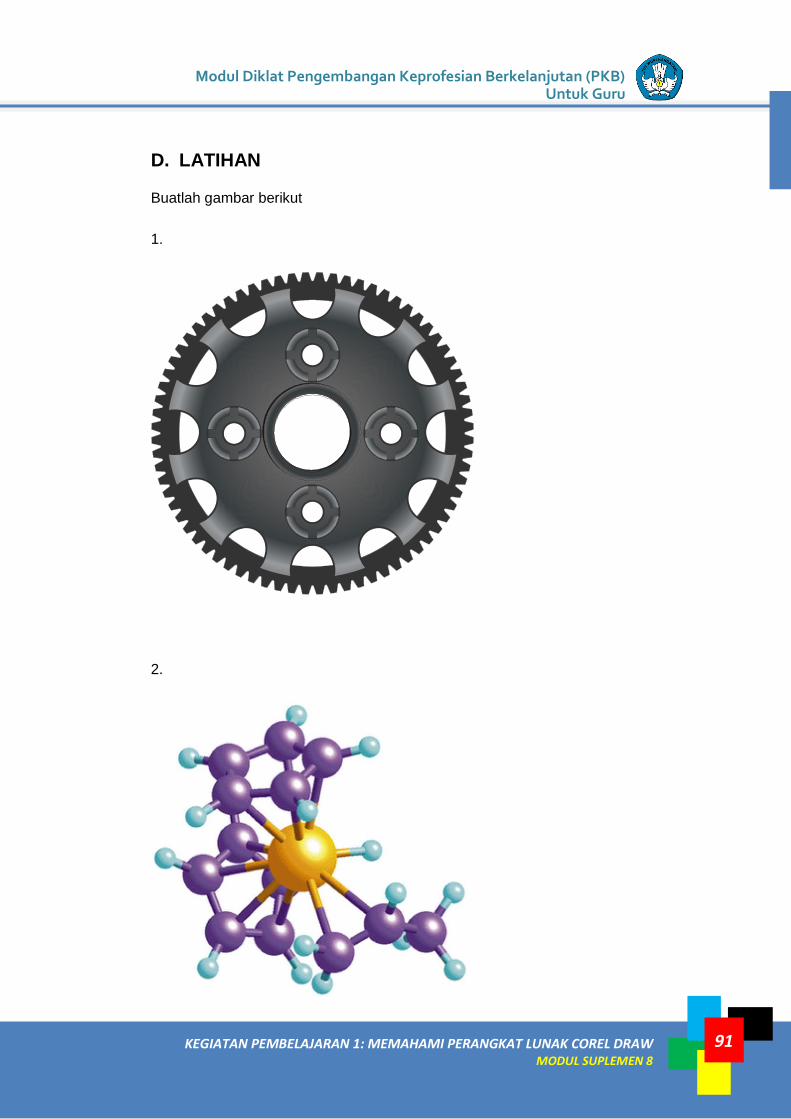
Modul Diklat Pengembangan Keprofesian Berkelanjutan (PKB) Untuk Guru
KEGIATAN PEMBELAJARAN 1: MEMAHAMI PERANGKAT LUNAK COREL DRAW MODUL SUPLEMEN 8
91
D. LATIHAN
Buatlah gambar berikut
1.
2.
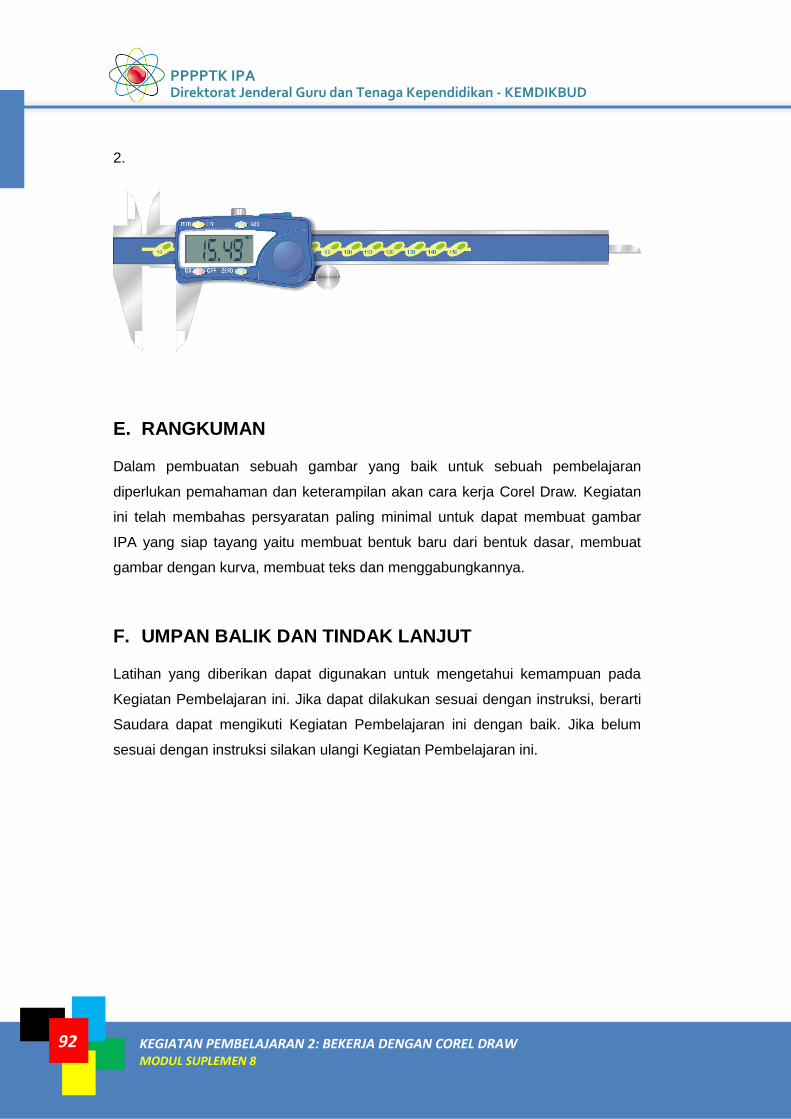
PPPPTK IPA Direktorat Jenderal Guru dan Tenaga Kependidikan - KEMDIKBUD
92 KEGIATAN PEMBELAJARAN 2: BEKERJA DENGAN COREL DRAW MODUL SUPLEMEN 8
2.
E. RANGKUMAN
Dalam pembuatan sebuah gambar yang baik untuk sebuah pembelajaran
diperlukan pemahaman dan keterampilan akan cara kerja Corel Draw. Kegiatan
ini telah membahas persyaratan paling minimal untuk dapat membuat gambar
IPA yang siap tayang yaitu membuat bentuk baru dari bentuk dasar, membuat
gambar dengan kurva, membuat teks dan menggabungkannya.
F. UMPAN BALIK DAN TINDAK LANJUT
Latihan yang diberikan dapat digunakan untuk mengetahui kemampuan pada
Kegiatan Pembelajaran ini. Jika dapat dilakukan sesuai dengan instruksi, berarti
Saudara dapat mengikuti Kegiatan Pembelajaran ini dengan baik. Jika belum
sesuai dengan instruksi silakan ulangi Kegiatan Pembelajaran ini.
EVALUASI MODUL SUPLEMEN 8
93
1. Area CorelDraw yang menampakan judul gambar saat ini dibuka adalah....
a. Title bar
b. Tool bar
c. Menu bar
d. Property bar
e. Scoll bar
2. Image yang tersusun dari objek garis dan kurva dengan perhitungan
matematis mengenai tata letak urutan, luas, warna dan sebagainya yaitu ….
a. gradasi
b. tekstur
c. hybrida
d. bitmap
e. vektor
3. Image vektor banyak dipakai untuk membuat objek-objek yang solid dan bisa
diubah-ubah ukurannya untuk berbagi keperluan seperti ....
a. pemandangan
b. manusia
c. tanaman
d. objek benda
e. logo
EVALUASI
EVALUASI MODUL SUPLEMEN 8
94
PPPPTK IPA Direktorat Jenderal Guru dan Tenaga Kependidikan - KEMDIKBUD
4. Mengganti satuan ukuran pada toolbox dilakukan dengan....
a. Pick tool
b. hand tool
c. free hand tool
d. shape tool
e. artistic media tool
5. Mengganti satuan ukuran pada toolbox dilakukan dengan....
a. Pick tool
b. hand tool
c. free hand tool
d. shape tool
e. artistic media tool
6. Untuk memasukan tulisan pada workspace menggunakan ...
a. bezier tool
b. pen tool
c. text tool
d. free hand tool
e. artistic media tool
7. Untuk mendapatkan sisa hasil potongan, sebaiknya Anda menggunakan
efek shaping….
a. Trim
b. weld
c. intersect
d. target union
e. union
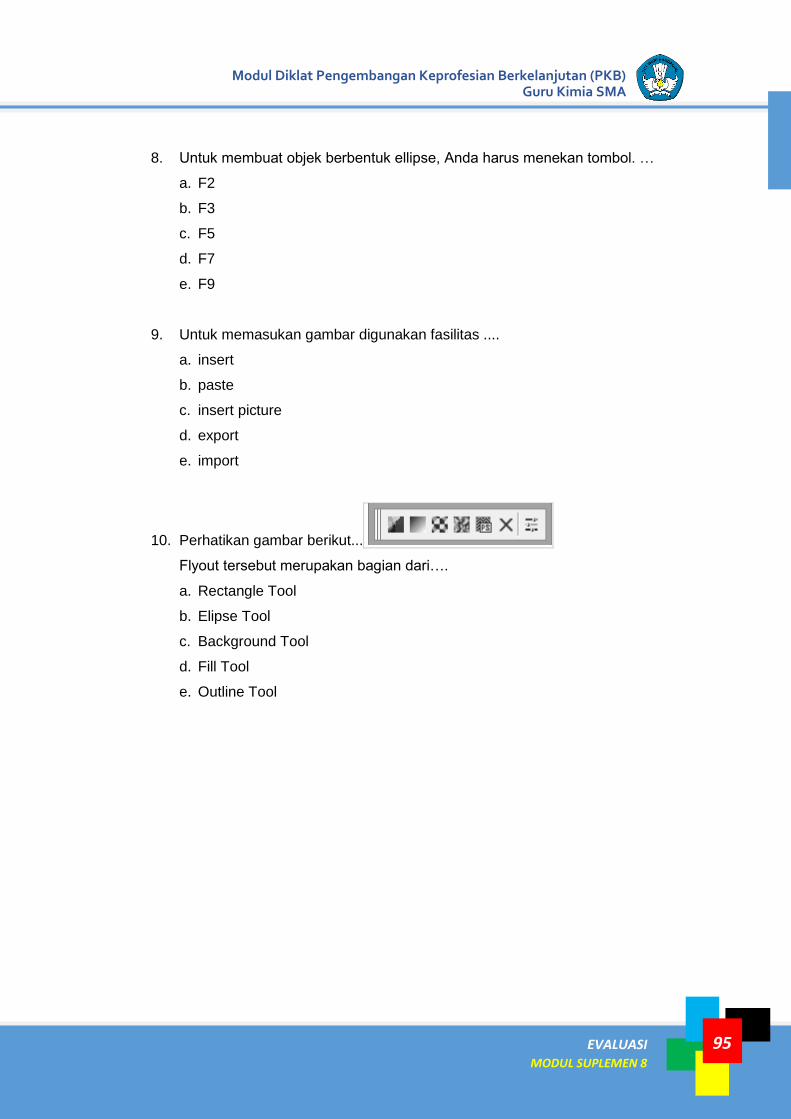
EVALUASI MODUL SUPLEMEN 8
95
Modul Diklat Pengembangan Keprofesian Berkelanjutan (PKB) Guru Kimia SMA
8. Untuk membuat objek berbentuk ellipse, Anda harus menekan tombol. …
a. F2
b. F3
c. F5
d. F7
e. F9
9. Untuk memasukan gambar digunakan fasilitas ....
a. insert
b. paste
c. insert picture
d. export
e. import
10. Perhatikan gambar berikut...
Flyout tersebut merupakan bagian dari….
a. Rectangle Tool
b. Elipse Tool
c. Background Tool
d. Fill Tool
e. Outline Tool

EVALUASI MODUL SUPLEMEN 8
96
PPPPTK IPA Direktorat Jenderal Guru dan Tenaga Kependidikan - KEMDIKBUD
GLOSARIUM
MODUL SUPLEMEN 3 97
Application Software yang dibuat oleh suatu perusahaan komputer
untuk mengerjakan tugas-tugas tertentu
Bullets Tanda yang dipakai untuk memberikan gambar atau
lambang tertentu pada daftar tulisan yang terdapat
dalam satu alinea (paragraph)
Double click Gerakan pada mouse dengan menekan tombol sebelah
kiri sebanyak dua kali secara cepat
Download Mengambil dokumen dari internet, dokumen tersebut
dapat berupa teks, gambar, file, dsb.
Drag Menekan tombol mouse sebelah kiri dan menggerakkan
ke arah tertentu.
Drop Pada aktivitas mouse yang berarti melakukan pelepasan
pada saat menekan tombol pada mouse
Enter Tombol pada keyboard untuk melakukan proses atau
masuk
ESC (escape) Tombol pada keyboard untuk melakukan pembatalan
Excel Aplikasi untuk mengolah baris dan kolom yang
dilengkapi fitur perhitungan, rumus, penyajian data dan
grafik.
Exit Perintah untuk keluar dari aplikasi yang sedang dibuka
GLOSARIUM
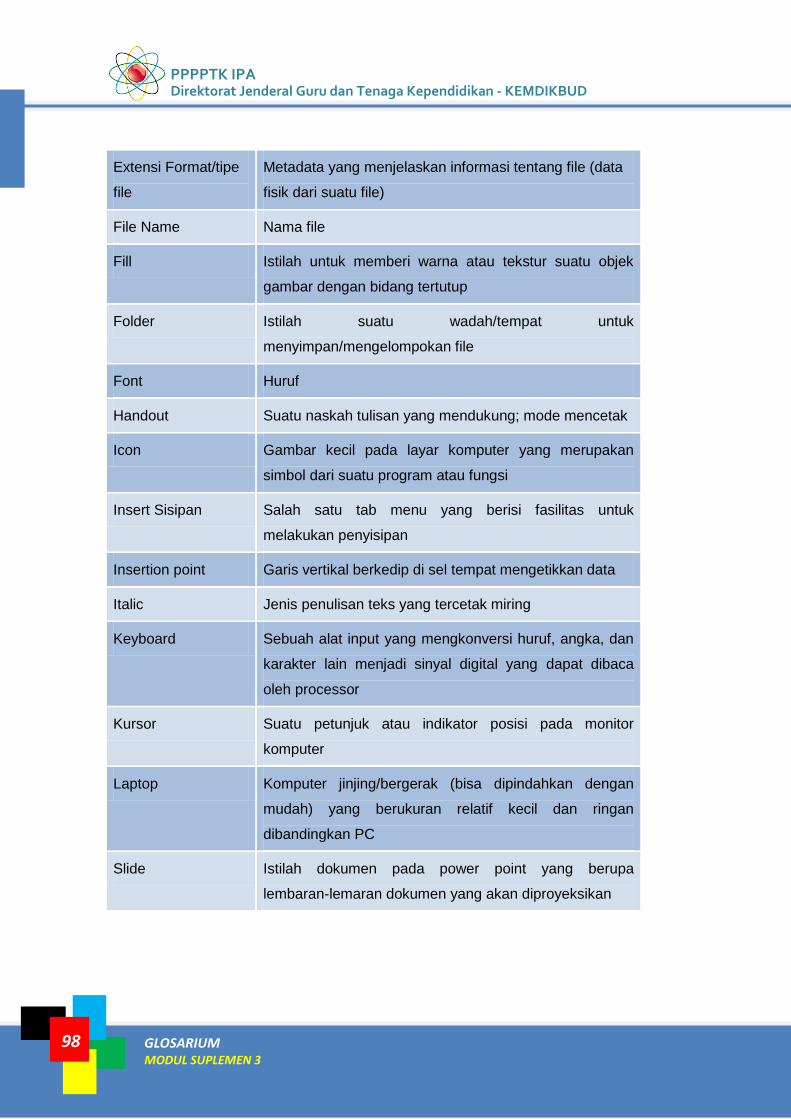
PPPPTK IPA Direktorat Jenderal Guru dan Tenaga Kependidikan - KEMDIKBUD
GLOSARIUM MODUL SUPLEMEN 3
98
Extensi Format/tipe
file
Metadata yang menjelaskan informasi tentang file (data
fisik dari suatu file)
File Name Nama file
Fill Istilah untuk memberi warna atau tekstur suatu objek
gambar dengan bidang tertutup
Folder Istilah suatu wadah/tempat untuk
menyimpan/mengelompokan file
Font Huruf
Handout Suatu naskah tulisan yang mendukung; mode mencetak
Icon Gambar kecil pada layar komputer yang merupakan
simbol dari suatu program atau fungsi
Insert Sisipan Salah satu tab menu yang berisi fasilitas untuk
melakukan penyisipan
Insertion point Garis vertikal berkedip di sel tempat mengetikkan data
Italic Jenis penulisan teks yang tercetak miring
Keyboard Sebuah alat input yang mengkonversi huruf, angka, dan
karakter lain menjadi sinyal digital yang dapat dibaca
oleh processor
Kursor Suatu petunjuk atau indikator posisi pada monitor
komputer
Laptop Komputer jinjing/bergerak (bisa dipindahkan dengan
mudah) yang berukuran relatif kecil dan ringan
dibandingkan PC
Slide Istilah dokumen pada power point yang berupa
lembaran-lemaran dokumen yang akan diproyeksikan
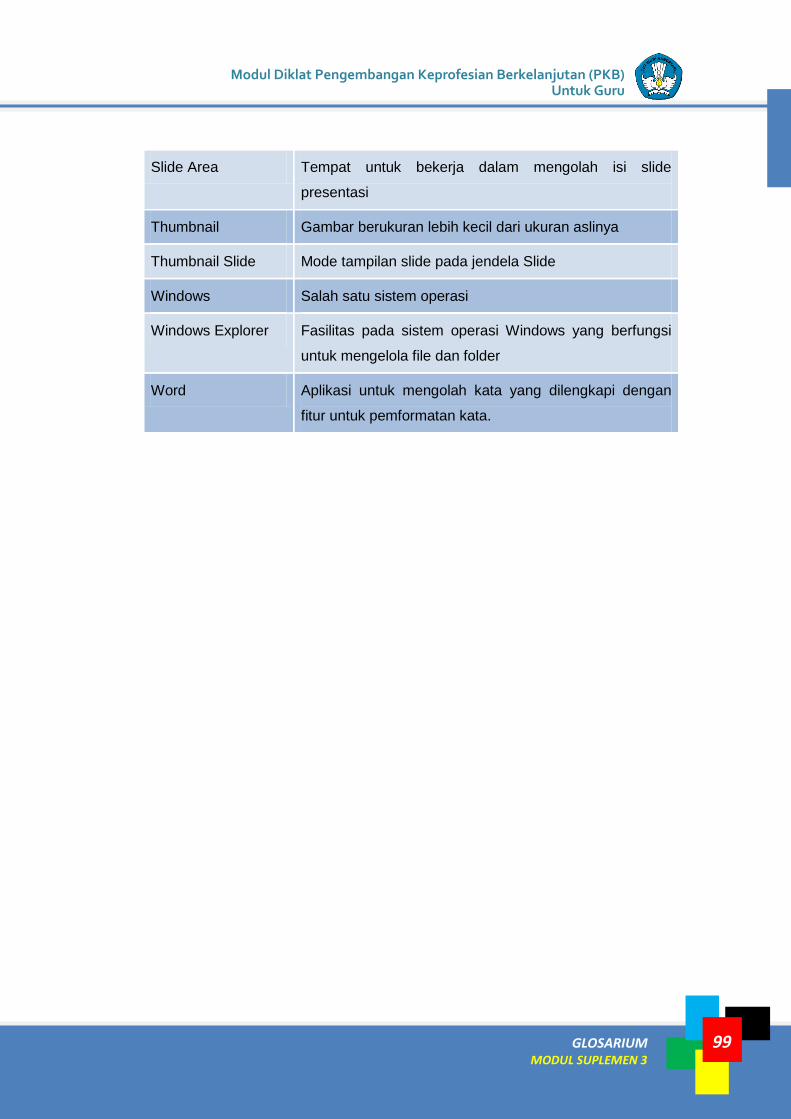
LISTRIK untuk SMP
GLOSARIUM MODUL SUPLEMEN 3
Modul Diklat Pengembangan Keprofesian Berkelanjutan (PKB) Untuk Guru
99
Slide Area Tempat untuk bekerja dalam mengolah isi slide
presentasi
Thumbnail Gambar berukuran lebih kecil dari ukuran aslinya
Thumbnail Slide Mode tampilan slide pada jendela Slide
Windows Salah satu sistem operasi
Windows Explorer Fasilitas pada sistem operasi Windows yang berfungsi
untuk mengelola file dan folder
Word Aplikasi untuk mengolah kata yang dilengkapi dengan
fitur untuk pemformatan kata.

PPPPTK IPA Direktorat Jenderal Guru dan Tenaga Kependidikan - KEMDIKBUD
GLOSARIUM MODUL SUPLEMEN 3
100
DAFTAR PUSTAKA
MODUL SUPLEMEN 8 101
2014, Corel Draw X7 User Guide, Corel Corporation
SUHARMAWAN Amd.GRAF, Modul Materi Corel Draw X7.
Jaka Pramana, E-Book Corel Draw X6, www.jakapramana.com
Agus Maulani, 2009, Graphic Design Module, Bandung: Seameo Qitep In
Science
Tim Penulis, 2014, Modul Pelatihan Dasar Teknologi Informasi dan Komunikasi
untuk Pembelajaran Online, Jakarta: Pusbangtendik – Kemendikbud.
DAFTAR PUSTAKA

PPPPTK IPA Direktorat Jenderal Guru dan Tenaga Kependidikan - KEMDIKBUD
DAFTAR PUSTAKA MODUL SUPLEMEN 8
102

Pusat Pengembangan dan Pemberdayaan Pendidik dan Tenaga Kependidikan Ilmu Pengetahuan Alam (PPPPTK IPA) DIREKTORAT JENDERAL GURU DAN TENAGA KEPENDIDIKAN KEMENTERIAN PENDIDIKAN DAN KEBUDAYAAN
Modul Suplemen Diklat
PENGEMBANGAN KEPROFESIAN
BERKELANJUTAN (PKB)
UNTUK GURU
MODUL SUPLEMEN 8
PEMANFAATAN COREL DRAW
DALAM PEMBELAJARAN IPA