
PELLET FIREPLACE WITH A WATER HEAT EXCHANGER FIREPLACE WITH A WATER HEAT... · 1 FIREPLACE Pellet...
18
1 FIREPLACE Pellet with a water heat exchanger INSTRUCTIONS For installation and operation Technical parameters Description Common safety. Possible dangers Norms and legislation Responsibility Installation Operation instructions of a panel with a display Cleaning and maintenance Everyday cleaning Seasonal cleaning and prophylaxis Warranty. Service. TECHNICAL PARAMETERS Nominal total heat power 17 kW Heat power from the heat exchanger 13 kW Heat power from the radiation 4 kW Decreased total heat power 5 kW 5 levels of power and automatic mode Temperature of the flue gases 195°C Effectiveness up to 90% Capacity of the water heat exchanger 20 l Maximal working pressure 2,0 bar Power supply AC 230V 50Hz Full electric power 350 W Working electric power 100 W Capacity of the ashpan 6,8 l Kind of fuel – wood pellets ø6mm/30mm Capacity of the pellet bunker 25 kg Consumption of pellets for nominal power 4 kg/h Consumption of pellets for minimal power 1,2 kg/h Weight 150 kg Overall dimensions of the body of the fireplace: Width - 536 mm Depth – 600 mm Height – 1040 mm Diameter of the incoming air for burning ø40 mm Diameter of the outgoing flue gases ø80mm Draught of the chimney (±2Pa) Weekly programming Sensor for room temperature Sensors for protection Infrared remote control
-
Upload
trinhtuong -
Category
Documents
-
view
224 -
download
2
Transcript of PELLET FIREPLACE WITH A WATER HEAT EXCHANGER FIREPLACE WITH A WATER HEAT... · 1 FIREPLACE Pellet...
1
FIREPLACE
Pellet with a water heat exchanger
INSTRUCTIONS
For installation and operation
Technical parameters Description Common safety. Possible dangers Norms and legislation Responsibility Installation Operation instructions of a panel with a display Cleaning and maintenance Everyday cleaning Seasonal cleaning and prophylaxis Warranty. Service. TECHNICAL PARAMETERS Nominal total heat power 17 kW Heat power from the heat exchanger 13 kW Heat power from the radiation 4 kW Decreased total heat power 5 kW 5 levels of power and automatic mode Temperature of the flue gases 195°C Effectiveness up to 90% Capacity of the water heat exchanger 20 l Maximal working pressure 2,0 bar Power supply AC 230V 50Hz Full electric power 350 W Working electric power 100 W Capacity of the ashpan 6,8 l Kind of fuel – wood pellets ø6mm/30mm Capacity of the pellet bunker 25 kg Consumption of pellets for nominal power 4 kg/h Consumption of pellets for minimal power 1,2 kg/h Weight 150 kg Overall dimensions of the body of the fireplace: Width - 536 mm Depth – 600 mm Height – 1040 mm Diameter of the incoming air for burning ø40 mm Diameter of the outgoing flue gases ø80mm Draught of the chimney (±2Pa) Weekly programming Sensor for room temperature Sensors for protection Infrared remote control

2
DESCRIPTION The pellet fireplace “Prity PLW 13” is designed to satisfy the requirements for comfortable heating in your home.
The fireplace functions together with a built and connected water heating installation (WHI), radiators etc. with installed heat power up to 16 kW. The WHI is built by a specialized company when observing all local, national and European norms ensuring safety, functionality, comfortability and aesthetics. For each room, which is going to be heated, the heat losses are calculated beforehand and depending on their size the power of the heating body is chosen. In the body of fireplace it is also provided a built-in highest effective and economical circulation pump class A, with consumption of electricity 5 W, up to maximum 22W, which ensures the circulation of the heat carrier – water, or water with added propylene glycol for the operation of the whole heating system. The fuel of the fireplace is wood pellets ø6mm/30mm. The quality of the pellets is of special importance. Regardless of the presence of certificate, some of the pellets, which show various defects when burning: more ash, slag formation in the ash, low effectiveness and caloricity. It is not allowed to use other fuels and waste. The pellets are poured into a bunker and through an auger dispenser they are delivered in a specially designed steel basket (brazier, charcoal pan) for burning, according to the chosen setting of the controller. Initially the pellets poured in the basket are kindled automatically after starting by means of an electrical heating cartridge – a lighter, which thereafter the program shuts down. The air necessary for the burning enters in an organized way through the grate of the basket. It comes in a tube lead away on the back of the fireplace with a possibility of sucking primary air outside the building. The ash as a residue from the combustion of the fuel is collected in an ashpan, which has a capacity of 6,0 litres. When using quality pellets, that means that the discharge of the ash can be done once monthly.

3
The flue gases are thrown out in the chimney by force by means of a built-in flue fan, controlled according to the settings made and the working mode. A protection is provided against a stuffed broken chimney thereby the operation of the fireplace stops. In it the necessary factory and user settings for operation have been programmed. The overall operation of the fireplace is controlled smartly by a built-in electrical block – specialized controller. The fireplace can also be controlled by infrared remote control. For the purpose of protecting the health, the life and the property of the user the necessary protections have been provided, which stop the operation of the fireplace on improper and predictably dangerous operation modes. COMMON SAFETY. KINDS OF DANGERS Attention: Using and handling this appliance requires a definite minimum of acquired knowledge and skills. All instructions which the producer has provided must be an important and essential part of this knowledge and skills, in order for it to be always at consumer’s disposal and obligatorily to be observed for the purpose of reducing all possible risks and dangerous consequences to a minimum or completely avoiding them. This appliance cannot be operated by children under 12 or by persons with decreased physical, sensory or mental capabilities, or insufficient experience and knowledge, unless they are supervised or instructed about the safe operation of the appliance by the person responsible for their safety and understand the dangers. Children must not play with the appliance. Cleaning and servicing of the appliance must not be done by unsupervised children. In operation or idle time, you must make sure that the fireplace is in a safe condition. The fireplace works only with a closed door of the firebox. Don’t allow the door of the fireplace to open when the fireplace operates and in the presence of fire. This can be dangerous. During operation of the fireplaces some surfaces are heated to a high temperature and then accidental and unregulated touching heavy thermal injures may occur. During idle time obligatorily unplug the plug from the socket. Make sure that there is no power supply in the appliance. No modifications in the appliance are allowed. When a change is necessary, use obligatorily only original parts. If the power cord is damaged, it must be replaced by the manufacturer or his service agent, or a similar qualified person, in order to avoid danger. NORMS AND LEGISLATION This fireplace has been produced in conformity and it corresponds the European norms: БДС EN 14785, БДС EN 60335‐1, БДС EN55014‐2, БДС EN 55014‐2, БДС EN 61000‐3‐2 и БДС EN 61000‐3‐3. Installation and operation of the appliance must comply with all local, national and European norms. RESPONSIBILITY The producer bears no direct or indirect responsibility, civil or criminal responsibility when:

4
Non-observing the instructions Non-observing normal safety rules Improper operation of the appliance Poor maintenance Installation in discrepancy of the norms of the country Installation by an unqualified and untrained personnel Modifications and amendments which are neither regulated nor approved
by the producer Using unoriginal spare parts Emergency events. Irresistible force (Force majeure)
INSTALLATION. INSTALLATION ON-SITE The fireplace is suitable to be placed in the biggest central premise of the abode. The specific place is selected so that the following requirements shall be considered and observed:
Close proximity to a chimney Convenience to build a functional, compact and aesthetic water heating system
(pipes, radiators and other elements). Possibility to ensure outside air Proper position and orientation so that it shall match the rest furnishing and for
observation of the living fire. It is not recommended to install the fireplace in a sleeping room or in a children’s
room. Enough distance around the fireplace to ensure convenience in operation,
maintenance, cleaning and prophylaxis.
DISTANCE TO ENSURE FIRE SAFETY The requirements for fire safety are obligatory:
Minimum distance at the side and at the back of the fireplace must be 40 cm. Minimum distance in front of the fireplace must be 80 cm. To use insulation and fire-safe stand for the fireplace, if the floor is inflammable.
The stand must be 20 cm wide at the side and 40 cm in front. Don’t put any inflammable objects closer than 0,5 m from the fireplace When connecting the fireplace with the chimney, density should be guaranteed,
as well as strength of attachment and prevention of the danger of fire. INSTALLATION TO A CHIMNEY The flue gases from the fireplace are lead out and discharged into a chimney by
means of a metal chimney stack (pipe). When installing, density and safety against pulling down shall be guaranteed.
It is not allowed to use a common stack. The chimney must be independent and there must be no other appliances discharged and included to it, even such that aren’t used.
In multifamily residential buildings there can be collective chimneys, designed and built with a special construction design, which is intended to be used by more than one appliance. In such case, you must know with certainty that the condition of this

5
chimney is good and no flue gases can go out through the chimney in an unregulated way into residential and building premises. The chimney must be absolutely dense and well insulated.
The presence of any temporary, spare, constant etc. openings is not allowed, except a dense and tightly closed opening for cleaning, located sufficiently … (low?)under the discharge of the fireplace and suitable for cleaning.
INCOMING EXTERNAL AIR The fireplace must be provided with air supply, necessary to guarantee a normal
combustion process and clean ambient atmosphere. It is obligatory for this air to be taken from the outside of the building and in the
shortest possible way is connected with PVC pipe ø40 mm lead out in the back wall of the fireplace. The entrance hole must be protected in a proper way against clogging, infusion of water or any objects. The air must be able to pass unhindered through the air pipe outside the fireplace.
In the room where the fireplace is installed no presence of any system which sucks air from the premise is allowed. Such system (fan for discharging air, absorber etc.) could cause dilution of the air in the room. As a result, returning flue gases from the burning fireplace into the premise is possible, and it is not only undesired but also harmful and dangerous for your health. Because of non-observance of the above mentioned, there are such cases with ordinary fireplaces on wood. The pellet fireplaces are better protected, namely because of the availability of an ID fan. Nevertheless:
The compliance with the instructions is obligatory to ensure your safety. CONNECTION OF THE FIREPLACE TO A WATER HEATING SYSTEM (WHS) Water heating system must be built up and connected to the fireplace – WHS,
radiators etc. with installed heat power up to 16 kW. The fireplace functions only together with a built-up and connected water
heating system, which is built by a specialized company when observing all local, national and European norms assuring functionality, comfort and aesthetics.
INFORMATION AND INSTRUCTIONS The pump is electrically connected and controlled by the controller. It is fitted
only mechanically – the threaded connections have no gaskets. Their sealing with suitable materials is done during installation by the installation company.
A filter with two spherical taps is fitted to the inlet of the pump outside at the back of the fireplace. The returning cooling water must enter the filter from the radiators.
The built WHS must have a possibility for the heat-transfer medium (water) to drain from the system in its lower part.
WHS can be closed, with a closed membrane expansion vessel. The fitting of a safety valve is obligatory which shall not allow an increase of the
pressure in the installation (and the fireplace) above 2 bars (0,2)M Pa. WHS can be open, with an open expansion vessel. It is not allowed to fit a stopcock between the outlet of the fireplace and the inlet
for the hot water of the WHS.

6
The connection between the chimney and the expansion vessel is direct, without any stop fittings. When building WHS, automatic deaeration (self-deaeration) of the system must be ensured.
During operation full switching off of all heaters is not provided and is not allowed in any way.
Characteristics and settings of pump GRUNDFOS ALFA 2L: The flow and the head of the pump can be changed by pressing the button. PP1- characteristic of the lowest proportional pressure. The head is reduced when the heat energy decreases and it increases when the
heat energy increases. PP2 –characteristic of the highest proportional pressure. The head decreases when the heat energy decreases and it increases when the
heat energy increases. CP1 – characteristic of the lowest constant pressure. The head is kept constant regardless of the energy heat consumption. CP2 – characteristic of the highest constant pressure. The head is kept constant but higher. Speed III – (factory default) The pump runs at a constant high speed, set to operate at the maximum
characteristic under all operation conditions. It is most suitable also on initial venting. Speed II – the pump runs at a constant average speed. Speed I – the pump runs at a constant low speed. From the available characteristics the most suitable for the built installation can
be selected. It matters the presence of thermostatic valves, underfloor heating, etc.

7
PREPARATION FOR INITIAL LIGHTING Allow possibility for aeration of the room. On initial kindling a characteristic sense
of smell appears because of the first working warming of the painted parts with the thermostable paint.
After the final completion of all installation works, make sure that you have read and got acquainted with all instructions in the manual of the fireplace.
The fireplace must be connected to the electricity grid (mains) 230V- 50Hz by means of a plug and a socket type “Schuko” and a three-wired electrical cable with an earthing (grounding)/neutral conductor. The protective neutral earthing must be checked and confirmed with certainty.
The sensor for the room temperature must be taken out outside the body of the fireplace for correct measurement.
Check the available settings of the panel-display and, if necessary, adjustments are made. Check the reading of the clock and the calendar.
The WHS must be filled and deaerated. The heaters (radiators) must have open valves.
It is fuelled by filling sufficient quantity of pellets in the hopper as for this purpose its lid which is in front of the display is opened.
The auger is started beforehand to provide pellets until they appear on the grate and the auger is switched off. The fireplace is ready to start.
OPERATION INSTRUCTIONS OF A PANEL WITH A DISPLAY
Fig.1 Panel
8
1. INTRODUCTION The panel (see Fig.1) has a button 5 to switch ON/OFF with an icon ON/OFF,
four buttons, whose functions are shown on the display close to each one of them and an infrared sensor (IR receiver) of the remote control.
2. MAIN SCREEN When you turn the fireplace on, on the display a screen appears with the logo of
the producer on the second line, and on the first line the current room temperature and hour appear.
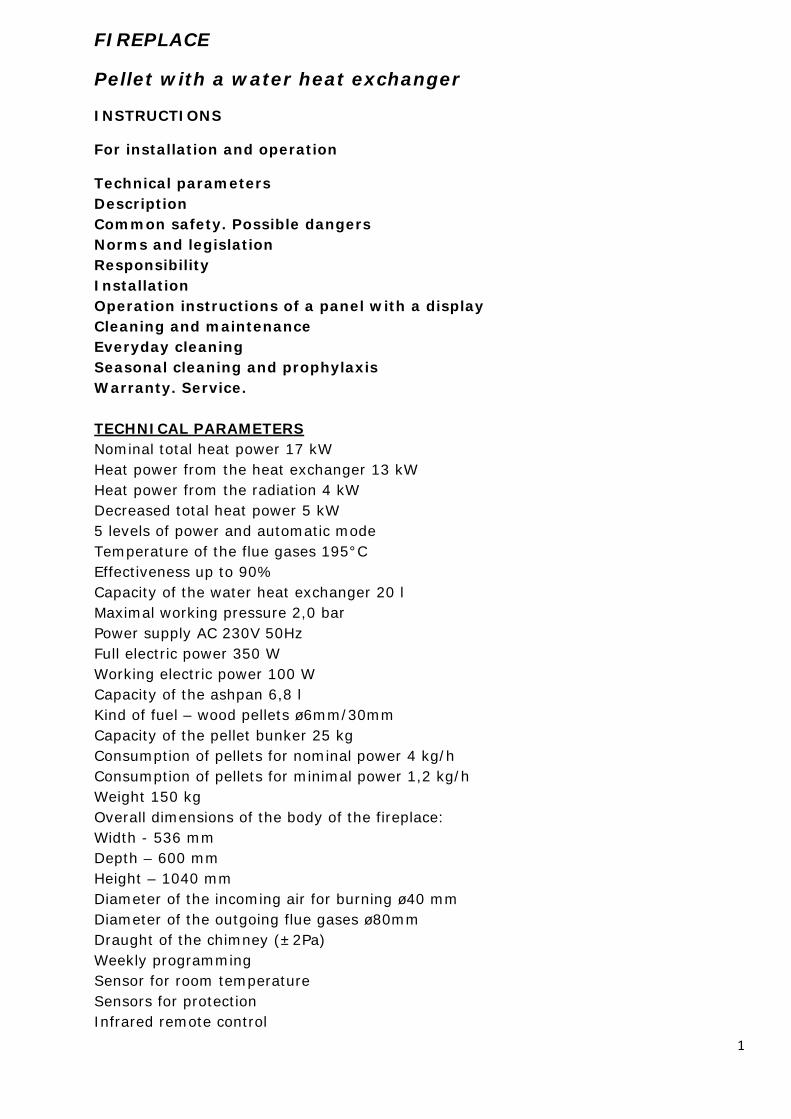
After about 12 sec. the main screen appears (see Fig.2). That means that the system is ready.
Fig.2 – Main screen 1
On the top line the room temperature and the current time are shown. The room temperature and the temperature of the water are toggled on the
display – in 5 seconds for the room temperature and 2 seconds for the temperature of the water. (see Fig.3)
Fig. 3 – Main screen 2
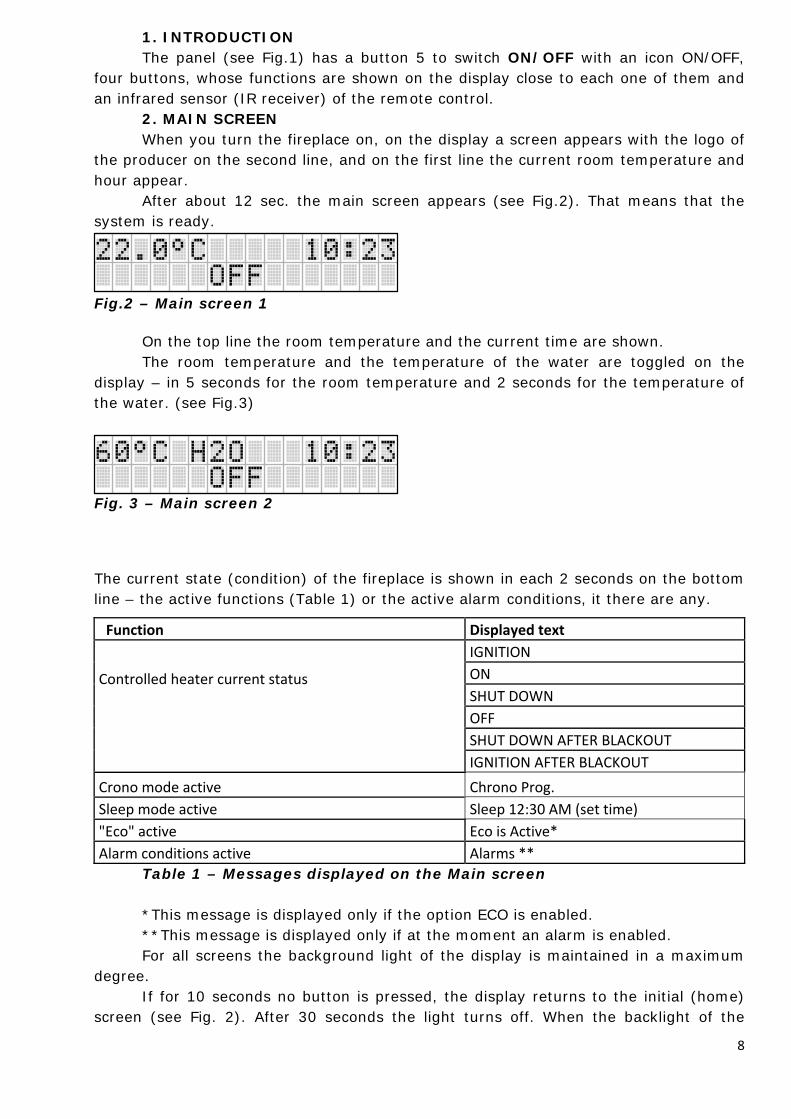
The current state (condition) of the fireplace is shown in each 2 seconds on the bottom line – the active functions (Table 1) or the active alarm conditions, it there are any.
Table 1 – Messages displayed on the Main screen *This message is displayed only if the option ECO is enabled. **This message is displayed only if at the moment an alarm is enabled. For all screens the background light of the display is maintained in a maximum
degree. If for 10 seconds no button is pressed, the display returns to the initial (home)
screen (see Fig. 2). After 30 seconds the light turns off. When the backlight of the
Function Displayed text
Controlled heater current status
IGNITION
ON
SHUT DOWN
OFF
SHUT DOWN AFTER BLACKOUT
IGNITION AFTER BLACKOUT
Crono mode active Chrono Prog.
Sleep mode active Sleep 12:30 AM (set time)
"Eco" active Eco is Active*
Alarm conditions active Alarms **

9
display is turned off, pressing a random button switches on again and the selection screen appears (see Fig. 4).
3. IGNITION (or SWITCHING OFF) OF THE FIREPLACE The ignition (or the switching off) of the fireplace is achieved by pressing and
holding of button 5 (ON/OFF) on the panel. 4. MAIN FUNCTIONS When pressing any of the buttons 1-4 on the panel the Selection screen is
displayed (see Fig.4) and adjustment of the main parameters is possible – the power of the fireplace and the room temperature.
Fig.4 – Selection screen
Button Mode toggles the modes from manual to automatic The advanced functions are selected by button Menu. The button 2 Temp/Fire changes the values of the temperature and the
power depending on the selected operational mode. When pressing the button ON/OFF the screen returns back to the home
screen.
5. FINE SETTING OF THE TEMPERATURE/POWER If the controller is in automatic mode, the desired values of the temperature change in cycles by pressing the button 2 Temp / Fire for temperature / power. As you keep the button pressed for 2 seconds, the selection screen will appear (see Fig.5). From this screen you can change the desired value of the temperature in steps of 1°C, from the minimum value 5°C to the maximum value 35°C of the room temperature.
Fig. 5 If the controller is in manual mode, the button 2 Temp / Fire changes in cycles the desired value of the power on the display in cycles. If you hold this button pressed for 2 seconds, the selection screen of the power appears (see Fig.6). From this screen you can change the desired value through 1 step, in intervals of 1 up to the maximum value.
Fig.6 In both cases described above, the value of the upper line flashes, so that the user understands that it can be changed. The buttons 4 (+) and 2 (-) increase or decrease the value, while button 3 OK saves the new value, the display returns to the selection screen.

10
When you press button 1 ESC, the SELECTION screen returns on the display without saving the new value. As you press button 5 ON/OFF the display returns to the home screen without saving the new value.
6. ECO MODE The function ECO is an economical mode in which the fireplace operates automatically at time intervals. The operating time and the idle time are set by the user.
7. ADVANCED FUNCTIONS By pressing button 3 Menu you reach “Advanced functions”. On the bottom line the name of the function is shown, which at the moment is displayed. On the top line the indicated value is shown. If no value appears on the top line, the message is displayed on the bottom line in a submenu, which you can access by pressing button 3 SETTING. The arrow keys allow you to search through the various options in the menu. Whether or not a value is displayed on the top line, in order to change the indicated function, you must press the button 3 SETTING to change this value. The value shown on the upper line begins flashing in order to inform the user that he can change it. Both bottom buttons can be arrows or they can be changed in +/- depending on the type of data which are displayed. They are used to increase or decrease the value of the data. The new value is confirmed by the key OK. Then the display returns to the previous screen.
Fig.7 In the table 2 various functions are listed in the same order as they appear on the display, together with their values.
Function Value
Water Temp. 40 ÷ 80°С
Day and Time
Chrono
Sleep * Off / hh:mm
Settings
Technical menu
User Info
Warnings Table 2 – List of the functions *This function is seen only if the fireplace is on.
8. DATE AND TIME MENU. The available functions are listed in Table 3, in the same order as they appear on the display, together with their values.
Function Value
Hour 00 ÷ 23
Minutes 00 ÷ 59
Day Mo ÷ Su
Date 00 ÷ 31
Month 01 ÷ 12
Year 2010 ÷ 2109 Table 3 – List of the functions in the date and time menu

11
9. OPERATION MODE DETERMINED BY THE TIME ON/OFF (CHRONO MODE) The CHRONO function allows the user to adjust 6 different intervals of time ON/OFF. Each interval can be determined for one or more days of the week, to ensure the user a quite flexible weekly schedule, which can be configured easily, so that it may meet any requirement. The available functions are listed in Table 4, in the same order as they appear on the display, together with their values.
Function Value
Activate ON/OFF
Load a profile
Reset Chrono
Prog. 1
Prog. 2
Prog. 3
Prog. 4
Prog. 5
Prog. 6 Table 4 – List of the time functions The option “Enable” is used to set active the time operation mode, defined for one week time. The option “Reset chrono” is used to cancel all current settings, which will be returned by default. A confirmation is required in order for the actually default values to be loaded. The option “Load Profile” is used to load a set of predefined templates (patterns) for time on/off. The options for schedule can be reached at a new level of the menu, with a set of data and parameters, as it is described in Table 5.
Function Value
Enable ON/OFF
Start 0‐23 (15 min steps)
Stop 0‐23 (15 min steps)
Air Temp. 5‐35°С (18°С by default)
Heat Temp. 40‐85 (60 by default)
Fire 1‐5
Days Table 5 – List of the time functions In order to adjust an everyday schedule as active, the hours for starting and stopping must be set so that the valid interval of time be defined. This allows the user to have a maximum degree of comfort in each interval of time. If two or more schedules overlap, the pattern for schedule with lower index will have priority over the other.
10. Function “SLEEP” The function “Sleep” is displayed only if the fireplace works or is kindled. The hour for automatic turn off can be adjusted as you select Off, in order to switch the function off, otherwise the available values can be changed starting from the decade of minutes,
12
which follows the current time (for example, if the current time is 3:43 in the afternoon, the first value which can be used is 3:50 in the afternoon) up to the maximum degree (extent) of 23 hours and 50 minutes after the current time. Whenever the button 4 (+) and button 2(-) are pressed, the time for shutdown is changed in steps of 10 minutes (increasing and decreasing). When you press button 3 OK the new value is confirmed, and the display returns to the previous screen (not flashing, constantly on).
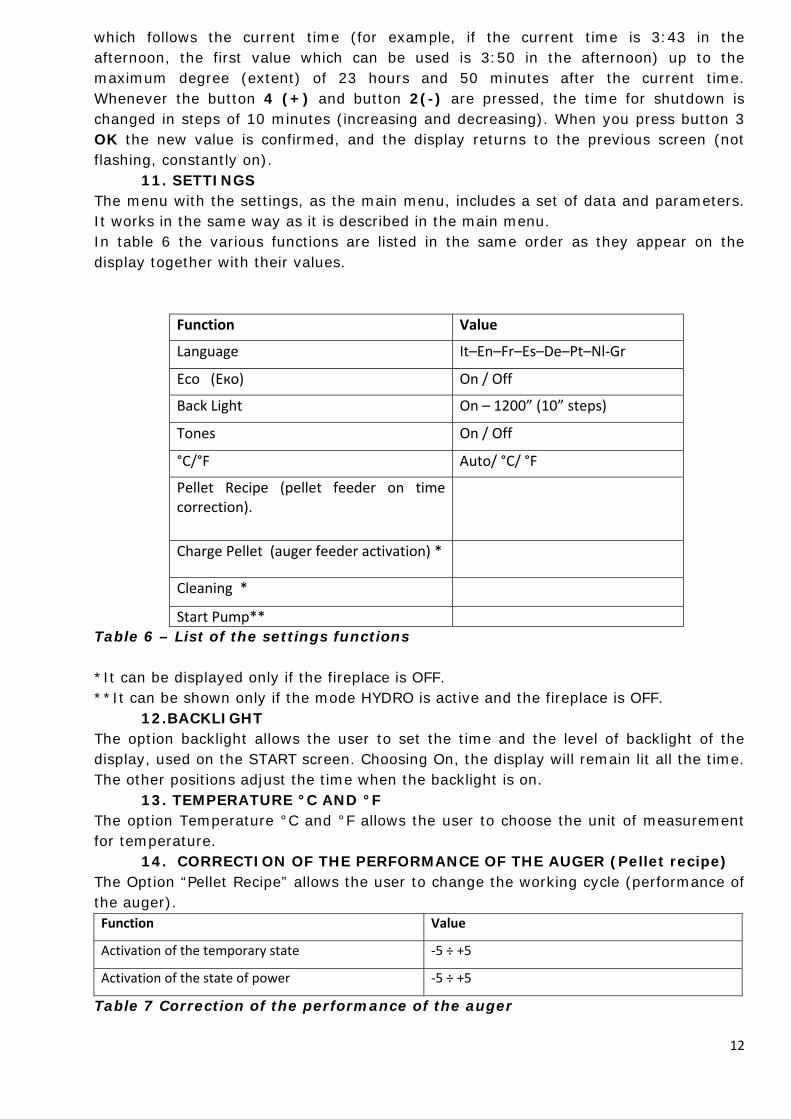
11. SETTINGS The menu with the settings, as the main menu, includes a set of data and parameters. It works in the same way as it is described in the main menu. In table 6 the various functions are listed in the same order as they appear on the display together with their values.
Function Value
Language It–En–Fr–Es–De–Pt–Nl‐Gr
Eco (Еко) On / Off
Back Light On – 1200” (10” steps)
Tones On / Off
°C/°F Auto/ °C/ °F
Pellet Recipe (pellet feeder on time correction).
Charge Pellet (auger feeder activation) *
Cleaning *
Start Pump** Table 6 – List of the settings functions *It can be displayed only if the fireplace is OFF. **It can be shown only if the mode HYDRO is active and the fireplace is OFF.
12.BACKLIGHT The option backlight allows the user to set the time and the level of backlight of the display, used on the START screen. Choosing On, the display will remain lit all the time. The other positions adjust the time when the backlight is on.
13. TEMPERATURE °C AND °F The option Temperature °C and °F allows the user to choose the unit of measurement for temperature.
14. CORRECTION OF THE PERFORMANCE OF THE AUGER (Pellet recipe) The Option “Pellet Recipe” allows the user to change the working cycle (performance of the auger).
Table 7 Correction of the performance of the auger
Function Value
Activation of the temporary state ‐5 ÷ +5
Activation of the state of power ‐5 ÷ +5
13
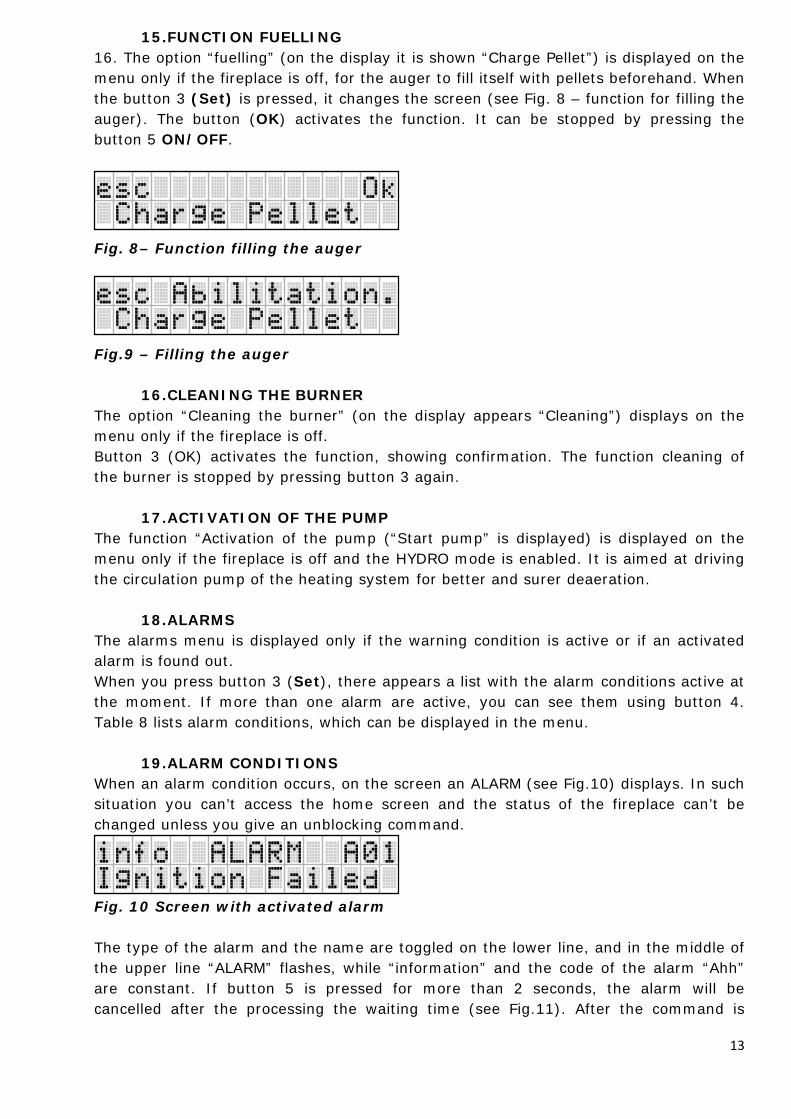
15.FUNCTION FUELLING 16. The option “fuelling” (on the display it is shown “Charge Pellet”) is displayed on the menu only if the fireplace is off, for the auger to fill itself with pellets beforehand. When the button 3 (Set) is pressed, it changes the screen (see Fig. 8 – function for filling the auger). The button (OK) activates the function. It can be stopped by pressing the button 5 ON/OFF.
Fig. 8– Function filling the auger
Fig.9 – Filling the auger
16.CLEANING THE BURNER The option “Cleaning the burner” (on the display appears “Cleaning”) displays on the menu only if the fireplace is off. Button 3 (OK) activates the function, showing confirmation. The function cleaning of the burner is stopped by pressing button 3 again.
17.ACTIVATION OF THE PUMP The function “Activation of the pump (“Start pump” is displayed) is displayed on the menu only if the fireplace is off and the HYDRO mode is enabled. It is aimed at driving the circulation pump of the heating system for better and surer deaeration.
18.ALARMS The alarms menu is displayed only if the warning condition is active or if an activated alarm is found out. When you press button 3 (Set), there appears a list with the alarm conditions active at the moment. If more than one alarm are active, you can see them using button 4. Table 8 lists alarm conditions, which can be displayed in the menu.
19.ALARM CONDITIONS When an alarm condition occurs, on the screen an ALARM (see Fig.10) displays. In such situation you can’t access the home screen and the status of the fireplace can’t be changed unless you give an unblocking command.
Fig. 10 Screen with activated alarm The type of the alarm and the name are toggled on the lower line, and in the middle of the upper line “ALARM” flashes, while “information” and the code of the alarm “Ahh” are constant. If button 5 is pressed for more than 2 seconds, the alarm will be cancelled after the processing the waiting time (see Fig.11). After the command is

14
cancelled, if the cause of the alarm has been removed, the display returns back to the START screen. The status of the fireplace can be supervised also from the informational menu.
Fig. 11 Screen on canceling an alarm
By pressing button 1(INFO), the display shows a short description of the problem, which has arisen (Fig.12).
Fig.12 Screen with alarm indication The display returns to the previous screen by pressing button ESC. If no button is pressed for 60 seconds, the display returns to the home screen. Table 8 shows a list of the codes of the alarms, their names and useful information with recommendations.
Code: Kind of the alarm Information
A01 Ignition Failed Clean Brazier and Restart
A02 Flame Shut Down Fill Pellet Tank
A03 Pellet Tank Over‐Temperature See instruction manual
A04 Fumes Over‐Temperature See instruction
A05 Fumes Pressure Switch Alarm Remove a Possible Obstruction
A08 Fumes Extractor Error Call Assistance
A09 Fumes Temp. Sensor Error Call Assistance
A10 Pellet Igniter Error Call Assistance
A11 Pellet Feeder Error Call Assistance
A13 Electronic MotherBoard Error Call Assistance
A18 Water Tank Over‐Temperature See instruction manual Table 8 List of the alarms
20. REMOTE CONTROL The panel has an integrated receiving device for infrared remote control (Firg.13)
Fig.13 – Remote infrared control The commands from the remote control are performed only if the START screen or the selection screen are displayed.

15
The selection of a degree of power is applied only after the fireplace is kindled successfully and if the ECO mode is off. CLEANING AND MAINTENANCE Before performing any maintenance or cleaning operation of the fireplace, take the following safety measures:
Be sure that all parts of the fireplace are cold. Be sure that the ash is entirely cold. Don’t forget the key to be in position “OFF”. Be sure that the plug has been removed from the socket in order to avoid
contact out of carelessness. Follow carefully the regulated instructions for cleaning. Failure to observe these instructions can cause problems in the operation of the fireplace When cleaning, use protective gloves. To clean from ash on the floor of the firebox and the walls, surfaces of the combustion chamber, it is suitable to use an ordinary brush of middle size. Most effective and final cleaning turns out by using a specialized vacuum cleaner to clean fireplaces, with a container. The lack of cleanness can prevent the startup and the normal, effective operation of the fireplace. Daily cleaning The same must be provided also before each lightning.
Cleaning of the grate Open the door of the combustion chamber. Raise the grate and shake it off in the opening to the ashpan. If there is accumulated ash, push it with a brush to the same opening. Place the grate very carefully and exactly in its place until support without blocking. Clean the glass pane very carefully. It is resistant to temperature shocks but is sensitive to mechanical forces –
stroke, pressure, etc. Wipe it with damp cloth or wash with cleaning detergents and water.
Clean the heating surfaces behind the combustion chamber. They aren’t accessible; therefore their cleaning is done with an integrated mechanism. They are two scrapers and proceed as follows:
Remove the top decorative cover by lifting. Under it you can see the clamping ends. Pull them upward and by moving up and down, five or six times, the surfaces are cleaned.
Cleaning the ashpan
The fireplace is equipped with an ashpan, which has a very big size. When using quality pellets, the ash from the ashpan

16
can be thrown away once monthly. If it is necessary to remove the ash more often, usually that means that pellets of bad quality are used. Seasonal cleaning and preventive maintenance Besides the operations included in the daily cleaning, after the end of the season one complete and extensive cleaning is necessary. If you have some difficulties, you can contact the seller who is committed to the service maintenance of the product.
Cleaning the entrance to the flue fan. To ensure an access, take the ashpan out, remove the lid from the opposite wall. The lid is fixed with two screws M5. Access under the heating surfaces is opened next to the entrance of the fan. It is suitable to clean with the special vacuum cleaner. The assembly is in the opposite order, as it is very important for the lid to close the opening tightly. It is obligatory to clean the whole way of the flue gases:
- Dismantle the metal pipes in order to clean them. - Clean the chimney along the entire length from its higher
part of the roof to the lowest part – the special opening for cleaning.
THE INSTALLATION HAS BEEN CARRIED OUT BY: Company: …………………………………………………………………………………………………………………………….. Address: ……………………………………………………………………………………………………………… Installer: …………………………………………………………………………………………………………….. The system is performed in accordance with the requirements for safe operation. 72-houred test has been carried out in operational conditions. Installer: ………………………………………………………………………………………………………………
WARRANTY CARD The warranty period of the product is 36 (thirty six) months from the date of the sale from the trade network, provided all requirements for correct transportation, installation and operation are observed.
For the removal of defects, the fireplace must be presented to the dealer, from
whom it was purchased or directly to the producer, as its warranty card must be obligatorily enclosed.
The firm producer satisfies all claims, except in the following cases: - formation of condensation; - broken glass; - the requirements for installation and operation indicated in the present
instructions and the instructions for installation of water heating systems have not been observed;
- the defects were caused during transportation;
17
- The fireplace has a bulging water jacket as a result of increased pressure in systems more than permissible.
ATTENTION!
The warranty is valid only if this guarantee card is filled in and signed legibly in ink or in a ball-point pen and stamped.
The producer is responsible for the lack of compliance of the products, object of the sales contract, according to the warranty according to cl. 112-115 of the Law for Consumer Protection.
Transportation expenses are at the expense of the customer.
Producer: “Prity 95” Ltd. Bulgaria, town of Liaskovets, M. Raycovichstr. 33
PRODUCT MODEL:
PRITY PLW13 Date of manufacture…………………………………………………………………………….. Serial number…………………….……………………………………………………………... QC passed………………….……………………………………………………………stamp The fireplace was delivered in a good working condition to the buyer:
(Full name of the purchaser) Address: ……………………………………………………………………………………….. Company name………………………………………………………………………………… City (town) ….………………………………………………………………………………… Invoice No. …………………… dated from …………………………………………………..
(Date of the sale) PURCHASER. …………………………….SELLER……………………………………….. (Signature) (Signature and stamp)
READ, KEEP AND OBSERVE THE PRODUCER’S INSTRUCTIONS!

18


