Pelican Thermostats 4 - Pelican Wireless Systems...Select a group to show thermostats that are in...
35
4 Pelican Thermostats Climate Management and Control This guide demonstrates how to ulize your Pelican Web App to control your thermostats, change temperatures, set schedules, view history graphs, and much more. What is included in this user guide: Navigang Your Pelican Web App 2 Controlling Your Pelican Thermostats 4 Creang Custom Thermostat Schedules 6 Ulizing Thermostat Vacaon Schedules 15 Adding Thermostat Event Schedules 20 Reading Thermostat History Graphs 27 1
Transcript of Pelican Thermostats 4 - Pelican Wireless Systems...Select a group to show thermostats that are in...

4Pelican ThermostatsClimate Management and Control
This guide demonstrates how to utilize your Pelican Web App to control your thermostats, change temperatures, set schedules, view history graphs, and much more.
What is included in this user guide:
Navigating Your Pelican Web App 2
Controlling Your Pelican Thermostats 4
Creating Custom Thermostat Schedules 6
Utilizing Thermostat Vacation Schedules 15
Adding Thermostat Event Schedules 20
Reading Thermostat History Graphs 27
1

4 Navigate to your Pelican Web App on any PC, smart phone, or tablet.A QUICK LOOK AT YOUR PELICAN WEB APP
Pelican Site Manager/Site NameThis will either display the ‘Site Name’ or Pelican Site Manager.
Alarm NotificationsSelect to show temperature and/or other alarms.
GroupSelect a group to show thermostats that are in that group.
MySitesIf you have multiple Pelican Web Apps between multiple sites, MySites allows you to easily navigate between your sites.
System TimeSelect to view the current time for this site.
AdminSelect to view site and product configuration.
Usage GraphsSelect to view energy consumption, run-time, and energy cost associated with the HVAC.
Schedule DashboardSelect to view and edit your thermostat’s main schedules, shared schedules, and event schedules all from a single dashboard.
The Pelican Web App is designed to be an intuitive platform for managing your entire building’s climate. Thermostat groups allow you to navigate directly to the thermostat(s) you want to control quickly and easy.
STEP ONE: SELECTING A GROUP
2

Thermostat NameIndicates the ‘Name’ associated with this thermostat.
Select to navigate to this thermostat’s ‘Control Page’.
Space TemperatureDisplays the real-time temperature in the space.
BackSelect to navigate back to the home screen of the Pelican Site Manager.
DescriptionThe first line of the Description input will show up as small text under a thermostat’s name.
SettingDisplays the setting for the above operation.
Operation StatusIndicates the current mode the thermostat is running in.
Group NameThis will display the ‘Group Name’ you are viewing.
The Operation Status indicates the current state of the thermostat. There are six different status indications:
● Cool On indicates that the thermostat is ‘Calling for Cool’.● Heat On indicates that the thermostat is ‘Calling for Heat’.● Fan On indicates that the thermostat is ‘Calling for Fan’ (in both Cool On and Heat On mode the thermostat is also calling for Fan).● Heat indicates that the temperature in the space is closest to the Heat Set point.● Cool indicates that the temperature in the space is closest to the Cool Set point.● System Off indicates that the thermostat is OFF.
A DEEPER LOOK AT OPERATION STATUS
Select a Group from the Pelican Web App home screen to view thermostats.A QUICK LOOK AT A THERMOSTAT GROUP
3

Cool SettingShows the current Cool Set point.
Slide the slider to adjust the Cool Temperature Setting.
Vacation Set TimesSelect to edit the ‘Vacation Schedule’ this thermostat follows when the Site is in ‘Vacation Mode’
FanSelect to switch ‘Fan Mode’ to Auto or On.
Heat SettingShows the current Heat Set point.
Slide the slider to adjust the Heat Temperature Setting.
BackSelect to navigate back to the group screen of the Pelican Site Manager. Any changes made will automatically be saved.
Space Temperature
SystemSelect to change the ‘System Mode’ the thermostat is running in.
Front KeypadSelect to Lock and Unlock the Thermostat’s Front Keypad.
ON = UNLOCKEDOFF = LOCKED
ScheduleSelect to adjust or edit the ‘Main Schedule’ this thermostat is following.
Thermostat NameThis will display the ‘Thermostat’s Name’ you are viewing.
The System Setting can be changed to four different system functions:
● Heat select to only have a heat temperature set point.● Cool select to only have a cool or A/C temperature set point.● Auto select to have both a heat and cool temperature set point. The thermostat will automatically switch between the two set points to maintain the space climate. The Pelican thermostat has a built-in change-over algorithm to guarantee it will opperate properly.● Off select to turn the thermostat off.
A DEEPER LOOK AT THERMOSTAT SYSTEM SETTING
HistorySelect to navigate to this thermostat’s ‘History Graphs’.
Event CalendarSelect to add special event schedules to thermostat.
Select a Thermostat from the Pelican Web App group screen to view and control a specific thermostat.
A QUICK LOOK AT CONTROLLING A THERMOSTAT
4
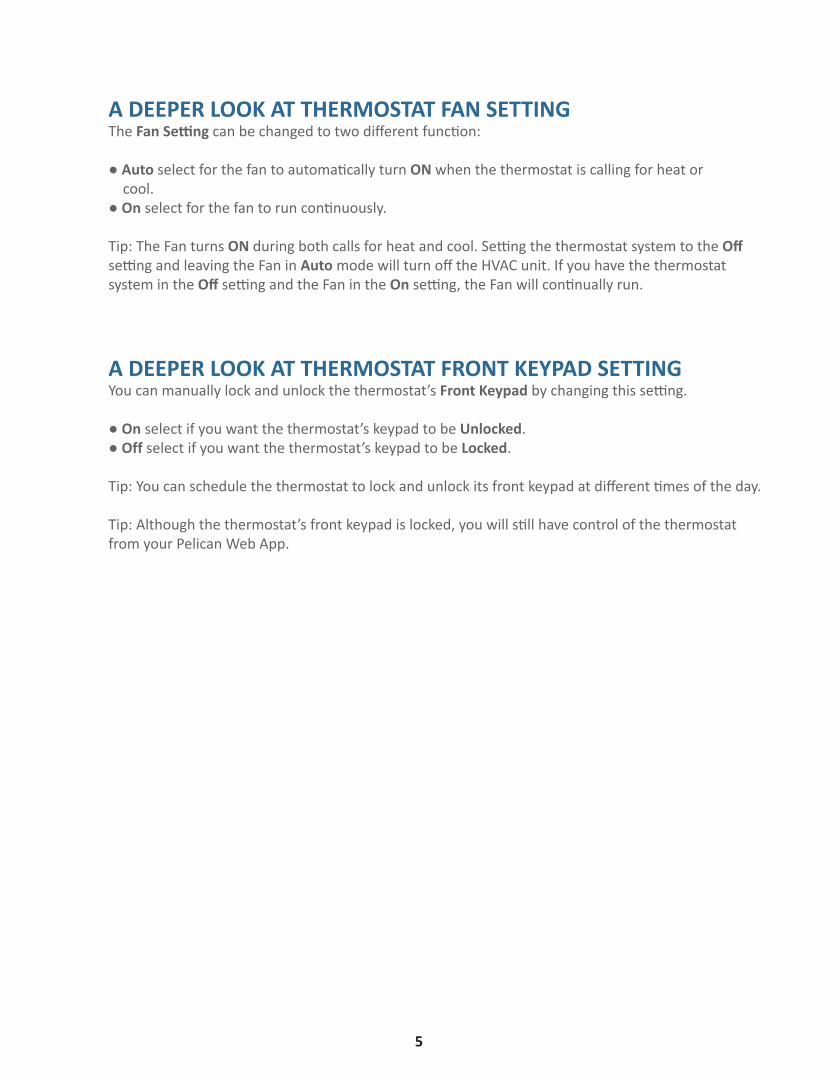
The Fan Setting can be changed to two different function:
● Auto select for the fan to automatically turn ON when the thermostat is calling for heat or cool.● On select for the fan to run continuously.
Tip: The Fan turns ON during both calls for heat and cool. Setting the thermostat system to the Off setting and leaving the Fan in Auto mode will turn off the HVAC unit. If you have the thermostat system in the Off setting and the Fan in the On setting, the Fan will continually run.
A DEEPER LOOK AT THERMOSTAT FAN SETTING
You can manually lock and unlock the thermostat’s Front Keypad by changing this setting.
● On select if you want the thermostat’s keypad to be Unlocked.● Off select if you want the thermostat’s keypad to be Locked.
Tip: You can schedule the thermostat to lock and unlock its front keypad at different times of the day.
Tip: Although the thermostat’s front keypad is locked, you will still have control of the thermostat from your Pelican Web App.
A DEEPER LOOK AT THERMOSTAT FRONT KEYPAD SETTING
5
Scheduling should always be used since it is one of the easiest ways to optimize your buildings climate and reduce excess energy usage after normal business hours. Pelican provides you with multiple scheduling options. This section covers a thermostat’s main schedule, or the schedule the thermostat will follow day in and day out.
A thermostat’s main schedule can be set in two different ways:
● Custom Schedule - is a schedule that is only associated with a single thermostat. ● Shared Schedule - is a schedule that can be associated with multiple thermostats. Please download and review User Guide 5 - Scheduling Dashboard to learn more about using Shared Schedules.
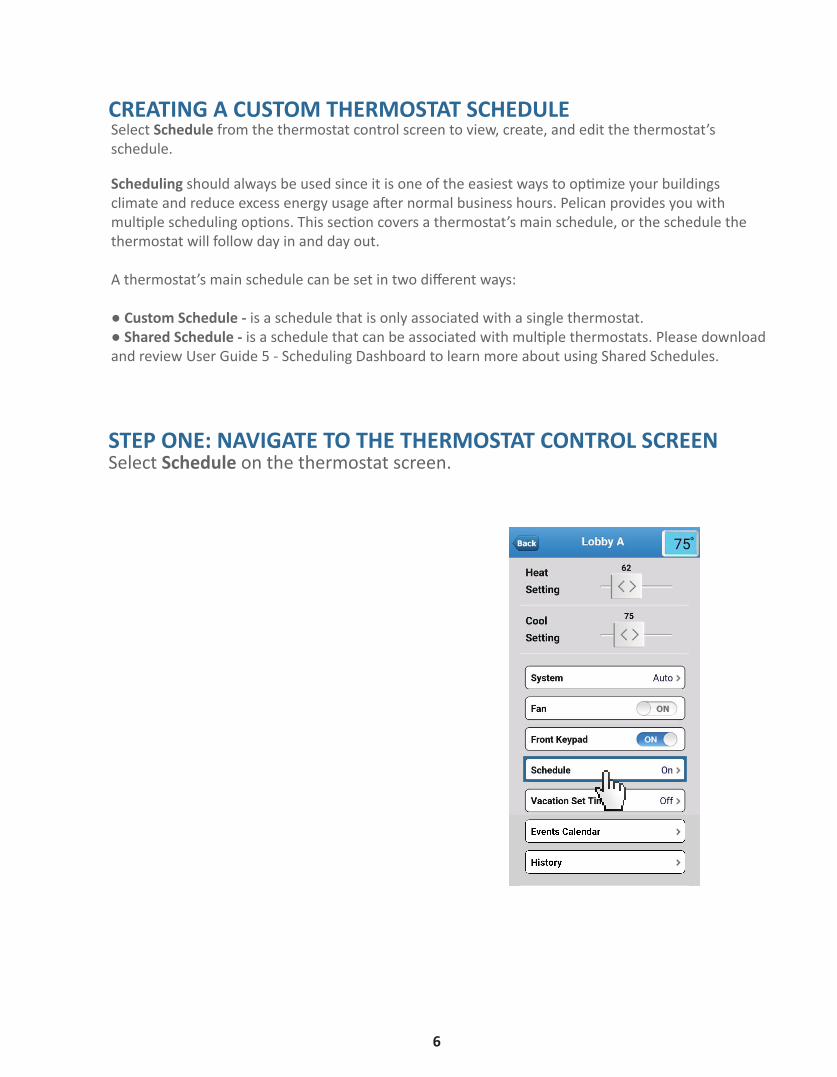
Select Schedule from the thermostat control screen to view, create, and edit the thermostat’s schedule.
CREATING A CUSTOM THERMOSTAT SCHEDULE
Select Schedule on the thermostat screen.STEP ONE: NAVIGATE TO THE THERMOSTAT CONTROL SCREEN
6

Thermostat NameIndicates which Thermostat’s Schedule you are editing.
BackSelect to navigate back to the Thermostat Control Screen. Any changes will automatically be saved.
Repeat There are three available schedule repeats to choose from:
● Daily will follow the same schedule everyday of the week.
●Weekday/Weekend will provide the thermostat with a schedule for the weekdays (Monday - Friday) and a different schedule for the weekend (Saturday - Sunday).
● Weekly each day of the week (Monday - Sunday) can run on its own schedule.
ScheduleSelect to choose between a Custom Schedule or a Shared Schedule.
● Custom Schedule select to create a unique schedule just for this thermostat.
● Shared Schedule if there are shared schedules then you can select from a list of schedules already created. To learn more about Shared Schedules download and review User Guide 5 - Scheduling Dashboard.
A QUICK LOOK AT A THE SCHEDULING SCREENThere are many different scheduling options that can be set to optimize how this thermostat runs.
STEP TWO: SETTING THE SCHEDULEThe Schedule can either be set to Custom, Off, or you can associated this thermostat with a Shared Schedule. This section focuses on setting a Custom schedule.
7

There are three available schedule repeats to choose from:● Daily will follow the same schedule everyday of the week.● Weekday/Weekend will provide the thermostat with a schedule for the weekdays (Monday - Friday) and a different schedule for the weekend (Saturday - Sunday).● Weekly each day of the week (Monday - Sunday) can run on its own schedule.
Select Repeat Select a Repeat Option
DAILY WEEKDAY/WEEKEND
A QUICK LOOK AT THE THREE REPEAT OPTIONS
WEEKLY
STEP THREE: SETTING A REPEAT
8

Depending on which Repeat option you set the schedule too will change the day or day range you can select from. Below shows a Weekday/Weekend schedule.
STEP FOUR: SETTING UP THE SCHEDULE FOR A SPECIFIC DAYOR DAY RANGE
Pressing the ‘+’ button will add a New Set Time. A Set Time is used to adjust the thermostat’s settings at a specific time of the day. You can add up to 12 set times for each day you are scheduling.
STEP FIVE: ADD A NEW SCHEDULE SET TIME
9

Sample ScheduleIndicates which Shared Schedule you are editing.
BackSelect to navigate back to the Schedules Screen.
Tip: This will also SAVE your new schedule.
Set Time 1Indicates this is the first Scheduled Time.
SystemSelect to choose which type of “System Setting” you want. For example: auto, heat, cool, or off.
Heat SettingSlide the Heat Setting to the desired heat temperature set point you want this thermostat to adjust to at the above Start Time.
*Unoccupied SetbackNote that this option will only be viewable/settable if you have installed Pelican thermostats connect to an Occupancy Sensors.
Download and review User Guide 7 - Manage Thermostat Accessories for more information.
New Set TimeSelect a + to ADD additional scheduled Times.
Tip: You can have up to 12 Set Times per schedule.
Delete Set TimeSelect a - to REMOVE a set time.
Start TimeSelect to pick what time you want the thermostat to switch to these settings (Deeper look on next page).
FanSelect to adjust the Fan to either Auto or On at the above Start Time.
Cool SettingSlide the Cool Setting to the desired cool temperature set point you want this thermostat to adjust to at the above Start Time.
Front KeypadSelect to adjust the Front Keypad to On (Unlocked) or Off (Locked) at the above Start Time.
Day/Day Range IndicatorIndicates which day or day range schedule you are editing.
TimeDisplays the start time you are selecting.
Minutes (M)Slide the minutes slider to choose at which minute you want this set time to start.
Hour (H)Slide the hour slider to choose at which hour you want this set time to start.
QUICK VIEW OF A SCHEDULE SET TIME
Select Start Time to configure when you want this set time to adjust the thermsotat’s operations.STEP SIX: SETTING A START TIME
10

After you have the Start Time set configure the thermostat setting adjustments you want to occur at this time.
STEP SEVEN: SET THE OTHER SCHEDULE OPTIONS
SystemSelect to choose which type of “System Setting” you want. For example: auto, heat, cool, or off.
Heat SettingSlide the Heat Setting to the desired heat temperature set point you want this thermostat to adjust to at the above Start Time.
*Unoccupied SetbackNote that this option will only be viewable/settable if you have installed Pelican thermostats connect to an Occupancy Sensors.
Download and review User Guide 7 - Manage Thermostat Accessories for more information.
FanSelect to adjust the Fan to either Auto or On at the above Start Time.
Cool SettingSlide the Cool Setting to the desired cool temperature set point you want this thermostat to adjust to at the above Start Time.
Front KeypadSelect to adjust the Front Keypad to On (Unlocked) or Off (Locked) at the above Start Time.
You can add up to 12 set times for each scheduled day. Normally a schedule will include a start time, an end time, and multiple system override times after the end time. To learn more about how to create system over-ride proceed to the next section.
STEP EIGHT: ADD MORE SET TIMES
New Set TimePressing the ‘+’ button will add an additional set time.
11

Once you finish adding and adjusting schedule set times, select the Back button found in the upper left hand corner of the screen. There is no save button, pressing back will automatically upload the schedule to the thermostat.
STEP EIGHT: FINISHED
12

The Pelican system uses the Scheduling tool to allow for timed system override settings. A system override is an automatic set-back anytime an individual changes the thermostat’s temperature settings away from the scheduled set point. Allowing you to only let an individual’s temperature change last for two or three hours and then revert back to a more economic temperature settings to save energy. This section goes over how to create two hour override periods from 6:00PM to 11:59PM using a thermostat’s schedule.
USING THE THERMOSTAT’S SCHEDULE TO CREATE TIMEDSYSTEM OVERRIDE SETTINGS
Below is an example of a schedule that turns a thermostat On (when business starts) at 6:00AM. If someone decides to change the thermostat’s temperature set point, the thermostat will allow them to. At 6:00PM (set time 2) the thermostat will set to Off, since the space is now normally closed.
But, the thermostat’s key pad has been left unlocked just in case someone might still need to turn on the HVAC unit after normal business hours. The issue is that if the unit is turned back on, the person might forget to turn it back off, and it will run at the last set point until the next day.
To prevent the thermostat from staying On all night, you can use additional set times to create economy setting adjustments every hour, two hours, etc. up to twelve total set times.
STEP ONE: NAVIGATE TO THE THERMOSTAT SCHEDULE
13
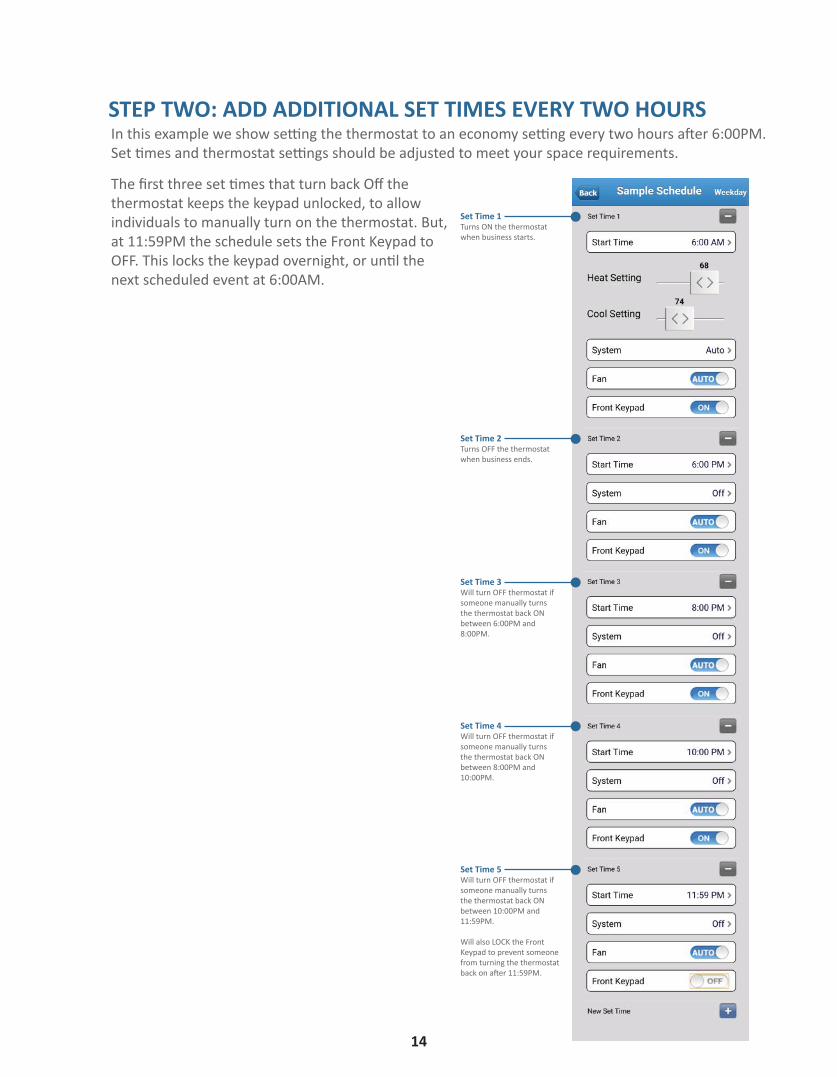
STEP TWO: ADD ADDITIONAL SET TIMES EVERY TWO HOURSIn this example we show setting the thermostat to an economy setting every two hours after 6:00PM. Set times and thermostat settings should be adjusted to meet your space requirements.
The first three set times that turn back Off the thermostat keeps the keypad unlocked, to allow individuals to manually turn on the thermostat. But, at 11:59PM the schedule sets the Front Keypad to OFF. This locks the keypad overnight, or until the next scheduled event at 6:00AM.
Set Time 2Turns OFF the thermostat when business ends.
Set Time 1Turns ON the thermostat when business starts.
Set Time 3Will turn OFF thermostat if someone manually turns the thermostat back ON between 6:00PM and 8:00PM.
Set Time 4Will turn OFF thermostat if someone manually turns the thermostat back ON between 8:00PM and 10:00PM.
Set Time 5Will turn OFF thermostat if someone manually turns the thermostat back ON between 10:00PM and 11:59PM.
Will also LOCK the Front Keypad to prevent someone from turning the thermostat back on after 11:59PM.
14

Vacation Scheduling is used to reduce your HVAC energy load when your buildings is on holiday or vacation. Each thermostat holds two schedules, its main schedule and the vacation schedule. The thermostat will switch to using its vacation schedule either automated through Pelican’s 365-day vacation calendar or by manually switching the site into Vacation mode. This section goes through how to create a Vacation schedule for a thermostat. To learn about how to activate a schedule download and review User Guide 6 - The Admin Screen.
Tip: Thermostats which do not have a Vacation schedules will continue to use their regular schedules even if the site is in Vacation Mode.
Select Vacation Set Times from the thermostat control screen to view, create, and edit the thermostat’s vacation schedule.
CREATING A THERMOSTAT VACATION SCHEDULE
Select Vacation Set Times on the thermostat screen.STEP ONE: NAVIGATE TO THE THERMOSTAT CONTROL SCREEN
15

Thermostat NameIndicates which Thermostat’s Schedule you are editing.
BackSelect to navigate back to the Thermostat Control Screen.
DefaultYou can create a default vacation schedule under the Admin screen. Once you have a default vacation schedule created, selecting this button will automatically copy that schedule into this thermostat. Download and review User Guide 6 - The Admin Screen to learn more about creating a default vacation schedule.
A QUICK LOOK AT A THE VACATION SET TIME SCREENThere are many different scheduling options that can be set to optimize how this thermostat runs.
STEP ONE: SETTING THE VACATION SCHEDULEThe Vacation Schedule can either be set as a Custom schedule or you can press the ‘Default’ button found in the upper right hand corner to copy your Default Vacation Schedule into the thermostat. This section focuses on setting a Custom schedule. Start by pressing the ‘+’ button to add a new set time.
New Set Time Selecting the ‘+’ button will add a new set time to your vacation schedule.
16

Back/SaveSelect to navigate back to the Shared Schedules Screen.
Tip: This will also SAVE your new schedule.
Set Time 1Indicates this is the first Scheduled Time.
SystemSelect to choose which type of “System Setting” you want to adjust this thermostat to at the above Start Time.
Heat SettingSlide the Heat Setting to the desired heat temperature set point you want this thermostat to adjust to at the above Start Time.
New Set TimeSelect a + to ADD additional schedule Times.
Tip: You can have up to 4 Set Times in a Vacation Schedule.
Delete Set TimeSelect a - to REMOVE a set time.
Start TimeSelect to set the time you want the thermostat to switch to these settings (Deeper look on next page).
FanSelect to adjust the Fan to either Auto or On at the above Start Time.
Fan CirculationThis will only appear if you have a ‘Fan Circulation’ setting in this thermostats configuration settings.
Turn this ON if you want the Fan to circulate the configured amount of minutes.
Set to OFF if you want to disable Fan Circulation
Cool SettingSlide the Cool Setting to the desired cool temperature set point you want this thermostat to adjust to at the above Start Time.
Front KeypadSelect to adjust the Front Keypad to On (Unlocked) or Off (Locked) at the above Start Time.
TimeDisplays the start time you are selecting.
Minutes (M)Slide the minutes slider to choose at which minute you want this set time to start.
Hour (H)Slide the hour slider to choose at which hour you want this set time to start.
QUICK VIEW OF A VACATION SCHEDULE SET TIME
After you have added a new set time the first item to configure is at what time you want this set time to occur. Select Start Time.
STEP TWO: SETTING A SET TIME
17

After you have the Start Time set configure the thermostat setting adjustments you want to occur at this time.
STEP THREE: SET THE OTHER SCHEDULE OPTIONS
You can add up to 4 set times in the vacation schedule.STEP FOUR: ADD MORE SET TIMES
New Set TimePressing the ‘+’ button will add an additional set time.
SystemSelect to choose which type of “System Setting” you want. For example: auto, heat, cool, or off.
Heat SettingSlide the Heat Setting to the desired heat temperature set point you want this thermostat to adjust to at the above Start Time.
New Set TimeSelect a + to ADD additional schedule Times.
Tip: You can have up to 4 Set Times in a Vacation Schedule.
FanSelect to adjust the Fan to either Auto or On at the above Start Time.
Fan CirculationThis will only appear if you have a ‘Fan Circulation’ setting in this thermostats configuration settings.
Turn this ON if you want the Fan to circulate the configured amount of minutes.
Set to OFF if you want to disable Fan Circulation
Cool SettingSlide the Cool Setting to the desired cool temperature set point you want this thermostat to adjust to at the above Start Time.
Front KeypadSelect to adjust the Front Keypad to On (Unlocked) or Off (Locked) at the above Start Time.
18

Once you finish adding and adjusting the vacation schedule set times, select the Back button found in the upper left hand corner of the screen. There is no save button, pressing back will automatically upload the vacation schedule to the thermostat.
STEP FIVE: FINISHED
19

Event Schedules are used to better manage a space during special events. For example, a space that is used on an irregular bases, such as a conference room, might not be able to run on a regular schedule. But, you need to schedule the space to be conditioned on specific days and times. An event schedule allows you to add future schedules that are only active for a set period. This way the conference room will only run when being used and save energy all other times. This section reviews adding an event schedule to a thermostat and setting different options to allow the thermostat to only run the HVAC unit when truly needed.
To learn about how to use the schedule dashboard download and review User Guide 5 - Schedule Dashboard.
Tip: An event schedule will override a thermostat’s main schedules only for the set amount of time. After the event the thermostat will revert back to its main schedule.
CREATING A THERMOSTAT EVENT SCHEDULE
Select Event Calendar on the thermostat screen.STEP ONE: NAVIGATE TO THE THERMOSTAT CONTROL SCREEN
20

Week OfDisplays the week you are viewing.
Add EventSelect to add a new event schedule.
Day and TimeEach box correlates between a date and time.
Back/SaveSelect to navigate back to the Shared Schedules Screen.
Tip: This will also SAVE your new schedule.
QUICK VIEW OF THE EVENT SCHEDULE CALENDAR
Select Add Event found below the event schedule calendar.STEP TWO: ADD A NEW EVENT
21

TitleName the event.
Start TimeSet the start time for the event.
End TimeSet the end time for the event.
Heat SettingSlide the Heat Setting to the desired heat temperature set point you want this thermostat to adjust to at the above Start Time.
Cool SettingSlide the Cool Setting to the desired cool temperature set point you want this thermostat to adjust to at the above Start Time.
RepeatSet how often to repeat this event schedule.
End DateIf this event repeats, set the day when the event stops repeating.
SystemSelect to choose which type of “System Setting” you want. For example: auto, heat, cool, or off.
Start DateSet the day for when this event starts or occurs.
FanSelect to adjust the Fan to either Auto or On at the above Start Time.
CancelSelect to void adding this event.
DoneSelect to save the event.
Front KeypadSelect to adjust the Front Keypad to On (Unlocked) or Off (Locked) at the above Start Time.
QUICK VIEW OF AN EVENT CONFIGURATION SCREEN
Select Title and name the event.STEP THREE: NAME THE EVENT
22
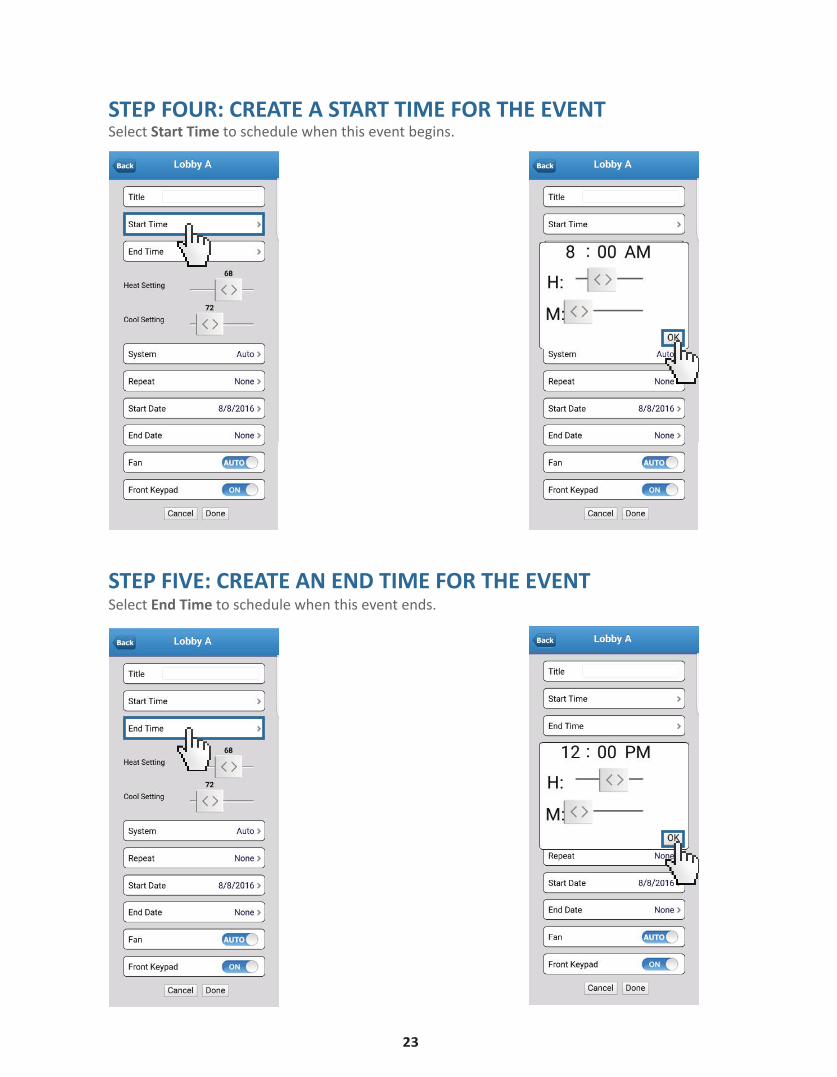
Select Start Time to schedule when this event begins.STEP FOUR: CREATE A START TIME FOR THE EVENT
Select End Time to schedule when this event ends.STEP FIVE: CREATE AN END TIME FOR THE EVENT
23

Configure the thermostat to run at the temperature and operation settings desired for this event.STEP SIX: SET THE THERMOSTAT SETTINGS
Select Repeat to manage how often this event repeats. An event can be Repeated between multiple days, months, or years. There are five options for repeating an event:
● None the event only happens during the single day it is scheduled.● Daily the event repeats everyday.● Weekly the event repeats the same day of each week.● Monthly the event repeats the same day of each month.● Yearly the event repeats the same day of each year.
STEP SEVEN: IF THE EVENT REPEATS
Heat SettingSlide the Heat Setting to the desired heat temperature set point you want this thermostat to adjust to at the above Start Time.
Cool SettingSlide the Cool Setting to the desired cool temperature set point you want this thermostat to adjust to at the above Start Time.
SystemSelect the “System Setting” you want to thermostat to adjust to at the above Start Time.
FanSelect to adjust the Fan to either Auto or On at the above Start Time.
Front KeypadSelect to adjust the Front Keypad to On (Unlocked) or Off (Locked) at the above Start Time.
24
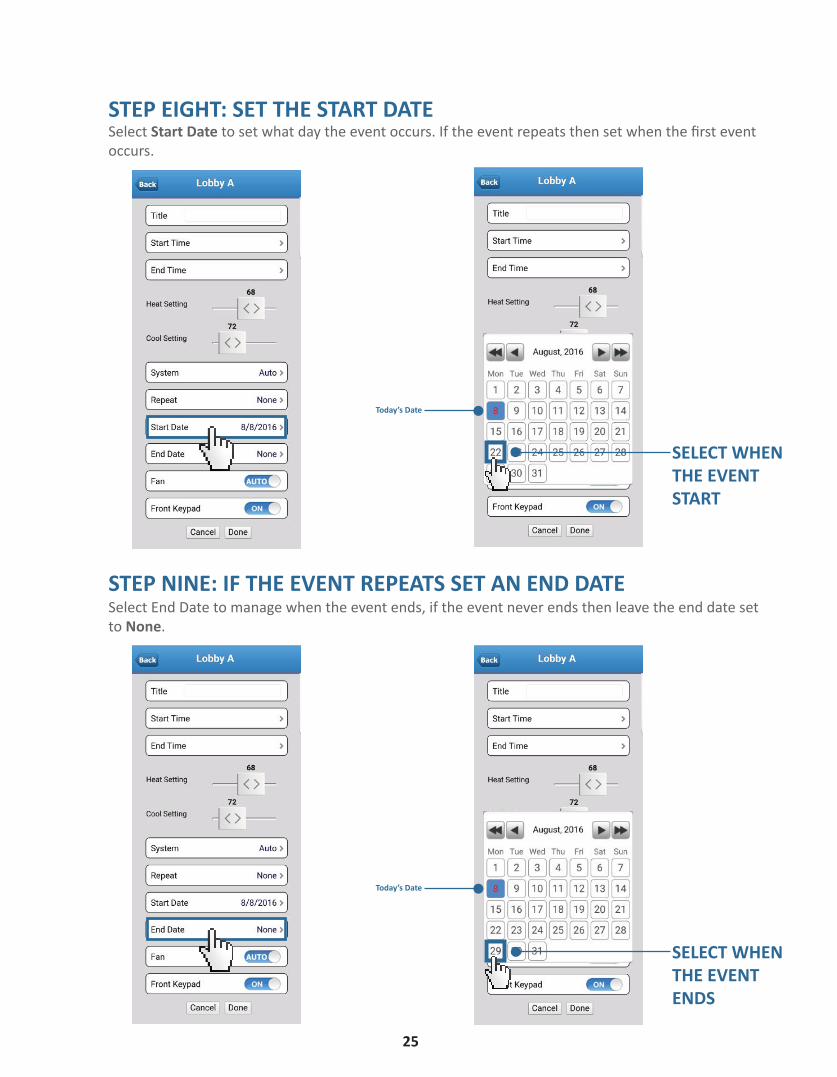
Select Start Date to set what day the event occurs. If the event repeats then set when the first event occurs.
STEP EIGHT: SET THE START DATE
Select End Date to manage when the event ends, if the event never ends then leave the end date set to None.
STEP NINE: IF THE EVENT REPEATS SET AN END DATE
SELECT WHENTHE EVENTSTART
Today’s Date
SELECT WHENTHE EVENTENDS
Today’s Date
25

Once you finish adding and adjusting the event schedule, select the Back button found in the upper left hand corner of the screen. There is no save button, pressing back will automatically upload the event schedule to the thermostat.
STEP TEN: FINISHED
Select the Edit button found below the calendar that matches the color of the event you want to edit.EDITING AN EXISTING EVENT
EventAn event will be shown on the calendar.
Edit EventThe “edit” button color will match the event color. Select to edit the event.
26

A thermostat’s Historical Trend Data can be viewed through the Pelican Web App. Your Pelican system tracks a wide range of historical information for each thermostat:
● Temperature tracked at every 1/10th of a degree change.● Temperature Set Points both the heat and cool set points as they are set through-out the day.● Calls for Heat and Cool highlights when the thermostat is requesting cool or heat from the HVAC equipment.● Calls for Fan highlights when the thermostat is requesting Fan from the HVAC equipment.● and much more. . .
Depending on the accessories you have connected to the thermostat you can view additional historical information. This section reviews the history graph for just a Pelican thermostat. For CO2 and Humidity thermostats please reference the end of this section. For thermostat graphs with other accessories please reference and download User Guide 7 - Manage Thermostat Accessories.
THERMOSTAT HISTORY GRAPHS
Select Hisotry on the thermostat screen.STEP ONE: NAVIGATE TO THE THERMOSTAT CONTROL SCREEN
27

The History Graphs are packed with information and the ability to adjust what you are viewing so you can better understand the climate in this space:
DateSelecting the Date will pull up a Calendar so you can easily navigate between days, months and years.
PreviousSelecting to navigate to the previous day’s historical data.
NextSelecting to navigate to the next day’s historical data.
TimeThe X-axis is time.
Cool Set pointA horizontal blue line is the cool set point.
Heat Set pointA horizontal red line is the heat set point.
Space TemperatureThe dark blue line is the space temperature as it moves through-out the day.
Space TemperatureThe dark blue line is the space temperature as it moves through-out the day.
Alarm NotificationA horizontal yellow line indicates there was a Notification generated at this time.
Shaded RedIndicates a call for HEAT.
Shaded BlueIndicates a call for COOL.
ZoomSelect + to zoom In.Select - to zoom Out.
ViewCheck to display.Uncheck to not display.
Time SliderIf you want to view exactly what is happening in this space at a specific time. Select this slider and move to the desired time you want to view.
Sliding this will automatically update these values.
TemperatureThe Y-axis is temperature.
QUICK VIEW OF A HISTORY GRAPH
28

Next MonthSelecting to navigate to the next month.
Previous MonthSelecting to navigate to the previous month.
Previous YearSelecting to navigate to the previous year.
Next YearSelecting to navigate to the next year.
When you select the Date on the History Graph it will pop up a Calendar as seen below:SELECTING A SPECIFIC DATE ON THE HISTORY GRAPHS
DaySelecting a day will bring you to that day’s history graph.
29

Thermostat NameIndicates the ‘Name’ associated with this thermostat.
Select to navigate to this thermostat’s ‘Control Page’.
Space TemperatureDisplays the real-time temperature in the space.
BackSelect to navigate back to the home screen of the Pelican Site Manager.
Temperature SettingDisplays the setting for the above operation.
CO2 LevelDisplays the real-time carbon-dioxide level in the space.
Operation StatusIndicates the current mode the thermostat is running in.
Group NameThis will display the ‘Group Name’ you are viewing.
The Operation Status indicates the current state of the thermostat. This box can indicate six different statuses:
● Cool On indicates that the thermostat is ‘Calling for Cool’.● Heat On indicates that the thermostat is ‘Calling for Heat’.● Fan On indicates that the thermostat is ‘Calling for Fan’ (in both Cool On and Heat On mode the thermostat is also calling for Fan).● Heat indicates that the temperature in the space is closest to the Heat Set point.● Cool indicates that the temperature in the space is closest to the Cool Set point.● System Off indicates that the thermostat is OFF.
A DEEPER LOOK AT OPERATION STATUS
Select a Group from the Pelican Web App home screen to view thermostats.A QUICK LOOK AT A GROUP OF THERMOSTATS WITH CO2
30

The History Graphs are packed with information and the ability to adjust what you are viewing so you can better understand the climate in this space:
TimeThe X-axis is time.
CO2 LevelThe dark green line is the space CO2 level as it moves through-out the day. CO2 Setting
The CO2 setting can be adjusted in the TS250 or TS250H configuration screen. Review and download User Guide 3 - Thermostat Setup to learn more.
ZoomSelect + to zoom In.Select - to zoom Out.
CO2The Y-axis is CO2.
QUICK VIEW OF A CO2 HISTORY GRAPH
31
ViewCheck to display.Uncheck to not display.

Thermostat NameIndicates the ‘Name’ associated with this thermostat.
Select to navigate to this thermostat’s ‘Control Page’.
Space TemperatureDisplays the real-time temperature in the space.
BackSelect to navigate back to the home screen of the Pelican Site Manager.
Temperature SettingDisplays the setting for the above operation.
Humidity LevelDisplays the real-time humidity level in the space.
Operation StatusIndicates the current mode the thermostat is running in.
Group NameThis will display the ‘Group Name’ you are viewing.
The Operation Status indicates the current state of the thermostat. This box can indicate six different statuses:
● Cool On indicates that the thermostat is ‘Calling for Cool’.● Heat On indicates that the thermostat is ‘Calling for Heat’.● Fan On indicates that the thermostat is ‘Calling for Fan’ (in both Cool On and Heat On mode the thermostat is also calling for Fan).● Heat indicates that the temperature in the space is closest to the Heat Set point.● Cool indicates that the temperature in the space is closest to the Cool Set point.● System Off indicates that the thermostat is OFF.
A DEEPER LOOK AT OPERATION STATUS
Select a Group from the Pelican Web App home screen to view thermostats.A QUICK LOOK AT A GROUP OF THERMOSTATS WITH HUMIDITY
32

A QUICK LOOK AT CONTROLLING A HUMIDITY THERMOSTATStart by selecting Humidity Control.
STEP ONE:SELECT HUMIDITY CONTROL
STEP TWO:SET HUMIDITY LEVEL
33

The History Graphs are packed with information and the ability to adjust what you are viewing so you can better understand the climate in this space:
TimeThe X-axis is time.
Humidity set pointA horizontal brown line is the humidity set point.
Humidity LevelThe pink line is the space humidity as it moves through-out the day.
Shaded RedIndicates is either a call for humidity or dehumidity.
ZoomSelect + to zoom In.Select - to zoom Out.
ViewCheck to display.Uncheck to not display.
Time SliderIf you want to view exactly what is happening in this space at a specific time. Select this slider and move to the desired time you want to view.
Sliding this will automatically update these values.
HumidityThe Y-axis is humidity.
QUICK VIEW OF A HUMIDITY HISTORY GRAPH
34

PelicanWireless Systems
Phone: 888-512-0490eMail: [email protected] [email protected]
Web: www.pelicanwireless.com
2655 Collier Canyon RoadLivermore, CA 94550
GUIDE 4 FINISHED.
© All Rights Reserved. Pelican Wireless Systems, LLC.