World of Joysticks Keyboard & Mouse Emulator...
15
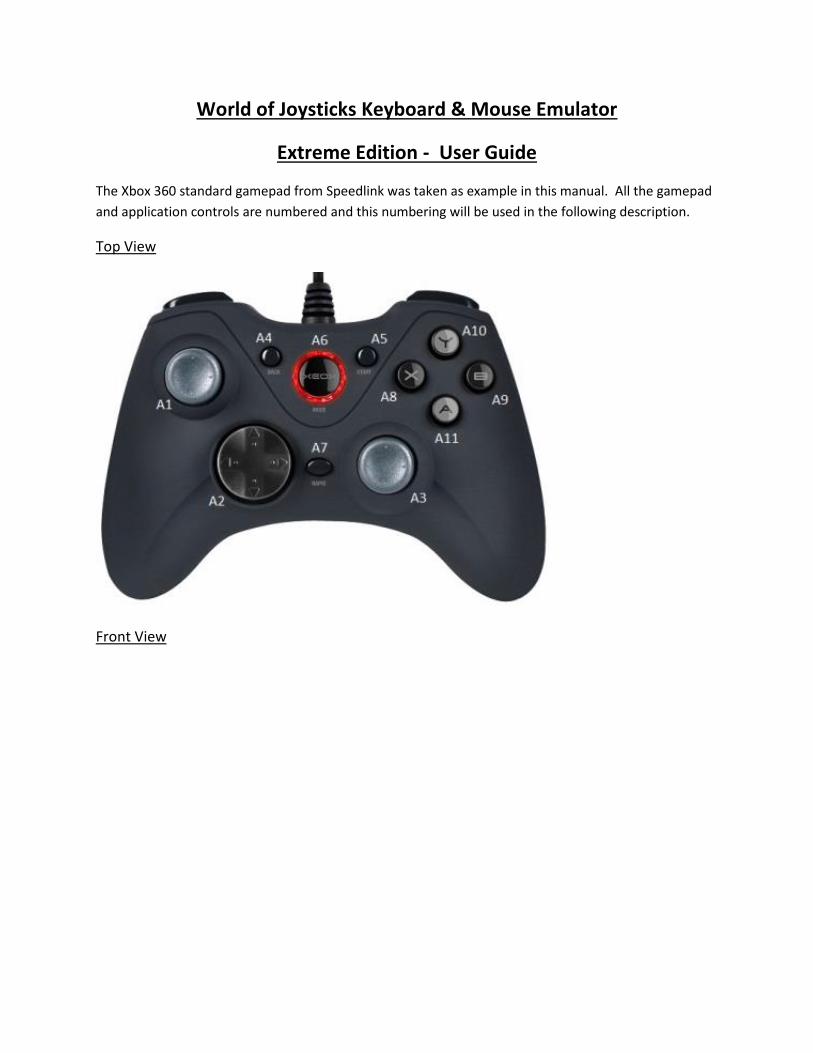
World of Joysticks Keyboard & Mouse Emulator Extreme Edition - User Guide The Xbox 360 standard gamepad from Speedlink was taken as example in this manual. All the gamepad and application controls are numbered and this numbering will be used in the following description. Top View Front View
Transcript of World of Joysticks Keyboard & Mouse Emulator...
World of Joysticks Keyboard & Mouse Emulator
Extreme Edition - User Guide
The Xbox 360 standard gamepad from Speedlink was taken as example in this manual. All the gamepad
and application controls are numbered and this numbering will be used in the following description.
Top View
Front View
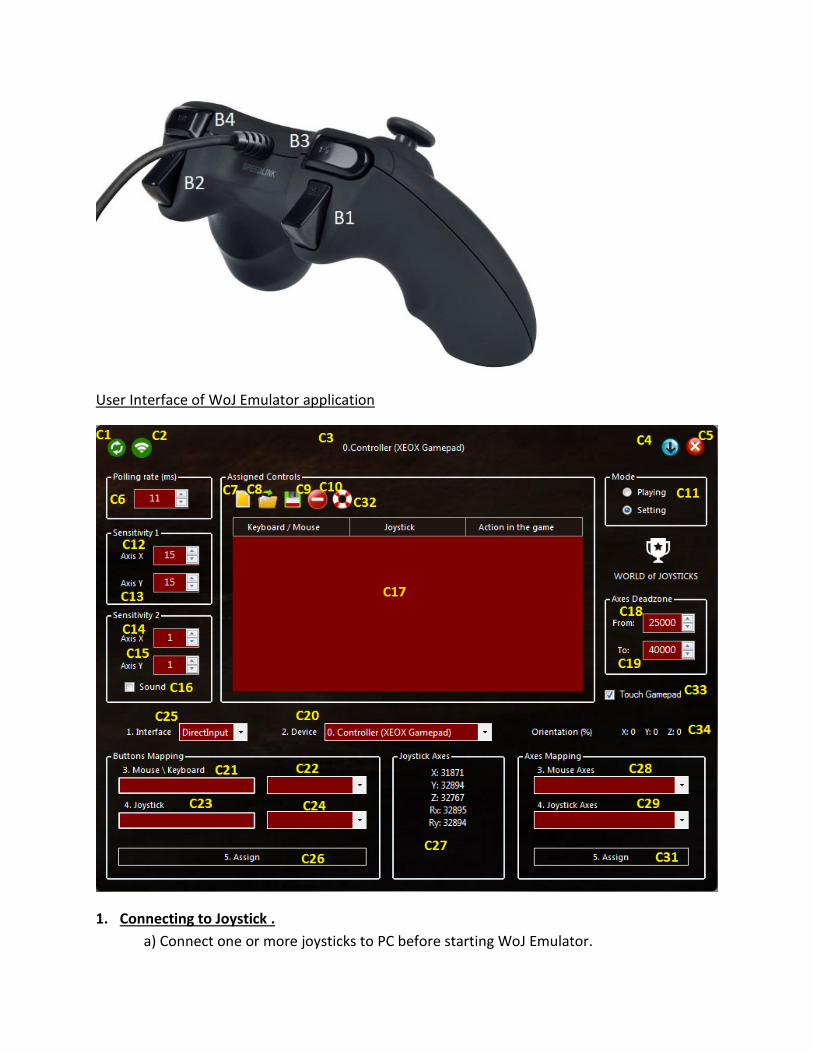
User Interface of WoJ Emulator application
1. Connecting to Joystick .
a) Connect one or more joysticks to PC before starting WoJ Emulator.
b) It is recommended to install the drivers of your joysticks from the CDs of web-sites of
manufacturers. For many joysticks Windows installs its own standard driver by default,
but you have to take in account that device name in the standard driver and driver from
manufacturer can be different, therefore WoJ Emulator probably won’t be able to apply
configuration created with a different driver.
However you always will be able to create the separate configurations for different
drivers.
c) Start WoJ Emulator. Choose an interface by [C25] selector. DirectInput – it is universal
interface for any gaming controllers but it does not support vibration for Xbox 360
devices. XInput – it is special interface from Microsoft for Xbox 360 devices, in this mode
they support vibration and their triggers control independent axes. If you are going to
use a Xbox 360 controller – choose XInput, for all other cases choose DirectInput.
Different interfaces cannot be mixed in the common configuration. For playing with
different devices simultaneously always choose DirectInput. XInput mode supports up to
four Xbox 360 controllers simultaneously. After choosing interface application will find
all the relevant devices and will display them in the [C3] label and [C20] selector. But if
application was started before connecting the joysticks – press the [C1] button to
refresh connection.
2. Investigate the functionality of your Joysticks.
First of all you have to select a joystick by [C20] selector. It is possible to mix the
assignments for multiple joysticks in the single configuration, to play with multiple joysticks
simultaneously. In this tutorial we’ll see how to assign controls for the single device but you
can do the same for others after switching [C20] selector.
Push the sticks of you joystick [A1, A3] and all the buttons, some of them can behave as
axes. Take a look at the panel [C27], it displays all the available axes. You have to identify all
the axes in order to use them for assignments.
In this device apart from 2 sticks (X,Y и Rx,Ry) you have a triggers [B1, B2] for Z axis (+/-).
Note: Special system buttons for switching modes for each model of joystick also can
influence on the assignment of axes and buttons, therefore please choose the most suitable
mode first.
In this gamepad system buttons are [A6, A7]. Also this device has the regular buttons [A4,
A5, A8, A9, A10, A11, B3, B4] and Point of View (POV) switch [A2].
3. Assignment of Keyboard Button to Joystick Button.
a) Click by mouse in the field [C21] to set focus.
b) Press a key on the keyboard, its name will be displayed in the field [C21].
c) Click by mouse in the field [C23] to set focus.
d) Press a joystick button, its name will be displayed in the field [C23].
e) Press the [C26] button in order to assign, assigned pair will be displayed in the table
[C17].
f) Optionally you can click on the last column of [C17] table to add inline the title of this
action in the game.
4. Assignment of Mouse Button to Joystick Button.
a) Click by appropriate mouse button in the field [C21], the name of pressed mouse button
will be displayed in the field [C21].
b) Click by mouse in the field [C23] to set focus.
c) Press a joystick button, its name will be displayed in the field [C23].
d) Press the button [C26] in order to assign, assigned pair will be displayed in the table
[C17].
e) Optionally you can click on the last column of [C17] table to add inline the title of this
action in the game.
5. Assignment of Mouse Wheel scrolling direction to Joystick Button.
a) Click by mouse in the field [C21] to set focus.
b) Scroll by mouse wheel Up or Down, its name will be displayed in the field [C21].
c) Click by mouse in the field [C23] to set focus.
d) Press a joystick button, its name will be displayed in the field [C23].
e) Press the button [C26] in order to assign, assigned pair will be displayed in the table
[C17].
f) Optionally you can click on the last column of [C17] table to add inline the title of this
action in the game.
6. Assignment of Virtual Button for switching axes sensitivity modes to Joystick Button.
а) Select the “Sensitivity 1/2” item from the [C22] selector , its name will be displayed in the
field [C21].
b) Click by mouse in the field [C23] to set focus.
c) Press a joystick button, its name will be displayed in the field [C23].
d) Press the button [C26] in order to assign, assigned pair will be displayed in the list [C17].
e) Optionally you can click on the last column of [C17] table to add inline the title of this
action in the game.
7. Assignment of Mouse Moving Direction to Joystick Button.
а) Select a mouse moving direction (Up, Down, Left, Right) from the [C22] selector , its
name will be displayed in the field [C21].
b) Click by mouse in the field [C23] to set focus.
c) Press a joystick button, its name will be displayed in the field [C23].
d) Press the button [C26] in order to assign, assigned pair will be displayed in the list [C17].
e) Optionally you can click on the last column of [C17] table to add inline the title of this
action in the game.
8. Assignment of Keyboard or Mouse Buttons to POV Joystick Switch direction.
All the elements were assigned to joystick buttons in the steps 3, 4, 5, 6 and 7 you can
assign to POV joystick switch [A2].
For this press an arrow or intermediate position of POV joystick switch [A2] instead of
joystick button.
Assign 8 directions of POV switch (Up, Down, Left, Right, UpLeft, UpRight, DownRight,
DownLeft). You can assign few actions for intermediate directions, e.g: Up and Left for
UpLeft. (to move vehicle UpLeft by pressing the intermediate switch position)
9. Assignment of Keyboard or Mouse Buttons to direction of Joystick Axis (+ \ -).
All the elements were assigned to joystick buttons in the steps 3, 4, 5, 6 and 7 you can
assign to direction of joystick axis (increase or decrease). For this choose a direction of axis
from the list [C24] instead of joystick button. As a result pressing the stick or trigger of your
joystick will behave as button instead of behave as axis.
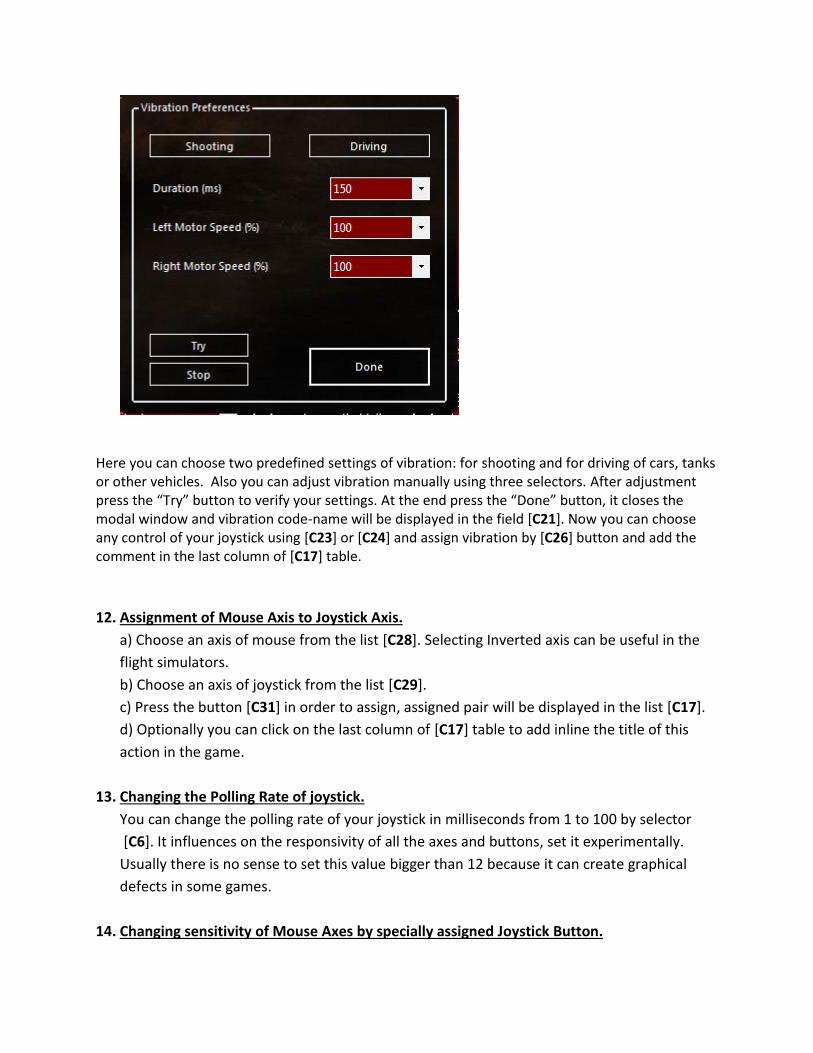
10. Assignment of Vibration to any Joystick control in the DirectInput mode.
Choose the “Vibration” item from the list [C22]. If you don’t see this option in the list – your
device does not support vibration or you are using Xbox 360 gamepad.
It opens the modal window of Vibration Preferences:

Here you can choose two predefined settings of vibration: for shooting and for driving of cars, tanks or other vehicles. Also you can adjust vibration manually using four selectors. After adjustment press the “Try” button to verify your settings. At the end press the “Done” button, it closes the modal window and vibration code-name will be displayed in the field [C21]. Now you can choose any control of your joystick using [C23] or [C24] and assign vibration by [C26] button and add the comment in the last column of [C17] table.
11. Assignment of Vibration to any Joystick control in the XInput mode.
Choose the “Vibration” item from the list [C22].
It opens the modal window of Vibration Preferences:
Here you can choose two predefined settings of vibration: for shooting and for driving of cars, tanks or other vehicles. Also you can adjust vibration manually using three selectors. After adjustment press the “Try” button to verify your settings. At the end press the “Done” button, it closes the modal window and vibration code-name will be displayed in the field [C21]. Now you can choose any control of your joystick using [C23] or [C24] and assign vibration by [C26] button and add the comment in the last column of [C17] table.
12. Assignment of Mouse Axis to Joystick Axis.
a) Choose an axis of mouse from the list [C28]. Selecting Inverted axis can be useful in the
flight simulators.
b) Choose an axis of joystick from the list [C29].
c) Press the button [C31] in order to assign, assigned pair will be displayed in the list [C17].
d) Optionally you can click on the last column of [C17] table to add inline the title of this
action in the game.
13. Changing the Polling Rate of joystick.
You can change the polling rate of your joystick in milliseconds from 1 to 100 by selector
[C6]. It influences on the responsivity of all the axes and buttons, set it experimentally.
Usually there is no sense to set this value bigger than 12 because it can create graphical
defects in some games.
14. Changing sensitivity of Mouse Axes by specially assigned Joystick Button.
We’ve already assigned the virtual button in the step 6.
Now we can set the sensitivity of mouse X and Y axes for each of two modes using selectors
[C12, C13] and [C14, C15] accordingly. It is recommend to set lower values in the second
mode to use it for precise aiming.
To remember that second mode was activated during playing you can enable the specific
sound by checkbox [C16]. You can replace the sound file according to your taste,
“sound.wav” is located in the installation folder.
15. Axes Threshold of Joystick.
This option you need only if some Axis with central position does not return to initial state
(usually 32767) after releasing the stick.
Check for the maximal value of this error in both directions and according to it set the
appropriate values for selectors [C18, C19].
As a result between assigned values will be dead-zone for all the axes of joystick.
There is no separate thresholds for each axis because it is usually < 8% and does not
influence on the gaming process.
16. Two main modes of WoJ Emulator application.
You can switch between Working and Assignments modes using switch [C11].
In the working mode the panel of assignments is hidden.
17. Working with configuration files.
Application uses the configuration files in the XML (UTF8) format.
a) Press the [C7] button to create a new configuration.
b) Press the [C8] button to load an existing configuration.
c) Press the [C9] button to save the configuration.
Attention please!
Application saves in the configuration file not only your assignments but also the values of
all the adjustment selectors, so if you changed something and didn’t save the configuration
– application will suggest you to save it.
Also in the configuration file saved the interface type and joystick(s) name(s) reported by
drivers. Application automatically selects suitable interface after loading the configuration.
d) Application allows you to delete from the list one or more assignments.
For this you have to mark them by mouse in the list [C17] and press the [C10] button.
18. Additional user interface functions.
a) Button [C32] opens the application web-site.
b) Button [C4] minimizes the application window.
c) Button [C5] hides the application to system tray.
d) Contextual menu can be opened from the tray and also by right mouse click in any empty
space of main application window.
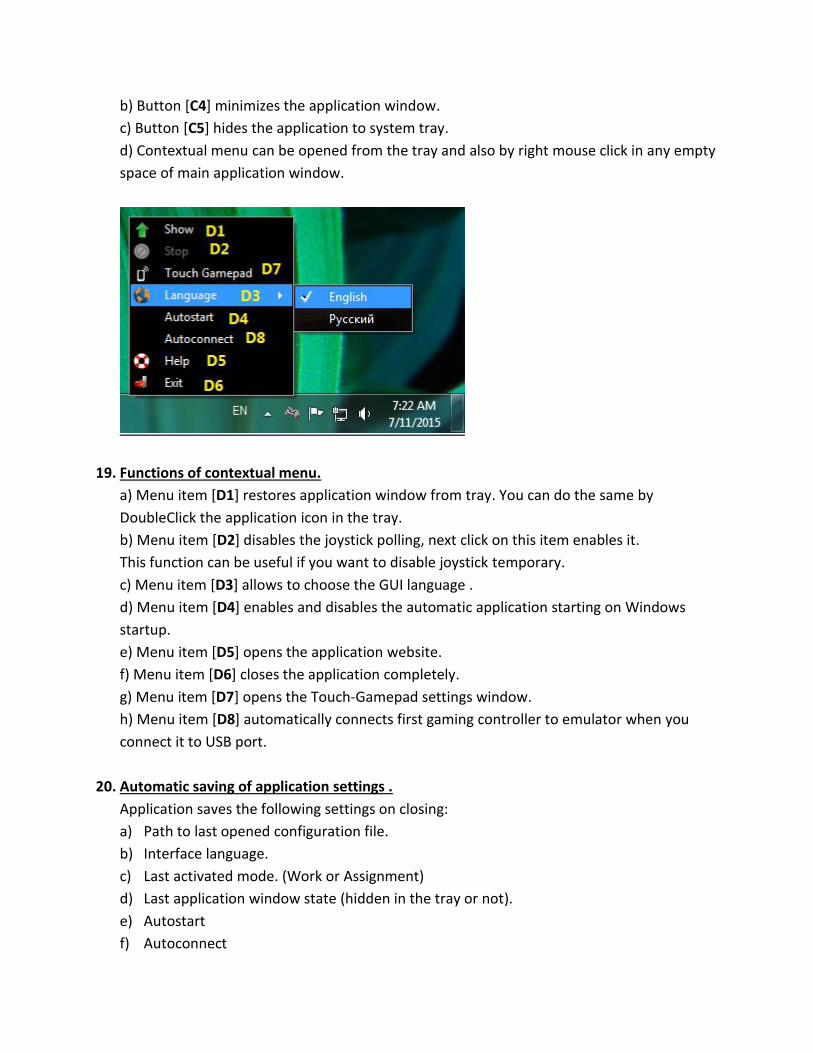
19. Functions of contextual menu.
a) Menu item [D1] restores application window from tray. You can do the same by
DoubleClick the application icon in the tray.
b) Menu item [D2] disables the joystick polling, next click on this item enables it.
This function can be useful if you want to disable joystick temporary.
c) Menu item [D3] allows to choose the GUI language .
d) Menu item [D4] enables and disables the automatic application starting on Windows
startup.
e) Menu item [D5] opens the application website.
f) Menu item [D6] closes the application completely.
g) Menu item [D7] opens the Touch-Gamepad settings window.
h) Menu item [D8] automatically connects first gaming controller to emulator when you
connect it to USB port.
20. Automatic saving of application settings .
Application saves the following settings on closing:
a) Path to last opened configuration file.
b) Interface language.
c) Last activated mode. (Work or Assignment)
d) Last application window state (hidden in the tray or not).
e) Autostart
f) Autoconnect
21. Tips and Tricks:
a) Keyboard Keys are too responsive – increase the “Polling Rate” value.
b) Mouse Axes are too responsive – decrease the “Sensitivity 1” values, if it is not enough –
increase the “Polling Rate” value.
c) Graphical artefacts while Mouse Movement - decrease the “Polling Rate” value.
22. Touch Gamepad - Introduction
WoJ Emulator enables you to use single mobile device as gaming controller separately or
together with one or few joysticks. Any modern smartphone or tablet with HTML5 web-
browser is suitable. Application is tested on several Android smartphones and tablets and
also on iPhone and iPad, on other platforms correct functionality is not guaranteed.
Application allows to create user-defined layouts with buttons (with repeat and without),
labels, touchpads and orientation Axes. Layouts are automatically loaded to mobile device
while connecting it to PC. Simple and convenient layout editor supports loading the pictures
to layout elements from any image hosting. If layout editor restricts your needs and you are
familiar with HTML language – it is possible to edit layouts manually. All the layout controls
apart from Orientation Axes should work on all the supported devices. But for Orientation
Axes your mobile device should contain accelerometer and compass. In the iPhone and iPad
they are certainly exist and work as expected but not in all the Android devices. In Android
you can check the sensors by “Sensor Box for Android” application - “Orientation Sensor”
should work. But existing sensors does not guarantee their normal work, I tried few budget
Android devices with incorrect orientation data received. Therefore there is more chances
to get it working on the devices of most popular brands.
Application also enables you to assign customizable vibrations to your actions, the same as
for joysticks. However vibration is not supported in the iOS web-browsers, but on Android
smartphones it should work, not in any tablet you’ll have vibrator.
Using Orientation Axes is most suitable for flight simulators. Touchpads are very useful for
precise aiming. When you create layout in the editor you assign names to all the controls,
you will see them later in the selectors of the main window, for assignments.
All the settings from the layout editor apart from Email address are saved in the already
known configuration files, together with joystick settings. Email address is saved in the
application settings, you need it for connecting your mobile device to PC.
You have a [С33] “Touch Gamepad” checkbox in the main application window, it allows to
remove all the mobile-related elements from the user interface. Uncheck it when you use
joysticks only!
From the top-left of main window you can see the indicator of mobile connection [С2].
It becomes white when it is connected and switches off after missing the connection but
not immediately. Also you can click it to disconnect from the PC side.
23. Touch Gamepad – Layout Editor
You will have predefined configurations to download from the application web-site, load
them by [С8] button (configurations are common for joysticks and mobile device), and also
you are enabled to create your own layouts with controls. For this choose [D7] form the
contextual menu – it opens Layout Editor.
First of all you have to enter your registration Email in the text-field [E34], if you don’t
have it yet – register now (click [E33] button). You must do it even if you’ve loaded a
predefined configuration. (you do it once)
Now let’s take a look how to create user-defined layout from scratch.
Press [E15] button to clear all the fields. Enter the name of new control in the [E1] field.
Choose a control type from the [E2] selector, you can create a Button with repeat or
without, touchpad or label. You can choose a background color by [E2] button – it will be
displayed in the [E5] field, or enter the URL of some background image in the [E3] text-field.
It can be a direct link to file from any image hosting. For labels it is irrelevant – they always
have the transparent background. If image-background is assigned to control – background
color always will be transparent.
From the top of background you can assign the text in the [E6] text-field, its color by [E7]
button – it will be displayed in the [E8] field, font by [E10] button – it will be displayed in the
[E38] field.
Position and size of controls should be assigned in % from the screen size by selectors
[E11],[E13] and [E12],[E14].
Now when all the parameters of new control are defined press [E16] button in order to add
it to the list [E9].
Later added layout elements have higher Z-order.
Layout elements from the list can be modified, for this select it in the list, edit the fields in
the same manner as for adding and press “Modify” button [E17] in order to save changes.
To remove element from the list you have to select it and press “Remove” [E18] button.
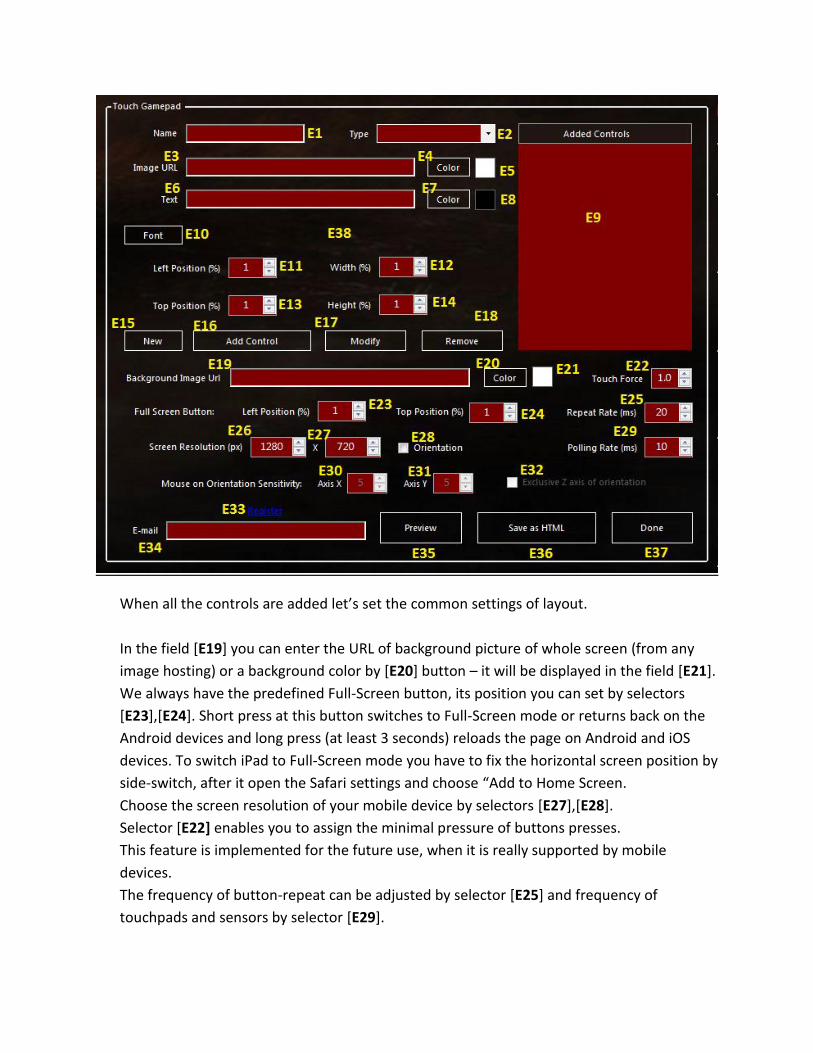
When all the controls are added let’s set the common settings of layout.
In the field [E19] you can enter the URL of background picture of whole screen (from any
image hosting) or a background color by [E20] button – it will be displayed in the field [E21].
We always have the predefined Full-Screen button, its position you can set by selectors
[E23],[E24]. Short press at this button switches to Full-Screen mode or returns back on the
Android devices and long press (at least 3 seconds) reloads the page on Android and iOS
devices. To switch iPad to Full-Screen mode you have to fix the horizontal screen position by
side-switch, after it open the Safari settings and choose “Add to Home Screen.
Choose the screen resolution of your mobile device by selectors [E27],[E28].
Selector [E22] enables you to assign the minimal pressure of buttons presses.
This feature is implemented for the future use, when it is really supported by mobile
devices.
The frequency of button-repeat can be adjusted by selector [E25] and frequency of
touchpads and sensors by selector [E29].
Sensitivity of mouse Axes assigned to Orientation Axes can be adjusted by selectors [E30],
[E31] and checkbox [E32] you can disable only when Z Orientation Axes is assigned but X
and Y are not. When you have this option checked Z Axis works only when X and Y axes have
zero values, it makes control of aircraft easier.
When all the settings are done it is a time for preview layout in the default PC web-browser,
press [E35] button for it.
Now you see what is incorrect, fix it and preview again. When everything is ok press [E36]
button in order to save the file which will be sent to mobile device while connecting to PC.
It is located here:
“c:\Users\[User Name]\AppData\Roaming\WoJEmulator\Publish.html”
And then press the [E37] button to close the window.
After returning back to the main window you have to Save configuration by [С9] button,
layout will be saved in the same file with assignments.
24. Touch Gamepad – Assignment of touch layout controls
After creating the layout we have to assign created controls to functions of keyboard and
mouse.
Orientation Axes X,Y,Z and also the Axes X,Y of all the created touchpads you can see in the
selector of joystick Axes [С29]:
Orientation X
Orientation Y
Orientation Z
[Name of Control] TAxis X
[Name of Control] TAxis Y
In the selector of joystick buttons [С24] you can see the touch-buttons, directions of all the
Orientation and Touchpads Axes:
[Name of Control] TButton
[Name of Control] TAxis X [-]
[Name of Control] TAxis X [+]
[Name of Control] TAxis Y [-]
[Name of Control] TAxis Y [+]
Orientation X [-]
Orientation X [+]
Orientation Y [-]
Orientation Y [+]
Orientation Z [-]
Orientation Z [+]
Assignment of all the mobile elements can be done exactly in the same way as we do for
joysticks, see the steps from 3 to 12.
Everything can be assigned to everything, without any restrictions.
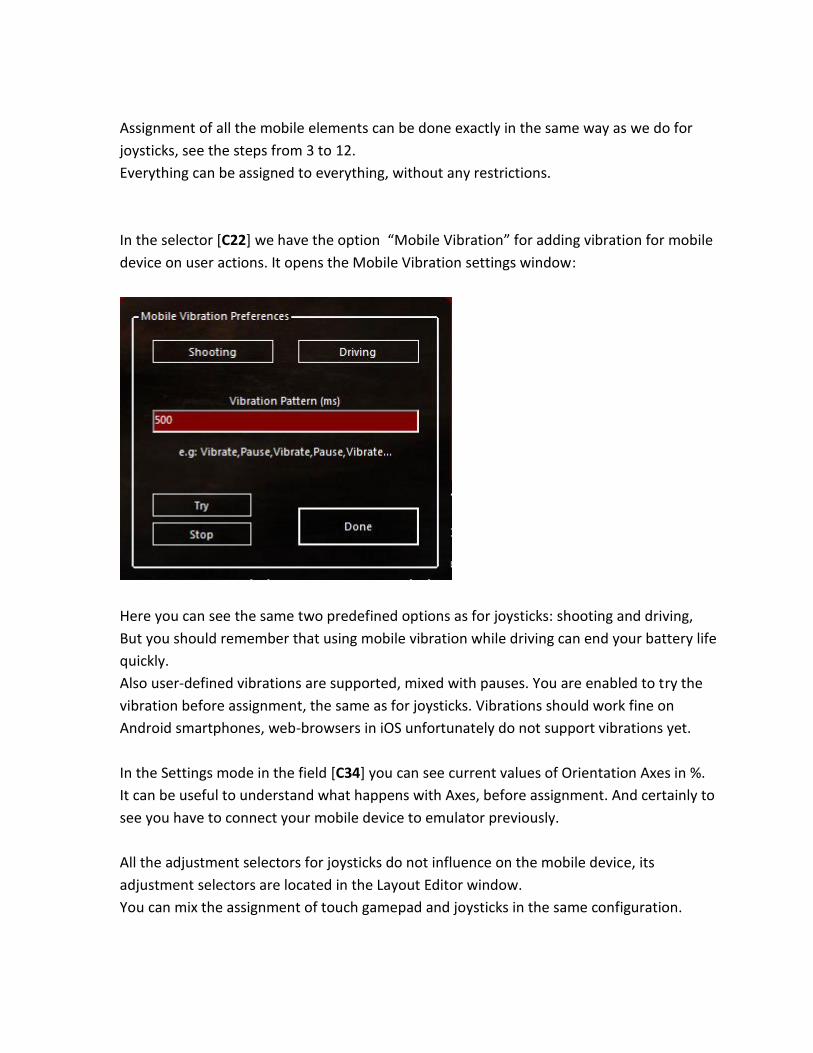
In the selector [С22] we have the option “Mobile Vibration” for adding vibration for mobile
device on user actions. It opens the Mobile Vibration settings window:
Here you can see the same two predefined options as for joysticks: shooting and driving,
But you should remember that using mobile vibration while driving can end your battery life
quickly.
Also user-defined vibrations are supported, mixed with pauses. You are enabled to try the
vibration before assignment, the same as for joysticks. Vibrations should work fine on
Android smartphones, web-browsers in iOS unfortunately do not support vibrations yet.
In the Settings mode in the field [С34] you can see current values of Orientation Axes in %.
It can be useful to understand what happens with Axes, before assignment. And certainly to
see you have to connect your mobile device to emulator previously.
All the adjustment selectors for joysticks do not influence on the mobile device, its
adjustment selectors are located in the Layout Editor window.
You can mix the assignment of touch gamepad and joysticks in the same configuration.

Your mobile device will start control the keyboard and mouse when you switch [С11] to
Game mode, together with joysticks if any of them is connected.
And don’t forget that for using your mobile device as gamepad you have to load or create a
configuration with touch layout, layout controls should be assigned to actions of keyboard
and mouse and mobile device should be connected to emulator.
As you could see Touch Gamepad feature opens a lot of opportunities for children with
parents and other creative people!
Contact Email: [email protected]
Web-Site: www.worldofjoysticks.com