MyResearch (Humanities) Module 3 Fall 2013 Natalie Colaiacovo Julie Jones Sharon Rankin.

ITS Academic Research Systems (ARS) Install VMware Horizon View Client and Sign into MyResearch
1 October 15, 2013
Welcome to MyResearch powered by VMware. The new MyResearch is faster, more powerful, more user friendly and can be used on handheld devices in addition to laptops and desktops. Both versions allow you access to your data and applications. The old MyResearch was web based while the New MyResearch requires an application to be installed on your laptop, desktop or handheld device. Desktop/Laptop Install Instructions To download and install the VMware View Client and start using the MyResearch on your desktop or laptop follow the steps:
1. Contact the ARS Team at [email protected] to have your account activated.
2. Download the VMware View Client from the VMware website.
3. Logon and configure (first time only) your MyResearch account. For details, go to page 3. Handheld Devices Install Instructions To download and install the VMware View Client and start using the MyResearch on your iPad, iPhone, Android or Kindle follow the steps:
1. Contact the ARS Team at [email protected] to have your account activated.
2. Download the VMware View Client from the VMware website.
3. Logon and (first time only) configure your MyResearch account. For details, go to page 10.
ITS Academic Research Systems (ARS) Install VMware Horizon View Client and Sign into MyResearch
2
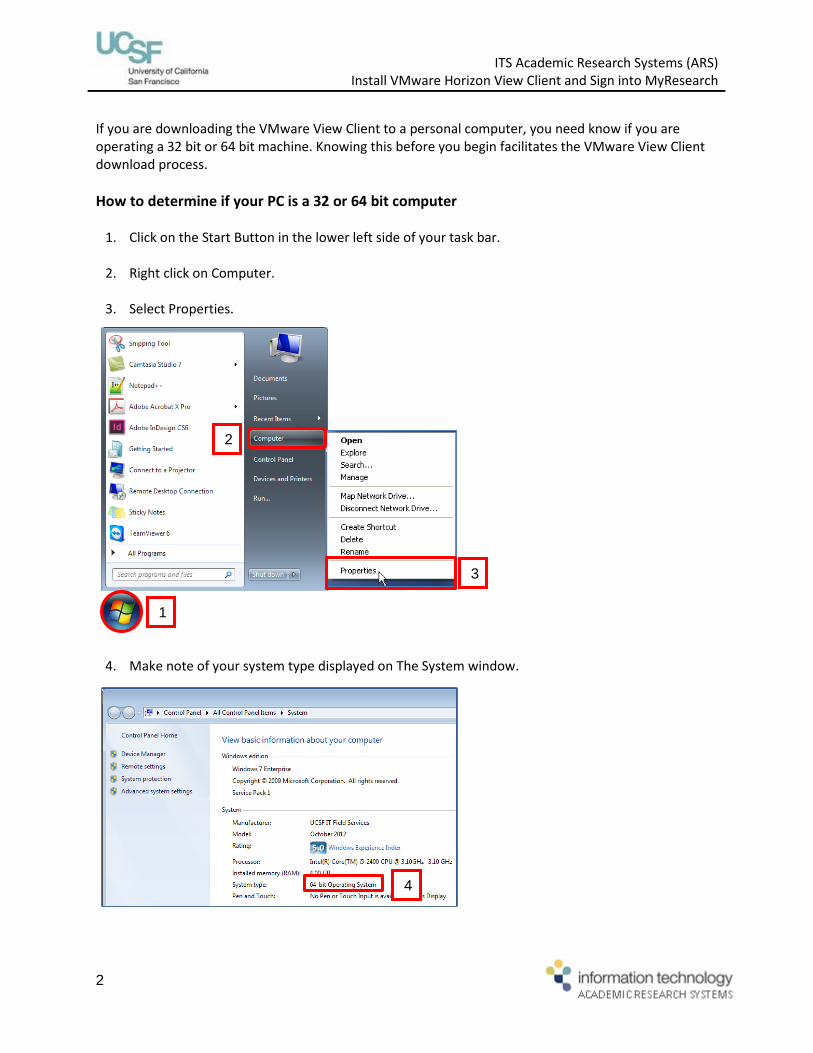
If you are downloading the VMware View Client to a personal computer, you need know if you are operating a 32 bit or 64 bit machine. Knowing this before you begin facilitates the VMware View Client download process. How to determine if your PC is a 32 or 64 bit computer
1. Click on the Start Button in the lower left side of your task bar.
2. Right click on Computer.
3. Select Properties.
4. Make note of your system type displayed on The System window.
1
2
3
4

ITS Academic Research Systems (ARS) Install VMware Horizon View Client and Sign into MyResearch
3
1. To install the VMware View Client on your desktop or laptop, click the link below:
https://my.vmware.com/web/vmware/info/slug/desktop_end_user_computing/vmware_horizon_clients/3_0
2. Select PC, Mac or Linux. Disregard the Local Mode Option listed on the options.
3. Click the Go to Downloads link that matches your bit size and platform.

ITS Academic Research Systems (ARS) Install VMware Horizon View Client and Sign into MyResearch
4
4. On the Download VMware Horizon View Client screen, select your Operating System (OS) and the
most recent version number, click the Download button.
5. Click the Save File button. Your download may run by itself or you may need to locate it and double-click it depending on your OS and browser.

ITS Academic Research Systems (ARS) Install VMware Horizon View Client and Sign into MyResearch
5
The VMware View Client installer opens.
6. Click the Next button. Accept the terms in the License Agreement window, click the Next button.
7. Accept the default settings (no action is required by the user), click the Next button. Enter view.ucsf.edu in the Default View Connection Server field, click the Next button.
ITS Academic Research Systems (ARS) Install VMware Horizon View Client and Sign into MyResearch
6
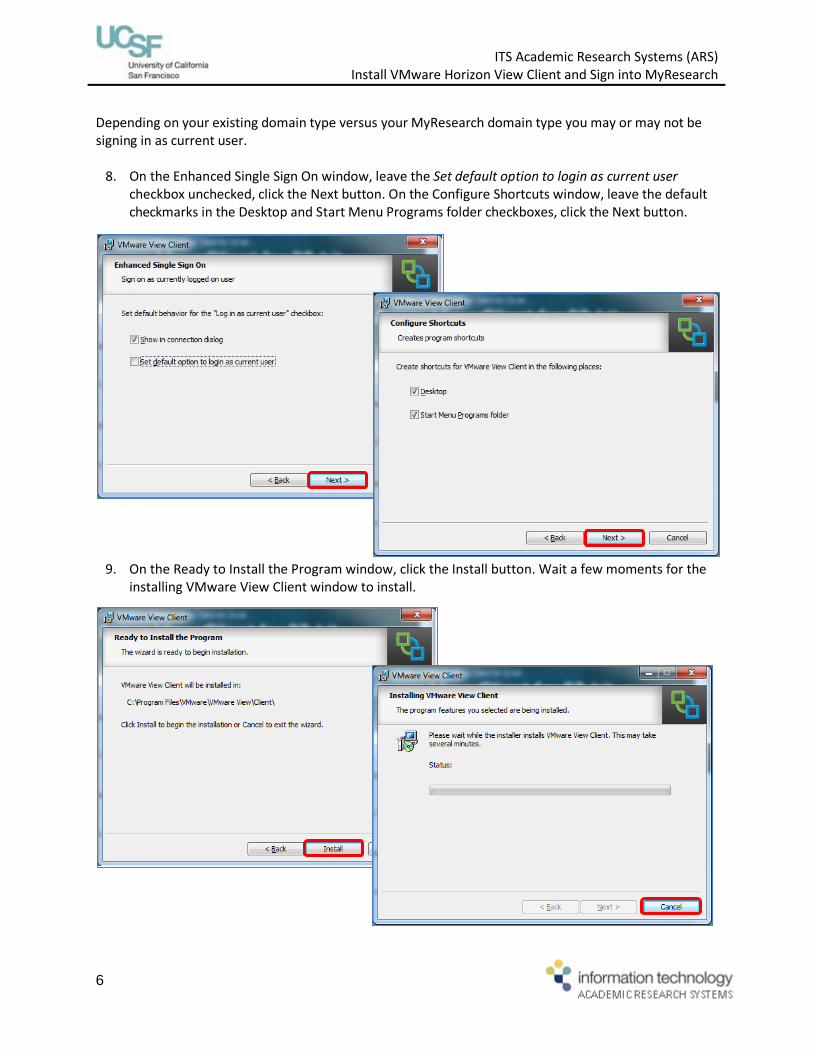
Depending on your existing domain type versus your MyResearch domain type you may or may not be signing in as current user.
8. On the Enhanced Single Sign On window, leave the Set default option to login as current user checkbox unchecked, click the Next button. On the Configure Shortcuts window, leave the default checkmarks in the Desktop and Start Menu Programs folder checkboxes, click the Next button.
9. On the Ready to Install the Program window, click the Install button. Wait a few moments for the installing VMware View Client window to install.

ITS Academic Research Systems (ARS) Install VMware Horizon View Client and Sign into MyResearch
7
10. Click the Finish button on the Installer Completed window. Click the Yes button to restart your
machine and install the VMware View Client.
11. After your computer restarts, double-click the VMware View icon located on your desktop. Leave the Connection Server field as view.ucsf.edu and click the Connect button.

ITS Academic Research Systems (ARS) Install VMware Horizon View Client and Sign into MyResearch
8
12. On the VMware View Client screen, complete the User name and Password fields using your
MyResearch username and password. It is likely that your domain is CAMPUS. Click the MyResearch Reconnect to desktop, click the Connect button.

ITS Academic Research Systems (ARS) Install VMware Horizon View Client and Sign into MyResearch
9
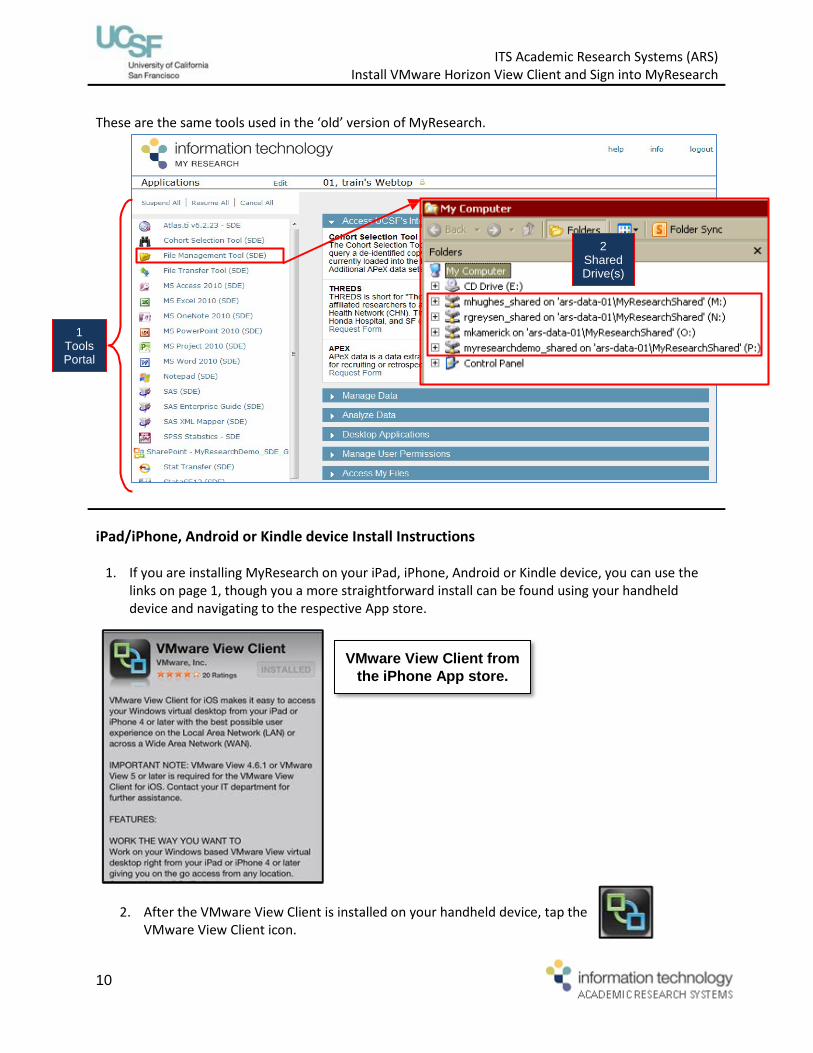
MyResearch opens your virtual desktop. The Tools Portal (the window on the left) is usually open and maximized when you first sign in. If it is not opened, click the IE icon on the bottom tool bar to open the Tools Portal. To locate existing uploaded data, click the Windows Explorer icon, click Computer. In MyResearch, shared data is located in the appropriate shared drive.
Internet Explorer icon = Opens the Tool Portal
Windows Explorer icon = Allows you to access the Computer function and MyResearch shared drives
1 Tools Portal
2 Shared Drive(s)
1 Tools Portal
2 Shared Drive(s)
ITS Academic Research Systems (ARS) Install VMware Horizon View Client and Sign into MyResearch
10
These are the same tools used in the ‘old’ version of MyResearch.
iPad/iPhone, Android or Kindle device Install Instructions
1. If you are installing MyResearch on your iPad, iPhone, Android or Kindle device, you can use the links on page 1, though you a more straightforward install can be found using your handheld device and navigating to the respective App store.
2. After the VMware View Client is installed on your handheld device, tap the VMware View Client icon.
1 Tools Portal
2 Shared Drive(s)
VMware View Client from the iPhone App store.

ITS Academic Research Systems (ARS) Install VMware Horizon View Client and Sign into MyResearch
11
3. Click either the + (plus) icon or the Add Server button. Enter view.ucsf.edu in the space provided
and tap the Go or Connect buttons.
4. Enter you MyResearch Username, Password, and Domain (Try CAMPUS first, if not correct, use your regular domain). Tap “MyResearch”.

ITS Academic Research Systems (ARS) Install VMware Horizon View Client and Sign into MyResearch
12
Your virtual desktop loads. Your virtual desktop opens. On smaller handheld devices (iPhone shown in the example below), an X icon displays, tap the X for additional commands. You are ready to use the New MyResearch.
NOTE: You cannot connect to the New MyResearch if you are on the UCSFGuest Wi-Fi – unless you are also signed into VPN. Use the UCSFwpa Wi-Fi, a private Wi-Fi network or 3G/4G.