Texas Parent-Taught Driver’s Education - Safe2Drive else or if you were able to download it...
74
Texas Parent-Taught Driver’s Education Instructor Guide for Behind-the-Wheel Instruction Provided by
Transcript of Texas Parent-Taught Driver’s Education - Safe2Drive else or if you were able to download it...

Texas Parent-Taught Driver’s Education
Instructor Guide for Behind-the-Wheel Instruction
Provided by

Safe2Drive
2
This is Safe2Drive’s guide for behind-the-wheel driver training. It is a straightforward self-help tool for parents to give their teens a good start behind the wheel. You, the parent (or guardian) and instructor, will use this guide to help teach your teen how to drive. The term, ‘behind-the-wheel’, implies you and your teen are sitting in the car. You will be behind the wheel in some cases; your teen will be behind it in others. But in all cases, you both will be in the car.
Please note, you must be registered for our Parent-Taught Driver Education course for this instruction to be valid and to receive a certificate. If you received this packet from someone else or if you were able to download it without registering for our Parent-Taught Driver Education course, please register for our course before proceeding with this guide.
1.0 How To Use This Guide
The state of Texas requires teens to complete a driver education program. It also authorizes parents (or guardians) to provide this education to their teens. The parent-taught program consists of two parts (Figure 1). One part involves coursework that your teen completes online under your supervision. The other part involves behind-the-wheel instruction that you provide your teen. The two parts work together to provide your teen a driver education that meets the requirements of the state of Texas. The two parts are done simultaneously. That means you provide behind-the-wheel instruction at the same time your teen completes the coursework online.
Figure 1 – Two Parts of Parent-Taught Driver Education
The driver education program in Texas is administered by the Department of Public Safety (DPS). Our course is approved by the DPS and meets all requirements for Texas’ parent-taught driver education program.
1.1 Behind-the-Wheel Instruction
This guide focuses on behind-the-wheel instruction (Figure 2). It helps you teach your teen how to drive by giving him or her direct experience at driving.
Texas Parent-Taught
Driver Education
Online
Coursework
Behind-the-Wheel
Instruction

Safe2Drive
3
Figure 2 – This Guide Helps You with Behind-the-Wheel Training
The state of Texas further divides behind-the-wheel instruction into two parts (Figure 3). One part involves instruction, while the second part involves practice. At all times you are required to supervise your teen.
Figure 3 – Two Parts of Behind-the-Wheel Instruction
Texas increased the number of practice hours from 20 to 30 as of 10/01/2013. All students who registered for a driver education course prior to October 1, 2013 are required to complete 20 hours of practice driving. Students who registered after that date are required to complete 30 hours. In both cases 10 hours must be night-time driving.
Instruction
The behind-the-wheel instruction consists of 14 hours of instruction that is equally divided between in-car observation and behind-the-wheel (btw) instruction (Figure 4).
You occupy the driver’s seat for the observation hours. Your teen observes you while he or she sits in the passenger seat. You may also instruct your teen to observe other drivers on the road if an educational moment arises.
Your teen occupies the driver’s seat during the BTW instruction hours. You instruct your teen while you sit in the passenger seat. Your teen drives and explains what he or she is doing as you monitor and teach.
Texas Parent-Taught
Driver Education
Online
Coursework
Behind-the-Wheel
Instruction
This guide
helps you
with this.
Behind-the-Wheel
Instruction
Instruction
14 Hours
Practice
30 Hours
Only 20 hours practice is required for students who register prior to 10/01/2013.

Safe2Drive
4
Figure 4 – Two Parts of Instruction
Practice
The 30 hours of practice driving begins after the teen completes the 14 hours of observation and instruction (20 hours of practice for students registered prior to October, 1, 2013). This guide works equally well for either the 20-hour or 30-hour practice lessons.
The State of Texas makes available free of charge a handy behind-the-wheel guide for the 30 hours of practice. You can get it from the Texas TEA web site:
http://www4.esc13.net/uploads/drivers/docs/forms/TX_30_Hour_BTW_Guide_8x11_(8-2013)_Final.pdf
Alternatively you can download it from our site.
We follow the outline suggested in the Texas guide and add supplemental material to equip you with all the information you need.
1.2 Game Plan
This guide is a companion to the 30-hour online educational program and works in conjunction with it. We provide a map that shows the recommended times when a behind-the-wheel lesson should be given (Figure 5). In most cases the behind-the-wheel lessons cover material that has been covered in the course. However, this is not always true. In some cases topics in a behind-the-wheel lesson may cover material not yet covered in the course. In these cases we will include instructional material in the behind-the-wheel guide. You will teach your teen this material.
Behind-the-Wheel
Instruction
Instruction
14 Hours
Practice
30 Hours
Observation
7 Hours
BTW Instruction
7 Hours

Safe2Drive
5
Figure 5 – Behind-the-Wheel and Coursework Map
Your teen must complete the first seven lessons of the online before Lesson 1 of behind-the-wheel instruction can be given. Then lessons 8 through 12 of the coursework should be completed before Lesson 2 of the behind-the-wheel instruction can be given. This interweaving of coursework and behind-the-wheel instruction continues until your teen has completed all the coursework and the 14 hours of behind-the-wheel instruction. The practice lessons are administered in their entirety at the end.
Learner License
It is critical that your teen obtain a Learner License prior to starting any behind-the-wheel instruction (Figure 6). Your teen may apply for a license upon completion of the first seven lessons of the online coursework and receipt of a certificate of completion.

Safe2Drive
6
Figure 6 – Learner License is Imperative
While your teen is earning a Learner License, we suggest you prepare yourself for the first steps of behind-the-wheel instruction. We suggest brushing up on your driving expertise by reading through the Texas Drivers Handbook (found at http://www.txdps.state.tx.us/DriverLicense/documents/DL-7.pdf). This will get you up-to-speed on current driving laws and practices.
Maximum Hours Each Day
Students are not permitted to engage in more than four hours total of driver education on any day (with a maximum of 2 hours spent on online coursework and a maximum of 2 hours spent on the behind-the-wheel observation and behind-the-wheel instruction per day). For the 30 hours of behind-the-wheel practice, students may only count one hour of practice time per day.
Please make sure your teen sticks within these guidelines. A tired student cannot learn efficiently or drive safely.
Turn Off the Radio
Turn off the radio and minimize other distractions. Turn off your teen’s cell-phone and put yours on vibrate. Leave snacks at home. Afterward, ‘celebrate’ the lesson by taking your teen for lunch or refreshment. Remember this is ‘driving school’. Radios are not played in a classroom, nor are teens permitted to use their cell-phones.
1.3 Logs
You are required to submit to the DPS logs for both behind-the-wheel instruction and behind-the-wheel practice. This is done using Form 91B. We provide this form on our web site. The first part of the form contains a log for the instruction (Figure 7). We will help you fill this out as we go along. The second part contains the log for the practice (Figure 8). We will help you fill this out as well.
Your teen must have a
Learner Licensebefore you teach behind-the-wheel.

Safe2Drive
7
Figure 7 – Form 91B Part 1 (Instruction Log)

Safe2Drive
8
Figure 8 – Form 91B Part 2 (Practice Log)
1.4 Your Feedback
We at Safe2Drive hope you find this guide useful. We also hope you send us comments and questions. We always appreciate hearing from people who have used this guide. Let’s all keep working to make our highways safer and keep our teens safe on the road.
2.0 Behind-The-Wheel Instruction
We suggest you print the lessons in this section (2.0 Behind-the-Wheel Instruction) and keep them in the vehicle during the lessons. The lessons are broken down into simple steps.
Everyone learns best by doing. It is an approach based firmly on principles of human psychology. Here is one additional fact. People learn best by doing things repeatedly. In our years observing parents teach, we have noticed a tendency for parents to lecture their teens. We suggest you avoid this. For one thing, it may create tension between you and your teen. People are naturally put on edge by someone else lecturing to them. Do you remember being lectured when you were young?

Safe2Drive
9
Instead, briefly and in a straightforward way, tell your teen exactly what you want him or her to know. Explain the reason for it. Ask once in a while if he or she understands. Otherwise, keep things moving. Let your teen do the work.
Table of Contents for Behind-the-Wheel Instruction
Figure 9 shows the lesson plan for the behind-the-wheel instruction. There are 8 lessons in all. Each lesson consists of in-car observation and instruction. The time spent on each lesson should be evenly divided between observation and instruction. However, since teens typically learn by doing we suggest you may want to spend extra time on instruction if you can.
Figure 9 – Table of Contents for Behind-the-Wheel Instruction
The hours shown next to each lesson are the minimum hours that the Texas DPS requires. We understand that each teen learns differently and at his or her own pace. Some are fast learners. Others require more time. You may find your teen needs more than the minimum time. That is ok. Take as much time as you need.
2.1 Driver Preparation …
Each lesson, including this first one, is broken down into several steps:
1) Overview
2) Observation
3) BTW Instruction
4) Log
In the first part we will describe what will be accomplished in the lesson. We will provide guidance on how to perform the observation part of the lesson and then the instruction part Remember you are in the driver seat during observation. Your teen is in the driver seat during instruction. Finally, we will help you complete the log.
Ok! Let’s get started.
1) Overview
The first behind-the-wheel lesson should take about 1 hour split equally between in-car observation and instruction. The location is a large empty parking lot.
Behind-the-Wheel Instruction
Form DL-91B Part 1
Lesson Form DL 91B Log Item Observation Instruction Total Hours
(Hours) (Hours) (Hours)
2.1 Driver Prep … 0.5 0.5 1.0
2.2 Vehicle Movements Part 1… 1.0 1.0 2.0
2.3 Driver Readiness 1.0 1.0 2.0
2.4 Risk Reduction … 1.0 1.0 2.0
2.5 Distractions … 1.0 1.0 2.0
2.6 Vehicle Movements Part 2 … 1.0 1.0 2.0
2.7 Adverse Conditions … 1.0 1.0 2.0
2.8 Consumer & Personal Responsibility 0.5 0.5 1.0
Total Hours 7.0 7.0 14.0

Safe2Drive
10
In this lesson the focus is on what a driver does:
1) Before getting in the car
2) While in the car (i.e., monitoring car equipment)
3) Before getting out of the car
2) Observation
Before Getting in the Car
Show your teen what you do prior to getting into the car. Driving school instructors typically refer to this as the ‘walk-around’. Key items to cover include:
1) Check that no one and nothing is behind the car
2) Check the tires for proper pressure (review the owner’s manual)
3) Dents or damage to the car
4) Strangers in the back seat
5) Evidence of oil, coolant, or other fluid leaks
The first one is arguably the most important. If nothing else ensure your teen does this!
Looking for strangers in the car sounds funny on the face of it. But we have all read tragic stories where a driver is surprised by an intruder who hid in the back seat.
While in the Car
Adjust the seats to create comfort. Typically the seat should be adjusted so that you are approximately 10 inches away from the steering wheel. The hands should typically be on the 3:00 and 9:00 positions (Figure 10).
Figure 10 – Hand Position (Takes Airbags into Account)
Adjust the mirrors to ensure you have views to the rear and sides of the car. Explain the blind spot (Figure 11) and how to protect against it.

Safe2Drive
11
Figure 11 – Blind Spots
Adjust your feet. Show your teen where you place your feet and how they are used to accelerate and brake. Keep in mind only the right foot is used for the gas and brake; never the left (EVER!). Also, shoes must be worn at all times when driving.
Routine inspection of cars has nearly become a thing of the past given the advances in automotive technology. Today, we usually rely on warning lights to let us know when trouble is brewing with our brakes, tires, or just about any part on our car. In fact, we often ignore warning lights even when they are flashing because cars still manage to work just fine for days or weeks. This has had the unfortunate side-effect of letting us take things for granted.
Your teen should assume some responsibility for routine inspection and preventive maintenance. It is easy to do. Believe it or not, this is a handy time to actually pull out the owner’s manual and read it. Teens will get a better sense of how a car actually works.
Finally, buckle up (Figure 12)! Ensure all other occupants are buckled up as well.
Figure 12 – Buckle Up!
Turn the ignition to ‘on’ to show your teen the gauges that you use, what they do, and how you interpret them. Walk through how each knob, dial, and control operates. This includes oil gauges, lights, wipers, hazards, and so on.
Now turn the car on. Show your teen how to place the car in gear while the brake is applied.

Safe2Drive
12
Drive in a straight line across the lot to demonstrate the use of the accelerator. Demonstrate how to maintain different speeds (10 mph, 20 mph).
Show your teen how to pull into and out of a parking space. Show him or her how to get the car exactly between the lines. Demonstrate how to get the front bumper close the front of the space.
Demonstrate a right turn and then a left turn. As simple as it may seem, learning to turn is challenging. Experienced drivers do it subconsciously. However, there actually twelve steps to a successful turn (Figure 13). Review these steps with your teen.
Figure 13 – Twelve Steps to a Safe Turn
Finally, demonstrate how to stop the car, place it in park, and turn off the engine. Get out of the car and inspect it to ensure it is parked properly.
3) Instruction
Now switch places with your teen. He or she is the driver, and you are the passenger. Have your teen repeat the steps. Three checklists are provided to help you ensure all the items in this lesson are covered:
1) Pre Drive (Figure 14)
2) Drive (Figure 15)
3) Post Drive (Figure 16)
Twelve Steps to a SafeTurn
Safe2Drive
Step Description
1 Check the rear view mirror to ensure cars behind you are a safe distance away.
2 Check both side mirrors and blind spots for any side traffic or obstacles.
3 Engage the turn signal.
4 Ensure that you are in the proper lane and positioned correctly.
5 Begin braking for warning and to begin slowing down.
6 Check the rearview mirror and side mirrors again.
7 Check the traffic entering the intersection from right, left, and oncoming.
8 Gauge the stastue of turn signals and other stopped cars' positions.
9 Continue braking smoothly, checking all mirrors.
10 Come to a full stop at the sign or intersection.
11 Check oncoming, left, and right traffic patterns once more.
12 Complete the turn.

Safe2Drive
13
Figure 14 – Pre Drive Checklist
Lesson 1 Checklist
Pre Drive
Step Description
1 Possess valid Texas Learner License.
2 Search around vehicle for obstacles or leaks.
3 Check vehicle for damage.
4 Check tire condition (proper inflaction, wear).
5 Check for children or animals around vehicle.
6 Enter driver seat; lock doors.
7 Put key in ignition.
8 Adjust seat and head rest.
9 Adjust steering column if necessary.
10 Adjust mirrors.
11 Buckles safety belt. Ensures others are buckled.
12 Place hands in proper hand position.
13 Place foot on brake.
13 Start engine.
14 Inspect instrument panel to ensure vehicle is in safe condition.

Safe2Drive
14
Figure 15 – Drive Checklist
Figure 16 – Post Drive Checklist
4) Completing the Log
Upon completing this lesson you can update your log (Figure 17).
Lesson 1 Checklist
Drive
Step Description
1 Release parking brake if necessary (remember foot is already on brake).
2 Place car in gear (assume driving forward).
3 Check for traffic, children, and other hazards.
4 Check rearview and side view mirrors.
5 Look over right and left shoulders.
6 Signal intention if necessary.
7 Gradually let up on brake and allow car to move forward.
8 Identify location at othe end of parking lot and drive toward it.
9 Bring car to a stop by applying the brake.
10 Turn car around.
11 Repeat steps 7-10 at other speeds (5 mph, 10 mph, and 15 mph).
12 Pull into and out of a parking space.
13 Repeat this step at other speeds (5 mph, 10 mph, and 15 mph).
14 Pull into and out of a parking space.
15 Align car in parking space with equal spaces on each side.
16 Align car in space with front bumper about six inches from front end of space.
17 Practice turn right using twelve steps.
18 Practice turn left using twelve steps.
Lesson 1 Checklist
Post Drive
Step Description
1 Come to a complete stop.
2 Place car in park.
3 Apply parking brake.
4 Turn off lights and other accessories.
5 Turn off ignition.
6 Remove foot from brake.
7 Remove key from ignition.
8 Unbuckle and get out of car.
9 Inspect car and ensure it is parked properly.
12 Lock car.

Safe2Drive
15
Figure 17 – Completing Log for Lesson 1
2.2 Vehicle Movements
1) Overview
This lesson requires a minimum of 2 hours evenly divided between observation and instruction. There are four locations: your garage, a large empty parking lot, a quiet residential intersection, and finally a busy intersection.
In this lesson your teen will learn several important driving techniques:
1) Scanning down the road (‘Eagle Eyes’)
2) Managing space around the vehicle
3) Maintaining vehicle balance
4) Entering the flow of traffic
5) Turning around
2) Observation
Scanning Down the Road
Eagles are birds of prey with incredible vision. They can see the smallest movements almost a mile away. Teen drivers, on the other hand, typically look no further than over their hood. This may be an exaggeration, but the point is valid. New drivers tend to focus narrowly on the immediate road ahead of them. But it is often what is outside that limited frame of reference that needs the most attention.
Enter date and time you started lesson 1 observation.
Enter date and time you started lesson 1 instruction.
Sign here.

Safe2Drive
16
We at Safe2Drive commonly hear the following expression when someone describes a crash they have experienced: “He came out of nowhere.” In reality, nothing comes out of nowhere. More than likely, the driver was not scanning.
Teens must develop scanning skills to identify real and potential hazards (Figure 18). Failure to see hazards, real and potential, is a common reason for crashes among teen drivers.
Figure 18 – Real and Potential Hazards
Your challenge in this exercise is to help your teen develop his or her eagle eyes. You will expand his or her horizon and area of focus.
Find a country road or quieter street with relatively long stretches of uninterrupted pavement. Ask your teen to identify the farthest point down the road. Typically this will be something that is fairly close. Help your teen find a spot twice as far down the road. The goal is to increase the scanning distance to about 12 seconds. On highways this means about a quarter mile. Your teen may express reservation about missing what is going on closer to home. However, it will become second nature with practice.
Also, show your teen how to scan left to right, identifying real and potential hazards. Typically, new drivers barely look beyond the sides of the road. Teach your teen to scan a wider area to identify looming hazards such as children on a playground, cars approach an intersection, or pedestrians approaching a crosswalk.
Managing the Space around the Vehicle

Safe2Drive
17
Teens also have a tendency to drive too close to the car in front. Moreover, they do not realize how protective the space around their vehicle can be. Begin this exercise by showing your teen how to pull into and out of the garage. Demonstrate how you ensure equal space on both sides when parking. Demonstrate how you pull within a desired distance of the front of the garage.
Next take your teen to a quiet street and demonstrate how you stay in the center of your lane. Explain how much space is between you and cars parked on the side as well as cars approaching in oncoming traffic. Show how mirrors can be used to effectively fine tune the distances between the vehicle and other obstacles on the side. Demonstrate to them the concept of gates, and how they must always maintain two open gates around the car (Figure 19) to ensure a safe exit strategy.
Figure 19 – Space Around the Car in the Form of ‘Gates’
Maintaining Vehicle Balance
Another common mistake teens make while driving is going into a turn too fast. In this exercise you will demonstrate the principles of vehicle balance. Specifically, you will demonstrate how to recover from entering a turn too fast.
Take your teen to a large empty parking lot that allows you to make left and right turns at about 30 mph. Demonstrate to your teen what happens if you turn to sharply. Then apply brakes while turning to show that this actually makes the situation worse (Figure 20). Then demonstrate to your teen the proper way to recover from this hazardous situation by taking your foot off the gas pedal.

Safe2Drive
18
Figure 20 – Reduce Braking on Sharp Turns
Entering the Flow of Traffic
New drivers also have difficulty gauging how fast vehicles are approaching and how quickly they will be ‘on top of you’. We at Safe2Drive have noticed that teens fail to account for the safety and annoyance factor. All too often, they force cars in the flow of traffic to slow down. Teens get the message after several glares and honks of horns. In this exercise take your teen to a busy highway intersection and find a safe place near the road to observe the passing cars. Pick a car in the distance and count the seconds it takes to reach you.
Now at a busy intersection that your teen will use, select distinct landmarks that can act as trigger points to help determine whether it is safe to enter the flow of traffic.
Demonstrate to your teen how to pull safely onto the road and accelerate quickly but smoothly to the appropriate speed.
Turning Around
In this exercise you will show your teen how to turn around. Find a dead-end, two-lane street (cul-de-sac) to begin practicing turnarounds. Turn the vehicle around without backing up once.
Now demonstrate a 3-point turn (Figure 21).

Safe2Drive
19
Figure 21 – 3-Point Turn
3) Instruction
Now switch places with your teen.
Scanning Down the Road
Park the car on a quiet street with a view as far down the road as possible. Have your teen identify objects, especially potential hazards, nearby and then as far down the road as possible.
Repeat the step while the teen drives slowly down the quiet street, constantly identifying new hazards as they appear.
Make sure your teen scans from left to right, again identifying potential hazards.
Managing the Space around the Vehicle
Have your teen pull into and out of the garage. Challenge him or her to create equal space on both sides. Also ensure your teen can park within one foot of the front obstacle in the garage. Provide him or her queues for how to identify how much space exists on the sides, front, and back.
Take your teen to a quiet street and ask him or her to stay in the center of your lane. Have him or her estimate how much space is between your car and cars parked on the side as well as cars approaching in oncoming traffic.
Have him or her use the mirrors.
Maintaining Vehicle Balance
Take your teen to a large empty parking lot that allows you to make left and right turns at about 20 mph. Have your teen turn the car sharply to feel the weight of the car shift.
Next, have your teen apply the brakes sharply to feel the weight shift again.
Finally, have your teen demonstrate how to slow down by simply removing the foot from the gas pedal.

Safe2Drive
20
Entering the Flow of Traffic
Using the landmarks you identified, have your teen pull into traffic.
Turning Around
Have your teen turn around in a cul-de-sac without backing up.
Have your teen do a 3-point turn.
4) Completing the Log
Upon completing lesson 2, complete your log by filling in your lesson dates and signing it. Keep in mind you must spend 2 hours on lesson 2 at a minimum. You may spend more hours if you wish.
Figure 22 – Completing the Log for Lesson 2
2.3 Driver Readiness
1) Overview
This lesson requires a minimum of 2 hours evenly divided between observation and instruction. The location is a lightly travelled multiple-lane highway (Figure 23). Ideally, you can find a street that is quiet enough to not cause your teen anxiety but provide sufficient traffic to allow your teen to interact with other cars.
In this lesson your teen will learn to travel respectfully with other traffic and change lanes. The concept of a safe following distance is presented.
Enter date and time you started lesson 2 observation.
Enter date and time you started lesson 2 instruction.
Sign here.

Safe2Drive
21
Figure 23 – Multiple-lane Highway
2) Observation
Take your teen onto a multiple-lane highway that is relatively quiet. You can do this usually by going out early on a weekend morning or even on a holiday when most people are home enjoying the festivities.
Demonstrate to your teen how to use the skills in the previous lesson to safely drive in one lane on a highway. Use scanning techniques to identify hazards, especially cars in front, on the sides, and behind. Demonstrate to your teen how to maintain a safe following distance.
Finally, demonstrate to your teen the technique of changing lanes. Changing lanes is relatively easy. It can be done with only a slight turn of the wheel. A lane change should not be abrupt, but it shouldn’t take too long. It is a smooth slide-over. Most importantly, make sure your teen sees how to check for blind spots. Review with your teen the steps to change lanes. Assume in this exercise you are moving to the left lane:
1) Scan in front to ensure sufficient room exists
2) Check your rearview and left-side mirror;
3) Look over your left-shoulder to check the blind spot
4) Put on your turn signal when you conclude it is safe to turn
5) Check your blind spot again
6) Change lanes if all is clear.
3) Instruction

Safe2Drive
22
Now switch places with your teen. Changing lanes is relatively easy, but it is a skill that must be practiced because it involves a lot of interaction with other drivers. Teens can easily be intimidated.
Again, make sure you are on a relatively quiet street with sufficient traffic to allow your teen the opportunity to interact.
First, while driving in one lane have your teen scan for hazards and maintain a safe following distance. Have him or her describe what is going on.
Next, have your teen change lanes.
4) Completing the Log
Upon completing lesson 3, complete your log by filling in your lesson dates and signing it. Keep in mind you must spend 2 hours on lesson 3 at a minimum. You may spend more hours if you wish.
Figure 24 – Completing the Log for Lesson 3
2.4 Risk Reduction
1) Overview
This lesson requires a minimum of 2 hours evenly divided between observation and instruction. The locations are three intersections, all lightly travelled. The types of intersections are:
1) Four-way intersection with stop signs
2) Four-way intersection with traffic lights
3) Three-way or four-way intersection with no traffic controls
Enter date and time you started lesson 3 observation.
Enter date and time you started lesson 3 instruction.
Sign here.

Safe2Drive
23
Ideally, you can find intersections that are quiet enough to not cause your teen anxiety but provide sufficient traffic to allow your teen to interact with other cars.
In this lesson your teen will learn to handle intersections. There are many types of intersections, and we cannot hope to cover them all in this lesson. However, there are three intersections that are commonly encountered. One is the four-way intersection with stops signs. This is most common on residential streets. The second is the four-way intersection with traffic lights. This is nearly ubiquitous, and you most likely encounter this every day. The third is the uncontrolled intersection. These are less common in today’s urban areas. Interestingly, you actually encounter these in parking lots. Mastering how to handle these intersections equips your teen for nearly all intersections.
2) Observation
Four-Way Intersection with Stop Signs
Drive with your teen to a quiet intersection with a four-way stop sign. Demonstrate the steps for handling a controlled intersection (with stop signs):
1) Slow down and come to a stop behind the sign.
2) Inch forward if necessary to see the roads to your right and left.
3) Scan the intersection from left to right for traffic.
4) Yield the right-of-way to cars stopped or in the intersection.
5) Proceed through the intersection when clear.
Describe to your teen the importance of always giving the right-of-way. It is never something you assume you have; nor is it something you take. You always give.
Four-Way Intersection with Traffic Lights
Drive with your teen to a quiet intersection with traffic lights. Demonstrate the steps for handling this type of controlled intersection:
1) Slow down as you approach the intersection.
2) Watch the light and proceed through the intersection cautiously if the light is green. Demonstrate to your teen how you still scan as you approach and go through the intersection. You cannot assume others will stop.
3) Watch the light and slow to a stop if the light is a stale yellow. Safe2Drive strongly recommends that young drivers come to a stop at all yellow lights --- stale or not.
4) Watch the light and slow to a stop if the light is red.
5) If stopped at the intersection proceed through it once the light is green. Once again scan left to right to ensure cars are not running the red light or turning on red in front of you.
Intersection with No Traffic Controls (Uncontrolled Intersection)
Intersections without stop signs, traffic lights, or any manner of traffic control are called uncontrolled intersections. Take your teen to an uncontrolled intersection. In this scenario we assume you take your teen to a slow-moving intersection in a rural or residential neighborhood. Explain the concepts of right-of-way as you demonstrate how to handle these intersections. Specifically, demonstrate the following process:

Safe2Drive
24
1) Take your foot off the gas pedal as you approach an uncontrolled intersection. It is also acceptable at times to decelerate rather than completely remove your foot from the gas pedal.
2) Scan left to right to look for real and potential hazards.
3) Slow further or even stop if you see a car that may reach the intersection prior to you or is already at the intersection.
4) Always yield the right-of-way.
5) Proceed through the intersection once the traffic is clear.
3) Instruction
Now switch places with your teen and have him or her do what you did.
Four-Way Intersection with Stop Signs
Have your teen verbalize the steps for handling a controlled intersection (with stop signs). Then, have your teen verbalize them again as he or she actually drives to an intersection and handles it.
Four-Way Intersection with Traffic Lights
Have your teen verbalize the steps for handling a controlled intersection (with traffic lights). Then, have your teen verbalize them again as he or she actually drives to an intersection and handles it.
Intersection with No Traffic Controls (Uncontrolled Intersection)
Have your teen verbalize the steps for handling an uncontrolled intersection (with stop signs). Then, have your teen verbalize them again as he or she actually drives to an intersection and handles it.
4) Completing the Log
Upon completing lesson 4, complete your log by filling in your lesson dates and signing it. Keep in mind you must spend 2 hours on lesson 4 at a minimum. You may spend more hours if you wish.

Safe2Drive
25
Figure 25 – Completing the Log for Lesson 4
2.5 Distractions
1) Overview
This lesson requires a minimum of 2 hours evenly divided between observation and instruction. The location is a two-way street with moderate traffic. You will do most of the driving in this lesson.
This lesson is about distractions. There is a famous old-school American author by the name of Henry David Thoreau. He wrote a book entitled ‘Walden’, and most of us have heard it at one time or another. The book is famous because Mr. Thoreau is a beautiful writer, and he also spent several years living alone in the woods. Oddly, one of his most famous quotes is especially appropriate for this lesson on distractions.
“No method or discipline can supersede the necessity of being forever on the alert.”
--Henry David Thoreau (Walden, Or Life in the Woods)
Safe driving requires constant and focused attention. The driver must be forever on the alert. This is not a highly developed trait among teens (Figure 26). Helping your teen develop a mind-set of heightened awareness and focus may actually be more valuable than any of the other lessons in this guide. The most highly developed driving skills are useless if a driver is not paying attention. In this lesson we look at the most common distractions teens encounter.
Enter date and time you started lesson 4 observation.
Enter date and time you started lesson 4 instruction.
Sign here.

Safe2Drive
26
Figure 26 – Teens are Easily Distracted
2) Observation
Real-Life Story
First, describe to your teen an incident, perhaps a tragedy, in which a crash occurred because a driver was distracted. Every person who works at Safe2Drive has a story. Unfortunately, they are easy to come up with. Describe this story to your teen.
Cell Phones
Review with your teen Texas’ cell phone laws. Demonstrate for him how many people on the road obey this law by pointing out people on cell phones as you drive.
As a parent make your teen promise to not use a cell-phone while driving. There is seldom a need to use the phone so urgently that you cannot pull off to the side of the road or into a parking lot. It is ok, even important, to have a cell phone in the car. Just don’t use it while driving. Your teen will probably violate this law if the laws of probability are working. However, it is still a vital exercise, and it may help a little bit.
Passengers
Passengers, especially other teens, are dangerous in a car. Review with your teen Texas’ laws on passengers while driving with a Learner License.
Food and Drink
We all eat and drink while in the car. However, it is dangerous. Do not do this while you are driving as an example for your teen.
Radio and Stereo Systems
We all fiddle with the radio when we drive. However, this is not a good practice for teens while they are learning to drive. Leave the radio off.
Animals
Pets are invaluable companions --- but not in a car. Discuss this with your teen and get agreement to leave pets at home while operating with a Learner License.
Other Distractions
Discuss with your teen other possible distractions. Identify as many as you can and describe how they can be a distraction (Figure 27).

Safe2Drive
27
Figure 27 – Common Distractions
3) Instruction
Now switch places with your teen.
Real-Life Story
Ask your teen if he or she is aware of someone who has experienced a tragedy that occurred because of a distracted driver.
Cell Phones
While he or she is driving identify other drivers (using the cell phone, drinking coffee, etc.).
Ask your teen to describe Texas’ cell-phone law.
Have your teen agree not to use the cell-phone while driving.
Passengers
Ask your teen to describe Texas’ laws on passengers while driving with a Learner License.
Ask your teen to agree not to drive with teen passengers while driving with a Learner License.
Food and Drink
Ask your teen to agree not to drive with teen passengers while driving with a Learner License.
Other Distractions
Have your teen identify other distractions.
4) Completing the Log
Upon completing lesson 5, complete your log by filling in your lesson dates and signing it. Keep in mind you must spend 2 hours on lesson 5 at a minimum.

Safe2Drive
28
Figure 28 – Completing the Log for Lesson 4
2.6 Vehicle Movements Part 2
1) Overview
This lesson requires a minimum of 2 hours evenly divided between observation and instruction. There are three locations required for this lesson:
1) A quiet street or parking lot that permits parallel parking
2) A quiet street that is inclined and permits parallel parking
3) A quiet street or parking lot that permits angled parking
This lesson is about parking.
2) Observation
Parallel Park
We all struggle with parking parallel and even adults with many years of experience are still unable to park parallel in the prescribed number of steps (Figure 29).
Show your teen how to parallel by following the four steps outlined in Figure 29.
1) Flash your brake lights, and signal a right turn. Stop two or three feet away from the front vehicle with the two rear bumpers even. Check traffic. Shift to Reverse. Look back over your right shoulder. Back slowly as you turn right. Aim toward the right-rear corner of the space.
2) Straighten the wheels when the back of your seat is even with the rear bumper of the front vehicle. Determine your personal reference point for this position. Slowly back straight. Look over your shoulder through the rear window.
Enter date and time you started lesson 5 observation.
Enter date and time you started lesson 5 instruction.
Sign here.

Safe2Drive
29
3) Turn your wheels sharply left when your front bumper is even with the front vehicle’s back bumper. Back slowly. Look out the rear window.
4) Straighten the wheels and stop when your vehicle is parallel to the curb. Stop before your vehicle touches the car behind. Develop reference points to know your distance from the curb and from the vehicle behind you. Slowly pull forward to center your vehicle in the space.
Figure 29 – Steps for Parallel Parking
Parking on Hills
In this exercise you will demonstrate how to park your car next the curb on an uphill and on a downhill. Follow the same steps you did to park parallel. However there is one final step to take when parking on a hill (Figure 30).
1) Uphill Parking – Turn your front wheels toward the center of the street. Your car will veer into the curb and stop if your car’s parking system fails.

Safe2Drive
30
2) Downhill Parking – Turn your front wheels toward the curb. Your car will again veer into the curb in the event your parking system fails.
Figure 30 – Parking on a Hill
Angle Parking
In this exercise demonstrate to your teen how to park in an angled parking space (Figure 31). You can use the following four steps to help your teen understand the process.
1) Check for traffic and pedestrians. Position your vehicle at least six feet away from the row of parked cars. Signal a right turn, check traffic to the rear, and begin braking.
2) Flash your brake lights to warn drivers behind. Check your right blind spot and continue braking.
3) Creep forward until you see the center of the space without your line of sight cutting across the parking line. This is your reference point to begin turning. Turn the wheels sharply to the right. Slowly enter the parking space.
4) Straighten the wheels when you are centered in the space. Determine your forward reference point to place the front bumper even with the curb or parking line.

Safe2Drive
31
Figure 31 Angled Parking
3) Instruction
Now switch places with your teen.
Parallel Park
Have your teen park parallel. You may want to use sawhorses or other devices instead of real cars!
Park on Hills
Have your teen park on an uphill and then a downhill.
Angled Parking
Have your teen park in an angled parking spot.
4) Completing the Log
Upon completing lesson 5, complete your log by filling in your lesson dates and signing it. Keep in mind you must spend 2 hours on lesson 5 at a minimum.

Safe2Drive
32
Figure 32 – Completing the Log for Lesson 4
2.7 Adverse Conditions
1) Overview
This lesson requires a minimum of 2 hours evenly divided between observation and instruction. This lesson is about driving in adverse conditions. Adverse conditions typically mean rain, snow, or another weather condition (Figure 33). However, it also includes such things as driving at night or any situation that is other than normal. The locations for this lesson vary. Ideally you can find locations that are experiencing an adverse condition such as a light rain or snow. You must exercise caution when doing this lesson. Do not take any risk with which you are not comfortable.
Figure 33 - Flooding

Safe2Drive
33
Teen drivers have more control in adverse conditions than they realize. Many people lame slippery roads or reduced visibility for a crash. An icy road has never caused a crash. Drivers cause crashes by failing to compensate for the effects of ice or rain.
2) Observation
Avoid Adverse Weather
Explain to your teen that the best defensive driving technique is to not drive in adverse conditions. Many trips can be avoided or postponed. Therefore, driving in bad weather is the first most common mistake.
Other Common Mistakes
Explain the second most common mistake is to drive too fast. The third is to not take into account the other drivers on the road who may be driving too fast.
Explain that driving in any bad condition requires the same four basic techniques:
1) Slow down.
2) Increase the following distance from the cars in front of you.
3) Pay even more attention (‘the most ever’); watch for others’ mistakes.
4) Brake carefully (and usually more often).
Rain
Demonstrate to your teen the steps you take when driving in rain. Ideally you can hold this lesson on the day when there is a light rain.
Highlight these important points:
1) It takes twice as far to stop in rain because you need to account for potentially slippery roads.
2) Light rain is actually more dangerous than pouring rain. Light rain makes roads especially slippery, especially if oil has built up on the road from a lack of rain earlier.
3) Heavy rains, however, cause hydroplaning.
Demonstrate to your teen how you employ the four steps above to reduce your risk.
Explain to your teen the concept of hydroplaning (Figure 34). When a car hydroplanes, its wheels are actually riding on a thin film of water rather than the road surface. Loss of control is highly likely at this point.

Safe2Drive
34
Figure 34 - Hydroplaning
Snow | Ice
Snow and ice on the surface of the road create a different set of conditions almost every time, depending on many factors. Teach your teen to be wary where ice forms first:
1) Bridges
2) Overpasses
3) Shady spots
4) Windy spots
Intersections usually have extra ice because of icing and re-icing from intermittent vehicle exhaust.
Demonstrate to your teen how to test the brakes and road conditions by carefully applying the brakes at slightly increasing speeds in an area without cars or obstacles. Sometimes the grip is good; sometimes it is not.
Fog
Fog is downright nasty. Explain to your teen the dangers of fog and how quickly visibility can be lost. Emphasize the importance of not driving in fog. Show your teen how to use low-beams only in fog to gain the most visibility possible. High beams make the situation worse.
Other Conditions
Discuss with your teen other adverse conditions that may arise and what to do about them. Some include:
1) Glare (from the sun)
2) Lightning
3) Flooding
3) Instruction
Now switch places with your teen if you have an opportunity to let your teen drive in an adverse condition. Safe2Drive strongly recommends these sessions be done in a large, empty parking lot.
Four Steps

Safe2Drive
35
Have your teen explain the four steps and what they mean.
Rain
Have your teen drive in a light rain (if possible) and describe the steps he or she takes to reduce risk.
Snow | Ice
Have your teen drive in a light snow (if possible) and describe the steps he or she takes to reduce risk.
4) Completing the Log
Upon completing lesson 7, complete your log by filling in your lesson dates and signing it. Keep in mind you must spend 2 hours on lesson 7 at a minimum.
Figure 35 – Log for Lesson 7
2.8 Consumer & Personal Responsibility
1) Overview
In this lesson you will plan a trip with your teen and then have him or her proceed from beginning to end. Throughout the trip he or she will exercise the skills you have demonstrated throughout. This lesson should take about 1 hour. The location varies.
Enter date and time you started lesson 7 observation.
Enter date and time you started lesson 7 instruction.
Sign here.

Safe2Drive
36
2) Observation
Discuss with your teen a trip you plan to take (even a short trip to the store is sufficient). Identify the roads you will travel and about how long you expect to take. Then both of you get in the car and take the trip.
3) Instruction
Now repeat the process. Perhaps your teen can take the drive back home. Now your teen must describe a trip plan including start and ending locations, proposed route, and approximate time.
4) Completing the Log
Upon completing lesson 8, complete your log by filling in your lesson dates and signing it. Keep in mind you must spend 1 hour on lesson 8 at a minimum.
Figure 36 – Log for Lesson 8
3.0 Behind-The-Wheel Practice
This portion of the behind-the-wheel training consists of ten lessons designed to take either 20 or 30 hours, depending on when your teen registered. Students who registered prior to October 1, 2013 are required to perform 20 hours of practice. Students who register afterward are required to perform 30 hours. This guide works equally well for either the 20-hour or 30-hour additional training. In either case at least ten hours must be night-time driving.
Enter date and time you started lesson 8 observation.
Enter date and time you started lesson 8 instruction.
Sign here.
Safe2Drive
37
The State of Texas makes available free of charge a handy behind-the-wheel guide for the 30 hours of practice. You can get it from the Texas DPS web site:
http://www4.esc13.net/uploads/drivers/docs/forms/TX_30_Hour_BTW_Guide_8x11_(8-2013)_Final.pdf
Alternatively you can download it from our site.
We follow the outline suggested in the Texas guide and add supplemental material to equip you with all the information you need.
We suggest you print the lessons in this section (3.0 Behind-the-Wheel Practice) and keep them in the vehicle during the lessons. The lessons are broken down into simple steps.
Table of Contents for Behind-the-Wheel Practice
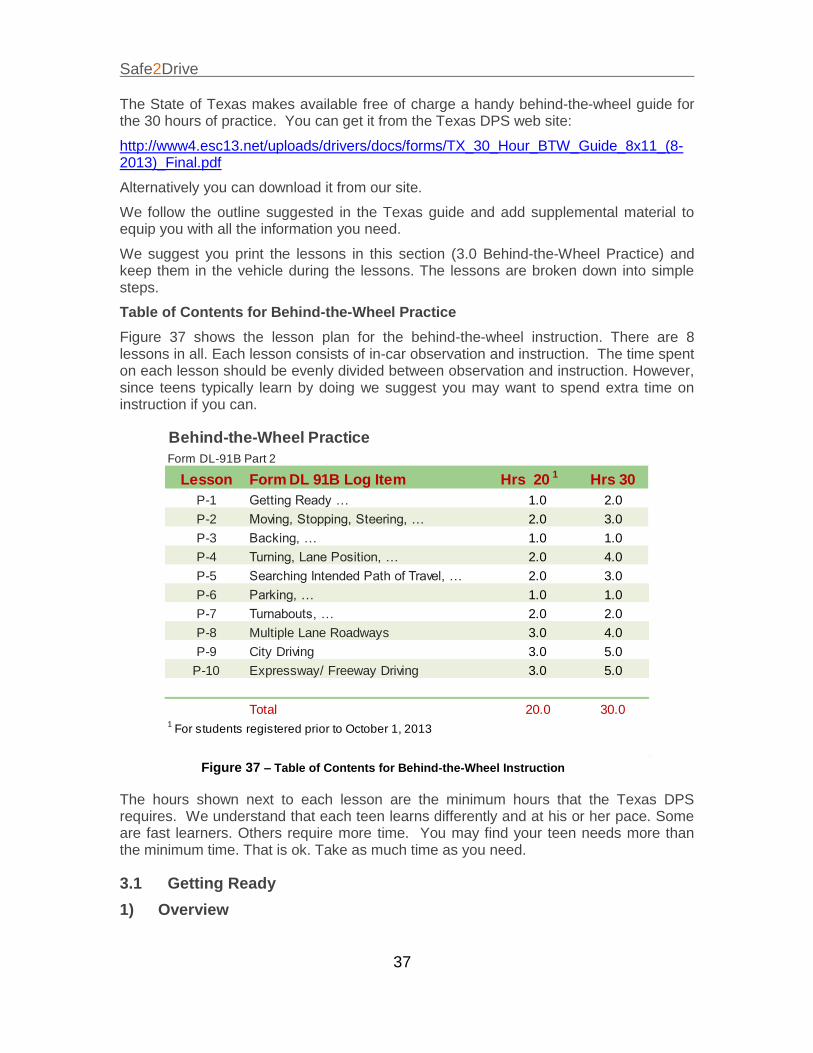
Figure 37 shows the lesson plan for the behind-the-wheel instruction. There are 8 lessons in all. Each lesson consists of in-car observation and instruction. The time spent on each lesson should be evenly divided between observation and instruction. However, since teens typically learn by doing we suggest you may want to spend extra time on instruction if you can.
Figure 37 – Table of Contents for Behind-the-Wheel Instruction
The hours shown next to each lesson are the minimum hours that the Texas DPS requires. We understand that each teen learns differently and at his or her pace. Some are fast learners. Others require more time. You may find your teen needs more than the minimum time. That is ok. Take as much time as you need.
3.1 Getting Ready
1) Overview
Behind-the-Wheel Practice
Form DL-91B Part 2
Lesson Form DL 91B Log Item Hrs 20 1 Hrs 30
P-1 Getting Ready … 1.0 2.0
P-2 Moving, Stopping, Steering, … 2.0 3.0
P-3 Backing, … 1.0 1.0
P-4 Turning, Lane Position, … 2.0 4.0
P-5 Searching Intended Path of Travel, … 2.0 3.0
P-6 Parking, … 1.0 1.0
P-7 Turnabouts, … 2.0 2.0
P-8 Multiple Lane Roadways 3.0 4.0
P-9 City Driving 3.0 5.0
P-10 Expressway/ Freeway Driving 3.0 5.0
Total 20.0 30.01 For students registered prior to October 1, 2013

Safe2Drive
38
This lesson focuses on preliminaries (Figure 38). It introduces your teen to the vehicle, including the instruments, controls, and other parts. It explains what your teen should do prior to getting in the car and turning the ignition. Finally, it lets your teen begin driving the car in short, slow movements across a parking lot.
Figure 38 – Topics for Lesson 1
The minimum time you should spend on this lesson is shown in Figure 39. The ideal location for this lesson is a large empty parking lot. You should drive to this lot with your teen in the passenger seat, park it, and turn it off. You should pull it into a parking space with either a curb or concrete stop at the end. This will be an important visual reference for your teen.
Figure 39 – Lesson Time for Practice Lesson #1
2) Practice Lesson
Identifying and Using Car Parts
Make sure he or she spends time studying the machine. There is no need for an extensive course. In fact, everyone probably knows less about the car today than ever before. This is because advances in automotive technology have virtually automated everything. We are usually encouraged not to try to fix things ourselves. Still, it is useful to have an understanding of what is under the hood. In most cars, the parts owners are required to maintain are clearly marked: oil dipstick, transmission fluid dipstick, brake and power steering fluid, and water levels. Use the owner’s manual for help. It may be helpful to start the engine while the hood is open to give your teen a feel for the power in the car.
Next, review the instruments on the instrument panel one-by-one. Most are obvious, but even certified technicians sometimes require the owner’s manual to identify things. Have your teen go through each instrument as well after you have explained them all. Pay particular attention to the three key gauges:
1) Temperature
2) Oil Pressure
3) Battery Power
1) Identifying and Using Car Parts
2) The Walk-Around
3) The Pre-Drive Checklist
4) A Short Drive
Lesson 1 Plan
Minimum Time
20-Hour Program 1 30-Hour Program
1 For students who registered prior to 10/01/2013
1 2

Safe2Drive
39
You should also discuss the fuel gauge and what it means. Most fuel gauges are not accurate. Some are really empty when the line is on empty. Others give you an emergency reservoir, perhaps a gallon or two, in case you are running low.
Open the glove compartment and show the vehicle registration, owner’s manual, and insurance. Explain the concept of high-beams and low-beams.
Lastly, let your teen sit in the driver’s seat and turn on the ignition. Make sure the car is in park and the parking brake is on. Today’s vehicles have many different starting procedures, so you will need to be specific about your vehicle. For example, most modern engines do not require the gas pedal to be pressed prior to starting the car. Have your teen identify what the gauges and instruments do after the engine starts. The same goes for shutting the engine off.
With your teen’s foot on the brake, have him or her shift into gear and then shift again back to park.
Now shut off the engine and both of you get out of the car for the next step.
The Walk Around
Demonstrate to your teen what you do prior to getting into the car. Driving school instructors typically refer to this as the ‘walk-around’. Another term commonly used is “Clear the Way”. Key items to cover include:
1) Check that no one and nothing is behind the car
2) Check the tires for proper pressure (review the owner’s manual)
3) Check for dents or damage to the car
4) Check for strangers in the back seat
5) Look for evidence of oil, coolant, or other fluid leaks
The first one is arguably the most important. If nothing else ensure your teen does this!
Looking for strangers in the car sounds funny on the face of it. But we have all read tragic stories where a driver is surprised by an intruder who hid in the back seat.
The Pre-Drive Checklist
The pre-drive checklist (Figure 40) is simple, but your teen must get into the habit of doing it every time.
Figure 40 – Pre-Drive Checklist
1) Fasten seatbelt
2) Adjust the seat
3) Adjust the mirrors
4) Adjust head rest
5) Adjust steering wheel
6) Lock doors
Pre-Drive Checklist

Safe2Drive
40
The items in the checklist are self-explanatory. Work with your teen to make sure he or she is comfortable. There is one technical comment worth noting. Typically drivers should be about 10 inches away from the front steering wheel. This allows the airbag to properly and safely deploy in the event of a crash. The concept of blind spots is also important to explain (Figure 41). Make sure your teen knows that he or she must turn a shoulder and look to make sure a car is not in a blind spot. There is no other way.
Figure 41 – Blind Spots
A Short Drive
Your teen will practice short, slow movements in the parking lot. Little or no acceleration is required. Have your teen complete the walk-around and pre-drive checklist. Now, have him or her turn the engine on while the foot is on the brake. Release the parking brake and place the car in reverse. Note this assumes that you as the instructor have parked the car in a parking space in a big, empty parking lot.
After a quick look on both sides to clear the way, slide the left hand to the top of the wheel and turn to look over the right shoulder. Look out the back window. Gently ease off the brake pedal if the way is clear. Allow the vehicle to move backward about 20 feet, so it is completely out of the space. Then depress the brake pedal and stop. Pull back into the space.
Have your teen park, turn off the car, and get out. Review the position of the car to allow the teen to gain a feel for spaces. Keep repeating this until the teen can back out and pull in to exact locations.
Next, begin moving around the lot. Have your teen only make turns while in forward motion for now. All backing should be done in a straight line. Have your teen practice simple turns, both right and left. Use the signal at all times. Focus on smooth steering and stops. Keep the car under 15 mph. Teach your teen how to ‘cover the brake’ when a potential hazard appears. Covering the brake involves taking the food off the accelerator and holding it over the brake. The brake is not actually pressed, nor does the foot rest on the brake pedal. Resting the foot on the brake is called ‘riding the brake’. This causes the brake lights to go on and may confuse drivers around you.
Also teach your teen to respond to your commands to “Stop”. Teach him or her to come to a smooth but firm stop anytime you give this command. This may come in handy.
3) Completing the Log

Safe2Drive
41
You can begin completing part 2 of the log (Figure 42). Recall the log is on Form 91B. The form is available in your packet and on our web site (www.safe2drive.com).
Figure 42 – Recording Lesson 1 Practice
3.2 Moving, Stopping, and Steering
1) Overview
This lesson focuses on the procedures for moving forward and backward, stopping, and steering (Figure 43). It also introduces your teen to the concept of reference points. Reference points allow your teen to position the vehicle properly. The location for this lesson is once again a large, empty parking lot.
Enter date and time you started lesson 1 practice. Sign here.

Safe2Drive
42
Figure 43 – Topics for this Lesson
The minimum time you should spend on this lesson is shown in Figure 44. The ideal location for this lesson is a large empty parking lot. You should drive to this lot with your teen in the passenger seat, park it, and turn it off. You should pull it into a parking space with either a curb or concrete stop at the end. This will be an important visual reference for your teen.
Figure 44 – Minimum Time for this Practice Lesson
2) Practice Lesson
Steering
As in the previous lessons have your teen drive slowly around the empty parking lot. When a turn is approached, change the turning method to use the push-pull-slide approach most experienced drives use. Let the wheel slip gently through the fingers as the vehicle straightens out. Finally, grasp the wheel gently to proceed. Explain to your teen the importance of maintaining focus on the road and not the hands or steering wheel.
Encourage your teen to verbalize what he or she is thinking.
Pick out targets and have your teen drive to them.
1) Steering
2) Stopping
3) Using Reference Points
4) Positioning
Lesson 2 Plan
Minimum Time
20-Hour Program 1 30-Hour Program
1 For students who registered prior to 10/01/2013
2 3

Safe2Drive
43
Figure 45 – Push | Pull | Slide Turn Technique
Stopping
Do not let the vehicle travel more than 10-15 miles per hour. Have your teen stop in the lane and then start up again. Practice making the stops and starts smooth. Practice easing on the brake to stop, then gently applying gas to start again. Also practice covering the brake. With your teen covering the brake, test him or her by intermittently calling for a stop.
Using Reference Points
Reference points are visual cues to help your teen position a vehicle exactly where he or she wants it. A forward reference point allows your teen to know when the front bumper of a car is even with the curb. An example of a forward reference point is shown in Figure 46. In this example the passenger-side mirror is used to line up the curb and the driver’s line of sight. When the mirror ‘touches’ the curb, the car is parked far enough into the space.

Safe2Drive
44
Figure 46 – Forward Reference Point
All cars are designed differently, and the passenger-side mirror may not work for you. You will need to experiment to find a reference point for your vehicle.
The same thing goes for the Rear Reference Point and the two Side Reference Points. This point tells you when the rear bumper is even with the curb.
Practice Positioning
Practice pulling into parking spaces and parking parallel to spaces. Use the reference points to make sure the car is parked properly. This will take practice.
3) Completing the Log
Complete the log for lesson 2 (Figure 48).

Safe2Drive
45
Figure 47 – Completing the Log
3.3 Backing
1) Overview
This lesson focuses on the procedures for moving backward (Figure 48). It builds on the concept of reference points introduced in the last lesson. The location for this lesson is once again a large, empty parking lot.
Enter date and time you started lesson 2 practice. Sign here.

Safe2Drive
46
Figure 48 – Topics for this Lesson
The minimum time you should spend on this lesson is shown in Figure 49. The ideal location for this lesson is a large empty parking lot. You should drive to this lot with your teen in the passenger seat, park it, and turn it off. You should pull it into a parking space with either a curb or concrete stop at the end. This will be an important visual reference for your teen.
Figure 49 – Minimum Time for this Practice Lesson
2) Practice Lesson
Procedure
Take extra care and move slowly when backing up (reversing) your vehicle. Before you begin, check that the way is clear behind you. Be especially careful to look for children and cyclists (Figure 50).
Figure 50 – Watch for Children
Put the gear selector in reverse and turn sideways in your seat to look over your shoulder in the direction you are moving, while holding the steering wheel firmly (Figure 51).
1) Backing Procedure
2) Steering
3) Using Reference Points
4) Positioning
Lesson 3 Plan
Minimum Time
20-Hour Program 1 30-Hour Program
1 For students who registered prior to 10/01/2013
1 1

Safe2Drive
47
If you are reversing straight back or to the right, turn your body and head to the right and look back over your right shoulder. When reversing to the left, turn your body and head to the left and look over your left shoulder. Always check the opposite shoulder as well. If you are turning as you reverse, check that the front end of your vehicle does not hit anything.
Figure 51 – Backing Procedure
Steering
As in the previous lessons have your teen drive backward slowly around the empty parking lot. Move slowly, barely above idle. Your teen must get a feel for how a car reacts when it is in reverse.
Encourage your teen to verbalize what he or she is thinking.
Pick out targets and have your teen drive to them.
Using Reference Points
Use the rear reference point you established in the last lesson and have your teen back into parking spaces. Create a rear reference point now if you did not in the last lesson.
Practice Positioning
Practice backing into parking spaces. Use the reference points to make sure the car is parked properly.
3) Completing the Log
Keep in mind that only one hour of instruction is permitted each day (Figure 52).

Safe2Drive
48
Figure 52 – Completing the Log
3.4 Turning, Lane Position, and Visual Skills
1) Overview
This lesson focuses on left and right turns (Figure 53). The concept of visual skills is introduced. Visual skills help a driver perform a turn safely. An important part of a safe turn is the ending: your lane position.
Enter date and time you started lesson 3 practice. Sign here.

Safe2Drive
49
Figure 53 – Topics for Lesson 4
The minimum time for this lesson is shown in Figure 54. The ideal location for this lesson is a quiet residential street. You want a street that gets little traffic. Allow traffic to clear if you encounter it during a lesson. Also in the same vicinity look for a parking lot that is occupied with cars but not busy. You want your teen to keep to a low speed.
Figure 54 – Minimum Time for this Lesson
2) Practice Lesson
Right Turns
We are going to practice right turns from a stop. It is important to make sure to clear the way before the turn. This requires a three-step check (Figure 55).
1) Look ahead for oncoming traffic that may be making a left turn.
2) Look to both sides to make sure no car is approaching from the left and a pedestrian or bicyclist is not stepping of the curb on the right.
3) Look behind to make sure no car is running up on top of you or even pulling around you.
1) Right Turns
2) Left Turns
3) Lane Position
Lesson 4 Plan
Minimum Time
20-Hour Program 1 30-Hour Program
1 For students who registered prior to 10/01/2013
2 4

Safe2Drive
50
Figure 55 – Clearing the Way for a Right Turn
Have your teen practice this in a parking lot or perform it on a quiet street. Come to a stop at an intersection with the car in the middle of the lane or slightly nearer the center of the lane. Also, make sure you are behind the pedestrian crosswalk if one exists. Pause for a moment. Now, complete the steps to perform a right turn:
1) Clear the way by performing the 3-part scan described above.
2) Pull forward and begin your turn into the closest open lane (Figure 56).
3) As the turn completes allow the steering wheel to slide through the hands (the vehicle straightens).
4) Scan ahead 15-20 seconds and begin traveling down your path of travel.
Left Turn from a Stop
Now move onto a left turn from a stop. In this case your teen should position the car closer to the center line of the lane to facilitate the turn. Stop with the wheels straight and the car behind the crosswalk if one exists. Pause for a moment. Once again it is important to clear the way (Figure 55).

Safe2Drive
51
Figure 56 – Lane Position for Right Turn
This time your teen must:
1) Look ahead for cars that may be crossing the intersection.
2) Look right and left for cross-traffic.
3) Look behind you to make sure no one is coming up on top of you or even pulling around you.
Now execute the steps for a left turn.
1) Clear the way by performing the 3-part scan described above.
2) Pull forward and begin your turn into the closest open lane .
3) As the turn completes allow the steering wheel to slide through the hands (the vehicle straightens).
4) Scan ahead 15-20 seconds and begin traveling down your path of travel.
Lane Position
Assist your teen with finishing in the proper lane position by showing them how to look ahead to their target area rather than being narrowly focused on the area in front of the car. Young drivers typically struggle to look down the road toward their target area.
3) Completing the Log
Only one hour of practice can be given each day (Figure 57).

Safe2Drive
52
Figure 57 – Completing the Log
3.5 Searching Intended Path of Travel
1) Overview
In this lesson your teen will practice three important driving skills (Figure 58). Scanning involves looking down the road toward the intended target. The driver is scanning for hazards. Following distance is a technique to ensure enough space exists between your car and the car in front. Finally, teens typically go into curves too fast when they first learn to drive. In this lesson your teen will practice handling curves safely.
Enter date and time you started lesson 4 practice. Sign here.

Safe2Drive
53
Figure 58 – Topics for Lesson 5
The suggested time for this lesson is show in
Figure 59 – Minimum Times for Lesson 5
2) Practice Lesson
Scanning
It is important for your teen to know that eyes determine the path of the vehicle. Drivers should spend the majority of their time looking ahead down the road toward their target. However, they must also scan the road in search of hazards. This may sound tricky at first, but adults do it without thinking. With practice young drivers will do it without thinking as well.
There are three steps to improving scanning skills:
1) “Look up” to see down the road, perhaps 20 seconds ahead.
2) “Sweep the eyes” by scanning left to right in search of hazards
3) “Do it all over” by repeatedly scanning
Find a country road or quieter street with relatively long stretches of uninterrupted pavement. Your first task in developing your teen’s scanning skills is to increase the distance down the road where his or her eyes search. Tell your teen to ‘look up’ as far as possible down the road. Have him or her identify the furthest object in the line of travel.
In addition to increasing the straight-ahead distance, your teen must also learn to sweep the eyes by scanning from left to right. This is sometimes called a peripheral scan. Most young drivers only scan the sides of the roads. Teach your teen to widen the scan to include cars approaching intersections, children playing in a school yard, or pedestrians nearing crosswalks.
Lastly, repeat the process and update the catalog of information. You must teach your teen that this is a continual process that goes on all the time.
Following Distance
Following distance is the space you maintain between your front bumper and the car in front of you. There are many schools of thought on how to do this, and there is no one correct way. Your teen will probably develop a feel for it over time. In the beginning,
1) Scanning
2) Following Distance (3-Second Rule)
3) Maintaining Vehicle Balance on Curves
Lesson 5 Plan
Minimum Time
20-Hour Program 1 30-Hour Program
1 For students who registered prior to 10/01/2013
2 3

Safe2Drive
54
however, it is probably helpful to have a more analytical method. One is called the 3-second rule. Here is how it works.
First you must be able to estimate, while you are driving, how far stationary objects from you. For example, the sign is nine seconds away.
Estimate the distance ahead in the following way.
1) Pick a stationary object this near the road (e.g., a sign);
2) Guess how many seconds the object is away from you;
3) Start counting (i.e., “1 thousand 1”, “1 thousand 2”, etc.);
4) Stop counting when your front bumper is beside the object;
This will give you the number of seconds between you and the object. Repeat the process until you have guessed the distance correctly.
The relationship between time and distance varies with speed. Obviously less time is required to reach an object as you increase your vehicle’s speed.
Estimating Your Following Distance (Buffer Zone)
Estimate the distance between you and the vehicle in front in the following way.
5) Pick an object near the road that is not moving (e.g., a sign);
6) Start counting when the back bumper of the car in front passes the object;
7) Stop counting when your front bumper passes the object;
The number is your following distance. Most professionals consider a three-second following distance safe under normal driving conditions. Some use a 2-second rule. The exact number is less important than doing it.
You will notice that you will maintain a safe following distance regardless of speed by keeping using the three-second rule. This is because the distance between you and the vehicle in front will automatically lengthen as you go faster. So you will be twice as far back at 60 mph as you will be at 30 mph.
Practice this with your teen.
Maintaining Vehicle Balance
Another common mistake teens make while driving is going into a turn too fast. In this exercise you will demonstrate the principles of vehicle balance. Specifically, you will demonstrate how to recover from entering a turn too fast.
Take your teen to a large empty parking lot that allows you to make left and right turns at about 30 mph. Demonstrate to your teen what happens if you turn to sharply. Then apply brakes while turning to show that this actually makes the situation worse (Figure 60Figure 20). Then demonstrate to your teen the proper way to recover from this hazardous situation by taking your foot off the gas pedal.

Safe2Drive
55
Figure 60 – Tight Turns
3) Completing the Log
Only one hour of practice can be given each day (Figure 61).

Safe2Drive
56
Figure 61 – Completing the Log
3.6 Parking
1) Overview
This lesson focuses on parking (Figure 62). Three types of parking are practiced. One is parking parallel. The second is angled parking. The final is parking on a hill.
Figure 62 – Topics for Lesson 6
Enter date and time you started lesson 5 practice. Sign here.
1) Parallel Parking
2) Angled Parking
3) Parking on a Hill
Lesson 6 Plan

Safe2Drive
57
The minimum time for this lesson is shown in Figure 63.
Figure 63 – Minimum Times for This Lesson
2) Practice Lesson
Parallel Park
We all struggle with parking parallel and even adults with many years of experience are still unable to park parallel in the prescribed number of steps (Figure 64)
Show your teen how to parallel by following the four steps outlined in Figure 64.
1) Flash your brake lights, and signal a right turn. Stop two or three feet away from the front vehicle with the two rear bumpers even. Check traffic. Shift to Reverse. Look back over your right shoulder. Back slowly as you turn right. Aim toward the right-rear corner of the space.
2) Straighten the wheels when the back of your seat is even with the rear bumper of the front vehicle. Determine your personal reference point for this position. Slowly back straight. Look over your shoulder through the rear window.
3) Turn your wheels sharply left when your front bumper is even with the front vehicle’s back bumper. Back slowly. Look out the rear window.
4) Straighten the wheels and stop when your vehicle is parallel to the curb. Stop before your vehicle touches the car behind. Develop reference points to know your distance from the curb and from the vehicle behind you. Slowly pull forward to center your vehicle in the space.
Minimum Time
20-Hour Program 1 30-Hour Program
1 For students who registered prior to 10/01/2013
1 1

Safe2Drive
58
Figure 64 – Steps for Parallel Parking
Angle Parking
In this exercise demonstrate to your teen how to park in an angled parking space (Figure 65Figure 31). You can use the following four steps to help your teen understand the process.
5) Check for traffic and pedestrians. Position your vehicle at least six feet away from the row of parked cars. Signal a right turn, check traffic to the rear, and begin braking.
6) Flash your brake lights to warn drivers behind. Check your right blind spot and continue braking.
7) Creep forward until you see the center of the space without your line of sight cutting across the parking line. This is your reference point to begin turning. Turn the wheels sharply to the right. Slowly enter the parking space.
8) Straighten the wheels when you are centered in the space. Determine your forward reference point to place the front bumper even with the curb or parking line.

Safe2Drive
59
Figure 65 - Angled Parking
Parking on Hills
In this exercise you will demonstrate how to park your car next the curb on an uphill and on a downhill. Follow the same steps you did to park parallel. However there is one final step to take when parking on a hill (Figure 66Figure 30).
9) Uphill Parking – Turn your front wheels toward the center of the street. Your car will veer into the curb and stop if your car’s parking system fails.
10) Downhill Parking – Turn your front wheels toward the curb. Your car will again veer into the curb in the event your parking system fails.

Safe2Drive
60
Figure 66 – Parking on a Hill
3) Completing the Log
Only one hour of practice can be given each day (Figure 67).
Figure 67 - Completing the Log
Enter date and time you started lesson 6 practice. Sign here.

Safe2Drive
61
3.7 Turnabouts
1) Overview
This lesson focuses on turning around (Figure 68). In most cases simply driving around the block is the safest way to turn around. Suggest to your teen that he or she use this method whenever practical. However, three turnabouts are common: 2-Point turn, 3-Point turn, and the U-Turn.
Figure 68 – Topics for Lesson 7
The required time for this lesson is shown in Figure 69.
Figure 69 – Minimum Times for this Lesson
2) Practice Lesson
2-Point Turn
On a quiet residential street locate a private drive to a parking lot or an empty intersection so your teen can perform a 2-point turn (Figure 70). Have your teen line the car parallel to the curb on the right with a driveway or street directly behind the car, put the car in reverse. Have your teen look through the back and the right of the car to make sure there are no pedestrians on the sidewalk. Also make sure there are no vehicles approaching from the driveway or road directly behind the car. Carefully turn the steering wheel to the right and back into the driveway. Once on the drive way turn the steering wheel to the left, put the car in drive. Again, make sure the way is clear. Finally, complete your turning by entering traffic.
1) 2-Point Turn
2) 3-Point Turn
3) U-Turn
Lesson 7 Plan
Minimum Time
20-Hour Program 1 30-Hour Program
1 For students who registered prior to 10/01/2013
2 2

Safe2Drive
62
Figure 70 – 2-Point Turn
3-Point Turn
Now, have your teen perform a 3-point turn. Use the same visual and turning skills to make this turn. Once again, make sure to clear the way.
Figure 71 – 3-Point Turn
U-Turn
Finally, have your teen practice U-Turns (Figure 72).

Safe2Drive
63
Figure 72 – U-Turns
3) Completing the Log
Only one hour of practice can be done each day (Figure 73).

Safe2Drive
64
Figure 73 – Completing the Log
3.8 Multiple-Lane Roadways
1) Overview
This lesson focuses on roads with multiple lanes. Three driving skills are practiced in this lesson (Figure 74).
Figure 74 – Lesson 8 Topics
The minimum time required for this lesson is in Figure 75.
Enter date and time you started lesson 7 practice. Sign here.
1) Lane Position
2) Lane Changing
3) Passing
Lesson 8 Plan

Safe2Drive
65
Figure 75 – Minimum Times for this Lesson
2) Practice Lesson
In simplest terms multiple-lane highways have two or more lanes traveling in each direction (Figure 76).
Figure 76 – Multiple-lane Highway
Lane Position
The width of a lane in most roads is 9 feet or more. Since cars are usually smaller than this, a driver can position a car at various locations in a lane (Figure 77).
1) The vehicle is near the lane line. This position is desirable for making left turns.
2) The vehicle is in the center of the lane. This is the most common and usually the safest place.
3) The vehicle is near the passenger-side lane line. This position is desirable for right turns.
Minimum Time
20-Hour Program 1 30-Hour Program
1 For students who registered prior to 10/01/2013
3 4

Safe2Drive
66
All three of these positions may be used, depending on the situation. For example, there is an increased margin of safety if a driver moves to the left-hand side of the lane if debris exists on the right.
Figure 77 – Lane Positions
Have your teen practice driving in these lane positions.
Lane Changing
Take your teen onto a multiple-lane highway that is relatively quiet. You can do this usually by going out early on a weekend morning or even on a holiday when most people are home enjoying the festivities.
Have your teen use techniques for changing lanes to move lanes on a highway. It can be done with only a slight turn of the wheel. A lane change should not be abrupt, but it shouldn’t take too long. It is a smooth slide-over. Most importantly, make sure your teen sees how to check for blind spots. Review with your teen the steps to change lanes. Assume in this instance you are moving to the left lane:
4) Scan in front to ensure sufficient room exists
5) Check your rearview and left-side mirror;
6) Look over your left-shoulder to check the blind spot
7) Put on your turn signal when you conclude it is safe to turn
8) Check your blind spot again
9) Change lanes if all is clear.
Passing
Now we are ready to practice passing. Review with your teen the seven steps to pass (Figure 78). They are:
Common Lane Positions

Safe2Drive
67
1) Keep a safe distance between you and the vehicle you intend to pass. Check the passing lane to make sure it is clear. If you are crossing a broken yellow line to pass, you must be able to see clearly at least 1600 feet in front of you. Check your mirror and your blind spot.
2) Signal and gradually move into the passing lane.
3) Maintain your speed until safely past the other vehicle. Then signal right.
4) Make sure there is enough distance between you and the other vehicle before moving back into the right lane. Wait at least until you can see the vehicle’s headlights in your mirror.
5) You must return to the right lane before any oncoming vehicle comes within 200 feet of you. Turn off your signal once you have returned to the right lane.
Figure 78 – Five Steps for Passing
Once again take your teen on a multiple lane highway when it is not busy (early Saturday or Sunday morning is best). Have him practice passing. Remember it safest to pass on the left.
3) Completing the Log
Only one hour of practice can be done each day (Figure 79).

Safe2Drive
68
Figure 79 – Completing the Log
3.9 City Driving
1) Overview
This lesson focuses on driving on busy urban roads. Your teen will use the skills acquired in the previous lessons to navigate through city streets. These skills include scanning, lane positioning, covering the brake, and identifying hazards. Special situations that arise in urban areas will be covered (Figure 80).
Figure 80 – Topics for Lesson 9
The minimum time for this lesson is shown in Figure 81.
Enter date and time you started lesson 8 practice. Sign here.
1) One-way Streets
2) Trolleys, street cars, etc.
3) Buses
Lesson 9 Plan

Safe2Drive
69
Figure 81 – Minimum Time for Lesson 9
2) Practice Lesson
One-Way Streets
One-way streets are common in city environments. Many one-way streets have multiple lanes (Figure 82). Discuss with your teen the benefits and risks of driving in the left, center, and right lanes of a multiple-lane one-way street. Left lanes are best for making left turns, but the risk is the increased difficulty of seeing past other cars to identify cross-traffic. The center lane is probably the safest lane, but you must be prepared for cars merging from both sides (right and left lanes). The right lane is best for right turns, but it also encounters the most stops (e.g., buses).
Figure 82 – One-way Street with Three Lanes
Take your teen to an area with one-way streets with multiple lanes. Have him drive in each lane and verbalize to you the benefits and challenges he or she sees.
You may enter any open lane when turning onto a multiple-lane one-way street (Figure 83). Keep in mind this is true in Texas but not necessarily other states.
Minimum Time
20-Hour Program 1 30-Hour Program
1 For students who registered prior to 10/01/2013
3 5
123

Safe2Drive
70
Figure 83 – Turning onto a Multiple-Lane One-Way Street
Trolleys, Streetcars, and Buses
Public transportation presents challenges on city streets. You must give them the right of way. Review with your teen the rules of the road regarding these vehicles.
3) Completing the Log
Only one practice session can be done each day (Figure 84).

Safe2Drive
71
Figure 84 – Completing the Log
3.10 Expressway / Freeway Driving
1) Overview
This final lesson focuses on freeway driving (Figure 85). Driving on the expressways usually gives on an immediate boost of adrenalin. Speeds are higher and all movements seem geared up a notch.
Figure 85 – Topics for Lesson 10
2) Practice Lesson
This means drives must adapt quickly to this new environment. It is easy to see this when one has driven on back roads for a period of hours and then suddenly enters a
Enter date and time you started lesson 9 practice. Sign here.
1) Entering and Exiting Expressway
2) Merging
3) Being Passed by Trucks
4) Emergency Stops and Reentering
Lesson 10 Plan

Safe2Drive
72
freeway. Suddenly everyone is passing you, and there are a few glares sent your way. Your teen will use all the driving skills for this practice.
Entering / Exiting Expressway
Find an appropriate stretch of highway and have your teen spend several occasions cruising and practicing all the skills she or he has learned. A clear stretch of highway should not present many roadside hazards.
Entering an expressway can be a tricky maneuver. Good judgment is required, and your teen’s ability will be tested. You want your teen to use the approach ramp and merge lane to accelerate until the vehicle is traveling at or near the same speed as the traffic already on the highway. This is an important concept. Young drivers typically are not aware of the impact their ‘slow merges’ have on other cars.
This is difficult maneuver when done in traffic. Find a lightly-traveled road with exits only a few miles apart. Then just keep traveling back and forth between them, entering and exiting, over and over.
The goal at the entrance is first to observe and clear the ramp, accelerate smoothly up to the speed of the highway, and then signal and merge into the lane (Figure 86). A lightly-traveled road allows for errors.
Figure 86 – Merging onto a Highway
You might want to wait on the shoulder until the ramp is empty. Trying to merge in traffic might be intimidating.
At an exit ramp, the turn signal should be on about 100 feet before the exit (Figure 87). This should be done whether or not anybody is on the road. You want this to become a habit.
It is also important to maintain speed until your teen has entered the deceleration lane or the ramp itself. Teach him or her not to slow down until clear of the traffic lane.

Safe2Drive
73
Figure 87 – Exiting a Highway
Merging
Here are three keys to safe merging that should be reviewed with your teen as he or she practices.
1) Clear the way. Determine how much room there is ahead on the ramp before you have to move over.
2) Select your place in traffic ahead of time. That means you have to examine oncoming traffic, and judge its speed and distance. Only then are you ready to move onto the highway.
3) Slip into traffic as close to the speed of the traffic as possible.
The place in traffic is a moving target. It is more like a ‘merge slot’ than a ‘merge spot’.
Being Passed by Trucks
Make your teen aware that trucks create air waves when they pass you. They will push your car. Hold the steering wheel firmly.
Emergency Stopping
You can explain the emergency stop to your teen. Let him practice it. The key to a safe emergency stop is to slow down as gradually as possible and give traffic behind you as much warning as possible. Here are the steps:
1) Ease of the gas
2) Turn on the signal
3) Make sure the shoulder is clear
4) Move over to the far edge of the pavement
5) Continue coasting until the speed drops to about 45 mph
6) Gradually steer off the roadway and onto the shoulder
7) Gently brake to a stop
8) Pull as far from the road as possible
9) Turn on the emergency flashers

Safe2Drive
74
Getting Back on the Road
Make this maneuver as close to a merge as possible. First, judge how much room there is ahead on the shoulder before you return to the pavement. If there is plenty of room:
1) Turn your flashers off
2) Get rolling only if there is a break in the traffic
3) Stay on the shoulder until your speed is 45 mph
4) Move over as soon as possible.
3) Completing the Log
Complete the log for the final lesson (Figure 88)!
Figure 88 – Completing the Log
Enter date and time you started lesson 10 practice. Sign here.