Dragon NaturallySpeaking Version 10 - Nuance...
13
Dragon NaturallySpeaking Version 10 Philips 9600 DPM Setup Guide for Dragon Philips 9600 DPM Setup Guide (revision 1.1) for Dragon NaturallySpeaking Version 10 as released in North America
Transcript of Dragon NaturallySpeaking Version 10 - Nuance...
Dragon NaturallySpeaking
Version 10
Philips 9600 DPM SetupGuide for Dragon
Philips 9600 DPM Setup Guide (revision 1.1)
for Dragon NaturallySpeaking Version 10 as released in North America
The material in this guide applies to Professional and Legal editions of DragonNaturallySpeaking, the Philips 9600 DPM device, and SpeechExec Pro Dictate software.
We welcome comments about this guide and all aspects of Dragon documentation includingthe User Guide, Tutorial, Tip of the Day, Help menu, Performance Assistant, “What Can ISay” window... Please email the documentation team at [email protected].
Information in this document is subject to change. The Knowledge Base atwww.support.nuance.com contains the latest technical information on theDragon product family, including versions predating Version 10.
The Support area of the Nuance website also includes recommended settingsfor additional microphones, digital voice recorders, tablet PCs, and othercompatible hardware devices tested by Nuance and approved for use withDragon.
This Guide’s Goals
Welcome to continuous speech recognition anywhere! Dragon NaturallySpeaking combined withDigital Recorders lets you speak naturally to create documents on the go.
This Guide aims to provide an efficient introduction, presenting what an end-user should be aware ofin order to have Dragon NaturallySpeaking transcribe from the Philips 9600 recorder with the highestlevel of accuracy – and convenience.
Before following the steps in this guide please consult your Philips 9600 DPM documentation forinstructions on how to install the Philips SpeechExec Pro Dictate software. The instructions in thisguide will cover the following topics:
Setting your options for the Philips 9600 Digital Recorder to work with Dragon.
Creating a Digital Recorder User Profile
Adding a Digital Recorder “Source” to an existing User Profile
How to transcribe a recording with your Philips 9600 DPM
No part of this document may be reproduced in any form or by any means, electronic ormechanical, including photocopying, recording, or by any information storage and retrievalsystems, without the express written consent of Nuance Communications, Inc.
Nuance, the Nuance logos, the Dragon logos, Dragon NaturallySpeaking, NaturallySpeaking, DragonBar andSelect-and-Say are trademarks or registered trademarks of Nuance Communications, Inc. or its affiliates in theUnited States and/or other countries. All other company names and product names referenced herein are thetrademarks of their respective owners
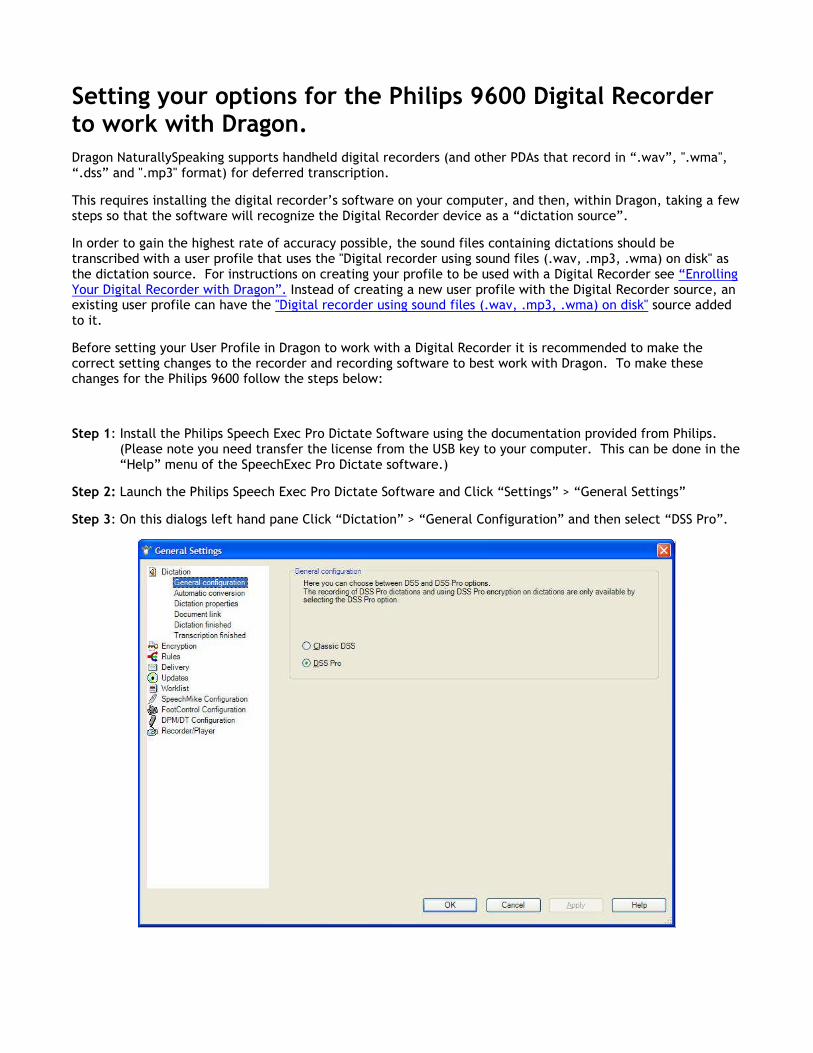
Setting your options for the Philips 9600 Digital Recorderto work with Dragon.
Dragon NaturallySpeaking supports handheld digital recorders (and other PDAs that record in “.wav”, ".wma",“.dss” and ".mp3" format) for deferred transcription.
This requires installing the digital recorder’s software on your computer, and then, within Dragon, taking a fewsteps so that the software will recognize the Digital Recorder device as a “dictation source”.
In order to gain the highest rate of accuracy possible, the sound files containing dictations should betranscribed with a user profile that uses the "Digital recorder using sound files (.wav, .mp3, .wma) on disk" asthe dictation source. For instructions on creating your profile to be used with a Digital Recorder see “EnrollingYour Digital Recorder with Dragon”. Instead of creating a new user profile with the Digital Recorder source, anexisting user profile can have the "Digital recorder using sound files (.wav, .mp3, .wma) on disk" source addedto it.
Before setting your User Profile in Dragon to work with a Digital Recorder it is recommended to make thecorrect setting changes to the recorder and recording software to best work with Dragon. To make thesechanges for the Philips 9600 follow the steps below:
Step 1: Install the Philips Speech Exec Pro Dictate Software using the documentation provided from Philips.(Please note you need transfer the license from the USB key to your computer. This can be done in the“Help” menu of the SpeechExec Pro Dictate software.)
Step 2: Launch the Philips Speech Exec Pro Dictate Software and Click “Settings” > “General Settings”
Step 3: On this dialogs left hand pane Click “Dictation” > “General Configuration” and then select “DSS Pro”.
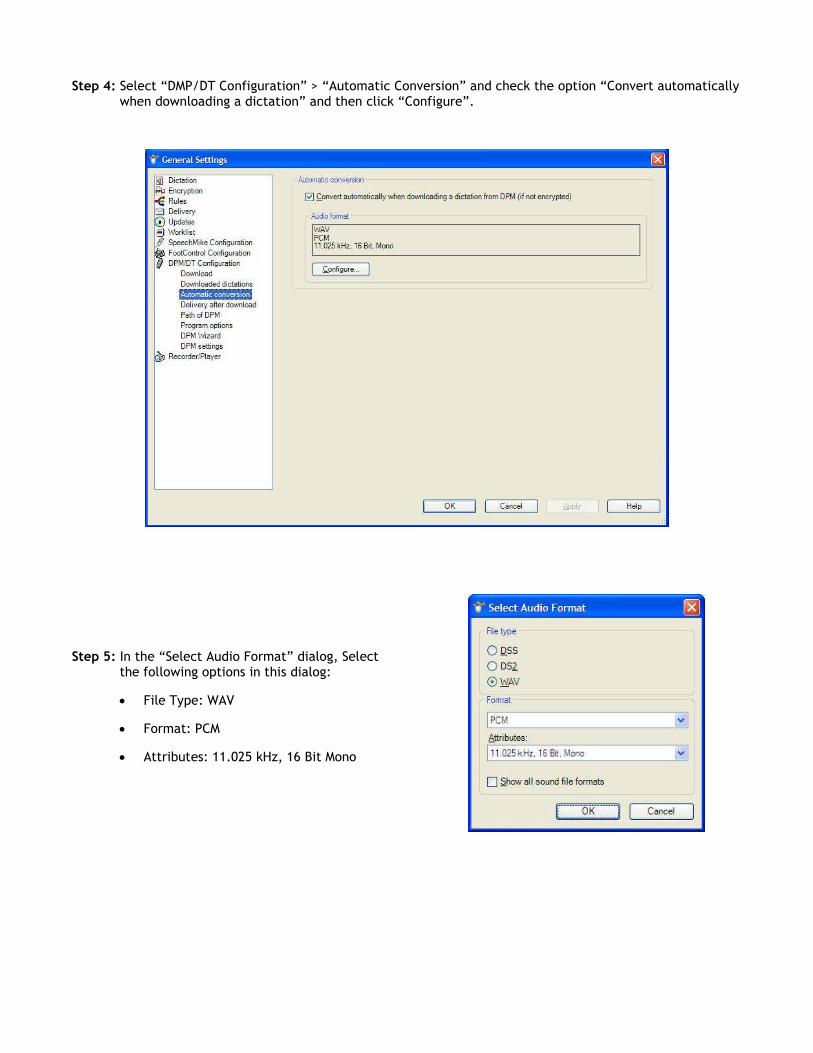
Step 4: Select “DMP/DT Configuration” > “Automatic Conversion” and check the option “Convert automaticallywhen downloading a dictation” and then click “Configure”.
Step 5: In the “Select Audio Format” dialog, Selectthe following options in this dialog:
File Type: WAV
Format: PCM
Attributes: 11.025 kHz, 16 Bit Mono
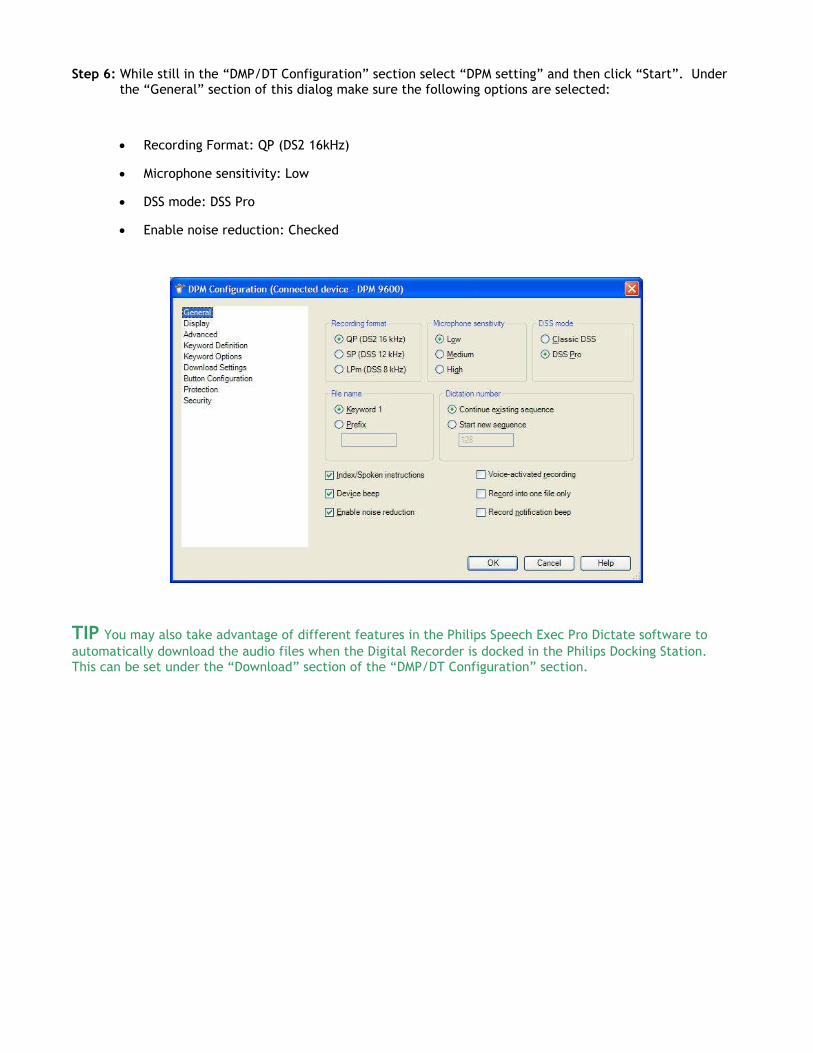
Step 6: While still in the “DMP/DT Configuration” section select “DPM setting” and then click “Start”. Underthe “General” section of this dialog make sure the following options are selected:
Recording Format: QP (DS2 16kHz)
Microphone sensitivity: Low
DSS mode: DSS Pro
Enable noise reduction: Checked
TIP You may also take advantage of different features in the Philips Speech Exec Pro Dictate software to
automatically download the audio files when the Digital Recorder is docked in the Philips Docking Station.This can be set under the “Download” section of the “DMP/DT Configuration” section.
“Enrolling” your Digital Recorder within Dragon
Dragon NaturallySpeaking is speaker-dependant software. To recognize your speech accurately, it must have a“profile” of you, which it stores in a set of files called user files (often referred to as “a User”).
Creating a User profile is easy. The first time you launch Dragon, the program automatically brings up its NewUser Wizard, which takes you step by step through the process of creating a profile, including choosing theright options for your audio input device and “accent”. After a verification of audio hardware, this wizard canpresents you with text to read aloud for into your recorder—this step, called general training, allows Dragon toadapt its acoustic model to the unique way you sound.
IMPORTANT For best results, it is highly recommended that you first use Dragon with a regular
microphone. This allows you to see the transcription/text appear on your screen in real time. This gives youimmediate feedback about how to best “Talk” to Dragon and helps you find the optimal flow and tone of voice(speech recognition software works best if you speak long phrases rather than individual words.) It isrecommended to then add a new “Dictation Source” to the microphone profile for the Digital Recorder. This isexplained further in the “Adding a Digital Recorder “Source” to an existing User Profile” section later in thisguide.
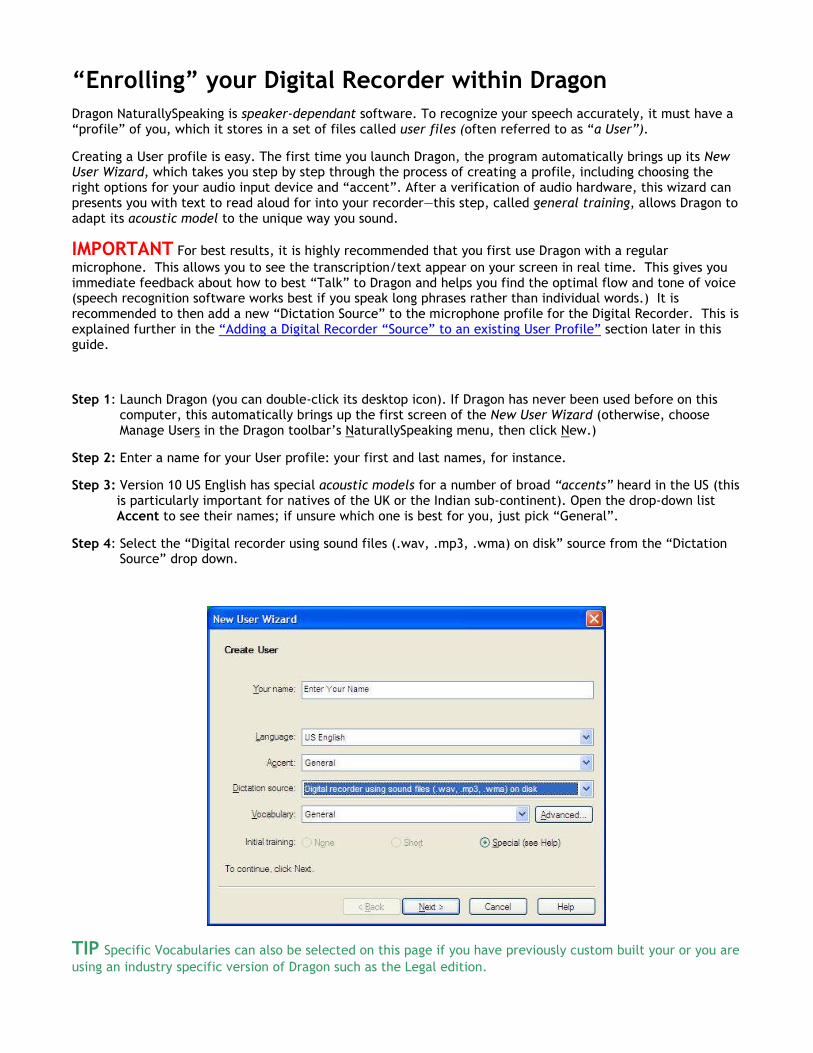
Step 1: Launch Dragon (you can double-click its desktop icon). If Dragon has never been used before on thiscomputer, this automatically brings up the first screen of the New User Wizard (otherwise, chooseManage Users in the Dragon toolbar’s NaturallySpeaking menu, then click New.)
Step 2: Enter a name for your User profile: your first and last names, for instance.
Step 3: Version 10 US English has special acoustic models for a number of broad “accents” heard in the US (thisis particularly important for natives of the UK or the Indian sub-continent). Open the drop-down listAccent to see their names; if unsure which one is best for you, just pick “General”.
Step 4: Select the “Digital recorder using sound files (.wav, .mp3, .wma) on disk” source from the “DictationSource” drop down.
TIP Specific Vocabularies can also be selected on this page if you have previously custom built your or you are
using an industry specific version of Dragon such as the Legal edition.
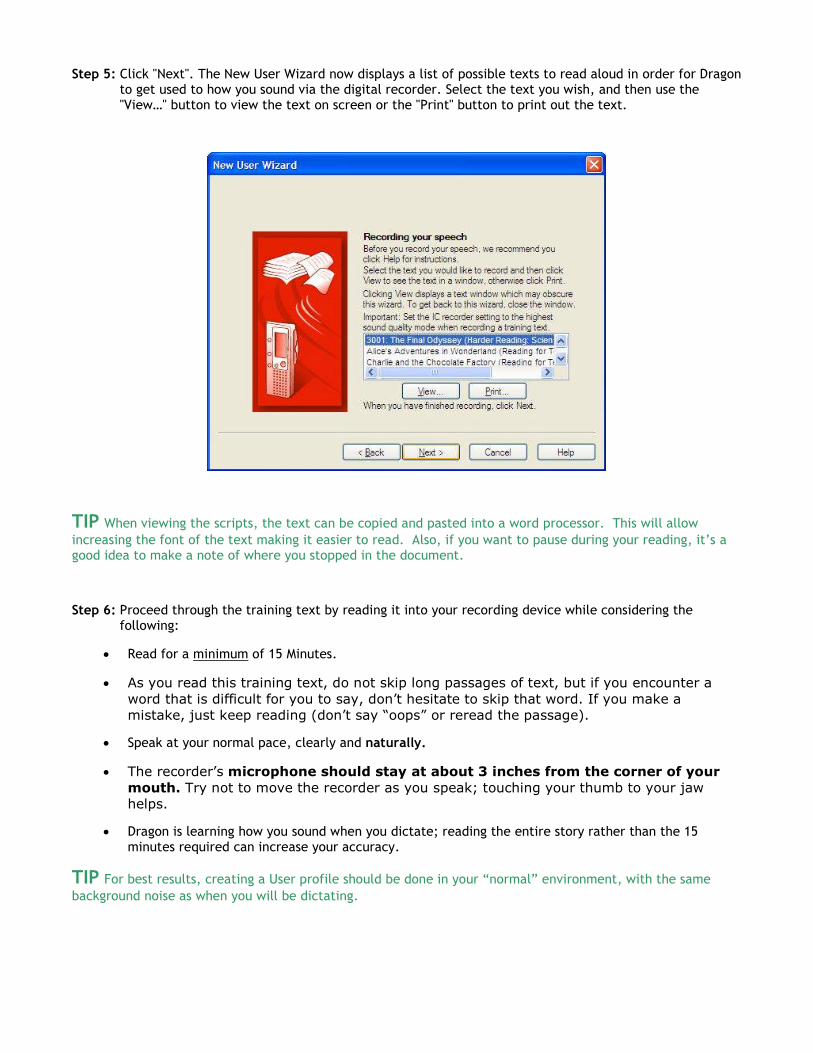
Step 5: Click "Next". The New User Wizard now displays a list of possible texts to read aloud in order for Dragonto get used to how you sound via the digital recorder. Select the text you wish, and then use the"View…" button to view the text on screen or the "Print" button to print out the text.
TIP When viewing the scripts, the text can be copied and pasted into a word processor. This will allow
increasing the font of the text making it easier to read. Also, if you want to pause during your reading, it’s agood idea to make a note of where you stopped in the document.
Step 6: Proceed through the training text by reading it into your recording device while considering thefollowing:
Read for a minimum of 15 Minutes.
As you read this training text, do not skip long passages of text, but if you encounter aword that is difficult for you to say, don’t hesitate to skip that word. If you make amistake, just keep reading (don’t say “oops” or reread the passage).
Speak at your normal pace, clearly and naturally.
The recorder’s microphone should stay at about 3 inches from the corner of yourmouth. Try not to move the recorder as you speak; touching your thumb to your jawhelps.
Dragon is learning how you sound when you dictate; reading the entire story rather than the 15minutes required can increase your accuracy.
TIP For best results, creating a User profile should be done in your “normal” environment, with the same
background noise as when you will be dictating.
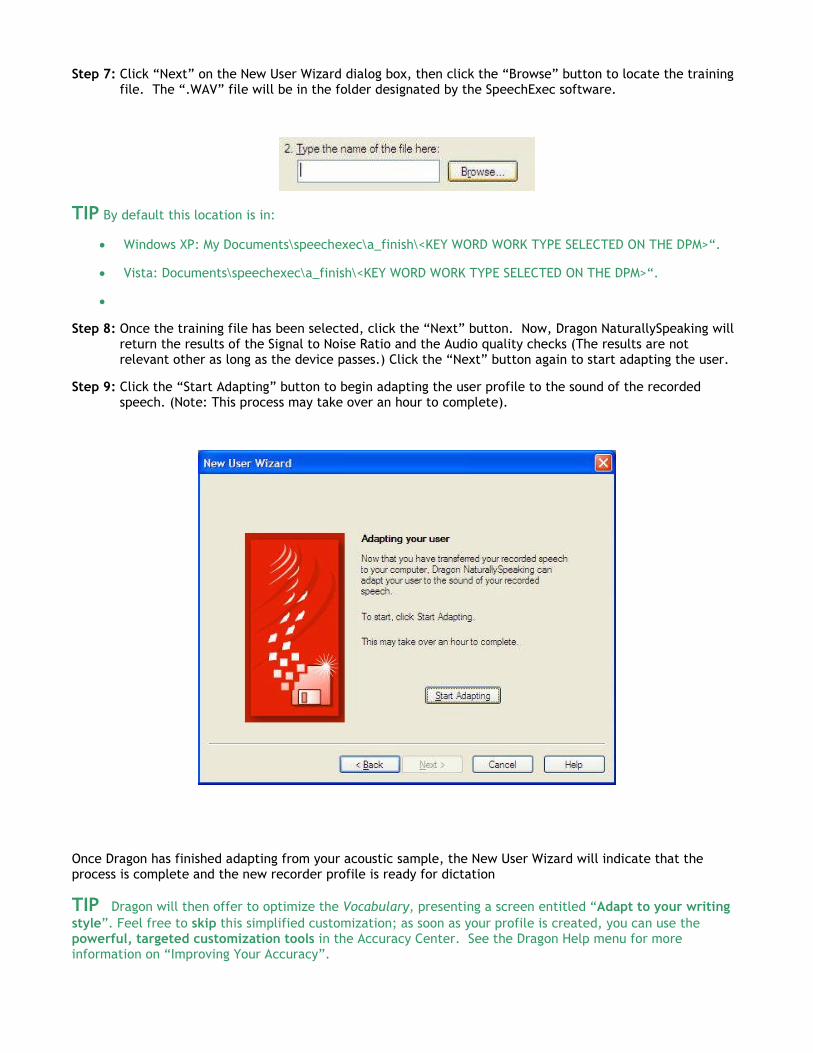
Step 7: Click “Next” on the New User Wizard dialog box, then click the “Browse” button to locate the trainingfile. The “.WAV” file will be in the folder designated by the SpeechExec software.
TIP By default this location is in:
Windows XP: My Documents\speechexec\a_finish\<KEY WORD WORK TYPE SELECTED ON THE DPM>“.
Vista: Documents\speechexec\a_finish\<KEY WORD WORK TYPE SELECTED ON THE DPM>“.
Step 8: Once the training file has been selected, click the “Next” button. Now, Dragon NaturallySpeaking willreturn the results of the Signal to Noise Ratio and the Audio quality checks (The results are notrelevant other as long as the device passes.) Click the “Next” button again to start adapting the user.
Step 9: Click the “Start Adapting” button to begin adapting the user profile to the sound of the recordedspeech. (Note: This process may take over an hour to complete).
Once Dragon has finished adapting from your acoustic sample, the New User Wizard will indicate that theprocess is complete and the new recorder profile is ready for dictation
TIP Dragon will then offer to optimize the Vocabulary, presenting a screen entitled “Adapt to your writing
style”. Feel free to skip this simplified customization; as soon as your profile is created, you can use thepowerful, targeted customization tools in the Accuracy Center. See the Dragon Help menu for moreinformation on “Improving Your Accuracy”.
Adding a Digital Recorder “Source” to an existing UserProfile
Instead of creating a new user profile with the Digital Recorder source, an existing user profile can have the“Digital recorder using sound files (.wav, .mp3, .wma) on disk” source added to it. In order to do this, use thefollowing steps:
TIP This is the preferred method of adding support for a Digital Recorder if you already have a User Profile
created for a different source. i.e. Mic-in, USB Headset, Bluetooth. By adding a new source to an existing UserProfile, vocabularies and commands will be shared between the two sources. If a new profile is created thatuses the Digital Recorder source, the user profile will use a separate acoustic model than any existing userprofiles, and vocabularies and commands won't be shared between multiples user profiles.
Step 1: Click “NaturallySpeaking > Open User
Step 2: Select the existing user profile to add the new source to.
Step 3: Click “Source > New”.
Step 4: Select the “Digital recorder using sound files (.wav, .mp3, .wma) on disk” from the Dictation Sourcedrop down list and then click “OK”.
Acoustic Training will have to be completed for the new dictation source. Once the new source is opened, thefollowing message will appear: “Recorder Training has not yet been successfully completed for this user anddictation source. We will give you the opportunity now.” To continue with the steps on training the source,please start with step 5 n the “Creating a Digital Recorder User Profile” section of this guide.
Transcribing a Recording from your Philips 9600 DPM
Using a Digital Voice Recorder
Follow these basic guidelines when dictating into your recorder for optimal recognition results:
Always hold the recorder at the same distance from your mouth. Some users choose to rest the deviceon their jaw for the most consistent results.
For better quality recordings, consider connecting your headset microphone to your device rather thantalking into the built-in microphone. (The headset microphone often offers superior noise-cancellingcapabilities so that Dragon can focus on your voice rather than potential background noise.)
Use the Restricted Command Set in recorded dictation to best control the formatting and to makecorrections while dictating. For example:
SCRATCH THAT - a command that deletes the previous utterance. An utterance is everything you saidwith a single breath.
RESUME WITH - a command that allows you to back up if you misspeak or change your mind afterdictating a phrase. For example, if you dictate “the suspect fled on foot east down Pleasant Street,”you can change the street name by dictating “RESUME WITH the suspect fled on foot east downProspect Street.”
Use different modes while recording to suit your specific dictation needs. Dragon NaturallySpeakingtranscribes in Normal Mode by default. However, there are instances where you may find it helpful toswitch modes. Dictating a series of numbers? Switch to Numbers mode. Not sure how to spell a specificname or technical term? Try using Spell Mode.
[Mode-Name] MODE ON or START [Mode-Name] MODE - Turn a mode on.
[Mode-Name] MODE OFF or STOP [Mode-Name] MODE - Turn a mode off.
SWITCH TO [Mode -Name] MODE - To switch modes.
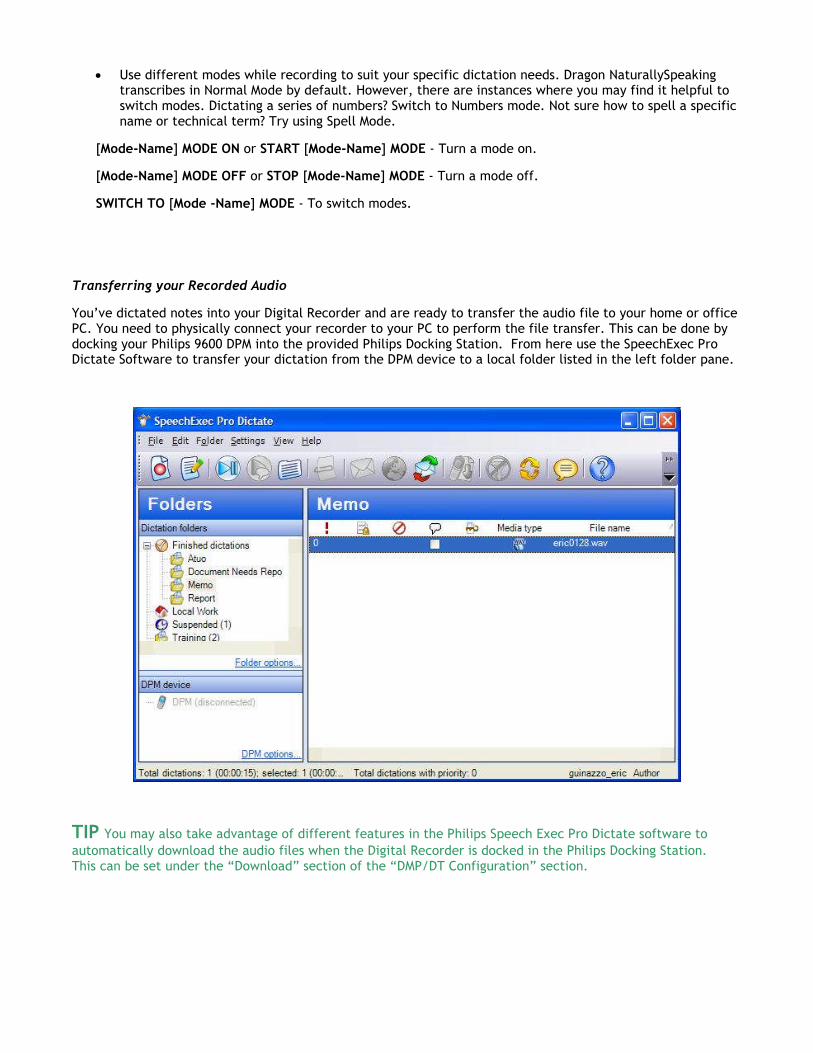
Transferring your Recorded Audio
You’ve dictated notes into your Digital Recorder and are ready to transfer the audio file to your home or officePC. You need to physically connect your recorder to your PC to perform the file transfer. This can be done bydocking your Philips 9600 DPM into the provided Philips Docking Station. From here use the SpeechExec ProDictate Software to transfer your dictation from the DPM device to a local folder listed in the left folder pane.
TIP You may also take advantage of different features in the Philips Speech Exec Pro Dictate software to
automatically download the audio files when the Digital Recorder is docked in the Philips Docking Station.This can be set under the “Download” section of the “DMP/DT Configuration” section.
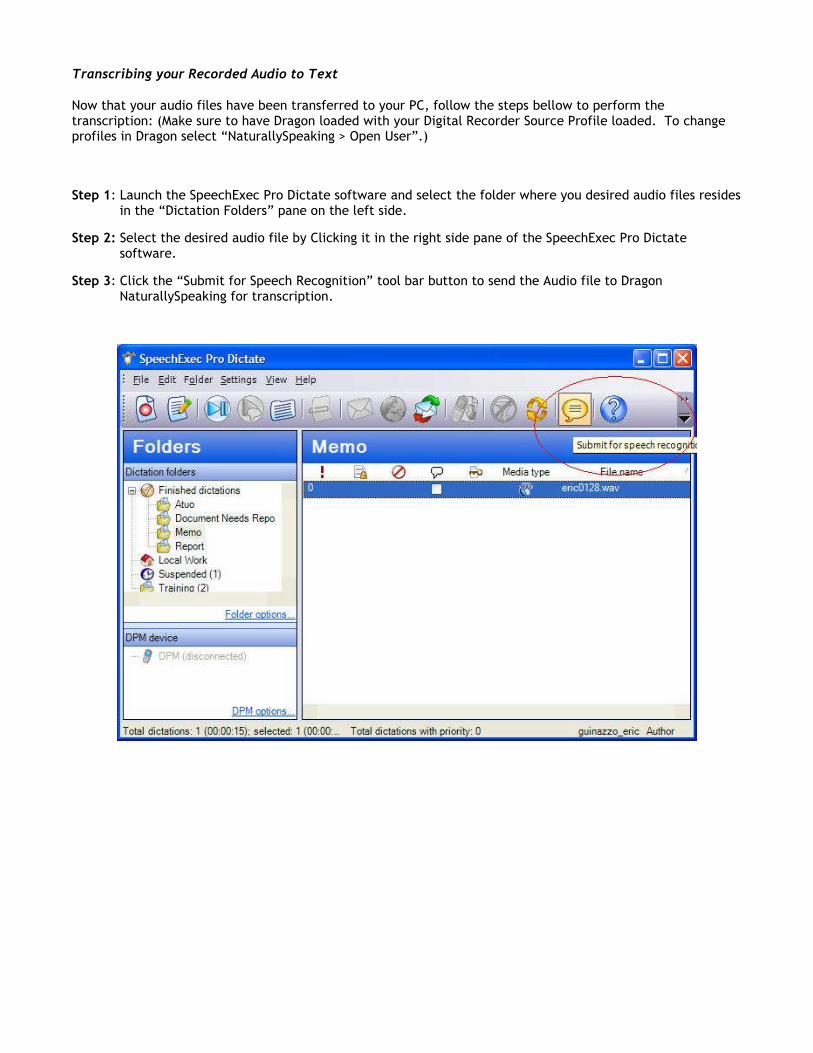
Transcribing your Recorded Audio to Text
Now that your audio files have been transferred to your PC, follow the steps bellow to perform thetranscription: (Make sure to have Dragon loaded with your Digital Recorder Source Profile loaded. To changeprofiles in Dragon select “NaturallySpeaking > Open User”.)
Step 1: Launch the SpeechExec Pro Dictate software and select the folder where you desired audio files residesin the “Dictation Folders” pane on the left side.
Step 2: Select the desired audio file by Clicking it in the right side pane of the SpeechExec Pro Dictatesoftware.
Step 3: Click the “Submit for Speech Recognition” tool bar button to send the Audio file to DragonNaturallySpeaking for transcription.
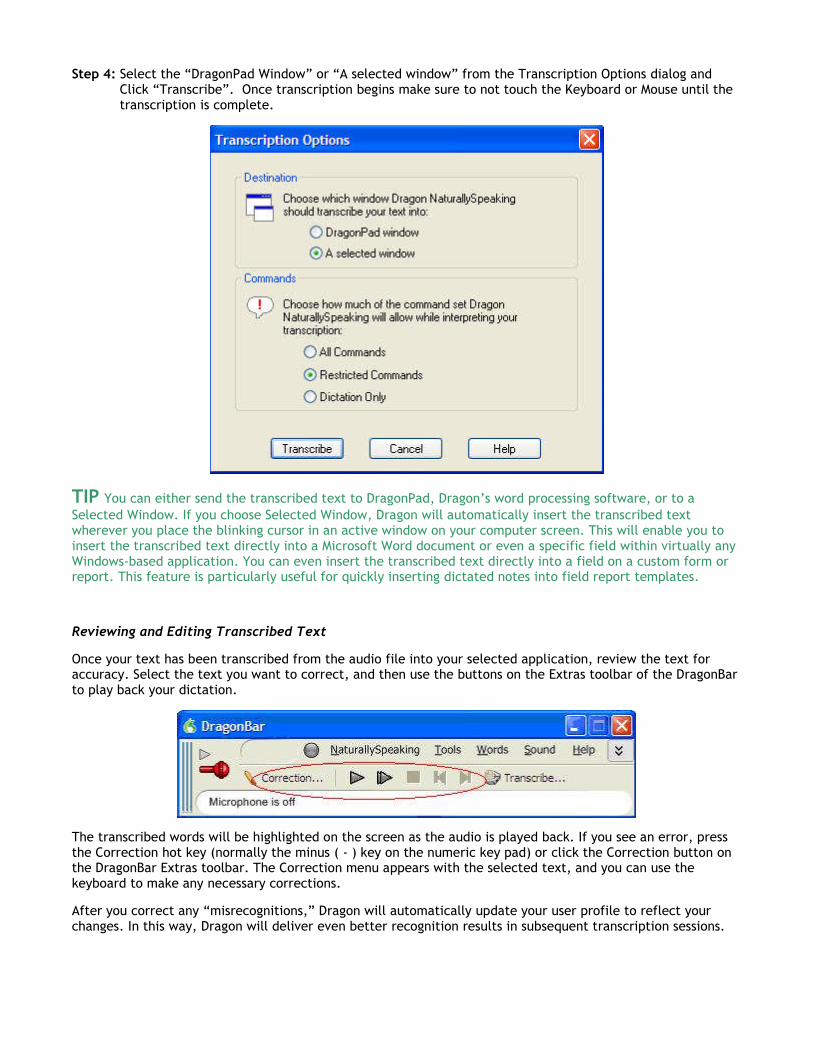
Step 4: Select the “DragonPad Window” or “A selected window” from the Transcription Options dialog andClick “Transcribe”. Once transcription begins make sure to not touch the Keyboard or Mouse until thetranscription is complete.
TIP You can either send the transcribed text to DragonPad, Dragon’s word processing software, or to a
Selected Window. If you choose Selected Window, Dragon will automatically insert the transcribed textwherever you place the blinking cursor in an active window on your computer screen. This will enable you toinsert the transcribed text directly into a Microsoft Word document or even a specific field within virtually anyWindows-based application. You can even insert the transcribed text directly into a field on a custom form orreport. This feature is particularly useful for quickly inserting dictated notes into field report templates.
Reviewing and Editing Transcribed Text
Once your text has been transcribed from the audio file into your selected application, review the text foraccuracy. Select the text you want to correct, and then use the buttons on the Extras toolbar of the DragonBarto play back your dictation.
The transcribed words will be highlighted on the screen as the audio is played back. If you see an error, pressthe Correction hot key (normally the minus ( - ) key on the numeric key pad) or click the Correction button onthe DragonBar Extras toolbar. The Correction menu appears with the selected text, and you can use thekeyboard to make any necessary corrections.
After you correct any “misrecognitions,” Dragon will automatically update your user profile to reflect yourchanges. In this way, Dragon will deliver even better recognition results in subsequent transcription sessions.
Key points about using Philips 9600 with Dragon:
You can add a new dictation source to an existing user profile and retain custom words added to youruser profile.
It is required to convert the DSS Pro file format to .WAV to work with Dragon NaturallySpeaking.
You must correctly set the options on the Philips recorder prior to creating your Digital Recorder profilewith Dragon NaturallySpeaking.
Speaking more naturally and in longer utterances improves the accuracy of Dragon NaturallySpeaking.
Making corrections with the Dragon Bar increases accuracy for future transcriptions.


![DRAGON NATURALLYSPEAKING SUCCESS STORY · Dragon [NaturallySpeaking]. I do soup to nuts with it.” Broda embarked on her architecture career during the days of ink drawings on mylar](https://static.fdocuments.net/doc/165x107/5fca0651c6dbcb5e26354130/dragon-naturallyspeaking-success-story-dragon-naturallyspeaking-i-do-soup-to.jpg)