Payroll Processing Guide - Login · Welcome to the Payroll Processing Guide – your instructional...
18
Payroll Processing Guide For Plan Sponsors © Professional Capital Services, LLC | WebSponsorLi nk.com | (888) 684-6653
Transcript of Payroll Processing Guide - Login · Welcome to the Payroll Processing Guide – your instructional...

Payroll Processing GuideFor Plan Sponsors
© Professional Capital Services, LLC | WebSponsorLink.com | (888) 684-6653

Welcome to the Payroll Processing Guide – your instructional path to easily process payroll data online. Here's what you'll find in this guide:
Process Overview 3
Stage 1: Identify Payrol l Changes 4Running the Payrol l Change Report 4
Stage 2: Enter and Submit Payrol l Data 667
Select an Entry Method Select a Pay Period Enter Payrol l Data 9
9111314
Option A: Upload a Fi le Containing the Payrol l Data Option B: Enter/Edit Records ManuallyOption C: Work with Existing Fi lesErrors and WarningsDeleting a Fi le or Records 15
16Review and Submit Data Confirmation 17
Stage 3: Review the Automated Funding Request (AFR) 18
© Professional Capital Services, LLC | WebSponsorLink.com | (888) 684-6653 2

Questions?
If you have questions, concerns, or would like more information, your Client Rela-tionship Manager is more than happy to help. Client Rela-tionship Managers are available Monday through Friday from 8:00am to 6:00pm EST at (888) 684-6653.
Process OverviewOur payrol l submission process is designed to assist you in funding contribution and loan payments to your retire-ment plan in three easy, safe, and secure stages.
Stage 1: Identify Payroll Changes
If your plan al lows members to make online contribution changes, run the Payrol l Change Report before each payrol l period to see al l of your plan's payrol l changes in one place! Use the report to enter changes online or to update your payrol l data fi le for uploading.
Stage 2: Submit Your Contribution Information
Our encrypted DataXpress system walks you through easy steps to submit your payrol l data. The system performs a series of val idation checks to confirm the data is in good order, then automatical ly sends instructions to your custodian to transfer funds from your bank account.
Stage 3: Review Your Automated Funding Request (AFR)
An AFR confirming the amount of your contribution is generated and emailed to you and posted to the Sponsor website. The AFR also explains any discrepancies between the contribution and what you had anticipated.
© Professional Capital Services, LLC | WebSponsorLink.com | (888) 684-6653 3

PCS Integrates Payroll Report with Popular Payroll Systems!
PCS now offers Payroll Reports that are compatible with the most popular payroll systems, including Paylocity, Ceridian, and ADP's Workforce Now, Pay Expert, or PCPW. Simply run the ADP Payroll Change Report and the data can be completely integrated into your system of choice! This eliminates the need for manual data entry for 401(k) payroll changes.
Stage 1: Identify Payroll ChangesTired of tracking al l of the potential changes from one payrol l to the next? If your plan al lows members to make online contribution changes, the Payrol l Change report tracks al l of your plan's payrol l changes in one place!
It's easy to set up and it's free! Before each payrol l period, simply run the Payrol l Change report. You'l l receive al l of the information necessary to update your payrol l for that period, including:
New loans, f inal loan payments, ful ly paid loans (show a zero total)
Automatic contribution acceleration Contribution increase, decrease, or suspension
Automatic enrol lment
Running the Payroll Change Report
1. Log in to WebSponsorLink.com and select the applicable plan.
2. Select Statements and Reports > Reports.
© Professional Capital Services, LLC | WebSponsorLink.com | (888) 684-6653 4

3. In the Report Selection box, scrol l down the l ist of available reports and cl ick Payroll Change
4. In the Options box, customize the report to suit your needs.
To include payrol l changes only from a specif ic pay period, enter the pay period From date and To date. Make sure that the To date is yesterday or earl ier. If you use today's date, you could miss any payrol l changes that might be made today after you run the report.
You can choose to save the report in PDF, Word, Text ASCII, or Excel format to faci l i tate importing the changes into your payrol l system or uploading them to your payrol l vendor.
5. Click Submit.
Once your report has been generated, you can download a copy by cl icking Open Report in the report popup window. It wi l l also be saved on the View Reports tab shown above.
© Professional Capital Services, LLC | WebSponsorLink.com | (888) 684-6653 5

Method DescriptionRecommended for
plans with
Upload a file containing the payroll data
Upload an Excel or comma delimited (.csv) file containing the payroll data.
A large number of participants
Manually enter employee information
Manually enter payroll data. Fewer than five participants
Copy information from a previous payroll period
Copy records that were submitted for a previous pay period and then edit them to reflect any changes.
Employees with fixed contributions
Work with a previously uploaded or manually created file
Continue working with records you previously uploaded or entered.
Any plan
Stage 2: Enter and Submit Payroll DataOn your plan Home page, cl ick DataXpress in the right column. All data entry methods use our encrypted DataXpress system to ensure that your submission is safe and secure.
Select an Entry Method
When you start DataXpress, you’re asked to choose how you want to enter your data into the system.
Entry Methods
© Professional Capital Services, LLC | WebSponsorLink.com | (888) 684-6653 6

1. Select a method.
2. Click Next to begin the submission process for that method. All methods involve a series of similar steps:
a. Select a pay period for the payrol l you’l l be submitting.
b. Enter the payroll data.
c. Review the contribution totals and submit your payroll .
d. Confirm and schedule payment.
Select a Pay Period
After selecting an entry method, select the division (i f applicable) and pay period for the payrol l .
1. Select Division: If you have multiple divisions or pay centers, select the division you want to work on.
© Professional Capital Services, LLC | WebSponsorLink.com | (888) 684-6653 7

2. Select the payrol l period from the l ist.
Make sure to select the payroll period that corresponds to the payroll data you’ll be entering.
Is the Pay Period Missing? If you don’t see the pay period in the l ist, you may need go back and select a different entry method. For example, i f you entered manual records for a pay period, but didn’t submit them, the Status for that pay period changes to Incomplete and it wi l l no longer be l isted as an available pay period for the edit or copy methods. To continue working with records in that pay period, you’l l need to select the "work with previous" method.
3. If you chose the copy method, select the previous pay period whose records you want to copy.
© Professional Capital Services, LLC | WebSponsorLink.com | (888) 684-6653 8
4. Click Next to continue with the next step, "Enter Payroll Data" below.

Enter Payroll Data
After selecting a pay period, the process for entering your payrol l data varies sl ightly depending on the entry method you selected.
Upload a file containing the payrol l data.
Enter records manually or copy them from a previous pay period, and then edit them. Work with
existing records.
Option A: Upload a File Containing the Payroll Data
Using this option, you create a data fi le containing your payrol l data, including contri-butions and loan payments, and then upload this f i le into DataXpress.
Tip: Make sure that your f i le format matches your plan’s pre-established layout. To view this layout, cl ick View Data Format.
1. Click Select File.
© Professional Capital Services, LLC | WebSponsorLink.com | (888) 684-6653 9

2. In the fi le selection window, navigate to and select the payrol l data fi le containing the payrol l datafor the pay period you selected. Click Open. When the fi le is loaded, i ts name is displayed next toSelect File.
Tip: After your f irst upload, DataXpress wil l remember where the fi le is stored on your computer.You may want to set up a special folder for al l of your contribution fi les.
3. If there’s a header row in your f i le, select Skip first record. If there’s a trai ler row in your f i le, suchas for totals, select Skip last record. If there’s more than one header or trai ler row in your f i le, you’l lneed to delete the extra rows and upload the updated fi le.
4. If you want to preview the first few records in your f i le after uploading, select Preview File.
5. Click Next to upload your payrol l f i le.
Various status messages are displayed while the fi le is being val idated and imported.
If the data is val id, you’re automatical ly taken to the next step, "Review and Submit Data" on page 16.
If the data contains errors, a popup window is displayed that l ists each error. You’l l need to correct the errors in your f i le (see "Errors and Warnings" on page 14) and then upload the new fi le.
© Professional Capital Services, LLC | WebSponsorLink.com | (888) 684-6653 10

Avoiding Upload Errors
Your f i le cannot contain:
Formulas
Borders
Dollar signs ($) or commas in amounts (enter 1000 rather than $1,000)
Dates in any format other than MM/DD/YYYY Dashes to indicate no data (leave the cel l blank or
enter 0)
9-digit ZIP codes (only 5-digit ZIP codes are al lowed)
Negatives expressed using parentheses (use the minus sign instead)
Your f i le can contain only one header row and one trai ler row. If there are multiple header or trai ler rows, delete the extra rows before selecting the fi le for upload. After selecting the fi le, make sure to select the “skip” checkboxes in step 1 above.
Use two decimal places in al l hours and monies (such as Gross Compensation, EE Deferral, Match, Loan Payments).
The State column only needs to be as wide as the two-letter state abbreviation.
Option B: Enter/Edit Records Manually
Using this option, you manually add and edit your participant records inside DataXpress. Al l payrol l data within the pay period is shown. These may be records from an uploaded fi le or records copied from a previous pay period.
© Professional Capital Services, LLC | WebSponsorLink.com | (888) 684-6653 11

1. Add records and/or edit the existing records.
2. Click a f ield to edit the existing information.
© Professional Capital Services, LLC | WebSponsorLink.com | (888) 684-6653 12

Commonly Used Icons
4. Click Save to val idate and save your changes.
5. Fields that need to be corrected are l isted at the bottom of the page. See "Errors and Warnings" onthe next page for information on fixing them.
6. When your data contains no errors, cl ick Next to continue with the next step,"Review and Submit Data" on page 16.
Option C: Work with Existing Files
Using this option, you’l l see a l ist of al l of the existing records related to the selected pay period. These may be records that were uploaded in a data fi le, entered manually, or a combination of both. Enter more records or edit the existing ones in the same manner as described for "Option B: Enter/Edit Records Manually" on page 11.
© Professional Capital Services, LLC | WebSponsorLink.com | (888) 684-6653 13
Add records for all plan participants
View the contribution totals for the current records
Refresh the current records
Save the current records
Validate the current records
3. If you’re not sure what an icon does, hover your mouse pointer over the icon to display a description.

Errors and Warnings
An error means the record cannot be imported and must be corrected.
Error Description
Birth date isblank
The birth date was blank or in the wrong date format. Use MM/DD/YYYY format.
Hire date isblank
The hire date was blank or in the wrong date format. Use MM/DD/YYYY format.
Hire date <birth date
A participant’s hire date cannot be before his/her birth date.
Rehire withno term date
A participant can be rehired only if he/she was previously terminated. Therefore, when a rehire date exists, a termination date is required.
Error Messages
A warning means the record can be imported, but might need your attention before further processing.
Warning Description
Hours blank The number of hours was blank or in the wrong format.
Birth date differ-ences
The uploaded file contains a birth date that differs from the date in the PCS system.
MergeduplicateSSNs
The uploaded file contains a Social Security number that differs from the SSN in the PCS system.
Missing compensation
The participant’s compensation was blank or in the wrong format.
Missing parti-cipants
The number of participants uploaded is less than the number of participants you uploaded during your previous payroll.
Last namedifference
The uploaded file contains a last name that differs from the last name in the PCS system.
Warning Messages
© Professional Capital Services, LLC | WebSponsorLink.com | (888) 684-6653 14
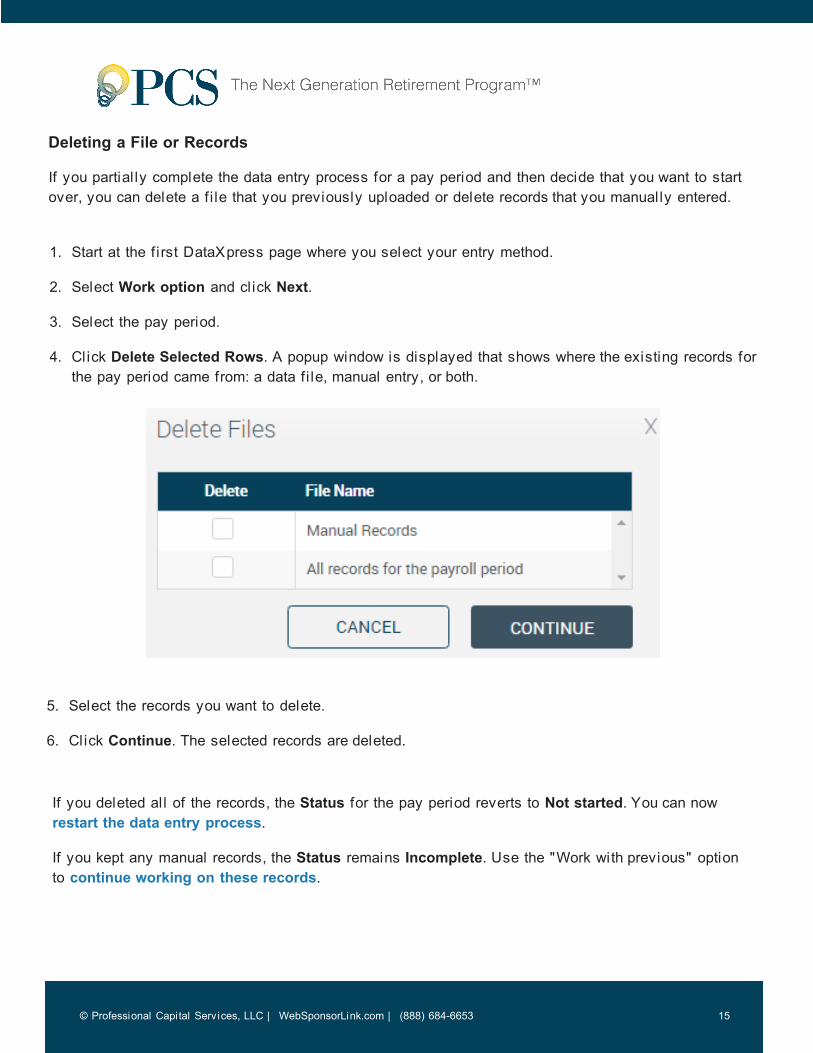
Deleting a File or Records
If you partial ly complete the data entry process for a pay period and then decide that you want to start over, you can delete a fi le that you previously uploaded or delete records that you manually entered.
1. Start at the first DataXpress page where you select your entry method.
2. Select Work option and cl ick Next.
3. Select the pay period.
4. Click Delete Selected Rows. A popup window is displayed that shows where the existing records forthe pay period came from: a data fi le, manual entry, or both.
5. Select the records you want to delete.
6. Click Continue. The selected records are deleted.
If you deleted al l of the records, the Status for the pay period reverts to Not started. You can now restart the data entry process.
If you kept any manual records, the Status remains Incomplete. Use the "Work with previous" option to continue working on these records.
© Professional Capital Services, LLC | WebSponsorLink.com | (888) 684-6653 15

If you kept an uploaded fi le, the Status remains Incomplete. Upload the file for processing, or use the edit option or "Work with previous" option to edit the records from the fi le or add new records.
Review and Submit Data
At this point, your payrol l data has been val idated, but has not been applied to your account.
1. Examine the results careful ly and confirm your totals.
2. If the totals are correct, cl ick Submit for Final Processing to continue with the next step, "Confirmand Schedule Payment" on the next page.
If the totals are incorrect, click Previous to return to the Edit Data page to correct the records.
© Professional Capital Services, LLC | WebSponsorLink.com | (888) 684-6653 16

Confirmation
The final page displays a confirmation number and the date and time the payrol l was submitted. The data that you submitted is val idated against your plan’s specif ications and existing data in our system. You wil l receive an Automated Funding Request (AFR) email showing the amount to be pulled to fund contributions.
PCS automatical ly sends instructions to your custodian to transfer the amount to be funded in connection with the payrol l f i le. Information submitted before 2:30 p.m. ET results in a request to your bank on the same business day. Information submitted after 2:30 p.m. ET results in a request on the next business day.
© Professional Capital Services, LLC | WebSponsorLink.com | (888) 684-6653 17

Stage 3: Review the Automated Funding Request (AFR)An AFR prevents contribution and loan payment funding issues before they occur. The AFR confirms that your payrol l data has been received and is ready for processing.
The AFR is generated seconds after you submit your payrol l data. You wil l receive a confirmation via email that your data was submitted for processing. If you don’t receive your AFR via email within f ive minutes of your submission, please contact your Client Rela-tionship Manager.
A copy of the AFR is posted to the Reports section of the Plan Sponsor website for future access.
The AFR reflects the contribution and loan payment amounts that wil l be funded via ACH.
Below the contribution section is important information to assist you in understanding why the amount shown may be different from what you had anticipated funding. For example, i f you included a contribution amount for a participant who is not yet el igible, that amount wil l not be transferred from your account and this discrepancy wil l be noted on the report. Discrepancies include:
Participants receiving excess loan payments for the current pay period Participants receiving loan
payments without an outstanding loan balance Employees with contributions who are not el igible for
the current pay period
After any discrepancies, the AFR provides information to assist you with future contri-butions, such as:
Participants who wil l be making their f inal loan payment in the next 30 days Employees who wil l
become el igible in the next 30 days
If any of the information on your AFR appears to be incorrect, please contact your Client Relationship Manager.
© Professional Capital Services, LLC | WebSponsorLink.com | (888) 684-6653 18