Patient Identification: Name: DOB: MR# · Draft 10-1-11 Kurtin/Caudle Patient Identification: Name:...
30
Patient Identification: Name: DOB: MR# Visit# HEMATOPATHOLOGY CONSULTATION BONE MARROW BIOPSY AND ASPIRATE Related Background and Clinical Data: REQUESTED ANALYSIS/TESTING ACUTE LEUKEMIA Hematopathology LYMPHOMA Cytogenetics Hematopathology Flow cytometry Cytogenetics NPM1 by PCR (AMLnew dx Flow cytometry: FLT3 by PCR (AMLnew dx) FISH – CMyc, BCL2 cKIT (D816V) by PCR ( AML new dx) CEBPa mutation by PCR (AML – new dx) CHRONIC LYMPHOCYTIC LEUKEMIA BCR/ABL p190/p210 by PCR (ALL – new dx)* Hematopathology BCR/ABL p190 by PCR (ALL monitoring)* Cytogenetics PMLRAR α by PCR (APLnew diagnosis)* Flow cytometry (Zap 70, CD38) new dx FISH –CLL panel MYELOPROLIFERATIVE NEOPL SMS IGHV by PCR Hematopathology Cytogenetics MYELOMA Flow cytometry Hematopathology BCR/ABL p190/p210 by PCR (CML new dx)* Cytogenetics BCR/ABL p210 by PCR (CML monitoring)* Flow cytometry JAK 2 by PCR (new diagnosis) * FISH – Myeloma panel PDGFR α by PCR (new diagnosis) cKIT (D816V) by PCR ( AML new dx) MYELODYSPLASTIC SYNDROMES PDGFR β by PCR (new diagnosis) Hematopathology BCR/ABL mutational analysis Cytogenetics PANCYTOPENIA/THROMBOCYTOPENIA/APLASTIC ANEMIA Flow cytome ry Hematopathology FISH – MDS panel Cytogenetics Flow cytometry BONE MARROW TRANSPLANT PNH CD55 and CD59 by flow cytometry Chimerisms Tcell subsets OTHER TESTING: TCell Subsets Mutational AnalysisRelapsed/Refractory CML Other Provider Signature: ID# Date: Time: Attending Provider Signature: ID# Date: Time:
Transcript of Patient Identification: Name: DOB: MR# · Draft 10-1-11 Kurtin/Caudle Patient Identification: Name:...

Draft 10-1-11 Kurtin/Caudle
Patient Identification: Name: DOB: MR# Visit#
HEMATOPATHOLOGY CONSULTATION BONE MARROW BIOPSY AND ASPIRATE
Related Background and Clinical Data:
REQUESTED ANALYSIS/TESTING
ACUTE LEUKEMIA � Hematopathology LYMPHOMA � Cytogenetics � Hematopathology � Flow cytometry � Cytogenetics � NPM1 by PCR (AML-‐new dx � Flow cytometry: � FLT3 by PCR (AML-‐new dx) � FISH – C-‐Myc, BCL2 � c-‐KIT (D816V) by PCR ( AML-‐ new dx) � CEBPa mutation by PCR (AML – new dx) CHRONIC LYMPHOCYTIC LEUKEMIA � BCR/ABL-‐ p190/p210 by PCR (ALL – new dx)* � Hematopathology � BCR/ABL-‐ p190 by PCR (ALL monitoring)* � Cytogenetics � PML-‐RAR α by PCR (APL-‐new diagnosis)* � Flow cytometry (Zap 70, CD38) new dx � FISH –CLL panel MYELOPROLIFERATIVE NEOPL SMS � IGHV by PCR � Hematopathology � Cytogenetics MYELOMA � Flow cytometry � Hematopathology � BCR/ABL p190/p210 by PCR (CML new dx)* � Cytogenetics � BCR/ABL p210 by PCR (CML monitoring)* � Flow cytometry � JAK 2 by PCR (new diagnosis) * � FISH – Myeloma panel � PDGFR α by PCR (new diagnosis) � c-‐KIT (D816V) by PCR ( AML-‐ new dx) MYELODYSPLASTIC SYNDROMES � PDGFR β by PCR (new diagnosis) � Hematopathology � BCR/ABL mutational analysis � Cytogenetics PANCYTOPENIA/THROMBOCYTOPENIA/APLASTIC ANEMIA � Flow cytome ry � Hematopathology � FISH – MDS panel � Cytogenetics � Flow cytometry BONE MARROW TRANSPLANT � PNH -‐ CD55 and CD59 by flow cytometry � Chimerisms
� T-‐cell subsets OTHER TESTING: T-‐Cell Subsets Mutational Analysis-‐Relapsed/Refractory CML
Other Provider Signature: ID# Date: Time:
Attending Provider Signature: ID# Date: Time:

Draft 10-1-11 Kurtin/Caudle
HEMATOPATHOLOGY: BONE MARROW BIOPSY AND ASPIRATE SPECIMEN PROCESSING REQUIREMENTS
ACUTE LEUKEMIA LYMPHOMA � Hematopathology – MARROW SLIDES � Hematopathology-‐ MARROW SLIDES � Cytogenetics-‐3ML DRK GRN � Cytogenetics-‐ 3ML DRK GRN � Flow cytometry-‐3ML DRK GRN � Flow cytometry-‐ 3ML DRK GRN � NPM1 by PCR (AML-‐new dx) 3ML LAV TO ARUP 40174
� FISH – C-‐Myc, BCL2
� FLT3 by PCR (AML-‐new dx) 3ML LAV TO ARUP 2005400
CHRONIC LYMPHOCYTIC LEUKEMIA
� c-‐KIT (D816V) by PCR ( AML-‐ new dx) 3ML LAV TO ARUP 40137
� Hematopathology-‐ MARROW SLIDES
� CEBPa mutation by PCR (AML – new dx) 3ML LAV TO ARUP 2004247
� Cytogenetics-‐ 3ML DRK GRN
� BCR/ABL p190 by PCR (ALL – new dx)* 3ML LAV TO MAYO 83336 *
� Flow cytometry (Zap 70, CD38) new dx-‐ 3ML DRK GRN
� PML-‐RAR α by PCR (APL-‐new diagnosis)* 3ML LAV TO ARUP 2002871
� FISH –CLL panel-‐ 3ML DRK GRN TO CYTOGENETICS WITH ARUP FORM
Chimerisms-‐ 2 YELLOW ACD TUBES. SEND TO BMT TRANSPLANT COORDINATORS
� IGHV by PCR-‐ 3ML LAV TO ARUP 0055552
MYELOPROLIFERATIVE NEOPLASMS MYELOMA � Hematopathology-‐MARROW SLIDES � Hematopathology-‐ MARROW SLIDES � Cytogenetics-‐ 3ML DRK GRN � Cytogenetics-‐ 3ML DRK GRN � Flow cytometry-‐3ML DRK GRN � Flow cytometry-‐ 3ML DRK GRN � BCR/ABL p210 by PCR (CML)* 3ML LAV TO MAYO 89007 *
� FISH – Myeloma panel-‐ 3ML DRK GRN TO CYTOGENETICS WITH ARUP FORM
� JAK 2 by PCR (new diagnosis) 3ML LAV TO MAYO 31155 � PDGFR α by PCR (new diagnosis) 3ML DRK GRN TO ARUP 2002360
MYELODYSPLASTIC SYNDROMES
� c-‐KIT (D816V) by PCR ( AML-‐ new dx) 3ML LAV TO ARUP 40137
� Hematopathology-‐ MARROW SLIDES
� PDGFR β by PCR (new diagnosis) 3ML DRK GRN TO ARUP 2002360
� Cytogenetics-‐ 3ML DRK GRN
� Flow cytometry-‐ 3ML DRK GRN
PANCYTOPENIA/THROMBOCYTOPENIA � FISH – MDS panel-‐ 3ML DRK GRN TO CYTOGENETICS WITH ARUP FORM
� Hematopathology-‐ MARROW SLIDES � Cytogenetics-‐ 3ML DRK GRN BONE MARROW TRANSPLANT � Flow cytometry-‐ 3ML DRK GRN � Chimerisms-‐ 2 YELLOW ACD TUBES. SEND TO BMT
TRANSPLANT COORDINATORS
� PNH -‐ CD55 and CD59-‐ 6ML LAV TO ARUP 2005006 WHOLE BLOOD. MARROW WILL BE DONE WITH A DISCLAIMER.
INFECTIOUS DISEASE
* May be evaluated by peripheral blood

Outline of recognized standard procedure(s) courtesy of Rodney Haltom, PA-‐C, to be adapted in accordance with standard procedures and protocols within individual organizations.
Ommaya Reservoir Access and Drug Administration Scientific Principle An Ommaya reservoir is an intraventricular catheter system that can be used for the aspiration of cerebrospinal fluid or for the delivery of drugs (e.g., chemotherapy) into the cerebrospinal fluid. It consists of a catheter in one lateral ventricle attached to a reservoir implanted under the scalp. It is used to treat brain tumors, leukemia/lymphoma, and leptomeningeal disease by intrathecal drug administration. In the palliative care of terminal cancer, an Ommaya reservoir can be inserted for intracerebroventricular (ICV) injection of morphine.
Procedure 1. Assemble supplies
• 25-‐gauge butterfly needle • 3–10 mL syringes (if drawing CSF for lab studies) • 2–4 sterile plastic tubes for sample transport • Syringe containing preservative-‐free medication to be injected • Sterile drape • Pack of 3 iodine swab sticks • Pack of 3 alcohol swab sticks • Band-‐aid or sterile bandage • Personal protective equipment (if administering chemotherapy) • Two pair of sterile gloves • Mask
2. Position patient with head elevated 20°–60° based on position of comfort for the patient. Assess site by palpating and locating center of port, clip hair as needed. 3. Open sterile supplies. Establish sterile field. 4. Put on mask.

Outline of recognized standard procedure(s) courtesy of Rodney Haltom, PA-‐C, to be adapted in accordance with standard procedures and protocols within individual organizations.
5. Drop onto sterile field • 25-‐gauge butterfly needle • Empty 10 mL syringe(s) • Medication (if ordered)
6. Put on sterile gloves. 7. Maintaining sterile technique, prepare skin over Ommaya reservoir. Swab to cleanse skin over reservoir with povidone-‐iodine using a circular motion from inner to outer aspect, extending beyond the injection site. Repeat with 2 additional swabs. Allow to dry for 2 minutes, then repeat process using alcohol swabs to remove the iodine. Change to clean pair of sterile gloves now. 8. Overlay sterile draping now so that port is exposed in center. 9. Pump the reservoir gently 3 or 4 times. 10. Attach empty 10-‐mL syringe to butterfly needle tubing. 11. Insert 25-‐gauge butterfly needle through middle of dome, at an angle perpendicular to the dome. Gently advance needle until the tip of the needle meets the backstop of the reservoir (alternate insertion sites in dome). 12. Slowly aspirate 1–2 cc CSF in syringe and set aside. 13. Attach empty syringe and aspirate as much CSF as needed for ordered testing; remove and set aside. Up to 40 cc may be aspirated safely, but it is very rare to ever need this much sample (use second syringe if needed). 14. Attach intrathecal chemo syringe (if ordered); administer chemo over 2–3 minutes and then remove chemo syringe. 15. Attach syringe containing the 1–2 cc of CSF that was previously set aside and slowly inject. This will flush the chemo remaining in the tubing into the port. 16. Remove butterfly needle from reservoir. 17. Place sterile dressing or bandage over reservoir and pump dome 5–10 times. 18. Dispense collected CSF into separate sterile tubes to be sent for ordered testing. (Remember to label the tubes appropriately with patient information) 19. May discharge patient 15–30 minutes after procedure completed if nausea, headache, or hypotension do not occur.

Outline of recognized standard procedure(s) courtesy of Rodney Haltom, PA-‐C, to be adapted in accordance with standard procedures and protocols within individual organizations.
Lumbar Puncture Procedure (Diagnostic and Intrathecal Medication Instillation) Scientific Principle Lumbar puncture is useful in the diagnosis of bacterial, fungal, mycobacterial, and viral CNS infections and, in certain settings, for help in the diagnosis of subarachnoid hemorrhage, CNS malignancies, demyelinating diseases, and Guillain-‐Barré syndrome. Because the blood-‐brain barrier is effectively bypassed during this procedure, chemotherapy can be effectively administered to the brain for prophylaxis and treatment of active malignancy. Procedure 1. Assemble supplies
• LP tray • Sterile gloves • Mask • Some institutions may also require that you wear a disposable gown
2. Position patient in either upright or lateral decubitus/fetal position.
• The lateral decubitus position is required if performing opening pressure. • If opening pressure not needed, then the upright position is preferred.
3. Locate position of top of iliac crests by palpation with both hands. Visualize the center of the spine that lines up with this location and palpate for the L4/L5 interspace. The space above (L3/L4) and the space below (L5/S1) can also safely be used for the procedure. 4. Mark the desired interspace with a light pen mark or a pressure mark. 5. Open LP tray and drop intrathecal chemo onto sterile field. LP needle should also be dropped if the tray does not have a needle you like (gauge too large or you do not want to use a Quincke needle). 6. Put on sterile gloves and mask (and gown if required by institution). 7. Swab to cleanse skin over lumbar area with povidone-‐iodine using a circular motion from inner to outer aspect, extending beyond the injection site. Repeat with 2 additional swabs. It is best to cover at least 1 other lumbar interspace during this step in case you need to change spaces during the procedure due to difficulty accessing your initially chosen space. 8. Draw up 3–5 cc lidocaine with provided syringe and 20-‐gauge needle and then replace with 25-‐gauge needle. 9. Make lidocaine skin wheal at interspace and then inject more lidocaine slowly through the center of the skin wheal as you advance with the 25-‐gauge needle. If patient is obese it may be

Outline of recognized standard procedure(s) courtesy of Rodney Haltom, PA-‐C, to be adapted in accordance with standard procedures and protocols within individual organizations.
necessary to now switch back to the longer 20-‐gauge needle and administer lidocaine deeper into the tissue. 10. Take up spinal needle and insert through center of skin wheal. The spinal needle may be advanced slowly, angling slightly toward the head. The flat surface of the bevel of the needle should be positioned to face to the side. This will allow the needle to spread rather than cut the dural sac, which may decrease incidence of spinal headache. Many providers choose to advance the needle incrementally, removing the stylet periodically to check for CSF flow, then reinserting the stylet until the subarachnoid space is entered. Sometimes a characteristic pop can be felt when the space is accessed, but this is not always the case. If patient complains of sharp pain then the needle is either close to or touching a spinal nerve root. Stop advancing and ask if the pain goes away. If so, then try again to advance slowly. Sometimes the pain will not recur, but if it does the needle will likely need to be withdrawn and reinserted. If bone is hit before the CSF is accessed, then the needle will need to be removed and reinserted at a different angle. Continue until CSF is obtained. 11a. (If opening pressure needed) If opening pressure is needed it is important to remember that patient must be in lateral decubitus position with head at same level as spine. Opening pressure must be performed before samples are taken. Attach flexible tubing to spinal needle. Attach stopcock to flexible tubing. Attach plastic measuring straws to stopcock. Turn stopcock handle such that CSF flows up the measuring straws. Stopcock must be held level with spinal column. Allow CSF to flow up the straw until it stops. Take measurement. Turn stopcock to position that allows collected CSF to drain into sample collection tubes and then turn again to allow free flow of CSF directly into sample tubes until all samples obtained. Recheck pressure by allowing CSF to once again flow into the measurement straw. If pressure is elevated it is often desirable to drain CSF until pressure comes into normal range but not below half the original value. Record the final value of closing pressure. Opening Pressure Normal Results 10 to 100 mm H2O in young children 60 to 200 mm H2O over 8 years of age Up to 250 mm H2O in obese patients Intracranial hypotension is defined as an opening pressure of less than 60 mm H2O Pressure greater than 250 mm H2O is diagnostic for intracranial hypertension 11b. (If no opening pressure needed) Collect CSF for required testing. Some spinal trays may include tubing that can be attached to the spinal needle to facilitate sample collection. Let the CSF flow out at its own natural pace. NEVER try to aspirate the CSF with a syringe. 12. Attach chemo syringe to tubing or end of spinal needle. Inject slowly over 2–3 minutes.

Outline of recognized standard procedure(s) courtesy of Rodney Haltom, PA-‐C, to be adapted in accordance with standard procedures and protocols within individual organizations.
13. Remove spinal needle. Some people prefer to reinsert the stylet prior to removal of needle. I have seen it taught both ways. 14. Wipe off iodine with wet paper towel and place bandaid over access site. 15. Instruct patient to lie flat for 1 hour post-‐procedure. 16. Encourage patient to drink plenty of water. Caffeine my decrease incidence and severity of LP headache. CSF Typical Normal Results Appearance: clear, colorless CSF total protein: 15–60 mg/100 mL Gamma globulin: 3%–12% of the total protein CSF glucose: 50–80 mg/100 mL (or greater than 2/3 of blood sugar level) CSF cell count: 0–5 white blood cells (all mononuclear), and no red blood cells Chloride: 110–125 mEq/L Approved Drugs for Intrathecal Chemotherapy and Typical Dose Cytarabine 100 mg Methotrexate 12 mg Rituximab 10 mg Hydrocortisone 7.5–30 mg Dexamethasone 4 mg Topotecan 0.4 mg

Punch Biopsy
and Suturing
Kathy Sharp, MSN, FNP-BC, AOCNP®, CCD Oncology Nurse Practitioner
Certified Clinical Densitometrist Bristol Medical Oncology
271 Medical Park Blvd Bristol, TN 37620

Lesion AssessmentSuspect Skin Cancer
Melanoma Full excisionSuspicion for melanoma Punch of most suspicious partBasal Cell Cancer Shave, Punch if sclerosing lesion Squamous Cell Deep Shave or Punch
Suspect Benign Skin Condition
Lesion Confined to Epidermis ShaveDermal Lesion PunchInflammatory Disorder Punch
Adapted from Usatine, R. P.; Moy, R. L.; Tobinick, E. L.; & Seigel, D. M. (1998). Skin Surgery: A Practical Guide, p. 52.
BIOPSY TYPES
• Punch • Shave • Excision

Facial Skin Tension Lines
From Trott, A. T. (1997). Wound and Lacerations: Emergency Care and Closure (2nd ed.), p. 16.
Skin Tension Lines
• Follow skin tension lines to-‐ eliminate or minimize scar formation -‐ facilitate easy closure of the wound• May vary person to person

Body Skin Tension Lines
From Trott, A. T. (1997). Wound and Lacerations: Emergency Care and Closure (2nd ed.), p. 16.
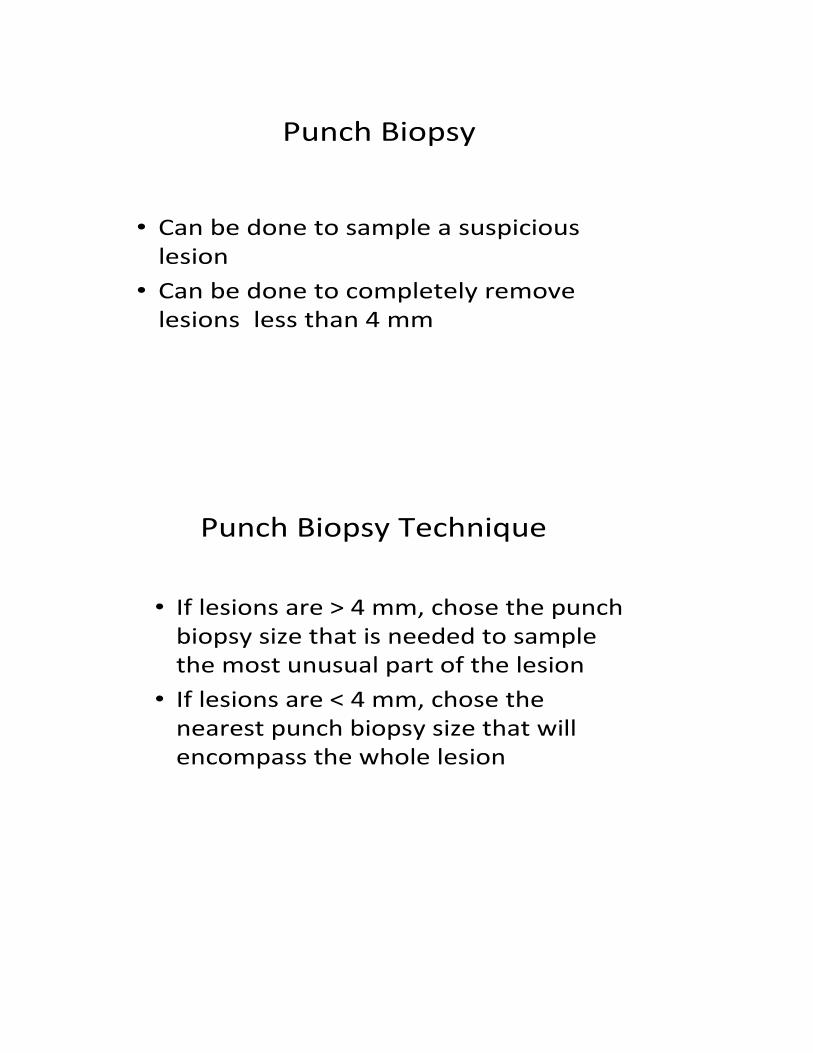
Punch Biopsy
• Can be done to sample a suspicious lesion
• Can be done to completely remove lesions less than 4 mm
Punch Biopsy Technique
• If lesions are > 4 mm, chose the punch biopsy size that is needed to sample the most unusual part of the lesion
• If lesions are < 4 mm, chose the nearest punch biopsy size that will encompass the whole lesion

Punch Biopsy Technique
From Usatine, R. P.; Moy, R. L.; Tobinick, E. L.; & Seigel, D. M. (1998). Skin Surgery: A Practical Guide , p. 108.

Punch Biopsy Technique
From Usatine, R. P.; Moy, R. L.; Tobinick, E. L.; & Seigel, D. M. (1998). Skin Surgery: A Practical Guide , p. 109.
Punch Biopsy Technique
From Usatine, R. P.; Moy, R. L.; Tobinick, E. L.; & Seigel, D. M. (1998). Skin Surgery: A Practical Guide , p. 110.
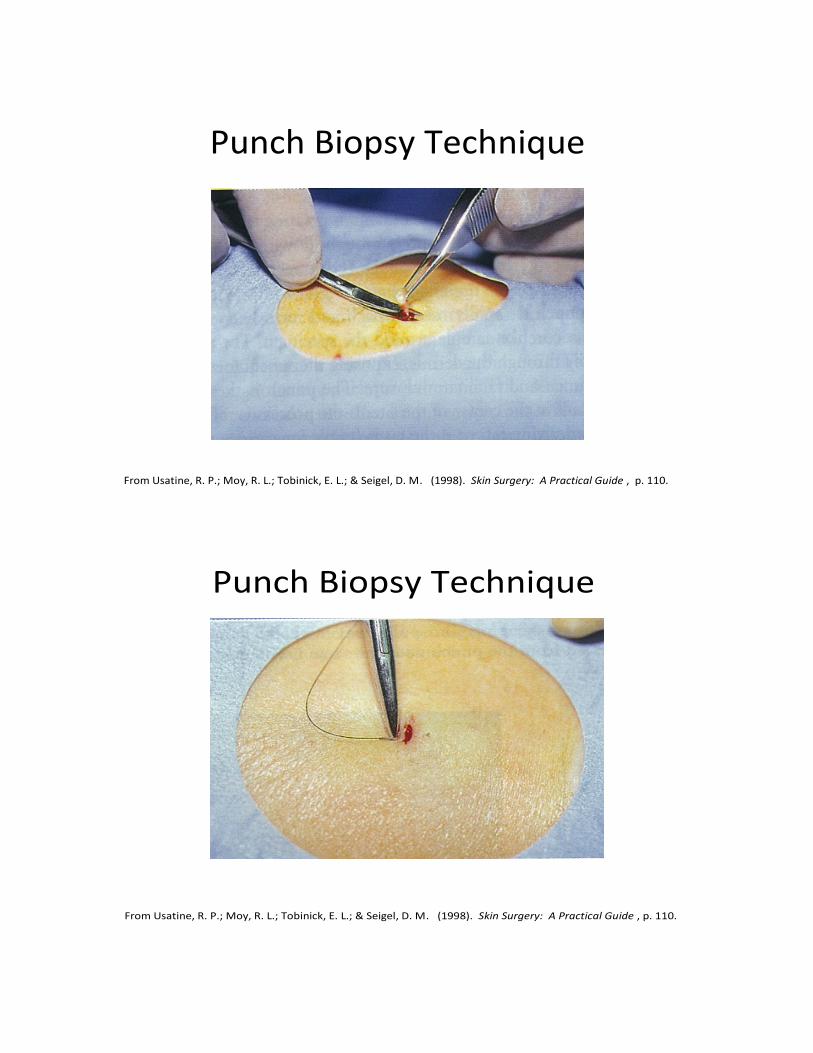
Punch Biopsy Technique
From Usatine, R. P.; Moy, R. L.; Tobinick, E. L.; & Seigel, D. M. (1998). Skin Surgery: A Practical Guide , p. 110.
Punch Biopsy Technique
From Usatine, R. P.; Moy, R. L.; Tobinick, E. L.; & Seigel, D. M. (1998). Skin Surgery: A Practical Guide , p. 110.

Punch Biopsy Technique
From Usatine, R. P.; Moy, R. L.; Tobinick, E. L.; & Seigel, D. M. (1998). Skin Surgery: A Practical Guide , p. 110.

Excisional Biopsy Pearls
• To completely remove a suspicious or known cancerous lesion
• Helpful to mark the skin with a sterile surgical marking pen, leaving an adequate margin
Excisional Biopsy Technique
From Usatine, R. P.; Moy, R. L.; Tobinick, E. L.; & Seigel, D. M. (1998). Skin Surgery: A Practical Guide , p. 127.

Correct Scalpel Excision
• Hold like a pencil• Rest the hand holding the scalpel on the patient
• Incise perpendicular to the skin or no more than 10 degree outward bevel
Correct Scalpel Technique
From Usatine, R. P.; Moy, R. L.; Tobinick, E. L.; & Seigel, D. M. (1998). Skin Surgery: A Practical Guide , p. 127.

Anatomy of the Needle
From Trott, A. T. (1997). Wound and Lacerations: Emergency Care and Closure (2nd ed.), p. 115.

Choosing the Suture
Recommendations for Nonabsorbable Suture
Wound Size
Face
Trunk
Extremities
5-0 to 6-0
4-0
4-0 to 5-0
Suture Removal
Face
Best in 5 days Scalp 7 to 10 days
Trunk
7 to 14 days
Extremities
7 to 14 days longer at/near joint

Grasping the Needle Holder
• Hold the needle holder in the palm of the hand like a screwdriver
• The rings are used only to clamp and unclamp the jaws
• Forefinger is used to guide the tip
Grasping the Needle Holder
From Trott, A. T. (1997). Wound and Lacerations: Emergency Care and Closure (2nd ed.), p. 104.

Arming the Needle Holder
• Grasping the needle is arming or loading• Use the least amount of pressure necessary to hold the needle
• Grasp the needle 1/3 of the way down on the swage
• Grasp the needle at the tip of the needle holder
Arming the Needle Holder
From Trott, A. T. (1997). Wound and Lacerations: Emergency Care and Closure (2nd ed.), p. 105.

Grasping the Forceps
Hold like a pencil with the top of the forceps resting against the
hand between thumb and forefinger
From Trott, A. T. (1997). Wound and Lacerations: Emergency Care and Closure (2nd ed.), p. 108.
Grasping the Tissue
Never “pinch” the skin with the jaws of
the forceps Use one side of the forcep to
elevate the skin
From Trott, A. T. (1997). Wound and Lacerations: Emergency Care and Closure (2nd ed.), p. 107.

Wound Closure Pearls
• Wound Approximation• Wound Tension• Sequence and Spacing• Eliminating/Minimizing Scars
Suture Techniques
• One-‐handed Tie• Two-‐handed Tie• Instrument Tie

Instrument Tie – Step 1
From Trott, A. T. (1997). Wound and Lacerations: Emergency Care and Closure (2nd ed.), p. 134.

Instrument Tie – Step 2
From Trott, A. T. (1997). Wound and Lacerations: Emergency Care and Closure (2nd ed.), p. 135.

Instrument Tie – Step 3
From Trott, A. T. (1997). Wound and Lacerations: Emergency Care and Closure (2nd ed.), p.136.

Instrument Tie – Step 4
From Trott, A. T. (1997). Wound and Lacerations: Emergency Care and Closure (2nd ed.), p. 137.

Checklist courtesy of Kathy Sharp, MSN, FNP-‐BC, AOCNP®, CCD
PUNCH BIOPSY PROCEDURE CHECKLIST
Pre-‐Procedure
_____ Explain the procedure to the patient
_____ Obtain signed consent
_____ Gather equipment
• Punch biopsy in appropriate size • Suture tray (may also be called laceration tray) containing needle holder, tissue forceps,
scissors, gauze, drape, towel • 1% lidocaine (with or without epinephrine depending on location of biopsy) • Alcohol wipes/swab sticks or Betadine swab sticks (these may be included on some
suture trays) • Pathology specimen container • Sterile gloves • Suture • Sterile marking pen (optional)
Procedure _____ Place patient in comfortable position
_____ Mark biopsy area with sterile marking pen (optional)
_____ Open suture/laceration tray and other necessary equipment
_____ Don sterile gloves
_____ Drape biopsy area
_____ Prep the skin with alcohol or Betadine if patient not allergic
_____ Anesthetize biopsy site with 1% lidocaine with or without epinephrine
_____ Complete punch biopsy
_____ Close biopsy site with suture (2-‐mm punch biopsies may be left to heal by secondary intention; also consider leaving inflammatory or infected lesions open to heal by secondary intention)
_____ Apply antibiotic ointment (if patient not allergic) to site and cover with bandage or sterile dressing

Biopsy and Suturing Basics
Bibliography
Trott, A. T. (1997). Wounds and lacerations: Emergency care and closure. St. Louis, MO: Mosby.
Usatine, R. P., Moy, R. L., Tobinick, E. L. & Siegel, D. M. (1998). Skin surgery: A practical guide. St. Louis, MO: Mosby.
Instructional Videos
How to perform a punch biopsy. American Academy of Dermatology. https://www.aad.org/education/basic-‐dermatology-‐curriculum/video-‐library/biopsy-‐and-‐pathology/how-‐to-‐perform-‐a-‐punch-‐biopsy
Interrupted suture + instrument tie. Iain Hennessey.
http://www.youtube.com/watch?v=9J2aM9clkco&feature=player_embedded#t=85 Duke Suture Skills Course -‐ Learn Suture Techniques.
http://www.youtube.com/watch?v=TFwFMav_cpE&feature=player_embedded#t=28 Simple Interrupted Suture With Instrument Tie. Andrew Wright.
http://www.youtube.com/watch?v=VmaenFTww9w&feature=player_embedded
SIM Vivo Videos Suture: The Instrument Tie http://www.bing.com/videos/search?q=How+to+Tie+a+Suture&Form=VQFRVP#view=detail&mid=7DEA9038CC2640DC9E367DEA9038CC2640DC9E36