Part Two: OpenStreetMap - pdxmelepdxmele.com/leaflet-osm-workshop/slides.pdf · More links on last...
44
Part Two: OpenStreetMap Powerful Mapping Web Applications with Open Source Tools Mele Sax-Barnett and Grant Humphries
Transcript of Part Two: OpenStreetMap - pdxmelepdxmele.com/leaflet-osm-workshop/slides.pdf · More links on last...
Part Two: OpenStreetMap
Powerful Mapping Web Applications with
Open Source Tools
Mele Sax-Barnett and
Grant Humphries
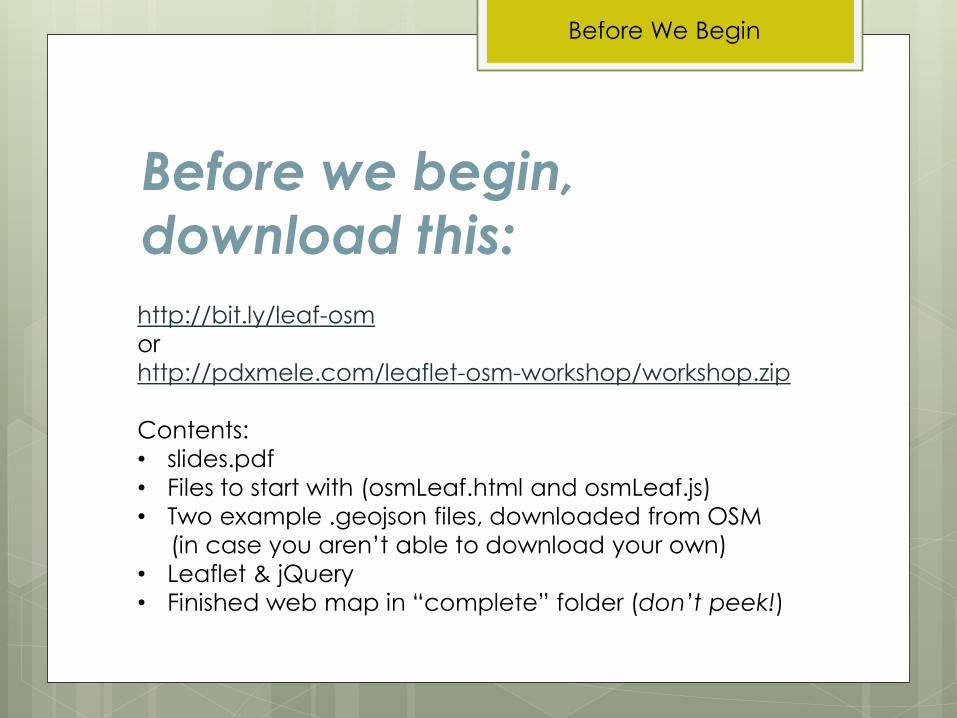
Before we begin,
download this:
Before We Begin
http://bit.ly/leaf-osm
or
http://pdxmele.com/leaflet-osm-workshop/workshop.zip
Contents:
• slides.pdf
• Files to start with (osmLeaf.html and osmLeaf.js)
• Two example .geojson files, downloaded from OSM
(in case you aren’t able to download your own)
• Leaflet & jQuery
• Finished web map in “complete” folder (don’t peek!)
An Introduction to
OpenStreetMap
About OpenStreetMap

OpenStreetWhat?
OpenStreetMap or OSM
Not “Open Street Maps”
Founded in 2004
Worldwide and seamless
“Wikipedia of Maps”
Editable by anyone with an account
Data available to anyone, for free
… as long as you credit the contributors
http://www.osm.org
About OpenStreetMap
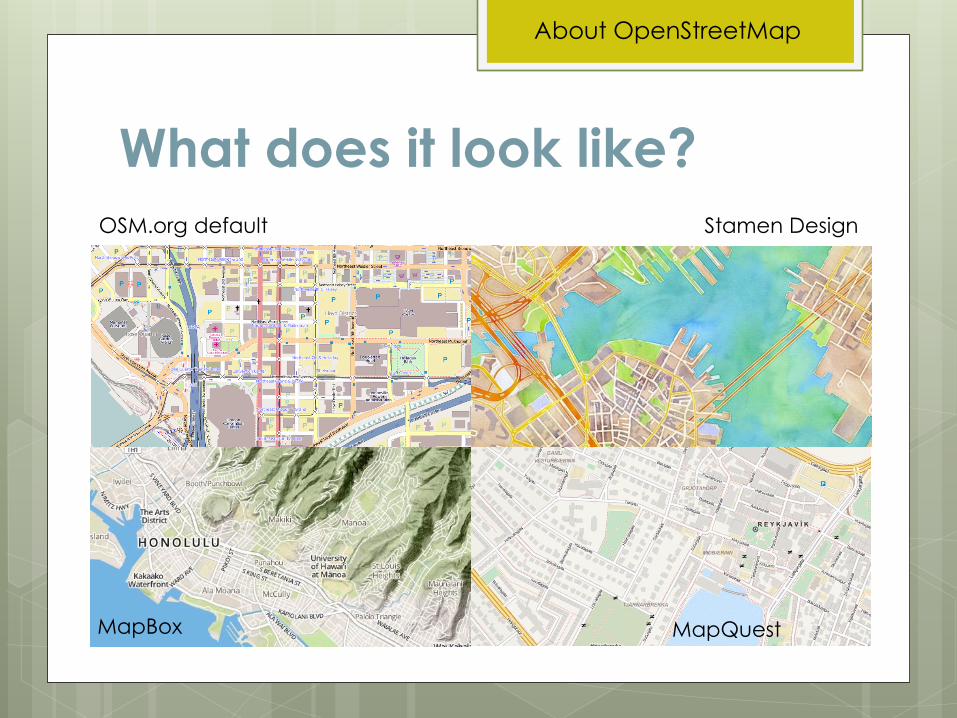
What does it look like?
OSM.org default
MapBox
Stamen Design
MapQuest
About OpenStreetMap
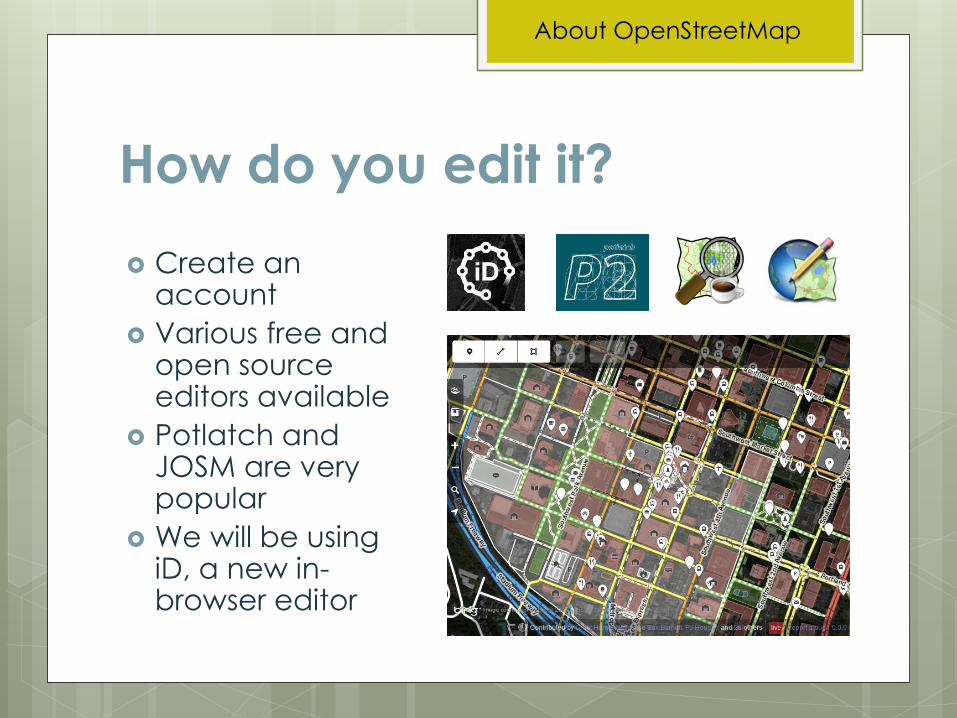
How do you edit it?
Create an account
Various free and open source editors available
Potlatch and JOSM are very popular
We will be using iD, a new in-browser editor
About OpenStreetMap
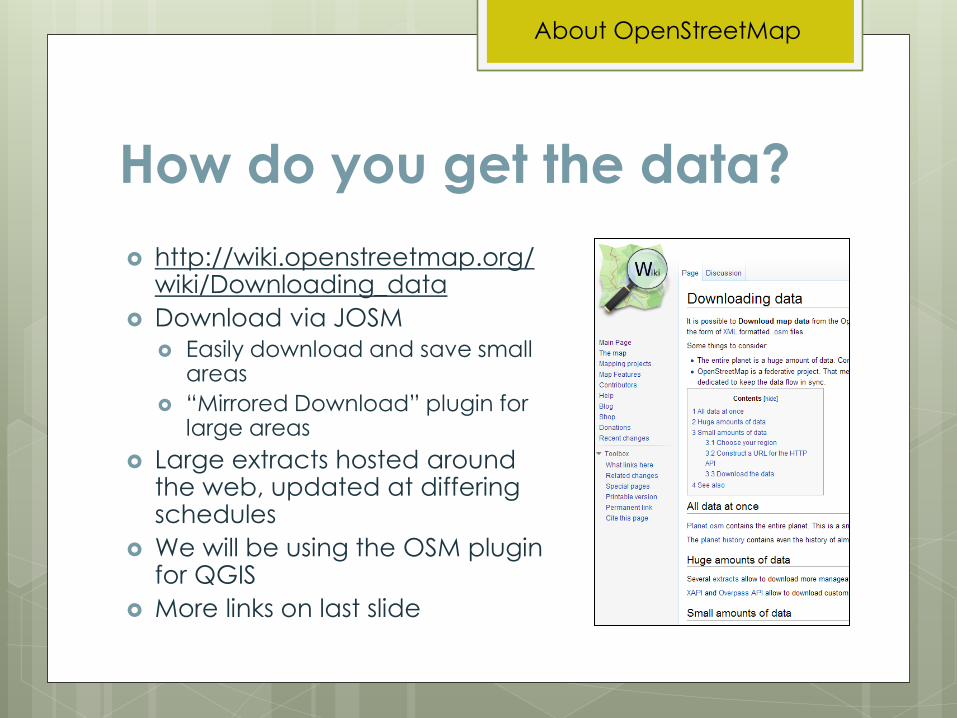
How do you get the data?
http://wiki.openstreetmap.org/wiki/Downloading_data
Download via JOSM
Easily download and save small areas
“Mirrored Download” plugin for large areas
Large extracts hosted around the web, updated at differing schedules
We will be using the OSM plugin for QGIS
More links on last slide
About OpenStreetMap

Editing basics:
Points of interest
Editing Basics

Step 1: Sign up for an account
Go to http://osm.org
Click the “sign up” link in
the top right corner
Set up your account!
Editing Basics

Step 2: Where and what
Congratulations! You are now the owner of one of > 1 million OSM editing accounts!
Go to http://osm.org
Find a neighborhood that you know well
Think about the places that you know about there - local knowledge
Notice anything missing?
Editing Basics
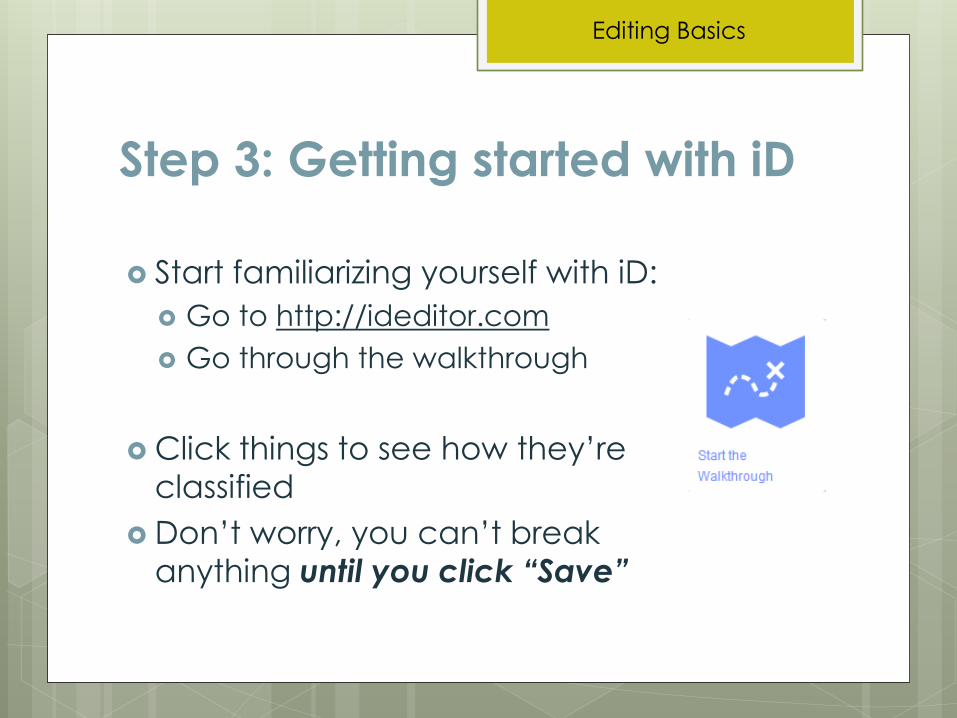
Step 3: Getting started with iD
Start familiarizing yourself with iD:
Go to http://ideditor.com
Go through the walkthrough
Click things to see how they’re
classified
Don’t worry, you can’t break
anything until you click “Save”
Editing Basics
Step 3: Getting started with iD
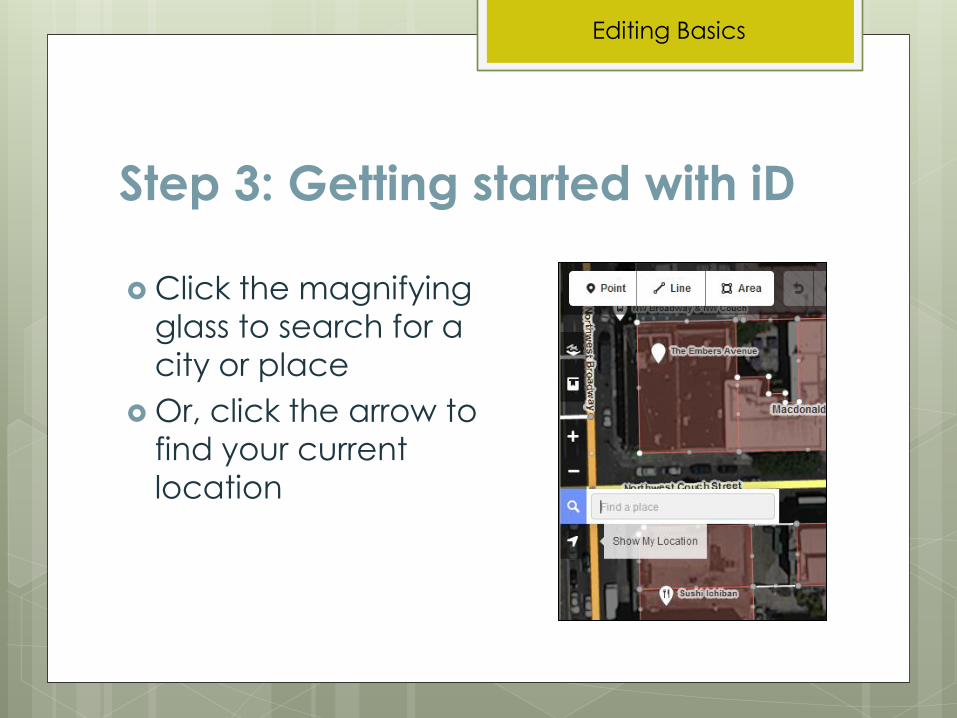
Click the magnifying
glass to search for a
city or place
Or, click the arrow to
find your current
location
Editing Basics
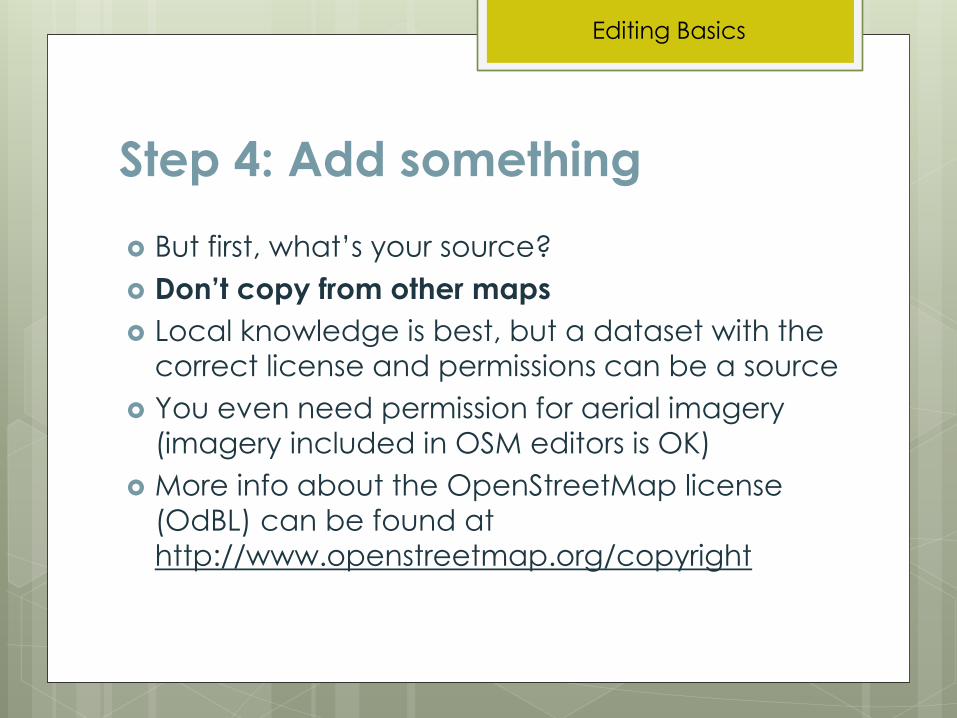
Step 4: Add something
But first, what’s your source?
Don’t copy from other maps
Local knowledge is best, but a dataset with the
correct license and permissions can be a source
You even need permission for aerial imagery
(imagery included in OSM editors is OK)
More info about the OpenStreetMap license
(OdBL) can be found at
http://www.openstreetmap.org/copyright
Editing Basics
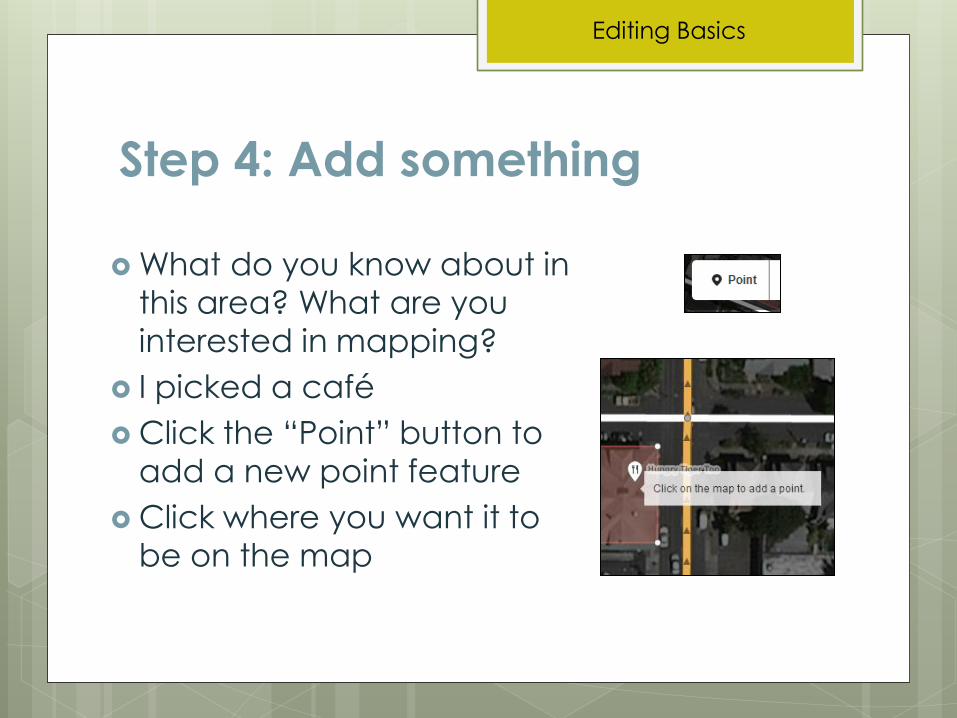
Step 4: Add something
What do you know about in
this area? What are you
interested in mapping?
I picked a café
Click the “Point” button to
add a new point feature
Click where you want it to
be on the map
Editing Basics

Step 4: Add something
Editing Basics
Click or search
the type of
feature to set it
Next, fill in the
details that you
know

Step 5: Save your edits
Editing Basics
Save early, save often
This creates a “changeset” that is sent to the database
Give an informative changeset comment that includes what you were working on and your sources
What imagery are you using? Do you know how to change it?
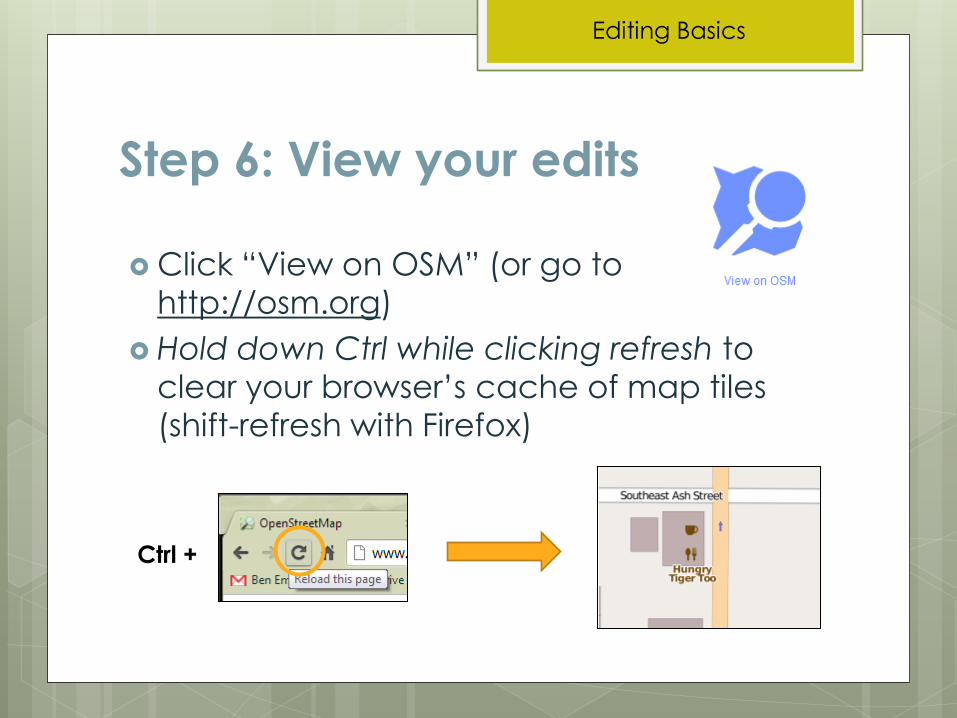
Step 6: View your edits
Editing Basics
Click “View on OSM” (or go to
http://osm.org)
Hold down Ctrl while clicking refresh to
clear your browser’s cache of map tiles
(shift-refresh with Firefox)
Ctrl +

More about editing
Editing Basics
JOSM (Java OpenStreetMap Editor) is another
editor we highly recommend
Not too hard to learn, especially if you’re familiar
with GIS software
http://josm.openstreetmap.de/
Visit http://wiki.osm.org for tagging help, or ask
on the newbies listserv
http://lists.openstreetmap.org/listinfo/newbies
Also check out http://learnosm.org

Getting and Preparing
your OSM Data
Getting OSM Data

Step 1: Get your plugins running
We will be using just QuantumGIS today to limit the
software you needed to install
Make sure that you’ve not only downloaded the
OSM and OpenLayers plugins, but also turned them on (2 steps)
Getting OSM Data
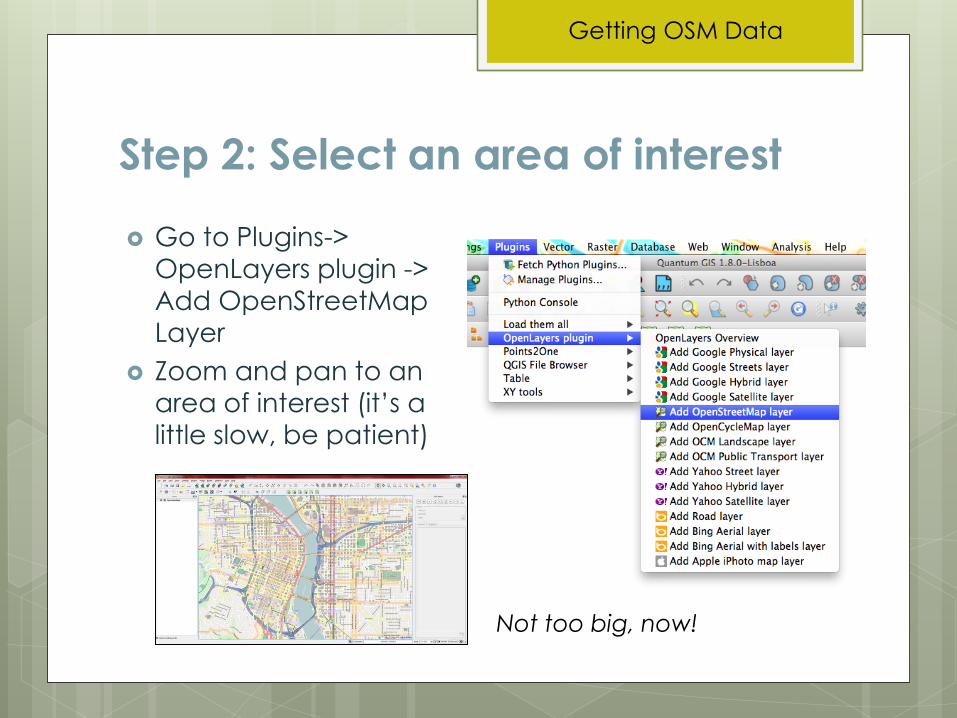
Step 2: Select an area of interest
Go to Plugins->
OpenLayers plugin ->
Add OpenStreetMap
Layer
Zoom and pan to an
area of interest (it’s a
little slow, be patient)
Not too big, now!
Getting OSM Data
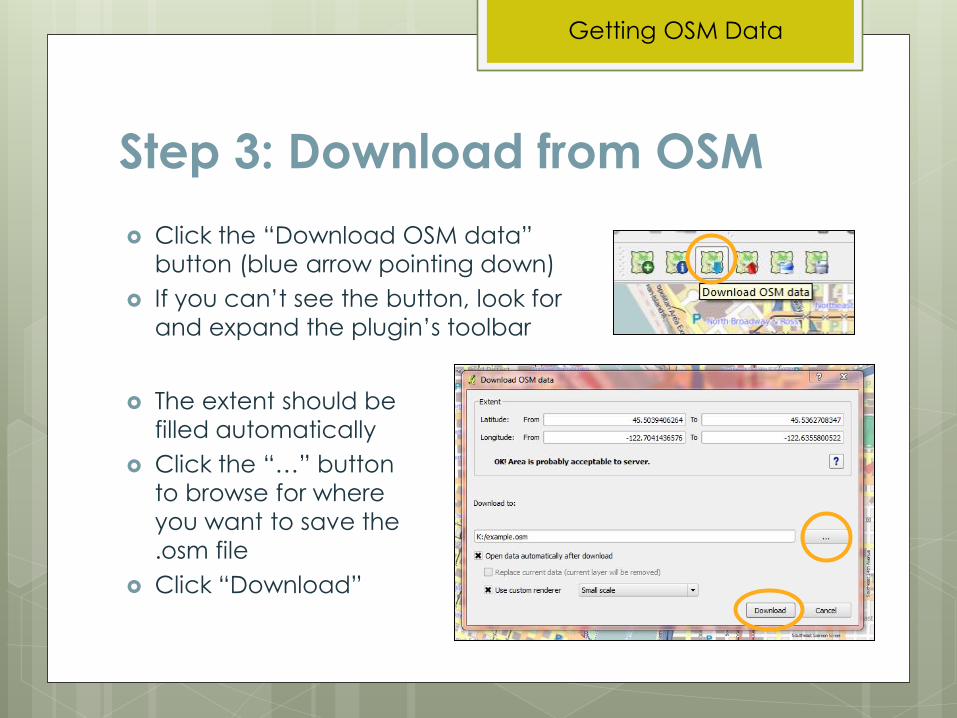
Step 3: Download from OSM
Click the “Download OSM data”
button (blue arrow pointing down)
If you can’t see the button, look for
and expand the plugin’s toolbar
The extent should be
filled automatically
Click the “…” button
to browse for where
you want to save the
.osm file
Click “Download”
Getting OSM Data
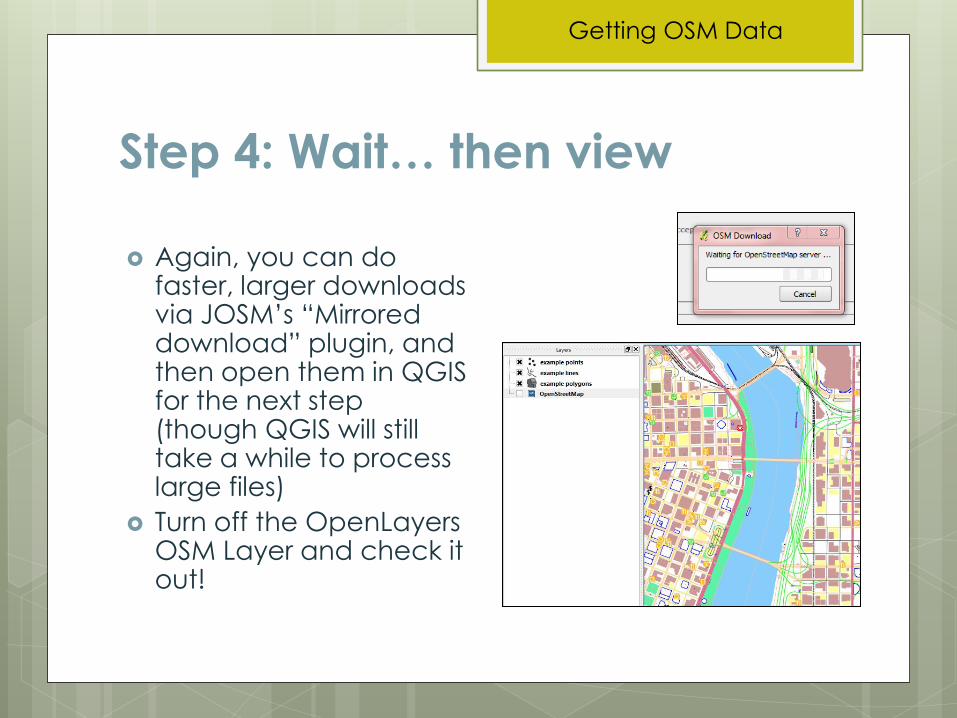
Step 4: Wait… then view
Again, you can do faster, larger downloads via JOSM’s “Mirrored download” plugin, and then open them in QGIS for the next step (though QGIS will still take a while to process large files)
Turn off the OpenLayers OSM Layer and check it out!
Getting OSM Data
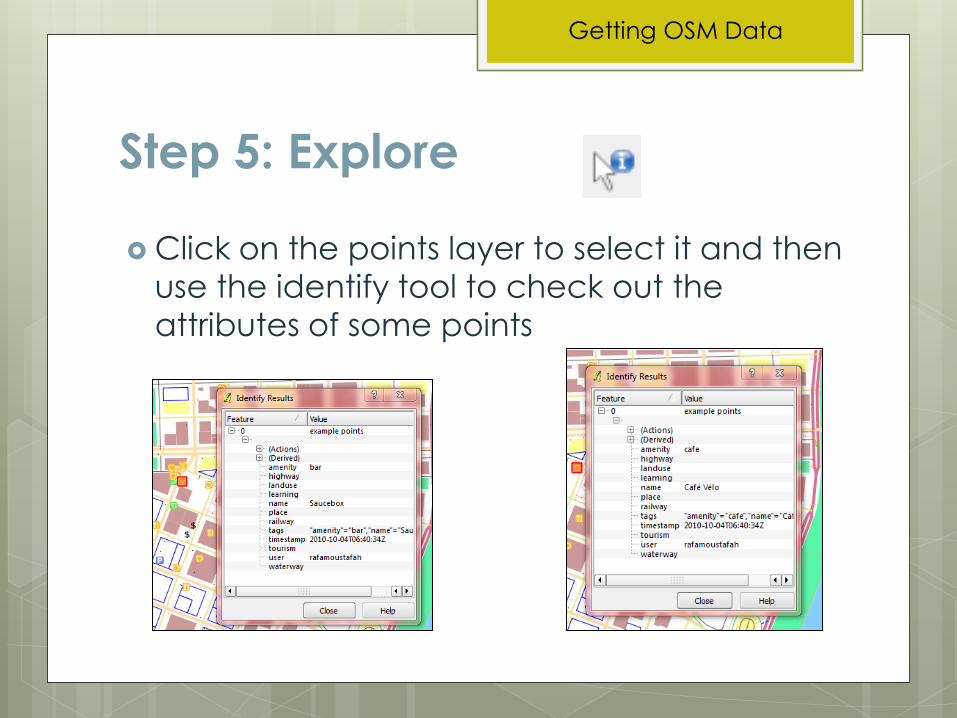
Step 5: Explore
Click on the points layer to select it and then
use the identify tool to check out the
attributes of some points
Getting OSM Data
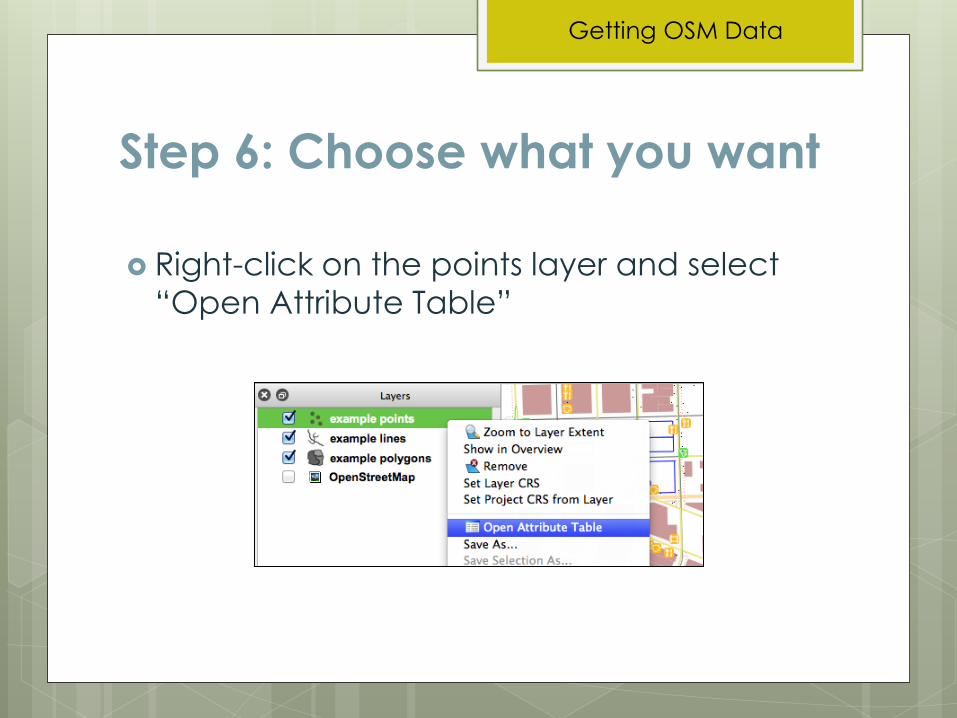
Step 6: Choose what you want
Right-click on the points layer and select
“Open Attribute Table”
Getting OSM Data
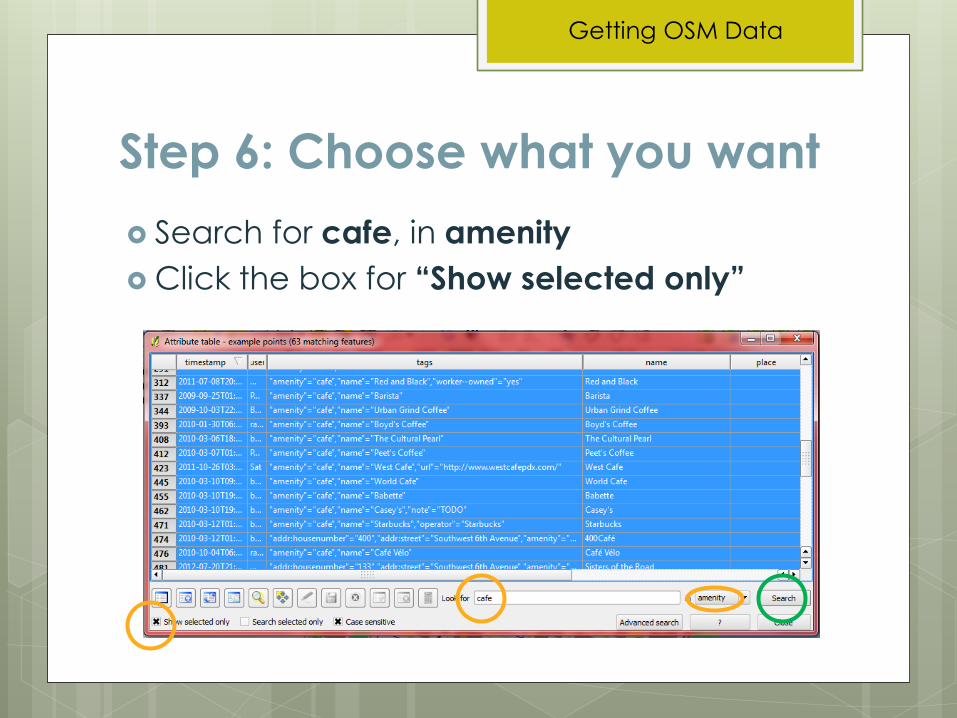
Step 6: Choose what you want
Search for cafe, in amenity
Click the box for “Show selected only”
Getting OSM Data
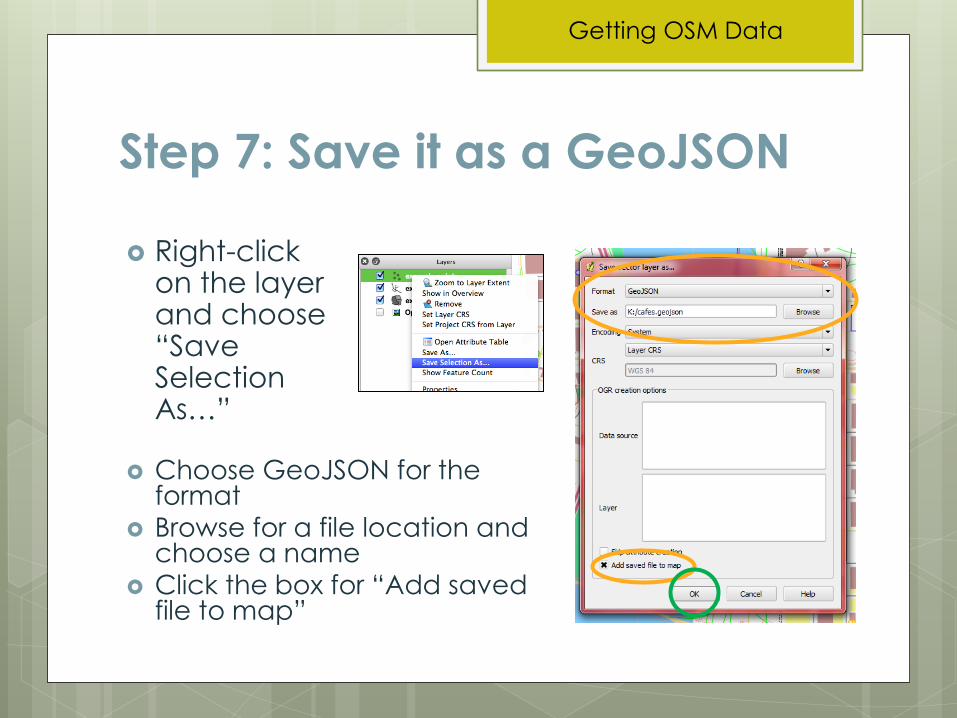
Step 7: Save it as a GeoJSON
Right-click on the layer and choose “Save Selection As…”
Choose GeoJSON for the format
Browse for a file location and choose a name
Click the box for “Add saved file to map”
Getting OSM Data

Step 8: Do it again
Repeat with a different type of POI
Grant and I are here to help!
I’m choosing bars
You can also use the “Advanced search” button to use the Search query builder for more complex queries
Additional tags should be in the ‘tags’ field
Getting OSM Data
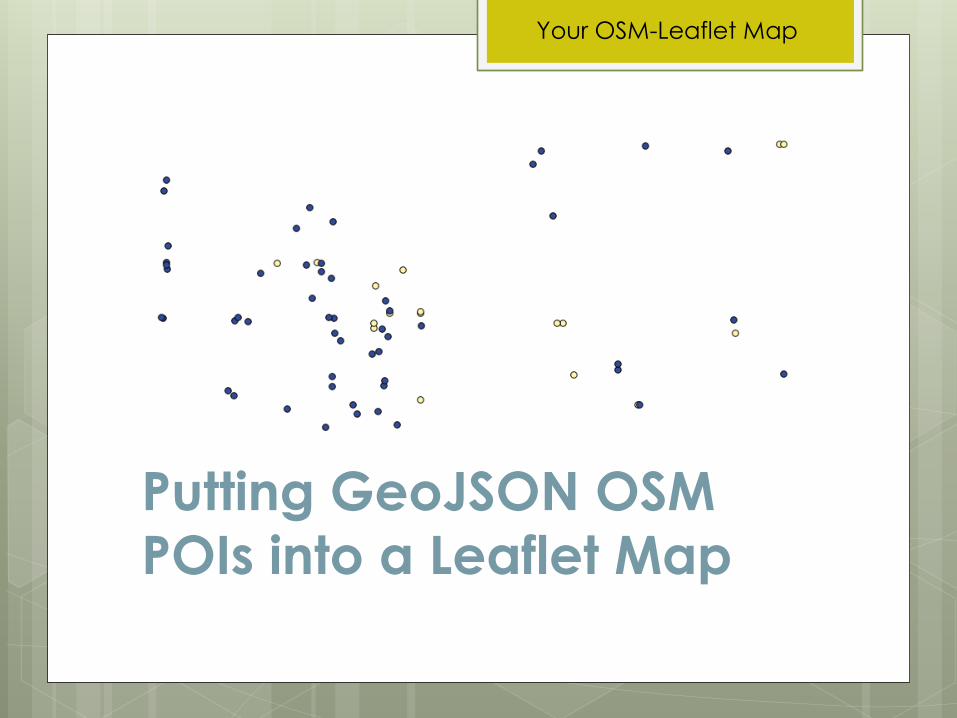
Putting GeoJSON OSM
POIs into a Leaflet Map
Your OSM-Leaflet Map

Step 1: Getting started
Let’s build off of one of Wm’s examples (Exercise 5)
Oh no, the rain is coming! Where are some coffee shops or bars that I can hide out in for a while?
How does the code need to be modified?
Your OSM-Leaflet Map
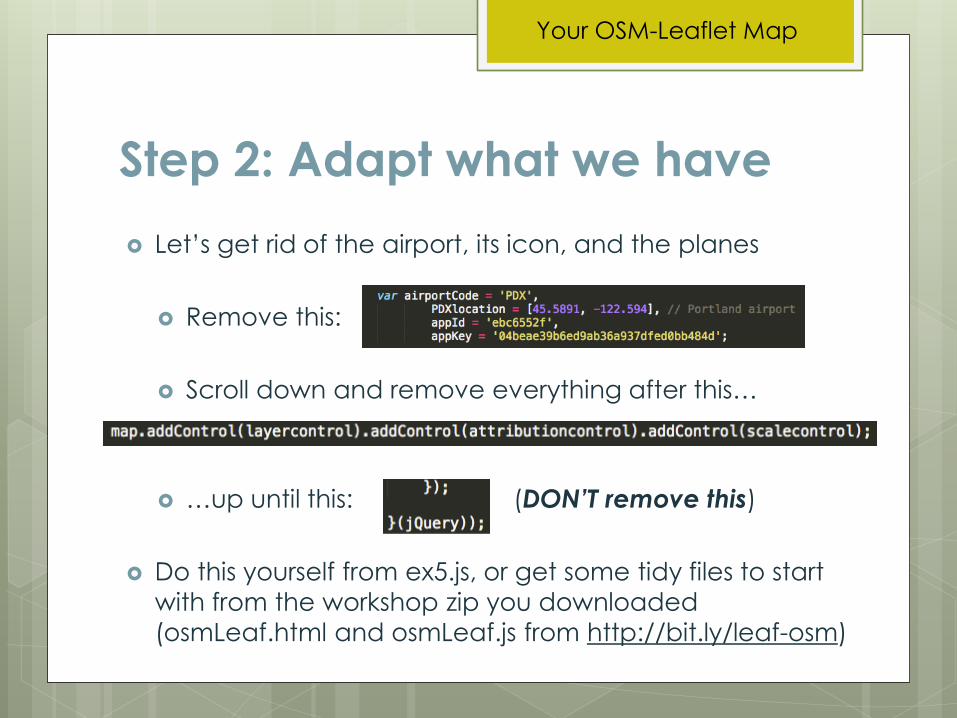
Step 2: Adapt what we have
Let’s get rid of the airport, its icon, and the planes
Remove this:
Scroll down and remove everything after this…
…up until this: (DON’T remove this)
Do this yourself from ex5.js, or get some tidy files to start
with from the workshop zip you downloaded
(osmLeaf.html and osmLeaf.js from http://bit.ly/leaf-osm)
Your OSM-Leaflet Map
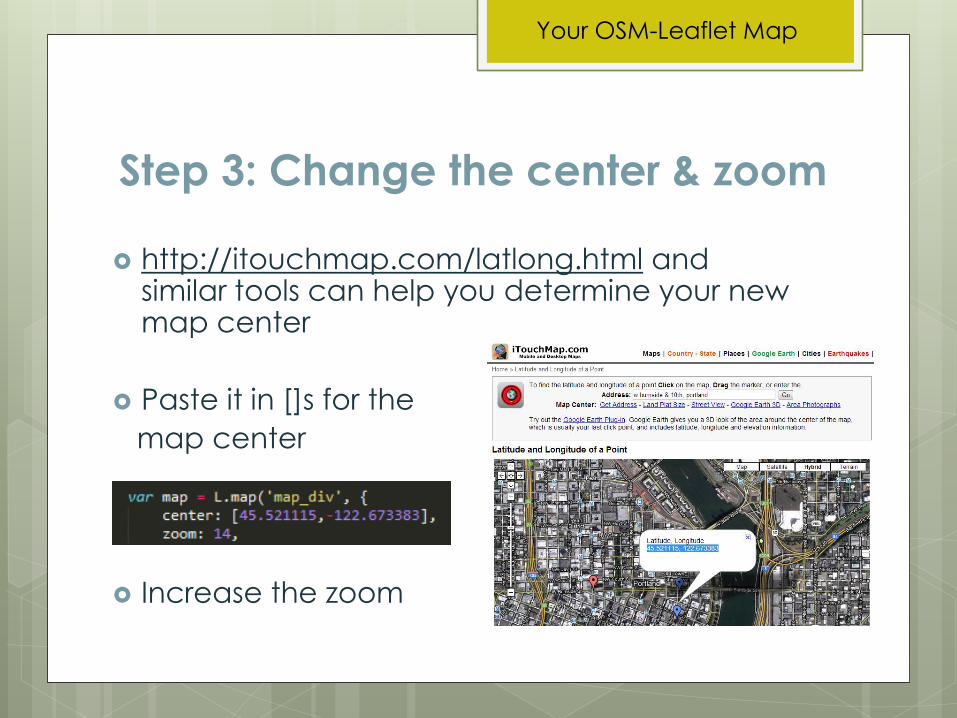
Step 3: Change the center & zoom
http://itouchmap.com/latlong.html and similar tools can help you determine your new map center
Paste it in []s for the
map center
Increase the zoom
Your OSM-Leaflet Map
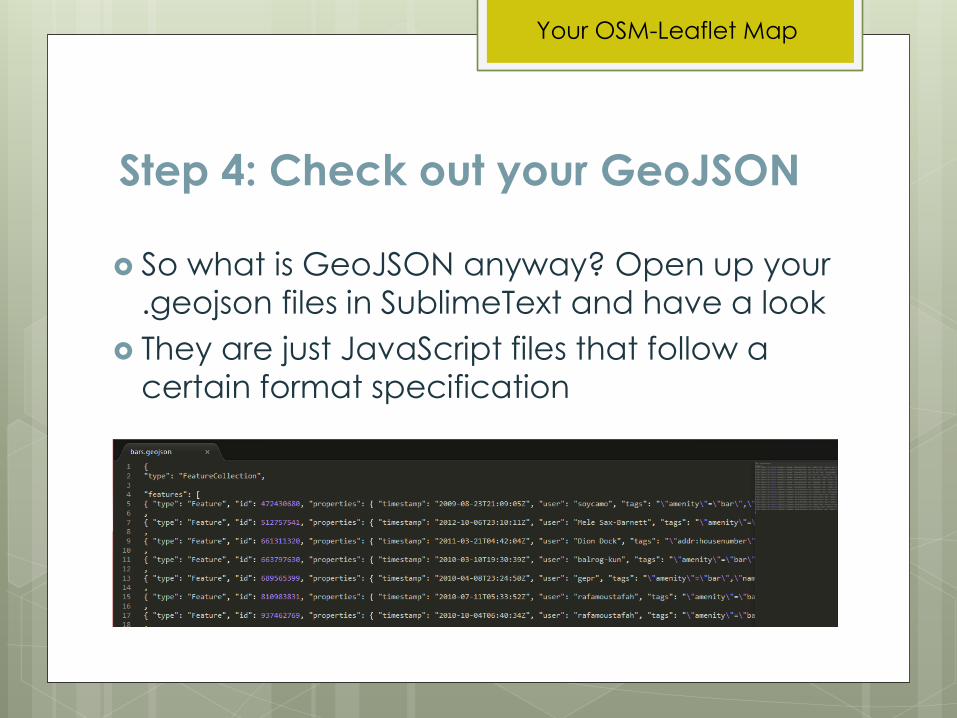
Step 4: Check out your GeoJSON
So what is GeoJSON anyway? Open up your
.geojson files in SublimeText and have a look
They are just JavaScript files that follow a
certain format specification
Your OSM-Leaflet Map

Step 5: First, set up the styles
Let’s make it so we can tell our layers apart
Put this code after … and mimic it for your second dataset
Give the copy a different name and pick a new fillColor (for example, #ff33ff)
Your OSM-Leaflet Map
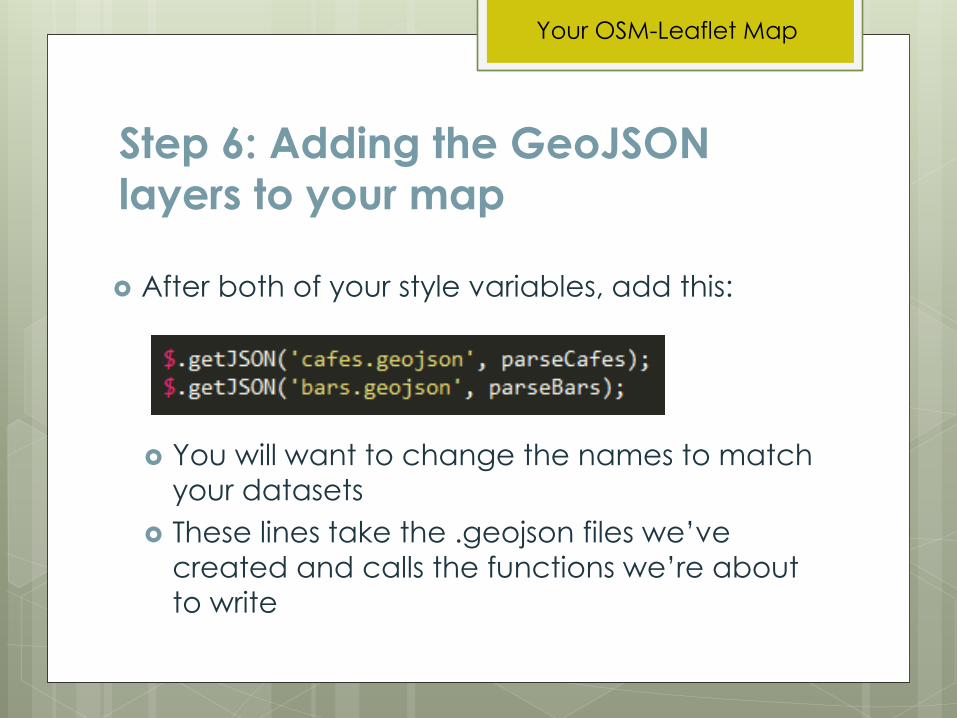
Step 6: Adding the GeoJSON
layers to your map
After both of your style variables, add this:
You will want to change the names to match
your datasets
These lines take the .geojson files we’ve
created and calls the functions we’re about
to write
Your OSM-Leaflet Map
Step 6: Adding the GeoJSON
layers to your map
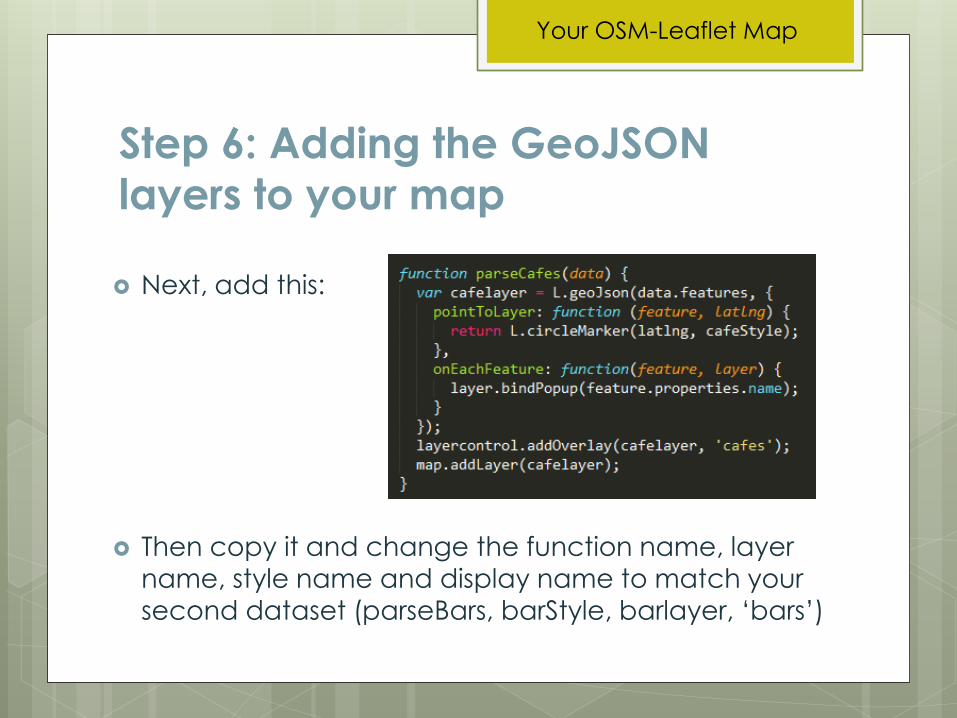
Next, add this:
Then copy it and change the function name, layer name, style name and display name to match your
second dataset (parseBars, barStyle, barlayer, ‘bars’)
Your OSM-Leaflet Map
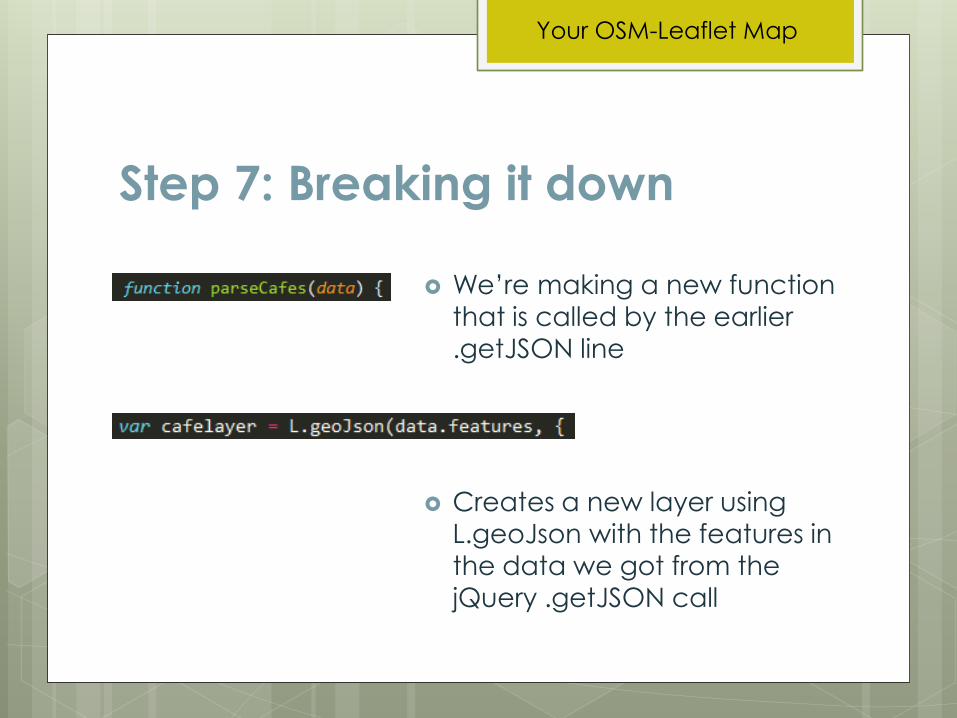
Step 7: Breaking it down
We’re making a new function
that is called by the earlier
.getJSON line
Creates a new layer using
L.geoJson with the features in
the data we got from the
jQuery .getJSON call
Your OSM-Leaflet Map
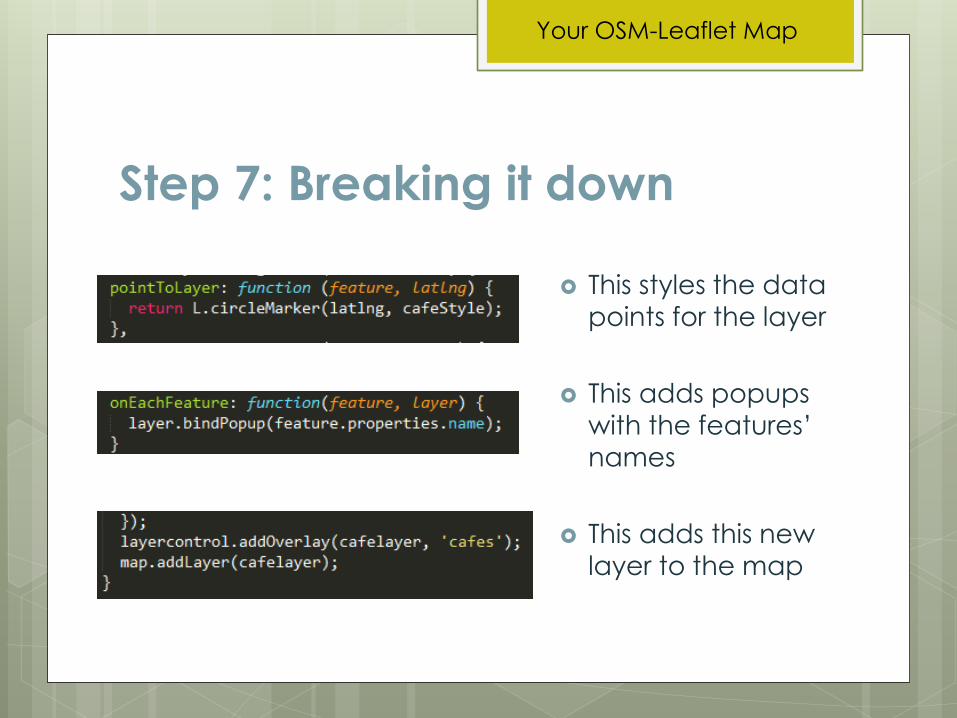
Step 7: Breaking it down
This styles the data
points for the layer
This adds popups
with the features’
names
This adds this new
layer to the map
Your OSM-Leaflet Map
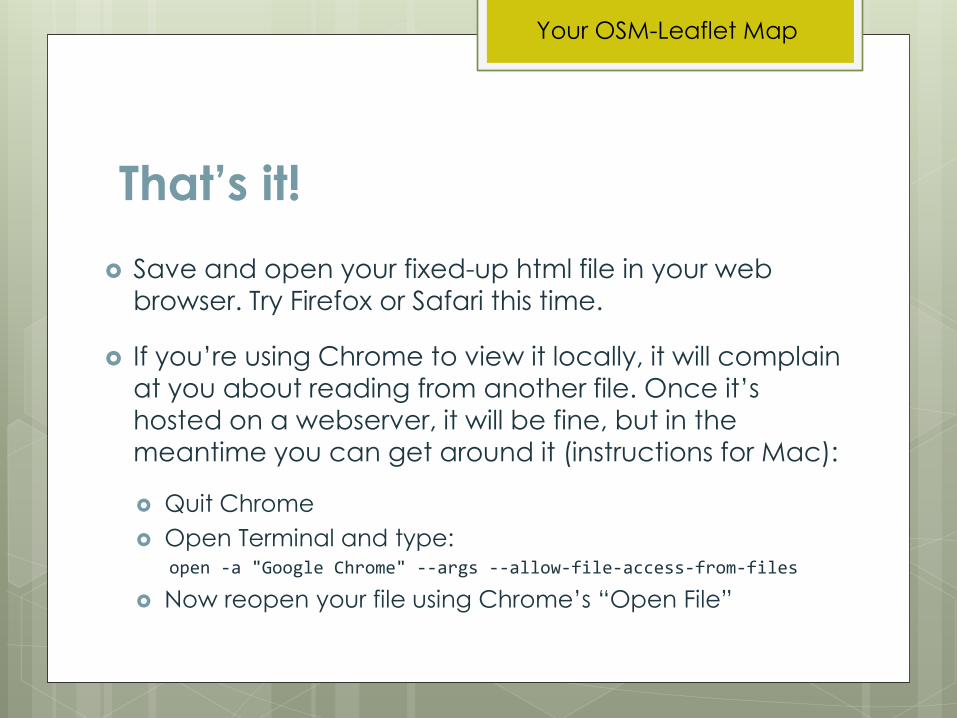
That’s it!
Your OSM-Leaflet Map
Save and open your fixed-up html file in your web
browser. Try Firefox or Safari this time.
If you’re using Chrome to view it locally, it will complain
at you about reading from another file. Once it’s
hosted on a webserver, it will be fine, but in the
meantime you can get around it (instructions for Mac):
Quit Chrome
Open Terminal and type: open -a "Google Chrome" --args --allow-file-access-from-files
Now reopen your file using Chrome’s “Open File”

Looking good!
Your OSM-Leaflet Map
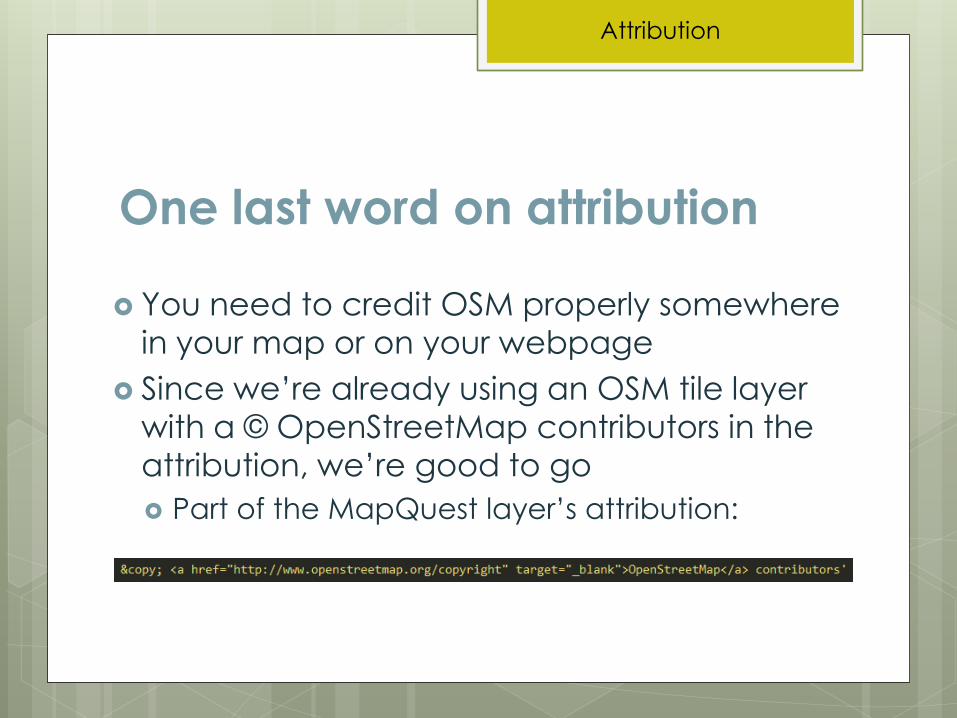
One last word on attribution
Attribution
You need to credit OSM properly somewhere
in your map or on your webpage
Since we’re already using an OSM tile layer
with a © OpenStreetMap contributors in the
attribution, we’re good to go
Part of the MapQuest layer’s attribution:
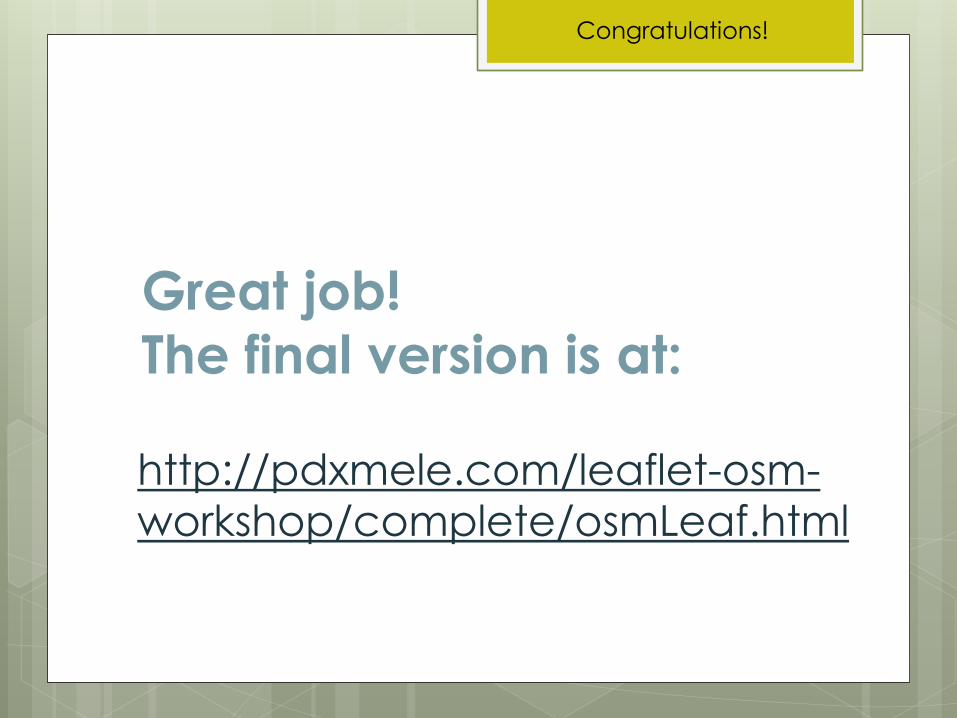
Great job!
The final version is at:
Congratulations!
http://pdxmele.com/leaflet-osm-
workshop/complete/osmLeaf.html
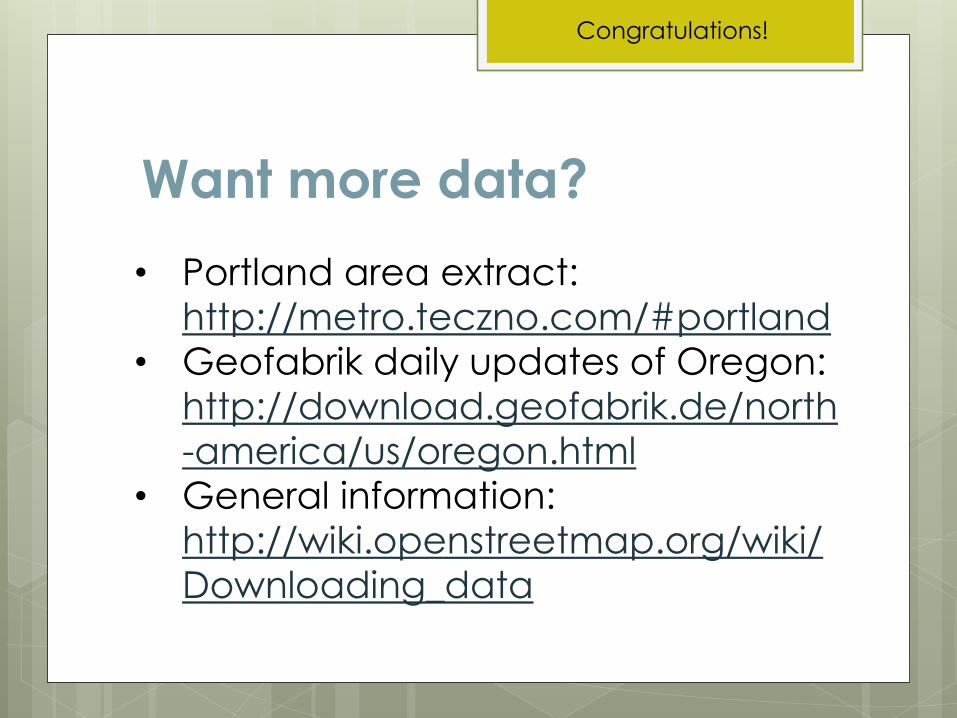
Want more data?
Congratulations!
• Portland area extract:
http://metro.teczno.com/#portland
• Geofabrik daily updates of Oregon:
http://download.geofabrik.de/north
-america/us/oregon.html
• General information:
http://wiki.openstreetmap.org/wiki/
Downloading_data