Part I – For the Float Builder PART I -- For the Float Builderbeverlyfarms.org/Floats.pdf · Part...
33
Part I – For the Float Builder For Float Supplies 5 Visit http://www.victorycorps.com/floats.html’ Or Call 1-800-328-6120 PART I -- For the Float Builder How to Build a Parade Float The noun "FLOAT" is like "parade" in that it can mean many things: A regulating device, a fishing bobber, a life preserver, a barometer gauge, a buoyant dock, a brewing vat, a plasterer's tool, a harrow, and so on. Looking down the list of definitions you will also find: "A flat-topped vehicle without sides for carrying displayed exhibits or objects in a procession; also, such a vehicle with its displayed exhibits or objects." In the business of building floats, a float is often called a "production." The word "float" was probably first used to mean a parade car because that's what a float should seem to do— "float". And it achieves the appearance of floating through its special construction and its embellishments, including the all- important fringe, which hides the wheels and gives it the look of being suspended in the air, gliding along without support. There are schools that offer credits to members of manual training classes for their work in building floats for the hometown parade. Many small business owners build their own float in their garage, keeping it carefully hidden until the day of glory. Some of them have become very adept at this do-it- yourself construction. Clubs have made wintertime projects of building floats. Private individuals with a flair for form and color have made a hobby of designing them. A float is a personal creation. Making a Beginning Making a Beginning Making a Beginning Making a Beginning To begin with, you will need four wheels, attached, of course, to axles, and a framework In some cases, float builders have started with nothing but wheels and axles, sometimes only wheels and one axle. Two-wheeled floats can be found. But the four-wheeled variety is much more stable and easier to work with. Floats may be built on trailers, trucks, cars, wagons — almost anything that can move, even boats, though the chance to build floating floats comes infrequently. Eighty per cent of all floats start with a flat platform: a truck bed or a trailer. If it's a truck, the design should blend the cab into the picture, or the cab may be removed and a special space left for the driver. A small tractor generally pulls a trailer, and that, too, is included in the decorative scheme. Suppose you're planning to build a float, and you already have a trailer. Your next concern is a place for construction, and space of this type is at a premium. If several floats are to be built, the construction site should be a large, open building, preferably without roof- support posts. And with doors large enough for egress. An airplane hangar is the ideal location for float building. In a small town, the lumberyard building generally offers the roominess needed, as well as a good supply of basic materials. Try for Novelty Try for Novelty Try for Novelty Try for Novelty There are a few basic designs, which are always good, with different decorative touches, but you may prefer to try for novelty. You have two elements to work with: shape and color. Too often the effect of a float is spoiled because it sticks too closely to the
Transcript of Part I – For the Float Builder PART I -- For the Float Builderbeverlyfarms.org/Floats.pdf · Part...

Part I – For the Float Builder
For Float Supplies 5Visit http://www.victorycorps.com/floats.html’Or Call 1-800-328-6120
PART I -- For the Float BuilderHow to Build aParade FloatThe noun "FLOAT" is like "parade" in that itcan mean many things: A regulating device, afishing bobber, a life preserver, a barometergauge, a buoyant dock, a brewing vat, aplasterer's tool, a harrow, and so on. Lookingdown the list of definitions you will also find:"A flat-topped vehicle without sides forcarrying displayed exhibits or objects in aprocession; also, such a vehicle with itsdisplayed exhibits or objects."
In the business of building floats, a float isoften called a "production." The word "float"was probably first used to mean a parade carbecause that's what a float should seem todo— "float". And it achieves the appearance offloating through its special construction andits embellishments, including the all-important fringe, which hides the wheels andgives it the look of being suspended in the air,gliding along without support.
There are schools that offer credits tomembers of manual training classes for theirwork in building floats for the hometownparade. Many small business owners buildtheir own float in their garage, keeping itcarefully hidden until the day of glory. Someof them have become very adept at this do-it-yourself construction. Clubs have madewintertime projects of building floats. Privateindividuals with a flair for form and colorhave made a hobby of designing them. A floatis a personal creation.
Making a BeginningMaking a BeginningMaking a BeginningMaking a BeginningTo begin with, you will need four wheels,attached, of course, to axles, and a frameworkIn some cases, float builders have started withnothing but wheels and axles, sometimesonly wheels and one axle. Two-wheeled floatscan be found. But the four-wheeled variety ismuch more stable and easier to work with.
Floats may be built on trailers, trucks, cars,wagons — almost anything that can move,even boats, though the chance to buildfloating floats comes infrequently. Eighty percent of all floats start with a flat platform: atruck bed or a trailer. If it's a truck, the designshould blend the cab into the picture, or thecab may be removed and a special space leftfor the driver. A small tractor generally pulls atrailer, and that, too, is included in thedecorative scheme.
Suppose you're planning to build a float, andyou already have a trailer. Your next concernis a place for construction, and space of thistype is at a premium. If several floats are to bebuilt, the construction site should be a large,open building, preferably without roof-support posts. And with doors large enoughfor egress. An airplane hangar is the ideallocation for float building. In a small town,the lumberyard building generally offers theroominess needed, as well as a good supply ofbasic materials.
Try for NoveltyTry for NoveltyTry for NoveltyTry for NoveltyThere are a few basic designs, which arealways good, with different decorativetouches, but you may prefer to try for novelty.You have two elements to work with: shapeand color. Too often the effect of a float isspoiled because it sticks too closely to the
Part I – For the Float Builder
For Float Supplies 6Visit http://www.victorycorps.com/floats.html’Or Call 1-800-328-6120
practical outlines of the vehicle on which itwas built. The idea is to mask theunderpinnings completely by varying theoverall shape, by working curves and swirlsinto the ground plan, and developing animaginative topside form . Almost every floathas a climactic point: the place where thepersonalities ride, or the massive emblem ismounted, or an animated figure goes throughits paces. The upper levels of the float areshaped to lead the eye to this point.
Once you have established your design, youfill out the ground outline with plain, lightlumber, cut in whatever curves are necessary,and fastened securely with nails or bolts tothe trailer bed. When your lateral shape is set,the vertical outlines, transverse,fore,-and-aft,are cut in plywood or wallboard and securelymounted. If your float is to carry live figures,platforms for them must be rigidly built andprovided with unobtrusive braces for floatriders to hold on to. If several riders are topopulate the float, they should be placed attwo or three different levels, highest at therear and center. Any float should besymmetrical, one side the same as the other.The sidewalk-bound onlooker will get noopportunity to move around and look at anymysteries on the other side.
In all this construction, you make allowancefor wheel clearance, springing, and theturning radius of the float. You shouldinspect the parade route to note any bumpsor depressions for which allowance must bemade, so your float doesn't scrape a forwardor rear overhang. If the float is on a truck, seeto it that no flammable material is near thehot exhaust line. You may decide to rig aspecial extension to carry exhaust beyond theoverhang. It's advisable, and it's wise, too, towrap the exhaust pipe to increase the safetyfactor.Having come this far, you have the skeletonof a float or basic framework, undecorated,
only partially shaped. Next you round out theshape, to form it into curves and hollows, orto give it that streamlined look. Perhaps partof the exposed portion of your float is solidmaterial, woodcut to shape, or plaster. Thesesurfaces should be painted before any of theother finishing material is added. You mightsprinkle or glitter over the freshly paintedsurfaces to give these an eye-catching sparkle.
Putting on the FinishPutting on the FinishPutting on the FinishPutting on the FinishMany special decorative shapes are availablealready molded in heavy materials exclusivelyfor float use. To the outline, after the exposedportions are painted, attach any of a numberof finishing materials—vinyl or metallic floralsheeting, in a rainbow of colors, or withdesigns worked in; aluminum foil paper, alsoin many colors, used flat or crumpled beforeapplication to increase its light-scatteringproperties, sparkle sheeting, or any other ofvarious finishes which may catch your eye.Artificial flowers, or real ones, may beattached, as may stars, crescents or otherappropriate decorative cutouts..
Part of your float may require mats, or vinyland metallic twists to accentuate its lines.Your choice is wide. The materials you selectare applied with special adhesives or staplingdevices. And the finish itself is subject tosome corrective shaping to get exactly theoutline you want.
Metallic or vinyl fringe goes around thebottom of the vehicle to mask the runninggear. A float is generally built with its bottomlevel spaced from the pavement to suit thelength of the fringe. If a fifteen-inch fringe isused, the float edge is built fifteen inchesfrom the pavement. With a one-inch overlapfor fastening, this allows a one-inch clearance,just right to create the illusion of floating.

Part I – For the Float Builder
For Float Supplies 7Visit http://www.victorycorps.com/floats.html’Or Call 1-800-328-6120
You now have a standard float which, it yourestimate of limitations is correct, is ready togo into the parade.
The Animated FloatThe Animated FloatThe Animated FloatThe Animated FloatThe standard float, without decorativesidecars, has some noteworthy cousins ofmore elaborate design. Animated floats havebeen built more and more cleverly each year.Fish blow bubbles, figures walk, dogs pullsleds, waterwheels turn, windmills revolveand mannequins play music.
These involve a basic departure in thebuilding of a float; the groundwork for apowered float is at least twice that of theconventional production. The mechanizedequipment must be built, installed, tested andanchored. It must stand the strain of trafficbefore the rest of the work goes forward.Endless belts, gear trains, eccentricmechanisms—virtually every transmissiondevice has been used in float animation. Whatmakes the whole idea possible is the portablepower generator, and its installation involvesstill more wrinkles in basic float design.Provisions must be made for safelyexhausting the small but efficient gas engineswhich run them. The design must also allowplenty of ventilation, since most of theseengines are air-cooled.
The wiring that goes into some animateddesigns may be complex, and should beinstalled and tested when the float is in theframe state. There will be little opportunity tomake changes after the production isdecorated. In some cases, animation ispowered by a driveshaft clutched and geareddirectly to a gas engine, eliminating wiring.Gas - electric power permits greater control.Occasionally power engines must beadditionally muffled to prevent discord withthe music of a following band, or just to maskthe obvious.
Float design should allow for wind pressure,and internal bracing should guarantee thatsurfaces exposed to gusts of wind aren'tdamaged. Above all, with a powered float,make sure that its working parts areaccessible for repair from the inside. Many afloat sponsor has had his day ruined bylearning that a spark plug couldn't bechanged without breaking through thedecorative capsule, necessitating additionalrepairs. Some sponsors insist that a float-builder be on hand, with materials, as aparade is about to start, to make decorativerepairs quickly in case of minor accident.
What Colors?What Colors?What Colors?What Colors?Too many builders, particularly those withlimited experience, worry about color. Fewcolors will clash on floats. The materials arebrilliant and more likely to accent the hues ofother materials than to cause discord. Pastelsare used more and more in float decoration,chiefly to set off strong colors, and it is inpastels that conflict is most likely. Don'timitate Christmas and do the job up inconventional red and green, but strive fornovelty. You may find your color scheme inthe theme of your parade, or in the idea ofyour float itself.
Some nationality groups with stronginfluences in parade cities prefer particulargroups of colors, perhaps those of their old-country flags. Some of the new metallicmaterials, and the neutral plastics, make colorselection unnecessary. It's show and glitteryou're after, and the golds and silvers have it.A patriotic parade has a general color schemealready established.
Presented By Victory CorpsMinneapolis, MNTel: 1-800-328-6120Email: [email protected]://www.victorycorps.com

8
Basic Steps of Parade Float ConstructionBasic steps of construction for a 7’ X 20’ parade float on a 4-wheel trailer chassis
Width between bolster stakes will vary ondifferent makes of trailers. Build 2” X 10”base frame (stringers and spreaders) to fitbetween bolster stakes of trailer being used
Place trailer chassis on level surface
Step 1
2” X 4” brace blocks2” X 10” stringers
2” X 10” spreaders
1” X 4” X bracesBolt frame to bolster stakes Step 2
Use 2” X 12” lumber for stringers and spreaderson floats over 25’ long
Nail 2” X 4” joiststo stringers
2” X 4” joists
2” X 4” stud tiesat front and rearof frame
Step 3
Extend reach bar toget desired wheel-base

9
PLAN STEP 1
9’ 10”3’ 6”
PLAN STEP 216’ 2”
3’ 6”
PLAN STEP 3
7’ 0” 16’ 2”

10
Floor in trailer platform with 1” X 6” boards(wider boards may be used if desired)
Nail boards to2” X 4” studs
Step 4
Nail apron to trailer platform
1” X 2”3. Remainingmeasurement is heightto build apron framework
2. Deduct 15”to allow for fringe drop
To determine apron height:1. Measure distance between top Step 5of trailer platform and ground
Nail cross membersbetween apron sidesand brace them to2” X 10” stringers
Apron braceLower cross member on apron front frameis elevated to allow for trailer tongue clearance Step 6
Ground line

11
PLAN STEP 4
16’ 2”7’ 0”
PLAN STEPS 5 –6
20’ 0”7’ 3”
2’ 1” 3’ 4” 1’ 3”
STEP 7
Overlap succeedingsheets at least 1”or more
Pin overlapping sheetstogether where materialjoins over open framework
Starting at theback, staplefloral sheets toapron frame
12
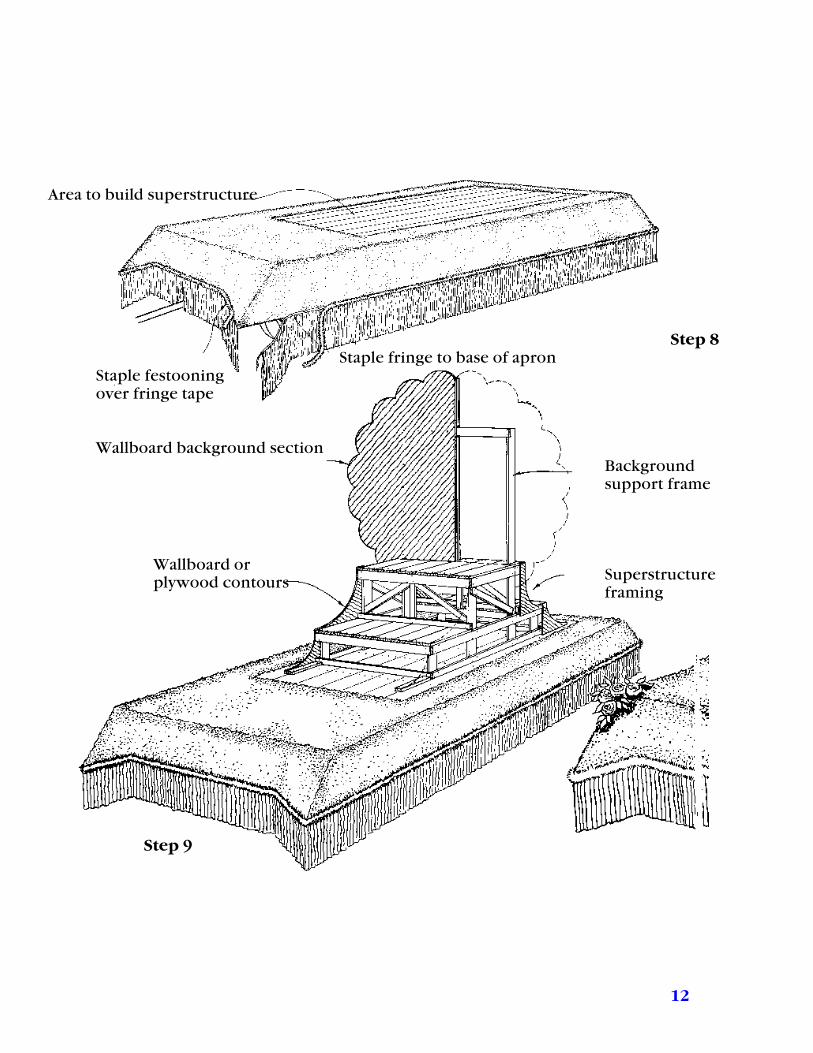
Area to build superstructure
Step 8 Staple fringe to base of apron
Staple festooningover fringe tape
Wallboard background sectionBackgroundsupport frame
Superstructureframing
Step 9
Wallboard orplywood contours

13
Step 10

14
WALLBOARD OR PLYWOOD CONTOURS
A variety of float bed designs maybe made from the basicconstruction by the use of cut-outcontour shapes of wallboard orplywood.
Nail 1” X 2” cross members between contours. Nailbraces to these members from 2” X 10” stringers.
15
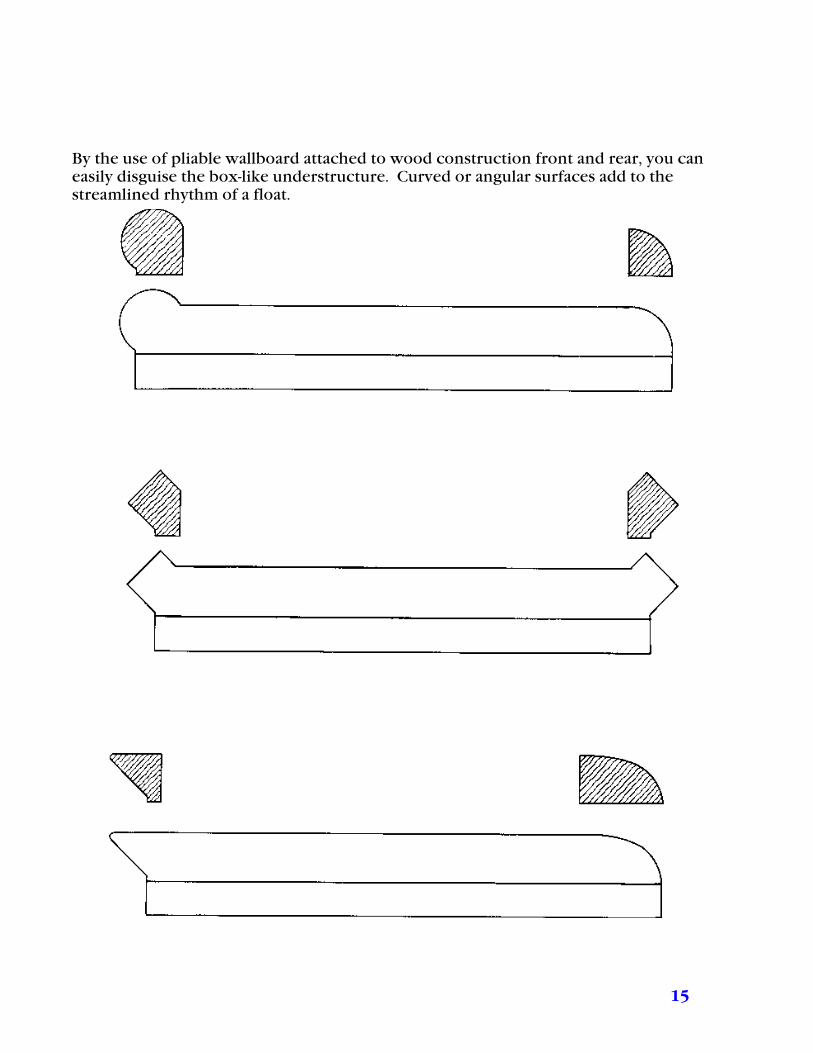
By the use of pliable wallboard attached to wood construction front and rear, you caneasily disguise the box-like understructure. Curved or angular surfaces add to thestreamlined rhythm of a float.

16
EXAMPLES OF SUPERSTRUCTURE
By the employment of simple geometric shapes basedupon the triangle, the circle, and the rectangle, interestingelevations can be designed. Long flowing lines, curved orangular, help give your float a feeling of architectural scale.

17
EXAMPLES OF SUPERSTRUCTURE

18
FLOAT DESIGNS VIEWED FROM THE FRONT
Parade audiences are curious to see the float next in line. The front elevation must,therefore, be given careful thought. Simple geometric shapes are the basis of many interestingvariations.

19
WATER PARADES: BARGE AND FLOAT CONSTRUCTION
A barge, 8’ wide and 20’ long, suitable for carrying a float display on water, such as those picturedon this page, can be made with four 50-gallon drums and a wooden framework(Ill. No. 1).
Floats to be displayed in a water parade are constructed in the same manner as for a street paradewith two exceptions: the barge (ill. No. 1) replaces the four-wheel trailer and the apron around thefloat is eliminated entirely.
Construction is started by building a flat platform the size of the barge, upon which the frame forthe superstructure is built, the same as you would on a trailer platform. After construction, thefloat can be completely decorated, except for the fringe, and stored until the day it is to be enteredin the parade.
The procedure for assembling a water parade, as outlined by the directors of the “Venetian WaterParade” at Ladysmith, WI, is as follows:
� All barges are placed on the shore nearthe water.
� The float displays are transported fromthe storage to the assembly area onlarge flatbed trucks.
� The floats are transferred off the trucksonto the barges by the crew ofassembly men.
� The floats are then fastened securely tothe barges with wire and the fringe is stapled around the edges of the float platforms.
� A mobile boom crane, fitted with a durable cable sling that is looped around undereach end of the barges, is used to lift the assembled units off from the shore and placethem out on the water.
� Each float is then tied to an outboard motor boat (as in ill. No. 2) and taken to the line-up area where it is anchored until parade time.

20
BASIC CONSTRUCTION OF A FLOAT FRAME FOR A FLAT BED TRUCK
1 x 4
7’ 10 ½”
2” x 4”
4’ 3”
1” X 4”“X” brace
Wire frame to bumper

21
8’ 0”
3’ 0”
1’ 3”2” lattice 1 x 2 apron frame

22
CAMOUFLAGING THE TRUCK FORM
Wallboard cutouts can be used to hide the truck cab and also to produce asweeping shape at the rear of the platform. Many variations are possible.

23
APPLICATIONS OF FLORAL SHEETING
Floral sheeting, the most widely used of all the float covering materials, is a product especiallymanufactured for decorating parade floats. This material, made in a variety of colors, hashundreds of tissue floral petals glued on a cloth backing, giving it a thick, soft, fluffyappearance. This material is produced in sheets approximately 1 yard square and can be cutinto pieces and joined together again with pins without the seams showing.
1. After unpacking sheets, “fluff” out petalsby shaking, as you would a rug.
4. To pin sheets together, where theunder side is inaccessible to punchpin back through the material withyour fingers (such as chicken wireforms, etc.), use an ice pick to guidethe pin as shown in illustrations A-B-C-D.
A. Push pin through material2. Floral sheeting may be torn into narrower
pieces, tearing down the narrow weave ofthe cloth backing as illustrated. Use scissorsfor all other cuts.
B.Push ice pick through
material
C.3. [A] Starting at the back, staple floral sheets
to apron frame.[B] Overlap succeeding sheets at least 1” Use ice pickor more. to guide the[C] Pin overlapping sheets together where pin backmaterial joins over open Aframework. D.
Pin
CB
Chicken wire foam

24
FOIL PAPER FOR DECORATING PARADE FLOATS
Foil paper is aluminum foil with a paper backing. This should be applied to solid surfaces such aswallboard, wooden platforms, etc.
After crinkling foil, staple securely tosolid surfaces of float.
Foil paper with a strong cloth backing is producedunder the trade-name “Sparkle Sheeting.” Thiscloth-backed material is made for use over openframework, or it may be pinned onto irregularforms such as chicken wire contours.
.
5. Open the folds and lightlysmooth out the foil paper.It will then have a crinkly,sparkling appearance.
7. Staple the edges down and then staple at random over theentire surface of the foil paper to hold it down securely.
Nail wallboard, boxboard, orplywood over open framework tomake a solid surface for staplingon foil paper
1.Unroll foil paper
2. Fold foil downlength at centerbut do not creaseon the fold.
3. Repeat folddown the length offoil paper. Foldedlength should nowbe about 6½” wide.
4. Using bothhands, crush papertogether down theentire length offoil.
6. Fold underthe edges alongthe length of foilpaper.

25
TINSEL FLITTER AND DIAMOND DUST
Many effects may be achieved with these sparkling products. Gold, silver, or colored tinselflitter gives a glittering, diamond-sparkle to stars, cut-out letters, figures, etc. A beautiful,snowy, sparkling appearance may be had by using white diamond dust over white or light-colored paints.
Tinsel flitter and diamond dust may be applied with one of the following adhesives:
� White latexadhesive
� Shellac � Glue
� Waterglass � Paint
1. Place object to be flittered on a large piece of paper.Apply a coat of adhesive on the portion of the objectto be flittered, such as on the outline edge of a letteror over the entire face of a cut-out star.
2. Sprinkle the flittergenerously into thewet adhesive.
4. Pour the surplusflitter on the paperback into thecontainer
3. Lift the object and shake off the surplus flitteronto the paper. Lay object aside until adhesive is dry.

26
THE APPLICATION OF CUT-OUT LETTERS TO FLOAT APRON
1. Arrange letters on floatplatform above the apronside to determine spacing.
2. Hold a letter against apron side so there isequal space above and below it.
3. Measure space between lower apron andboard and bottom of letter.
8. After all letters have been fastened to float, remove guideline string and pull nails.
4. Mark this measurement at each end ofapron and drive nails at these points.
5. Tie a string tightlybetween nails. This is thelettering guide line.
6. To fasten cut-outwallboard letters, placebottom of letter alongguide line string and nailto center board of apron
7. To fasten cut-out letters of floral sheeting or foilpaper:(a) Apply a coat of adhesive
to back of letter.
(b) Place bottom of letteralong guide line string andpress firmly over entireface of letter until itadheres to float.

27
FLORAL CAR DECORATION
Width: build frame so that there is aslight clearance on front wheels whenthey are fully turned to the right and left.
Splice long piecesif necessary
Length: Build frame to fit outside of bumpers
Base frame
Base frame is hung from supportsacross front and rear bumpers
1 x 4 1” X 2” tiebraces acrossframe corners
Hang base frame from bumpers as shown in illustration [A] or [B].[A] For cars with bumpers close to body[B] For cars with bumpers extended out from body
Pad between allparts of framethat may rubon car body
1 x 4 1 x 4 legs 1 x 4
Wire support cross-Nail plate support to legs hangers to bumper beamso that bottom of frame 1 x 4will be 15” off from the Ground line legsground
28
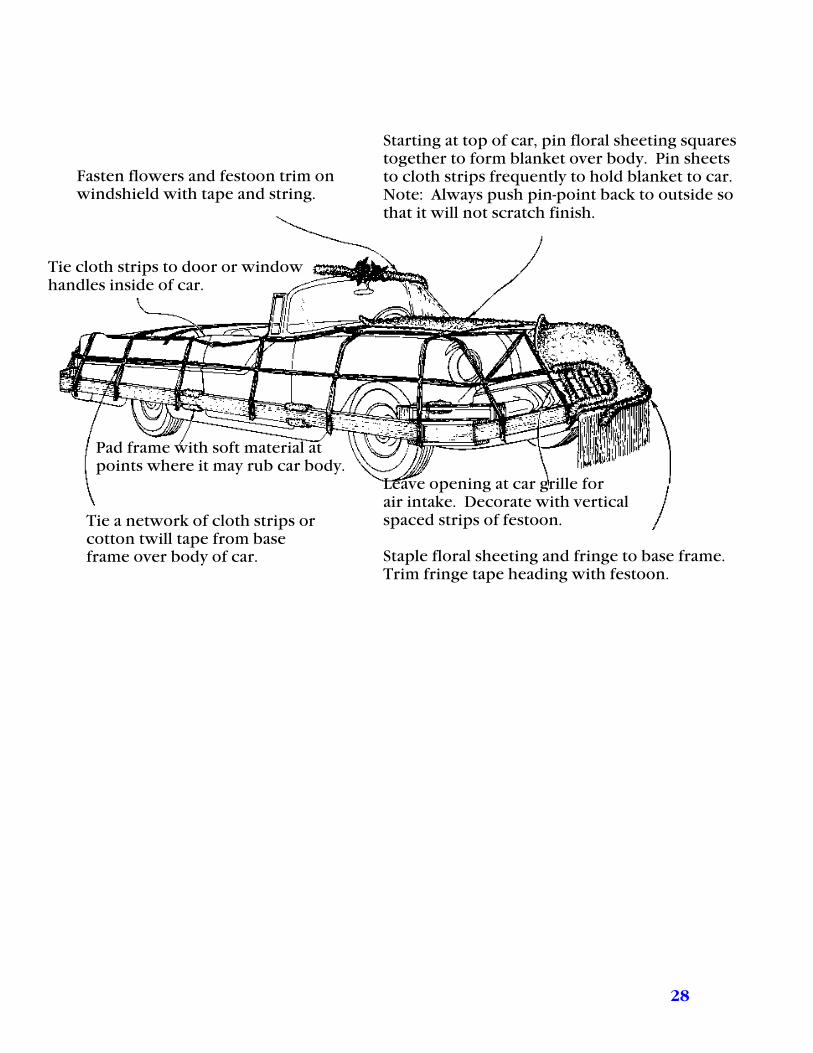
Starting at top of car, pin floral sheeting squarestogether to form blanket over body. Pin sheetsto cloth strips frequently to hold blanket to car.Note: Always push pin-point back to outside sothat it will not scratch finish.
Tie cloth strips to door or windowhandles inside of car.
Pad frame with soft material atpoints where it may rub car body.
Leave opening at car grille forair intake. Decorate with verticalspaced strips of festoon.
Staple floral sheeting and fringe to base frame.Trim fringe tape heading with festoon.
Fasten flowers and festoon trim onwindshield with tape and string.
Tie a network of cloth strips orcotton twill tape from baseframe over body of car.
29
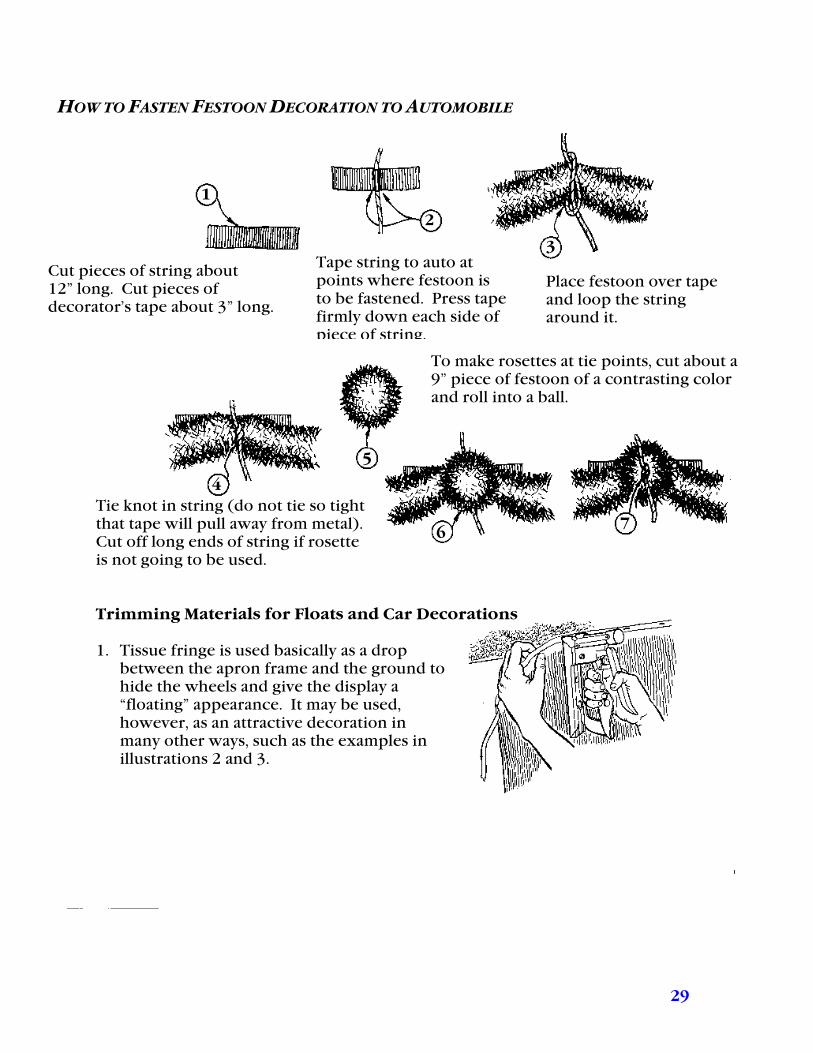
HOW TO FASTEN FESTOON DECORATION TO AUTOMOBILE
Cut pieces of string about12” long. Cut pieces ofdecorator’s tape about 3” long.
To make rosettes at tie points, cut about a9” piece of festoon of a contrasting colorand roll into a ball.
Tie knot in string (do not tie so tightthat tape will pull away from metal).Cut off long ends of string if rosetteis not going to be used.
Trimming Materials for Floats and Car Decorations
1. Tissue fringe is used basically as a dropbetween the apron frame and the ground tohide the wheels and give the display a“floating” appearance. It may be used,however, as an attractive decoration inmany other ways, such as the examples inillustrations 2 and 3.
6
5
7
4
1
2
3Tape string to auto atpoints where festoon isto be fastened. Press tapefirmly down each side ofpiece of string.
Place festoon over tapeand loop the stringaround it.

30
Staple festoon trim
Staple fringe to arch
Rattan or latticearch
2. Tissue fringe stapled to rattan or lattice arches
3. Tissue fringe drapes
4. Tissue festoon roping, the most versatile floattrimming material, may be stapled around apronbase to hide the fringe tape heading, or be usedto achieve several other decorating effects, someof which are shown in illustrations 5-6-7-8.
5. Festoon draped in a double row.

31
6
6. Modernistic lines of festoon
7. Festoon pattern trim7
8. Car decoration
9. Tissue tassels of a contrasting colorapplied over fringe
10. Tissue tassels combinedwith flower rosettes andfestoon drapes.
8
910
32
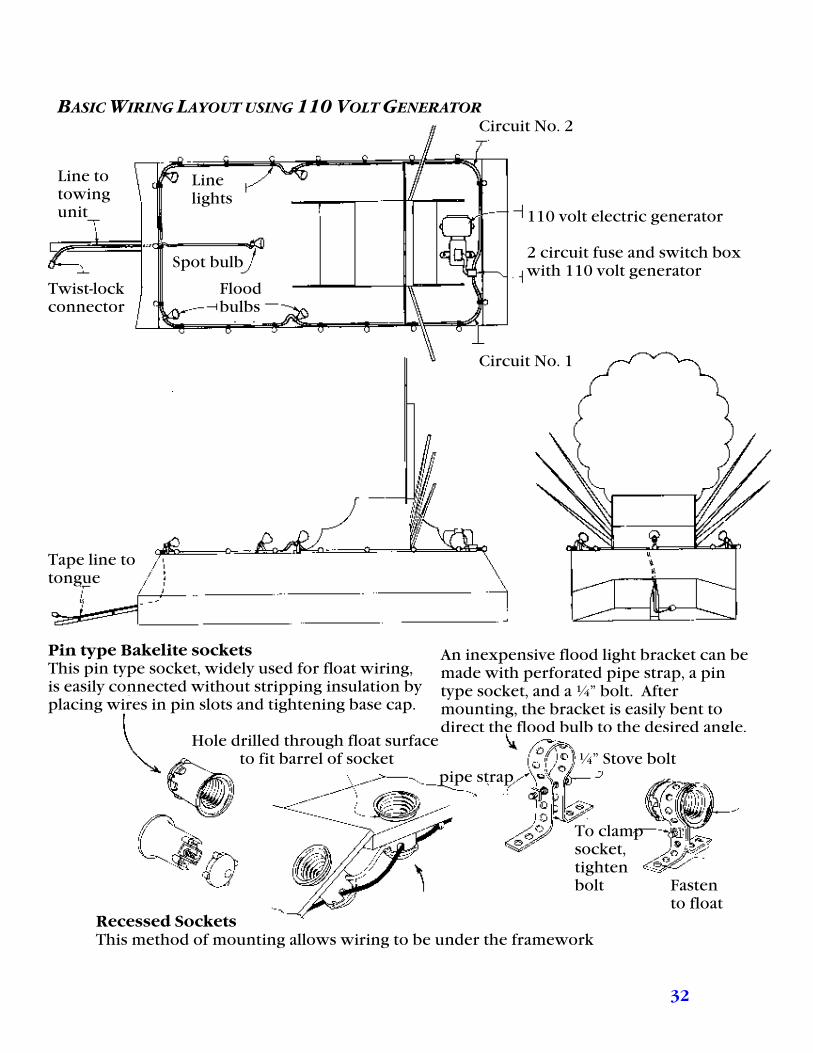
BASIC WIRING LAYOUT USING 110 VOLT GENERATORCircuit No. 2
Linelights
110 volt electric generator
2 circuit fuse and switch boxwith 110 volt generator
Twist-lock Floodconnector bulbs
Circuit No. 1
Tape line totongue
Pin type Bakelite socketsThis pin type socket, widely used for float wiring,is easily connected without stripping insulation byplacing wires in pin slots and tightening base cap.
Hole drilled through float surfaceto fit barrel of socket ¼” Stove bolt
pipe strap
To clampsocket,tightenbolt Fasten
to floatRecessed SocketsThis method of mounting allows wiring to be under the framework
Line totowingunit
An inexpensive flood light bracket can bemade with perforated pipe strap, a pintype socket, and a ¼” bolt. Aftermounting, the bracket is easily bent todirect the flood bulb to the desired angle.
Spot bulb

33
Diagram of Battery Connections for 36-Volt Lighting SystemWhen a 110 volt portable electric generator is notavailable for light power to illuminate a parade float,power for smaller voltage systems may be suppliedwith batteries. It should be taken into consideration,however, when planning your lighting with batterypower, that the bulbs required (25-watt and 50-watt –medium base) for systems from 6 to 36 volts, may notbe available locally and will have to be ordered froman out-of-town supplier. The reflector type spot andflood bulbs used in the 110 volt systems are not
Light sockets 6 volt Ground batteries
Knife switch
Positive
manufactured in the smaller voltages. Use theattachable type reflector made to fit over an ordinarylight bulb, with battery powered systems. Use sixbatteries of 6-volts each connected in series.
Use 30 volt bulbs (25 watts each for generalillumination, 50 watts each with attachable reflectors)
Total lighting should not exceed a maximum of 600watts, which is the equivalent of twenty-four 25-wattbulbs or sixteen 25-watt and four 50-watt bulbs. Thissystem should give illumination for approximately 2hours, starting with batteries at full charge.
Diagram of Battery Connections for6-volt Lighting SystemUse six batteries of 6 volts each connected in parallel.Use 6 volt bulbs (25 watts each for generalillumination, 50 watts each with attachablereflectors).Total lighting should not exceed amaximum of 600 watts, which is the equivalent oftwenty-four 25-watt bulbs or sixteen 25-watt and four50-watt bulbs. This system should give approximately2 hours of illumination, starting with the batteries atfull charge.
Light sockets 6 volt batteries
Knife switchGround
Positive
6 volt
110 volt reflector typeflood or spot bulb Pin type socket
SURFACE WIRINGPin type sockets
Flood lightbracket
Clear bulbs
Insulated staplesExtreme care should be taken when applying decorating materialover surface wiring to prevent driving a staple into the wires.Take extra caution when applying foil paper because it is a goodconductor of electricity.
38
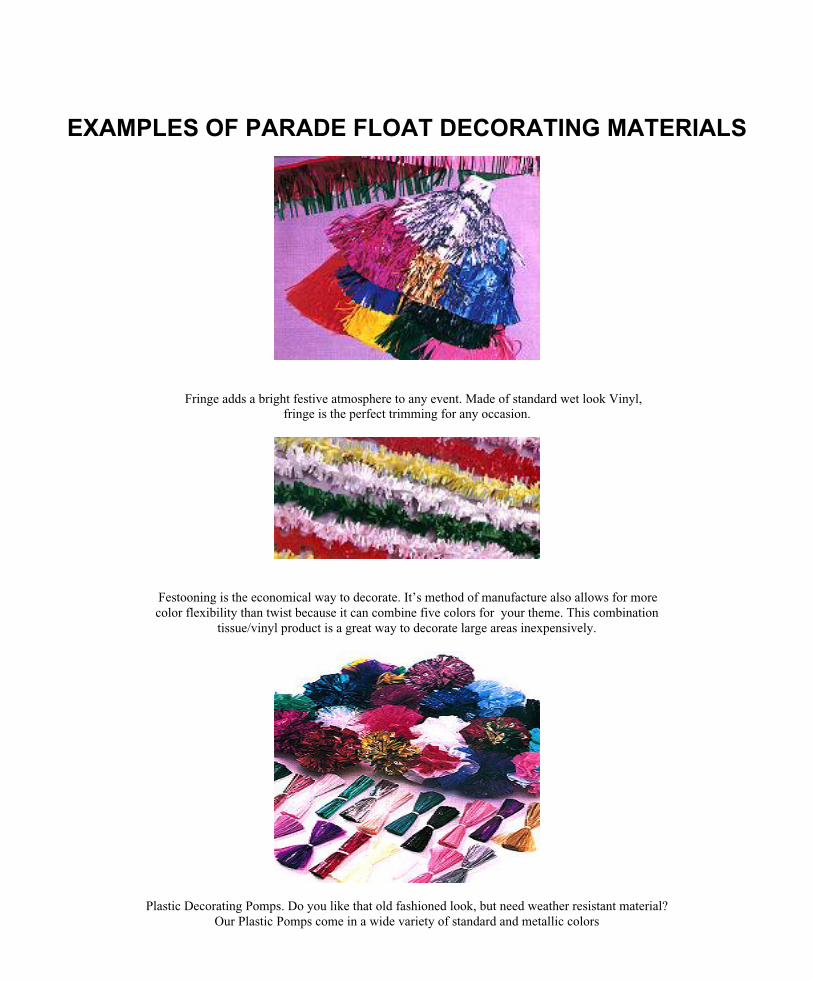
EXAMPLES OF PARADE FLOAT DECORATING MATERIALS
Fringe adds a bright festive atmosphere to any event. Made of standard wet look Vinyl,fringe is the perfect trimming for any occasion.
Festooning is the economical way to decorate. It’s method of manufacture also allows for morecolor flexibility than twist because it can combine five colors for your theme. This combination
tissue/vinyl product is a great way to decorate large areas inexpensively.
Plastic Decorating Pomps. Do you like that old fashioned look, but need weather resistant material?Our Plastic Pomps come in a wide variety of standard and metallic colors

39
Vinyl Floral Sheeting is made of durable flame-resistant vinyl and comes in a multitudeof rainbow colors
Premium metallic Sheeting is made of durable flame-resistant vinyl.
For Float SuppliesVisit http://www.victorycorps.com/floats.htmlOr Call 1-800-328-6120

Part I – For the Float Builder
For Float Supplies 36Visit http://www.victorycorps.com/floats.html’Or Call 1-800-328-6120
Examples of Parade Float Kits
F504 7’ x 21’ F150A 7’ x 16’
F503 7’ x 22’ F169 7’ x 16’
F710 7’ x 20’ F509 8’ x 18½
F184 7’ x 21’ F170 7’ x 17’

Part I – For the Float Builder
For Float Supplies 37Visit http://www.victorycorps.com/floats.html’Or Call 1-800-328-6120
F602 7’ x 18½ F436 8’ x 16’
F451 7’ x 15’ F618 7’ x 20’
F300A 7’ x 16’ F316 7’ x 17’
F310 7’ x 18’ F308 7’ x 18’