Part 2: ESP32 Development Board - DIY IoT · Part 2: The 35 euro IoT project 7 3 Hardware 3.1...
40
Part 2: ESP32 Development Board Oene Bakker © 2017
Transcript of Part 2: ESP32 Development Board - DIY IoT · Part 2: The 35 euro IoT project 7 3 Hardware 3.1...
Part 2:
ESP32 Development Board
Oene Bakker © 2017
Part 2: The 35 euro IoT project
2
1 Preface This book is a follow-up to the previously published book "The 35 Euro IoT Project" (referred to in this book as "Part 1"). Since the end of 2016, the ESP32 has become available as a successor to the ESP8266. In addition to Wi-Fi, the ESP32 also offers Bluetooth. In addition, the ESP32 is not (much) more expensive than the ESP8266. Although many expensive development boards are offered (between 10 and 30 euros). This book uses a Geekcreit® ESP32 Development Board. Ordered in China, it costs just 6 euros. So the title "The 35 euro IoT project" doesn’t have to change. The software used in this book is free to download. And the software and scripts are also made available for free. If necessary, the required hardware must be purchased by the reader. Because I use a Dutch version of Windows and some of the installed software also uses the Dutch language, some terms may be in Dutch (especially in the images I use). Where applicable I translated them to English. I think this should not be a problem for the reader. Lots of reading and DIY fun! August 4, 2017 Oene Bakker De Westereen
Part 2: The 35 euro IoT project
3
Inhoudsopgave 1 Preface ......................................................................................................................................... 2
2 The concept ................................................................................................................................. 5
2.1 Accountability .......................................................................................................................... 5
2.2 Prescience ................................................................................................................................ 6
2.3 Reading guide .......................................................................................................................... 6
2.4 Abbreviations .......................................................................................................................... 6
2.5 Version management .............................................................................................................. 6
3 Hardware ..................................................................................................................................... 7
3.1 Inleiding ................................................................................................................................... 7
3.2 ESP32 ....................................................................................................................................... 7
3.3 Hardware ................................................................................................................................. 8
3.3.1 Used hardware ................................................................................................................ 8
3.3.2 Hardware schema ............................................................................................................ 8
3.3.3 DHT22 and level shifter ................................................................................................... 9
3.3.4 Geekcreit® ESP32 Development Board ......................................................................... 10
4 Software .................................................................................................................................... 11
4.1 Introduction ........................................................................................................................... 11
4.2 Installatie van GIT .................................................................................................................. 11
4.3 Installatation of the ESP32 Core ............................................................................................ 17
4.4 Installation of the Xtensa and ESP32 Tools ........................................................................... 17
4.5 Python ................................................................................................................................... 18
4.5.1 Install Python ................................................................................................................. 18
4.5.2 Installation of pySerial and EspTool .............................................................................. 21
4.6 Test the software installation ................................................................................................ 22
5 The ESP32 IoT project ................................................................................................................ 27
5.1 Introduction ........................................................................................................................... 27
5.1.1 WiFi connection ............................................................................................................. 27
5.1.2 Setup date and time ...................................................................................................... 27
5.1.3 MQTT connection .......................................................................................................... 27
5.1.4 Determining temperature and humidity ....................................................................... 27
5.2 IOT_ESP32_Project source .................................................................................................... 28
6 Test ............................................................................................................................................ 35
6.1 Introduction ........................................................................................................................... 35

Part 2: The 35 euro IoT project
4
6.2 ESP32, NodeJS, MongoDB en Mosca ..................................................................................... 35
6.2.1 Start MongoDB .............................................................................................................. 35
6.2.2 Start NodeJS Express serve and Mosca broker ............................................................. 36
6.2.3 Start the ESP32 .............................................................................................................. 36
6.2.4 Start an Chrome browser .............................................................................................. 39
7 Index .......................................................................................................................................... 40
Part 2: The 35 euro IoT project
5
2 The concept
2.1 Accountability The texts quoted and recorded in this book are as far as I know as a writer from the so-called free domain (free pics, public text). If this is not the case, I would like to express my apologies. This book has been compiled with the utmost care and the solutions shown have been extensively tested. However, if errors occur this has been done without any intention. Despite all the care taken in the composition of this book, the author cannot be held liable for any damage resulting from any error in this publication. The book shows a hardware solution with estimated costs of approximately € 35, -. This price was at the time of writing and is subject to exchange rate fluctuations of, among other things, the dollar rate. The author cannot be held liable for this and for the availability of the hardware used. The assumption is that the reader is in possession of a PC, laptop or tablet with preferably Windows 10. In addition, the ownership of an Android smartphone with Android version 5.0.1 or above is recommended but not required (the solution also works with an emulator). Working with the required hardware and power adapters can be a risk. The solution shown works with low voltages (max. 5 volt) which, of course, limits the risks. Incorrectly connecting may damage your hardware irreparably! The author cannot be held liable for any damage resulting from this. It's all at your own risk. The contents of this book may not be commercially used. The reader is free to use the contents of this book for private and hobby purposes. This also applies to use this book and its content in education. The sources associated with this book may be copied, used and / or modified without any limitation.

Part 2: The 35 euro IoT project
6
2.2 Prescience This part is a continuation of Part 1. Therefore, it is assumed that the reader has knowledge of the software and hardware as described in Part 1. Knowledge of programming is a pre, but with some perseverance it must be possible for every hobbyist to realize the solutions shown. Also, no knowledge of soldering is needed because of the use of a so-called breadboard solution. The design of this book is low-threshold and works step by step to the final effect. And as often, Google is our best friend (or any other search engine, anyway). For questions about the contents of this book, the following email address is available: [email protected] The author will do his best to answer all questions.
2.3 Reading guide The book, as in Part 1, is divided into an introductory part (chapters 1 and 2) and a practical part (chapter 3 and further). The sources can also be downloaded again from www.diyiot.nl/download Extract the downloaded zip file. The book refers to the sources by: See: Sources … …
2.4 Abbreviations See part 1.
2.5 Version management
Version Date Remark
1.0 04-08-2016 New
Part 2: The 35 euro IoT project
7
3 Hardware
3.1 Inleiding Hardware setup lightly differs from Part 1. In addition to replacing the ESP8266 Development Board with an ESP32 Development Board, no DS1307 RTC module is used. Reason for this is that there is currently no full support of all hardware when using the Arduino IDE.
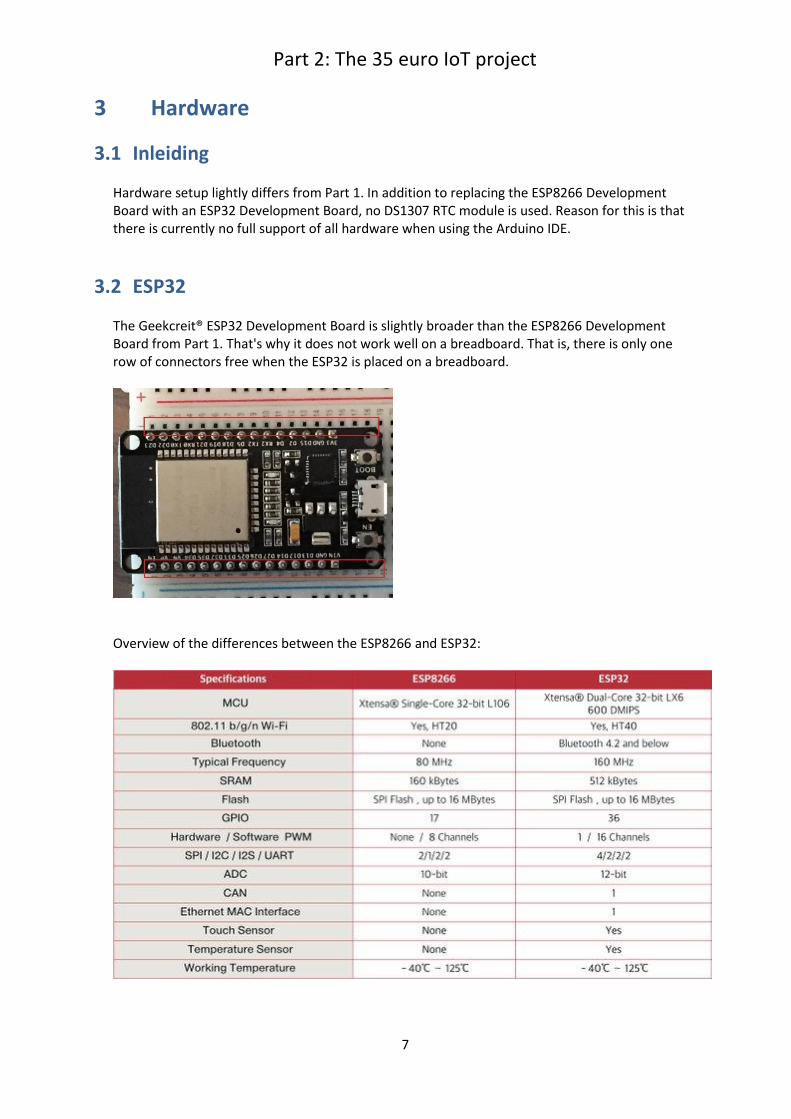
3.2 ESP32 The Geekcreit® ESP32 Development Board is slightly broader than the ESP8266 Development Board from Part 1. That's why it does not work well on a breadboard. That is, there is only one row of connectors free when the ESP32 is placed on a breadboard.
Overview of the differences between the ESP8266 and ESP32:
Part 2: The 35 euro IoT project
8
3.3 Hardware
3.3.1 Used hardware Used hardware:
• Geekcreit® ESP32 Development Board
• DHT22
• Level shifter
• Breadboard
• Breadboard power supply (3.3V/5V)
• Jumper cables
• Arduino power supply
• Micro USB cable
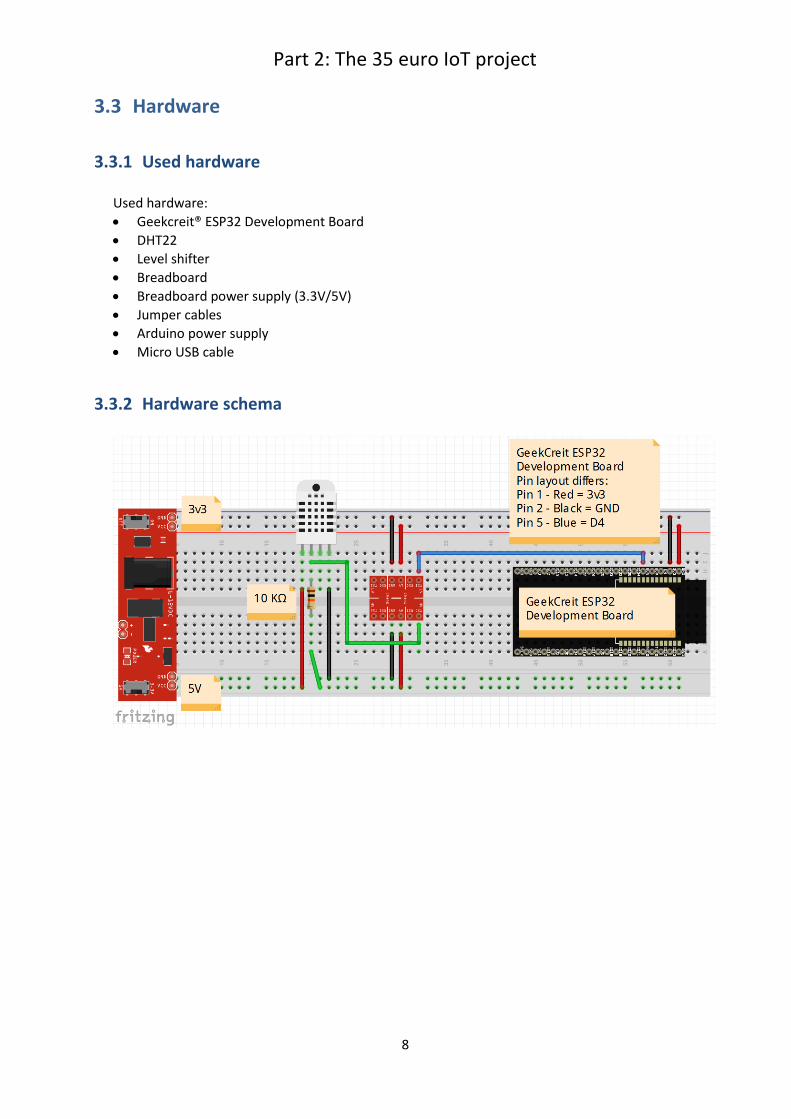
3.3.2 Hardware schema
Part 2: The 35 euro IoT project
9
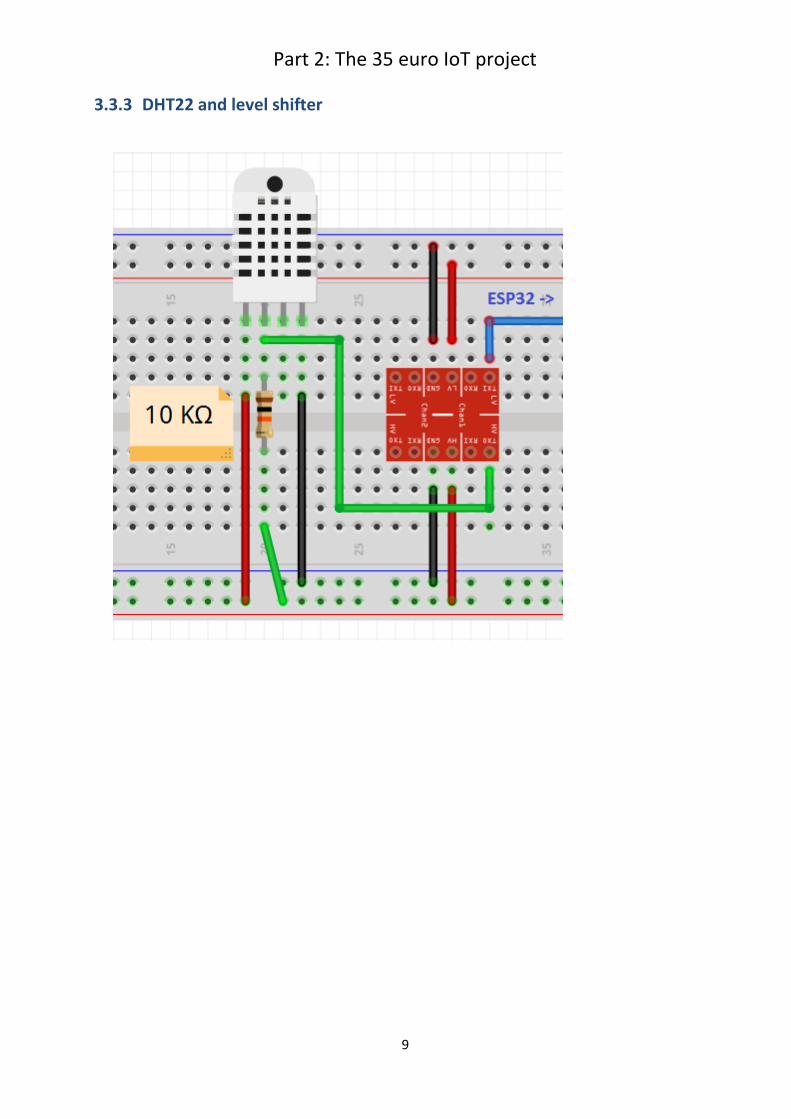
3.3.3 DHT22 and level shifter
Part 2: The 35 euro IoT project
10
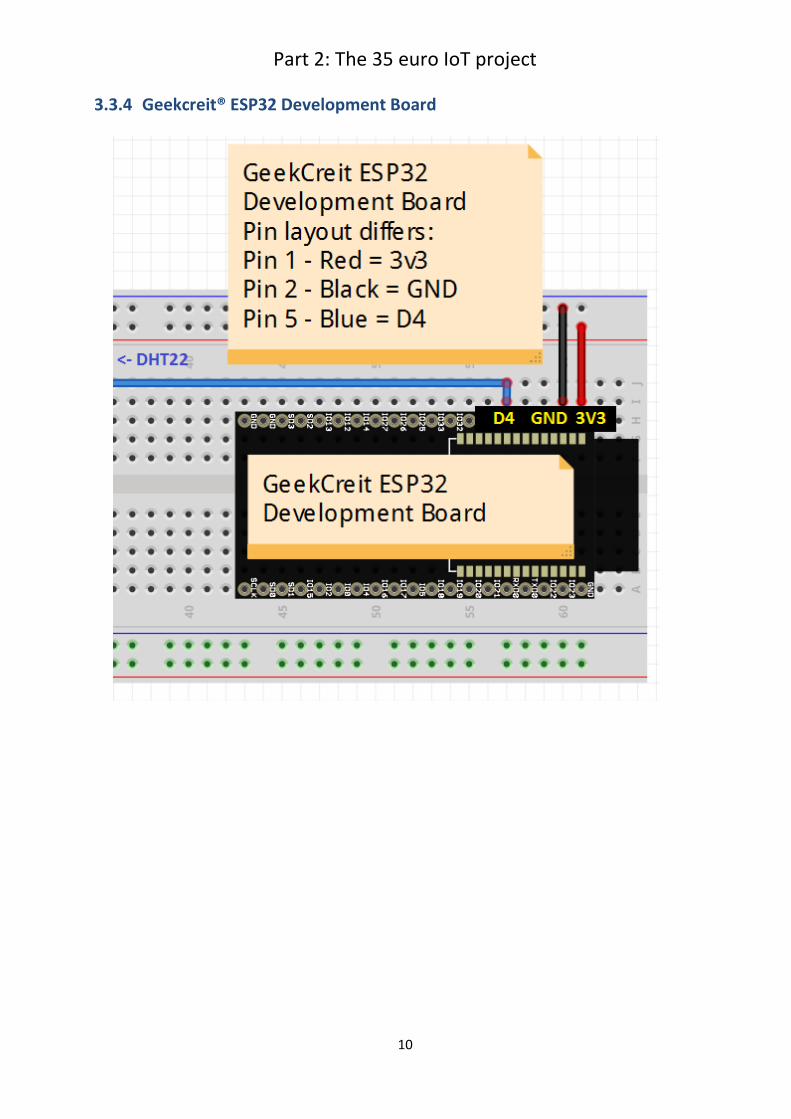
3.3.4 Geekcreit® ESP32 Development Board
Part 2: The 35 euro IoT project
11
4 Software
4.1 Introduction This chapter describes the software installations of software that are not yet described in Part 1. For the other software used in this book, reference are made to Part 1.
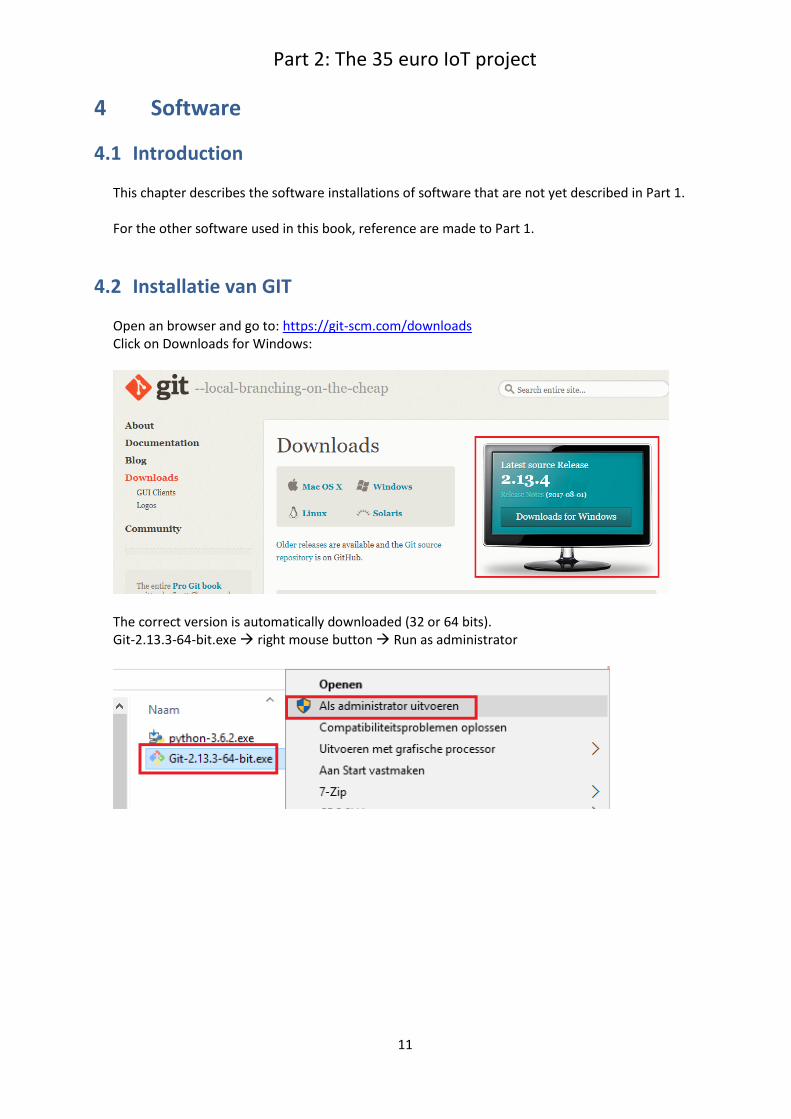
4.2 Installatie van GIT Open an browser and go to: https://git-scm.com/downloads Click on Downloads for Windows:
The correct version is automatically downloaded (32 or 64 bits). Git-2.13.3-64-bit.exe right mouse button Run as administrator
Part 2: The 35 euro IoT project
12
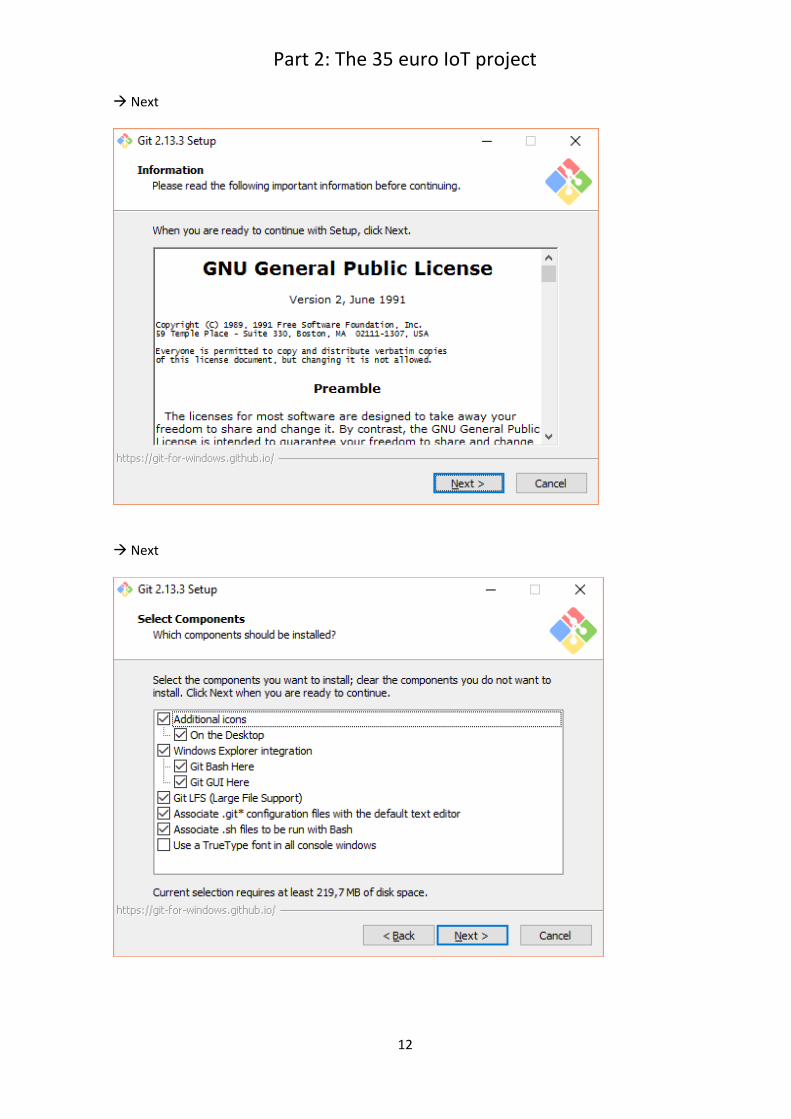
Next
Next
Part 2: The 35 euro IoT project
13
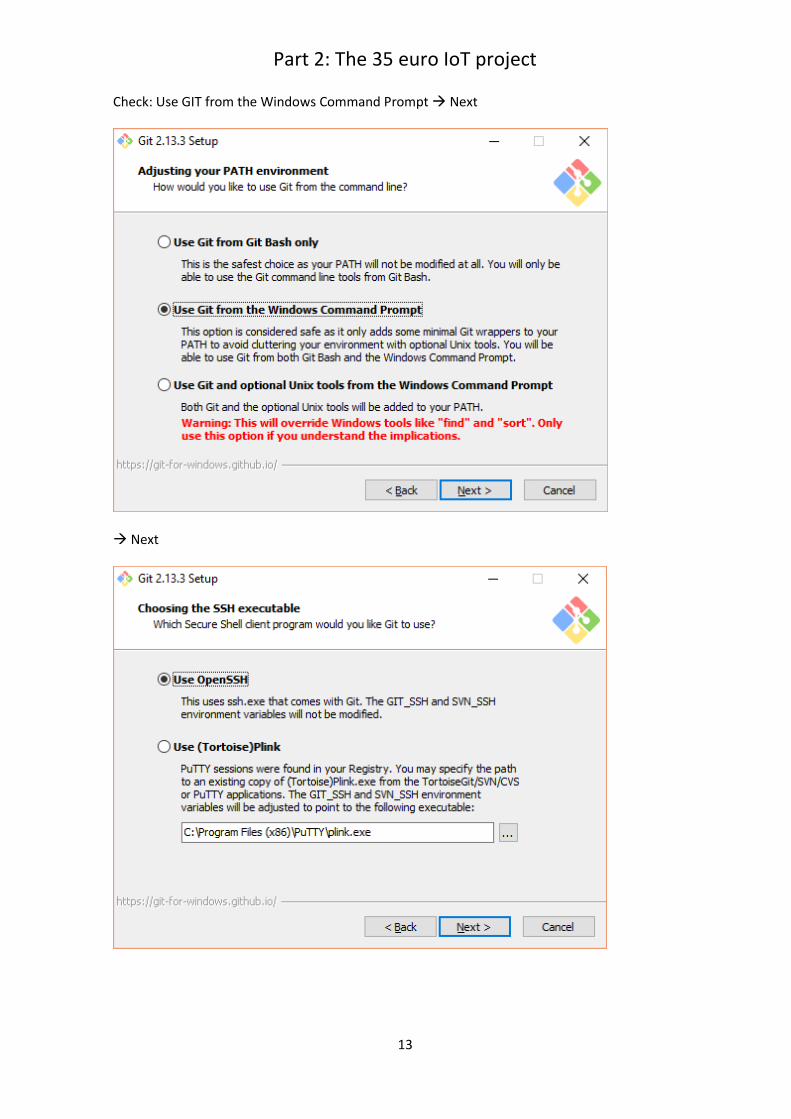
Check: Use GIT from the Windows Command Prompt Next
Next
Part 2: The 35 euro IoT project
14
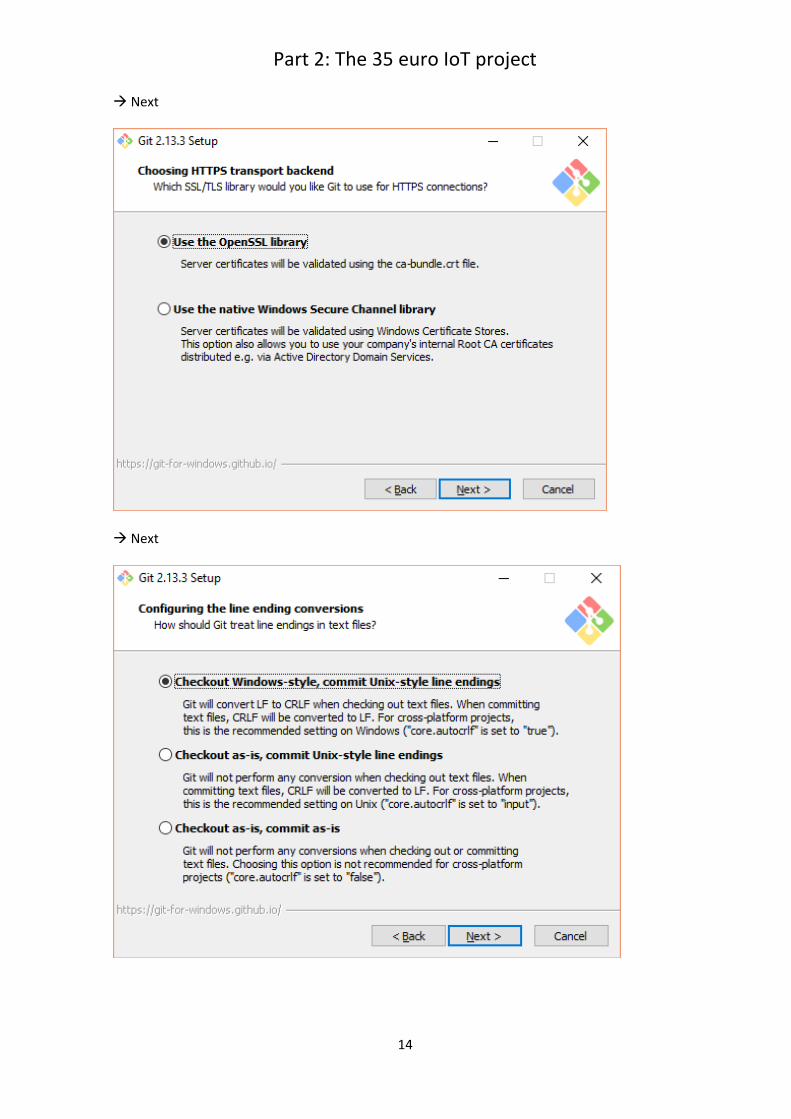
Next
Next
Part 2: The 35 euro IoT project
15
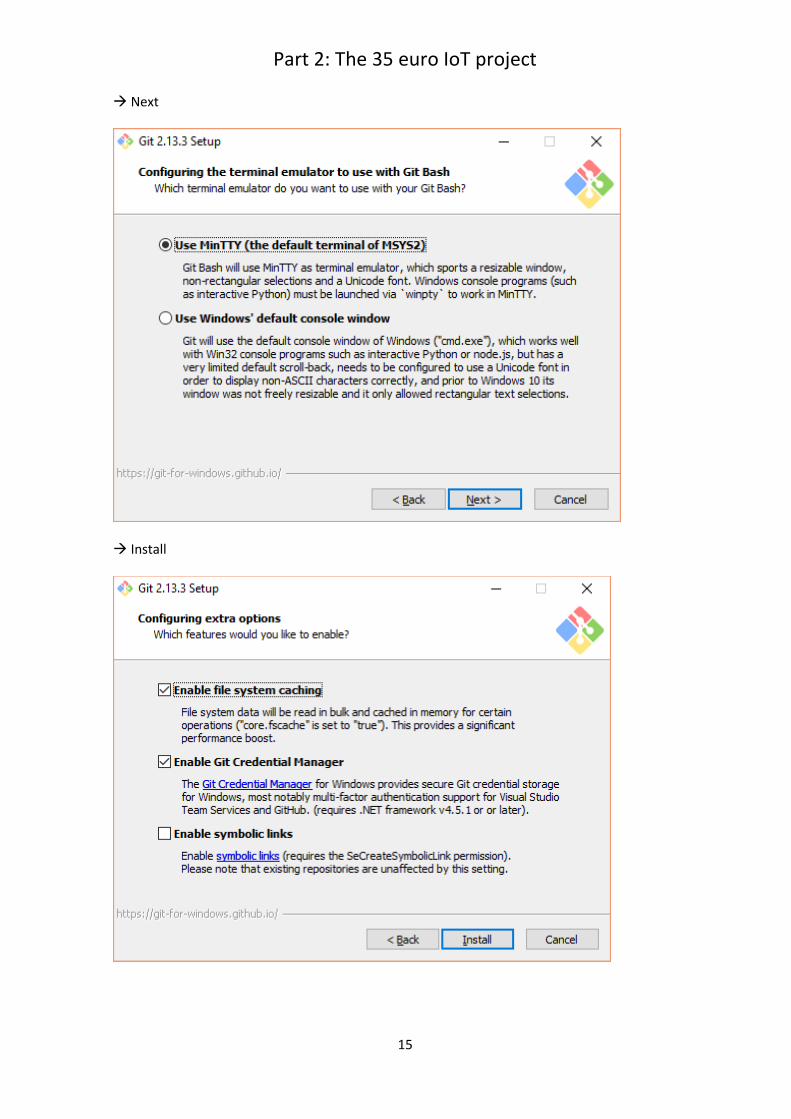
Next
Install
Part 2: The 35 euro IoT project
16
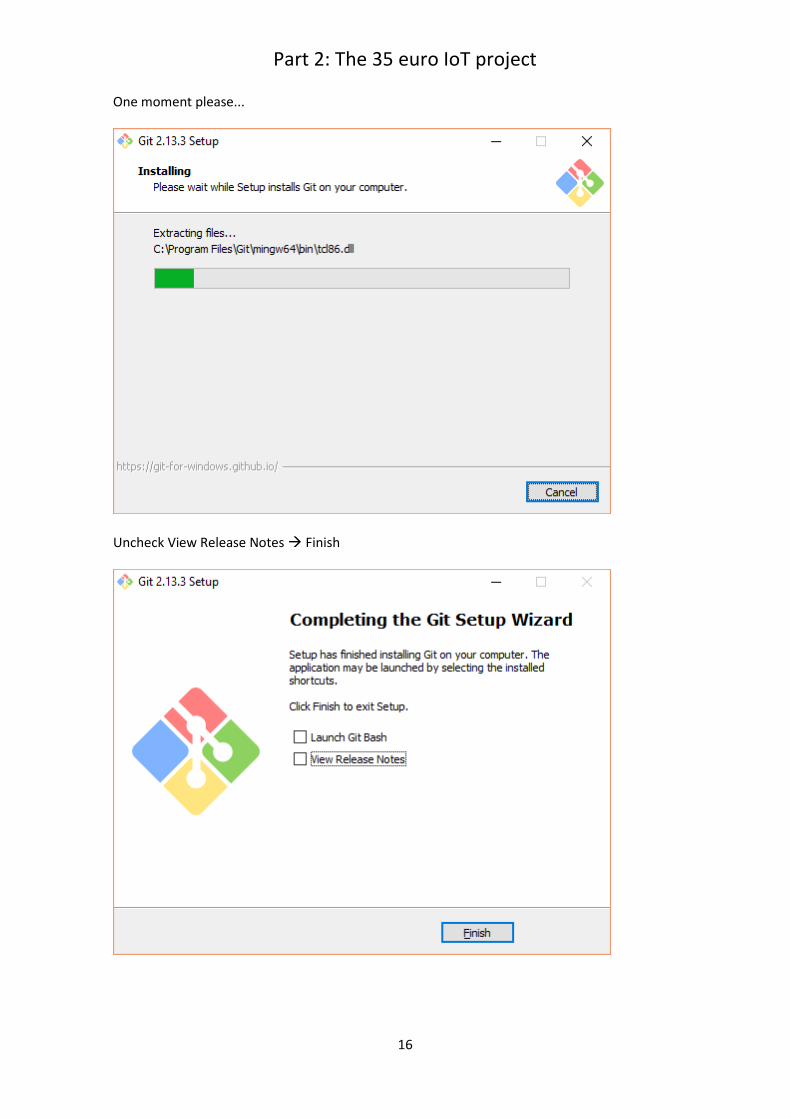
One moment please...
Uncheck View Release Notes Finish
Part 2: The 35 euro IoT project
17
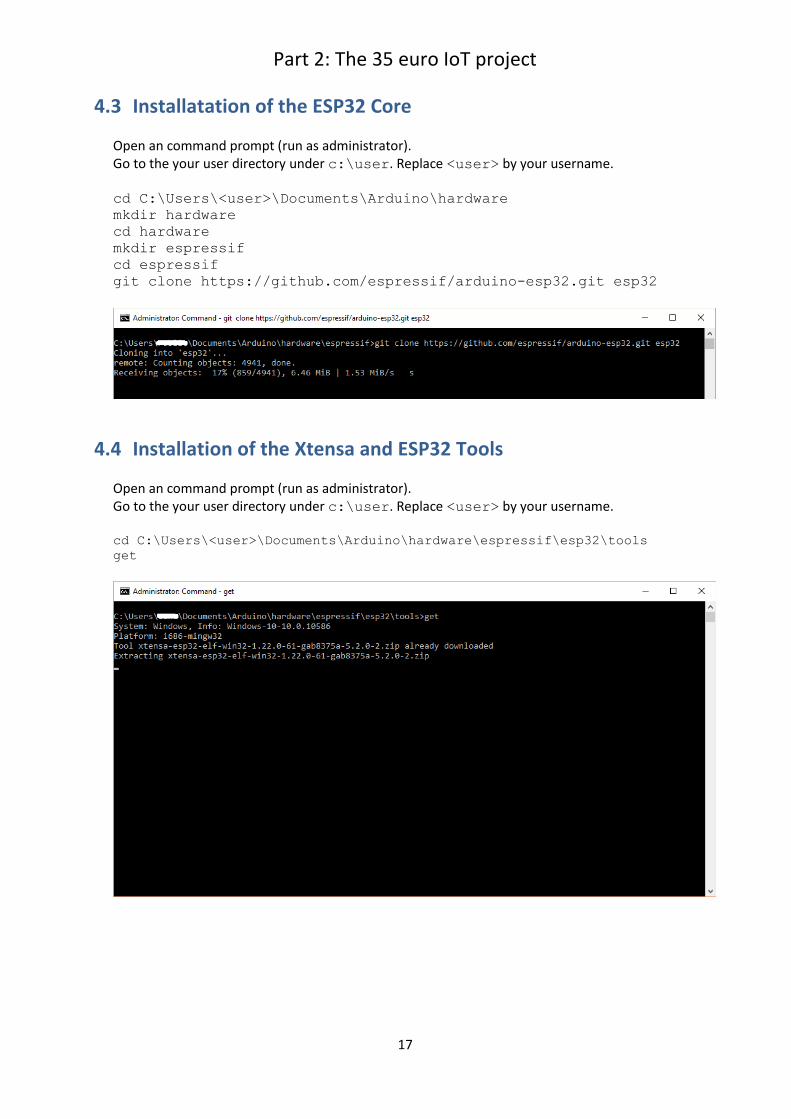
4.3 Installatation of the ESP32 Core Open an command prompt (run as administrator). Go to the your user directory under c:\user. Replace <user> by your username. cd C:\Users\<user>\Documents\Arduino\hardware
mkdir hardware
cd hardware
mkdir espressif
cd espressif
git clone https://github.com/espressif/arduino-esp32.git esp32
4.4 Installation of the Xtensa and ESP32 Tools Open an command prompt (run as administrator). Go to the your user directory under c:\user. Replace <user> by your username. cd C:\Users\<user>\Documents\Arduino\hardware\espressif\esp32\tools
get
Part 2: The 35 euro IoT project
18
4.5 Python
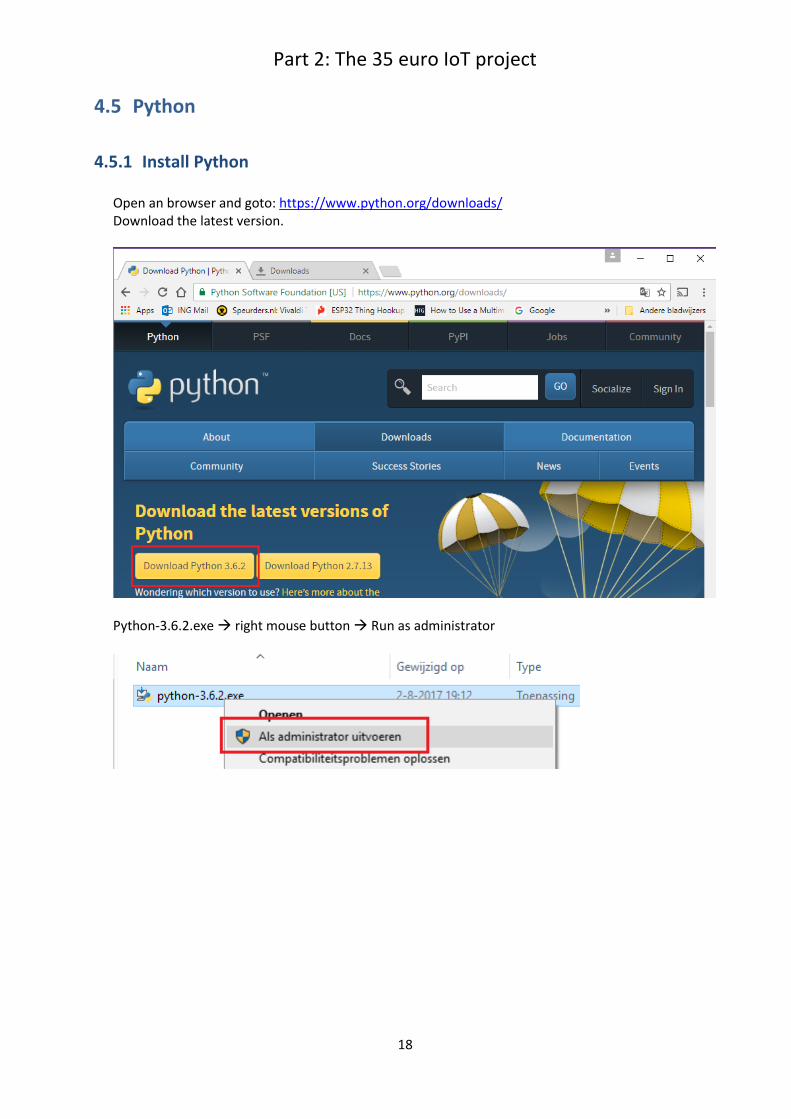
4.5.1 Install Python Open an browser and goto: https://www.python.org/downloads/ Download the latest version.
Python-3.6.2.exe right mouse button Run as administrator
Part 2: The 35 euro IoT project
19
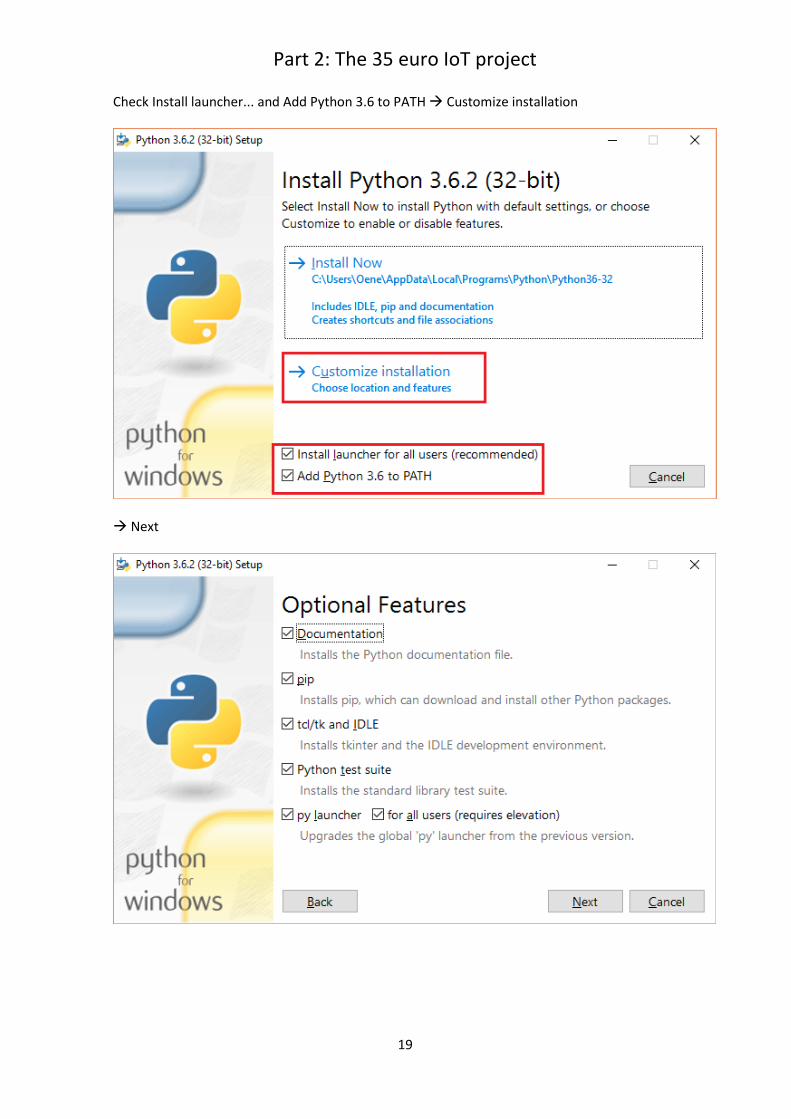
Check Install launcher... and Add Python 3.6 to PATH Customize installation
Next
Part 2: The 35 euro IoT project
20
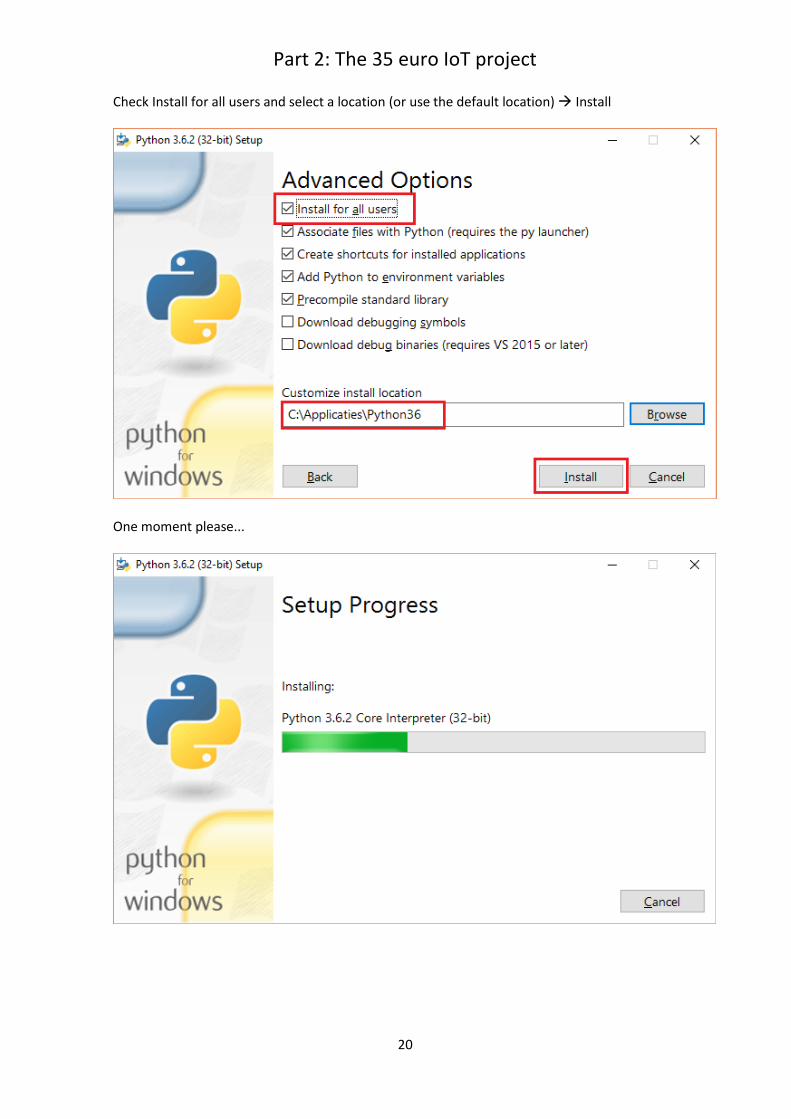
Check Install for all users and select a location (or use the default location) Install
One moment please...
Part 2: The 35 euro IoT project
21
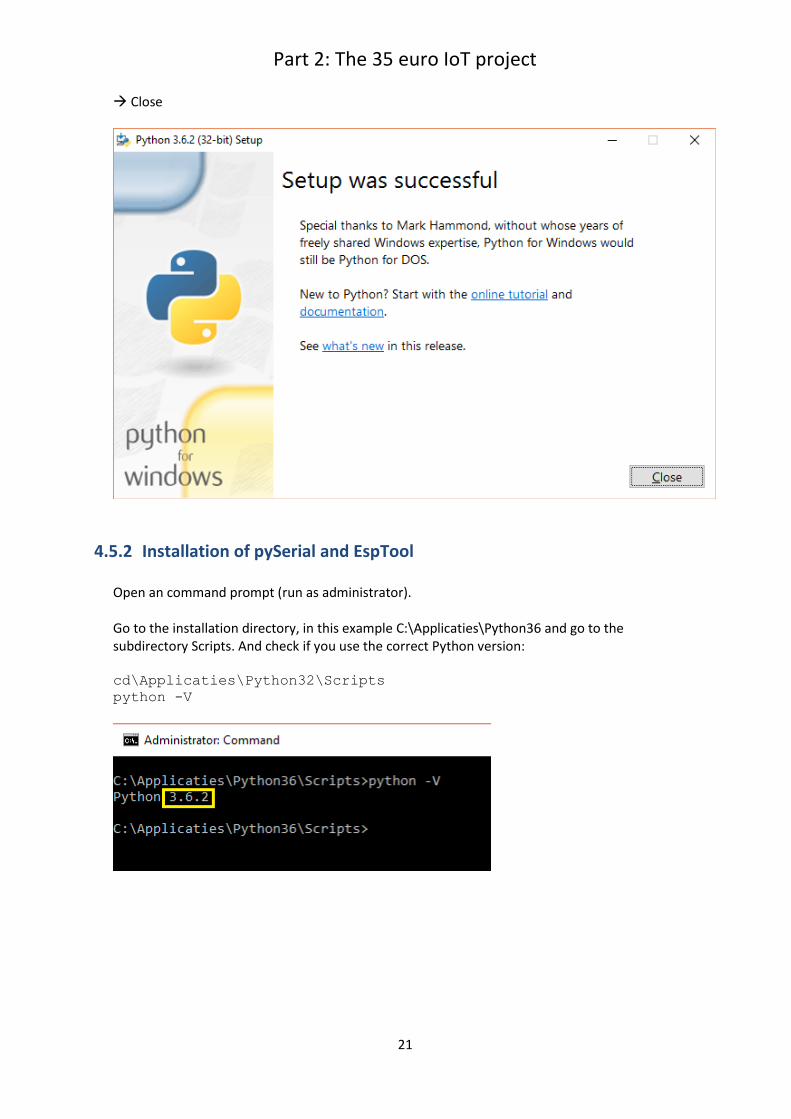
Close
4.5.2 Installation of pySerial and EspTool Open an command prompt (run as administrator). Go to the installation directory, in this example C:\Applicaties\Python36 and go to the subdirectory Scripts. And check if you use the correct Python version: cd\Applicaties\Python32\Scripts
python -V
Part 2: The 35 euro IoT project
22
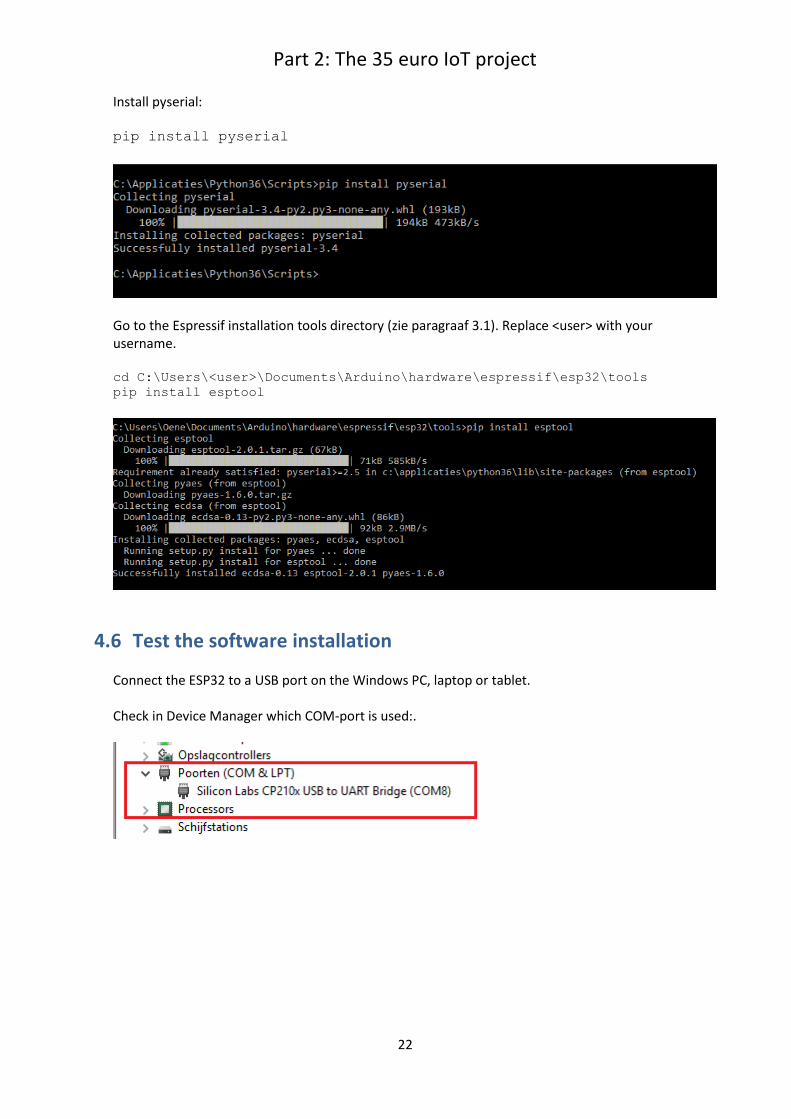
Install pyserial: pip install pyserial
Go to the Espressif installation tools directory (zie paragraaf 3.1). Replace <user> with your username. cd C:\Users\<user>\Documents\Arduino\hardware\espressif\esp32\tools
pip install esptool
4.6 Test the software installation Connect the ESP32 to a USB port on the Windows PC, laptop or tablet. Check in Device Manager which COM-port is used:.
Part 2: The 35 euro IoT project
23
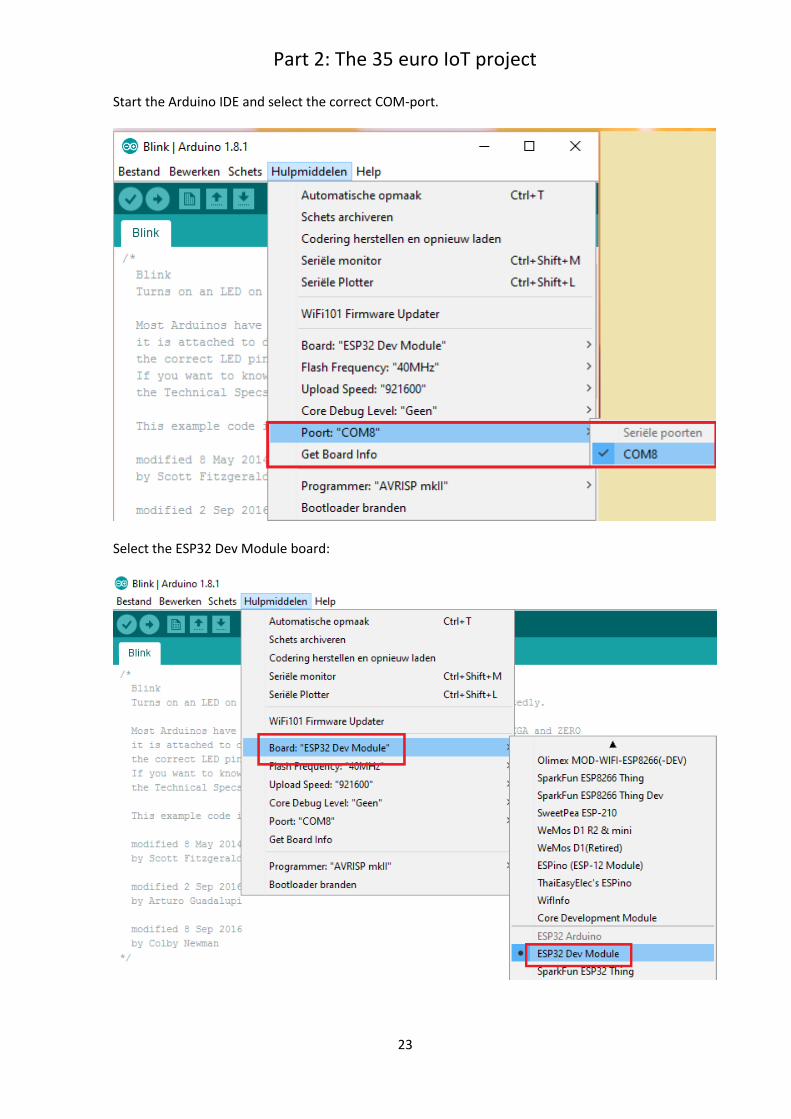
Start the Arduino IDE and select the correct COM-port.
Select the ESP32 Dev Module board:
Part 2: The 35 euro IoT project
24
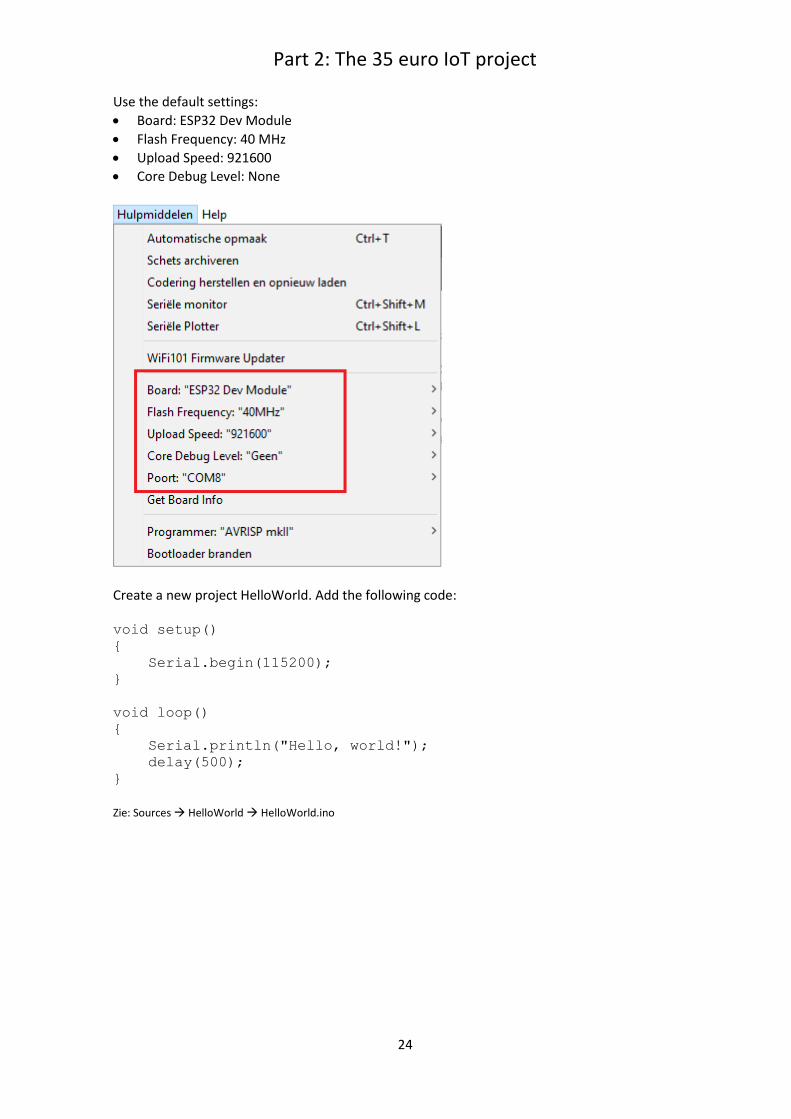
Use the default settings:
• Board: ESP32 Dev Module
• Flash Frequency: 40 MHz
• Upload Speed: 921600
• Core Debug Level: None
Create a new project HelloWorld. Add the following code: void setup()
{
Serial.begin(115200);
}
void loop()
{
Serial.println("Hello, world!");
delay(500);
}
Zie: Sources HelloWorld HelloWorld.ino
Part 2: The 35 euro IoT project
25
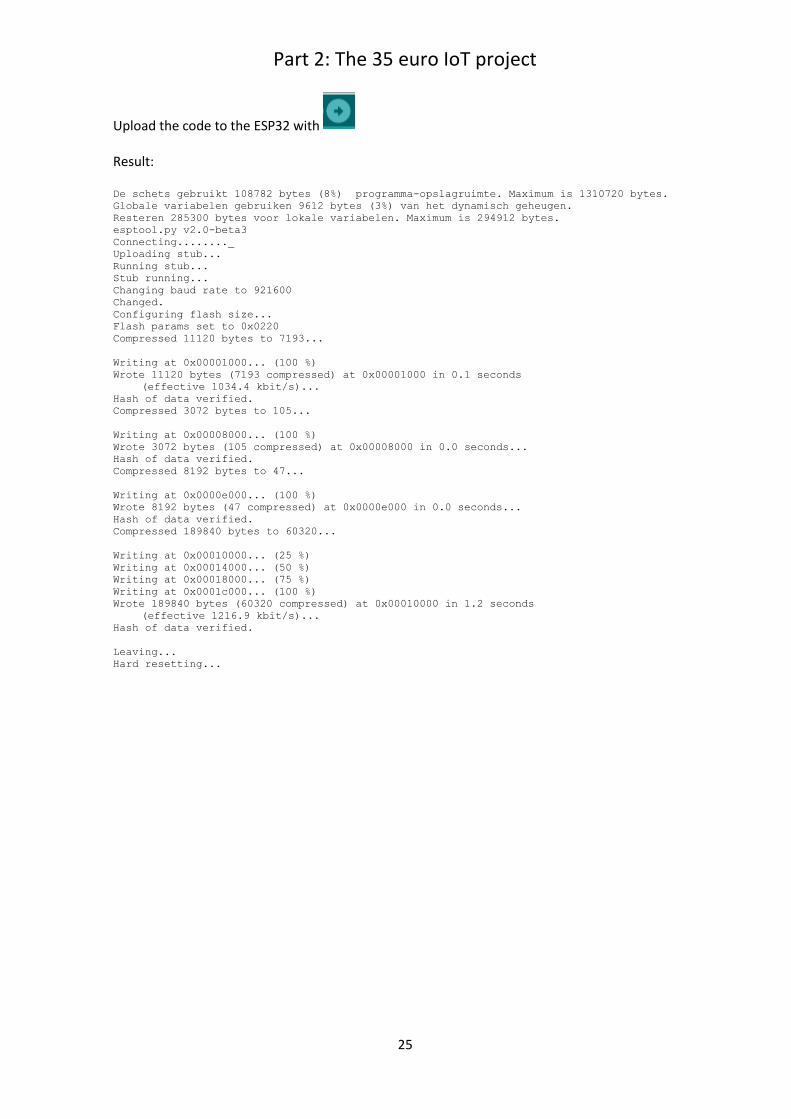
Upload the code to the ESP32 with Result: De schets gebruikt 108782 bytes (8%) programma-opslagruimte. Maximum is 1310720 bytes.
Globale variabelen gebruiken 9612 bytes (3%) van het dynamisch geheugen.
Resteren 285300 bytes voor lokale variabelen. Maximum is 294912 bytes.
esptool.py v2.0-beta3
Connecting........_
Uploading stub...
Running stub...
Stub running...
Changing baud rate to 921600
Changed.
Configuring flash size...
Flash params set to 0x0220
Compressed 11120 bytes to 7193...
Writing at 0x00001000... (100 %)
Wrote 11120 bytes (7193 compressed) at 0x00001000 in 0.1 seconds
(effective 1034.4 kbit/s)...
Hash of data verified.
Compressed 3072 bytes to 105...
Writing at 0x00008000... (100 %)
Wrote 3072 bytes (105 compressed) at 0x00008000 in 0.0 seconds...
Hash of data verified.
Compressed 8192 bytes to 47...
Writing at 0x0000e000... (100 %)
Wrote 8192 bytes (47 compressed) at 0x0000e000 in 0.0 seconds...
Hash of data verified.
Compressed 189840 bytes to 60320...
Writing at 0x00010000... (25 %)
Writing at 0x00014000... (50 %)
Writing at 0x00018000... (75 %)
Writing at 0x0001c000... (100 %)
Wrote 189840 bytes (60320 compressed) at 0x00010000 in 1.2 seconds
(effective 1216.9 kbit/s)...
Hash of data verified.
Leaving...
Hard resetting...
Part 2: The 35 euro IoT project
26
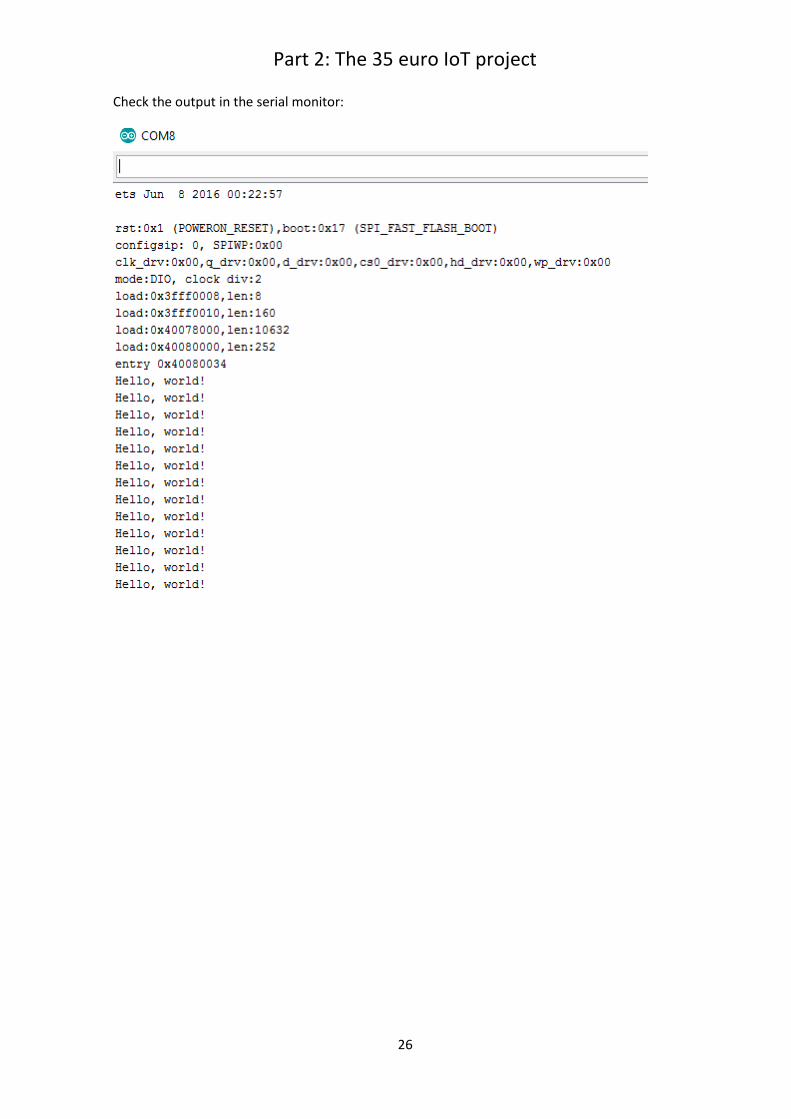
Check the output in the serial monitor:

Part 2: The 35 euro IoT project
27
5 The ESP32 IoT project
5.1 Introduction This chapter describes the software implementation of the used IoT project on the ESP32. The differences with Part 1 are also indicated.
5.1.1 WiFi connection Setting up a WiFi connection is the same as with the ESP8266 (in Part 1). However, another Wi-Fi library is being used that was created especifically for the ESP32. Because the NTP protocol is used to set the date and time, an Internet connection is required at all times. Therefore a Virtual Router can be not used (see Part 1).
5.1.2 Setup date and time In Part 1, the date and time was set through the NTP protocol. The date and time then were set in a DS1307 RTC module. Unfortunately, the ESP32 does not yet support RTC modules. Therefore, this part only uses the setting of the date and time via the NTP protocol. The NTP library used in Part 1 is incompatible with the ESP32 and therefore, a direct call is made to the NTP server.
5.1.3 MQTT connection Setting up the MQTT connection is the same as for the ESP8266 in Part 1. Also, publishing messages doesn’t differs from Part 1. This also applies of formatting the message in JSON format.
5.1.4 Determining temperature and humidity The support of the DHT22 with the existing library is not great. It sometimes works and sometimes not. This means that we have fallen back on a "simple" DHT library that converts so-called "raw" data to temperature and humidity. This solution is fairly stable results. In any case, its good enough for this project. Although the DHT22 sensor is 5 Volt tolerant, it was connected in Part 1 to a voltage of 3.3 Volt. In combination with the ESP32, this was not a stable combination. Therefore, in this hardware scheme, the DHT22 is connected to a voltage of 5 volts. This also means that a level shifter is required because the ESP32 operates on a 3.3 Volt voltage.

Part 2: The 35 euro IoT project
28
5.2 IOT_ESP32_Project source The structure of the source is: 1. Include files 2. DHT variables and setup
You can choose between the DHT22 or DHT11. 3. NTP variables and setup
Put the right NTP server here, in this example, the IP address of nl.ntp.pool.org 4. WiFi and MQTT variables and setup
Enter the SSID and password of the WiFi access points (home and mobile) here. And also set the IP address of the used MQTT connection (see Part 1).
5. Some global used variables. 6. Setup of WiFi, MQTT and date and time (NTP). 7. De main loop
a. Check if the client is active, if not do a reconnect. b. Every 5 seconds, a message is sent with the temperature humidity.
8. Setup WiFi connection. 9. Read DHT sensor for the temperature and humidity readings. 10. Set up MQTT connection and publish messages. 11. Format a message in JSON format. See: Sources IOT_ESP32_Project IOT_ESP32_Project.ino /*
ESP32 DHT NTP WIFI
DHT_PIN 4
Start MongoDB:
cd Program Files\MongoDB\Server\3.2\bin
mongod
Start NodeJS:
cd Program Files\nodejs
node mijnserver.js
*/
//1
// ----------------------------------------------------------------------------------------
// Includes
// ----------------------------------------------------------------------------------------
#include <SPI.h>
#include <TimeLib.h>
#include <WiFi.h>
#include <PubSubClient.h>
#include <SimpleDHT.h>
#include <ArduinoJson.h>
// 2
// ----------------------------------------------------------------------------------------
// DHT
// ----------------------------------------------------------------------------------------
const uint8_t DHT_PIN = 4; // DHT pin
//#define SELECT_DHT11
#define SELECT_DHT22
#ifdef SELECT_DHT11
SimpleDHT11 dht11; // DHT11
#else
#ifdef SELECT_DHT22
SimpleDHT22 dht22; // DHT22
#endif
#endif
Part 2: The 35 euro IoT project
29
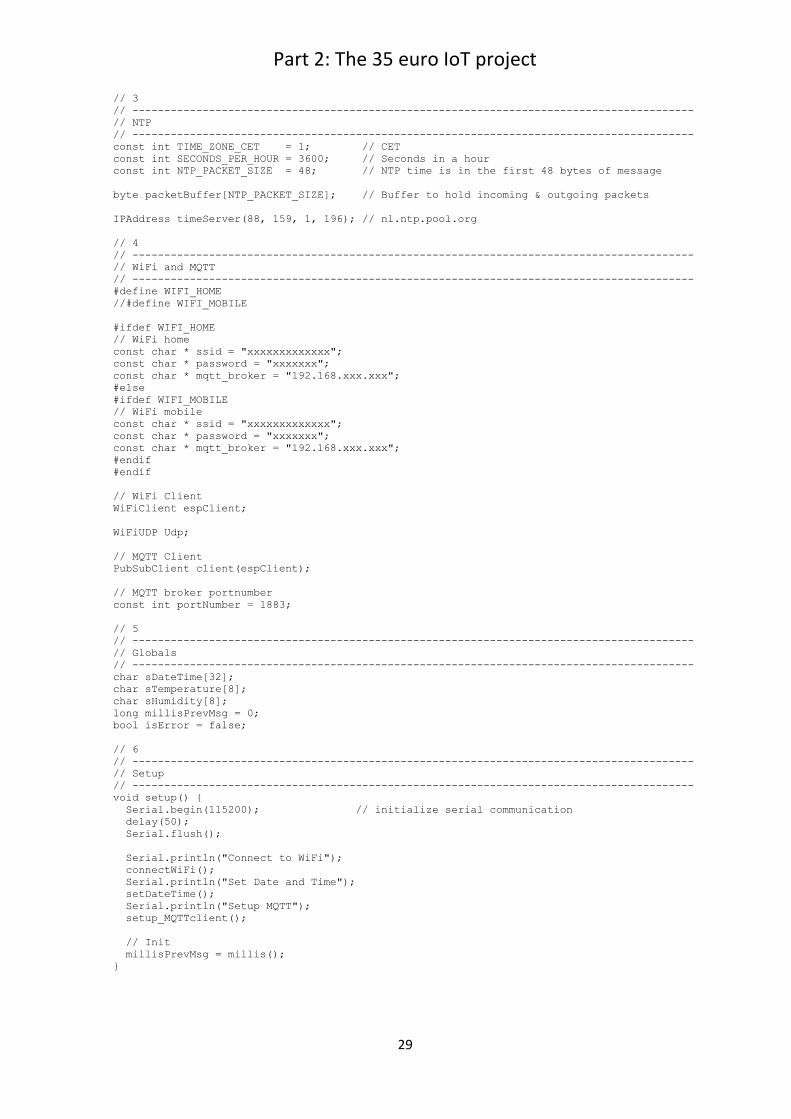
// 3
// ----------------------------------------------------------------------------------------
// NTP
// ----------------------------------------------------------------------------------------
const int TIME_ZONE_CET = 1; // CET
const int SECONDS_PER_HOUR = 3600; // Seconds in a hour
const int NTP_PACKET_SIZE = 48; // NTP time is in the first 48 bytes of message
byte packetBuffer[NTP_PACKET_SIZE]; // Buffer to hold incoming & outgoing packets
IPAddress timeServer(88, 159, 1, 196); // nl.ntp.pool.org
// 4
// ----------------------------------------------------------------------------------------
// WiFi and MQTT
// ----------------------------------------------------------------------------------------
#define WIFI_HOME
//#define WIFI_MOBILE
#ifdef WIFI_HOME
// WiFi home
const char * ssid = "xxxxxxxxxxxxx";
const char * password = "xxxxxxx";
const char * mqtt_broker = "192.168.xxx.xxx";
#else
#ifdef WIFI_MOBILE
// WiFi mobile
const char * ssid = "xxxxxxxxxxxxx";
const char * password = "xxxxxxx";
const char * mqtt_broker = "192.168.xxx.xxx";
#endif
#endif
// WiFi Client
WiFiClient espClient;
WiFiUDP Udp;
// MQTT Client
PubSubClient client(espClient);
// MQTT broker portnumber
const int portNumber = 1883;
// 5
// ----------------------------------------------------------------------------------------
// Globals
// ----------------------------------------------------------------------------------------
char sDateTime[32];
char sTemperature[8];
char sHumidity[8];
long millisPrevMsg = 0;
bool isError = false;
// 6
// ----------------------------------------------------------------------------------------
// Setup
// ----------------------------------------------------------------------------------------
void setup() {
Serial.begin(115200); // initialize serial communication
delay(50);
Serial.flush();
Serial.println("Connect to WiFi");
connectWiFi();
Serial.println("Set Date and Time");
setDateTime();
Serial.println("Setup MQTT");
setup_MQTTclient();
// Init
millisPrevMsg = millis();
}
Part 2: The 35 euro IoT project
30
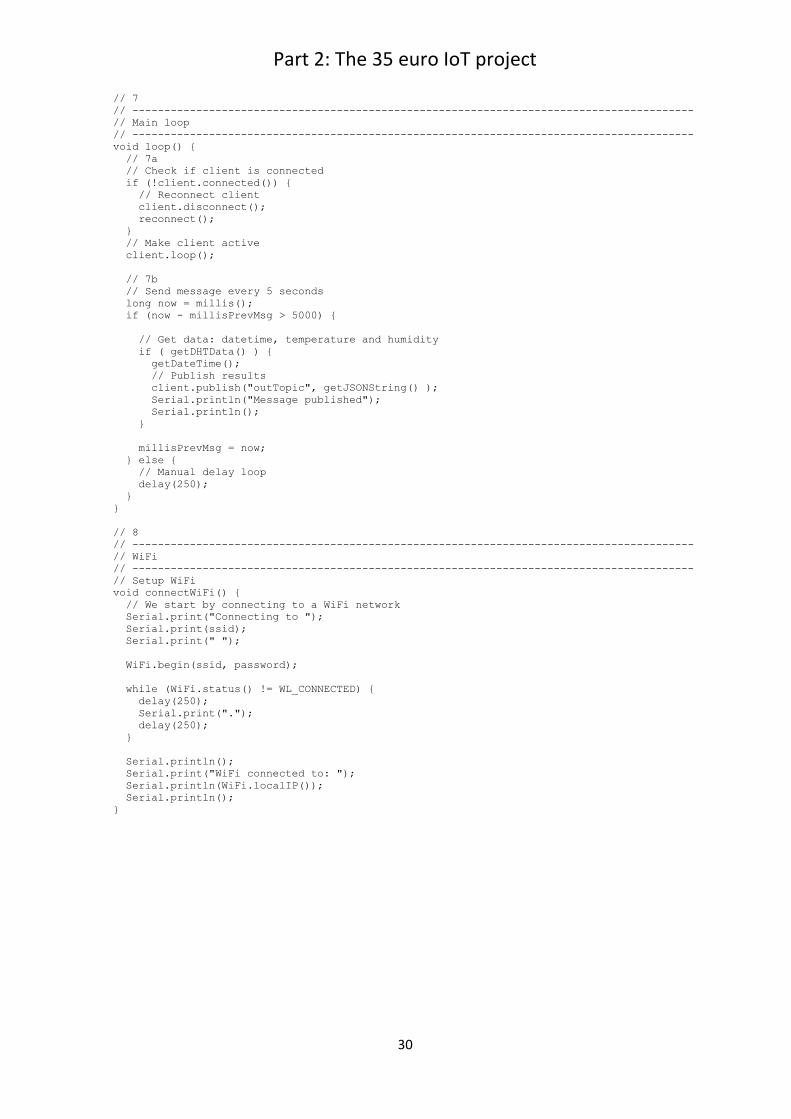
// 7
// ----------------------------------------------------------------------------------------
// Main loop
// ----------------------------------------------------------------------------------------
void loop() {
// 7a
// Check if client is connected
if (!client.connected()) {
// Reconnect client
client.disconnect();
reconnect();
}
// Make client active
client.loop();
// 7b
// Send message every 5 seconds
long now = millis();
if (now - millisPrevMsg > 5000) {
// Get data: datetime, temperature and humidity
if ( getDHTData() ) {
getDateTime();
// Publish results
client.publish("outTopic", getJSONString() );
Serial.println("Message published");
Serial.println();
}
millisPrevMsg = now;
} else {
// Manual delay loop
delay(250);
}
}
// 8
// ----------------------------------------------------------------------------------------
// WiFi
// ----------------------------------------------------------------------------------------
// Setup WiFi
void connectWiFi() {
// We start by connecting to a WiFi network
Serial.print("Connecting to ");
Serial.print(ssid);
Serial.print(" ");
WiFi.begin(ssid, password);
while (WiFi.status() != WL_CONNECTED) {
delay(250);
Serial.print(".");
delay(250);
}
Serial.println();
Serial.print("WiFi connected to: ");
Serial.println(WiFi.localIP());
Serial.println();
}
Part 2: The 35 euro IoT project
31
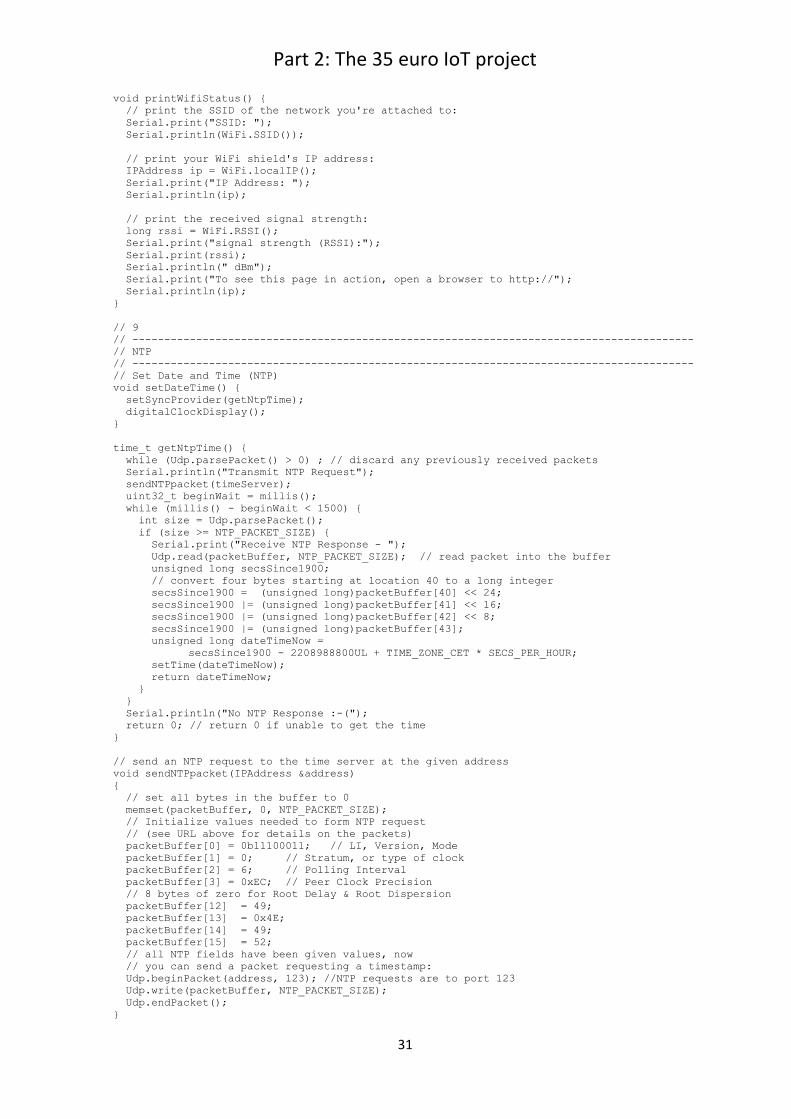
void printWifiStatus() {
// print the SSID of the network you're attached to:
Serial.print("SSID: ");
Serial.println(WiFi.SSID());
// print your WiFi shield's IP address:
IPAddress ip = WiFi.localIP();
Serial.print("IP Address: ");
Serial.println(ip);
// print the received signal strength:
long rssi = WiFi.RSSI();
Serial.print("signal strength (RSSI):");
Serial.print(rssi);
Serial.println(" dBm");
Serial.print("To see this page in action, open a browser to http://");
Serial.println(ip);
}
// 9
// ----------------------------------------------------------------------------------------
// NTP
// ----------------------------------------------------------------------------------------
// Set Date and Time (NTP)
void setDateTime() {
setSyncProvider(getNtpTime);
digitalClockDisplay();
}
time_t getNtpTime() {
while (Udp.parsePacket() > 0) ; // discard any previously received packets
Serial.println("Transmit NTP Request");
sendNTPpacket(timeServer);
uint32_t beginWait = millis();
while (millis() - beginWait < 1500) {
int size = Udp.parsePacket();
if (size >= NTP_PACKET_SIZE) {
Serial.print("Receive NTP Response - ");
Udp.read(packetBuffer, NTP_PACKET_SIZE); // read packet into the buffer
unsigned long secsSince1900;
// convert four bytes starting at location 40 to a long integer
secsSince1900 = (unsigned long)packetBuffer[40] << 24;
secsSince1900 |= (unsigned long)packetBuffer[41] << 16;
secsSince1900 |= (unsigned long)packetBuffer[42] << 8;
secsSince1900 |= (unsigned long)packetBuffer[43];
unsigned long dateTimeNow =
secsSince1900 - 2208988800UL + TIME_ZONE_CET * SECS_PER_HOUR;
setTime(dateTimeNow);
return dateTimeNow;
}
}
Serial.println("No NTP Response :-(");
return 0; // return 0 if unable to get the time
}
// send an NTP request to the time server at the given address
void sendNTPpacket(IPAddress &address)
{
// set all bytes in the buffer to 0
memset(packetBuffer, 0, NTP_PACKET_SIZE);
// Initialize values needed to form NTP request
// (see URL above for details on the packets)
packetBuffer[0] = 0b11100011; // LI, Version, Mode
packetBuffer[1] = 0; // Stratum, or type of clock
packetBuffer[2] = 6; // Polling Interval
packetBuffer[3] = 0xEC; // Peer Clock Precision
// 8 bytes of zero for Root Delay & Root Dispersion
packetBuffer[12] = 49;
packetBuffer[13] = 0x4E;
packetBuffer[14] = 49;
packetBuffer[15] = 52;
// all NTP fields have been given values, now
// you can send a packet requesting a timestamp:
Udp.beginPacket(address, 123); //NTP requests are to port 123
Udp.write(packetBuffer, NTP_PACKET_SIZE);
Udp.endPacket();
}
Part 2: The 35 euro IoT project
32
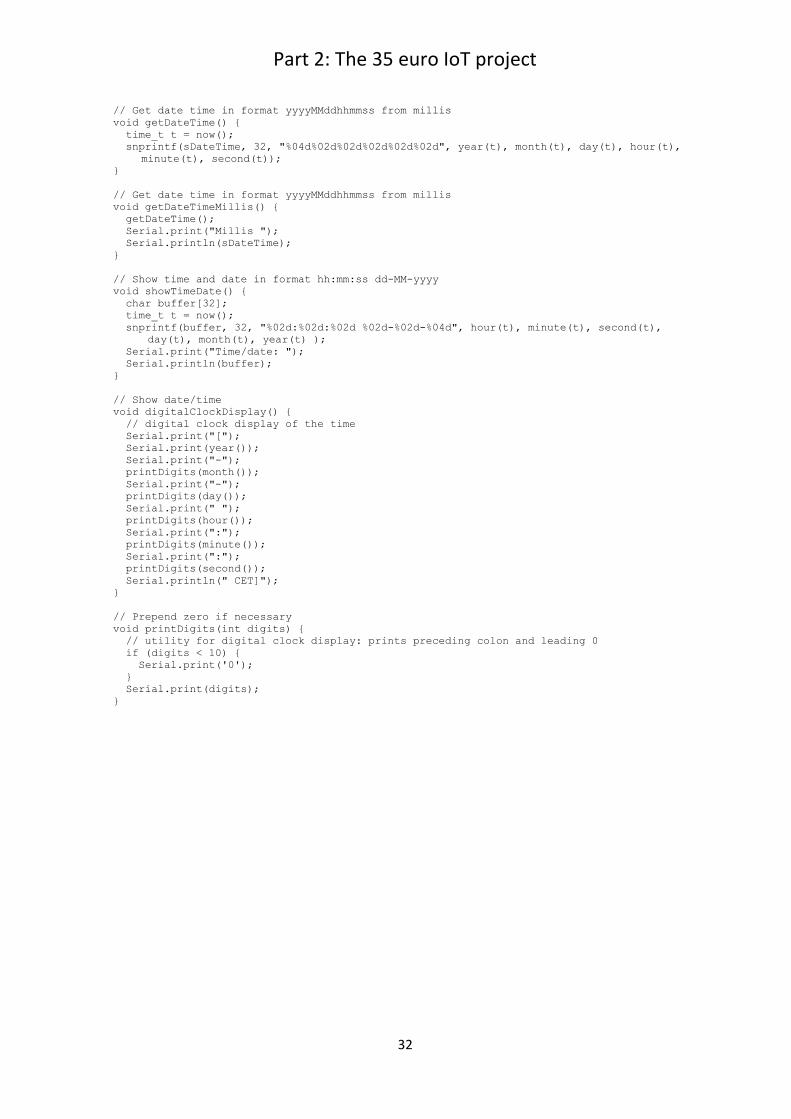
// Get date time in format yyyyMMddhhmmss from millis
void getDateTime() {
time_t t = now();
snprintf(sDateTime, 32, "%04d%02d%02d%02d%02d%02d", year(t), month(t), day(t), hour(t),
minute(t), second(t));
}
// Get date time in format yyyyMMddhhmmss from millis
void getDateTimeMillis() {
getDateTime();
Serial.print("Millis ");
Serial.println(sDateTime);
}
// Show time and date in format hh:mm:ss dd-MM-yyyy
void showTimeDate() {
char buffer[32];
time_t t = now();
snprintf(buffer, 32, "%02d:%02d:%02d %02d-%02d-%04d", hour(t), minute(t), second(t),
day(t), month(t), year(t) );
Serial.print("Time/date: ");
Serial.println(buffer);
}
// Show date/time
void digitalClockDisplay() {
// digital clock display of the time
Serial.print("[");
Serial.print(year());
Serial.print("-");
printDigits(month());
Serial.print("-");
printDigits(day());
Serial.print(" ");
printDigits(hour());
Serial.print(":");
printDigits(minute());
Serial.print(":");
printDigits(second());
Serial.println(" CET]");
}
// Prepend zero if necessary
void printDigits(int digits) {
// utility for digital clock display: prints preceding colon and leading 0
if (digits < 10) {
Serial.print('0');
}
Serial.print(digits);
}
Part 2: The 35 euro IoT project
33
// 9
// ----------------------------------------------------------------------------------------
// DHT
// ----------------------------------------------------------------------------------------
// Get temperature reading from sensor
bool getDHTData() {
char buffer[8];
float temperature = 0.0f;
float humidity = 0.0f;
int err = SimpleDHTErrSuccess;
#ifdef SELECT_DHT11
if ((err = dht11.read2(DHT_PIN, &temperature, &humidity, NULL)) != SimpleDHTErrSuccess) {
Serial.print("Read DHT11 failed, err=");
Serial.println(err);
delay(2000);
return false;
}
#else
#ifdef SELECT_DHT22
if ((err = dht22.read2(DHT_PIN, &temperature, &humidity, NULL)) != SimpleDHTErrSuccess) {
Serial.print("Read DHT22 failed, err=");
Serial.println(err);
delay(2000);
return false;
}
#endif
#endif
// Temperature: 99.99 to 9.9 (25.11 -> 25.1 / 7.65 --> 7.6 / 0.15 -> 0.1)
dtostrf(temperature, 1, 1, buffer);
sprintf(sTemperature, "%s", buffer);
// Humidity: 99.99 to 9 (25.11 -> 25 / 7.65 --> 7 / 0.15 -> 0)
dtostrf(humidity, 1, 0, buffer);
sprintf(sHumidity, "%s", buffer);
#ifdef SELECT_DHT11
delay(1500);
#else
#ifdef SELECT_DHT22
delay(2500);
#endif
#endif
return true;
}
Part 2: The 35 euro IoT project
34
// 10
// ----------------------------------------------------------------------------------------
// MQTT
// ----------------------------------------------------------------------------------------
// Client callback function
void callback(char* topic, byte* payload, unsigned int length) {
Serial.print("Message arrived: [");
Serial.print(topic);
Serial.print("] ");
for (int i = 0; i < length; i++) {
Serial.print((char)payload[i]);
}
Serial.println();
}
// Try to reconnect client
void reconnect() {
// Loop until we're reconnected
while (!client.connected()) {
Serial.print("Attempting MQTT connection: ");
// Attempt to connect
if (client.connect("dht22publish")) {
Serial.println("connected");
// Once connected, publish an announcement...
client.publish("outTopic", "ESP8266Client connected!");
// ... and resubscribe
client.subscribe("inTopic");
} else {
Serial.print("failed, rc=");
Serial.print(client.state());
Serial.println(": try again in 5 seconds");
delay(5000);
}
}
}
void setup_MQTTclient() {
client.setServer(mqtt_broker, portNumber);
client.setCallback(callback);
Serial.print("MQTT client connected to: ");
Serial.print(mqtt_broker);
Serial.print(":");
Serial.println(portNumber);
Serial.println();
}
// 11
// ----------------------------------------------------------------------------------------
// JSON
// ----------------------------------------------------------------------------------------
const char * getJSONString() {
// Setup JSON objects
String jsonString;
StaticJsonBuffer<128> jsonBuffer;
JsonObject& root = jsonBuffer.createObject();
JsonObject& data = jsonBuffer.createObject();
data["datetime"] = sDateTime;
data["temperature"] = sTemperature;
data["humidity"] = sHumidity;
root.set("dht22", data);
root.printTo(jsonString);
Serial.println("Message: ");
root.prettyPrintTo(Serial);
Serial.println();
// Return JSON string
return jsonString.c_str();
}
// ----------------------------------------------------------------------------------------
Part 2: The 35 euro IoT project
35
6 Test
6.1 Introduction For testing, look at Part 1. The only difference is that the ESP8266 has been replaced by an ESP32. However, a basic test will be described in this chapter.
6.2 ESP32, NodeJS, MongoDB en Mosca
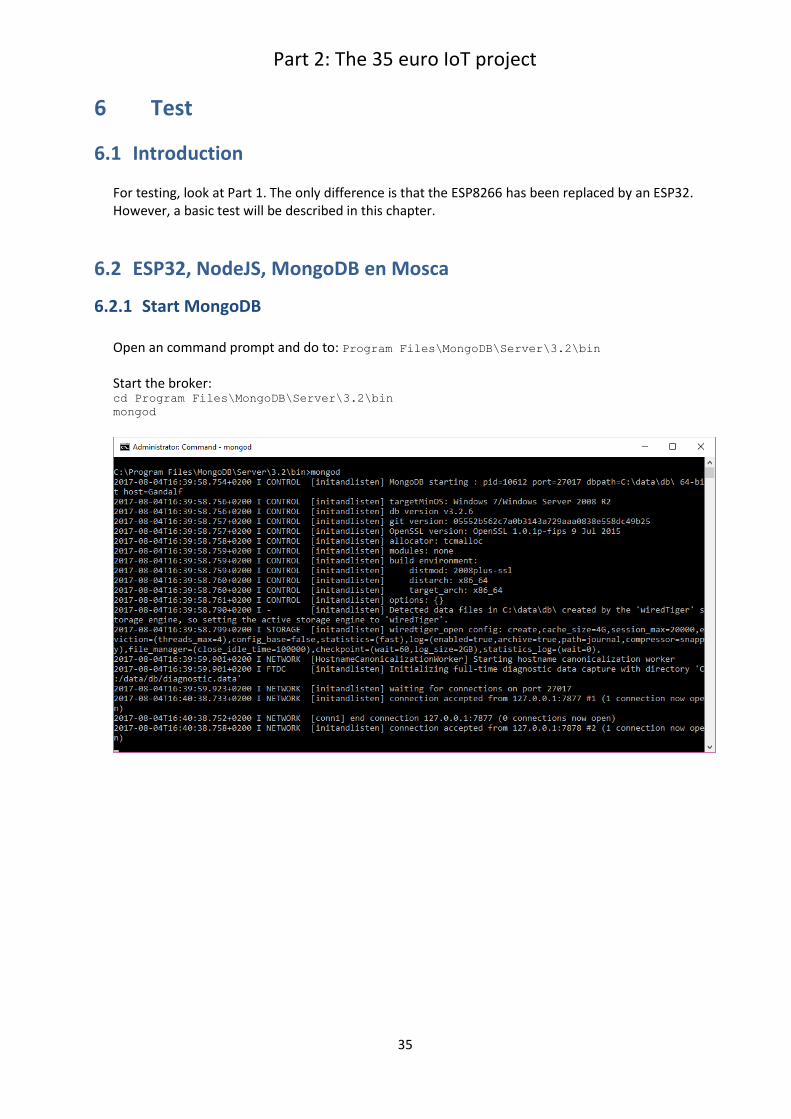
6.2.1 Start MongoDB Open an command prompt and do to: Program Files\MongoDB\Server\3.2\bin Start the broker: cd Program Files\MongoDB\Server\3.2\bin
mongod
Part 2: The 35 euro IoT project
36
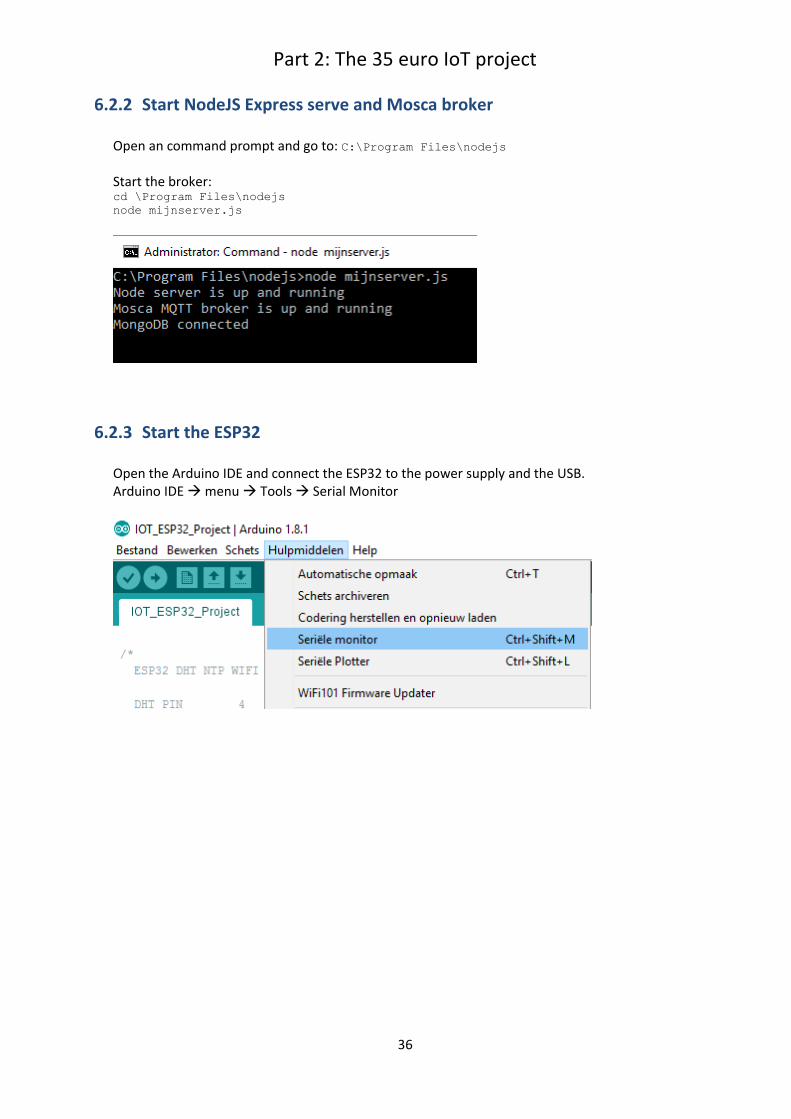
6.2.2 Start NodeJS Express serve and Mosca broker Open an command prompt and go to: C:\Program Files\nodejs Start the broker: cd \Program Files\nodejs
node mijnserver.js
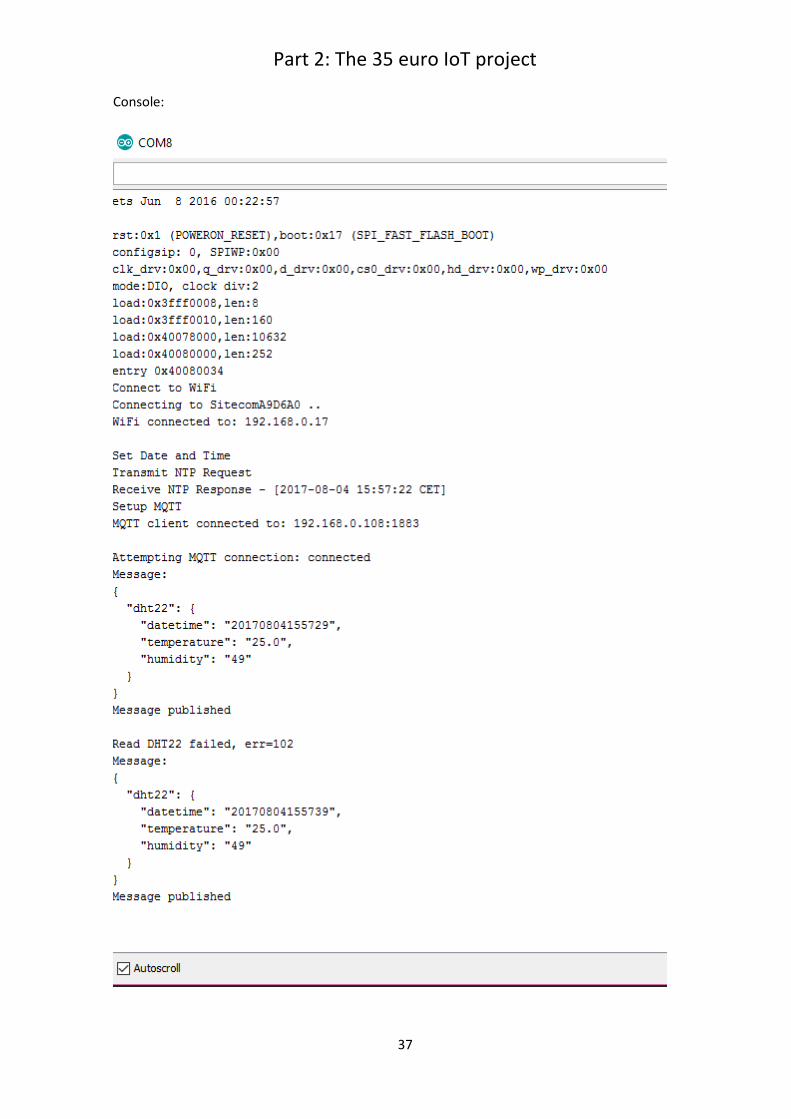
6.2.3 Start the ESP32 Open the Arduino IDE and connect the ESP32 to the power supply and the USB. Arduino IDE menu Tools Serial Monitor
Part 2: The 35 euro IoT project
37
Console:
Part 2: The 35 euro IoT project
38
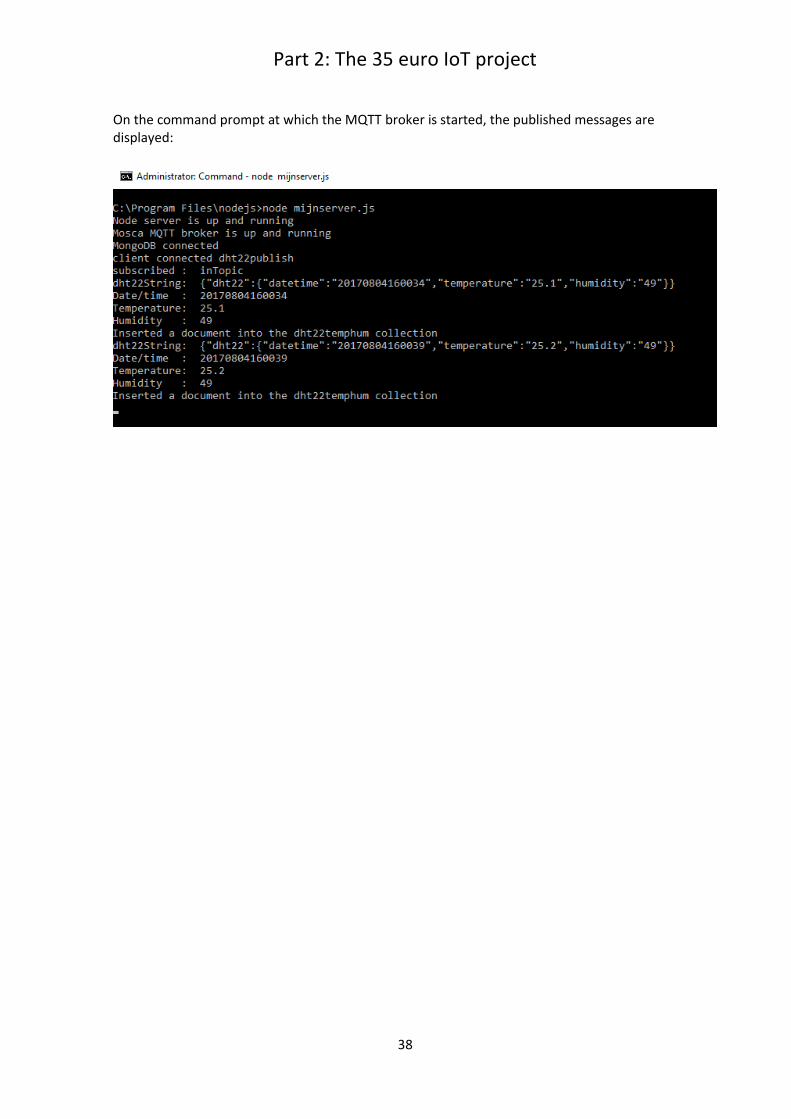
On the command prompt at which the MQTT broker is started, the published messages are displayed:

Part 2: The 35 euro IoT project
39
6.2.4 Start an Chrome browser Open an browser, preferably a Chromebrowser. Use the MQTT broker's IP address, in this example 192.168.0.108 or localhost. Go to: http://localhost:5000/dht/index.html
or http://192.168.0.108:5000/dht/index.html
Comments: 1. As shown, the setup works with the set up connections NodeJS, MongDB and Mosca from
Part 1. 2. The AngularJS also works with the setup (so the title is still referring to the ESP12E). 3. The DHT22 is a slow sensor and occasionally error messages appear in the console. 4. The upload of the sketch does not always work at once. Repeat or choose another USB port
wil solve this problem.
Part 2: The 35 euro IoT project
40
7 Index
Accountability, 5 Android, 5 Arduino, 36 Arduino power supply, 8 Breadboard, 8 broker, 35, 36 DHT sensor, 28 DHT22, 8, 9, 27, 28, 33, 39 DS1307 RTC, 7, 27 ESP-12E, 22, 35, 36 ESP32, 1, 2, 7, 8, 10, 17, 23, 24, 25, 27,
28, 35, 36 ESP8266, 2, 7, 27, 35 EspTool, 21 Geekcreit, 2, 7, 8, 10
GIT, 11, 13 index.html, 39 Level shifter, 8 Micro USB cable, 8 mijnserver.js, 36 MongoDB, 28, 35 Mosquitto, 35, 36 MQTT, 27, 28, 29, 34, 36, 38, 39 NodeJS, 35, 36 NTP, 27, 28, 29, 31 port, 22 pySerial, 21 Python, 18, 19, 21 smartphone, 5 Windows 10, 5